
After updating Windows 11, and 10 or upgrading to Windows, does your PC refuse to detect TV? Or do you face no sound, HDMI no signal issues?
If so, you are in luck; you can fix the issue by updating the HDMI driver. This post will discuss the best ways to update HDMI drivers and fix HDMI-related problems.
Before getting into details, let us understand what HDMI is. After that, check a few basic things and try the best ways to update HDMI drivers.
What is HDMI?
HDMI means High-Definition Multimedia Interface, used to transmit digital video and audio from a source, such as a computer or TV cable box, to a computer monitor, TV, or projector.
Basic Troubleshooting- HDMI Port Not Working
- Firstly, make sure the HDMI port and cable are working. You can try connecting it to another TV or another system to see if it works.
- Plug off your TV and re-plug the HDMI port to see if the issue is fixed.
- If not, try using another HDMI cable and see if that fixes the problem.
- In most cases, the problem is due to the HDMI cable. However, if it is fine, the issue can be caused due to an outdated driver. Here’s what you need to do to update drivers.
Best Way to Update HDMI Driver On Windows 11, 10
The quickest, easiest, and hassle-free way to update an HDMI driver is to use Advanced Driver Updater. Using this excellent driver updating tool, you can update outdated, incompatible, and corrupted graphics drivers.
Furthermore, to use this tool, you don’t need to provide any information; the tool does that on its own and quickly displays the list of outdated drivers.
How to Update HDMI Driver On Windows 11, 10
Note: There’s no need for a driver for your HDMI port or cable. The HDMI port automatically detects connected devices and communicates with them. However, if the graphics driver is outdated, you might face issues. Therefore, when you face issues with HDMI, use Advanced Driver Updater to update graphics drivers.
Method 1. Check Display Settings
The connected PC or laptop fails to detect your TV when the display output settings are incorrect. To check if everything is in order, follow these steps:
1. Right-click on the desktop > Display settings.
2. Under Multiple displays, click Detect.

If this doesn’t work, switch to the following steps:
1. Press the Windows key + P
2. This will bring up a menu on the right-hand side corner; click the Duplicate switch to extend now. Check if Window can detect the TV
PC screen/Computer only —
Duplicate —
Extend —
Second screen/Projector only —
You can try each model to see which works for you. However, if this also fails to work, try updating drivers.
Check This- How To Fix USB Ports Not Working Issue in Windows 10, 11
Method 2- Update Windows
1. Press Win + X to open the Power menu and then select Settings.
2. Click on the Windows Update tab in the left section of the Settings window.
3. Locate the Check for Updates button in the top-right corner and click on it.

The Windows OS will now connect to the Microsoft Servers and download the latest updates for you. It is recommended that you press the Check for updates button 2 to 3 times after each download and install process is completed to ensure no updates are left.
5. Then click on Advanced Options in the settings provided below.
6. In the next page, click on Optional Updates (Features, Drivers, etc).

7. Choose all the driver updates and click on the Download & Install button.

8. Wait for the update process to finish and restart your computer.
Method 3. Update Graphics Drivers
If the above steps didn’t work, probably the issue would be with the driver. Here’s how to update the outdated graphics driver and fix issues with HDMI.
Option 1 – Manually Update Graphics Driver
For HDMI driver Windows 11 and 10 downloads, follow these steps:
1. Press Windows + X > Device Manager
2. Double-click Display adapters.
3. Right-click the display driver you wish to update > select Update driver.
4. Click, Search automatically for drivers, and wait for Windows to look for driver updates. If an update is available, it will be downloaded in the background.
5. Reboot the system after updating drivers. However, if you get the message. “ The best drivers for your device are already installed.” We suggest visiting the manufacturer’s website to look for driver updates.

From time to time to add features and fix issues, graphics adapter manufacturers keep updating drivers. If Device Manager fails to show an update, you need to go to the manufacturer’s website and look for the correct drivers corresponding to your operating system.
Once you download the setup file, double-click on it and follow the on-screen instructions to update the drivers.
If this seems too much trouble and you don’t like it, try an automatic way to update drivers.
Option 2 – Automatically Update Graphics Driver (Recommended)
To update graphics drivers automatically, use Advanced Driver Updater without the fear of downloading incorrect drivers. This top driver updating tool smartly looks for corrupt, incompatible, and outdated drivers.
To update HDMI port drivers on Windows 11 and 10, you can use the Free or Registered version of Advanced Driver Updater.
Using the registered version, you can update all outdated drivers simultaneously, while the Trial version allows updating one driver at a time.
Also, the registered version comes with a 60-day money-back guarantee and technical support.
Must Read- How to Fix PCI Serial Port Driver Issues on Windows
To update the HDMI driver for Windows 11, 10 64-bit, using the best driver updater for Windows, follow these steps:
- Click the button below to get Advanced Driver Updater.
- Launch the best driver updating tool – Advanced Driver Updater.
- To run the scan, click the Start Scan Now button.

- Let the scanning finish. After that, review the scan results.

- Click the Update driver to update the graphics driver using the trial version. However, if you are a registered user, click Update All.

- Restart the PC to apply the change.
Now try to connect the device using the HDMI port; you should not face any problems.
How to Download HDMI Video Drivers
In case your PC is unable to find the appropriate drivers to update, or updating the existing drivers is not fixing the error, you should turn to the traditional methods and download the latest HDMI video drivers for your PC. It is easy to download a file and install it, provided you are aware of what drivers work with your PC. Two steps will help you download the latest HDMI video drivers for your Windows PC. These include –
- Checking the System Information
- Downloading and installing the latest drivers.
You will not be able to find the appropriate drivers unless you have Hence, the first thing to do is to identify what type of video drivers are compatible with your video card.
Read Also: How to Fix Video Controller (VGA) Driver Issue for Windows 11/10
Method 1. Check System Information
Step 1 – On your desktop, press Win+R to open the run search.
Step 2 – In the run search, use the command dxdiag and hit enter.

Step 3 – This will launch the DirectX Diagnostic Tool on your PC.

Step 4 – After opening this you have the entire system information about what type of graphics driver your PC is using, what is the process, what are the display configurations in use, etc.

Step 5 – Use the next page button or simply click on the Display 1 button to open the video configuration of your PC. There you can find information about the video card manufacturer.
After going through the information, you now have enough information about the manufacturer that you can easily navigate to their website to look for the latest drivers.
Method 2. Download HDMI Video Drivers
Step 1 – Once you have found the manufacturer, simply search online for the drivers on the manufacturer’s official website.
Step 2 – Find the latest version of the drivers that they have to offer.

Step 3 – Download the installation file from the website and run the exe file to start the installation.
HDMI Port Still Showing Errors? Here’s What You Can Do!
If, after updating the drivers, you cannot use the HDMI port to its full potential or the video lags when you use it, chances are that your HDMI port or the graphics card driver is damaged. In case of hardware failure, you are left with no option other than to replace the port.
However, if it is a software-related issue, you first need to identify the problem. For instance, if you get an error such as “HDMI port no signal” when you connect the device, there are different ways to troubleshoot it.
Not to mention, there may be several other factors that may be bothering the functioning of your device. To give you a better understanding of these terms, we have curated a few FAQs. Check them out so you can get clarity on why HDMI is not working on your PC.
Frequently Asked Questions
Q1. Why won’t my HDMI work on my PC?
The plugged-in devices are not correctly working because the HDMI port or cable is damaged or the driver is outdated.
Q2. How do I activate my HDMI port?
Generally, on laptops, the HDMI port is always activated. However, if you are using a desktop to activate the HDMI port, follow these steps:
1. Insert one end of the HDMI cable into the HDMI port on the PC.
2. Turn on the external device and insert the second end of the cable into HDMI IN port.
This will turn on the HDMI port. Note: If the computer screen flickers, don’t worry; the HDMI is getting detected.
Q3. How do I set up HDMI on my laptop?
- Connect the laptop to the TV with an HDMI cable.
- Power on both devices.
- Select the HDMI input, and that’s it.
If you face any problem, go to Settings > System > Display and ensure TV is selected. In addition, adjust the resolution.
Q4. How do I display my computer on my TV with HDMI?
To display my computer on TV with HDMI, first, check the display settings.
1. Open Display Settings. Right-click on the desktop > Display settings.
2. Under Multiple displays, click Detect.
If you face any problems here, try these steps:
1. Press the Windows key + P
2. Click the Duplicate switch to extend now. Check if Window can detect the TV
PC screen/Computer only —
Duplicate —
Extend —
Second screen/Projector only —
You can try each model to see which works for you. However, if this also fails to work, try updating drivers using Advanced Driver Updater.
Getting HDMI Driver Updated on Windows
We hope the above methods help fix the issue you were experiencing with the HDMI port. Please share your feedback in the comments section. In addition to the above steps, we suggest disconnecting the HDMI cable from all ports, shutting down the device for 3-5 minutes, and then restarting and reconnecting everything. This also helps fix the HDMI issue.
If you find the information helpful, share it with others and share your feedback in the comments section below.
Useful :
How To Update Realtek Bluetooth Driver – Windows 11,10
How To Download & Update MPOW Bluetooth Driver
How To Update AMD Drivers On Windows 11, 10
Одна из проблем, с которой можно столкнуться, подключая ноутбук к ТВ по кабелю HDMI — отсутствие звука на телевизоре (т.е. он воспроизводится на ноутбуке или колонках компьютера, но не на ТВ). Обычно такая проблема легко решается и далее в инструкции — возможные причины того, что по HDMI нет звука и способы их устранения в Windows 10, 8 (8.1) и Windows 7. См. также: Как подключить ноутбук к телевизору, Плохое качество изображения по HDMI.
Примечание: в некоторых случаях (причем не очень редко) все далее описанные шаги по решению проблемы оказываются не нужны, а все дело в убавленном до нуля звуке (в плеере в ОС или на самом телевизоре) или случайно нажатой (возможно, ребенком) кнопкой Mute на пульте ТВ или ресивера, если он используется. Проверьте эти моменты, особенно если еще вчера всё работало исправно. Если при диагностике аудио устройства HDMI вы видите сообщение, что это устройство уже используется другим приложением, отдельное руководство по этой проблеме здесь: Это устройство уже используется другим приложением при выводе звука по HDMI.
Настройка устройств воспроизведения Windows
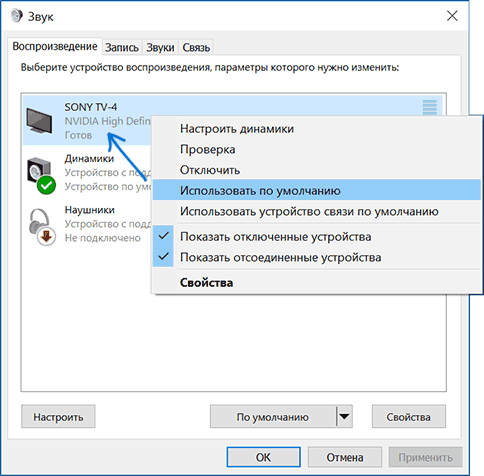
Обычно, когда в Windows 10, 8 или Windows 7 вы подключаете телевизор или отдельный монитор по HDMI к ноутбуку, звук автоматически начинает воспроизводиться на нем. Однако, бывают исключения, когда устройство воспроизведения не изменяется автоматически и остается прежним. Тут стоит попробовать проверить, имеется ли возможность вручную выбрать, на чем будет проигрываться аудио.
- Нажмите правой кнопкой мыши по значку динамика в области уведомлений Windows (справа внизу) и выберите пункт «Устройства воспроизведения». В Windows 10 1903, 1809 и 1803 чтобы попасть в устройства воспроизведения в меню выберите пункт «Открыть параметры звука», а в следующем окне — «Панель управления звуком», либо через Панель управления — Звук.
- Обратите внимание на то, какое из устройств выбрано в качестве устройства по умолчанию. Если это Динамики или наушники, но в списке также присутствуют NVIDIA High Definition Audio, AMD (ATI) High Definition Audio или какие-то устройства с текстом HDMI, нажмите по нему правой кнопкой мыши и выберите пункт «Использовать по умолчанию» (делайте это, когда телевизор уже подключен по HDMI).

- Примените сделанные настройки.
Вероятнее всего, этих трех шагов будет достаточно, чтобы решить проблему. Однако, может оказаться, что в списке устройств воспроизведения нет ничего похожего на HDMI Audio (даже если нажать правой кнопкой мыши по пустому месту списка и включить отображение скрытых и отключенных устройств), тогда, возможно, помогут следующие варианты решения проблемы.
Установка драйверов для HDMI аудио
Возможен вариант, что у вас не установлены драйверы для вывода аудио по HDMI, хотя драйверы видеокарты установлены (такое может быть, если при установке драйверов вы вручную задавали какие именно компоненты нужно установить).
Чтобы проверить, ваш ли это случай, зайдите в диспетчер устройств Windows (во всех версиях ОС для этого можно нажать клавиши Win+R на клавиатуре и ввести devmgmt.msc, а в Windows 10 также из меню правого клика по кнопке «Пуск») и откройте раздел «Звуковые, игровые и видеоустройства». Дальнейшие шаги:
- На всякий случай в диспетчере устройств включите показ скрытых устройств (в пункте меню «Вид»).
- Обратите внимание в первую очередь на количество звуковых устройств: если это единственная аудио-карта, то, судя по всему, драйверы на звук по HDMI действительно не установлены (об этом далее). Также возможен вариант, что устройство HDMI (обычно имеет в названии эти буквы, либо производителя чипа видеокарты) есть, но отключено. В этом случае, нажмите по нему правой кнопкой мыши и выберите пункт «Задействовать».

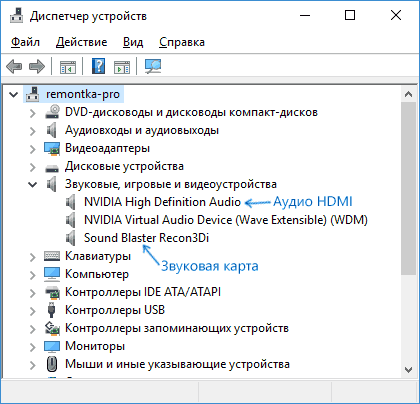
В случае, если в списке только ваша звуковая карта, то путь решения проблемы будет следующим:
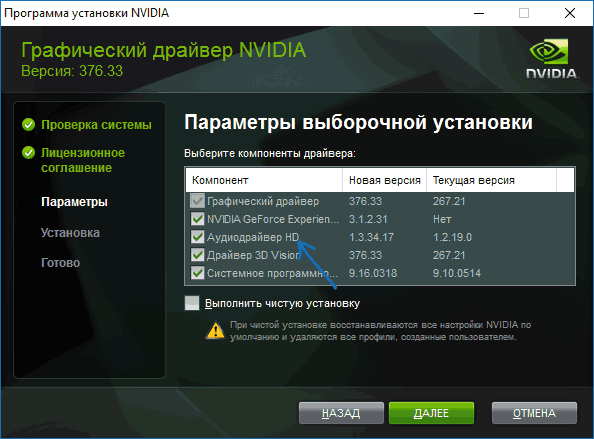
- Загрузите драйверы для вашей видеокарты с официального сайта AMD, NVIDIA или Intel, в зависимости от самой видеокарты.
- Установите их, при этом, если вы используете ручную настройку параметров установки, обратите пристальное внимание на то, что драйвер звука по HDMI отмечен и устанавливается. Например, для видеокарт NVIDIA он носит название «Аудиодрайвер HD».

- По завершении установки перезагрузите компьютер.
Примечание: если по той или иной причине драйверы не устанавливаются, возможно, дело в каком-то сбое текущих драйверов (и проблема со звуком объясняется тем же самым). В этой ситуации можно попробовать полностью удалить драйверы видеокарты, а затем установить их заново.
Если звук с ноутбука по HDMI все также не воспроизводится на телевизоре
Если оба способа не помогли, при этом в устройствах воспроизведения точно выставлен нужный пункт, рекомендую обратить внимание на:
- Еще раз — проверьте настройки ТВ.
- Если есть такая возможность, попробуйте другой кабель HDMI, или проверить, будет ли передаваться звук по этому же кабелю, но с другого устройства, а не с текущего ноутбука или компьютера.
- В том случае, если для подключения по HDMI используется переходник или адаптер на HDMI, звук может и не получиться заставить работать. Если используется VGA или DVI на HDMI, то точно нет. Если DisplayPort — HDMI, то должно работать, но на некоторых адаптерах по факту звука нет.
Надеюсь, вам удалось решить проблему, если же нет — опишите подробно, что и как происходит на ноутбуке или компьютере при попытке выполнить шаги из руководства. Возможно, мне удастся вам помочь.
Дополнительная информация
Программное обеспечение, поставляемое с драйверами видеокарт, также может иметь собственные настройки вывода звука по HDMI для поддерживаемых дисплеев.
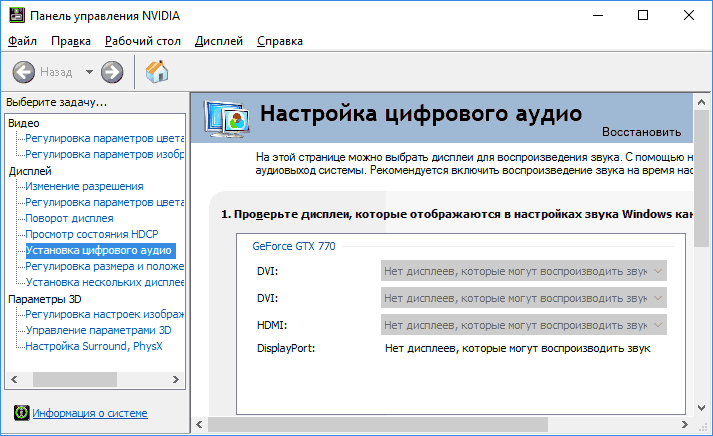
И хотя это редко помогает, загляните в настройки «Панель управления NVIDIA» (пункт находится в панели управления Windows), AMD Catalyst или Intel HD Graphics.
На этой странице вы можете бесплатно скачать Драйвер для ASUS C8HM70-I/HDMI Realtek Audio Win10 32bit&64bit V6.0.1.7503-WHQL v.6.0.1.7503
Категория:Mainboards
Производитель:ASUS
Оборудование:ASUS C8HM70-I/HDMI
Тип программы:Software
Название:Realtek Audio Win10 32bit&64bit V6.0.1.7503-WHQL
Версия:6.0.1.7503
Размер файла:257.35Mb
Рейтинг:5/5
Тип архива:ZIP
Дата выхода:30 Jun 2015
Система:Windows 10, Windows 10 64-bit, Windows 8.1, Windows 8.1 64-bit, Windows 8, Windows 8 64-bit, Windows 7, Windows 7 64-bit, DOS, Others, Others, Others, Others, Others, Others, Others, Others, Others, Others, Others, Others, Others, Others, Others, Others, Others, Others, Others
Status:Free
Загрузок:552
Описание:Realtek Audio Win10 32bit&64bit V6.0.1.7503-WHQL driver for ASUS C8HM70-I/HDMI
Правовая информация:Все програмное обеспечение, размещённое на Driver.ru является бесплатным. Все названия и торговые марки принадлежат их владельцам.
Внимание:Некоторые программы получены из непроверенных источников. Мы не гарантируем их совместимость и работоспособность. Всегда проверяйте загруженные файлы с помощью антивирусных программ. Мы не несём никакой ответственности за возможные потери, возникшие в результате установки загруженных программ. Загрузка файла с Driver.ru обозначает вашу информированность об этом и согласие с данными условиями.
Похожие файлы:
Название:Realtek LAN WIN10 32bit&64bit
Версия:10.1.505.2015
Система:Windows 10Windows 10 64-bit
Название:Realtek Audio Driver
Версия:6.0.1.7354
Система:Windows 8.1, Windows 8.1 64-bit, Windows 8, Windows 8 64-bit, Windows 7, Windows 7 64-bit, Windows XP, Windows XP 64-bit, DOS, Others, Others, Others, Others, Others, Others, OthersOthers
Описание:Realtek Audio Driver for ASUS C8HM70-I/HDMI
Realtek Audio Driver V6.0.1.7354 for Windows Win7 32bit & Win7 64bit & Win8 32bit & Win8 64bit & Win8.1 32bit & Win8.1 64bit—(WHQL).
Скачать ASUS C8HM70-I/HDMI Realtek Audio Драйвер v.6.0.1.7354
Тип программы:BIOS
Версия:0702
Система:BIOS
Тип программы:BIOS
Версия:0601
Система:BIOS
Тип программы:BIOS
Версия:0505
Система:BIOS
Описание:BIOS for ASUS C8HM70-I/HDMI
1 Enhance compatibility with some PCIE device.
2.Revise help string in BIOS.
3..Fixed F8 function is abnormal under fastboot.
4.Improve system compatibility.
Скачать ASUS C8HM70-I/HDMI BIOS v.0505
Тип программы:BIOS
Версия:0404
Система:BIOS
Тип программы:BIOS
Версия:0305
Система:BIOS
Название:AI Suite II
Версия:2.01.01
Система:Windows 8, Windows 8 64-bit, Windows 7, Windows 7 64-bit, Windows XPWindows XP 64-bit
Описание:AI Suite II driver for ASUS C8HM70-I/HDMI
Type: Utilities
ASUS AI Suite II V2.01.01 for Windows XP 32bit & XP 64bit &
Win7 32bit & Win7 64bit & Win8 32bit & Win8 64bit.
ASUS Update ( EZ Update ) V2.00.11 for Windows XP 32bit & XP
64bit & Win7 32bit & Win7 64bit & Win8 32bit & Win8
64bit.
MyLogo V1…
Скачать ASUS C8HM70-I/HDMI AI Suite II v.2.01.01 драйвер
Название:AI Suite II
Версия:2.01.01
Система:Windows 8, Windows 8 64-bit, Windows 7, Windows 7 64-bit, Windows XPWindows XP 64-bit
Описание:AI Suite II driver for ASUS C8HM70-I/HDMI
Type: Utilities
ASUS AI Suite II V2.01.01 for Windows XP 32bit & XP 64bit &
Win7 32bit & Win7 64bit & Win8 32bit & Win8 64bit.
ASUS Update V1.04.07 for Windows XP 32bit & XP 64bit & Win7
32bit & Win7 64bit & Win8 32bit & Win8 64bit.
MyLogo V1.03.06 for Windows X…
Скачать ASUS C8HM70-I/HDMI AI Suite II v.2.01.01 драйвер
Название:Boot Setting
Версия:1.00.10
Система:Windows 8Windows 8 64-bit
Перейти к контенту
HDMI – это интерфейс для передачи информации с компьютера на воспроизводящие устройства. Характерным фактом является то, что поддерживается вывод не только картинки, но и звука. Для реализации такого подхода нужен соответствующий драйвер.
| Разработчик: | Intel |
| Размер: | 84 Кб |
| Модель: | HDMI Sound |
Обратите внимание: данный файл является на 100% оригинальным, распространяется на полностью бесплатной основе и предварительно загружен с официального сайта разработчика.
Как установить
В виде максимально короткой пошаговой инструкции предлагаем разобрать процесс установки отсутствующего драйвера для того, чтобы звук на вашем телевизоре передавался через HDMI:
- Скачиваем недостающий файл, предварительно произведя распаковку.
- Делаем правый клик на обозначенном на скриншоте элементе и, в случае с Windows 11, жмём по «Показать дополнительные параметры». На более ранних операционных системах сразу выбираем пункт «Установить».
- Утвердительно отвечаем на все появляющиеся запросы, также предоставляем доступ к полномочиям администратора.
Не забудьте перезагрузить операционную систему для того, чтобы все внесённые изменения могли правильно прописаться в реестре Windows.
( 8 оценок, среднее 2.25 из 5 )
If you’re facing “HDMI No Sound in Windows 10” issue then don’t worry as today we are going to see a way to fix this issue. HDMI (High Definition Multimedia Interface) is a connector cable that helps transmit uncompressed video data and compressed or uncompressed digital audio between devices. HDMI replaces the old analogue video standards, and with HDMI, you get clear and sharper images.

There are several causes because HDMI Sound might not be working, such as outdated or corrupted sound drivers, damaged HDMI cable, no proper connection with the device, etc. So before moving forward, first check if the cable is working properly by connecting it to another device or PC. If the cable works, then you can follow the below guide. So without wasting any time let’s see How to Fix HDMI Sound Not Working in Windows 10 with the help of the below-listed tutorial.
Table of Contents
Make sure to create a restore point just in case something goes wrong.
Method 1: Set HDMI the default playback device
1. Right-click on Volume icon from the taskbar and select Sounds.
2. Make sure to switch to Playback tab then right-click on HDMI or Digital Output Device option and click on “Set as Default“.

3. Click Apply, followed by OK.

4. Reboot your PC to save changes.
Note: If you do not see HDMI option in the Playback tab then right-click in an empty area inside the playback tab then click on Show disconnected devices and Show disabled devices to checkmark it. This will show you HDMI or Digital Output Device option, right-click on it and select Enable. Then again right-click on it and select Set as default.
Method 2: Update your Sound Drivers
1. Press Windows Key + R then type devmgmt.msc and hit Enter to open Device Manager.

2. Expand Sound, video and game controllers and then right-click on “Realtek High Definition Audio” & select Update driver.

3. On the next window, click on “Search automatically for updated driver software“.

4. If you already have the updated driver, you will see the message “The best drivers for your device are already installed“.

5. If you don’t have the latest drivers, then Windows will automatically update Realtek Audio drivers to the latest update available.
6.Once finished, reboot your PC to save changes.
If you’re still facing the HDMI Sound Not Working Issue, then you need to update the drivers manually, follow this guide.
1. Again open Device Manager then right-click on Realtek High Definition Audio & select Update driver.
2. This time, click on ” Browse my computer for driver software.”

3. Next, select “Let me pick from a list of available drivers on my computer.”

4. Select the appropriate driver from the list and click Next.

5. Let the driver installation complete and then restart your PC.
Method 3: Enable Audio Controllers
1. Press Windows Key + R then type devmgmt.msc and hit Enter to open Device Manager.
2. Click on View from the device manager menu then select “Show hidden devices“.
3. Now Expand “System Devices” and find Audio Controller such as “High Definition Audio Controller“.
4. Right-click on High Definition Audio Controller then selects Enable.

Important: If above doesn’t work then right-click on High Definition Audio Controller then select Properties. Now under General tab click “Enable Device” button at the bottom.

Note: If the Enable button is greyed or don’t see the option, your Audio Controller is already enabled.
5. If you have more than one Audio Controller, you need to follow the above steps to Enable each of them separately.
6. Once finished, reboot your PC to save changes and see if you’re able to Fix HDMI Sound Not Working in Windows 10.
Method 4: Update Graphic Card Drivers
1. Press Windows Key + R then type devmgmt.msc and hit enter to open Device Manager.
2. Next, expand Display adapters and right-click on your Graphics Card and select Enable.
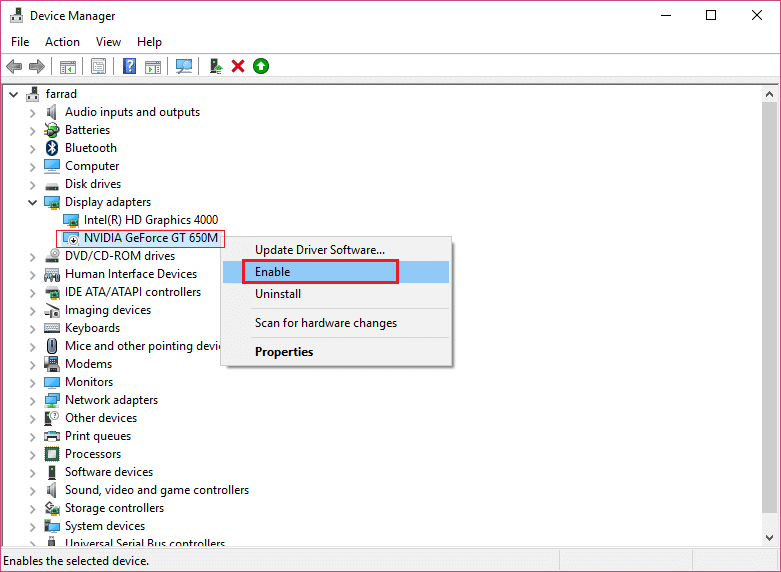
3. Once you have done this again right-click on your graphics card and select “Update Driver“.
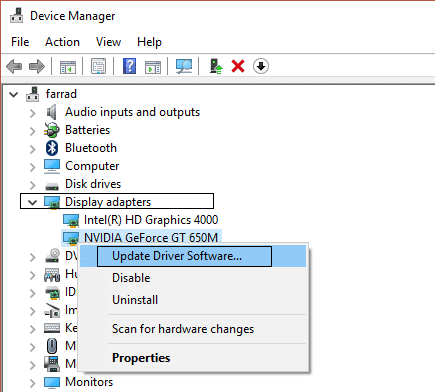
4. Select “Search automatically for updated driver software” and let it finish the process.
5. If the above steps helped fix the issue, then very good, if not then continue.
6. Again right-click on your graphics card and select “Update Driver” but this time on the next screen select “Browse my computer for driver software.”
7. Now select “Let me pick from a list of available drivers on my computer.”
8. Finally, select the latest driver from the list and click Next.
9. Let the above process finish and restart your PC to save changes.
Method 5: Rollback Graphic Drivers
1. Press Windows Key + R then type devmgmt.msc and hit Enter to open Device Manager.
2. Expand Display Adapter then right-click on your graphics card and select Properties.
3. Switch to Driver tab then click “Roll Back Driver“.
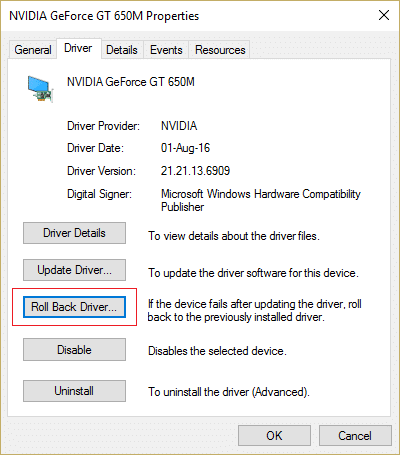
4. You will get a warning message, click Yes to continue.
5. Once your graphics driver is rolled back, reboot your PC to save changes.
If you’re able to Fix HDMI Sound Not Working in Windows 10 Issue, if not then continue with the next method.
Method 6: Uninstall Graphic and Audio Drivers
1. Press Windows Key + R then type devmgmt.msc and hit Enter to open Device Manager.
2. Expand Display Adapter then right-click on your graphics card and select Uninstall.
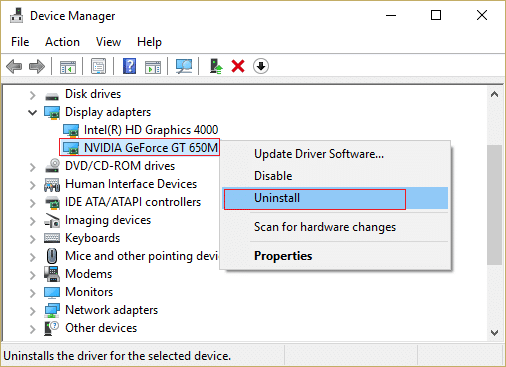
3. Click Yes to continue with the uninstallation.
4. Similarly, expand “Sound, video and game controller” then right-click on your Audio device such as “High Definition Audio Device” and select Uninstall.

5. Again click OK to confirm your actions.
6. Once finished, reboot your PC to save changes.
Recommended:
- 5 Ways to Fix No Sound on YouTube
- Youtube Not Working Issue on Chrome [SOLVED]
- Fix YouTube Running Slow On Your PC
- How to Reinstall Realtek HD Audio Manager [GUIDE]
That’s it you have successfully Fix HDMI Sound Not Working in Windows 10 but if you still have any questions regarding this tutorial then feel free to ask them in the comment’s section.