Все способы:
- Способ 1: Журнал событий
- Способ 2: Сторонние приложения
- WinDbg
- BlueScreenView
- Вопросы и ответы: 1
Способ 1: Журнал событий
Простой, но не самый удобный способ определения кода синего экрана, так как он предполагает выполнение дополнительных действий.
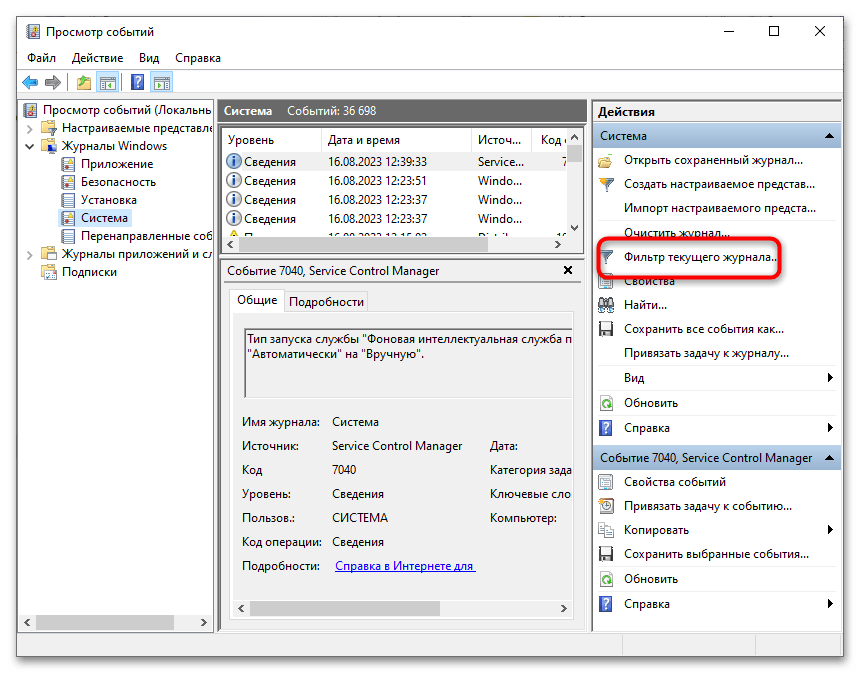
- Откройте системный «Журнал событий» командой
eventvwr.msc, выполненной в вызванном нажатием клавиш Win + R диалоговом окошке быстрого запуска. - Нажмите в правой колонке ссылку «Фильтр текущего журнала».
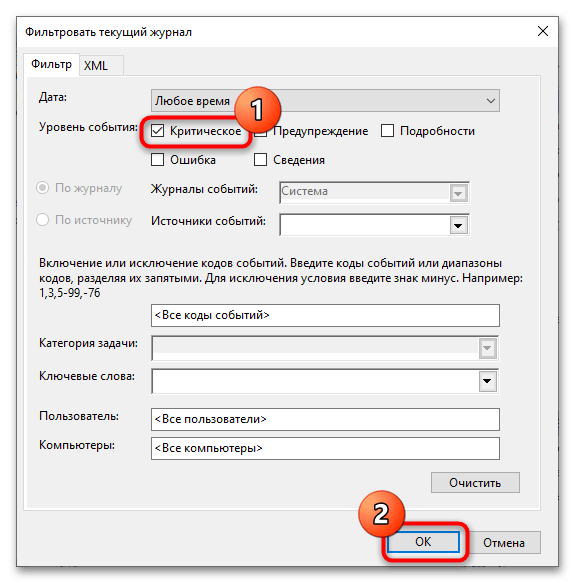
- В открывшемся окне отметьте флажком пункт «Критическое» и нажмите «ОК», чтобы отфильтровать события.
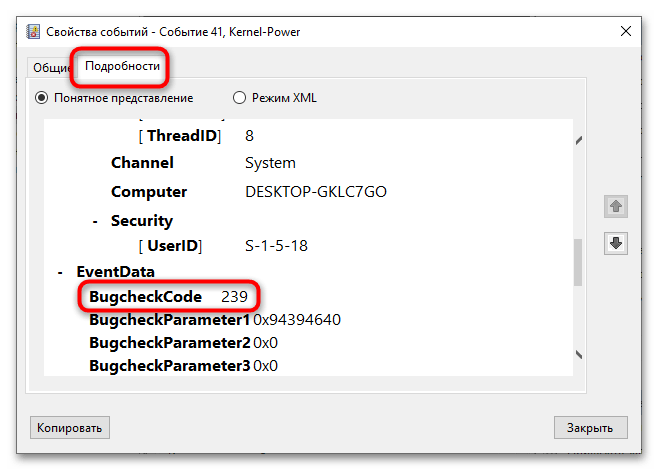
- Выберите последнюю запись об ошибке и откройте ее свойства двойным по ней кликом.
- Переключитесь на вкладку «Подробности», отыщите в списке параметр «BugCheckCode» и посмотрите его значение. Это и будет код ошибки в десятичном счислении.
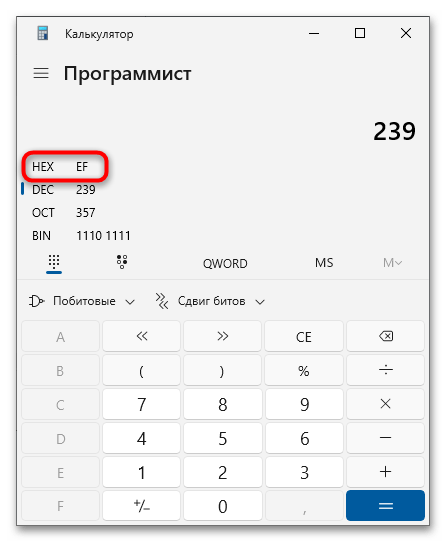
- Переведите его в шестнадцатеричную систему счисления, воспользовавшись штатным «Калькулятором» Windows, переключив его в режим «Программист» (через меню, вызванное нажатием по кнопке меню слева вверху). Результат будет указан в строке «HEX» без нулей, которые понадобится добавить. Например, EF = 0x000000EF.

Теперь можно выполнить поиск решения проблемы в интернете, указав полученный шестнадцатеричный код ошибки BSOD.
Способ 2: Сторонние приложения
Удобнее определять ошибку через специальные приложения, работающие с файлом дампа. По умолчанию его создание включено в Windows, но если вы отключали его создание вручную, то просмотреть стоп-код таким образом не получится из-за отсутствия файла для анализа сбоя.
WinDbg
Синий экран со стоп-ошибками в Windows 10 не отличается информативностью и нередко содержит только название ошибки, но не ее код. Чтобы определить ее код, необходимо проанализировать файл минидампа. Сделать это можно средствами фирменной утилиты Microsoft WinDbg.
Скачать WinDbg с официального сайта
- Скачайте приложение для анализа дампов с Microsoft Store или официальной страницы разработчика и установите.
- Запустите программу от имени администратора и нажмите в левом верхнем углу кнопку «Файл».
- Выберите в меню опцию «Open dump file», нажмите кнопку «Browse», укажите путь к анализируемому файлу дампа в папке
C:\Windows\Minidumpи нажмите «Open». Папка Minidump может содержать несколько файлов c расширением DMP, из них следует выбирать тот, который имеет название, соответствующее дате и времени ошибки синего экрана. - Прокрутите содержимое блока «Command» вниз, найдите ссылку «!analyze -v» и кликните по ней. Вместо этого можно вставить команду
!analyze -vв поле под блоком «Command» и нажать клавишу ввода. - Отладчик выполнит анализ файла дампа и выведет в блок «Command» подробные сведения об ошибке. Ищите ее название – код будет указан напротив него в полном или сокращенном виде, например 139, 0x139 или 0x00000139.
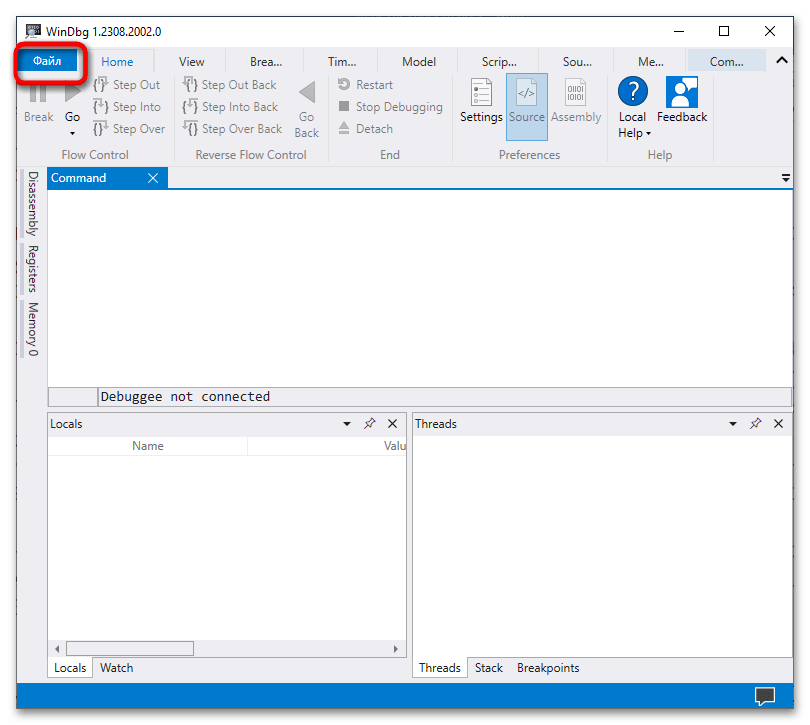
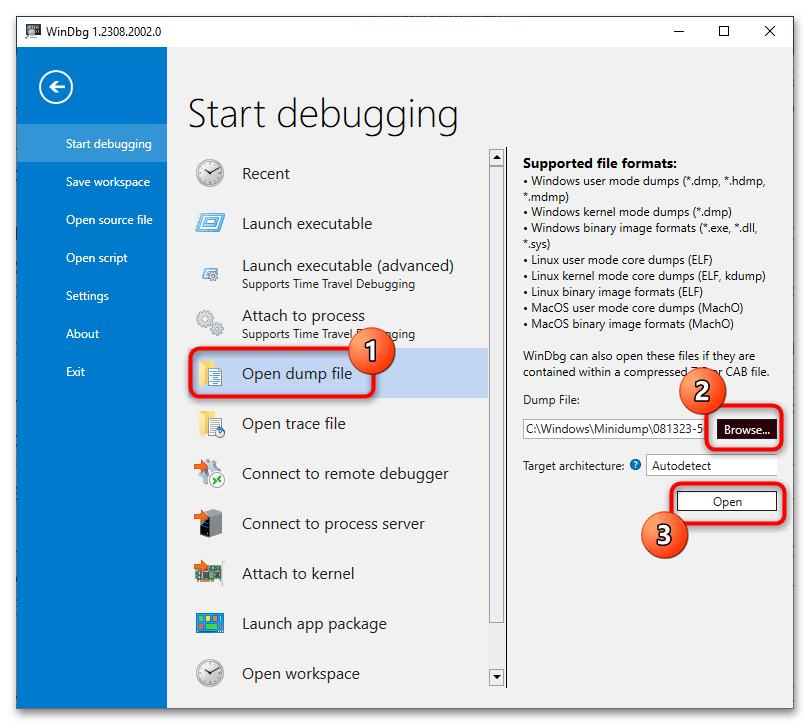
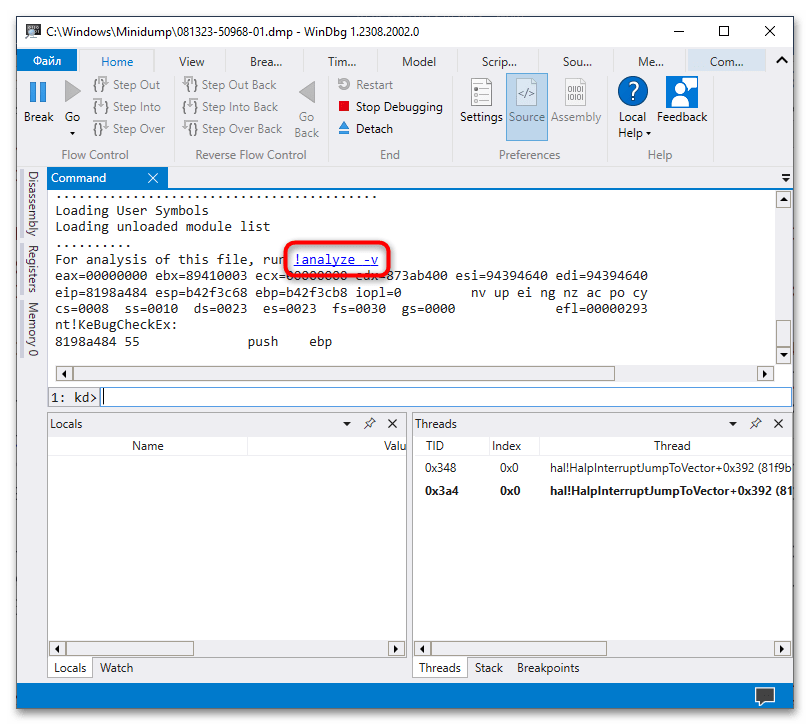
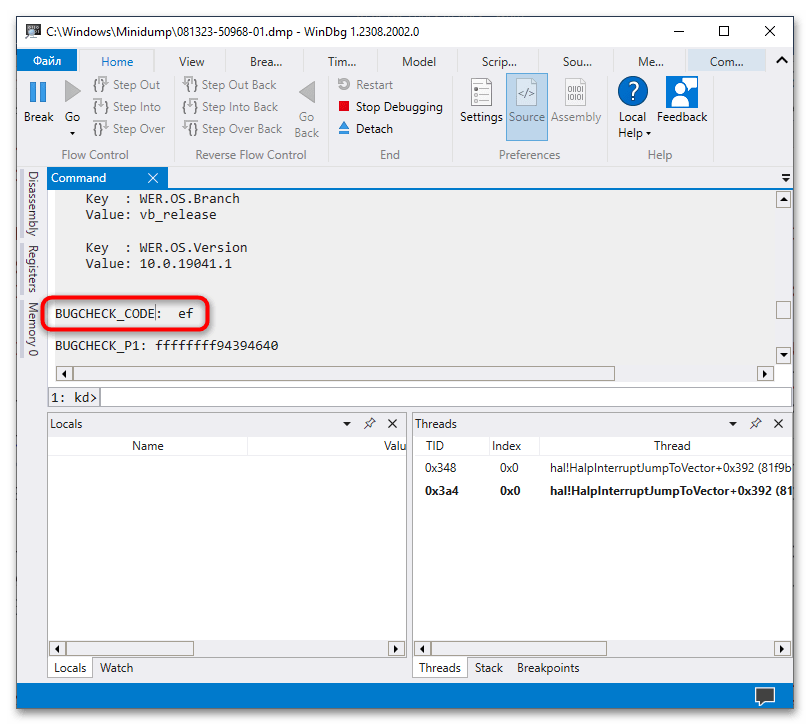
Кроме кода WinDbg позволяет получать множество других полезных сведений об ошибке, в частности аргументы и имя исполняемого файла, вызвавшего критический сбой.
BlueScreenView
Для получения кода ошибки экрана BSOD также можно использовать стороннюю утилиту BlueScreenView. Она не настолько функциональна как WinDbg, но намного проще и меньше инструмента от Microsoft.
Скачать BlueScreenView с официального сайта
- Скачайте архив с утилитой с сайта разработчика, распакуйте его и запустите исполняемый файл. Там можно скачать и языковой файл — для русификации интерфейса поместите языковой файл в папку с исполняемым файлом «BlueScreenView.exe».
- По умолчанию утилита автоматически считывает все файлы дампов в папке
C:\Windows\Minidump, но если в вашем случае файл дампа находится в другом месте, откройте дополнительные параметры утилиты комбинацией клавиш Ctrl + 0. - В открывшемся окошке выберите пункт «Загрузить один файл МиниДампа» и укажите путь к файлу DMP.
- Просмотрите содержимое колонки «Код ошибки» — в нем будет указан искомый код в шестнадцатеричном формате.
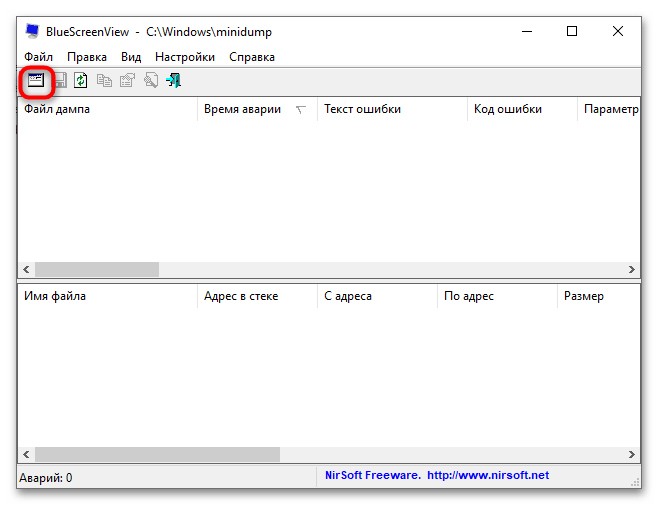

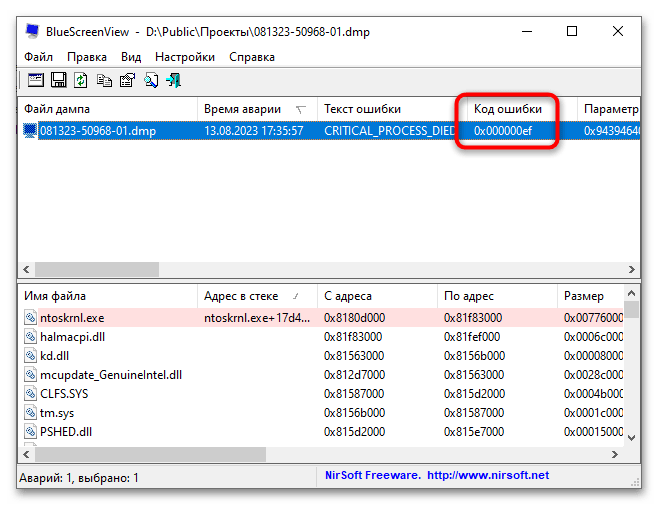
Помимо кода ошибки синего экрана, утилита BlueScreenView показывает сбойный драйвер, список связанных файлов, параметры, стеки адресов и другие отладочные сведения.
Наша группа в TelegramПолезные советы и помощь
Blue Screen of Death (BSOD) error is one of the common bugs you may encounter for several reasons. It may lead your system from malfunction to a complete crash, and you may end up losing access to your system and stored data. Sometimes, the error may go after rebooting your system. But what if it keeps occurring, and you don’t find any bugcheck for this error?
It would understandably be a frustrating situation. Don’t worry, though!
You can figure out the cause of the error with the help of the BSOD log file. Fortunately, Windows 10 stores such information in a sophisticated way, i.e., by creating a BSOD log file. But it doesn’t get stored in document or text form, which you can open and access directly. Accessing this file is a bit tricky. However, the solutions we’ve provided in this blog can help you locate the file and read it.
How to Find Windows 10 BSOD Logs?
A few DIY methods are shared here to help you check the BSOD logs Windows 10. Follow the steps mentioned against the methods.
Method 1: Use the Event Viewer
Using Event Viewer, you can view the content of event log files, and search & read the BSOD logs to diagnose issues related to the system and functions. It accesses the memory dumps and gathers logs stored on the PC. Event Viewer also provides crucial data on troubleshooting a problem when the system encounters a Blue Screen error.
- Type Event Viewer in Windows Search Box to open it.
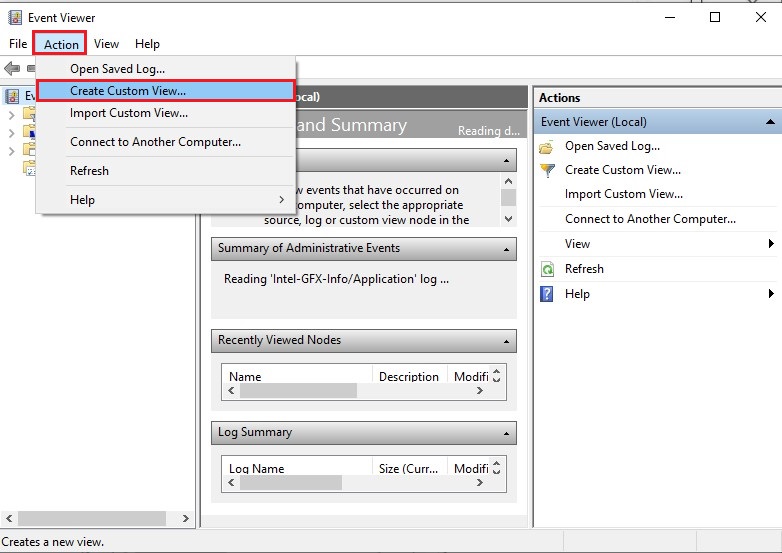
- Go to Actions given on the top-left menu.
- Click Actions > Create Custom View.
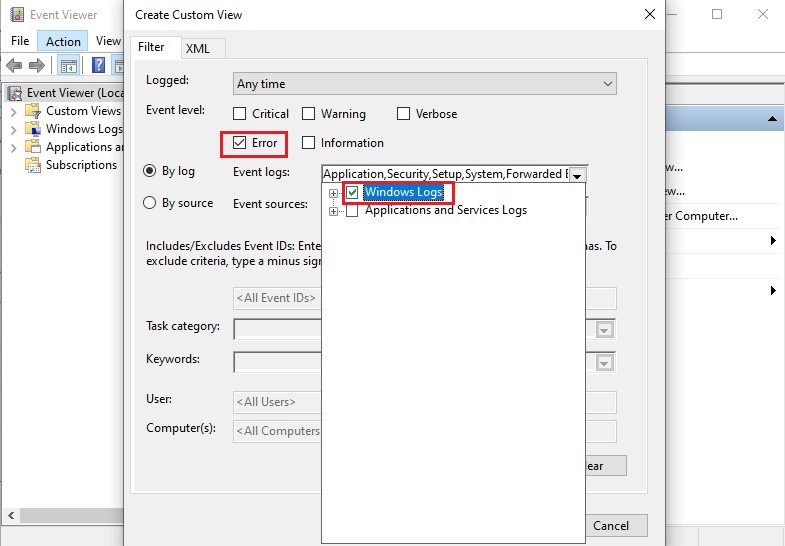
- Select a time range against the ‘Logged’ option.
- Mark Error in Event Level and then mark Windows Logs in Event logs. Finally, click OK.
- Rename the ‘Custom View’ and click OK.
You’ll be able to see all the error logs on the screen. Locate the error events at the time of the last BSOD.
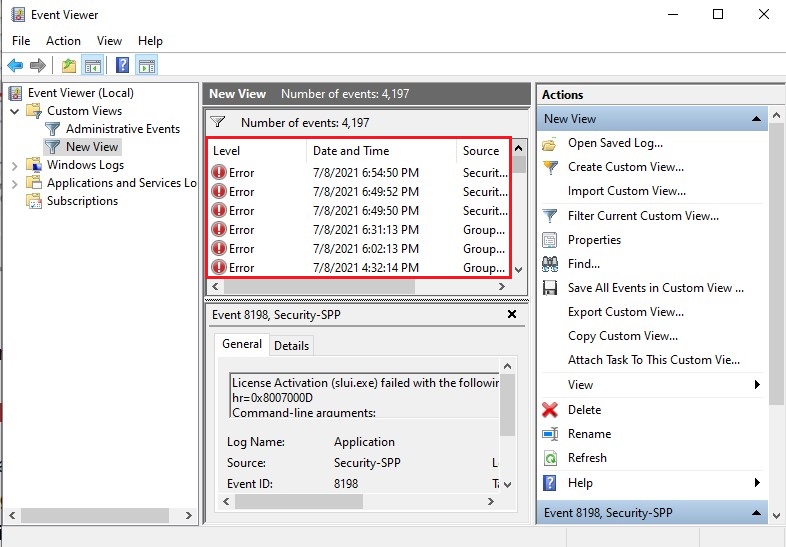
You can also click Details to see a log of apps and system messages, including errors, warnings, and information messages. It also helps in fixing other Windows problems.
Method 2: Use Windows 10 Monitor
Windows 10 Reliability Monitor is a built-in tool, allowing users to know the system’s stability. It lets you analyze if the application is crashing or not responding to issues and builds a PC stability chart. The Reliability Monitor checks out the stability on a scale of 1-10. The larger the scale, the better the system’s stability. You can access this tool through the control panel:
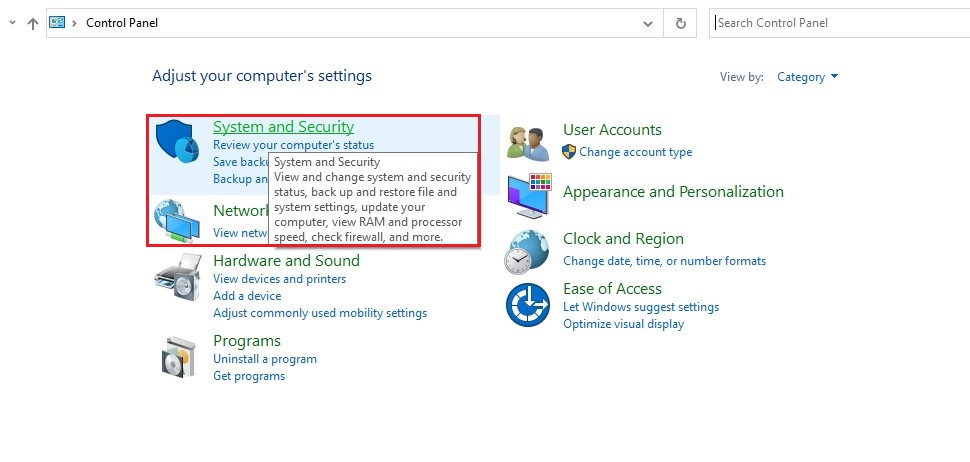
- Open Control Panel and navigate to System and Security.
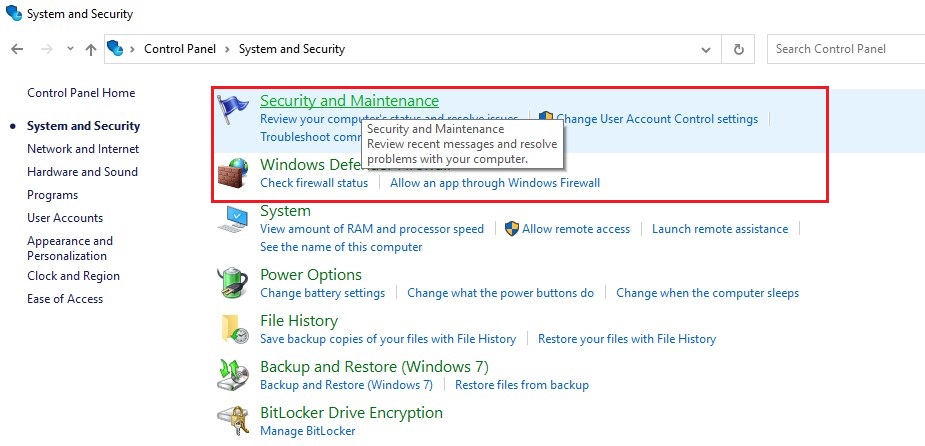
- Next, go to Security and Maintenance.
- Navigate to Maintenance > View reliability history.
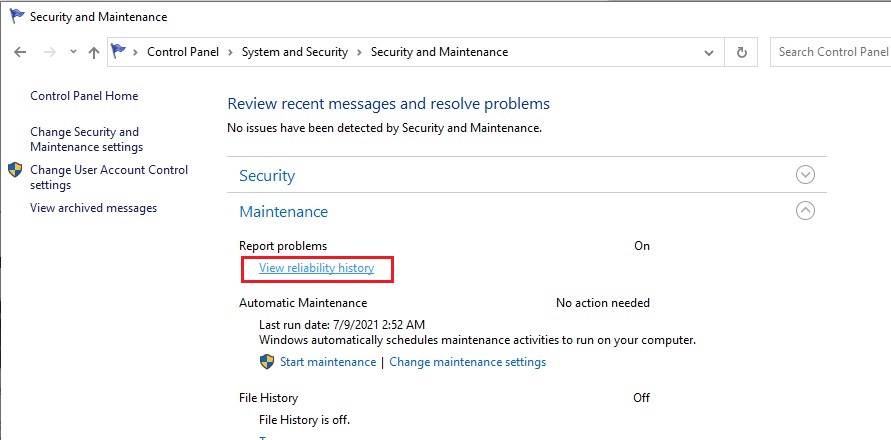
You will see the reliability data, displaying as a graph, where the cross (x) icons in red show errors and (i) icons in blue show a warning or notable event in the system.
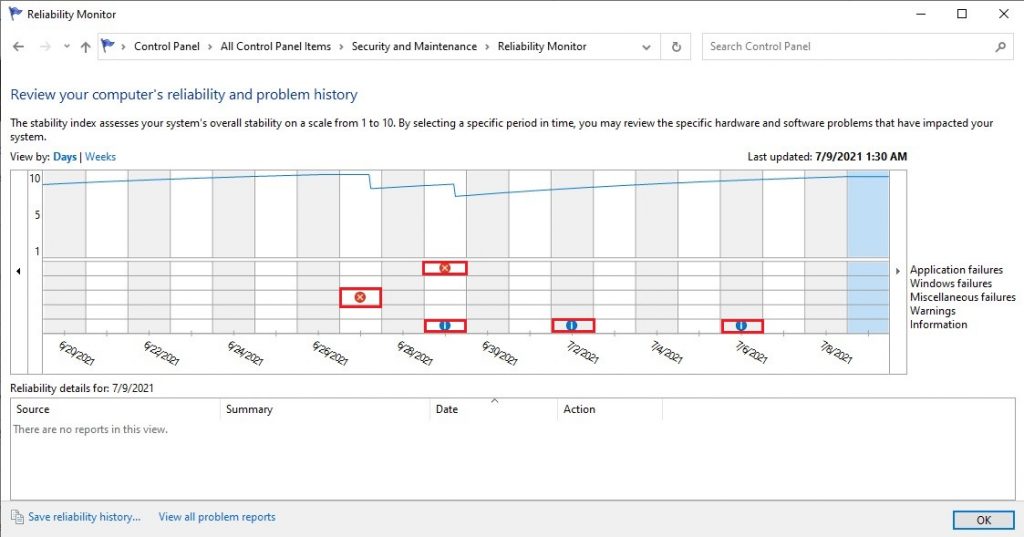
When you click on Error or Warning icons, it will display the problem details. You can expand the details to locate BSOD errors or crashes.
Method 3: Use Registry Editor
You can also use the Registry Editor to check for the Windows 10 BSOD files. Follow the given instructions:
- Open the Run dialog box by pressing Windows + R. Type in regedit, and press Enter.
- Click ‘Yes’ if it asks for your permission to run the utility.
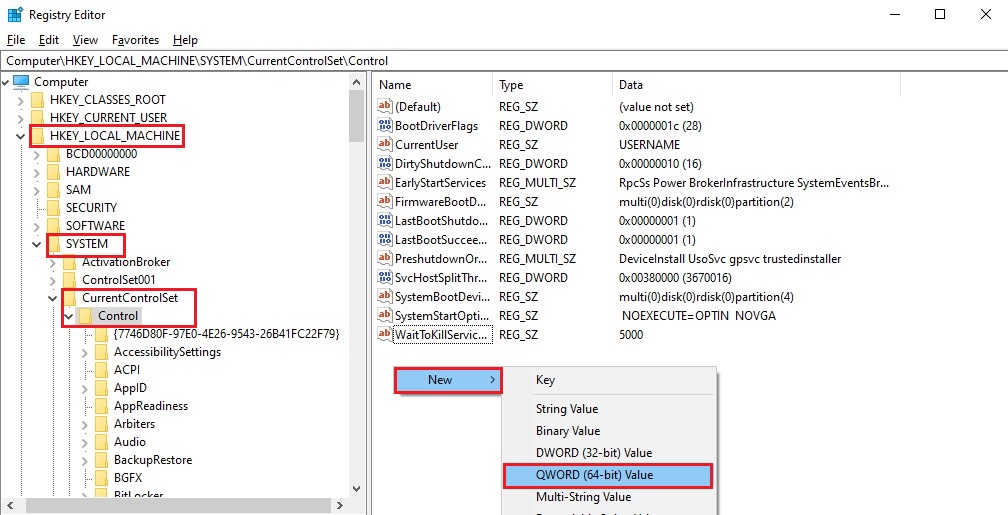
- Then follow HKEY_LOCAL_MACHINE > SYSTEM > CurrentControlSet > Control.
- Go to the right panel of Registry Editor, click New > QWORD (64 bit) Value.
- Rename it as Display Parameters, set the Value data to 1, and then click OK.
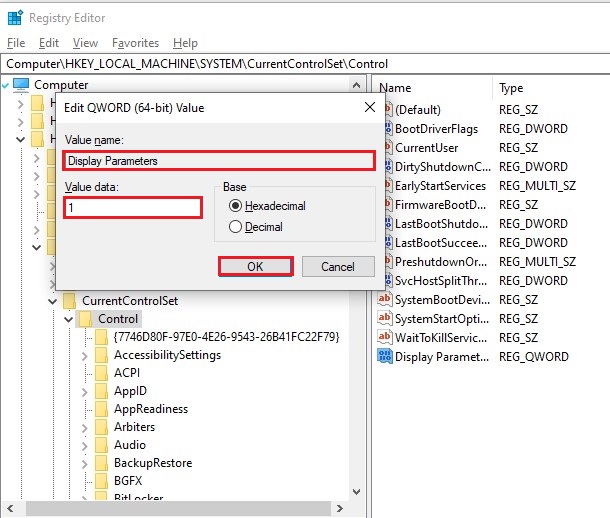
- Now, close the Registry Editor and reboot your PC.
I still can’t find where the BSOD logs Windows 10 are located. How would I fix it, and what about my data? Is it possible to recover data from a PC affected by a BSOD error? Don’t worry about your data, as you can recover it with the help of a powerful data recovery tool, such as Stellar Data Recovery Professional. It is a DIY data recovery software, which supports recovery from unbootable, crashed, or BSOD-affected Windows PCs and laptops. You can download its trial version to check its functionality and data recovery success rates.
Locating and accessing the Windows 10 BSOD logs is not always child’s play. However, you can refer to the methods given in this blog. Also, don’t forget to check the BSOD fixes. Finally, if you want to get back any lost data from the BSOD-affected system, use reliable data recovery software. The software can help you retrieve data even from non-booting or crashed Windows systems.
Was this article helpful?
YES0
NO
Did you recently face the Blue Screen of Death error? But couldn’t understand why the error occurs? Don’t worry, Windows saves the BSOD log file in a specific location. In this guide, you will find where is the BSOD log file located in Windows 10 and how to access & read the log file.
A Blue Screen Of Death (BSOD) is a splash screen that displays information about a system crash for a short while and proceeds to restart your computer. In the process, it saves the crash log files in the system before performing the restart. The BSOD happens due to a variety of factors, including incompatible software interfering with operating system processes, memory overflow, overheating of hardware, and failed system modifications.
The BSOD captures essential information regarding the crash and stores it on your computer so that it can be retrieved and sent back to Microsoft to analyze the cause of the crash. It has detailed codes and information that allows the user to diagnose issues with their computer. These files cannot be retrieved in a human-readable format, but it can be read using specific software that is present within the system.
Most of them might not be aware of the BSOD log files since you might not get enough time to read the text that appears during a crash. We can solve this issue by finding the location of the BSOD logs and viewing them to find problems and the time when it occurred.

Table of Contents
To find the location of Blue Screen of Death, BSOD error log file on Windows 10, follow the below method:
Access the BSOD log files using the Event Viewer Log
The Event Viewer Log is used to view the content of event logs – files that store information about the start and stop of services. It can be used to diagnose issues related to the system and functions, just like the BSOD log. We can use the Event Viewer Log to search and read the BSOD log files. It accesses the memory dumps and collects all the logs stored on your computer.
Event Viewer Log also provides vital information regarding troubleshooting any issues that happen when the system encounters a Blue Screen of Death. Let’s see how to access the BSOD log files using the Event Viewer Log:
1. Type Event viewer and click on it from the search results to open it.

2. Now, click on the Action tab. Select “Create custom view” from the dropdown menu.

3. Now you will be presented with a screen to filter the event logs according to different attributes.
4. In the Logged field, choose the time range from which you need to get the logs. Select the Event level as Error.

5. Choose Windows Logs from the Event log type dropdown and click OK.

6. Rename your view to anything you like and click OK.

7. Now you can see the Error events listed in the Event Viewer.

8. Select the most recent event to see the BSOD log details. Once selected, go to the Details tab to get more information regarding the BSOD error logs.
Use Windows 10 Reliability monitor
Windows 10 Reliability Monitor is a tool that enables users to know their computer’s stability. It analyzes the application crashing or not responding issues to create a chart about the stability of the system. The Reliability Monitor rates the stability from 1 to 10, and the higher the number – the better the stability. Let us see how to access this tool from the Control Panel:
1. Press Windows key + S to open Windows Search Bar. Type Control Panel in the search box and open it.
2. Now click on System and Security then click on the Security and Maintenance option.

3. Expand the maintenance section and click on the option “View reliability history.”

4. You can see that the reliability information is displayed as a graph with the instabilities and errors marked on the graph as points. The red circle represents an error, and the “i” represents a warning or notable event that occurred in the system.

5. Clicking on the error or warning symbols displays detailed information regarding the problem along with a summary and the exact time when the error occurred. You can expand the details to get more details about the BSOD crash.
Disable or Enable Memory Dump Logs in Windows 10
In Windows, you can disable or enable memory dump and kernel dump logs. It is possible to change the storage space allocated to these dumps to store logs reading system crashes. By default, the memory dump is located at “C:\Windows\memory.dmp”. You can easily change the default location of the memory dump files and enable or disable the memory dump logs:
1. Press Windows + R to bring up the Run window. Type “sysdm.cpl” in the window and hit Enter.

2. Go to the Advanced tab and click on the Settings button under Startup and Recovery.

3. Now in the Write Debugging information, select the appropriate option from Complete memory dump, Kernel memory dump, Automatic memory dump.

4. You can also disable the dump by selecting None from the dropdown. Note that you will not be able to report errors as the logs will not be stored during a system crash.

5. It is possible to change the location of the dump files. First, select the appropriate memory dump then under the “Dump file” field then type in the new location.
6. Click OK and then Restart your computer to save changes.
Memory dumps and BSOD log files help the user fix different issues on the Windows-based computer. You can also check the error using the QR code displayed during the BSOD crash on Windows 10 computer. Microsoft has a Bug check page that lists such error codes and their possible meanings. Try these methods and check whether you can find the solution for the system instability.
Recommended:
- Fix Ntoskrnl.exe BSOD Blue Screen error
- Using Driver Verifier to fix Blue Screen of Death (BSOD) errors
- Fix Black Desktop Background In Windows 10
We hope this article was helpful and you were able to find the BSOD log file location in Windows 10. If you still have any questions or confusion regarding this topic then feel free to ask them in the comment section below.

When the Windows PC crashes or freezes, a crash log is generated; you can check the Windows crash logs to find out what is causing this issue on your computer.
Sometimes, the computer screen turns blue, or the system starts freezing. Consequently, end up losing files on the computer. If the same is happening to you, then don’t panic. In this case, you should check for Windows crash report or error logs on your computer.
Here, I have discussed different ways how to check crash logs in Windows 10. So, keep reading the article to learn how to view Windows crash logs and error logs.
To repair corrupted Windows system files & optimize PC performance, we recommend Advanced System Repair:
This software is your one stop solution to fix Windows errors, protect you from malware, clean junks and optimize your PC for maximum performance in 3 easy steps:
- Download Advanaced System Repair rated Excellent on Trustpilot.
- Click Install & Scan Now to install & scan issues causing the PC problems.
- Next, click on Click Here to Fix All Issues Now to fix, clean, protect and optimize your PC effectively.
Method 1: Check Windows 10 Crash Logs/Error Logs via Event Viewer
The first method finds the Windows crash logs using the Event Viewer. Event Viewer collects all the information about the system software & device drivers.
It includes different types of information, from errors to the system’s success. It captures error types, warning types, informational types, alert types, success audit types, failure audit types, notice types, and debug types.
As there is a huge amount of data stored in the Event Viewer, our main focus is to collect the Windows error logs that caused crashing on the system. To do so, you have to follow these steps:
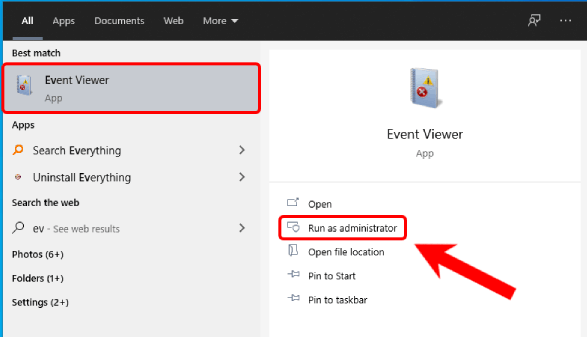
- Go to the Windows Search box and type Event Viewer.
- Right-click on the Event Viewer and select Run as Administrator.
- Now, on the left section of the Event Viewer window, you can see all the categorized logs.
- To see the Windows error logs, click on the Windows Logs to expand the section.
- Click on the System.
- Under the list of events, you can see all the errors that occurred on your system and caused Windows to crash.
- To see the details of errors, you need to select the particular error from the list.
- After selecting the error, you will get detailed information about that error at the bottom of the window.
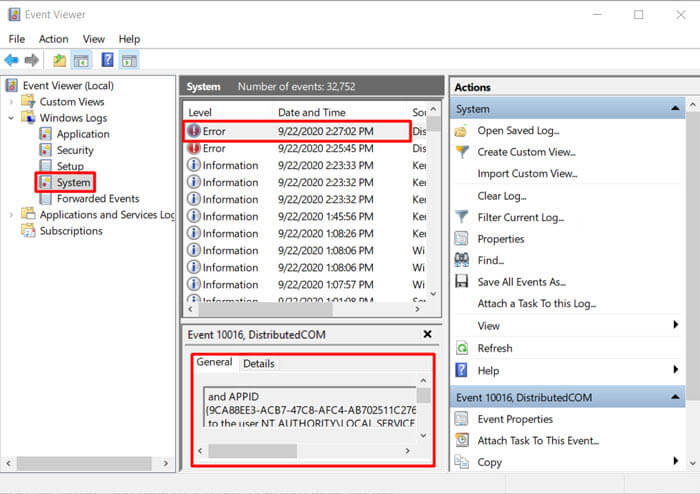
- Under the General tab, you will get general information about the error. And under the Detail tab, raw event data.
Method 2: Create Custom View to See Error Logs/Crash Logs on Windows 10
Another method of checking the Windows 10 crash logs is creating the Custom View in Event Viewer. It is a more efficient and quick way of seeing the Windows 10 error logs or crash logs. For this, you need to do the following:
- Open Event Viewer as shown in the above-given steps.
- Go to the Windows Logs > System.
- Now, go to the errors list and select the error.
- Select the Create a custom view option given at the right-side Actions section of the window.
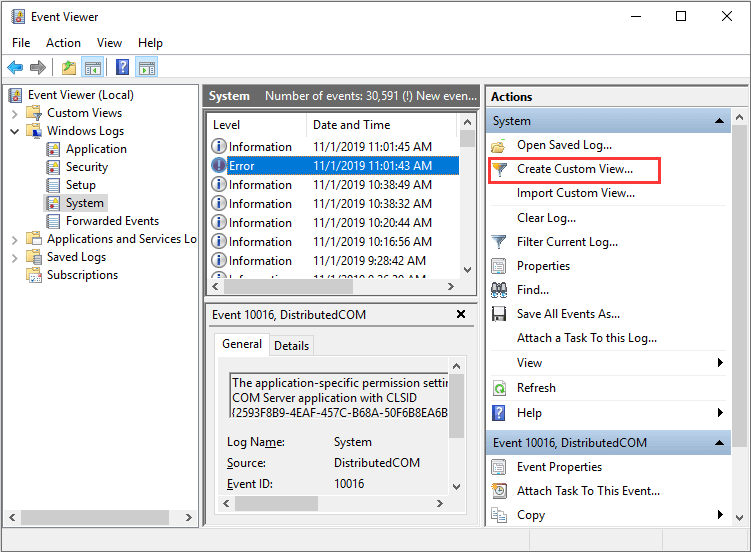
- Now, a new window will pop up on the screen. Here, you need to select the time range for which you wish to see the log.
- Next, select the checkboxes given next to the Warning, Critical, and Error.
- Select “By log” and click on the dropdown list > select the System, Security, and Applications options.
- Click on the OK button.
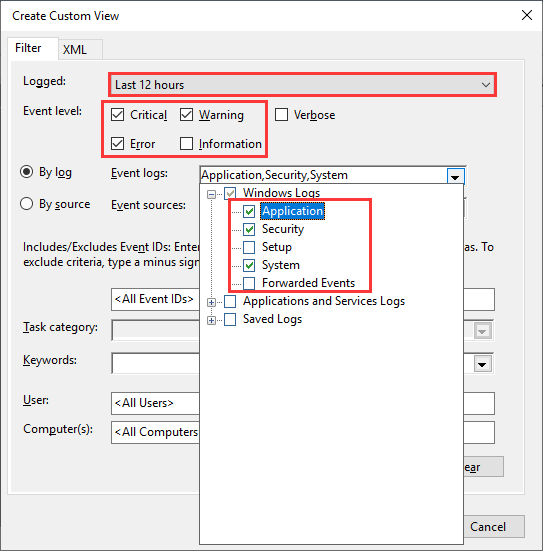
- Set the name of your custom view > click on the OK button.
- Now, you can see all the Windows 10 crash logs of the selected time period.
Method 3: View Windows 10 Crash Log/Error Logs via Reliability Monitor
The Reliability Monitor feature was first introduced on Windows 7 and later adopted in Windows 10/8.1/8. Reliability Monitor provides an overview of how the system works.
It represents Windows’s warnings, errors, and crashing information in a graphical format. In simple words, it shows you how your system is reliable and stable has been.
So, if your Windows 10 system crashes or shows errors, you can use the Reliability Monitor to check the crash logs.
- Go to the Windows Search box > type reliability.
- Click on the View reliability history.
- This is how the Reliability Monitor window looks like. Here, all the reliability and problem history is sorted by dates. If your Windows 10 crashes, freezes, or hang, then you can see the red circle and X icon in the report.
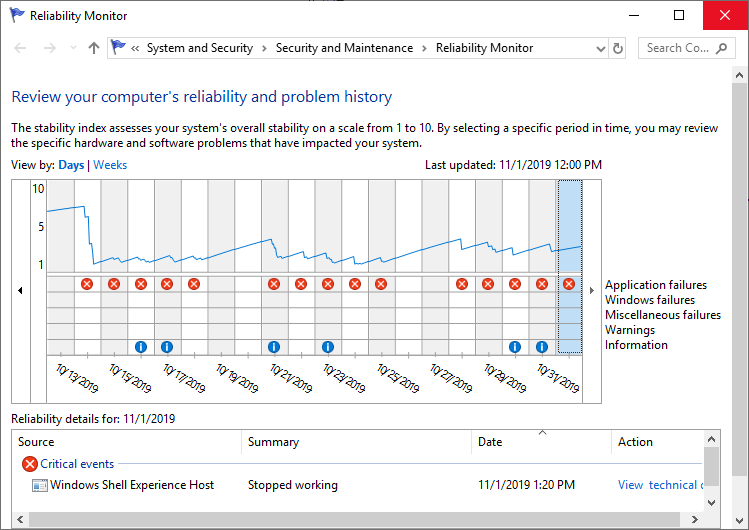
- Now, if you want to see the crash log of a specific date, just go to the column of that day and you will get the detailed information of the error at the bottom section of the window.
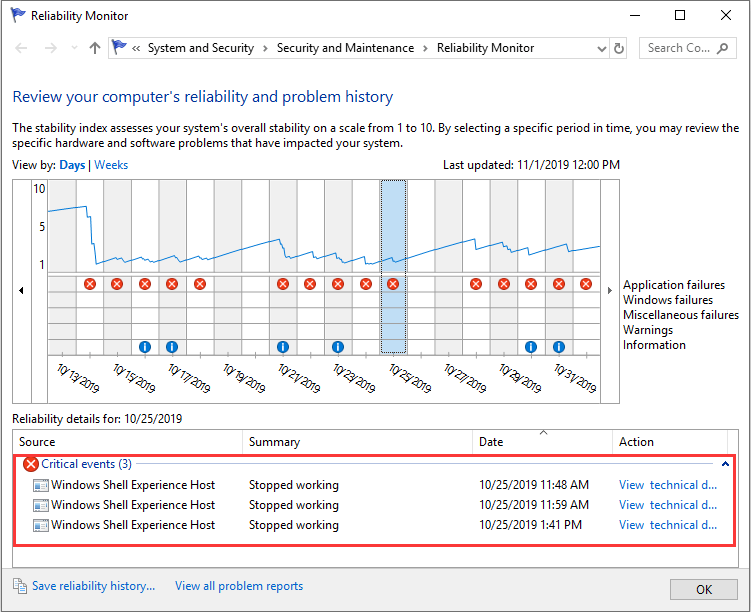
- To find out more about the particular problem, double-click on the event.
Method 4: Find Error Logs on Windows 10 by Using PowerShell.
Windows 10 has a powerful feature i.e. PowerShell, that allows you to run command-line programs. So, to find the error and crash logs on Windows 10, you can run the below-given commands in the PowerShell:
- Press Windows + X keys > select Powershell from the list.
- In the Powershell, write any of these commands and press the Enter key:
Get-EventLog -Log LogName | where {$_.entryType -match “LogType”}
Or
Get-EventLog -Log system | where {$_.entryType -match “Error”}
Or
Get-EventLog -LogName System -EntryType Error
Or
Get-EventLog -LogName System -Newest 15 -EntryType Error
Method 5: Use 3rd Party Software to Find Windows 10 Crash/Error Logs
Apart from the above-given manual methods, there is some third-party software you can use to see the Windows 10 Event Logs. So. here are those third-party apps that can help you to see the crash logs on Windows 10:
- EventTracker
- SysMon
- Splunk
- Project Lasso
- LOGalyze
- ADAudit Plus
How to Check Windows 10 Event Logs?
Besides Windows crash logs and error logs, event logs can also help you discover the problem of Windows crashing. When a program crashes on the system or suddenly disappears, an event log file can help you troubleshoot the problem.
To view event logs on the Windows system, follow these instructions:
- Press Windows + X keys > select Event Viewer from the list.
- Go to the Windows Logs.
- Click on the Application.
- Select the latest error from the events list shown as the Application error under the Source column.
- Now, you can see the error detail in the box given at the bottom.
How to Find Windows 10 BSOD Log?
If your system crashes and the BSOD error appears just after that, you don’t need to check the entire error log; instead, only find the BSOD log in Windows 10. For this, you have two options –
1: By using Create Custom View option in Event Viewer
As already discussed, creating a custom view in the Event Viewer enables users to check the logs more effectively and easily. The same method will be used to find the Windows 10 BSOD logs. Hence, go to Method 2 and follow the steps.
2: Use Third-Party BSOD Viewer
If you found the above method too tricky or complicated, you can do it easily with the 3rd party Event Viewer. Use the BlueScreenView to find the BSOD logs.
This app will do the same thing as Windows Event Viewer. This tool will scan your computer and search for the BSOD crashed files so that you can easily troubleshoot the problem.
Windows 10 crashing is not a new problem and is very common among users. This is something that every other Windows user experiences with their computers. However, it is important to know the reasons that are causing this issue on your system.
Hence, I gathered some of the common causes of why your Windows computer is crashing:
- Failing RAM: If your computer’s RAM fails, it will be difficult for Windows to gather data from memory. As a result, your Windows will crash or freeze as it will keep trying to retrieve information from memory.
- Bad drivers: Another biggest reason for Windows crashing is a bad driver. It is because installing the wrong driver will crash the system and may welcome viruses to the system.
- Hard drive malfunctioning: If the hard drive on your computer is not working properly, it can also cause crashes. A malfunctioning hard drive affects the files on the computer, making work difficult for Windows to open those files.
- System Overheating: When the system overheats, parts of the computer become unable to function, which causes Windows to crash/freeze.
How to Fix Windows Crashing?
Windows crashing is a common problem that makes things hard for the system. Henceforth, there are some solutions that you can follow to fix this problem on your computer:
- Disconnect external devices: To fix this problem, you should disconnect all the external devices as it might be the reason that is causing the communication problem between Windows 10 & your device.
- Update drivers: Running outdated or corrupted drivers often leads to crashing problems on Windows 10. So, check whether the device drivers are compatible and updated or not.
- Remove Virus/Malware: The virus/malware on the system corrupts/infects the files, including the ones required for Windows 10 functioning. So, if this is the case with you, check for viruses/malware on your PC.
- Run SFC: The corrupted/damaged Windows system files won’t let Windows work efficiently. Hence, you need to run the SFC command on your computer to fix the corrupt system files.
- Use PC Repair Tool: The best solution that most professionals use to fix the Windows crashing issue is using the PC Repair Tool. This tool can fix several PC errors/issues, including BSOD errors, DLL errors, repair corrupted Windows system files, and crashing problems.
Conclusion
So, this is all about finding Windows 10 crash logs. Whenever your Windows crashes or freezes, follow one of these methods and see the event logs on Windows 10 to find out the reasons causing problems on your system.
I hope the article is helpful for you. If you still have any queries, please share them on our Facebook or Twitter page. Also, don’t forget to follow us on social media for more informative Windows 10 guides.
Good Luck..!
Hardeep has always been a Windows lover ever since she got her hands on her first Windows XP PC. She has always been enthusiastic about technological stuff, especially Artificial Intelligence (AI) computing. Before joining PC Error Fix, she worked as a freelancer and worked on numerous technical projects.
@titov_andrei
All my life I learn — and die a fool!
Комп перезагружается внезапно, даже иногда без нагрузки на память, проц и диск. Выходит сообщение на синем фоне о сборе данных об ошибке и дальнейшей перезагрузке. Где посмотреть эти данные?
-
Вопрос задан
-
57455 просмотров
C:\Windows\MEMORY.DMP C:\Windows\Minidump + Event viewer
Перед загрузкой системы нажмите F8 и выберете опцию «Отключить автоматическую перезагрузку при отказе системы». После этого при возникновении синего экрана можно посмотреть об ошибке подробнее. Проблема либо аппаратная, либо в драйверах.
Пригласить эксперта
Чтобы быстро просмотреть логи именно от синих экранов смерти BSOD, гораздо удобнее воспользоваться бесплатной программой BlueScreenView
-
Показать ещё
Загружается…
