
Все способы:
- Способ 1: Lively Wallpaper
- Способ 2: HD 4K Живые обои
- Способ 3: DeskScapes
- Способ 4: Push Video Wallpaper
- Вопросы и ответы: 0
Способ 1: Lively Wallpaper
По умолчанию в Windows 11 отсутствует инструмент, с помощью которого можно было бы установить живые обои. Для выполнения этой задачи пользователям понадобится скачивать дополнительные программы. Одна из подходящих называется Lively Wallpaper и распространяется через Microsoft Store. Давайте рассмотрим процесс ее установки и использования в операционной системе.
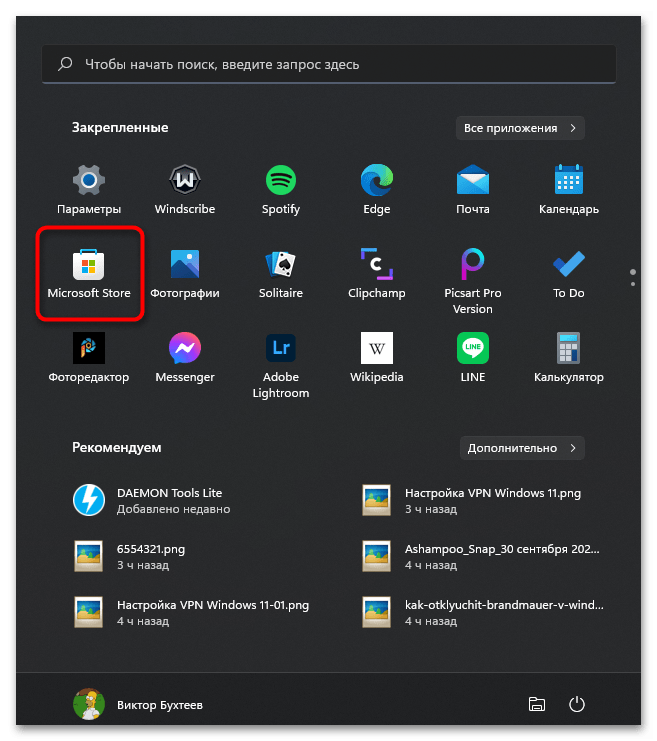
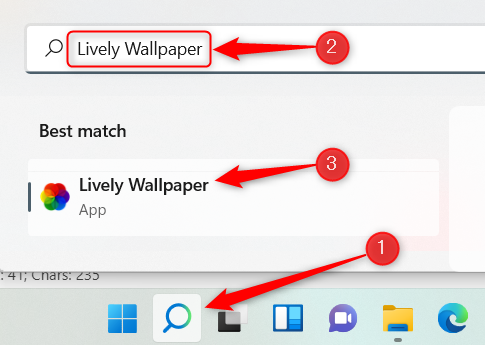
- Откройте меню «Пуск» и в списке закрепленных значков найдите «Microsoft Store». Запустите магазин для поиска приложения внутри него.
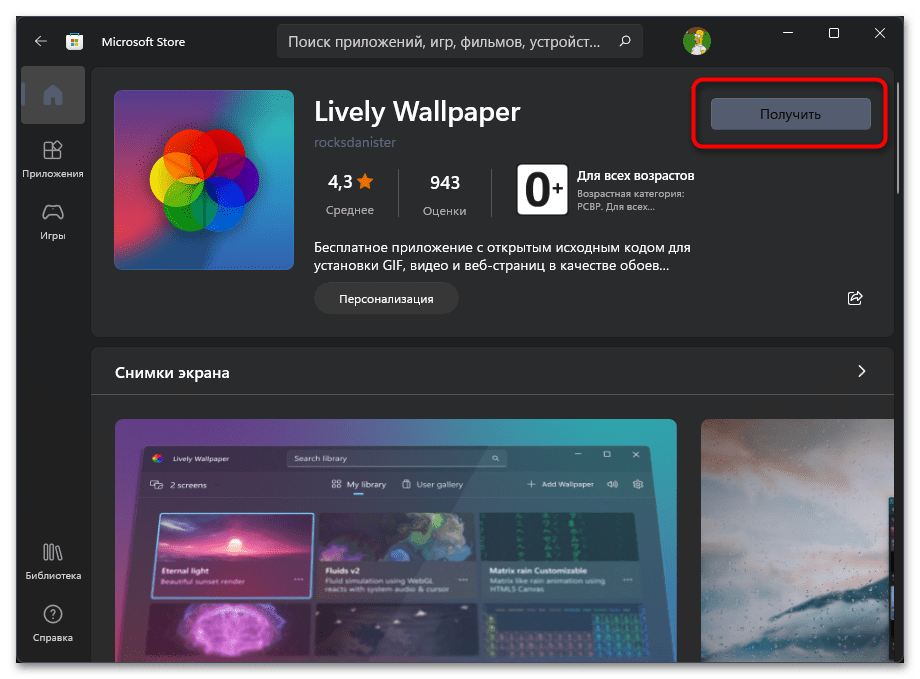
- Активируйте строку поиска, найдите «Lively Wallpaper» и перейдите на страницу приложения.
- Нажмите «Получить», чтобы запустить установку.
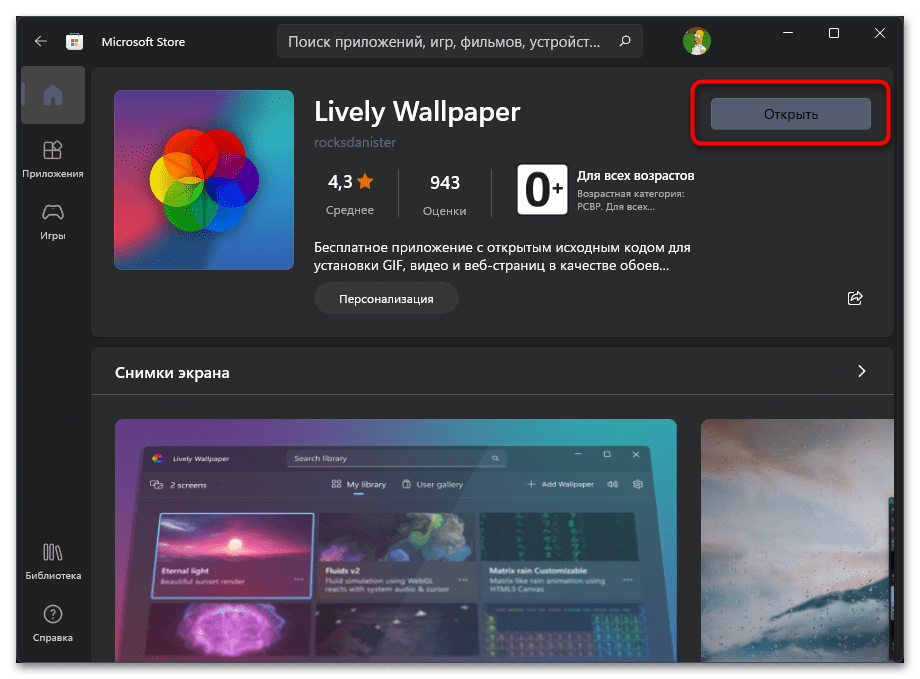
- Вы можете следить за процессом инсталляции, а по завершении нажать «Открыть», чтобы сразу запустить программу и перейти к ее настройке.
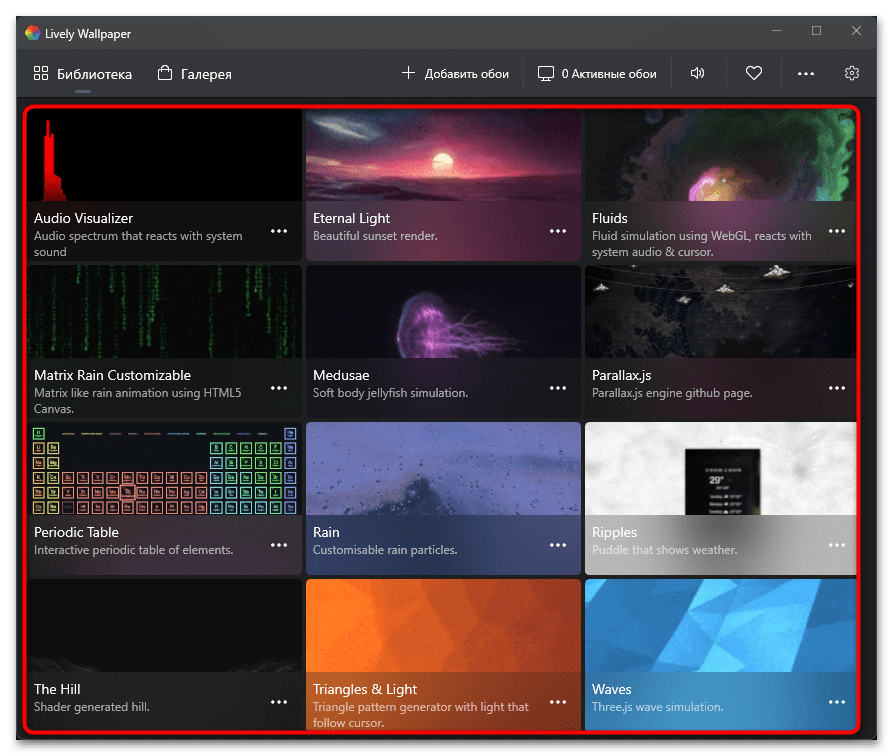
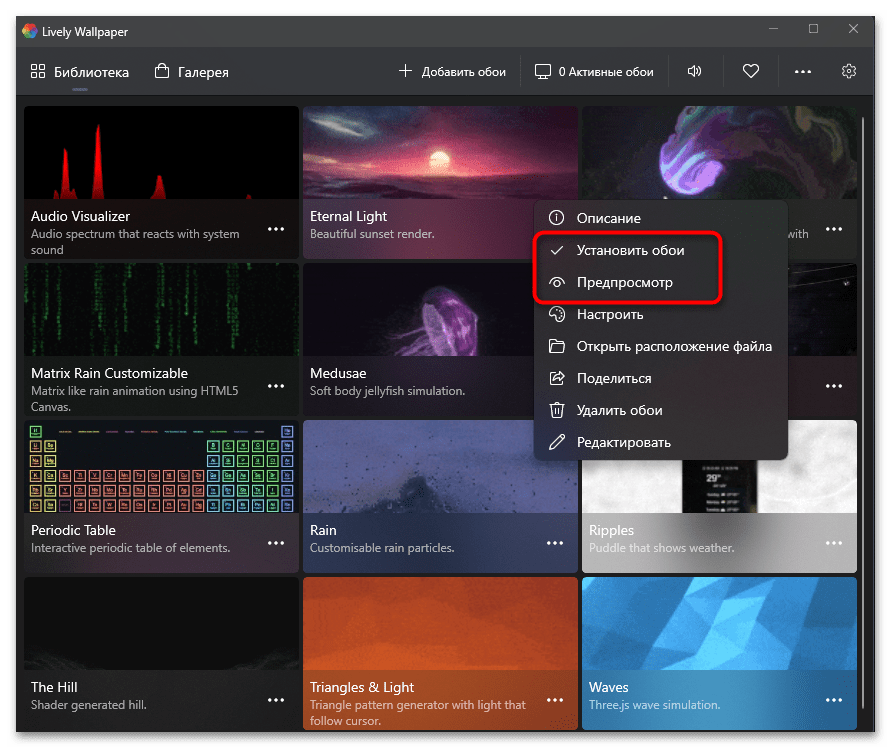
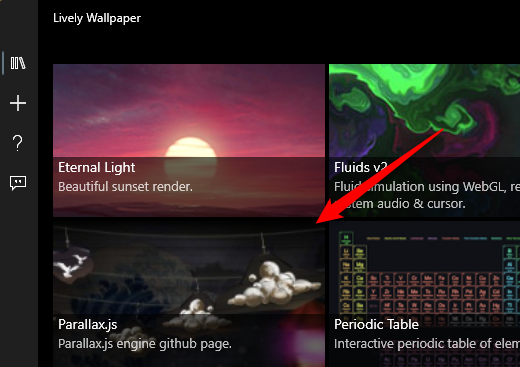
- Разработчики сразу же предлагают на выбор большое количество разных живых обоев из встроенной библиотеки. Ознакомьтесь с этим списком и отыщите среди них подходящий вариант.
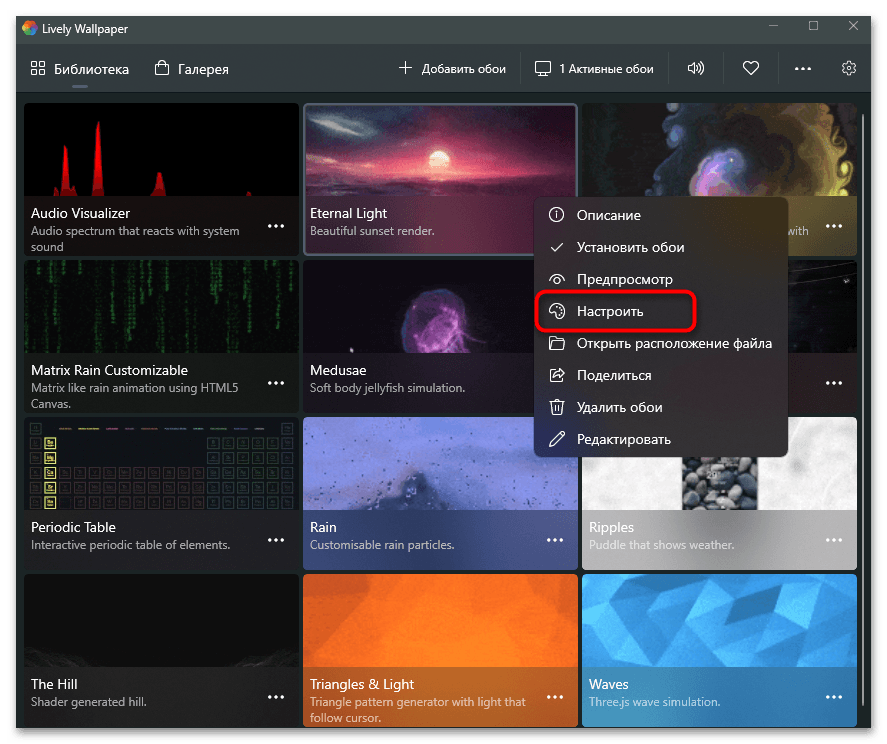
- Нажмите по кнопке с тремя точками справа от подходящих обоев, чтобы сразу установить их на рабочий стол или перейти к предпросмотру.
- Заметим, что все обои, присутствующие в Lively Wallpaper, обладают персональными настройками, напрямую влияющими на внешний вид анимации.
- Вы можете изменять яркость, контраст, гамму, сатурацию и скорость воспроизведения. Если выбранные обои имеют звуковое сопровождение, а вам оно не нужно, активируйте галочку возле пункта «Mute».
- Сверните окно с параметрами и обратите внимание на рабочий стол. Изменения вступают в силу сразу же, поэтому вы будете видеть, как теперь выглядят живые обои.
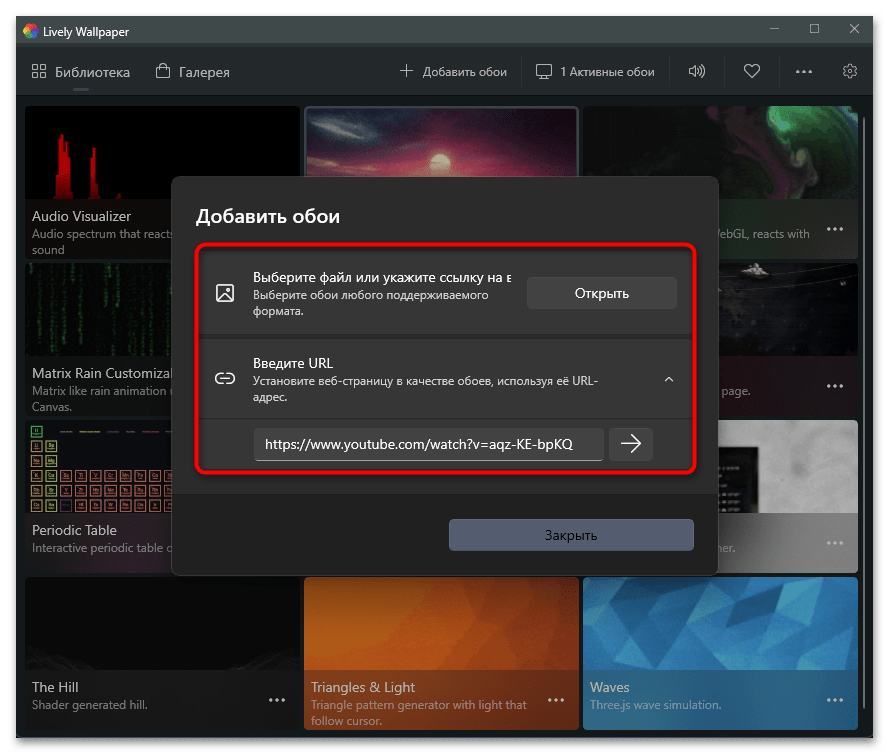
- Если ничего подходящего из библиотеки найти не удалось, можно нажать кнопку «Добавить обои», чтобы выбрать локальный файл или вставить ссылку на видео с YouTube.
- В новом окне выберите подходящий тип импорта и завершите добавление своих собственных живых обоев, которые хранятся в формате GIF или любом современном типе видео.
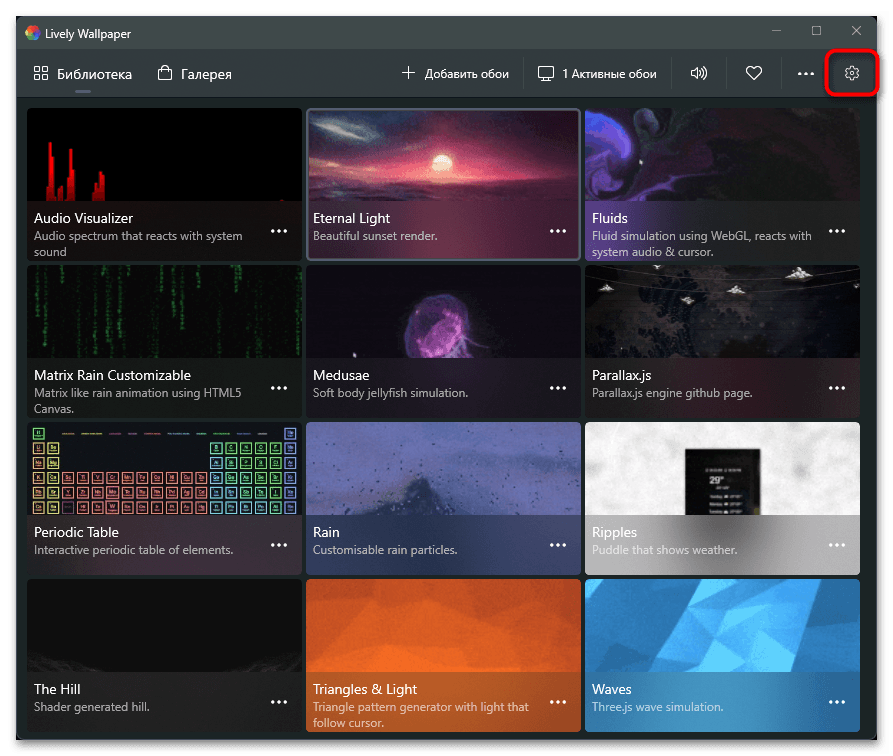
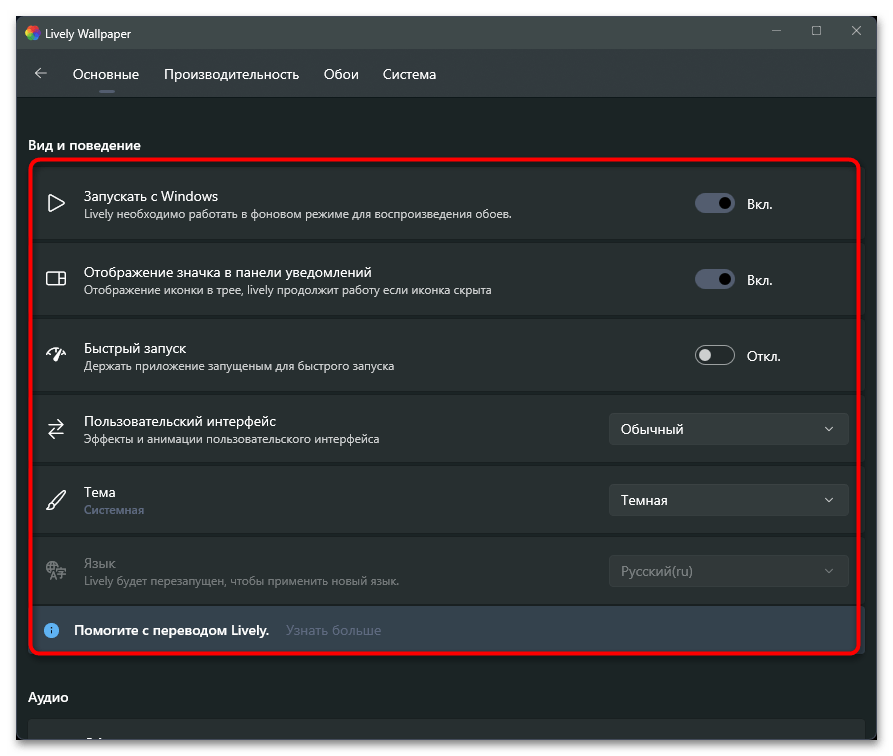
- В завершение обзора данного приложения разберем его общие настройки, для перехода к которым нужно нажать по значку с изображением шестеренки справа вверху.
- Среди основных параметров вы найдете переключатель для автоматического запуска с Windows, что обязательно нужно для воспроизведения живых обоев. Сможете настроить отображение значка на панели уведомлений и активировать быстрый запуск, чтобы получать оперативный доступ к библиотеке с живыми обоями.
- Перейдите на вкладку «Производительность» для просмотра параметров воспроизведения и отдельных функций для ноутбуков. Останавливаться на всех них не будем, поскольку каждый из них имеет свое описание на русском языке, с помощью которого вы и сможете понять, стоит ли активировать ту или иную функцию.


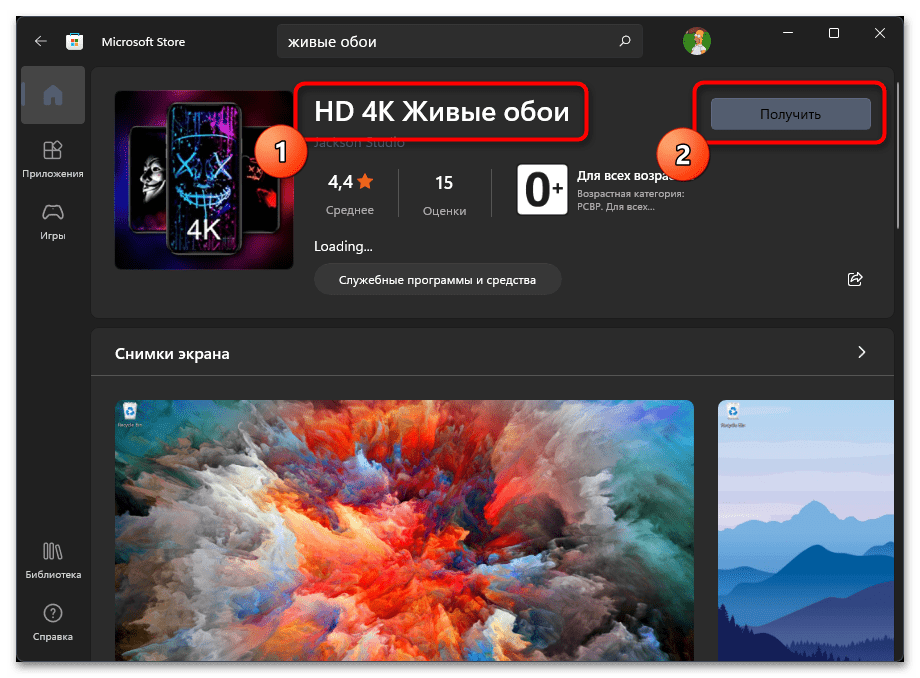
Способ 2: HD 4K Живые обои
Разберем еще одно приложение для установки живых обоев, которое можно скачать бесплатно через Microsoft Store. Его функциональность не такая широкая, как у предыдущей программы, а также отсутствует встроенная библиотека с эффектами. Мы бы рекомендовали использовать HD 4K Живые обои тем юзерам, кто уже скачал видео, которое будет установлено в качестве живых обоев, или нашел на него ссылку на YouTube.
- Отыщите страницу приложения HD 4K Живые обои по названию в магазине и нажмите кнопку «Получить».
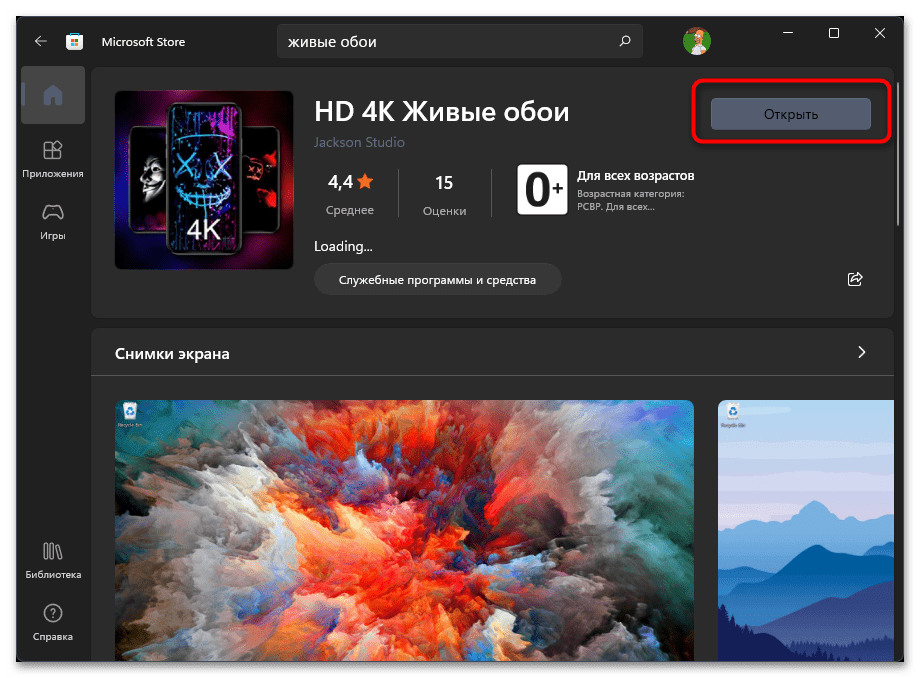
- После установки щелкните по «Открыть» или используйте для запуска значок, который должен автоматически добавиться в меню «Пуск».
- Окно у HD 4K Живые обои минималистичное. На выбор предлагается два варианта работы и список для переключения экранов, если таких используется несколько. По умолчанию будет выбран режим воспроизведения локального файла, а для выбора конкретного видео понадобится нажать кнопку «Browse».
- Если вам больше подходит использование ролика с YouTube без предварительного скачивания файла на компьютер, поставьте галочку возле пункта «YouTube/Niconico Video» и вставьте ссылку в поле ниже.
- Остается только нажать «play», чтобы запустить воспроизведение.
- Больше в HD 4K Живые обои никаких настроек нет, поэтому вы можете просто просматривать воспроизведение живых обоев на рабочем столе, время от времени менять их или останавливать проигрывание через меню программы.
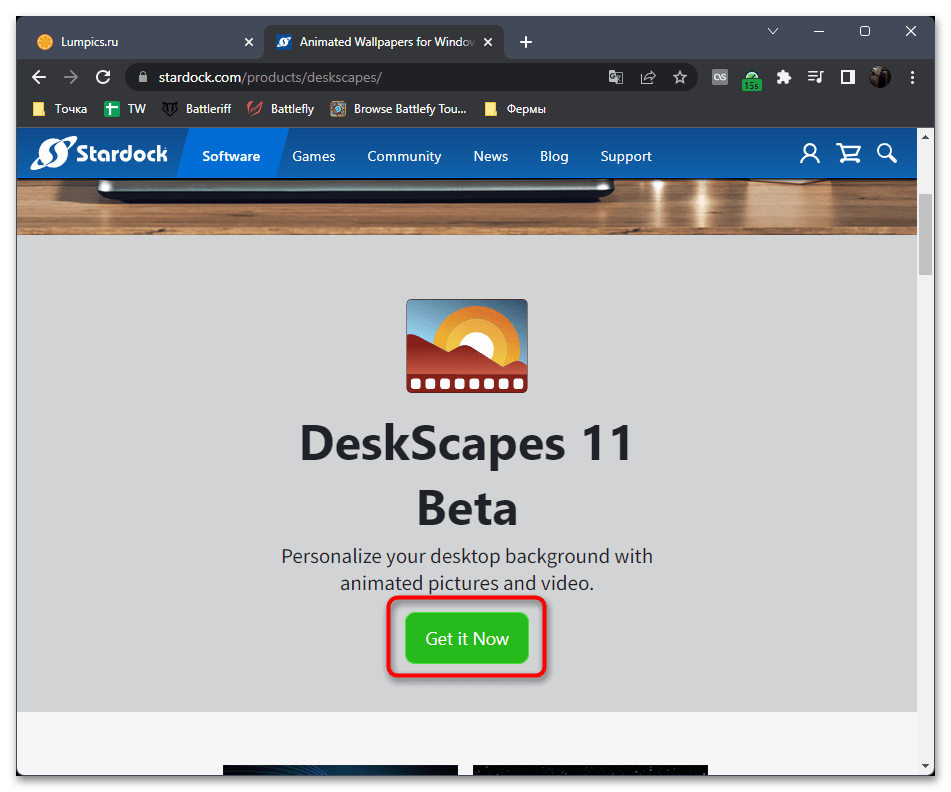
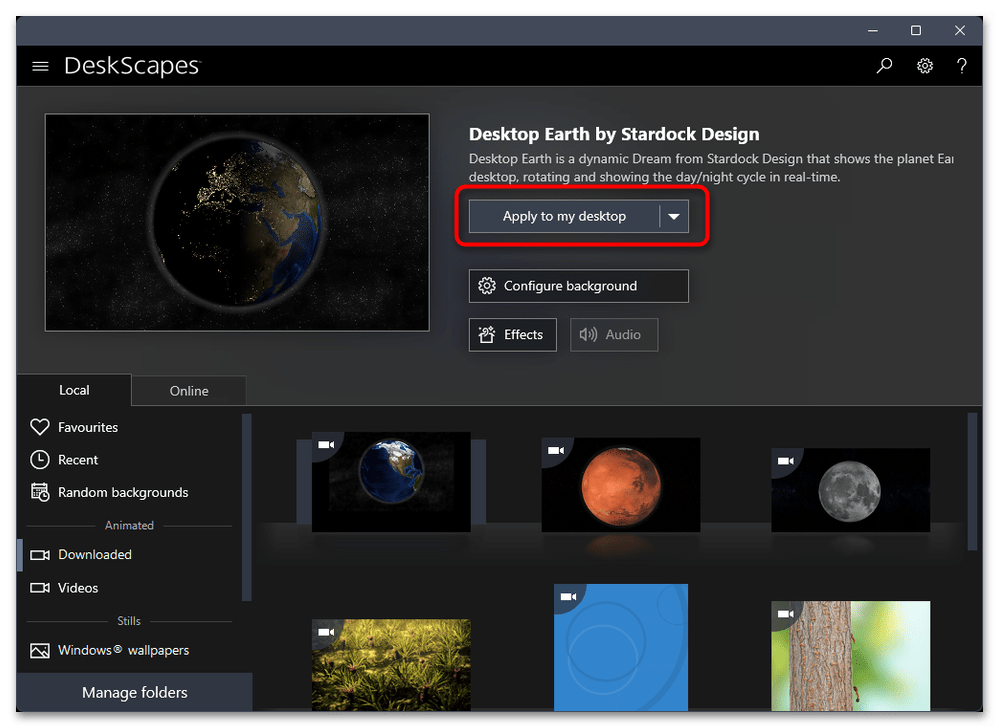
Способ 3: DeskScapes
Далее остановимся на программном обеспечении под названием DeskScapes. Для его использования понадобится загрузить пробную версию на 30 дней или оформить покупку на официальном сайте, что обязательно нужно учитывать еще до перехода к ознакомлению со следующей инструкцией. Данный софт имеет много разных настроек и большую встроенную библиотеку с живыми обоями.
Скачать DeskScapes с официального сайта
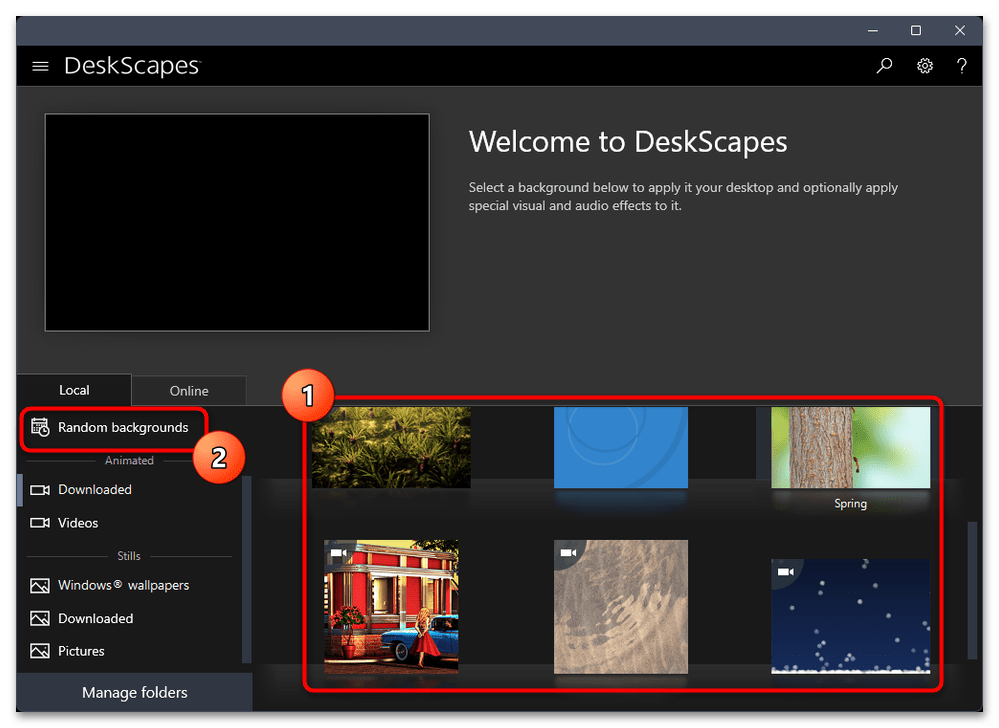
- Начните с выбора сборки или скачивания пробной версии программы с официального сайта. Затем пройдите установку и запустите софт.
- Справа вы увидите список живых обоев, которые уже скачаны и доступны к использованию. Дополнительно можно нажать по кнопке «Random backgrounds», чтобы настроить случайное воспроизведение.
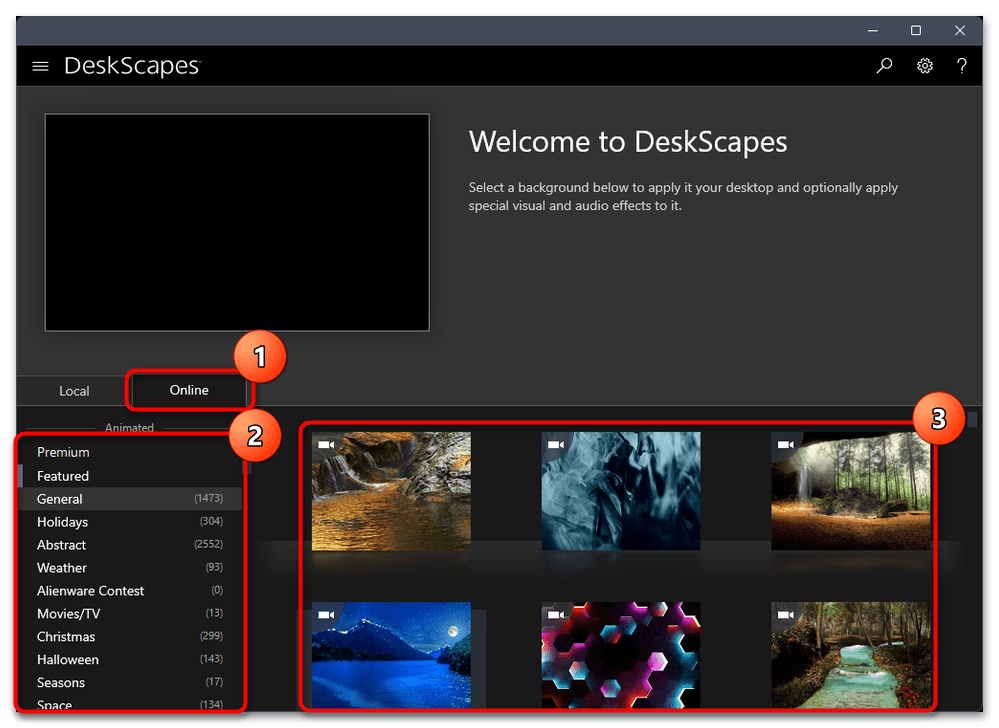
- Переключитесь на вкладку «Online» для поиска живых обоев, которые можно скачать на компьютер и использовать через DeskScapes. В списке слева вы найдете перечень доступных категорий, а справа увидите все варианты живых обоев.
- Выберите подходящее видео и нажмите «Download this background», чтобы скачать его на ПК и применить в качестве фона рабочего стола.
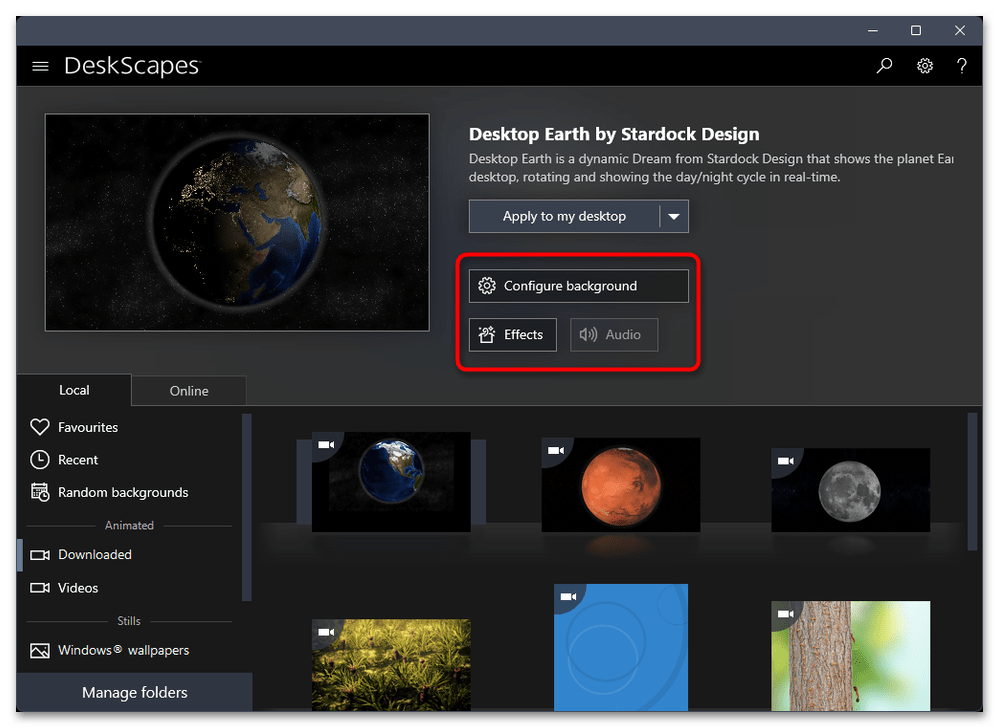
- Каждые обои имеют свои особенные настройки и расширенные эффекты, за переход к выбору которых отвечают две кнопки на панели с презентацией самого фона рабочего стола.
- В отдельном окне вы сможете настроить скорость анимации и движение находящихся на ней объектов. Количество настроек зависит исключительно от того, какой фон был выбран.
- Для применения живых обоев и установки их на рабочий стол в Windows 11 нажмите кнопку «Apply to my desktop».
- Дополнительно отметим, что на панели слева есть категории с разными обоями и видео. В них вы можете выбирать одну из загрузок или переходить к библиотеке установленных файлов для их переключения.


Способ 4: Push Video Wallpaper
Push Video Wallpaper — более простое программное обеспечение, но и распространяется оно бесплатно. В нем есть несколько разных заготовок для установки живых обоев, но больше всего акцент сделан на возможности выбора видео с YouTube для установки его как фона рабочего стола или добавления видео, которое предварительно было скачано на компьютер. Кстати, загрузка разных живых обоев доступна с официального сайта, где присутствует довольно обширная библиотека.
Скачать Push Video Wallpaper с официального сайта
- Сначала скачайте Push Video Wallpaper по ссылке выше и установите программу в Windows 11.
- После запуска можете выбрать один из любых шаблонов, чтобы проверить воспроизведение живых обоев.
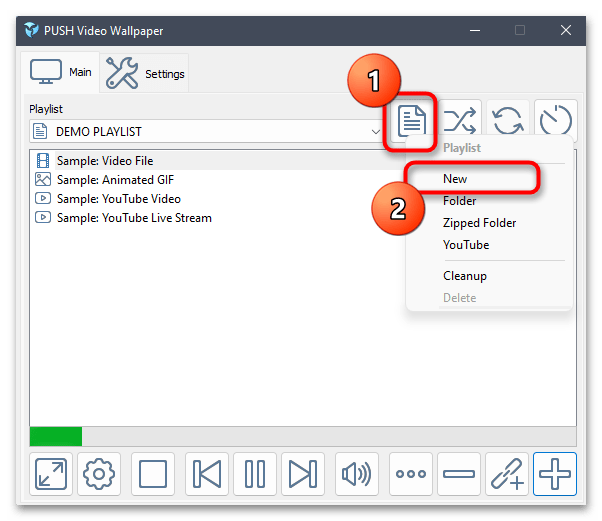
- Если нужно создать собственный профиль для дальнейшего добавления видео или ссылок с YouTube, нажмите по значку с изображением файла и выберите вариант «New».
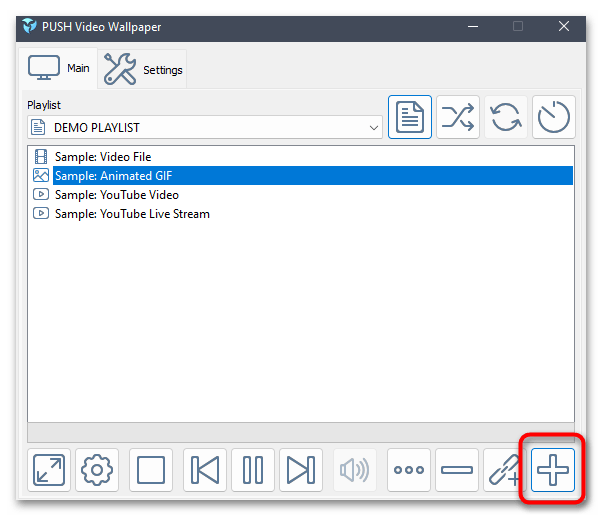
- Далее щелкните по кнопке с плюсом, чтобы перейти к выбору файла или вставке ссылки.
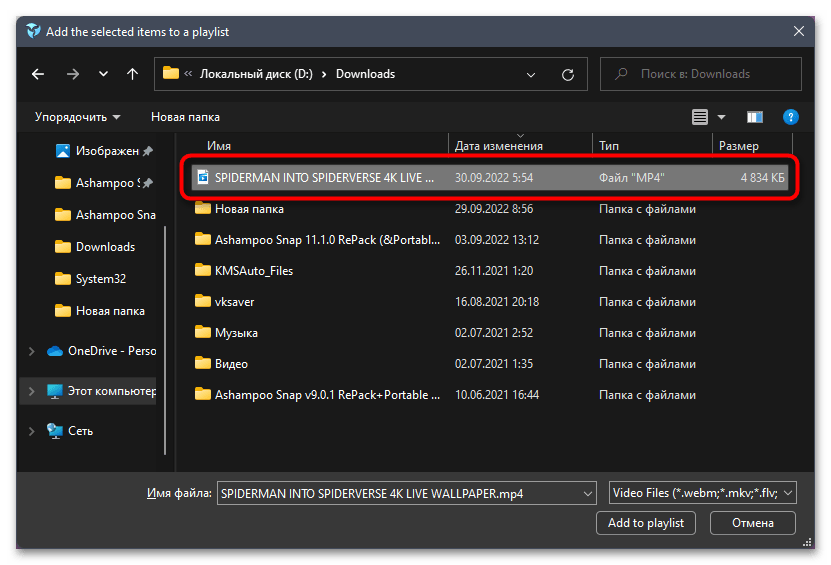
- Ссылка вставляется в отобразившееся на экране поле, а файл выбирается через открывшееся окно «Проводника». После этого изменения сразу же вступят в силу и вы увидите, что фон рабочего стола был изменен на выбранную анимацию.
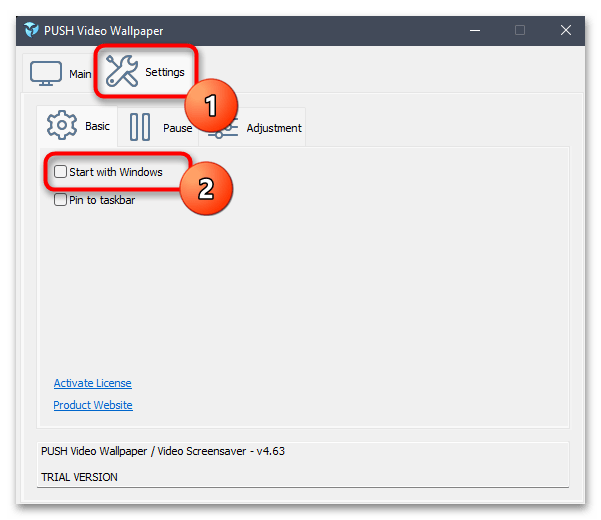
- Дополнительно рекомендуем переключиться на вкладку «Settings» и установить галочку «Start with Windows», чтобы Push Video Wallpaper запускалась вместе с операционной системой и сразу применяла анимированный фон рабочего стола.


Наша группа в TelegramПолезные советы и помощь
Вопрос о том, как установить живые обои рабочего стола Windows 11 или Windows 10 очень популярен среди пользователей, однако сделать это системные средствами не получится. Бесплатных программ для этих целей не так много, но они существуют.
Lively Wallpaper — сравнительно простая, полностью бесплатная программа с открытым исходным кодом и на русском языке, позволяющая поставить живые обои на рабочий стол Windows 11/10, возможно, одна из лучших среди бесплатных для этих целей, о ней и пойдет речь далее в обзоре. Также ниже вы найдете видео с демонстрацией работы программы.
Загрузка Lively Wallpaper
Скачать бесплатную программу Lively Wallpaper можно либо в официальном магазине Microsoft Store, либо с сайта разработчика, последняя версия доступна здесь (начиная с версии программы 1.0 требуется Windows 10 версии 1903 или новее или Windows 11): https://www.rocksdanister.com/lively/

Установка живых обоев не должна вызвать каких-либо проблем — дополнительное ПО не устанавливается, какие-либо нюансы отсутствуют.
После первого запуска программы запустится мастер настройки, в котором в текущей версии доступна лишь две опции: запускать ли Lively Wallpaper вместе с Windows (добавлять ли программу в автозагрузку) и выбор темы панели задач (например, можно сделать прозрачную панель задач), последнюю опцию в дальнейшем можно поменять в параметрах программы в разделе «Система».
Доступные живые обои, настройка, возможности программы
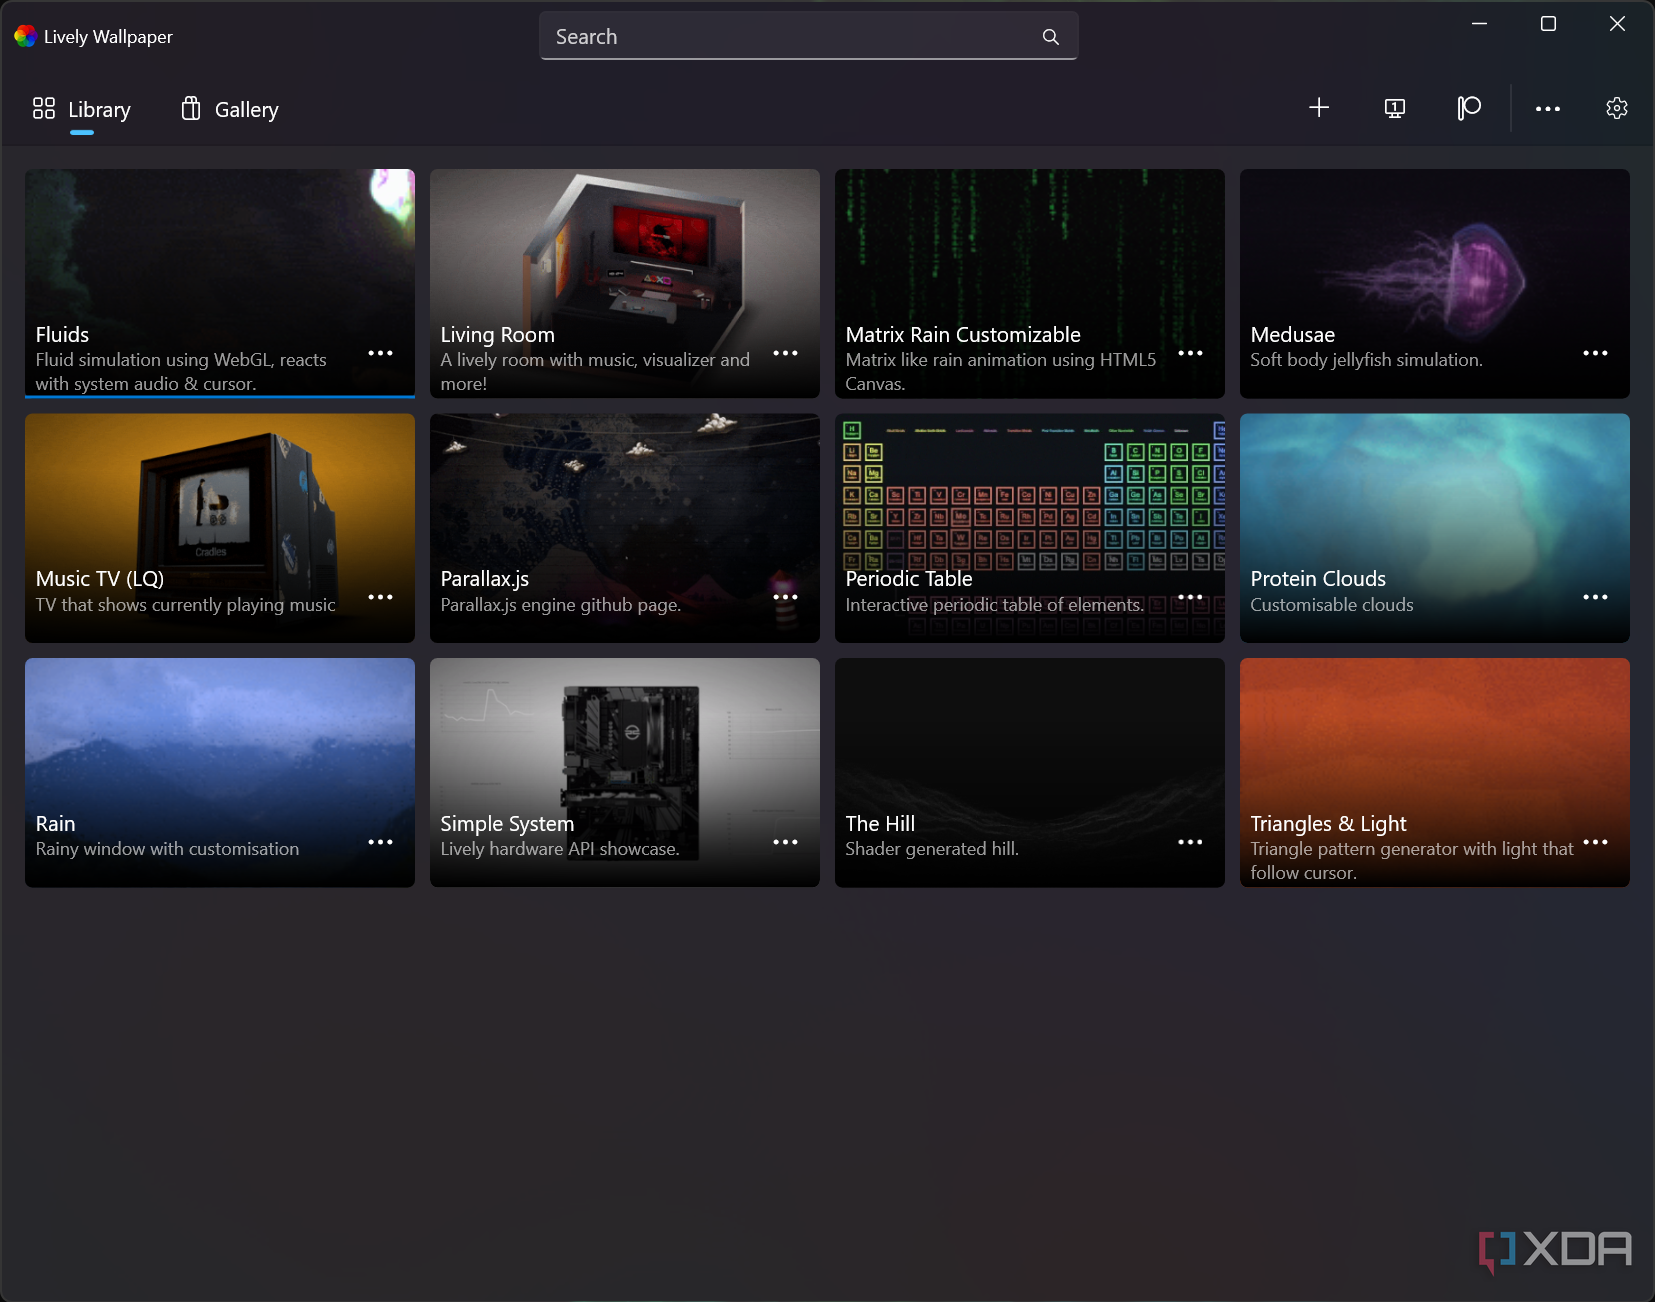
После этого откроется главное окно программы с набором уже готовых живых обоев для Windows 11 и 10.
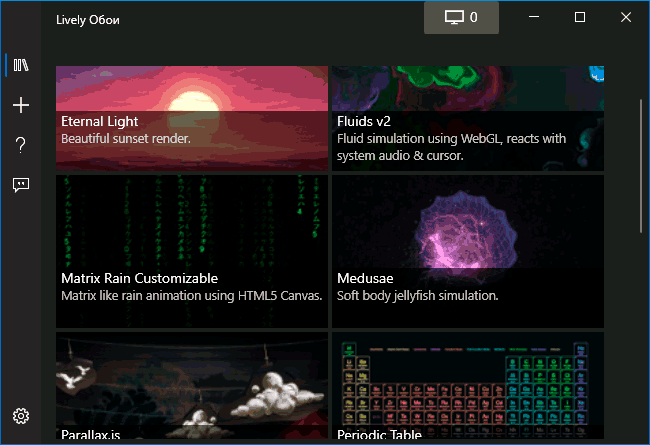
Среди них представлены:
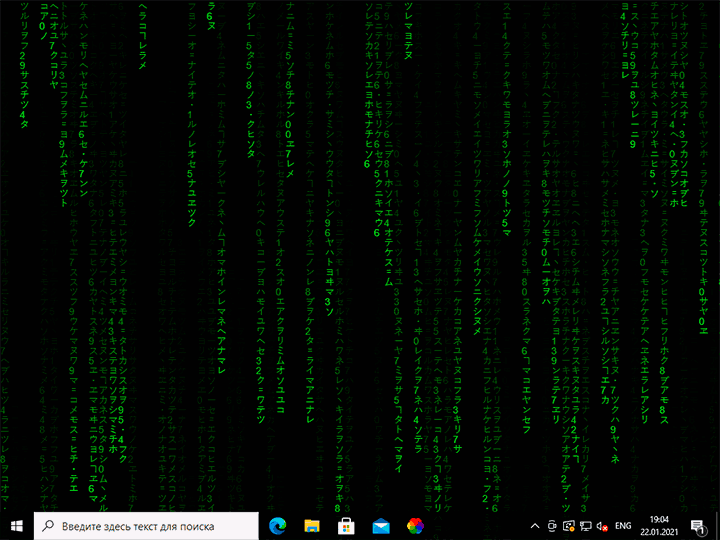
- Экран из «Матрицы»
- Периодическая система элементов Менделеева
- Различные графические эффекты
- Обои с эффектом параллакса при перемещении указателя мыши
- Рассветы-закаты, морская поверхность на закате.
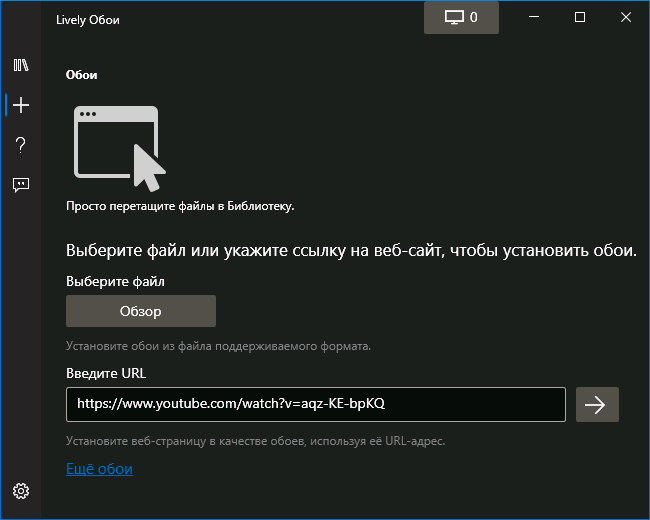
Но возможности установки живых обоев не ограничиваются предустановленным набором, вы можете добавлять свои обои:
- Нажмите по кнопке «Плюс» в панели слева.
- Укажите файл с видео либо анимированным Gif, ссылку на YouTube, страницу HTML5 с нужным графическим эффектом, ZIP-архив с живыми обоями для Lively Wallpaper, шейдер с shadertoy.com

- После выбора нужных живых обоев (могут применяться не сразу, а через какой-то промежуток времени), некоторые из них можно настроить, для этого нажмите по кнопке настройки (кнопка с изображением экрана и цифрой) в заголовке программы.
- Настройки могут быть разными для разных обоев: например, для видео можно включить или отключить звук, где-то доступно изменение цветов и других параметров, как правило, разобраться не сложно. При наличии нескольких мониторов можно выбрать, для каких экранов будут применяться выбранные обои.

- В последней версии программы появилась опция «записи обоев». Суть работы: нажимаем правой кнопкой мыши по обоям в списке, анимация которых зависит от действий пользователя (например, Fluids), выбираем пункт «Предпросмотр обоев». Нажимаем по кнопке записи в строке заголовка и записываем видео, в котором будет сохранено ваше взаимодействие с живыми обоями. Затем это видео можно будет установить в виде записанных обоев.
- Рекомендую зайти в настройки программы (кнопка с изображением шестеренки слева внизу) и изучить доступные опции. Например, на вкладке «Производительность» вы найдете параметры для поведения программы в различных ситуациях: например, отключение живых обоев при работе ноутбука от батареи, работы полноэкранных приложений, таких как игры, при использовании удаленного рабочего стола, и другие опции, которые могут оказаться полезными для вашего сценария использования.

- Вкладка обои тоже может быть полезна, в случае если идеальной работы живых обоев со стандартными настройками добиться не удаётся. Здесь вы можете включить или отключить аппаратное ускорение для обоев, выбрать плеер для живых обоев из видео и анимированных GIF, задать разрешение для потокового видео из Интернета, изменить движок веб-браузера, используемого для отрисовки HTML5 обоев.


Ещё одна интересная возможность живых обоев Lively Wallpaper для пользователей, умеющих разобраться в коде или хотя бы подменить ресурсы — экспорт имеющихся обоев: для этого нажимаем правой кнопкой мыши по живым обоям в каталоге, выбираем пункт «Экспорт Lively.zip» и сохраняем файл в удобное расположение.

Затем останется открыть архив и редактировать в меру своих умений: например, сравнительно легко почти для любого пользователя будет заменить ресурсы (изображения в папке assets) в parallax.js обоях, а после редактирования рекомендую изменить описание в файле package.json (чтобы обои не дублировались в Lively Wallpaper). По завершении — упаковываем измененные файлы в ZIP-архив, и импортируем в программу, используя шаги 1-2 из инструкции выше.
Lively Wallpaper работает на удивление гладко (во всяком случае, в моем тесте), быстро (используется аппаратное ускорение), а при запуске любого полноэкранного приложения (например, игры), живые обои Lively полностью останавливаются, чтобы не использовать ресурсы компьютера.
Quick Links
-
Download Lively Wallpaper From the Microsoft Store
-
Select a Live Wallpaper From Lively Wallpaper’s Library
-
Set a Custom Video, YouTube Video, or GIF as a Wallpaper
-
Set an Animated Wallpaper on Multiple Monitors
Summary
- Lively Wallpaper is a third-party app that allows you to set live wallpapers on Windows 11, it’s free and can be downloaded from the Microsoft Store.
- Lively Wallpaper comes with a library of live wallpapers to choose from, and you can also set custom videos, YouTube videos, or GIFs as wallpapers. You can customize the placement and set wallpapers on multiple monitors.
- Wallpaper Engine is paid software that allows you to have animated desktops as well. It is available on Steam.
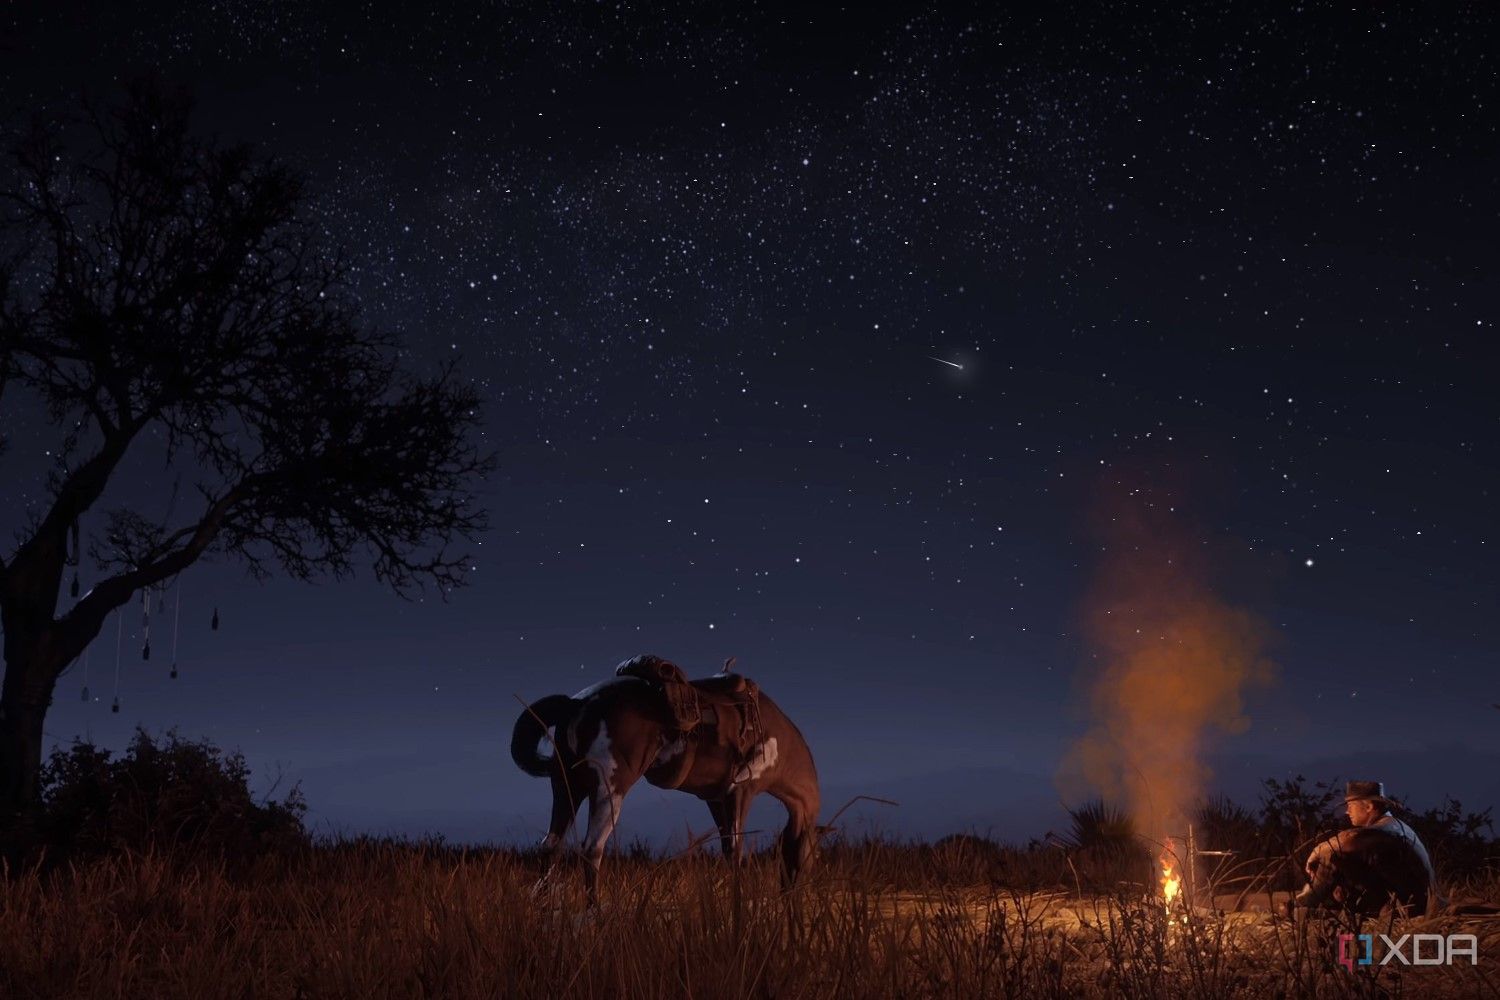
Tired of your still desktop background? You can liven things up by setting a live wallpaper or animated desktop background. Unfortunately, there’s no native way to do this in Windows 11, but there’s a handy third-party app you can use.
Download Lively Wallpaper From the Microsoft Store
You can set a live desktop background in Windows 11, but to do so, you’ll need to use a third-party application.
There are many apps out there that claim to live up to the task at hand, but beware of downloading third-party apps unless you know and trust the developers. Many of these apps may contain viruses that infect your computer.
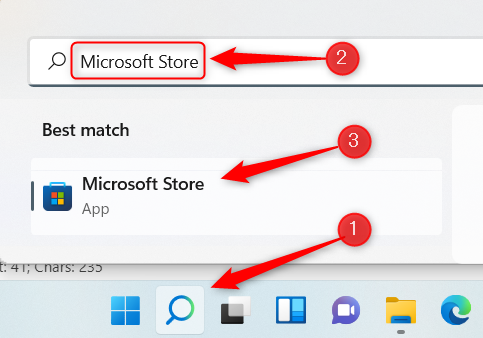
Our recommended app is Lively Wallpaper, a free and open-source app. You can download Lively Wallpaper from the Microsoft Store. To get this app, click the Windows Search icon in the taskbar, type «Microsoft Store» in the Search box, and then select Microsoft Store from the search results.
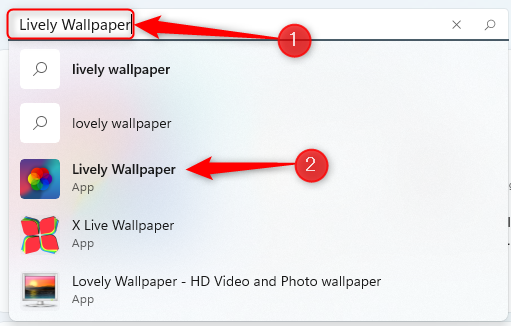
In Microsoft Store, type «Lively Wallpaper» in the Search bar and then choose the Lively Wallpaper app from the search results.
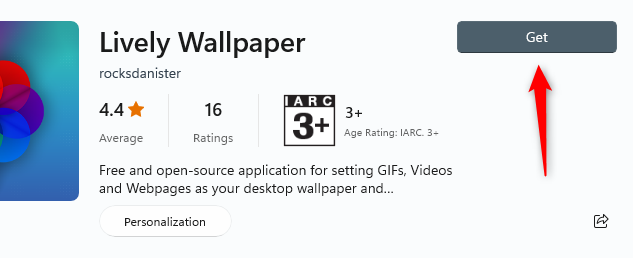
Next, you’ll see some information about the application. Click «Get» to the right of this info.
Once selected, Lively Wallpaper will begin downloading. After it’s installed, you can search for it using Windows Search.
Click Lively Wallpaper from the search results to launch the app.
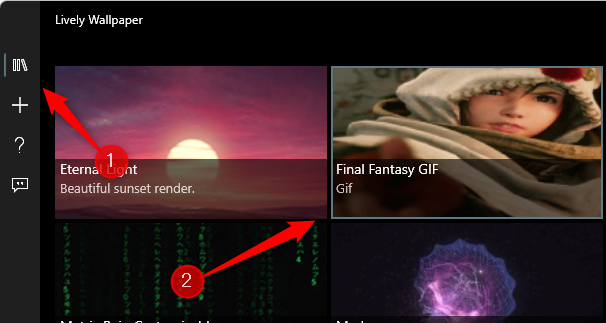
Select a Live Wallpaper From Lively Wallpaper’s Library
Lively Wallpaper comes equipped with several live wallpapers for you to choose from. To use one, simply open the app and then select the one you want from the library. In this example, we’ll choose Parallax.js.
That’s all there is to it. The live wallpaper is now set.
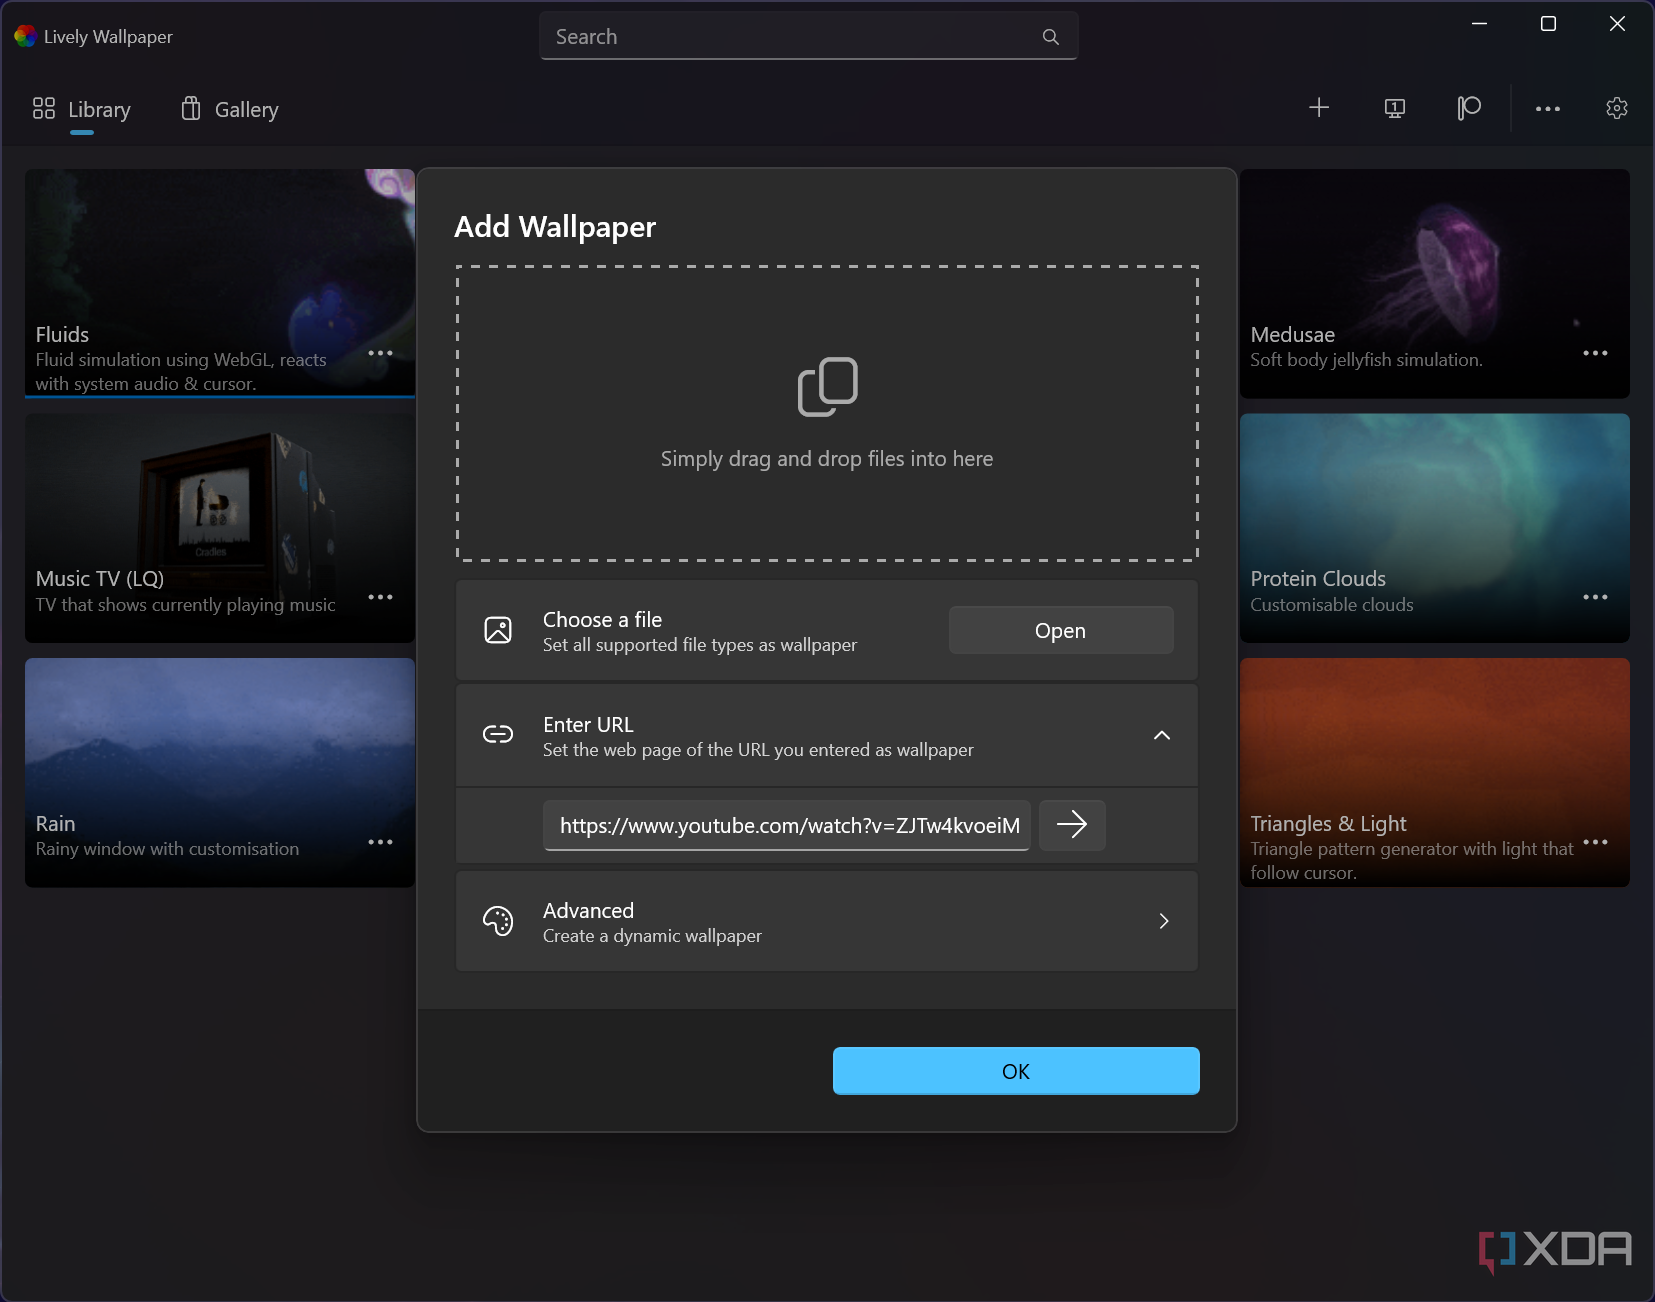
Set a Custom Video, YouTube Video, or GIF as a Wallpaper
If you don’t find a wallpaper you like from Lively Wallpaper’s library, you can set your own using a video or GIF on your PC, or even using a YouTube video.
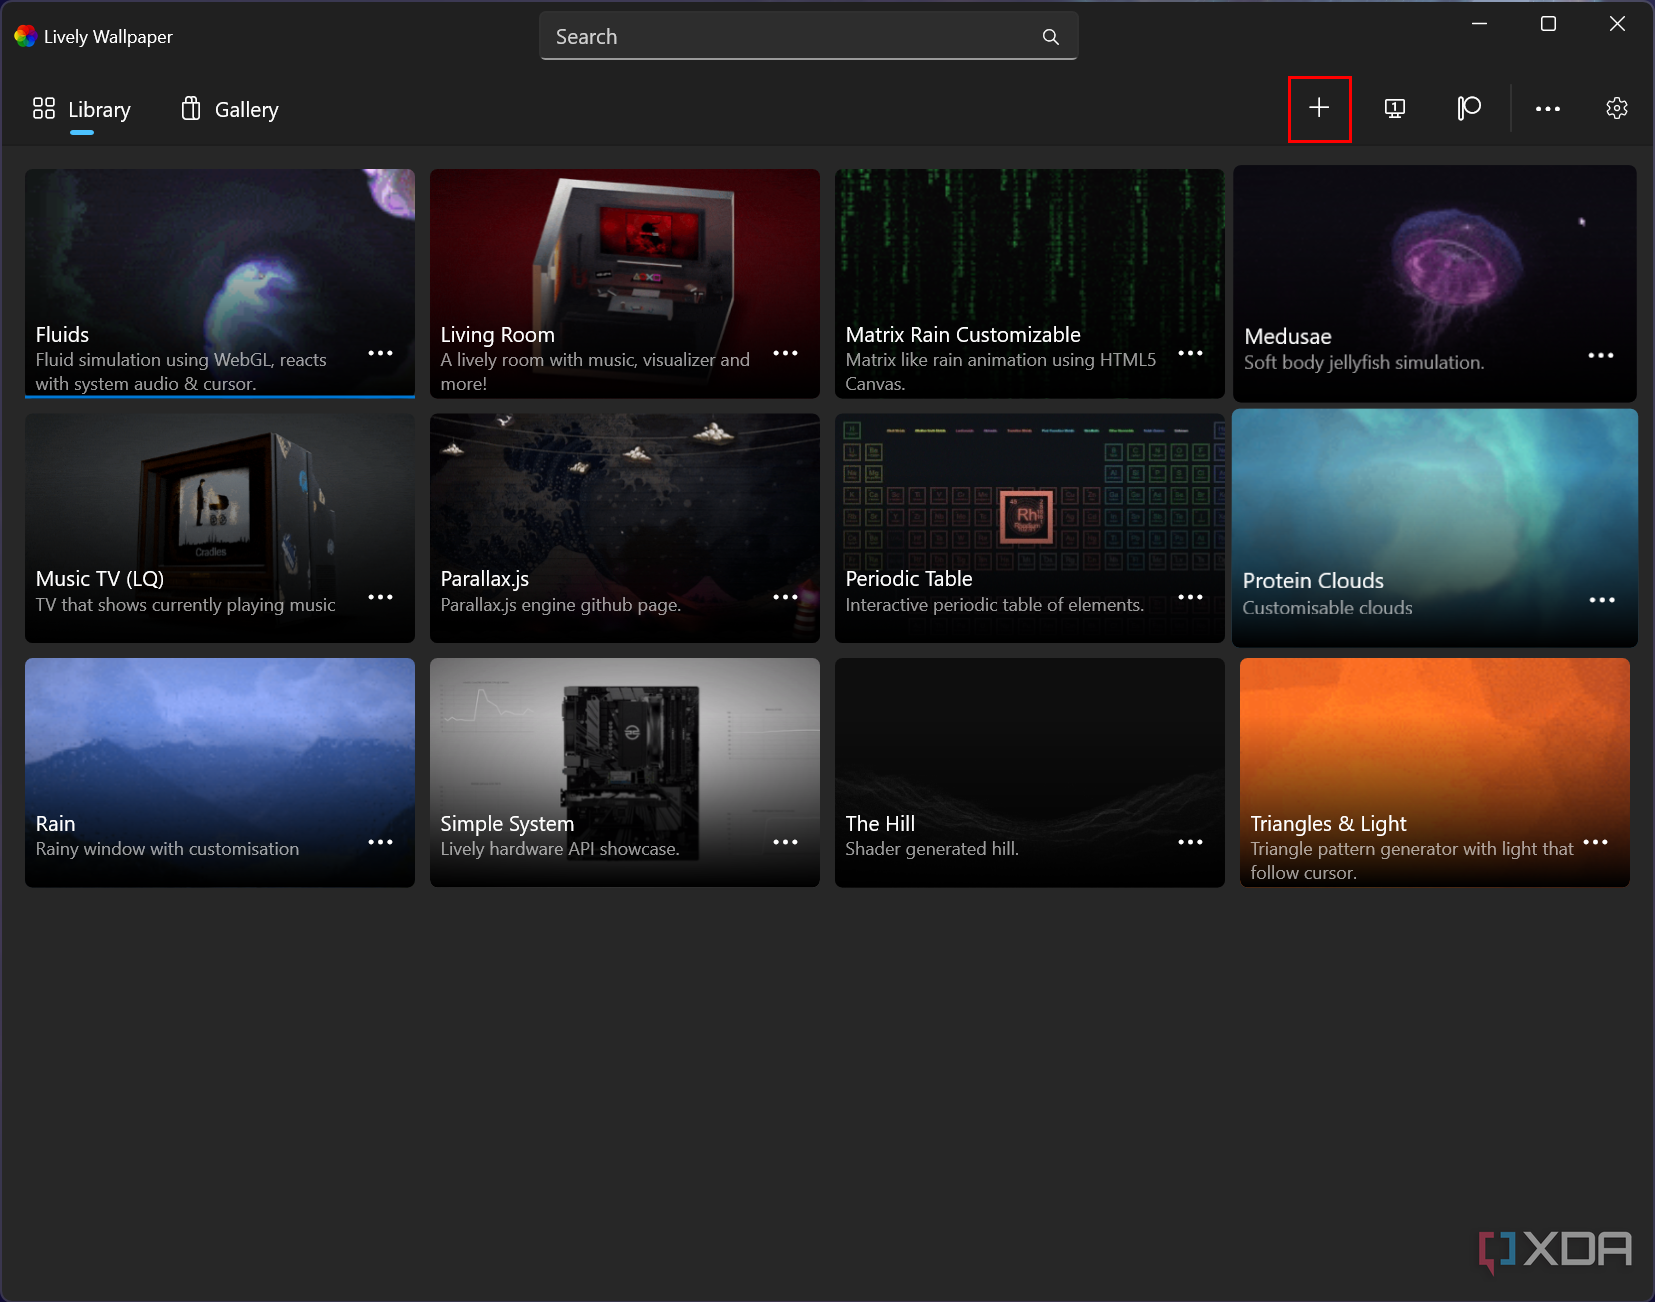
To get started, open the app and then click the Plus (+) icon in the left-hand pane.
On the next screen, if you want to choose a video or GIF from your PC, click «Browse» under Select File.
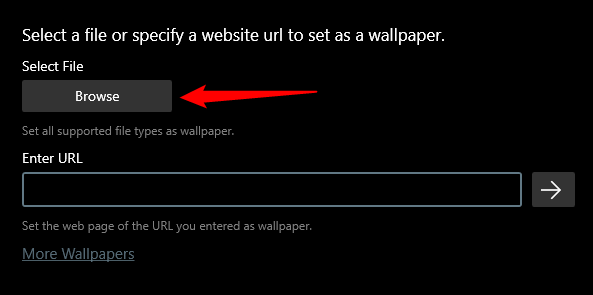
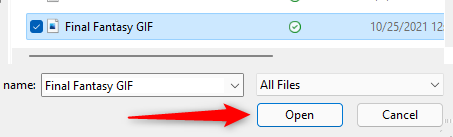
File Explorer will open. Locate the video or GIF you want to use, select it, and then click «Open.»
Or, if you want to use a YouTube video, enter the URL of the YouTube video in the «Enter URL» text box and then click the right arrow button.
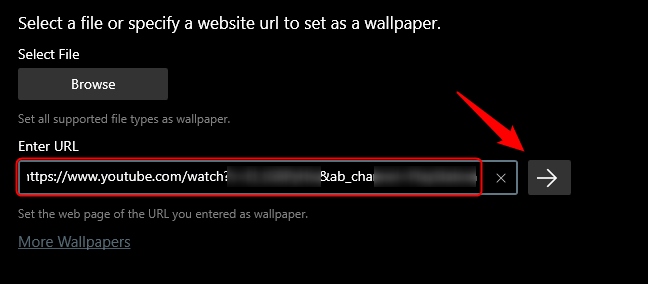
Whether you chose a local video or GIF, or a YouTube video, it will appear in the app’s library. Click the Library button (three books) in the left-hand pane, and then choose the newly uploaded video or GIF.
Once selected, it will appear as your desktop background.
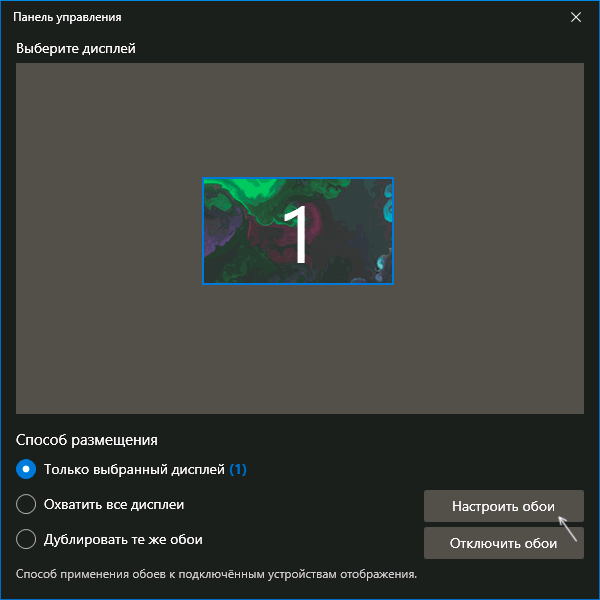
Set an Animated Wallpaper on Multiple Monitors
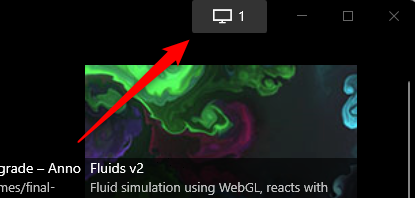
If you’re using multiple monitors, you may notice that the wallpaper you selected is only applied to one screen. To set the live wallpaper on other monitors, open the app and click the Control Panel (monitor) icon in the top-right corner of the window.
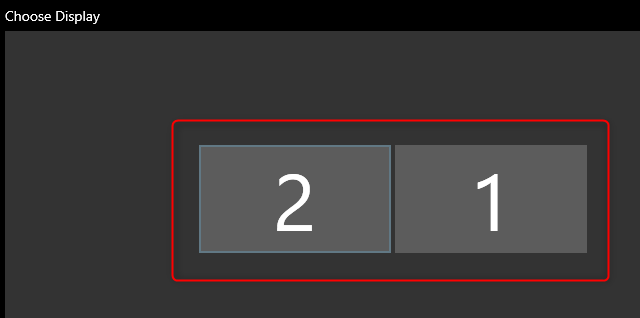
The app’s Control Panel will appear. The default placement method is «Selected Screen Only,» which means that the wallpaper you select will only be displayed on the selected screen. To set a wallpaper on the other screen, select it in the Choose Display group.
Once selected, go back to the app’s library and choose the wallpaper you want to place on the other screen.
You can also change the placement method of the selected wallpaper. That is, you can choose to make the selected wallpaper stretch across all screens or duplicate the same wallpaper on each screen. Just click the bubble next to the option you want to use.
Close Lively Wallpaper
If you decide you want to stop using the live wallpaper you set using Lively Wallpaper, open the app and then click the Control Panel (monitor) icon in the top-right corner of the window.
In the app’s Control Panel, click «Close Wallpapers» in the bottom-right corner of the window.
The wallpaper will be removed.
There are also other options if you’re willing to spend a few dollars — Wallpaper Engine is available on Steam and extremely popular.
Not interested in using a third-party app? While there’s no native way to use live wallpapers with Windows 11, Microsoft did a great job providing a ton of beautiful wallpapers for its OS — and changing the desktop background is easy.
Sign in to your XDA account

Quick Links
-
How to use live wallpapers on Windows 11 with Lively Wallpaper
-
Tips and tricks for using Lively Wallpaper
-
How to use live wallpapers on Windows 11 with Wallpaper Engine
-
Tips and tricks for using Wallpaper Engine
Windows 11 offers more customization than any other version of Windows, but it’s still not enough for those who love to customize their digital workspace. Thankfully, there are a ton of unofficial tweak tools you can employ to make your version of Windows feel more like home, from reskinning the whole UI to replacing the Start menu with other options. But if you don’t want to go to those lengths for a little more flair, how about adding an app to make your desktop wallpaper animated, so you’re not stuck staring at static screens all day long? We’ve tested out the two most popular options, one paid and one free, to give you a good overview of which one is best for your desktop.
How to use live wallpapers on Windows 11 with Lively Wallpaper
Let’s dive into the free option and see how it fares
Lively Wallpaper is easily one of the coolest apps for using unique animated wallpapers for your PC. It’s free and open-source, with listings on the Microsoft Store and on GitHub for anybody who wants to contribute. The app provides a few wallpapers out of the box and allows you to customize them in different ways.
Here’s how you can get started with this free tool:
- Download and install Lively Wallpaper from the Microsoft Store.
-
Open Lively Wallpaper, and you’ll be greeted with the home screen featuring a few (12, at writing time) wallpapers to choose from.

- Click any of the options to immediately set it as your desktop background.
-
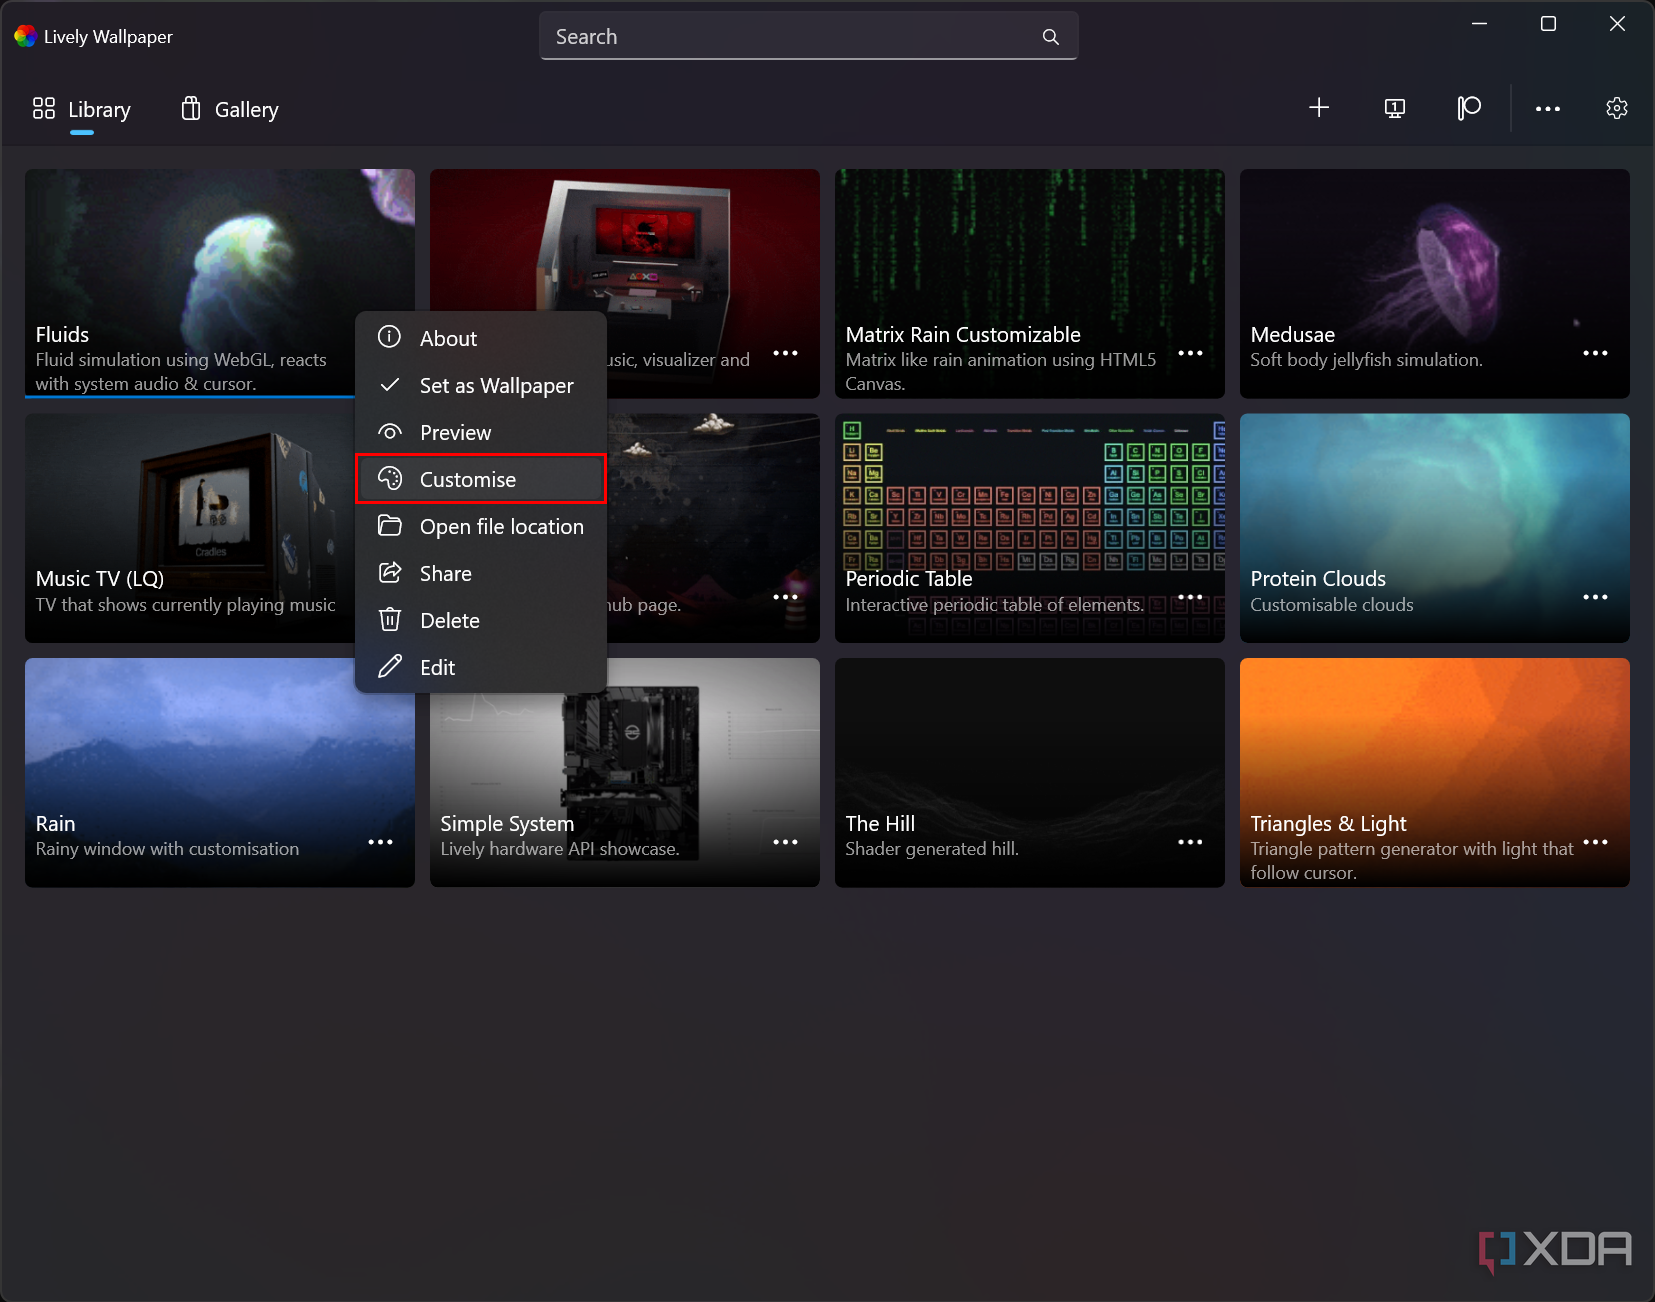
To customize the look of your wallpaper, click the ellipsis button next to its name, then choose Customise wallpaper.
- Since the available wallpapers are pretty different, the options you get also vary. These can include colors, the size of certain elements, and more. You can see changes in real time as you make them (assuming the wallpaper is currently active).
- Click OK to save your changes.
Once you’ve saved your settings, you can close the app using the X button in the top right corner, which will minimize to the system tray. Closing it completely will make your wallpaper disappear. The app is also set to start with the system, so your animated background is always visible, though you can change this in the app’s settings.
The app also has a Gallery tab in the main view, which will presumably house user-created wallpapers in the future. For now, you’re stuck with a few curated ones, but they’re all great.
How to choose your own wallpaper
While you don’t have an endless supply of wallpapers to choose from, Lively Wallpaper does let you upload your own. All kinds of wallpapers are supported, including video (online or local), GIFs, and even interactive web-based wallpapers. While we won’t dive into how you can create these wallpapers, the developer offers documentation on what’s supported. If you already have a wallpaper, here’s how to set it up.
- Open the Lively Wallpaper app.
-
Click the + (plus) icon in the menu bar at the top.
-
Choose a file or source to use as a wallpaper
- To use a local file, drag and drop the file into the area indicated on the screen or click Open to browse for a file. Most video file types are supported.
- Use the Enter URL option to use an online video or a webpage. The app uses a custom handler for things like YouTube videos, so you can have a video playing in the background as long as it’s not restricted from being embedded.
- The Advanced option lets you create dynamic wallpaper based on a 2D image. It uses AI to determine depth and generate a parallax effect when you move your mouse, though it can be imperfect at times.
-
You can still customize some of these wallpapers just as you can with the default ones. Local video offers settings like contrast, brightness, and playback speed, while AI-generated dynamic wallpapers let you adjust how much an image should shift with the parallax effect.

- When you’re done, close the app, and the video or animated wallpaper will remain visible. If the video has audio, it will usually be muted whenever you have another app in focus.
How to apply wallpapers to multiple monitors
If you only have one monitor for your PC, things are probably pretty straightforward so far, but if you want to use these animated wallpapers on multiple screens, you may want to mess around with extra options to make it work on all your displays.
You can do this by clicking the monitor icon on the menu bar, labeled with X Active Wallpapers (X being the number of monitors with an active wallpaper from the app). From here, you can choose one of three options:
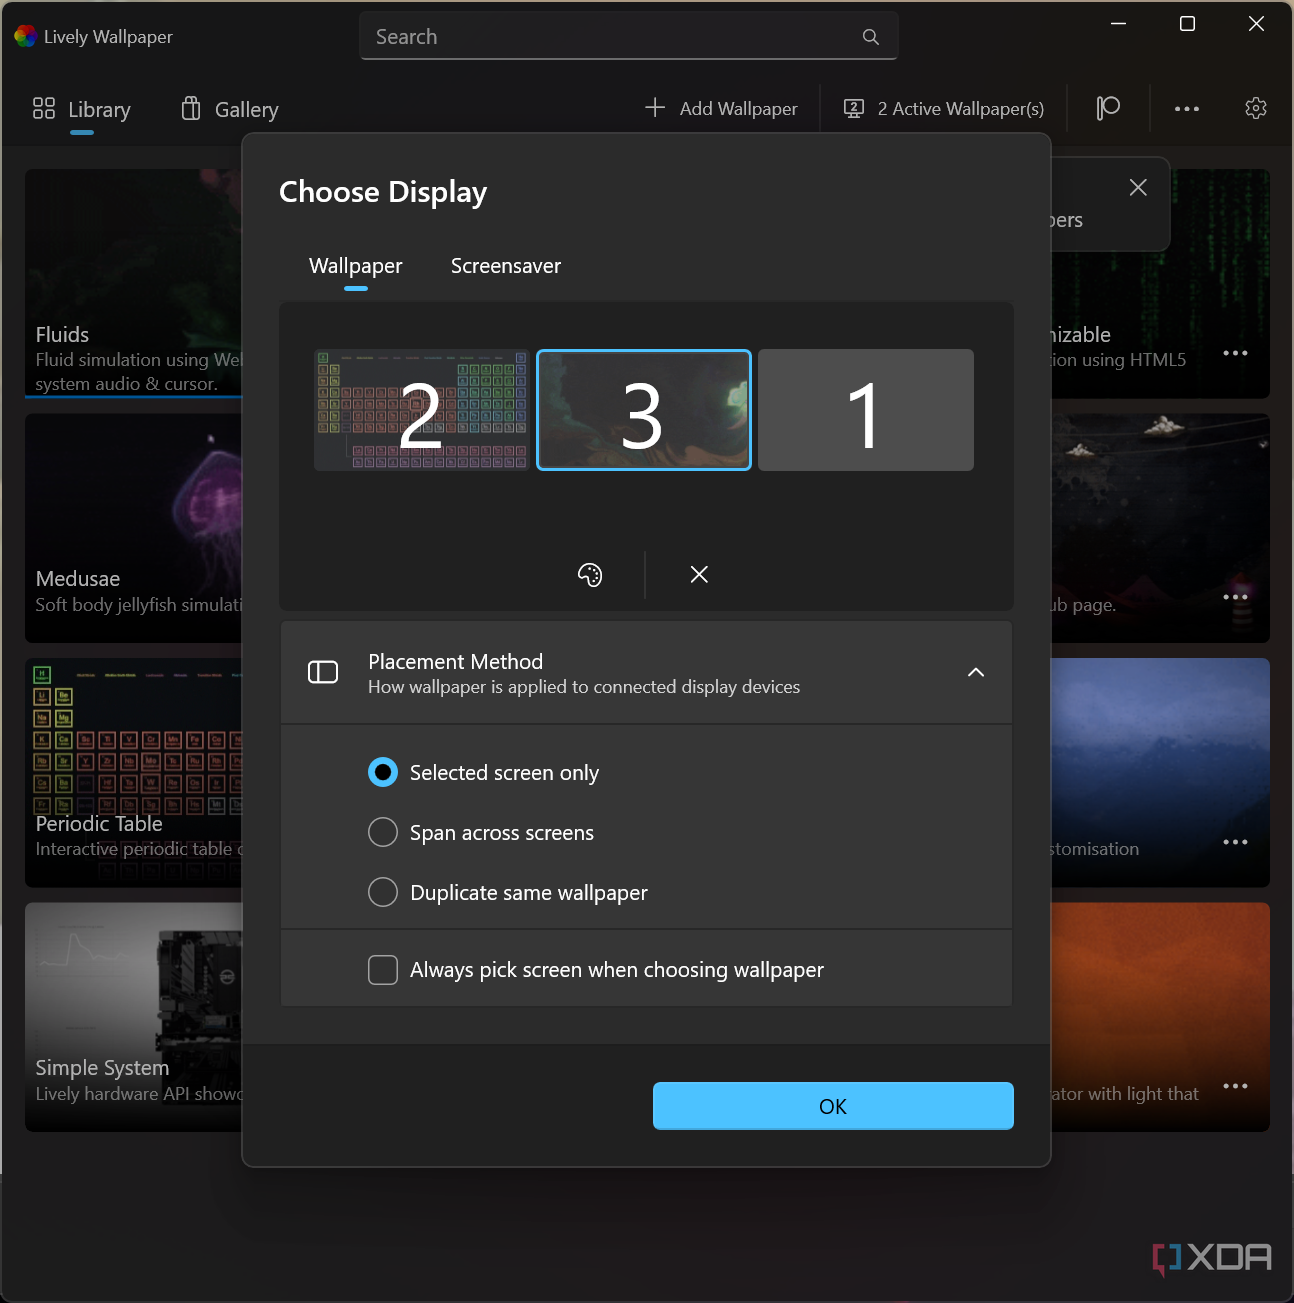
- Selected screen only (default): Applies the wallpaper only to the selected screen.
- Span across screens: Extend the wallpaper across your monitors.
- Duplicate same wallpaper: Repeat the same wallpaper on each monitor.
Some wallpapers may work well when spanned, while others will look better if you choose the duplicate option. You can play around with this depending on the wallpaper you have. If you’d like the option to always choose a monitor before applying a wallpaper, check the box that reads Always pick screen when choosing wallpaper. Click OK when you’re done with your changes here.
Tips and tricks for using Lively Wallpaper
Lively Wallpaper doesn’t impact performance too much, but you can take some measures to save power, especially if you have a laptop. By default, Lively Wallpaper will pause the wallpaper animations whenever a fullscreen app is open, but you can further customize these options by going into the app’s settings and checking the Performance tab. The options here include:

- Applications fullscreen: Decide what happens with animated wallpapers when an app is opened in fullscreen (default: Pause).
- Applications focused: Decide what happens when another app is in focus (default: Nothing).
- When on battery power: Decide what happens when a laptop isn’t connected to a charger (default: Nothing).
- When on battery Saver: Decide what happens when Battery Saver is enabled in the Windows settings (default: Nothing).
- When on Remote Desktop: Decide what happens when the computer is being accessed via a Remote Desktop session (default: Pause).
- Display pause rule: Decide whether pause rules should apply to all screens or on a per-screen basis (default: Per screen).
- Pause algorithm: Choose how the app should determine if another app is active. The default is Foreground process, and we recommend leaving this untouched. There’s also a Direct3D option that only pauses the wallpaper when a Direct3D app is running in exclusive fullscreen mode and disables all other performance settings.
You can use all these settings to adjust how Lively Wallpaper should behave to reduce resource usage and save power. Setting more options to Pause will save you more power, but it can reduce how lively these wallpapers feel in certain circumstances.
How to use live wallpapers on Windows 11 with Wallpaper Engine
The best option around with a relatively affordable cost
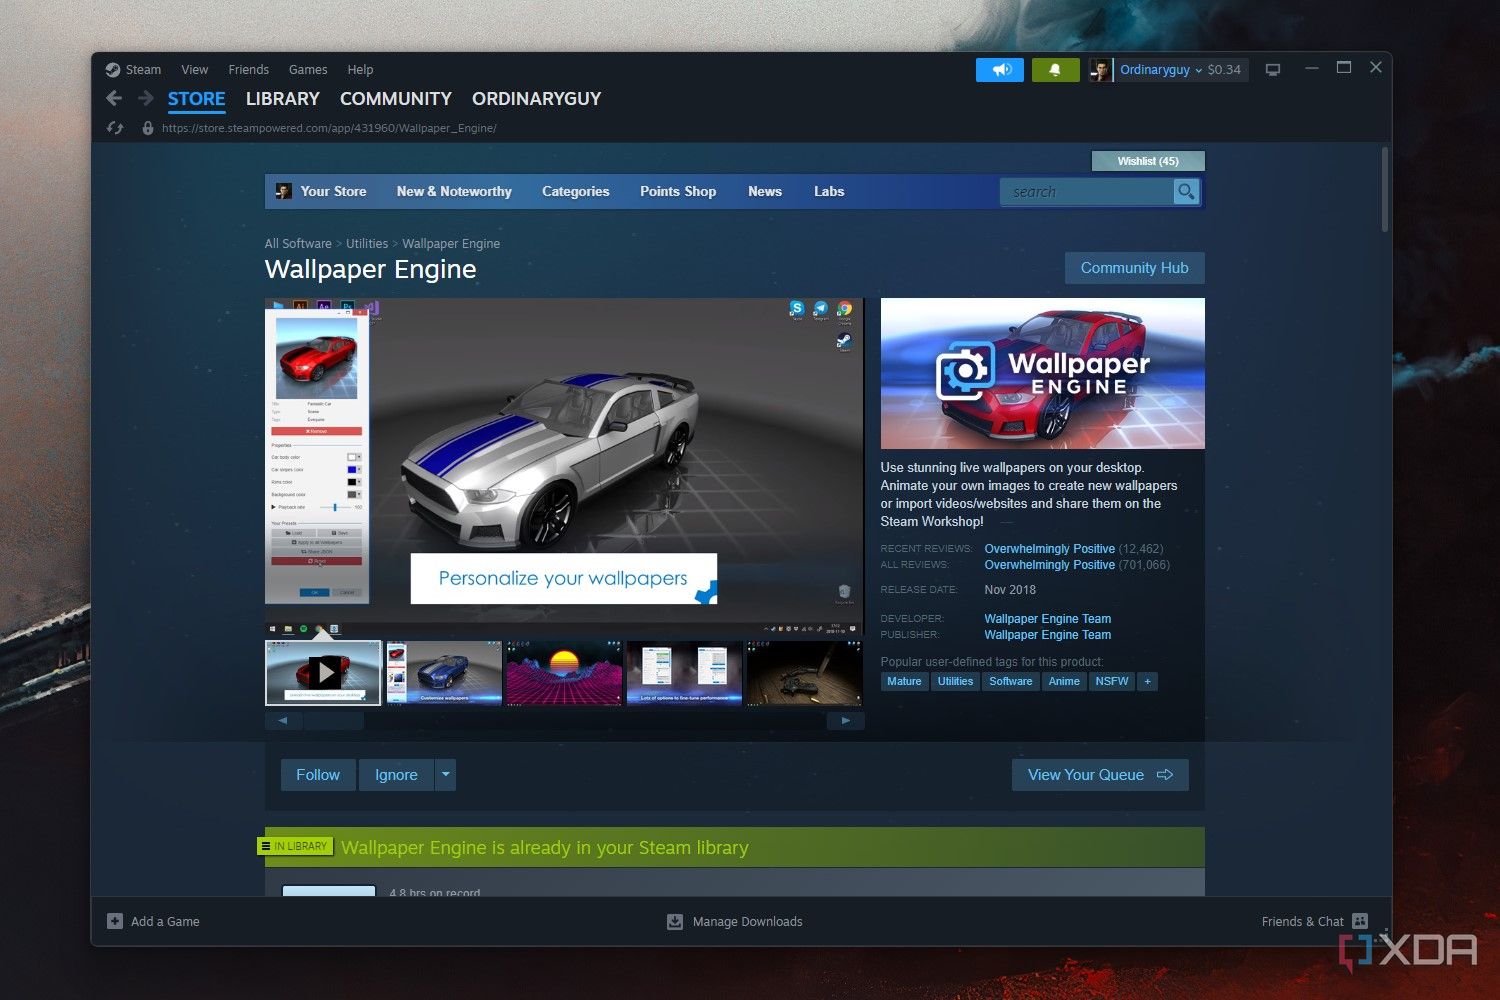
Lively Wallpaper works great as a free tool, but scouring through Google and YouTube looking for that perfect video to use as an animated wallpaper does take some time. You’re not even entirely sure how the end result will look until you apply the wallpaper. While the pre-installed wallpapers look great, some of you might want more options to pick from. Enter Wallpaper Engine.
Wallpaper Engine is a cheap wallpaper app on Steam (currently $4 and often on sale). It’s one of the most popular non-game apps on the platform, and the main reason behind its success is access to the Steam Workshop. Users can create their own live wallpapers based on games, anime, landscapes, digital art, and more. The app has a thriving community of wallpapers, and you can quickly find almost anything you can think of.
Related
20 best wallpapers on Wallpaper Engine worthy of your PC
Wallpaper Engine is home to the most stunning live wallpapers on Windows. Here are the ones worth your attention.
Setting up Wallpaper Engine
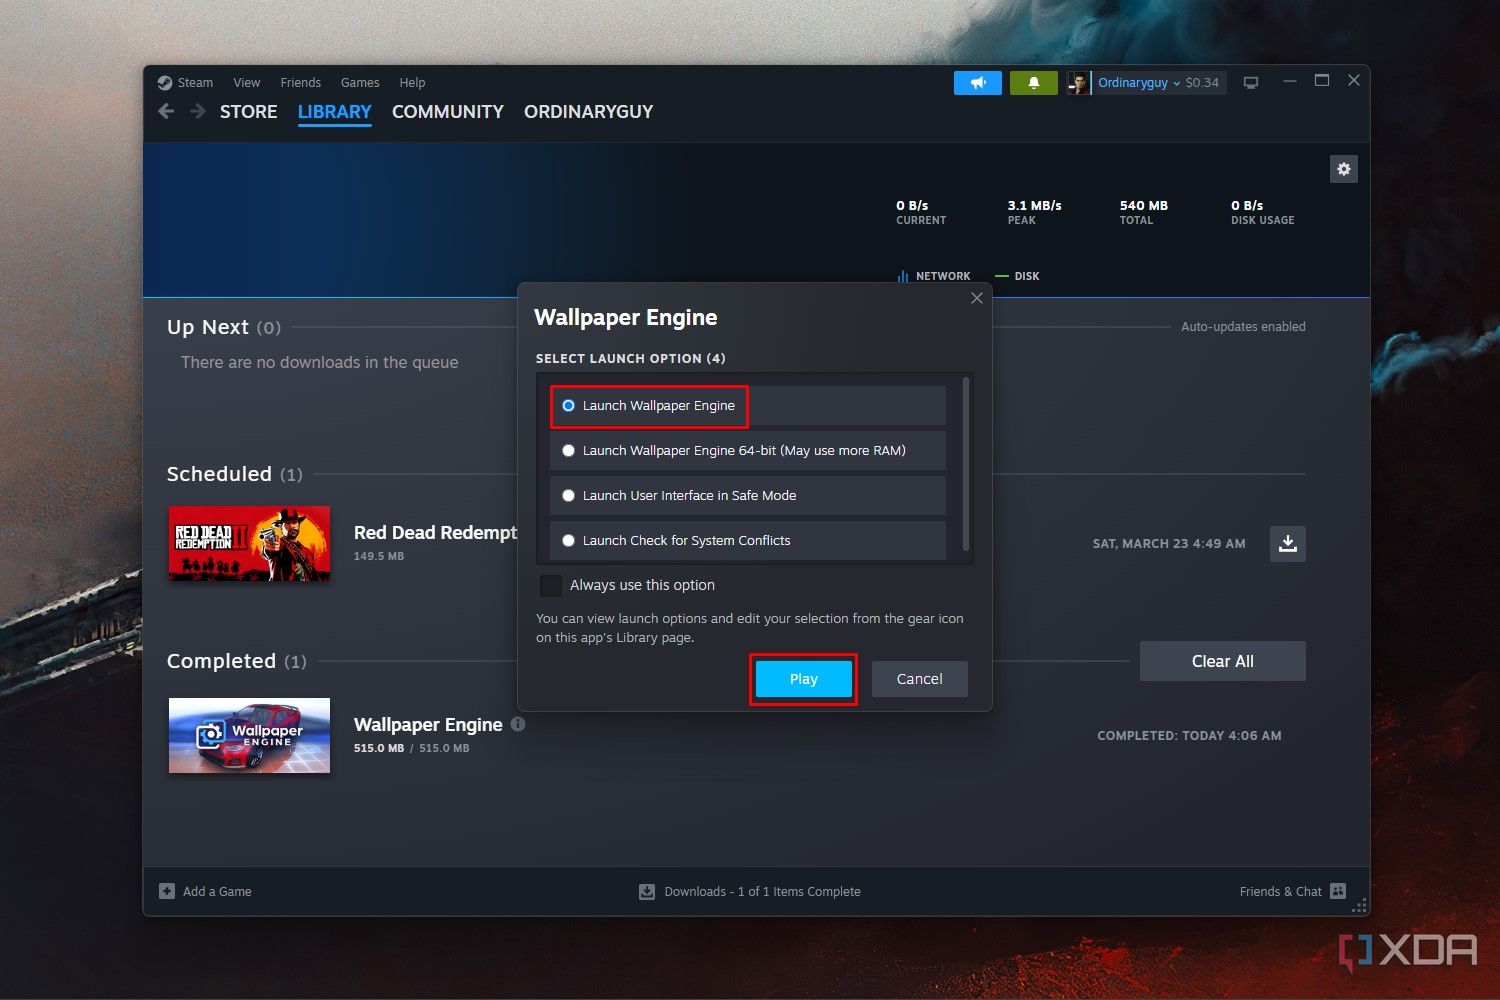
Wallpaper Engine is incredibly easy to set up, as it launches directly from Steam and tells you everything you need to know from the get-go. Still, here are the exact steps that you need to follow if you’re unsure of how to get started:
- Buy and install Wallpaper Engine from Steam.
-
Launch the app from your Steam library. Steam will ask you to select one of the launch options, but you can stick to the default and first options. To avoid the message in the future, tick the box for Always use this option.

-
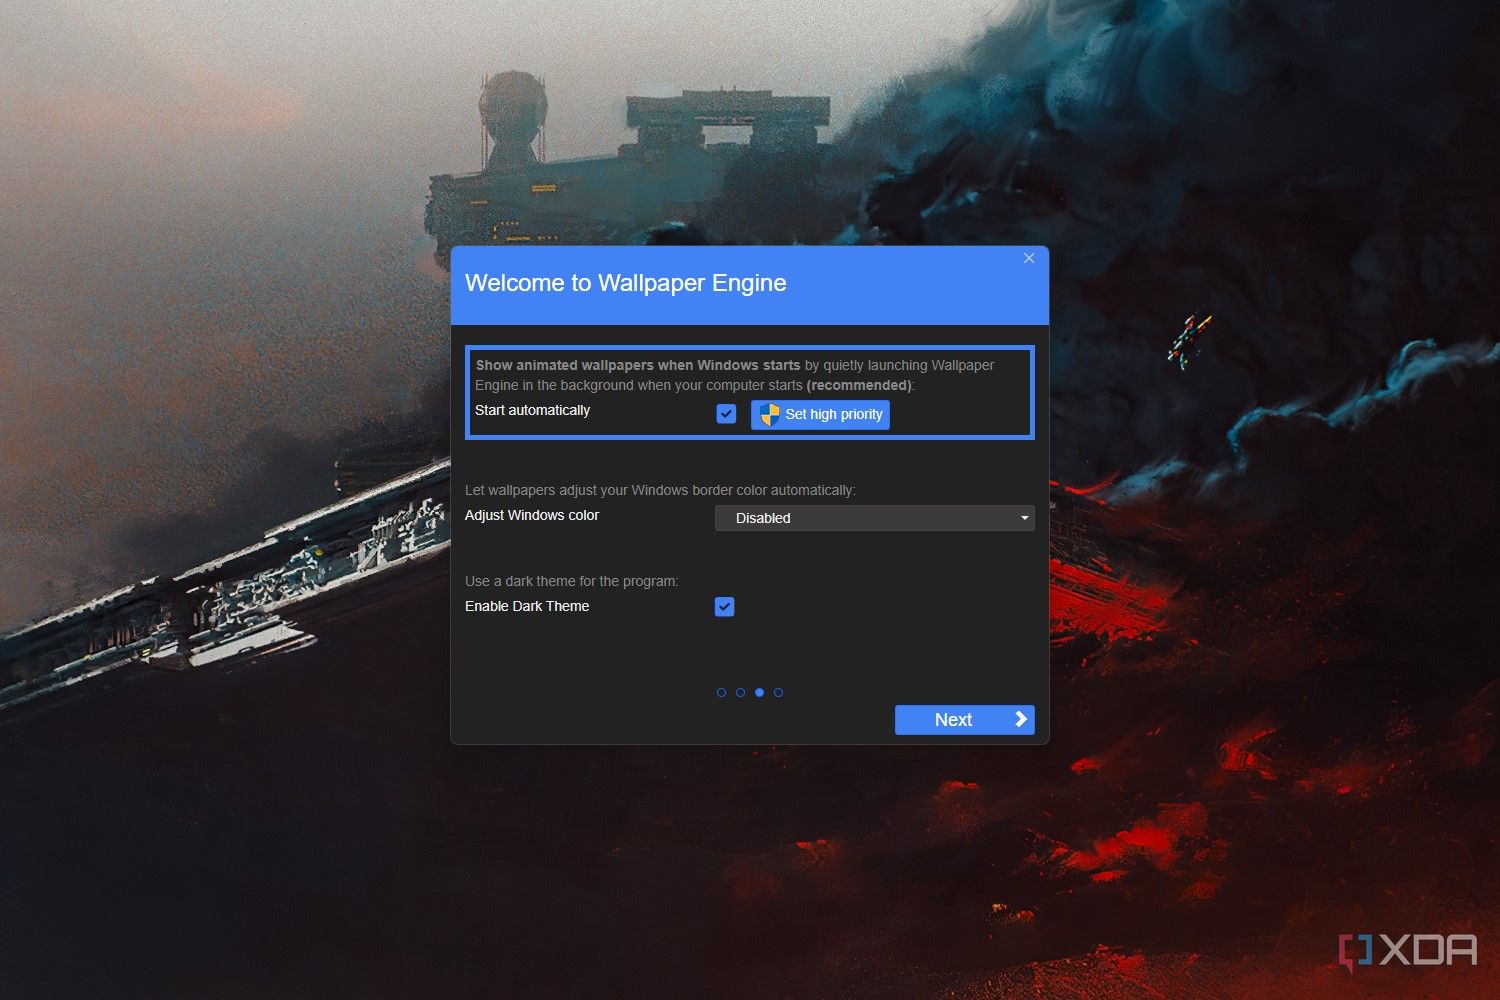
A setup wizard should pop up. Start by selecting your language and clicking Let’s go.
-
Next, select the quality present you want for your live wallpapers. Low will give you a 10fps animation, Medium will give you 15, High will give you 25, and Ultra will give you 30. Go with High for now and click Next. We can always change the quality later.
-
On the next screen, tick the box for Start automatically. From now on, Wallpaper Engine will launch whenever you boot up Windows. Click Next to continue.
- Finally, click All done on the last screen to complete the setup process.


If you follow the settings above, Wallpaper Engine will launch and work seamlessly every time you turn on your computer. If you’re having issues with performance, consider changing the quality preset. We’ll discuss how to do that in later sections.
Choosing and customizing a wallpaper in Wallpaper Engine
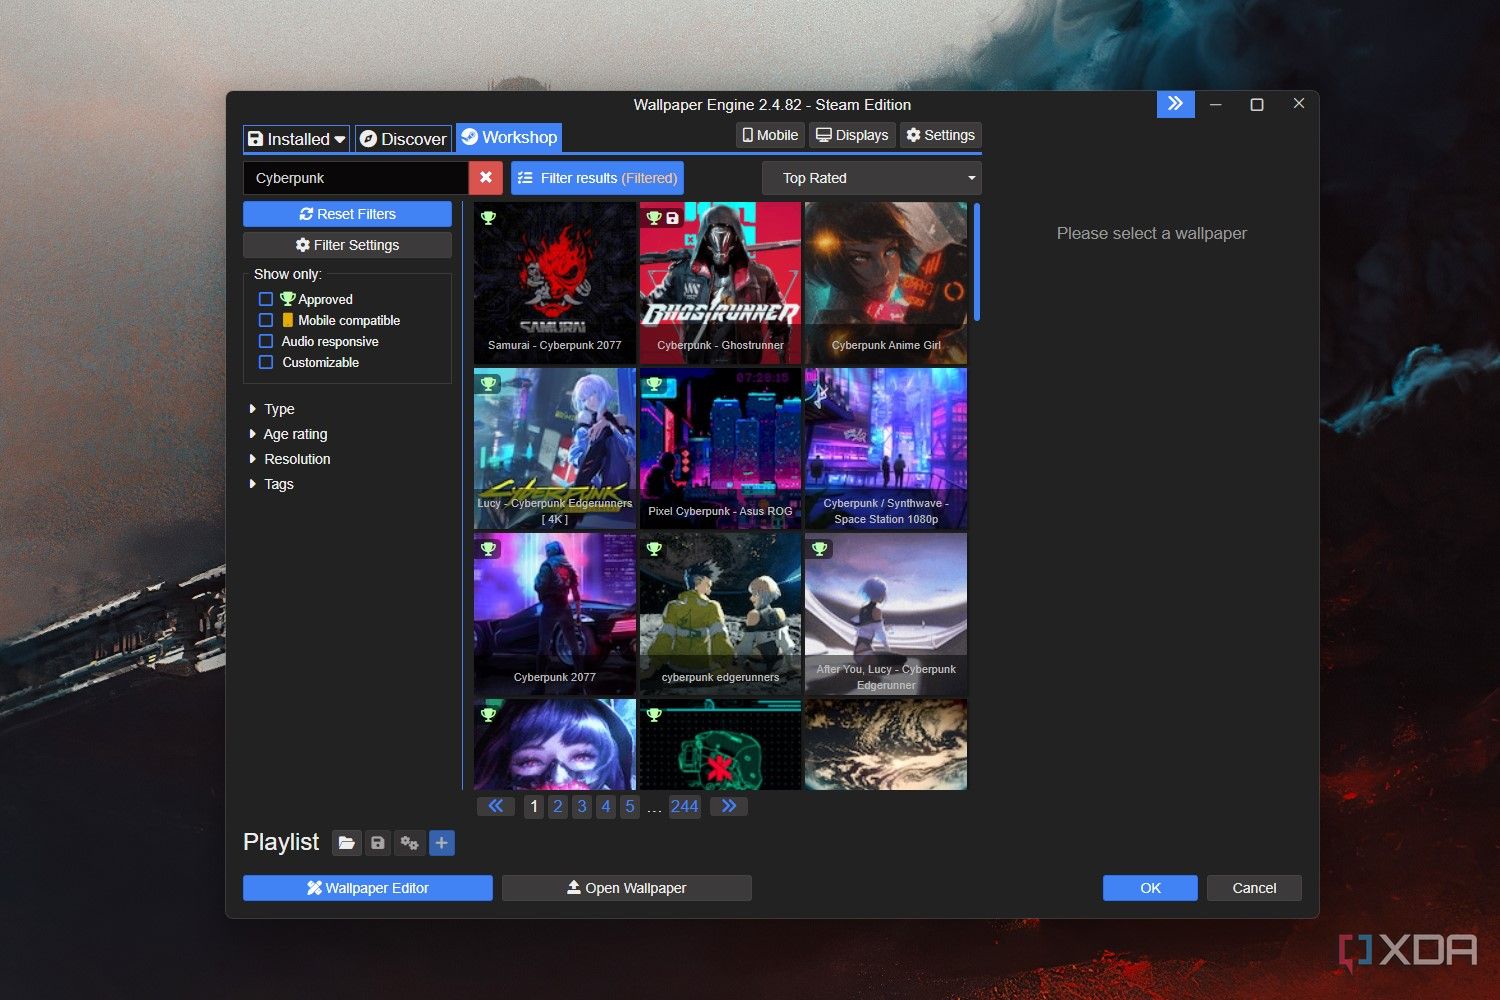
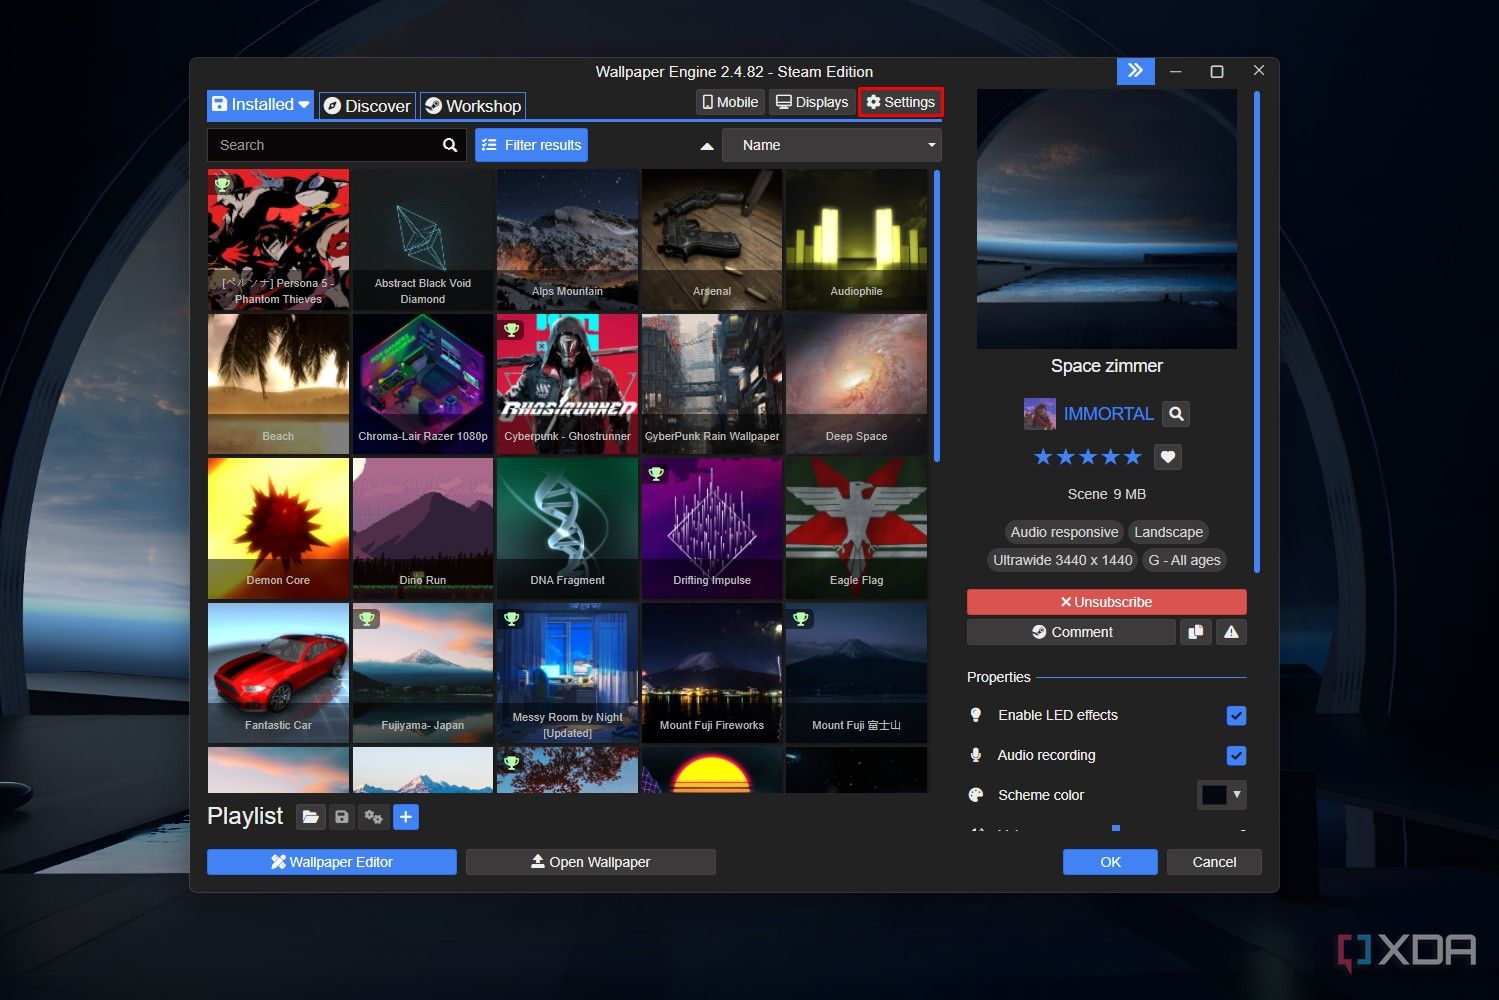
After downloading and installing the Wallpaper Engine app from Steam, you can start by browsing through the massive catalog. After opening the app, you’ll notice three sections in the upper-left corner: Installed, Discover, and Workshop.
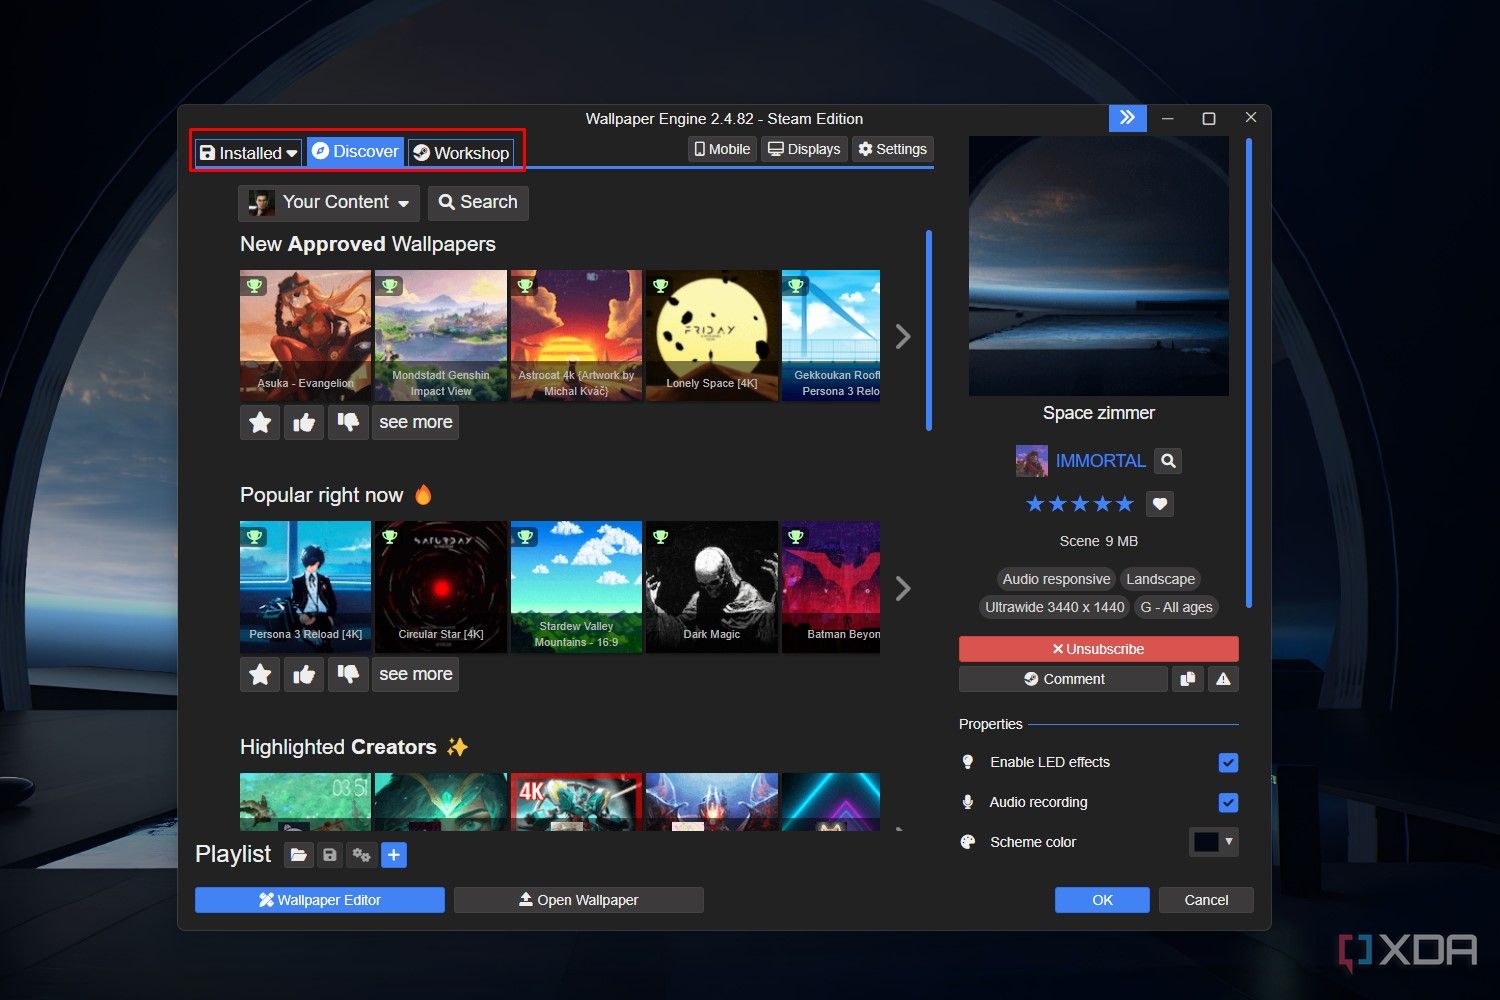
- The Installed section shows the wallpapers you have already saved, as well as pre-installed wallpapers that you can quickly apply.
- Next, the Discover section highlights some of the more popular collections and individual wallpapers.
- Finally, the Workshop section contains every user-created wallpaper uploaded to the app’s catalog. You can browse through this section or use the search bar to find something specific.
Here are the exact steps for finding and applying wallpaper from the Workshop sections:
-
Head over to the Workshop section and browse the different wallpapers. The search box allows you to find specific wallpapers.
-
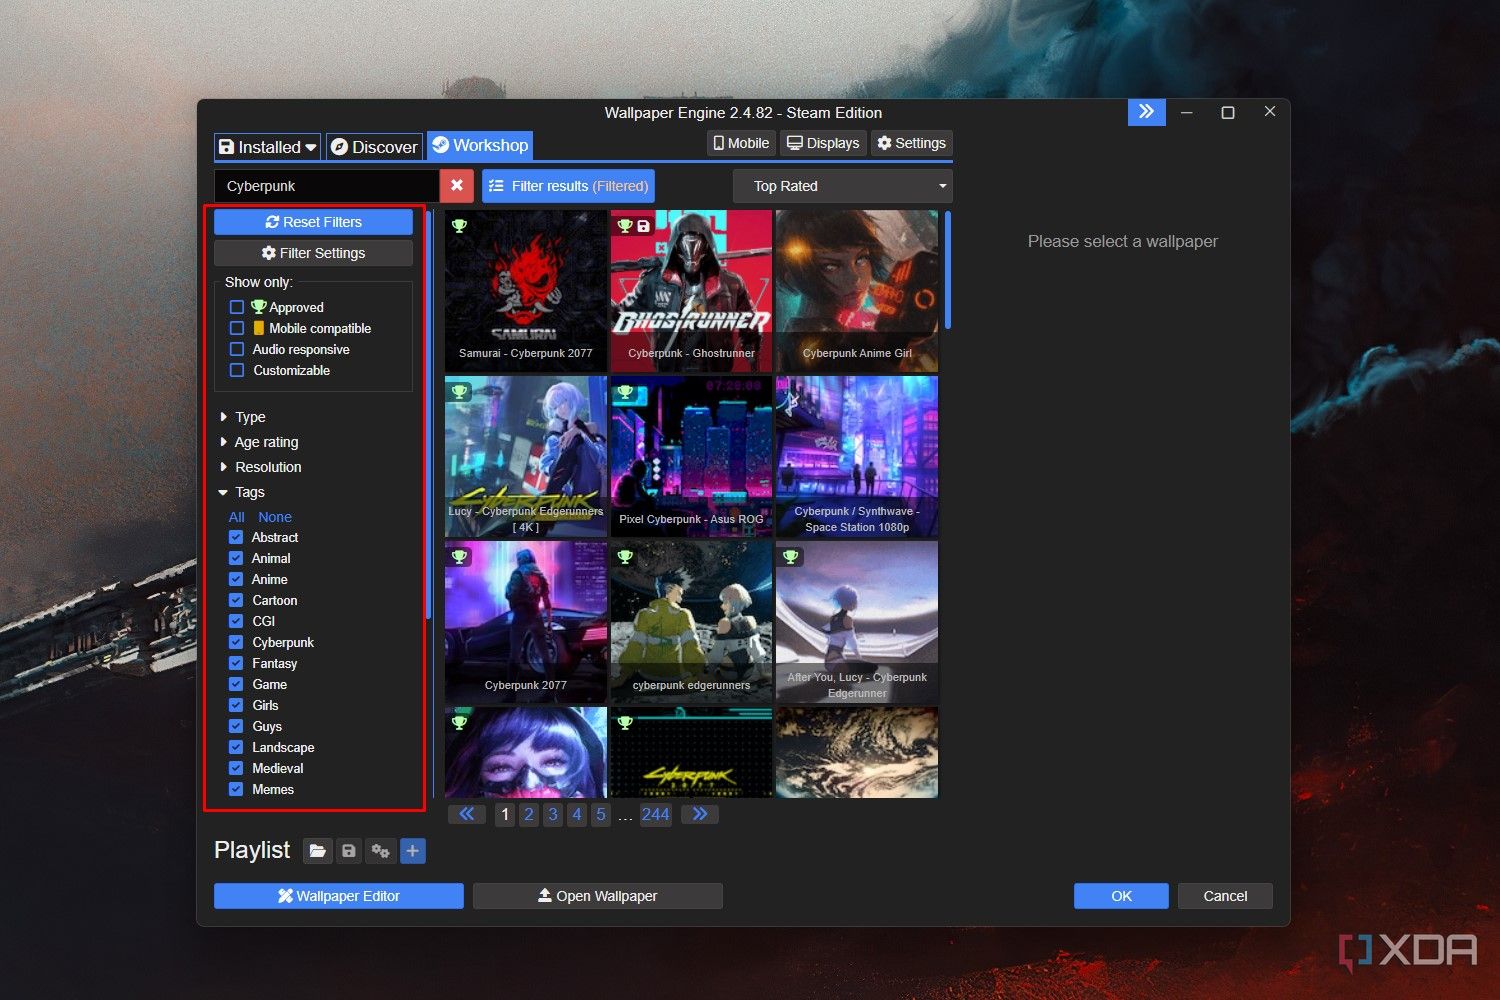
You can further refine your search by using the filters in te left sidebar. You can filter by resolution, tags, media formats, and age ratings.
-
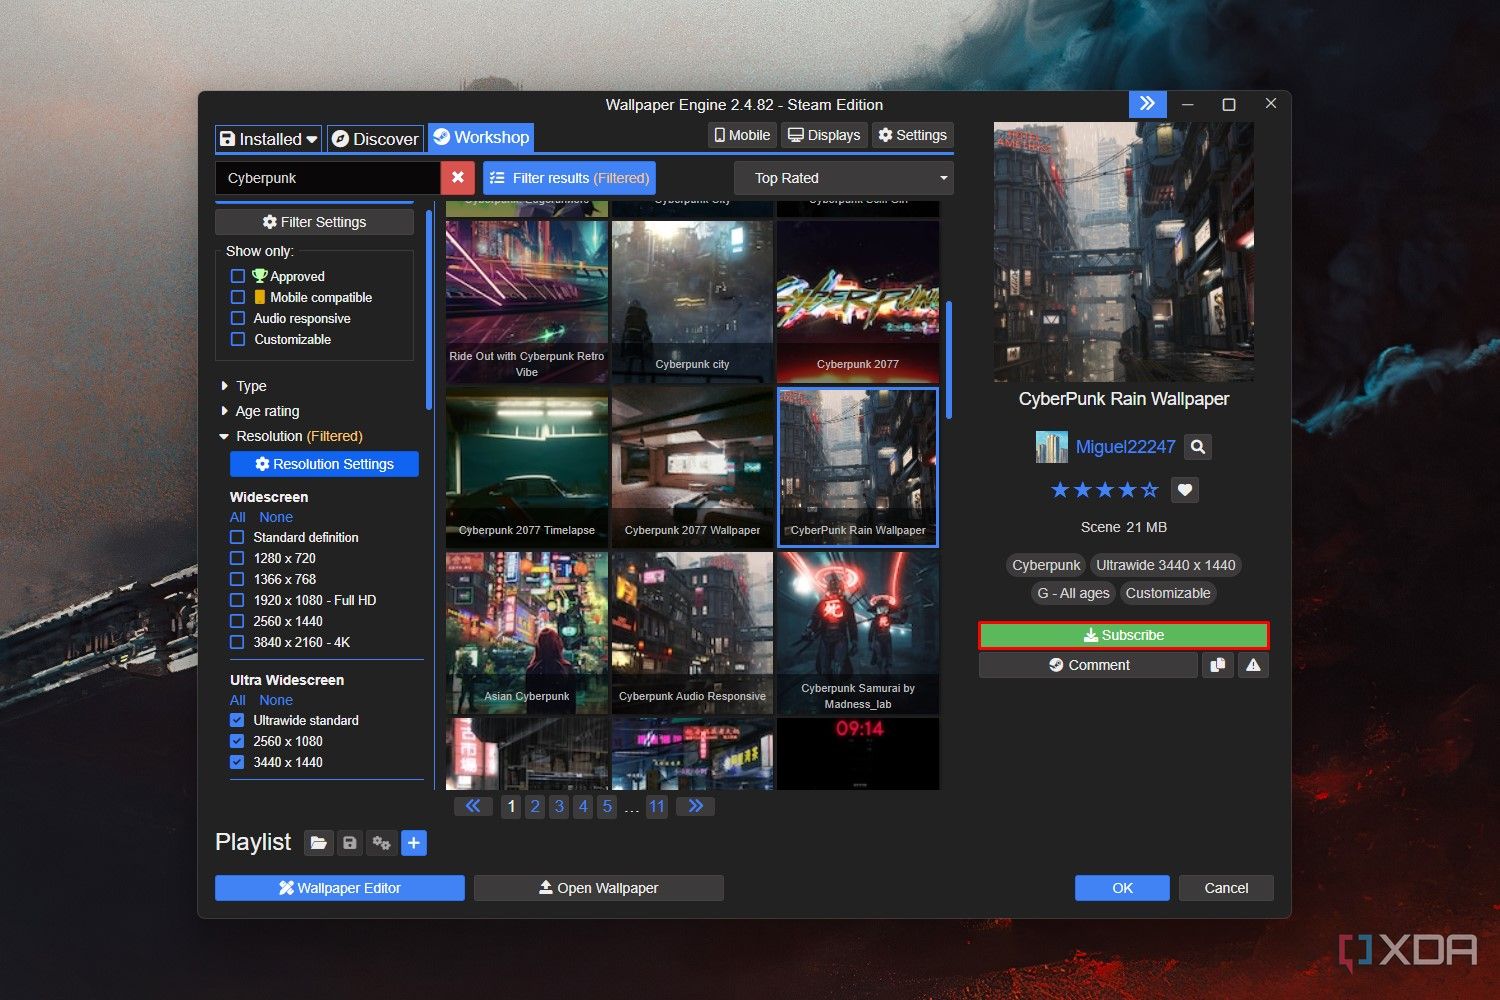
After you find a wallpaper you like, click it to open it. From the window on the right, click Subscribe to download and apply the wallpaper. Any wallpaper you subscribe to will end up in the Installed section.
-
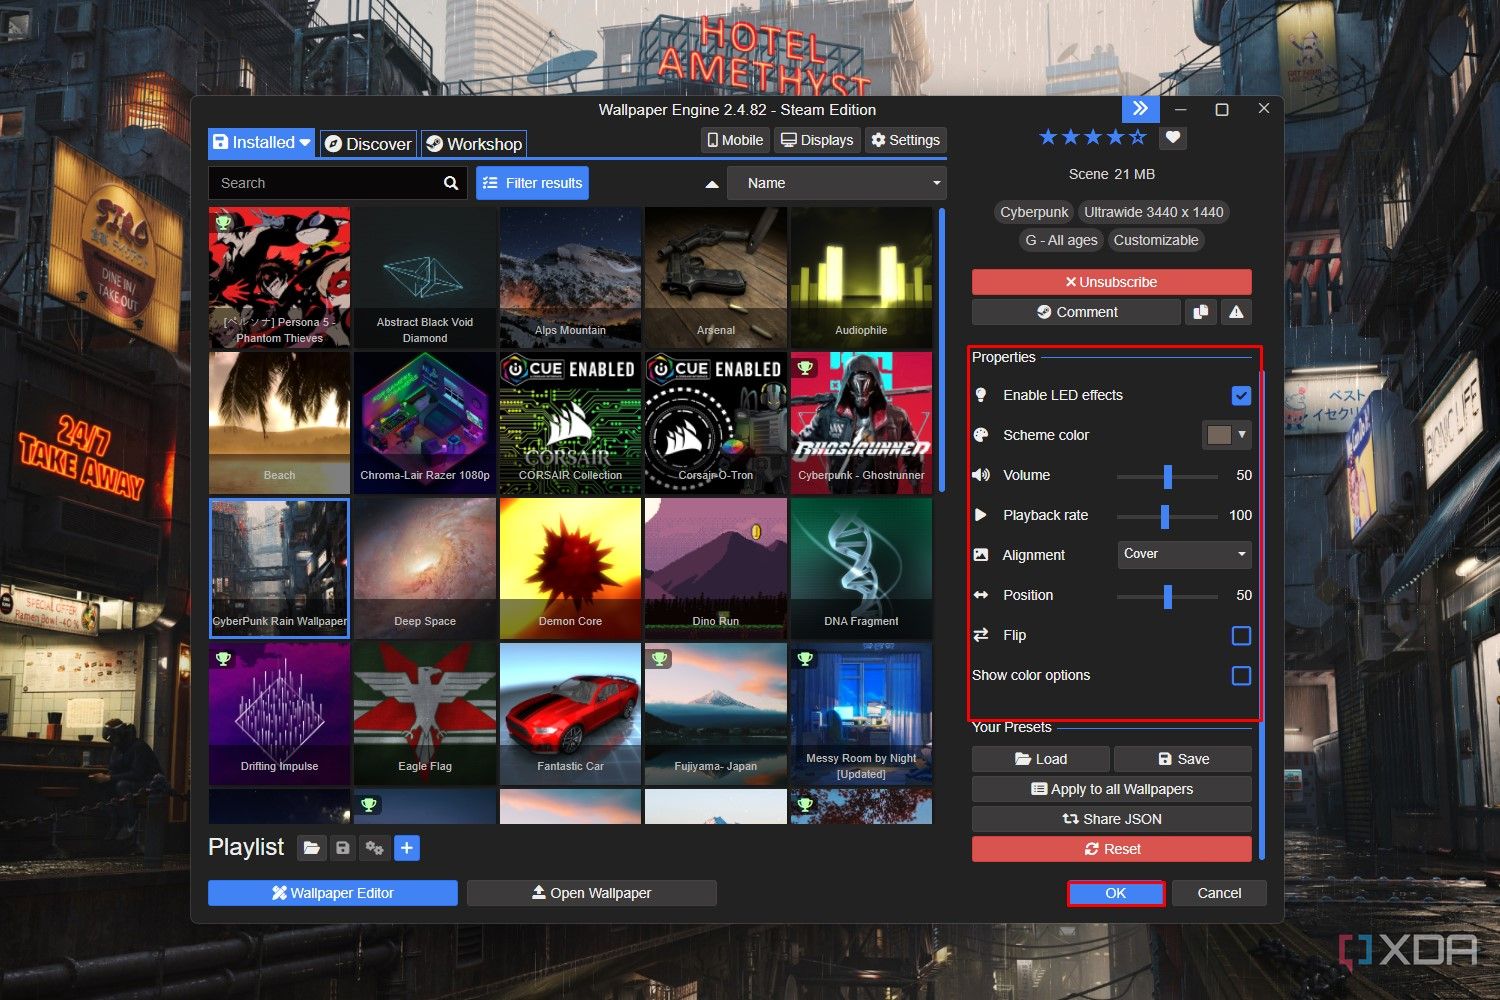
After subscribing to a wallpaper, you can change its Color scheme, Alignment, Playback rate, Volume, and Position from the window on the right. Once you’re happy with your preset, click OK to apply it.
-
You can now close Wallpaper Engine, and it will minimize itself to the system tray. The selected wallpaper will be applied while the app runs in the background.
Tips and tricks for using Wallpaper Engine
Up until now, things have been pretty straightforward. However, if you want to make the most of Wallpaper Engine, you’ll want to play around with the options in the Settings and Displays tab.
Multi-monitor support
If you have more than one monitor, it’s worth going to the Displays tab within Wallpaper Engine to set up how you want animated wallpapers to appear on different screens. The Displays tab is located at the top of the Wallpaper Engine app, right next to the Settings tab.
Here are some tips for setting up wallpapers across multiple monitors:
- When applying a wallpaper, you can choose whether it will apply to Monitor 1 or Monitor 2. This allows you to apply different wallpapers to either monitor.
- If you want to clone the wallpaper to both monitors, go to the Displays tab and click Wallpaper per display. From the drop-down menu, select Clone single wallpaper.
- To stretch a wallpaper across both displays, go to the Displays tab, click Wallpaper per display, and select Stretch single wallpaper.
Tips for performance
By default, Wallpaper Engine isn’t all that intensive in terms of performance. However, if you have a lower-end machine with a limited amount of RAM or are using a laptop, it can make your system feel sluggish. Fortunately, there are a ton of different options you can change in the Settings tab to improve performance. You can find this tab in the top-right corner of Wallpaper Engine.
Here are some options you can change to improve performance:
Play around with these settings to see what works best for your system. Keep in mind that certain wallpapers have higher-quality textures and shadows, which can impact performance even with the Medium or Low presets.
Make your monitor pop
Both of these tools work well, but Wallpaper Engine offers an endless selection of user-created wallpapers from the Steam workshop. This makes it well worth the $4 asking price. On the other hand, Lively Wallpaper is a great free tool that allows you to make your own wallpapers or use some of the pre-installed creations. If you’re uncertain between the two, try out Lively Wallpaper first before spending money on Wallpaper Engine.
Related
- To set live wallpapers on Windows 11, install “Lively Wallpaper,” open the app, click on “Library,” right-click the live wallpaper, and choose “Set as Wallpaper.”
UPDATED 11/19/24: On Windows 11, you can set live wallpapers with animations on the desktop, but not officially. The “Lively Wallpaper” app, available through the Microsoft Store, allows you to use a live background on Windows 11, similar to those animated wallpapers on Android.
What’s Lively Wallpaper?
Lively Wallpaper is an open-source application that allows you to set videos, webpages, and GIF images as desktop wallpapers and screensavers. The application offers a library with many live wallpapers you can choose from to set as background on Windows 11, but you can always add custom ones.
In addition, the app offers a feature that uses AI to convert a static image into a dynamic wallpaper that adds depth effects as you move the mouse around the desktop.
In this guide, I’ll teach you how to set wallpapers with animations on your Windows 11 desktop.
If you want to set live wallpapers on Windows 11, you must install the app and select the animation.
Install Lively Wallpaper app on Windows 11
To install the Lively Wallpaper app, use these steps:
-
Open the Lively Wallpaper app on the Microsoft Store.
-
Click the Get in Store app button.

-
Click the Install button.

Once you complete the steps, you can use the app to set living wallpapers on your desktop.
Alternatively, you can install the app from Command Prompt (admin) using the winget install --id 9NTM2QC6QWS7 command with the Windows Package Manager.
Choose and set live wallpaper
To set a live wallpaper as a background on the Windows 11 desktop, use these steps:
-
Open Lively Wallpaper app.
-
Click on Library.
-
Choose one of the animated wallpapers.
-
Click the menu (three-dotted) button and select the “Set as Wallpaper” option.

-
(Optional) Click the Customize option from the context menu to adjust the settings depending on the wallpaper features, such as color, quality, animation speed, and more.


After you complete the steps, the live wallpaper will apply to the desktop. Also, depending on the animation, you may get some interactions. For example, if you set the “Fluids” option, the desktop will react to the system volume and cursor. And the “Periodic Table” option highlights each element, and you move the cursor over the table.
Create custom live wallpaper
The Lively Wallpaper app also allows you to create custom moving backgrounds using video and GIF files locally stored on your computer. Or you can use videos from YouTube or other sources and even websites.
To create a custom live wallpaper, use these steps:
-
Open the Lively Wallpaper app.
-
Click on Library.
-
Click the Add wallpaper button from the top-right.

-
Select the option to add a new wallpaper:
- The “Choose a file” option allows you to load animation files (such as GIF or video) locally stored on your computer.
- The “Enter URL” option allows you to provide the link with the video (for example, a YouTube video or website).
-
Continue with the on-screen directions (if applicable).
-
(Optional) Click the menu (three-dotted) button and select the “Set as Wallpaper” option.
-
Click the Customize option from the context menu to adjust the available settings.


Once you complete the steps, the live wallpaper will apply to the desktop.
You can always delete any of the wallpaper by clicking the menu (three-dotted) button in the item and selecting the “Delete” option and the “OK” button.
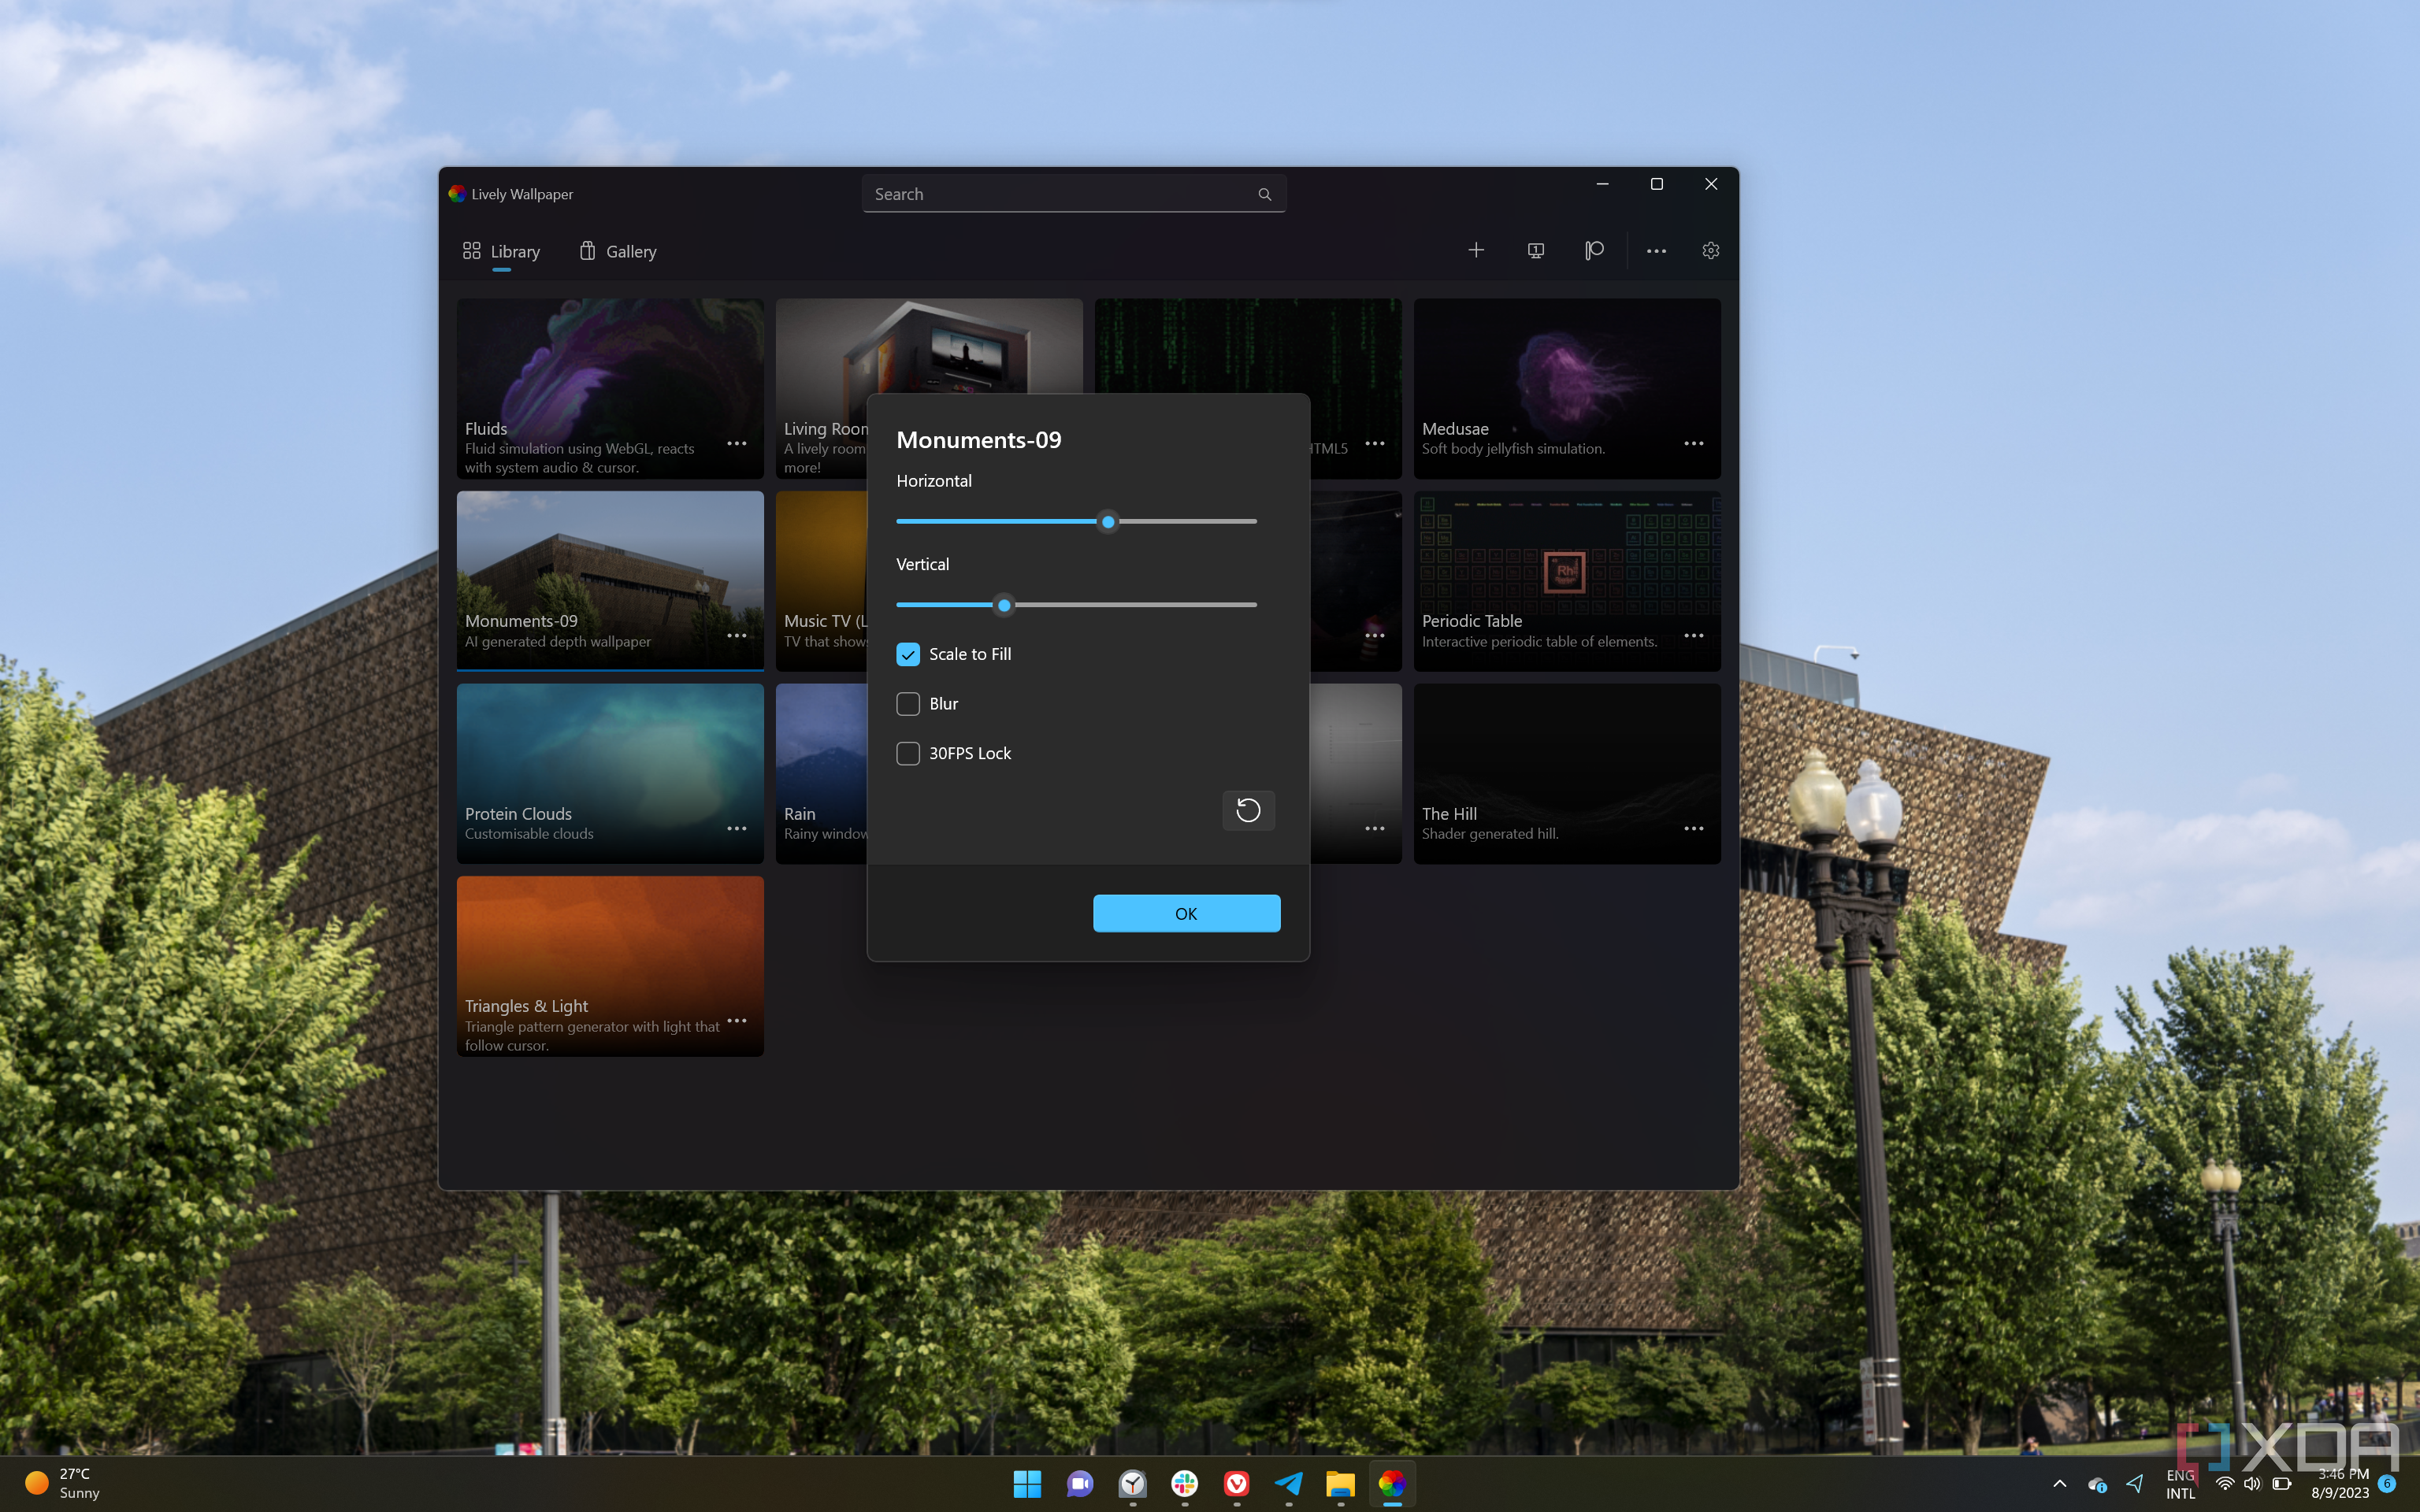
Create custom depth wallpaper
In addition, the app also offers an option to create moving wallpapers using AI to convert an image into a dynamic image that uses depth effects. This feature is similar to the “Depth Effects” feature that Microsoft is working to bring to Windows 11.
To create a custom live wallpaper, use these steps:
-
Open the Lively Wallpaper app.
-
Click on Library.
-
Click the Add wallpaper button from the top-right.
-
Click the Advanced setting.
-
Click the Download button to get the required package. (You only have to do this once.)

-
Click the Depth Wallpaper.
-
Choose the image to process and add the depth effects with AI.
Quick tip: It’s best to select an image so the app can easily detect its elements.
-
Click the Open button.
-
Click the Continue button.


After you complete the steps, the wallpaper will apply, and you can move the mouse around the desktop to experience the depth effect.
Configure live wallpaper on multiple monitors
Lively Wallpapers includes support to set the same different backgrounds on all your monitors.
To apply a wallpaper on multiple monitors, use these steps:
-
Open the Lively Wallpaper app.
-
Click on Library.
-
Click the Active Wallpapers button from the top-right.
-
Choose the placement method, including:
- Selected screen only: The background image will apply to the currently selected monitor.
- Span across screens: The same background span across monitors.
- Duplicate same wallpaper: The same image will apply to all displays.
-
Check the “Always pick screen when choosing wallpaper” option so that when you click the image, you will get the option to choose the display. (This feature only works when the “Selected screen only” option is selected.)
-
Click the OK button.
-
Click the menu (three-dotted) button and select the “Set as Wallpaper” option.


Once you complete the steps, the wallpaper will apply to the different screens, depending on your configuration.
Configure Lively Wallpaper as screensaver on Windows 11
To set a live wallpaper as a screensaver on Windows 11, use these steps:
-
Open the Lively Wallpaper app.
-
Click on Library.
-
Click the Active Wallpapers button from the top-right.
-
Click the Screensaver tab.
-
Click the “One time setup required to run screensaver” option.

Quick note: This action will open the web browser on the Lively GitHub page. On that page, continue with the “Windows Screensaver file” steps under the “Setup instructions” section. This requires downloading and extracting a “.zip” file into the
C:\Windows\folder, right-clicking the “.scr” file, and choosing the “Install” option. -
Choose the Lively option from the “Screen saver” settings.

-
Click the OK button.
-
Click the Wallpaper tab.
-
Click the Screensaver tab to refresh the screen and have access to the feature.
-
Click the OK button.


After you complete the steps, the running wallpaper will become the screensaver on Windows 11.
Other details about Lively Wallpaper
The app also has a “Gallery” section but doesn’t offer anything at this time. On the “Settings” page (click the gear button at the top right), you can control the startup behavior and rules to minimize performance impact. From the “System” tab, you can even control the Taskbar theme to make it blurry, fully transparent, and more.
The “General” tab includes settings to control the app at startup and theme colors. You will also find the path where the app saves the wallpaper files, and you can choose to prevent animation previews within the app.

In the “Performance” tab, since these wallpapers are animated images, they will require extra system resources. On this page, you can control the wallpaper playback and how the app should behave on laptops or when using specific features. For example, Lively will pause automatically when using an app or game on full screen or accessing the device through a Remote Desktop session. Finally, you can also set a rule to stop the animation when running on battery.

In the “Wallpaper” tab, you can choose the default settings when applying new wallpaper, such as fit and input for interaction, and you can choose the plugins to play video, display the web page, or GIF image on the screen.

The “System” tab includes log and debug files. You can learn more about this project on GitHub.
Update November 19, 2024: This guide has been updated to ensure accuracy and reflect changes to the process.