
Как мне исправить прерывистое видео в Windows 10?
“Я недавно обновил свой компьютер до Windows 10. Но когда я воспроизвожу любое видео на своем компьютере, оно
постоянно прерывается и отстает. Почему я сталкиваюсь с таким прерывистым воспроизведением видео и как мне
это исправить?”
Существует несколько причин, по которым пользователи Windows 10 сталкиваются с прерывистым воспроизведением
видео, когда видео отрывисто и дает сбои. Такая проблема может возникнуть внезапно, а также при обновлении
операционной системы Windows. Проблема может быть связана с поврежденными видеофайлами, неисправным
медиаплеером, неисправным графическим драйвером и даже устаревшей версией Windows 10. Мы обсудим все возможные
причины, по которым у вас происходит прерывистое воспроизведение. После этого мы предложим решения, как
исправить прерывистое воспроизведение видео в несколько простых шагов.
Часть 1: Почему у меня прерывистое воспроизведение видео?
Вам необходимо понять, что вызывает прерывистое воспроизведение видео, чтобы вы могли выбрать правильное решение
для устранения проблемы. Нам трудно точно определить, какая из этих причин применима в вашем случае, но,
возможно, у вас есть идея получше, потому что вы лучше знаете состояние своего компьютера. Вот все возможные
причины, по которым ваше видео заикается.
- Вы воспроизводите видео с мультимедийного устройства, а не с жесткого диска.
- Медиаплеер устарел или работает со сбоями.
- Графический драйвер устарел или неисправен
- Видеофайл поврежден.
- Видеофайл имеет очень высокое разрешение.
- Могут быть некоторые проблемы с конфигурациями системы.
- Ваш компьютер заражен вирусами и вредоносными программами.
- Проблема с неподдерживаемым форматом видеофайла или видеокодеком.
- Проблема с браузером при просмотре любого видео онлайн.
Часть 2: Как исправить прерывистое воспроизведение видео в Windows 10?
Теперь, когда у вас есть некоторые идеи о возможной причине прерывистого воспроизведения видео, пришло время
устранить проблему. Прежде всего, вы должны убедиться, что у вас установлена последняя версия Windows 10 и ваш
компьютер не заражен вирусом. Лучше, если вы будете воспроизводить видеофайлы на другом компьютере, чтобы
убедиться, что проблема связана с вашим компьютером, а не с самим видеофайлом. Поэтому вам следует попробовать
эти лучшие решения о том, как исправить прерывистое воспроизведение видео в Windows 10.
Решение 1. Повторно импортируйте или скопируйте видео еще раз
Если вы воспроизводите видео с любого мультимедийного устройства, такого как DVD, USB-накопитель или SD-карта,
воспроизведение видео может быть прерывистым. Это связано с тем, что скорость чтения мультимедийного устройства
может быть невысокой, и, следовательно, скорость воспроизведения должна быть снижена, чтобы соответствовать
скорости чтения. Поэтому лучше скопировать видео с мультимедийного устройства на свой жесткий диск. После этого
вы можете повторно импортировать видеофайл в медиаплеер и воспроизвести его снова.
Решение 2. Обратитесь к другим медиаплеерам
Если используемый вами медиаплеер устарел или работает со сбоями, воспроизведение видео может быть прерывистым.
Вот почему вам следует воспроизвести видеофайл на другом видеоносителе. Поскольку вы используете Windows 10, вы,
скорее всего, используете проигрыватель Windows Media. Вместо этого вы можете загрузить VLC Media Player и
воспроизвести видеофайл там. Убедитесь, что формат видеофайла совместим. В противном случае вам необходимо
преобразовать формат видеофайла в формат, совместимый с VLC или Windows Media Player.
Решение 3. Обновите графические драйверы в Windows 10
Если графический драйвер устарел, в Windows 10 видео может быть прерывистым. Драйвер может быть не в состоянии
точно обрабатывать видео, и, следовательно, могут возникать сбои и прерывания. Вот почему вам необходимо
обновить графический драйвер до последней доступной версии. Если графический драйвер уже обновлен до последней
версии, лучше переустановить видеодрайвер еще раз, чтобы быть полностью уверенным, что видеодрайвер не является
причиной проблемы.
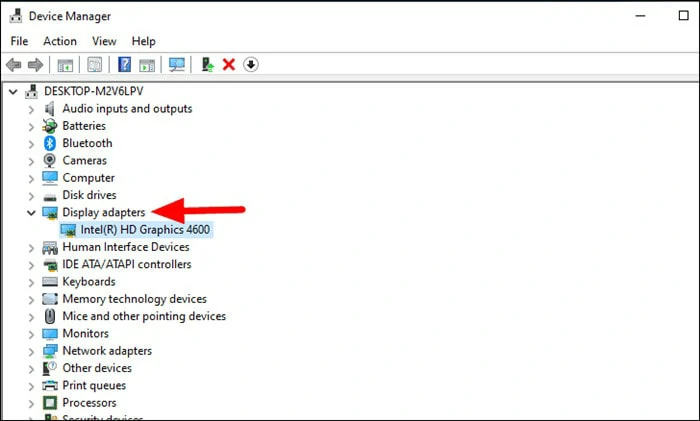
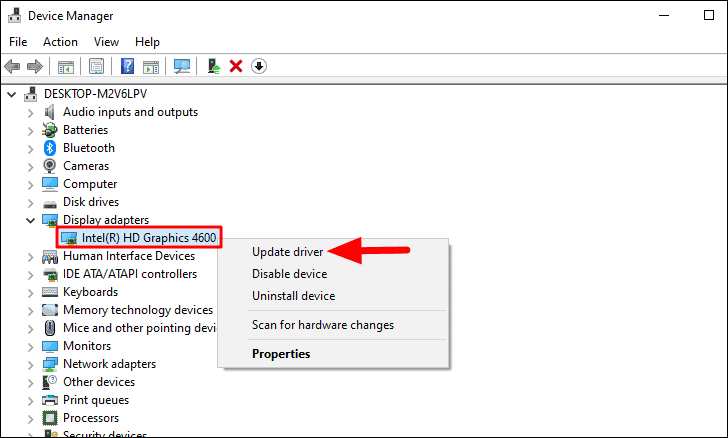
1. Обновите видеодрайвер
-
Щелкните правой кнопкой мыши на значке меню «Пуск» и выберите опцию «Диспетчер устройств».
- Когда откроется диспетчер устройств, перейдите в раздел «Адаптеры дисплея» и разверните его подразделы.
-
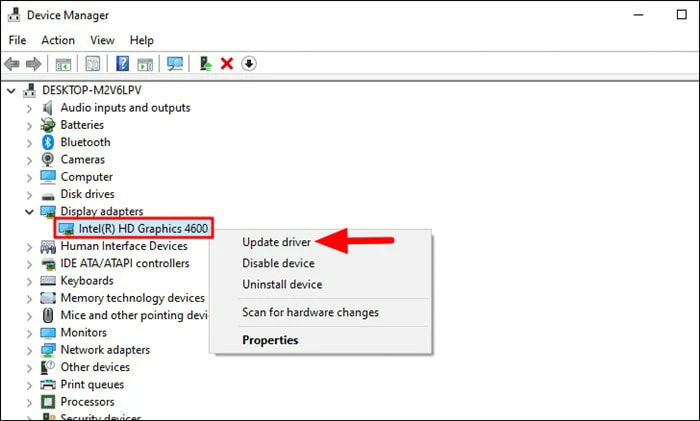
Щелкните правой кнопкой мыши графический драйвер и выберите опцию «Обновить драйвер».
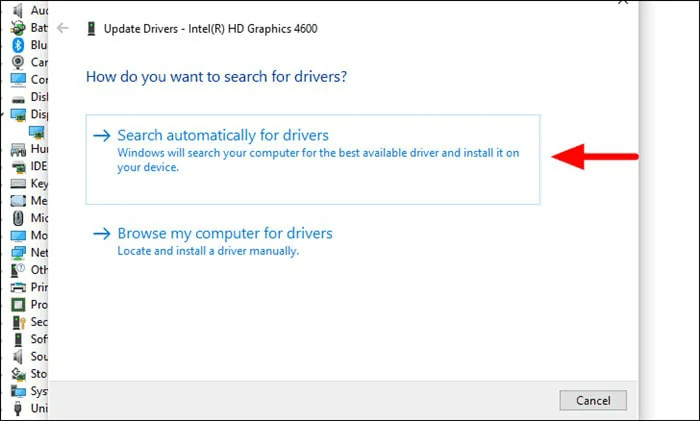
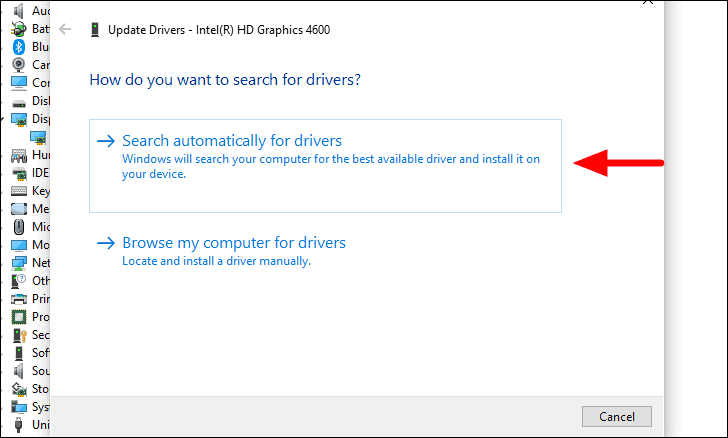
- В окне Обновления драйверов выберите опцию автоматического поиска драйверов. Убедитесь, что у вас активное
подключение к Интернету. Программа будет выполнять поиск только последней версии драйвера, и вам необходимо
следовать инструкциям на экране, чтобы завершить процесс обновления драйвера. - Перезагрузите компьютер и воспроизведите видео еще раз, чтобы убедиться, что проблема решена.
2. Переустановите видеодрайвер
- Откройте диспетчер устройств, щелкнув правой кнопкой мыши значок меню «Пуск».
- Разверните «Адаптеры дисплея» и щелкните правой кнопкой мыши графический драйвер.
-
Выберите опцию Удалить устройство и следуйте инструкциям на экране, чтобы сначала удалить драйвер.
Перезагрузите компьютер один раз. - После удаления перейдите в меню «Пуск» и откройте «Настройки».
- Когда откроются настройки, перейдите к опции «Центр обновления Windows» на левой панели.
-
Нажмите на кнопку «Проверить наличие обновлений», и ваша система автоматически выполнит поиск и установит
последнюю версию драйвера. - Как только вы увидите сообщение “Вы в курсе событий”, вы можете перезагрузить компьютер и воспроизвести
видео, чтобы узнать, решена ли проблема.
Решение 4. Восстановите поврежденный видеофайл с помощью 4DDiG File RepairHOT
Если вы воспроизводили видеофайл на другом компьютере и там он также прерывается, проблема связана с
видеофайлом. Скорее всего, он был поврежден, и вам необходимо восстановить видеофайл, чтобы устранить проблему с
прерывистым воспроизведением видео в Windows 10. Мы рекомендуем 4DDiG File Repair как
лучшее приложение для
восстановления видео, позволяющее восстанавливать видеофайлы мгновенно и идеально. Вот основные функции 4DDiG
File Repair, которые делают его лучшим приложением для восстановления видеофайлов.
- Вы можете восстанавливать видео всех популярных форматов, начиная от MP4 и MOV до FLV и MKV.
- Вы можете восстановить видео, которые являются прерывистыми, отрывистыми, нечеткими, мерцающими, с заиканием
и сбоями. - Вы можете восстановить видео, хранящиеся на вашей SD-карте, USB-флэш-накопителе и жестком диске.
- Вы можете пакетно восстанавливать видео разных форматов за один раз, и приложение полностью безопасно и не
сохраняет восстановленное видео. - Вы можете восстанавливать видео с камер основных брендов, таких как Sony, GoPro и Canon.
Ниже приведены инструкции о том, как исправить прерывистую запись видео в Windows 10 с помощью восстановления
файлов 4DDiG.
-
Загрузите и установите восстановление файлов 4DDiG на свой компьютер. Откройте приложение и нажмите
кнопку «Пуск» в разделе «Исправить ошибки видео». -
Нажмите на кнопку добавить видео, чтобы импортировать поврежденный видеофайл в приложение. Вы можете
добавить несколько видеофайлов, чтобы их восстановить сразу. -
Нажмите на кнопку запуска, чтобы инициировать процесс ремонта.
-
После завершения ремонта можно просмотреть файл видеофайл. После этого можно нажать на экспорт или
экспортировать все кнопки, чтобы сохранить ремонтированные видеофайлы в нужном месте.
Решение 5. Преобразуйте видео 4K в разрешение 1080p или ниже
Большинство пользователей с недорогим процессором или графическим процессором GPU могут испытывать прерывистое
воспроизведение VLC, особенно когда видео имеет высокое разрешение. Например, вы воспроизводите видео в формате
4K, которое требует высокой скорости обработки от графического процессора, но ваш графический процессор не в
состоянии соответствовать требованиям, видео будет прерывистым. Поэтому лучше уменьшить разрешение видео,
преобразовав его из 4K или 1080p в более низкое разрешение. Ниже приведены шаги по снижению разрешения видео в
медиаплеере VLC, чтобы устранить проблему с прерывистым воспроизведением VLC 4k.
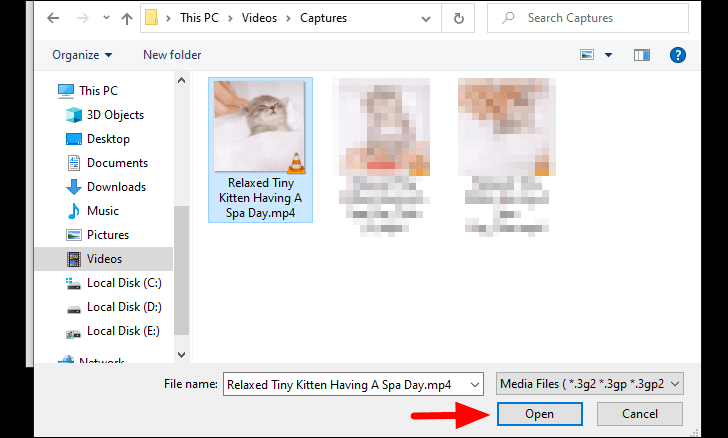
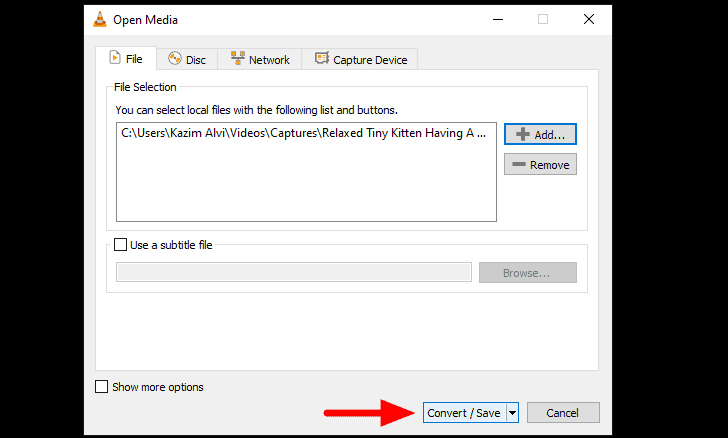
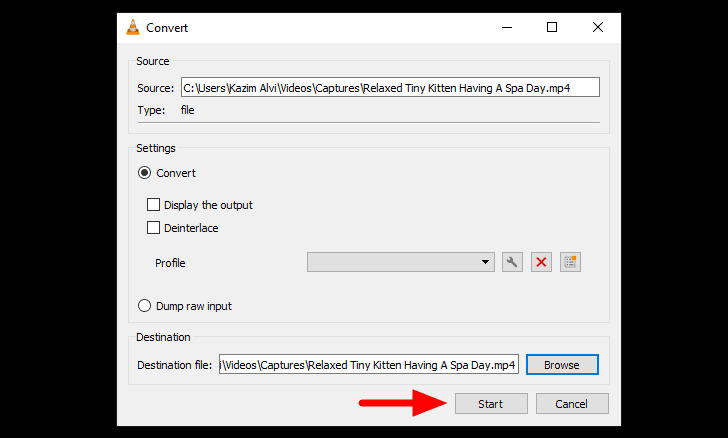
- Откройте медиаплеер VLC и выберите пункт меню Мультимедиа. Затем нажмите на опцию Конвертировать/сохранить.
-
Как только откроется диалоговое окно Конвертировать/сохранить, нажмите на кнопку Добавить и выберите
видеофайл 4K с вашего мультимедийного устройства. Нажмите на опцию Конвертировать с помощью кнопки
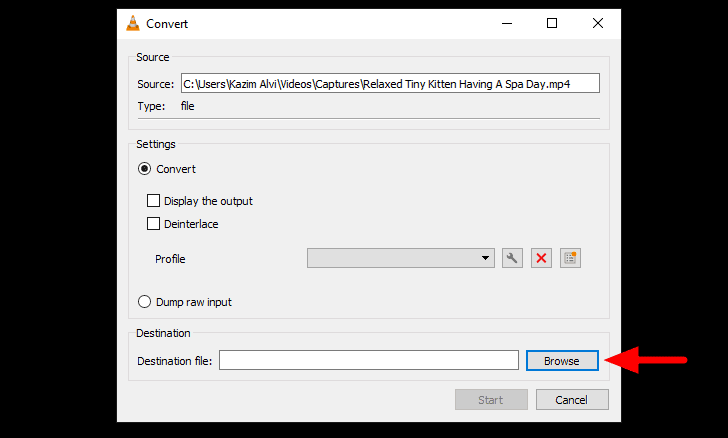
Скрыть/Сохранить. - В окне Конвертации выберите нужный профиль и нажмите на значок гаечного ключа.
-
В окне профиля перейдите на вкладку видеокодек, а затем на вкладку Разрешение. Выберите желаемое
разрешение. Нажмите на кнопку Сохранить. -
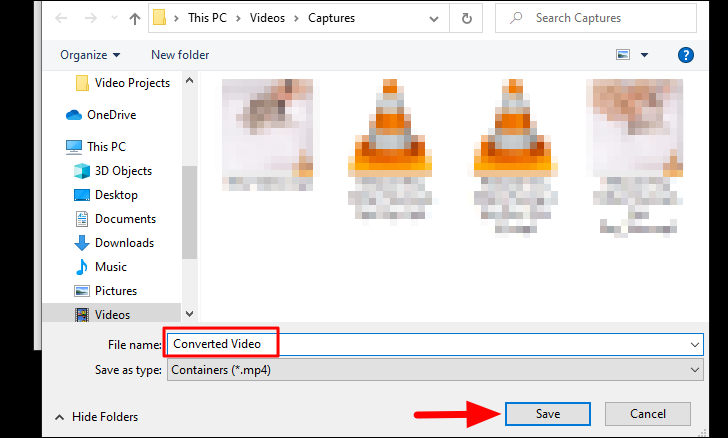
Выберите файл назначения и нажмите на кнопку «Пуск», и у вас будет видеофайл 4K в более низком
разрешении.
Решение 6. Обновите браузер и очистите файлы cookie
Когда вы воспроизводите видео онлайн и сталкиваетесь с проблемой прерывистого воспроизведения, вам необходимо
сделать две вещи. Во-первых, убедитесь, что браузер обновлен до последней версии. Во-вторых, вам следует
очистить данные о просмотре, поскольку предварительно загруженные данные могут помешать плавному воспроизведению
видео. Здесь мы демонстрируем, как обновить браузер Chrome и очистить данные о просмотре в качестве решения
проблемы прерывистой потоковой передачи видео в Интернете.
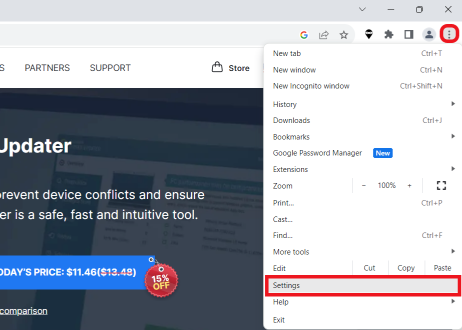
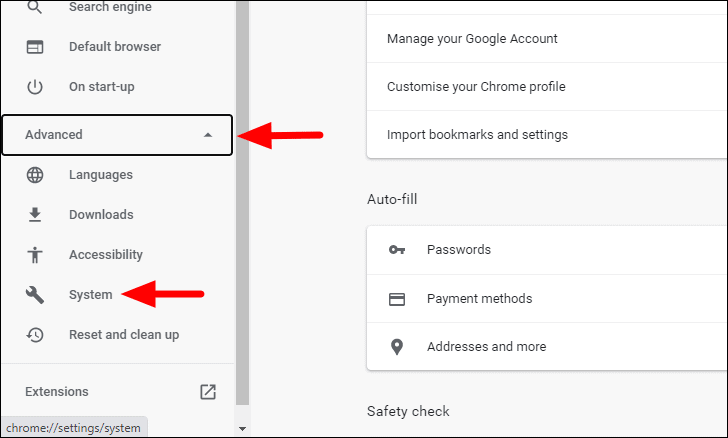
- Откройте браузер Chrome и нажмите на значок «Дополнительно» в правом верхнем углу.
-
Перейдите в справку и нажмите на опцию «О Google Chrome».
- Chrome выполнит поиск, если доступно какое-либо обновление, и обновит версию. После этого перейдите в раздел
Дополнительные инструменты и нажмите на опцию Очистить данные о просмотре. -
Выберите файлы cookie и другие данные сайта и выберите временной диапазон как все время.
- Нажмите на кнопку Очистить данные, а затем перезапустите Chrome и воспроизведите видео, чтобы узнать,
устранена ли проблема.
Советы:Возможно, вас заинтересует, как исправить, что видео не воспроизводится в Chrome?
Часть 3. Профессиональные советы по предотвращению прерывистого воспроизведения видео
Профилактика всегда лучше, чем лечение, и есть определенные шаги, которые вы можете предпринять, чтобы
предотвратить прерывистое воспроизведение видео.
- При воспроизведении видео с высоким разрешением убедитесь, что в фоновом режиме работает не так много
приложений. Это связано с тем, что приложения, работающие в фоновом режиме, оказывают давление на вашу
систему, и видео может начать отставать и становиться прерывистым. - Всегда лучше запускать видеофайл с SSD и даже жесткого диска, а не с USB-накопителя или SD-карты. Это
связано с тем, что скорость чтения с USB-накопителя или SD-карты, как правило, ниже, чем с жесткого диска и
SDD-накопителя. - На вашем компьютере должно быть установлено антивирусное приложение, чтобы предотвратить заражение
видеофайлов вирусами и вредоносными программами и их повреждение. - Вы должны знать популярные форматы видеофайлов, потому что при воспроизведении необычного формата видеофайла
в вашем медиаплеере он может быть прерывистым. Это связано с тем, что медиаплеер может быть несовместим с
воспроизведением формата видеофайла. Вы всегда можете воспользоваться конвертером, чтобы преобразовать
необычный формат видеофайла в популярный формат видеофайла, и, следовательно, вы сможете беспрепятственно
воспроизводить видео на своем медиаплеере. - Обновите операционную систему до последней версии, и то же самое касается графического драйвера, а также
медиаплеера. - И последнее, но не менее важное:если вы воспроизводите видео онлайн с перебоями в воспроизведении,
вам следует убедиться, что скорость Интернета достаточна и что никакая другая вкладка браузера не занимает
полосу пропускания. Это связано с тем, что если буферизация видео не является плавной, воспроизведение будет
прерывистым.
Вывод:
Мы довольно часто получаем запросы относительно прерывистого воспроизведения видео в Windows 10. Причины,
стоящие за проблемой, могут быть очень простыми, и решения также просты. В большинстве случаев проблема связана
либо с системой, либо с самим файлом. Если видеофайл поврежден, мы рекомендуем 4DDiG File Repair, чтобы
мгновенно исправить видеофайл в несколько простых шагов.
Александр Кокин (старший редактор)
Александр Кокин, главный редактор 4DDiG, занимается предоставлением наилучших решений для проблем, связанных с Windows и Mac, включая восстановление данных, ремонт, исправление ошибок.
Windows 10 brings several performance enhancements over the previous versions of Windows. It is sleeker, faster and more productive. However, many users may face performance issues including lag and occasional freezes.
Don’t worry. Here are some quick solutions to make Windows 10 faster and improve the performance of video lagging. Keep scrolling to know more.
Can’t Miss: 5 Best Free Video Editor for Windows 10>
Part 1. The Main Causes of Video Lagging/ Stuttering on Windows 10
Before directly diving into the various fixes, it’s necessary to figure out the causes behind the stuttering problem. Many reasons lead to video lagging on Windows 10, from computer breakdown to video file problems. Let’s take a close look at the causes.
Outdated graphics drivers
Running an older version of Windows
Issues with the system configurations
Now let’s see how to fix video stuttering on Windows 10. (To edit the video or change the video format, try FlexClip for help)
Part 2. Fixes for Video Stuttering Problem
Fix 1. Update Windows
Whether you’re facing a video lag or stuttering problem, you first need to check the Windows updates. Each time a new version is released, bugs and problems from the prior version are solved. Update your Windows system if you have bugs.
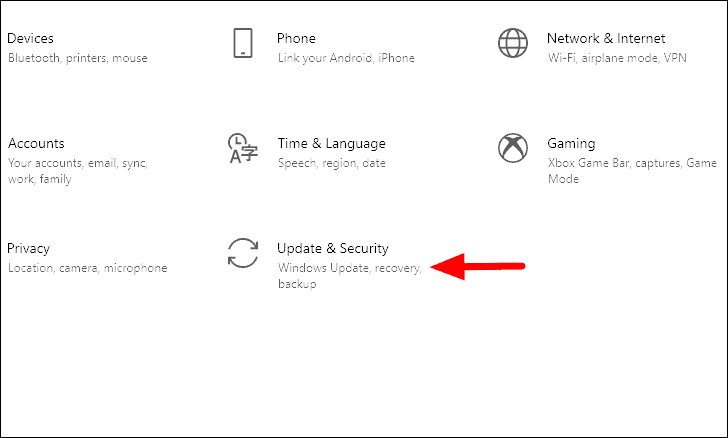
1. Press Windows + I to launch system Settings and choose Update & Security from the options.
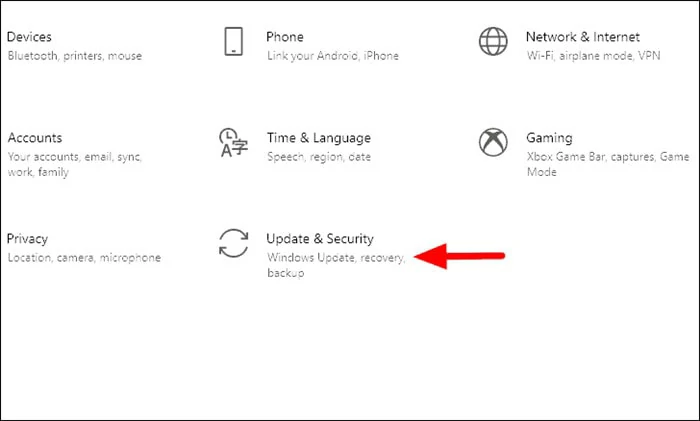
Open Your Windows Settings
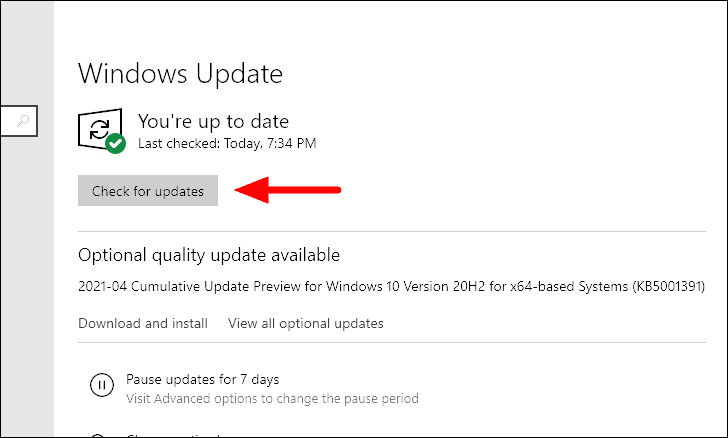
2. The ‘Windows Update’ tab will automatically appear. Here click on the ‘Check for updates’ box on the right side of the screen.
3. If any updates are available, Windows will start to download and install them on your system automatically.
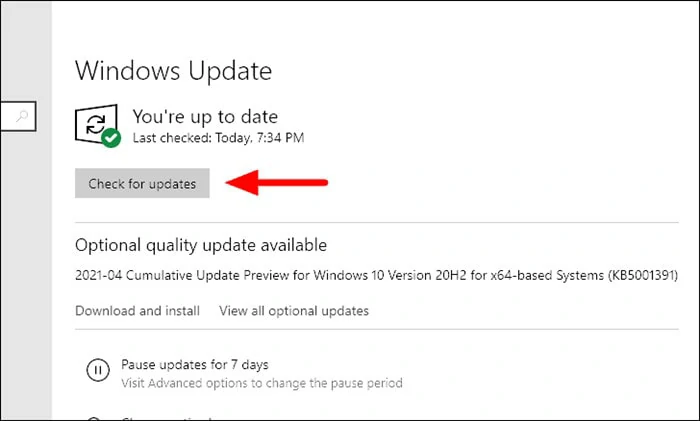
Update Your Windows Version Now
Fix 2. Analyze Hardware Changes on Windows
Hardware changes may cause video lagging or stuttering problems. Therefore, it’s a good idea to scan for hardware changes on your PC.
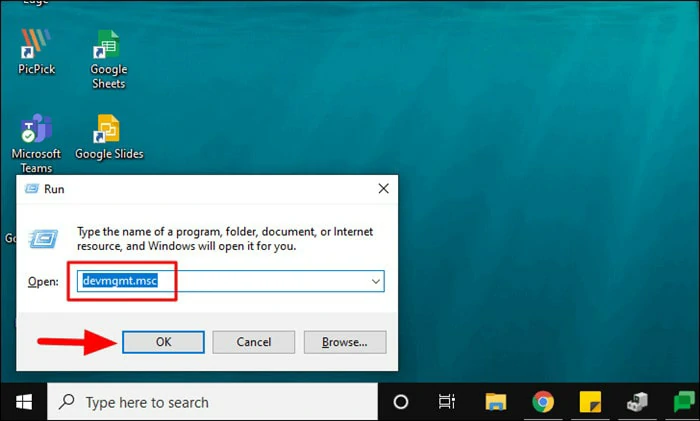
1. Launch Device Manager application and press Windows +R to open the Run command. Next you need to type in ‘devmmgt.msc’ in the text field and click “OK”.
Enter Hardware Settings
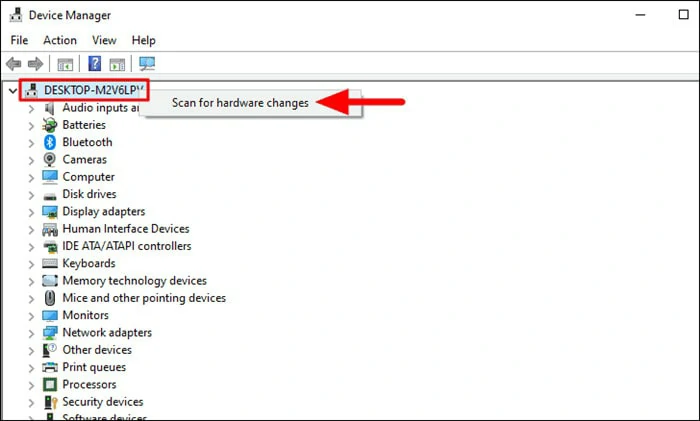
2. After you’ve done this, pick “Scan for hardware changes” from the list. When the scanning is over, try to play the video again to check if the stuttering problem is solved.
Scan for Hardware Changes
Fix 3. Update Graphics Driver
You may run into a problem if you have an outdated graphics driver. So you have to ensure that your graphics driver is up to date. If you’re facing issues with video playback, always check for graphics driver updates.
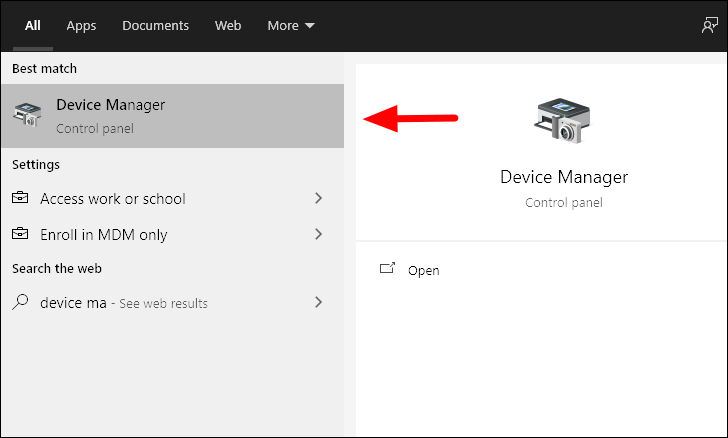
Firstly, search the Device Manager in the start menu and launch it by clicking on the search result.
Search for the Device Manager
On the ‘Device Manager’ window, double-click on ‘Display Adapter’ to explore the drivers under it.
Right-click on the graphic driver and select Update driver from the drop-down menu.
Find the Update Driver Option
The Update driver window will pop up where you can see many options to let the Windows search for the driver or you can browse and manually install it. You can select the first option to update your graphics driver.
Search Automatically for Driver
Once the update process is finished, reboot your computer to check if the error is fixed.
Fix 4: Reset the Power Plan
Resetting the default power plan is another method to fix the video lagging issue on Windows 10. Here’s how to restore it.
Open the Control Panel and choose Power Options.
Now, click on ‘Change plan settings’ under the ‘Selected plan’ section.
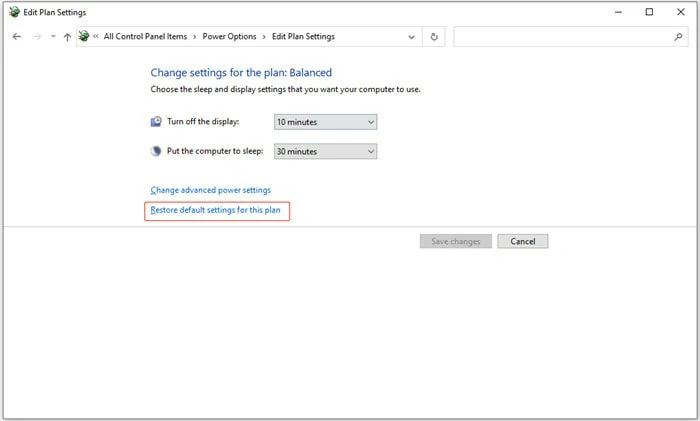
Change the Plan Settings
Confirm this operation and restart your PC.
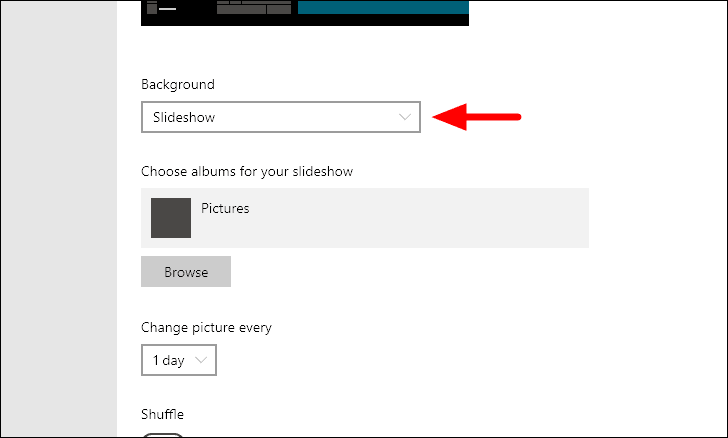
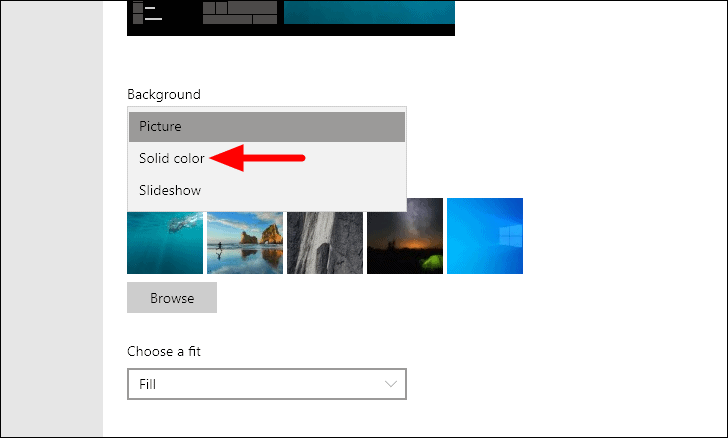
Fix 5: Modify the Wallpaper Settings
Many users report that after setting a slideshow as the wallpaper, the video they are playing may skip a frame every time the background picture changes. If you’re encountering this bug, change the wallpaper settings to fix it.
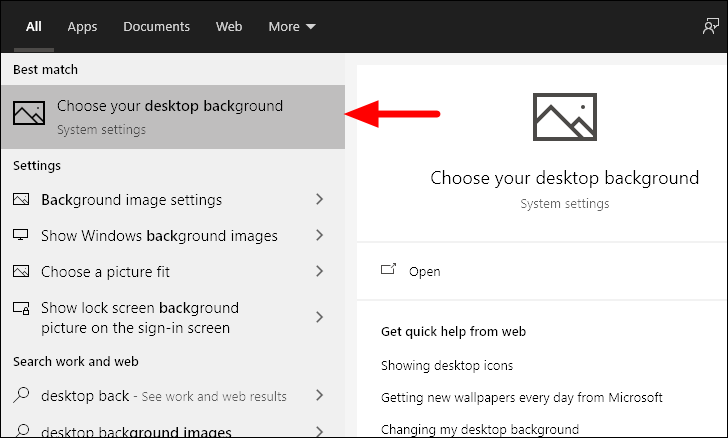
1. Launch the Start menu and enter the desktop background in the search panel.
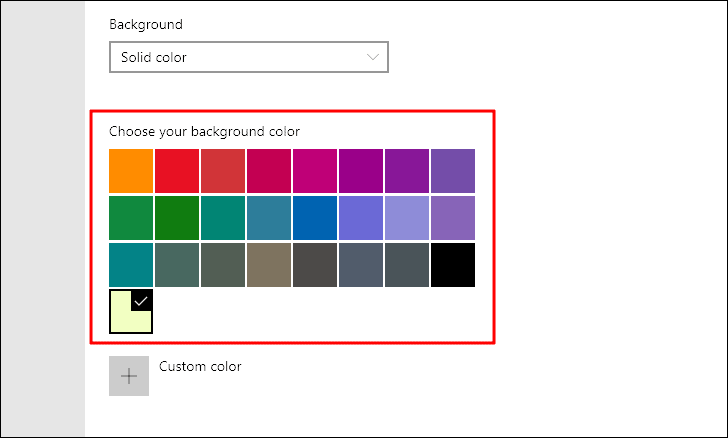
2. Head to background settings and change background from Slideshow to Picture or Solid color.

Change the Background Option
Fix 6: Scan for Malware
If malicious items infect your computer, the video lagging problem may occur. Therefore, you need to run a full system scan tool to detect and remove any harmful virus from your computer. After that, try to relaunch your computer and play your video again to see if the problem is fixed.
Part 3. Fix the Video Lagging Issue with VLC Media Player
Fix 1: Change the File Caching Value
One common way to fix the video lagging issue with the VLC media player is to change the File Cache value. Because a higher value might lead to HD videos lagging or stuttering. Hence, follow the steps below to alter the cache value.
Find the Preference Option from the Drop down Menu
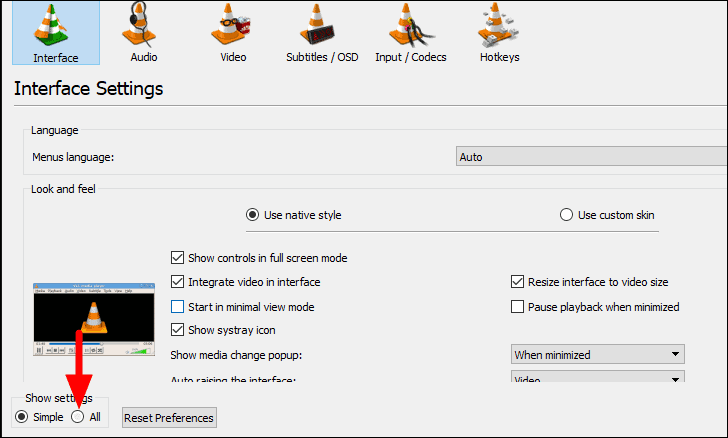
Move to Input / Codecs and select the checkbox for ‘All’ under ‘Show Settings’ at the bottom-left corner.
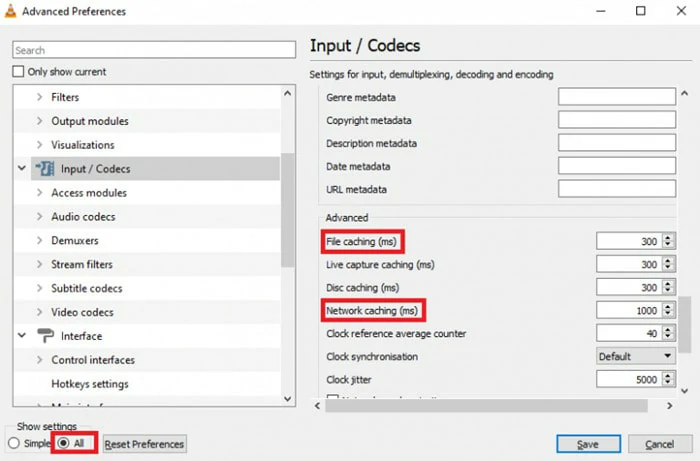
Move to Input/Output Panel
Here you can change the File caching (ms) value to a smaller value. Afterward, play the video again to see if the lagging is removed.
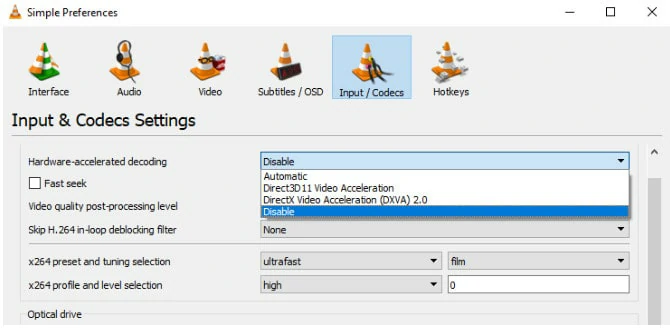
Fix 2: Disable Hardware Decoding to Fix Video Lagging
Accelerated hardware decoding might cause the video lagging issue. To resolve this, you need to disable the hardware encoding. Check the steps below to turn off the hardware encoding.
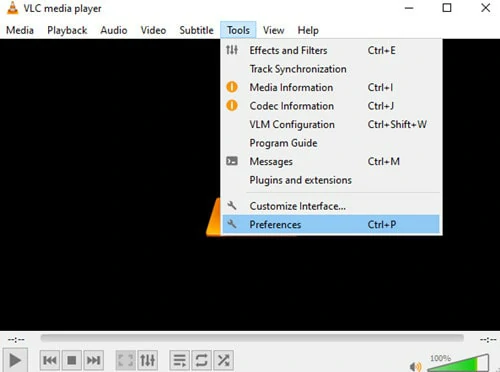
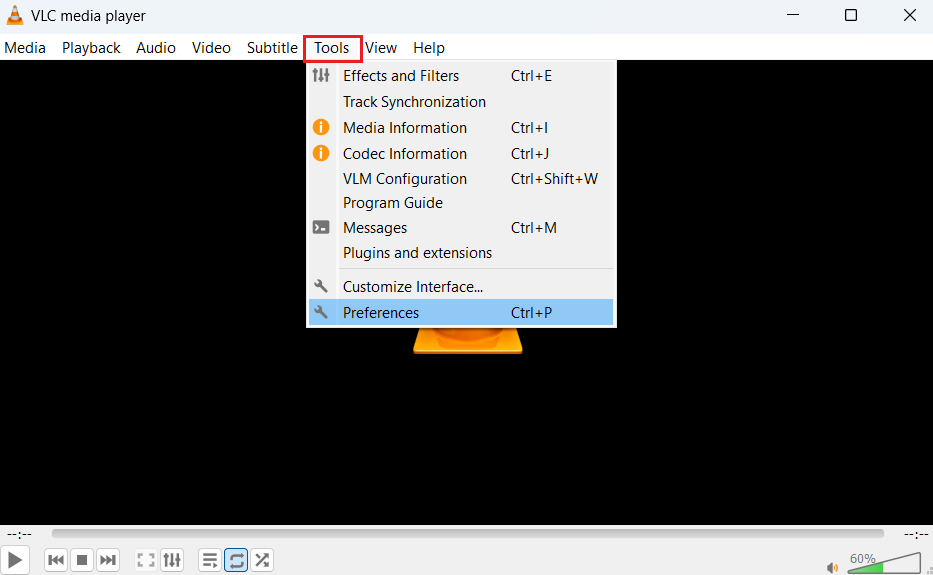
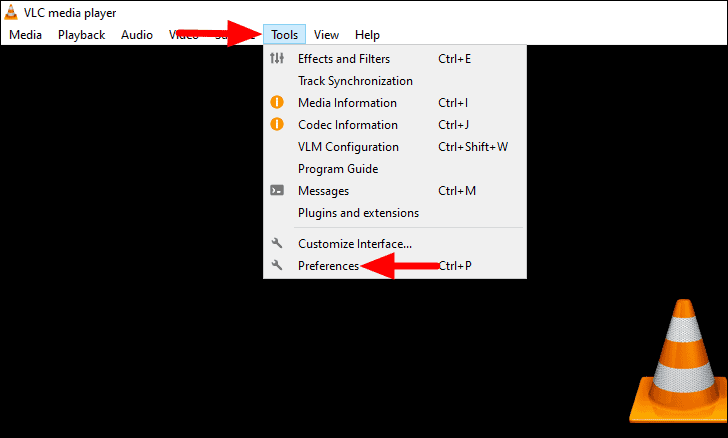
1. Launch VLC and navigate to Tools > Preferences.
2. In the settings window, click on Input and Codecs on the left sidebar.
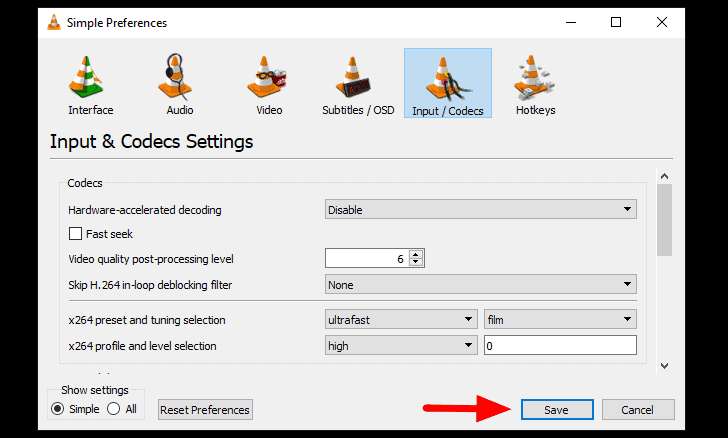
3. Now, choose the Disable the Hardware-accelerated decoding option.
Disable Hardware-accelerated Decoding Option
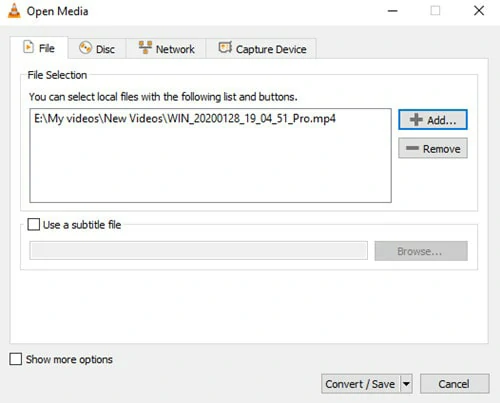
Fix 3: Convert the Video File into a Compatible Format
If you’re still facing lagging and stuttering issue with VLC media player, the video format may not be compatible. Hence, you’d better convert the video into a compatible one by following the steps below:
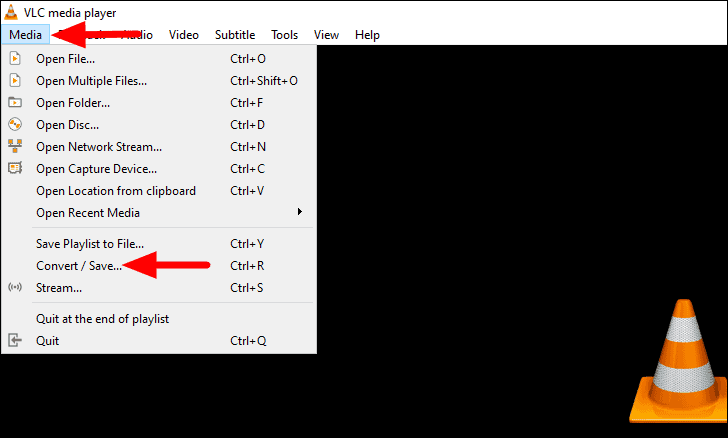
To convert the format, click on the ‘Media’ menu in the main interface, and select ‘Convert/Save’ from the drop-down menu.
Go to File > Click Add button to select the video file you want to convert > Hit the Convert/Save button.
Now set your destination folder and hit the Convert icon.
Convert the Video Format
Once the conversion process is completed, play it again to check if the video runs without any lags.
The Bottom Line
This post lists nine ways to fix video lagging or stuttering problems on Windows 10. Try the methods mentioned above and check if the problem is solved.
Professional in video editing and video marketing, we’d love to give some constructive tips and tricks to help our users make fantastic videos.
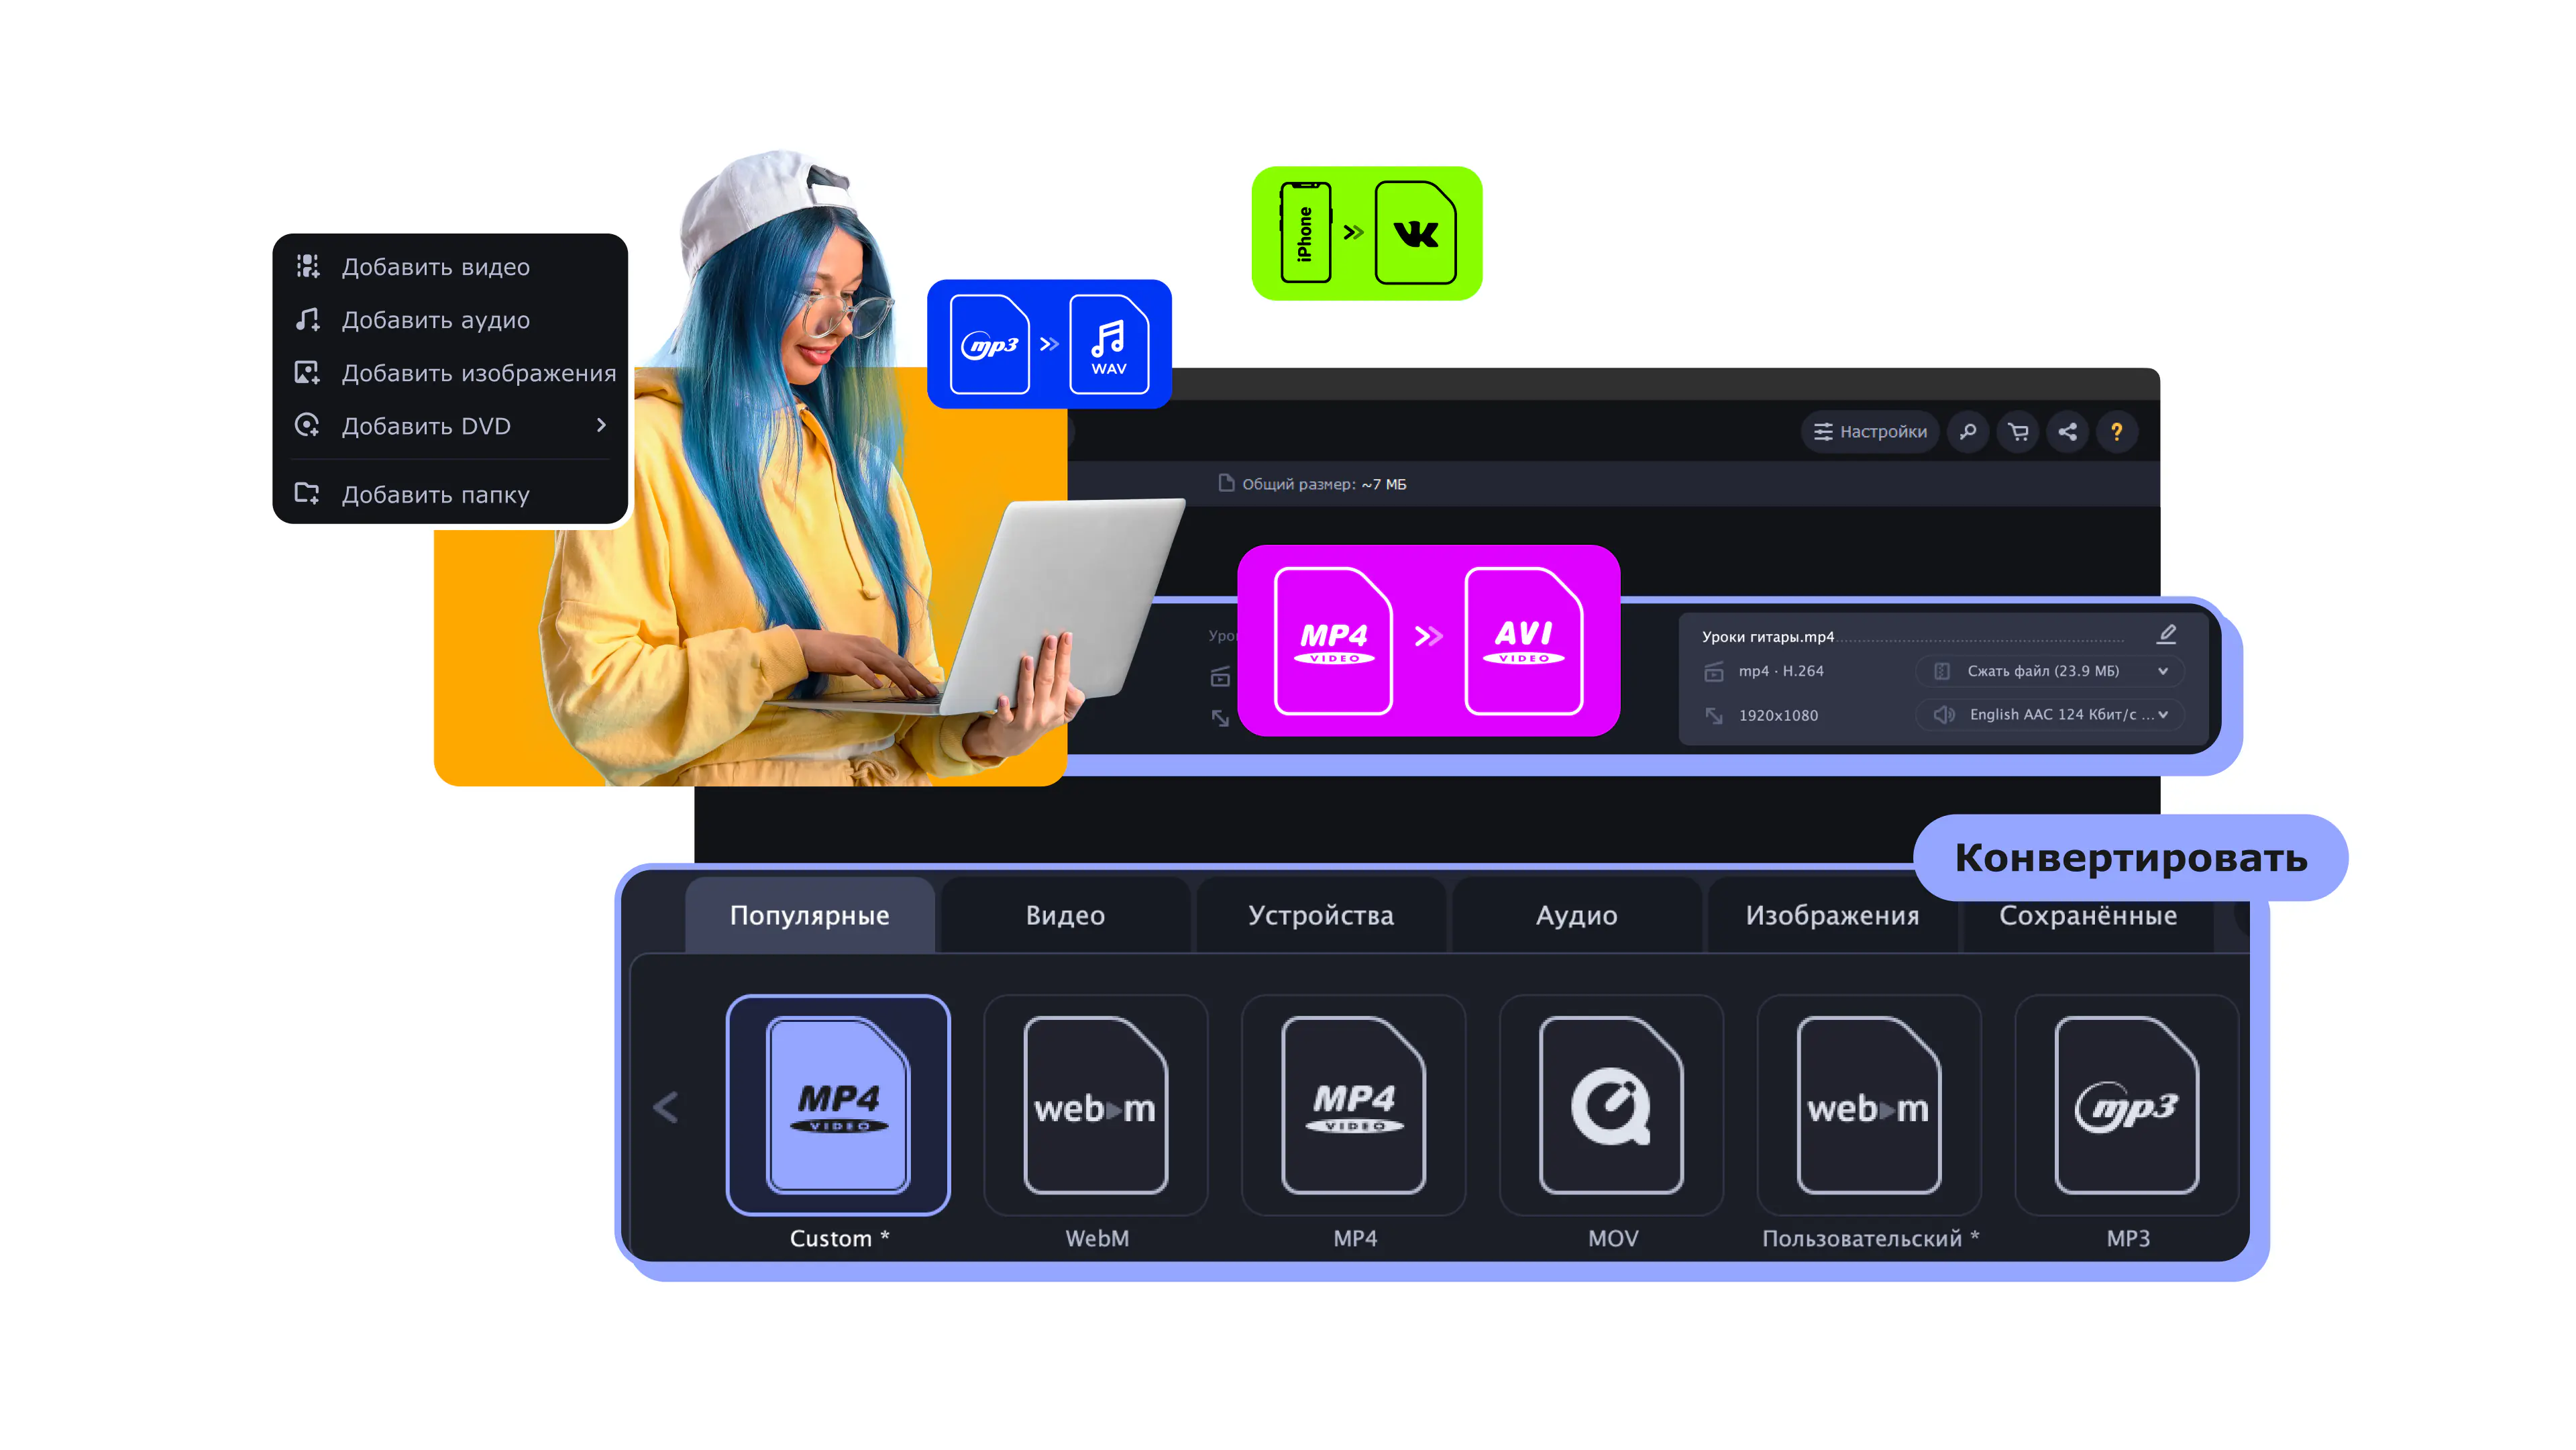
Что делать, если тормозит видео на ноутбуке или компьютере?
Попробуйте изменить формат файла в Мовавика Конвертер:
- Сверхбыстрая конвертация
- Любое количество файлов любого размера
- Редактирование и сжатие в пару кликов

Согласитесь, очень раздражает, когда видео тормозит и движется рывками на ПК, ноутбуке или мобильном гаджете. Например, вы возвращаетесь из отпуска, где сняли на камеру множество памятных моментов, пытаетесь посмотреть видео дома – и не получается, потому что оно тормозит. Причин может быть много: слабое устройство, неполадки с драйверами, несовместимость с медиаплеером, поврежденный файл и т. д. Ниже мы предлагаем решения для каждого случая.
Почему видео тормозит и движется рывками на ПК?

Выделим две категории причин – программную (софтверную) и аппаратную (хардверную, т.е. оборудование). К первой относятся:
-
Устаревшие или отсутствующие драйверы
-
Неполадки с аудио- и видеокодеками
-
Отключенные визуальные эффекты
-
Проблемы с медиаплеером
-
Поврежденный видеофайл
-
Неподдерживаемые форматы файлов фильмов
Другая часть – аппаратная категория:
-
Слабое оборудование
-
Повышенная нагрузка на устройство
Зная причины, по которым тормозит видео, можно искать решения. Кроме того, вы можете попробовать Мовавика Конвертер – простой и эффективный инструмент для быстрого перевода файлов видео, аудио и изображений в любой другой формат.
Как исправить прерывистое видео
В зависимости от того, в чём именно проблема, надо сделать одно из следующих действий:
-
Обновить драйверы
-
Обновить аудио- и видеокодеки
-
Включить визуальные эффекты
-
Воспользоваться другим видеоплеером
-
Прибегнуть к «скоростным трюкам» в VLC
-
Проверить технические характеристики компьютера
-
Снизить разрешение видеофайла
-
Конвертировать видео
-
Проверить устройство на вирусы. Они могут ухудшать работу всей системы, в т.ч. при воспроизведении видео.
-
Восстановить повреждённый исходник.
Обновление драйверов

Если они устаревшие, некорректные или вовсе отсутствуют, то система может сбоить. Иногда это сказывается на воспроизведении видеофайлов.
Решение для ОС семейства Windows:
-
Откройте Пуск.
-
Зайдите в Панель управления.
-
Выберите Диспетчер устройств.
-
Кликните правой кнопкой мыши по нужному устройству (видеоадаптеры).
-
В появившемся контекстном меню выберите Обновить конфигурацию оборудования. Система автоматически найдет и установит последнюю версию драйвера.
Когда всё сделано, перезагрузите компьютер и проверьте, решена ли проблема.
Обновление видеокодеков
Достаточно скачать и установить пакет библиотек K-Lite Codec Pack. Этот архив решит проблемы с видео, если декодировщик на Вашем устройстве был устаревшим или вовсе отсутствовал. Тем, кто всё ещё пользуется Windows XP, нужен XP Codec Pack.
Включение визуальных эффектов
Бывает, что на экране мелькают горизонтальные полосы – разрыв кадров. Это называется тирингом (tearing). Если Вы столкнулись с такой проблемой, то она вызвана отключенными визуальными эффектами. Видеодрайвер работает в режиме без сглаживания картинки.
Как исправить это в Windows:
-
Кликаем правой кнопкой мыши по ярлыку компьютера на рабочем столе.
-
Выбираем пункт Свойства.
-
В левой части появившегося окна кликаем Дополнительные параметры системы.
-
Во вкладке дополнительно нажимаем Параметры в блоке Быстродействие.
-
Выбираем опцию Обеспечить наилучший вид, кликаем по Применить.
Если пользуетесь Windows 7 и тиринг всё равно остался, то надо поменять стиль оформления:
-
Кликните правой кнопкой мыши по пустому месту на рабочем столе.
-
Зайдите в Персонализация.
-
Выберите одну из тем Aero с прозрачными эффектами.
Используйте другой медиаплеер
Поочерёдно воспроизведите проблемное видео в разных программах:
-
VLC media player
-
PotPlayer
-
KMPlayer
-
MX Player
Бывает так, что на одном проигрывателе видео тормозит, а на другом идет без проблем. Windows Media Player лучше не использовать – он очень бывает «капризным», особенно в полноэкранном режиме.
«Скоростные трюки» в VLC
Функционал этого плеера позволяет если не решить, то обойти проблемы с воспроизведением. Полезная штука, если видео тормозит в любом медиапроигрывателе.
Что нужно сделать в VLC media player:
-
Откройте вкладку Инструменты. Она в верхней части окна VLC.
-
Выберите пункт Настройки.
-
Перейдите в подраздел Видео (верхняя часть окна).
-
Поставьте галочки на всех пунктах, где это можно.
-
В нижнем левом углу есть Показывать настройки. Выберите там Все.
-
В списке (левая часть окна) найдите пункт Видеокодеки и кликните по нему.
-
В появившемся списке выберите FFmpeg.
-
Поставьте галочку на Разрешить трюки со скоростью.
-
Нажмите Сохранить (правый нижний угол).
-
Перезапустите VLC.
Проверьте характеристики устройства
Это уже «хардверная» (аппаратная) причина, которая встречается нередко. Чем выше разрешение и фреймрейт видео, тем больше ресурсов требуется для его воспроизведения. Например, для FullHD-контента в 60 fps нужны процессор с тактовой частотой от 2,4 ГГц и минимум 4 Гб оперативной памяти. Основная нагрузка ляжет на графический адаптер. Чем мощнее видеокарта или встроенное в процессор видеоядро, тем лучше она/оно справится с обработкой высококачественных видео.
Примерные системные требования для проигрывания контента в любом разрешении (FullHD, 2K, 4K, 8K):
-
Процессор: Ryzen 3 3200G или Intel Core i3-9100. Оба с интегрированной графикой.
-
Если у Вас есть процессор с тактовой частотой от 3,0 ГГц, но без встроенного графического ядра, то нужно брать дискретную видеокарту уровня GTX 1050 Ti.
-
Объем оперативной памяти: 8 Гб.
Уменьшите разрешение
Если видео тормозит на ноутбуке или ПК по причине слабой аппаратной части, то можно просто уменьшить разрешение. Перекодированный контент менее требователен к ресурсам, что во многих случаях избавляет от глюков.
Для функции изменения разрешения используйте специальный софт, например, Мовавика Конвертер:
-
Нажмите Добавить файлы (верхний левый угол), а в появившемся меню – Добавить видео.
-
В диалоговом окне найдите проблемный файл и кликните по нему. Далее – Открыть (нижний правый угол). Можно выбрать несколько роликов для одновременной обработки.
-
В нижней части интерфейса откройте вкладку Видео. Выберите формат AVI или MP4 (последний можно запускать как на компьютерах, так и на мобильных устройствах).
-
Если вам нужно сохранить видео конкретно для смартфона или планшета, то перейдите в соседнюю вкладку Устройства. Найдите производителя и модель своего гаджета. Вариант попроще – подключить устройство к компьютеру и нажать на кнопку автоопределения (значок телефона с лупой в нижней правой части окна). Конвертер сам предложит оптимальный профиль конвертации.
-
Кликните по значку шестеренки (внизу) – откроются настройки преобразования.
-
В появившемся окне найдите графу Размер кадра и определитесь с нужным вам разрешением. К примеру, если исходник в FullHD (1920х1080), то можно выбрать 1280х720. Чем меньше разрешение, тем меньше требований к мощности, но это , конечно, скажется на качестве видео.
-
Выберите место на компьютере, куда сохранить преобразованный файл (значок папки в нижней части интерфейса). По умолчанию это папка Мовавика Library.
-
Нажмите синюю кнопку Старт и подождите, пока конвертер сделает свое дело.
-
Запустите «обновленное» видео. Если проблема не исчезла или исчезла частично, то конвертируйте файл ещё раз, только с ещё более низким разрешением.
Это решение актуально для любого слабого устройства, будь оно стационарным или портативным.
Измените формат видео
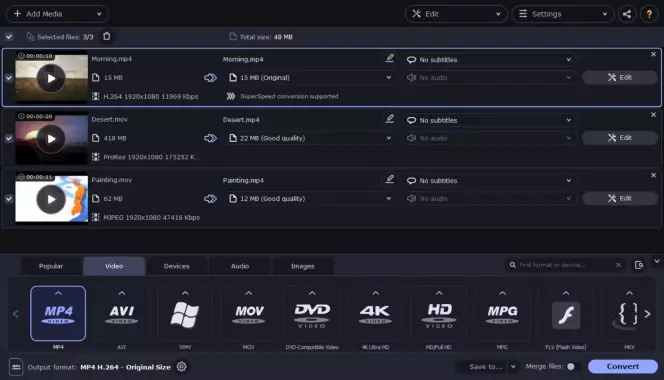
Это можно сделать, например, также в Мовавика Конвертер. Достаточно загрузить в него нужное видео, выбрать новый формат и запустить процесс конвертации. Этой займет всего несколько минут. Если необходимо до конвертации сделать монтаж видео: обрезку, поворот видео, наложение водяного знака и т.д., это также можно сделать в этой программе.
Проверьте компьютер на вирусы
Вредоносные программы могут повредить или удалить часть данных, включая видеофайлы. Кроме того, они имеют свойство потреблять системные ресурсы. Работоспособность видеоплееров, соответственно, может пострадать.
Проверить компьютер на вирусы (и удалить их) будет не лишней вспомогательной мерой. Это делается специализированными программами.
Восстановите поврежденные видео
Если неисправен сам исходник, то вряд ли вам поможет хоть какое-то из перечисленных решений. В этом случае остается прибегнуть к специальным утилитам по восстановлению видео.
Примеры подобного софта:
-
All Media Fixer Pro
-
ASF-AVI-RM-WMV Repair
-
DivFix++
-
Divx Avi Asf Wmv Wma Rm Rmvb Fix Joiner
-
Video Repair Tool
-
VirtualDubMod
У каждой программы свои алгоритмы работы, поэтому рекомендуется попробовать их все. Не сработает одна – может справиться другая. Когда процедура завершена, проверяйте «восстановленное» видео в любом исправном плеере (кроме Windows Media Player). Учтите, что успешный результат не гарантирован даже при использовании всех вышеперечисленных программ.
Как исправить проблемы при просмотре видео в Интернете

Веб – это особая подтема с отдельной спецификой. Здесь тоже требуются актуальные кодеки, обновленные драйверы и достаточно мощный компьютер. Ко всему этому прибавляются кэш и пропускная способность Интернета.
Очистка лишних данных
Во время серфинга по сети, браузер сохраняет временные и кэш-файлы. Иногда это приводит к некорректному воспроизведению видео, да и вообще к медленной работе устройства. Удалите их, чтобы они не вызывали проблем.
В Google Chrome это делается так:
-
Откройте главное меню браузера (нажмите клавиши Ctrl+H или кликните по вертикальному троеточию в верхнем правом углу).
-
Если открывали через троеточие, то в появившемся меню выберите История и затем снова История.
-
Нажмите на Очистить историю (левая часть окна).
-
В появившемся меню отметьте галочкой все пункты (история, cookie, кэш).
-
Нажмите синюю кнопку Удалить данные. Учтите, что после этого вам придется заново вводить логины и пароли на сайтах, где вы были зарегистрированы.
В других браузерах очистка проводится аналогичным образом.
Проверьте скорость подключения к Интернету
Медленное подключение к сети – одна из главных причин, по которой виснет браузер. Особенно это заметно при просмотре видео и стримов в высоком качестве.
Узнать скорость подключения можно на сайте SpeedTest by Ookla. Сравните полученные значения с теми, которые провайдер должен предоставлять вам по договору. Можно даже позвонить им и поинтересоваться условиями Вашего текущего тарифа. Если обещанные и фактические значения совпадают или только чуть-чуть расходятся, а видео при просмотре онлайн всё равно тормозит, то есть смысл перейти на более дорогой пакет. В ином случае, провайдер не дает вам скорости, за которую Вы же заплатили. Это повод разобраться в ситуации и, возможно, сменить поставщика интернет-услуг.
Отключите VPN
Пользователи часто забывают об этом. Маскировка родного IP-адреса бьет по исходной скорости подключения. Проверяйте, что VPN работает только тогда, когда вам это нужно.
Отключите торрент-клиент
Загрузки из Интернета «съедают» значительную часть трафика. Отключайте uTorrent и подобные P2P-клиенты, когда они вам не нужны.
Установите специальное расширение
Актуально для Ютуба, который использует стандарт сжатия VP8/VP9. Слабые устройства могут не потянуть его, поэтому есть смысл установить h264ify – бесплатное расширение из интернет-магазина Chrome. Грубо говоря, оно меняет VP8/VP9 на H.264, что во многих случаях избавляет от торможения.
Снизьте качество видео
На Ютубе это делается так:
-
Кликните по значку шестеренки (правый нижний угол проигрывателя).
-
Выберите Качество.
-
Нажмите на Автонастройка. Так видео будут проигрываться в разрешении, сообразном вашей скорости подключения.
-
Обновите страницу (клавиша F5 или значок круглой стрелки в верхнем левом углу браузера).
В других интернет-плеерах это делается аналогичным образом. Еще можно остановить ролик и подождать, пока он подгрузится.
Как предупредить проблемы с торможением видео на будущее
Несколько советов:
-
Не пренебрегайте надежными антивирусами. Лучше вовремя избавиться от угроз, чем позволить им нагружать систему и повреждать файлы
-
Всегда делайте резервные копии исходного видео
-
Конвертируйте только проверенными программами
-
Редактируйте только копии, сохраняя оригинал видео
Чтобы решить проблемы с форматом и качеством видео, попробуйте Мовавика Конвертер. Он выручит в случаях, когда плеер не поддерживает какой-либо тип файлов, или мощности компьютера/лэптопа/смартфона не хватает для воспроизведения контента. Программа дружелюбна к людям, интерфейс ее логичен, а скорость конвертации – высока.
Удобная программа для сверхбыстрой конвертации видео, аудио и изображений
Частые вопросы
Есть целый ряд причин, почему это происходит. Их можно условно поделить на программные (софтверные) и аппаратные (хардверные).
К софтверным относятся:
-
Неактуальные или отсутствующие драйверы
-
Неактуальные или отсутствующие кодеки
-
Отключенные визуальные эффекты
-
Неполадки или неправильные настройки медиаплеера
-
Повреждения видеофайлов
К хардверным относятся:
-
Слабые ресурсы (процессор, графический адаптер, оперативная память), мощности которых не хватает для воспроизведения видео в определенном разрешении и фреймрейте.
-
Высокая нагрузка на компьютер, из-за чего сокращаются ресурсы для проигрывания. Причиной тому могут быть вирусы.
Причины могут иметь общий характер:
-
Неактуальные или отсутствующие кодеки
-
Устаревшие или отсутствующие драйверы
-
Маломощный компьютер, ноутбук или мобильный гаджет
А могут быть специфичными для веба:
-
Низкая скорость подключения к Интернету
-
Включенный VPN, торрент или любая другая программа, отнимающая сетевой трафик
-
Накопившиеся «мусорные» данные
Вариантов много:
-
Установить или обновить драйверы на видеоадаптер
-
Установить или обновить кодеки
-
Включить все визуальные эффекты в параметрах Быстродействия. В Windows 7 ещё выбрать любую тему Aero с прозрачными эффектами
-
Запустить одно и то же видео в разных медиаплеерах и посмотреть, где оно воспроизводится лучше всего
-
Использовать «трюки со скоростью» в настройках VLC media player
-
Удостовериться, что мощности вашего устройства хватает для проигрывания видео в том или ином разрешении, фреймрейте.
-
Снизить качество видео с помощью конвертера, например, – Мовавика Конвертер
-
Попытаться восстановить видеофайл соответствующим программным обеспечением
Если затрагивать онлайн-просмотры, то нужно делать следующее:
-
Очистить браузер от побочных данных (история, куки-файлы, кэш)
-
Проверить скорость подключения к Интернету
-
Отключить все программы, которые потребляют интернет-трафик (торренты, VPN и т.д.)
-
Конкретно для Ютуба можно установить расширение h264ify
-
Снизить качество видео в настройках онлайн-проигрывателя
Похожие инструкции
-
ТОП-16 лучших бесплатных конвертеров видео 2025
-
10 бесплатных программ для сжатия видео без потери качества – ТОП 2025
-
16 лучших аудиоконвертеров – ТОП 2025
-
MP4 плеер | ТОП-8 лучших проигрывателей MP4
-
14 лучших RAW-конвертеров | Как конвертировать RAW без потери качества
-
Ошибка при открытии кодека в Sony Vegas и ее исправление
-
GIF в JPG | Как конвертировать GIF в JPG и обратно
-
Конвертер видео для iPad: 3 способа
-
Видео без звука на компьютере и телефоне? Простые способы как это исправить
-
Конвертировать MTS в MP4 онлайн и бесплатно

Остались вопросы?
Если вы не можете найти ответ на свой вопрос, обратитесь в нашу службу поддержки.
Подпишитесь и получайте скидки, советы по монтажу и идеи для контента
На нашу рассылку подписалось уже более 1,5 млн. пользователей
Table of contents
- What Causes My Locally Stored Videos to Stutter and Glitch During Playback?
- What If I Get Stuttering Videos in All Browsers
- How to Fix Choppy Streaming Video on Windows 10 Computers
- Solution 1: Update your graphics driver
- Solution 2: Install Windows Updates
- Solution 3: Restore the default settings of your chosen Power Management plan
- Solution 4: Change your wallpaper settings
- Solution 5: Change your browser settings
- Solution 6: Scan for Malware
- Solution 7: Scan for hardware changes
- Solution 8: Temporarily disable your antivirus program
- Conclusion
- FAQ
Have you ever been frustrated byvideo stuttering when playing back? This can also happen when streaming videos online. It’s a common problem with numerous potential causes. In this guide, we’ll look at some possible causes of these choppy streaming videos and suggest practical solutions to help you resolve the problem. We’ll go into the specifics to help you understand and resolve choppy video issues, from out-of-date video players to graphics driver problems and system setups. Let’s begin.
What Causes My Locally Stored Videos to Stutter and Glitch During Playback?
Why do videos stutter on my computer? Various factors could lead to video stuttering in Windows 10 . It could be that:
- Your video player is out of date.
- Your graphics driver is outdated.
- You haven’t installed Windows updates.
- You have set up unfavorable system configurations.
- Your system is infected with malware.
It could also be that the video you can’t play is damaged. Consider getting the file again. Or, if you are using a VLC media player, follow the instructions below and see if the video will play properly afterwards:
- Open the program and click on the Tools tab.
- Click on Preferences at the bottom of the context menu.
- At the top of the page, click on Input/codecs.

- Go to the Files category. Under Damaged or Incomplete AVI file, select Always Fix from the drop-down menu.
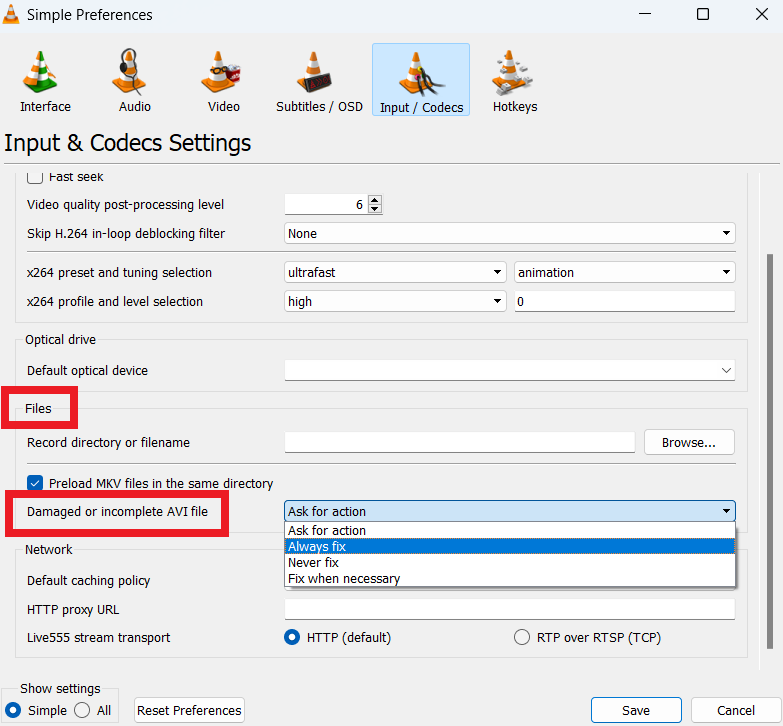
- Save the changes and exit the window.
Now, try playing the video again if the video lagging is still happening. If so, check the other solutions in this guide.
What If I Get Stuttering Videos in All Browsers
The first thing you have to do is see if you have a strong internet connection. You should check your modem and consider rebooting it.
Next, ensure that your browser is up to date, and then clear the cookies and temporary files.
If this doesn’t solve the choppy video, we’ll discuss the methods to fix the problem in the following sections.
Related: Hard Refresh Your Browser: Chrome, Firefox, Edge, and Safari
How to Fix Choppy Streaming Video on Windows 10 Computers
Whether you’re experiencing choppy video playback on Windows 10 in your browser or media player applications, the solutions below will help you resolve it.
Solution 1: Update your graphics driver
Outdated display drivers usually cause video lagging on the computer. We recommend updating your display drivers to see if that resolves the problem.
Here’s how to update your drivers using Device Manager:
- Type Device Manager in the search bar and click to open.
- Expand Display adapter, right-click on it, and select Uninstall.
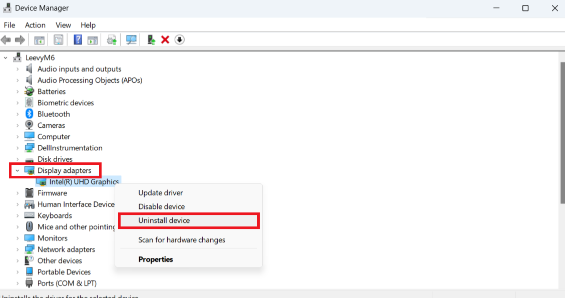
- Restart your computer, click Windows Update, and select Check for updates.
Windows will check for recent drivers and update them. After the update, reboot your computer and check if the videos stuttering on Windows 10 issues has been resolved. Use Auslogics Driver Updater for automatic fix
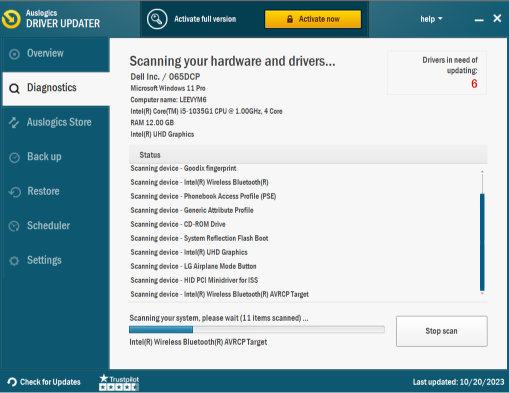
Auslogics Driver Updater is a reliable program that thoroughly examines your system’s drivers for outdated or incompatible drivers that may be causing playback issues.
The program downloads and installs the most recent, manufacturer-recommended drivers, resolving the main source of the video stuttering p roblems.
This guarantees that your graphics drivers, essential for smooth video playback, are current and compatible with your system.
Download Auslogics Driver Updater
Prevent hardware errors and ensure problem-free device operation with this advanced tool that detects outdated drivers and safely gets them updated.
Related: Auslogics Driver Updater: New Drivers in One Click!
Solution 2: Install Windows Updates
Follow these easy steps to download and install available updates for your operating system:
- Press the Windows logo key.
- Go to the search bar and type Updates.
- Click on Check for updates from the results list.
- Click the Check for updates button on the right-hand side of the open window.
Restart your computer and see if your videos play without issues when the process is complete.
Related: How to Manually Check and Install Windows Updates
Solution 3: Restore the default settings of your chosen Power Management plan
The computer’s performance is linked to your preferred power plan options. And since you can edit the settings, you might have made changes now, causing the video issues you face.
If this is the case, restoring the default configurations will help fix it.
Here’s what you must do:
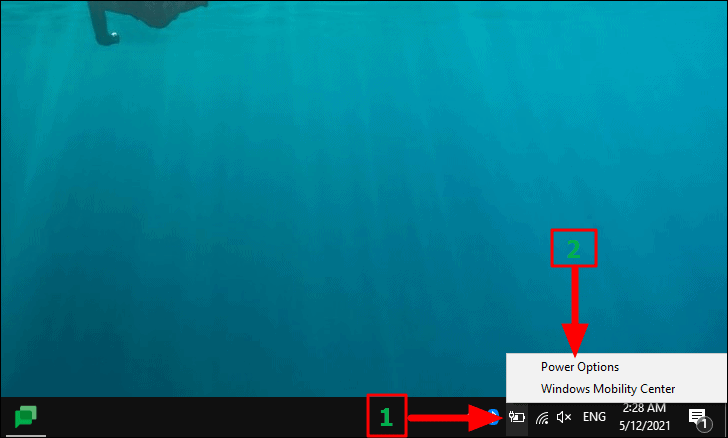
- Right-click on the battery icon on your taskbar.
- Select Power Options from the context menu.
- Click the Change plan settings link next to your selected power plan.
- Click the link that says Restore default settings for this plan. (You’ll find the option at the bottom of the page).
- Click OK to confirm the action.
Restart your computer, and then try playing the video again.
Related: Enable Ultimate Performance Power Plan in Windows 10/11
Solution 4: Change your wallpaper settings
If you’ve enabled slideshow for your desktop background and set a short interval, your video might skip a frame each time a new background comes on.
You can either disable the option entirely or adjust the settings.
Follow these easy steps:
- Go to the Start menu.
- Type Wallpaper in the search bar and select Choose background, slideshow, or solid color as your background mode from the results.
- Now click Background and select Picture or Solid color. But if you would rather keep the slideshow on, set a longer interval (30 minutes or 1 hour).
Check to see if the choppy video has stopped. If not, proceed to the next solution.
Related: How to Set a Dual Monitor Wallpaper on Windows 10 and 11?
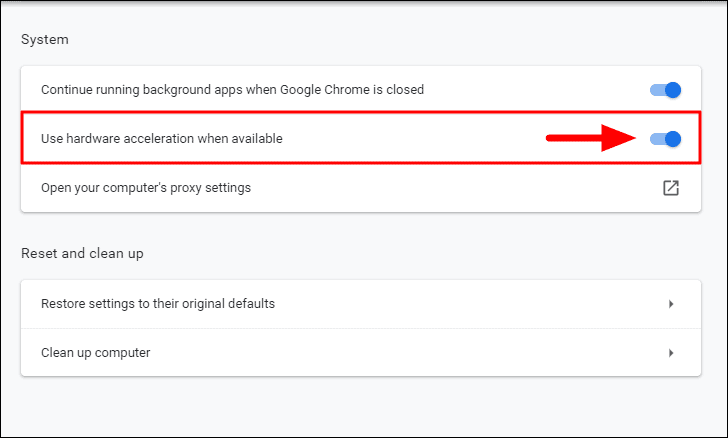
Solution 5: Change your browser settings
In Google Chrome, there’s a feature known as hardware acceleration that could be causing the stuttering issues while streaming your videos.
Switching it (Turning it on disabled and off if enabled) might help resolve the issue. Here’s how to fix choppy streaming video.
- Launch the browser and click the three vertical dots.
- Click on Settings.
- Click on System, and disable the Use hardware acceleration when available if it’s on or enable if it’s one.
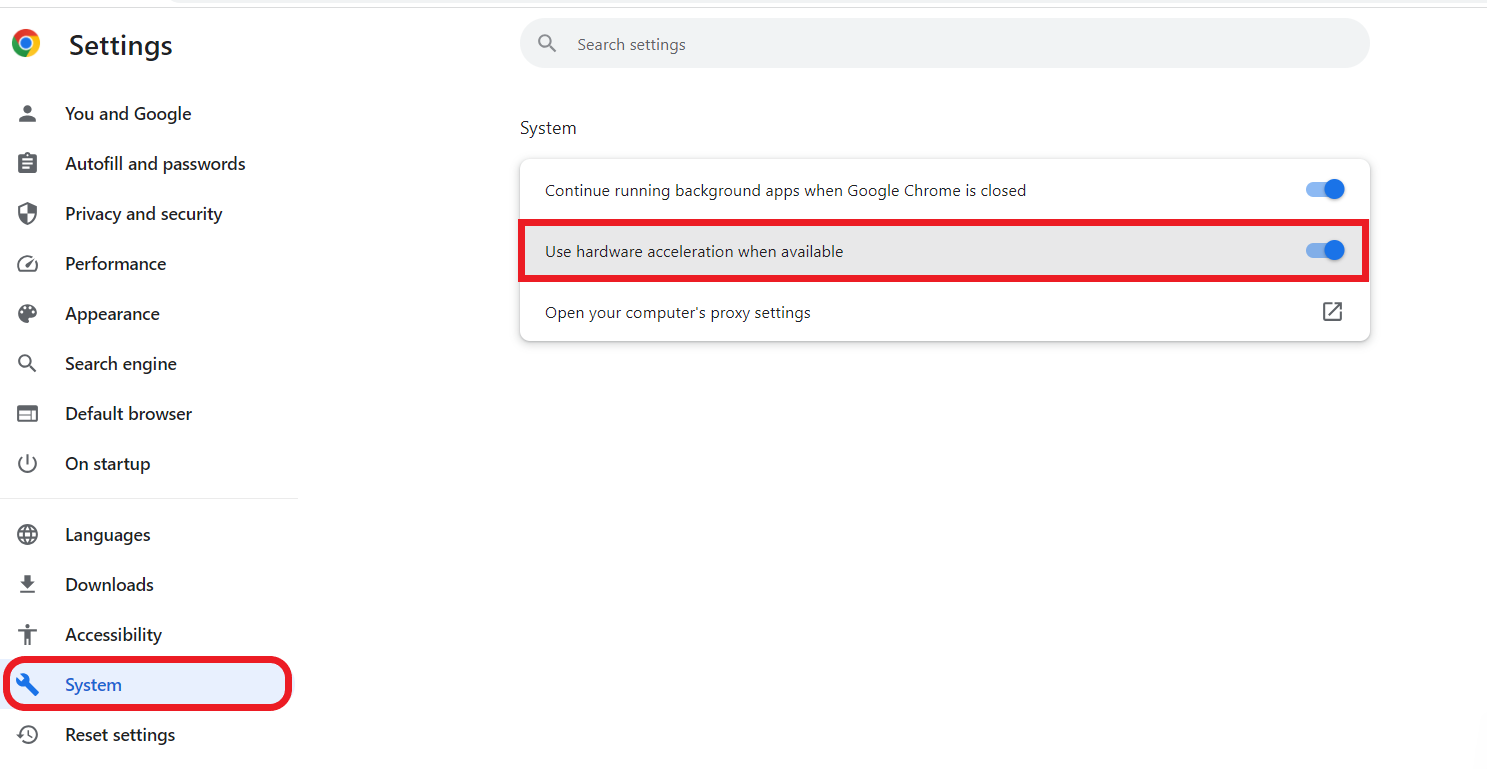
- Restart the browser and play the video if the problem has been resolved. If it does, repeat the above steps to undo your change.
Update Chrome’s WideVine featureThe next thing you can do is to update Chrome’s WideVine component. Follow the easy steps below to get it done. But first, you have to clear your cookies and other browsing data:
- Launch the browser and open a new tab.
- Press
Ctrl + Shift + Delete. This will lead you straight to the Clear browsing data page.
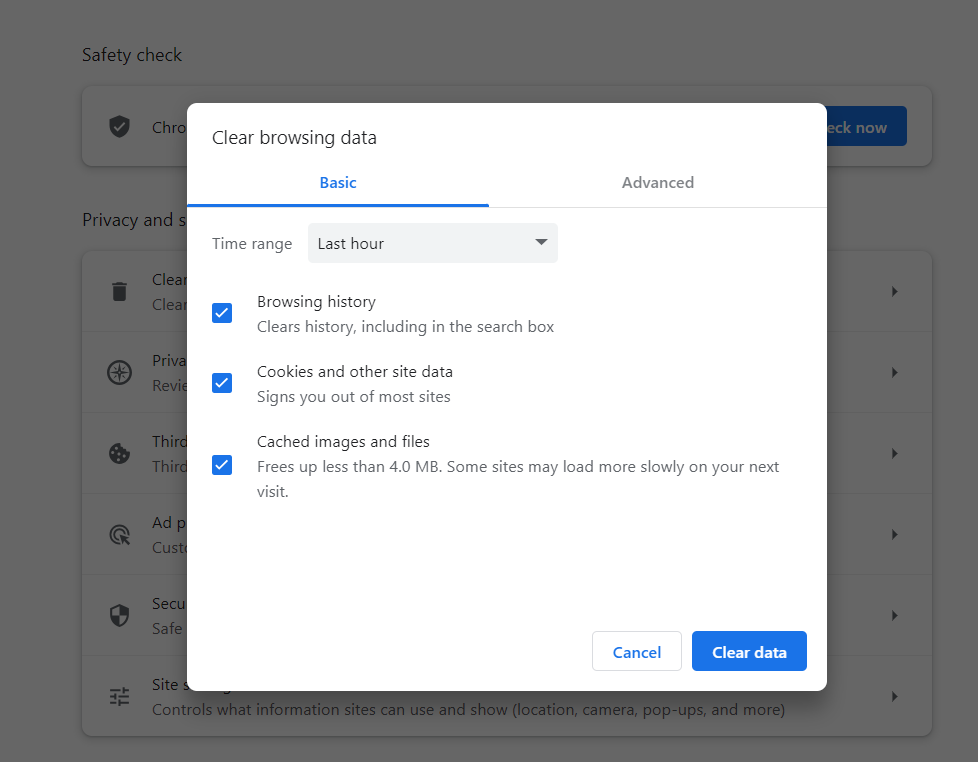
- Choose All time as the time range and then mark the checkbox for the listed entries.
- Now click the Clear data button.
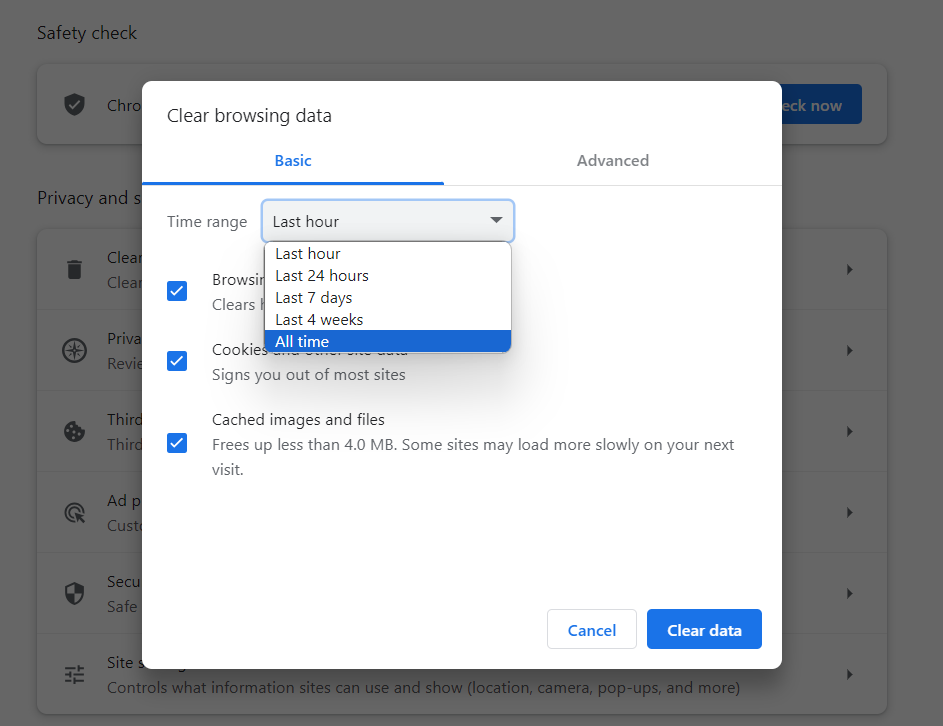
- Close the browser.
After you’ve completed the above steps, update WideVineCDM. Here’s how to do it:
- Press the
Windows + Rto open the Run dialog box. - Type or copy and paste C:/Program Files (x86)/Google/Chrome/Application into the field and press
Enter.
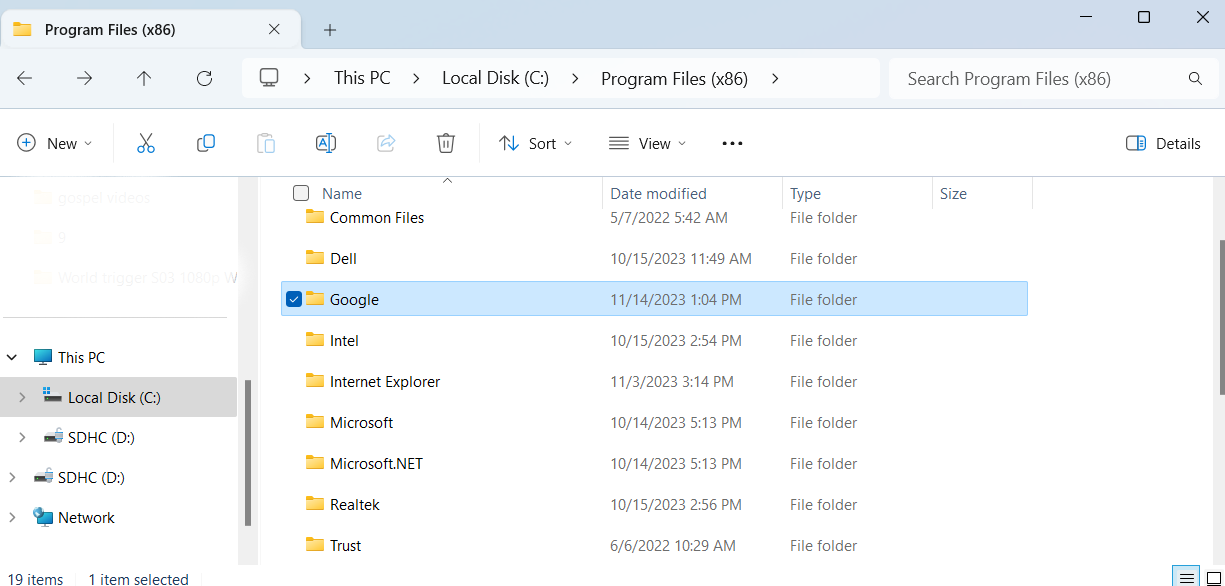
- Open the folder that’s named with a code number. Inside, you’ll find the WideVineCDM directory. Delete it.
- Open the Run dialog box again and enter C:\Users\(YourUsername)\AppData\Local\Google\Chrome\User Data. Then click OK.
- Locate WideVineCDM and delete it.
- Launch Chrome.
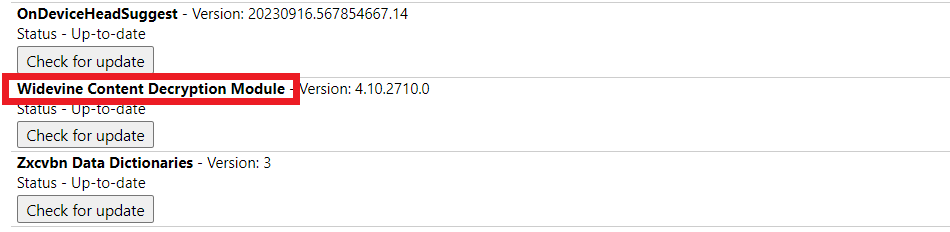
- Type or copy and paste
chrome://componentsinto the URL bar and pressEnter.
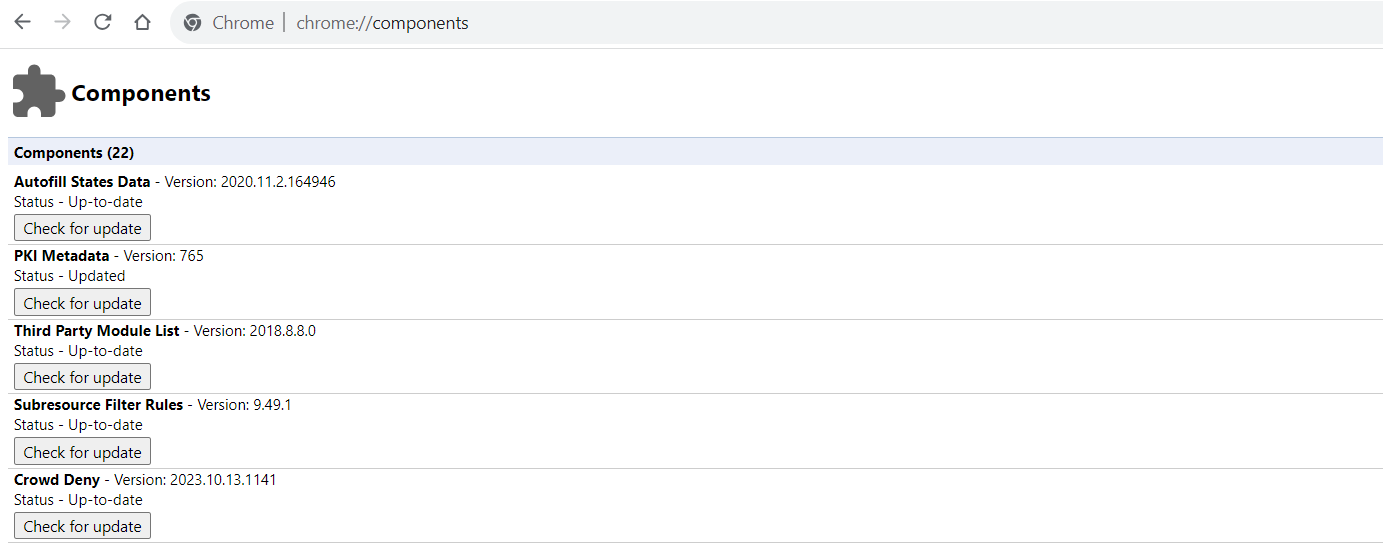
- Go to Wide Vine Content Decryption Module (Note the version) and click the Check for Updates button.
- Wait for the process to complete, and then close the browser.
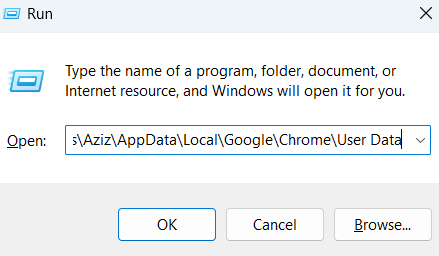
- Open the Run dialog box again.
- Type in
C:\Users\(Your Username)\AppData\Local\Google\Chrome\User Dataand pressEnter.
- Open the WideVindCDM folder and rename the entry to the version you noted in step 13.
Now, launch your browser and try to play your videos. See if the video stuttering problem has been resolved.
Related: [EASY GUIDE] How to Stop Pop-Ups in Google Chrome?
Solution 6: Scan for Malware
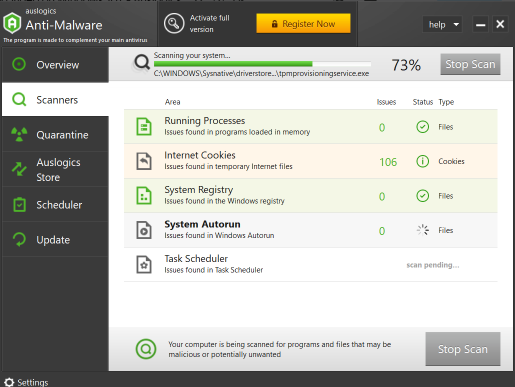
A virus or other malware infecting your device could be the cause if you’re experiencing choppy video playback on Windows 10.
Malware comes in different forms that can drain system resources and interfere with different functions, such as video playback.
Consider performing a virus scan on your computer to resolve video lagging p roblems.
Identifying and removing viruses with a reputable malware removal tool, like Auslogics Anti-Malware, can help restore smooth video playback.
Download Auslogics Anti-Malware
Detects malware, spyware and viruses, then safely removes them from your PC to help keep it as secure as possible. The program is made to complement your main antivirus.
Related: Auslogics Anti-Malware: Features and Reviews
Solution 7: Scan for hardware changes
Scanning for hardware changes through Device Manager might help fix the issue:
- Press
Windows + Xand click on Device Manager. - Right-click on a blank area in the open window and select Scan for hardware changes.
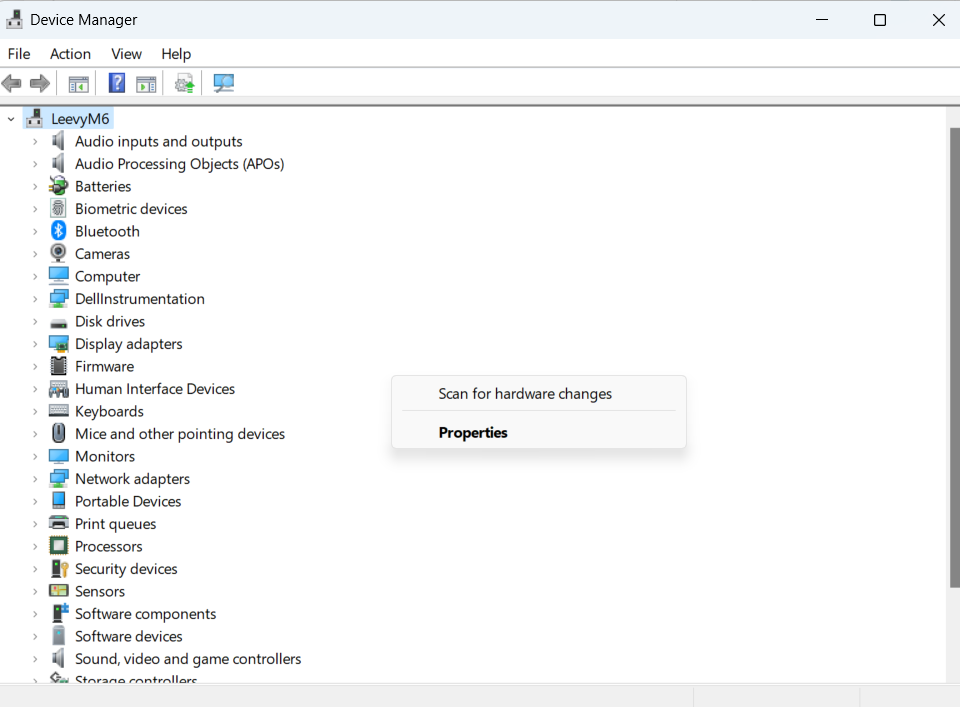
- After completing the process, close the window and try playing your videos again.
Related: How to Fix the Error Code 45 in Device Manager
Solution 8: Temporarily disable your antivirus program
Some users have reported that they could stop the video stuttering and glitches after disabling their security program. Some antivirus software developers confirmed this.
You can, therefore, try it out and see if that does the trick for you, especially if you’ve attempted all the above fixes without any results, although quite unlikely.
If this solution works, permanently disable the antivirus program and switch to a different brand.
Finally, you can try a simple step like converting your video to another format. It may help if the video won’t play correctly on Windows 10 due to format incompatibility. WinX Video Converter is an excellent tool for free converting any 4K/HD videos to Windows 10 compatible formats.
Convert MKV to MP4, AVI to WMV, HEVC to H.264, etc. The software can also reduce video file size, cut, crop, merge video footage, or adjust video parameters.
The app’s intuitive interface makes it easy to operate.
Conclusion
Video lagging problems can be frustrating in the digital era, especially when it interferes heavily with your tasks. But now that you have the information in this article, you can confidently resolve these issues.
Here’s a detailed guide to fixing video stuttering and glitches, whether it’s through updating graphics drivers, installing Windows updates, or tweaking a few basic system settings.
Remember that troubleshooting may appear difficult initially, but with these step-by-step guides and patience, you can solve the issue.
FAQ
How to stop YouTube videos from lagging?
Try these few methods to stop YouTube videos from lagging. Make sure your internet connection is stable first.
Next, if necessary, change the YouTube video quality settings to a lesser resolution. It could also be helpful to clear the cookies and cache in your browser.
Ensure your browser is up to date, and try turning off any add-ons that might interfere.
Why are my videos choppy on Windows 10?
You can do several things to improve if your Windows 10 movies are choppy. First, make sure your graphics drivers are current. Check the device manager to ensure this. You should also close any background apps that aren’t necessary to free up system resources.
Adjusting your computer’s power settings to prioritize performance over energy conservation may also be helpful in certain situations.
What is hardware acceleration, and how can it help with video lag?
With hardware acceleration, the software can offload video rendering tasks to the computer’s hardware, such as the GPU.
By using your graphics card’s capabilities, turning on hardware acceleration in your browser or video player can improve the video quality you play.
Since the GPU is intended for these activities, it can be extremely useful in lowering video lag and enhancing overall performance.
How often should I update my graphics drivers?
Updating your graphics drivers regularly is essential for the best possible video performance. New driver versions usually include bug fixes and improvements, which might improve compatibility with video playback.
Check the company’s website that made your graphics card to ensure you have the drivers’ most recent, stable version.
You can also use Auslogics Driver Updater to update your drivers to the manufacturer’s current version automatically.
Can software conflicts be resolved without reinstalling Windows?
In many situations, software incompatibilities can be resolved without reinstalling Windows. First, update all installed software to the most recent versions. If the problem continues, find and remove any conflicting programs.
You can also use the built-in Windows utilities, such as the System File Checker (SFC), to scan and fix corrupted system files. A comprehensive antivirus check to rule out malware problems is also recommended.
When a video lags on Windows 10, it’s probably the most irritating feeling ever. There are various problems that lead to the issue and you can fix them easily at home without the need to take your system out for a repair.
Also, the lag or stutter is not always for the same set of videos for every user. For some, the videos stored on their system may lag while for others it could be with the videos they play online. Some users have also reported issues with videos on a specific media player.
What Causes Videos to Lag or Stutter on Windows 10?
Before we delve into the various fixes, it’s necessary to understand the causes behind videos lagging or stuttering on Windows 10. Once you identify the underlying issue that’s leading to the lagging of videos, fixing it would be much simpler and convenient.
- Running an older version of Windows
- Outdated drivers
- Outdated media player
- Corrupt video file
- System infected with malware
- Incorrect system configuration
Now that you know the various issues, it’s time we walk you through the fixes. The fixes have been categorized into three sections, one for videos stored on the system, another for issues playing a video on the VLC media player, and the last for playing videos online.
Fixing Lagging and Stuttering for Videos Stored on Computer
Since there are multiple factors that lead to a lag in videos, the solutions are diverse but anyone with basic technical acumen can easily execute all the fixes mentioned in the article.
Fix 1: Scan for Hardware Changes
Hardware changes can lead to lagging and stuttering of videos and scanning for it might help fix the issue. Before you start with the other fixes, you should first scan for hardware changes.
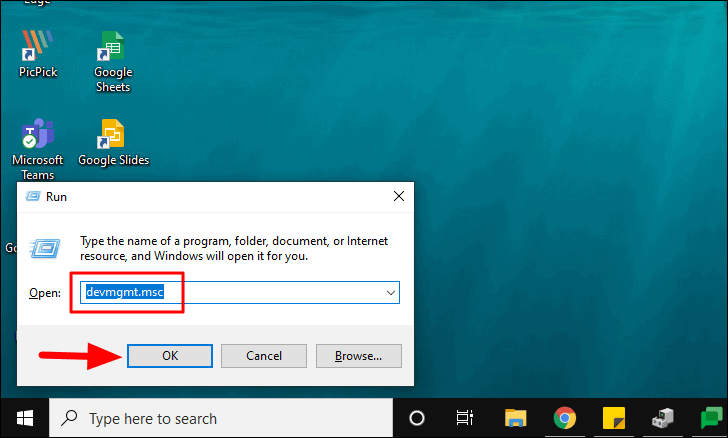
To scan for hardware changes, you first need to open the ‘Device Manager’. Press WINDOWS + R to launch the ‘Run’ command. Next, enter ‘devmgmt.msc’ in the text box and then click on ‘OK’.
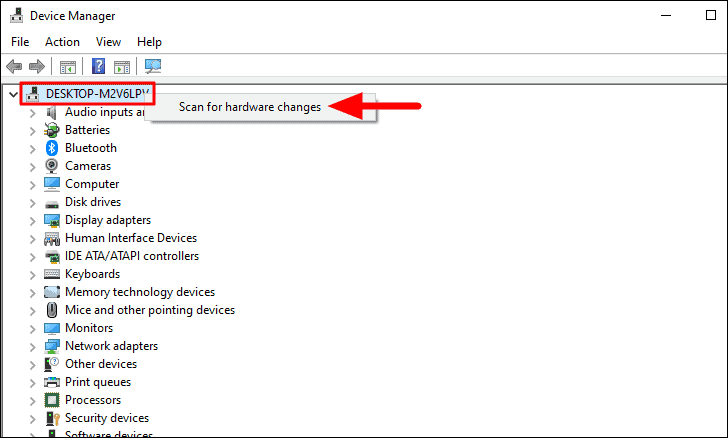
Now, right-click on the device name at the top and then select ‘Scan for hardware changes’ from the menu.
After the scan is complete, play the video again and check if the playback issue is resolved. If you still experience lag and stutter, try the next fix.
Fix 2: Update Windows
Whenever a video lags for a prolonged period on multiple media players, your primary approach should be to look for Windows updates. With each update, the bugs and issues in the previous version are fixed. If the videos on your system are lagging due to a bug, updating the Windows should solve the problem.
To search for updates, press WINDOWS + I to launch system ‘Settings’ and then select ‘Update & Security’ from the options.
The ‘Windows Update’ tab will open by default since it’s listed first on the left. Click on the ‘Check for updates’ icon on the right to check if there are any available Windows updates. In case there is, Windows will start to download and install it on your system.
You will be asked to restart the computer once the updates are installed. Now, check if the issue with playback is resolved. If not, move to the next fix.
Fix 3: Update Graphics Driver
Outdated drivers also result in lagging and stuttering of videos. Windows generally look up for driver updates and install them on their own. However, in some cases, it does not happen and if you are facing issues with video playback, always check for graphic driver updates.
To search for graphic driver updates, you first need to launch the ‘Device Manager’. Search for it in the ‘Start Menu’ and then launch it by clicking on the search result.
On the ‘Device Manager’ window, double-click on ‘Display Adapter’ to view the drivers under it.
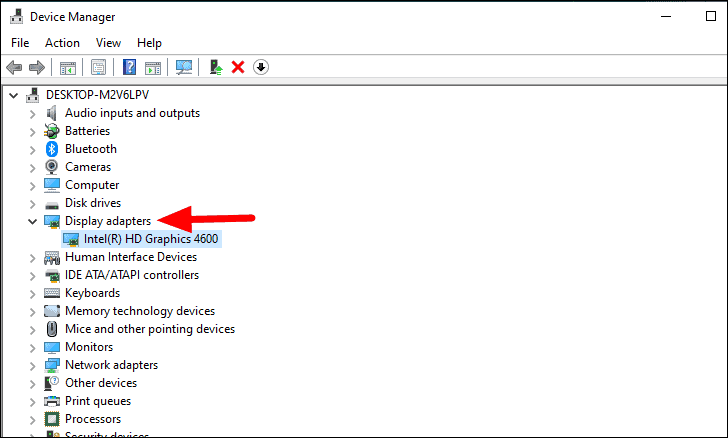
Next, right-click on the graphics drivers and select ‘Update driver’ from the context menu.
The ‘Update Driver’ window will open where you will find the options to either let the Windows search for the driver or you can browse and manually install it, in case you have already downloaded the driver. If you are not too tech-savvy, it’s recommended that you select the first option. Windows will now look for the driver and install it, in case an updated version is available.
After you have updated the driver, reboot the Windows and check if the error is fixed.
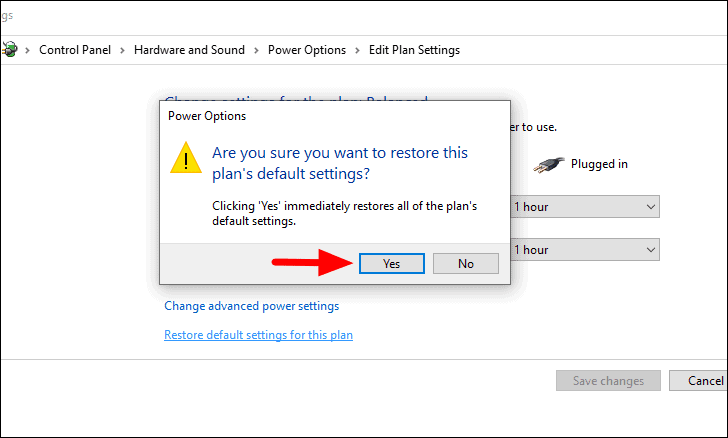
Fix 4: Restore Default Settings for the Power Plan
If you have made modifications to the power plan, it could be leading to lagging and stuttering of videos when you play them. To fix the issue, restore default settings for the current power plan.
To restore default settings for the power plan, right-click on the battery icon in the system tray and then select ‘Power Options’ from the menu.
The ‘Power Options’ window will now launch. Now, click on ‘Change plan settings’ under the ‘Selected plan’ section.
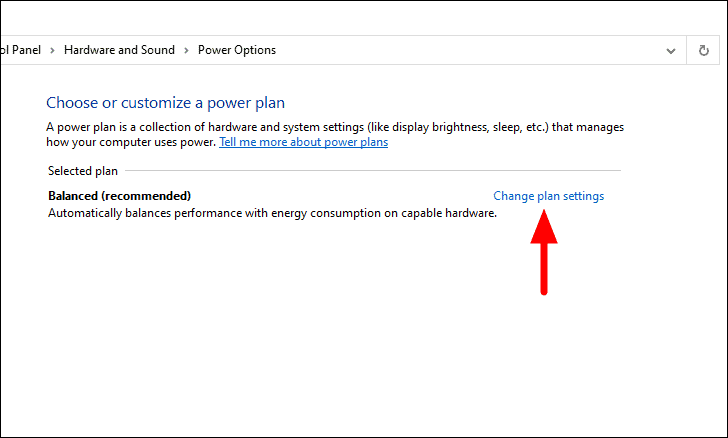
You will now see the current power plan and its settings. Next, click on ‘Restore default settings for this plan’ at the bottom.

Now, click on ‘Yes’ on the confirmation box that pops up.
Fix 5: Changing the Number of Processors
Changing the number of processors has worked for many users. Although it’s not a sure-shot method but if none of the ones above have worked for you, it’s time you give it a try.
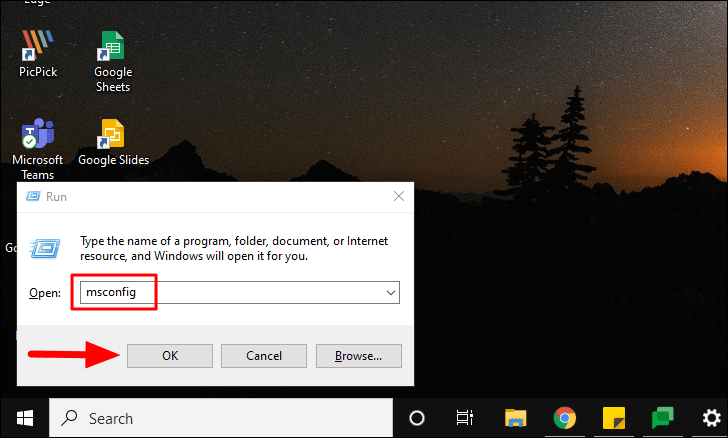
To change the number of processors, you first need to launch ‘System Configuration’. Press WINDOWS + R to launch the run command, enter ‘msconfig’ in the provided section, and then click on ‘OK’.
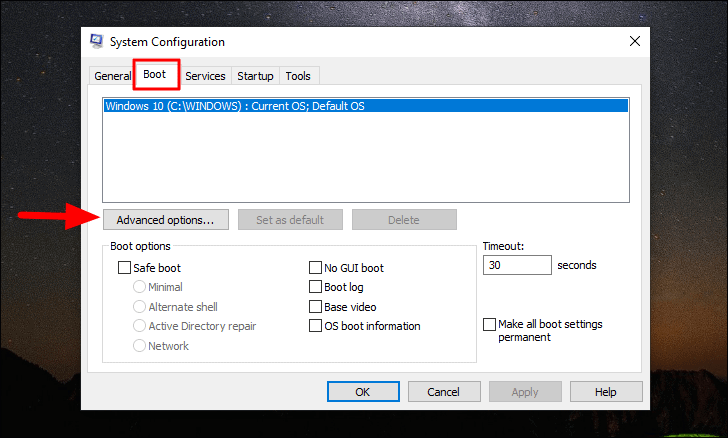
In the System Configuration window, select the ‘Boot’ tab at the top and then click on ‘Advanced options’.
Next, tick the checkbox for ‘Number of processors’, click on the box under it, and then select either ‘1’ or ‘2’ from the drop-down menu. After you have changed the number of processors, click on ‘OK’ at the bottom to save the changes in the ‘BOOT Advanced Options’ window.
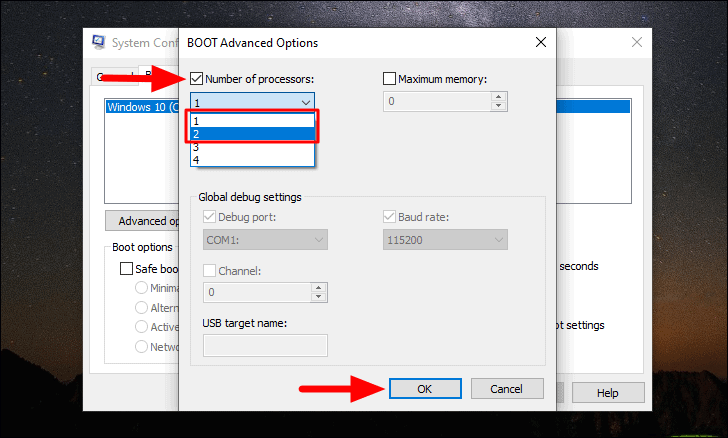
Again click on ‘OK’ on the ‘System Configuration’ window to save the modifications and close the window. Now, reboot your system and see if the lag and stutter error for the video playback has been fixed. If not, move to the next fix.
Fix 6: Modify the Wallpaper Settings
When you set a slideshow as the wallpaper, every time the background picture changes, the video you are playing may skip a frame. This can be categorized as a bug in Windows, and if this is the issue that you are encountering, changing the wallpaper to something static might do the job.
To change the background, enter ‘Desktop Background’ in the ‘Start Menu’ and then launch the setting from the search results.
Next, click on the box under background to select a different type.
Next, select either ‘Picture’ or ‘Solid color’ from the menu.
In this case, we have selected ‘Solid Color’ in the last step and various options are displayed to chose from. If you select picture, there will be a few options for you chose from or you can browse the system for more.
Fix 7: Lowering the Video Resolution
Many a time, high-resolution videos may lag or stutter on Windows 10. If none of the above fixes resolved the issue for you, try lowering the video resolution. There are multiple third-party apps that allow you to lower the resolution, however, the Video Editor built-in in the ‘Photos’ app negates the need for any.
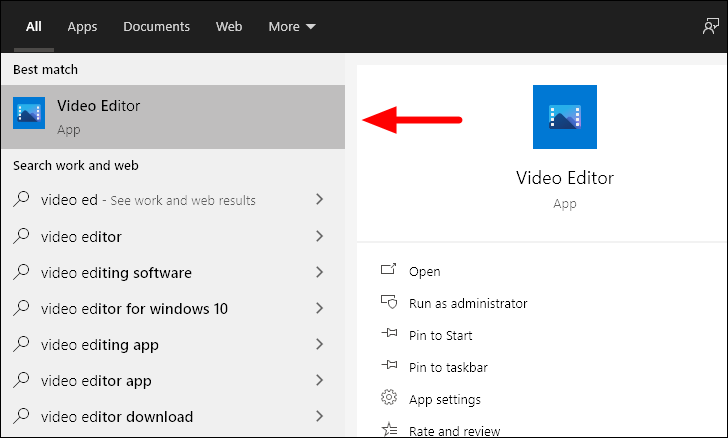
Search for ‘Video Editor’ in the ‘Start Menu’ and then click on the result to launch it.
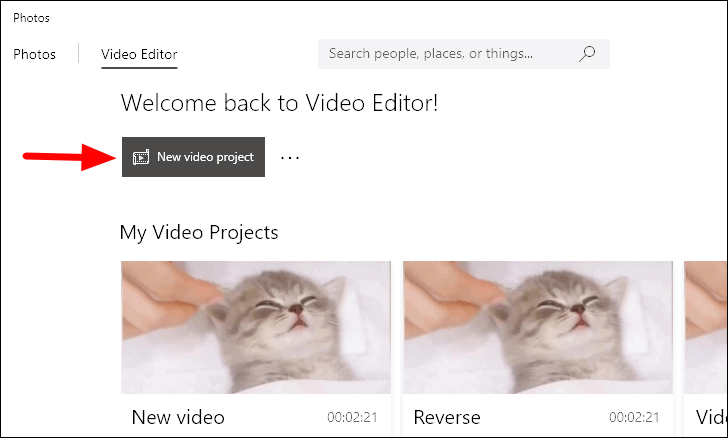
Next, click on ‘New video project’ option near the top-left corner to create a new project.
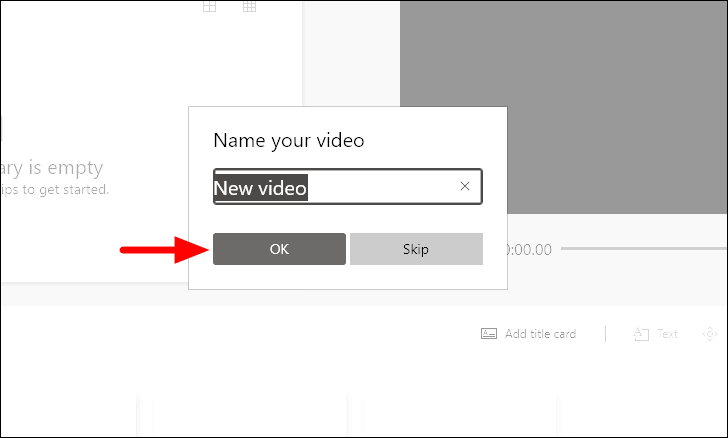
Enter a name for the video project in the provided section and then click on ‘OK’.
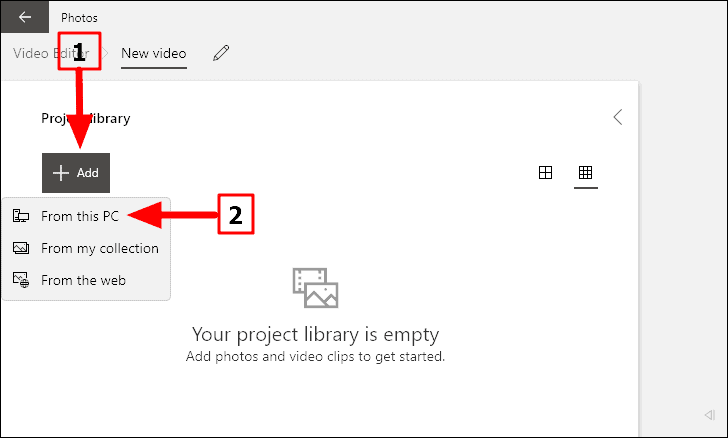
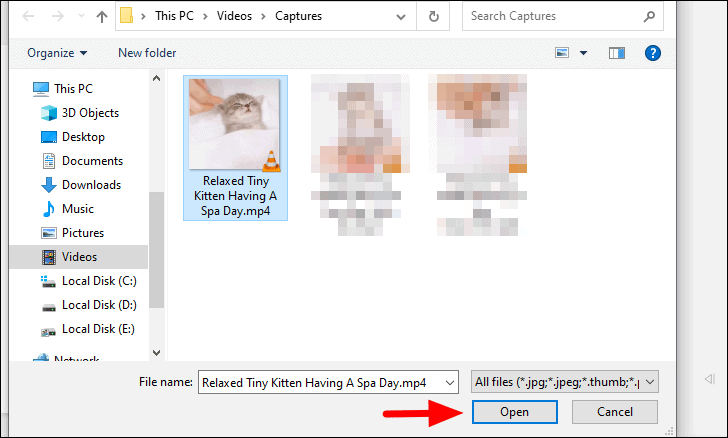
You now need to add videos to the project to lower their resolution. Click on ‘Add’ near the top-left corner and then select ‘From this PC’ in the drop-down menu.
Now, locate and select the video for which you wanted lower resolution and click on ‘Open’ at the bottom.
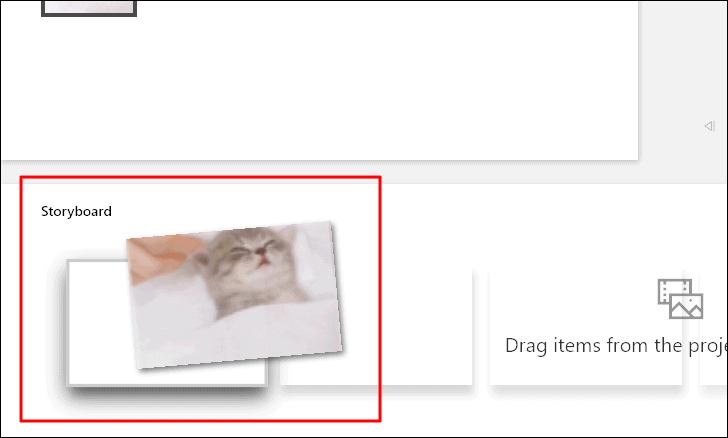
Next, drag and drop the video from ‘Project Library’ section to the ‘Storyboard’ section at the bottom.
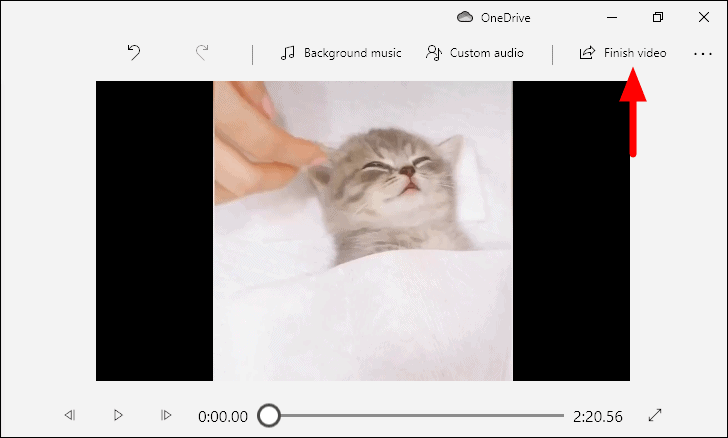
Since we are not here to make any edits, rather just lower the resolution, click on ‘Finish Video’ at the top-right corner.
The ‘Finish your video’ window will pop up, click on the box under ‘Video quality’ to explore the other options.
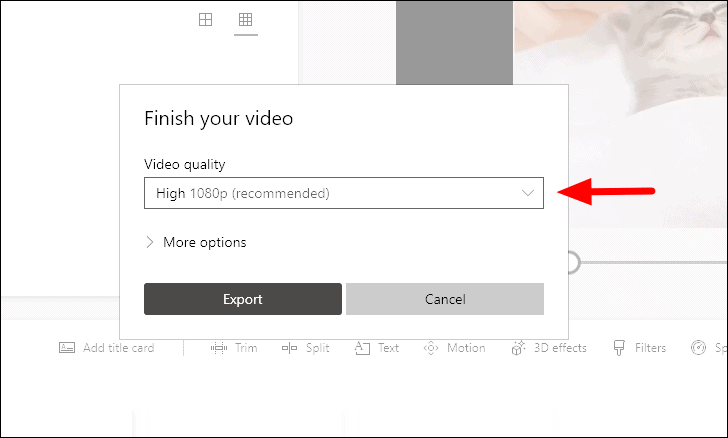
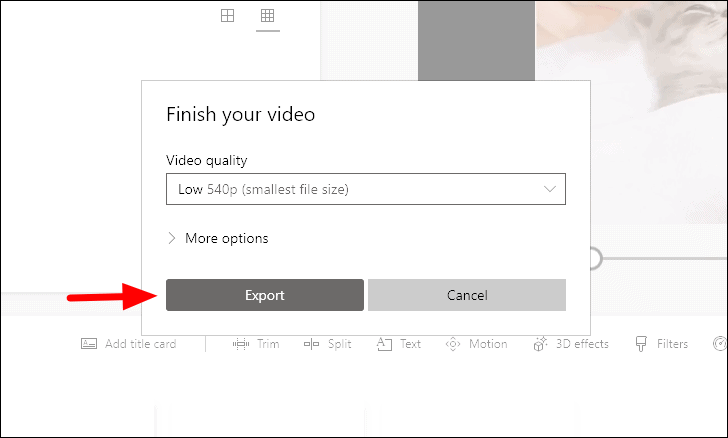
Now, select a lower resolution from the drop-down menu based on your preference and the desired final video quality.
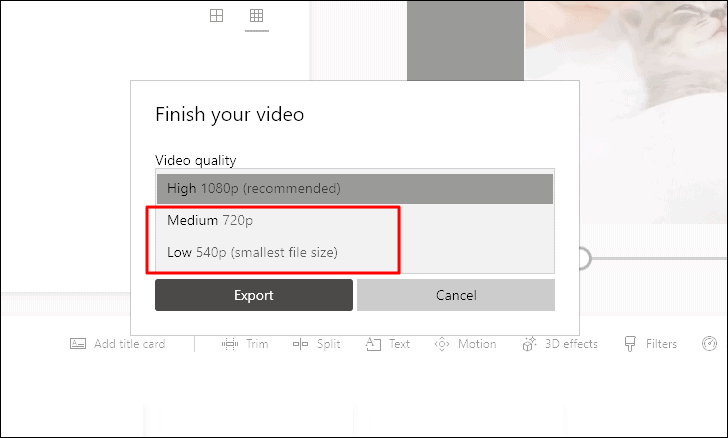
After you have selected a lower resolution, click on ‘Export’.
Now, browse and chose the location where you want to save the new video with lower resolution and click on ‘Export’ at the bottom.
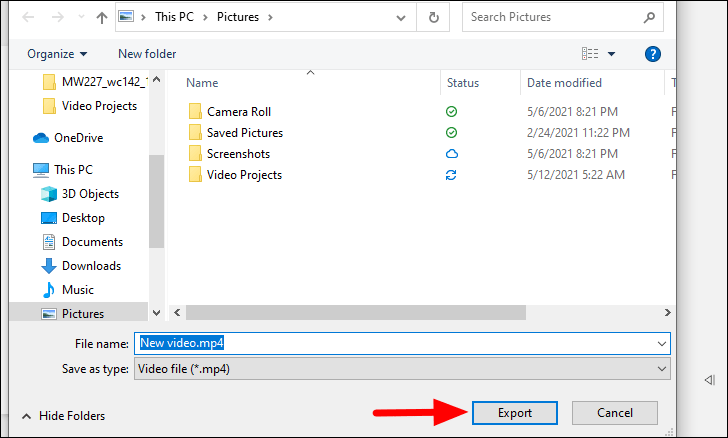
You can now play the new video and the lag and stutter issue will be resolved. This should however be the last resort since it affects the video quality.
Fixing Lagging and Stuttering for Videos with VLC Media Player
VLC Media Player is one of the most extensively used multimedia players across the globe as it supports almost all formats and has a straightforward interface. However, there are times when a video may lag while playing on VLC which is irksome. But the best part, VLC has various built-in features that allow a user to fix the issue.
Fix 1: Disable Hardware-Accelerated Decoding
Hardware-accelerated decoding could be one of the reasons behind the lagging and stuttering of videos. If you are facing issues with multiple videos, it’s time you disable it.
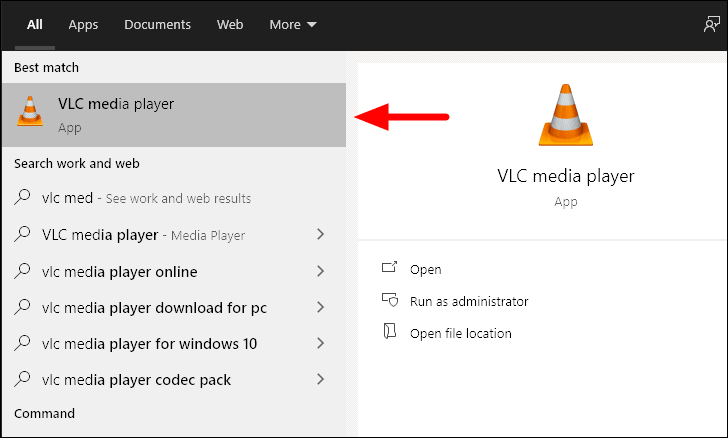
Search for ‘VLC Media Player’ in the ‘Start Menu’ and then launch the app by clicking on the search result.
Now, click on the ‘Tools’ option in the top ribbon and select ‘Preferences’ from the drop-down menu. You can also use the WINDOWS + P keyboard shortcut to launch the ‘Preferences window.
In the preferences window, switch to the ‘Input/Codecs’ tab from the top, and then click on the box next to ‘Hardware-accelerated decoding’.

Next, select ‘Disable’ from the list of options in the drop-down menu.

After you have disabled hardware-accelerated decoding, click on ‘Save’ at the bottom to apply the changes.
Now, play the video that was earlier lagging and see if the issue has been fixed. If not move to the next fix for VLC.
Fix 2: Change File Caching Value
Another common fix is to change the ‘File caching’ value. When the value is high, HD videos tend to lag and stutter, thus changing it to a lower value will do the job.
To change the ‘File caching’ value, press WINDOW + P to launch the ‘Preferences’ window and then select the checkbox for ‘All’ under ‘Show Settings’ at the bottom-left corner.
Next, select ‘Input/Codecs’ tab from the list of options on the left.

In the ‘Input/Codecs’ setting, scroll down to the ‘Advanced’ section, and then choose a lower value for ‘File caching’. Experiment with different values until the video playback error is fixed. After you have changed the value, click on ‘OK’ at the bottom.

Fix 3: Convert Video into a Compatible Format
If the above two fixes didn’t work for you, the video format might not be compatible, thus leading to the lag and stutter. VLC allows you to convert videos into formats that are compatible with it, thus negating the need for another app.
To change the format, click on the ‘Media’ menu in the ribbon, and then select ‘Convert/Save’ from the drop-down menu.
Next, click on ‘Add’ to select a video to change its format.

Now, browse and select the required video and click on ‘Open’ at the bottom.
After you have added a video, click on ‘Convert/Save’ at the bottom to convert the format into a compatible one.
The ‘Convert’ window will launch, click on the ‘Browse’ at the bottom to select a destination folder for the formatted video.
Now, select the desired location for the new video and add a name for it. Once done, click on ‘Save’ at the bottom.
After you are done selecting a destination folder, click on ‘Start’ at the bottom to start the conversion process.
Once the video has been converted to a compatible format, it will start playing without any lag or stutter on VLC Media Player.
Fixing Lagging and Stuttering for Videos Played on Browser with Hardware Acceleration
One of the common issues that lead to lag and stutter when playing video on web browsers is ‘Hardware Acceleration’. It is when a program puts specific computer hardware to use to increase the efficiency of a task when compared to the software running it by itself. When it comes to playing videos, the component that’s put to use is GPU (Graphics Processing Unit).
In case you are facing video playback issues, it’s time you change the hardware acceleration setting for the browser. In case it’s enabled, turn it off and vice versa. We will talk you through the process for four of the most common browsers, Chrome, Firefox, Edge, and Opera.
Enable/Disable Hardware Acceleration for Chrome
To modify the hardware acceleration for Google Chrome, click on the ellipsis on the top-right corner of the screen. Next, select ‘Settings’

In the Chrome settings, click on the ‘Advanced’ option on the left and select ‘System’ from the drop-down menu.
Next, click on the toggle next to ‘Use hardware acceleration when available’ to turn it off when enabled and turn it on when disabled.
Now, restart the browser and try playing the video and the playback error must be resolved by now. If you still encounter the lag and stutter, move to section about updating WideVineCDM.
Enable/Disable Hardware Acceleration for Firefox
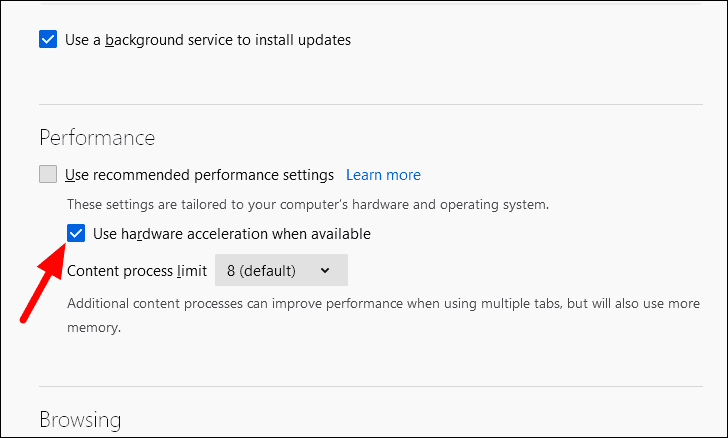
To modify the hardware acceleration settings in Firefox, launch the browser and click on the ‘Open Application Menu’ icon at the top-right. Next, select ‘Options’ from the drop-down.
Now, the ‘General’ tab will launch by default, and click on the checkbox for ‘Use recommended performance settings’ under ‘Performance’ to view the options under it.
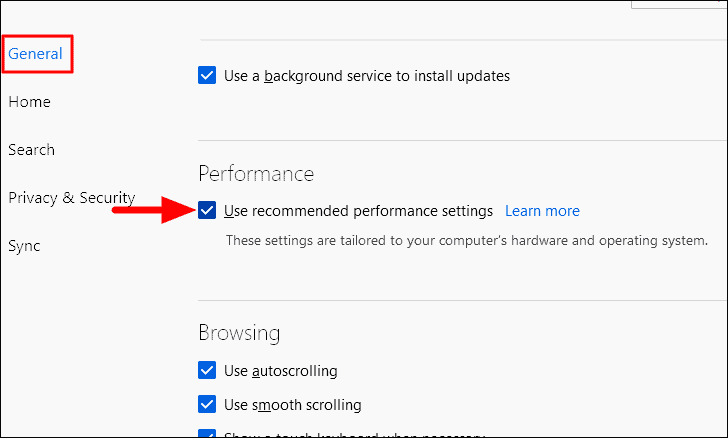
Next, click on the checkbox for ‘Use hardware acceleration when available’ to change its current status.
Enable/Disable Hardware Acceleration for Edge
To enable/disable hardware acceleration for Firefox, click on the ellipsis at the top-right corner.
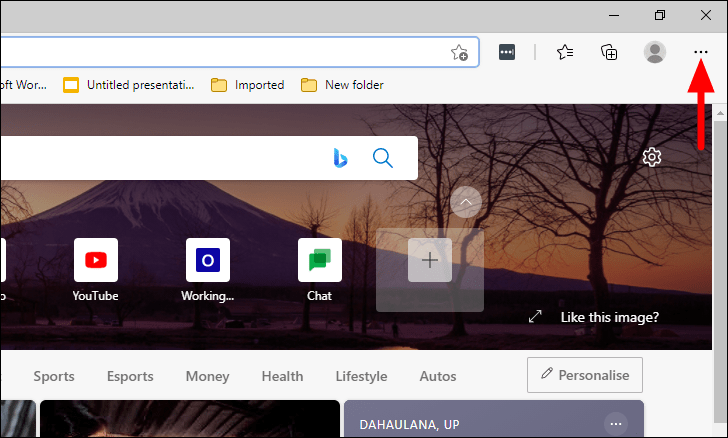
Next, select ‘Settings’ from the drop-down menu.
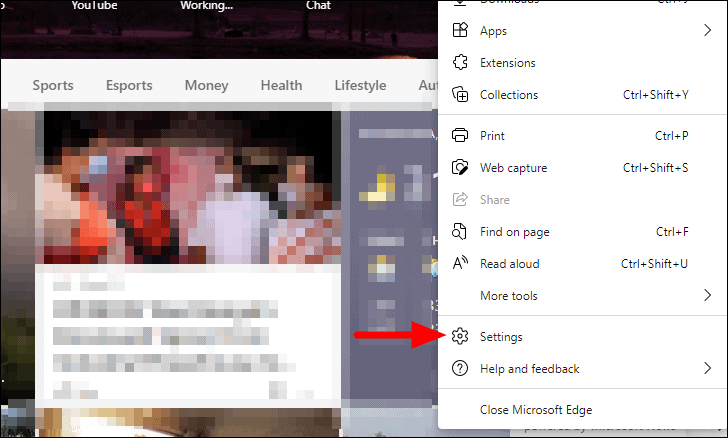
Now, click on the ‘System’ tabs from the list of options on the left.
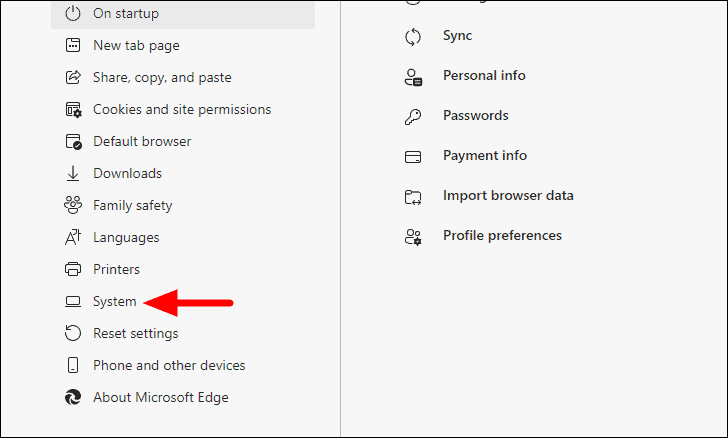
Next, click on the toggle next to ‘Use hardware acceleration when available’ to change the hardware acceleration setting.
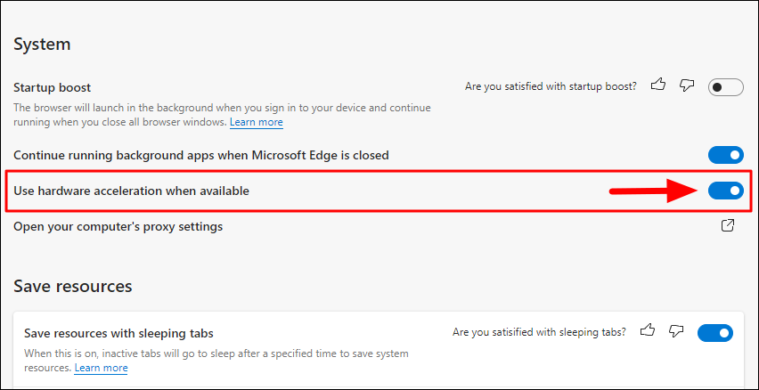
After reversing the ‘Hardware Acceleration’ settings, restart the browser and check whether the video playback error is resolved in Edge.
Enable/Disable Hardware Acceleration for Opera
To enable/disable hardware acceleration for Opera, launch the ‘Opera Browser’ and click on the ‘Easy Setup’ option at the top-right corner.
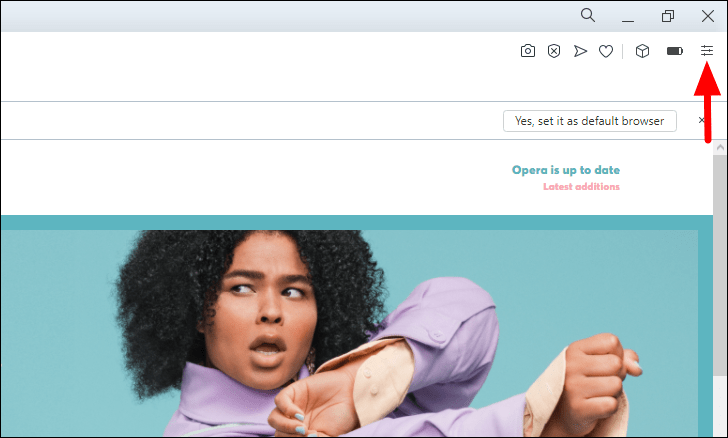
A drop-down menu will now appear on the screen, select ‘Go to full browser settings’ from the list of options.
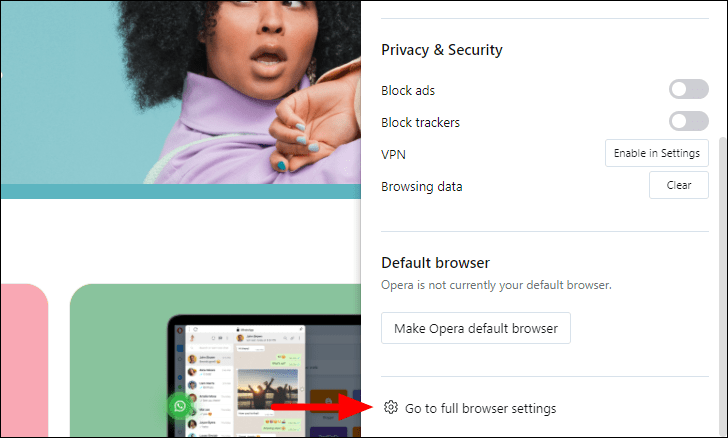
Next, click on the ‘Advanced’ option at the left to jump to the advanced settings.
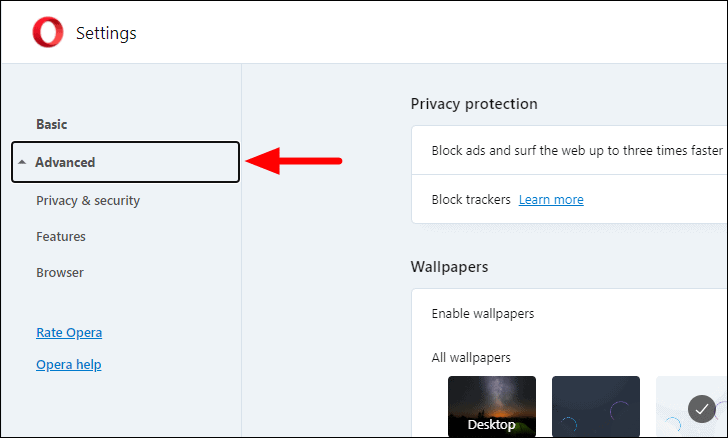
Scroll down and look for the ‘System’ section. Next, click on the toggle next to ‘Use hardware acceleration when available’ to change the setting.
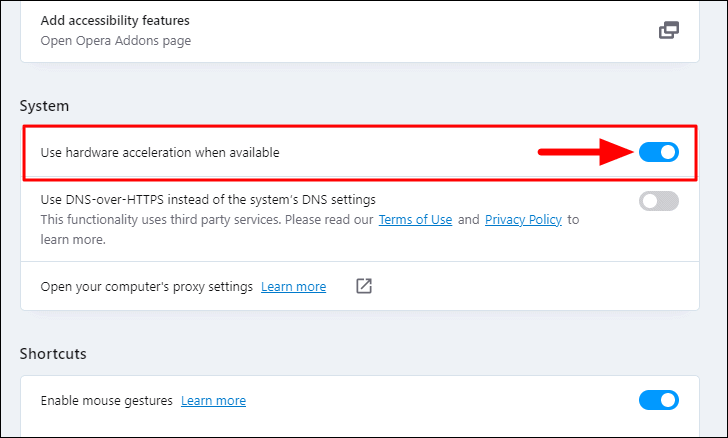
After you have made the changes, restart the browser and check if the video playback error is resolved.
If the lag and stutter issue with video playback still exists, move to the next fix.
Updating the WideVine Component on Browsers
If enabling/disabling the hardware acceleration didn’t fix the video playback error, your last option is to update the browser’s Widevine component. Widevine CDM not just restricts piracy, it also helps a user stream high-quality videos on browsers and devices without any issues.
Follow instructions to update WideVineCDM in your browser and see if that fixes the video playback issue. If you had an outdated WideVineCDM component, then updating it can likely fix the lag or stuttering issues with DRM-protected content.