
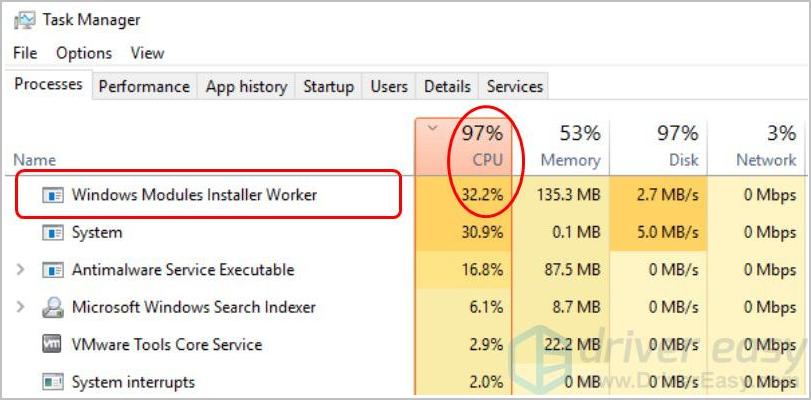
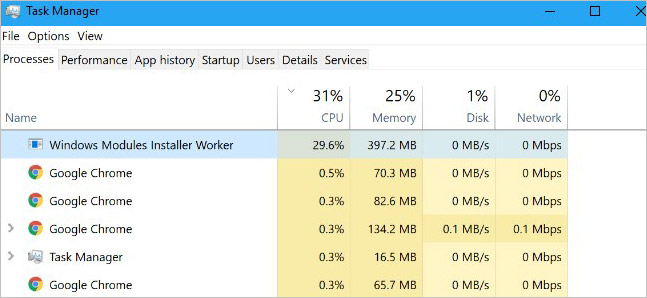
Does the screenshot above look familiar? If you’re on Windows 10, and you notice that the Windows Modules Installer Worker process is using a large percentage of your CPU, you certainly aren’t the only one. We’ve seen many Windows Users are reporting this issue. But the good new is, you can fix it. We’ve put together 2 solutions you can try.
What is Windows Modules Installer Worker?
Windows Modules Installer Worker(TiWorker.exe) is a Windows Update Service that looks for new updates and installs it to your computer. In other words, when your computer’s system is checking for Windows update or installing any update, this process will be running automatically.
How do I fix Windows Modules Installer Worker High CPU?
Here are 2 solutions you can try to fix this problem. You may not have to try both of them; if Method 1 doesn’t work, then you can try Method 2 to resolve the issue. In addition, you can try our Bonus Tip to solve your computer woes.
- Stop and disable the Windows Update service
- Change your Internet setting
Note: Both Method 1 & Method 2 will stop Windows Automatic update on your computer
Method 1: Stop and disable the Windows Update service
Only when the Windows Update service is running, can Windows checks or installs updates. So if we stop and disable the Windows Update service, Windows can’t check or install any update. As a result, the Windows Module Installer Worker process won’t use a large percentage of your CPU then.
Here’s how you can do stop and disable the Windows Update service:
1) On your keyboard, press the Windows logo key and R at the same time to invoke the Run box.
2) Type services.msc and click OK.
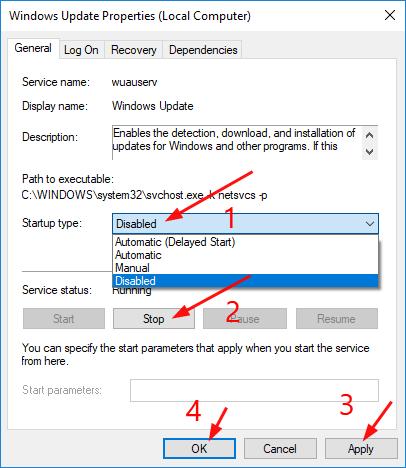
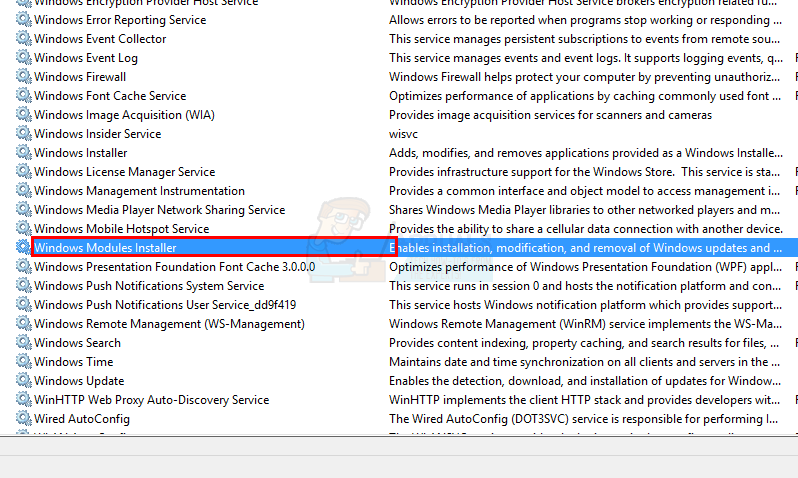
3) You should then see the Services window again. Double-click Windows Update.

4) Set its startup type to be Disabled and click Stop. Then click Apply > OK.
5) The CPU usage on your computer should return to normal. If it doesn’t you can try Method 2 below.
Method 2: Change your Internet setting
The other way to stop Windows Automatic Update on your computer is to change your Internet to metered connection. See how:
Case 1: You’re using a Wi-Fi Network
Case 2: You’re using an Ethernet Network
Case 1: You’re using a Wi-Fi Network
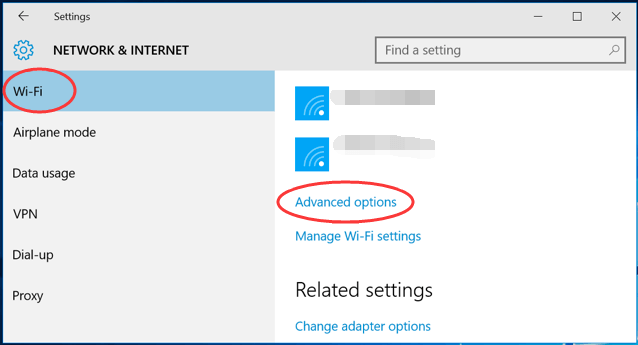
1) Go to Start > Settings > Network & Internet > Wi-FI. Then click Advanced Options.
2) Tick on Set as metered connection.
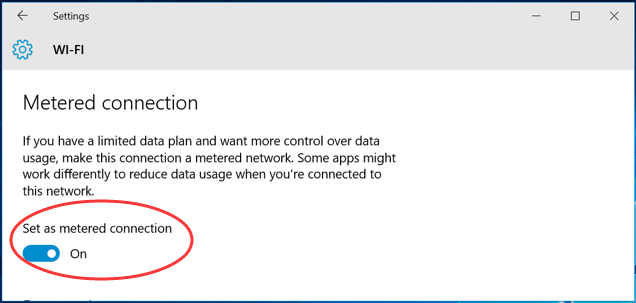
You’re done. Check if the problem still exists.
Case 2: You’re using an Ethernet Network
1) On your keyboard, press the Windows logo key and R at the same time to invoke the Run box.
2) Type regedit and click OK.
3) Click Yes when prompted by UAC ( User Account Control ).
4) On the open window, go to
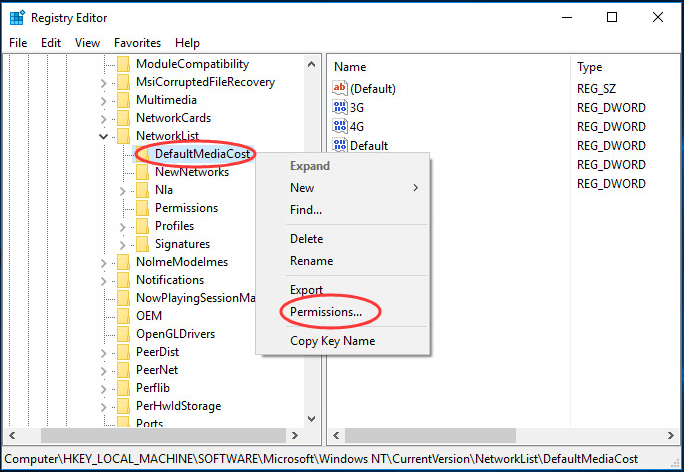
HKEY_LOCAL_MACHINE > SOFTWARE > Microsoft > Windows NT > CurrentVersion > NetworkList > DefaultMediaCost
Then Right-click DefaultMediaCost and select Permissions.
5) Click Add... Then type your user name into Enter the object names to select and click Check Names.
Click OK.
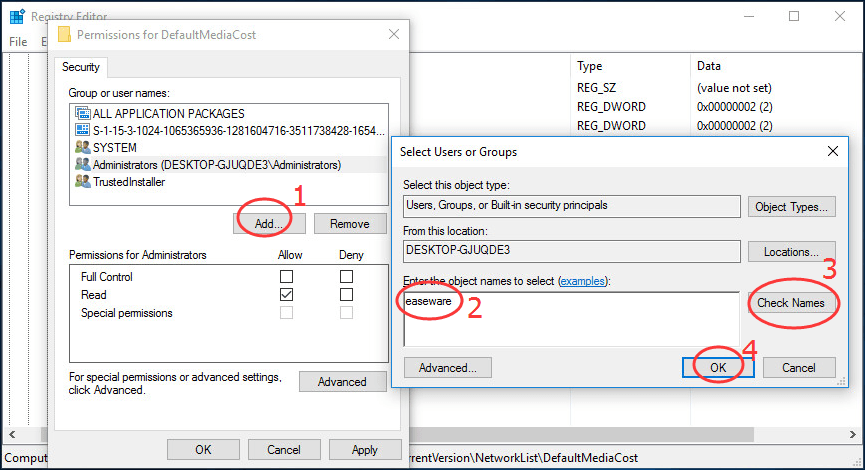
6) Click the user you just add, then tick on allow for Full Control.
Click OK.
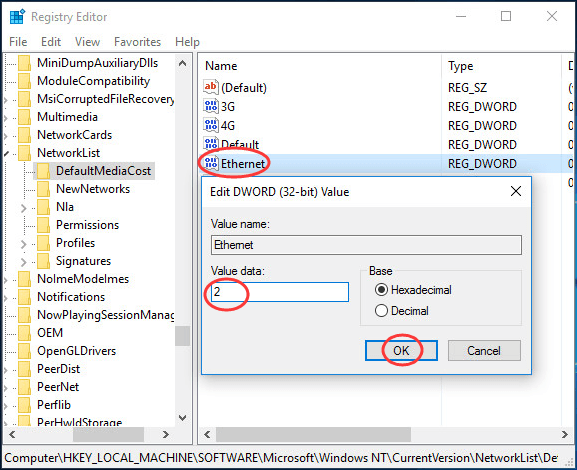
7) Double-click on Ethernet. Then set its Value data to be 2.
Click OK and close Regedit Editor window.
 Reboot your computer.
Now Windows Modules Installer Worker may not cause High CPU on your Windows 10.
Want us to fix the problem for you?

If none of the fixes above worked, or you just don’t have the time or confidence to troubleshoot the problem for yourself, get us to fix it for you. All you need to do is buy a 1-year subscription to Driver Easy (just $29.95) and you get free technical support as part of your purchase. Then you can contact our computer technicians directly, explain your problem, and they’ll investigate to see if they can resolve it remotely.
153
153 people found this helpful
Available in other languages
Stoßen Sie auf hohe CPU-Auslastung wegen des Prozesses Windows Modules Installer Worker? Keine Sorge. Hier finden Sie 4 Lösungen dagegen!
If you feel like your computer is really slow despite having enough RAM and not many applications running then you might be a victim of Windows Modules Installer Worker High CPU usage issue. The Windows Modules Installer Worker is a Windows Update service that runs in the background and checks for Windows Updates. Although the task of this service is pretty useful, it might hog down your whole PC by taking 50% or more resources.
You can confirm the issue by pressing CTRL + SHIFT + ESC. This will bring up the task manager. Make sure that the Processes tab is selected, scroll down and search for a process named Windows Modules Installer. This should be in background process section. If you look at the information given in front of Windows Modules Installer, you will be able to see the amount of memory taken by this process as well. If your computer is really slow then the memory usage will most likely be more than 50%. There’s nothing you can do about the process running in the background because it starts automatically. So, as long as the process is running, which it will for as long as you are using the PC, it will definitely keep your computer slow.
The reason behind this, as mentioned above, is the Windows Modules Installer service. This is basically a Windows Update service. The memory taken by this service is basically because of the service searching for Windows Update in the background. Although the process is most likely to run and take lots of resources in Windows versions prior to Windows 10, but Windows 10 users have also experienced this issue.
There are a couple of solutions for this problem that are listed below. Go through each of these methods and check which one solves the issue for you.
Method 1: Manual Windows Update
The first thing that you should do is switch the Windows Update to manual mode. Since the service starts automatically, switching it to manual mode and turning it off is a very good workaround for this problem.
- Hold Windows key and press R
- Type services.msc and press Enter
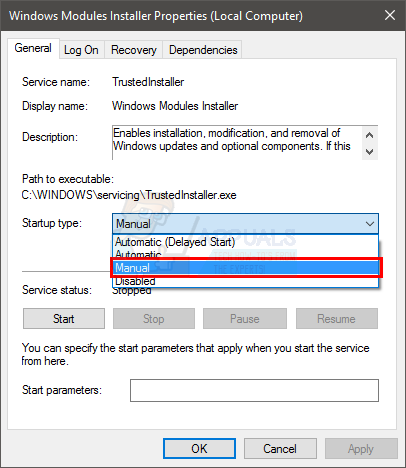
- Locate and double click the service named Windows modules installer
- Select Manual from the drop down menu in Startup Type section
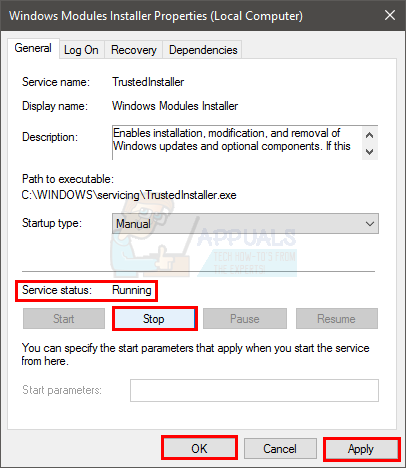
- Click Stop if the status of the service is Running. This should be in Service Status section
- Click Apply then Ok
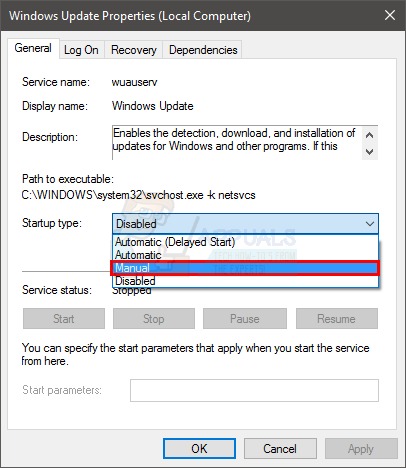
- Locate and double click Windows Update
- Select Manual from the drop down menu in Startup Type section
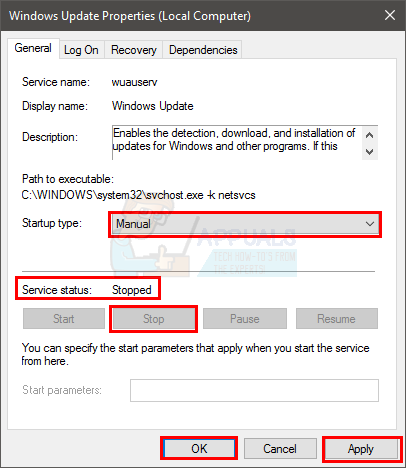
- Click Stop if the status of the service is Running. This should be in Service Status section
- Click Apply then Ok
Once you are done, you should be good to go.
Note: Windows Updates are important for your system and provides a lot of security updates as well. These updates are crucial for your system. Since you have set your Windows update to manual, don’t forget to check for updates manually.
Method 2: Troubleshoot
You can also use the Windows built-in troubleshooter to solve this issue. This has worked for plenty of users.
- Hold Windows key and press R
- Type control.exe /name Microsoft.Troubleshooting and press Enter
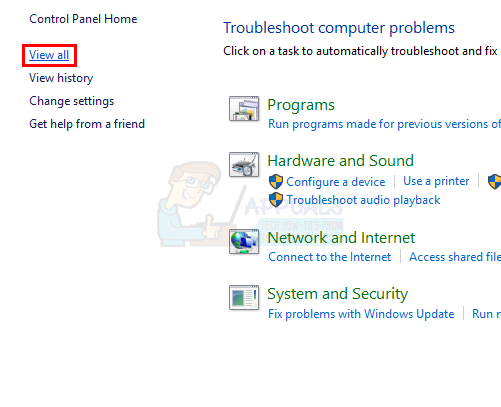
- Click View All
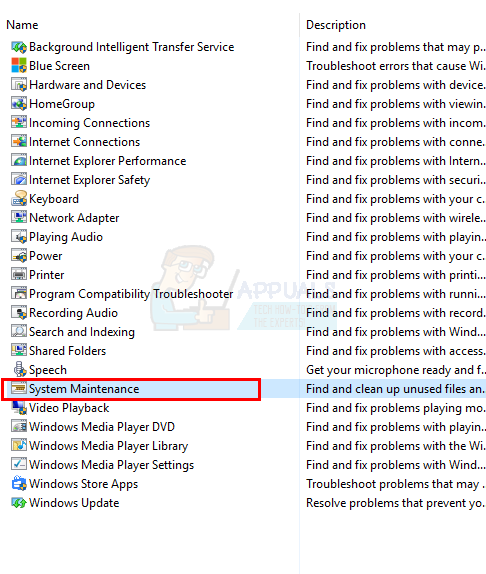
- Select System Maintenance
- Click Advanced and make sure the option that says Apply repairs automatically is checked

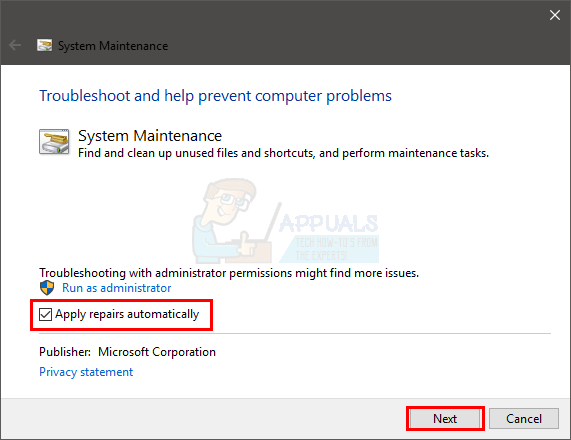
- Click Next
Wait for the Windows to troubleshoot your system and solve the issues that it might find. Once the process is done, check for updates and you should be good to go.
Kevin Arrows
Kevin Arrows is a highly experienced and knowledgeable technology specialist with over a decade of industry experience. He holds a Microsoft Certified Technology Specialist (MCTS) certification and has a deep passion for staying up-to-date on the latest tech developments. Kevin has written extensively on a wide range of tech-related topics, showcasing his expertise and knowledge in areas such as software development, cybersecurity, and cloud computing. His contributions to the tech field have been widely recognized and respected by his peers, and he is highly regarded for his ability to explain complex technical concepts in a clear and concise manner.
While carrying out a resource-intensive task, a sudden spike in CPU or memory usage is common. This spike usually goes down after some time or when the task is finished. However, there are times when certain processes, like the Windows Modules Installer Worker, shows 100% disk usage in the task manager. This sudden issue leads to a stuttering and sluggish computer without any resources to handle additional tasks.
The Windows Modules Installer Worker’s CPU or memory usage skyrocketing to 100% leaves users wondering about its causes. Regardless of this spike affecting the performance, this issue is not worrisome and can be fixed easily using the methods explained below.
What is Windows Modules Installer Worker (WMIW)?
Windows Modules Installer Worker, WMIW, or TiWorker.exe, is a critical Windows core system process whose function is to check and install Windows updates automatically. This process has administrator-level permissions and works in the background to install all the necessary updates without needing any user interference.
Like any other Windows process or application, the Windows Modules Installer Worker requires some power to work efficiently. Apart from installing updates, the TiWorker.exe also ties up various important system resources like .NET to keep essential processes working smoothly.
While installing updates, it can run into problems, leading to Windows Modules Installer Worker 100% disk usage issue.
Why does the Windows Modules Installer Worker reflect High CPU Usage?
Upon checking the task manager and finding the Windows Modules Installer Worker high CPU usage issue, we assume that the process, in itself, is corrupt or causing problems.
However, there are many other reasons that can cause the Windows Modules Installer Worker high CPU usage. The reasons could be – a malware infection, broken update installer, insufficient power supply, faulty memory or disk, and more.
Windows Modules Installer Worker 100% disk usage can also be due to dust build-up and improper airflow inside the CPU cabinet, resulting in computer overheating and subsequent effects like stuttering, unexpected frame drops, and system crashing.
Methods to Fix the Windows Modules Installer Worker 100% Disk Usage
There is no single cause behind the Windows Modules Installer Worker high disk usage. Nevertheless, we have explained several fixes below that might help fix potential triggers causing this issue.
Method 1: Perform a Clean Boot
A clean boot boots the computer with a minimum set of essential processes and applications. Doing this will help you figure out if the Windows Modules Installer Worker high CPU usage is due to a background program interfering with the TiWorker.exe process. The steps to do this are simple –
- Press WINDOWS + R and type msconfig. Press Enter.
- You’ll see the System Configuration screen.
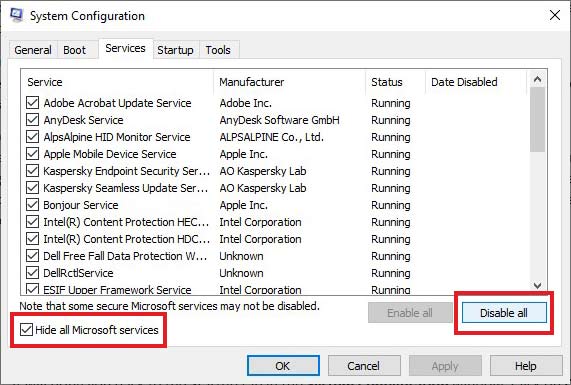
- Navigate to the Services tab and check the Hide all Microsoft services option.
- Then, click on Disable all to disable all third-party services.
- Then, go to the Startup tab and click on Open Task Manager.
- In the startup tab, disable all the applications. Close the Task Manager.
- It will bring you back to the Startup tab in the System Configuration window. Click on OK.
- Restart your computer. Your computer will boot in a clean boot environment.
Method 2: Run Memory Diagnostics
Faulty RAM module/s might be causing the Windows Modules Installer Worker high CPU usage issue on your system. You can test the memory modules via Windows’ built-in memory diagnostics tool. Here’s what to do –
- Press WINDOWS + R and type mdsched.exe. Press Enter.
- Click on Restart now and check for the problems option.
- Wait for the tool to finish the scan and restart the computer.
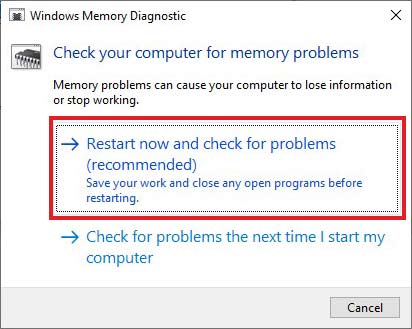
Note – Make sure to save everything and close all applications before using it.
Method 3: Do a Comprehensive Malware Check
A malware inside your system might have already replaced the real Windows Modules Installer Worker process and mimicking it for suspicious activities. If you see something suspicious or you are facing the Windows Modules Installer Worker 100% CPU usage error after visiting a random webpage or connecting an unknown device to your system, perform a virus scan on your Windows PC. Use a reliable and well-renowned antivirus for this purpose.
Method 4: Set PC performance to the Best
Unwanted features like visual effects can hog up the system resources, leading to other processes like TiWorker.exe to stall or show 100% disk usage. You can fix this by opting for the best performance. To do this –
- Open My PC.
- Right-click on the blank space and click on Properties.
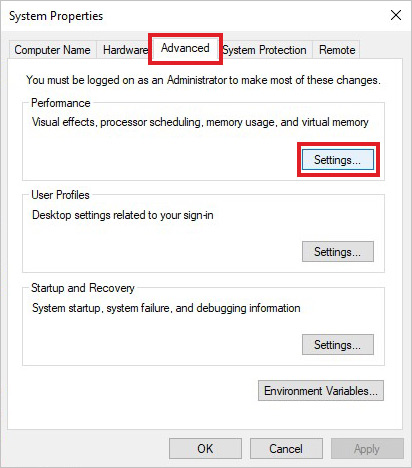
- Click on Advanced system settings to open the System Properties window.

- Under the Advanced tab, go to the Performance section and click on Settings.
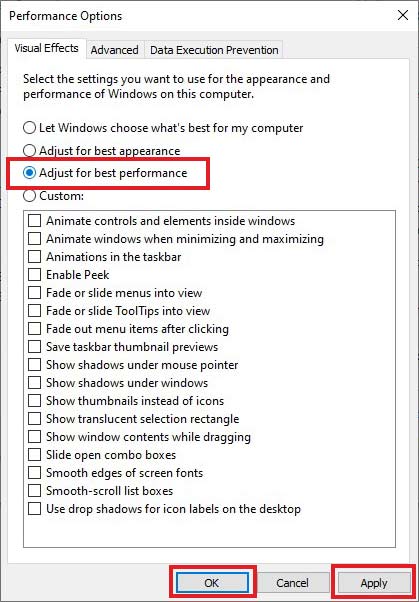
- In the Performance Options window, under the Visual Effects tab, click on Adjust for best performance.
- Click OK.
Method 5: Set Windows Modules Installer Worker to Manual
Automatic update installation in Windows is a great way to prioritize other important tasks. However, in some scenarios, it has issues that lead to Windows Modules Installer Worker 100% CPU usage. You can fix this by toggling the service to ‘manual’ mode. To do this –
- Press WINDOWS + R and type services.msc. Press Enter.
- Locate the Windows Module Installer and right-click on it. Click on properties.
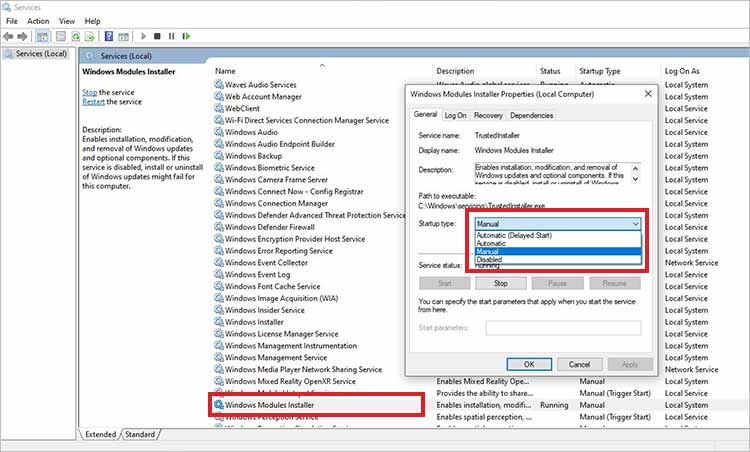
- Change the Startup type to manual.
- Click on Apply and OK.
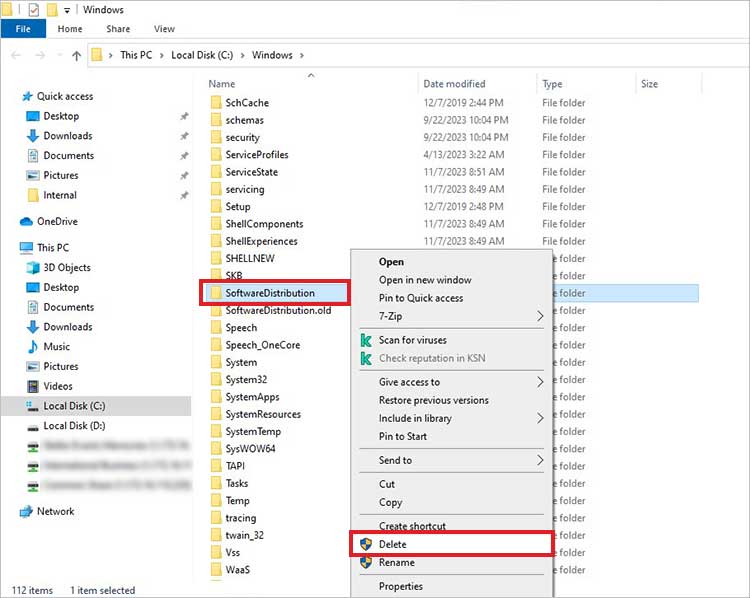
Method 6: Delete the SoftwareDistribution Folder
SoftwareDistribution is a folder that Windows uses to temporarily store files required for installing Windows updates. These files can sometimes conflict with the Windows Modules Installer Worker process, resulting in high CPU usage errors. You can fix the TiWorker high CPU usage by deleting the SoftwareDistribution folder. Here are the steps for doing this –
- Press WINDOWS + R and type services.msc. Press Enter.
- Locate the Windows Update service and stop it.

- Close the Services Window and again press WINDOWS + R.
- Type C:\Windows\ and press Enter.
- Navigate to the SoftwareDistribution folder and delete it.
You can also clean other temporary files from your computer to clear all unwanted files on your computer.
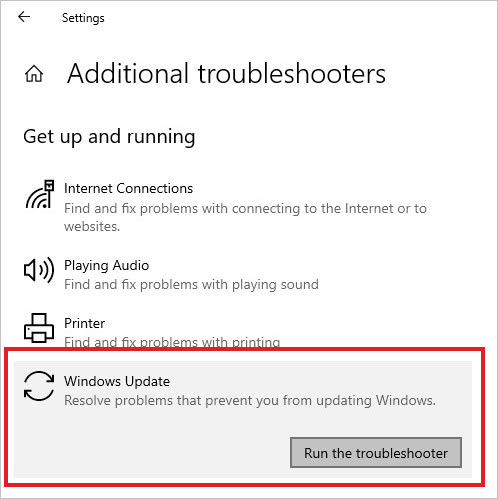
Method 7: Run Windows Update Troubleshooter
If there is a problem with the Windows updater itself, it can cause the Windows Modules Installer Worker 100% usage on your Windows computer. You can resolve the underlying problem by running the Windows update troubleshooter. For this –
- Press WINDOWS + I to open Settings.
- Click on Update & Security.
- Click on Troubleshoot in the left pane.

- Click on Additional troubleshooters.
- Locate the Windows Update troubleshooter and click on it.
- Click on Run the troubleshooter. Follow the on-screen instructions afterward.
Reduce Unnecessary CPU Usage
The Windows Modules Installer Worker (WMIW) 100% disk usage is an unusual behavior indicating high CPU/disk image that can slow down the computer.
Using the methods explained above, you can fix the Windows Modules Installer Worker high disk usage issue in no time. And, if your computer is constantly stuttering and crashing due to high CPU usage, try using System Restore to restore the PC to a previous error-free state.
If you accidentally deleted some files on your sluggish computer, worry not and use a powerful Windows data recovery software to recover them.
[FIXED] — Svchost.exe High CPU usage
How to fix modern setup host high CPU usage issue?
Methods to fix WUDFHost.exe high CPU usage on Windows PCs
[FIXED] – Antimalware service executable high CPU usage issue
Is the Windows Modules Installer Worker process essential?
Yes, WMIW or Windows Modules Installer Worker is a core system process that automatically installs various OS and security updates. It also ensures that essential processes are working smoothly.
What causes 100% Disk usage?
Multiple instances of an application running simultaneously, too many applications running parallel, malware or cryptominer working in the background are some of the reasons behind high disk usage.
Will upgrading RAM or SSD solve 100% usage issue?
In some cases, if the 100% usage is due to insufficient RAM or old HDD, upgrading RAM and switching to SSD can help you resolve high CPU/memory issue.
Was this article helpful?
YES7
NO
One of my windows 2008 didn’t come after reboot. Upon checking the console, saw a message stating “Please wait for the Windows Modules Installer.”. Had to bring up the server at the earliest. It took about an hour, tried reset but server was getting back on to same page. Application team was eagerly waiting for it to come back. Started looking for alternative methods to bring it up.
When checking server was pinging and able to shared folders. Hence, connected to the server from services.msc using the option “Connect to another computer..”
Disabled “Windows Module Installer” service and restarted the server.
Bang, server was back on its home page.
Thanks,
WintelAdmin