Installing Windows Defender on Server 2012 R2 is a common challenge faced by system administrators and IT professionals. Windows Defender is a built-in antivirus solution offered by Microsoft that provides real-time protection against viruses, malware, and other threats. While Server 2012 R2 does not come with Windows Defender pre-installed, there are methods available to install and configure it on the server.
This blog post aims to provide a detailed guide on how to install Windows Defender on Server 2012 R2. We will explore different methods, their pros and cons, as well as provide alternative solutions and bonus tips to enhance the security of your server.
The Challenge of Installing Windows Defender on Server 2012 R2
Installing Windows Defender on Server 2012 R2 can be challenging due to the following reasons:
- Lack of pre-installed Windows Defender: Unlike Windows client operating systems, Server 2012 R2 does not come with Windows Defender pre-installed. Therefore, additional steps are required to install and enable it on the server.
- Incompatibility with other antivirus products: If you already have an antivirus product installed on your server, there might be compatibility issues with Windows Defender. It is important to consider this before proceeding with the installation.
- Minimal documentation: Microsoft does not provide detailed documentation on how to install Windows Defender on Server 2012 R2, which can make the process confusing and time-consuming for administrators.
Now let’s explore the different methods to install Windows Defender on Server 2012 R2.
Video Tutorial:
Method 1: Using PowerShell
Method: PowerShell is a powerful command-line tool in Windows that allows users to automate administrative tasks. We can use PowerShell commands to install and enable Windows Defender on Server 2012 R2.
Pros:
1. PowerShell offers a streamlined and efficient way to install Windows Defender.
2. It allows for automation, making it easier to deploy Windows Defender on multiple servers.
3. PowerShell commands are well-documented and widely supported by the Microsoft community.
Cons:
1. Requires administrative privileges to run PowerShell commands.
2. Users should have a basic understanding of PowerShell syntax and commands.
3. In some cases, PowerShell scripts can be blocked by security policies, preventing the installation of Windows Defender.
Now, let’s go through the steps to install Windows Defender using PowerShell:
1. Open PowerShell with administrator privileges.
2. Run the following command to install Windows Defender:
Install-WindowsFeature -Name Windows-Defender, GUI-Management-Tools
3. Once the installation is complete, restart the server for the changes to take effect.
Method 2: Using Server Manager
Method: Server Manager is a management console in Windows that allows administrators to manage server roles and features. We can use Server Manager to install and enable Windows Defender on Server 2012 R2.
Pros:
1. Server Manager provides a user-friendly interface for installing and managing server roles and features.
2. It is a built-in tool in Windows Server, eliminating the need for additional downloads or installations.
3. Server Manager supports remote management, making it easier to install Windows Defender on multiple servers.
Cons:
1. Requires administrative privileges to access and use Server Manager.
2. The graphical interface of Server Manager might be overwhelming for users who are not familiar with it.
3. Server Manager can be slower compared to PowerShell when installing large features like Windows Defender.
Here are the steps to install Windows Defender using Server Manager:
1. Open Server Manager.
2. Click on “Manage” and select “Add Roles and Features”.
3. Follow the on-screen instructions in the “Add Roles and Features” wizard, ensuring that you select “Windows Defender” as a feature to install.
4. Once the installation is complete, restart the server for the changes to take effect.
Method 3: Using DISM (Deployment Image Servicing and Management)
Method: DISM is a command-line tool in Windows that allows users to service and manage Windows images offline or in a running operating system. We can use DISM to install Windows Defender on Server 2012 R2.
Pros:
1. DISM provides a flexible and versatile approach to install Windows components, including Windows Defender.
2. It is a built-in tool in Windows, eliminating the need for additional downloads or installations.
3. DISM commands are well-documented and widely supported by the Microsoft community.
Cons:
1. Requires administrative privileges to run DISM commands.
2. Users should have a basic understanding of DISM syntax and commands.
3. DISM commands can be complex and may require additional parameters for successful installation.
To install Windows Defender using DISM, follow these steps:
1. Open Command Prompt with administrator privileges.
2. Run the following command to check the available editions of Windows Defender:
Dism /online /Get-Features /Format:Table
3. Identify the feature name for Windows Defender by locating “Windows-Defender” in the output of the previous command.
4. Run the following command to install Windows Defender:
Dism /online /Enable-Feature /FeatureName:Windows-Defender
5. Once the installation is complete, restart the server for the changes to take effect.
Method 4: Using Group Policy
Method: Group Policy is a feature in Windows that allows administrators to manage user and computer settings centrally. We can use Group Policy to enable and configure Windows Defender on Server 2012 R2.
Pros:
1. Group Policy provides a centralized and scalable way to enable Windows Defender on multiple servers.
2. It allows for granular control over the configuration settings of Windows Defender.
3. Group Policy settings can be easily modified and updated as per organizational requirements.
Cons:
1. Requires administrative privileges to access and modify Group Policy settings.
2. Users should have a good understanding of Group Policy concepts and settings.
3. Group Policy changes might take time to propagate to all network resources.
To enable Windows Defender using Group Policy, follow these steps:
1. Open Group Policy Management console.
2. Create or select a Group Policy Object (GPO) linked to the desired Organizational Unit (OU) or domain.
3. Navigate to “Computer Configuration” > “Policies” > “Administrative Templates” > “Windows Components” > “Windows Defender”.
4. Double-click on “Turn off Windows Defender” to open the policy settings.
5. Select the “Disabled” option to enable Windows Defender.
6. Apply the changes to the desired OU or domain.
7. Update the Group Policy on target servers using the following command:
gpupdate /force
Alternatives: What to Do If You Can’t Install Windows Defender
If you cannot install Windows Defender on Server 2012 R2 for any reason, here are some alternative solutions you can consider:
1. Install a third-party antivirus software: There are various antivirus solutions available in the market that are compatible with Server 2012 R2. Research and choose a reputable antivirus software that meets your organization’s security requirements.
2. Utilize Windows Defender Offline: If you suspect a malware infection on your server, you can use Windows Defender Offline, a bootable antivirus scanner that can detect and remove malware before the operating system loads.
3. Implement Microsoft Security Essentials: Although Microsoft discontinued support for Microsoft Security Essentials on Server 2012 R2, you can still consider using it as an alternative antivirus solution. However, keep in mind that it does not offer the same level of features and protection as Windows Defender.
Bonus Tips
Here are some bonus tips to enhance the security of your Server 2012 R2:
1. Keep the server up to date: Regularly install Windows updates, including security patches, to protect against new threats and vulnerabilities.
2. Enable Windows Firewall: Configure and enable the built-in Windows Firewall to add an extra layer of protection to your server.
3. Implement strong password policies: Enforce strong password policies and regularly prompt users to change their passwords to prevent unauthorized access.
5 FAQs about Installing Windows Defender on Server 2012 R2
Q1: Can I install Windows Defender alongside another antivirus software on Server 2012 R2?
A: It is generally not recommended to run multiple antivirus software on the same server. They can conflict with each other and cause performance issues. It is best to choose one antivirus solution and disable or uninstall any other competing antivirus software.
Q2: Is Windows Defender sufficient for protecting my Server 2012 R2 from all types of threats?
A: While Windows Defender provides basic protection against common threats, it is recommended to complement it with other security measures such as regular updates, strong passwords, and a secure network infrastructure. Consider additional security solutions based on your specific requirements and risk profile.
Q3: Can I install Windows Defender on Server Core installations of Server 2012 R2?
A: Unfortunately, Windows Defender is not available for Server Core installations of Server 2012 R2. It is only available for installations with a graphical user interface (GUI).
Q4: How often should I run Windows Defender scans on my Server 2012 R2?
A: It is recommended to perform regular scans using Windows Defender to ensure the ongoing security of your server. The frequency of scans can vary depending on your organization’s security requirements and risk profile. Consider scheduling weekly or monthly scans to detect and mitigate any potential threats.
Q5: Can I install Windows Defender on older versions of Windows Server, such as Server 2008 R2?
A: Windows Defender is not available for older versions of Windows Server, such as Server 2008 R2. It was introduced in Windows Server 2016 and later versions. For older versions, consider using alternative antivirus solutions or upgrading to a supported version of Windows Server.
In Conclusion
Installing Windows Defender on Server 2012 R2 can be a challenge, but with the methods and tips outlined in this blog post, you can successfully implement this antivirus solution on your server. Whether you choose to use PowerShell, Server Manager, DISM, or Group Policy, make sure to consider the pros and cons of each method and select the one that best suits your requirements.
If you cannot install Windows Defender, explore alternative antivirus solutions or utilize Windows Defender Offline to mitigate malware threats. Additionally, follow the bonus tips provided to enhance the overall security of your Server 2012 R2. Remember to keep your server up to date, enable Windows Firewall, and implement strong password policies to ensure a robust defense against malicious activities.
,
As you already know, Microsoft Security Essentials (aka «Windows Defender» in latest OS versions) is a free full-featured anti-malware solution that is capable of detecting and stopping potentially malicious software and viruses, and its included in Windows 8, 8.1, Windows 10 and Windows Server 2016 edition.
In Server 2012 and 2012 R2 editions, the Windows Defender is available only on Server Core installations (without the user interface). But, fortunately, there is a way to bypass this «limitation», and to protect your Server 2012 or 2012R2 (with the GUI interface) from viruses, by installing the previous version of the Windows Defender, the Microsoft Security Essentials.
This tutorial contains instructions to install Microsoft Security Essentials Antimalware protection, in Windows Server 2012 R2 and Windows Server 2012.
How to Setup Microsoft Security Essentials on Server 2012 or Server 2012 R2.
To install Microsoft Security Essentials on Server 2012/2012R2:
1. Proceed and download the Security Essentials for Windows 7, from this link.
2. Then copy the downloaded file (mseinstall.exe), to the root folder of drive C:\
3. Right-click at the downloaded «mseinstall» file and choose Properties.

3. At Compatibly tab, select Run this program in compatibly mode for Windows 7 and click OK.
4. Then copy the «mseinstall.exe» file to the root folder of drive C:\
5. Now open command prompt and navigate to the root folder of drive C:, by typing «cd\» (without quotes).
6. In command prompt, type (copy/paste) the following command and press Enter:
- mseinstall.exe /disableoslimit

7. The installation should start. Click Next and follow the onscreen prompts to install Security Essentials on your Server.

8. When the installation is completed, you ‘re done! *

* Notes:
1. If you want to use another antivirus solution and you cannot uninstall Security Essentials, because the uninstall fails with error «0x8004FF04 – MSE cannot be installed on this computer», then read this tutorial.
2. If the Virus Definitions doesn’t updated automatically, then you can download the latest definition updates for Microsoft Security Essentials and install them manually.
That’s it! Let me know if this guide has helped you by leaving your comment about your experience. Please like and share this guide to help others.
If this article was useful for you, please consider supporting us by making a donation. Even $1 can a make a huge difference for us in our effort to continue to help others while keeping this site free:
- Author
- Recent Posts
Konstantinos is the founder and administrator of Wintips.org. Since 1995 he works and provides IT support as a computer and network expert to individuals and large companies. He is specialized in solving problems related to Windows or other Microsoft products (Windows Server, Office, Microsoft 365, etc.).
How to Configure Windows Defender on Windows Server 2012 R2
If you are using Windows Server 2012 R2, it is essential to have a robust security solution in place to protect your server from malware and other threats. Windows Defender, Microsoft’s built-in antivirus software, can help you safeguard your server from various security risks.
In this article, we will guide you through the process of configuring Windows Defender on Windows Server 2012 R2, ensuring that your server is well-protected against malware and other malicious activities.
Step 1: Open Windows Defender
The first step in configuring Windows Defender on your Windows Server 2012 R2 is to open the program. To do this, follow these steps:
- Click on the Start button and type ‘Windows Defender’ in the search bar.
Once you have located Windows Defender, click on the program to open it.
Step 2: Update Windows Defender
Before configuring Windows Defender, it is crucial to make sure that the program is up-to-date. To update Windows Defender, follow these steps:
- Click on the ‘Update’ tab in Windows Defender.
Windows Defender will check for updates and install them if there are any available.
Step 3: Configure Windows Defender Settings
Once Windows Defender is up-to-date, you can proceed to configure its settings to ensure optimal protection for your Windows Server 2012 R2. Some key settings to consider include:
- Real-time protection: Turn on real-time protection to scan new files and programs as they are downloaded or accessed on your server.
- Cloud-based protection: Enable cloud-based protection to access the latest threat information and protect your server from emerging threats.
- Automatic sample submission: Allow Windows Defender to automatically submit detected samples to Microsoft for analysis and improve threat detection.
By configuring these settings, you can enhance the security of your Windows Server 2012 R2 and protect it from various security threats.
Step 4: Perform Regular Scans
In addition to real-time protection, it is essential to perform regular scans on your Windows Server 2012 R2 to detect and remove any existing malware. To schedule a scan, follow these steps:
- Click on the ‘Scan’ tab in Windows Defender.
- Select the type of scan you want to perform (Quick scan, Full scan, or Custom scan).
- Choose a convenient time to schedule the scan, such as during off-peak hours.
Regularly scanning your server will help you identify and eliminate any potential security threats, keeping your system secure and stable.
Conclusion
Configuring Windows Defender on Windows Server 2012 R2 is essential to ensure the security and stability of your server. By following the steps outlined in this article, you can enhance the protection of your server against malware and other security threats.
Remember to keep Windows Defender up-to-date and perform regular scans to maintain a secure computing environment for your Windows Server 2012 R2.
#Antivirus #configuration #cybersecurity #Windows Defender #Windows Server 2012 R2
Since April 11th, 2022, the new unified Microsoft Defender for Endpoint solution is generally available for Server 2016 and Server 2016. The unified Microsoft Defender for Endpoint solution enables more features that were previously only available on Windows Server 2019 and later. The new modernized solution stack enables more security features for Server 2012R2 and Server 2016.
August 18, 2022; Blog completely rewritten based on latest announcement and improvements; included MECM/ Defender for Cloud and updated information since GA release.
Previous method
Previously there was a large gap between the latest Server 2019 build and the down-level OS systems. In comparison with Server 2019, the onboarding process was quite complex with the Microsoft Monitoring Agent. The MMA agent was required as the EDR sensor wasn’t built-in, for Server 2016 en Server 2012R2.
Server 2016 is by default installed with Microsoft Defender Antivirus. For Server 2012R2 there was no installed AV by default, and you had to install System Centre Endpoint Protection (SCEP).
With the Microsoft Monitoring Agent and Defender AV/SCEP, there were still some missing protection features – like Attack Surface Reduction, Automated Investigation, Network Protection, and many more protection features.
Now the good news. Currently in general availability is the new unified solution for Server 2012R2 and Server 2016. The new unified solution reduces complexity by removing dependencies and installation steps – and more important no more SCEP, MMA, and all the latest security features available.
The new unified package brings the following major improvements directly to the new Defender for Endpoint solution:
- Attack Surface Reduction rules
- Network protection
- Controlled Folder Access
- Potentially Unwanted Application blocking
- Improved detection capabilities
- Response capacibiliteits
- EDR in block mode
- Automated Investigation and Response (AIR)
- Tamper Protection
- Live Response
Overview of all features
New Defender for Endpoint agent
The new unified solution is available in one single package for all the down-level systems. Summary for Windows Server systems:
Built-in Defender AV and EDR sensor. Only onboarding package needed for onboard
- Windows Server 1803
- Windows Server 2019
- Windows Server 2022
New unified MDE installation package and onboarding package are needed for onboard
- Windows Server 2012R2
- Windows Server 2016
Windows Server 2008R2 is currently only supported for onboarding using the legacy MMA-agent and SCEP. Advised is to migrate Server 2008R2, which makes it possible to manage all systems with a single solution and the same configuration. SCEP is legacy and missed critical protection capabilities provided by Microsoft.
Microsoft announced in the last couple of months multiple improvements which make the installation of the new unified agent way more easier from products like; Microsoft Defender for Cloud and Microsoft Endpoint Configuration Manager. Currently it is possible to migrate all existing MMA-based Defender for Endpoint solutions to the new unified agent.
Download new Defender for Endpoint agent
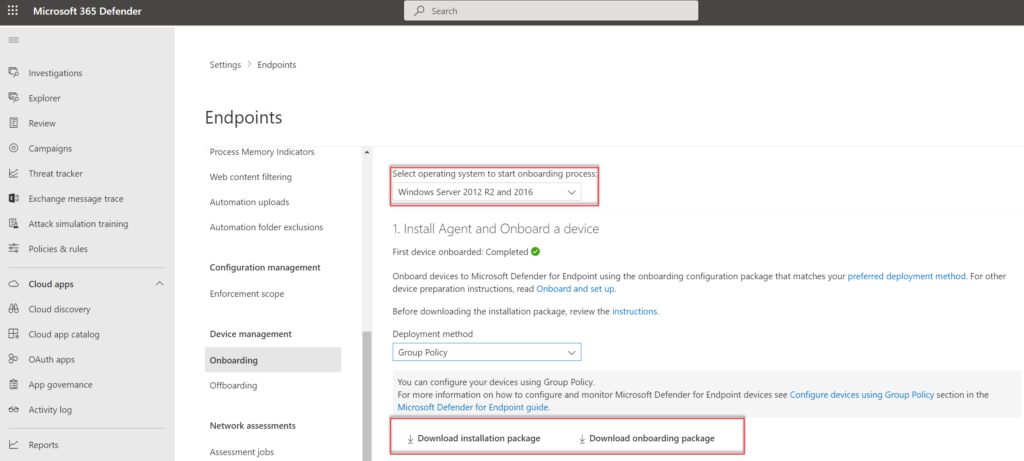
The new Defender for Endpoint installation and onboarding packages can be downloaded directly from the security.microsoft.com portal.
- Go to Security.Microsoft.com
- Open Settings -> Endpoints -> Onboarding
- Select Windows Server 2012R2 and Server 2016
- Select Deployment method; Group Policy or one of the other deployment methods
Download the installation package (md4ws.msi) and onboarding package (WindowsDefenderATPOnboardingScript.cmd).
NOTE: The package is updated monthly with new improvements. Make sure to download always the latest package before usage. The package contains the Defender product version and additional improvements.
Prerequisites for Windows Server 2012R2 and Windows Server 2016
For the new unified solution, fewer requirements are needed in comparison with the legacy method. The following requirements are needed before installing the new Defender solution.
Network
Ensure connectivity requirements are configured. Network requirements are the same as Windows Server 2019. Important: There is no OMS Gateway support for the new agent. Follow the instructions for configuring the network connectivity. Download here the spreadsheet including all URLs (WW + Defender Geography)
Server 2012R2 requirements
When the latest monthly rollup is installed – no additional prerequisites are needed for Server 2012R2. During the installer the package checks for the following updates:
- Update for customer experience and diagnostic telemetry / KB3080149
- Update for Universal C Runtime in Windows / KB2999226
Make sure both updates are correctly installed. Important; when already using SCEP it is needed to remove the SCEP agent first. Recommended is to use the installer script which automatically removes SCEP and installs additional prerequisites. (more information later in this blog)
Server 2016 requirements
For Server 2016 the build-in Defender server must be enabled. For correctly installing the new agent make sure the following prerequisites are in place.
- The Servicing Stack Update (SSU) from September 14, 2021 or later must be installed. (latest version recommended)
- The Latest Cumulative Update (LCU) from September 20, 2018 or later must be installed. (latest version recommended)
- Enable build-in Defender Antivirus
- Update the latest Defender Antivirus platform version (download package from Microsoft Update Catalog or MMPC)
Manual installation
Installation of the new Defender for Endpoint agent is simple when the prerequisites are correctly in place. md4ws.msi supports additional parameters:
Silent installation:
Msiexec /i md4ws.msi /quietSilent installation + configuration in passive mode:
Msiexec /i md4ws.msi /quiet FORCEPASSIVEMODE=1Passive mode
If there is a default non-Microsoft antivirus/antimalware solution available it is directly possible to enable the passive mode for the Microsoft Defender Antivirus components. using FORCEPASSIVEMODE=1
For making sure Defender for Endpoint is correctly configured in passive mode after the initial onboarding the “ForceDefenderPassiveMode” need to be added.
- Path:
HKLM\SOFTWARE\Policies\Microsoft\Windows Advanced Threat Protection - Name:
ForceDefenderPassiveMode - Type:
REG_DWORD - Value:
1
During the installation the following error can be visible; Please update Windows Defender. When the error is showing make sure the latest Defender platform update is installed for Server 2016.
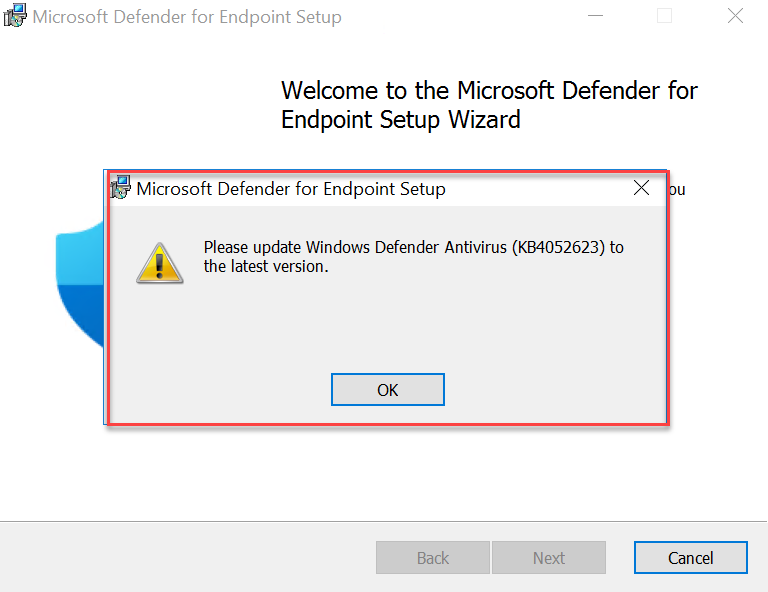
For checking the current platform version. Use the PowerShell command: Get-MpComputerStatus and check the value: AMProductVersion

Scripted installation
Microsoft published a GitHub installation script that automated most of the migration/ installation steps. The script can help with automating the following steps:
- Remove the OMS workspace for Microsoft Defender for Endpoint
- Remove System Center Endpoint Protection (SCEP) client if installed on Server 2012R2
- Download and install (Windows Server 2012 R2) prerequisites if required.
- Trying to active Defender on Windows Server 2016
- If Defender is installed and running but outdated, it updates to the latest platform version on Windows Server 2016 when the state is upgradeable (see prerequisites)
- Install Microsoft Defender for Endpoint
- Onboard Defender for Endpoint
More information and download: upgrade script | Github
Install and remove the MMA agent (replace <WORKSPACE_ID> with the actual MMA agent ID)
.\Install.ps1 -RemoveMMA <WORKSPACE_ID> -OnboardingScript ".\WindowsDefenderATPOnboardingScript.cmd"Install and configure passive mode
.\Install.ps1 -OnboardingScript ".\WindowsDefenderATPOnboardingScript.cmd" -Passive-Passive
The parameter -Passive enabled Defender Antivirus in passive mode. Make sure to set the “ForceDefenderPassiveMode” registry key on all servers for getting the passive mode enabled after the Defender for Endpoint onboarding.
Path: HKLM\SOFTWARE\Policies\Microsoft\Windows Advanced Threat Protection
Name: ForceDefenderPassiveMode
Type: REG_DWORD
Value: 1
Passive mode can be disabled when changing the value from 1 to 0. Passive mode can be used when migrating from non-Microsoft antivirus solutions.
The result after installing and onboarding with the installer script:

For Server 2012R2 and Server 2016 the Sense service is enabled after completing the MDE onboarding script.

Install/Migrate in Defender for Cloud
When using Defender for Cloud for Server 2012R2 and Server 2016 onboarding the new Defender for Servers Plan 1/2 integration can be used for automatically installing or migrating from the MMA-based Defender solution.
MDE integration with Defender for Servers P2 is by default the new solution for new Defender for Cloud activations or new subscriptions. When Defender for Servers P2 was enabled before June 20th, 2022, or MDE integration was enabled before June 20th, 2022, the new Enable Unified Solution button is visible.
The following options are available:
- Migrate all machines in subscriptions using Enable Unified Solution button
- Testing particular machines using REST API without enabling the complete subscription
- Deploying using Azure Policy
One of the following situations is mostly available in environments;
- Defender for Servers is already enabled and Microsoft Defender for Endpoint was deployed (MMA solution)
- Defender for Servers integration was never enabled
To enable the MDE unified solution in existing subscriptions you can easily opt-in to the unified solution on the subscription environment settings/integrations page. For opening the settings:
- Go to Defender for Cloud
- Go to Environment settings and select the subscription
- Go to Integrations
The button Enable unified solution is visible when the MDE integration was enabled before June 20th, 2022.

After enablement, it can take up to 12 hours before the extension is installed and MMA is replaced with the new Defender solution. Microsoft uses a version of the Defender script for uninstalling SCEP and installing the new solution. View the following blog for more information; How to upgrade from MMA-based Defender for Endpoint to MDE unified solution in Defender for Cloud?
Install using Microsoft Endpoint Configuration Manager
Since update 2207 for Microsoft Endpoint Configuration Manager current branch the improved Defender for Endpoint onboarding for Windows Server 2012R2 and Windows Server 2016 is finally available.
Since version 2207 Configuration Manager version 2207 supports the automatic installation of the new unified Microsoft Defender for Endpoint agent.
Migration is possible using the Client Settings which are used previously for MMA/ SCEP.
Migrating from SCEP
- Change the Client settings used for Endpoint Protection and change from Microsoft Monitoring Agent MMA (legacy) to MDE client (recommended).
- Configure the Defender for Endpoint onboarding file downloaded from security.microsoft.com
- Upload the .onboarding file and configure file sample collection
Client settings can be founded under Endpoint Protection
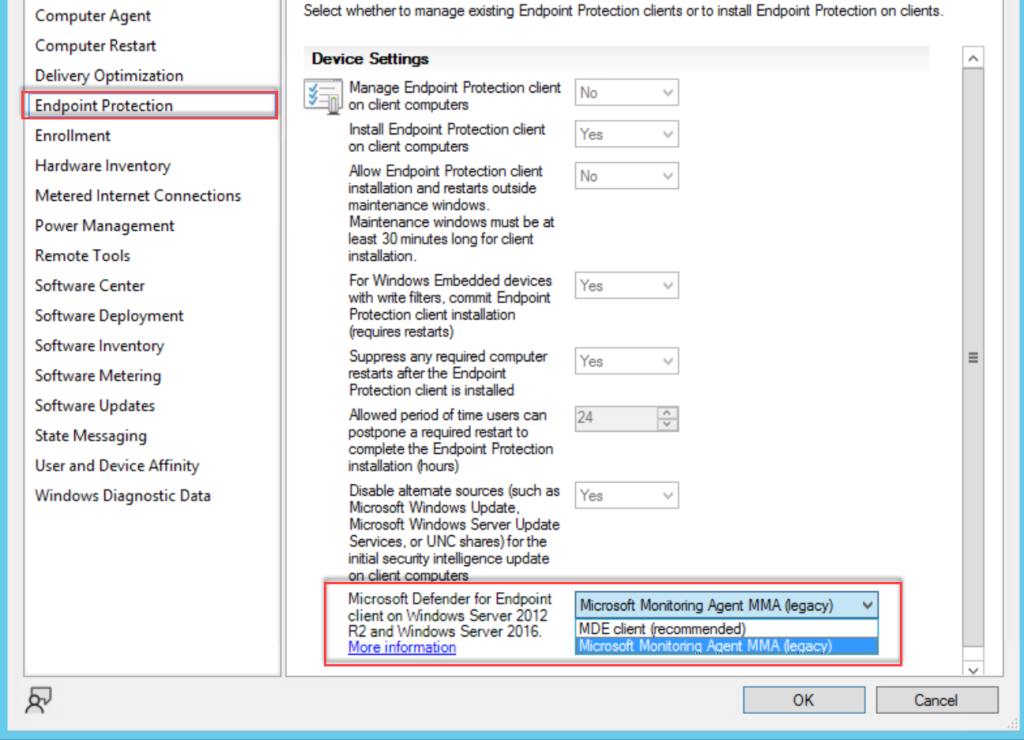
Go to Assets and Compliance > Endpoint Protection > Microsoft Defender ATP Policies and select Create Microsoft Defender ATP Policy and upload the downloaded onboarding file from security.microsoft.com. (use the Deployment method; Microsoft Endpoint Configuration Manager current branch and later)

Note: For Server 2008R2 and older MDE-supported down-level systems it is still needed to use Microsoft Monitoring Agent (MMA) (legacy) in the Client Settings and use the workspace key + workspace ID. Server 2012R2/ Server 2016 works via the .onboardingfile and the new MDE client setting; where Server 2008R2 works only with the MMA configuration.
Differences in portal
After onboarding, the new features are visible on the device page. The following actions are now available in comparison with the legacy MMA situation:
- Isolate devices
- Run Antivirus Scan
- Collect Investigation Package
- Initiate Live Response Session (now supported)
- Initiate Automated Investigation (now supported)
Server 2016 ( legacy MMA)

Server 2016 (new MDE unified solution agent)

Configuration
With the new Unified Solutions all the Group Policy, PowerShell commands, and other management options similar to Server 2019 are available for Server 2012R2 and Server 2016. You can use the Group Policy templates for Server 2019 to manage Defender on Windows Server 2012R2 and 2016. The following methods are available:
- Microsoft Endpoint Configuration Manager
- GPO
- PowerShell
- Security Management feature in MEM (advised and supported for the new agent)
View the following blog for more in-depth MEM for MDE management details; Managing Microsoft Defender for Endpoint with the new Security Management feature in MEM
Configuration – Attack Surface Reduction
Attack Surface Reduction is with the new unified solution available. Based on the Server OS there are some differences in the ASR support.
| ASR Rule | ID | Server 2016 | Server 2012R2 |
| Block abuse of exploited vulnerable signed drivers | 56a863a9-875e-4185-98a7-b882c64b5ce5 | Yes | Yes |
| Block Adobe Reader from creating child processes | 7674ba52-37eb-4a4f-a9a1-f0f9a1619a2c | Yes | Yes |
| Block all Office applications from creating child processes | d4f940ab-401b-4efc-aadc-ad5f3c50688a | Yes | Yes |
| Block credential stealing from the Windows local security authority subsystem (lsass.exe) | 9e6c4e1f-7d60-472f-ba1a-a39ef669e4b2 | Yes | Yes |
| Block executable content from email client and webmail | be9ba2d9-53ea-4cdc-84e5-9b1eeee46550 | Yes | Yes |
| Block executable files from running unless they meet a prevalence, age, or trusted list criterion | 01443614-cd74-433a-b99e-2ecdc07bfc25 | Yes | Yes |
| Block execution of potentially obfuscated scripts | 5beb7efe-fd9a-4556-801d-275e5ffc04cc | Yes | Yes |
| Block JavaScript or VBScript from launching downloaded executable content | d3e037e1-3eb8-44c8-a917-57927947596d | Yes | No |
| Block Office applications from creating executable content | 3b576869-a4ec-4529-8536-b80a7769e899 | Yes | Yes |
| Block Office applications from injecting code into other processes | 75668c1f-73b5-4cf0-bb93-3ecf5cb7cc84 | Yes | Yes |
| Block Office communication application from creating child processes | 26190899-1602-49e8-8b27-eb1d0a1ce869 | Yes | Yes |
| Block process creations originating from PSExec and WMI commands | d1e49aac-8f56-4280-b9ba-993a6d77406c | Yes | Yes |
| Block untrusted and unsigned processes that run from USB | b2b3f03d-6a65-4f7b-a9c7-1c7ef74a9ba4 | Yes | Yes |
| Use advanced protection against ransomware | c1db55ab-c21a-4637-bb3f-a12568109d35 | Yes | Yes |
| Block Win32 API calls from Office macros | 92e97fa1-2edf-4476-bdd6-9dd0b4dddc7b | No | No |
| Block persistence through WMI event subscription | e6db77e5-3df2-4cf1-b95a-636979351e5b | No | No |
Configuration – Network Protection
For enabling Network Protection, additional configuration is required. For Server 2012R2 and Server 2016 additional configuration is needed for Network protection. Use the below PowerShell commands for enabling the NetworkProtection feature.
Set-MpPreference -EnableNetworkProtection Enabled
Set-MpPreference -AllowNetworkProtectionOnWinServer 1
Set-MpPreference -AllowNetworkProtectionDownLevel 1
Set-MpPreference -AllowDatagramProcessingOnWinServer 1
Set-MpPreference -AllowSwitchToAsyncInspection $True
Update maintenance
Important is to apply the latest updates which are supported for Server 2012R2 and Server 2016. KB5005292 is released for updating Microsoft Defender for Endpoint. This update services the EDR sensor included in the new Microsoft Defender for Endpoint unified solution and is needed for Server 2016 / 2012R2 based on the EDR sensor component. Important: Make sure the new update is deployed to receive features and fixes.
Result: Automated Investigation & Response AIR
Automated Investigation and response (AIR) is working and exactly the same in comparison with Windows 10+/ Server 2019+
Server 2016:

Server 2012R2:
Result: Live Response
Live response is supported and working exactly the same in comparison with Windows 10/ Server 2019.
Server 2016:
Server 2012R2:
Good to know
- Operating system upgrades aren’t supported. Offboard then uninstall before upgrading
- Automatic exclusions for server roles aren’t supported on Windows Server 2012 R2
- No UI is available on Windows Server 2012R2 (use PowerShell cmdlets)
More limitations can be founded here
Conclusion
The new Defender for Endpoint unified solution for Server 2012R2 and 2016 works way easier in comparison with the legacy MMA onboarding method. The new unified solution package reduces complexity by removing dependencies and installation steps. It also standardizes capabilities and functionality for the complete Defender for Endpoint stack.
Oh.. and it is always a good idea to upgrade Server 2012R2 and 2016 to one of the latest Server versions. Don’t stay behind if you can upgrade easily to Server 2019 or higher.
Sources
- Microsoft: Defending Windows Server 2012 R2 and 2016
- Jeffreyappel.nl: How to upgrade from MMA-based Defender for Endpoint to MDE unified solution in Defender for Cloud
- GitHub: MDE installer script
- Microsoft: Onboard Windows servers to the Microsoft Defender for Endpoint service
- Microsoft: Attack Surface Reduction (ASR) rules
Windows especially have fantastic preinstalled Windows Defender Antivirus on their major operating system. Keeping the server secure from the well-known attacks Windows Defender will surely help you. It has a very simplistic mechanism and configuration which you can do as per requirements.
In this article learn: How to use and configure Windows Defender Antivirus on Windows Server?
Check Windows Defender Antivirus & Addons Status
In some OS settings windows defender antivirus is disabled due make the performance better. But we can go ahead and check the status of Windows Defender using the following steps whether it is installed or available to install,
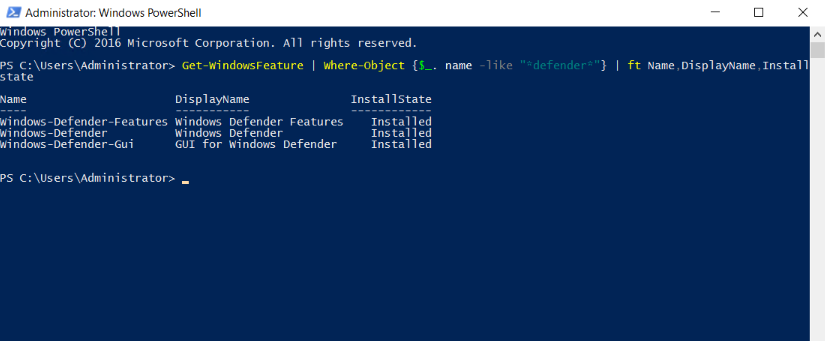
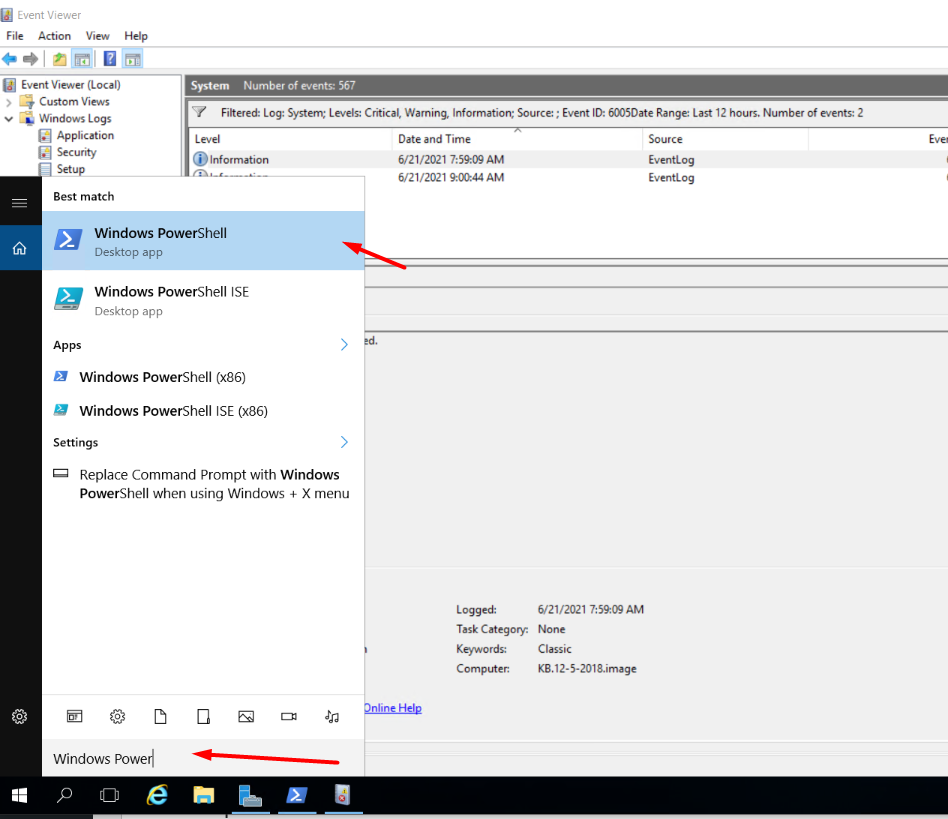
1. Login to Windows Server → Search and Open “Windows Powershell“.
2. Run the following command to enable the Windows Defender Antivirus on the server.
Get-WindowsFeature | Where-Object {$_. name -like "*defender*"} | ft Name,DisplayName,Installstate
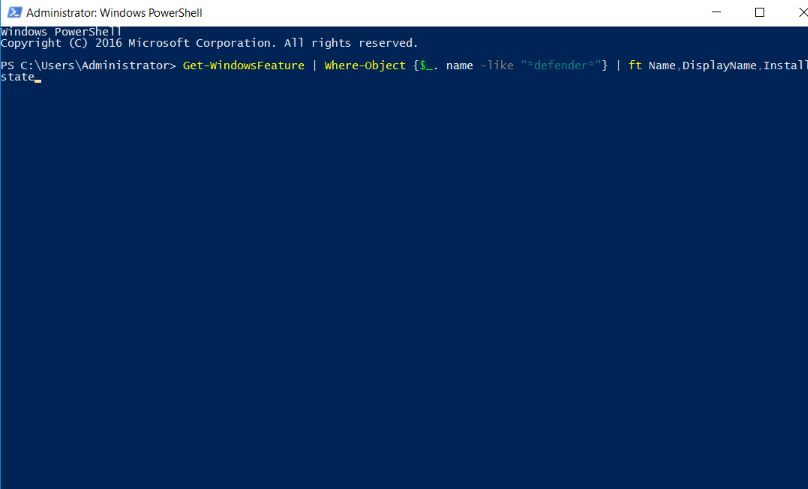
3. Now you can see all the available or installed status of windows defender antivirus and modules/addons of the windows defender antivirus. All the items with Available Status you can install using following methods,
Install Windows Defender Antivirus GUI Manually.
In the windows server operating systems (2012, 2016, etc) there is no GUI is installed/enabled by default for Windows Defender Antivirus. But, windows offer us options to install/enable the GUI using server manager or Powershell. If the above command turned output as Available for Windows Defender and its add-on modules, you can install it from server manager or Powershell.
Using Server Manager.
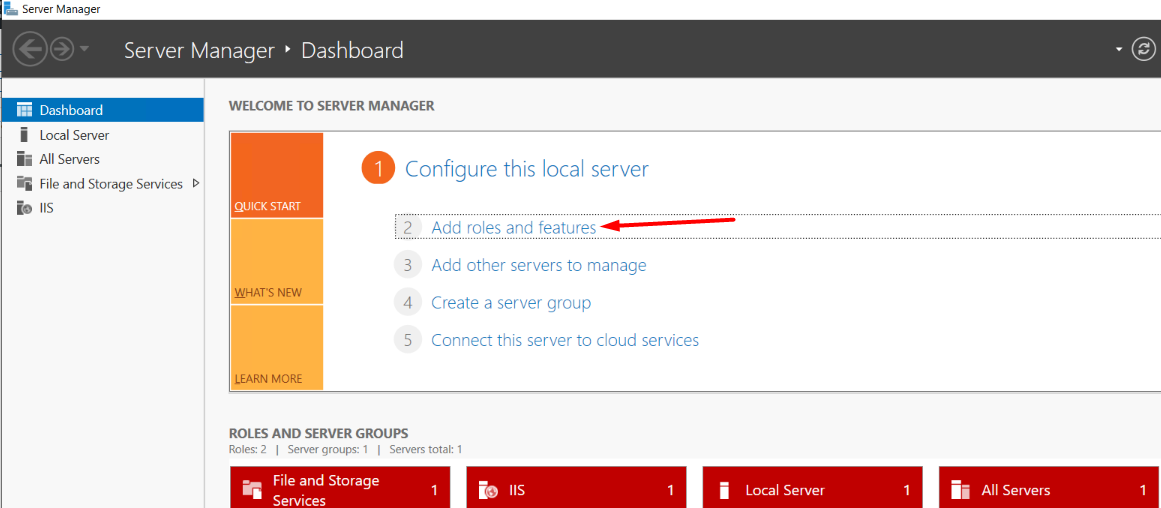
1. Log in to your Windows Server 2012, 2016, or later → Open Server Manager.
2. Click on “Add Roles and Features“.
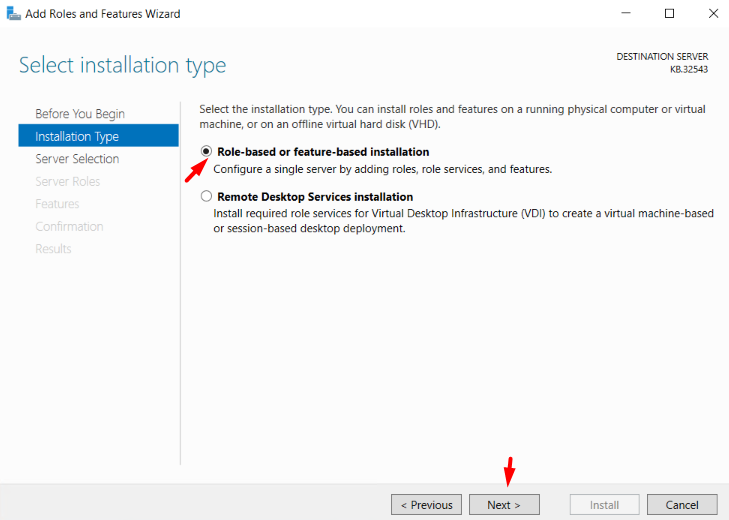
3. In the Installation Type section, select Role-based or feature-based installation → Next.
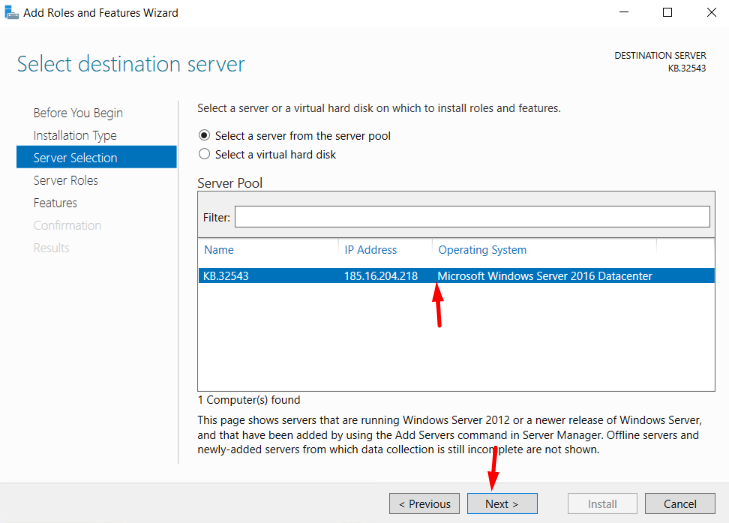
4. In Server Selection, select your Windows Server, if your server is configured in the network, then select the particular server from the list to process the installation → Next.
5. Do not select or Deselect anything in Server Roles Section → Click Next
6. In the Feature Section, click on GUI for Windows Defender as well as Windows Defender (If it is not installed) from under Windows Defender Features.
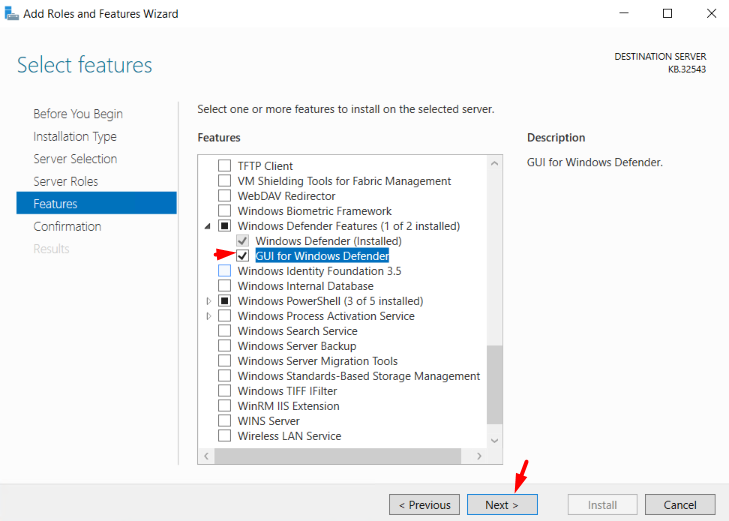
7. In the Confirmation section, click on Install.
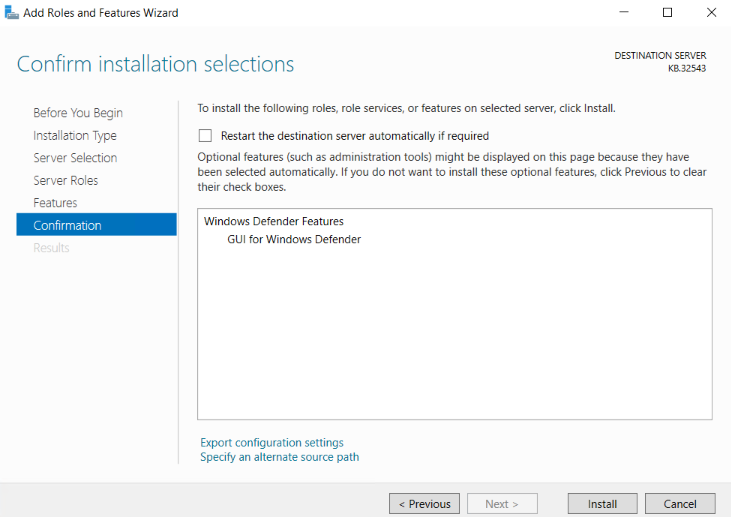
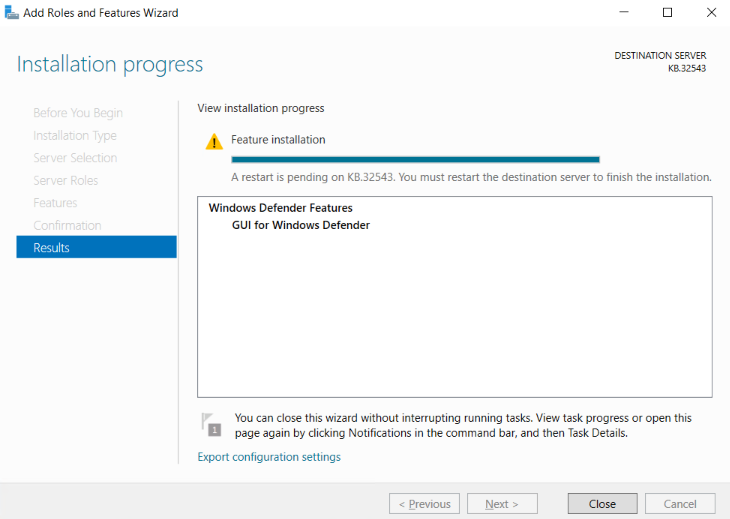
You must restart the destination server to finish the installation.
Using PowerShell.
1. Login to Windows Server → Search and Open “Windows Powershell”.
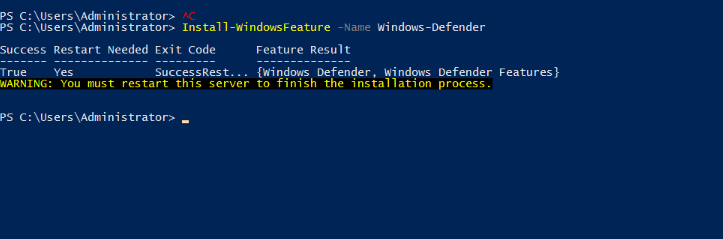
2. Run the below command to install the Windows Defender Antivirus,
Install-WindowsFeature -Name Windows-Defender
3. Run the following command to install/enable the Windows Defender Antivirus GUI on the server.
Install-WindowsFeature -Name Windows-Defender-GUI
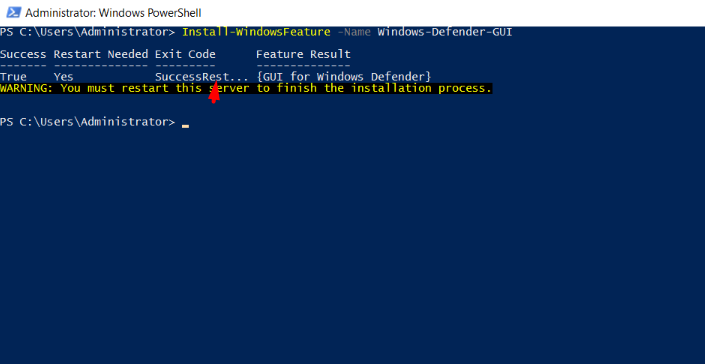
You must restart the destination server to finish the installation.
Configure Windows Defender Antivirus.
This is a crucial part of Windows Defender Antivirus working. The default settings offered by windows are quite decent and should work properly as per security concerns but we can take the configuration to next level and make sure to increase server security with manual configuration.
First, log in to Windows Server → Search and Open “Windows Defender Settings“.
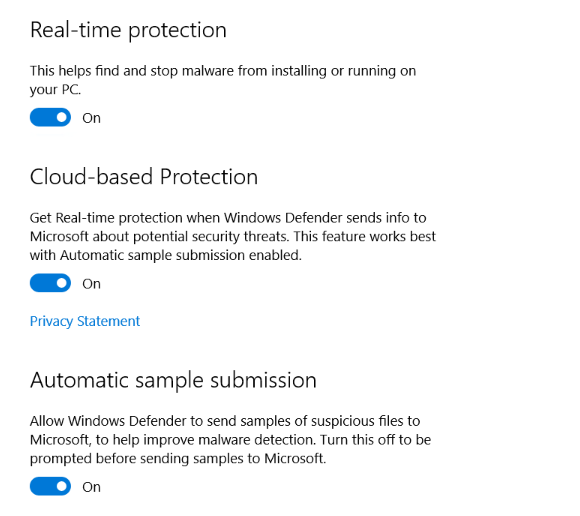
Realtime Protection (Recommended)
This feature provided by windows works in real-time and stops any kind of malware activity running on the server. Enabling this option may cause extra use of hardware resources.
Cloud-based Protection
If any real-time malware activity got detected then its information will be shared with Microsoft, the collectively provided data from other servers as well will help Microsoft to stop or workaround to those potential risks.
Automatic Sample Selection (Optional)
If this option is enabled, windows will share suspicious files with Microsoft and help them investigate them to reduce future attacks.
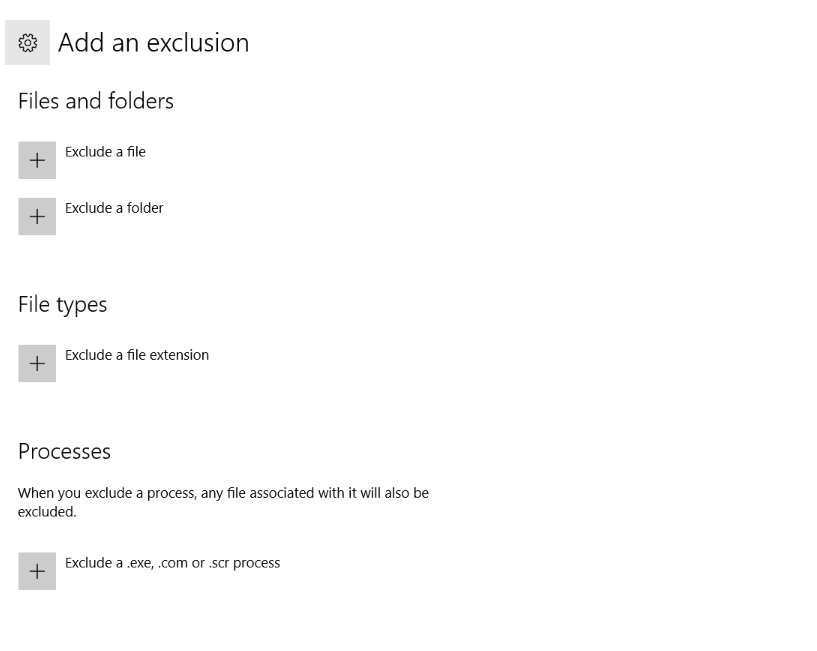
Exclusions
Through this option, you can exclude any program, file, process, and file type from Windows Defender Antivirus Protection.
Operating Windows Defender Antivirus GUI.
First, log in to Windows Server → Search and Open “Windows Defender Settings” → Click on “Windows Defender Settings“.
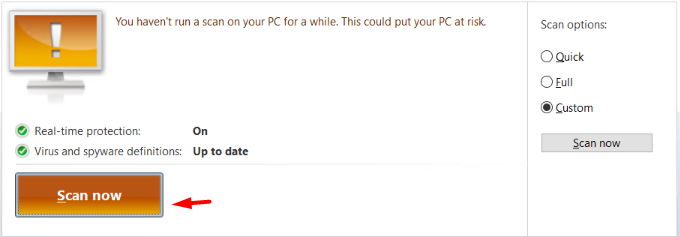
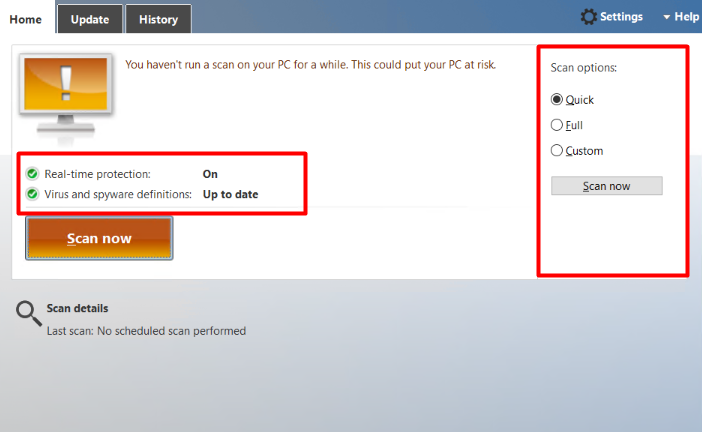
In the “Home” tab you can schedule the scan. Also, can customize scan with the help of scan options.
Quick: This option scans the area which is most likely to be get infected with malware, spyware, viruses.
Full: This option scans all the files available on the hard drive of the system as well as running programs for any kind of threat.
Custom: This option only checks the specified location for the infected files.
Also, if you enabled the Real-time protection as per the above instructions you can check its status on the GUI interface.
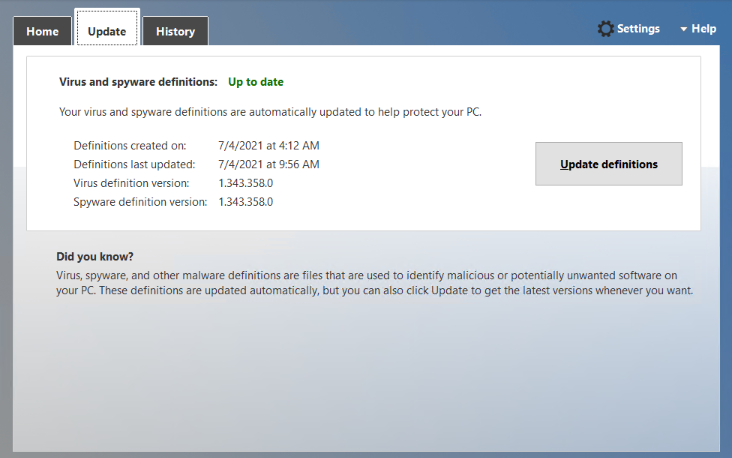
In the “Update” tab, Microsoft provides regular updates over newly developed malware, spyware; you should keep the Windows Defender Antimalware up to the date. All the last update and new update-related information you can find under the “Update” section.
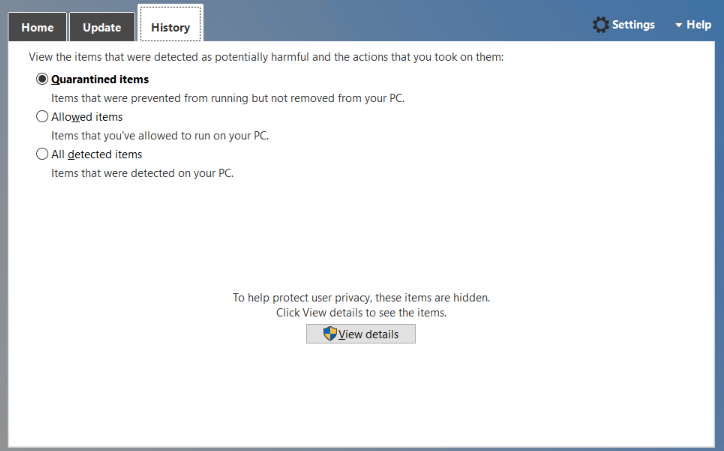
In the “History” tab you can find the following event history,
Quarantine Items: These are items that are prevented from running by the windows but not yet removed.
Allowed Items: These are items that are manually allowed by you.
All detected items: These are items detected on the server.
Once you configure all the above options, you can click on the “Scan Now” button to start the scanning.