
Windows 11 supports the latest wireless technologies standard from WFA (Wi-Fi Alliance) including Wi-Fi 6, Wi-Fi 7, and WPA3. Wi-Fi 6 is the sixth generation of Wi-Fi that improves efficiency, flexibility, and scalability, providing higher speeds and capacity for modern applications. Wi-Fi 7 is the latest generation that promises even faster speeds and improved latency, network capacity, and overall stability. WPA3 is the latest security standard that enhances Wi-Fi security, offering features like more robust authentication and increased cryptographic strength.
These advancements in Wi-Fi technology and security are designed to support the increasing demand for wireless connectivity in various environments, from homes to large enterprises, ensuring a better and more secure user experience.
To take advantage of the increased performance, coverage, and security, here’s what you’ll need:
-
A router that supports Wi-Fi 7, Wi-Fi 6/6E, and/or WPA3. To find out if your router supports this, check the documentation that came with it or visit the router manufacturer’s website. If you’re considering buying a new router, look for a Wi-Fi 7 label for the latest Wi-Fi features.
-
Windows 11 installed on your PC. To check and make sure you have the latest updates for Windows 11, select the Start button, then select Settings > Windows Update > Check for updates.
Note: Wi-Fi 7 is available starting with Windows 11, version 24H2.
-
A wireless network adapter that supports Wi-Fi 7, Wi-Fi 6/6E, and/or WPA3. To see if your PC supports it, check the documentation that came with it or check the PC manufacturer’s website.
Tip: You can also check to see what your network adapter supports by opening the Command Prompt (or Terminal), and then typing the command netsh wlan show drivers. Look next to Radio types supported and see if it includes 802.11be (for Wi-Fi 7) or 802.11ax (for Wi-Fi 6/6e) and look under Authentication and cipher supported in infrastructure mode and see if it includes WPA3 Personal and WPA3 Enterprise.
Wi-Fi 7
Wi-Fi 7, also known as IEEE 802.11be Extremely High Throughput (EHT), is the latest Wi-Fi technology that offers unprecedented speed, reliability, and efficiency for your wireless devices.
Here are some of Wi-Fi 7’s new features:
-
Multi-Link Operation (MLO) allows devices to use multiple bands (2.4 GHz, 5 GHz, and/or 6 GHz) simultaneously to avoid network congestion and maintain connectivity.
Tip: Once connected, you can see if Multi-Link Operation is supported in your connection by selecting Settings > Network & internet > Wi-Fi > (your network) properties, and checking the value next to Network band (channel). If it shows more than one band (for example, 5 GHz and 6 GHz, or 2.4 GHz and 5 GHz), then MLO is supported.
-
320 MHz ultra-wide bandwidth in the 6 GHz band doubles the speed to your devices and enables new possibilities for high bandwidth applications and scenarios, such as AR/VR.
-
4096-QAM modulation increases data transmission by 20% and improves the quality of video streaming, video conferencing, and more.
With Wi-Fi 7, you can enjoy multi-gigabit speeds on your Windows PC and experience up to 4x faster speeds than Wi-Fi 6 and Wi-Fi 6E, and close to 6x faster than Wi-Fi 5. You can also enjoy significantly lower latency, which improves the responsiveness and performance of real-time activities like gaming and video conferencing. Please note that performance may vary by manufacturer and hardware device capabilities.
Note: Wi-Fi 7 (Enterprise) is not currently supported in Windows 11.
Wi-Fi 6/6E
Wi-Fi 6, also known as IEEE 802.11ax High Efficiency (HE), is the sixth generation of the Wi-Fi standard. It brings several enhancements to wireless networks (WLANs) and is designed to improve performance, efficiency, and scalability.
Here are some of Wi-Fi 6’s new features:
-
Multi-User Multiple Input, Multiple Output (MU-MIMO) transmissions, allowing multiple devices to communicate simultaneously.
-
Double the potential bandwidth from four streams to eight streams.
-
1024-QAM modulation to enable broadcasting over up to eight spatial data streams.
In addition to that, Wi-Fi 6E extends Wi-Fi 6 support to the 6ghz band. It opens up ultra-wide data channels, providing additional spectrum for faster and more reliable connections in a less crowded spectrum.
With Wi-Fi 6/6E, you can enjoy increased speed, capacity, and efficiency, making it ideal for modern applications and a better overall Wi-Fi experience.
WPA3
Building on the widespread adoption of WPA2 over more than a decade, WPA3 is the latest generation of Wi-Fi security from WFA, offering a host of features to simplify Wi-Fi security, enabling more robust authentication, and delivering increased cryptographic strength for highly sensitive data markets. For more information, visit the WFA website.
-
WPA3-Personal is more resilient, password-based authentication even when users choose passwords that fall short of typical complexity recommendations.
Tip: If you have a WPA2 and a WPA3 AP (access point) in your network setup, your PC will first try to connect using WPA3-Personal, automatically upgrading your existing WPA2-Personal configuration. A wireless network adapter that supports cross-roaming is required to seamlessly roam between WPA2 and WPA3, if part of your network isn’t yet compatible with WPA3.
-
WPA3-Enterprise builds on top of WPA2-Enterprise by providing the additional requirement of using Protected Management Frames on all WPA3 connections with 802.1X for user authentication with a RADIUS server.
-
WPA-Enterprise (192 bits) offers the equivalent of 192-bit cryptographic strength, providing additional protections for networks transmitting sensitive data, such as government or finance.
Некоторые пользователи, обновившиеся до Windows 10 последней версии, могут обнаружить, что при подключении к Wi-Fi сети, защищенной паролем, появляется уведомление о том, что соединение не защищено с информацией «В этой сети Wi-Fi применяется устаревший стандарт безопасности. Мы рекомендуем подключиться к другой сети».
В этой короткой инструкции о том, почему вы видите такое сообщение в Windows 10, что означает устаревший стандарт безопасности и как исправить проблему с подключением Wi-Fi.
Почему соединение Wi-Fi не защищено и что значит устаревший стандарт безопасности
Windows 10 показывает уведомление о том что подключение не защищено в двух случаях. Первый — когда для Wi-Fi сети не установлен пароль и эта причина вполне понятна. Второй возможный сценарий — использование устаревших типов шифрования для Wi-Fi сети и именно этот вариант может вызвать вопросы.
Если в качестве типа безопасности для вашей беспроводной сети выбран WEP или в качестве типа шифрования используется TKIP, вы получите уведомление, о котором идет речь в этой инструкции. Причина простая: по сегодняшним меркам эти стандарты действительно являются небезопасными и их не рекомендуется использовать (а на некоторых современных роутерах их уже нельзя выбрать) в связи с относительной простотой взлома.
Что делать в этой ситуации? Шаги простые, особенно если вы ранее сами настраивали свой роутер и не зависят от марки и модели беспроводного маршрутизатора (интерфейс может отличаться, но логика везде одна и та же):
- Зайдите в веб-интерфейс настроек роутера и перейдите на страницу настроек беспроводной сети (или параметров безопасности Wi-Fi).
- В качестве типа безопасности выберите один из современных вариантов, лучше всего —WPA3/WPA2 (при наличии) или WPA2-PSK (если будет предлагаться выбрать тип шифрования, то AES).

- Задайте пароль для Wi-Fi (скорее всего его придется установить заново).
- Сохраните сделанные настройки.
- Через некоторое время (в этот момент может показаться, что страница настроек роутера «зависла») заново подключитесь к беспроводной сети уже с новым паролем (предварительно может потребоваться «забыть» Wi-Fi сеть в Windows 10).

После этого никакие уведомления о том, что сеть не защищена и используется устаревший стандарт безопасности появляться не будут.
Если вы не знаете, как все это проделать на вашем роутере, посмотрите инструкции по настройке Wi-Fi роутера — все они одним из этапов содержат информацию о настройке Wi-Fi сети и пароля на беспроводную сеть: а это именно то расположение, где и задаются интересующие нас настройки.
В редких случаях, но очень старых беспроводных маршрутизаторах вы можете столкнуться с тем, что современные стандарты безопасности не поддерживаются. В этом случае наилучшим вариантом будет заменить роутер, они не слишком дорогие.
Security issues with WiFi connection are very common these days. To protect your privacy, it’s important to make sure your wireless connection is secure. The following are a few tips that help you do so…
Try these tips
The following are the tips that have helped many people secure their WiFi connection. We recommend you check them all to ensure your WiFi security.
For home network
- Change your WiFi password regularly
- Update your router firmware
- Use a good wireless router
For public network
- Connect to the correct network
- Use a VPN
Tip 1: Change your WiFi password regularly
This is one of the things you should do to make sure it’s secure. To change your password:
- Connect a Windows computer to your WiFi network.
- Press the Windows logo key and R on your keyboard at the same time to open the Run box.
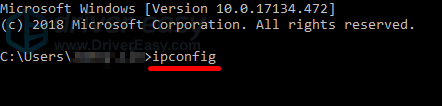
- Type “cmd”, then press Enter on your keyboard to open Command Prompt.
- On Command Prompt, type “ipconfig”, then press Enter on your keyboard.

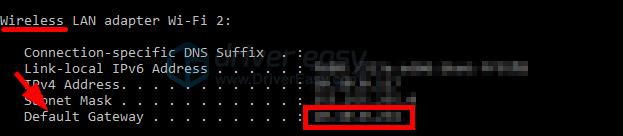
- Note down the Default Gateway address under your wireless network adapter.

- Open your web browser, then type the Default Gateway address in the address bar and press Enter.
- Log in your router.
- Go to the Wireless or Wireless Security settings.
You may need to check your router manual for information on where to change your password.

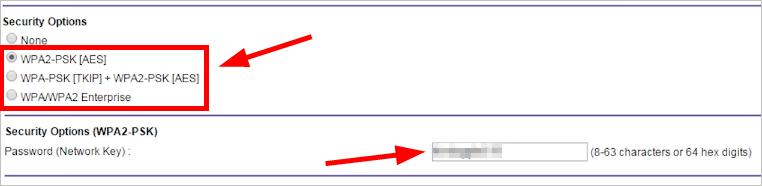
- Select a WPA2 option for your wireless security options, then change your password.
Always use a strong password. This keeps you from password crackers.

- Apply or save your settings.

This is how you change your WiFi password. You should do this every few months to prevent your password from being cracked.
Tip 2: Update your router firmware
The manufacturer of your router releases regular firmware updates to fix security issues. You should make sure your router firmware is up to date.
To check your router for firmware update:
- Connect a Windows computer to your WiFi network.
- Go to your router manufacturer website, then search your router model.
- Go to your router firmware download page and download the firmware update to your computer.
- Press the Windows logo key and R on your keyboard at the same time to open the Run box.
- Type “cmd”, then press Enter on your keyboard to open Command Prompt.
- On Command Prompt, type “ipconfig”, then press Enter on your keyboard.
- Note down the Default Gateway address under your wireless network adapter.
- Open your web browser, then type the Default Gateway address in the address bar and press Enter.
- Log in your router.
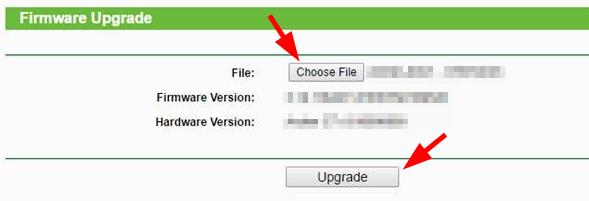
- Go to the Administration/Tools/… settings, then go to the Firmware Upgrade section.
You may need to check your router manual for information on where to find the Firmware Upgrade section.
- Click Choose File to choose the downloaded firmware update on your computer, then click Upgrade.

- Wait for the update process to be complete.
Now this should have updated your router firmware!
Tip 3: Use a good wireless router
Perhaps your router is too old and it doesn’t support latest security features, such as more secure encryption methods or a built-in firewall. We recommend you consider buying a new router, so you won’t experience security issues caused by outdated hardware.
Tip 4: Connect to the correct network
The first thing you should do when connecting to a public wireless network is make sure you access the right one. By doing so can you protect yourself from the hackers that are using a look-alike network as a trap. You should know the correct name (SSID) of the network before you connect to it. You may need to ask the administrator of this network or the service provider for this information.
Also, make sure the public wireless network you’re using is taking some security measures. For example, it should require you to enter a password or complete a authentication process before it allows you to access the Internet. If it doesn’t, you should always be extra careful about what personal data you enter.
Tip 5: Use a VPN
VPN (Virtual Private Network) helps you browse the Internet in a secure and anonymous way. It reduces the risk of your data transmitted being compromised even if you’re using a insecure WiFi network.
There are two ways you can use a VPN:
The first one is set up your own VPN server, and connect your computer to that server. You should have a server (or at least a normal computer) at a different location from your home. And the process of configuring the connection requires some advanced computer skills.
The second and easier one is to use a VPN service. We recommend using NordVPN. NordVPN helps you set up a fast, stable and secure Internet connection to anywhere. And it helps you do this with just a few clicks!
You can get a decent deal for the NordVPN services. Check out the NordVPN coupons here!
To use NordVPN:
- Download and install NordVPN.
- Run NordVPN, then choose a location you want to connect to.


That’s it! You’ve already set up a VPN connection to the Internet on your computer!
Hopefully the tips above help you secure your WiFi network connection. If you have any questions or suggestions, feel free to leave us a comment below.
13
13 people found this helpful
Table of Contents:
As smartphones and other devices with wireless network adapters, computers with Windows 10 will show you a list of available WiFi networks in your surrounding.
With many reachable wireless access points popping up and disappearing again, the available networks list can become quite annoying.
If needed you can use the allowed and blocked filter list of Windows 10 to block certain WiFi networks or all unknown WiFi networks.
This also allows restricting the PC to connect to certain permitted WiFi access points and blocking any connection to other devices or hotspots.
Here we show you how to block WiFi signals using different CMD commands that edit Windows 10 filter lists for allowed and blocked networks.
How To Display Wireless Networks marked Allowed and Blocked
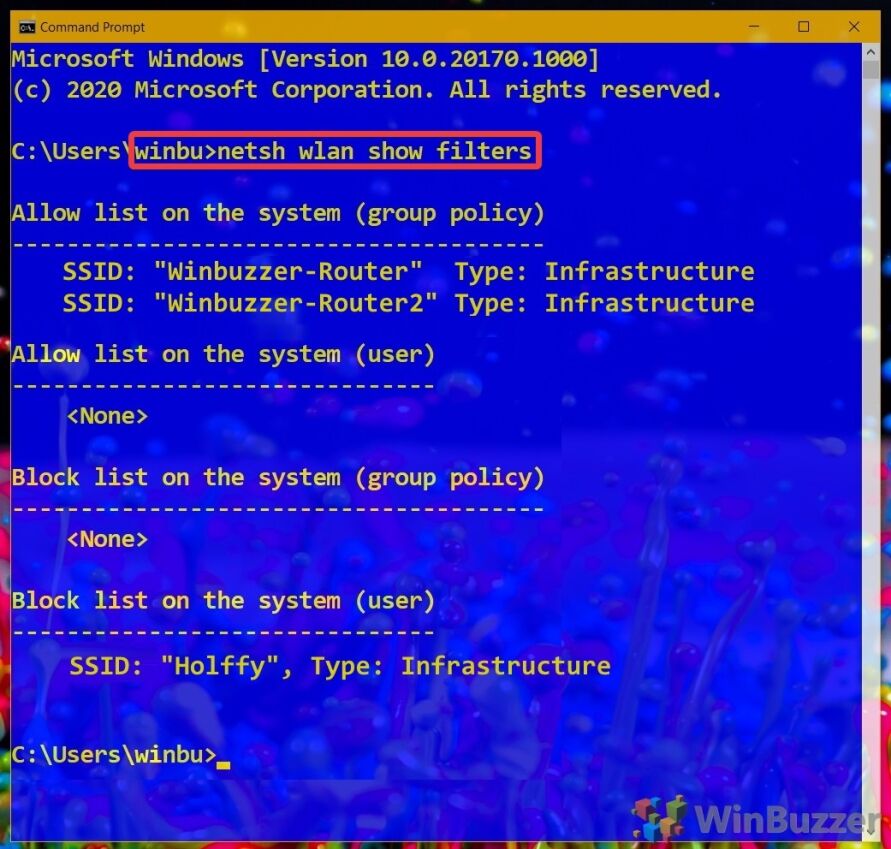
This will display a list of wireless networks that have been added to the allowed or blocked filter lists. Once you block a WiFi network adding it to the blocked filter, this is the only way to see it as it will disappear from the available networks list in
-
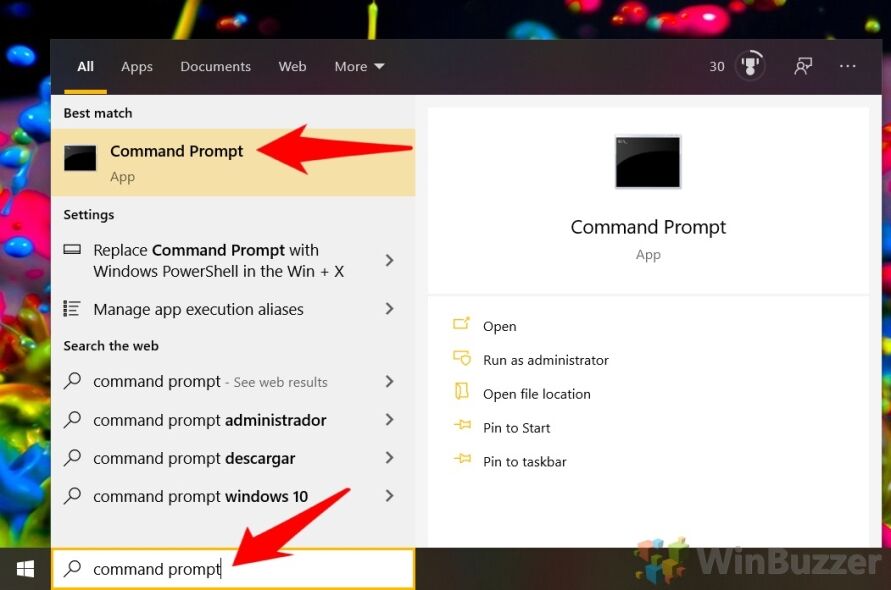
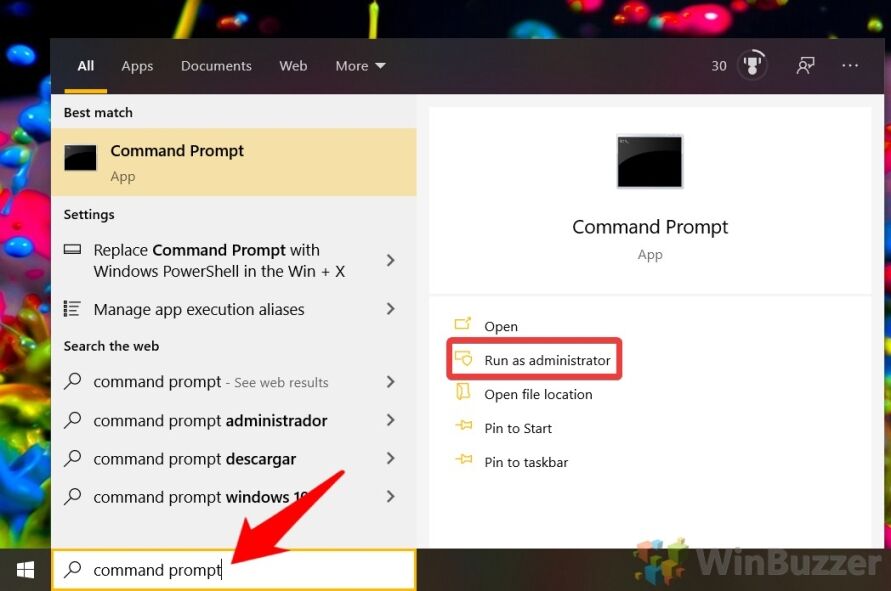
Open the Command Prompt

- Run one of the following commands according to your needs
List all allowed and blocked wireless networks:
netsh wlan show filters
List only all allowed wireless networks:
netsh wlan show filters permission=allow
List only all blocked wireless networks:
netsh wlan show filters permission=block

How to Add or Remove a Wireless Network in the Allowed Filter List
SSIDs (Service Set Identifiers) present in the allowed filter list will show when you use the “Denyall” option below to hide all “unknown” networks in Windows 10.
- Open the Command Prompt

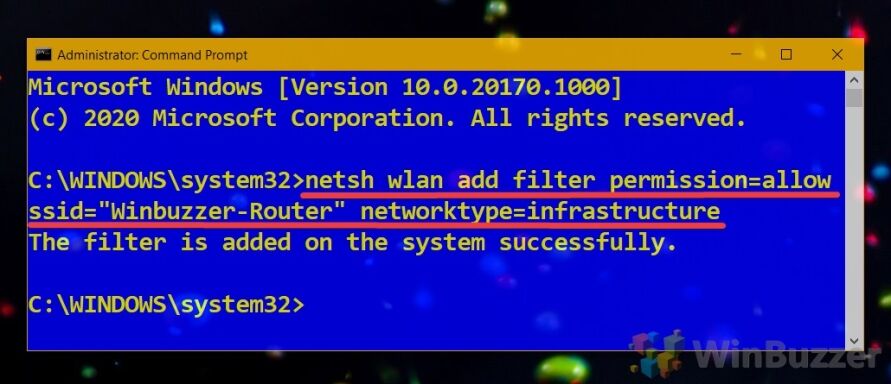
- Add available wireless network to allow list
Run the following command replacing “NETWORK NAME” in the command with the actual SSID of the wireless network.
netsh wlan add filter permission=allow ssid="NETWORK NAME" networktype=infrastructure

- Remove available wireless network from allow list
Run the following command replacing “NETWORK NAME” in the command with the actual SSID of the wireless network.
netsh wlan delete filter permission=allow ssid="NETWORK NAME" networktype=infrastructure


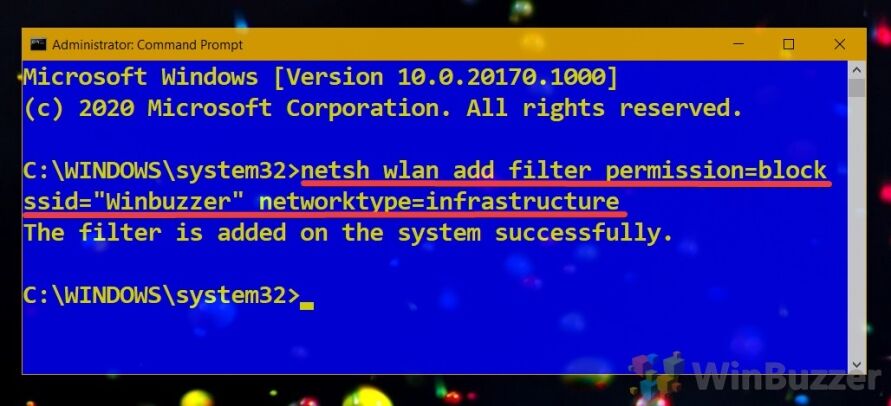
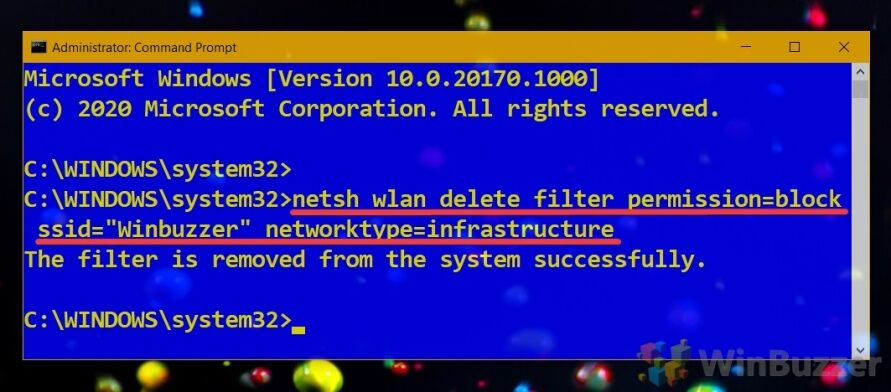
How to Add or Remove a Wireless Network in the Blocked Filter List
WiFi networks in the blocked filter list will be hidden in the available networks list, and can no longer be connected to.
- Open the Command Prompt
- Add available wireless network to blocked list
Run the following command replacing “NETWORK NAME” in the command with the actual SSID of the wireless network.
netsh wlan add filter permission=block ssid="NETWORK NAME" networktype=infrastructure

- Remove wireless network from blocked list
Run the following command replacing “NETWORK NAME” in the command with the actual SSID of the wireless network.
netsh wlan delete filter permission=block ssid="NETWORK NAME" networktype=infrastructure

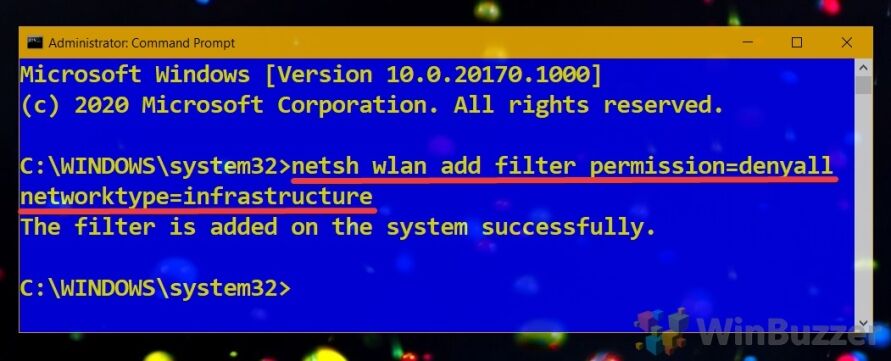
How to Block all not Allowed Wireless Networks via “denyall”
This hides all WiFi networks that are not explicitely added to the Allowed list from the available networks list. “Denyall” is the fastest way to block all but explicitely defined WiFi networks from showing up.
- Open the Command Prompt
- Apply the denyall-command
netsh wlan add filter permission=denyall networktype=infrastructure


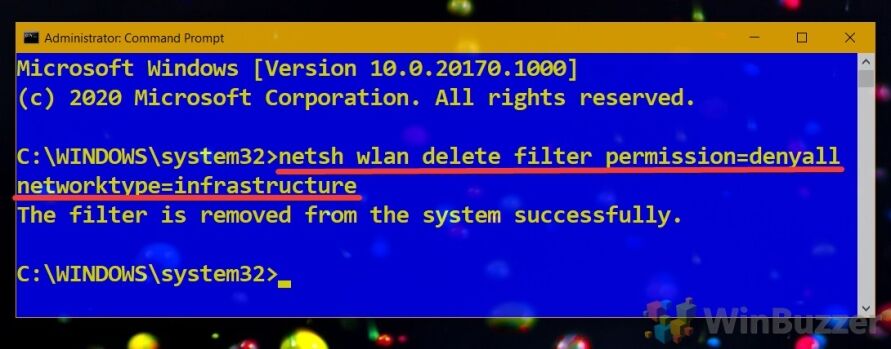
How to Revert the “Denyall”-filter to unblock all Wireless Networks
This will undo the previous option. Wireless networks will display in the visible available networks list and be able to connect to again.
- Open the Command Prompt
- Run command to undo the denyall-filter
netsh wlan delete filter permission=denyall networktype=infrastructure


How To Hide or Show Blocked Wireless Networks in the Available Networks List
This option is mostly obsolete. It allows to show (or re-hide) WiFi networks that have been added to the blocked networks list. Common practise is not adding a network to the blocked networks lists if you want to show it.
- Open Command Prompt
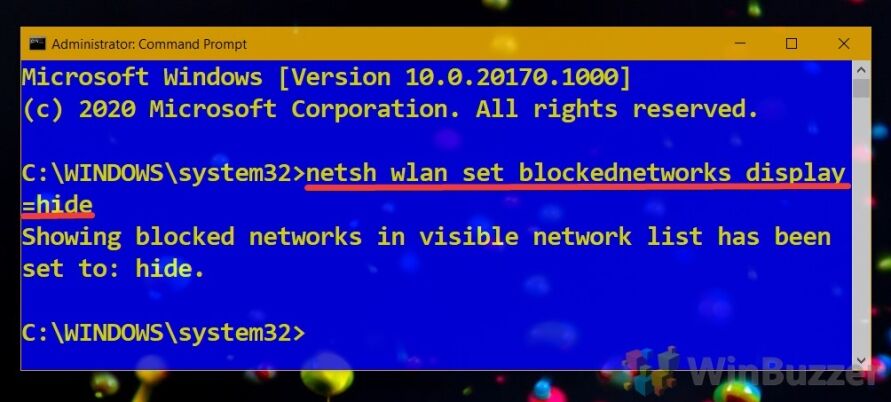
- Run command to hide blocked wireless networks
netsh wlan set blockednetworks display=hide

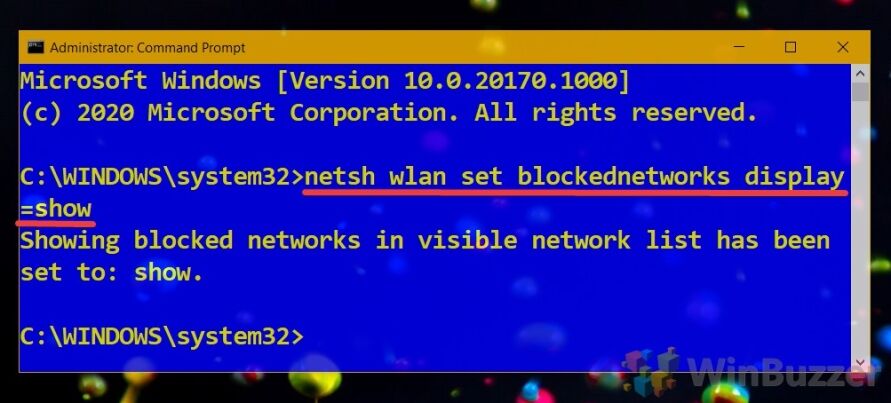
- Run command to show blocked wireless networks
netsh wlan set blockednetworks display=show


How to See Stored WiFi Passwords and Turn Your PC into a WiFi Hotspot
Windows 10 also allows to show previously stored WiFi passwords in the case you have lost them. You can also share your internet connection on Windows 10 by turning it into a WiFi hotspot for people nearby.
Last Updated on August 27, 2021 3:46 pm CEST
Markus Kasanmascheff
Markus has been covering the tech industry for more than 15 years. He is holding a Master´s degree in International Economics and is the founder and managing editor of Winbuzzer.com.
В данной статье показаны действия, с помощью которых можно проверить тип безопасности Wi-Fi сети в операционной системе Windows 10.
Тип безопасности Wi-Fi сети — это различные режимы защиты беспроводных сетей, которые обеспечивают безопасность данных и контроль доступа к беспроводным сетям.
- WEP (Wired Equivalent Privacy) – устаревший и небезопасный метод проверки подлинности. Это первый и не очень удачный метод защиты. Злоумышленники без проблем получают доступ к беспроводным сетям, которые защищены с помощью WEP. Не нужно устанавливать этот режим в настройках своего роутера, хоть он там и присутствует (но не всегда).
- WPA (Wi-Fi Protected Access) – надежный и современный тип безопасности. Максимальная совместимость со всеми устройствами и операционными системами.
- WPA2 – новая, доработанная и более надежная версия WPA. Есть поддержка шифрования AES CCMP. На данный момент, это лучший способ защиты Wi-Fi сети. Именно WPA2 рекомендуется использовать.
В свою очередь WPA/WPA2 может быть двух видов:
- WPA/WPA2 — Personal (PSK) – это обычный способ аутентификации. Когда нужно задать только пароль (ключ) и потом использовать его для подключения к Wi-Fi сети. Используется один пароль для всех устройств. Сам пароль хранится на устройствах, где его при необходимости можно посмотреть, или сменить. Рекомендуется использовать именно этот вариант.
- WPA/WPA2 — Enterprise – более сложный метод, который используется в основном для защиты беспроводных сетей в офисах и разных заведениях. Позволяет обеспечить более высокий уровень защиты. Используется только в том случае, когда для авторизации устройств установлен RADIUS-сервер (сервер который выдает пароли).
При необходимости можно проверить тип безопасности Wi-Fi сети к которой подключено ваше устройство.
Содержание
- Как проверить тип безопасности Wi-Fi сети используя «Параметры Windows»
- Как проверить тип безопасности Wi-Fi сети в командной строке
- Как проверить тип безопасности Wi-Fi сети используя свойства сетевого подключения
Как проверить тип безопасности Wi-Fi сети используя «Параметры Windows»
Чтобы проверить тип безопасности Wi-Fi сети, откройте приложение «Параметры», для этого нажмите на панели задач кнопку Пуск и далее выберите Параметры или нажмите сочетание клавиш + I.

В открывшемся окне «Параметры» выберите Интернет и сети.

Затем выберите вкладку Wi-Fi, и в правой части окна нажмите на Wi-Fi сеть к которой вы подключены.

В следующем окне, в разделе «Свойства», в строке Тип безопасности: вы увидите тип безопасности (режим защищённого доступа).

Как проверить тип безопасности Wi-Fi сети в командной строке
Чтобы проверить тип безопасности Wi-Fi сети, запустите командную строку от имени администратора и выполните следующую команду:
netsh wlan show interfaces
В строке Проверка подлинности: будет отображен тип безопасности Wi-Fi сети.

Как проверить тип безопасности Wi-Fi сети используя свойства сетевого подключения
Чтобы проверить тип безопасности Wi-Fi сети данным способом, нажмите сочетание клавиш + R, в открывшемся окне Выполнить введите (скопируйте и вставьте) ncpa.cpl и нажмите кнопку OK.

В окне «Сетевые подключения» дважды щёлкните левой кнопкой мыши по беспроводному подключению.

Затем в открывшемся окне «Состояние — Беспроводная сеть» нажмите кнопку Свойства беспроводной сети.
В следующем окне выберите вкладку «Безопасность», и в выпадающем списке Тип безопасности: будет отображен тип безопасности Wi-Fi сети.
Используя рассмотренные выше действия, можно проверить тип безопасности Wi-Fi сети в операционной системе Windows 10.