How to Turn On Kernel DMA Protection in Windows 11
As our world becomes more reliant on technology, the importance of securing our operating systems has never been more critical. With the advancements in hardware and software come new vulnerabilities that can put our sensitive information at risk. One such vulnerability lies in Direct Memory Access (DMA), which allows peripherals to access system memory without going through the CPU. This potential for exploitation has led to the introduction of Kernel DMA Protection, a security feature designed to help safeguard your system against unauthorized access by malicious devices.
If you are a Windows 11 user and are concerned about the security of your data, this article will guide you through enabling Kernel DMA Protection. We will cover what Kernel DMA Protection is, why it matters, and a step-by-step walkthrough on how to enable it on your Windows 11 device.
What is Kernel DMA Protection?
Kernel DMA Protection is a security feature that aims to mitigate the risks associated with direct memory access by peripheral devices. When a device can access the system memory directly, it can potentially read or write information that could compromise the integrity and confidentiality of the system. Kernel DMA Protection prevents unauthorized devices from accessing sensitive areas of your system memory.
In essence, Kernel DMA Protection works by using a secure processing environment and validating the connectivity of devices attempting to access the system’s resources. If any device fails the validation checks, the access is denied. This feature is particularly crucial for systems with Thunderbolt ports, where external peripherals can be added without prior interaction with the operating system.
Why is Kernel DMA Protection Important?
-
Integrity of Data: By preventing unauthorized access to system memory, Kernel DMA Protection ensures that the integrity of your data remains intact. Malicious software can hijack data, leading to identity theft or data corruption.
-
Protection Against Physical Attacks: Physical access to a computer sometimes leads to security breaches, particularly if attackers connect malicious devices. Kernel DMA Protection serves as a barrier to such attacks.
-
Increased Security Posture: As cyber threats continue to evolve, organizations and individuals must adopt a defense-in-depth strategy, where multiple layers of security work together to protect assets. Kernel DMA Protection is one of those vital defense layers.
-
Safeguarding Sensitive Information: For users who often deal with sensitive information, such as financial data or personal identification, Kernel DMA Protection can be an essential security feature.
How to Enable Kernel DMA Protection on Windows 11
Enabling Kernel DMA Protection in Windows 11 is a straightforward process, but it requires some configuration in the system BIOS/UEFI as well as adjustments in Windows itself. Here are the steps you need to take.
Prerequisites
-
Compatible Hardware: Ensure your device supports Kernel DMA Protection. This feature is typically available on newer devices with UEFI firmware. Most systems that came with Windows 10 or Windows 11 installed will have this option.
-
Updated Drivers and Firmware: Always keep your device drivers and BIOS/UEFI firmware up-to-date. Check your manufacturer’s website for the latest updates.
-
Administrator Access: You will need administrator privileges to make changes to your device settings.
Step-by-Step Instructions
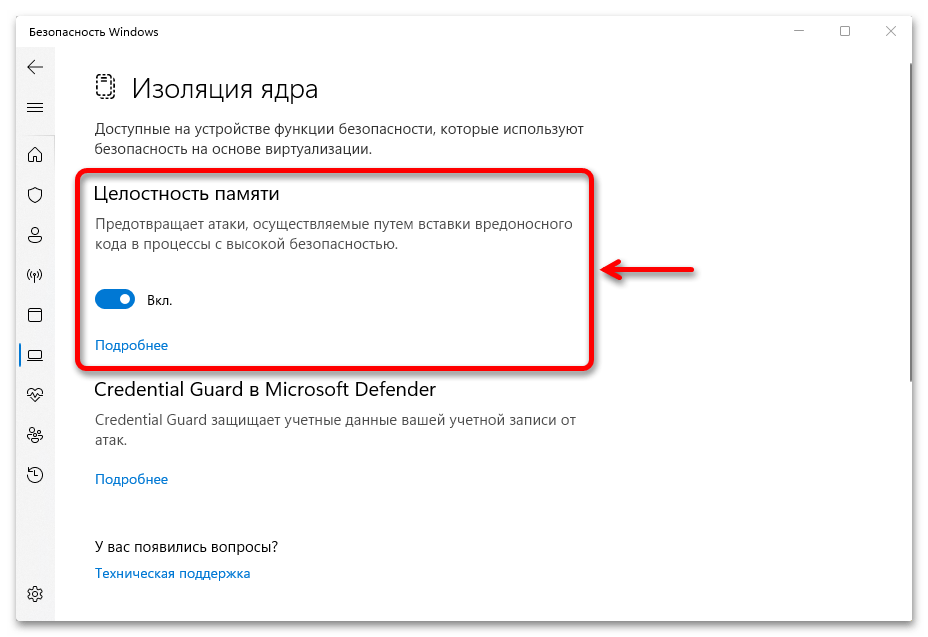
Step 1: Enable Memory Integrity
Before enabling Kernel DMA Protection, it is advisable to activate the Memory Integrity feature (also known as Core Isolation). Memory Integrity protects core processes and drivers from being modified by malware.
-
Open Windows Security:
- Click on the Start menu and type Windows Security.
- Open the Windows Security app from the search results.
-
Navigate to Device Security:
- In the Windows Security app, click on Device security.
-
Core Isolation Details:
- Click on Core isolation details under the Core isolation section.
-
Toggle Memory Integrity:
- Find the Memory integrity option and toggle it to On.
- If it prompts for a restart, choose to restart your device to apply the changes.
Step 2: Enable Kernel DMA Protection in BIOS/UEFI
Kernel DMA Protection needs to be enabled in the motherboard’s firmware settings (BIOS/UEFI). The exact steps may vary depending on the manufacturer, but here’s a general guide:
-
Access BIOS/UEFI:
- Restart your computer.
- As soon as it starts booting up, repeatedly press the key that enters the BIOS/UEFI setup. This key is often one of the function keys (F2, F10, F12), Delete, or Esc—refer to your computer’s documentation for specifics.
-
Navigate to Security Tab:
- Once in the BIOS/UEFI interface, use the arrow keys to find the Security, Advanced, or similar tab.
-
Locate DMA Protection Settings:
- Look for settings related to Kernel DMA Protection, Memory Protection, or Thundebolt Security if applicable—this can be different based on the specific BIOS/UEFI version.
-
Enable Kernel DMA Protection:
- Set the Kernel DMA Protection option to Enabled.
-
Save and Exit:
- Save your changes and exit the BIOS/UEFI setup (often done by pressing F10).
Step 3: Confirm Kernel DMA Protection Status
Once you have completed the above steps, you can check whether Kernel DMA Protection is enabled:
-
Open Windows Security Again:
- Click on the Start menu and type Windows Security to open the app.
-
Device Security:
- Navigate back to Device security.
-
Additional Security Options:
- Click on Security processor details (or similar option). You may find Kernel DMA protection listed with its status.
-
Look for Protection Status:
- Confirm that the Kernel DMA Protection shows as enabled.
Troubleshooting Common Issues
If you face any issues while enabling Kernel DMA Protection, consider the following troubleshooting tips:
-
Incompatible Hardware: If your device doesn’t support Kernel DMA Protection, you may need to upgrade your hardware.
-
BIOS/UEFI Versions: Ensure you are using the latest version for your motherboard, as outdated firmware might not show the necessary options.
-
Reboot Requirements: Changes in BIOS/UEFI often require a reboot, so ensure you boot back into Windows after making changes to see their effects.
-
Driver Conflicts: Certain drivers, like those for older hardware or devices not optimized for Windows 11, might cause issues. Consider updating all drivers via the Device Manager.
-
Technical Support: If you are unsure about any settings or face persistent issues, contacting your PC manufacturer’s technical support can provide further insights.
Conclusion
In a world where cybersecurity threats are increasingly sophisticated, enabling features like Kernel DMA Protection on your Windows 11 device is a proactive step in safeguarding your data and ensuring a secure computing environment. By following the steps outlined in this article, you can effectively enable Kernel DMA Protection, enhancing your system’s defenses against potential attacks.
Always remember that security is an ongoing concern; it’s vital to remain vigilant about updates, practices, and staying informed about new security features introduced in your operating system.
-
Home
-
News
- Great Ways to Disable Kernel DMA Protection on Windows 11
By Daisy | Follow |
Last Updated
Kernel DMA protection is a Windows security feature. Some users want to disable it. This post from MiniTool tells you how to check if Kernel DMA protection is enabled and how to disable Kernel DMA protection on Windows 11.
What Is Kernel DMA Protection?
Kernel DMA protection is a security feature in Windows 11 that prevents unauthorized access to your system memory by external devices. However, some users may want to disable it for various reasons, such as compatibility issues or performance optimization.
How to Check If Kernel DMA Protection Is Enabled?
Systems that support Kernel DMA protection will enable the feature automatically, with no user or IT admin configuration required. Here is how to check if Kernel DMA protection is enabled.
You can use the Windows Security settings to check if Kernel DMA Protection is enabled. Here is how to do that:
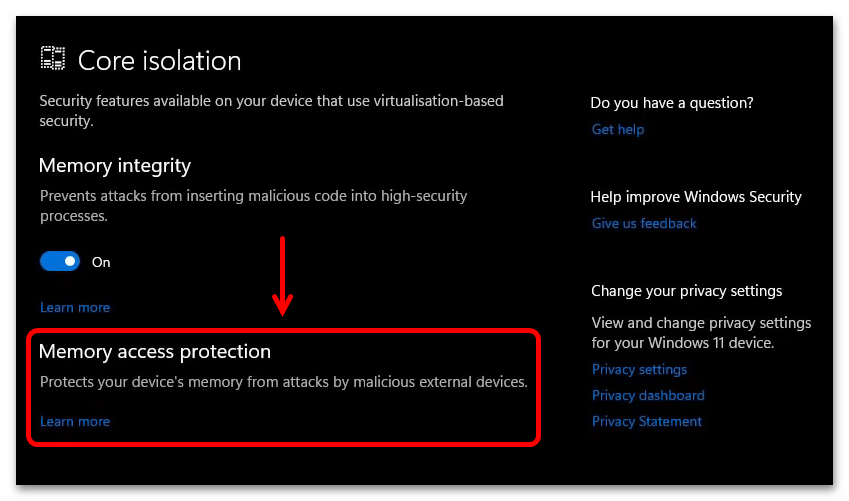
1. Press the Windows + I keys to open Settings. Then, go to Privacy & security > Windows Security > Open Windows Security.
2. Next, select Device security > Core isolation details > Memory access protection.
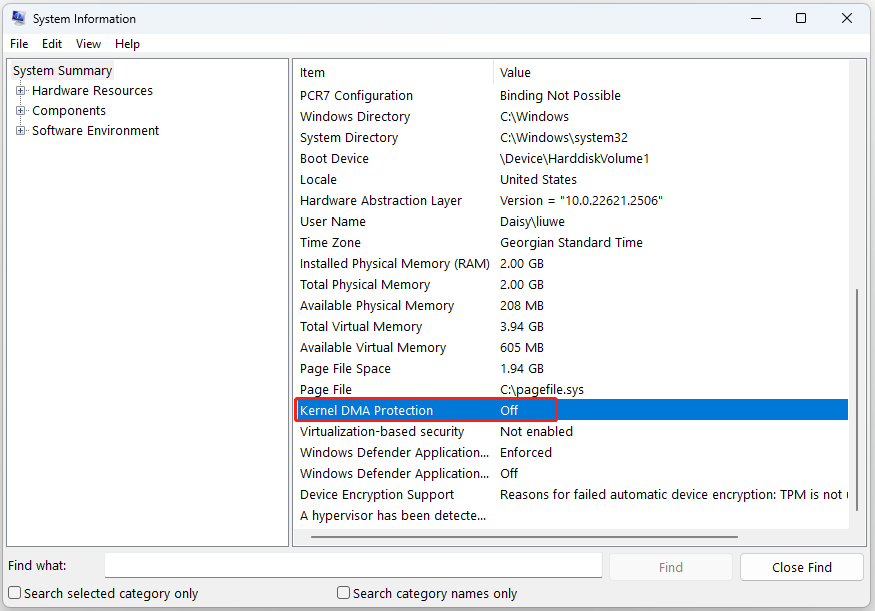
Alternatively, you can use the System Information application (msinfo32.exe). If the system supports Kernel DMA Protection, the Kernel DMA Protection value will be set to ON.
How to Disable Kernel DMA Protection
To disable Kernel DMA protection on Windows 11, you can follow these steps:
1. Press the Windows + I keys to open Settings. Then, go to Privacy & security > Windows Security > Open Windows Security.
2. Next, select Device security > Core isolation details. Under Memory access protection, toggle the switch to Off. You may need to enter your administrator password or PIN to confirm the change.
3. Restart your laptop for the change to take effect.
Some users report that the previous method can’t disable Kernel DMA protection, then, you can try to disable it in BIOS. To disable kernel DMA protection depends on different manufacturer BIOS. If you can get a specific manual then it would be more helpful. So please refer to the manual of your PC manufacturer. But generally, the steps are as below:
1. Press the Certain key to enter BIOS based on your PC manufacturer.
2. Then if you can boot in, you will land on the BIOS page. Usually, this DMA setting will be under the Security Tab.
3. Choose the Kernel DMA Protection and then select Disabled.
Tips:
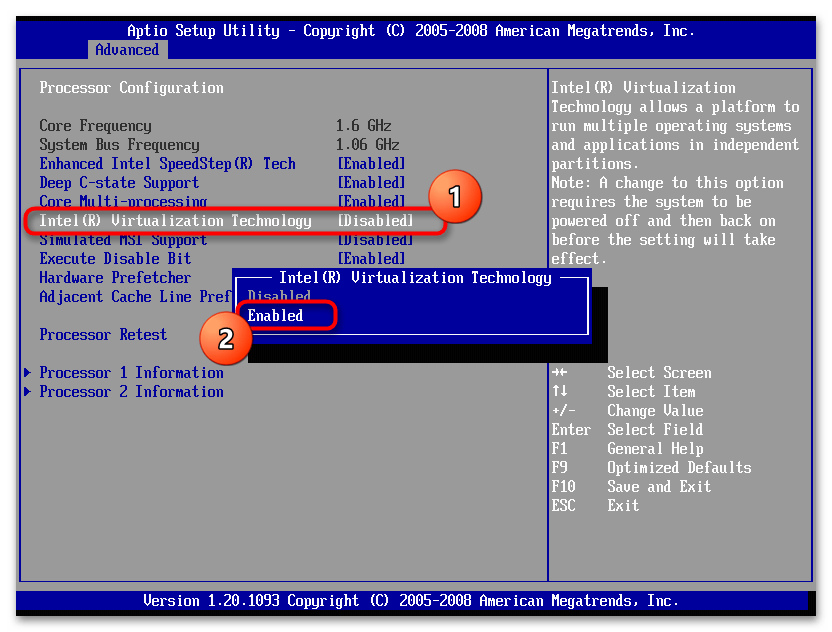
If you don’t have the option to disable Kernel DMA Protection, you can set the Intel Virtualization Technology for I/O (VT- d) to Disabled in the BIOS. (VT-d settings can be found under Advanced CPU Settings)
Save And Exit and then reboot your MXI PC.
How to Protect Your PC
Whether disabling Kernel DMA protection on Windows 11 or not, it’s recommended to back up your important data regularly to protect it since virus attacks or malware attacks may cause your data lost. To do that, you can try the free backup software – MiniTool ShaodwMaker. It can back up files, folders, systems, and disks.
MiniTool ShadowMaker TrialClick to Download100%Clean & Safe
Final Words
How to disable Kernel DMA protection on Windows 11? This post provides ways and you can choose one of them based on your needs. I hope that this post will be useful to you.
About The Author
Position: Columnist
Having been an editor at MiniTool since graduating college as an English major, Daisy specializes in writing about data backups, disk cloning, and file syncing as well as general computer knowledge and issues. In her free time, Daisy enjoys running and going with friends to the amusement park.
Описание технологии
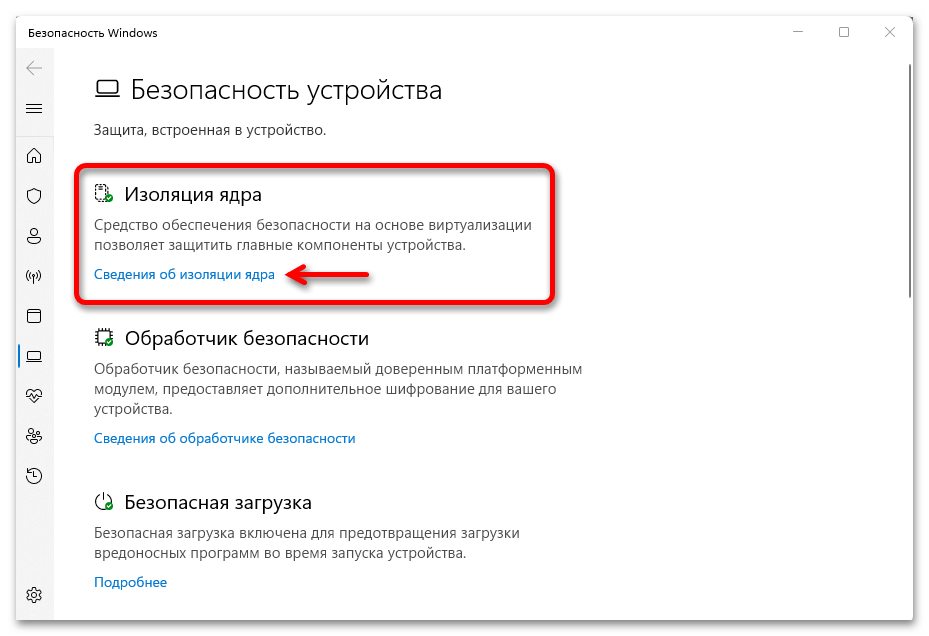
Система безопасности Windows 11 давно не ограничивается штатной программой Microsoft Defender Antivirus. «Изоляция ядра» – еще одна защитная технология, которая обеспечивает безопасность устройства и операционной системы путем запуска важных процессов в специальной виртуализированной области.
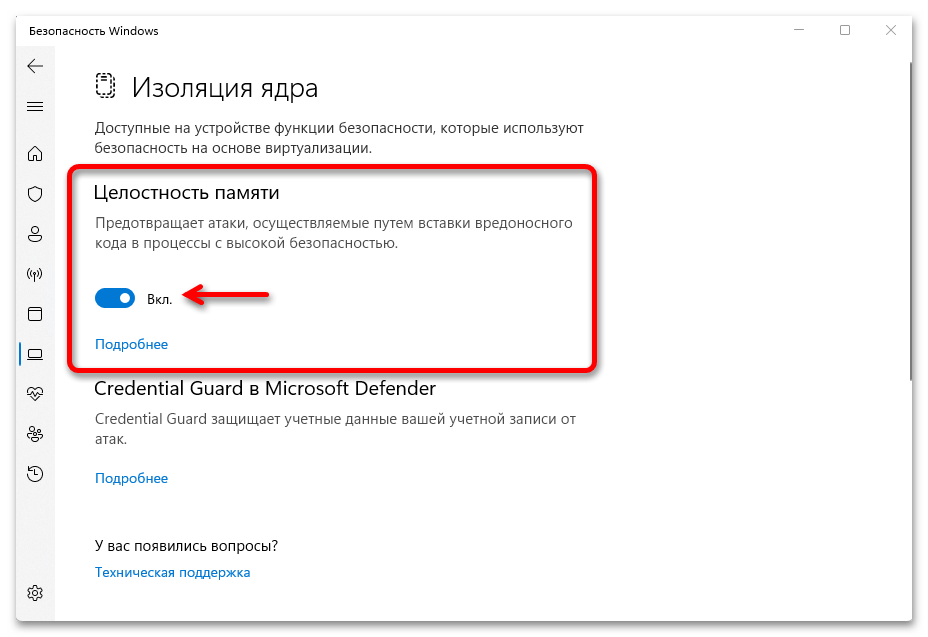
Ее главная функция — «Целостность памяти», которая затрудняет получение злоумышленниками доступа к компьютеру через вредоносное программное обеспечение. Перед запуском приложения часть его кода отправляется в изолированную среду, созданную с помощью аппаратной виртуализации, а после проверки, если ничего подозрительного найдено не было, передается обратно операционной системе для выполнения.
В зависимости от устройства и версии ОС «Изоляция ядра» может поддерживать дополнительные функции. К таким относится «Защита ядра DMA», которая блокирует атаки с прямым доступом к памяти через периферийные устройства, подключенные к внешним и внутренним PCI-портам, например Thunderbolt или M.2.
Кроме того, может поддерживаться «System Guard» Защитника Windows – набор инструментов, способных отслеживать и блокировать попытки взлома устройства через прошивку еще до загрузки системы. А также функция защиты учетных данных, которая особенно полезна для офисных и школьных компьютеров, так как позволяет скрывать от мошенников маркеры доступа к различным ресурсам в одной организации.

Управление функцией
«Изоляции ядра» работает в пассивном режиме и каких-то специальных настроек не имеет. Главное, чтобы была включена «Целостность памяти». В Windows 11, по крайней мере в последних ее сборках, технология безопасности обычно активна по умолчанию, но мы на всякий случай покажем, где она находится, а заодно и как ее запустить.
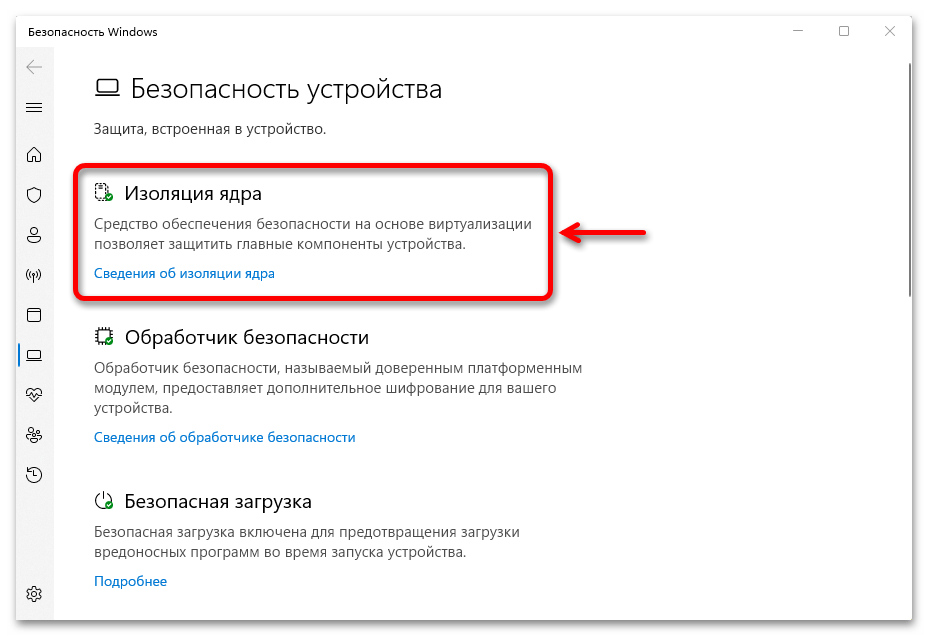
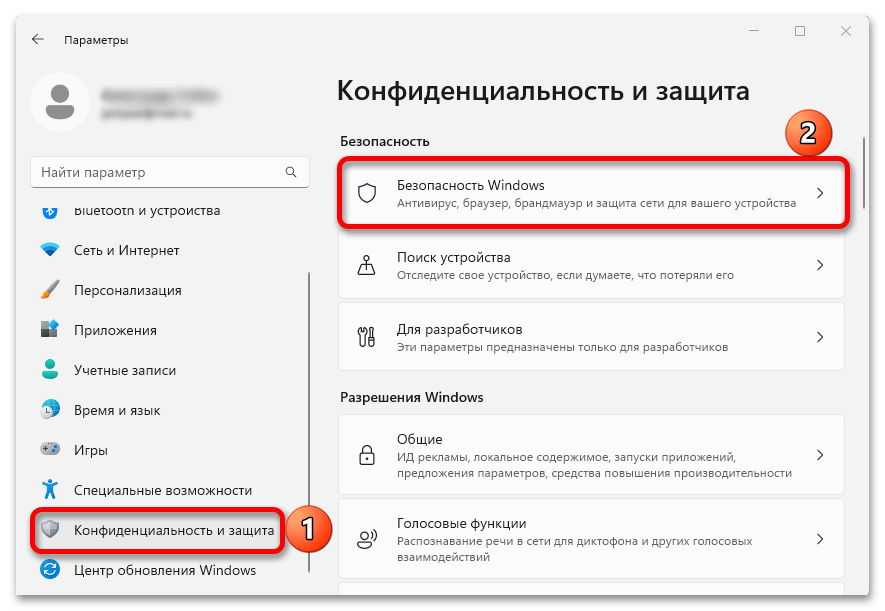
- Сочетанием клавиш «Windows+I» открываем системные «Параметры», во вкладке «Конфиденциальность и защита» кликаем плитку «Безопасность Windows»,

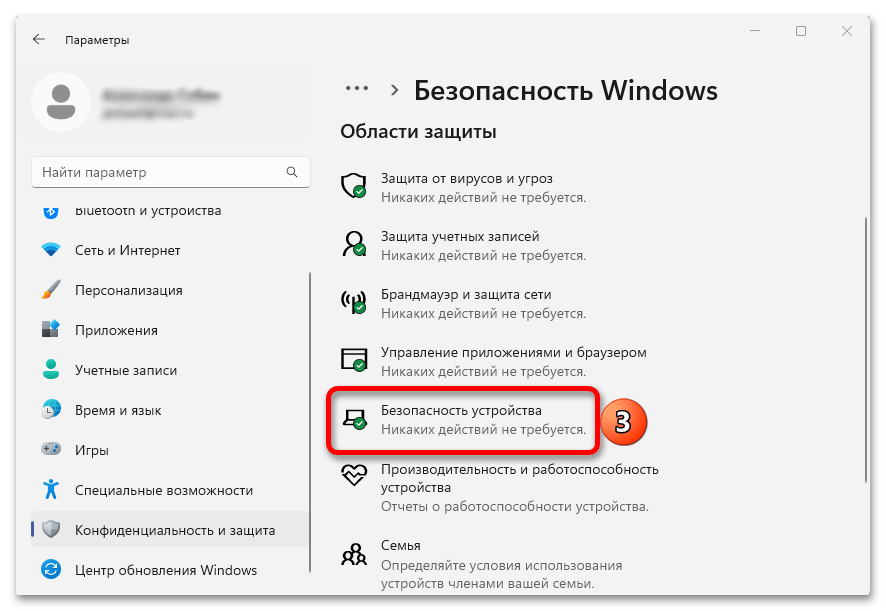
затем «Безопасность устройства»,

находим блок «Изоляция ядра», жмем на ссылку «Сведения»,

и включаем «Целостность памяти».
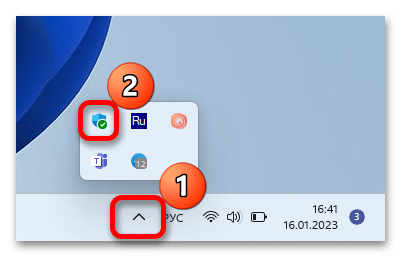
- Альтернативный путь начинается с системного трея. Нажимаем стрелочку вверх на панели задач, кликаем иконку в виде щита,

переходим к инструментам защиты оборудования, а далее таким же образом активируем функцию.

Если все так замечательно, как описывают Microsoft, то, конечно, лучше, чтобы технология работала, но бывают случаи, в которых отключение «Целостности памяти» может пригодиться. И на это есть сразу несколько способов, которые подробно описаны в отдельной статье на нашем сайте.
Подробнее: Отключение изоляции ядра в Windows 11
Возможные проблемы
Учитывая принцип работы «Изоляции ядра», компьютер должен обязательно поддерживать технологию виртуализации и важно, чтобы она была включена везде, где это возможно, начиная с BIOS/UEFI.
Подробнее: Как включить виртуализацию в Windows 11
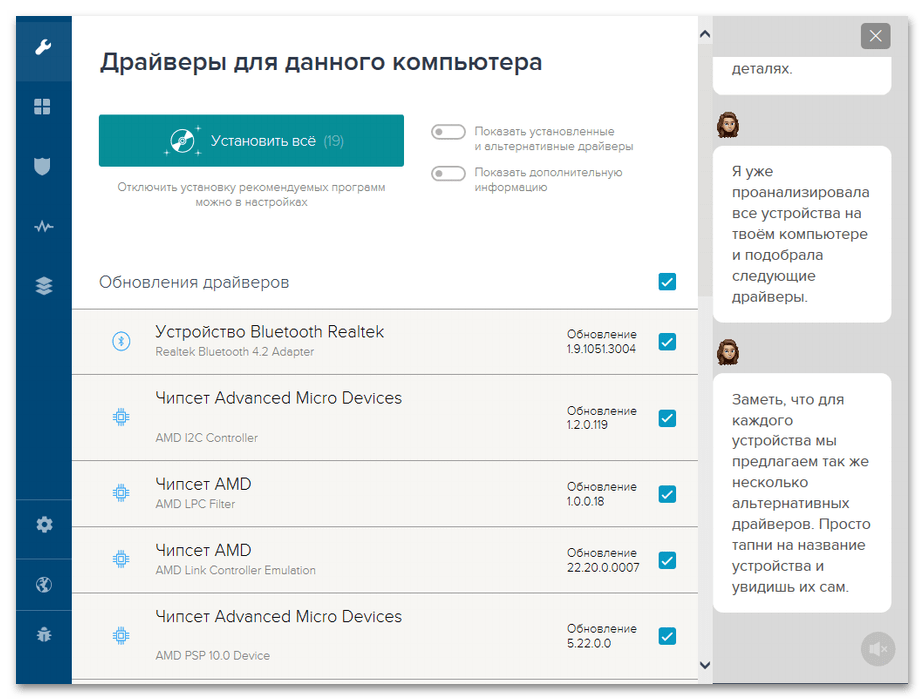
Кроме того, на компьютере могут быть установлены драйверы, которые несовместимы с этой технологией. И так как их запуск считается более приоритетным, блокируется защитная функция. Обычно это какие-нибудь устаревшие драйверы и тогда оптимальный вариант – обновить их.
Проблема в том, что определить, какие именно драйверы конфликтуют, иногда бывает сложно. Если у вас это получится, попробуйте получить обновления с помощью «Диспетчера устройств». Кроме того, наличие апдейтов можно посмотреть в «Центре обновления Виндовс» или воспользоваться специальными программами, которые подскажут, каких драйверов не хватает на компьютере.
Подробнее:
Как обновить драйвера на компьютере
Программы для установки драйверов
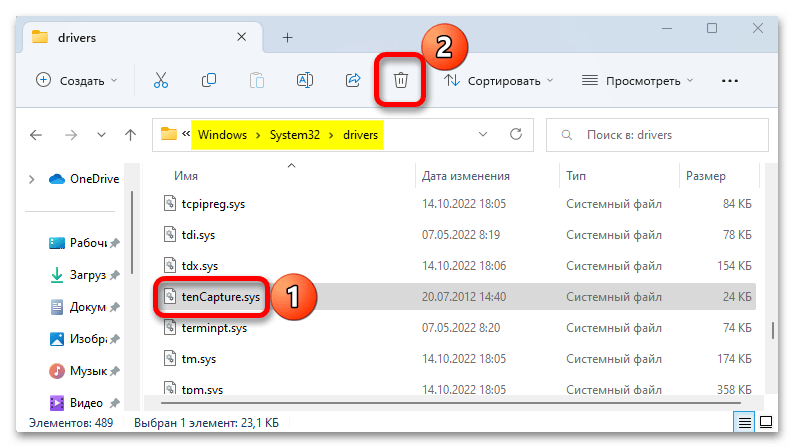
В нашем случае обновить драйверы не получилось, поэтому будем их удалять, но помним, что Microsoft такого делать не рекомендует, ведь есть вероятность, что какое-нибудь оборудование после этого перестанет отвечать. С другой стороны, может быть так, что раньше вы подключали какое-то устройство, а теперь перестали им пользоваться, а значит, и драйверы для него не нужны.
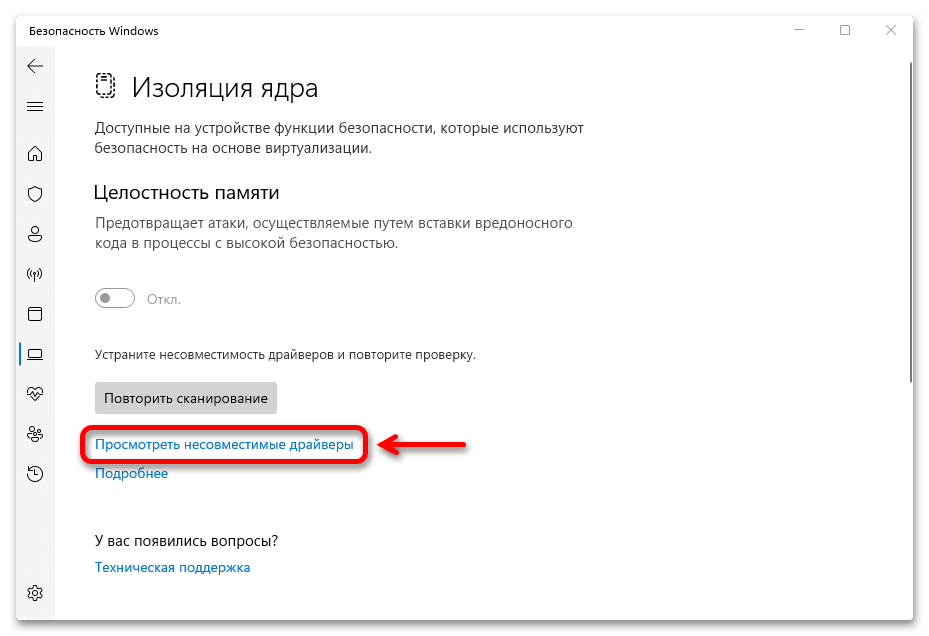
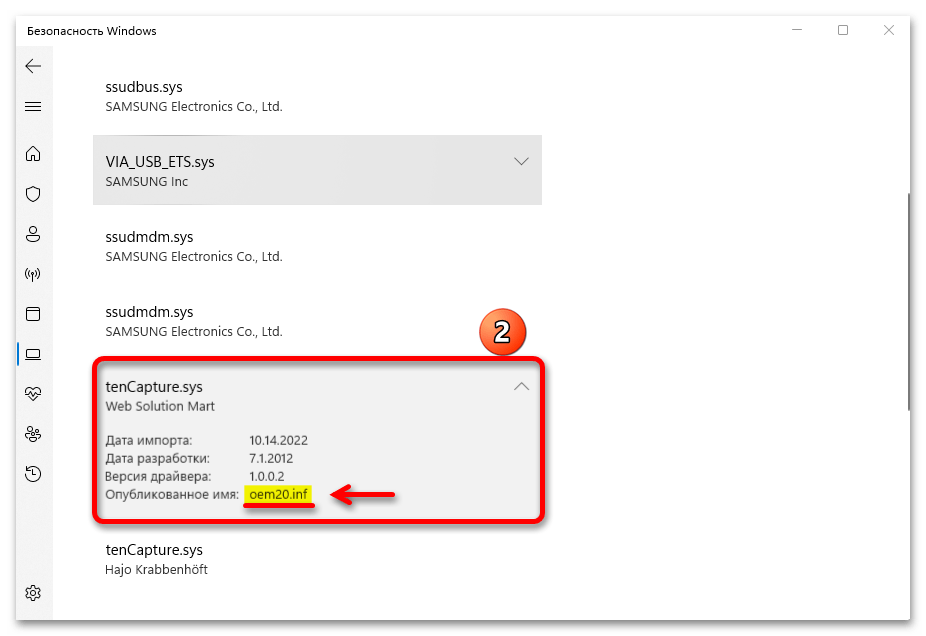
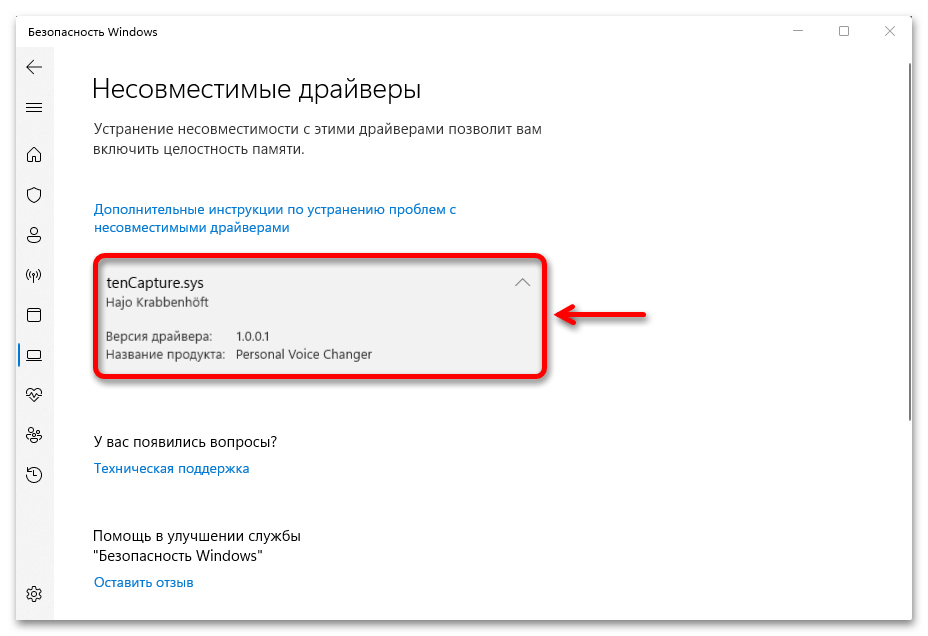
- Итак, если функция заблокирована из-за несовместимости драйверов, как это показано на скриншоте ниже, открываем их список.
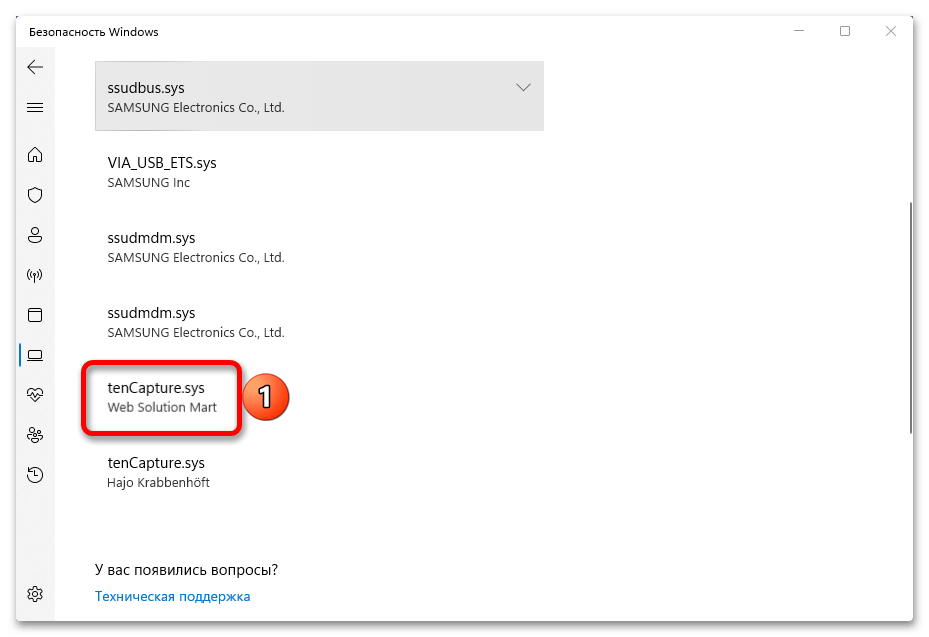
- Теперь жмем на любой из них

и выясняем имя.
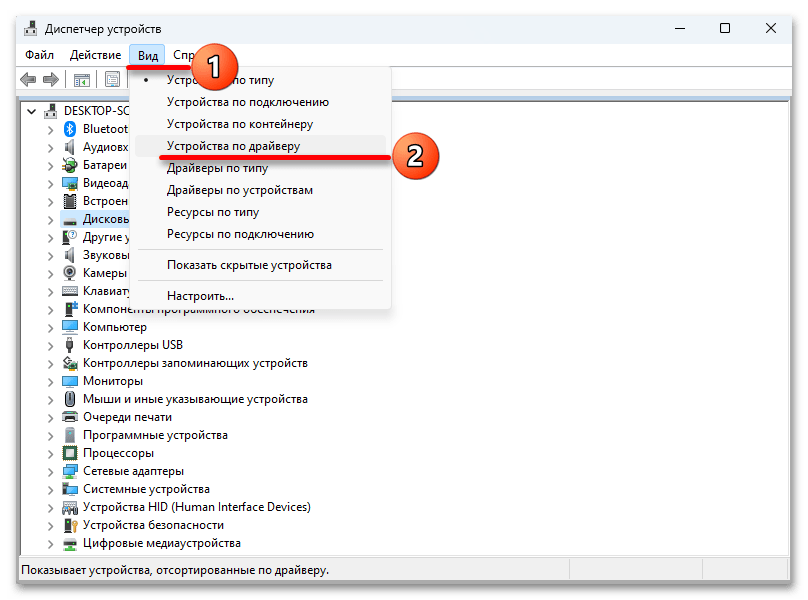
- Кликаем правой кнопкой мышки «Пуск» и вызываем «Диспетчер устройств».
- Открываем вкладку «Вид» и выбираем тип сортировки – «Устройства по драйверу».
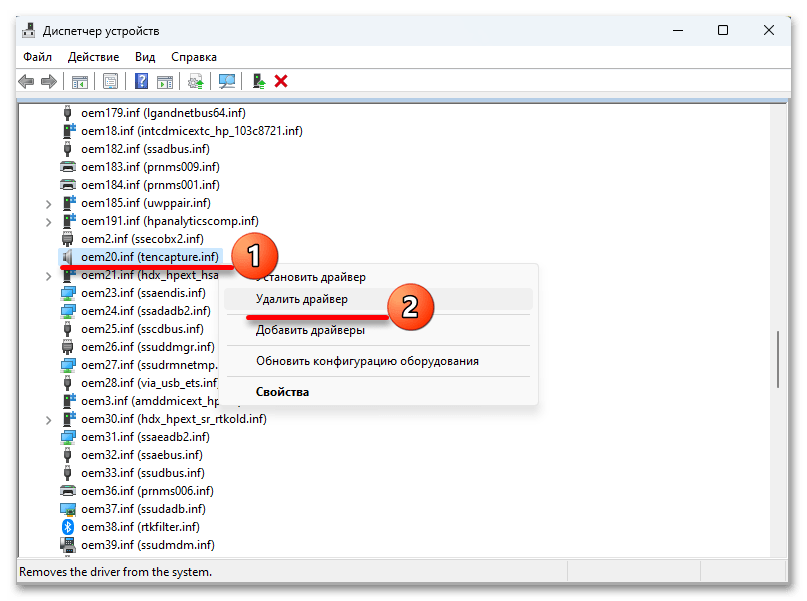
- Находим нужную запись, правой кнопкой мышки открываем контекстное меню, жмем «Удалить»,

подключаем опцию принудительного удаления и подтверждаем операцию.
- Один из драйверов, как видно на скриншоте ниже, не имеет конкретного названия, поэтому мы не смогли его найти в «Диспетчере устройств».
- В этом случае его можно поискать и удалить в системной папке. Переходим в директорию:
C:\Windows\System32\driversищем и удаляем запись.
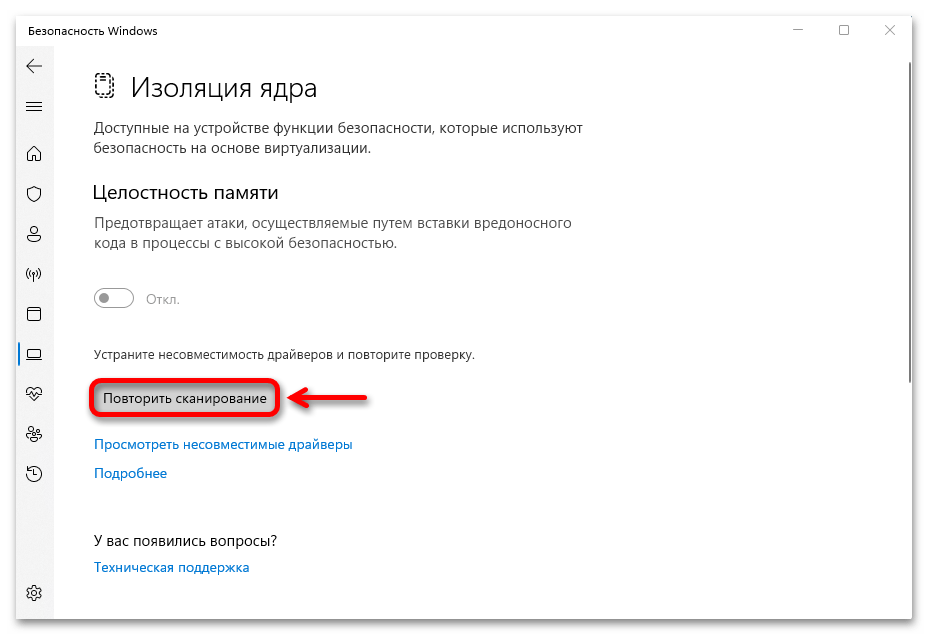
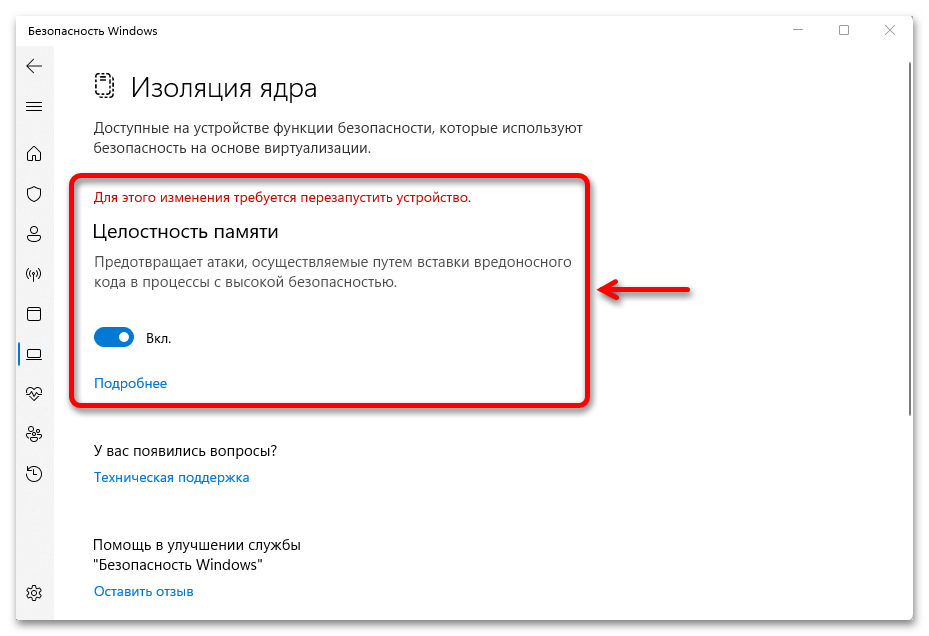
- После этого запускаем повторное сканирование

и, если все нормально, функция включится сразу после перезагрузки системы.
Процесс удаления драйверов не всегда завершается успешно, и если это ваш случай, ознакомьтесь с отдельной статьей на нашем сайте, где помимо системных инструментов, используется для этого стороннее программное обеспечение.
Подробнее: Полное удаление драйвера с компьютера
Наша группа в TelegramПолезные советы и помощь
How to Turn on Kernel DMA Protection in Windows 11
As digital security risks continue to rise, ensuring that your device is protected against unauthorized access is paramount. One significant security feature introduced in Windows 11 is Kernel DMA Protection. This feature is designed to help defend your system against Direct Memory Access (DMA) attacks that could allow malicious actors to access sensitive information directly from hardware components, especially in scenarios involving external peripherals. Understanding this protection mechanism is crucial for any Windows 11 user who values their data security.
Understanding Kernel DMA Protection
Kernel DMA Protection is a protective mechanism that prevents harmful devices from accessing your system’s memory while it’s running. With the growing use of Thunderbolt and PCIe devices that can directly access system memory, vulnerabilities can arise if an attacker connects a malicious external device. The feature works by ensuring that only authorized and secure devices can access kernel memory through DMA.
By default, Kernel DMA Protection may not be enabled, especially on older hardware. Thus, it’s essential to check and activate it if your setup supports it. Kernel DMA Protection leverages technologies such as virtualization-based security (VBS) to isolate sensitive parts of the operating system, making it significantly harder for attackers to exploit system memory.
Checking System Requirements for Kernel DMA Protection
Before enabling Kernel DMA Protection, you’ll need to ensure that your hardware supports the feature. Here’s a checklist to help confirm if your system meets the necessary requirements:
-
Windows 11 Version: Make sure you are running a version of Windows 11 that supports Kernel DMA Protection. This feature is mainly found in Windows 11 Pro, Enterprise, and Education editions.
-
Hardware Compatibility:
- TPM (Trusted Platform Module): Your device should have a TPM version 2.0 chip.
- UEFI Firmware: Your device’s firmware must support UEFI (Unified Extensible Firmware Interface), as it allows for advanced security features.
- Virtualization: You need to have virtualization support enabled in the BIOS/UEFI settings, which would usually include options for Intel VT-x or AMD-V.
-
Thunderbolt Support: If your system has Thunderbolt ports, ensuring they are configured correctly is crucial for enabling Kernel DMA Protection.
-
Drivers and Updates: Ensure that your device drivers and Windows updates are up to date, as these updates often include important security patches and enhancements to existing protection features.
How to Enable Kernel DMA Protection in Windows 11
If your system meets the above requirements, you can follow these steps to enable Kernel DMA Protection:
Step 1: Access UEFI Firmware Settings
To enable Kernel DMA Protection, an initial adjustment needs to be made in your computer’s UEFI firmware settings. Here’s how to access them:
- Open the Settings App: Click on the Start menu and select the settings gear icon.
- Go to ‘Update & Security’: Navigate to the ‘Update & Security’ section.
- Choose Recovery: Click on ‘Recovery’ from the left sidebar.
- Advanced startup: Under the ‘Advanced startup’ section, click on ‘Restart now’.
- Choose Troubleshoot: After your PC restarts, click on ‘Troubleshoot’.
- Choose Advanced options: Next, select ‘Advanced options’, and then choose ‘UEFI Firmware Settings’.
- Restart: Press ‘Restart’, which will take you into your UEFI/BIOS settings.
Step 2: Enable Virtualization
Inside the UEFI settings, you will need to enable virtualization:
- Locate the Virtualization Option: This is usually found under the ‘Advanced’ settings or ‘CPU Configuration’.
- Enable Intel VT or AMD-V: Depending on your processor, enable Intel VT-x (for Intel) or AMD-V (for AMD).
- Save Changes and Reboot: After enabling the option, save your changes and exit the UEFI settings.
Step 3: Enable Kernel DMA Protection
After ensuring virtualization is enabled, you need to ensure that Kernel DMA Protection is turned on in Windows settings:
- Open the Settings App Again: As before, click on the Start menu and go to the settings gear icon.
- Select ‘Privacy & security’: From the sidebar, choose the ‘Privacy & security’ option.
- Click on ‘Device encryption’: If your PC supports it, you should find this setting.
- Enable Device Encryption: Toggle the device encryption to turn it on. This is an essential prerequisite for Kernel DMA protection.
- Navigate to Device Security: Back in the main ‘Privacy & security’ section, look for ‘Device security’ and click on it.
- Check for Kernel DMA Protection: Here, you should find an option labeled ‘Kernel DMA Protection’. If it is listed as ‘off’, you will need to enable it.
Step 4: Confirm Settings in Windows Security
To ensure Kernel DMA Protection is running effectively, you can check its status in Windows Security:
- Open Windows Security: You can do this by searching ‘Windows Security’ in the Start menu.
- Go to Device Security: In the Windows Security dashboard, click on ‘Device security’.
- Check the ‘Core isolation’ section: Under the Core isolation section, you should see information about Kernel DMA Protection.
- Verify Kernel DMA Protection Status: If it shows as ‘Enabled’, then Kernel DMA Protection is turned on successfully.
Additional Considerations
-
Updating Drivers: Regularly check for driver updates, especially for devices that connect via Thunderbolt or other interfaces that support direct memory access.
-
Connecting Peripherals: Be mindful of the devices you connect to your system. Ensure that only trusted peripherals are plugged into your computer, as Kernel DMA Protection primarily protects against unauthorized devices.
-
Monitoring Security: Continuously monitor your system’s security status via Windows Security and ensure there are no unauthorized access attempts.
-
Staying Informed: Stay updated on Windows 11 security best practices and features. Microsoft frequently releases updates that enhance existing security protocols.
-
Backup Your Data: Always have a reliable backup solution in place. Even with Kernel DMA Protection, data loss can occur due to various reasons. Regularly back up important files.
Troubleshooting Common Issues
Even if you have taken all the necessary steps, you may run into issues when trying to enable Kernel DMA Protection. Here are some common problems and their solutions:
-
Kernel DMA Protection Option Not Visible:
- Ensure your system firmware (UEFI) supports secure boot and virtualization.
- Validate that you have a compatible TPM version and it is enabled.
-
Device Encryption Fails to Enable:
- Check whether your hard drive is formatted as NTFS. Device encryption only works on NTFS formatted drives.
- Ensure that your user account has administrative privileges.
-
After enabling, the system behaves abnormally:
- Some older devices may not be compatible with Kernel DMA Protection and could cause system stability issues. If problems arise, consider disabling the feature temporarily to assess system stability.
Conclusion
In today’s digital landscape, securing USB and Thunderbolt ports with Kernel DMA Protection is critical for safeguarding personal and sensitive information. With Windows 11’s robust security architecture that includes Kernel DMA Protection, users can significantly reduce the risk of unauthorized access through malicious devices.
Following the steps outlined in this article ensures that your system is protected against DMA attacks, leveraging the latest security features offered by Microsoft. Be proactive in maintaining your security settings, regularly update your drivers, and stay informed about the latest threats and protection measures. By implementing these guidelines, you’ll be better equipped to protect your digital environment against the myriad of evolving security threats.
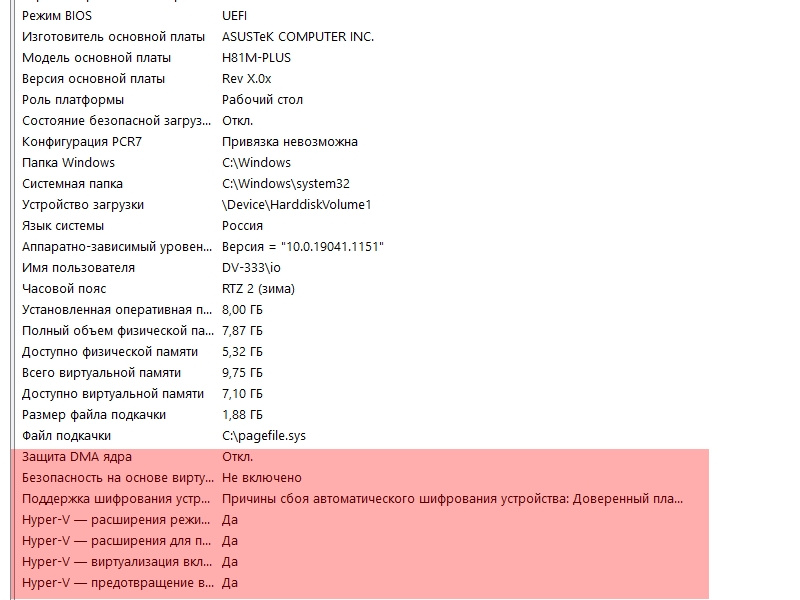
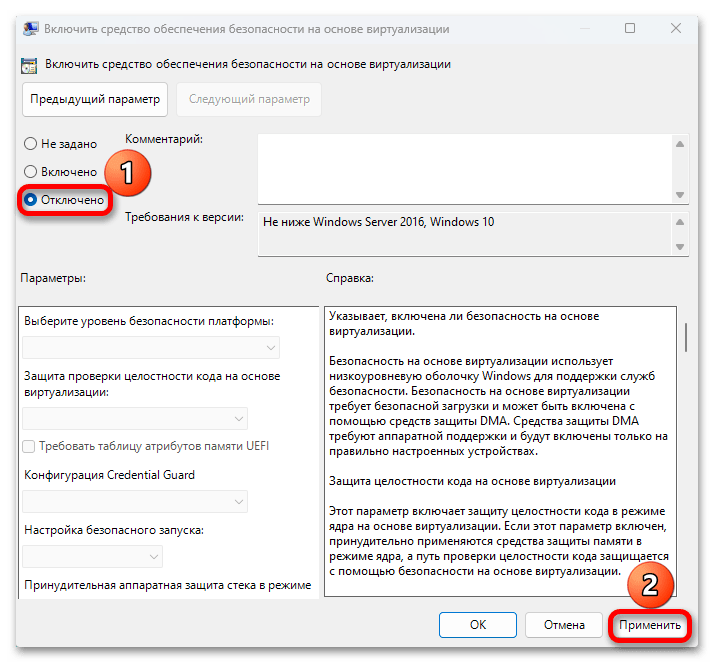
в сведениях о системе указано,что отключена защита ядра,безопасность на основе виртуализации,включен Hyper-V.
в биос включил виртуализацию по совету из интерета для того,чтобы якобы включить защиту ядра. сведения о системе по прежнему показывают,что защита отключена.
Hyper-V в биос отключен, а в системе мной отключены все службы,которые с ним связаны (но в сведениях о системе всё равно указано,что они включены)
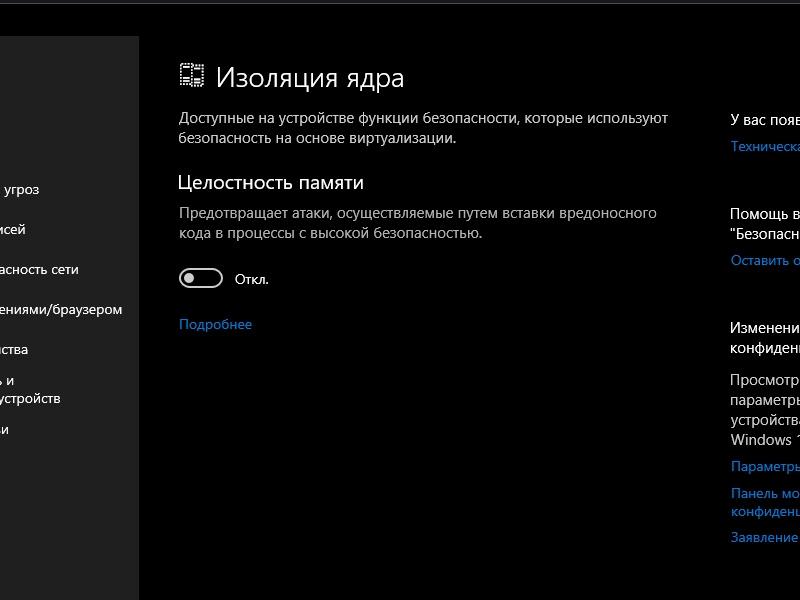
Изоляцию ядра включить через *обновления и безопасность — безопасность устройства — изоляция ядра — включить — перезагрузить систему* НЕ ПОЛУЧАЕТСЯ. При перезагрузке выскакивает ошибка на голубом экране,система перезагружается и изоляция ядра остаётся выключенной