
Загрузить PDF
Загрузить PDF
В этой статье мы расскажем вам, как установить XAMPP на компьютер с Windows 10. XAMPP — это менеджер серверов, который позволяет запускать серверы Apache, MySQL и другие с одной панели.
-

-

Эта кнопка находится посередине страницы.
- В зависимости от браузера вам, возможно, сначала придется выбрать папку для загрузки или подтвердить скачивание.
-

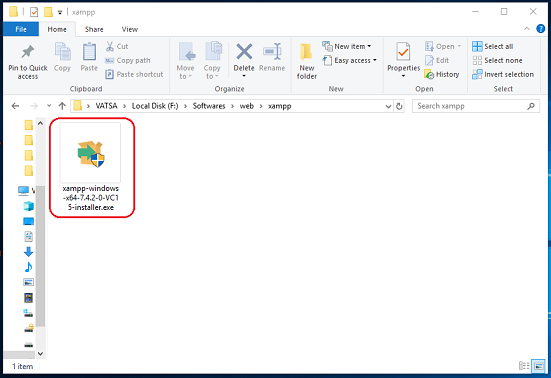
Он должен называться примерно так: xampp-win32-7.2.4-0-VC15-installer. Файл находится в паке для загрузок (например, в папке «Загрузки» или на рабочем столе).
-

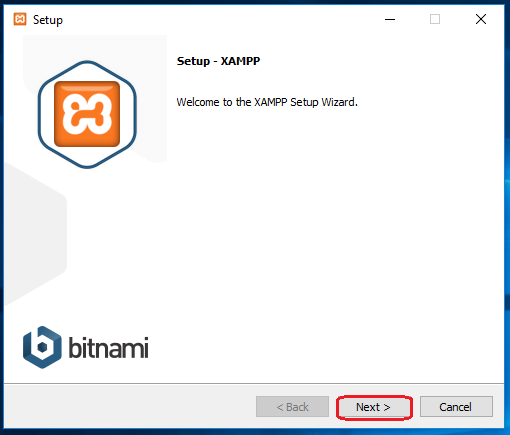
Откроется окно установщика XAMPP.
- Возможно, вам придется нажать «OK» во всплывающем окне, если на компьютере активирован контроль учетных записей (UAC).
-
Эта опция находится внизу окна установщика.
-

Просмотрите список атрибутов XAMPP в левой части окна; если вы видите атрибут, который не хотите устанавливать как часть XAMPP, снимите возле него флажок.
- По умолчанию будут установлены все атрибуты.
-

Эта опция находится внизу окна.
-

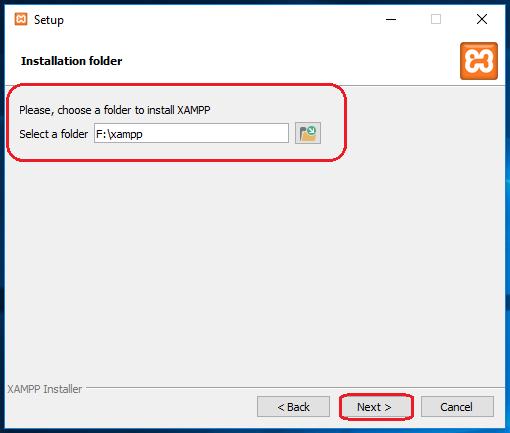
Щелкните по значку в виде папки справа от предлагаемого пути установки, а затем щелкните по нужной папке на компьютере.
- Если на компьютере активирован контроль учетных записей, не устанавливайте XAMPP в папку на системном диске (например, на диске «C:»).
- Можно выбрать папку (например, «Рабочий стол»), а затем нажать «Make New Folder» (Создать новую папку), чтобы создать новую папку и выбрать ее в качестве папки для установки XAMPP.
-
Так вы подтвердите, что выбранная папка является папкой для установки XAMPP.
-

Вы найдете эту опцию внизу страницы.
-
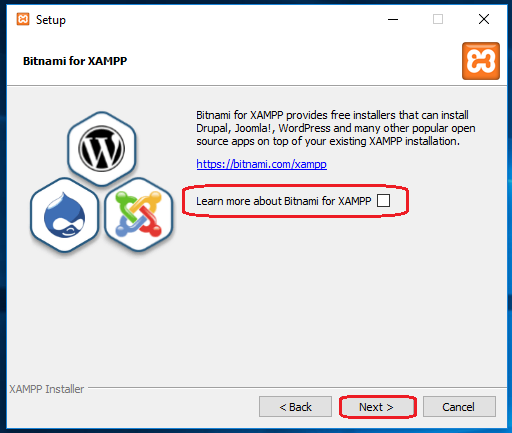
Снимите флажок у опции «Learn more about Bitnami» (Подробнее о Bitnami), а затем нажмите Next (Далее). Эта опция находится посередине страницы.
-
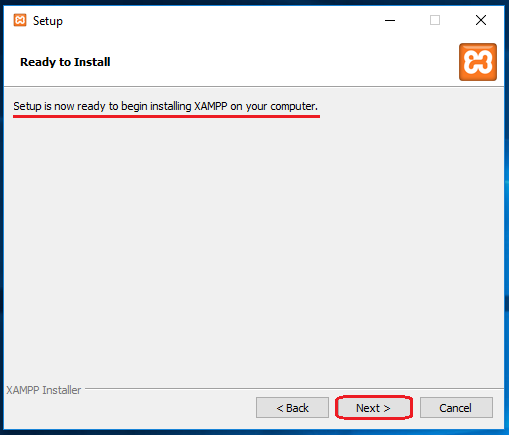
Для этого нажмите «Next» (Далее) в нижней части окна. Запустится процесс установки файлов XAMPP в выбранную папку.
-
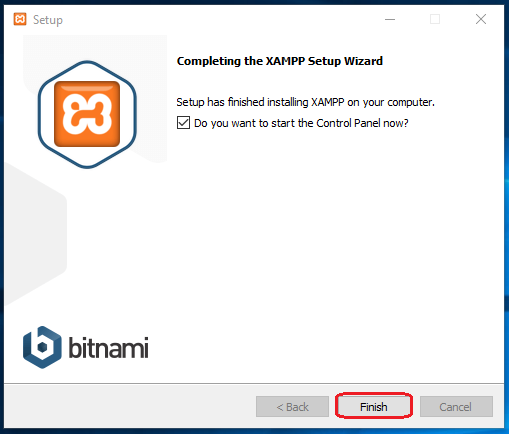
Эта опция находится внизу окна установщика XAMPP. Окно закроется, но откроется панель управления XAMPP, на которой можно получать доступ к своим серверам.
-
Для этого установите флажок рядом с флагом соответствующей страны.
-
Откроется главная страница панели управления.
-
Чтобы открыть панель управления XAMPP в будущем, откройте папку, в которую вы установили XAMPP, щелкните правой кнопкой мыши по оранжево-белому значку «Xampp-control», в меню выберите «Запуск от имени администратора», а затем нажмите «Да» в окне с запросом.
- Когда вы сделаете это, слева от каждого типа сервера (например, «Apache») появятся красные символы «X». Если щелкнуть по этому символу, вам будет предложено установить программное обеспечение для соответствующего типа сервера на компьютер — если вы согласны, нажмите «Yes» (Да).
- Обратите внимание, что двойной щелчок по значку «Xampp_start» не приведет к запуску XAMPP.
-
На некоторых компьютерах с Windows 10 Apache не запускается из-за «заблокированного порта». Это может произойти по нескольким причинам, но существует довольно простое решение:[1]
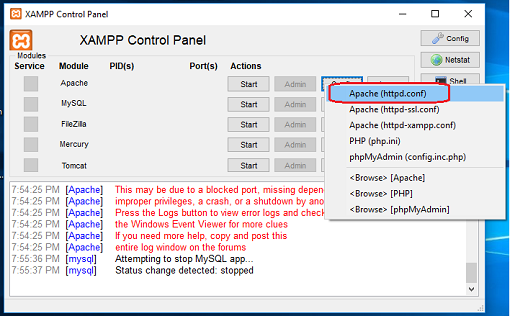
- Нажмите «Config» (Настройки) справа от «Apache».
- Выберите «Apache (httpd.conf)» в меню.
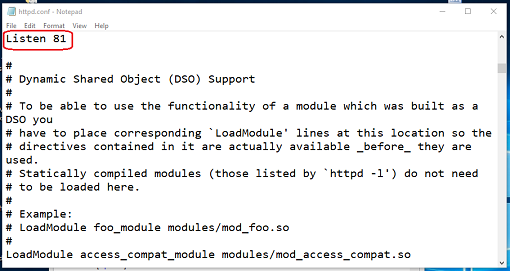
- Прокрутите вниз до раздела «Listen 80» (чтобы быстро найти его, можно нажать Ctrl+F и ввести listen 80).
- Замените 80 на любой открытый порт (например, 81 или 9080).
- Нажмите Ctrl+S, чтобы сохранить изменения, а затем закройте текстовый редактор.
- Перезапустите XAMPP, нажав «Quit» (Выйти), а затем снова запустите его от имени администратора из папки XAMPP.
Реклама


Советы
- XAMPP предоставляет доступ к различным типам серверов, включая Filezilla и Mercury.
Реклама
Предупреждения
- Если Apache запустить через порт 80, воспользоваться Skype уже не получится.
Реклама
Об этой статье
Эту страницу просматривали 10 926 раз.
Была ли эта статья полезной?
27.12.2020, 18:28. Показов 8178. Ответов 0
Установка и базовая настройка XAMPP под Windows 10
Для начала установим сам веб-сервер, делается это в несколько шагов:
1. Скачаем установщик XAMPP с нужной версией PHP.
2. Запускаем установщик, windows спросит, разрешать ли приложению вносить изменения — соглашаемся. В некоторых случаях может появляться такое сообщение:
Это означает, что из-за контроля учётных записей (UAC) XAMPP может неправильно установиться и просит не устанавливать его в каталог С:\Program Files, либо поменять права доступа к этому каталогу. Нажимаем OK.
3. Открывается окно с приветствием, нажимаем Next >; далее нам предоставляется выбор компонентов, которые надо установить:
(если Вы ещё плохо понимаете, что это за волшебные слова — лучше оставьте всё выбранным)
После того как выбор сделан — нажимаем Next >; теперь нам предстоит выбрать, в какой директории будет установлен веб-сервер, я предпочитаю в домашнем каталоге создать папку «xampp» и уже в ней проводить установку:
(разумеется Вы можете выбрать другой каталог)
Нажимаем Next >, в следующем пункте снимаем галочку с чек-бокса (это переход на сайт bitnami), снова нажимаем Next >, и Вас спросят «всё ли введено верно, можно ли начинать установку?», если это так — опять же, нажимаете знакомую кнопку продолжения , и остаётся лишь ждать.
После того, как установка закончена, нам предлагают открыть панель XAMPP — отказываемся (нам нужен не обычный запуск, а от имени администратора) и закрываем окно (кнопка Finish).
4. (Этот шаг можно пропустить) Что бы в дальнейшем у нас не возникало каких-либо проблем с правами — настроим запуск панели управления XAMPP с правами администратора. Для этого — открываем в любом файлом менеджере каталог куда был установлен веб-сервер, находим файл xampp-control.exe, кликаем ПКМ → создать ярлык уже по ярлыку нажимаем ПКМ → свойства в открывшемся окне нажимаем дополнительно, и ставим галочку в чек-бокс «запуск от имени администратора»:
Теперь запускаем панель управления XAMPP.
5. Протестируем работу веб-сервера — нажимаем нажимаем start напротив надписи «Apache» и заходим на localhost. Если всё хорошо, должна появиться приветственная надпись XAMPP:
6. Перейдём к настройке веб-сервера. Слева от названия модуля есть чекбоксы, изначально в них должны быть красные крестики, кликнув на них поменяйте на галочки — таким образом Вы установите Apache, MySQL и т.д. в качестве служб windows.
По желанию, можно настроить панель XAMPP, так, что бы при запуске, сразу стартовали некоторые модули. Для этого надо нажать Config в правом меню:
В открывшемся окне, под заголовком Autostart of modules, Вы можете выбрать, какие модули будут запускаться вместе с программой. Выше вы можете выбрать какой редактор и браузер будут использоваться по умолчанию. Изначально по умолчанию используется notepad.exe, но я предпочитаю менять на редактор notepad++. Браузер используется тот же, что стоит в системе с статусом «default» (для этого нужно оставить строку пустой):
Вложение 1212819
Теперь настройка хоста
7. Далее осталось определиться — где будут храниться файлы разрабатываемой страницы/веб-приложения. Есть два варианта, оба рабочие.
Первый вариант.
В файловом менеджере открываем место установки XAMPP (напримеру у меня это C:\Users\Panda58dev\xampp), далее находим каталог htdocs и как раз в нём хранятся файлы той страницы (localhost). Эти файлы можно удалить — ничего страшного не будет. Создаём тут папку, в неё добавляем файл index.php с таким содержимым:
| PHP | ||
|
Заходим на http://localhost/название_папки/ , и результат должен быть подобным:
Второй вариант. (более заморочный)
Так же, можно настроить виртуальный хост. Для этого в панели XAMPP выбираем настройку Apache (config) и первый пункт (httpd.conf). Должно открыться окно выбранного ранее вами редактора. Прокручиваем вниз и вставляем вот такую конфигурацию:
Кликните здесь для просмотра всего текста
<VirtualHost ваш_сайт.com:80>
DocumentRoot C:\Users\User\xampp\htdocs\ваша_папка
ServerName ваш_сайт.com
ServerAdmin admin@ваш_сайт.com
<Directory «C:\Users\User\xampp\htdocs\ваша_пап ка»>
Options Indexes FollowSymLinks
Allow from all
Require all granted
IndexIgnore /
RewriteEngine on
RewriteCond %{REQUEST_FILENAME} !-f
RewriteCond %{REQUEST_FILENAME} !-d
RewriteRule . index.php
</Directory>
</VirtualHost>
В директиве DocumentRoot и <Directory> не обязательно должен быть путь приведённый в примере, каталог с файлами сайта могут быть где угодно, к примеру L:\sites\ocStore. Сохраняем, закрываем.
Более подробнее о конфигурации виртуальных хостов в apache, Вы можете поискать в сети.
Далее нам нужно отредактировать файл hosts, который можно найти по этому пути: C:\Windows\System32\drivers\etc. Открываем файл hosts (от имени администратора) и в самый низ вставляем
Кликните здесь для просмотра всего текста
#Мой сайт
127.0.0.1 ваш_сайт.com
Сохраняем, закрываем, перезапускаем apache (нажимаем кнопку stop, потом кнопку start). Открываем браузер, вводим имя вашего сайта — готово.
Install And Configure XAMPP on Windows 10: Whenever you code any website in PHP you will need something that can provide a PHP development environment and help connect the backend with the front end. There are many software’s which you can use to locally test your website such as XAMPP, MongoDB, etc. Now each software has its own advantages and disadvantages but in this guide, we will specifically talk about XAMPP for Windows 10. In this article, we will see how one can install and configure XAMPP on Windows 10.
XAMPP: XAMPP is an open source cross-platform web server developed by Apache friends. It is best for web developers who develop websites using PHP as it provides an easy way to install the necessary components required to run PHP based software like WordPress, Drupal, etc on Windows 10 locally. XAMPP saves the time and frustration of manually installing and configuring Apache, MySQL, PHP, and Perl on the device to create a test environment.

Each character in word XAMPP signifies one programming language which XAMPP helps to install and configure.
X stands as an ideographic letter which refers to cross-platform
A stands for Apache or Apache HTTP server
M stands for MariaDB which was known as MySQL
P stands for PHP
P stands for Perl
XAMPP also includes other modules like OpenSSL, phpMyAdmin, MediaWiki, WordPress and more. Multiple instances of XAMPP can exist on one computer and you can even copy XAMPP from one computer to another. XAMPP is available in both full and standard version called the smaller version.
Make sure to create a restore point just in case something goes wrong.
How to Install XAMPP on Windows 10
If you want to use XAMPP then first you need to download and Install XAMPP on your computers then only you will be able to use it. To download and Install XAMPP on your computers follow the below steps:
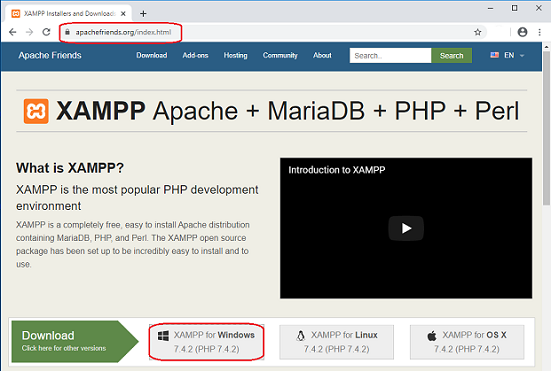
1.Download XAMPP from official website Apache friends or type the below URL in your web browser.

2.Choose the version of PHP for which you want to install XAMPP and click on the download button in front of it. If you do not have any version restrictions then download the oldest version as it may help you to avoid any issues related to PHP based software.

3.As soon as you click the Download button, XAMPP will start downloading.
4.When the download is completed, open the downloaded file by double-clicking on it.
5.When you will ask to allow this app to make changes in your PC, click on the Yes button and start the Installation process.
6.Below warning dialog box will appear. Click on the OK button to continue.

7.Again click on the Next button.

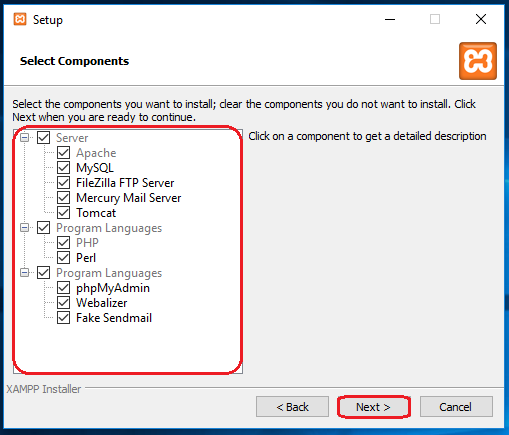
8.You will see a list of components that XAMPP allows to install such as MySQL, Apache, Tomcat, Perl, phpMyAdmin, etc. Check the boxes against the components you want to install.
Note: It is recommended to leave the default options checked and click on the Next button.

9.Enter the folder location where you want to install XAMPP software or browse through the location by clicking on small icon available next to the address bar. It is recommended to use the default location settings to install XAMPP software.
10.Click on Next button.
11.Uncheck “Learn more about Bitnami for XAMPP” option and click Next.
Note: If you want to learn about Bitnami then you can remain the above option checked. It will open a Bitnami page in your browser when you will click Next.

12.The below dialog box will appear saying that the setup is now ready to begin installing XAMPP on your computer. Again click on Next button to continue.

13.Once you click Next, you will see XAMPP has begun installing on Windows 10. Wait for the Installation process to complete.

14.After the installation is completed, a dialog box will appear which will ask to allow the app through the Firewall. Click on the Allow Access button.

15.Click on the Finish button to complete the process.
Note: If you let the “Do you want to start the Control Panel now?” option check then after clicking Finish your XAMPP control panel will open up automatically but if you unchecked it then you have to manually open the XAMPP control panel.

16.Choose your language either English or German. By default English is selected and click on the Save button.
17.Once the XAMPP Control Panel opens up, you can start using it to test your programs and can begin the web server environment configuration.

Note: The XAMPP icon will appear in the Taskbar whenever XAMPP is running.
18.Now, start some services like Apache, MySQL by clicking on Start button corresponding to the service itself.

19.Once all the services have started successfully, open localhost by typing http://localhost in your browser.
20.It will redirect you to the XAMPP dashboard and the default page of the XAMPP will open.

21.From the XAMPP default page, click on phpinfo from the menu bar to see all the details and information of PHP.

22.Under the XAMPP default page, click on phpMyAdmin to see the phpMyAdmin console.

How to configure XAMPP on Windows 10
XAMPP Control Panel consists of several sections and each section has its own significance and use.
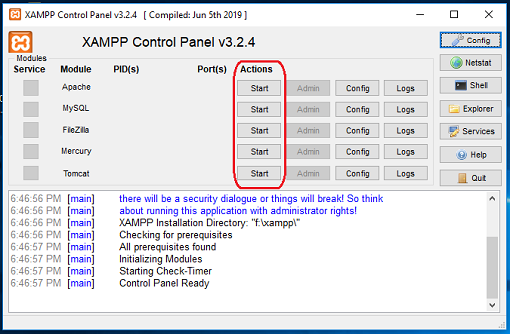
Module
Under Module, you will find a list of services provided by the XAMPP and there is no need to install them separately on your PC. The following are the services provided by XAMPP: Apache, MySQL, FileZilla, Mercury, Tomcat.
Actions
Under Action section, Start and Stop buttons are there. You can start any service by clicking on the Start button.
1.If you want to start MySQL service, click on the Start button corresponding to the MySQL module.

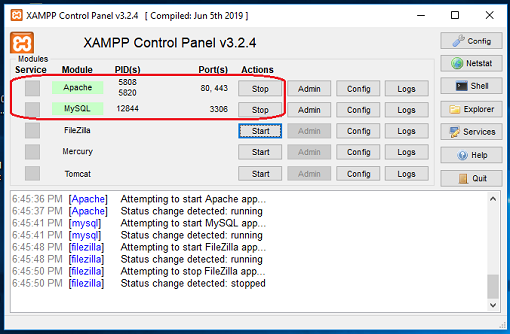
2.Your MySQL service will start. The MySQL module name will become green and it will confirm that MySQL has started.
Note: Also you can check the status from the below logs.

3.Now, if you want to stop MySQL from running, click on the Stop button corresponding to the MySQL module.

4.Your MySQL service will stop running and its status will become stopped as you can see in the logs below.

Port(s)
When you will start services like Apache or MySQL by clicking on the Start button under the action section, you will see a number below the Port(s) section and corresponding to that particular service.
These numbers are TCP/IP port numbers which each service uses when they are running. For example: In the above figure, Apache is using TCP/IP Port Number 80 and 443 and MySQL is using 3306 TCP/IP port number. These port numbers are considered to be there default port numbers.

PID(s)
When you will start any service provided under the Module section, you will see some numbers will appear next to that particular service under the PID section. These numbers are the process ID for that particular service. Each service running on the computer has some process ID.
For example: In the above figure, Apache and MySQL are running. The process ID for Apache is 13532 and 17700 and process ID for MySQL is 6064.
Admin
Corresponding to the running services, the Admin button becomes active. By clicking on it you can get access to the administration dashboard from where you can check if everything is working correctly or not.
Below figure shows a screen which will open up after clicking at Admin button corresponding to MySQL service.

Config
Corresponding to each service under the Module section, Config button is available. If you click on the Config button, you can easily configure each of the above services.

At the extreme right side, one more Config button is available. If you click on this Config button then you can configure which services to automatically start when you launch XAMPP. Also, some options are available which you can modify according to your need and requirements.

By clicking on above Config button, below dialog box will appear.
1.Under Autostart of modules, you can check the services or modules which you want to start automatically when XAMPP is launched.
2.If you want to change the language of XAMPP then you can click on the Change Language button.
3.You can also modify Service and Port Settings.
For example: If you want to change the default port for Apache server follow the below steps:
a.Click on Service and Port Settings button.
b.Below Service Settings dialog box will open up.

c.Change the Apache SSL Port from 443 to any other value like 4433.
Note: You should note down the above port number somewhere safe as it may be needed in the future.
d.After changing the port number, click on the Save button.
e.Now click on the Config button next to Apache under the Module section in XAMPP Control Panel.
f.Click on Apache (httpd-ssl.conf) from the context menu.

g.Search for “Listen” under the text file which just opened and change the port value to which you earlier noted in step c. Here it will be 4433 but in your case, it will be different.

h.Also look for <VirtualHost _default_:previous port number>. Change the port number to the new port number. In this case, it will look like <VirtualHost _default_:4433>
i.Save the changes.
4.After making changes, click on the Save button.
5.If you do not want to save the changes then click on the Abort button and your XAMPP will roll back to the previous state.
Netstat
On the extreme right side, below the Config button, Netstat button is available. If you will click on it, it will give you a list of services or sockets currently running and accessing which network, their process ID and TCP/IP port information.

List will be divided into three parts:
- Active Sockets/Services
- New Sockets
- Old Sockets
Shell
On the extreme right side, below the Netstat button, Shell button is available. If you click on the Shell button then it would open the shell command line utility where you can type commands to access the services, apps, folders, etc.

Explorer
Below the Shell button, there is an Explorer button, by clicking on it you can open the XAMPP folder in File Explorer and can see all the available folders of XAMPP.

Services
If you click on the Services button below the Explorer button, it will open the Services dialog box which will give you the details of all the services running on your computer.

Help
By clicking on Help button present below the Service button, you can look for any help you want by clicking on the available links.
Quit
If you want to exit from XAMPP Control Panel, then click on the Quit button available on the extreme right side below the Help button.
Log Section
At the bottom of the XAMPP Control Panel, present a box of logs where you can see which activities are currently running, what errors are faced by the running services of XAMPP. It will provide you with information on what happens when you start a service or when you stop service. Also, it will provide you information regarding each and every action taking place under XAMPP. This is also the first place to look when something goes wrong.

Most of the times, your XAMPP will work perfectly using the default settings to create a testing environment to run the website you have created. However, sometimes depending on the availability of port or your setup configuration you may need to change the TCP/IP port number of the running services or set the password for phpMyAdmin.
To change these settings, use the Config button corresponding to the service for which you want to make changes and save the changes and you will be good to use the XAMPP and the other services provided by it.
Recommended:
- External Hard Drive Not Showing Up or Recognized? Here is how to fix it!
- How to Use OneDrive: Getting Started with Microsoft OneDrive
- Disable Touchpad when Mouse is connected in Windows 10
- How to Set Auto Shutdown in Windows 10
I hope this article was helpful and you can now easily Install And Configure XAMPP on Windows 10, but if you still have any questions regarding this tutorial then feel free to ask them in the comment’s section.
Introduction
XAMPP is a free and open-source tool used by web developers in the Windows family and other platforms to set up the development and testing environment. XAMPP server comes with the XAMPP control panel to manage all its components easily.
XAMPP stands for (X) Cross-platform, (A) Apache, (M) MySQL, (P) PHP, (P) Perl and with some additional modules including phpmyadmin (for the database), FileZilla, Mercury, and Tomcat.
Once you have installed and configured the XAMPP server in your system, you can easily work with any CMS like WordPress, Joomla, drupal and more. XAMPP server works like a local server in your system that is generally used by PHP developers to test the websites (web-projects).
This tutorial will show you the various steps on how to install and configure the XAMPP server on Windows 10.
Installation Process of the XAMPP Server
Step 1
To download the XAMPP server, visit the «Apache Friends» website in your web browser.
Step 2
Click on «XAMPP for Windows». Then, navigate the downloading location and the file will be automatically downloaded.
Step 3
Double-click the downloaded file to launch the XAMPP installer.
Step 4
«Setup» window will appear on the screen. Then, click on the «Next» button.
Step 5
Select the components that you want to install and click on the «Next» button.
Note
By default, all components are selected in your XAMPP installation.
Step 6
Choose a folder to install the XAMPP and click on the «Next» button.
Step 7
Uncheck the «Learn more about Bitnami for XAMPP» option and click on the «Next» button.
Step 8
«Ready to Install» window will appear on the screen, then click on the «Next» button.
Step 9
Click on the «Finish» button.
Step 10
Select a language. (either English or German) and click on the «Save» button.
Configuration Process of XAMPP Server
Step 1
Start the XAMPP control panel through the «Run as administrator» option.
Step 2
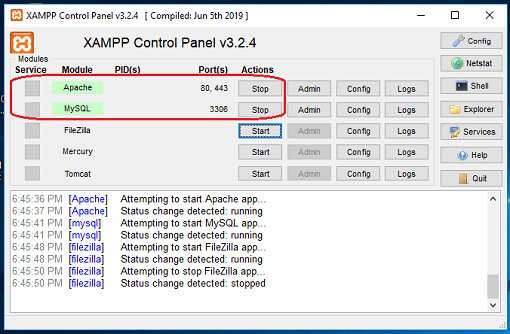
«XAMPP Control Panel» will appear on the screen and click on «Start» action to start the «Apache» and «MySQL» modules.
Note:-
The default XAMPP server settings should work for most users. When you start the related modules (services) then, the color of the related modules (service) becomes change into the green color and the PID(s) and the Port(s) number will also be shown to the user.
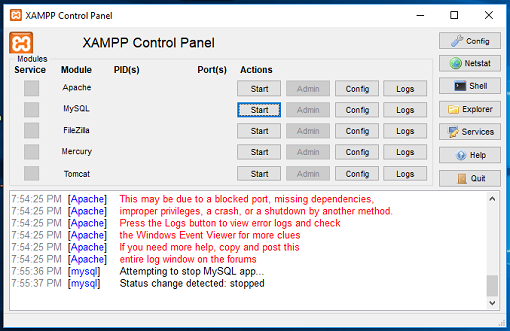
Fix an Issue of Apache not Starting in XAMPP
Some of the users may face an issue with Apache and MySQL module services not working in XAMPP. However, depending on the setup configuration or usage of your system, you may need to change the port number of the Apache and the MySQL. For example, because the «World Wide Web Services» under «Internet Information Services (IIS)» is also run on port 80 in your system, which is also the default port of apache in XAMPP. And, the two servers (applications) can not use (run) the same port simultaneously. Follow the instructions below to fix the problem with Apache and MySQL services.
Method 1. Change the default port of Apache
Step 1
Open the XAMPP Control Panel.
Step 2
In Apache Module Service, click on the «Config» button.
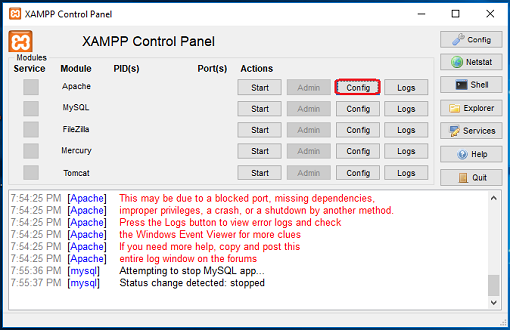
Step 3
Click on «Apache (httpd.conf)» option.
Step 4
By pressing the «Ctrl + F» key, find the «Listen 80» and replace it with another open port (like 81 or 9080) and save the file.
Step 5
Restart the XAMPP Server.
Step 6
Again, open the «XAMPP Control Panel» and click on the start option under the «Apache» module services.

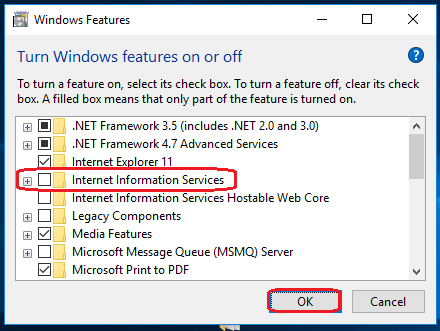
Method 2. By disabling the Internet Information Services (IIS)
Step 1
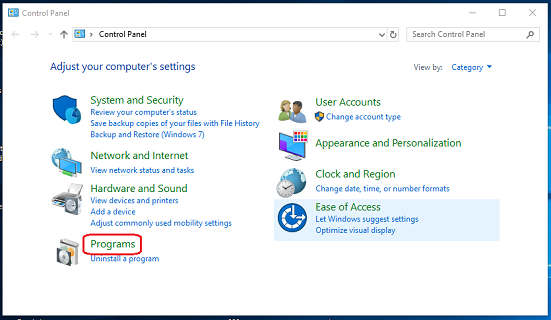
From the Start Menu, search for Control Panel.
Step 2
Click on «Programs».
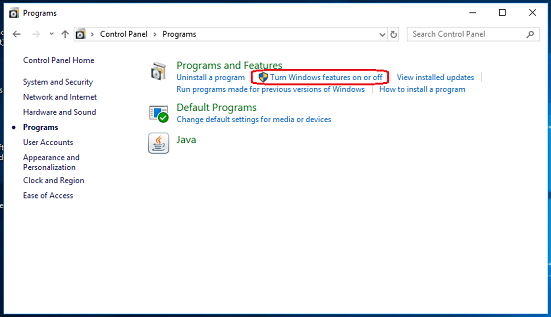
Step 3
Click on the «Turn Windows Feature on or off» option.
Step 4
Uncheck (clear) the «Internet Information Services» option and click on the «OK» button.
Step 5
Click on the «Restart Now» option (This will reboot/restart your computer/laptop).
Step 6
Again, open the «XAMPP Control Panel» and click on the start option in the «Apache» module services.
Conclusion
By following any of the above methods, you can install and configure the XAMPP server on Windows 10.
I hope you enjoyed this article. Follow C# Corner to learn more new and amazing things about Windows 10.
Thanks for reading this article.
- To install XAMMP on Windows 11 and 10, download and run the installer to unpack the files, continue with the default selection of components (MySQL, phpMyAdmin, PHP, and Apache), choose the installation location, continue with the on-screen directions, and allow access through the firewall.
- You can open Command Prompt (admin) and run the “winget install –id ApacheFriends.Xampp.8.2” command.
- Alternatively, it’s possible to install XAMPP using the XAMPP app on Windows 11 and 10.
UPDATED 9/24/2024: On Windows 10 and even on Windows 11, you can install XAMPP through the standalone installer or Command Prompt, and in this guide, I’ll teach you how to complete this process with both methods. XAMPP is a free, open-source software that provides an easy way for web designers and developers to install the components to run PHP-based software like WordPress, Drupal, Joomla, and others on Windows, Linux, and macOS.
If you are a web developer or are trying to get into blogging, XAMPP will save you time and frustration by automatically installing and configuring Apache, MySQL, PHP, and Perl to create a testing environment on your device.
In this guide, I will outline the steps to install XAMPP on Windows 11 (and 10) and the instructions to configure the web environment and fix common problems after the setup.
- Install XAMPP on Windows 11 and 10
- Configure XAMPP on Windows 11 and 10
- Fix Apache not starting on XAMPP
- Increase phpMyAdmin upload size on XAMPP
- Change phpMyAdmin password on XAMPP
You can install XAMPP on Windows 11 and 10 by downloading and running the application installer from the official website, using Command Prompt with the Windows Package Manager (winget) tool, or the Dev Home app.
Method 1: From Installer
To download and install XAMPP on Windows 11 and 10, use these steps:
-
Open Apache Friends website.
-
Click the Download button for the Windows version of XAMPP and save the file on your computer.
Quick note: If you have special version requirements for PHP, download the version you need to install. If you do not have a version requirement, download the oldest version, as it may help you avoid issues trying to install PHP-based software. In addition, these instructions have been tested to work for XAMPP version 8.2.12 and older versions, but you can use this guide for other versions.
-
Double-click the downloaded file to launch the installer.
-
Click the OK button.
-
Click the Next button.
-
XAMPP offers various components you can install, such as MySQL, phpMyAdmin, PHP, Apache, and more. Since you will be using most of these components, I recommend that you leave the default options.
-
Click the Next button.

-
Use the default installed location. (You can also choose another folder to install the software in the “Select a folder” field.)
-
Click the Next button.
-
Select the language for the XAMPP Control Panel.
-
Click the Next button.
-
Clear the “Learn more about Bitnami for XAMPP” option.
-
Click the Next button.
-
Click the Next button again.
-
Click the “Allow access” button to allow the app through the Windows Firewall (if applicable).
-
Click the Finish button.


Once you complete the steps, the XAMPP Control Panel will launch, and you can begin configuring the web server environment.
You can also follow these instructions in my video tutorial on my YouTube channel. (Remember to like and subscribe.)
Method 2: From Command Prompt
To install XAMPP from Command Prompt with the winget tool on Windows, use these steps:
-
Open Start.
-
Search for Command Prompt, right-click the top result, and select the Run as administrator option.
-
(Optional) Type the following command to search for the name of the application and press Enter:
winget search xampp
Quick note: While the command is not required, the installation query must match the ID, name, or moniker of the package, which can change at any time. So, searching the application to execute the correct install command is a good idea and helps you to determine the available versions of the app.
-
Type the following command to install XAMPP with the Windows Package Manager and press Enter:
winget install --id ApacheFriends.Xampp.8.2

-
Continue with the on-screen directions (if applicable).

After you complete the steps, the package manager will download the package from the specified source, and it will proceed to install the application. The device may restart automatically during this process. The installation will set up the app inside the C:\xampp folder.
Method 3: From Dev Home
To install XAMPP with the Dev Home app, use these steps:
-
Open Start.
-
Search for Dev Home and click the top result to open the app.
-
Click on Machine Configuration from the left navigation pane.
-
Click the Install applications setting under the “Quick steps” section.

-
Search for XAMPP using the search box at the top of the page.
-
Click the Plus button next to the result to the app version you want on the list.

-
Click the Next button.
-
Check the “I agree and want to continue” option.
-
Click the Set up button to begin the installation.
-
Click the Yes button (if applicable).


Once you complete the steps, the Dev Home app will use the Windows Package Manager to download and install the version of XAMPP you selected.
Configure XAMPP on Windows 11 and 10
The XAMPP Control Panel includes three main sections. In the “Module” section, you will find all the web services available. You can start each service by clicking the “Start” button.
When you start some of the services, including Apache and MySQL, on the right side, you’ll also see the process ID (PID) number and TCP/IP port (Port) numbers each service uses. For example, Apache uses TCP/IP ports 80 and 443 by default, while MySQL uses TCP/IP port 3306.
You can also click the “Admin” button to access the administration dashboard for each service and verify that everything is working correctly.

On the right side is a list of buttons to configure various aspects of the control panel, including the “Config” button to configure which modules will automatically start when you launch XAMPP.
Clicking the “Netstart” button in the Control Panel will give you a list of services currently accessing the network, including TCP/IP address, port, and process ID information.

In addition, the Control Panel has quick-access buttons to open the shell command-line utility, XAMPP installation folder, and services and to close the app.
Finally, you can access the logs section to see what happens whenever you start a module or change a setting. This is the first place to look when something isn’t working.

The default settings should work for most situations to create a testing environment. However, depending on your setup configuration, you may have to change the Apache server’s TCP/IP port number, the database upload size, or the password for phpMyAdmin.
To access and change these settings, you’ll have to use the “Config” button for the corresponding service. For example, you’ll need to open the “httpd.conf” file to change the Apache server settings and the “my.ini” file to change the MySQL settings.
Fix Apache not starting on XAMPP
The XAMPP installation is very straightforward, but Windows 10 sometimes may not allow the Apache server to run. Usually, it’s because the “World Wide Publishing Service” is running on port “80” on the computer, which also happens to be the default TCP/IP port that Apaches use on XAMPP, and two apps can’t use the same networking port.
If you encounter this issue, there are several ways to resolve it. One is to uninstall the publishing service or change the default port on Apache.
Method 1: Uninstall World Wide Web Services
If you do not have any app depending on the World Wide Web Services feature, you can uninstall it with these steps:
-
Open Start.
-
Search for Control Panel, and click the top result to open the experience.
-
Click on Programs.
-
Click the Programs and Features option.
-
Click the “Turn Windows features on or off” option from the left pane.

-
Expand the “Internet Information Services” branch
-
Clear the “World Wide Web Services” option.
-
Click the OK button.

-
Restart your computer.
-
Start the XAMPP Control Panel.
-
Click the Start button on Apache.


After you complete the steps, Apache should be able to run in port 80 on your device.
Method 2: Change the default Apache TCP/IP port
Instead of removing the World Wide Web Services, you can configure Apache to run on a different TCP/IP port.
To change the Apache listening port on XAMPP, use the steps:
-
Open XAMPP Control Panel.
-
On Apache, click the Config button.
-
Select the “Apache (httpd.conf)” option.

-
Scroll down and find the “Listen 80” line.
-
Change the number “80” for another TCP/IP port number that isn’t in use. For example, “81.”

-
Save and close the httpd.conf file.
-
Click the Start button on Apache from the XAMPP Control Panel.


Once you complete the steps, the Apache server should run without issues on the new TCP/IP port specified.
The only caveat with this configuration is that you’ll need to append the TCP/IP port number on the address whenever you want to connect to the test site. For example, to access the Apache server on the web browser, you must type “localhost:81/dashboard” instead of “localhost/dashboard.”
Method 2: Stop World Wide Web Publishing Service
Another way to fix the port problem is to stop the service and change its settings to start the service manually (only).
To change the World Wide Web Publishing Service, use these steps:
-
Open Start.
-
Search for Services, and click the top result to open the experience.
-
Double-click the “World Wide Web Publishing Service” service.

-
Click the Stop button.
-
Change the startup type to Manual.
-
Click the Apply button.
-
Click the OK button.

-
Open the XAMPP Control Panel.
-
Click the Start button to run the Apache server.


The best way to get Apache working again is to uninstall the World Wide Web Publishing Service. However, if that is not possible, you can change the TCP/IP port number or stop the service as necessary.
Increase phpMyAdmin upload size on XAMPP
Another common problem with XAMPP is the default database upload limit. For instance, developers often copy a website for troubleshooting or work on-site without disrupting the live website. However, people using WordPress or another content management software will quickly discover that they can’t upload a database because it exceeds the maximum permitted upload size, 2048 KiB.
To increase the database upload limit on phpMyAdmin, use these steps:
-
Open XAMPP Control Panel.
-
Click the Explorer button.
-
Open the php folder.
-
Open the php.ini file with any text editor.

-
Change the value for
upload_max_filesizeandpost_max_sizeto the size you want. For example:post_max_size=100Mandupload_max_filesize=100Mto import database files of up to 40MB.
-
Click the Stop button for MySQL and Apache.
-
Click the Start button to restart Apache and MySQL.


Once you complete the steps, you should be able to import large database files on phpMyAdmin.
Change phpMyAdmin password on XAMPP
By default, phpMyAdmin (MySQL) uses “root” as a username without a password. This means that if you are installing a WordPress site when prompted, you only need to enter the root as the username and leave the password field empty.
To change the phpMyAdmin password on XAMPP, use these steps:
-
Open XAMPP Control Panel.
-
Click the Admin button for MySQL.
-
Click on the “User accounts” tab.
-
Click the Edit privileges option for the username root, but only the one with the hostname localhost.

-
Click the Change password button.
-
Confirm a new password.

-
Click the Go button.


After you complete the steps, if you try to log in to phpMyAdmin, you might get an access denied “Cannot connect: invalid settings” message.
Fix phpMyAdmin access denied message
If you’re having problems signing into phpMyAdmin, you’ll need to configure the “config.inc.php” file.
To change the configuration settings in the “config.inc.php” file, use these steps:
-
Open XAMPP Control Panel.
-
Click the Explorer button.
-
Open the phpMyAdmin folder.
-
Open the config.inc.php file with any text editor.

-
Change the following lines under the “Authentication type and info” section:
-
On
$cfg['Servers'][$i]['auth_type'] = 'config';replaceconfigforcookie. -
On
$cfg['Servers'][$i]['AllowNoPassword'] = true;replacetrueforfalse.

-
-
Save and close the file.


Once you complete the steps, you can log in to the phpMyAdmin dashboard, and XAMPP should be configured and ready to use with any supported PHP-based software.
Update September 24, 2024: This guide has been updated to ensure accuracy and reflect that the instructions will work on Windows 10 as well as on Windows 11.