
This guide will show you WineHQ LTS Setup on Fedora Linux 39. Also, you will learn to Run a Windows app with Wine on your Fedora 39. Wine is a popular platform that you can use to run Windows applications on your Linux server. You can proceed to the following steps on the Orcacore website to get the latest stable version of Wine and start to install it in Fedora 39.
Table of Contents
Step-by-Step WineHQ LTS Setup on Fedora Linux 39
Before you start your WineHQ LTS Setup on Fedora Linux 39, remember to log in to your server as a non-root user with udo privileges. Then, follow the steps below to complete this guide.
Step 1 – Enable Wine Repository on Fedora 39
First, you must run the system update by using the following command:
sudo dnf update -yThen, you can enable the WineHQ Fedora repository that includes the latest build version. To do this, you can run the following command:
sudo dnf config-manager --add-repo https://dl.winehq.org/wine-builds/fedora/38/winehq.repo
Note: At the current time, you can use the Fedora 38 Wine repo for the Fedora 39.
Step 2 – Command for WineHQ Installation on Fedora 39
At this point, you can easily use the DNF package manager to install the latest version of Wine on your Fedora Linux.
To install the Stable release, you can run the command below:
sudo dnf install winehq-stable -yYou can also install the beta or staging release with the following command:
sudo dnf install winehq-staging -yAdvanced users and developers can use the development release with the command below:
sudo dnf install winehq-devel -yIn this guide, we use the stable release of Wine on Fedora 39.
When your installation is completed, very it by checking the Wine version:
wine --versionIn your output, you will see:
Step 3 – Configure Wine on Fedora Linux 39
At this point, you must configure your WineHQ installation in Fedora 39. To do this, run the following command as a regular user:
winecfgWait until your Wine configuration is updated.
Then, you will be asked to set up the Wine Mono installer. Click on the Install button.
It will automatically begin downloading and installing Mono and related components.
Next, you will see the following screen. From there you can adjust your desired settings and continue.

When it is completed, you will now be able to run Windows applications in Fedora 39.
Step 4 – Run an Application with Wine on Fedora Linux 39
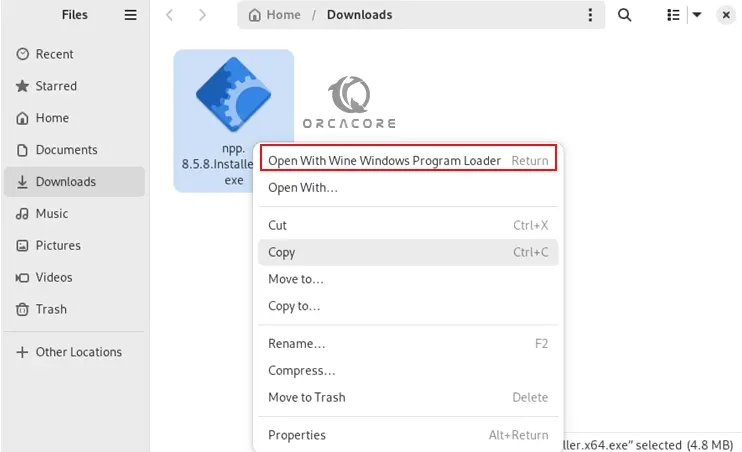
At this point, we want to show you how to use Wine to run the Windows applications in Fedora Linux 39. As an example, we downloaded the Notepad ++ installer from its official site to show you how to run the Windows app with WineHQ.
Then, to run it with Wine, right-click on the app and select Open with Wine Windows Program Loader.
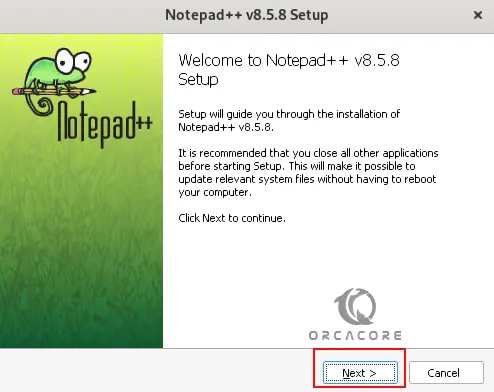
It will open the installer setup for you. Choose your desired language and click Ok.
Click Next on the Welcome screen.
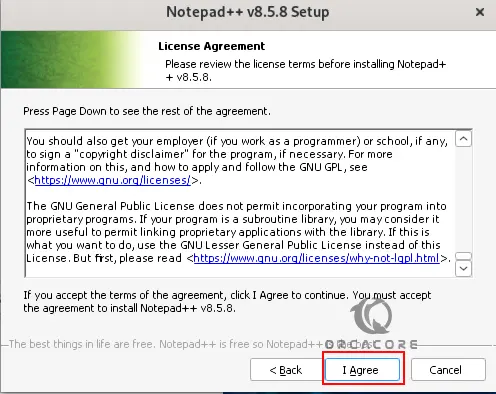
Accept the license agreement and click I Agree.
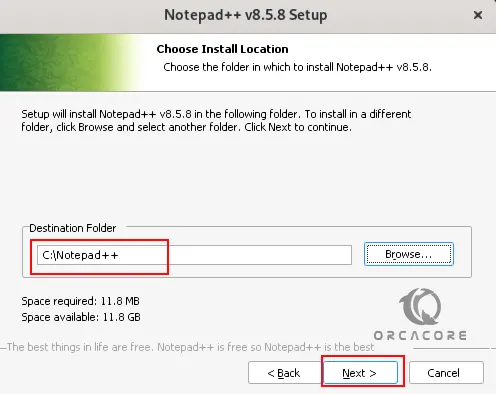
Next, choose the destination of your folder and click Next.
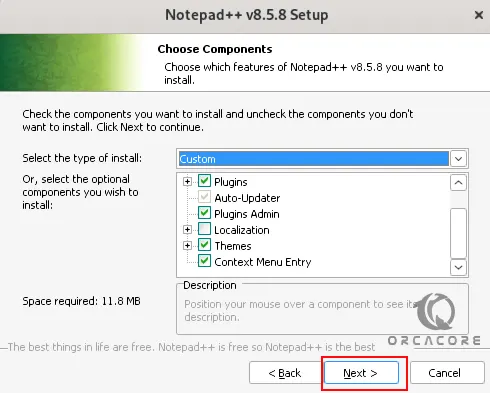
Choose the components you want to install and click Next.
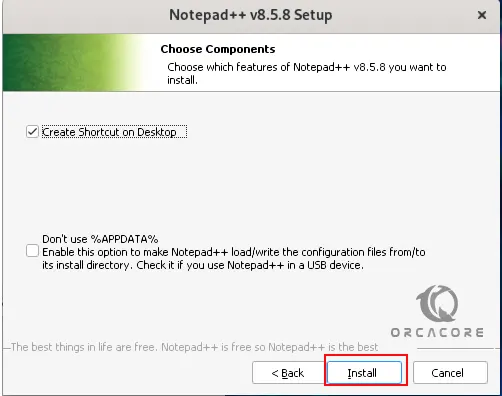
Then, click on Install to complete the process.
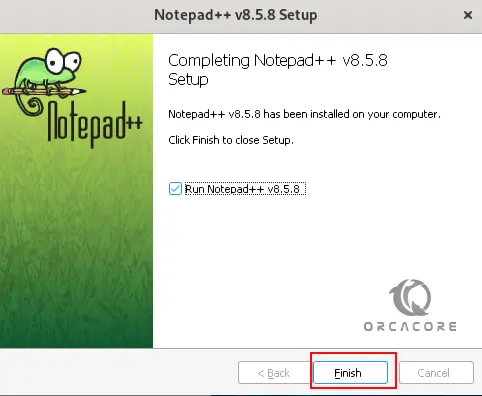
Finally, click Finish.
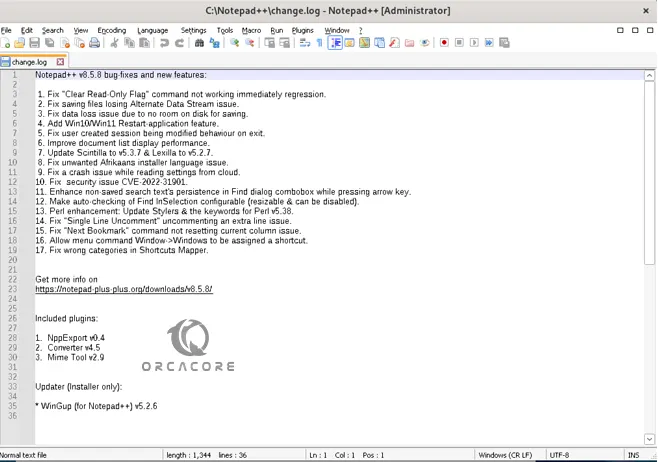
At this point, you will see your Notepad ++ app in Fedora Linux 39. You can easily run your applications with WineHQ in Linux distros.
Step 5 – Update WineHQ in Fedora Linux
To get the latest versions of Wine, you can easily update your app from the terminal. To do this, you can simply run the command below:
sudo dnf upgrade --refreshStep 6 – Uninstall WineHQ from Fedora Linux
If you no longer want to use Wine in your Fedora Linux 39, you can easily remove it by using the command below:
sudo dnf remove winehq-stableNote: If you use other branches, replace the name of winehq-stable.
To remove the WineHQ repository, you can run the following command:
sudo rm /etc/yum.repos.d/winehq.repoConclusion
At this point, you have learned WineHQ or Wine LTS Setup Installation on Fedora Linux 39, configure it, and start using it by running a Windows app with Wine.
Hope you enjoy using it. Also, you may like to read the following guides:
Slack Setup on Fedora Linux 39
Fix APEI Generic Hardware Error Source in Linux
Wine is a powerful compatibility layer that allows Linux users to run Windows applications seamlessly. For Fedora users, installing Wine can open the door to a wide variety of software that may not be natively available on Linux. This article will guide you through the process of installing Wine on Fedora 41, ensuring you have all the necessary information to get started effectively.
As Fedora continues to evolve, version 41 brings several enhancements that improve the overall user experience. Installing Wine on this version can provide access to essential Windows applications, making it a valuable tool for both casual and professional users. In this guide, we will cover everything from prerequisites to troubleshooting common issues, ensuring you have a smooth installation experience.
Prerequisites
Before diving into the installation process, it’s crucial to ensure your system meets certain requirements:
- System Requirements: A 64-bit version of Fedora 41 is necessary, as Wine primarily supports 64-bit applications.
- Updated System: Make sure your system is up-to-date. Run the command
sudo dnf updatein the terminal. - Dependencies: Some essential packages may need to be installed beforehand. These typically include development tools and libraries.
Choosing the Right Version of Wine
Wine comes in several versions: Stable, Development, and Staging. Each version serves different user needs:
- Stable: This version is recommended for general users who require reliability and consistent performance.
- Development: Ideal for users who want the latest features but may encounter bugs.
- Staging: This version includes experimental features that are not yet in Stable; use it if you need cutting-edge functionality and are willing to troubleshoot.
Selecting the right version depends on your specific needs and the applications you intend to run. For most users, starting with the Stable version is advisable.
Installing Wine from Fedora Repositories
The easiest way to install Wine on Fedora 41 is through the official repositories using the DNF package manager. Follow these steps:
- Open Terminal: Access your terminal application from the applications menu or by pressing
Ctrl + Alt + T. - Update Your System: Before installing any new software, ensure your system is updated by running:
sudo dnf update - Install Wine: Execute the following command to install Wine:
sudo dnf install wine - Verify Installation: After installation, check if Wine was installed correctly by running:
wine --versionYou should see the installed version number displayed in the terminal.
This method installs the default version of Wine available in Fedora’s repositories. However, this might not always be the latest version available.
Installing Wine from WineHQ
If you require a more recent version of Wine or specific features not available in the default repository, consider installing it from WineHQ. Here’s how:
- Add WineHQ Repository: First, you need to add the official WineHQ repository for Fedora 41. Run:
sudo dnf config-manager --add-repo https://dl.winehq.org/wine-builds/fedora/41/winehq.repo - Select Your Version: Choose between Stable, Development, or Staging. For example, to install the Stable version:
sudo dnf install winehq-stable - Install Required Dependencies: During installation, DNF may prompt you for additional dependencies. Confirm their installation when prompted.
- Check Installation Again: Once installed, verify by running:
wine --version
This method provides access to newer features and improvements that may not yet be included in Fedora’s standard repositories.
Post-Installation Configuration
Your next step after installation is configuring Wine for optimal performance. This can be done using the configuration tool called `winecfg`:
- Run winecfg: Open your terminal and type:
winecfg - Select Windows Version: In the application that opens, you can select which version of Windows you want Wine to emulate (e.g., Windows 10). This setting can impact application compatibility.
- Create a Wine Prefix: The first time you run `
winecfg`, it automatically creates a default Wine prefix in your home directory under~/.wine. You can customize this by creating additional prefixes if needed. - Add Libraries: If certain applications require specific Windows libraries (DLLs), you can add them under the “Libraries” tab within `
winecfg`.
Common Issues and Troubleshooting
No installation process is without its challenges. Here are some common issues and their solutions when installing or running Wine on Fedora 41:
- Error: “Wine is not installed”: If you encounter this message after installation, ensure that your PATH variable includes the directory where Wine is installed. You may need to restart your terminal or log out and back in.
- Poor Performance with Applications: If applications run slowly or crash frequently, try adjusting settings in `
winecfg`, such as changing the Windows version or enabling/disabling certain graphics options. - Libraries Missing Errors: If an application complains about missing DLLs, consider using Winetricks to install them easily. Run:
wget https://raw.githubusercontent.com/Winetricks/winetricks/master/src/winetricks && chmod +x winetricks && ./winetricks - No Sound Output: If sound does not work in applications running under Wine, check your audio settings in `
winecfg` and ensure that ALSA or PulseAudio is selected as your audio driver.
Using Wine to Run Windows Applications
You’re now ready to run Windows applications using Wine! Here’s how to get started:
- Navigating to Application Directory: If you have a Windows application installer (e.g., .exe file), navigate to its directory using terminal commands or a file manager.
- Running an Application: You can run an application by executing:
wine /path/to/application.exe - Create Shortcuts: If you plan on using an application frequently, consider creating desktop shortcuts for easier access. This can usually be done by creating a `.desktop` file in your home directory’s Desktop folder.
- Tweaking Performance Settings: If you experience issues with graphics-intensive applications, try enabling virtual desktop mode in `
winecfg`. This may help improve performance and stability.
Congratulations! You have successfully installed Wine. Thanks for using this tutorial for installing the Wine on Fedora 41 system. For additional or useful information, we recommend you check the official Wine website.
VPS Manage Service Offer
If you don’t have time to do all of this stuff, or if this is not your area of expertise, we offer a service to do “VPS Manage Service Offer”, starting from $10 (Paypal payment). Please contact us to get the best deal!
r00t is an experienced Linux enthusiast and technical writer with a passion for open-source software. With years of hands-on experience in various Linux distributions, r00t has developed a deep understanding of the Linux ecosystem and its powerful tools. He holds certifications in SCE and has contributed to several open-source projects. r00t is dedicated to sharing her knowledge and expertise through well-researched and informative articles, helping others navigate the world of Linux with confidence.
Run Windows applications (including Microsoft 365 and Adobe Creative Cloud) on GNU/Linux with KDE Plasma, GNOME or XFCE, integrated seamlessly as if they were native to the OS.

Underlying Mechanism
WinApps works by:
- Running Windows in a
Docker,Podmanorlibvirtvirtual machine. - Querying Windows for all installed applications.
- Creating shortcuts to selected Windows applications on the host GNU/Linux OS.
- Using
FreeRDPas a backend to seamlessly render Windows applications alongside GNU/Linux applications.
Additional Features
- The GNU/Linux
/homedirectory is accessible within Windows via the\\tsclient\homemount. - Integration with
Nautilus, allowing you to right-click files to open them with specific Windows applications based on the file MIME type. - The official taskbar widget enables seamless administration of the Windows subsystem and offers an easy way to launch Windows applications.
Supported Applications
WinApps supports ALL Windows applications.
Universal application support is achieved by:
- Scanning Windows for any officially supported applications (list below).
- Scanning Windows for any other
.exefiles listed within the Windows Registry.
Officially supported applications benefit from high-resolution icons and pre-populated MIME types. This enables file managers to determine which Windows applications should open files based on file extensions. Icons for other detected applications are pulled from .exe files.
Contributing to the list of supported applications is encouraged through submission of pull requests! Please help us grow the WinApps community.
Please note that the provided list of officially supported applications is community-driven. As such, some applications may not be tested and verified by the WinApps team.
Officially Supported Applications
|
Adobe Acrobat Pro (X) Icon in the Public Domain. |
Adobe After Effects (CC) Icon in the Public Domain. |
||
|
Adobe Audition (CC) Icon in the Public Domain. |
Adobe Bridge (CS6, CC) Icon in the Public Domain. |
||
|
Adobe Creative Cloud (CC) Icon under MIT license. |
Adobe Illustrator (CC) Icon in the Public Domain. |
||
|
Adobe InDesign (CC) Icon in the Public Domain. |
Adobe Lightroom (CC) Icon in the Public Domain. |
||
|
Adobe Photoshop (CS6, CC, 2022) Icon in the Public Domain. |
Command Prompt (cmd.exe) Icon under MIT license. |
||
|
File Explorer (Windows Explorer) Icon in the Public Domain. |
Internet Explorer (11) Icon in the Public Domain. |
||
|
Microsoft Access (2016, 2019, o365) Icon in the Public Domain. |
Microsoft Excel (2016, 2019, o365) Icon in the Public Domain. |
||
|
Microsoft Word (2016, 2019, o365) Icon in the Public Domain. |
Microsoft OneNote (2016, 2019, o365) Icon in the Public Domain. |
||
|
Microsoft Outlook (2016, 2019, o365) Icon in the Public Domain. |
Microsoft PowerPoint (2016, 2019, o365) Icon in the Public Domain. |
||
|
Microsoft Publisher (2016, 2019, o365) Icon in the Public Domain. |
Microsoft Visio (Standard/Pro. 2021, Plan 2) Icon in the Public Domain. |
||
|
Microsoft Project (Standard/Pro. 2021, Plan 3/5) Icon in the Public Domain. |
Microsoft Visual Studio (Comm./Pro./Ent. 2022) Icon in the Public Domain. |
||
|
mIRC Icon in the Public Domain. |
PowerShell Icon under MIT license. |
||
|
Windows (Full RDP Session) Icon in the Public Domain. |
Installation
Step 1: Configure a Windows VM
Both Docker and Podman are recommended backends for running the Windows virtual machine, as they facilitate an automated Windows installation process. WinApps is also compatible with libvirt. While this method requires considerably more manual configuration, it also provides greater virtual machine customisation options. All three methods leverage the KVM hypervisor, ensuring excellent virtual machine performance. Ultimately, the choice of backend depends on your specific use case.
The following guides are available:
- Creating a Windows VM with
DockerorPodman - Creating a Windows VM with
libvirt
If you already have a Windows VM or server you wish to use with WinApps, you will still have to follow the final steps described in the libvirt documentation.
Step 2: Install Dependencies
Install the required dependencies.
- Debian/Ubuntu:
sudo apt install -y curl dialog freerdp3-x11 git iproute2 libnotify-bin netcat-openbsd
- Fedora/RHEL:
sudo dnf install -y curl dialog freerdp git iproute libnotify nmap-ncat
- Arch Linux:
sudo pacman -Syu --needed -y curl dialog freerdp git iproute2 libnotify gnu-netcat
- OpenSUSE:
sudo zypper install -y curl dialog freerdp git iproute2 libnotify-tools netcat-openbsd
- Gentoo Linux:
sudo emerge --ask=n net-misc/curl dev-util/dialog net-misc/freerdp:3 dev-vcs/git sys-apps/iproute2 x11-libs/libnotify net-analyzer/openbsd-netcat
Note
WinApps requires FreeRDP version 3 or later. If not available for your distribution through your package manager, you can install the Flatpak:
flatpak install flathub com.freerdp.FreeRDP
sudo flatpak override --filesystem=home com.freerdp.FreeRDP # To use `+home-drive`
However, if you have weird issues like #233 when running Flatpak, please compile FreeRDP from source according to this guide.
Step 3: Create a WinApps Configuration File
Create a configuration file at ~/.config/winapps/winapps.conf containing the following:
##################################
#   WINAPPS CONFIGURATION FILE   #
##################################

# INSTRUCTIONS
# - Leading and trailing whitespace are ignored.
# - Empty lines are ignored.
# - Lines starting with '#' are ignored.
# - All characters following a '#' are ignored.

# [WINDOWS USERNAME]
RDP_USER="MyWindowsUser"

# [WINDOWS PASSWORD]
# NOTES:
# - If using FreeRDP v3.9.0 or greater, you *have* to set a password
RDP_PASS="MyWindowsPassword"

# [WINDOWS DOMAIN]
# DEFAULT VALUE: '' (BLANK)
RDP_DOMAIN=""

# [WINDOWS IPV4 ADDRESS]
# NOTES:
# - If using 'libvirt', 'RDP_IP' will be determined by WinApps at runtime if left unspecified.
# DEFAULT VALUE:
# - 'docker': '127.0.0.1'
# - 'podman': '127.0.0.1'
# - 'libvirt': '' (BLANK)
RDP_IP="127.0.0.1"

# [WINAPPS BACKEND]
# DEFAULT VALUE: 'docker'
# VALID VALUES:
# - 'docker'
# - 'podman'
# - 'libvirt'
# - 'manual'
WAFLAVOR="docker"

# [DISPLAY SCALING FACTOR]
# NOTES:
# - If an unsupported value is specified, a warning will be displayed.
# - If an unsupported value is specified, WinApps will use the closest supported value.
# DEFAULT VALUE: '100'
# VALID VALUES:
# - '100'
# - '140'
# - '180'
RDP_SCALE="100"

# [MOUNTING REMOVABLE PATHS FOR FILES]
# NOTES:
# - By default, `udisks` (which you most likely have installed) uses /run/media for mounting removable devices.
#   This improves compatibility with most desktop environments (DEs).
# ATTENTION: The Filesystem Hierarchy Standard (FHS) recommends /media instead. Verify your system's configuration.
# - To manually mount devices, you may optionally use /mnt.
# REFERRENCE: https://wiki.archlinux.org/title/Udisks#Mount_to_/media
REMOVABLE_MEDIA="/run/media"

# [ADDITIONAL FREERDP FLAGS & ARGUMENTS]
# NOTES:
# - You can try adding /network:lan to these flags in order to increase performance, however, some users have faced issues with this.
# DEFAULT VALUE: '/cert:tofu /sound /microphone'
# VALID VALUES: See https://github.com/awakecoding/FreeRDP-Manuals/blob/master/User/FreeRDP-User-Manual.markdown
RDP_FLAGS="/cert:tofu /sound /microphone"

# [MULTIPLE MONITORS]
# NOTES:
# - If enabled, a FreeRDP bug *might* produce a black screen.
# DEFAULT VALUE: 'false'
# VALID VALUES:
# - 'true'
# - 'false'
MULTIMON="false"

# [DEBUG WINAPPS]
# NOTES:
# - Creates and appends to ~/.local/share/winapps/winapps.log when running WinApps.
# DEFAULT VALUE: 'true'
# VALID VALUES:
# - 'true'
# - 'false'
DEBUG="true"

# [AUTOMATICALLY PAUSE WINDOWS]
# NOTES:
# - This is currently INCOMPATIBLE with 'docker' and 'manual'.
# - See https://github.com/dockur/windows/issues/674
# DEFAULT VALUE: 'off'
# VALID VALUES:
# - 'on'
# - 'off'
AUTOPAUSE="off"

# [AUTOMATICALLY PAUSE WINDOWS TIMEOUT]
# NOTES:
# - This setting determines the duration of inactivity to tolerate before Windows is automatically paused.
# - This setting is ignored if 'AUTOPAUSE' is set to 'off'.
# - The value must be specified in seconds (to the nearest 10 seconds e.g., '30', '40', '50', etc.).
# - For RemoteApp RDP sessions, there is a mandatory 20-second delay, so the minimum value that can be specified here is '20'.
# - Source: https://techcommunity.microsoft.com/t5/security-compliance-and-identity/terminal-services-remoteapp-8482-session-termination-logic/ba-p/246566
# DEFAULT VALUE: '300'
# VALID VALUES: >=20
AUTOPAUSE_TIME="300"

# [FREERDP COMMAND]
# NOTES:
# - WinApps will attempt to automatically detect the correct command to use for your system.
# DEFAULT VALUE: '' (BLANK)
# VALID VALUES: The command required to run FreeRDPv3 on your system (e.g., 'xfreerdp', 'xfreerdp3', etc.).
FREERDP_COMMAND=""
Important
RDP_USER and RDP_PASS must correspond to a complete Windows user account and password, such as those created during Windows setup or for a domain user. User/PIN combinations are not valid for RDP access.
Important
If you wish to use an alternative WinApps backend (other than Docker), uncomment and change WAFLAVOR="docker" to WAFLAVOR="podman" or WAFLAVOR="libvirt".
Configuration Options Explained
- If using a pre-existing Windows RDP server on your LAN, you must use
RDP_IPto specify the location of the Windows server. You may also wish to configure a static IP address for this server. - If running a Windows VM using
libvirtwith NAT enabled, leaveRDP_IPcommented out and WinApps will auto-detect the local IP address for the VM. - For domain users, you can uncomment and change
RDP_DOMAIN. - On high-resolution (UHD) displays, you can set
RDP_SCALEto the scale you would like to use (100, 140 or 180). - To add additional flags to the FreeRDP call (e.g.
/prevent-session-lock 120), uncomment and use theRDP_FLAGSconfiguration option. - For multi-monitor setups, you can try enabling
MULTIMON. A FreeRDP bug may result in a black screen however, in which case you should revert this change. - If you enable
DEBUG, a log will be created on each application start in~/.local/share/winapps/winapps.log. - If using a system on which the FreeRDP command is not
xfreerdporxfreerdp3, the correct command can be specified usingFREERDP_COMMAND.
Step 4: Test FreeRDP
-
Test establishing an RDP session by running the following command, replacing the
/u:,/p:, and/v:values with the correct values specified in~/.config/winapps/winapps.conf.xfreerdp3 /u:"Your Windows Username" /p:"Your Windows Password" /v:192.168.122.2 /cert:tofu # Or, if you installed FreeRDP using Flatpak flatpak run --command=xfreerdp com.freerdp.FreeRDP /u:"Your Windows Username" /p:"Your Windows Password" /v:192.168.122.2 /cert:tofu
- Please note that the correct
FreeRDPcommand may vary depending on your system (e.g.xfreerdp,xfreerdp3, etc.). - Ensure you use the correct IP address for your Windows instance in the above command.
- If prompted within the terminal window, choose to accept the certificate permanently.
If the Windows desktop appears in a
FreeRDPwindow, the configuration was successful and the correct RDP TLS certificate was enrolled on the Linux host. Disconnect from the RDP session and skip the following debugging step. - Please note that the correct
-
[DEBUGGING STEP] If an outdated or expired certificate is detected, the
FreeRDPcommand will display output resembling the following. In this case, the old certificate will need to be removed and a new RDP TLS certificate installed.@@@@@@@@@@@@@@@@@@@@@@@@@@@@@@@@@@@@@@@@@@@@@@@@@@@@@@@@@@@ @ WARNING: CERTIFICATE NAME MISMATCH! @ @@@@@@@@@@@@@@@@@@@@@@@@@@@@@@@@@@@@@@@@@@@@@@@@@@@@@@@@@@@ The hostname used for this connection (192.168.122.2:3389) does not match the name given in the certificate: Common Name (CN): RDPWindows A valid certificate for the wrong name should NOT be trusted! The host key for 192.168.122.2:3389 has changed @@@@@@@@@@@@@@@@@@@@@@@@@@@@@@@@@@@@@@@@@@@@@@@@@@@@@@@@@@@ @ WARNING: REMOTE HOST IDENTIFICATION HAS CHANGED! @ @@@@@@@@@@@@@@@@@@@@@@@@@@@@@@@@@@@@@@@@@@@@@@@@@@@@@@@@@@@ IT IS POSSIBLE THAT SOMEONE IS DOING SOMETHING NASTY! Someone could be eavesdropping on you right now (man-in-the-middle attack)! It is also possible that a host key has just been changed. The fingerprint for the host key sent by the remote host is 8e:b4:d2:8e:4e:14:e7:4e:82:9b:07:5b:e1:68:40:18:bc:db:5f:bc:29:0d:91:83:f9:17:f9:13:e6:51:dc:36 Please contact your system administrator. Add correct host key in /home/rohanbarar/.config/freerdp/server/192.168.122.2_3389.pem to get rid of this message.If you experience the above error, delete any old or outdated RDP TLS certificates associated with Windows, as they can prevent
FreeRDPfrom establishing a connection.These certificates are located within
~/.config/freerdp/server/and follow the naming format<Windows-VM-IPv4-Address>_<RDP-Port>.pem(e.g.,192.168.122.2_3389.pem,127.0.0.1_3389.pem, etc.).If you use FreeRDP for purposes other than WinApps, ensure you only remove certificates related to the relevant Windows VM. If no relevant certificates are found, no action is needed.
Following deletion, re-attempt establishing an RDP session.
Step 5: Run the WinApps Installer
With Windows still powered on, run the WinApps installer.
bash <(curl https://raw.githubusercontent.com/winapps-org/winapps/main/setup.sh)
Once WinApps is installed, a list of additional arguments can be accessed by running winapps-setup --help.

Adding Additional Pre-defined Applications
Adding your own applications with custom icons and MIME types to the installer is easy. Simply copy one of the application configurations in the apps folder located within the WinApps repository, and:
- Modify the name and variables to reflect the appropriate/desired values for your application.
- Replace
icon.svgwith an SVG for your application (ensuring the icon is appropriately licensed). - Remove and reinstall WinApps.
- Submit a pull request to add your application to WinApps as an officially supported application once you have tested and verified your configuration (optional, but encouraged).
Running Applications Manually
WinApps offers a manual mode for running applications that were not configured by the WinApps installer. This is completed with the manual flag. Executables that are in the Windows PATH do not require full path definition.
winapps manual "C:\my\directory\executableNotInPath.exe"
winapps manual executableInPath.exe
Updating WinApps
The installer can be run multiple times. To update your installation of WinApps:
- Run the WinApps installer to remove WinApps from your system.
- Pull the latest changes from the WinApps GitHub repository.
- Re-install WinApps using the WinApps installer by running
winapps-setup.
Installation using Nix
First, follow Step 1 of the normal installation guide to create your VM.
Then, install WinApps according to the following instructions.
After installation, it will be available under winapps, with the installer being available under winapps-setup
and the optional launcher being available under winapps-launcher.
Using standalone Nix
First, make sure Flakes and the nix command are enabled.
In your ~/.config/nix/nix.conf:
experimental-features = nix-command flakes
# specify to use binary cache (optional)
extra-substituters = https://winapps.cachix.org/
extra-trusted-public-keys = winapps.cachix.org-1:HI82jWrXZsQRar/PChgIx1unmuEsiQMQq+zt05CD36g=
extra-trusted-users = <your-username> # replace with your username
nix profile install github:winapps-org/winapps#winapps
nix profile install github:winapps-org/winapps#winapps-launcher # optional
On NixOS using Flakes
# flake.nix
{
  description = "My configuration";

  inputs = {
    nixpkgs.url = "github:NixOS/nixpkgs/nixos-unstable";

    winapps = {
      url = "github:winapps-org/winapps";
      inputs.nixpkgs.follows = "nixpkgs";
    };
  };

  outputs =
    inputs@{
      nixpkgs,
      winapps,
      ...
    }:
    {
      nixosConfigurations.hostname = nixpkgs.lib.nixosSystem rec {
        system = "x86_64-linux";

        specialArgs = {
          inherit inputs system;
        };

        modules = [
          ./configuration.nix
          (
            {
              pkgs,
              system ? pkgs.system,
              ...
            }:
            {
              # set up binary cache (optional)
              nix.settings = {
                substituters = [ "https://winapps.cachix.org/" ];
                trusted-public-keys = [ "winapps.cachix.org-1:HI82jWrXZsQRar/PChgIx1unmuEsiQMQq+zt05CD36g=" ];
              };

              environment.systemPackages = [
                winapps.packages."${system}".winapps
                winapps.packages."${system}".winapps-launcher # optional
              ];
            }
          )
        ];
      };
    };
}
On NixOS without Flakes
Flakes aren’t real and they can’t hurt you..
However, if you still don’t want to use flakes, you can use WinApps with flake-compat like:
# configuration.nix
{
  pkgs,
  system ? pkgs.system,
  ...
}:
{
  # set up binary cache (optional)
  nix.settings = {
    substituters = [ "https://winapps.cachix.org/" ];
    trusted-public-keys = [ "winapps.cachix.org-1:HI82jWrXZsQRar/PChgIx1unmuEsiQMQq+zt05CD36g=" ];
    trusted-users = [ "<your username>" ]; # replace with your username
  };

  environment.systemPackages =
    let
      winapps =
        (import (builtins.fetchTarball "https://github.com/winapps-org/winapps/archive/main.tar.gz"))
        .packages."${system}";
    in
    [
      winapps.winapps
      winapps.winapps-launcher # optional
    ];
}
Star History
Linux distributions are becoming more and more popular every day, and Fedora Workstation is not left behind. This popularity brings forth the need to run Windows applications on Linux distros like Fedora. Windows has quite some excellent Software that is not available for Linux.
Unfortunately, compatibility issues prevent us from installing Windows ‘.exe.’ files on Unix or Linux systems. However, this doesn’t mean it’s impossible. You can do so using WineHQ.
What is WineHQ?
Wine is a free and Opensource compatibility layer that enables users to run Windows applications and software in a Unix or Linux environment. Unlike virtual machines or emulators, Wine translates application calls that would be recognized by the Windows system so that the app can run in a near-native environment.

Wine to run windows applications on Linux
This way, one can run software meant for Windows systems without significant memory or performance issues. In other cases, some Wine installed programs perform much better on Linux than on the Windows environment.
Wine Features
- supports 64-bit, 32-bit, 16-bit (Windows 9x/NT/2000/XP/Vista/7/8/10, and Windows 3.x) libraries, and DOS programs
- It supports Win32 memory compatibility, threads and proce3sses, and exception handling.
- supports the playing of DirectX games on Linux. It supports the running of OpenGL and Vulkan games and applications
- has excellent support for system sound drivers like OSS and ALSA
- It supports the use of external devices such as modems, serial devices, USB drives, and Winsock TCP/IP networking.
- supports several input devices, including keyboard and graphical tablets
- It comes with the ASPI interface (SCSI) that enables the use of Scanners, DVD/CD writer, and other devices.
- supports multilingual keyboard input methods
- comes with several sample programs like internet explore after a fresh installation
Since Wine is an open-source program that is updated from time to time, you can find more added features on the official wine_features page.
Install WineHQ on Fedora Workstation
In this article, we will give you a step by step procedure of how to install WineHQ on your Fedora workstation. Our distribution of choice is Fedora 31; however, we will still show you to install WIneHQ for Fedora 32 and Fedora 29.
The user requirements for this tutorial include:
- An active internet connection.
- Elevated privileges to perform the installation. Therefore, you will need to know the root password.
Step 1. Ensure your system is up to date by executing the commands below on the Terminal.
sudo dnf clean all
sudo dnf update

Update your Fedora system
Step 2. Now, you will need to add the WineHQ repository in our system. Select the repository that matches your Fedora version from the options below.
- Fedora 32:
dnf config-manager --add-repo https://dl.winehq.org/wine-builds/fedora/32/winehq.repo
- Fedora 31:
dnf config-manager --add-repo https://dl.winehq.org/wine-builds/fedora/31/winehq.repo
- Fedora 29:
sudo dnf config-manager --add-repo https://dl.winehq.org/wine-builds/fedora/29/winehq.repo
Add Fedora 31 WineHQ repository in the system.

Step 3. Once we have added the WineHQ repository in our system, we can now proceed to install WIneHQ. Choose any of the releases below if you have no idea which package to run, execute the stable branch.
- Stable branch:
sudo dnf install winehq-stable
- Development branch
sudo dnf install winehq-devel
- Staging branch.
sudo dnf install winehq-staging
For this post, I will use the stable branch.
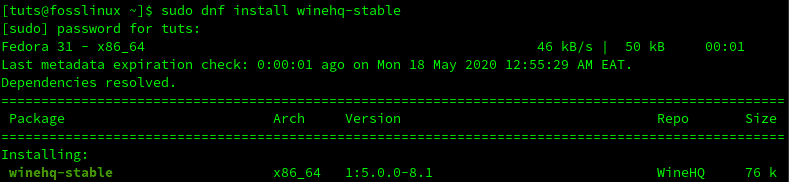
Install WineHQ in Fedora
Step 4. Once the installation is complete, verify using the ‘–version’ command, as shown below.
wine --version

Verify WIne installation
Install a Windows program with Wine
Now let’s give you a tip on how to install Windows programs in Fedora Workstation using Wine. The test program we will use is PowerISO. It’s a Windows program used for creating a bootable installation USB drive.
Step 1. Navigate to the directory containing your Windows ‘.exe.’ file. Right-click on it and choose the option, Open with “Wine Windows Program Loader.”

Open with WIne Program Loader
Step 2. The PowerISO license agreement page will open after some time.

PowerISO Licence Agreement page
Click “I Agree” to continue.
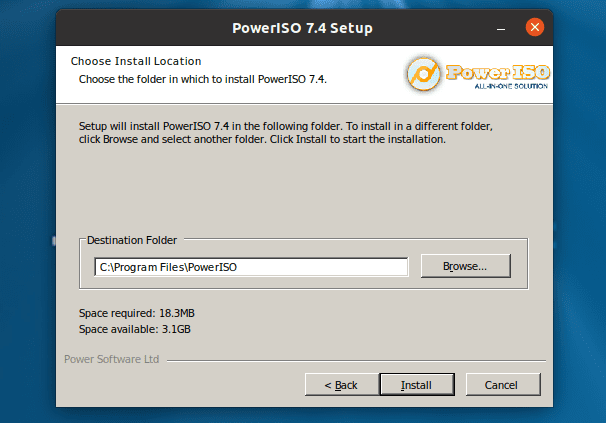
Step 3. On the next Window, you will need to select the installation location. By default, Wine installs all programs in the C:/ directory. It would be best if you left the installation path as indicated.
Choose PowerISO install location
Click “Install” to start the installation process.
Step 4. Once the installation is complete, you will see a message that it was successful. Click “Next.” On the next window that appears, do not alter any information there, click “Close.”
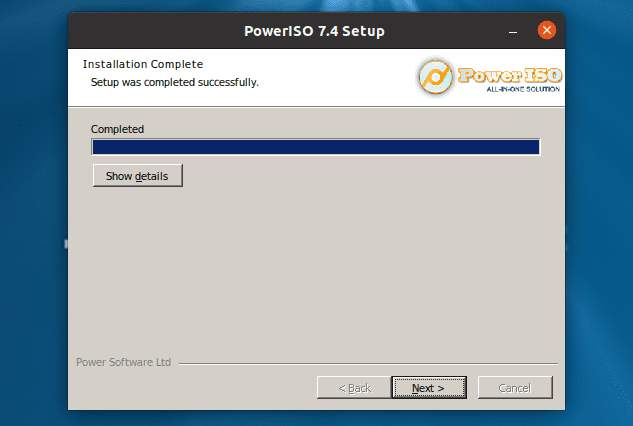
Installation completed successfully
Now, we have successfully installed PowerISO in Fedora Workstation using WineHQ.
Step 5) To launch the program, navigate to the Desktop, and you should see a file called PowerISO or PowerISO.desktop. If its the ‘PowerISO’ file, double click on it to open the program. If its ‘PowerISO.desktop’ as shown below, you will use the ‘gtk-launch’ command to launch it.

PowerISO_desktop file
Note, to use the gtk-launch command, we need to copy the PowerISO.desktop file in the /usr/share/applications‘ directory.Once you have done, execute the command below on the Terminal.
gtk-launch PowerISO.desktop
The PowerISO main window should now open.
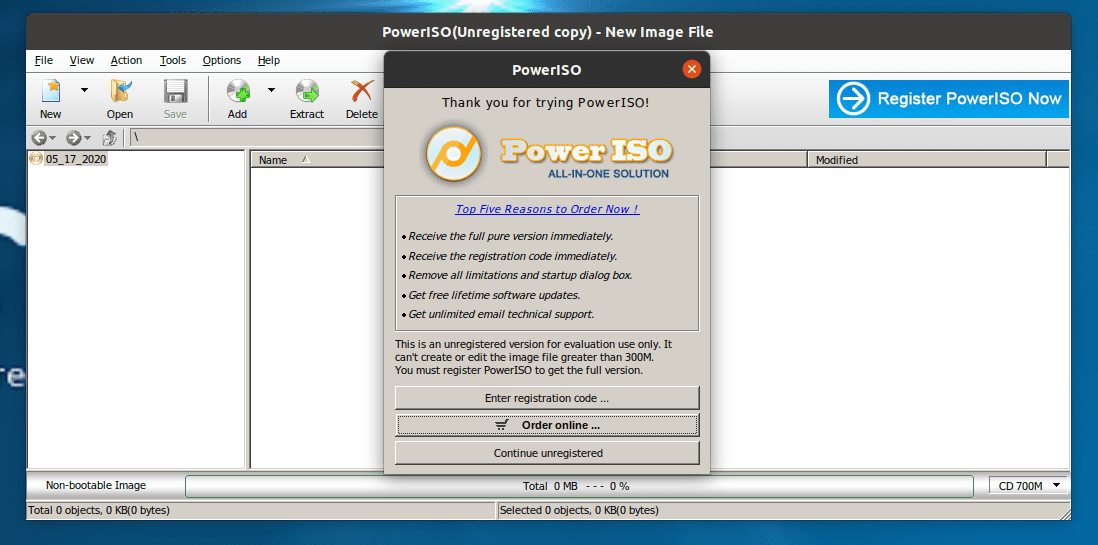
PowerISO main window
That’s how easy it is to install a Windows program on Fedora using WineHQ.
Uninstall a program installed with WineHQ on Fedora
Suppose you want to uninstall a program you installed with WineHQ on your Fedora system, it’s a relatively straightforward process.
Step 1. Open the Terminal and execute the command below.
wine uninstaller
This command will open the Wine Add/Remove programs window, as shown below.
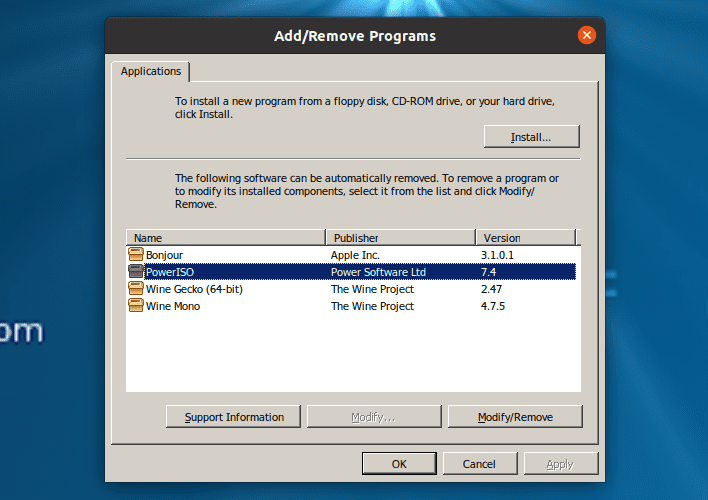
Wine Add-Remove programs window
Step 2. Select the program you wish to uninstall and click the “Remove” button. In this case, we want to uninstall PowerISO, by clicking “Remove,” PowerISO uninstallation will open. See the image below.
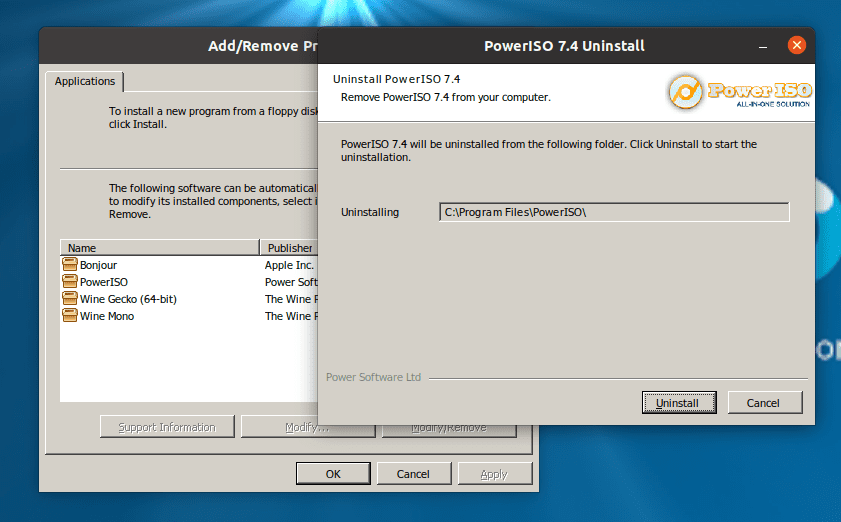
Uninstall PowerISO using WIneHQ uninstall window
Uninstall WineHQ from Fedora Workstation
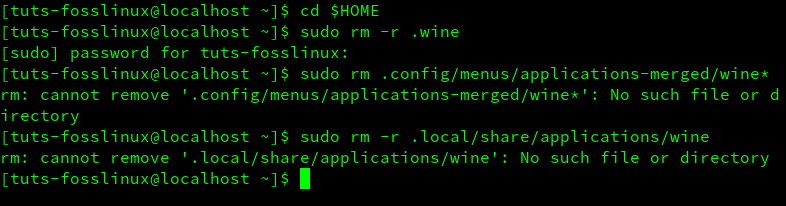
From my experience working with WineHQ on Fedora Workstation, using the ‘–purge‘ or ‘remove‘ command does not entirely remove WineHQ from your system.
If you wish to remove Wine and all its components, execute the commands below in order before running the ‘–purge’ and remove command. It’s important to note that you will lose all data, including the programs installed using WineHQ.
cd $HOME
sudo rm -r .wine
sudo rm .config/menus/applications-merged/wine*
sudo rm -r .local/share/applications/wine
sudo rm .local/share/desktop-directories/wine*
sudo rm .local/share/icons/????_*.xpm
Remove_Unistall WineHQ on Fedora Workstation
Some of these commands might raise errors like ‘directory not found,’ however, this shouldn’t be a bother. Continue executing every single command. When done, now run the ‘–purge’ and ‘remove’ command below.
sudo apt-get --purge remove wineConclusion
WineHQ is a program that saves you the stress of running Virtual machines or dual booting only to have Windows applications running on your system. After a successful installation, visit the Wine Application Database webpage to see some of the Windows software you can install and run on Fedora.
Welcome to the guide on installing Wine 9.0 on Fedora! Wine is a compatibility layer that enables you to run Windows applications on Linux and other Unix-like operating systems. With the latest version of Wine, you can enjoy improved compatibility and performance when running your favorite Windows software on your Fedora system. This step-by-step tutorial will walk you through the installation process, ensuring that you can seamlessly integrate Wine into your Fedora environment and start using your preferred Windows applications without hassle. Let’s get started!
Prerequisite
You must have a sudo privileged account for the Wine installation on Fedora.
Wine required many development packages. First, we recommend upgrading all system packages using the following commands.
sudo dnf clean allsudo dnf update
Step 1: Configure Wine Repository
The first step in installing WineHQ on Fedora is to add the WineHQ repository to your system. This can be done by running the following commands. First, import the Winehq GPG key into your system.
sudo dnf -y install dnf-plugins-coresudo rpm --import https://dl.winehq.org/wine-builds/winehq.key
Next, add the Wine package repository to your system.
source /etc/os-releasesudo dnf config-manager --add-repo https://dl.winehq.org/wine-builds/fedora/${VERSION_ID}/winehq.repo
If you are running Fedora 35 or older version repository contains WineHQ 7 and older versions. So if you want to use Wine 8, you need to upgrade Fedora to the latest version.
Step 2: Install WineHQ on Fedora
You have configured the WineHQ yum repository on your Fedora system. The next step is to install WineHQ by running the following command:
sudo dnf install winehq-stable
The above command will install a large number of packages as a dependency. The installation may take time as per your network speed. Enjoy a cup of coffee until the installation finishes.
Step 3: Verify the Installation
After finishing the installation process, Use the following command to check the version of wine installed on your system.
wine --version

wine-9.0
Step 4: Configure Wine
WineHQ is now installed on your system, but it is not yet configured. The next step is to configure Wine by running the following command:
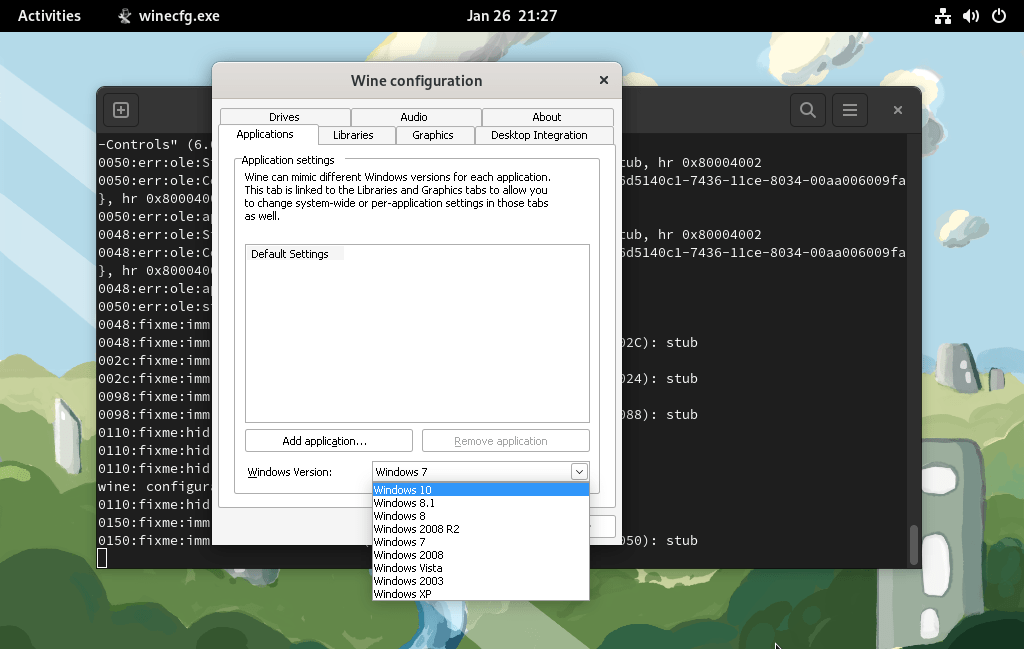
winecfg
This will open the Wine configuration window, where you can set various options such as the Windows version to emulate and the location of the virtual C drive.
Step 5: Running .exe file Using Wine
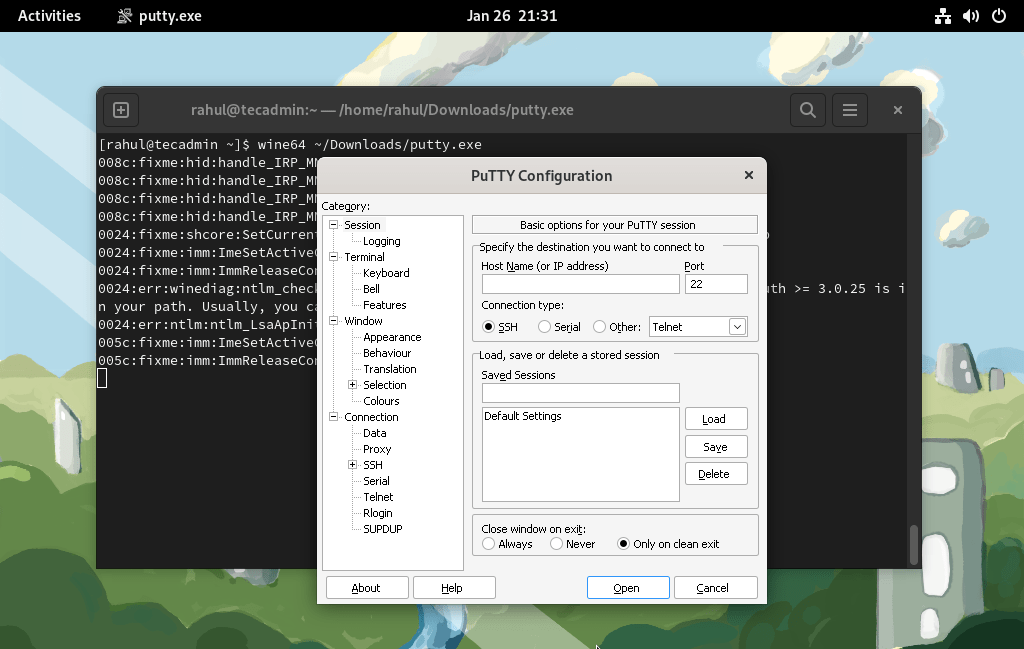
For this example, I have downloaded the putty.exe file. Now use the wine utility to run this putty Windows application on your Fedora system.
wine ~/Downloads/putty.exe
Conclusion
Congratulations! You have successfully installed Wine 9.0 on your Fedora system. With Wine, you now have the ability to run a wide range of Windows applications seamlessly on your Linux environment. Whether it’s productivity software, games, or other utilities, Wine provides you with the compatibility needed to enjoy your favorite Windows programs without having to switch operating systems. Remember to regularly update Wine to access the latest features and improvements. Enjoy exploring the possibilities that Wine brings to your Fedora experience!