
Microsoft выкатила ряд требований для оборудования устройства, необходимых для установки Windows 11. В частности, ваш компьютер должен иметь встроенный TPM модуль, современный процессор, поддерживать UEFI Secure Boot. Даже если ваш компьютер не поддерживает на аппаратном уровне эти функции, вы можете использовать виртуальный TPM модуль и запустить Windows 11 в виртуальной машине. В этой статье мы рассмотрим, как создать виртуальную машину с Windows 11 в Hyper-V.
Содержание:
- Создаем виртуальную машину с Windows 11 в Hyper-V
- Установка Windows 11 в виртуальной машине Hyper-V
Создаем виртуальную машину с Windows 11 в Hyper-V
На вашем компьютере уже должна быть установлена роль Hyper-V. Вы можете установить Hyper-V как на десктопе с Windows 10, так и на хосте с Windows Server или бесплатным Microsoft Hyper-V Server.
Вы можете создать виртуальную машину Windows 11 из графической консоли Hyper-V или с помощью PowerShell.
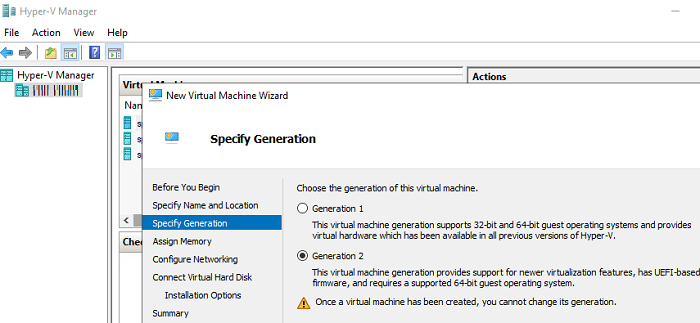
- Запустите консоль Hyper-V Manager, щелкните Create -> New Virtual Machine;
- Укажите имя ВМ;
- Обязательно выберите второе поколение виртуальной машина (виртуальное оборудование Generation 2 поддерживает UEFI, Secure Boot и виртуальный TPM);

- Укажите размер оперативной памяти для ВМ (не менее 4Гб, иначе при установке Windows 11 появится ошибка, что компьютер не соответствует минимальным требованиям для установки ОС);
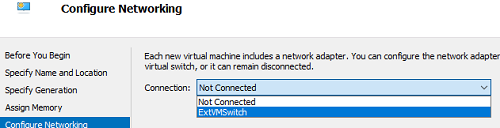
- Подключите ВМ к виртуальному коммутатору Hyper-V с доступом к интернету (опционально);
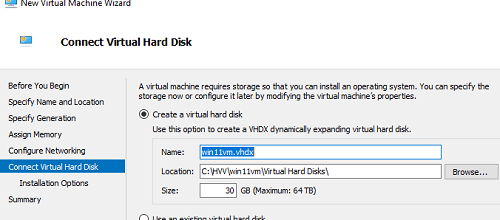
- Укажите размер виртуального vhdx диска для ВМ с Windows 11 (рекомендуется использовать диск не менее 64 Гб, но для минимальной ВМ достаточно и 30 Гб);
- На следующем шаге выберите, что хотите установить ОС позднее.
Итак, виртуальная машина готова. Теперь нужно настроить параметры ВМ для установки гостевой Windows 11.
- Откройте параметры ВМ;
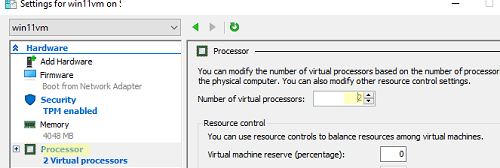
- Откройте вкладку управления виртуальными процессорами (Processor) и увеличьте количество vCPU как минимум до 2;
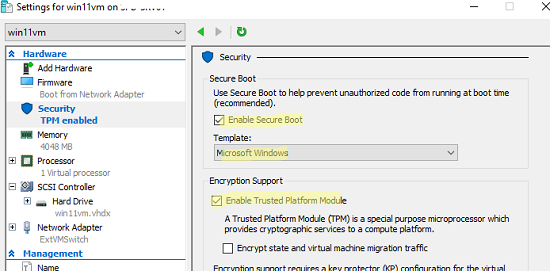
- Перейдите на вкладку Security, включите опцию Secure Boot и в качестве шаблона выберите Microsoft Windows;
- Включите опцию доверенного платформенного модуля (Enable Trusted Platform Module);
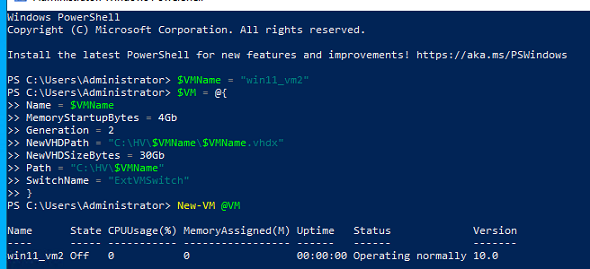
Вы можете создать виртуальную машину Windows 11 на Hyper-V с помощью PowerShell:
$VMName = "win11_vm2"
$VM = @{
Name = $VMName
MemoryStartupBytes = 4Gb
Generation = 2
NewVHDPath = "C:\HV\$VMName\$VMName.vhdx"
NewVHDSizeBytes = 30Gb
Path = "C:\HV\$VMName"
SwitchName = "ExtVMSwitch"
}
New-VM @VM
Добавьте второй CPU для ВМ:
Set-VM -VMName $VMName -ProcessorCount 2
Установка Windows 11 в виртуальной машине Hyper-V
Для установки Windows 11 в виртуальную машину вам понадобится ISO образ. Вы можете скачать установочный ISO образ с Windows 11 с сайта Microsoft (https://www.microsoft.com/en-us/software-download/windows11), или воспользоваться Media Creation Tool для генерации установочного образа Windows.
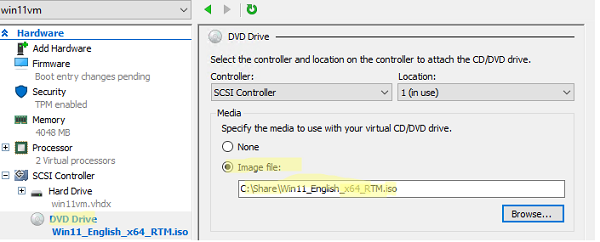
Подключите скачанный ISO образ Windows 11 к виртуальной машине. Для этого перейдите в раздел SCSI Controllers и добавьте вириальный DVD привод (DVD Drive -> Add).

В списке оборудования ВМ появится DVD Drive. Выберите его, включите опцию Image file и укажите путь к установочному ISO образу Windows 11. Сохраните настройки ВМ.
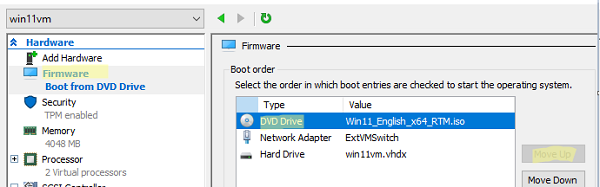
Еще раз откройте свойства ВМ, и на вкладке Firmware установите виртуальный DVD привод в качестве первичного загрузочного устройства (переместите эту запись вверх с помощью кнопки Move Up).
Эти же самые операции можно выполнить из PowerShell. Смонтируйте ISO образ в виртуальный DVD привод и измените порядок загрузки ВМ:
$virt_dvd = Add-VMDvdDrive -VMName $VMName -Path 'C:\Share\Win11_English_x64_RTM.iso' -Passthru
Set-VMFirmware -VMName $VMName -FirstBootDevice $virt_dvd
Осталось добавить поддержку виртуального TPM:
Set-VMKeyProtector -NewLocalKeyProtector -VMName $VMName
Enable-VMTPM -VMName $vmname
Запустите виртуальную машину из консоли Hyper-V или с помощью PowerShell:
Start-VM -Name $vmname
Откройте консоль виртуальной машины и нажмите любую клавишу для загрузки с виртуального DVD.
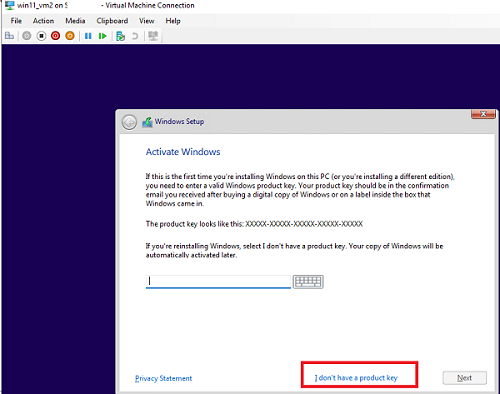
Следуйте мастеру установки Windows 11: выберите язык, формат времени, раскладку клавиатуры, редакцию ОС (в ISO образе может быть несколько редакций Windows). Если у вас нет ключа установки для Windows 11, можете пропустить этот шаг, нажав I don’t have a product key.
Если вы попытаетесь установить Windows 11 в виртуальную машину без TPM чипа, UEFI Secure boot или с памятью менее 4 Гб, то на этом этапе появится ошибка:
Запуск Windows 11 на этом компьютере не возможен.
Этот компьютер не соответствует минимальным требованиям к системе для установки этой версии Windows. Дополнительные сведения см. на сайте aka.ms/WindowsSysReq
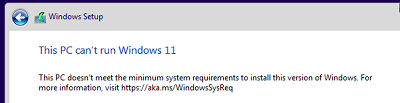
Проверьте, что ваша виртуальная машина соответствует всем требованиям, или вы можете продолжить установку, игнорируя требования совместимости Windows 11. Подробнее об этом в статье Установка Windows 11 без TPM, Secure Boot и других проверок.
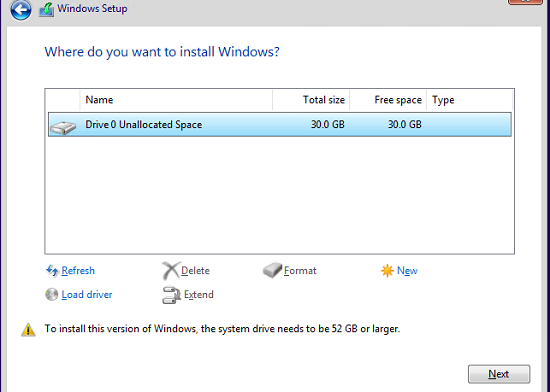
Выберите режим установки Выборочная: только установка Windows для опытных пользователей (Custom: Install Windows only advanced).
Осталось создать на виртуальном диске таблицу разделов. Вы можете создать разделы вручную, либо установить Windows 11 в неразмеченную область (Drive 0 Unallocated Space -> Next). В этом случае установщик Windows сам создаст системные разделы EFI, MSR и System Reserved; оставшемся месте будет использовано под раздел для Windows.
После этого начнется установка Windows 11 на выбранный виртуальный диск.
Установка Windows 11 в виртуальную машину VMware описана в отдельной статье.
Trying to install Windows 11, but not meeting requirements? (Hyper-V)

The error that prevents the computer from running Windows 11 is due to not meeting the minimum system requirements.
You can refer to the following table:
| Processor | 1 gigahertz (GHz) or faster with 2 or more cores on a compatible 64-bit processor or System on a Chip (SoC). |
| TPM | Trusted Platform Module (TPM) version 2.0. Check here for instructions on how your PC might be enabled to meet this requirement. |
| Storage | 64 GB or larger storage device Note: See below under “More information on storage space to keep Windows 11 up-to-date” for more details. |
| System firmware | UEFI, Secure Boot capable. Check here for information on how your PC might be able to meet this requirement. |
| RAM | 4 GB or larger storage device |
| Graphics card | Compatible with DirectX 12 or later with WDDM 2.0 driver. |
| Display | High definition (720p) display that is greater than 9” diagonally, 8 bits per colour channel. |
| Internet connection and Microsoft account | Windows 11 Home edition requires internet connectivity and a Microsoft account. |
If you are trying to run Windows 11 on Hyper-V, the default Generation 2 Virtual Machines does NOT meet the requirement.
Also consider
You will need to modify the following configuration for Processor and TPM to accommodate the required configuration.
| Processor | 1 gigahertz (GHz) or faster with 2 or more cores on a compatible 64-bit processor or System on a Chip (SoC). |
| TPM | Trusted Platform Module (TPM) version 2.0. Check here for instructions on how your PC might be enabled to meet this requirement. |
Meeting TPM requirement on a Virtual Machine, Generation 2:
- Right Click the virtual machine
- Click Settings
- Click Security
- Mark ‘Enable Trusted Platform Module’

Meeting Processor requirement on a Virtual Machine, Generation 2:
- Right Click the virtual machine
- Click Settings
- Click Processor
- Change ‘Number of virtual processors’ to a minimum of ‘2’

Now enjoy Windows 11 on Hyper-V.

-
Home
-
News
- Can’t Boot Windows 11 After Enabling Hyper-V? See How to Fix!
By Vera | Follow |
Last Updated
Why won’t Windows 11 boot after enabling Hyper-V? How to fix this issue? If you can’t boot Windows 11 after enabling Hyper-V, you come to the right place. From this post on MiniTool, you can find some possible reasons and workarounds to solve it.
PC Won’t Boot After Enabling Virtualization
Microsoft Hyper-V, also called Windows Server Virtualization before its release, is a native hypervisor that enables you to run multiple OSs as virtual machines on Windows. To know more information about it, refer to our previous post – What Is Hyper V? Some Basics You Should Know about Hyper-V.
Although Hyper-V plays an important role in your Windows PC, it may cause some issues. According to reports, you can’t boot Windows 11 after enabling Hyper-V and enter the lock screen, which happens to many PCs.
Why does this boot issue occur? When analyzing reasons, you may find:
- A certain third-party app blocks Windows 11 from booting when Hyper-V is active.
- Some system files get missing or corrupted.
- You haven’t updated Windows 11 for a long time.
When suffering from this boring issue, take it easy since you can take some measures to easily solve it. Move to the next part to learn how to troubleshoot it via some tips.
Related post: How to Enable Hyper-V on Windows 11? Here Are 3 Ways
Fix 1: Uninstall Trusteer Rapport
You may use Trusteer Rapport to protect your system from financial malware and phishing attacks. But this app can be a culprit that causes Windows 11 to not boot after enabling Hyper-V.
To solve the boot issue, you should go to uninstall this notorious app. So, do these:
Step 1: Boot your PC and then press F2 or Del to enter the BIOS menu. Based on different PC brands, the key to access BIOS may vary and you can see this guide – [5 Ways] How to Get Into BIOS on Windows 11 on Restart.
Step 2: In BIOS, go to the Advanced tab to find the virtualization setting and disable it. Then, the system will boot to the Desktop.
Tips:
The names and locations of the virtualization setting in BIOS vary from different manufacturers.
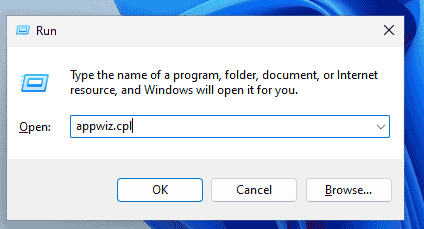
Step 3: Press Win + R, type appwiz.cpl,and click OK to open the Programs and Features window.
Step 4: Locate Trusteer Endpoint Protection, right-click on it, and tap on Uninstall. Then, finish the uninstallation.
Step 5: Restart the PC and then enable virtualization in BIOS, Windows 11 will boot properly.
Fix 2: Disable an Flag in BCD
When you can’t boot Windows 11 after enabling Hyper-V, you can try to run Command Prompt and disable an important flag in the BCD. It is said that this flag is notorious since it always causes Boot Repair Loop in the previous Windows versions. In Windows 11, it may come back after you enable Hyper-V.
To fix it, do these:
Step 1: Boot your PC and restart it when you see the Windows logo. Repeat this operation three times and your PC will enter the Automatic Repair window. Just tap on Advanced options to enter WinRE.
Step 2: Go to Troubleshoot > Advanced options > Command Prompt.
Step 3: Type BCDedit /set hypervisorlaunchtype Off and press Enter.
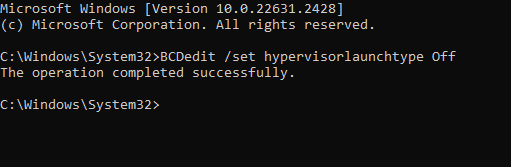
Step 4: After that, restart the PC and see if the Boot Repair Loop is solved.
Fix 3: Run System Restore
When Windows boot fails after enabling Hyper-V, you have a chance to restore the PC to an earlier state using a restore point if you have one.
Step 1: Go to WinRE and click Troubleshoot > Advanced options > System Restore.
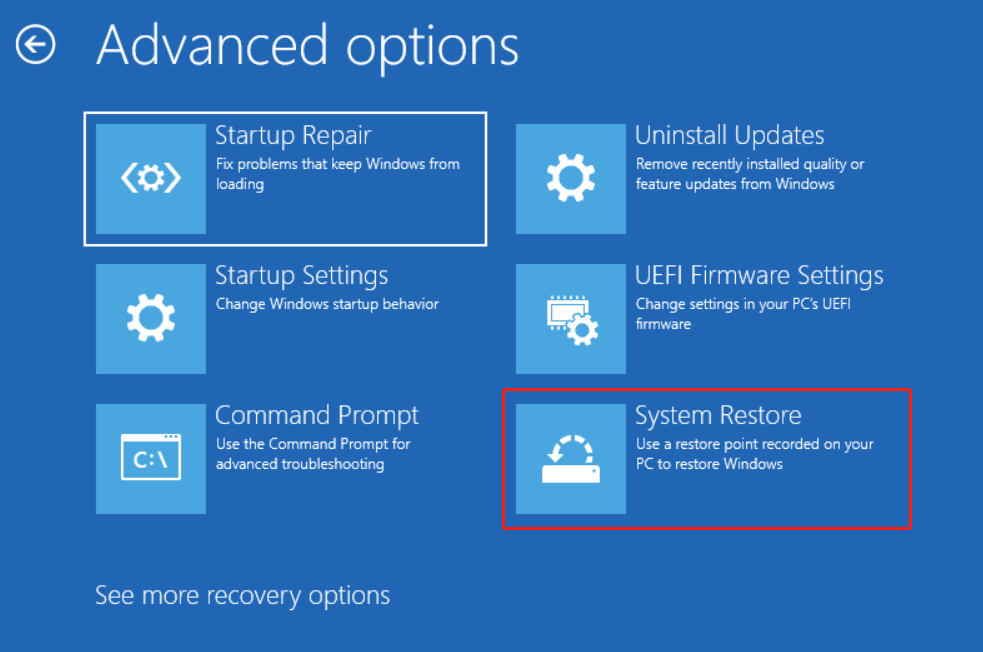
Step 2: Go to choose a restore point.
Step 3: Confirm the restore information and click Finish.
Fix 4: Reinstall Windows 11
If all the fixes cannot fix Windows 11 not booting after enabling Hyper-V, the only way you can try is to reinstall the operating system.
Before proceeding, we recommend backing up your important files stored in the C drive since the installation can erase everything from the system partitions. To keep data safe, run MiniTool ShadowMaker and then follow the guide – How to Backup Windows 11 to External Drive (Files & System).
MiniTool ShadowMaker TrialClick to Download100%Clean & Safe
Then, reinstall Windows 11 by using one way in this post – How to Reinstall Windows 11? Try 3 Simple Ways Here Now.
Verdict
Can’t boot Windows 11 after enabling Hyper-V? Now, you learn how to solve this boot issue in the given solutions. If you have other workarounds, send an email to us.
About The Author
Position: Columnist
Vera is an editor of the MiniTool Team since 2016 who has more than 7 years’ writing experiences in the field of technical articles. Her articles mainly focus on disk & partition management, PC data recovery, video conversion, as well as PC backup & restore, helping users to solve some errors and issues when using their computers. In her spare times, she likes shopping, playing games and reading some articles.
Some users reporting that when they’re trying to install Windows 11 on Hyper V Manager installation process end with error message “This PC can’t run Windows 11“.
During the installation, when select particular edition of Windows 11 and click next button an error message appears “This PC can’t run Windows 11” with full message. “This PC doesn’t meet minimum system requirements to install this version of Windows.”

As this error message gives no exact information about what minimum system requirement device lack and triggers the issue.
Lots of users use Hyper V Manager to run Windows 11 virtually on their device. After doing a deep research I figure out that lots of users are seeing the same error message. If you made up to this blog post, then you’re one out of them.
Fortunately, it is possible to fix this error and complete the installation of Windows 11 on Hyper-V. Here’s how you can do that:
In Hyper V manager, you need to select and right-click on the particular virtual machine and select Settings.
In the Settings window, you need to switch to Security tab and then on the right-side make sure that the box for Enable Secure boot and Enable Trusted Platform Machine is checked.

If not, check boxes for both the options, click Apply and OK. After doing this check if this helps in fixing the issue.
In case, screen with error message still appears, then again launch Virtual machine settings and this time switch to Processor tab.

On the right side, make sure that “Number of virtual processor” is set to at least 2. After that Apply and OK.
According to various reports changing virtual processor to 2 or above fix the issue.
If nothing helps in fixing the issue so far, then try a registry workaround. Here’s what you need to do:
On Windows 11 Setup screen, you need to press the Shift + F10 key to open the command prompt window.
Here, you need to type regedit and hit enter. This will launch Registry Editor.

In the registry editor, go to HKEY_LOCAL_MACHINE\SYSTEM\Setup
In the Setup folder, create a new key and name it “LabConfig“.

In the “LabConfig“, right-click on the blank area in the right sidebar > select key > DWORD (32-bit) Value and name it “BypassTPMCheck” and set its Value data 1.

Following same procedure, create two more DWORD Values named “BypassSecureBootCheck” and “BypassRAMCheck” and set Value data 1.

Close the command prompt and try again and try to install Windows 11.
In case, this also fails to fix the issue, then I personally suggest you to delete that particular virtual machine and quick create virtual machine again with default settings.

Once of the tip suggested in this blog post will fix the “This PC Can’t Run Windows 11” Error in Hyper V and let you install Windows 11.
Why don’t you give it a try and let us know if this fix the issue or not. If you face any other issue while installing Windows 11 on Hyper V, then feel free to ask in the comments.
Viney Dhiman, the mind behind GeekerMag, is a seasoned content writer with over 12 years of experience. Specializing in simplifying complex tech concepts, he covers Windows OS, Android, iOS, web apps, and product reviews. His work can be found on popular tech websites like Gizmodo and The Verge, and he has been interviewed by the Microsoft Edge team.
You have enabled the Hyper-V Platform on your Windows 11 computer, but after allowing it, you can not boot your Windows 11.
The situation is very annoying and frustrating, right?
If this issue is the case, there is nothing to worry about.
I have been in a similar situation as you, and I have been able to get out of this issue with proper tests and research. So, if you are looking for an ultimate solution to solve your boot problem on your Windows 11 computer, you are in the right place then.
This post will show you some of the best practical and effective methods to solve your boot issue after enabling the Hyper-V Platform on your Windows 11 computer.
Keep reading and precisely follow the instructions to fix your Windows 11 boot issue.
So, let’s get started to fix your Windows 11 boot issue.
Many Windows 11 users reported that they face the boot problem when Hyper-V Platform is enabled on their Windows 11 computer.
This section will discuss possible reasons not to boot your Windows 11 system when the Hyper-V Platform is enabled.
Here are the possible reasons for can not boot your Windows 11 computer issue::
Third-Party Applications Interfering
The first reason is the third-party applications. Many third-party applications interfere with others’ applications and can create issues. Users have reported that Trusteer Rapport and similar programs block them from booting while Hyper-V is enabled.
In this situation, you can resolve the problem by temporarily turning off virtualization and deleting the offending third-party software before re-enabling virtualization.
Check our latest post: Download Boot Camp Drivers for Windows 11.
Outdated Windows
Another booting issue when the Hyper-V Platform is enabled on your Windows 11 computer is outdated Windows OS. When your Windows OS is outdated, your system may conflict with the other functionality that creates booting issues.
So, update your Windows regularly to avoid boot problems while the Hyper-V Platform is enabled on your Windows 11 computer device.
Corrupted System Files
Corrupting system files is one of the most common reasons not to boot your Windows 11 system issues when the Hyper-V Platform is enabled. When the system files become corrupted, your application may become conflicting.
To fix the booting issue on your Windows 11 computer, you need to repair or reset your windows.
You’ve seen the possible causes for not booting your Windows 11 system when the Hyper-V Platform is enabled so far, and in the next part, I’ll show you several tested and proven solutions to solve the problem.
So, let’s get started to know the solutions to solve the booting issue on your Windows 11 computer.
You may also like to read: Upgrade to Windows 11 on Mac Using Boot Camp
How to Fix Can’t Boot Windows 11 After Enabling Hyper-V
After enabling the Hyper-v on your Windows 11 computer, many users face not boot windows. Generally, the issue occurs when the conflict between Windows Hypervisor virtualization and the current Windows version.
In the previous section, you’ve seen the possible potential reason for the Windows boot issue while the Hyper-V is enabled on your Windows 11 computer so far.
This section will show you several tested, and proven solutions to the Windows can not boot issue when the Hyper-V is enabled on your Windows 11 computer.
So, let’s dive right in to know the Windows 11 boot issue solution.
Here are the steps to fix the can’t boot windows 11 after enabling Hyper-V :
1. Disable Hypervisor using Advanced Recovery Mode
The most effective method to solve the Windows 11 boot issue is to disable the Hypervisor Platform using the Advanced Recovery Mode method.
Using the Advanced Recovery Mode method, you will boot into recovery mode and then disable Hypervisor Platform using the command-line program. After disabling the Hypervisor Platform, you can boot into your Windows 11.
Follow the steps below to disable the Hypervisor Platform using the Advanced Recovery Mode:
Note: It’s preferable to restart the computer several times to ensure that the boot issue is simply gone.
Check out the easiest way to Fix Computer won’t Boot to BIOS on Windows 11.
2. Disable Hypervisor using UEFI Mode
Another effective method to solve the Windows 11 boot issue is to disable the Hypervisor Platform using UEFI Mode.
You can disable Hypervisor Platform using the system UEFI Firmware Settings after booting into Advanced Recovery Mode. You can now reboot into Windows 11 after removing the Hypervisor Platform.
Follow the steps below to disable the Hypervisor Platform using the system UEFI Mode:
Note: It’s preferable to restart the computer several times to ensure that the boot issue is simply gone.
Follow our epic guide on how to Boot to Safe Mode in Windows 11.
3. Perform System Restore point
To solve your booting issue while you enable the Hypervisor Platform, you can perform a System Restore to restore your system files and settings.
System Restore can help fix problems that might be making your computer run slowly or stop responding.
Follow these steps to perform a System Restore:
Check out our expert-recommended post on how to solve Error 0x00000001 in Game Pass on Windows 11.
4. Perform Startup Repair
You can perform a Startup Repair on your windows to solve the Windows 11 botting problem if any previous methods do not solve your booting problem on your Windows 11 computer.
When your system may face any problem while booting on your Windows 11 computer, you can efficiently perform a Startup Repair to solve the boot problem quickly.
Follow these steps to perform a Startup Repair:
Final Thoughts
After enabling the Hyper-v on your Windows 11 computer, many users face not boot windows. Generally, the issue occurs when the conflict between Windows Hypervisor virtualization and the current Windows version.
In this article, you’ve seen the possible potential reason for the Windows boot issue while the Hyper-V is enabled on your Windows 11 computer so far.
Here, I demonstrate several tested and proven solutions to the Windows can not boot issue when the Hyper-V is enabled on your Windows 11 computer. You can successfully solve your Windows 11 booting problem using these practical methods.
I hope you found this post to be informative. If you found your solution, please let me know which method works for you.
You may also look at other posts if you’re interested in learning more about similar topics.