
Все способы:
- Входим в Виндовс под «Администратором»
- Windows 10
- Windows 8
- Windows 7
- Windows XP
- Заключение
- Вопросы и ответы: 18
При работе за компьютером довольно часто встречаются ситуации, когда в операционной системе необходимо произвести действия, требующие исключительных прав. Для этого существует особая учетная запись с именем «Администратор». В этой статье мы поговорим о том, как ее включить и войти под ней в систему.
Входим в Виндовс под «Администратором»
Во всех версиях Windows, начиная с XP, в списке пользователей «Администратор» имеется, но эта «учетка» по умолчанию отключена в целях безопасности. Это обусловлено тем, что при работе в этой учетной записи включаются максимальные права на изменение параметров и работу с файловой системой и реестром. Для того чтобы ее активировать, необходимо произвести ряд действий. Далее разберемся, как это сделать в разных редакциях Windows.
Windows 10
Учетную запись «Администратор» можно активировать двумя способами – через оснастку управления компьютером и с помощью консоли Windows.
Способ 1: Управление компьютером
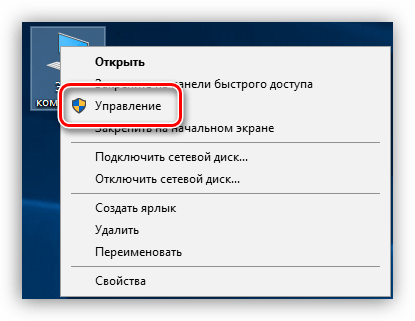
- Кликаем правой кнопкой мыши по значку компьютера на рабочем столе и выбираем пункт «Управление».

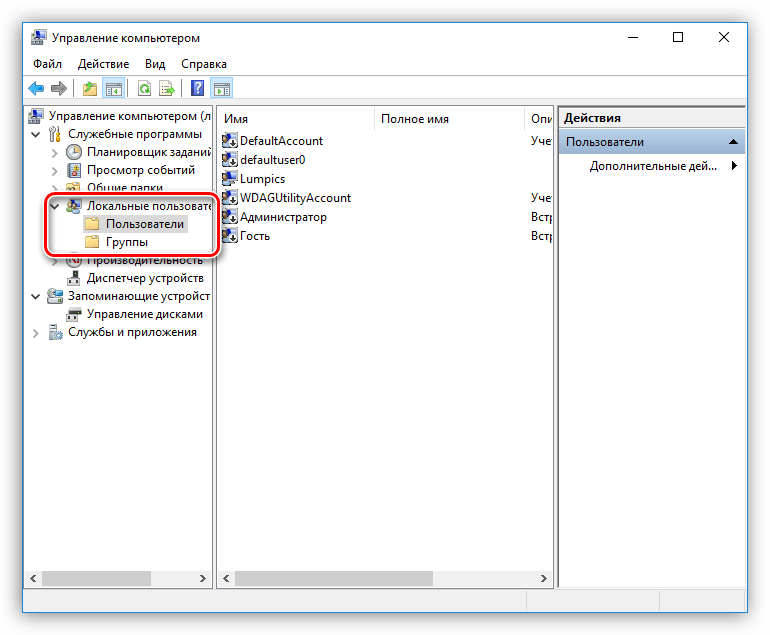
- В открывшемся окне оснастки открываем ветку «Локальные пользователи и группы» и кликаем по папке «Пользователи».

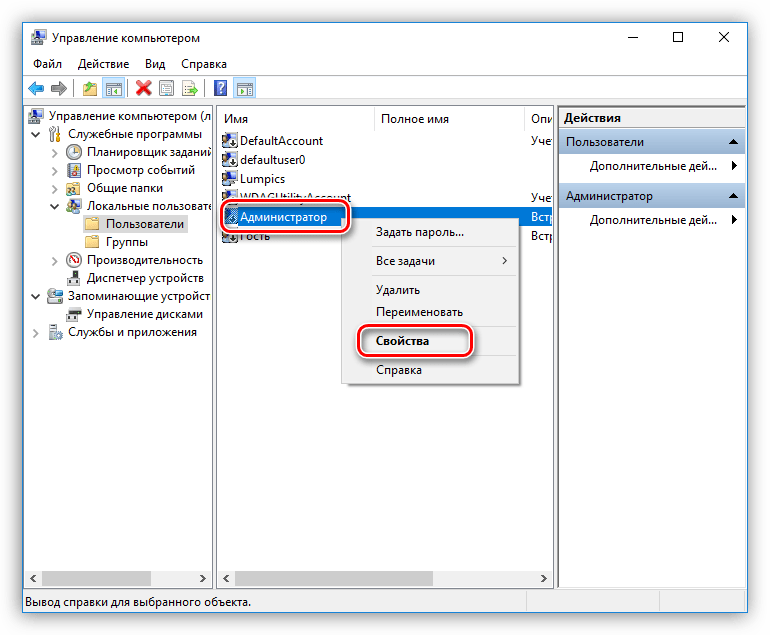
- Далее выбираем пользователя с именем «Администратор», кликаем по нему ПКМ и переходим к свойствам.
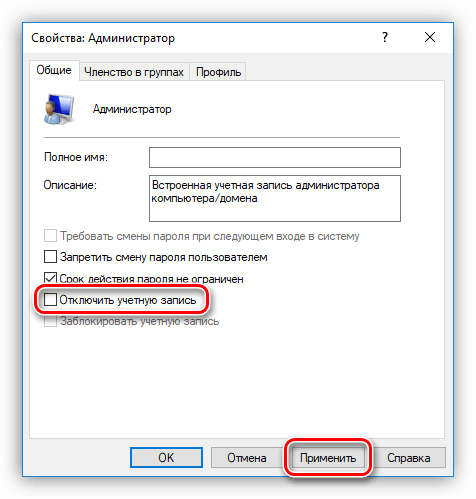
- Снимаем галку напротив пункта, который отключает эту запись, и нажимаем «Применить». Все окна можно закрыть.

Способ 2: Командная строка
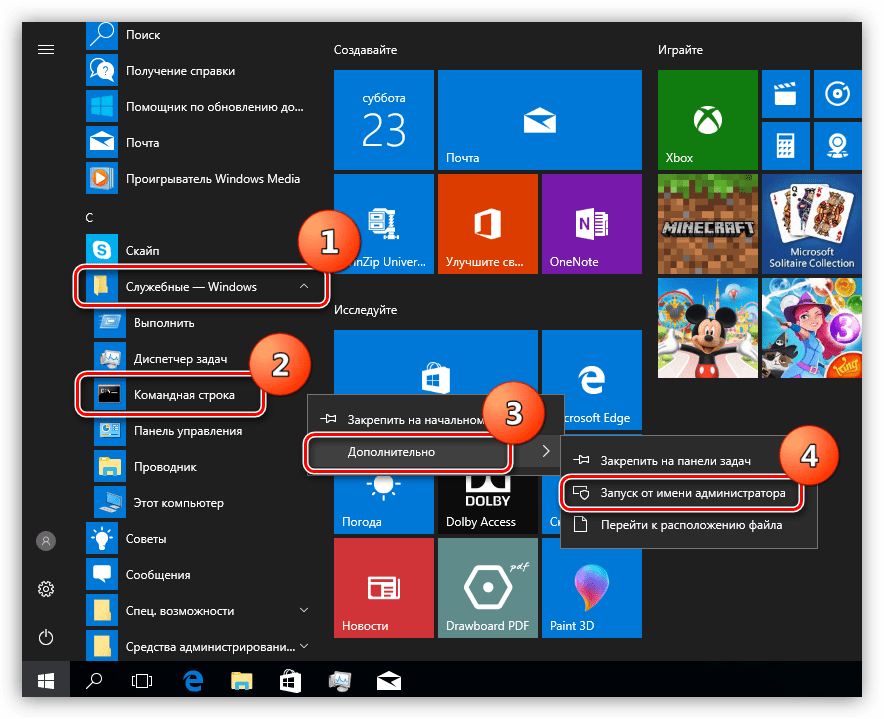
- 1. Для запуска консоли идем в меню «Пуск – Служебные», находим там «Командную строку», кликаем по ней ПКМ и переходим по цепочке «Дополнительно – Запуск от имени администратора».

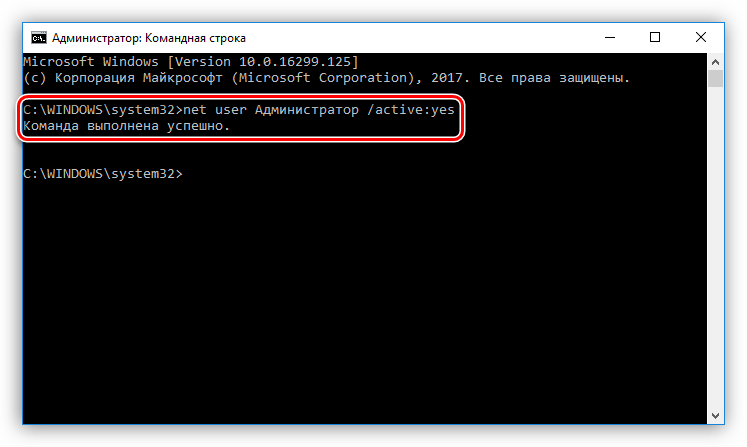
- В консоли пишем следующее:
net user Администратор /active:yesЖмем ENTER.

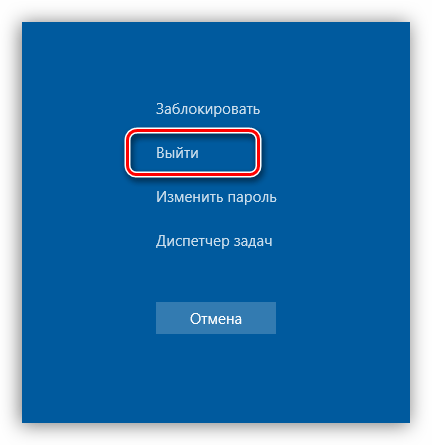
Для того чтобы войти в Windows под этой учетной записью, нажимаем комбинацию клавиш CTRL+ALT+DELETE и в открывшемся меню выбираем пункт «Выйти».
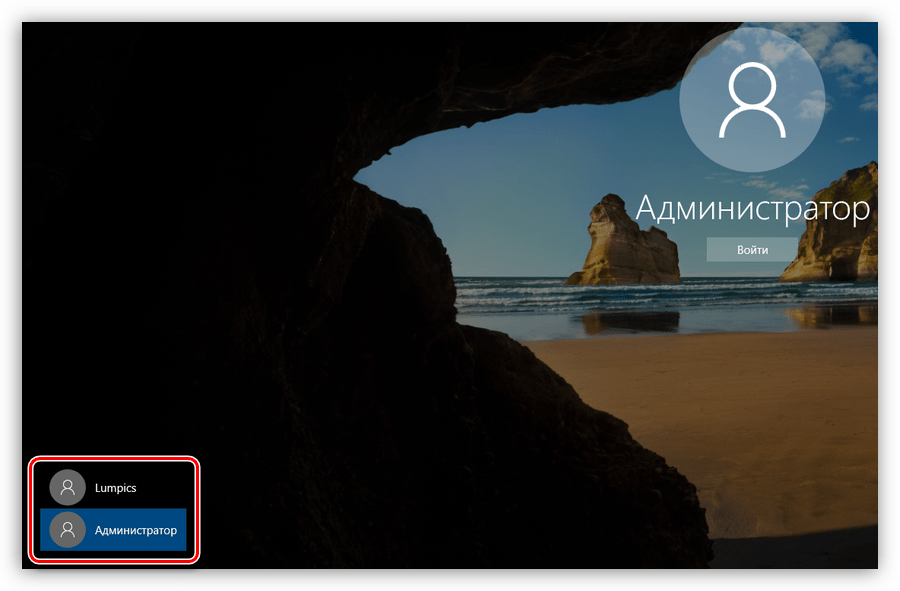
После выхода кликаем по экрану блокировки и в левом нижнем углу видим нашего включенного пользователя. Для входа достаточно выбрать его в списке и произвести стандартную процедуру логина.
Windows 8
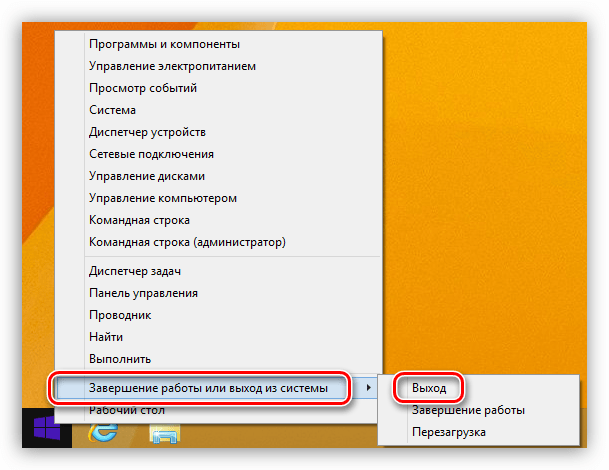
Способы включения учетной записи Администратора точно такие же, что и в Windows 10 – оснастка «Управление компьютером» и «Командная строка». Для входа необходимо кликнуть ПКМ по меню «Пуск», навести курсор на пункт «Завершение работы или выход из системы», а затем выбрать «Выход».
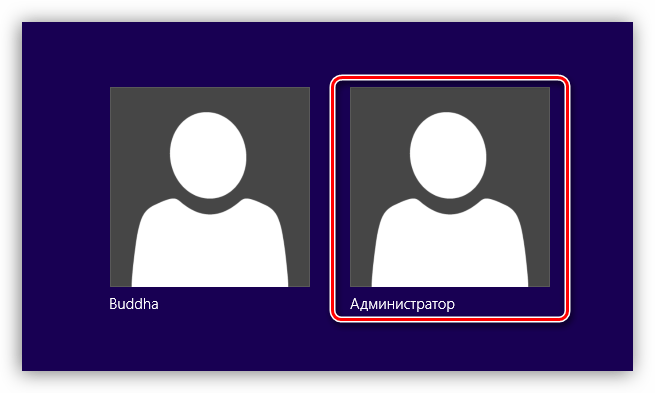
После выхода и клика и разблокировки экрана появятся плитки с именами пользователей, в том числе и Администратора. Вход также осуществляется стандартным способом.
Windows 7
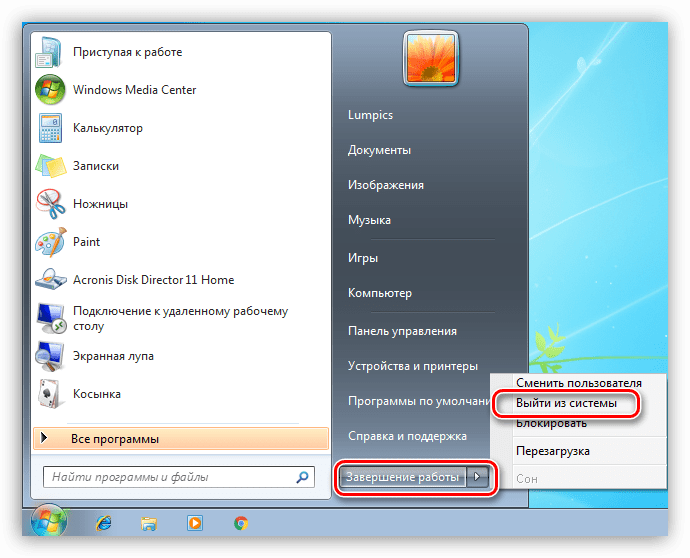
Процедура активации «Администратора» в «семерке» не отличается оригинальностью. Необходимые действия выполняются аналогично с более новыми системами. Для использования учетной записи необходимо выйти из системы через меню «Пуск».
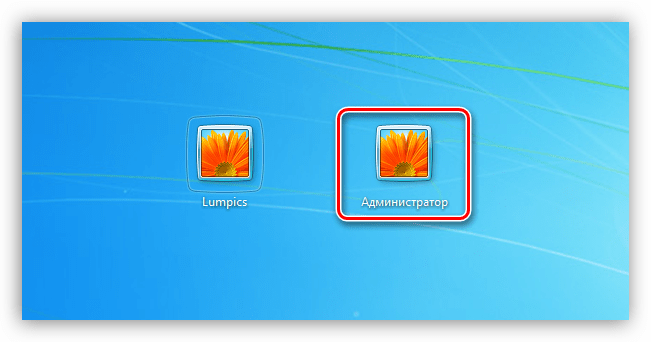
На экране приветствия мы увидим всех пользователей, чьи учетные записи на данный момент активированы. Выбираем «Администратора» и входим в систему.
Windows XP
Включение учетной записи Администратора в XP выполняется по тому же сценарию, что и в предыдущих случаях, а вот вход выполняется несколько сложнее.
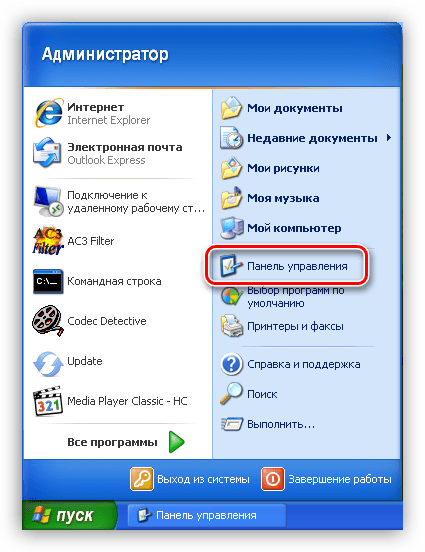
- Открываем меню «Пуск» и переходим к «Панели управления».

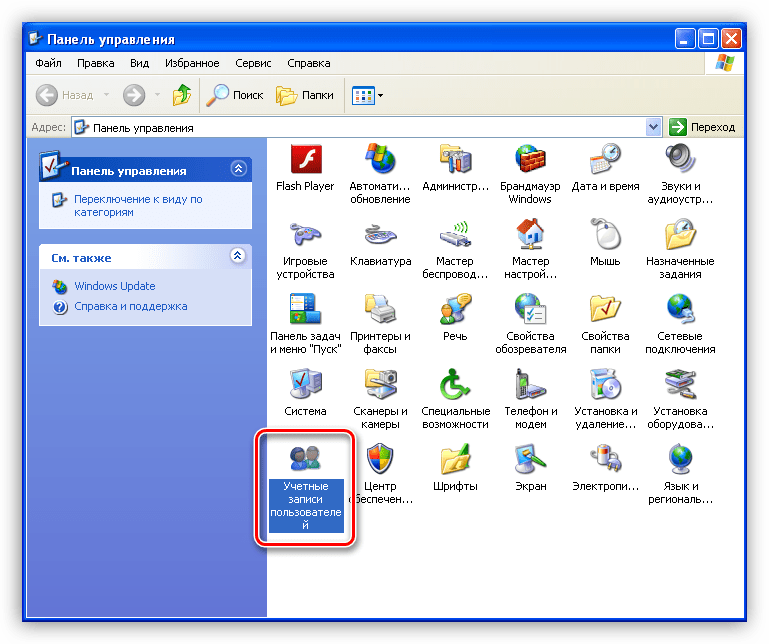
- Дважды кликаем по разделу «Учетные записи пользователей».

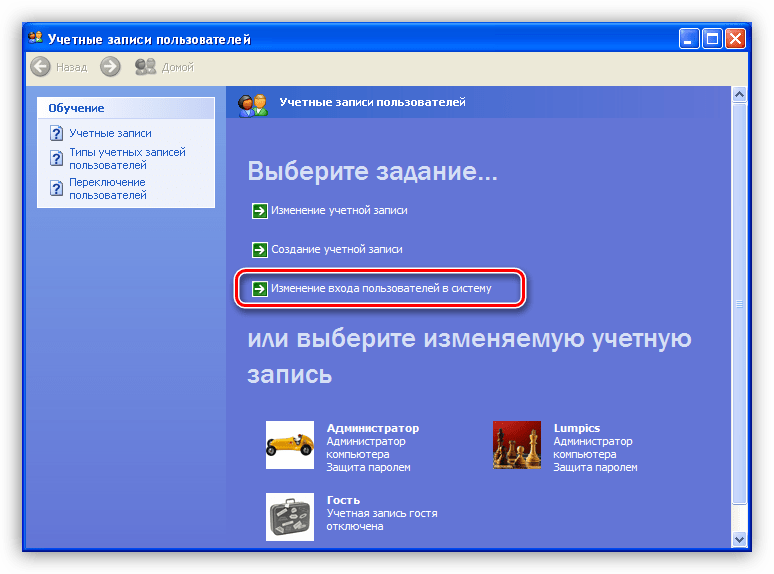
- Переходим по ссылке «Изменение входа пользователей в систему».

- Здесь ставим обе галки и жмем «Применение параметров».

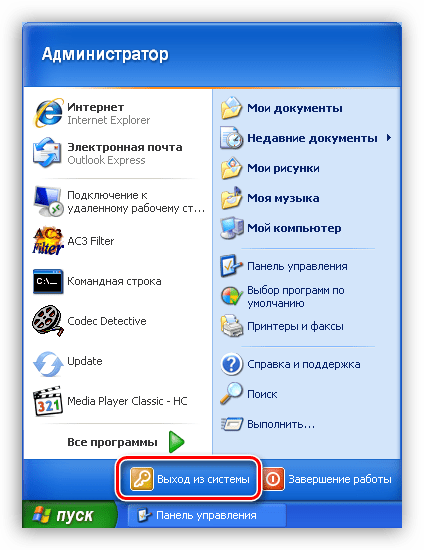
- Снова идем в меню «Пуск» и нажимаем «Выход из системы».

- Жмем кнопку «Смена пользователя».
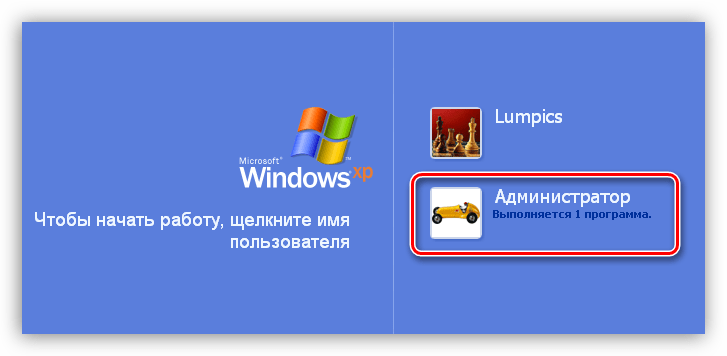
- После выхода видим, что появилась возможность доступа к «учетке» Администратора.


Заключение
Мы сегодня научились активировать пользователя с именем «Администратор» и входить под ним в систему. Имейте в виду, что данная учетная запись обладает исключительными правами, и работать под ней постоянно небезопасно. Любой злоумышленник или вирус, получивший доступ к компьютеру, будет иметь такие же права, что чревато печальными последствиями. Если вам потребовалось выполнить действия, описанные в этой статье, то после проведения необходимых работ переключитесь на обычного пользователя. Это простое правило позволит сохранить файлы, параметры и личные данные в случае возможной атаки.
Наша группа в TelegramПолезные советы и помощь
In Windows 10, knowing how to run programs as administrator is very important. By default, apps and games in Windows 10 run without administrator permissions, to prevent unauthorized changes to your system. However, there are times when some programs require administrator permissions to work properly or to run specific commands. Windows 10 offers you the ability to run programs as admin without having to disable anything. Here are all the methods to use «Run as administrator» on any desktop app in Windows 10:
First things first: About UAC and Run as administrator
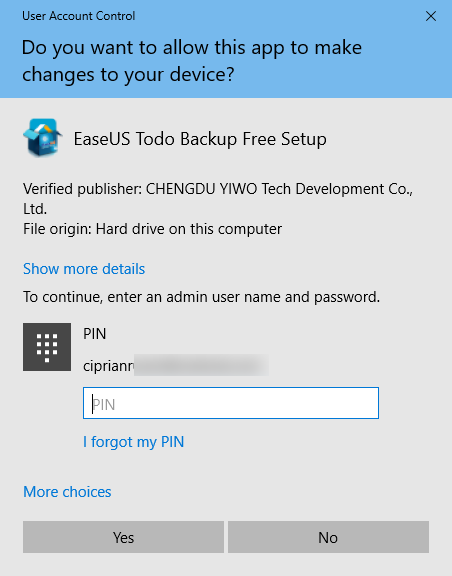
In early versions of Windows, applications had system-wide privileges, which was a security risk. All of Microsoft’s operating systems from Windows Vista onward, including Windows 10, include UAC or User Account Control, a security feature that prevents unauthorized changes to the operating system. Trying to run an application as administrator is one of the changes that require administrative privileges. Before the selected program is launched, a UAC prompt is triggered, asking for permission. If you run the application from an account without administrator permissions, the UAC prompt asks you to enter an administrator password. Without the admin password, the program does not launch.
In Windows 10, you can only run a program with administrator permissions if it is a desktop app. Some of these applications, like security software, cannot run correctly without having administrative permissions. Windows apps that are installed from the Microsoft Store cannot be run with administrative privileges in Windows 10. Furthermore, they have the same level of permissions as a normal user account, so they are not allowed to make changes to advanced system settings or the Windows Registry.
You can learn more about the difference between desktop apps and UWP apps and figure out which ones you can «Run as administrator» by reading What is a Windows app? How is it different from a desktop app or a program?.
1. Run a program as admin from the contextual menu of its Start Menu shortcut or tile
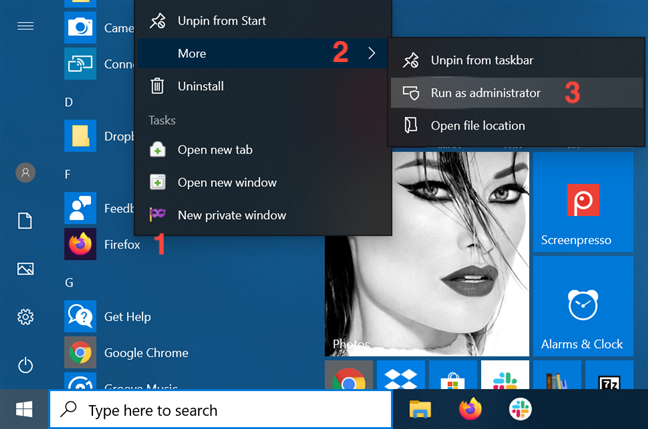
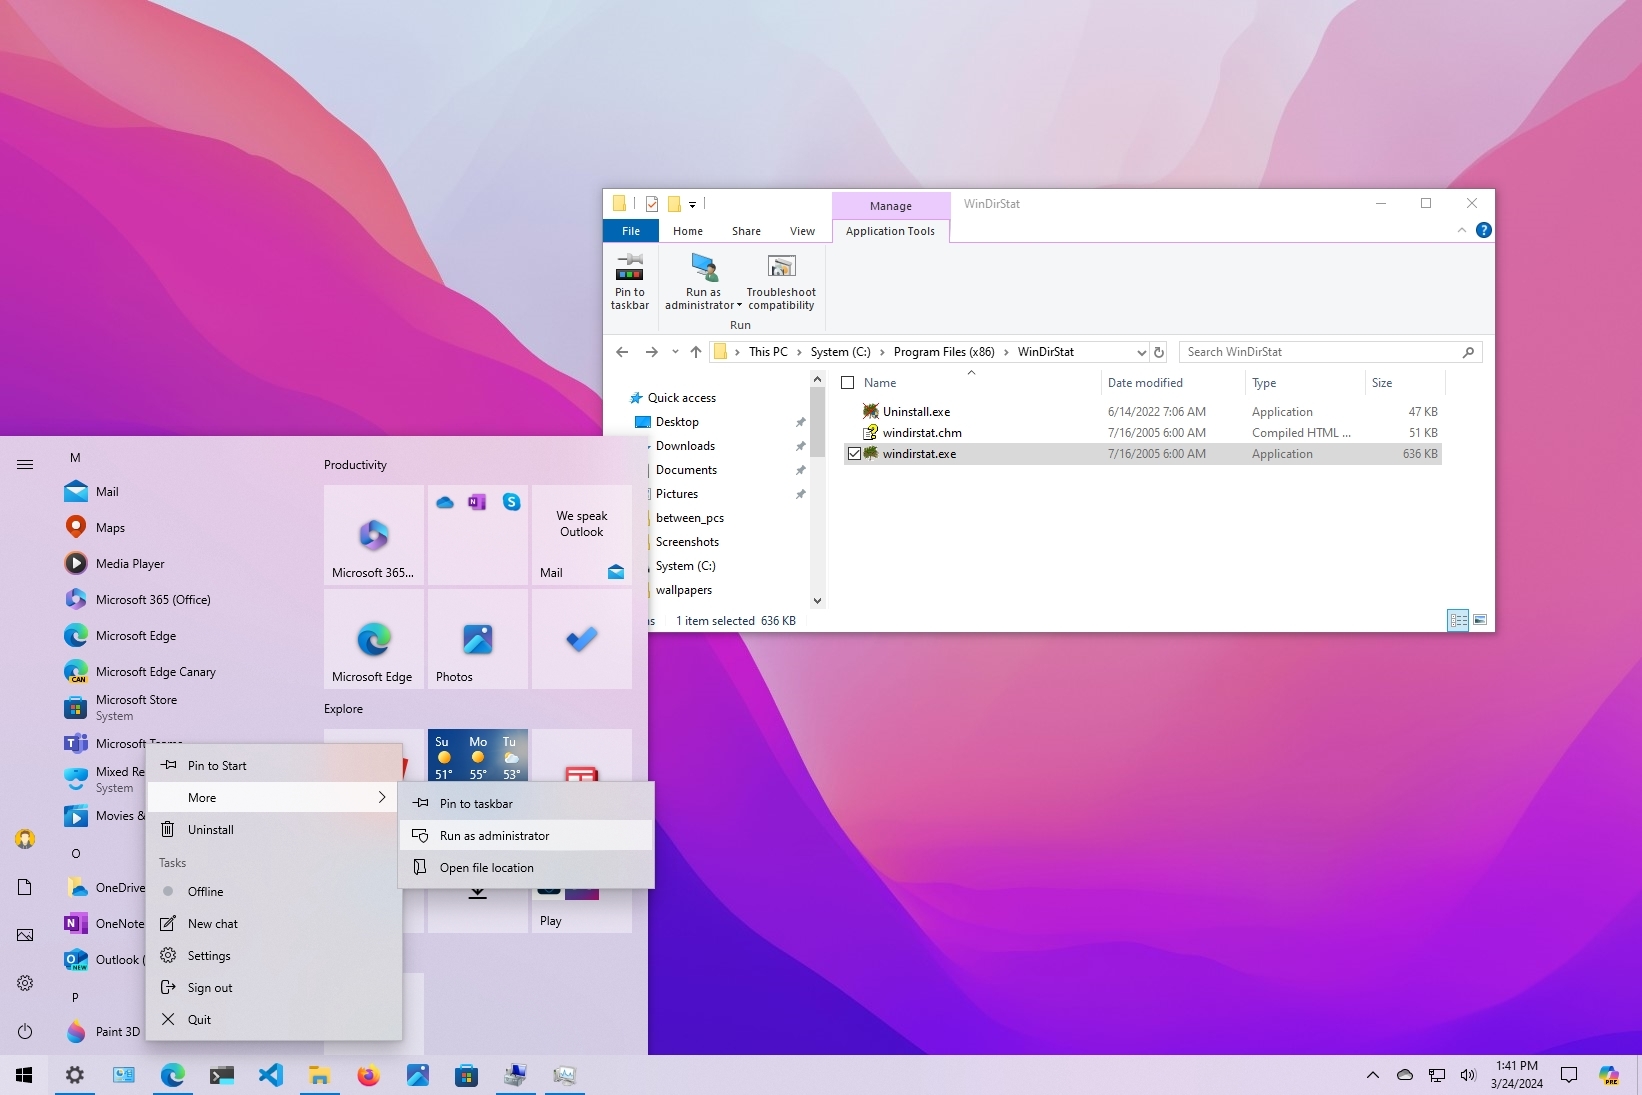
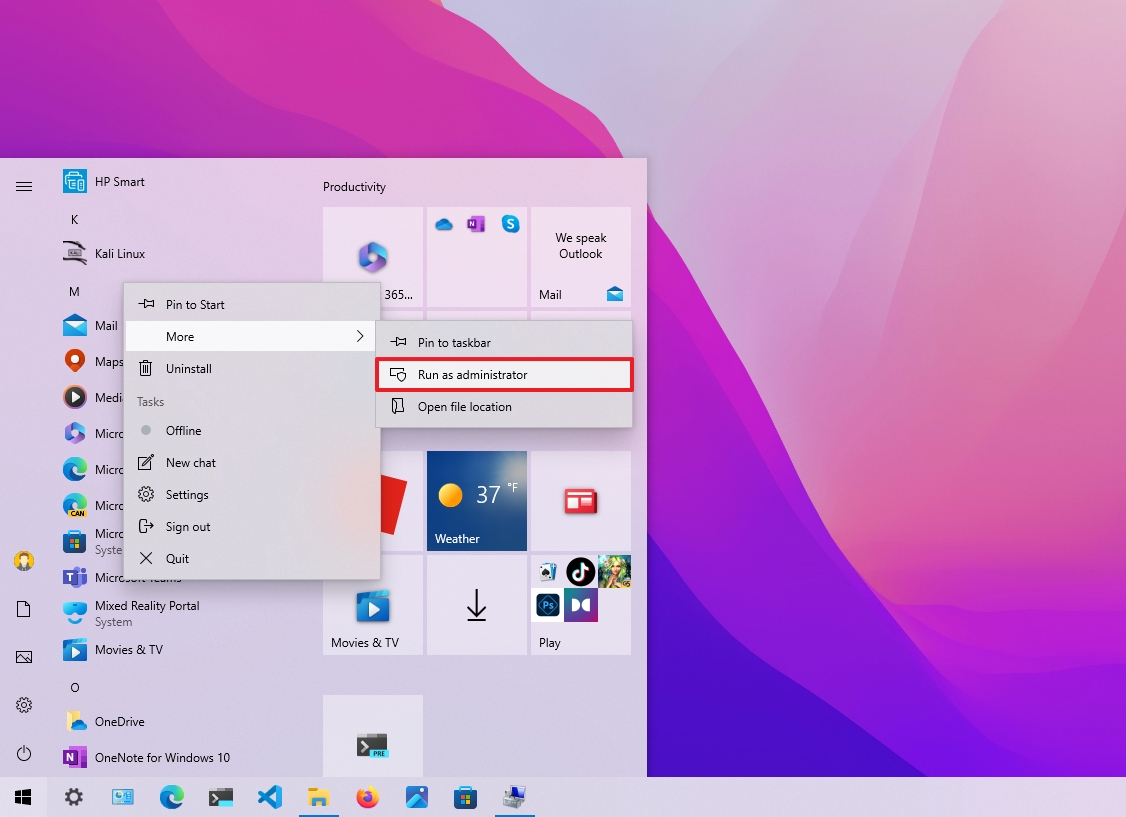
In Windows 10, you can launch a program with administrative permissions by using the contextual menu of its Start Menu shortcut. First, open the Start Menu. Then, find the shortcut of the program you want to launch in the All apps list, and right-click or press-and-hold on it to open a contextual menu. Click, tap, or hover over the More option, and then click or tap on «Run as administrator.«
If you have a tile for your desktop app available in the Start Menu, right-click or press-and-hold on it to open a contextual menu. Access More and then click or tap on «Run as administrator.«
2. Run as administrator using «Ctrl + Shift + Click» on its Start Menu shortcut or tile
Open the Start Menu and locate the shortcut of the program you want to launch as administrator. Hold down both the Ctrl and the Shift keys on your keyboard and then click or tap on that program’s shortcut.
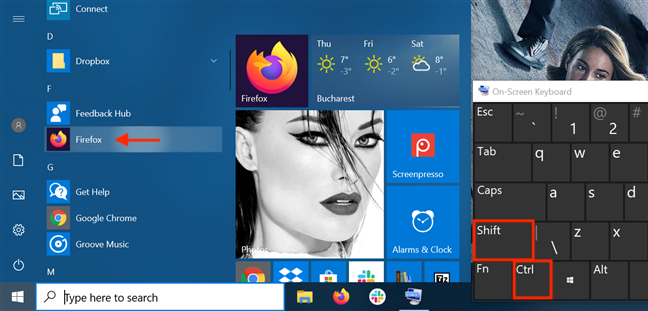
You can also use the «Ctrl + Shift + Click/Tap» shortcut on an app’s Start Menu tile to run it with administrator permissions in Windows 10.
During our tests, this method did not work every time, so if that is the case for you, either try again or consider running the app as administrator another way.
3. Run a program as administrator from its desktop shortcut
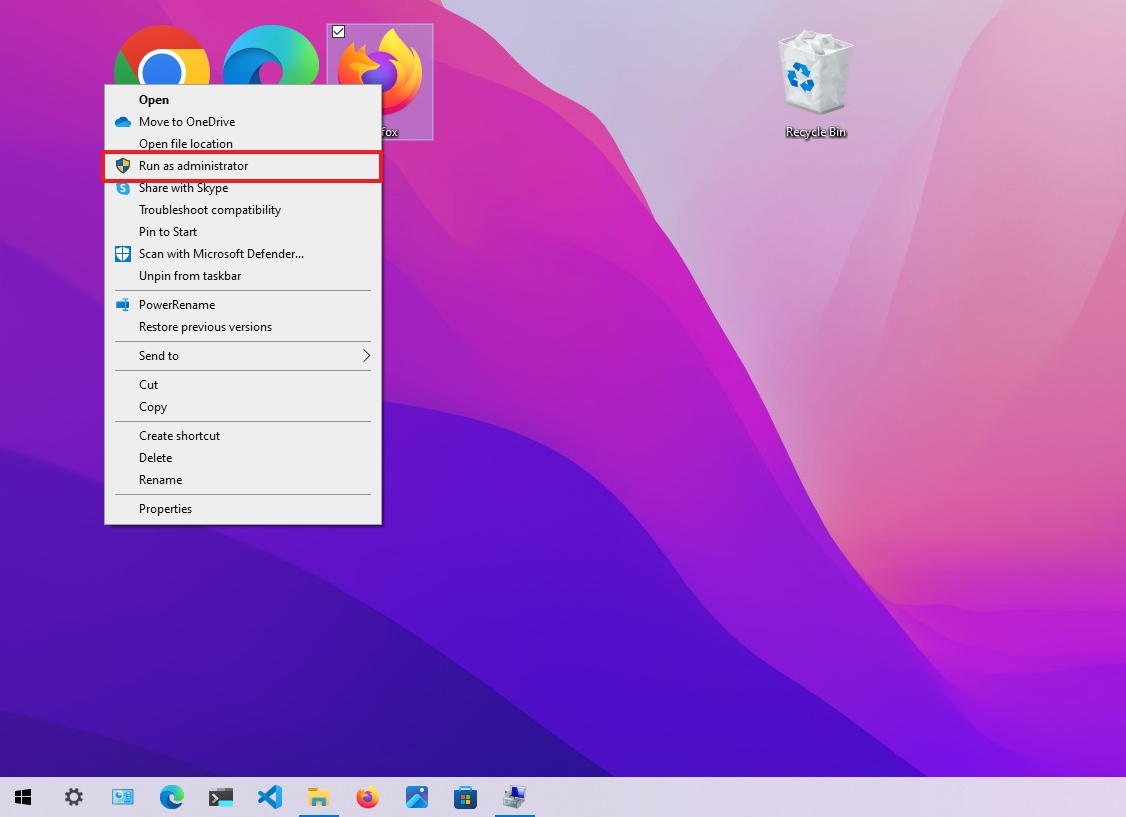
Find the desktop shortcut for the program you want to run as admin or create one yourself. Then, right-click or press-and-hold on it to open a contextual menu. Click or tap on the «Run as administrator» option.

4. Run a desktop app as administrator from its taskbar shortcut
In Windows 10, you can also run a desktop app with administrator permissions from its taskbar shortcut. Right-click or press-and-hold on the shortcut, and then right-click or press-and-hold again on the program’s name. Then, from the menu that opens, choose «Run as administrator.»
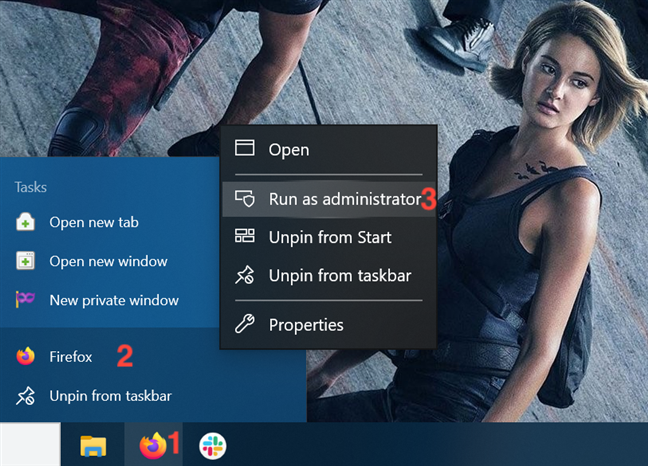
You can also use the «Ctrl + Shift + Click/Tap» shortcut on an app’s taskbar shortcut to run it with administrator permissions in Windows 10.
5. Run a program as administrator from its right-click menu
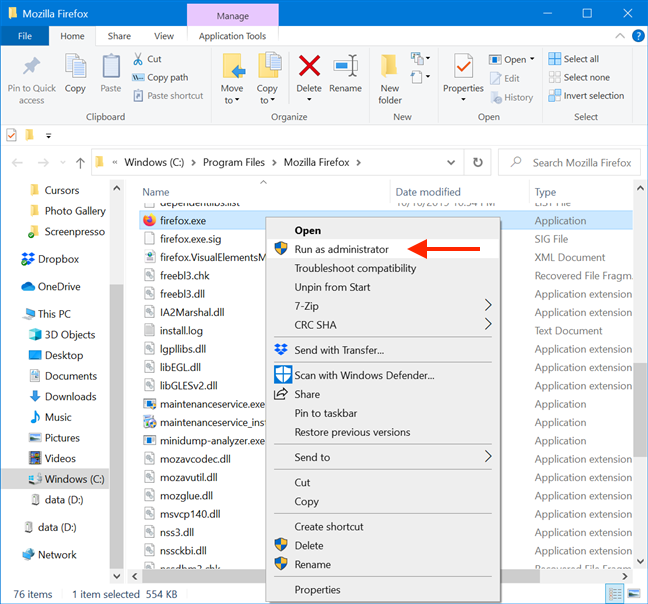
Although easier to find, shortcuts are not the only way to run a program as administrator in Windows 10. You can perform the same action from the main executable file’s contextual menu.
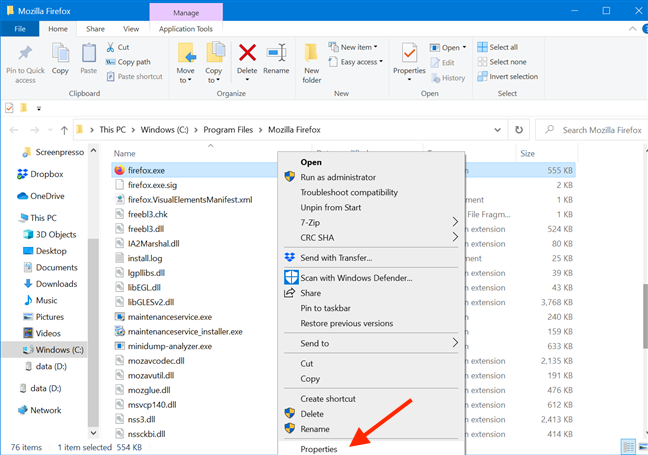
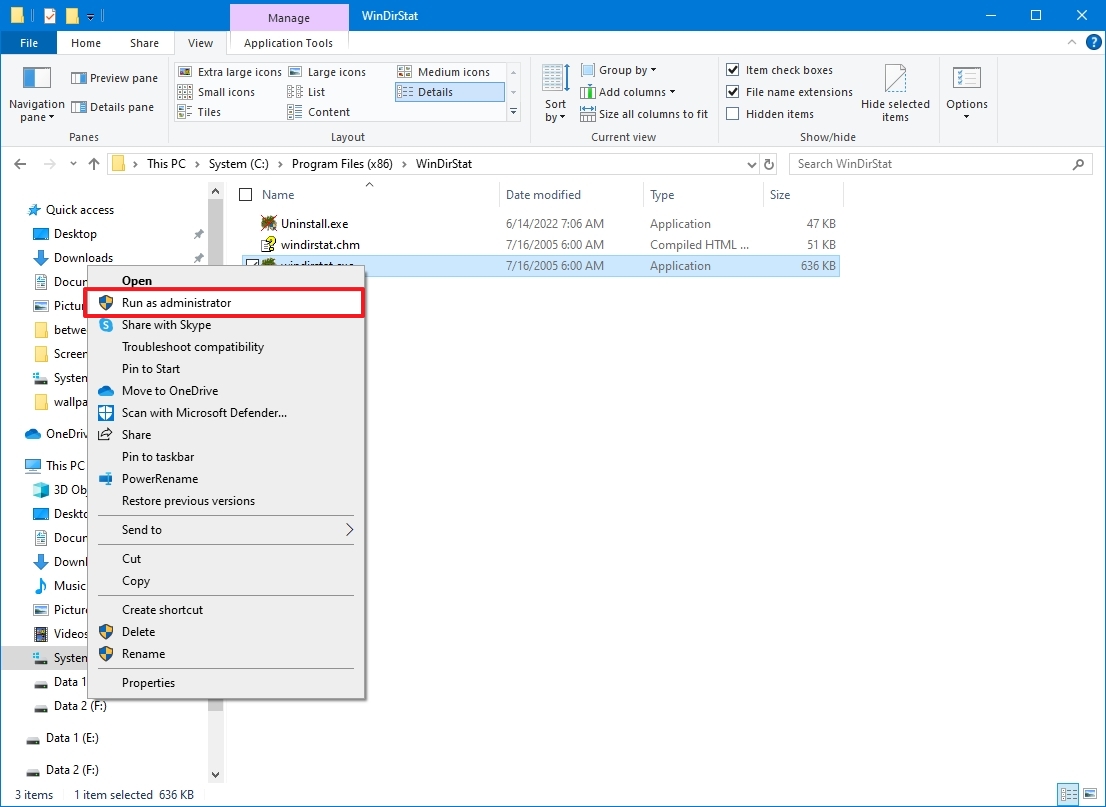
Open File Explorer and find the desktop app’s executable. Right-click or press-and-hold on it to open the contextual menu, and then click or tap on «Run as administrator.«
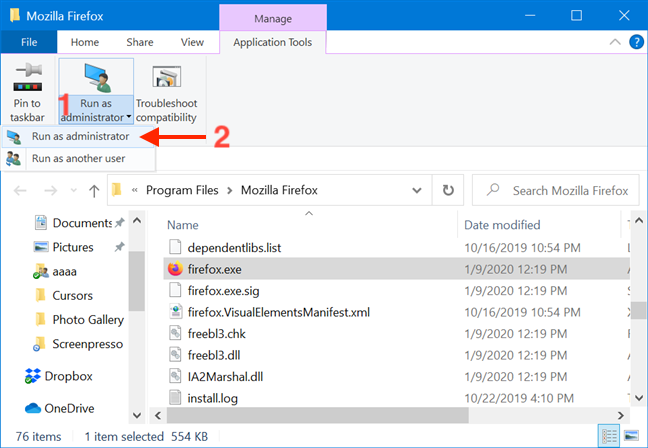
6. Use «Run as administrator» from File Explorer’s ribbon
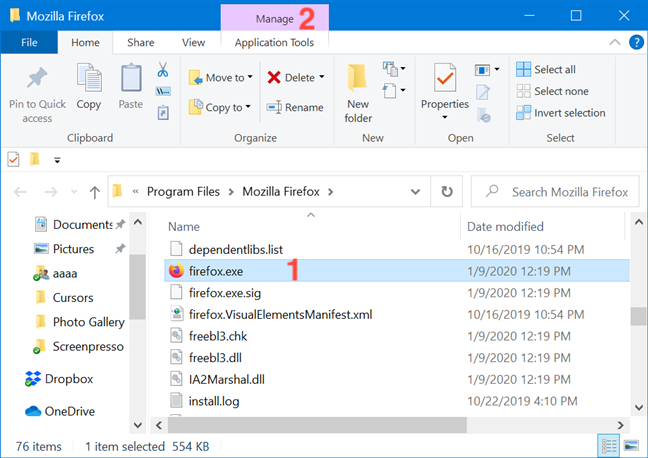
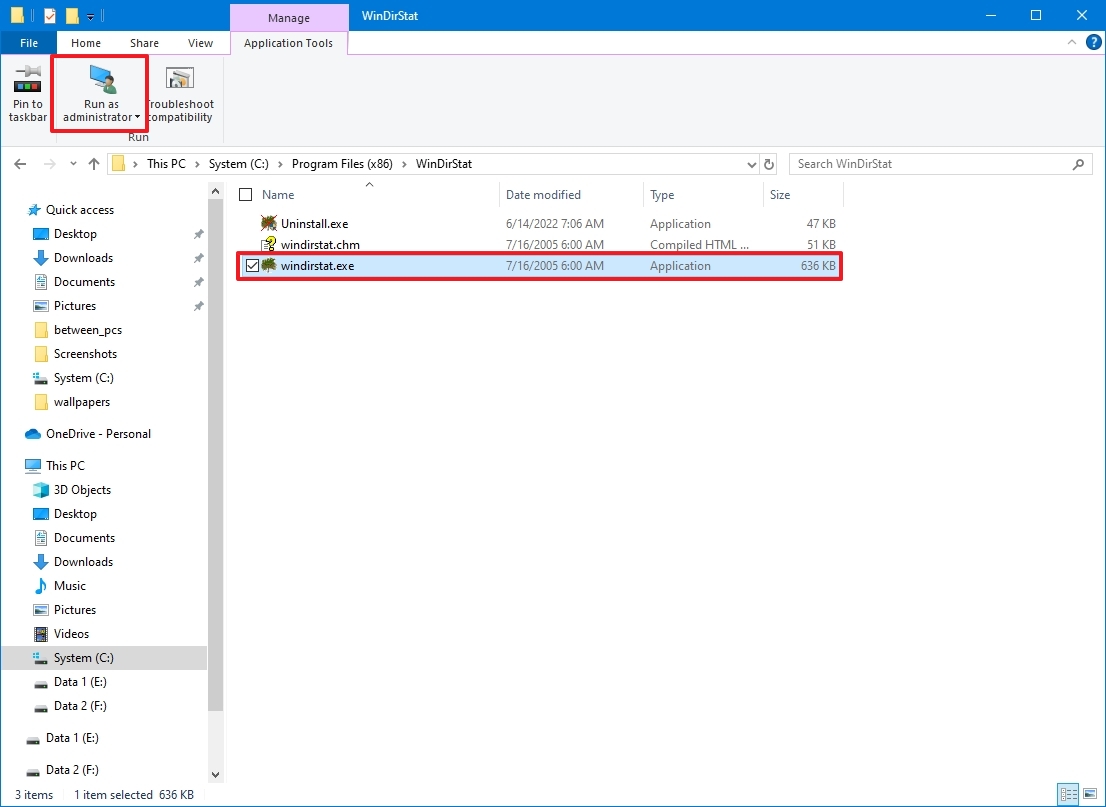
Find the program’s main executable in File Explorer. Select it, and then click or tap on the Manage tab from the ribbon.
The option you need is displayed in the Run section of Application Tools. Click or tap on the upper half of the «Run as administrator» button to give the selected app admin permissions.
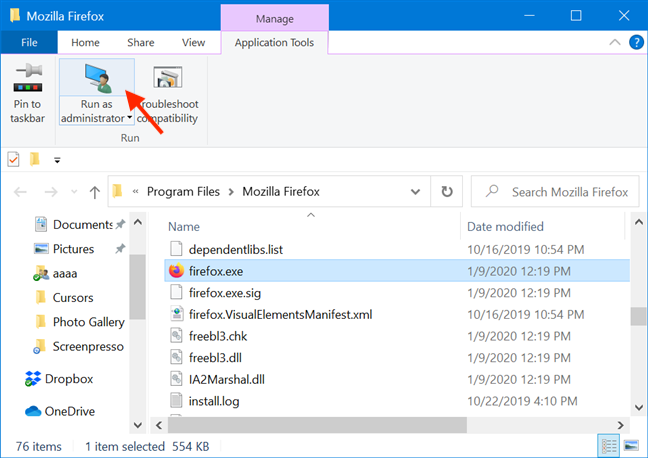
As an alternative, you can also press the lower half of the «Run as administrator» button and then click or tap on the «Run as administrator» option from the drop-down menu.
7. Run a desktop app as admin from the Search window
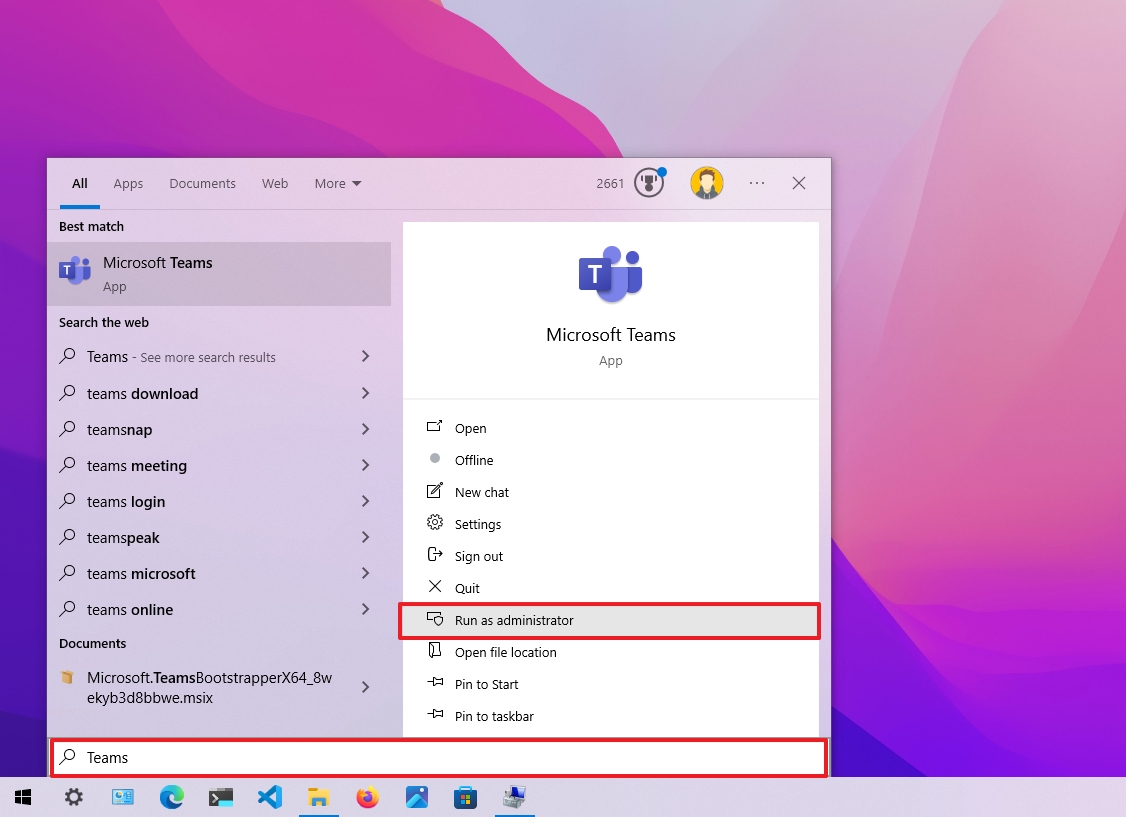
In the taskbar search field, type in the name of the program that needs to run with administrator permissions. Then, click or tap on the «Run as administrator» option displayed on the right side of the Search window.
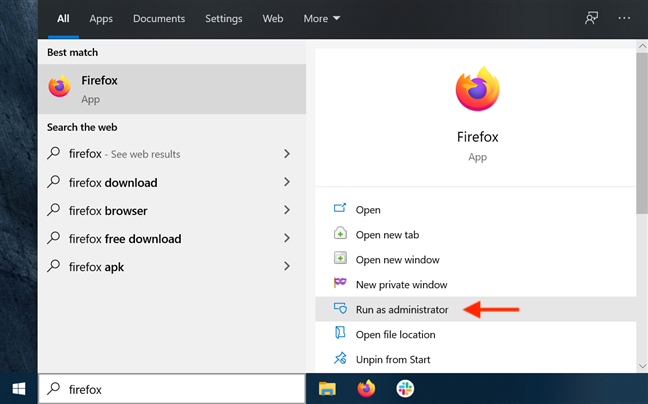
Obviously, when you see the UAC prompt asking for permission to run the app as admin, click or tap Yes.
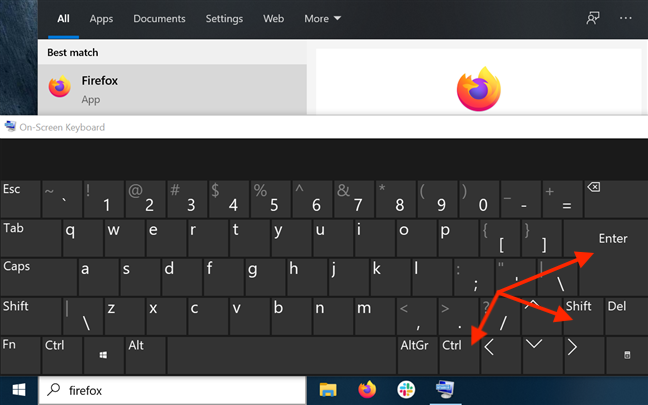
8. Run a program as administrator using «Ctrl + Shift + Enter» on its taskbar search result
Type the name of the program in your taskbar’s search field. If there are multiple results, use the arrow keys on your keyboard to highlight the program you want to run as administrator. Then, simultaneously press the Ctrl + Shift + Enter keys on your keyboard.
9. Run a program as administrator from the Run window
Open the Run window and type in the name of the executable for the program you want to run as administrator. Then hold down the Ctrl and Shift keys on your keyboard and click or tap on OK.
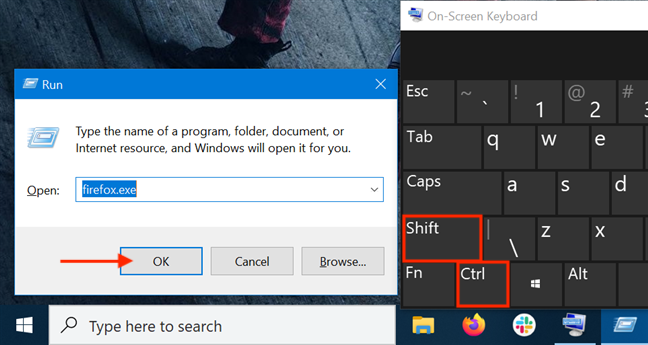
Alternatively, after typing in the name of the program’s main executable, press the Ctrl + Shift + Enter keys on your keyboard at the same time.

10. Run as admin from the Task Manager
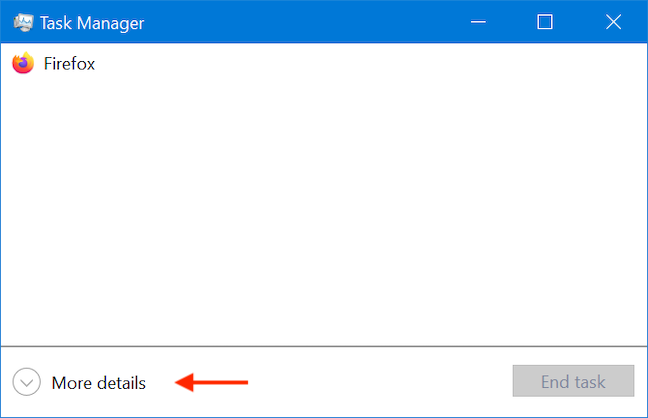
Another way to launch a program as administrator in Windows 10 is to start it using the Task Manager. To begin, open the Task Manager. Then, if it opens up in its compact view, click or tap on the More details button.
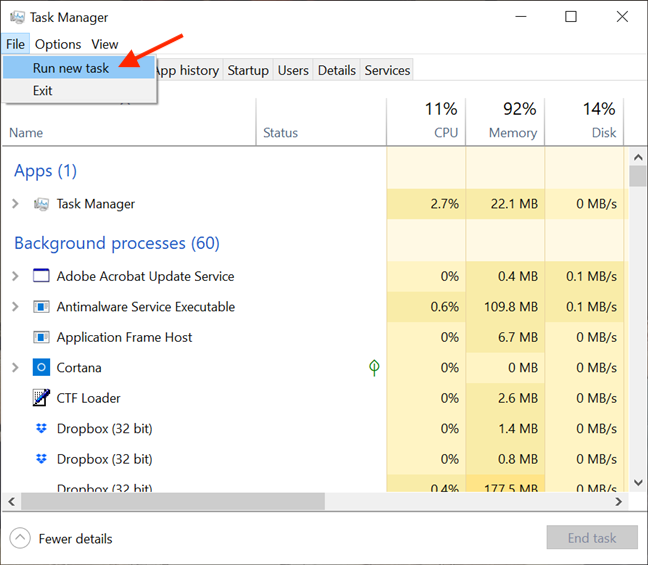
In the expanded Task Manager, open the File menu and click or tap on «Run new task.«
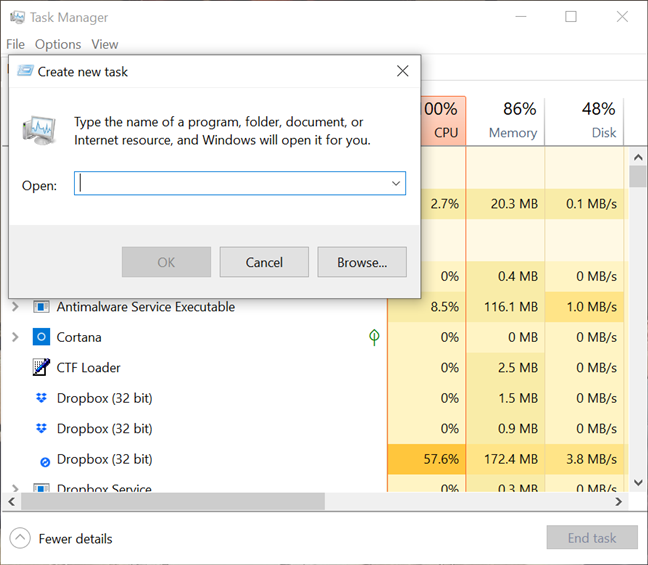
This opens the «Create new task» window. You can use its Open field to enter the path to the program you want to launch as administrator, or you can click or tap on Browse to navigate to it. Then, make sure to check the «Create this task with administrative privileges.» option and click or tap on OK.
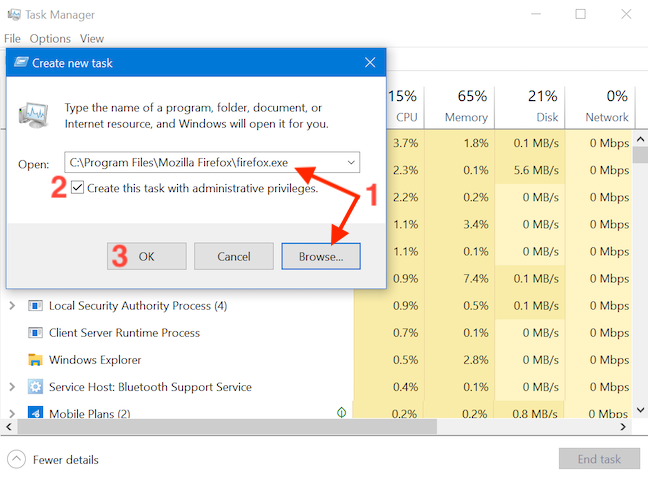
TIP: An advantage of using this method to launch programs as administrator is that you skip the UAC part of the process. That is because the app automatically inherits the permissions of the Task Manager — in our case, administrator permissions — so all you have to do is check the box to enable the option, as seen above. The option is missing if you only have standard user permissions on the device.
11. Run a desktop app as admin using the RunAs command in Command Prompt (CMD) or PowerShell
If the command line is your favorite way of asking your computer to do what you want, you can also access Command Prompt or PowerShell to run a program as administrator. Enter the following command in the CMD or PowerShell window, adjusting it to fit your needs:
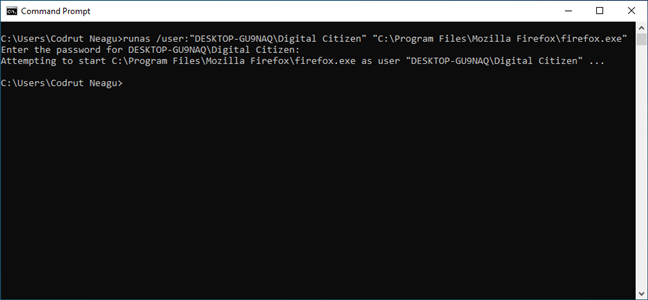
runas /user:»your_computer_name\administrator_name» «C:\path\program.exe«
Replace your_computer_name with your computer’s name, administrator_name with the name of a user account that is an administrator on your system, and C:\path\program.exe with the complete path to the program that you want to run as administrator.
As seen in the image below, if you enter the command correctly, you are also asked to enter the administrator’s password. Then, press Enter on your keyboard once again.
TIP: Using this method to launch programs as administrators, you skip the UAC part of the process.
12. Always run a program with administrator permissions
To avoid constantly having to use the methods illustrated above on desktop apps accessed on a regular basis, you can set a program to always run with administrator permissions.
First, open File Explorer and find the main executable of the program you want to run. Right-click or press and hold on it to open the contextual menu. Then, click or tap on Properties.
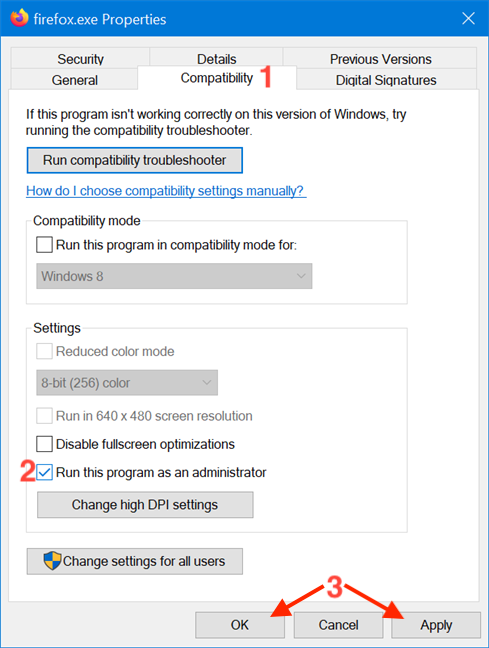
In the Properties window, go to the Compatibility tab. At the bottom of the window, check the box next to the «Run this program as an administrator» option, and then click or tap on Apply or OK.
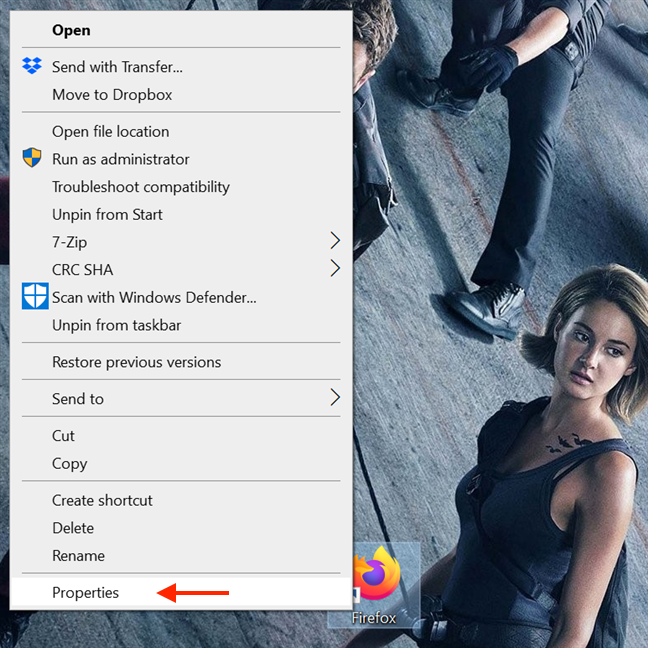
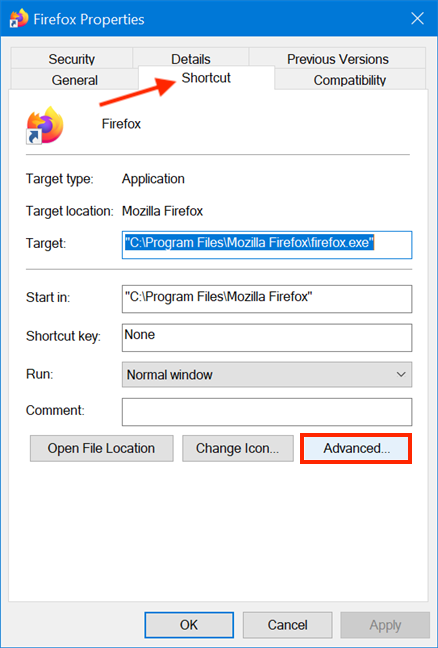
This setting is applied, and, from now on, the program always runs with administrator permissions. Follow the same steps if you want to disable the option. You can also edit the Properties of a program’s shortcut to avoid tampering with its main executable. To begin, right-click or press-and-hold on a program’s shortcut to access its contextual menu, and click or tap on Properties.
Then, in the shortcut’s Properties window, select the Shortcut tab. Click or tap on the Advanced button to open Advanced Properties.
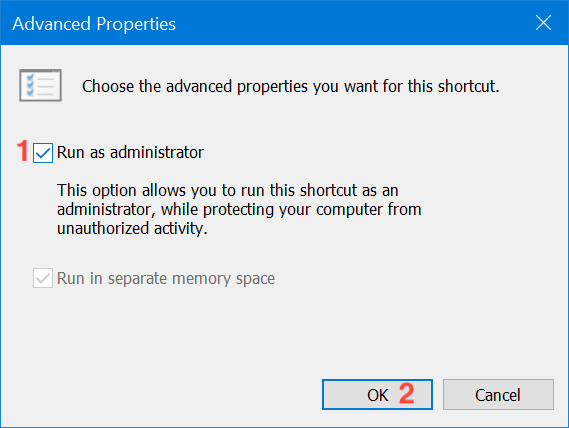
In the Advanced Properties window, check the box next to «Run as administrator» and then click or tap OK.
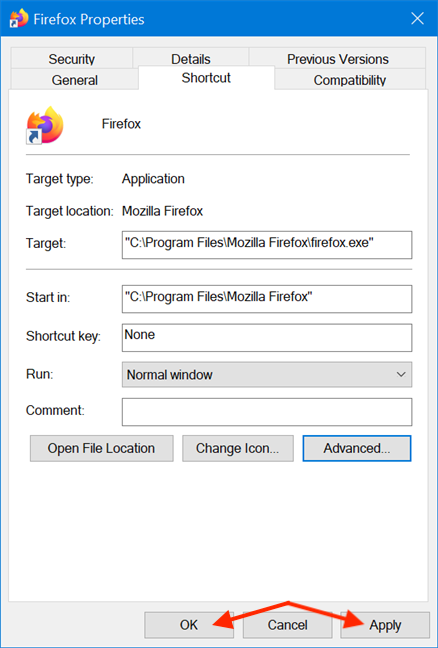
Finally, you are returned to the Properties window, where you have to click or tap on OK or Apply, and you are done.
The settings are applied, and your program works with administrative permissions as long as you open it using the same shortcut. When you use the methods in this section, the UAC prompts you as soon as you try to launch the app.
13. Run a program with administrator permissions and without a UAC prompt
Using the Task Scheduler, you can run a program as administrator without being prompted by the UAC (User Account Control) every time. It is simple, and you don’t have to disable UAC, thus compromising Windows 10’s security. We put together a detailed step by step guide to help you: Use the Windows Task Scheduler to run apps without UAC prompts and admin rights.
Which method(s) do you plan to use?
In Windows 10, there are fewer apps that need to run with administrator permissions than in older versions of Windows. However, a few legitimate programs still require elevated privileges. The main thing to remember is that even if you are logged in with an administrator account, you regularly run apps as a standard user. This means that if you need to run a program that requires administrator permissions, you can just use one of the methods described above and then approve it in the UAC prompt. Which of the method(s) illustrated do you plan to use? Did you already use some of them? Let us know in a comment.
Распространённый совет по решению проблем с запуском или работой какой-либо программы или игры — попробовать запустить её от имени Администратора, часто предполагается, что пользователь уже знает, как это сделать, но это не всегда верно для начинающих.
В этой инструкции подробно о том, как запустить любую игру или программу как Администратор в Windows 10 различными способами.
- Запуск игр и программ как Администратор
- Видео инструкция
- PsExec и NirCmd
Способы запуска программы как Администратор
Учитывайте, что для возможности выполнения описанных далее шагов, ваша учётная запись должна иметь соответствующие права администратора в системе или, при их отсутствии, вам потребуется ввести пароль такой учётной записи. Также будьте осторожнее с запуском малоизвестных вам программ от администратора (так как тем самым вы им даёте права на почти любые изменения в системе), предварительно проверьте такую программу на вирусы онлайн.
В Windows 10 возможны разные методы запуска программ и игр от имени Администратора, по порядку рассмотрим их все.
- Если ярлык программы или её исполняемый EXE файл находятся в известной вам папке или на рабочем столе Windows 10, просто нажмите по такому ярлыку правой кнопкой мыши и выберите пункт «Запуск от имени Администратора».

- Для запуска программы от имени администратора из меню Пуск, нажмите по значку такой программы правой кнопкой мыши, выберите пункт «Дополнительно» и нажмите по пункту «Запуск от имени Администратора».

- Один из самых простых способов запуска ПО с повышенными правами — использование поиска в панели задач: набираем в поиске название программы и, если она была найдена, нажимаем по результату правой кнопкой мыши и выбираем пункт контекстного меню «Запуск от имени администратора». Для некоторых программ (например, командной строки) такой пункт будет отображаться в панели справа от результата поиска.

- Если значок программы, которую нужно запустить от администратора находится только в панели задач, способов прямого запуска из этого расположения я предложить не могу, но знайте, что эти ярлыки фактически находятся в папке (просто вставьте этот путь в адресную строку проводника и нажмите Enter)
%AppData%\Microsoft\Internet Explorer\Quick Launch\User Pinned\TaskBar
и уже оттуда запускать их от администратора можно первым способом.
- И ещё один вариант: запустите командную строку от имени Администратора, в ней введите путь к нужной программе и нажмите Enter — программа также запустится от имени администратора.


Как сделать, чтобы программа или игра всегда запускалась с повышенными правами
Если вы не хотите каждый раз проделывать описываемые действия и требуется, чтобы выбранная программа или игра всегда запускалась от имени администратора, вы можете сделать следующее:
- Нажмите правой кнопкой мыши по ярлыку или значку (исполняемому файлу) и откройте пункт «Свойства».
- Откройте вкладку «Совместимость» и отметьте пункт «Запускать эту программу от имени администратора», затем примените настройки.


И ещё один момент: значки некоторых программ имеют изображение щита в правом нижнем углу — такие программы всегда запускаются с правами администратора: это необходимое условие для их работы, заданное разработчиками.
Видео инструкция
Запуск программ с правами администратора и не только с помощью PsExec или NirCmd
Для опытных пользователей (а скорее даже не для них, а для администраторов), понимающих стоящие перед ними задачи и готовых разобраться, может оказаться полезной утилита PsExec, доступная в составе PsTools на Microsoft Sysinternals — https://docs.microsoft.com/en-us/sysinternals/downloads/psexec. Обычно её используют для запуска инструментов на удаленной машине, но можно применить и на локальном компьютере.
Например, с помощью psexec, мы можем запустить программу от имени администратора (в том числе из bat-файла) без запроса контролей учётных записей следующим образом (первый вариант для запуска от имени Администратора программы, не требующей повышения прав по умолчанию, второй — для программ, которым это требуется, например, regedit):
psexec -u Администратор -p password путь_к_program.exe
psexec -u Администратор -p password "cmd.exe" /c start путь_к_программе_с_запросом_uac

Это лишь примеры, не рекомендую такое применение. Для работы приведённой команды встроенная учётная запись администратора локального компьютера должна быть активна и иметь пароль (в команде — password), иначе потребуются дополнительные настройки локальной политики безопасности. Существуют и иные варианты реализации необходимых действий в psexec, включая запуск программ от имени системного аккаунта и не только. Ещё одна утилита командной строки с иными возможностями, но также позволяющая выполнить запуск приложения с повышенными правами — NirSoft NirCmd.
Запуск программного обеспечения от имени администратора – важный момент, о котором необходимо знать пользователю операционной системы Windows 10. Некоторые утилиты не работают без предоставления прав, поскольку им необходимо общаться с системой. Существует несколько способов открыть приложение в таком режиме.
Способы запуска приложения с расширенными правами
Содержание
- Способы запуска приложения с расширенными правами
- Контекстное меню
- Меню «Пуск»
- Системная поисковая строка
- Панель быстрого доступа
- Диспетчер задач
- Командная строка
- Как активировать постоянный запуск с повышенными правами
Для начала следует отметить, что следует избегать запуска неизвестных программ от имени администратора, поскольку они получают возможность изменять все в системе. Перед открытием рекомендуется проверить софт или игру на наличие вирусов.
Предоставлять права можно только традиционному настольному ПО (Win32), а приложения из магазина Microsoft Store в этом случае работать не будут. Чтобы запустить программу или игру от имени администратора, необходимо, чтобы учетная запись имела соответствующие права.
Самый простой способ запуска программы или игры от имени администратора – это вызов контекстного меню. Для открытия софта с правами щелкните по исполняемому файлу или ярлыку правой клавишей мышки. В появившемся списке выберите соответствующий пункт. В следующем окне подтвердите действие.

Запустить приложение или игру из меню «Пуск» также возможно с правами администратора. Для этого найдите в списке установленного софта нужное, кликните по нему правой кнопкой мыши. В появившемся меню наведите курсор на пункт «Дополнительно», затем выберите открытие от имени администратора.

Системная поисковая строка
Еще один способ – это использование системной поисковой строки. Щелкните по соответствующему значку на панели задач внизу, затем введите название программы или игры. Вверху отобразится список результатов поиска. Кликните правой клавиши мыши по иконку приложения, затем по пункту «Запуск от имени администратора».

Панель быстрого доступа
Если иконка приложения находится на панели быстрого доступа Windows 10, то для его запуска с правами администратора нажмите на нее правой кнопкой мыши, затем то же самое сделайте со значком в появившемся меню. Откроется дополнительный список параметров, где есть функция, открывающая доступ к системным изменениям.

Диспетчер задач
Система Windows 10 предусматривает еще один способ запуска приложений с расширенными правами – через диспетчер задач:
1. Кликните правой клавишей мыши по нижней панели, чтобы вызвать контекстное меню и перейти в диспетчер задач.

2. Выберите раздел «Файл». Развернется небольшое меню, где нужно нажать на пункт «Запустить новую задачу».

3. В строке введите название исполняемого файла или программы, затем поставьте галочку напротив пункта «Создать задачу с правами администратора».
4. Нажмите на клавишу Enter или кнопку «ОК» для подтверждения.

При нажатии на кнопку «Обзор» в окне создания задачи откроется проводник системы, через который можно найти нужное приложение или игру. Программа будет запущена, что отобразится в диспетчере задач на вкладке «Процессы».
Командная строка
Удобный инструмент ОС Windows позволяет управлять системой без графического интерфейса. Иными словами, это текстовый способ взаимодействия с ПК. Чтобы запустить приложение через командную строку, следуйте инструкции:
1. Через системный поиск отыщите приложение «Командная строка» и запустите его от имени администратора.

2. Для начала необходимо перейти в ту директорию, где расположена утилита. Например, введите команду cd c:\Program Files\CCleaner. Кликните по клавише Enter.
3. Для запуска утилиты пропишите команду CCleaner.exe, затем снова нажмите на Enter.

Поскольку командная строка запущена уже с расширенными правами, то и другие программы, открытее через нее, будут в этом же режиме.
Как активировать постоянный запуск с повышенными правами
Система позволяет сделать так, чтобы приложение всегда открывалось с повышенными правами без подтверждения или вызова контекстного меню для выбора способа запуска. Сделать это возможно через свойства софта:
- Кликните правой клавишей мышки по файлу в формате EXE или ярлыку приложения. В контекстном меню внизу нажмите на пункт «Свойства».
- Перейдите во вкладку «Совместимость».
- Поставьте отметку рядом с параметром «Запускать эту программу от имени администратора».
- Нажмите на кнопку «Применить», затем на «ОК», чтобы изменения вступили в силу.

Обратите внимание, что некоторые программы имеют расширенные права по умолчанию. Рядом с иконками таких приложений отображается щита желто-синего цвета. Это значит, что дополнительные манипуляции не требуются.
Для запуска или установки некоторых приложений нужны расширенные права администратора, чтобы напрямую взаимодействовать с системой. По умолчанию большинство приложений не имеют доступа к изменению данных ОС, но существует несколько способов, которые позволяют открыть софт в таком режиме.
(Image credit: Mauro Huculak)
On Windows 10, the ability to run an app as administrator is an essential skill that every user should know because, by design, apps operate in user mode to prevent potential unwanted changes that may negatively affect the experience. However, some trusted programs may sometimes require elevated permissions, and understanding the steps to run them with appropriate permissions always comes in handy.
Whatever the reason it might be, Windows 10 includes several methods for quickly starting an app with elevated privileges, including the Start menu, File Explorer, Command Prompt, and more. However, it’s important to note that this is only true for traditional desktop (Win32) programs, since modern apps through the Microsoft Store can’t run elevated.
In this how-to guide, I will walk you through launching an app with administrator privileges to complete an elevated task.
How to run app as administrator from Stat menu
As an administrator, you have at least two quick ways to start an application using the Start menu.
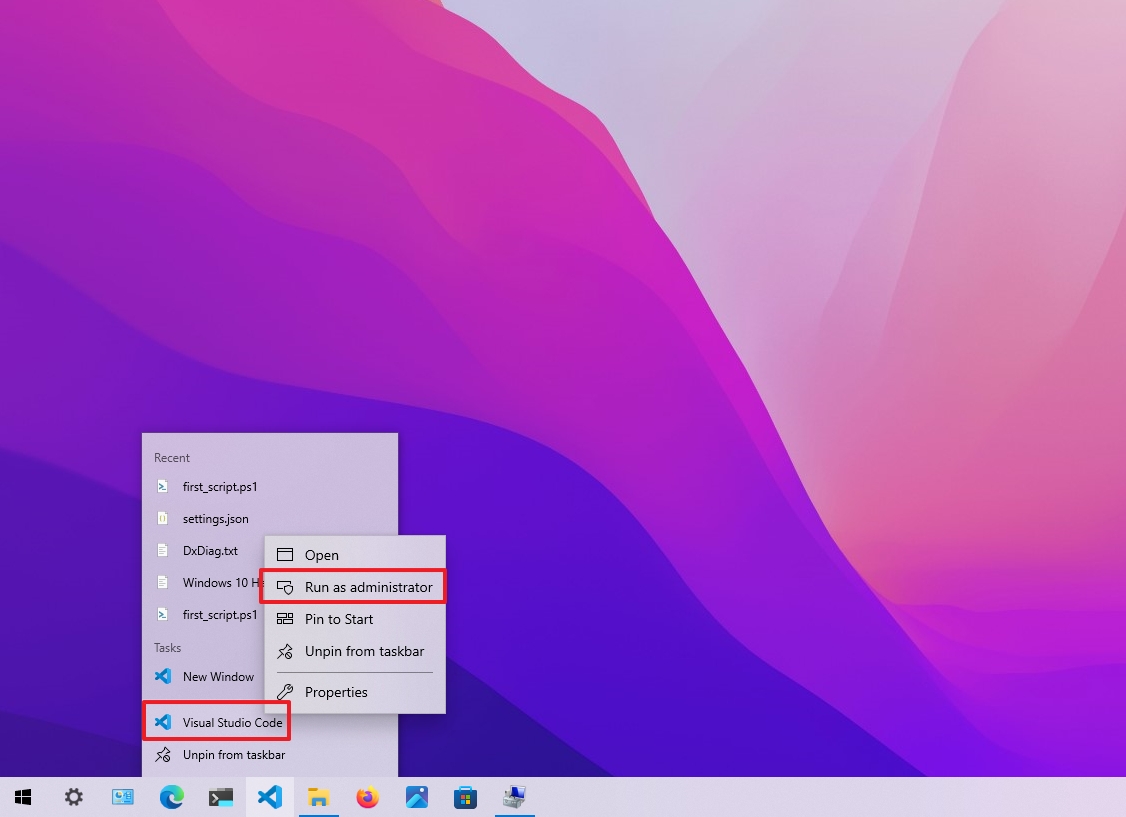
To run a program as administrator from the Start menu context menu, use these steps:
- Open Start.
- Right-click the app (anywhere on the menu).
- Select the More submenu, and click the Run as administrator option.
To start an app with admin right using the keyboard shortcut, use these steps:
- Open Start.
- Use the «Ctrl + Shift» keyboard and click the app from the list.
- (Optional) Select the app using the arrow keys.
- Use the «Ctrl + Shift + Enter» keyboard shortcut.
How to run app as administrator from Search
If you use the search experience, you also have two ways to run apps with administrative permissions.
All the latest news, reviews, and guides for Windows and Xbox diehards.
To open an app as an administrator from the search box, use these steps:
- Open Start.
- Quick tip: You can also open search directly from the taskbar (if available) or use the «Windows key + S» keyboard shortcut.
- Search for the app.
- Click the Run as administrator option from the right side. (Sometimes, the option is hidden until you click the down-arrow button.)
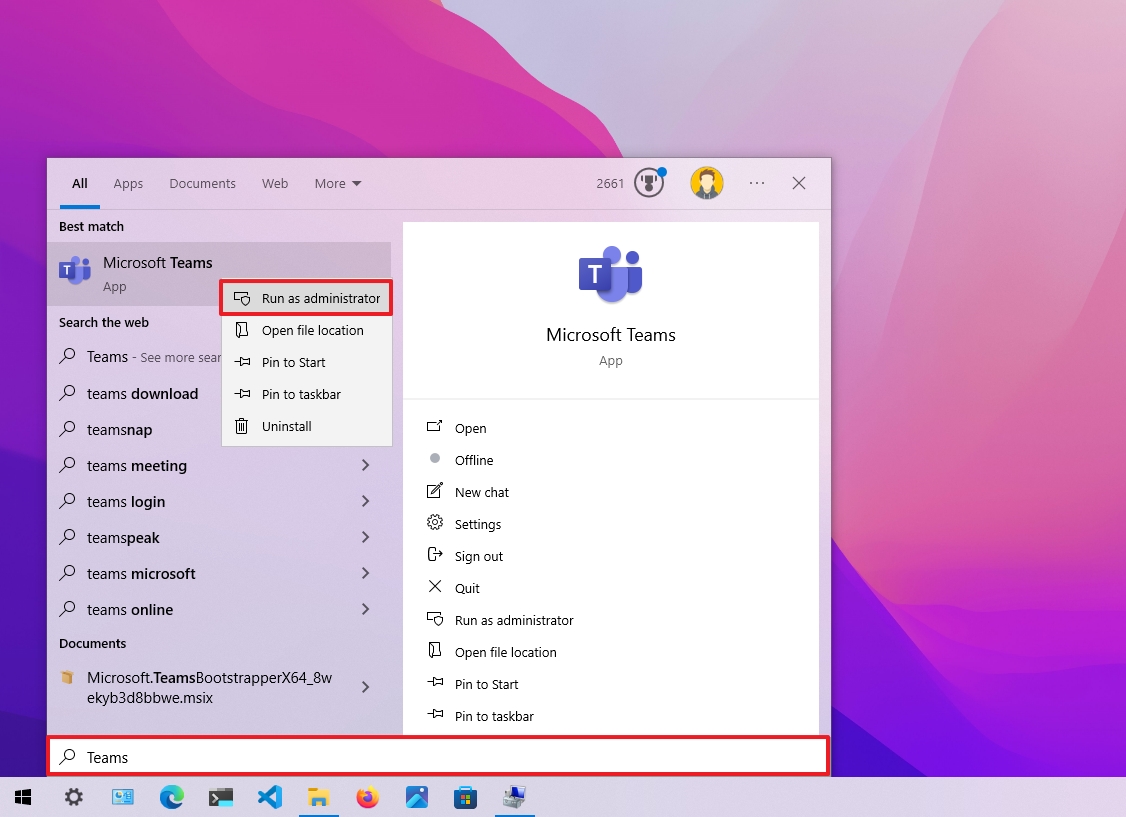
- (Optional) Right-click the app and select the Run as administrator option.
Search keyboard shortcut
To run an app from search with a keyboard shortcut, use these steps:
- Open Start.
- Search for the app.
- Use the «Ctrl + Shift + Enter» keyboard shortcut.
How to run app as administrator from desktop
On Windows 10, you can also start apps elevated from the desktop or taskbar.
To start an app with elevated privileges from the desktop, use these steps:
- Use the «Windows key + D» keyboard shortcut to view the desktop (if applicable).
- Right-click the app, and select the Run as administrator option.
To run apps elevated from the Taskbar, use these steps:
- Right-click the app in the Taskbar.
- Right-click the app name.
- Select the Run as administrator option.
How to run app as administrator from Run
To start a program as an admin user from the Run command, use these steps:
- Open Start.
- Search for Run and click the top result to open the app.
- Quick tip: You can also open the Run command using the «Windows key + R» keyboard shortcut.
- Type the name of the app—for example, explorer.exe.
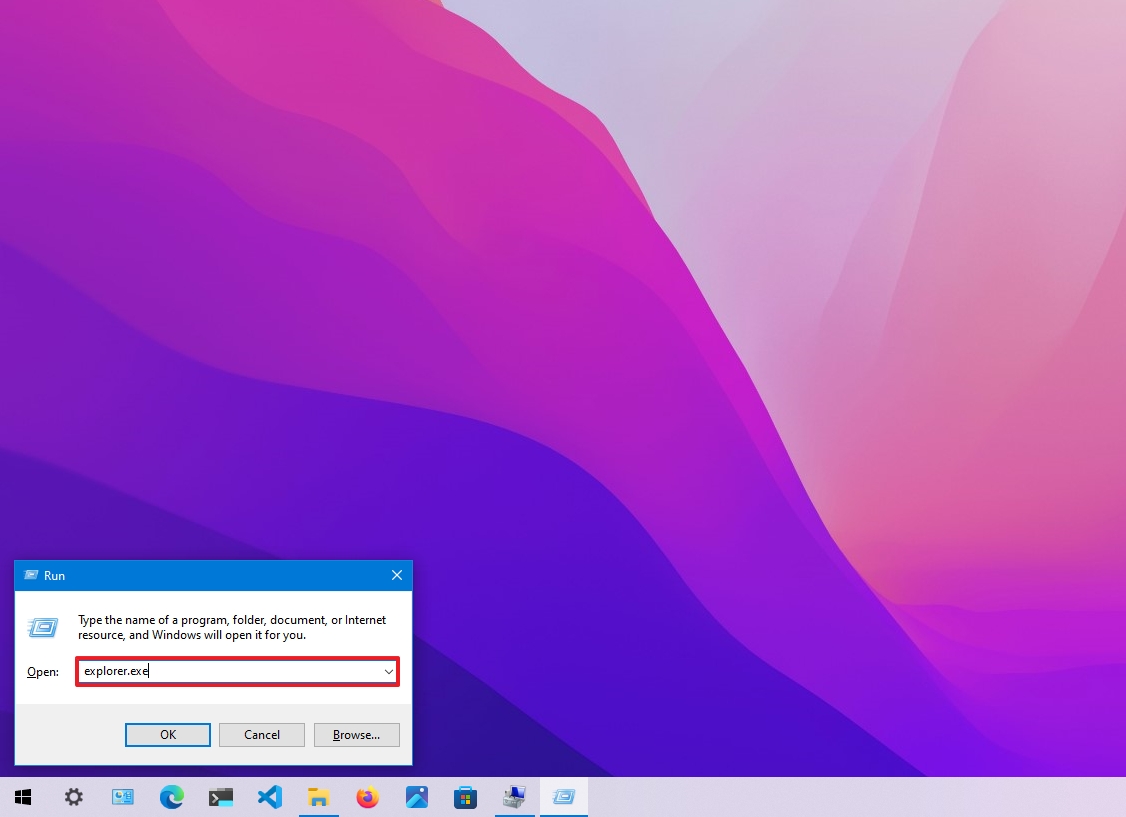
- Use the «Ctrl + Shift» keyboard shortcut.
- Click the OK button.
How to run app as administrator from Task Manager
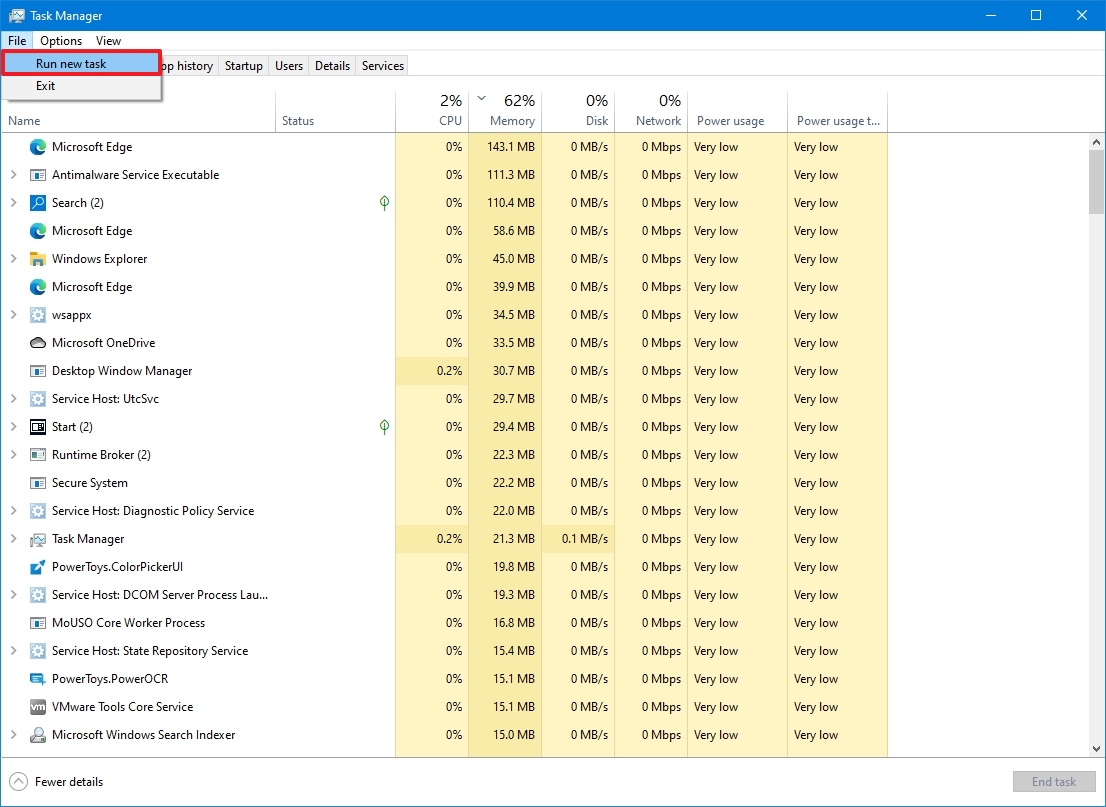
To launch an app as an administrator from Task Manager, use these steps:
- Open Start.
- Search for Task Manager and click the top result to open the app.
- Quick tip: Other alternative ways to open the experience include right-clicking the Taskbar and selecting the «Task Manager» option. Use the «Ctrl + Shift + Esc» keyboard shortcut, the «Ctrl + Alt + Delete» shortcut, and click the «Task Manager» option.
- Click the File menu
- Select the «Run new task» option.
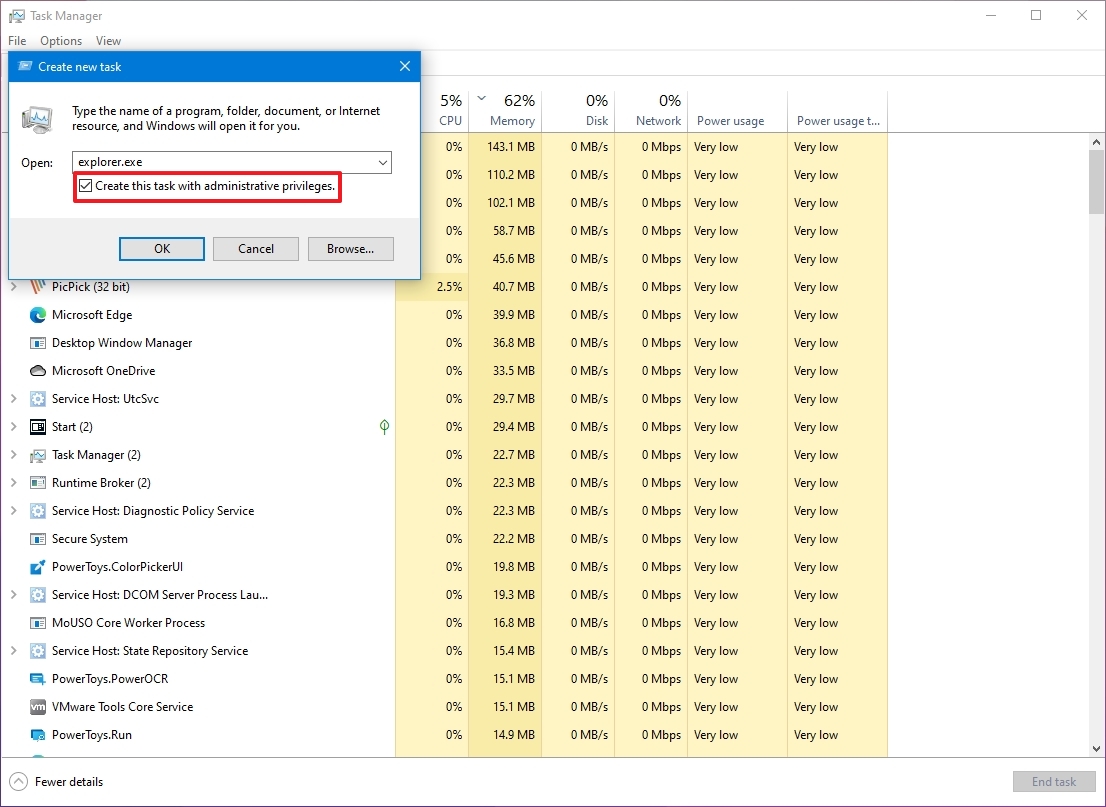
- Type the name of the app.
- Check the «Create this task with administrator» privileges.
How to run app as administrator from File Explorer
File Explorer includes at least two ways to launch apps as an administrator user.
To open app elevated with File Explorer, use these steps:
- Open File Explorer.
- Navigate to the folder with the executable file.
- Right-click the app and select the Run as administrator option.
To run a program as an administrator with the ribbon menu, use these steps:
- Open File Explorer.
- Navigate to the folder with the executable file.
- Select the app.
- Click the Application Tools tab.
- Click the Run as administrator button.
- Quick note: If you click the arrow button, you can select to launch the app as admin or as a different user.
How to run app as administrator from Command Prompt
To run an app elevated from Command Prompt, use these steps:
- Open Start.
- Search for Command Prompt and click the top result to open the console.
- Type the following command to run an app with administrator privileges and press Enter: runas /user:»COMPUTER-NAME\ADMIN-USER» «C:\PATH\TO\PROGRAM.EXE»
In the command, update the syntax with your computer name, administrator user, and the correct program path. For example, this command starts PowerShell 7 with administrator privileges: runas /user:»wm-win10-rp\user@email.com» «C:\Program Files\PowerShell\7\pwsh.exe»
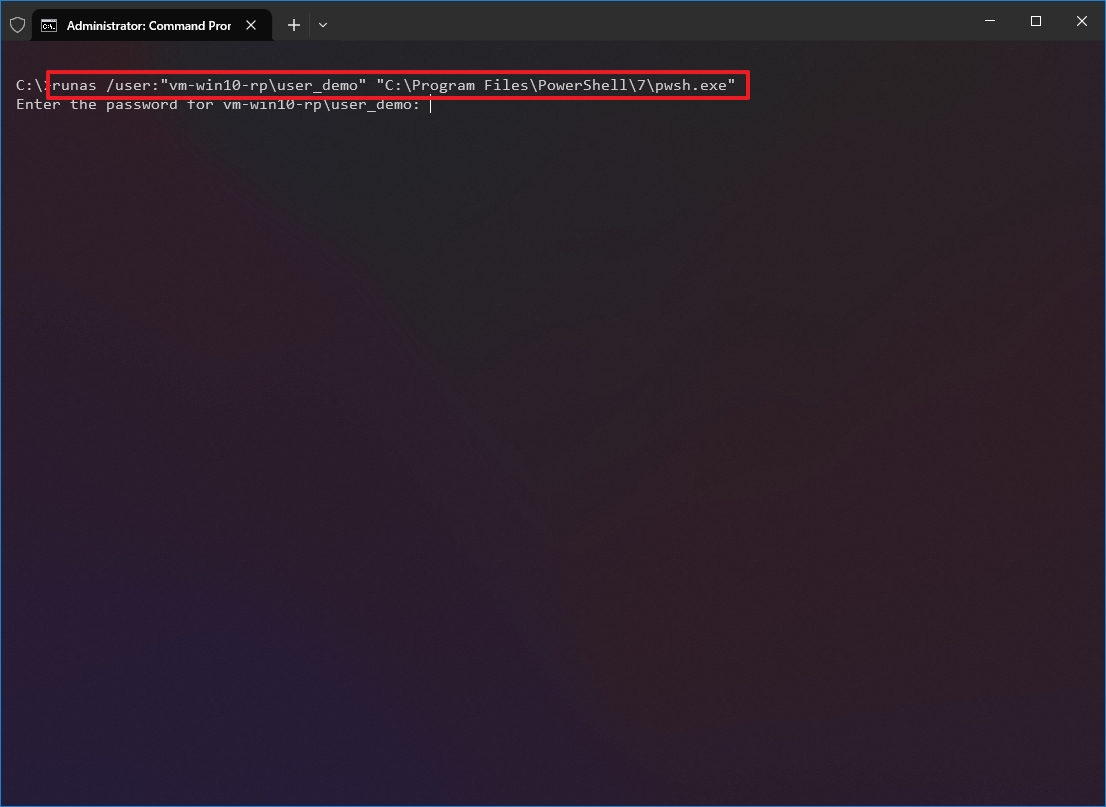
- Confirm the password and press Enter.
If you want to run an app always as an administrator, you can use these steps.
More resources
For more helpful articles, coverage, and answers to common questions about Windows 10 and Windows 11, visit the following resources:
- Windows 11 on Windows Central — All you need to know
- Windows 10 on Windows Central — All you need to know
Mauro Huculak has been a Windows How-To Expert contributor for WindowsCentral.com for nearly a decade and has over 15 years of experience writing comprehensive guides. He also has an IT background and has achieved different professional certifications from Microsoft, Cisco, VMware, and CompTIA. He has been recognized as a Microsoft MVP for many years.