
Рассмотрим поэтапно процесс установки и запуска Windows приложения в операционной системе Astra Linux.
Дистрибутив Astra Linux основан на ядре операционной системы Debian. И для Debian, а также других дистрибутивов Linux, существует прекрасное широко известное средство для запуска приложений Windows – программа Wine. Эта программа представляет собой своего рода «песочницу», в которой выполняется Windows приложение. Wine отслеживает, к каким Windows API обращается программа, и перенаправляет её вызов на аналогичные API Linux, если они есть. Из-за того, что Windows и Linux – очень разные операционные системы, не для каждого API Windows существует аналог в Линукс, и наоборот. Поэтому не все программы будут работать под Wine. Но многие. Рассмотрим установку Wine и запуск из-под него Windows приложения на примере Notepad++.
1Установка Wine в Astra Linux
Первым делом необходимо запустить менеджер пакетов Synaptic. Быстрее всего это сделать так. Нажать сочетание клавиш Win+R и начать вводить в поле команды название Synaptic. Почти сразу высветится найденная программа. Наводим курсор на неё (или стрелками и клавишей Enter) и запускаем. При запуске Synaptic потребует ввести пароль от учётной записи.

Запуск менеджера пакетов Synaptic
Теперь в менеджере пакетов необходимо найти Wine. Кликаем на иконку с лупой в верхней панели. И набираем в открывшемся окне поиска Wine.

Поиск пакетов программы Wine в менеджере пакетов Synaptic
Менеджер пакетов найдёт программу Wine и отобразит её компоненты. Для установки нужно нажать кнопку «Применить» на верхней панели инструментов.

Установка программы Wine в Astra Linux
Начнётся установка Wine.

Процесс установки программы Wine в Astra Linux
Необходимо дождаться окончания процесса инсталляции.
2Использование Wine в Astra Linux
Теперь идём на сайт программы Notepad++ и скачиваем установочный файл. Он будет загружен в директорию «Загрузки» текущего пользователя. Чтобы в этом убедиться, можно запустить терминал (например, xterm, запуск аналогично: Win+R и набрать xterm) и ввести в командной строке ls Загрузки. Появится содержимое каталога «Загрузки». В списке должен присутствовать скачанный установщик блокнота.
Невозможно запустить установщик напрямую, т.к. он скомпилирован под ОС Windows. Тут нам и придёт на помощь Wine. В командной строке терминала xterm набираем следующее:
wine Загрузки/npp.7.8.9.Installer.exe
Название файла, естественно, должно соответствовать вашему скачанному файлу. Начнётся процесс установки блокнота, стандартный для Windows. Просто пройдите его до конца, как обычно.

Процесс установки программы Notepad++ в Astra Linux
Когда программа будет установлена, Wine создаст на диске в своей директории иерархию каталогов, похожую на Windows. По умолчанию рабочая директория Wine скрыта. Чтобы её увидеть, нужно в проводнике (менеджере файлов) в мню «Вид» выбрать пункт «Отображать скрытые» или нажать сочетание клавиш Ctrl+H. Теперь директория Wine со всеми подкаталогами стала видна.

Настройка отображения скрытых файлов и каталогов в Astra Linux
В Linux директории, название которых начинается с символа точки «.», по умолчанию являются скрытыми.

Настройка отображения директории программы Wine в Astra Linux
Можем через менеджер файлов зайти в каталог Notepad++ и убедиться, что программа Wine создала всю иерархию директорий, как в Windows.
Можно запускать блокнот из командной строки терминала xterm:
wine "C:/Program Files (x86)/Notepad++/notepad++.exe"

Запуск Notepad++ из консоли в Astra Linux
Для быстрого запуска блокнота в менеджере файлов кликаем на файле notepad++.exe правой кнопкой мыши и в контекстном меню выбираем пункт Отправить – Рабочий стол (создать ярлык). На рабочем столе Astra Linux появится ярлык для запуска Notepad++.

Создание ярлыка для быстрого запуска Windows программы в Astra Linux
Если при нажатии на ярлык ничего не происходит, стоит посмотреть его свойства, кликнув правой кнопкой мыши на ярлыке. Затем в окне «Свойства» перейти на вкладку «Ярлык» и обратить внимание на строчку «Команда». В ней должна быть именно та же команда, которую мы только что набирали в консоли. Если это не так, поправьте:

Свойства ярлыка для запуска Windows программы в Astra Linux
Теперь вы можете полноценно пользоваться программой Notepad++, написанной для Windows, в операционной системе Astra Linux.
Как я уже упоминал, далеко не все Windows программы запускаются и работают из-под Wine с такой же лёгкостью. Но теперь вы знаете как проверить, будет работать под Линукс или нет интересующая вас Windows программа.
Wine is one of my must-have tools for working on Linux. If you do not know Wine, it is a compatibility layer between Windows and Linux, that bridges the gap between the two and allows Windows applications to work on Linux; almost magically.
While Wine has been available since a long time, but the 3.0 release brought an important update — support for Android. That means, now you can easily run Windows apps on Android. And through this post, I will tell you just how to do that.
Let’s take a look.
Run Windows Programs on Any Platform with Wine and 6 Other Apps
Run Windows Programs on Any Platform with Wine and 6 Other Apps
Make no mistake, Windows is still the most used (and popular) operating systems for desktops and laptops. So… Read more
Prerequisites
Wine for Android is a simple app, and you only require an Android device with a working Internet connection to download and run it.
You can also download the required app (Wine’s APK) and Windows apps (.exe’s) on your computer and transfer them to your mobile device in case your smartphone does not have a working network connection.
Download & Install Wine
Please follow the below instructions to get started with this tutorial:
- Open “https://dl.winehq.org/wine-builds/android/” in your mobile.
- Download the latest available release per your device platform. For instance, I downloaded “wine-3.2-arm.apk” on my phone, but you may need its “x86” version if your device has an Intel CPU in place of an ARM CPU (as mine).
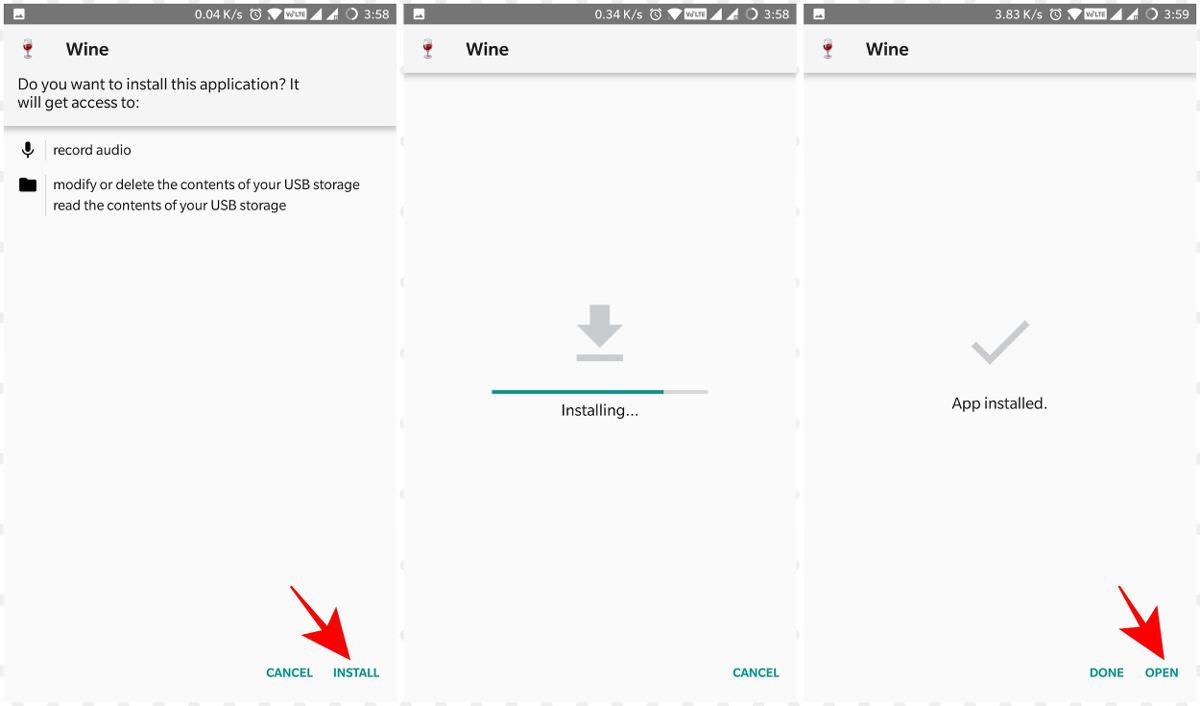
- Open the downloaded APK, and install Wine app on your device.

Try out Wine on Android
After you have downloaded and installed Wine on your device, it is time to experiment with it. Just follow the below steps to continue with this guide:
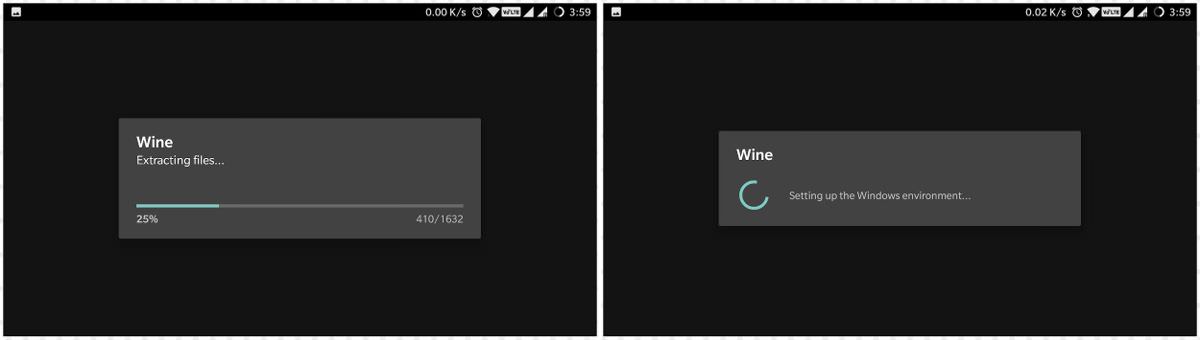
- Open the Wine app on your Android device. If you are starting it for the first time, it will take some time to extract its files and set up the Windows environment, but from the second time onwards, it will be much faster.
- Once Wine is loaded, you will see a classic desktop of Windows, which instantly reminds me of Windows 98. You may click the Start button, and to your surprise, you will see just two options there, suggesting there is a lot more to do.
Download apps & tools
As most of us own a device powered by an ARM CPU, we can only run WinRT apps using Wine on Android. The list of supported WinRT apps is small, as you must have guessed by now; and you can access the complete app list on this thread on XDA Developers.
However, if you are fortunate enough to hold a device with an Intel CPU like ASUS ZenFone 2, you have a lot more choices to pick from the supported apps.
That is because you can run Win32 apps, i.e., x86 aka 32-bit apps using Wine for Android.
If you need to install a Windows app inside Wine, the process is as simple as below steps:
- On Wine’s desktop, click on the Start button.
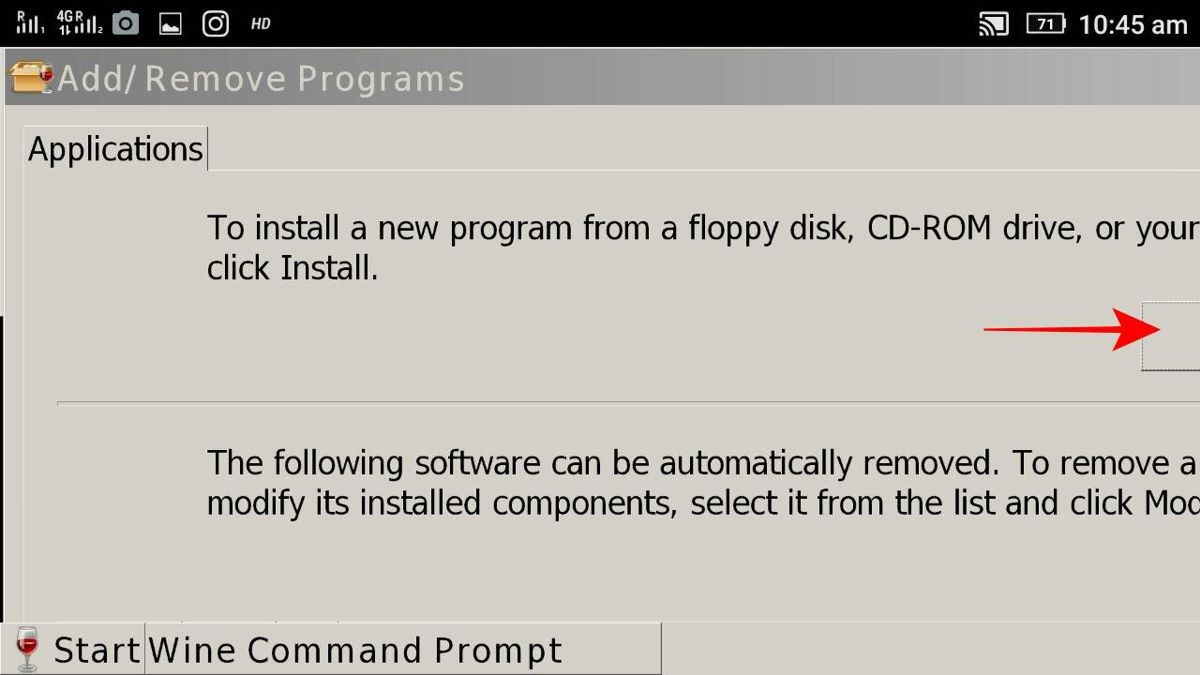
- Choose Control Panel and go to “Add/Remove Programs” from the options.
- A new window will open. Click the Install button in it.
- A file dialog will open. Here you can browse and select the app (.exe) you wish to install.
- You will see the program’s installer. Follow the on-screen instructions provided by the installer and install the app as you install any other program in Windows.
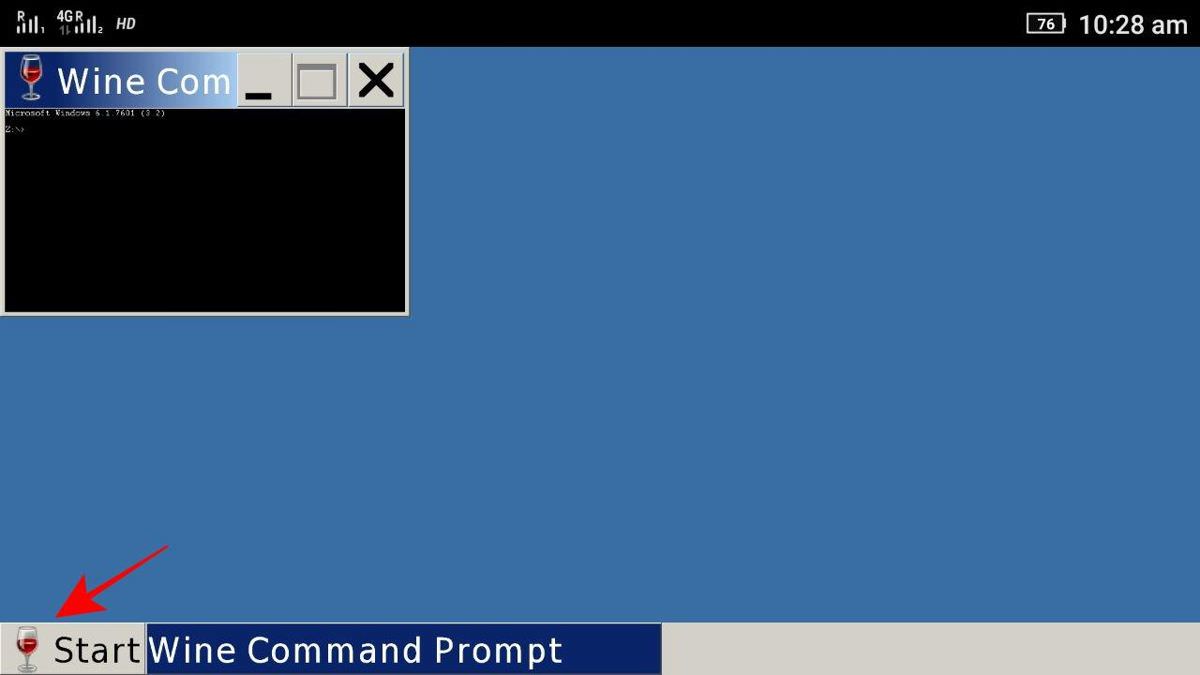

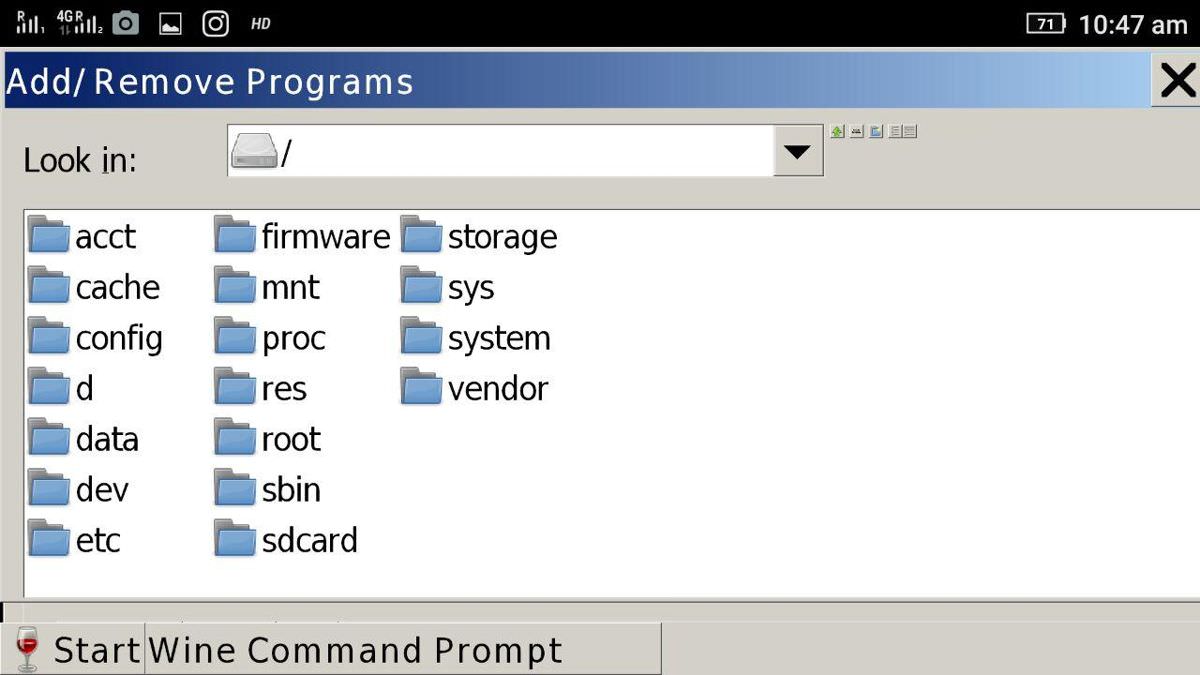
Alternatively, you can use Wine Command Prompt to install or run a program inside Wine. Just type the full path of the executable in the command prompt, and Wine will show the program’s installer.
Afterward, simply follow the on-screen instructions and at the end of the process, the program will be installed. And you will see its entry under Start menu.

For example, if you are trying to install Notepad++ (with “npp.exe” as its file) and its installer is present in your device’s Downloads directory, which is located at “/sdcard/Downloads”. Then you must type “/sdcard/Downloads/npp.exe” inside the command prompt window.
Troubleshooting issues
Following are some of the most common Wine issues and some instructions on how to troubleshoot them.
1. Wine won’t install on my Android device.
If you can’t install it, maybe the downloaded APK file is corrupt. In this case, just download it fresh and try installing it again. While installing Wine, if you are getting a message saying “not allowed to install unknown apps“, then you need to change a setting.
You can do it by heading over to Settings > Security and then toggling on “Unknown sources”.
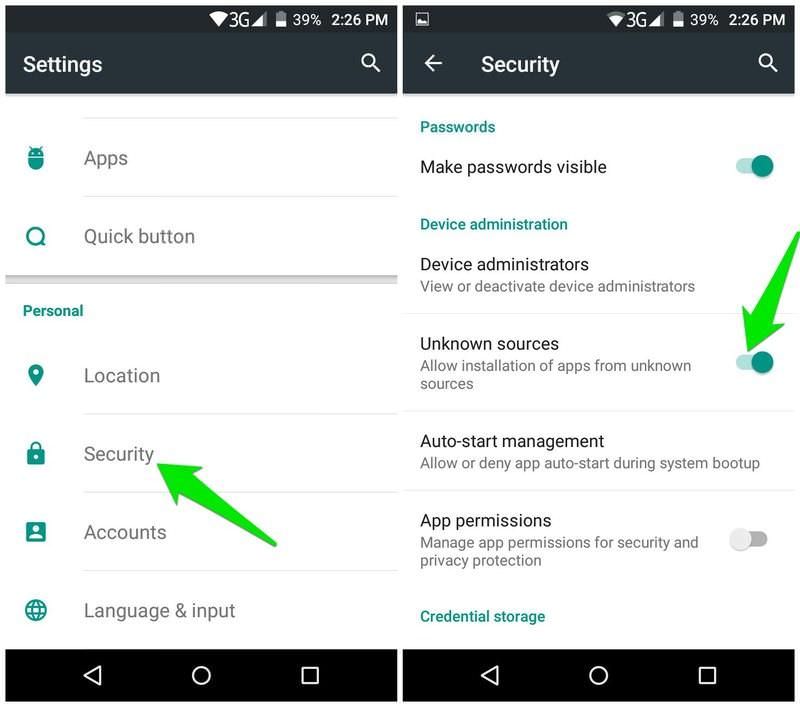
If you are not using Google’s flavor of Android, then this setting may reside at a different place — just search for it in Settings or google the procedure for your device. After you have changed this option, you can try installing this app — it shall work.
2. Wine won’t start/run on my Android device.
If you are able to install Wine but not able to start or run the same, then there is some issue with your device — probably a compatibility problem.
Also, please note that Wine 3.x (up to 3.2 at the time of writing) does not support Android 8 (Oreo) platform. That said, Wine 3.x on Android 8 will always get stuck on the “Setting up the Windows environment…” screen.
Moreover, during my tests using Android Emulator, I found that Wine 3.2 is not working on emulated devices — for both ARM and x86 versions. Though the devices are assigned enough resources yet I could not reach the classic desktop on Wine using an emulator. That being said, please know that Wine 3.2 may not work on AVD (Android Virtual Device).
3. Soft aka on-screen keyboard is not showing up.
Wine 3.2 is not yet complete in terms of features and this bug is one of the proofs of its imperfection. That being said, you will need a physical keyboard (like Bluetooth keyboard) to work with Wine. It is because soft keyboard won’t show up on the screen in case you wish to type something, and the only workaround is to plug in a hard keyboard.
4. I cannot choose a directory or a file in the file dialog.
Windows default setting needs you to double-click an item (say a file or folder) to open it, as you must have done in Windows. Since we are talking about touch-enabled devices, we need to double tap to emulate a double-click. And I found it does not work very well, at least for now.
That’s why, it is good to use a physical keyboard and use its navigation keys to navigate through windows, options, directories, etc. or choose a file or folder.
10 Apps to Connect Computer to Android Devices
10 Apps to Connect Computer to Android Devices
When you’re a vivid smartphone user, you may need to connect your device to your PC or Mac…. Read more
That’s all about using Wine on Android
Hope you are successful at installing and running Windows apps on Android using Wine. If you get into problems, you can ask for a solution on WineHQ Forums, and you can also write a comment below to ask me directly.

With the end of life coming for Windows 10 and the system requirements issue with Windows 11, many users are seeking alternatives. One of the most popular alternatives to Windows is Linux. But what do Windows users do about running Windows apps on the open-source operating system?
Turn to Wine.
Also: Your Windows 10 PC can’t be upgraded? You have 5 options before support ends in 2025
Wine is a compatibility layer that lets you run Windows apps on Linux. Because there are so many applications for Windows that don’t have a native version for Linux, it became necessary to create the means to run them on the open-source operating system.
When you combine the lengthy list of native applications you can install on Linux with the built-in app stores, the universal package managers Snap and Flatpak, AppImages, and Wine, the list of available software for Linux is massive.
Unfortunately, not every Windows app can run via Wine. If you’re curious about the apps that can, here’s a searchable database that lists them, from games to productivity tools and everything in between.
Also: Ubuntu vs. Debian: 7 key differences help determine which distro is right for you
The good news is that the Wine development team is always quite busy. The latest release of the software added enhancements such as improved API compatibility; fixed bugs related to DirectX to improve game stability; improved graphics rendering and more accurate high-DPI support (with automatic scaling of non-DPI-aware windows); added ARM support, new debugging tools, a new desktop control applet, and an applet for toggling advanced joystick settings; added the X11 backend with multi-touch functionality; and much more.
So, how do you run those Windows apps on Linux with Wine? Let’s get to work.
How to run a Windows app on Linux with Wine
What you’ll need: I’ll demonstrate the process on Ubuntu Desktop, but Wine can be installed on most Linux distributions. To install Wine, you’ll need a running Linux distribution and a user with sudo privileges. That’s it.
The first thing to do is log in to your Linux desktop and open a terminal window.
Show more
Install both Wine and Winetricks, which is a tool to make configuring Wine easier, with the command:
Show more
sudo apt-get install wine winetricks -y
Do note that the above command will take some time to complete.
If you’re using an RHEL-based or Fedora-based distribution, you first have to add the necessary repository with the command:
Show more
sudo dnf config-manager —add-repo https://dl.winehq.org/wine-builds/fedora/36/winehq.repo
You can then install Wine with the command:
sudo dnf install winehq-stable -y
You will also need to install Winetricks manually for Fedora, which can be done with the following command:
wget https://raw.githubusercontent.com/Winetricks/winetricks/master/src/winetricks && chmod +x winetricks && sudo mv winetricks /usr/local/bin/
Run the Winetricks app, which will automatically create the necessary directories for you with the command, below.
In the resulting window, you’ll want to click «Select the default wineprefix» and click OK. In the next window, select «Run winecfg» and click OK. You can then configure the version of Windows you want Wine to mimic by choosing the option from the Windows Version dropdown and clicking OK.
Show more
Winetricks makes it easy to configure several Wine options.
Screenshot by Jack Wallen/ZDNET
Winetricks also lets you take care of several other options, such as installing DLLs, fonts, and more.
At this point, though, you can close that window and prepare to install your first Windows app.
Installing a Windows app with Wine
I’ll show you how to install the Notepad++ Windows app with Wine’s help.
First, download the Windows installer for the app and save it in your Downloads directory. Then, open your terminal window and change into the Downloads directory with the command cd ~/Downloads.
Run the installer with the command wine npp.*.exe. Finally, the Windows install wizard will open, where you can click your way to success. If you receive an error that 32-bit support is missing, you can run the following command to fix the error:
sudo dpkg —add-architecture i386 && sudo apt-get update && sudo apt-get install wine32
Installing a Windows app on Linux with Wine is simple.
Screenshot by Jack Wallen/ZDNET
Once the installation completes, you’ll find the Notepad++ launcher in your desktop menu.
Installing a Windows app with Winetricks
Another cool trick up Wine’s sleeve is the ability to install a Windows app directly from within Winetricks. If you run the Winetricks app, which can now be launched from your desktop menu, and select «Install an application,» you’ll be greeted with a list of applications that you can install directly from the GUI.
Also: Seeking the latest in Linux? There’s a right way and a wrong way to use Distrowatch
This method will automatically download and run the necessary installer file and then open the install wizard to complete the process.
Winetricks allows you to install applications easily.
Screenshot by Jack Wallen/ZDNET
Further configuration might be needed
Notepad++ is a fairly simple app to install with Wine. However, some apps (especially games) might require further configuration. If that occurs, run the Winetricks app again to correct the configurations.
The amount of work needed will depend on the app you want to install. If you receive errors when you try to install a Windows app via Wine, you might have to research which configurations are necessary for that particular app.
Also: Want to save your aging computer? Try these 5 Linux distributions
Even with those potential issues, installing supported Windows apps on Linux with Wine is considerably easier than you might think. If your computer currently runs Windows 10 and won’t run Windows 11, why not install one of the many Linux distributions on that machine and continue using it for years to come?
See also
How to install Spark on Windows 11
Hello everyone, today we are going to install Spark on Windows.
Prerequisites
- Java 8 runtime environment (JRE)
- Apache Spark 3.3.0
Step 1 — Install Java 8 or Later
To install Apache Spark on windows, you would need Java 8 or the latest version hence download the Java version from Oracle and install it on your system. If you wanted OpenJDK you can download it from here.
You can install Java 8 from the following link here.
After finishing the file download we open a new command prompt, we should unpack the package
Because I am installing Java in folder Java of my C drive (C:\Java)
we create the the directory
then run the following command to unzip:
tar -xvzf jre-8u361-windows-x64.tar.gz -C C:\Java\
Note: This article explains Installing Apache Spark on Java 8, same steps will also work for Java 11 and 13 versions.
Step 2 — Download packages
Apache Spark comes in a compressed tar/zip files hence installation on windows is not much of a deal as you just need to download and untar the file.
For this tutorial we are going to install Apache Spark 3.3.2 with Pre-built Apache Hadoop 3.3
Download Apache spark by accessing the Spark Download page and select the link from “Download Spark ”.

We download the following file:
https://www.apache.org/dyn/closer.lua/spark/spark-3.3.2/spark-3.3.2-bin-hadoop3.tgz
After download, untar the binary using 7zip or any zip utility to extract the zip file and copy the extracted directory spark-3.3.2-bin-hadoop3.tgz to c:\Hadoop\spark-3.3.2-bin-hadoop3
Let us open a terminal and we create the the directory
then we go to the directory where was Downloaded the file
run the following command to unzip:
tar -xvzf spark-3.3.2-bin-hadoop3.tgz -C C:\Spark\
The extracted files are in the directory C:\Spark\spark-3.3.2-bin-hadoop3
cd C:\Spark\spark-3.3.2-bin-hadoop3
dir

Step 3 — Edit Spark Environment Variables
Now we’ve downloaded and unpacked all the artefacts we need to configure two important environment variables.
First you click the windows button and type environment
a) Configure Environment variables
We configure JAVA_HOME environment variable
by adding new environment variable:
Variable name : JAVA_HOME
Variable value: C:\Java\jre1.8.0_361
Follow the below steps if you are not aware of how to add or edit environment variables on windows.
- Open System Environment Variables window and select Environment Variables.
- On the following Environment variable screen, add
SPARK_HOME,HADOOP_HOME,JAVA_HOMEby selecting the New option. - This opens up the New User Variables window where you can enter the variable name and value

the same with SPARK_HOME environment variable:
Variable name : SPARK_HOME
Variable value: C:\Spark\spark-3.3.2-bin-hadoop3
and finally with HADOOP_HOME environment variable:
Variable name : HADOOP_HOME
Variable value: C:\Hadoop\hadoop-3.3.0
b) Configure PATH environment variable
Once we finish setting up the above two environment variables, we need to add the bin folders to the PATH environment variable. On Edit the PATH variable

If PATH environment exists in your system, you can also manually add the following two paths to it:
%JAVA_HOME%/bin
%SPARK_HOME%/bin
%HADOOP_HOME%/bin
Add Spark, Java, and Hadoop bin location by selecting New option.

Spark with winutils.exe on Windows
To run Apache Spark on windows, you need winutils.exe as it uses POSIX like file access operations in windows using windows API.
winutils.exe enables Spark to use Windows-specific services including running shell commands on a windows environment.
We create the folder
mkdir C:\Hadoop\hadoop-3.3.0\
Download winutils.exe for Hadoop 3.3 and copy it to %HADOOP_HOME%\bin folder.
cd Downloads
copy winutils.exe C:\Hadoop\hadoop-3.3.0\bin
Verification of Installation
Once you complete the installation, Close your terminal window and open a new one and please run the following command to verify:
you will have
java version "1.8.0_361"
Java(TM) SE Runtime Environment (build 1.8.0_361-b09)
Java HotSpot(TM) 64-Bit Server VM (build 25.361-b09, mixed mode)
You should also be able to run the following command:
Microsoft Windows [Version 10.0.22621.1555]
(c) Microsoft Corporation. All rights reserved.

C:\Users\ruslanmv>spark-shell
Setting default log level to "WARN".
To adjust logging level use sc.setLogLevel(newLevel). For SparkR, use setLogLevel(newLevel).
Spark context Web UI available at http://192.168.1.207:4040
Spark context available as 'sc' (master = local[*], app id = local-1683488208402).
Spark session available as 'spark'.
Welcome to
      ____              __
     / __/__  ___ _____/ /__
    _\ \/ _ \/ _ `/ __/  '_/
   /___/ .__/\_,_/_/ /_/\_\   version 3.3.2
      /_/

Using Scala version 2.12.15 (Java HotSpot(TM) 64-Bit Server VM, Java 1.8.0_361)
Type in expressions to have them evaluated.
Type :help for more information.

scala> 23/05/07 21:37:04 WARN ProcfsMetricsGetter: Exception when trying to compute pagesize, as a result reporting of ProcessTree metrics is stopped
spark-shell is a CLI utility that comes with Apache Spark distribution.
Spark-shell also creates a Spark context web UI and by default, it can access from http://localhost:4041.
Testing Spark
Open a new terminal and type
On spark-shell command line, you can run any Spark statements like creating an RDD, getting Spark version e.t.c
you will get
let us try type
val rdd = sc.parallelize(Array(1,2,3,4,5,6,7,8,9,10))
you get
scala> val rdd = sc.parallelize(Array(1,2,3,4,5,6,7,8,9,10))
rdd: org.apache.spark.rdd.RDD[Int] = ParallelCollectionRDD[0] at parallelize at <console>:23
Congratulations! You have installed Apache Spark on Windows 11.
Модератор: Модераторы разделов
Ответить
-
Версия для печати
Расширенный поиск
7 сообщений
• Страница 1 из 1
-
GRSrus
- Сообщения: 52
как установить Windows installer и C++ 2008sp1 в Wine.
-
Цитата
Сообщение
GRSrus »
При установке Windows installer через winetricks командой winetricks msi2 вылазиет ошибка Service exists. В чем проблемма?
P.S. Вобще мне не нужен Windows Installer, но без него я не могу установить C++ 2008 пишет «невозможно получить доступ к службе Windows installer»
Спасибо сказали:
Вернуться к началу
-
yaleks
- Сообщения: 2121
- Статус: вне статуса
- ОС: Gentoo ~
Re: как установить Windows installer и C++ 2008sp1 в Wine.
-
Цитата
Сообщение
yaleks »
Код: Выделить всё
winetricks vcrun2008Спасибо сказали:
Вернуться к началу
-
GRSrus
- Сообщения: 52
Re: как установить Windows installer и C++ 2008sp1 в Wine.
-
Цитата
Сообщение
GRSrus »
yaleks писал(а): ↑
03.01.2010 13:18
Код: Выделить всё
winetricks vcrun2008
я ж сказал что не устанавливается, пишет: невозможно получить доступ к Windows installer
Спасибо сказали:
Вернуться к началу
-
yaleks
- Сообщения: 2121
- Статус: вне статуса
- ОС: Gentoo ~
Re: как установить Windows installer и C++ 2008sp1 в Wine.
-
Цитата
Сообщение
yaleks »
GRSrus писал(а): ↑
03.01.2010 14:40
я ж сказал что не устанавливается, пишет: невозможно получить доступ к Windows installer
начните заново с пустого профиля wine
Спасибо сказали:
Вернуться к началу
-
GRSrus
- Сообщения: 52
Re: как установить Windows installer и C++ 2008sp1 в Wine.
-
Цитата
Сообщение
GRSrus »
yaleks писал(а): ↑
03.01.2010 16:13
GRSrus писал(а): ↑
03.01.2010 14:40
я ж сказал что не устанавливается, пишет: невозможно получить доступ к Windows installer
начните заново с пустого профиля wine
Спасибо за совет, завтра попробую.
Спасибо сказали:
Вернуться к началу
-
Fkabir
- Сообщения: 369
Re: как установить Windows installer и C++ 2008sp1 в Wine.
-
Цитата
Сообщение
Fkabir »
А если просто wine start file.msi ?
Спасибо сказали:
Вернуться к началу
-
yaleks
- Сообщения: 2121
- Статус: вне статуса
- ОС: Gentoo ~
Re: как установить Windows installer и C++ 2008sp1 в Wine.
-
Цитата
Сообщение
yaleks »
Fkabir писал(а): ↑
04.01.2010 15:42
А если просто wine start file.msi ?
если вы считаете себя умнее создателя winetricks, то делайте так.
Спасибо сказали:
Вернуться к началу
Ответить
-
Версия для печати
Показать:
Поле сортировки:
Порядок:
7 сообщений
• Страница 1 из 1
Вернуться в «WINE»