- Настройка сервера NTP на ОС Windows 10
- Автоматическая настройка
- Настройка вручную
- Настройка синхронизации времени и часового пояса на сервере RLP
Настройка сервера NTP на ОС Windows 10
Для настройки сервера понадобятся права администратора у пользователя Windows.
Автоматическая настройка
- Скачайте файл NTP_server_setup.bat
- Нажмите на файл правой кнопкой мыши и в меню выберите Запуск от имени администратора. Если Windows запросит разрешения на внесение изменений приложением, нажмите кнопку Да.

- Подождите, пока скрипт настроит сервер NTP. Последняя команда скрипта выводит текущую конфигурацию службы времени. Если скрипт успешно настроил сервер NTP, то в разделе NtpServer опция Enabled будет выставлена в 1. Нажмите любую клавишу, чтобы завершить работу скрипта и закрыть окно командной строки.


Настройка вручную
- Зайдите в редактор реестра одним из способов:
- Нажмите клавиши Win+R, в появившемся окне Выполнить наберите regedit и нажмите Enter.
- В строке поиска Windows наберите regedit и выберите найденное приложение Редактор реестра.

Если Windows запросит разрешения на внесение изменений приложением Редактор реестра, нажмите кнопку Да.
- Нажмите клавиши Win+R, в появившемся окне Выполнить наберите regedit и нажмите Enter.
- В Редакторе реестра перейдите по пути
\HKEY_LOCAL_MACHINE\SYSTEM\CurrentControlSet\Services\W32Time\TimeProviders\NtpServer
Для этого можно воспользоваться деревом в левой части окна или скопировать и добавить строку пути в поле в верхней части окна.
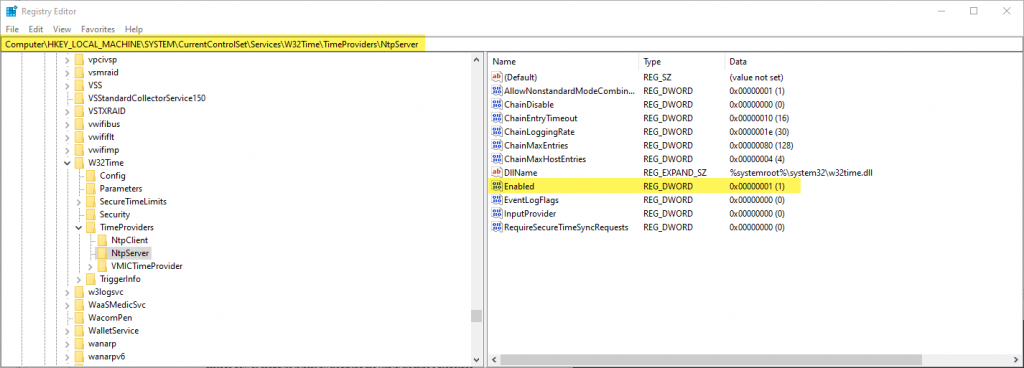
- Откройте окно изменения параметра Enabled двойным щелчком мыши по нему в правой части окна Редактора реестра. Измените значение параметра на 1 и нажмите кнопку ОК.
- В Редакторе реестра перейдите по пути
\HKEY_LOCAL_MACHINE\SYSTEM\CurrentControlSet\Services\W32Time\Config
- Измените значение параметра AnnounceFlags на 5.
- Закройте Редактор реестра.
- Чтобы изменения вступили в силу, необходимо перезапустить службу времени Windows. Зайдите в управление службами одним из способов:
- Нажмите клавиши Win+R, в появившемся окне Выполнить наберите services.msc и нажмите Enter.

- В строке поиска Windows наберите службы и выберите найденное приложение Службы.
- Нажмите клавиши Win+R, в появившемся окне Выполнить наберите services.msc и нажмите Enter.
- В списке служб найдите Службу времени Windows.

- Дважды щёлкните на службу, чтобы зайти в окно её настройки.
Если служба в состоянии Остановлена, то нажмите кнопку Запустить и дождитесь запуска службы.
Если служба в состоянии Выполняется, сначала нажмите кнопку Остановить, дождитесь остановки службы, нажмите кнопку Запустить и дождитесь запуска службы.
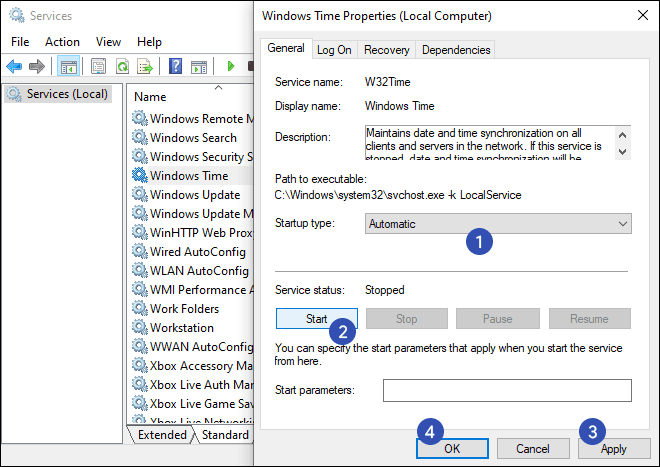
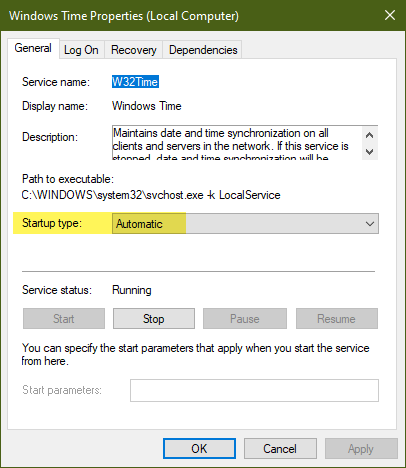
Установите Тип запуска в Автоматически и нажмите кнопку ОК, чтобы сохранить настройку.

- Закройте окно Служб Windows.
- Для проверки, что сервер NTP запустился, можно использовать команду w32time командной строки Windows.
Запустите командную строку Windows одним из способов:- Нажмите клавиши Win+R, в появившемся окне Выполнить наберите cmd и нажмите Enter.
- В строке поиска Windows наберите cmd и выберите найденное приложение Командная строка.
- Нажмите клавиши Win+R, в появившемся окне Выполнить наберите cmd и нажмите Enter.
- В Командной строке наберите или скопируйте сочетанием клавиш Shift+Insert строку
w32tm /query /configurationи нажмите клавишу Enter.

- Команда выведет текущую конфигурацию службы времени. Если сервер NTP запущен, то в разделе NtpServer опция Enabled будет выставлена в 1. Закройте окно Командной строки.
- Для работы сервера NTP нужно разрешить в Брандмауэре Windows UDP траффик по порту 123. Откройте Монитор брандмауэра Защитника Windows в режиме повышенной безопасности одним из способов:
- Нажмите клавиши Win+R, в появившемся окне Выполнить наберите wf.msc и нажмите Enter.
- В строке поиска Windows наберите и выберите найденное приложение.
- Нажмите клавиши Win+R, в появившемся окне Выполнить наберите wf.msc и нажмите Enter.
- В окне Монитора брандмауэра… переключитесь на Правила для входящих подключений и нажмите на Создать правило…

- Выберите тип правила Для порта и нажмите кнопку Далее.
- Выберите Протокол UDP, впишите номер порта 123 и нажмите кнопку Далее.
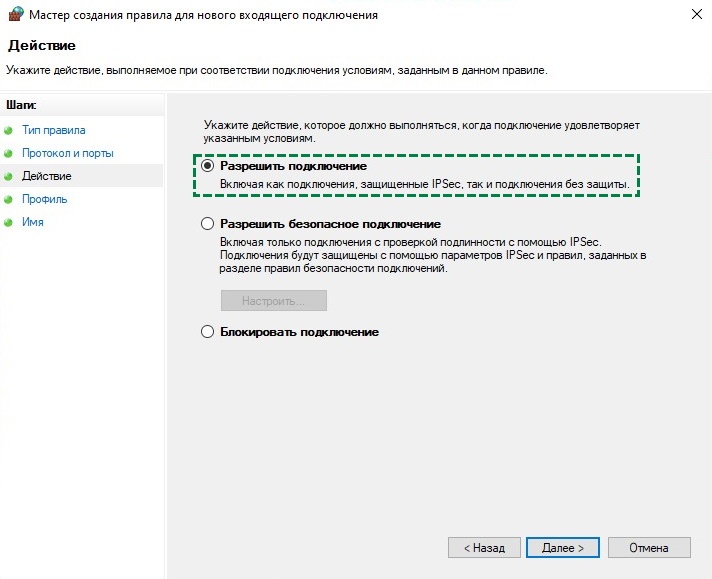
- Выберите Разрешить подключение и нажмите кнопку Далее.
- Установите галочки для всех профилей и нажмите кнопку Далее.
- Введите имя правила, например, udp in 123 и нажмите кнопку Готово.
- Переключитесь на Правила для исходящего подключения и нажмите Создать правило. Создайте правило с такими же настройками (тип правила, протокол и порты и т.д.), как и в предыдущих пунктах.

- Закройте окно Монитора брандмауэра…


Настройка синхронизации времени и часового пояса на сервере RLP
Для копирования файлов по сети из ОС Windows можно использовать WinSCP.
Команды можно вводить как локально на сервере, так и удалённо по SSH. Для удалённого подключения можно использовать PuTTY.
Данные для подключения по умолчанию:
Логин: root
Пароль: root (при наборе пароля он может не отображаться, даже символами «звёздочка»)
- Скачайте и разархивируйте ntp_local_install.zip
- Скопируйте получившуюся папку
ntp_local_installв папкуhomeна сервере RLP. - Зайдите на сервер локально или удалённо.
- Остановите службу TRASSIR командой:
systemctl stop t1daemon - Установите rpm из скопированной папки командой:
yum install -y /home/ntp_local_install/*.rpm - Зайдите в редактирование файла настроек планировщика задач командой:
crontab -e - Нажмите клавишу Insert для перехода в режим редактирования.
Добавьте строку*/5 * * * * sudo ntpdate IP-адрес компьютера на Windows с настроенным NTP-сервером
Пример:*/5 * * * * sudo ntpdate 192.168.1.1 - Нажмите клавишу Esc, чтобы выйти из режима редактирования. Введите
:wq!и нажмите клавишу Enter, чтобы сохранить изменения и выйти из редактора. - Проверьте текущий часовой пояс на сервере RLP командой
timedatectl status
Часовой пояс и город указаны в разделе Time zone:
- Если часовой пояс на сервере не совпадает с часовым поясом, где физически размещён сервер, то его можно поменять:
- Выведите список городов, поддерживаемых службой времени и выберите ближайший:
Для списка городов Европы введите команду:timedatectl list-timezones | grep Europe
Для списка городов Азии введите команду:timedatectl list-timezones | grep Asia -
Установите нужный часовой пояс командой:
timedatectl set-timezone выбранный город
Пример:timedatectl set-timezone Asia/VladivostokГород нужно указать в том же виде, в котором он выводится командой
timedatectl list-timezones, включая регистр букв. Если указать город неправильно, часовой пояс не изменится.
- Выведите список городов, поддерживаемых службой времени и выберите ближайший:
- Проверьте текущее время на сервере RLP командой:
date
Время должно совпадать со временем на компьютере с настроенным NTP-сервером. Если время не совпадает, то подождите пять минут (настроенный период синхронизации) и введите команду ещё раз.

Запустите TRASSIR командой:systemctl start t1daemon
удобный скрипт для работы со временем на серверах NTP доступен по ссылке:
https://ncloud.dssl.ru/s/HpQrdWMBLet7Wps
Windows — NTP server installation
Windows — NTP server installation
Would you like to learn how to install the NTP server on Windows? In this tutorial, we are going to show you how to configure an NTP server on a computer running Windows.
• Windows 2012 R2
• Windows 2016
• Windows 2019
• Windows 10
• Windows 7
Equipment list
Here you can find the list of equipment used to create this tutorial.
This link will also show the software list used to create this tutorial.
Windows — Related Tutorial:
On this page, we offer quick access to a list of tutorials related to Windows.
Tutorial Windows — NTP server installation
As Administrator, start an elevated command-line.

Create a backup of the Windows registry entries.
Configure the Windows time service as an NTP server.
Configure the list of NTP servers.
Configure the NTP poll interval.
Configure the Windows time service to start automatically.
Start the Windows time service.
Optionally, restart the Windows time service using the graphical interface.

Create a Firewall rule to allow the input of packets on the NTP port.
Verify the NTP server configuration.
Here is the command output.
Congratulations! You have finished the installation of the NTP server on Windows.
Tutorial Windows — NTP server verification
Verify the NTP server peer list.
Verify the NTP service communication.
From a remote computer, test your NTP server.
Here is the command output.
In our example, the NTP server IP address is 172.31.0.84.
From a computer running Linux, test your NTP server.
Here is the command output.
Congratulations! You have finished the NTP server configuration on Windows.
VirtualCoin CISSP, PMP, CCNP, MCSE, LPIC22020-12-03T09:48:59-03:00
Related Posts
Page load link
Ok
A Time Server or NTP Server is used to synchronize the time across devices in a network. For example, in Windows, your time automatically gets synchronized with time.windows.com. The time.windows.com is the time server or NTP server created by Microsoft. Similarly, you can also make your computer a time server or NTP server. And then, you can synchronize the time of all devices in your local (LAN) network with your PC.
In this tutorial, we are going to show you how to make your computer an NTP or Time Server. And, you don’t need to install any software to do this. We will be using Windows Registry Editor to turn your computer into Time Server.
SEE ALSO: How to Make Your Computer a Web Server?
Follow these steps to configure your Windows 10 or Windows 11 PC as a Time Server.
Step 1: Open Services and Stop Windows Time Service
To make your computer a time server, we will need to make some changes to Windows Time Service. So, first of all, we will need to stop the Windows Time service in the Windows services console.
Go to Start > Control Panel > System & Security > Administrative Tools > Services to open the Windows Services console. Alternatively, you can type services.msc in RUN and press ENTER.
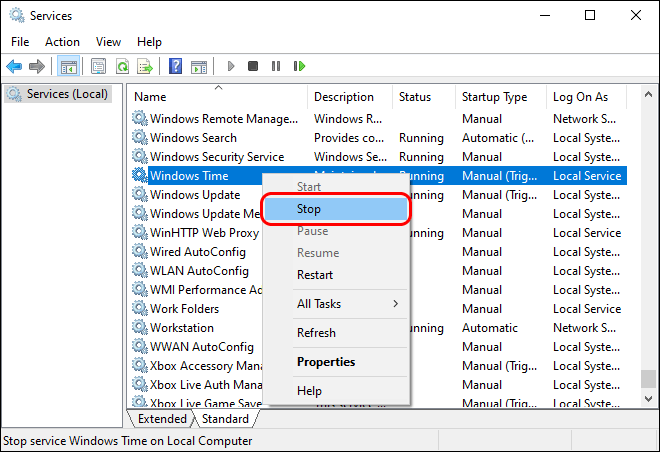
Now, the Windows Services console will open. Here, look for the ‘Windows Time‘ service. After that, right-click on Windows Time service and select Stop to stop this service. But if the service is already in the stopped state, you can move to the next step.
Step 2: Open Registry Editor and Create LocalNTP DWORD
Now, open Registry Editor. Go to RUN, type regedit , and press the Enter button to launch Registry Editor.
You may see UAC Prompt, click on Yes to continue. Registry Editor will open. In Registry Editor, go to the following registry key:
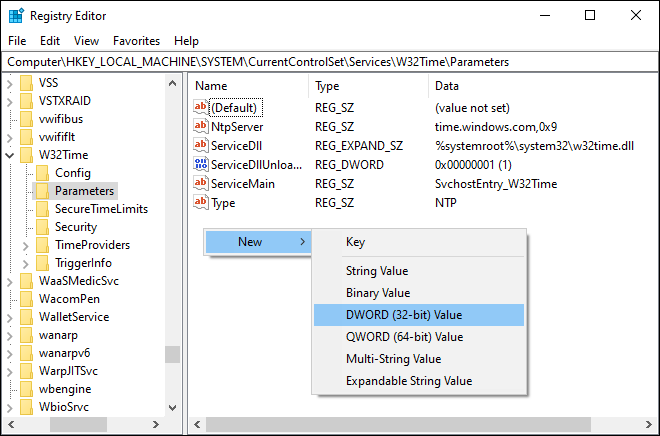
HKEY_LOCAL_MACHINE\SYSTEM\CurrentControlSet\Services\W32Time\Parameters
If you don’t see the LocalNTP DWORD on the right side, you will have to create it to make your computer a time server. So, to create the DWORD, right-click in the blank space and select New > DWORD (32-bit) Value.
Now, type the name of the new DWORD as LocalNTP (case sensitive).

After creating the DWORD, double-click on it to modify its value. Then set the DWORD value to 1 (Hexadecimal).
Step 3: Enable NTP Server in Windows
This is one of the most important steps to make your PC an NTP server. Do not close the Registry Editor yet, go to the following key in the Registry Editor.
HKEY_LOCAL_MACHINE\SYSTEM\CurrentControlSet\services\W32Time\TimeProviders\NtpServer
Here, on the right side, you will find a DWORD named Enabled. Right-click and select Modify to change its value.

Now, set the value data of Enabled DWORD to “1” (Hexadecimal).
Step 4: Set Announce Flags
Now, go to the following key in Registry Editor.
HKEY_LOCAL_MACHINE\SYSTEM\CurrentControlSet\services\W32Time\Config
Here, we will change the value of AnnounceFlags DWORD. So, right-click on it and select Modify.
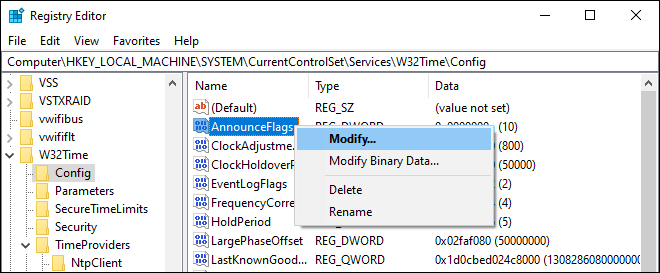
Now, set the value of AnnounceFlags DWORD to “5” (Hexadecimal). Now, your PC will advertise itself as an NTP server.
Step 5: Start Windows Time Service
Go to Start > Control Panel > System and Security > Administrative Tools > Services again. Now, double-click on the “Windows Time” service to open its Properties. Here, set the Startup type to Automatic, start the service, and then click OK.
Now, you can use your computer as an NTP server. You can now synchronize the time of other computers in your LAN/Local network with your PC.
SEE ALSO: Check these 10 Cool Command Prompt Tricks for you.
Step 6: Synchronize Time with NTP Server
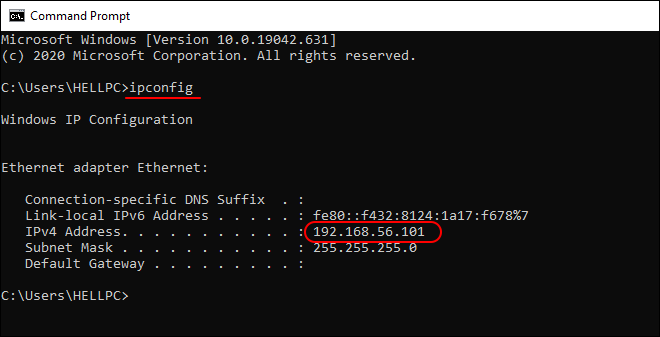
Let’s see how to synchronize the time of any other PC using this newly created NTP Server. First, you need to find the IP address of your PC. You can check your IP in Network Settings or via Command prompt using the ipconfig command. In this tutorial, the IP address of our PC is 192.168.56.101. This is just an example, it may be different for you.
ipconfig command to find the IP Address of Your PCNow, go to another computer whose time you want to synchronize. Open the Control Panel and search for date time and click on Set the time and date link from the search results.
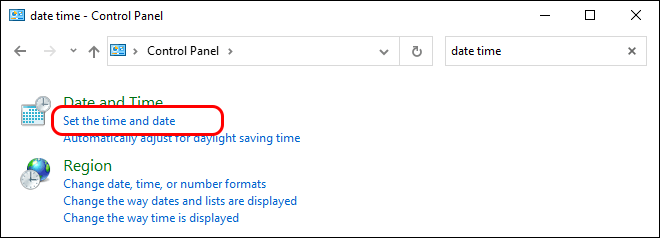
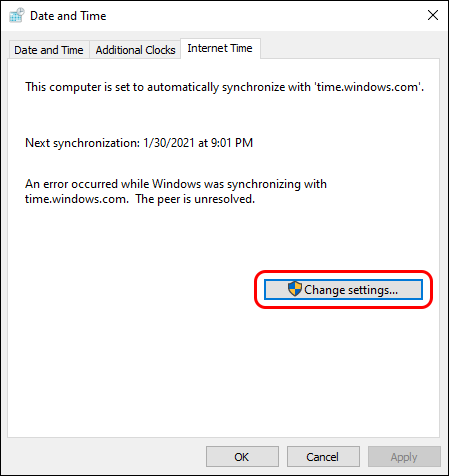
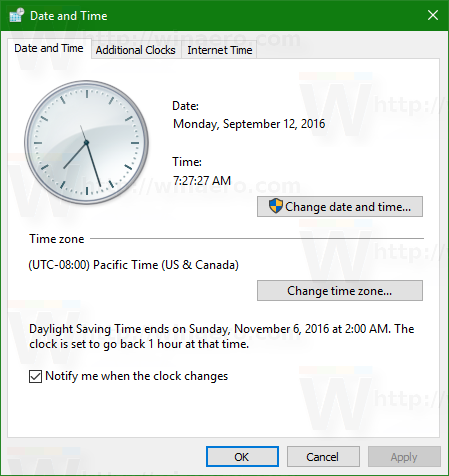
Date and Time settings will open. Go to the Internet Time tab and click on Change Settings.
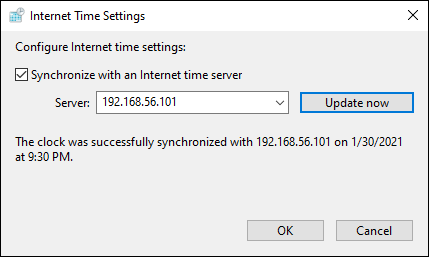
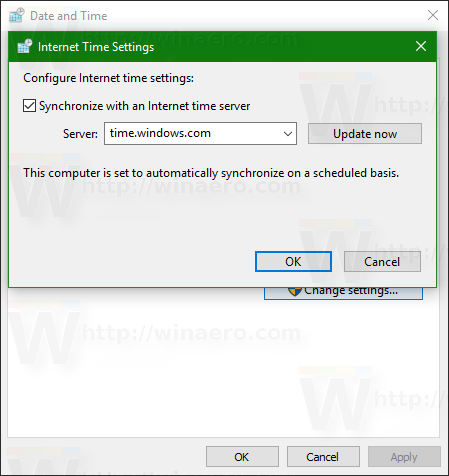
A small Internet Time Settings window will open. Here, enter the IP address of your NTP server (192.168.56.101 in our case) in the box and click on Update Now to synchronize time. It may give you an error on the first attempt. Click on Update Now again and your time will be synchronized successfully. Now, you can click OK to close the time settings window.
SEE ALSO: How to Set up Minecraft Server on Android Phone?
Turn your PC into an NTP Server without Any Software
Now, you have successfully turned your computer into an NTP or Time Server without any software. You can synchronize the time of every device on your network using this NTP server. You can also synchronize the time of any remote device using this NTP server by forwarding the NTP port on your router. NTP port is “123” by default. The process of forwarding a port in your router depends on the type of router you use. You can check your router’s manual for more details.
We hope you liked this tutorial. In case you have any problems, feel free to write them down in the comment section below. Feel free to subscribe to our newsletter to get the latest tutorials directly into your inbox.
Skip to content
Internet Time (NTP) is a very useful way to keep your PC’s time accurate automatically. Once configured, Windows will request time data periodically from time servers, so you can be sure that time and date on your device are set properly. Here is how it can be done.
With Windows 10, Microsoft is moving all classic settings of the Control Panel to the new Universal (Metro) app called Settings. It already includes all basic management options that the average user needs to control the operating system. One of its pages is dedicated to Date and Time options. It is located in Settings -> Time & language -> Date & time:
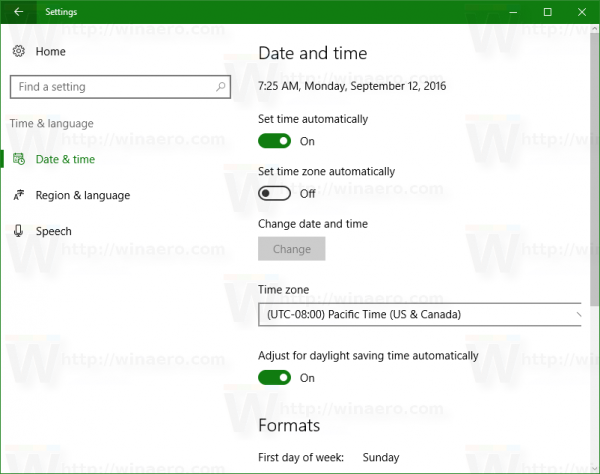
As of this writing, it does not include anything related to NTP. To configure NTP, you still need to use the classic Control Panel applet.
Configure Internet Time (NTP) options in Windows 10
To set the NTP server in Windows 10, do the following.
- Open Control Panel.
- Go to the following section:
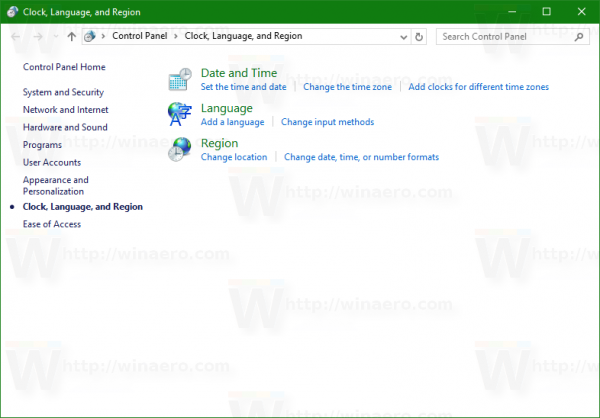
Control Panel\Clock, Language, and Region

- Click the icon Date and Time:The following window will appear on the screen:

- There, switch to the tab named Internet Time. To adjust available settings, you need to click the button «Change settings…»:

Once you click it, you will be able to enable NTP and specify a custom time server if required:

Alternatively, you can specify a custom NTP server using the Registry. It can be done as follows.
- Open Registry Editor.
- Go to the following Registry key:
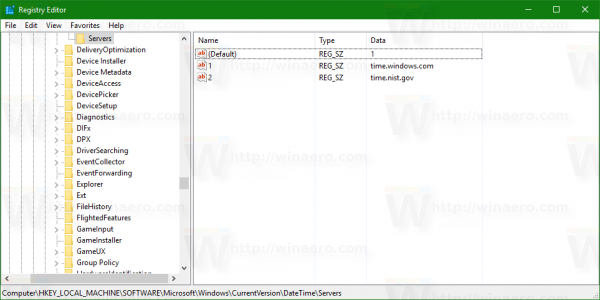
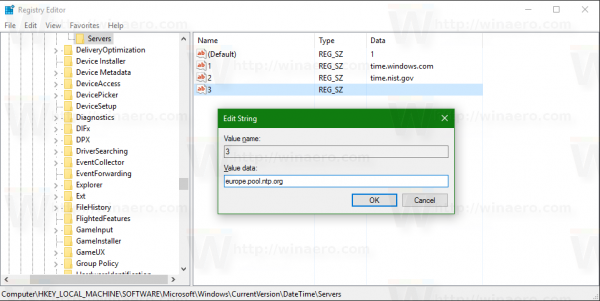
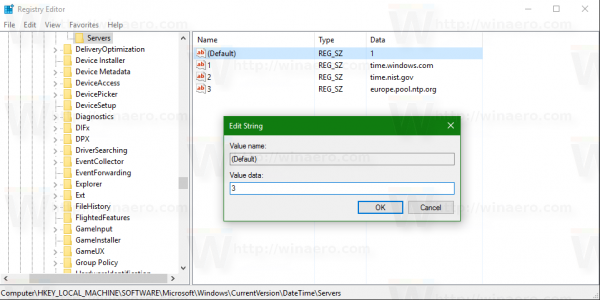
HKEY_LOCAL_MACHINE\SOFTWARE\Microsoft\Windows\CurrentVersion\DateTime\Servers
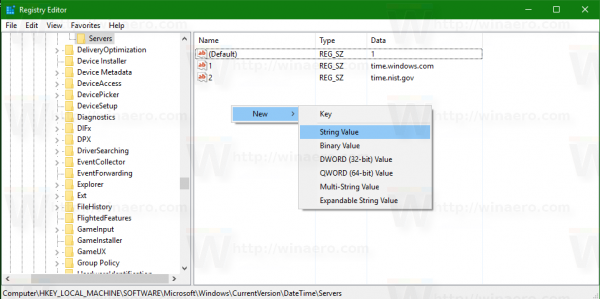
- There, every time server should be stored under string values named 1,2,3 …n and so on. The server which is currently in use is determined by the default parameter which should be set to the appropriate number (the value name). You can add here a new string value and set the default parameter you have created:


- You might need to restart Windows 10 to apply the changes you made.
That’s it.
Support us
Winaero greatly relies on your support. You can help the site keep bringing you interesting and useful content and software by using these options:
If you like this article, please share it using the buttons below. It won’t take a lot from you, but it will help us grow. Thanks for your support!
The steps are the same to configure a Windows client or server as an NTP server. These steps will work on current and previous versions of windows.
First make sure the NTP service is set to Automatic. If it is disabled or set to manual, change it to automatic and start the service.
Check the registry and verify the server is enabled.
Computer\HKEY_LOCAL_MACHINE\SYSTEM\CurrentControlSet\Services\W32Time\TimeProviders\NtpServer: Enabled should be set to 1
Now that you’ve updated the registry, you need windows to read your update. You can do that any one of the following 3 ways:
- Restart the time service
- Reboot your machine
- Open an administrator command prompt and run this command to have it reread the windows time portion of the registry:
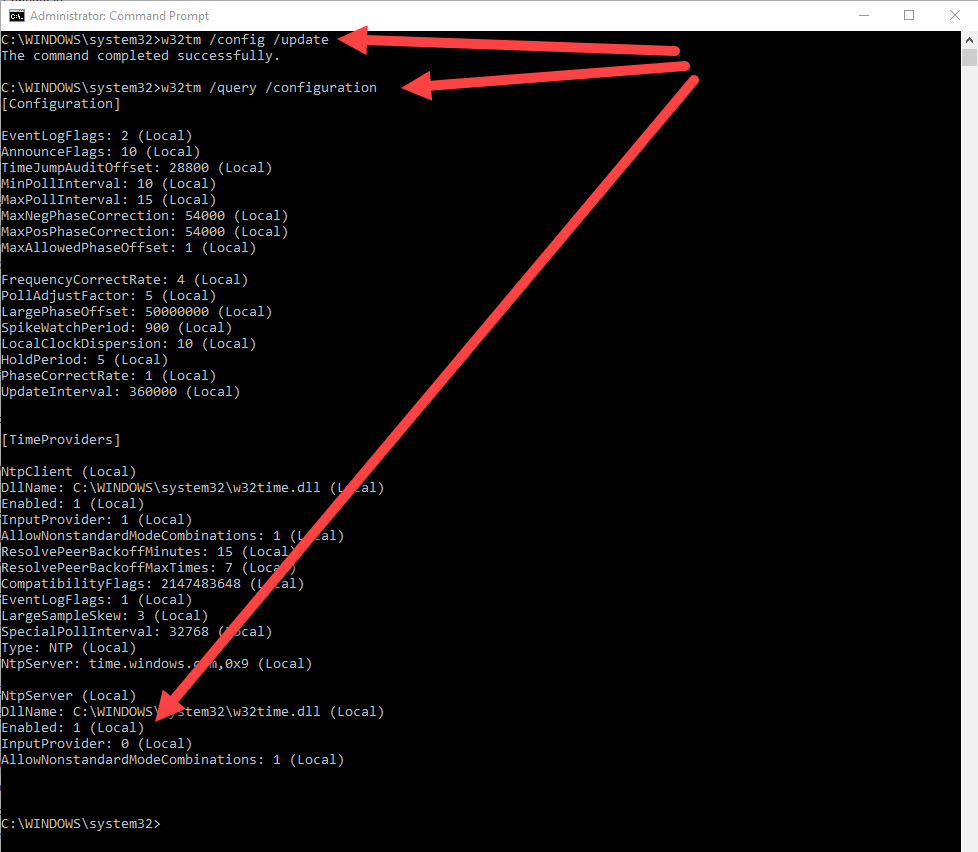
w32tm /config /update
You should see “The command completed successfully”
You can run this command at an administrator command prompt to verify your NTP server is running: w32tm /query /configuration. You should see 3rd line from the last line Enabled: 1 (Local). This is under NtpServer in the [TimeProviders] section of the results.
If you get the error “The service has not been started” go back and verify you set the Windows Time service to automatic.