
Последнее обновление: 07.09.2023
Установка сервера Mongod
Официальный сайт предоставляет пакеты дистрибутивов для различных платформ: Windows, Linux, MacOS, Solaris. И каждой платформы доступно несколько дистрибутивов.
Причем есть два вида серверов — бесплатный Community и платный Enterprise. В данном руководстве будем использовать бесплатную версию Community.
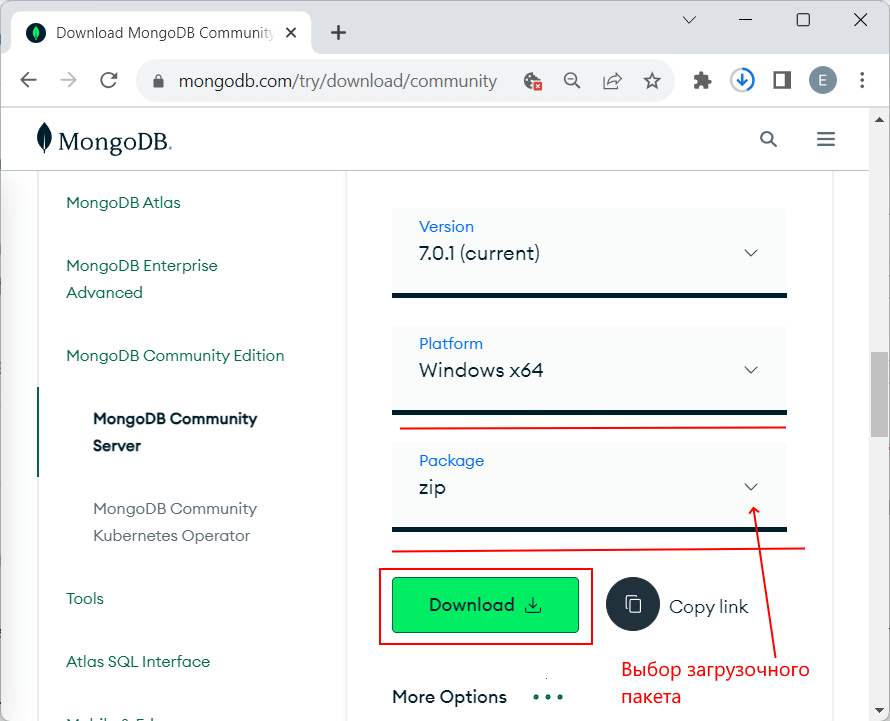
Для установки MongoDB загрузим один распространяемых пакетов с официального сайта https://www.mongodb.com/try/download/community.
Для загрузки всех необходимых файлов выберем нужную операционную систему и подходящий тип пакета. Рассмотрим на примере установки на ОС Windows.
MongoDB можно загрузить в ряде вариантов. Так, для Windows доступна загрузка установщика msi и также доступна загрузка архива zip.
В реальности нам достаточно загрузить zip-архив и распаковать в нужной нам папке. Поэтому выберем этот вариант загрузки (хотя также можно выбрать вариант установщика msi):
Если до установки уже была установлена более ранняя версия MongoDB, то ее необходимо удалить.
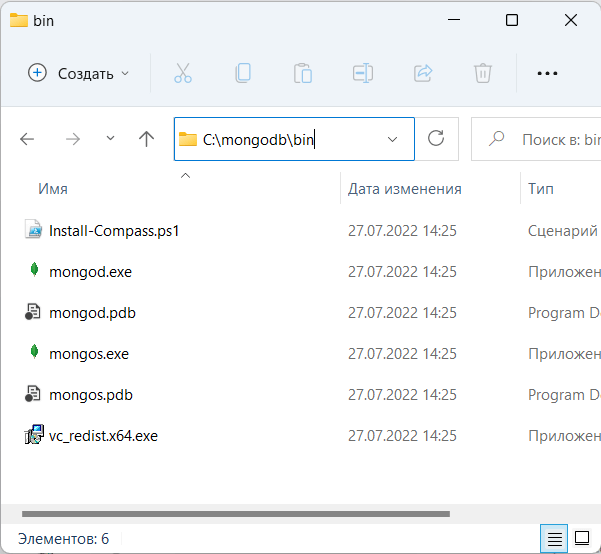
После загрузки архивного пакета распакуем его в папку C:\mongodb.
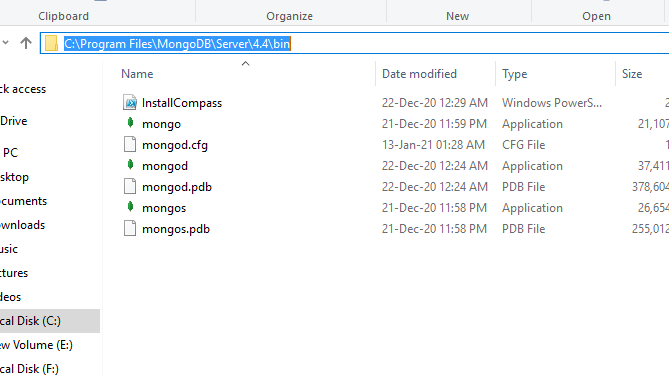
Если после установки мы откроем папку bin в распакованном архиве (C:\mongodb\bin), то сможем найти там кучу приложений, которые выполняют определенную роль. Вкратце рассмотрим их.
-
mongod: сервер баз данных MongoDB. Он обрабатывает запросы, управляет форматом данных и выполняет различные
операции в фоновом режиме по управлению базами данных -
mongos: служба маршрутизации MongoDB, которая помогает обрабатывать запросы и определять местоположение данных в кластере
MongoDB
Создание каталога для БД и запуск MongoDB
После установки надо создать на жестком диске каталог, в котором будут находиться базы данных MongoDB.
В ОС Windows по умолчанию MongoDB хранит базы данных по пути C:\data\db, поэтому, если вы используете Windows, вам надо создать
соответствующий каталог.
Если же возникла необходимость использовать какой-то другой путь к файлам, то его можно передать при запуске MongoDB во флаге
--dbpath.
Итак, после создания каталога для хранения БД можно запустить сервер MongoDB. Сервер представляет приложение mongod, которое находится
в каталоге bin в папке сервера. Для этого запустим терминал/командную строку и там введем соответствующие команды. Для ОС Windows это
будет выглядеть так:
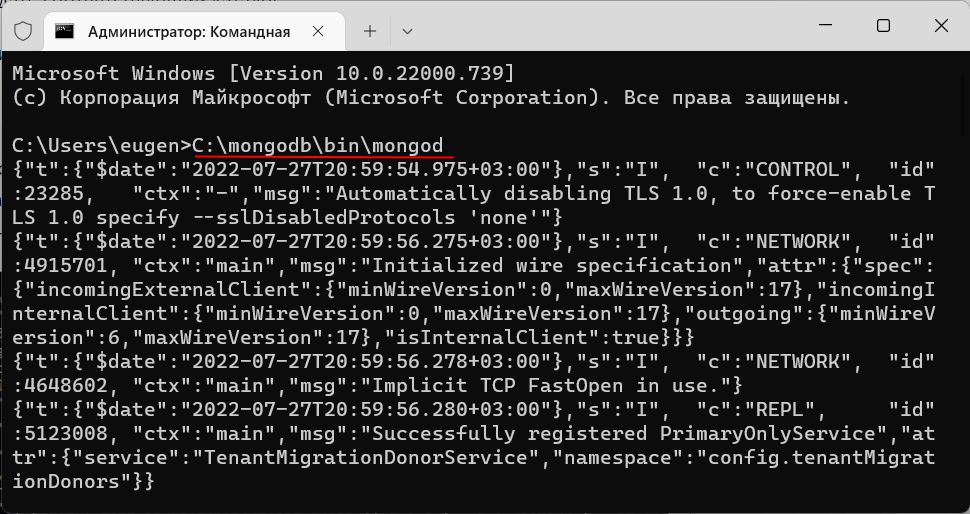
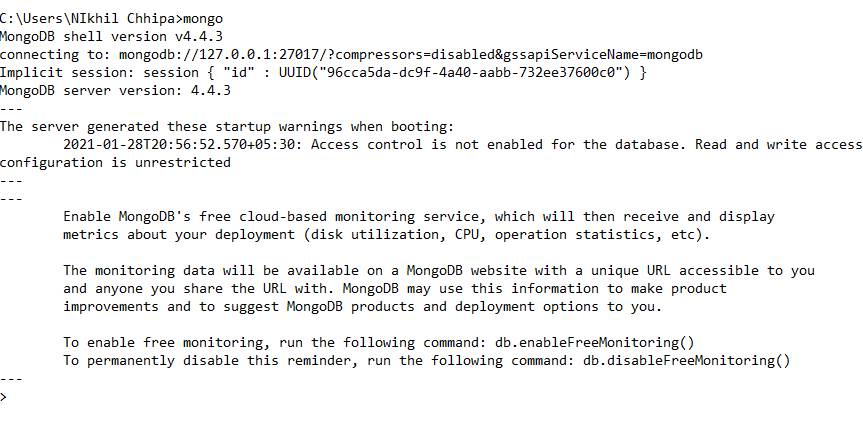
Командная строка отобразит нам ряд служебной информации, например, что сервер запускается на localhost на порту 27017.
И после удачного запуска сервера мы сможем производить операции с бд через клиент.
Установка клиента Mongosh
Выше мы установили сервер MongoDb. Однако для работы с сервером нам нужен клиент. Наиболее простым клиентом в данном случае является MongoDB Shell или mongosh —
консольная оболочка для отправки запросов к серверу, которая также предоставляется непосредственно компанией MongoDB.
Для установки клиента перейдем по адресу https://www.mongodb.com/try/download/shell
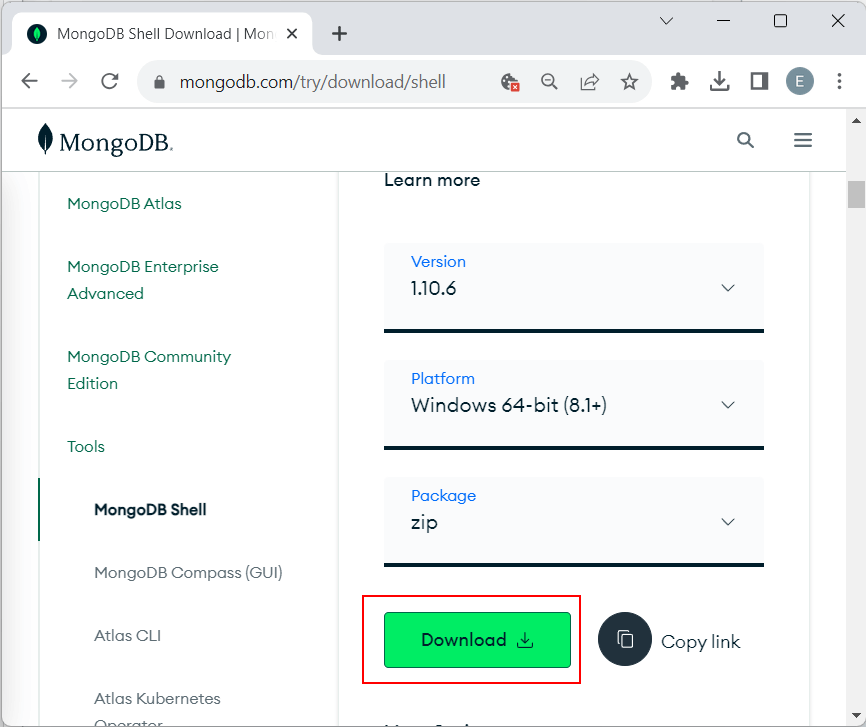
Здесь опять же мы можем выбрать версии клиента для разных операционных систем. Для Windows пакет клиента доступен в виде архива zip.
Загрузим этот пакет и распакуем его в папку C:\mongosh.
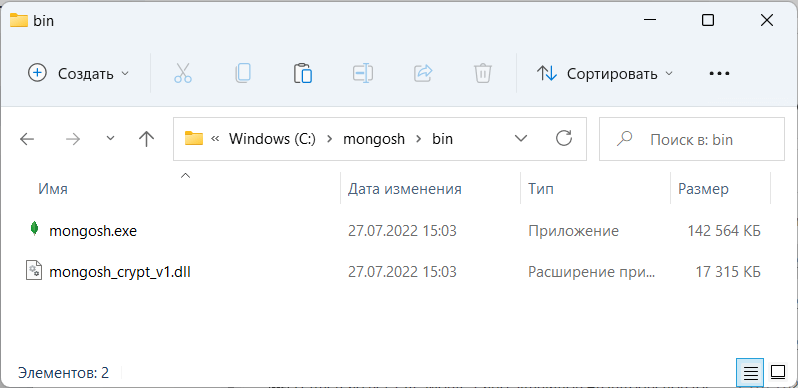
Если в распакованном архиве мы зайдем в папку bin (то есть C:\mongosh\bin), то обнаружим там консольную утилиту mongosh,
которая будет применяться для работы с сервером MongoDB:
Подключение к серверу из клиента
Используем выше установленное клиентское приложение mongosh для взаимодействия с сервером mongodb. (При работе с mongosh не стоит забывать, что у нас должен быть запущен сервер mongod).
Итак, запустим файл mongosh, который располагается в выше рассмотренной папке установки:
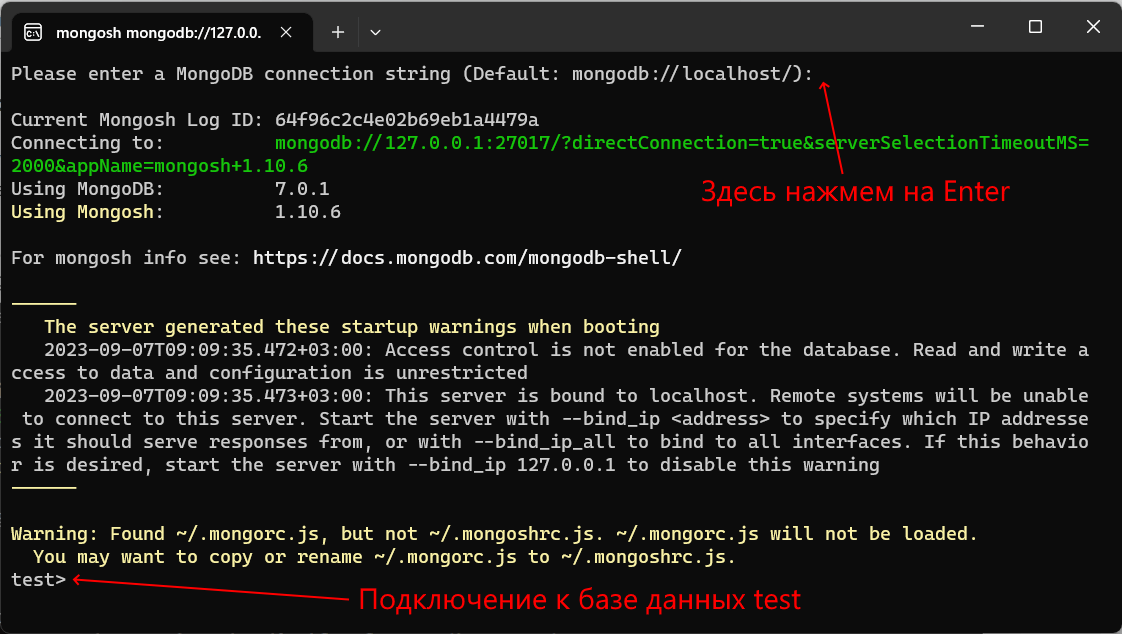
При запуске программы mongosh вначале она спросит пользователя, какую строку подключения использовать для подключения к серверу MongoDB. В этом моменте просто нажмем на Enter,
чтобы использовать строку подключения к MongoDB по умолчанию. А по умолчанию сервер mongodb запускается на порту 27017,
а полная строка подключения выглядит следующим образом: mongodb://localhost:27017 или mongodb://127.0.0.1:27017
После подключения консоль отобразит ряд служебной информации и подключится к базе данных test.
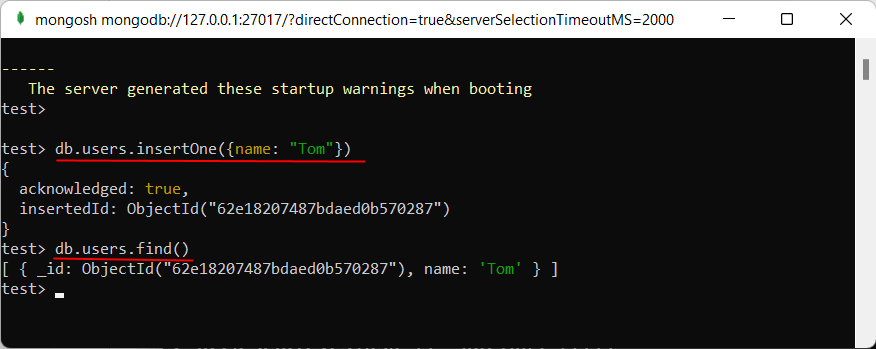
Теперь поизведем какие-либо простейшие действия. Введем в консоль последовательно следующие команды и после каждой команды нажмем на Enter:
db.users.insertOne( { name: "Tom" } )
db.users.find()
С помощью функции db.users.insertOne() в коллекцию users базы данных test добавляется объект { name: "Tom" }.
Идентификатор db представляет текущую базу данных. В нашем случае мы подключены к базе данных по умолчанию — то есть к базе данных test,
соответственно db здесь представляет базу данных test. При этом не важно, есть или нет такая бд — если ее нет, то она создается
После db идет users — это коллекция, в которую затем мы добавляем новый объект. Если в SQL нам надо создавать таблицы заранее, то коллекции
MongoDB создает самостоятельно при их отсутствии.
Описание добавляемого объекта определяется в формате, с которым вы возможно знакомы, если имели дело с форматом JSON. То есть в данном случае у объекта
определен один ключ «name», которому сопоставляется значение «Tom». То есть мы добавляем пользователя с именем Tom.
Если объект был успешно добавлен, то консоль выведет результат операции, в частности, идентификатор добавленного объекта.
А вторая команда db.users.find() выводит на экран все объекты из бд test.
Из вывода вы можете увидеть, что к начальным значениям объекта было добавлено какое-то непонятно поле ObjectId.
Как вы помните, MongoDB в качестве уникальных идентификаторов документа использует поле _id. И в данном случае ObjectId как
раз и представляет значение для идентификатора _id.
Установка драйверов MongoDB
В дальнейшем в рамках данного руководства мы будет рассматривать взаимодействие с сервером MongoDB преимущественно через выше использованную оболочку
mongo. Однако, мы также можем взаимодействовать с mongodb в наших приложениях, написанных на PHP, C++, C# и других языках программирования. И для этой цели необходим специальный драйвер.
На офсайте на странице https://docs.mongodb.com/ecosystem/drivers/ можно найти список драйверов
для всех поддерживаемых языков программирования, в частности, для PHP, C, C++, C#, Java, Go, Python, Rust, Ruby, Scala, Swift, а также для Node.js.
Работа с драйверами на конкретных языках программирования будет рассмотрена в соответствующих разделах, посвященных этим языкам..
Looking to install MongoDB on your Windows machine? This detailed guide will help you install MongoDB on Windows (Windows Server 2022, 2019, and Windows 11) quickly and efficiently. Whether you’re a developer or a beginner, follow this guide for seamless MongoDB installation, including setting up environment variables and running the MongoDB server.
Requirements for Installing MongoDB on Windows
1. Supported Versions
- MongoDB 4.4 or higher (64-bit only).
2. Compatible Operating Systems:
- Windows Server 2022
- Windows Server 2019
- Windows 11
2. Permissions Required:
The user running MongoDB services (mongod, mongos) must have membership in the following groups:
- Performance Monitor Users
- Performance Log Users
How to Install MongoDB on Windows Using MSI
To install MongoDB on Windows, first, download the MongoDB server and then install the MongoDB shell. The Steps below explain the installation process in detail and provide the required resources for the smooth download and install MongoDB.
Step 1: Download MongoDB Community Server
Go to the MongoDB Download Center to download the MongoDB Community Server.

Here, You can select any version, Windows, and package according to your requirement. For Windows, we need to choose:
- Version: 7.0.4
- OS: Windows x64
- Package: msi
Step 2: Install MongoDB
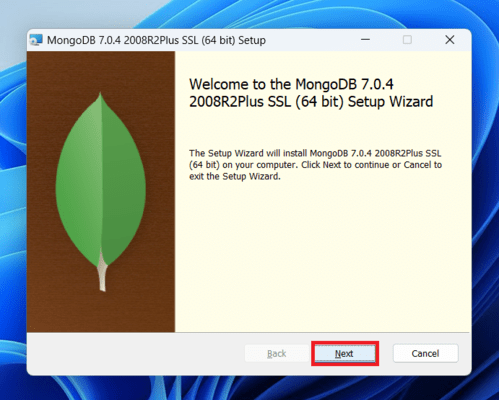
- When the download is complete open the msi file and click the next button in the startup screen:
- Now accept the End-User License Agreement and click the next button:
- Now select the complete option to install all the program features. Here, if you can want to install only selected program features and want to select the location of the installation, then use the Custom option:

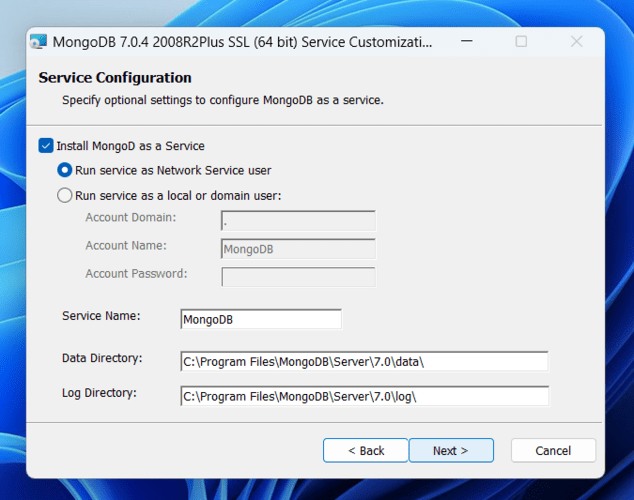
Step 3: Configure MongoDB Service
- Select “Run service as Network Service user” and copy the path of the data directory. Click Next:

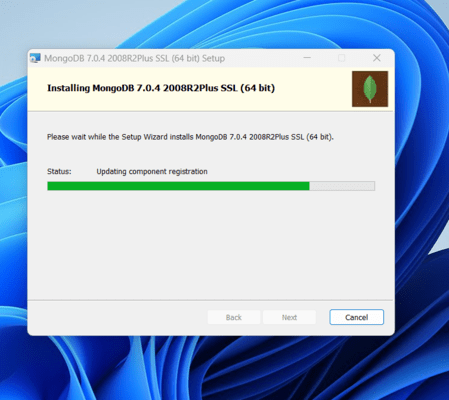
- Click the Install button to start the MongoDB installation process:

- After clicking on the install button installation of MongoDB begins:
Step 4: Complete Installation
- Now click the Finish button to complete the MongoDB installation process:
Step 5: Set Environment Variables
- Now we go to the location where MongoDB installed in step 5 in your system and copy the bin path:
- Now, to create an environment variable open system properties >> Environment Variable >> System variable >> path >> Edit Environment variable
- paste the copied link to your environment system and click Ok:

Run MongoDB Server (mongod)
Step 1. Start MongoDB Service
- After setting the environment variable, we will run the MongoDB server, i.e. mongod.
- So, open the command prompt and run the following command:
mongod
When you run this command you will get an error i.e. C:/data/db/ not found.
Step 2. Create Required Folders
- Now, Open C drive and create a folder named “data”
- Inside the data folder create another folder named “db“.
Step 3. Restart MongoDB
After creating these folders. Again open the command prompt and run the following command:
mongod
Now, this time the MongoDB server(i.e., mongod) will run successfully.

Run the MongoDB Shell (mongosh)
Starting from MongoDB version 5.0, the traditional MongoDB shell (mongo) has been deprecated. The recommended shell for interacting with MongoDB databases is now mongosh, which provides improved functionality, better syntax, and full compatibility with the latest MongoDB features.
Step 1. Connect to MongoDB Server with mongosh
- Now we are going to connect our server (mongod) with the mongo shell. So, keep that mongod window
- open a new command prompt window and type:
mongosh
- You are now connected to the MongoDB shell.
Please do not close the mongod window if you close this window your server will stop working and it will not able to connect with the mongo shell.
Step 2. Create a Database
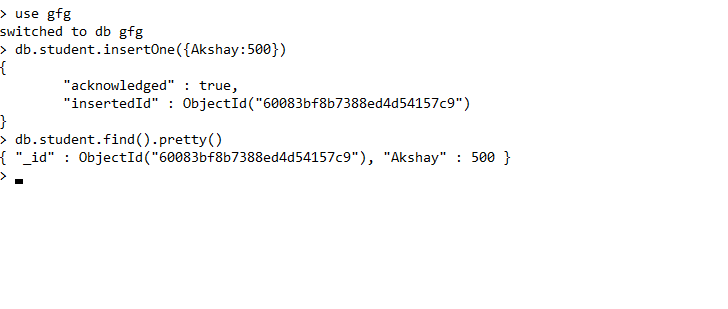
Now we can make a new database, collections, and documents in our shell. Use the following command within the mongosh shell to create a new database:
use database_name
The use Database_name command makes a new database in the system if it does not exist, if the database exists it uses that database:
use gfg
Step 3: Add Data to a Collection
Insert a document into a collection using:
db.collection_name.insertOne({field: value})
The db.Collection_name command makes a new collection in the gfg database and the insertOne() method inserts the document in the student collection:
db.student.insertOne({Akshay:500})
Installing MongoDB on Windows Without Admin Rights
Here is Step by Step process on How to Install MongoDB on Windows without Admin Rights –
Step 1: Download the MongoDB ZIP Archive
Get the ZIP version of MongoDB from the official MongoDB website.
Step 2: Extract Files
Extract the ZIP archive to a location on your computer where you have write permissions, such as your user directory.
Step 3: locate the “bin” folder
- Navigate to the extracted MongoDB directory and locate the “bin” folder.
- Open a command prompt window and navigate to the “bin” folder within the MongoDB directory.
Step 4: Run MongoDB Server Without Installation
Run the MongoDB server by executing the command with the path to the directory where you want to store MongoDB data files. Make sure to use a location where you have write permissions.
Command: mongod.exe --dbpath=path\to\data\directory, replacing "path\to\data\directory"
Step 5: Run MongoDB Shell
- MongoDB should now be running locally on your Windows system without the need for admin rights.
- You can interact with MongoDB using the MongoDB shell by running the command
mongo.exe
By following these steps, you can install and run MongoDB on Windows without admin rights, allowing you to work with MongoDB databases on your local machine.
Important Points to Remember
- The old MongoDB shell command
mongois deprecated from MongoDB version 5.0 onward. - Always use the modern
mongoshcommand for compatibility with new features. - Ensure the MongoDB server (
mongod) runs continuously while interacting throughmongosh.
Conclusion
Installing MongoDB on Windows is simple and flexible, whether we have administrative rights or not. By following the outlined steps, we can successfully set up the MongoDB server, configure the necessary environment variables, and start working with MongoDB databases using the MongoDB Shell. This guide walks us through both standard installation using MSI and manual setup without admin rights.
By following these steps, we can start using MongoDB to create and manage databases on our Windows machine. For more in-depth learning, check out our MongoDB Tutorial or MongoDB: An Introduction.
MongoDB — это документо-ориентированная база данных NoSQL, которая используется для хранения больших объемов данных. Вместо таблиц и строк, как в традиционных реляционных базах данных, в данные в MongoDB хранятся в виде документов, подобных JSON-формату.

У MongoDB открытый исходный код, и она имеет бесплатную версию. В этом материале вы узнаете, как установить MongoDB на разные операционные системы: Windows, Ubuntu и CentOS.
dbaas
В MongoDB установка на Windows начинается с загрузки дистрибутива. Переходим на официальный сайт систему управления базами данных mongodb.com и нажимаем кнопку «Products». В окне выбираем версию Community. Community — это бесплатная версия MongoDB, поэтому установим её. Выбираем версию СУБД, в нашем случае 5.0.9 и загружаем его в удобном формате — мы выбрали .msi.
После загрузки пакета установщика переходим к непосредственно к установке. Во время установки инсталлятор предложит вам сделать MongoDB службой Windows:
Служба Windows — это приложение, исполняемое при запуске операционной системой Windows и выполняющееся вне зависимости от статуса пользователя. В чем-то служба Windows схожа с демонами из Linux. Если вы по какой-то причине не хотите, чтобы MongoDB была установлена на ваше устройство как служба Windows, то снимите галочку на этом этапе.
Для установки MongoDB Compass не снимайте галочку на этом этапе:
MongoDB Compass — это графический клиент для просмотра и администрирования базы данных.
После нажатия кнопки «Next» начнется установка MongoDB. Во время процесса установщик может не обнаружить некоторых пакетов и предложит их установить. Для их полноценной установки устройство придется перезагрузить. После завершения установки откроется MongoDB Compass.
Установка MongoDB на Ubuntu
Устанавливать MongoDB будем на Ubuntu 22.04. На момент написания статьи репозиторий для Ubuntu 22.04 ещё не вышел, поэтому будет использовать репозиторий для 20.04. Для установки MongoDB на Debian 10/11 руководствуйтесь туториалом на сайте MongoDB.
Заказать облачный сервер с предустановленной ОС Ubuntu или Debian можно в Timeweb Cloud.
Настройка прокси
Репозитории MongoDB недоступны для пользователей из России, и для установки софта понадобится прокси-сервер, расположенный за рубежом. Прокси-сервер — это промежуточный узел между клиентом и целевым сервером. Для того, чтобы apt использовал прокси, его нужно прописать в настройках. Будем использовать простой SOCKS5-прокси.
Откроем конфигурационный файл прокси apt /etc/apt/apt.conf.d/proxy.conf:
sudo nano /etc/apt/apt.conf.d/proxy.confИ добавим в него информацию о прокси:
Acquire::http::Proxy "socks5h://IpAddres:port";
Acquire::https::Proxy "socks5h://IpAddres:port";
Acquire::socks::Proxy "socks5h://IpAddres:port";
Вместо IpAddres и Port необходимо указать IP-адрес вашего прокси и порт.
Шаг 1. Установка libssl1
Так как используем репозиторий не для нашей системы, то для корректной работы MongoDB необходимо установить пакет libssl1. В ином случае получим такую ошибку:
The following packages have unmet dependencies:
 mongodb-org-mongos : Depends: libssl1.1 (>= 1.1.1) but it is not installable
 mongodb-org-server : Depends: libssl1.1 (>= 1.1.1) but it is not installable
 mongodb-org-shell : Depends: libssl1.1 (>= 1.1.1) but it is not installable
Для установки пакета выполняем следующие команды в терминале:
echo "deb http://security.ubuntu.com/ubuntu focal-security main" | sudo tee /etc/apt/sources.list.d/focal-security.list
sudo apt update
sudo apt install libssl1.1
Шаг 2.
Добавляем GPG-ключ репозитория MongoDB:
curl -fsSL https://www.mongodb.org/static/pgp/server-5.0.asc | sudo apt-key add -Шаг 3.
Добавляем репозиторий MongoDB:
echo "deb [ arch=amd64,arm64 ] https://repo.mongodb.org/apt/ubuntu focal/mongodb-org/5.0 multiverse" | sudo tee /etc/apt/sources.list.d/mongodb-org-5.0.listШаг 4.
Обновляем apt:
sudo apt updateШаг 5.
Устанавливаем MongoDB:
sudo apt install -y mongodb-orgВот полный список команд для установки MongoDB на Ubuntu 22.04:
echo "deb http://security.ubuntu.com/ubuntu focal-security main" | sudo tee /etc/apt/sources.list.d/focal-security.list
sudo apt update
sudo apt install libssl1.1
curl -fsSL https://www.mongodb.org/static/pgp/server-5.0.asc | sudo apt-key add -
echo "deb [ arch=amd64,arm64 ] https://repo.mongodb.org/apt/ubuntu focal/mongodb-org/5.0 multiverse" | sudo tee /etc/apt/sources.list.d/mongodb-org-5.0.list
sudo apt update
sudo apt install -y mongodb-org
Установка MongoDB Compass
У MongoDB Compass есть три версии:
- Полная — все функции включены;
- Изолированная — все подключения, кроме как к инстансу MongoDB, отключены;
- Только для чтения — без возможности записи и удаления данных.
Установка полной версии:
wget https://downloads.mongodb.com/compass/mongodb-compass_1.32.3_amd64.deb
sudo apt install ./mongodb-compass_1.32.3_amd64.deb
Установка изолированной версии:
wget https://downloads.mongodb.com/compass/mongodb-compass-isolated_1.32.3_amd64.deb
sudo apt install ./mongodb-compass-isolated_1.32.3_amd64.deb
Установка Read-only:
wget https://downloads.mongodb.com/compass/mongodb-compass-readonly_1.32.3_amd64.deb
sudo apt install ./mongodb-compass-readonly_1.32.3_amd64.deb
MongoDB: установка на CentOS
Настройка прокси
Для установки MongoDB на CentOS нужно настроить прокси, как и в случае с Ubuntu. Откройте файл /etc/yum.conf и добавьте в него следующие строки:
proxy=http://IpAddres:port
proxy_username=login
proxy_password=password
IpAddres и Port — IP-адрес и порт вашего прокси. Login и Password — имя пользователя и пароль, если для прокси необходима авторизация.
Теперь создадим репозиторий /etc/yum.repos.d/mongodb-org-5.0.repo для установки MongoDB с помощью yum:
[mongodb-org-5.0]
name=MongoDB Repository baseurl=https://repo.mongodb.org/yum/redhat/$releasever/mongodb-org/5.0/x86_64/ gpgcheck=1
enabled=1
gpgkey=https://www.mongodb.org/static/pgp/server-5.0.asc
Установим MongoDB:
sudo yum install -ymongodb-orgЗаключение
В этом материале мы разобрали, как установить MongoDB на 3 разные операционные системы. MongoDB — это гибкая и мощная система управления базами данных, которая подойдет для проектов без сложной структуры. К слову, в скором времени MongoDB появится на Timeweb Cloud как облачная база данных (Database-as-a-service).
В официальном канале Timeweb Cloud собрали комьюнити из специалистов, которые говорят про IT-тренды, делятся полезными инструкциями и даже приглашают к себе работать.
In this MongoDB tutorial, I am listing down the steps to install MongoDB on Windows machine. Also, we will learn about a few basic operations related to starting and shutting down MongoDB.
1. Download MongoDB
There are three builds of MongoDB for Windows:
- MongoDB for Windows Server 2008 R2 edition [Download link]
- MongoDB for Windows 64-bit [Download link]
- MongoDB for Windows 32-bit [Download link]
To find which version of Windows you are running, enter the following command in the command prompt:
c:\> wmic os get osarchitectureMore download options are given in official website of MongoDB.
2. How to Install MongoDB
The links above will download zip files you extract directly onto any place in the system of your choice. I have extracted them in “d:/mongodb“. So, all code samples in this post and future posts will refer to this location.
It is recommended to add d:/mongodb/bin to Windows environment variable so that you can directly access MongoDB’s commands in the command prompt.
Also, please create the following directories inside d:/mongodb:
- D:\mongodb\data
- D:\mongodb\log
3. Create mongo.config Configuration File
This is an important step before marching ahead. Create a normal text file in location d:/mongodb and save it with the name mongo.config. Now place the below configuration options in the file. You can change the option’s values at your will.
##Which IP address(es) mongod should bind to.
bind_ip = 127.0.0.1

##Which port mongod should bind to.
port = 27017

##I set this to true, so that only critical events and errors are logged.
quiet = true

##store data here
dbpath=D:\mongodb\data

##The path to the log file to which mongod should write its log messages.
logpath=D:\mongodb\log\mongo.log

##I set this to true so that the log is not overwritten upon restart of mongod.
logappend = true

##log read and write operations
diaglog=3

##It ensures write durability and data consistency much as any journaling scheme would be expected to do.
##Only set this to false if you don’t really care about your data (or more so, the loss of it).
journal = true
4. How to Start and Shutdown MongoDB Server
To start the MongoDB server, use the mongod command in the command prompt:
D:\mongodb\bin>mongod --config D:\mongodb\mongo.config --journal

2014-05-25T16:51:18.433+0530 warning: --diaglog is deprecated and will be removed in a future release
2014-05-25T16:51:18.434+0530 diagLogging level=3
2014-05-25T16:51:18.435+0530 diagLogging using file D:\mongodb\data/diaglog.5381d22e
To connect to MongoDB from the command prompt, use the mongo command:
D:\mongodb\bin>mongo

MongoDB shell version: 2.6.1
connecting to: test
Welcome to the MongoDB shell.
For interactive help, type "help".
For more comprehensive documentation, see   https://www.mongodb.com/docs/
Questions? Try the support group   https://groups.google.com/forum/!forum/mongodb-user
Server has startup warnings:
2014-05-25T16:52:09.158+0530 [initandlisten]
2014-05-25T16:52:09.158+0530 [initandlisten] ** NOTE: This is a 32 bit MongoDB binary.
2014-05-25T16:52:09.158+0530 [initandlisten] **       32 bit builds are limited to less than 2GB of data (or less with --jour
nal).
2014-05-25T16:52:09.158+0530 [initandlisten] **       See https://www.mongodb.com/docs/manual/faq/fundamentals/
2014-05-25T16:52:09.158+0530 [initandlisten]
To shutdown the MongoDB server, you must be an authorized user. So after getting auth complete, use the below command in the command prompt:
> use admin
switched to db admin

> db.shutdownServer()

2014-05-25T19:55:25.221+0530 DBClientCursor::init call() failed
server should be down...
2014-05-25T19:55:25.224+0530 trying reconnect to 127.0.0.1:27017 (127.0.0.1) failed
2014-05-25T19:55:26.225+0530 warning: Failed to connect to 127.0.0.1:27017, reason: errno:10061 No connection could be made b
ecause the target machine actively refused it.
2014-05-25T19:55:26.225+0530 reconnect 127.0.0.1:27017 (127.0.0.1) failed failed couldn't connect to server 127.0.0.1:27017 (
127.0.0.1), connection attempt failed

> quit()
5. How to Install MongoDB Windows Service
To install the window service, use the below command:
mongod --config D:\mongodb\mongo.config --installStart the windows service from the command prompt:
net start MongoDBStop the windows service from the command prompt:
net stop MongoDBRemove the windows service:
mongod --removeSample run of all above four commands is below:
D:\mongodb\bin>mongod --config D:\mongodb\mongo.config --install

2014-05-25T20:07:41.191+0530 warning: --diaglog is deprecated and will be removed in a future release
2014-05-25T20:07:41.192+0530 diagLogging level=3
2014-05-25T20:07:41.193+0530 diagLogging using file D:\mongodb\data/diaglog.53820035

D:\mongodb\bin>net start MongoDB

The MongoDB service was started successfully.

D:\mongodb\bin>net stop MongoDB

System error 109 has occurred.

The pipe has been ended.

D:\mongodb\bin>mongod --remove

2014-05-25T20:09:32.514+0530
2014-05-25T20:09:32.515+0530 warning: 32-bit servers don't have journaling enabled by default. Please use --journal if you wa
nt durability.
2014-05-25T20:09:32.515+0530
2014-05-25T20:09:32.518+0530 Trying to remove Windows service 'MongoDB'
2014-05-25T20:09:32.520+0530 Service 'MongoDB' removed
6. Download/Use MongoDB Java Driver
Download the MongoDB java driver (mongo-java-driver-2.9.3.jar) from this download link. It’s a jar file you need to include in your classpath or copy in /lib folder in the project where you want to use MongoDB.
7. Verify MongoDB Connection from Java Application
To verify that MongoDB has been installed and working properly, execute the below program:
import java.net.UnknownHostException;
import java.util.List;
import com.mongodb.MongoClient;

public class VerifyMongoDBInstallation {

  public static void main(String[] args) throws UnknownHostException {

    MongoClient mongo = new MongoClient("localhost", 27017);

    List<String> dbs = mongo.getDatabaseNames();
    for (String db : dbs) {
      System.out.println(db);
    }
  }
}
That’s all for MongoDB windows installation, startup and shutdown operations. Next, we will learn about some CRUD operations. Follow me to stay tuned.
Happy Learning !!

MONGODB
Mar 05, 2025
5 Min Read
6907 Views
(Last Updated)
Embarking on a MongoDB install on Windows marks a significant first step towards harnessing the power of one of the most popular NoSQL databases used in web application development and real-time storage.
This guide aims to walk you through each critical phase, from initial download to configuring MongoDB as a Windows service, ensuring a robust installation foundation.
By focusing on a step-by-step approach, you’ll be equipped to verify your installation, connect to MongoDB, and start leveraging its full potential, laying down the groundwork for advanced development and database management tasks.
Table of contents
- Installing MongoDB in 5 Simple Steps:
- 1) System Requirements and Pre-installation Checklist
- 2) Downloading and Setting Up MongoDB
- 3) Installing MongoDB on Windows
- 4) Configuring MongoDB as a Windows Service
- 5) Verifying Installation and Connecting to MongoDB
- Concluding Thoughts…
- FAQs
- Can I install MongoDB locally?
- How to run MongoDB in the terminal?
- Where is MongoDB located?
- What is MongoDB used for?
Installing MongoDB in 5 Simple Steps:
1) System Requirements and Pre-installation Checklist
Supported Windows Versions
MongoDB 7.0 Community Edition is compatible with the following 64-bit Windows versions on x86_64 architecture:
- Windows Server 2022
- Windows Server 2019
- Windows 11
It is important to note that MongoDB does not support the Windows Subsystem for Linux (WSL). For Linux installations, a supported Linux system is required.
Required Hardware Specifications
To ensure MongoDB runs smoothly on your system, the following hardware specifications are recommended:
- Disk Space: At least 10 GB of free disk space, plus additional space necessary for your data.
- RAM: Minimum of 4 GB, though more may be required depending on your usage patterns.
- CPU: MongoDB requires x86_64 microarchitectures. For Intel, a Sandy Bridge or later Core processor is necessary. For AMD, a Bulldozer or later processor is required.
Checking System Compatibility
Before installing MongoDB on Windows, ensure your system does not have Hyper-V running if you plan to use VirtualBox, as Microsoft does not support VirtualBox on Hyper-V. Additionally, check the MongoDB version compatibility:
- For MongoDB versions prior to 7.0, Windows Server 2016 is supported.
- For MongoDB 7.0 and later, Windows Server 2019 is recommended.
To check the MongoDB version you are currently using, you can run the command:
mongod --versionThis pre-installation checklist ensures that your system meets all requirements to achieve optimal performance and stability when running MongoDB.
Before diving into the next section, ensure you’re solid on full-stack development essentials like front-end frameworks, back-end technologies, and database management. If you are looking for a detailed Full Stack Development career program, you can join GUVI’s Full Stack Development Career Program with Placement Assistance. You will be able to master the MERN stack (MongoDB, Express.js, React, Node.js) and build real-life projects.
Additionally, if you want to explore MongoDB in a self-paced course, try GUVI’s self-paced MongoDB certification course.
2) Downloading and Setting Up MongoDB
Navigating to MongoDB Official Website
To begin the MongoDB installation process on your Windows system, first, navigate to the MongoDB official download page. This page will guide you to the MongoDB Community Server download section, where you can start the process of downloading the necessary installation package.

Selecting the Correct MongoDB Version
- Once you are on the MongoDB download page, you will need to make several selections to ensure you download the correct installer for your system.
- Start by selecting the appropriate version of MongoDB. For most users, the latest stable release is recommended for optimal security and performance.
- However, if you have specific requirements, you may choose an older version.
- Ensure your selections match your Windows system specifications, especially choosing the 64-bit version as the 32-bit versions are not compatible with MongoDB.

Downloading the MongoDB Installer (MSI Package)
- After selecting the version and confirming your operating system as Windows, proceed to choose the ‘MSI’ as the package type.
- This option is specifically for Windows users and provides an installer package file format used by Windows. Once all options are correctly set, click the green ‘Download’ button.
- The MongoDB
.msiinstaller file will begin downloading and should appear in your default download location, typically theDownloadsfolder.
- Navigate to this folder, and double-click on the
.msifile to launch the installation wizard, which will guide you through the setup process.
Must Read: MongoDB vs. MySQL: Which Database Should You Learn?
3) Installing MongoDB on Windows
Running the MongoDB Installer
- Initiate the Installation: Locate the downloaded MongoDB
.msifile in yourDownloadsfolder. Double-click on the file to start the installation wizard which will guide you through the setup process.


Choosing the Installation Type
- Setup Options: In the installation wizard, you will be prompted to choose between ‘Complete’ and ‘Custom’ setup types.
- Complete Setup: This option installs MongoDB with all features to the default location and is recommended for most users.
- Custom Setup: This allows you to select specific components to install and choose installation locations.

Configuring Network Options and Data Directories
- Service Configuration: Decide if you want to run MongoDB as a Windows service. This can be set during the installation.
- Run as Service: Choose to run MongoDB as a service, which will start MongoDB automatically with Windows.
- Data Directory and Log Directory: Specify paths for data storage and logs. If these directories do not exist, the installer will create them and set appropriate permissions.
- Network Configuration: Configure network settings during installation to bind MongoDB to a specific IP address or leave the default localhost (127.0.0.1).

Completing the Installation Process
- Install MongoDB Compass (Optional): You can choose to install MongoDB Compass along with the MongoDB server. This GUI tool helps in managing your database.

- Finalize Installation: Review your settings and click ‘Install’ to begin the installation process. A progress bar will display the installation status.

- Launch MongoDB: Once the installation is complete, you can start MongoDB using the
mongodcommand in the command prompt if it’s not set to run as a service. Ensure that themongod.exeprocess is running successfully by checking for the ‘waiting for connections’ message in the console output.

Also Explore: A Comprehensive Guide to Data Modeling in MongoDB [2024]
4) Configuring MongoDB as a Windows Service
Understanding the Benefits of MongoDB as a Service
Running MongoDB as a Windows service provides several advantages that enhance both the manageability and reliability of your database system. Here are the key benefits:
- Automatic Startup: MongoDB starts automatically with the system, ensuring availability without manual intervention.
- Runs in the Background: Operates quietly in the background, freeing you from maintaining an open terminal session.
- Control and Manageability: Offers straightforward commands for starting, stopping, and restarting MongoDB, simplifying database management.
- Enhanced Security: Configuring MongoDB as a service allows for more robust security settings and user permissions.
- Scalability: Facilitates easier scaling in multi-server environments, streamlining operations across different machines.
Setting up MongoDB Service via the Command Line
To install MongoDB as a service on your Windows machine, follow these steps:
- Open Command Prompt as Administrator: This ensures you have the necessary permissions to create a service.
- Navigate to Your MongoDB Installation: Change the directory to where
mongod.exeis located, typicallyC:\Program Files\MongoDB\Server\4.2\bin. - Run the Installation Command: Execute the command:
mongod --config "C:\mongodb\mongod.cfg" --install- Ensure your configuration file (
mongod.cfg) specifies thesystemLog.pathandstorage.dbPath.
Verifying MongoDB Service Status
After setting up MongoDB as a service, it’s important to verify that it is running correctly:
- Check Service Status: Use the
services.msccommand to open the Windows Services management console. Locate the MongoDB service and check its status. - Using Command Line: Alternatively, you can check the service status using the command:
sc query MongoDB- Look for
STATEin the output to confirm if the service is running (RUNNINGstate).
By configuring MongoDB as a Windows service, you ensure that your database system is robust, secure, and efficiently managed, ready to support your applications reliably.
Must Explore: Top 7 Reasons To Learn MongoDB!
5) Verifying Installation and Connecting to MongoDB
Testing MongoDB Installation
- Verify the MongoDB Service: Ensure that the MongoDB server is running by opening the Command Prompt and typing:
mongod --version- This command returns the version of MongoDB installed, confirming the installation was successful.
- Check for Active Connections: Use the command:
netstat -an | find "27017"- This checks if MongoDB’s default port 27017 is active, indicating the server is running and listening for connections.
Launching and Using the Mongo Shell
- Open the Mongo Shell: After confirming the MongoDB service is active, launch the Mongo shell by typing:
mongoin the Command Prompt. This connects to your MongoDB instance running on localhost with the default port.
- Navigating the Shell: Once inside the Mongo shell, you can interact with your MongoDB instance. Start by checking the current database with:
dbwhich should return test, the default database.
Performing Basic MongoDB Operations
- Listing Databases: To view all available databases, use the command:
show dbsThis displays all databases currently on the MongoDB server.
- Switching Databases: To switch to a specific database, use:
use <database_name>Replace <database_name> with the name of the database you want to access.
- Creating and Querying Collections: This formats the output for better readability.
- Create a Collection: If you need to create a new collection, type:
db.createCollection('newCollection')- Insert Data: Add data to the collection using:
db.newCollection.insert({name: "test", value: "1"})- Find Data: Retrieve the data by running:
db.newCollection.find().pretty()By following these steps, you can verify that MongoDB has been installed correctly on your system, connect to the MongoDB instance using the Mongo shell, and perform basic operations to interact with your data. This ensures that your MongoDB installation is ready for further development and data management tasks.
Also Explore The Ultimate Battle: MongoDB vs SQL – Top Differences [2024]
Kickstart your Full Stack Development journey by enrolling in GUVI’s certified Full Stack Development Career Program with Placement Assistance where you will master the MERN stack (MongoDB, Express.js, React, Node.js) and build interesting real-life projects. This program is crafted by our team of experts to help you upskill and assist you in placements.
Alternatively, if you want to explore MongoDB in a self-paced course, try GUVI’s self-paced MongoDB certification course.
Concluding Thoughts…
Through the detailed steps outlined in this guide, beginning with system requirements and rounding off with verifying MongoDB’s installation and connectivity, the foundation for MongoDB on a Windows system has been thoroughly established.
Not only does this set the stage for leveraging MongoDB’s dynamic NoSQL database capabilities for web application development and real-time storage management, but it also equips you with the fundamental knowledge to tackle advanced database management and development tasks with confidence.
Also Find Out How to Install React.js on Windows: A Complete Guide
FAQs
Can I install MongoDB locally?
Yes, MongoDB can be installed locally on your machine. You can download the appropriate installer from the MongoDB website and follow the installation instructions provided. Refer to the guide above to learn how in detail.
How to run MongoDB in the terminal?
To run MongoDB in the terminal, you need to start the MongoDB server by executing the ‘mongod’ command. Then, you can use the ‘mongo’ command to interact with the MongoDB instance.
Where is MongoDB located?
MongoDB is typically located in the ‘bin’ directory of the installation directory on your system. The exact location may vary depending on how MongoDB was installed and your system configuration.
What is MongoDB used for?
MongoDB is a popular NoSQL database used for storing and managing unstructured data. It is commonly used in web development, mobile app development, and big data applications for its scalability, flexibility, and ease of use.
Career transition
About the Author
Jaishree Tomar
A recent CS Graduate with a quirk for writing and coding, a Data Science and Machine Learning enthusiast trying to pave my own way with tech. I have worked as a freelancer with a UK-based Digital Marketing firm writing various tech blogs, articles, and code snippets. Now, working as a Technical Writer at GUVI writing to my heart’s content!
View all post by Jaishree Tomar