
Basic Steps#
-
Start the notebook server from the command line:
-
You should see the notebook open in your browser.
Starting the Notebook Server#
After you have installed the Jupyter Notebook on your computer, you are ready
to run the notebook server. You can start the notebook server from the
command line (using Terminal on Mac/Linux,
Command Prompt on Windows) by running:
This will print some information about the notebook server in your terminal,
including the URL of the web application
(by default, http://localhost:8888):
$ jupyter notebook
[I 08:58:24.417 NotebookApp] Serving notebooks from local directory: /Users/catherine
[I 08:58:24.417 NotebookApp] 0 active kernels
[I 08:58:24.417 NotebookApp] The Jupyter Notebook is running at: http://localhost:8888/
[I 08:58:24.417 NotebookApp] Use Control-C to stop this server and shut down all kernels (twice to skip confirmation).
It will then open your default web browser to this URL.
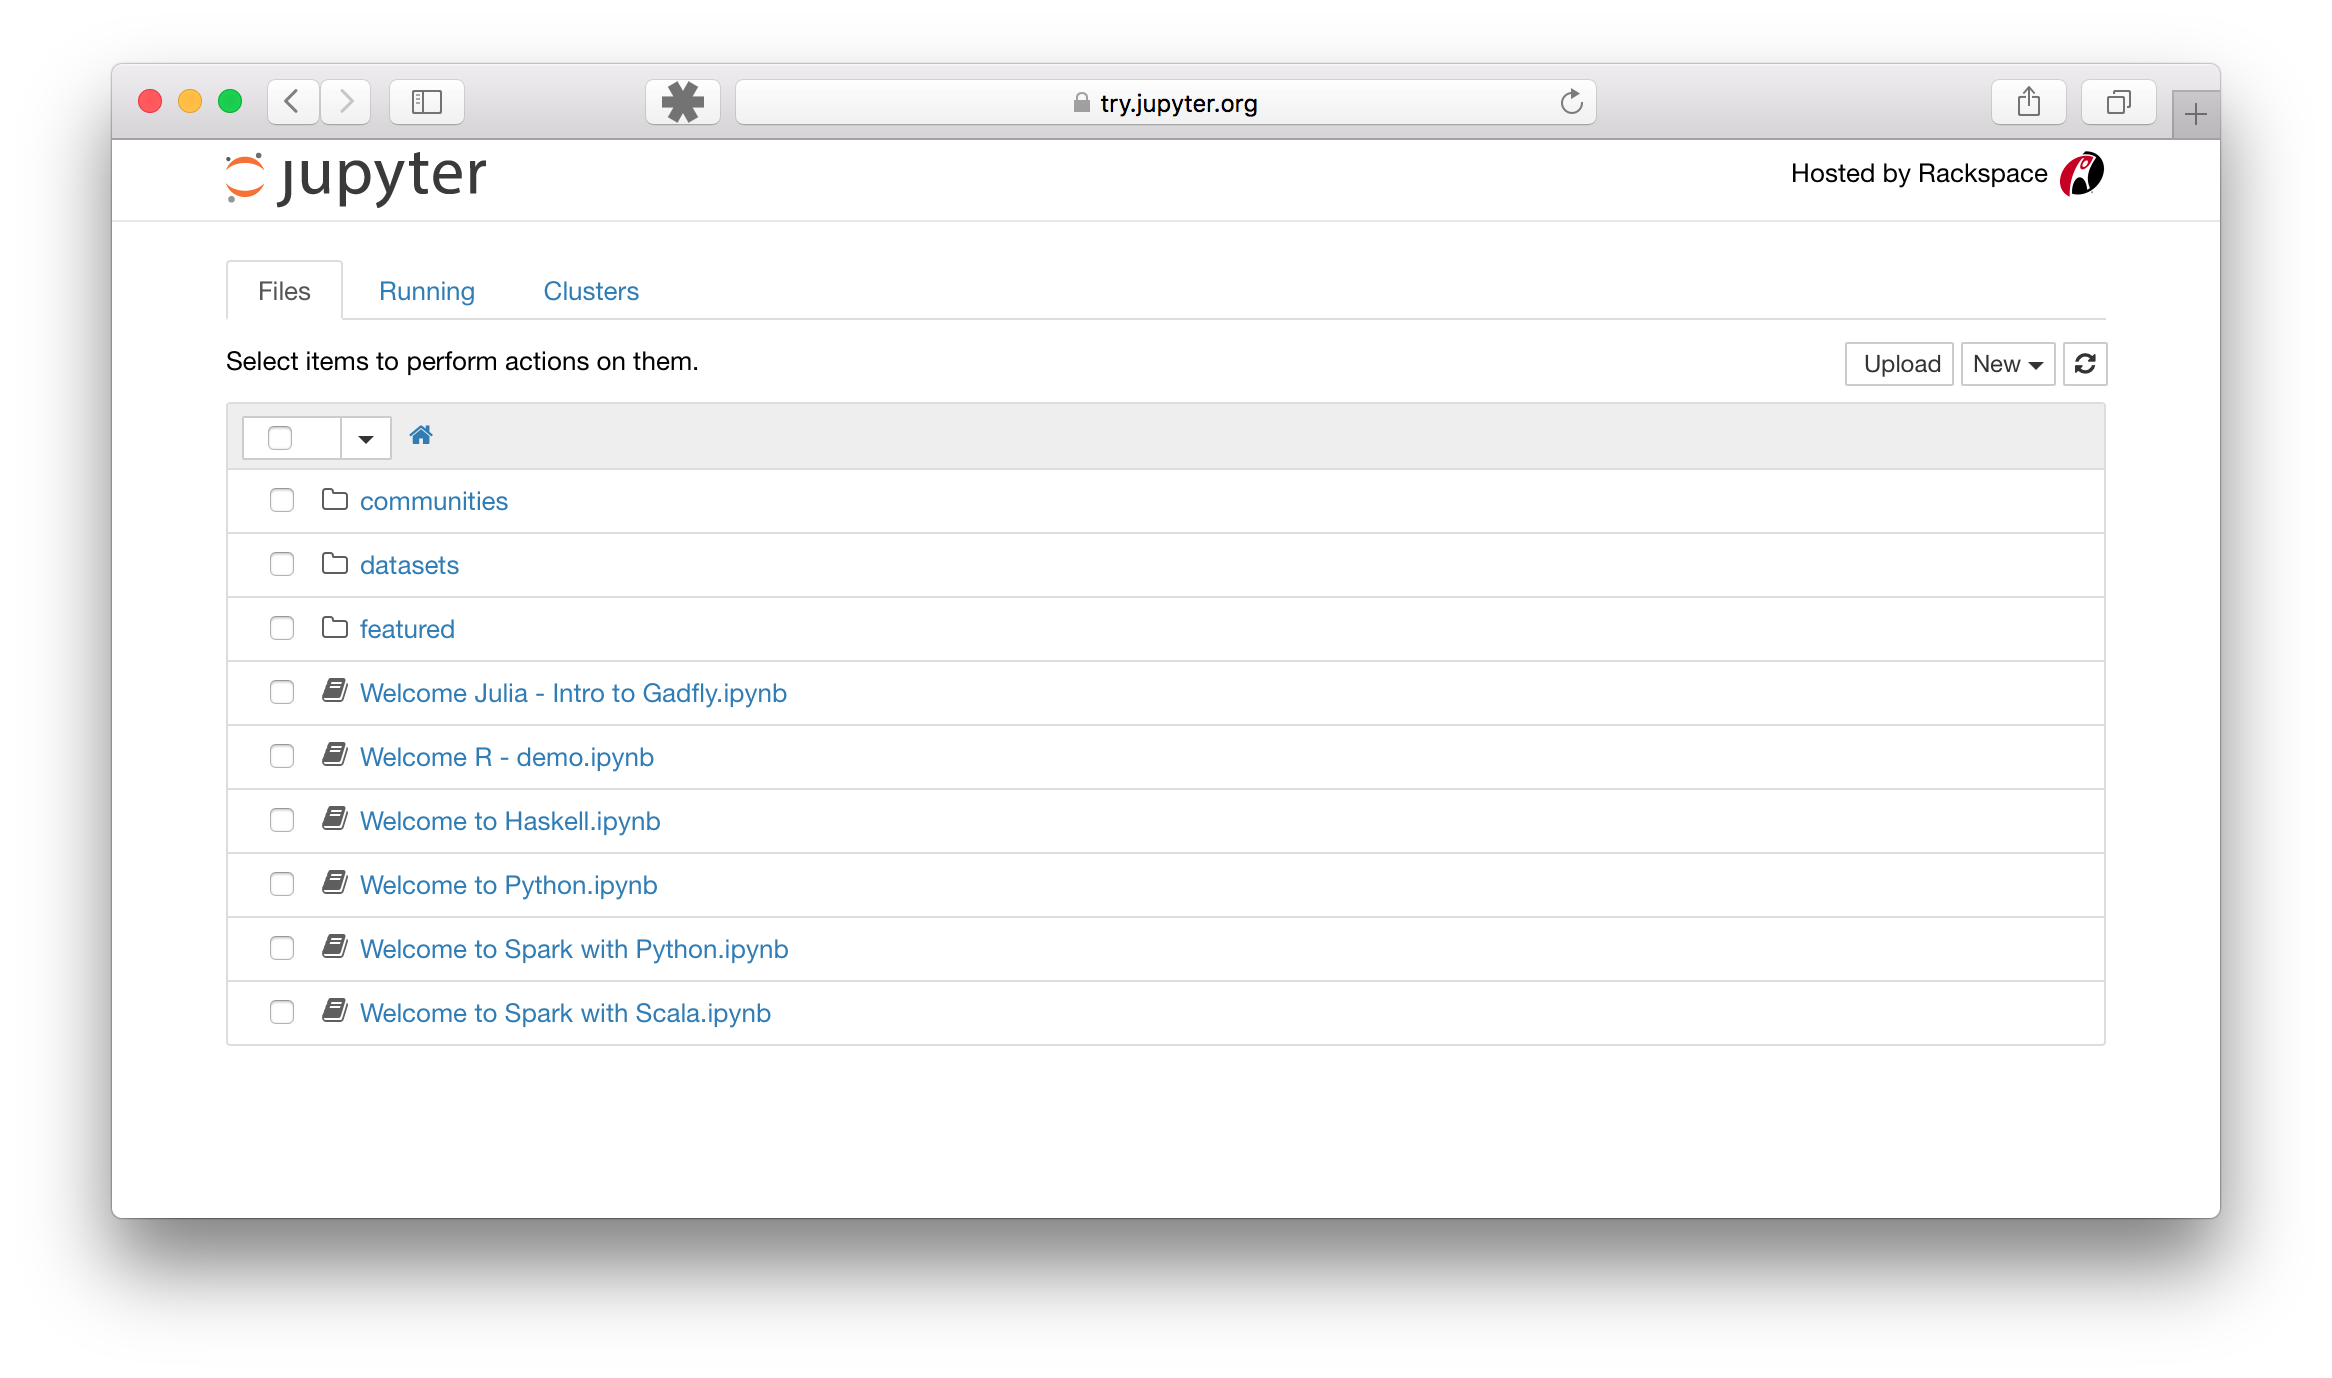
When the notebook opens in your browser, you will see the Notebook Dashboard,
which will show a list of the notebooks, files, and subdirectories in the
directory where the notebook server was started. Most of the time, you will
wish to start a notebook server in the highest level directory containing
notebooks. Often this will be your home directory.
Notebook Dashboard
Introducing the Notebook Server’s Command Line Options#
How do I open a specific Notebook?#
The following code should open the given notebook in the currently running notebook server, starting one if necessary.
jupyter notebook notebook.ipynb
How do I start the Notebook using a custom IP or port?#
By default, the notebook server starts on port 8888. If port 8888 is
unavailable or in use, the notebook server searches the next available port.
You may also specify a port manually. In this example, we set the server’s
port to 9999:
jupyter notebook --port 9999
How do I start the Notebook server without opening a browser?#
Start notebook server without opening a web browser:
jupyter notebook --no-browser
How do I get help about Notebook server options?#
The notebook server provides help messages for other command line arguments
using the --help flag:
Using a command-line interface#
Notebooks can be executed from your terminal using the execute subcommand. It expects notebook paths as input arguments and accepts optional flags to modify the default behavior.
Running a notebook is this easy.
jupyter execute notebook.ipynb
You can pass more than one notebook as well.
jupyter execute notebook.ipynb notebook2.ipynb
By default, notebook errors will be raised and printed into the terminal. You can suppress them by passing the --allow-errors flag.
jupyter execute notebook.ipynb --allow-errors
For more sophisticated execution options, consider the papermill library.
I had the exact same problem and it was driving me crazy. Other answers provide a solution, but they don’t explain why you and I are having this problem.
I will try to explain why this is happening and then provide some solutions.
You can go to the end to see the TL;DR.
1)What’s going on? Why is this error happening?
I’ll try to make a step-by-step answer so everything is explained clearly.
If you think it’s too basic at the beginning, go to the end of this «article».
I’ll first start with common things like running the python shell from the terminal or running pip. You’ll see why you can do that from the terminal and we’ll end up on why and how you can run the jupyter notebook from the terminal as well.
Ready? Let’s start!
Have you ever wondered why you can type python in the terminal (command prompt) and suddenly start the Python interpreter?
    Microsoft Windows [Version 10.0.18363.1440]
    (c) 2019 Microsoft Corporation. All rights reserved.

    C:\Users\YOUR-USERNAME>python
    Python 3.9.1 (tags/v3.9.1:1e5d33e, Dec  7 2020, 17:08:21) [MSC v.1927 64 bit (AMD64)] on win32
    Type "help", "copyright", "credits" or "license" for more information.
    >>>
Enter fullscreen mode
Exit fullscreen mode
You probably already know (but maybe don’t) that this is because Python was added to the Windows PATH environment variable. You probably did it at installation time or afterwards.
But, what is this PATH environment variable?
It basically allows you to run any executables, that are located inside
the paths specified in the variable, at the command prompt without
having to give the full path to the executable.
You can check the content of that PATH variable with:
    >>> import sys
    >>> for path in sys.path:
            print(path)
Enter fullscreen mode
Exit fullscreen mode
    C:\Users\YOUR-USERNAME\AppData\Local\Programs\Python\Python39\python39.zip
    C:\Users\YOUR-USERNAME\AppData\Local\Programs\Python\Python39\DLLs
    C:\Users\YOUR-USERNAME\AppData\Local\Programs\Python\Python39\lib
    C:\Users\YOUR-USERNAME\AppData\Local\Programs\Python\Python39
    C:\Users\YOUR-USERNAME\AppData\Local\Programs\Python\Python39\lib\site-packages
    ... (some other paths were taken out for clarity)
Enter fullscreen mode
Exit fullscreen mode
You can see this folder: C:\Users\YOUR-USERNAME\AppData\Local\Programs\Python\Python39. This is the place where Python version 3.9 is installed.
Let’s check its content:
    <DIR>   DLLs
    <DIR>   Doc
    <DIR>   etc
    <DIR>   include
    <DIR>   Lib
    <DIR>   libs
    <DIR>   Scripts
    <DIR>   share
    <DIR>   tcl
    <DIR>   Tools
            LICENSE.txt
            NEWS.txt
            python.exe
            python3.dll
            python39.dll
            pythonw.exe
            vcruntime140.dll
            vcruntime140_1.dll
Enter fullscreen mode
Exit fullscreen mode
Voilà! We have the python.exe file (an executable). We have a Python executable file in the PATH, that’s why you can start the Python interpreter from the terminal with just typing python. If this wasn’t the case you would have to type the full path to the executable file in the terminal:
C:\Users\YOUR-USERNAME> C:\Users\YOUR-USERNAME\AppData\Local\Programs\Python\Python39\python)
Enter fullscreen mode
Exit fullscreen mode
Instead of just:
C:\Users\YOUR-USERNAME> python
Enter fullscreen mode
Exit fullscreen mode
And what about when you use pip?
It’s the same principle. You can run pip from the terminal because there is a pip executable file in the PATH variable.
If you go to C:\Users\YOUR-USERNAME\AppData\Local\Programs\Python\Python39\Scripts\ (which is in the PATH showed above) you’ll see many executables files. One of them is pip. Actually I have three versions: pip, pip3.9 and pip3.
The Scripts folder allows exectuable files to be run from the terminal. Like pip or other libraries that you intend to run directly from the terminal. The Scripts folder:
…is not intended for you, it’s for scripts that are installed as
components of modules that you install. For example, pip is a module,
but it also has a wrapper script by the same name, pip, which will be
installed in that directory.If you put something there and it is properly in your PATH, then it
should be executable
That wrapper script would be the pip executable file. When this executable file is run, it locates the pip folder in the Python installation folder and runs pip.
But you could also run pip directly from the installation folder (C:\Users\YOUR-USERNAME\AppData\Local\Programs\Python\Python39\Lib\site-packages), without needing the executable pip file.
But, how can you do it?
I’m glad you ask. There is a Python way to run modules as the main module (without the need to import it).
python -m pip
Enter fullscreen mode
Exit fullscreen mode
When you run a module directly its name becomes __main__. What -m does is:
Search
sys.pathfor the named module and execute its contents as the__main__module.
What is __main__?
'__main__'is the name of the scope in which top-level code executes.A module’s
__name__is set equal to'__main__'when read from standard
input, a script, or from an interactive prompt.
…
I guess that the pip executable does something similar, or at least, has the same effect: to start pip.
2)What does this have to do with the Jupyter Notebook?!
Think of the Jupyter Notebook as the same as pip. If you want to run jupyter in the terminal, you need an executable that it’s on the PATH.
We have already seen that the executables of modules like pip or jupyter are located here C:\Users\YOUR-USERNAME\AppData\Local\Programs\Python\Python39\Scripts\.
If I check the content of the folder I see this:
    easy_install-3.9.exe
    easy_install.exe
    f2py.exe
    jsonschema.exe
    jupyter-bundlerextension.exe
    jupyter-console.exe
    jupyter-nbconvert.exe
    jupyter-nbextension.exe
    jupyter-notebook.exe
    jupyter-qtconsole.exe
    jupyter-serverextension.exe
    jupyter-trust.exe
    pip.exe
    pip3.9.exe
    pip3.exe
Enter fullscreen mode
Exit fullscreen mode
I see the already mentioned pip, pip3.9 and pip3. But I don’t see jupyter (the word «jupyter» alone).
If I type jupyter in the terminal I get the error that started all:
'jupyter' is not recognized as an internal or external command, operable program or batch file.
Enter fullscreen mode
Exit fullscreen mode
Finally we’ve reached an answer to your question!!!
‘jupyter’ is not recognized as a command because there is no executable file in the Scripts folder called jupyter.
So, let’s try a different executable. What about jupyter-notebook?
BINGO! The notebook is running!
    Serving notebooks from local directory:
    C:\Users\YOUR-USERNAME\AppData\Local\Programs\Python\Python39\Scripts
    Jupyter Notebook 6.3.0 is running at:
    http://localhost:8888/?token=... (edited)
    or http://127.0.0.1:8888/?token=... (edited)
    Use Control-C to stop this server and shut down all kernels (twice to skip confirmation).
Enter fullscreen mode
Exit fullscreen mode
I don’t know why I don’t have a jupyter executable called ‘jupyter’. The official documentation says to use jupyter notebook on the terminal, but it seems that in some cases it doesn’t work. And I think it has to do with what I mentioned above: there is no jupyter exectuable in the Scripts folder.
If you remember, I told you that you can run pip as the main module using python -m pip.
It happens that you can do the same with jupyter.We just need to know how to call it. As in with pip, we have to check the folder where 3rd party libraries are installed: C:\Users\YOUR-USERNAME\AppData\Local\Programs\Python\Python39\Lib\site-packages.
You’ll see jupyter_console, but this just creates an interactive notebook in the terminal, not exactly what you were looking for. You’re also going to find folders ending with .dist.info, like jupyter_console-6.4.0.dist-info. This is just metadata of the Wheel Binary Package builder. You’ll also see a folder like jupyterlab_pygments, but that’s for JupyterLab. We want to use the classic Jupyter notebook.
What we want is to run notebook. How do we know this?
You’ll see in the folder site-packages the folder (package) notebook. Inside there is a file called __main__.py:
    #__main__.py
    if __name__ == '__main__':
        from notebook import notebookapp as app
        app.launch_new_instance()
Enter fullscreen mode
Exit fullscreen mode
It’s calling notebookapp.py which is a «A tornado based Jupyter notebook server.» Yes, this is what we need.
We can see that launch_new_instance in the notebookapp calls launch_instance(), which «launches an instance of a Jupyter Application«.
Perfect! We are in the correct folder. To run the jupyter notebook from the Python interactive shell we have to run the notebook package with:
python -m notebook
Enter fullscreen mode
Exit fullscreen mode
3)*** SUMMARY: SOLUTION ***
tl;dr:
I have explained and showed why this error is happening.
Now let’s summarize the solutions:
- To know the name of the
jupyterexecutable (in theScriptsfolder), so you can run directly from the terminal (Command Prompt) as:
jupyter notebook
Enter fullscreen mode
Exit fullscreen mode
or as:
jupyter-notebook
Enter fullscreen mode
Exit fullscreen mode
Or whatever name you have.
- Run the notebook as the main module from Python:
python -m notebook
Enter fullscreen mode
Exit fullscreen mode
I hope this helps you as much as it helped me. I’m open to your comments and suggestions.
NOTE: Originally posted in StackOverflow
https://stackoverflow.com/a/66938692/6710903
- Introduction on How to Open a Jupyter Notebook using command line in CMD App
- Installing and Execute Jupyter Notebook using a script and How to Launch it:
- Using the Command Line:
- Troubleshooting The Jupyter Notebook Interface

Introduction on How to Open a Jupyter Notebook using command line in CMD App
Jupyter Notebook is a popular web application that allows users to create and share documents that contain live code, equations, visualizations, and narrative or interactive text. It’s widely used for data analysis or output, scientific computing, and machine learning, among other things.
While Jupyter can be launched through a graphical user interface (GUI), opening it from the command line can be more efficient and convenient, especially for advanced users. This tutorial will explain how to launch Jupyter from the command prompt on different operating systems, including Windows, macOS, and Linux.
This will be a good summary for you to learn how to modify, set up and enable Jupyter on your computer. Whether you’re a beginner or an experienced software user, learning how to use the command line to launch Jupyter Notebook app can save you time and help you streamline your workflow.
Read through this whole module, and it will make your life easier.
Installing and Execute Jupyter Notebook using a script and How to Launch it:
Before you can open the notebook in the terminal, you must install it on your computer. If you don’t already have it installed, you can follow these steps to install it:
-
First, make sure you have Python installed on your computer. It requires Python 3.3 or greater, but it’s recommended to use Python 3.6 or later as we will use Python code.
-
launch a terminal or command prompt window on your computer.
-
Type the following command to install Jupyter Notebook using pip (Python’s package manager):
pip install jupyter
-
Depending on your system configuration, you may need to run the command with administrator privileges (e.g. using sudo on Linux or macOS).
-
Once the installation is complete, you can verify that it is installed by typing the following command:
jupyter notebook --version
- This should display the version number of Jupyter that is installed on your computer.
That’s it! Once it is installed, you can proceed to the next section to learn how to open it from the command line.
Using the Command Line:
Once Jupyter Notebook is installed on your computer, you can open it from the command line by following these steps:
-
Open a terminal or command prompt window on your computer.
-
Navigate to the directory where you want to create or open a Jupyter Notebook. You can use the
cdcommand to change directories. For example, if you want to create a new Notebook in a directory called «my_notebooks», you would navigate to that directory by typing:cd my_notebooks -
Once you’re in the correct directory, type the following command to start Jupyter Notebook:
jupyter notebook -
This should launch Jupyter Notebook in your default web browser. If your browser doesn’t launch automatically, you can manually navigate to
http://localhost:8888/treeon your browser. -
From here, you can create a new Notebook by clicking the «New» button in the upper right corner of the screen or launch an existing Notebook by clicking on its filename.
-
When you finish using Jupyter Notebook, you can stop the server by returning to the command prompt window and pressing
Ctrl-C.
That’s it! By using the command line to launch Jupyter Notebook, you can quickly create and edit Notebooks without navigating through menus or using a graphical user interface.
Troubleshooting The Jupyter Notebook Interface
Launching Jupyter Notebook from the command line is usually straightforward, but you may encounter some issues along the way. Here are some common problems and solutions:
-
«Command not found» error: If you receive this message that says «jupyter: command not found», it means that Jupyter Notebook is not in your system’s PATH environment variable. To fix this, you can add the directory where Jupyter Notebook is installed to your PATH variable. Alternatively, you can specify the full location to the
jupyterexecutable when you run the command. -
Port already in use error: If you see this message that says «Port 8888 is already in use», it means that another process on your computer is already using that port. To fix this, you can either stop the other process (if you know what it is) or specify a different port when you start Jupyter Notebook. For example, you can use the command
jupyter notebook --port 8889to start the server on port 8889 instead. -
«SSL error» when using HTTPS: If you’re trying to access Jupyter Notebook using HTTPS and you receive a message that says «SSL error», it may mean that your browser is not trusting the self-signed SSL certificate that Jupyter Notebook generates by default. To fix this, you can either use HTTP instead of HTTPS or add the certificate to your browser’s trusted certificates list.
-
Notebook not appearing in browser: If you start Jupyter Notebook from the command line but the Notebook doesn’t appear in your browser, it may mean that your browser is not compatible with Jupyter Notebook. Make sure you’re using a modern, up-to-date browser like Chrome, Firefox, or Safari.
-
Other issues: If you encounter other issues when launching Jupiter Notebook from the command line, you can search online for solutions or ask for help on forums like Stack Overflow or the Jupyter community forums.
You can quickly get back to using Jupyter Notebook from the command line without too much hassle by troubleshooting common issues like these.
Launching Jupyter Notebook from the command line is a powerful way to quickly create and edit Notebooks without having to navigate through menus or use a graphical user interface. By following the steps outlined in this article, you can install Jupyter Notebook on your computer and start using it from the command line in just a few minutes.
Remember, if you encounter any issues along the way, don’t be afraid to search online for solutions or ask for help on forums like Stack Overflow or the Jupyter community forums. With a little troubleshooting, you can quickly get back to using Jupyter Notebook and enjoy its many benefits for data science, machine learning, and more.
Sources:
Codecademy
Towards Data Science
Jupyter Notebook
Related articles
-
How to uninstall Jupyter Notebook
-
Google Colab vs Jupyter Notebook: Which is Better?
-
How to Open Jupyter Notebook in Chrome
-
Jupyter Notebook Dark Theme — Jupyter Dark Mode
This tutorial guides you on how to run Jupyter Notebook on Windows from command line. I have installed Python 3.x on Windows 10 and tried to run jupyter notebook from Windows command line. But it failed with the following error : No module named notebook.
> python -m notebook
C:\Users990\AppData\Local\Programs\Python\Python38-32\python.exe: No module named notebook
From the above error it is evident that jupyter is not installed on your windows machine.
Therefore, first you need to install Jupyter on Windows 10 using the following pip install command.
> pip install jupyter
Collecting jupyter
  Downloading jupyter-1.0.0-py2.py3-none-any.whl (2.7 kB)
Collecting notebook
  Downloading notebook-6.3.0-py3-none-any.whl (9.5 MB)
     |████████████████████████████████| 9.5 MB 547 kB/s
Collecting jupyter-console
  Downloading jupyter_console-6.4.0-py3-none-any.whl (22 kB)
Collecting qtconsole
  Downloading qtconsole-5.0.3-py3-none-any.whl (119 kB)
     |████████████████████████████████| 119 kB 467 kB/s
Collecting ipykernel
  Downloading ipykernel-5.5.3-py3-none-any.whl (120 kB)
     |████████████████████████████████| 120 kB 1.7 MB/s
Collecting ipywidgets
  Downloading ipywidgets-7.6.3-py2.py3-none-any.whl (121 kB)
     |████████████████████████████████| 121 kB 1.3 MB/s
Collecting nbconvert
  Downloading nbconvert-6.0.7-py3-none-any.whl (552 kB)
     |████████████████████████████████| 552 kB 159 kB/s
Collecting prometheus-client
  Downloading prometheus_client-0.10.1-py2.py3-none-any.whl (55 kB)
-----------
----------
--------
Using legacy setup.py install for pandocfilters, since package 'wheel' is not installed.
Using legacy setup.py install for pywinpty, since package 'wheel' is not installed.
Using legacy setup.py install for pyrsistent, since package 'wheel' is not installed.
Installing collected packages: prometheus-client, ipython-genutils, traitlets, pywin32, jupyter-core, pywinpty, tornado, terminado, Send2Trash, mistune, pygments, jupyterlab-pygments, entrypoints, MarkupSafe, jinja2, testpath, pyparsing, packaging, six, webencodings, bleach, defusedxml, async-generator, pyzmq, python-dateutil, jupyter-client, attrs, pyrsistent, jsonschema, nbformat, nest-asyncio, nbclient, pandocfilters, nbconvert, pycparser, cffi, argon2-cffi, parso, jedi, wcwidth, prompt-toolkit, pickleshare, colorama, decorator, backcall, ipython, ipykernel, notebook, jupyter-console, qtpy, qtconsole, widgetsnbextension, jupyterlab-widgets, ipywidgets, jupyter
    Running setup.py install for pywinpty ... done
    Running setup.py install for pyrsistent ... done
    Running setup.py install for pandocfilters ... done
Successfully installed MarkupSafe-1.1.1 Send2Trash-1.5.0 argon2-cffi-20.1.0 async-generator-1.10 attrs-20.3.0 backcall-0.2.0 bleach-3.3.0 cffi-1.14.5 colorama-0.4.4 decorator-5.0.7 defusedxml-0.7.1 entrypoints-0.3 ipykernel-5.5.3 ipython-7.22.0 ipython-genutils-0.2.0 ipywidgets-7.6.3 jedi-0.18.0 jinja2-2.11.3 jsonschema-3.2.0 jupyter-1.0.0 jupyter-client-6.1.12 jupyter-console-6.4.0 jupyter-core-4.7.1 jupyterlab-pygments-0.1.2 jupyterlab-widgets-1.0.0 mistune-0.8.4 nbclient-0.5.3 nbconvert-6.0.7 nbformat-5.1.3 nest-asyncio-1.5.1 notebook-6.3.0 packaging-20.9 pandocfilters-1.4.3 parso-0.8.2 pickleshare-0.7.5 prometheus-client-0.10.1 prompt-toolkit-3.0.18 pycparser-2.20 pygments-2.8.1 pyparsing-2.4.7 pyrsistent-0.17.3 python-dateutil-2.8.1 pywin32-300 pywinpty-0.5.7 pyzmq-22.0.3 qtconsole-5.0.3 qtpy-1.9.0 six-1.15.0 terminado-0.9.4 testpath-0.4.4 tornado-6.1 traitlets-5.0.5 wcwidth-0.2.5 webencodings-0.5.1 widgetsnbextension-3.5.1
WARNING: You are using pip version 20.1.1; however, version 21.0.1 is available.
You should consider upgrading via the 'c:\users990\appdata\local\programs\python\python38-32\python.exe -m pip install --upgrade pip' command.
Congratulations! you had installed Jupyter Notebook on Windows 10. To run the Jupyter Notebook, run the following command at the Command Prompt.
> python -m notebook

[I 12:10:56.381 NotebookApp] Writing notebook server cookie secret to C:\Users990\AppData\Roaming\jupyter\runtime\notebook_cookie_secret
[W 12:10:57.016 NotebookApp] Terminals not available (error was No module named 'winpty.cywinpty')
[I 12:10:57.016 NotebookApp] Serving notebooks from local directory: C:\Users990\Documents\sneppets\Workspaces\Python\Examples
[I 12:10:57.017 NotebookApp] Jupyter Notebook 6.3.0 is running at:
[I 12:10:57.017 NotebookApp] http://localhost:8888/?token=2ad96578b2fddf1825107039bae731e076d7d8620967bfc3
[I 12:10:57.017 NotebookApp]  or http://127.0.0.1:8888/?token=2ad96578b2fddf1825107039bae731e076d7d8620967bfc3
[I 12:10:57.017 NotebookApp] Use Control-C to stop this server and shut down all kernels (twice to skip confirmation).
[C 12:10:57.070 NotebookApp]

    To access the notebook, open this file in a browser:
        file:///C:/Users/91990/AppData/Roaming/jupyter/runtime/nbserver-13252-open.html
    Or copy and paste one of these URLs:
        http://localhost:8888/?token=2ad96578b2fddf1825107039bae731e076d7d8620967bfc3
     or http://127.0.0.1:8888/?token=2ad96578b2fddf1825107039bae731e076d7d8620967bfc3
Notebook server has been started from the command line. You should see notebook open in a browser as shown below. Note, it will open your default web browser to that URL as shown below.
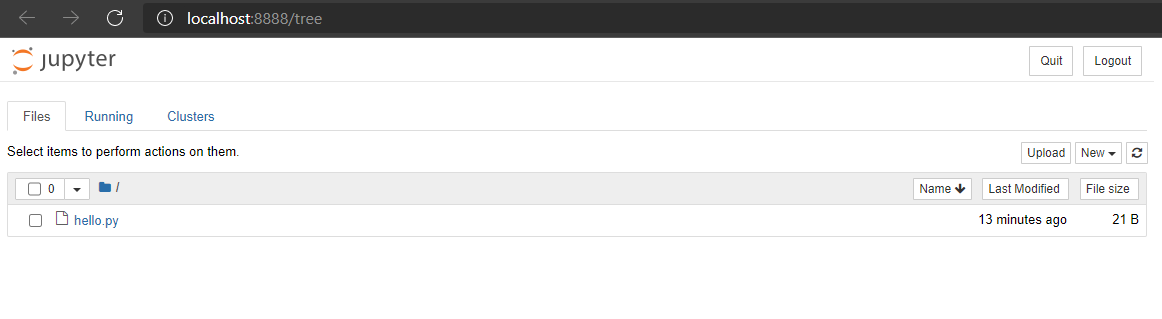
After notebook opens in the default browser, you will see the Notebook Dashboard which will show list of notebooks, files and other subdirectories in the directory where the notebook server has started. Please note, I have only hello.py in the Jypyter folder path from where I started notebook server. Therefore you only see hello.py file.
That’s it. You had learnt how to install jupyter notebook on Windows 10. Also, learnt how to run jupyter notebook on Windows from command line.
Hope it helped 🙂
You’ll also like:
- Run a Jupyter Notebook .ipynb file from terminal or cmd prompt
- Amazon Linux AMI : apt-get command not found
- Linux: sudo: apt-get: command not found
- How to Start Stop Restart MariaDB on Linux OS ?
- Putty Fatal Error No supported authentication methods available
- How to find which users belongs to a specific group in linux
- Give write permissions for specific user or group for specific folder in linux
- How to unzip a zip file from Terminal (Google Cloud Shell)
- Build a Docker Image with a Dockerfile and Cloud Build in GCP?
- How to create GCP project on Google Cloud Platform
- MariaDB – How to set max_connections permanently ?
- How to create GCP project on Google Cloud Platform
- Is it possible to change Google Cloud Platform Project ID ?
- Create non-root SSH user account and provide access to specific folders
- MySQL : How to grant all privileges to the user on database ?
- How to install OpenJDK 11 in Ubuntu Machine ?
References
- jupyter
- Github
To open Jupyter Notebook from the command prompt, simply type the following command and hit enter:
jupyter notebook
Setting Up Your Environment
Installing Python
To leverage Jupyter Notebook, you first need to have Python installed on your system. Python is the programming language that runs Jupyter Notebook, so it’s essential for its functionality.
- Windows Users:
- Download the latest version of Python from the official Python website. Make sure to check the box «Add Python to PATH» during installation to avoid future navigation issues through CMD.
- Mac and Linux Users:
- Use a package manager like Homebrew for Mac or apt for Linux to install Python. For example:
brew install pythonor
sudo apt-get install python3
Installing Jupyter Notebook
Once Python is installed, you can easily install Jupyter Notebook using the Python package manager, pip.
- Open CMD (or Terminal) and type the following command:
pip install notebook - After the installation completes, verify it by running:
jupyter --version
This command should return the version number of Jupyter, confirming that the installation was successful. If you encounter any errors, ensure that pip is updated by running:
pip install --upgrade pip
How to Start Jupyter Notebook from Cmd Easily
Accessing Command Prompt
To open Jupyter Notebook, you first need to access the Command Prompt or Terminal depending on your operating system.
- Windows: Press `Windows key + R`, type `cmd`, and hit Enter. Alternatively, search for «cmd» in the search bar.
- Mac: Open Finder, navigate to Applications > Utilities, and double-click “Terminal.”
- Linux: Use `Ctrl + Alt + T` to open the terminal or search it in your applications.
Navigating to Your Project Directory
Before launching Jupyter Notebook, navigate to the directory where you want to work. Use the `cd` command to change directories.
For example, if your project is located at `C:\Users\Username\Documents\MyProject`, you would type:
cd C:\Users\Username\Documents\MyProject
Make sure you modify the path to reflect your own file system. Being in the right directory will ensure that all your notebooks and files are easily accessible.
Launching Jupyter Notebook
Once you are in your desired project directory, it’s time to launch Jupyter Notebook. Simply type the following command in CMD:
jupyter notebook
This command will initiate Jupyter Notebook and automatically open your default web browser to display the notebook interface. The interface will show your current directory, letting you create or open existing notebooks easily.
How to Open PowerShell from Cmd in Simple Steps
Useful Commands in Jupyter Notebook Interface
Navigation Commands
Once you are in the Jupyter Notebook dashboard, several file operations can be performed efficiently:
- Create a new notebook: Click on «New» and select your desired Python version.
- Open an existing notebook: Click on the notebook file you wish to open.
- Delete notebooks: Check the box next to a notebook and click “Delete.” Make sure to confirm.
Kernel Management Commands
In Jupyter, the kernel is the computational engine that executes the code contained in a notebook. You can start, stop, or change the kernel using the menu options:
- Starting a kernel: This happens automatically when you open a notebook.
- Stopping a kernel: Go to the menu and select `Kernel > Shutdown`, which stops the kernel from running.
- Switching kernels: If you want to use a different version of Python, navigate to `Kernel > Change kernel` and select from the available options.
How to Open Services from Cmd in a Flash
Customizing Jupyter Notebook
Configuring Settings
Jupyter Notebook has a configuration file where you can customize various settings. To create a configuration file, run the following command:
jupyter notebook --generate-config
The config file will be created in your `.jupyter` directory. You can open and edit this file to set default notebook styles, startup options, and more.
Using Virtual Environments
Using virtual environments is a best practice in Python development, allowing you to manage dependencies for different projects efficiently. Here’s how to do it:
- Create a virtual environment:
python -m venv myenv - Activate the environment:
- Windows:
myenv\Scripts\activate- Mac/Linux:
source myenv/bin/activate - Launch Jupyter from the virtual environment by installing Jupyter again:
pip install notebook
jupyter notebook
How to Open File Explorer from Cmd in a Snap
Troubleshooting Common Issues
Issues When Launching Jupyter Notebook
If you encounter problems launching Jupyter Notebook, common solutions can help resolve them:
- Ensure that you have activated the correct Python or virtual environment.
- Check if the path to your Python installation is correctly set in your system’s environment variables.
- If you see error messages about missing packages, simply install those packages using pip.
Performance Optimization Tips
To enhance Jupyter Notebook’s performance:
- Regularly update Jupyter and its dependencies using:
pip install --upgrade notebook - Reduce the number of active kernels by shutting down those not in use.
How to Open Control Panel from Cmd: Quick Steps Explained
Conclusion
Being able to launch Jupyter Notebook from CMD not only speeds up your workflow but also provides you flexibility in managing your Python projects. By mastering these CMD commands and configurations, you can ensure a seamless experience in your data analysis and coding tasks.

How to Delete File from Cmd: A Simple Guide
Call to Action
If you found this guide helpful, consider subscribing for more concise and informative tutorials. Share your experiences and questions in the comments below – let’s continue learning together!