
В этом уроке вы узнаете, как запустить JavaScript на вашем компьютере разными способами. А еще напишите первую программу Hello, world!
JavaScript — популярный язык программирования с широким спектром применения. Раньше его использовали в основном для интерактивности веб-страницам: например, для анимации или валидации форм. Сейчас же JS используется еще и во многих других областях: разработка серверных, мобильных приложений и так далее.
Из-за широкого спектра применения JavaScript можно запустить несколькими способами:
- через вкладку «Консоль» в веб-браузере;
- с помощью Node.js
- с помощью веб-страницы.
Через вкладку «Консоль» в браузере
В большинстве современных браузеров уже есть встроенные механизмы JavaScript, поэтому запустить код на JS можно прямо в браузере. Вот, как это сделать:
Шаг 1. Откройте любой браузер (мы будем использовать Google Chrome).
Шаг 2. Откройте инструменты разработчика. Для этого щелкните правой кнопкой мыши на пустой области и выберите пункт «Просмотреть код» (Inspect). Горячая клавиша: F12.

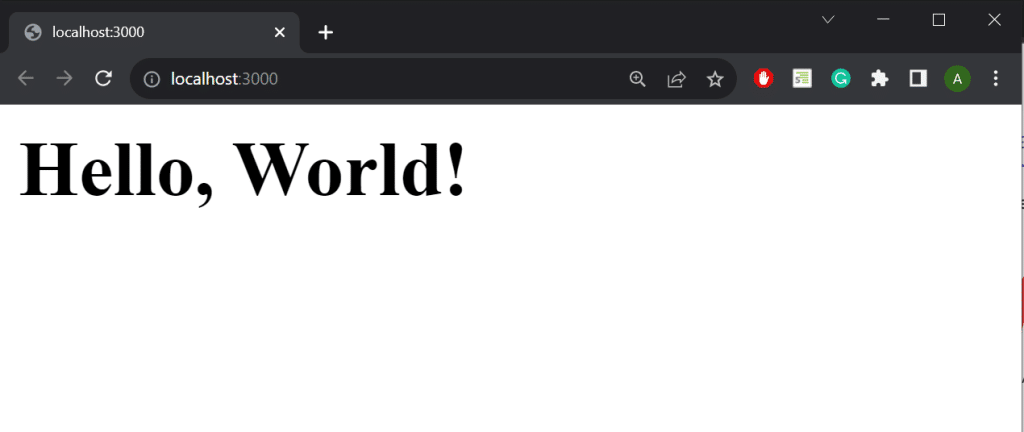
Шаг 3. В инструментах разработчика перейдите на вкладку «Консоль» (Console). Здесь уже можно писать код на JavaScript. Попробуйте ввести console.log("Hello, world!") и нажмите Enter, чтобы запустить код.

С помощью Node.js
Node — среда выполнения кода JavaScript вне браузера. Вот, как запустить JS с помощью Node.js:
Шаг 1. Установите последнюю версию Node.js.
Шаг 2. Установите IDE или текстовый редактор. Мы будем использовать Visual Studio Code.
Шаг 3. В VS Code перейдите в Файл > Новый файл и напишите код на JS. Сохраните файл с расширением .js. Мы написали программу, которая выводит на экран строку «Hello, world!», поэтому файл будет называться helloworld.js.
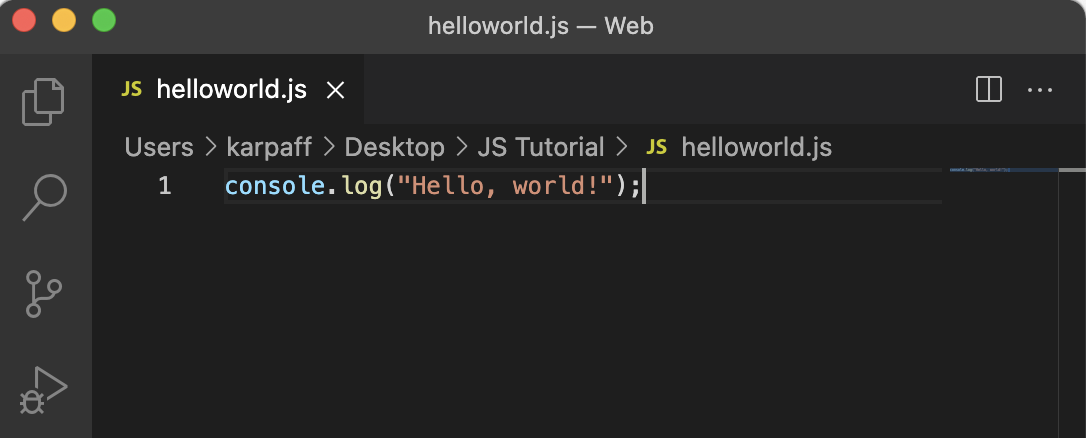
Шаг 4. Откройте терминал/командную строку, перейдите к расположению файла (используйте команду cd <путь>). Введите node helloworld.js и нажмите Enter. Вывод появится в терминале.

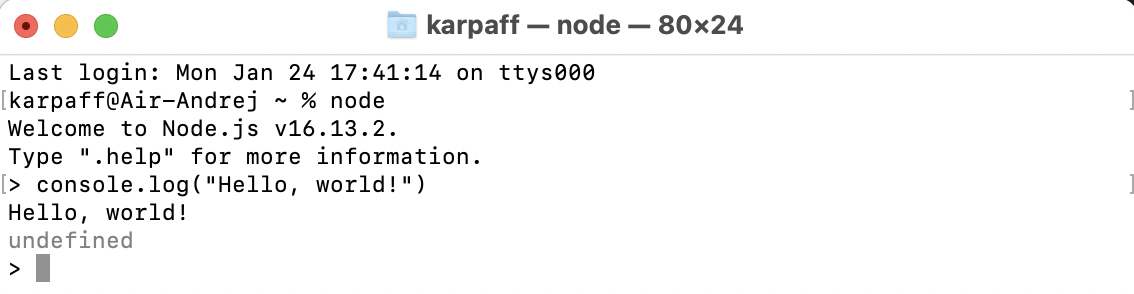
Примечание. JavaScript-код можно написать и запустить непосредственно в терминале. Для этого просто введите
nodeи нажмите Enter.
С помощью веб-страницы
JavaScript изначально создавали для того, чтобы сделать веб-страницы интерактивными, поэтому JavaScript и HTML идут рука об руку. Вот, как запустить код на JS с помощью веб-страницы:
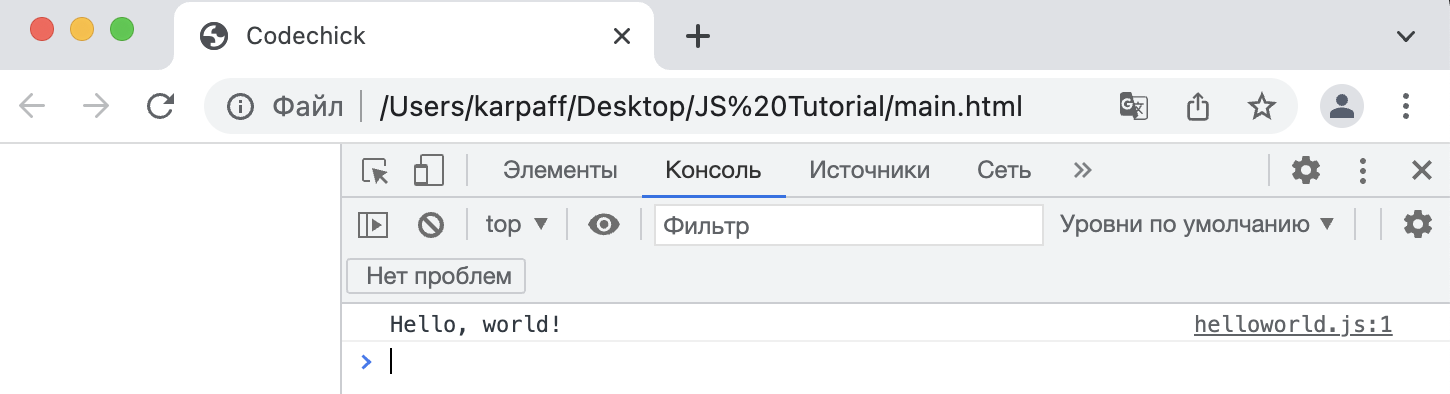
Шаг 1. Откройте VS Code. Перейдите в Файл > Новый файл. Сохраните файл с расширением .html. У нас это будет main.html.
Шаг 2. Скопируйте doctype, расположенный ниже. Это необходимый для запуска HTML-страницы код. Сохраните скопированный текст в файле.
<!doctype html>

<html lang="en">
<head>
  <meta charset="utf-8">

  <title>Codechick</title>
</head>

<body>
  <script src=""></script>
</body>
</html>
Шаг 3. Аналогично создайте файл с расширением .js. Напишите в файле следующий JS-код и сохраните его. У нас это будет helloworld.js.
console.log("Hello, world!");
Шаг 4. Вернитесь к файлу main.html и на 11 строке впишите название JS-файла. В нашем случае это будет выглядеть так:

Шаг 5. Откройте main.html с помощью браузера.
Шаг 6. Чтобы проверить, запустился ли ваш JS-код, щелкните правой кнопкой мыши в свободной области, нажмите «Просмотреть код» и перейдите на вкладку «Консоль».
Теперь, когда вы знаете, как запустить JavaScript, приступим к изучению основ JS.
JavaScript — скриптовый язык, и код на нём предназначен для запуска в браузере. Браузер берёт код, проверяет его на ошибки и, если их нет, выполняет команды в нужной последовательности. А мы видим результат на странице или в консоли браузера. Но бывают случаи, когда нужно выполнить JS-код вне браузера. Например, при создании серверных приложений, написании скриптов для автоматизации задач или тестировании кода.
Такой JS-код называют серверным. Чтобы запустить его, нужно поставить на компьютер отдельный движок и правильно настроить систему. Разбираем, как вообще исполняется JS-код, и покажем несколько способов его запуска без браузера.
Как работает JS-движок
Поскольку JavaScript — скриптовый язык, для запуска программ на нём нужен интерпретатор. Код на JS сначала нужно преобразовать в машинный код, который затем исполнится компьютером. Для этого в браузерах есть встроенный движок JavaScript. Например, V8 в Chrome, SpiderMonkey в Firefox, JavaScriptCore в Safari, Hermes в React Native и так далее.
JS-движок работает так:
- Читает исходный код и переводит его в специальную структуру данных — абстрактное синтаксическое дерево. Каждая ветвь и лист такого дерева соответствуют элементам кода — операторам, выражениям и переменным. В таком виде компьютеру проще понять и обработать код.
- Компилирует код «на лету» — переводит в машинный код часто используемые участки кода, чтобы ускорить их выполнение. Это называется Just-In-Time-компиляцией, то есть компиляцией «точно в нужное время».
- После этого скомпилированный машинный код исполняется на уровне процессора.
Хорошая новость в том, что движок, или, точнее, его эмулятор, можно использовать и вне браузера, просто установив его как отдельную программу себе на компьютер. Дальше попробуем сделать именно это.
⚠️ Какой бы мы ни выбрали способ, запуск кода на JS работает только через какой-то движок: V8 или другой. Без движка запустить код не получится. Во всех случаях, что мы рассмотрим, под капотом происходит одно и то же: мы передаём код на исполнение движку, просто разными способами.
Что нужно для запуска кода без браузера
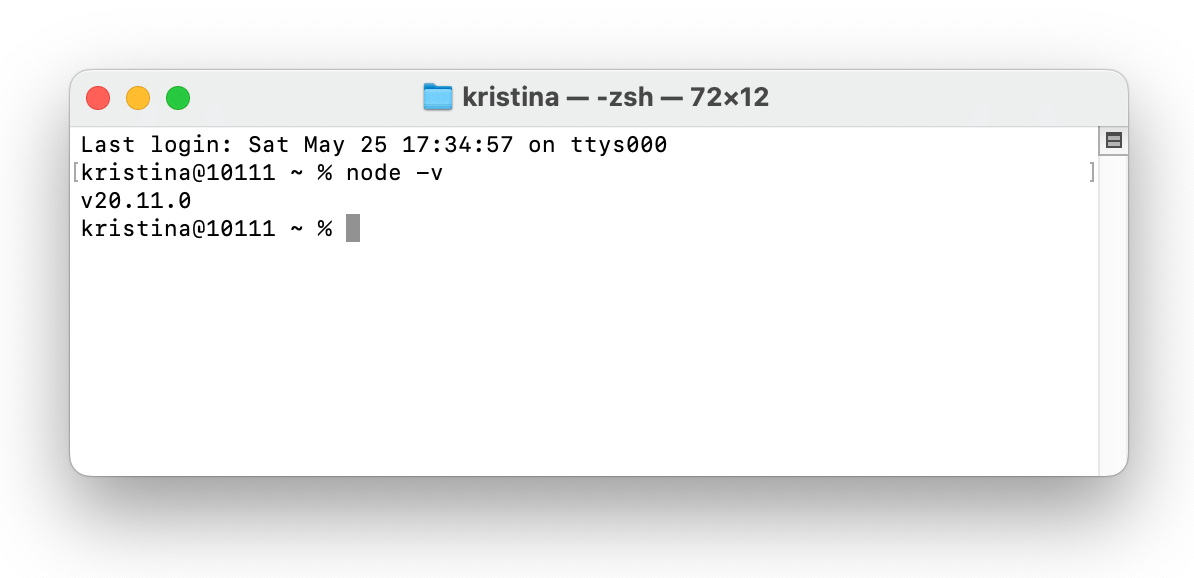
Самый распространённый способ запустить JavaScript-код вне браузера — использовать Node.js. Это среда выполнения JS, построенная на движке V8 от Google Chrome. Установить его довольно просто:
- Заходим на официальный сайт и скачиваем версию для своей ОС.
- Запускаем скачанный файл и следуем инструкциям установщика.
- Заходим в командную строку или терминал и проверяем версию. Для этого нужно ввести команду
node -v. Если всё правильно, мы увидим номер установленной версии.
Теперь можем приступить к запуску кода.
Пишем и запускаем код прямо в терминале
В Node.js есть интерактивная оболочка REPL (Read-Eval-Print Loop). В ней можно писать и сразу выполнять JS-код.
Чтобы запустить REPL, делаем следующее:
1. Открываем терминал или командную строку на компьютере.
2. Вводим команду node и нажимаем Enter. Появится приглашение >, это значит, что REPL готов.
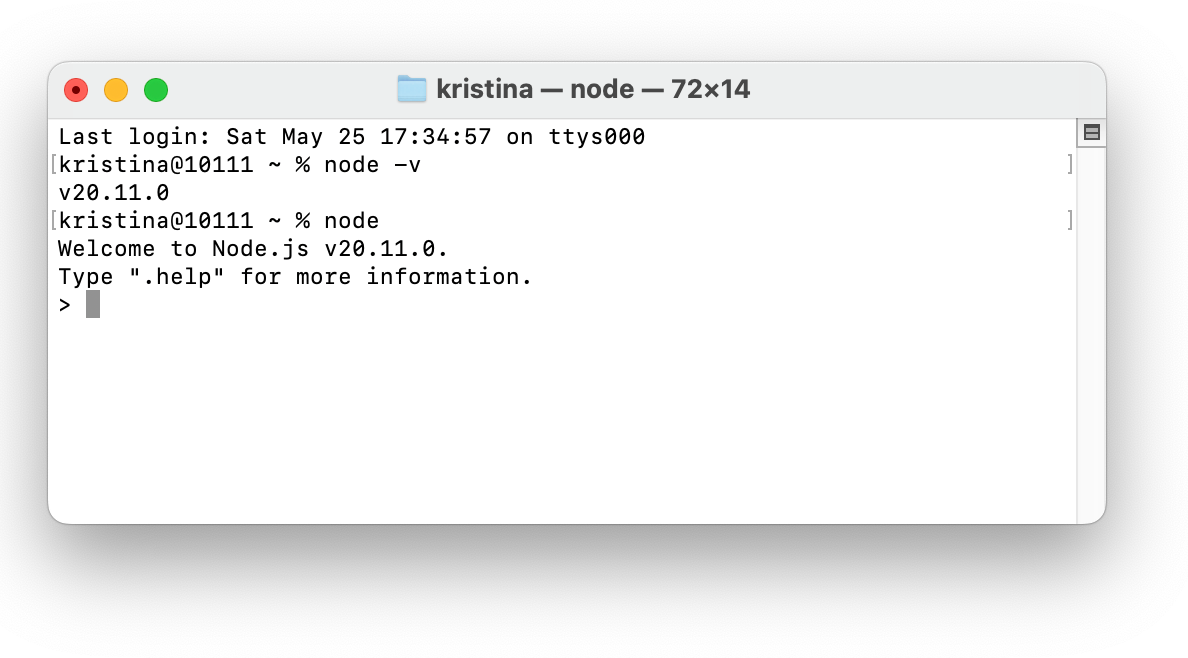
3. Пишем любой JS-код, как в консоли браузера, например console.log(018 == '018')
Запускаем готовый скрипт в командной строке
С помощью Node.js можно запускать файлы со скриптами. Для этого нужно сделать следующее:
1. Открываем терминал или командную строку и переходим в папку, где находится наш JS-файл. Для этого используем команду cd для перехода к нужной папке (команда одинаковая для всех операционных систем). Например, так:
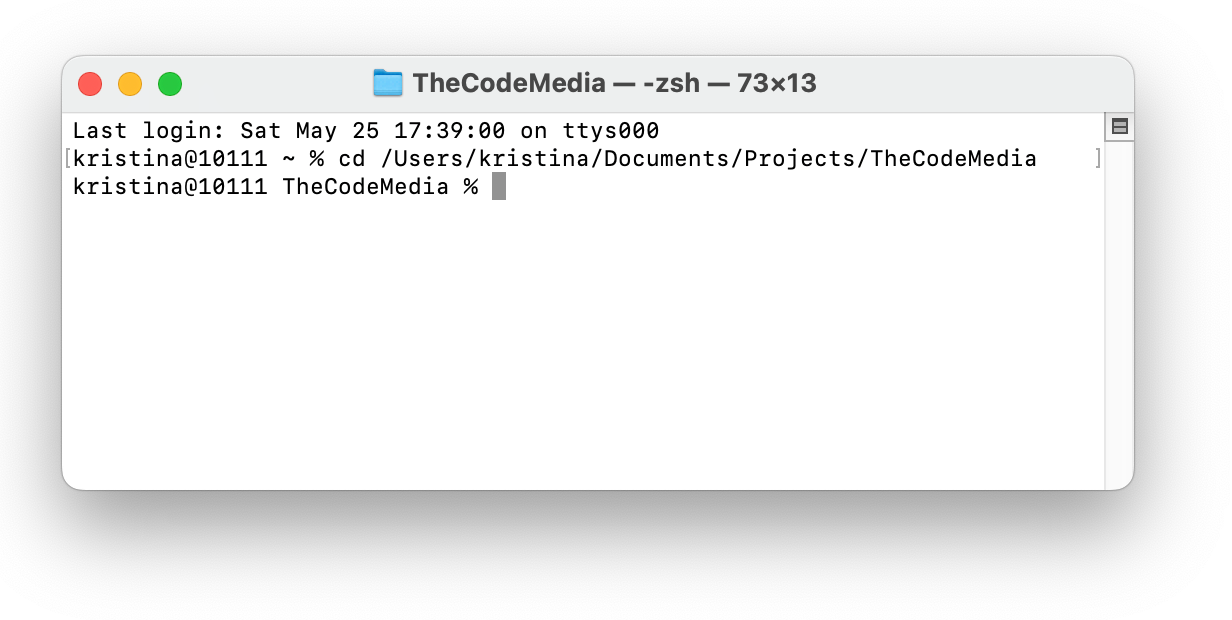
2. Далее пишем команду node и имя файла. Например, node script.js:
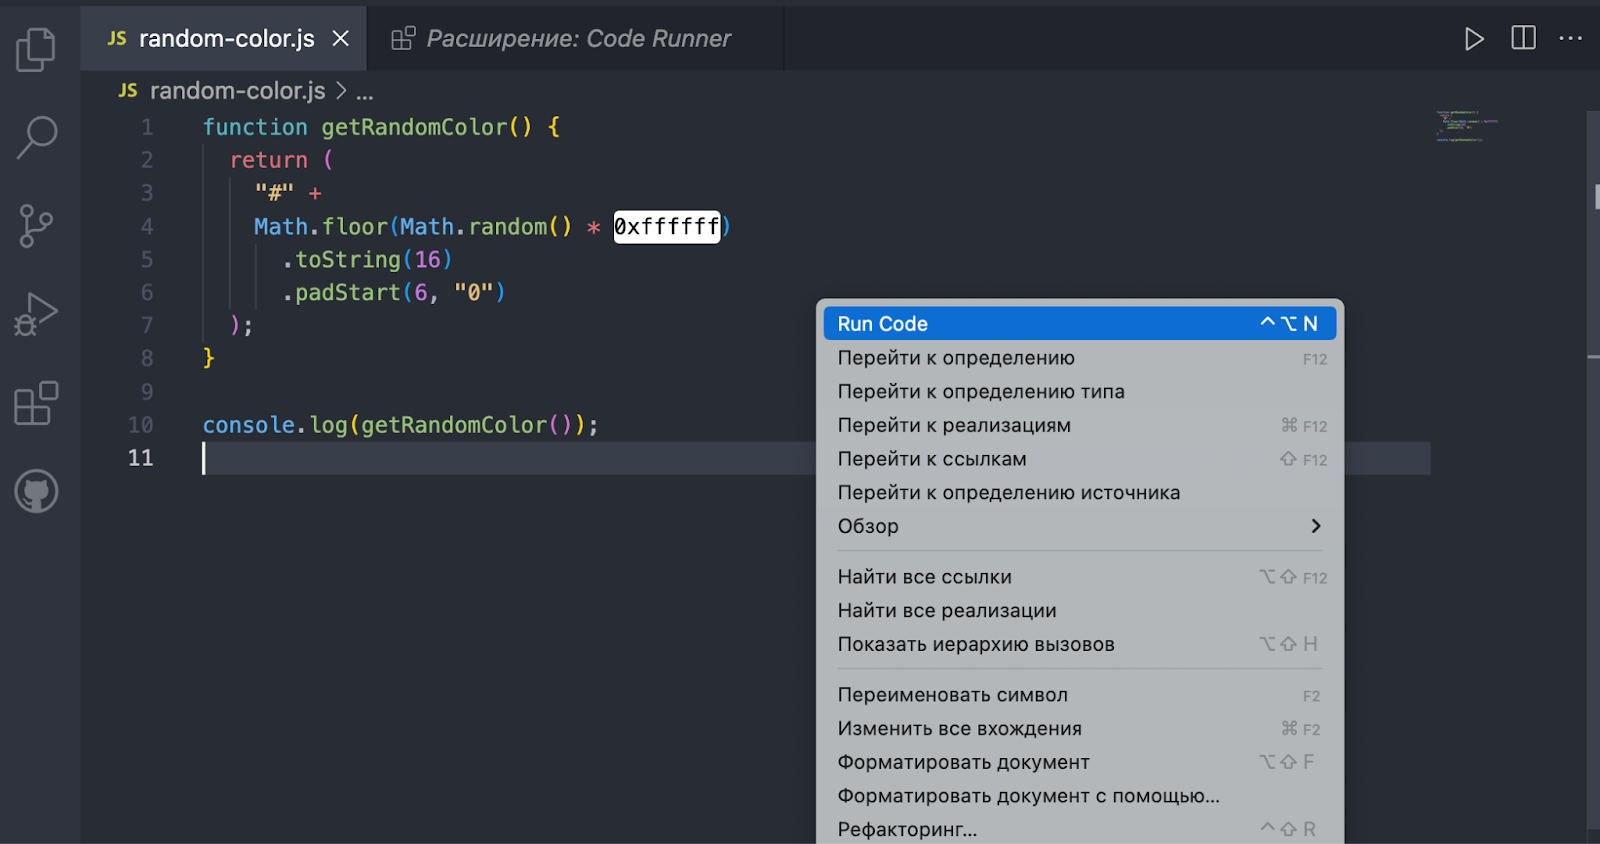
В этом примере мы запустили файл random-color.js: внутри лежит функция, которая генерирует случайный цвет в формате HEX. Результат исполнения #5a5acf виден в терминале.
Запускаем скрипт в терминале VS Code
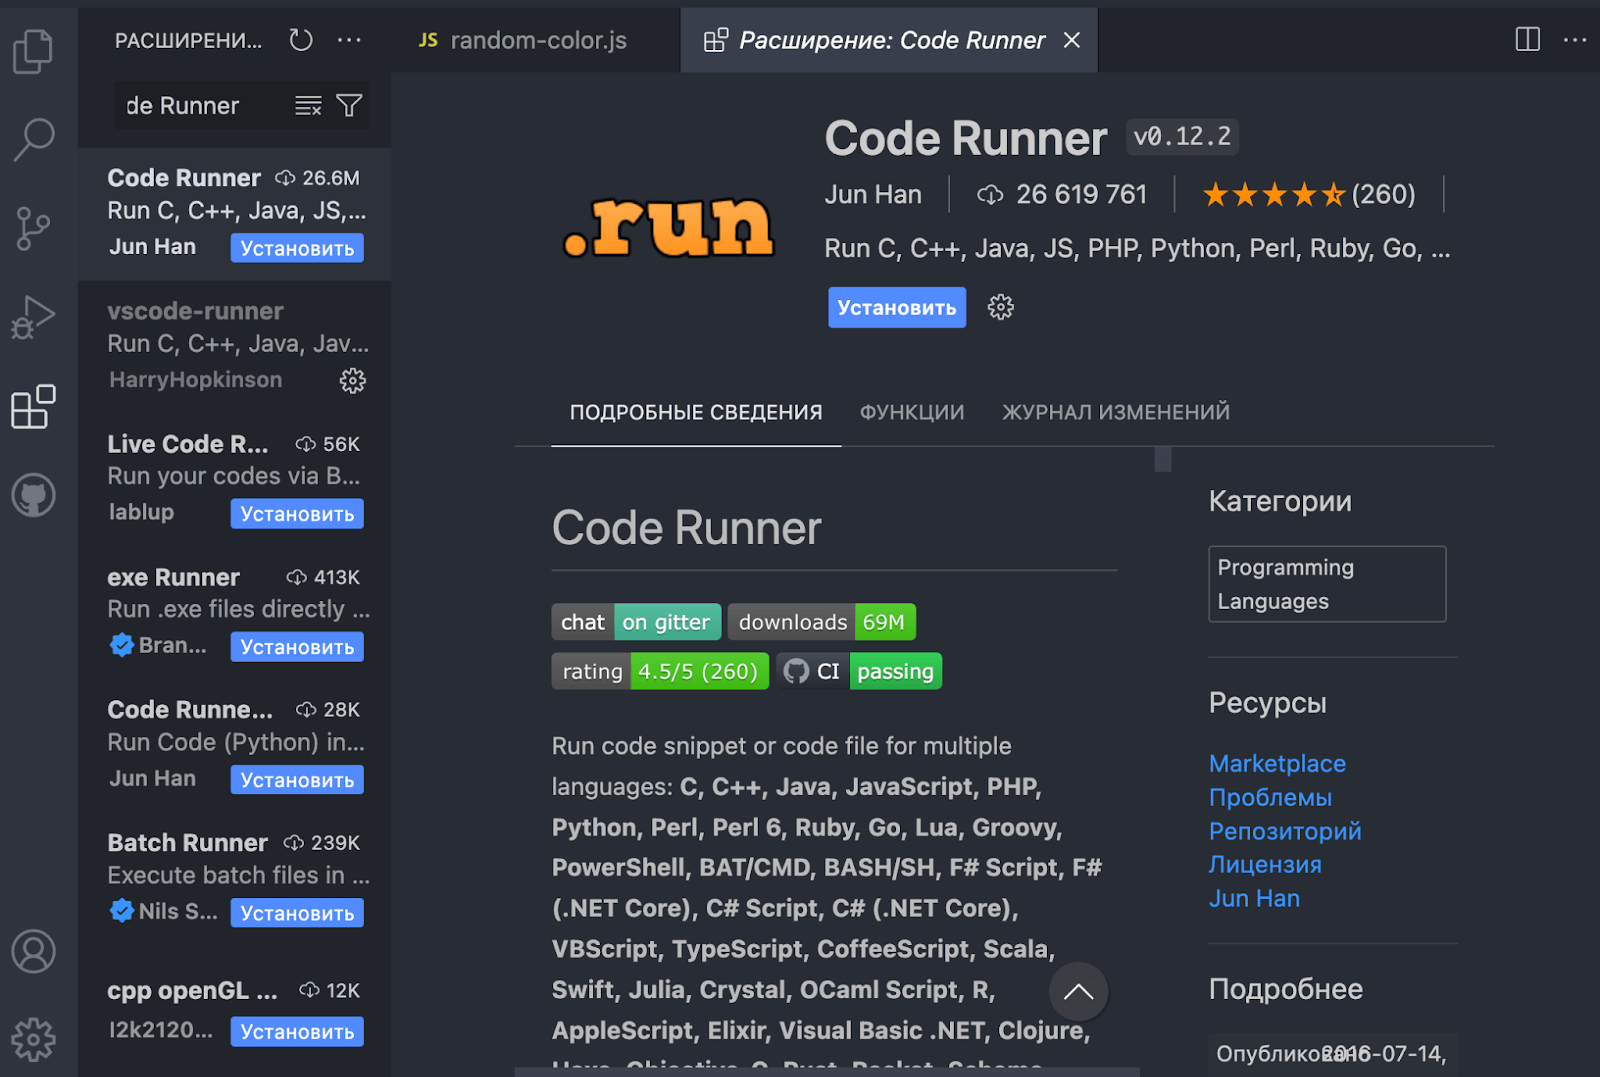
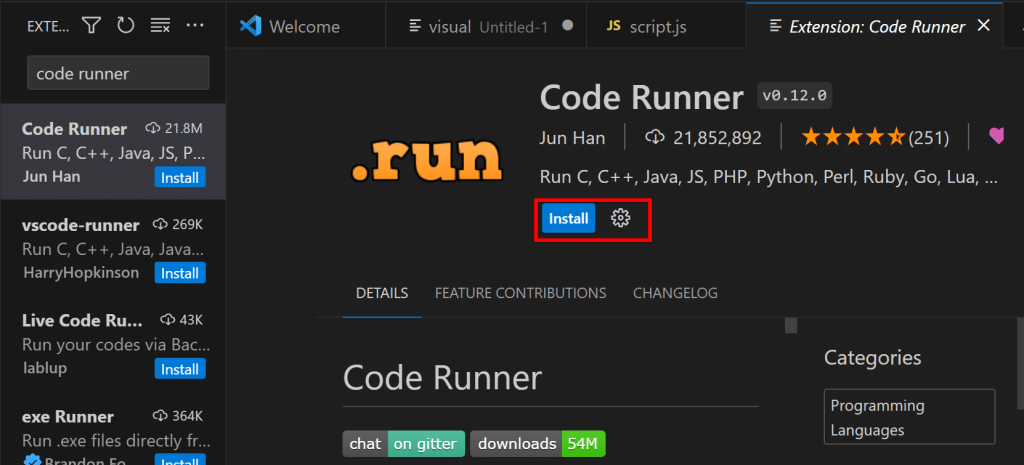
С установленным Node.js можно запустить JS-код напрямую в редакторе кода, например VS Code. Для этого нужно установить дополнительное расширение Code Runner для редактора, а затем с его помощью запустить код в терминале редактора:
1. Заходим в «Расширения» (Extensions), вводим название плагина Code Runner и нажимаем «Установить» (Install):
2. Открываем файл со скриптом, который хотим запустить.
3. Щёлкаем по области кода правой кнопкой мыши и в контекстном меню выбираем Run Code.
Аналогично можно запустить JS-код в других редакторах, используя расширения, например, для редактора Atom — пакет Atom Runner. Самое главное, чтобы на компьютере был установлен движок для JS.
Что ещё
Мы рассмотрели самый распространённый и простой способ запуска JS-кода — через node.js. Но запускать его можно и через другие среды выполнения, например Rhino, Deno, JavaScriptCore. Суть та же: устанавливаете и настраиваете среду выполнения и запускаете JS-код.
Вёрстка:
Маша Климентьева
Are you struggling to run .JS files in Windows 10? Look no further. Running .JS files on a Windows 10 operating system can seem daunting, but with the right knowledge and a few simple steps, you’ll be able to execute them smoothly and efficiently. Let’s explore the process of running .JS files on Windows 10 and unlock the full potential of your JavaScript code.
To run .JS files in Windows 10, you need to have Node.js installed on your computer. Node.js is a JavaScript runtime that allows you to execute JavaScript code outside of a web browser. With over 67 million downloads in 2019 alone, Node.js has become an essential tool for developers worldwide. Once you have Node.js installed, you can easily run .JS files by opening a command prompt or PowerShell window, navigating to the directory where the .JS file is located, and typing «node filename.js» (where «filename.js» is the name of your JavaScript file) to execute the code. With Node.js, running .JS files on Windows 10 has never been easier.
To run a .JS file in Windows 10, follow these steps:
- Open the command prompt by pressing the Windows key + R, then typing «cmd» and hitting Enter.
- Navigate to the directory where the .JS file is located using the «cd» command.
- Type «node .js» in the command prompt, replacing with the actual name of the .JS file.
- Press Enter to execute the .JS file and see the output in the command prompt.

How to Run .JS File in Windows 10: Getting Started
Running .JS files in Windows 10 allows users to execute JavaScript code directly on their operating system. JavaScript is a popular programming language used for web development, and being able to run .JS files on Windows 10 provides a convenient way to test and execute JavaScript code without relying on a web browser. In this article, we will explore different methods to run .JS files in Windows 10, catering to both beginners and advanced users.
Method 1: Using Node.js
Node.js is a popular runtime environment that allows you to run JavaScript outside the browser. To run .JS files using Node.js in Windows 10, follow these steps:
- First, download and install Node.js on your Windows 10 computer.
- Open the Command Prompt by pressing Win + R and typing cmd. Press Enter to launch the Command Prompt.
- Navigate to the directory where your .JS file is located using the
cdcommand. For example, if your file is on the Desktop, you can use the commandcd Desktop. - Once you are in the correct directory, type
node filename.jsand replace filename with the actual name of your .JS file. - Press Enter to run the .JS file using Node.js. The output or any errors will be displayed in the Command Prompt.
Advantages of Using Node.js
Running .JS files using Node.js offers several advantages:
- Access to the Node.js ecosystem: Using Node.js allows you to access the vast number of libraries and frameworks available in the Node.js ecosystem, making it easier to develop and run JavaScript applications.
- Server-side JavaScript: Node.js is commonly used for server-side development, so running .JS files in Node.js allows you to test and experiment with server-side JavaScript functionality.
- Command-line interface: Node.js provides a command-line interface, making it suitable for executing JavaScript code without the need for a web browser.
Common Errors
If you encounter any errors while running a .JS file using Node.js, there are a few common issues to consider:
- Ensure that you have installed Node.js correctly. Double-check the installation steps and try running the .JS file again.
- Verify that the file path in the Command Prompt is correct. If the .JS file is in a different directory, navigate to that directory using the
cdcommand before running the .JS file. - Check your code syntax. If there are any syntax errors in the .JS file, Node.js will display an error message in the Command Prompt.
Method 2: Using a Text Editor
If you prefer a graphical user interface, running .JS files using a text editor is another option. Here’s how you can do it:
- Open your preferred text editor (e.g., Visual Studio Code, Sublime Text, Atom) on your Windows 10 computer.
- Create a new file or open an existing .JS file in the text editor.
- Write or paste your JavaScript code into the file.
- Save the file with a .JS extension and choose a suitable name.
- Open the integrated terminal in the text editor or use the text editor’s built-in functionality to run the .JS file.
Advantages of Using a Text Editor
Running .JS files in a text editor provides the following advantages:
- User-friendly interface: Text editors typically offer a user-friendly interface and features specifically designed for writing and running code.
- Output display: Text editors may have built-in options to display the output of the .JS file within the editor itself, making it convenient to view the results.
- Code editing capabilities: In addition to running the .JS file, text editors provide advanced code editing features such as syntax highlighting, auto-completion, and code formatting, improving the development experience.
Common Errors
If you encounter any errors while running a .JS file in a text editor, consider the following:
- Make sure you have selected the correct file type when saving the file. Ensure that the file extension is .JS and not something else.
- Check the integrated terminal settings in your text editor. Ensure that it is properly configured to run JavaScript files.
- Verify that your code does not have any syntactical errors. Mistakes in the code may cause the .JS file to fail or behave unexpectedly.
Running .JS Files in Windows 10: Advanced Methods
Once you are familiar with the basic methods of running .JS files in Windows 10, you can explore more advanced options that offer additional functionality and flexibility.
Method 3: Using a Code Editor with Live Server
If you are working on a JavaScript project that requires a web browser environment, using a code editor with a live server is a great option. This allows you to run your .JS files in a browser and immediately see the changes as you modify the code. Here’s how you can do it:
- Install a code editor that supports a live server feature, such as Visual Studio Code with the Live Server extension.
- Open your JavaScript project folder in the code editor.
- Locate the .JS file you want to run.
- Right-click on the .JS file and select Open with Live Server.
- The .JS file will open in a browser, and any changes made to the code will automatically refresh the page, allowing you to see the results in real-time.
Advantages of Using a Code Editor with Live Server
Utilizing a code editor with a live server offers several advantages:
- Real-time updates: Any changes made to the .JS file are immediately reflected in the browser, providing a live preview of the script’s execution.
- Interactive debugging: Code editors with live server features often include built-in tools for debugging JavaScript code, enabling you to identify and fix errors more efficiently.
- Multiple device testing: With live server capabilities, you can view and test your .JS files on various devices simultaneously (e.g., desktop, mobile, tablet) to ensure cross-platform compatibility.
Common Errors
If you encounter any errors while running a .JS file using a code editor with a live server, consider the following:
- Ensure that you have correctly installed the code editor and the live server extension. Double-check the installation steps and make sure they are properly configured.
- Check the settings of the live server extension to ensure it is set up correctly for your project.
- Verify that your .JS code does not contain any runtime errors that may cause the script to fail. Debug any issues and try running the file again.
Method 4: Using a Web Browser Console
If you only need to execute snippets of JavaScript code or test functionalities quickly, using the web browser console is a simple and convenient method. Here’s how you can do it:
- Open your preferred web browser (e.g., Google Chrome, Mozilla Firefox, Microsoft Edge).
- Navigate to any webpage or open a blank tab.
- Right-click on the webpage and select Inspect or Inspect Element to open the browser’s developer tools.
- In the developer tools panel, locate the Console tab.
- Click on the console input field and start typing JavaScript code. Press the Enter key to execute each line or block of code.
Advantages of Using a Web Browser Console
Using a web browser console for running .JS files offers the following advantages:
- Quick execution: The browser console allows you to execute JavaScript code without the need for external tools or installations. It provides a convenient method for testing snippets of code or experimenting with JavaScript functionalities.
- Real-time feedback: The console displays output and error messages instantly, allowing you to see the results of your code and debug any issues immediately.
- Integrated browser features: The browser console provides access to various browser features and APIs, enabling you to interact with web elements and test browser-specific JavaScript functionalities.
Common Errors
If you encounter any errors while using the web browser console to run .JS files, consider the following:
- Ensure that the console is enabled in your browser’s developer tools. If not, you may need to enable it from the settings or options menu.
- Check for any typos in your code. A simple mistake, such as a missing semicolon or a misspelled function name, can cause errors in the console.
- Verify that the JavaScript syntax is correct. The console will display an error if there are any syntax errors in the code.
Running .JS files in Windows 10 provides a seamless experience for executing JavaScript code directly on your operating system. Whether you choose to use Node.js, a text editor, a code editor with a live server, or the web browser console, you have multiple options depending on your preferences and requirements. Experimenting with these methods will enhance your JavaScript development workflow and empower you to create powerful and interactive applications.
Running .JS Files in Windows 10
To run .JS (JavaScript) files in Windows 10, follow these steps:
- Open the Command Prompt or PowerShell by searching for it in the Windows Start Menu.
- Navigate to the directory where the .JS file is located by using the ‘cd’ command. For example, if the file is located in the ‘Documents’ folder, type ‘cd Documents’.
- Once you are in the correct directory, simply type ‘node filename.js’ in the Command Prompt or PowerShell. Replace ‘filename.js’ with the name of your .JS file.
By following these steps, you will be able to run .JS files in Windows 10 using the Command Prompt or PowerShell. This allows you to execute JavaScript code and run scripts on your computer.
### Key Takeaways: How to Run .JS File in Windows 10
- Open Command Prompt on your Windows 10 computer.
- Navigate to the directory where the .js file is located.
- Type «node» followed by the name of the .js file.
- Press Enter to run the .js file in the Command Prompt.
- Verify the output of the .js file to ensure it ran correctly.
Frequently Asked Questions
Here are some commonly asked questions about running .JS files in Windows 10:
1. Where can I find a JavaScript file in Windows 10?
If you’re looking for a JavaScript file in Windows 10, you can typically find it in the folder where you saved or downloaded the file. The default save location may be the «Downloads» folder, but it could be different if you chose a custom location during the download or save process.
To locate the JavaScript file, you can use File Explorer to navigate to the desired folder. Once you’re in the folder, look for the file with the .js extension, which indicates that it is a JavaScript file.
2. How do I run a JavaScript file in Windows 10?
To run a JavaScript file in Windows 10, you have a few options:
Option 1: Use a text editor or Integrated Development Environment (IDE) that supports JavaScript, such as Visual Studio Code. Open the JavaScript file in the editor/IDE and use the built-in tools to run or execute the code.
Option 2: Use the Windows Command Prompt. Open the Command Prompt and navigate to the folder where the JavaScript file is located using the «cd» command. Once you’re in the correct folder, type «node filename.js» (replace «filename.js» with the actual name of your JavaScript file) and press Enter to run the file.
3. Can I run a JavaScript file in a web browser?
No, you cannot directly run a JavaScript file in a web browser. JavaScript files are meant to be executed by a JavaScript engine, which is built into web browsers. To run a JavaScript file in a web browser, you need to create an HTML file that includes a script tag with the source attribute pointing to the JavaScript file. When you open the HTML file in a web browser, the JavaScript code will be executed.
Alternatively, you can use a browser-based JavaScript development environment like CodePen or JSFiddle to write and run JavaScript code online.
4. Are there any prerequisites for running a JavaScript file in Windows 10?
Yes, there are prerequisites for running a JavaScript file in Windows 10:
1. You need to have a JavaScript interpreter or engine installed on your computer. One popular option is Node.js.
2. If you’re using a text editor or IDE, make sure it supports JavaScript and is properly configured.
5. How can I debug a JavaScript file in Windows 10?
Debugging a JavaScript file in Windows 10 involves identifying and resolving errors or issues in the code. Here are a few options for debugging:
1. Use the debugging tools available in your text editor or IDE, such as breakpoints, variable inspection, and step-by-step execution.
2. If you’re running the JavaScript file in a web browser, you can use the browser’s built-in developer tools (usually accessed by pressing F12) to debug the JavaScript code.
3. Consider using a dedicated JavaScript debugger tool, such as Chrome DevTools for Google Chrome or Node.js debugger for debugging JavaScript in Node.js.
To run a .JS file in Windows 10, you can follow a simple process. First, make sure you have Node.js installed on your computer. Node.js is a runtime environment that allows you to execute JavaScript code outside of a web browser. You can download the Node.js installer from the official website and follow the on-screen instructions to install it.
Once you have Node.js installed, open the command prompt by pressing the Windows key + R, typing «cmd» and pressing Enter. Navigate to the directory where your .JS file is located using the «cd» command. For example, if your file is located on the desktop, you would type «cd Desktop» and press Enter.
Knowing how to run a JavaScript file is an essential skill for any programmer working with this popular programming language.
Mastering this skill will allow you to test and preview your code effectively, ultimately enhancing your overall development process.
You can run a Javascript file by referencing it within an HTML file, then use a web browser to execute it. Another way to run Javascript files is by using the Node JS runtime environment to run it via the command line.

Alternatively, you can also run your Javascript code within popular IDEs like Visual Studio Code
In this article, we will explore these 3 easy methods and guide you on the optimal way to execute a JavaScript file.
So, let’s begin!
How to Create a Javascript File
Before you can run your javascript file, you first have to write the code in a script file. To do this, you can use any plain text editor or a dedicated code editor.
I recommend using a dedicated editor like VS Code.
It offers features like code completion, syntax highlighting, and an integrated terminal.
After installing it, you can install extensions like CodeRunner to help you run Javascript code directly within the IDE.
Other great IDE options include WebStorm and Sublime Text.

Read on and we’ll show you a step-by-step guide on how you can create a javascript file developer console node command javascript code inside.
- Open the code editor of your choice.
- Create a new file and start typing your code into the editor.
- Here’s a simple JavaScript snippet that displays a message in the console:
console.log("Hello, World!"). - Once you have written your JavaScript code, it’s time to save the file. If you’re using Visual Studio Code, simply use the Ctrl+S shortcut.
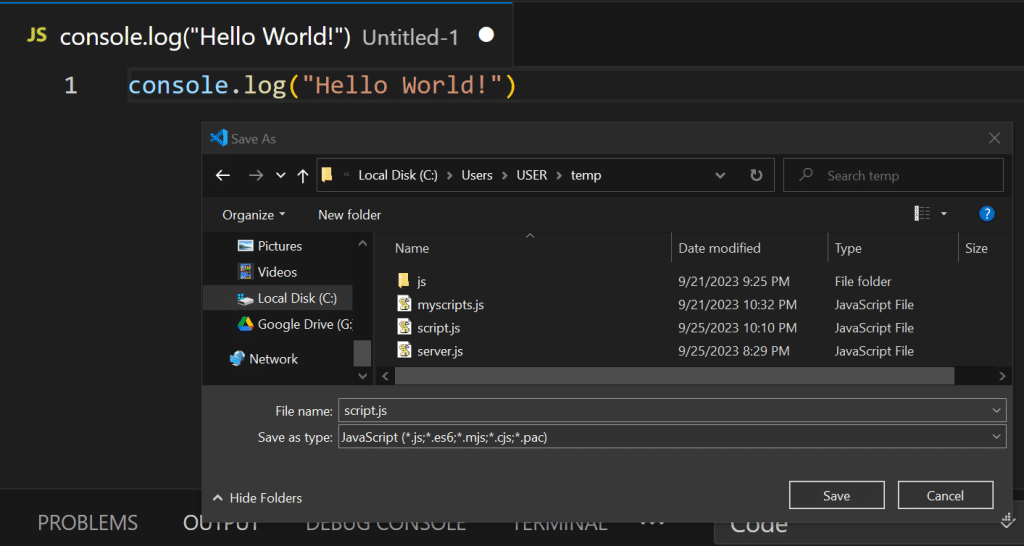
- If you’re using a plain text editor, go to the “File” menu in your editor’s toolbar and select “Save As.”
In the dialog box that appears, choose the location where you want to save your file. - When naming your JavaScript file, it is important to use the .js extension to indicate that it is a JavaScript file.
For example, you can name your file script.js. - Finally, click “Save” to store your file.
Congratulations, you’ve just created a JavaScript file! Now, let’s look at how to run this file.
How to Run a Javascript File
Method 1: Using a Web Browser
You can use modern web browsers to test and run your JavaScript code. Some popular choices include Google Chrome, Mozilla Firefox, and Microsoft Edge.
You can also install browser extensions like React Developer Tools or Redux DevTools to augment your development experience.
To run a JavaScript file using a web browser, you first need to create an HTML file that will load and execute your script.
To create one, follow these steps:
- Create an HTML file, for example, index.html.
- Inside the HTML file, add a <script> tag that points to your external JavaScript file.
For instance, if your JavaScript file is named script.js, your HTML file should look like this:<!DOCTYPE html> <html> <head> <script src="script.js"></script> </head> <body> </body> </html> - Make sure your HTML file and Javascript file are in the same directory.
- Save your HTML file and open it in your preferred web browser. The JavaScript code in your script.js file should now execute.
- You can open the browser console by pressing the F12 key to see the output of the script.
Once you open the console, you’ll see the output of the script. To make it more convenient, you can add the code below to your Javascript file:
alert("Hello, World!")Output:
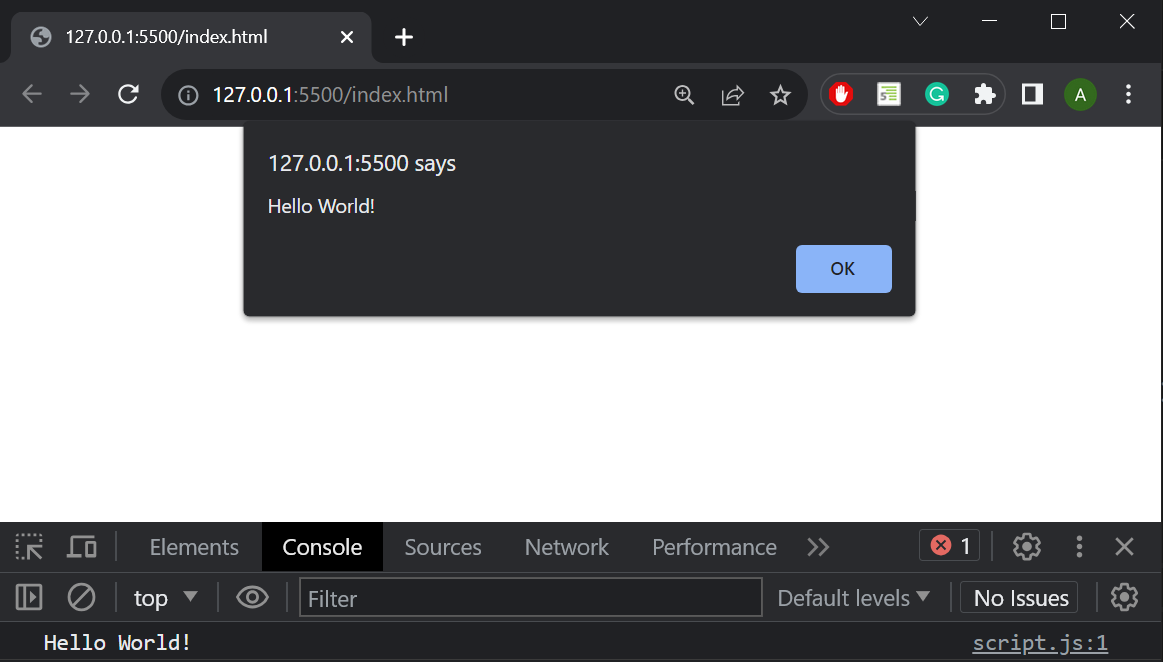
It will print out the code to the browser console and alert the user.
Method 2: Using Node.js
Node.js is a JavaScript runtime that enables you to run JavaScript code outside of a browser on the command line. It’s necessary for server-side development and using popular build tools like npm (Node Package Manager).
Running a JavaScript file using Node.js is a more straightforward process. First, make sure Node.js is installed on your machine. If not, you can download and install node from the official website. Once Node.js is installed, follow these steps:
- Open your terminal or command prompt.
- Navigate to the directory where your JavaScript file is located.
- Type node [file_name] and press Enter.
Replace [file_name] with the name of your JS script.
For example, since our file is called script.js, we’ll type:>>> node script.js
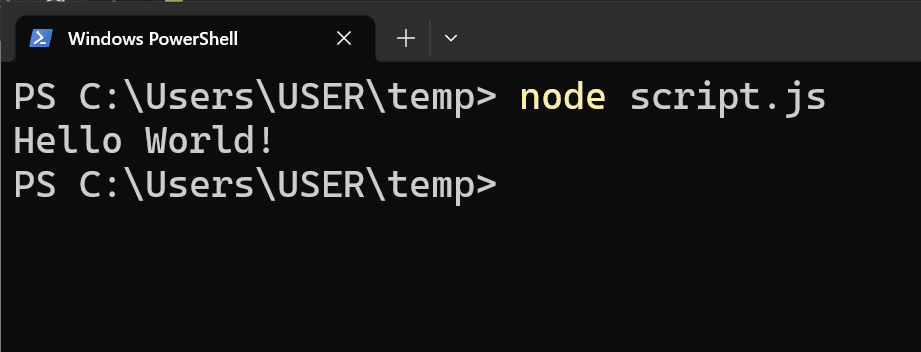
Your JavaScript file will now run using the Node.js environment.
Now, Let’s look at a more advanced example of Javascript’s application in a backend application.
Let’s demonstrate how to spin up a simple server:
- Create a new Javascript file named server.js and place the code below inside it.
// server.js const http = require('http'); const server = http.createServer((req, res) => { res.end('Hello, World!'); }); server.listen(3000, () => { console.log('Server running on http://localhost:3000'); }); - Navigate to the terminal and run this script with the following command:
>>> node server.js - Go to your browser and type in the following URL: http://localhost:3000
- You will see a message confirming that your server is live.
Method 3: Using a Visual Studio Code Extension
One of the many advantages of VSCode is the amount of extensions and developer tools it provides. We can use one of these extensions to run Javascript code right inside the IDE. The name of this extension is Code Runnner.

Here’s how you can install it:
- Go to the extensions tab using the Ctrl+Alt+X shortcut and search for Code Runner.
- Click on the install button to install it in VS code.
- Once it’s done installing, navigate back to your Javascript file in VScode.
- You’ll see a play button at the top right side of your screen.
- Click on it to run your Javascript code.
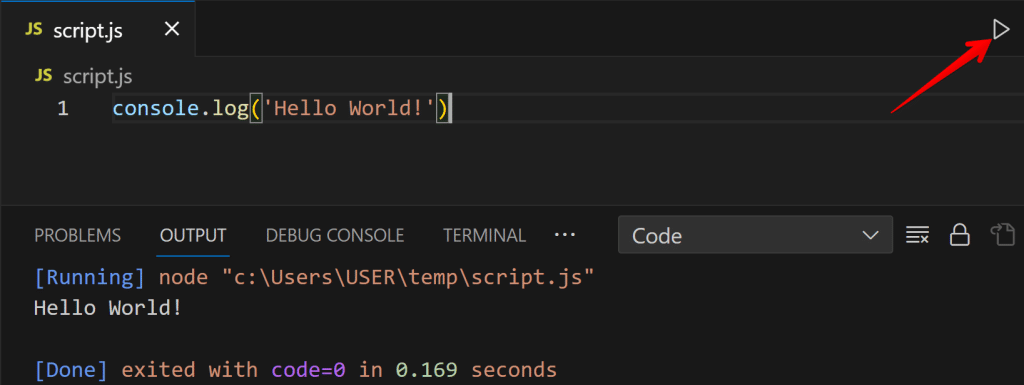
- It will display the output of your Javascript code in the terminal below.
You can also install other popular extensions like GitHub CoPilot which is an AI assistant that can help make your programming experience smoother.
Final Thoughts
In summary, running JavaScript files is a simple task that can be achieved using multiple methods! By now, you should have a clear understanding of how you can run Javascript files by using a browser, terminal, or an IDE.
With the confidence and knowledge you’ve gained through this article, I’m sure you’re well-equipped to apply these techniques in your own projects. Happy coding!
If you enjoyed this article, be sure to check out our video on how you can Unleash The Power Of OpenAI’s Code Interpreter For Data Analysis!
Frequently Asked Questions
Can I run JavaScript online?
Yes, you can. There are several online tools and platforms where you can run JavaScript code without installing any additional software.
Some popular options include:
- JSFiddle
- CodePen
- JS Bin
- Repl.it
These web-based tools allow you to write, run, and share JavaScript code directly in your browser.
How to use Chrome to execute a JavaScript file?
To execute a JavaScript file using Google Chrome, you can either include the file in an HTML document as described earlier, or you can use the Developer Tools’ Console to run code snippets.
To access the Console, right-click anywhere on a page, select “Inspect“, and then click on the “Console” tab.
Alternatively, you can click the F12 button to open the console.
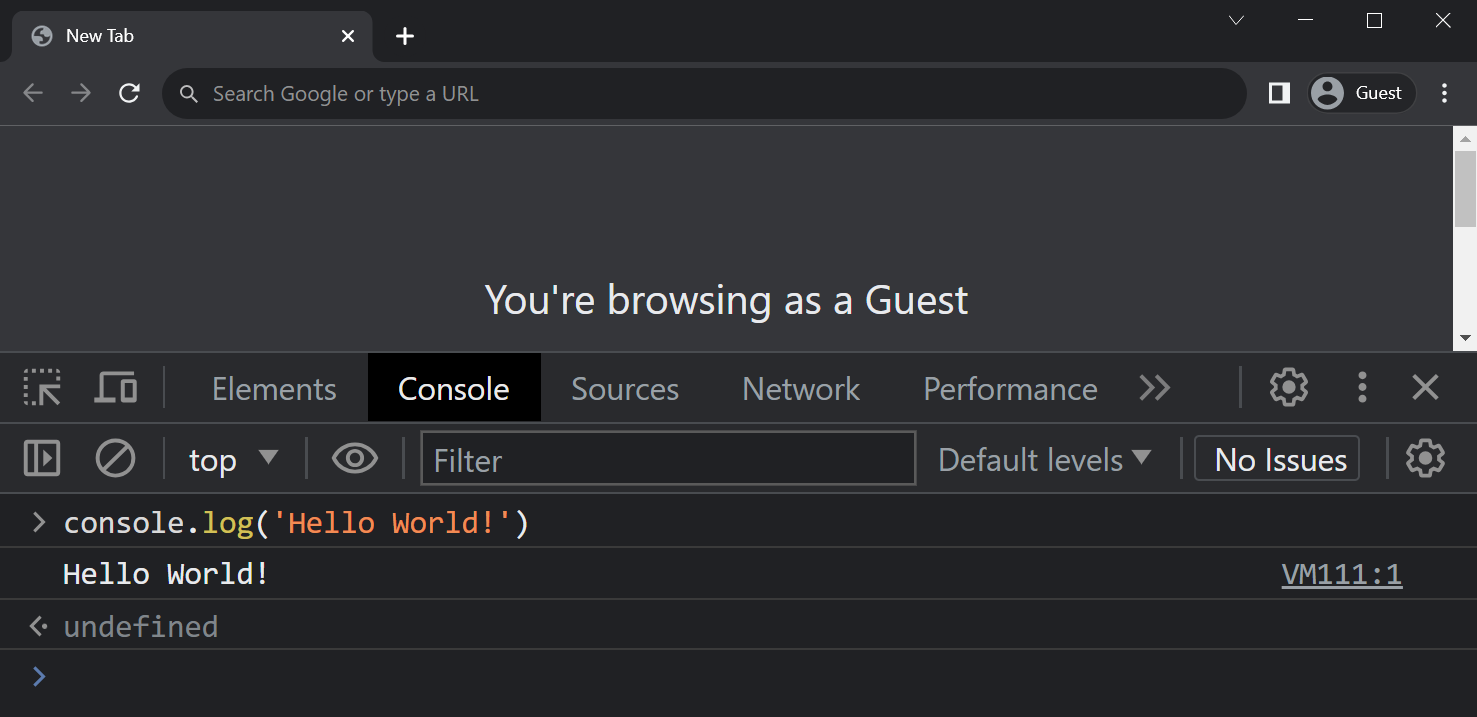
You can write and execute JavaScript code directly in this Console. To create a multi-line string or move to the next line, simply use the Shift + Enter key combo.
Is it possible to run a JS file in the terminal without Node.js?
Running a JS file in the terminal without Node.js is not commonly recommended, as Node.js has become the standard runtime for executing JavaScript outside of a browser environment.
However, alternatives like Windows Script Host (WSH) and JScript may allow you to run simple JS files directly in a Windows terminal.
That being said, it is highly recommended to use Node.js for running JavaScript files in a terminal, as it provides better compatibility, functionality, and performance.
JavaScript — это один из самых популярных языков программирования, используемых для создания интерактивных сайтов. Он является неотъемлемой частью современных технологий и выполняет роль «движка», который оживляет статичные страницы. Если вы только начинаете осваивать JavaScript, то, прежде всего, нужно понять, как его запускать и выполнять.
В этой статье мы разберемся, как запустить JavaScript, какие способы выполнения кода существуют, а также как избежать распространенных ошибок.
Эксперты рекомендуют
Как запустить JavaScript: основные способы
1. Использование браузерной консоли
Один из самых простых способов начать работу с JavaScript — это использовать консоль браузера. Все современные браузеры имеют встроенную консоль разработчика, через которую можно вводить и выполнять JavaScript.
Для этого достаточно открыть браузер, использовать инструменты разработчика (чаще всего вызываются нажатием клавиши F12 или правой кнопкой мыши на странице с выбором «Просмотр кода» или «Инспектор»), и в разделе «Консоль» можно вводить и выполнять команды JavaScript.
Этот метод удобен для быстрой проверки фрагментов кода, без необходимости создавать HTML-страницу или подключать внешние файлы.
2. Вставка кода в HTML
JavaScript часто используется внутри HTML-документов для реализации интерактивных элементов страницы. Код можно вставить прямо в HTML с помощью тега script.
Метод используется, когда код должен выполняться на странице, сразу после загрузки контента. Он полезен для простых задач, таких как изменение элементов или реагирование на действия пользователя.
3. Подключение внешних файлов
Для организации больших проектов код обычно размещается в отдельных файлах, а затем подключается к HTML-странице. Это помогает улучшить структуру и ускоряет загрузку.
Этот способ предпочтителен для более крупных проектов, где код JavaScript используется на нескольких страницах или содержит несколько модулей.
4. Через Node.js
Если вы хотите выполнять JavaScript за пределами браузера, например, для создания серверных приложений, можно использовать Node.js. Это среда выполнения JavaScript, которая позволяет запускать код на сервере.
Node.js устанавливается на ваш компьютер и позволяет запускать файлы непосредственно через командную строку или терминал.
Выполнение кода JavaScript в браузере
Как работает интерпретатор?
Когда вы загружаете веб-страницу, браузер автоматически интерпретирует и выполняет код. В процессе выполнения кода браузер преобразует его в машинный и выполняет команды. Это происходит в режиме реального времени.
В каком порядке загружаются и выполняются скрипты?
Браузер выполняет код по порядку его появления в HTML-документе. Скрипты могут быть загружены и выполнены синхронно или асинхронно в зависимости от их расположения и использования атрибутов.
Синхронный порядок: Если скрипт указан без атрибутов async или defer, браузер загрузит и выполнит его сразу же, блокируя рендеринг до завершения выполнения.
Асинхронный порядок: Скрипты с атрибутом async загружаются параллельно с другими ресурсами и выполняются сразу после загрузки, не блокируя остальную страницу.
Отложенный порядок: Скрипты с атрибутом defer загружаются в фоновом режиме, но их выполнение откладывается до тех пор, пока весь HTML не будет загружен.
Подключение JavaScript к HTML
|
Метод |
Описание |
Преимущества |
Недостатки |
| Внутренний скрипт (в теге script) в head | Скрипт размещается непосредственно в теге script в разделе head. | Простота реализации, подходит для небольших проектов. | Может замедлить рендеринг, блокируя отображение контента. |
| Внутренний скрипт (в теге script) в body | Скрипт находится внизу документа, сразу перед закрывающим тегом /body. | Страница отображается быстрее, так как скрипт выполняется после загрузки контента. | Может требовать дополнительных настроек для некоторых операций. |
| Внешний файл с использованием тега script | Код находится в отдельном .js файле и подключается через атрибут src. | Улучшение структуры проекта, упрощение масштабируемости и повторного использования. | Нужно следить за правильностью пути к файлу, могут возникнуть проблемы с кэшированием. |
| С использованием атрибута async | Скрипт загружается и выполняется параллельно с другими ресурсами. | Не блокирует загрузку, ускоряет рендеринг. | Может возникнуть проблема с порядком выполнения скриптов. |
| С использованием атрибута defer | Скрипт загружается в фоновом режиме, но выполняется только после загрузки всей страницы. | Улучшение производительности, выполнение скрипта после рендеринга контента. | Может замедлить работу, если скрипт требуется сразу после загрузки. |
Способы выполнения JavaScript-кода
JavaScript можно выполнить разными способами, каждый из которых имеет свои преимущества и ограничения. Важно выбрать подходящий вариант в зависимости от целей и особенностей проекта.
1. Выполнение в браузере:
Один из самых распространённых способов — это выполнение JavaScript прямо в браузере. Для этого достаточно разместить скрипт на странице, и он будет выполнен при загрузке. Это подходит для простых сценариев, когда нужно быстро выполнить действия, не требующие сложной логики.
2. Использование интерфейса командной строки:
Другим вариантом является выполнение с использованием интерфейса командной строки. В таком случае, код выполняется в средах, таких как Node.js. Это решение идеально подходит для серверных приложений или для автоматизации задач, не требующих взаимодействия с браузером.
3. Выполнение на сервере:
JavaScript также можно выполнить на сервере с помощью серверных технологий, таких как Node.js, где выполняется серверная логика. Это даёт больше гибкости в разработке веб-приложений, позволяя обрабатывать запросы, управлять данными и взаимодействовать с базами данных.
4. Онлайн-инструменты и редакторы:
Важным моментом является использование онлайн-инструментов и редакторов. Существуют специальные платформы, позволяющие запускать скрипты без необходимости настраивать локальную среду.
Эти сервисы идеальны для тестирования и быстрого прототипирования.
5. Выбор подходящего способа выполнения:
Каждый способ имеет свои особенности, которые нужно учитывать при разработке. Выбор подходящего варианта напрямую зависит от задач, требующих решения, и характеристик проекта.
Возможные ошибки и их решение
- Синтаксическая ошибка. Возникает из-за неверной структуры (например, забытая скобка или лишняя запятая). Проверяйте грамматику перед выполнением.
- Ошибки выполнения. Происходят при делении на ноль или обращении к несуществующему объекту. Для отладки используйте инструменты разработчика.
- Ошибки типов. Могут возникать при неожиданном преобразовании типов (например, сложение строки и числа). Применяйте явные преобразования или проверки типов.
- Не найден элемент. Происходит при обращении к отсутствующему на странице элементу. Убедитесь в существовании элемента перед использованием.
- Проблемы с асинхронными операциями. При неправильной работе с асинхронными запросами (например, AJAX). Используйте промисы или async/await для последовательности.
- Конфликт имен переменных. Возникает, когда переменные имеют одинаковые имена, особенно в глобальной и локальной области видимости. Применяйте уникальные имена и контролируйте области видимости.
- Неопределенная переменная. Происходит, когда пытаетесь использовать неинициализированную переменную. Убедитесь, что переменная или объект объявлены до использования.
Используйте консоль браузера для отладки. Современные браузеры позволяют поставить точку останова, просматривать значения переменных и исследовать выполнение шаг за шагом.
Реальная история успеха
Дмитрий, начинающий разработчик, решил освоить JavaScript после нескольких месяцев работы с HTML и CSS. Сначала он сталкивался с трудностями при подключении скриптов, но, изучив различные способы их выполнения, смог реализовать сложный интерактивный элемент для веб-сайта. Этот опыт не только позволил ему разобраться в работе, но и открыл возможности для перехода в более высокооплачиваемую должность в крупной IT-компании.
Заключение
Изучение JavaScript и его возможностей — важный шаг на пути к успешной карьере веб-разработчика. Понимание того, как правильно подключать и выполнять код, поможет вам создавать более динамичные и интерактивные страницы. Надеемся, что это руководство помогло вам лучше понять, как работает JavaScript и какие способы его запуска существуют.