
В этой инструкции вы найдете несколько простых шагов по установке и настройке DOSBox — эмулятора ПК под управлением старенькой операционной системы MS DOS. Обычно DOSBox включен в комплект поставки игры при её покупке в Steam или GOG. Но если у вас остались старые игры, которые хочется запустить, а сделать это в Windows 10 уже не получается, то настройте эмулятор самостоятельно.
Примечание. Эта инструкция предназначена для пользователей Windows.
Шаг 1. Установка DOSBox
1. Заходим на сайт www.dosbox.com, переходим в раздел Download, находим версию для Windows (Win32 installer), скачиваем её. Скачивание происходит через сервис SourceForge, на котором располагаются многие проекты с открытым исходным кодом.
Примечание: На момент написания обзора актуальная версия эмулятора — 0.74-3. Номер версии меньше единицы не означает, что эмулятор — не законченный проект. DOSBox уже давно работает стабильно и используется, в том числе, для запуска старых игр в Steam и других онлайн-магазинах.
Но ничто не бывает идеальным, и разработчики находят и исправляют ошибки в приложении, так что время от времени следует обновлять DOSBox на своем ПК. Просто установите новую версию эмулятора поверх старой. При необходимости измените файл конфигурации (шаг 3, пункт 7).
2. Запускаем инсталлятор, устанавливаем эмулятор. Инсталлятор создает иконку на рабочем столе, а также добавляет DOSBox в меню «Пуск». Если вы запустите DOSBox сразу после установки, то увидите командную строку.
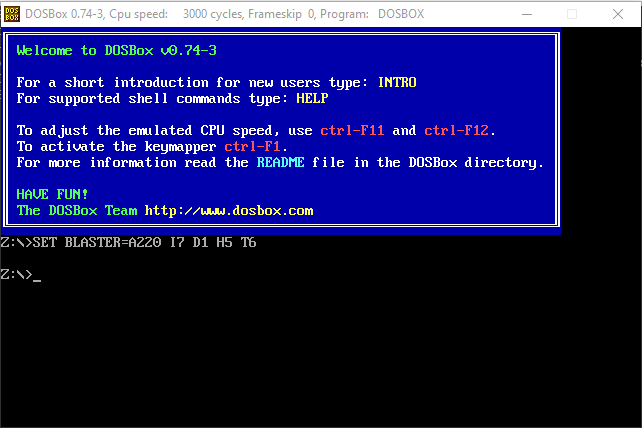
3. Закройте эмулятор, если вы его запустили. Всю настройку будем производить в Windows.
Шаг 2. Дополнительные инструменты
1. На странице DOSBox размещены также ссылки на различные графические оболочки для эмулятора. Вы можете воспользоваться одной из них. В этом случае читать этот гайд вам не потребуется, но, возможно, придется искать гайд по выбранному вами приложению. Мы предлагаем воспользоваться другим способом работы с DOSBox.
2. Так как планируется самостоятельная установка игр и приложений для MS-DOS, а также их дальнейшая настройка, лучше всего будет «вернуться» в 90-е и создать программную среду, максимально схожую с той, что была в те времена. Драйвера мыши, дополнительной памяти, привода компакт дисков и т. п. нам не потребуются. Все это включено в состав эмулятора. Но для комфортной работы в DOS потребуется файловый менеджер.
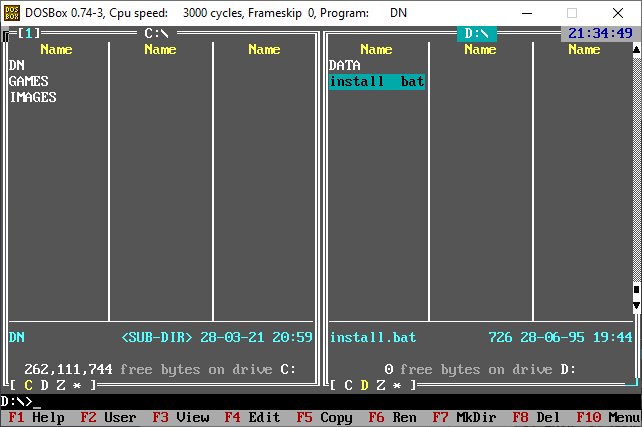
3. В качестве файлового менеджера лучше всего воспользоваться известным DOS Navigator, разработанного компанией RitLabs. Версию 1.51 можно скачать с сайта компании, или воспользоваться OpenSource версией, которая доступна на сайте www.dnosp.com (версия DOS/Real Mode).
4. Если у вас отсутствует физический привод компакт-дисков, то DOSBox может подключать их образы без использования сторонних программ (в форматах iso и cue). Или можно воспользоваться любым другим эмулятором приводов CD, в том числе встроенного в Windows 10.
Примечание. При использовании сторонних программ, образы дисков в виртуальном приводе придется менять только при выключенном DOSBox.
Шаг 3. Предварительная настройка
1. Теперь нужно настроить структуру каталогов на жестком диске. В любом удобном месте с помощью проводника Windows необходимо создать каталог DOS (вы можете назвать его иначе, но в этом случае не забудьте изменить команды, которые будете прописывать в конфигурационные файлы). Проще всего его создать в корневом каталоге диска C.
C:\DOS
2. В каталоге DOS создайте подкаталоги DN, GAMES, IMAGES.
C:\DOS\DN
C:\DOS\GAMES
C:\DOS\IMAGES
3. В каталог DN распакуйте из архива DOS Navigator.
4. В каталоге IMAGES разместите снятые образы дисков приобретенных игр. Если игры не требуют установки, то просто скопируйте их файлы в свой каталог в папке GAMES.
5. Самое время настроить DOSBox. Откройте меню «Пуск» и в группе DOSBox запустите DOSBox Options. В Блокноте Windows откроется текстовый конфигурационный файл, и туда нужно будет внести некоторые изменения.
6. Настройки по умолчанию адекватны большинству конфигураций ПК, так что трогать их не стоит. Разве что можно включить полноэкранный режим при запуске. Для этого нужно поменять строку
fullscreen=false
на
fullscreen=true
Но лучше включать полноэкранный режим после запуска кнопками Alt+Enter.
7. В конце файла конфигурации найдите раздел
[autoexec]
и скопируйте под эту строку этот код:
mount C C:\DOS
# Указан путь к физическому или виртуальному приводу CD имеющий в Windows обозначение D:\
# Замените путь к приводу, если он имеет другое обозначение
mount D D:\ -t cdrom
C:
cls
C:\DN\dn.com
exit
Если вы меняли пути расположения каталога DOS, то измените путь на правильный в первой строчке.
Если вы не используете эмулятор привода компакт-дисков, а предпочитаете пользоваться встроенными средствами DOSBox, то строчку
mount D D:\ -t cdrom
замените на такую:
imgmount D C:\DOS\IMAGES\disk1.iso C:\DOS\IMAGES\disk2.iso ... -t cdrom
где C:\DOS\IMAGES\ — путь в Windows, где хранятся ваши образы дисков, а disk1.iso, disk2.iso и т. д. — имена файлов образов, которые вы хотите подключить к виртуальной машине. Переключение между дисками в DOSBox осуществляется клавишами Ctrl+F4.
Примечание. Будьте внимательнее при написании имен файлов и путей. Особое внимание обращайте на расширение файлов iso или img. Ошибка в написании приведет к тому, что команда при запуске DOSBox выполнена не будет, и ни один из образов не будет подключен.
Закройте Блокнот, сохраните файл.
Шаг 4. Устанавливаем, играем
1. Смонтируйте на виртуальный привод нужный вам образ диска или вставьте диск в дисковод, если не используете средства DOSBox и если это требуется для установки или самой игры.
2. Запустите DOSBox. Вы попадете в DOS Navigator. Если вы не знакомы с двухпанельными файловыми менеджерами 90-х, то это не беда.
- Alt+F1 и Alt+F2 — выбор диска на левой и правой панели, соответственно.
- Tab — переключение между панелями.
- Кнопки со стрелками на клавиатуре — перемещение курсора.
- Enter — войти в каталог или запустить приложение. DOS Navigator подсвечивает исполняемые файлы и выводит их в начале списка.
- Alt+X — выйти из приложения (автоматически закроется DOSBox).
- Alt+F9 — играть в лучший тетрис на ПК.
3. Если игра требует установки, то установите её с диска D. В DOS установочная программа, как правило, имеет название файла INSTALL.EXE, в отличие от SETUP.EXE в Windows. Установку производите в каталог C:\GAMES виртуальной DOS-машины.
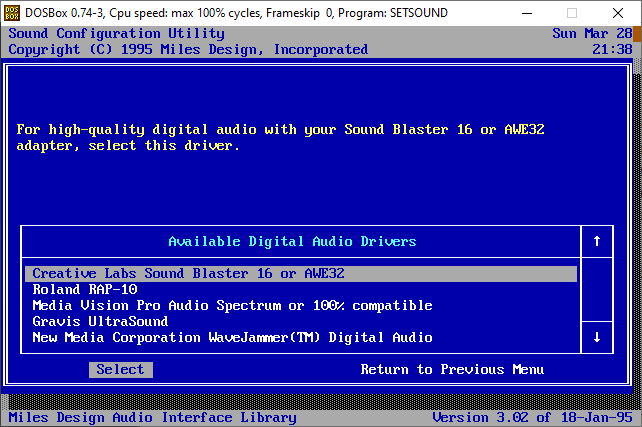
4. После установки нужно настроить звук. Обычно установочная программа предложит это сделать сразу после копирования файлов. Если это не произошло, перейдите в каталог установленной игры, и запустите программу настройки звука (обычно она имеет название SETUP.EXE или SETSOUND.EXE). Настройки необходимо выбрать для драйвера digital audio и драйвера midi audio.
5. DOSBox эмулирует звуковую карту Sound Blaster 16, поэтому при выборе звуковой карты выбирайте эту модель. Если её в списке нет, то можно выбрать обычный Sound Blaster или Pro. Как правило, программы настройки автоматически подбирают правильные параметры карты. Если этого не произошло, их можно ввести в программе настройки вручную:
I/O ADRESS=220
IRQ=7
DMA=1
Эти параметры прописаны в файле конфигурации DOSBox.
6. Найдите в интернете патч с последней версией. При необходимости, обновите игру до последней версии.
7. Все готово! Добро пожаловать в 90-е! Запускайте.
Сейчас на главной
Many improvements have come with the most recent versions of Windows. Unfortunately, along with these improvements, support for running certain DOS programs has been lost. For those who are attached to their old DOS software, there is hope.
You can still run your favorite DOS programs using an open source DOS emulator called DOSBox. DOSBox was designed to run DOS games, but will run many other DOS applications as well. There’s even a long list of DOS programs that have been tested on DOSBox. As well as Windows, DOSBox will run under Mac OS X, Linux and FreeBSD.
Download and Install DOSBox
Navigate to the DOSBox.com downloads website and select the Windows link. You will be automatically forwarded to the SourceForge.net website to download the installation file. If you have trouble with the download, click the direct link or click the mirror link to choose another download site.
Make sure you have 4.3 MB of free space to install DOSBox. Start the file, then make sure that Core files and Desktop Shortcut are selected. Click Next and Install to continue the installation, then click Close.

Install DOS Software
Before you start installing your software, create a directory on your C: drive for the files. For example, if you would like to play games, create a DosGames directory. Make sure that your folder name is 8 characters or less.
Don’t use spaces or any characters other than letters or numbers to name your DOS directory. Once the directory has been created, move your DOS files to the directory or install the DOS software directly into the directory.

Mount a Drive
Before you get started, make sure all your DOS programs are installed in a single directory. Start DOSBox with the shortcut on your desktop. At the command prompt, type MOUNT C C:\DIRECTORY\, where DIRECTORY is the folder on your hard drive containing your DOS programs. If the DOS files are on a floppy disk, type MOUNT A A:\ -t floppy. If they’re on a CD, type MOUNT E E:\ -t cdrom, where E is the letter of your CD-ROM drive.

In some cases, you won’t be able to type a backslash (\) in the directory path. This is due to a conflict between DOSBox’s key mapping and the key mapping of some keyboards. To solve the problem, press CTRL + F1. Delete and re-add the backslash key to remap the keyboard until the backslash key types the right character.

You must re-mount the drive each time you start DOSBox.
Change Directories and Run Your DOS Program
You can change your directory easily in DOSBox by simply typing the name of your mounted drive. For example, if you’ve mounted drive C:, then simply type C: at the Z: prompt. Then type DIR to see the files in your directory.
Type CD plus the name of the directory to change to a different directory. Type DIR again to see the contents of the new directory. Look for a .COM or .EXE file name. Type the file name to start the program.

For more tips on using DOS, read How to navigate in the DOS command prompt.
Related Posts
- How to Use Event Viewer to Troubleshoot Windows Problems
- How to Boot into Safe Mode in All Versions of Windows
- How to Reset Your Computer Password If You Lock Yourself Out
- 14 Command Prompt (CMD) Commands Windows Users Should Know
- Change from Public to Private Network in Windows
There’s a lot of older telecom and other software out there that is very specialized, not upgradeable, not replaceable, and won’t run on modern Windows operating systems like Windows 7, Windows 8, Windows 10 or Windows 11. Otherwise, the software works just fine, and spending a lot of money to replace it seems crazy.
There are many Windows 95/98 and even 3.1 computers out there running these special apps today.

When Vista and XP came out many of the DOS programs that ran fine under W95/98 wouldn’t run at all on those operating systems.
The good news is that Windows 7, Windows 8 and Windows 10 32-bit (not 64-bit) have changed that! Windows 11 is 64-bit only and will likely not run DOS programs well.
Note that if you use a 32-bit operating system, you have to make sure you are using the 32-bit versions of any Windows programs you’re using (not the 64-bit versions).
It turns out that Vista and XP didn’t handle the DOS programs and their memory needs very well. There were problems converting 16-bit (DOS stuff) to the 32-bit memory addressing scheme in Vista and XP (and the 64-bit versions of all Windows systems). If you’re interested in the nitty gritties this is a good explanation of how «thunking» (the ability to share data between 16-bit and 32-bit stuff) was broken in Vista and XP:
Microsoft Article on Thunking
Only the 32-bit versions of W7 & W8 & W10 work correctly with DOS programs!
The DOS stuff we use in our office never worked in Vista or XP. All of the installs of W7 I had were 64-bit, so the DOS stuff never worked on W7 for me either.
Then I decided to try the W7 32 bit just to see what happened, and the programs worked about 80% fine. That meant that I could now use the DOS program on a machine with a modern browser, which happened to be one of the requirements for us to migrate that machine from W98SE. I couldn’t find a modern browser that runs in W98SE.
Luckily for us, I wrote the DOS programs we use and could change them easily. For some DOS programs the original authors aren’t around anymore, so it might take some extra tweaking to make it work on W7 if it’s possible at all. There’s a pretty good chance there won’t be a problem if you take a look at some of my tips, below.
One of the benefits of using a DOS program is that it’s very quick and easy to use without a mouse.
DOS programs seem to run a lot slower on W7 32 bit than they did on a W98 box. The DOS programs we use are blindingly fast on W98 machines. Not on W7, but perfectly usable.
If all you have is a 64-bit system to play with there’s a program called DOSBOX that will let you run DOS programs on both 32-bit and 64-bit systems (really designed for playing old DOS games), going back to Vista and XP (as well as W7 & W8). You can check it out at:
http://www.dosbox.com/
The DIR Command is Different!
We do a lot of reading directories for new files. We do that by doing a DIR command and reading the output into memory and massaging the results. It turns out that in Vista and above they added a line to the top section of the DIR output, which was easy to fix by throwing away 5 lines instead of 4 before we started looking for file names.
They also changed the format of each line with a file name in the DIR, but that didn’t matter for us.
Boot Problems with Network Drives
W7 often has a problem connecting to network drives from any workstation. In the case of our machines, they’re involved with automating processes. I really needed the machine to boot up and connect to the network drives automatically, without my manually clicking on the disconnected drives to reconnect.
I run a batch file with the net use command to reconnect the drives, but it doesn’t reconnect the drives unless you wait about 20 seconds after the W7 machine starts loading stuff in the Startup Group. This is in a batch file called reconn.bat:
net use L: \\Serverd\Ddrive
net use M: \\Serverd\Edrive
net use P: \\Backup1\C
net use Q: \\Backup2\D
The fix is to delay reconn.bat so it waits 20 seconds…
Delaying Running Programs
I couldn’t just drop the reconn.bat batch file into the startup group because the drives wouldn’t reconnect unless I waited 20 seconds to run the batch file. To fix that I bought a program called Startup Delayer (the free version would also work, but won’t save the configurations for testing):
http://www.r2.com.au/page/products/show/startup-delayer/
In addition to delaying the batch file to reconnect the network drives, I also had to delay any programs that use those drives from starting before reconn.bat. Startup Delayer let me set all the programs that need to see the networked drive to run after the drives were reconnected. That really saved a lot of time and hassle!
Wow. I almost had a Windows 7 32-bit machine that worked as well as W98SE!
Printing from DOS Programs
It turns out that you probably need a little help getting print statements in DOS programs to work on a network or USB printer. It might work without help, but it was a problem for us. A quick fix was a program called Printfil:
http://www.printfil.com/english.htm
This lets you specify a local or network printer. Seems to work fine, and there are lots of options to play with.
Print Screen
We run some reports by doing a screen print of the DOS screen. We used a DOS TSR (Terminate and Stay Resident) on the old W98 machines to print the screen to a page on the printer, and then send a form feed to eject the page from the laser printer. That’s worked well for us for a long time, but the TSR won’t run in the DOS box in W7 32 bit. Greenshot solved that problems for us:
http://getgreenshot.org/
This program lets you tell it to grab the Print Screen when you push that button (you can tell it to use any button) and send it to a printer with a form feed. I save toner on the laser printer by telling the program to only print in black and white, and in our case inverting the colors so the blue background on the DOS screen doesn’t show up in black on the printer. It’s easy to setup, free, and really handy!
CAPS & Number Lock
We need the caps lock and num lock to be set differently in different DOS screens. With the old DOS and W98 machines I simply peeked and poked memory to determine the status and set the caps and num lock. Those peeks and pokes definitely don’t work on W7!
This is the easiest way I found to set the caps and num lock from the DOS program on the W7 machine. I simply call a batch file from the DOS program which runs «capslock on» or «capslock off» in the batch file. Same with numlock.
http://www.rjlsoftware.com/software/utility/capslock/
http://www.rjlsoftware.com/software/utility/numlock/
Running this program is a lot slower than the pokes, but it works for us.
Arranging the ICONS on the Desktop so They’ll Stay!
We leave the DOS program open all the time on the W7 desktop in the upper left corner. It turns out that W7 puts other icons at the upper left corner, so they’re always covered up by our DOS program. W7 likes to rearrange icons after you move them, from time to time.
The fix I found for that is a Windows program called DesktopOK:
http://www.softwareok.com/?Freeware/DesktopOK
It lets you save your icon arrangement and restore it when the system boots. It lets us put the icons anywhere we need them, and they return to the correct position after the system restarts.
Digging Around in a Windows Machine to See What’s There…
In the old days with DOS I used a program called XTREE to give me the lowdown on any PC I sat down at. Before you start changing stuff it’s a really good idea to know exactly what’s on the machine. XTREE (and then XTREE Gold) did a great job of giving me a graphical tree view of everything on a disk and let me install or fix stuff without screwing up the machine further.
Today I use a clone of XTREE called ZTREE that runs on all versions of Windows. The author of ZTREE used all the same commands as XTREE so you don’t have to use a mouse to do anything:
http://www.ztree.com/html/ztreewin.htm
It gives a much clearer picture of what’s on a hard drive, local or remote, than My Computer or Windows Explorer. If you’ve never used XTREE it will take a little while for your fingers to learn what they have to do to get you where you want, but once your fingers learn it it’s incredibly fast.
Having WiFi Problems, and You Have W7 or W8?
In W7 and W8 they added some capabilities to the netsh (network shell) command that really helps diagnose why WiFi connections aren’t working well. To access netsh, click the START button in W7 and type cmd into the little text box at the bottom, and hit enter. I don’t use W8 so I don’t know where you find the place to get to cmd in W8 since there’s no START button.
When the command box opens, at the prompt type:
netsh wlan show networks mode=bssid
You can get a little more information with:
netsh wlan show all
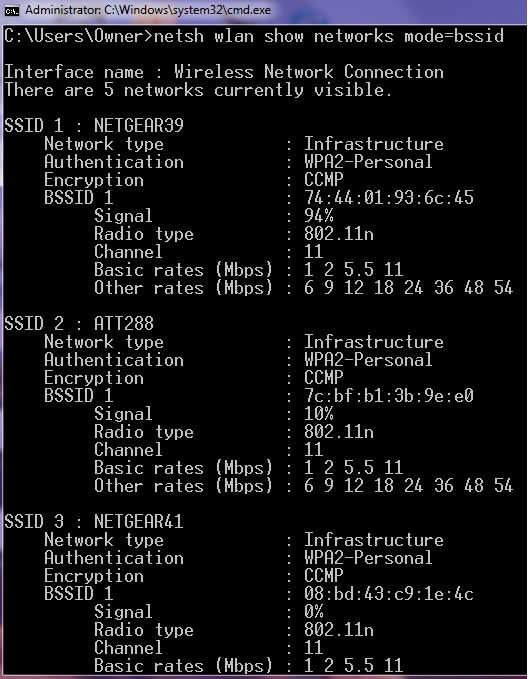
It will give you a list of all the Wi-Fi networks that can be seen. The important thing is to see what Channel your Wi-Fi is on, and what all the other Wi-Fi routers are on. In the example above you can see that all the networks are on Channel 11. In this case it doesn’t matter much because the signal is so bad on the second two networks listed (there are two more when I scroll down) but having two or more Wi-Fi routers set to the same channel is a recipe for crummy Wi-Fi for everybody.
If you have a router that does both 2.4 and 5 gig, you’ll see two SSIDs for your location. Make sure neither one is on the same channel as a nearby router, unless maybe if the signal strength from the other routers is really low.
The fix is to go into your router and change the channel, or both channels if you have a 5G router with 2 SSIDs.
There is a wonderful app called Wi-Fi Analyzer by farproc in the Android Google Play and Kindle app stores that works great, and gives you the same information as the netsh wlan commands in W7/8.
When you open the free app after downloading it, touch View and choose AP list from the drop down. It gives you all the WiFi routers it can see, signal strength and the Channel number.
I haven’t found an app that will do that on ios for iPhones/iPads, but there may be one.
Finding Utility Programs on the Internet is DANGEROUS!
The links I provided for the various utilities on this page are safe as far as I can tell.
BUT if the utility is free you’ll probably find it on many other sites on the Internet. The problem with almost all of those sites that let you download free software is that they «wrap» the software in their own installer, which is there to put all kinds of other questionable software on your PC along with the free software you want.
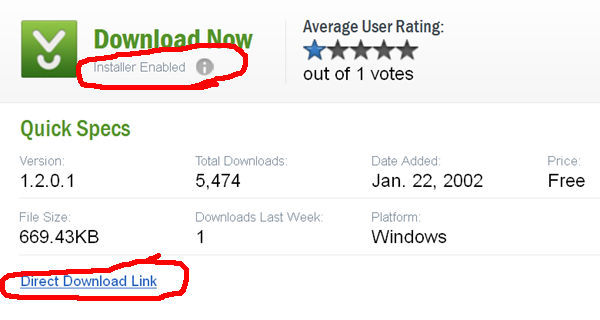
CNET is probably the safest place to download free programs because they give you the option to use a Direct Download Link (if you know to do that) or use their Installer which will probably screw up your computer. See the Two ways to download software from CNET circled in red:
Even SourceForge, the place that says it’s «Trusted for Open Source,» wraps their downloads in an installer:
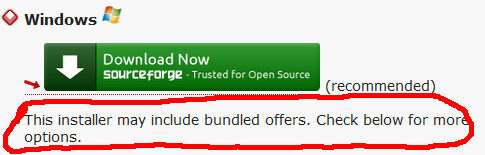
They do tell you a second time that you’re going to be using an installer when I tried to download Filezilla. If I install any of the junk in the installer by accident, Filezilla shares in some of the money they get from SourceForge. Other software on SourceForge may or may not have an installer?
So maybe it doesn’t contain malware? I did check and they tell you in BIG letters that you can opt out of two goofy programs they want to put on your PC (I opted out). I think when I tried the direct link it was still wrapped in their installer, but I’m not positive. I didn’t want to spend much time trying to get bad stuff onto my computer!

In general, I think I’d trust CNET only with the direct download link. I guess they need to charge money to pay for the servers, and the makers of the junk software they install generally pay them per install.
SourceForge lets savvy users opt out of installing the junk in their installer. Any time you are downloading something take the time to read the screen! Don’t just click ACCEPT. Being really careful can save you A LOT of headaches.
Almost ALL of the other sites with collections of «free software» that you can download may really screw up your computer with junk when you use their installer, or they may even install malware that would be very difficult to get rid of (if you can at all).
If a site says you should use their Installer to make downloads faster (or for any other reason), DON’T DOWNLOAD IT! Look for the original author’s site which probably has a direct download link. If they also have a link to get it from one of the free software sites, go for the direct link!
Как использовать OAuth2 со Spring Security в Java
Javaican 14.05.2025
Протокол OAuth2 часто путают с механизмами аутентификации, хотя по сути это протокол авторизации. Представьте, что вместо передачи ключей от всего дома вашему другу, который пришёл полить цветы, вы. . .
Анализ текста на Python с NLTK и Spacy
AI_Generated 14.05.2025
NLTK, старожил в мире обработки естественного языка на Python, содержит богатейшую коллекцию алгоритмов и готовых моделей. Эта библиотека отлично подходит для образовательных целей и. . .
Реализация DI в PHP
Jason-Webb 13.05.2025
Когда я начинал писать свой первый крупный PHP-проект, моя архитектура напоминала запутаный клубок спагетти. Классы создавали другие классы внутри себя, зависимости жостко прописывались в коде, а о. . .
Обработка изображений в реальном времени на C# с OpenCV
stackOverflow 13.05.2025
Объединение библиотеки компьютерного зрения OpenCV с современным языком программирования C# создаёт симбиоз, который открывает доступ к впечатляющему набору возможностей. Ключевое преимущество этого. . .
POCO, ACE, Loki и другие продвинутые C++ библиотеки
NullReferenced 13.05.2025
В C++ разработки существует такое обилие библиотек, что порой кажется, будто ты заблудился в дремучем лесу. И среди этого многообразия POCO (Portable Components) – как маяк для тех, кто ищет. . .
Паттерны проектирования GoF на C#
UnmanagedCoder 13.05.2025
Вы наверняка сталкивались с ситуациями, когда код разрастается до неприличных размеров, а его поддержка становится настоящим испытанием. Именно в такие моменты на помощь приходят паттерны Gang of. . .
Создаем CLI приложение на Python с Prompt Toolkit
py-thonny 13.05.2025
Современные командные интерфейсы давно перестали быть черно-белыми текстовыми программами, которые многие помнят по старым операционным системам. CLI сегодня – это мощные, интуитивные и даже. . .
Конвейеры ETL с Apache Airflow и Python
AI_Generated 13.05.2025
ETL-конвейеры – это набор процессов, отвечающих за извлечение данных из различных источников (Extract), их преобразование в нужный формат (Transform) и загрузку в целевое хранилище (Load). . . .
Выполнение асинхронных задач в Python с asyncio
py-thonny 12.05.2025
Современный мир программирования похож на оживлённый мегаполис – тысячи процессов одновременно требуют внимания, ресурсов и времени. В этих джунглях операций возникают ситуации, когда программа. . .
Работа с gRPC сервисами на C#
UnmanagedCoder 12.05.2025
gRPC (Google Remote Procedure Call) — открытый высокопроизводительный RPC-фреймворк, изначально разработанный компанией Google. Он отличается от традиционых REST-сервисов как минимум тем, что. . .