
Многие пользователи Windows однажды приходят к использованию планировщика заданий для автоматизации тех или иных действий. Несмотря на то, что создание заданий и настройка условий их выполнения — не слишком сложная задача, иногда возникают сложности, например, при использовании BAT-файлов с набором команд в планировщике заданий.
В этом материале подробно о том, как решить возможные проблемы при запуске сценариев BAT в планировщике заданий Windows 11/10 и других версий и что следует учитывать, если что-то работает не так, как ожидается.
Особенности запуска .BAT файлов в планировщике заданий
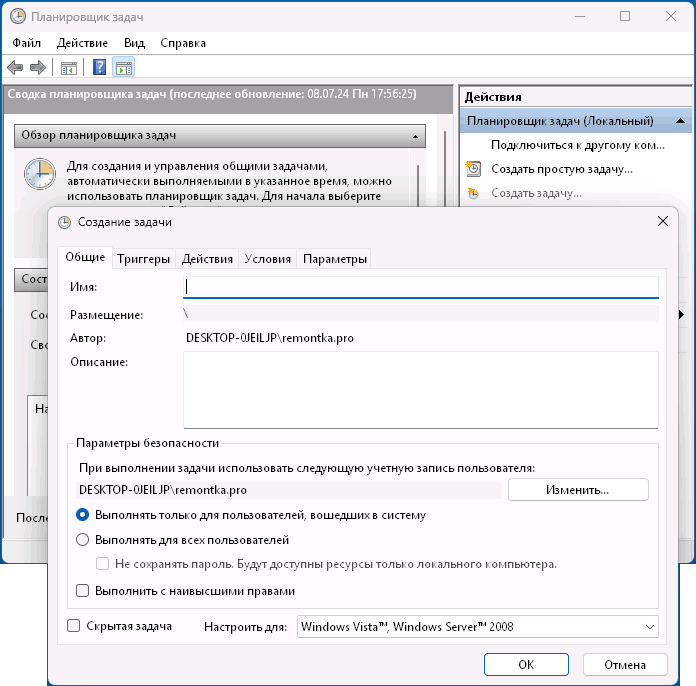
В базовом сценарии пользователь, желающий добавить выполнение BAT файла в планировщике заданий, запускает его (Win+R — taskschd.msc) нажимает «Создать задачу», при необходимости включает выполнение с наивысшими правами и от нужного пользователя, устанавливает триггеры и прописывает путь к файлу сценария BAT на вкладке «Действия».
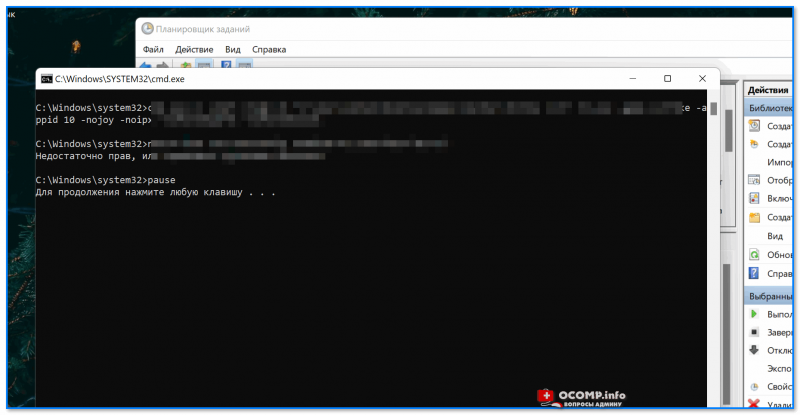
При этом в некоторых случаях этого может быть достаточно и всё работает исправно, но иногда возникают проблемы, которые можно описать как: BAT исправно работает при запуске вручную или из cmd, но не через планировщик заданий.
Часто работающее быстрое решение проблемы в такой ситуации (работает во многих случаях) — при создании действия использовать не путь к файлу .BAT в поле «Программа или сценарий», а следующий подход:
- Указать cmd.exe в поле «Программа или сценарий»
- В поле «Добавить аргументы» прописать
/c start "" "путь_к_файлу.bat"

Однако и этого может быть недостаточно для исправной работы, всё зависит от конкретного сценария. Причина — некоторые особенности выполнения BAT (и других заданий) через планировщик:
- По умолчанию рабочая папка выполняемого задания —
%SystemRoot%\System32
независимо от того, где располагается сам файл .BAT. Вы можете изменить рабочую папку создавая действие в Планировщике, либо использовать абсолютные пути в командах вместо относительных.
- При конфигурации задания следует учитывать права учетной записи, из-под которой выполняется задание (настраивается в разделе «Параметры безопасности» на вкладке «Общие»). Локальный администратор или учетная запись «Система» может не иметь доступ к сетевым расположениям, учетная запись обычного пользователя — к системным папкам и папкам других пользователей. Кроме этого, если BAT файл получает дату и время, их формат также будет определяться учётной записью.
- Если BAT-файл обращается к переменным среды пользователя, их список и значения также будут зависеть от того, под какой учётной записью выполняется задание.
- Часто при попытке получить доступ к сетевому расположению из BAT-файла, выполняемого через планировщик заданий возникают ошибки. Решение — выполнить подключение к сетевому расположению прямо в BAT (в примере монтируется как X:):
%SystemRoot%\System32\net.exe use X: \\ИмяКомпьютера\ИмяОбщейПапки пароль /user:Домен\Учетная_запись
по завершении задания при необходимости отключить расположение используйте команду:
%SystemRoot%\System32\net.exe use X: /delete /yes
Для большинства заданий работает либо запуск с использованием cmd.exe, как было описано выше, либо указание рабочей папки.
Ещё несколько нюансов, которые следует учитывать:
- Путь к рабочей папке не следует брать в кавычки. По некоторым отзывам, поведение также может зависеть от наличия/отсутствия закрывающего слэша в пути к рабочей папке. Также может иметь смысл выполнить переход к нужной рабочей папке в самом сценарии:
cd диск:\путь\к\папке
- Задания могут не выполняться при питании от батареи, если не изменить соответствующие настройки на вкладке «Условия».
- Не забывайте выбирать нужного пользователя на вкладке «Общие», а если требуются права администратора — включать отметку «Выполнять с наивысшими правами» на той же вкладке.
- В некоторых случаях задания, где включено «выполнять для всех пользователей» могут работать неправильно. Проверьте, работает ли задание если изменить параметры безопасности на «Выполнять только для пользователей, вошедших в систему».
Если у вас не работает что-то в части запуска .BAT файлов в Планировщике заданий, вы можете описать ситуация в комментариях ниже, постараемся разобраться.
Download Windows Speedup Tool to fix errors and make PC run faster
Occasionally, you might need to schedule to run a batch file automatically in your Windows. In this article, I’ll share a tip on how to schedule a Batch file automatically using Task Scheduler.
To schedule a Batch File to run automatically in Windows 11 and Windows 10, you will have to follow these steps:
- Create a Batch file
- Open Task Scheduler
- Create a Basic Task
- Open Task Scheduler Library
- Make Task runs with the highest privileges.
Step 1: Create a batch file you wish to run and place it under a folder where you have enough permissions, for example, under C drive.
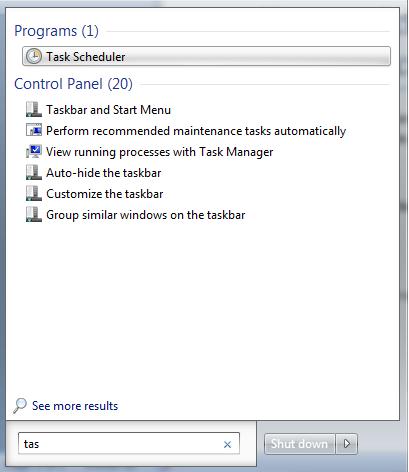
Step 2: Click on Start and under search, type in Task, and click open Task Scheduler.
Step 3: Select Create Basic Task from the Action pane on the right of the window.
Step 4: Under Create Basic Task, type in the name you like and click Next.
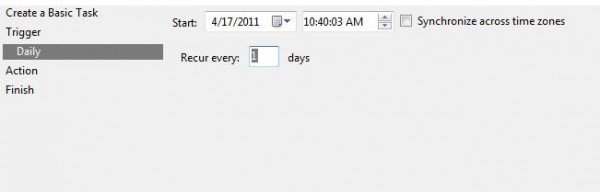
Step 5: From the Trigger, select the option you like and click Next.
I chose Daily and clicked Next, which brought me to this screen.
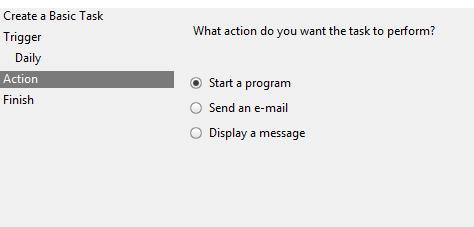
Step 6: Then click on Start a Program and click Next.
Step 7: Now click on Browser and select the batch file you would like to run.
Step 8: Finally, click on Finish to create the Task.
Now that we have created a Task, we must ensure it runs with the highest privilege. Since we have UAC settings, we have to make sure that it should not fail if it does not bypass the UAC settings when you run the file.
So click on Task Scheduler Library.
Then, double-click on the Task you just created.
Step 8: Click on Run with Highest privilege, then click OK.

Congratulations!
You have successfully created a Scheduled Task to automate a batch file. However, there can be drawbacks such as if the application you are trying to invoke needs a password. In that case, you cannot run it silently.
How do I run multiple batch files after one?
If you want to run batch files one after another, you can use the task scheduler and time them to run with the one-minute gap. The other way is to create a mother batch file, add a list of all bat files inside it, and let it execute one after the other.
How to add timeout or sleep in a Batch File?
You can add the following command along with other parameters. It will ensure user input is not considered, and there is no output for this.
timeout /t 30 /nobreak > NUL
How to run the batch files on Startup?
When setting up the task with the scheduler, you can run it as soon as you log into the PC. It can be delayed by a minute, but it will be executed. If you need to run it every few minutes, make sure to set it accordingly.
Shyam aka “Captain Jack” is a Microsoft MVP alumnus and a Windows Enthusiast with an interest in Advanced Windows troubleshooting. Suggestions made and opinions expressed by him here are his personal ones and not of his current employers.
Здравствуйте.
Не многие (оказывается) знают, что Windows может автоматически запускать нужную вам программу (или открывать файл) в то время, которое вы зададите! Представьте, вы можете один раз настроить запуск BAT-файла для копирования определенного каталога (примеры таких BAT’ников приводил тут) — и это будет происходить автоматически, например, каждый вторник или среду. Удобно? Тот-то… 😉
Сделать это позволяет планировщик заданий — встроенное приложение в Windows для планирования различных действий. Это достаточно функциональный инструмент, и позволяет решать многие задачи (можно серьезно облегчить себе «жизнь» и ускорить работу за ПК).
Собственно, в рамках этой заметки я хочу показать один из вариантов работы с планировщиком — поставим ему задачу запустить определенный исполняемый файл в нужное нам время.
*
Пример настройки планировщика заданий
📌 ШАГ 1
Чтобы открыть планировщик заданий — можно прибегнуть к неск. способам:
- первый: нажать сочетание Win+R — в окне «Выполнить» ввести команду control schedtasks и нажать Enter (универсальный вариант);
- второй: кликнуть по меню «Поиск», ввести «планировщик…» и открыть найденный результат (актуально для Windows 11/10). 👇
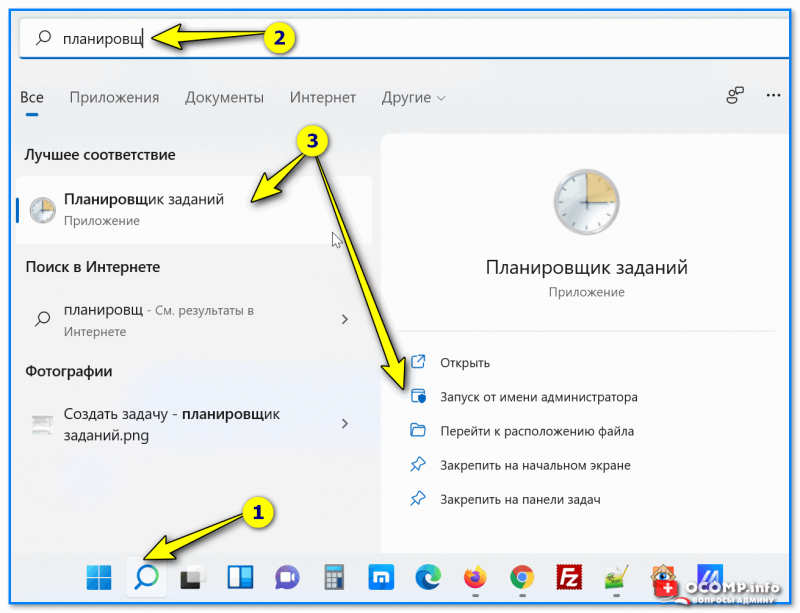
Поиск — планировщик заданий (Windows 11)
*
📌 ШАГ 2
Когда откроется окно планировщика заданий — обратите внимание на меню справа: в нем нам нужно кликнуть по функции «Создать задачу». См. пример ниже. 👇
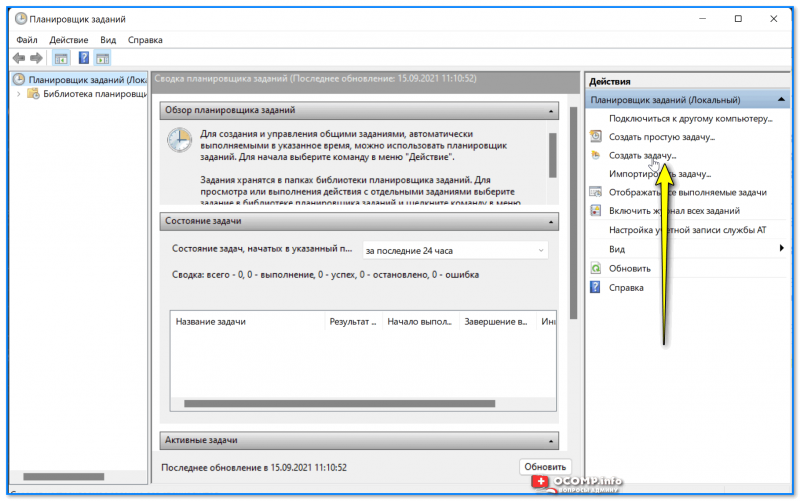
Создать задачу — планировщик заданий
Далее задаче нужно дать имя: я использовал «Delete trash» (удаление мусора). Имя задачи может быть любым (главное, чтобы вы могли потом сами понять, что это за задача, не открывая ее лишний раз… 😉).
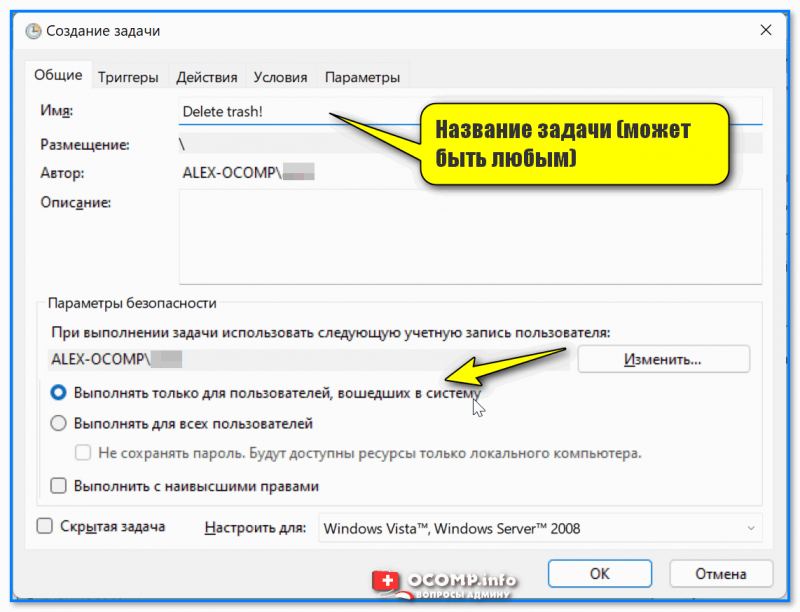
Для кого выполнять задачу
*
📌 ШАГ 3
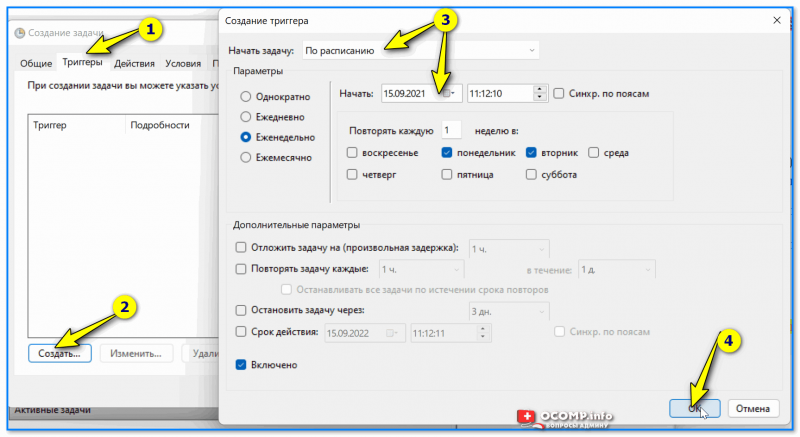
Затем нужно перейти во вкладку «Триггеры» — и нажать по кнопке «создать».
Именно здесь будет задаваться время (и условие), при котором планировщик выполнит задание (например, запустит программу/скрипт).
В своем примере я выбрал «По расписанию»: указал периодичность запуска (раз в неделю) и дни, в которые можно запускать задачу (понедельник и вторник). 👇
Примечание: если вам нужно запускать задачу при каждом включении компьютера — вместо «По расписанию» укажите вариант «При входе в систему», здесь я рассказывал про автозагрузку подробнее…
Триггеры — когда выполнять задачу, расписание
Кстати, обратите внимание, что есть достаточно много вариантов, когда запускать ту или иную задачу: по расписанию, при входе в систему, при простое, при каком-то событии, и т.д. 👇 Можно автоматизировать свое рабочее место по максимум, создав самые разные запланированные задачи. 😉
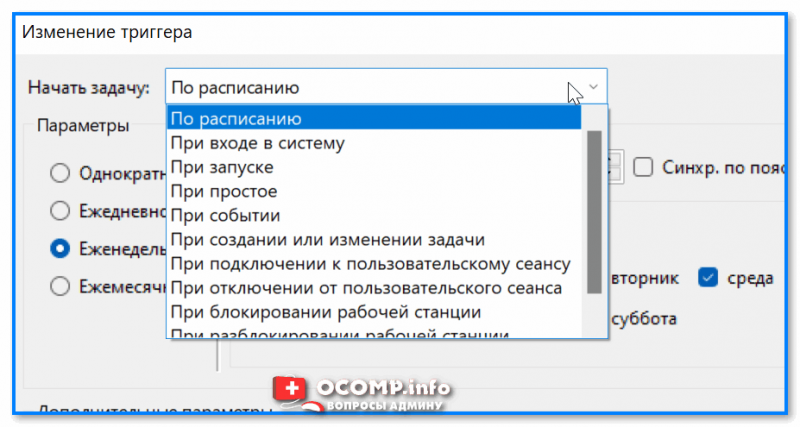
Обратите внимание, что есть много разных вариантов триггера
*
📌 ШАГ 4
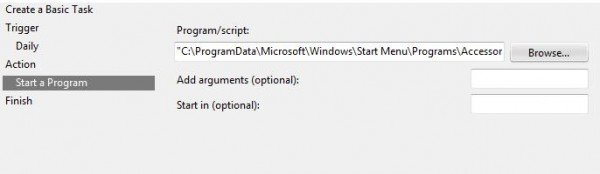
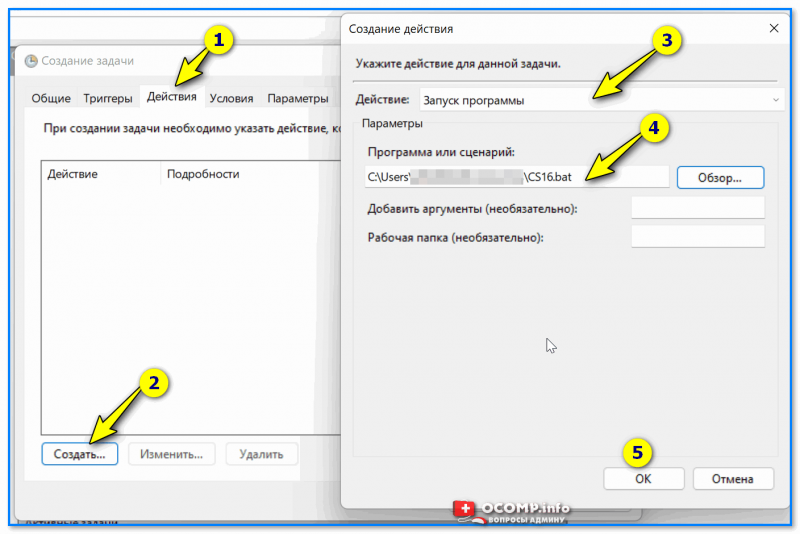
Следующий шаг — вкладка «Действия». В ней нам нужно указать само действие, например, «Запуск программы»*, и тот BAT- или EXE-файл (программу), которую нужно запустить (разумеется, можно также добавить необходимые аргументы // если это требуется -> см. справку к своей программе).
В своем примере я просто указал расположение нужного мне скрипта (BAT’ника).
* Примечание: кроме запуска программы, можно вывести какое-нибудь сообщение, или отправить электро-почту.
Задаем действия
*
📌 ШАГ 5
Обратите внимание, что во вкладке «Условия» можно задать интересные функции:
- запускать задачу при простое ПК;
- запускать только при питании от электросети (для ноутбуков!);
- пробуждать ПК для выполнения задачи (например, если он ушел в режим сна);
- запускать задачу только при наличии подключения к сети.

Условия
*
📌 ШАГ 6
Во вкладке «Параметры» можно добавить еще некоторые полезные опции: выполнять ли задачу при сбое, как быстро ее останавливать, запускать ли ее повторно и пр. В своем примере я оставил все галочки, которые стояли по умолчанию…
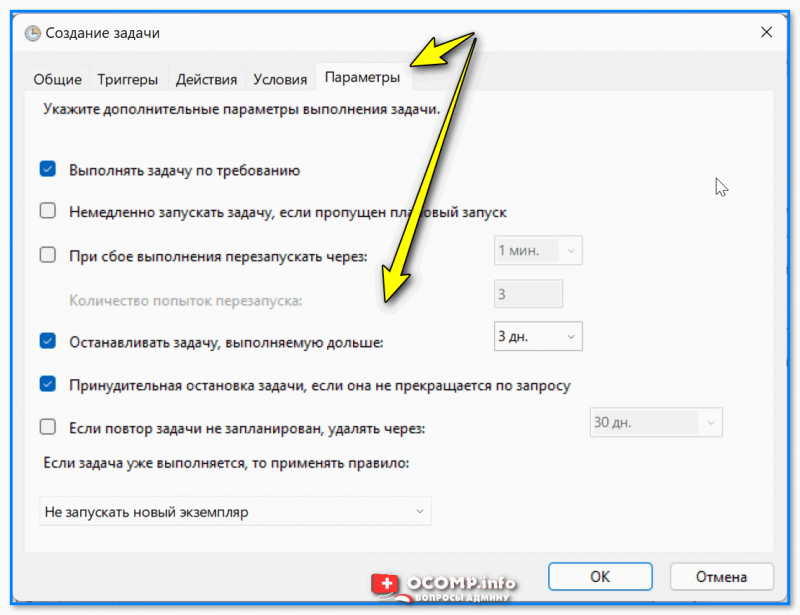
Параметры
*
📌 ШАГ 7
После сохранении задачи — вы увидите, что она появилась в общем перечне планировщика заданий. См. мой пример ниже. 👇
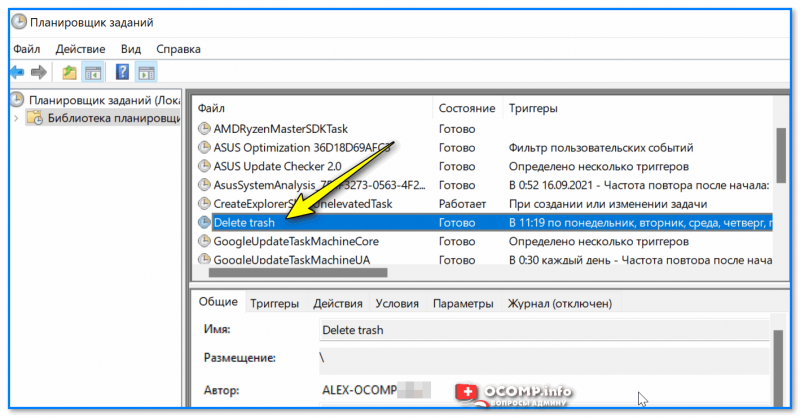
Наша задача теперь есть в списке!
В назначенную минуту (при соблюдении заданных условий) — вы заметите, как автоматически запустится нужный вам файл… (кстати, при первичной настройке рекомендую расписание запуска настроить так, чтобы планировщик отработал при вас \\ для проверки).
Задача выполнена?! 👇👌
Мой BAT-файл был запущен в нужное время!
*
Дополнения по теме — приветствуются!
Всех благ!
👋
Batch files are a great way to run tasks on your PC automatically. If you’d like to schedule a batch file to run automatically, use your Windows 10 or Windows 11 PC’s Task Scheduler utility.
Task Scheduler lets you trigger your batch file to run at a specific time or when a specified event occurs. You also get loads of configurable options to define how the file runs. We assume you already have the batch file created, so in this article, we’ll show you how to schedule that batch file to run.

Why Schedule Batch Files on Your Windows PC
There are countless reasons to schedule a batch file on your PC. One good example is creating a batch file that clears your Downloads folder. For example, you can run this batch script to remove your Downloads every week.
Similarly, you can make a script that automatically launches your favorite programs when you turn on your computer. When it comes to automating tasks with batch files, your creativity is the only limit.
Place your bat file in an appropriate location on your PC. If you move the file after creating the task, the task will stop working, so place it somewhere you’d like it to stay. Start the process by opening your Microsoft Windows PC’s Start menu, searching for Task Scheduler, and selecting that tool in the search results.

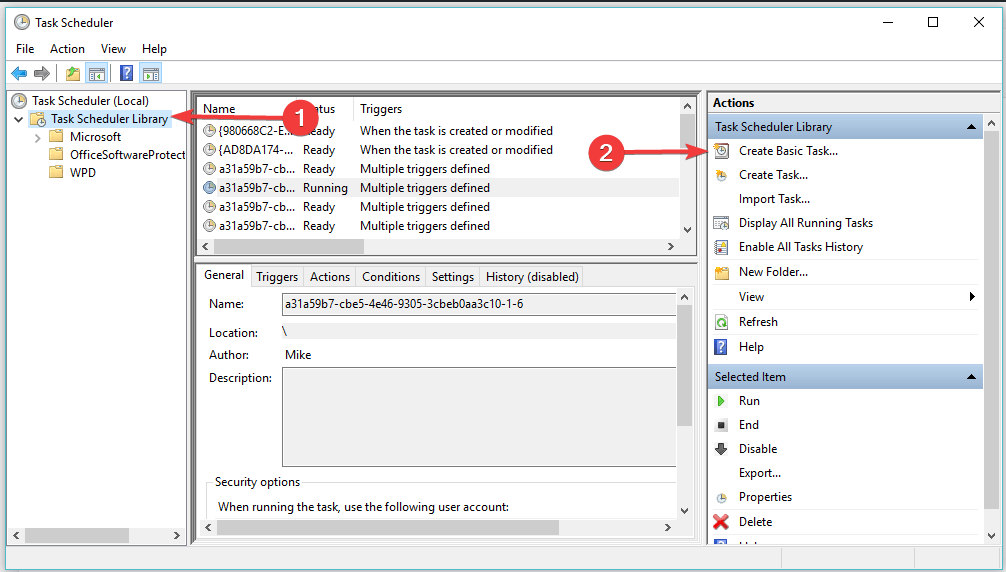
Select Action > Create Basic Task on the Task Scheduler’s window. You’ll use this task to run your batch file.

Select the Name field and type a name for your task. The name could be anything that helps you recognize your task. Then, optionally, enter a description for the task and select Next at the bottom.

You’ll choose when and how often your batch file runs in the following window. The options that you can choose from are:
- Daily: Run your batch file every day.
- Weekly: Execute your file on a particular day each week.
- Monthly: Run your batch file on a particular day each month.
- One time: Only run the batch file once.
- When the computer starts: Launch your batch file when your PC turns on. Note that this task will run when the computer starts, but before logging on.
- When I log on: Run your batch file when you log in to your account on your PC.
- When a specific event is logged: This is for advanced users. If you want to run your batch file when a particular event takes place on your PC, choose this option.
In most cases, you’ll choose one of the first four options. Once you’ve made a selection, click Next at the bottom.
We’ll choose the Weekly option for the demonstration.

You’ll choose when to run your batch file on the window that opens. Depending on what you selected in the previous step, you’ll see appropriate options.
Since we chose Weekly in the previous step, we’ll select the start date and time on this window. Then, we’ll click the Recur every box and pick when the task reoccurs, and then choose the day of the week.
Finally, we’ll select Next at the bottom.

Task Scheduler will now ask what you’d like to run at the specified time. Choose Start a program since you want to run a batch file. Then, select Next at the bottom.

Click the Browse button on the following screen and choose the batch file to run. Optionally, add arguments and a start in time. Then, select Next at the bottom.

You’ll see your newly created task’s summary on your screen. Click the Finish button if this summary looks good to you.

Task Scheduler has saved your task, and your task will run at the specified date and time.
Edit or Delete a Batch File Task in Task Scheduler on Windows
Task Scheduler allows you to edit your task even after creation. This way, you can change what, when, and how often the batch file runs. You can also delete the task if you no longer want to run your file.
Start the Task Scheduler utility on your Windows 10 or Windows 11 PC and select the Task Scheduler Library on the left. In the middle pane, right-click your task and choose Properties from the menu to edit the task.

Use the various tabs on the Properties window to change your task’s options. For example, select the Triggers tab if you’d like to change the schedule for your batch file. You can then choose the current schedule, click Edit, and then specify the new schedule for your file.

Similarly, open the Actions tab to change what batch file runs when your task is launched. Again, select your current batch file, click Edit, and then select the new file if you want.

Lastly, you can get rid of your task so that your batch file doesn’t automatically run. You can do this by right-clicking your task on Task Scheduler’s main window and choosing Delete from the menu.

Choose Yes in the prompt to delete your task. You can always create a new task to run the same or a different file at scheduled intervals.
Keep in mind that your PC must be on for Task Scheduler to run your task. Your batch file won’t run if your PC is off when the scheduled time comes.
Related Posts
- How to Fix a “This file does not have an app associated with it” Error on Windows
- How to Fix an Update Error 0x800705b4 on Windows
- How to Resolve “A JavaScript error occured in the main process” Error on Windows
- How to Fix the Network Discovery Is Turned Off Error on Windows
- How to Change Folder Icons in Windows
Readers help support Windows Report. We may get a commission if you buy through our links.
Read our disclosure page to find out how can you help Windows Report sustain the editorial team. Read more
Batch files usually contain several Command Prompt commands, and they are extremely useful for advanced users. Speaking of batch files, today we’re going to show you how to schedule batch file in Windows.
Scheduling batch files is as simple as creating one, and to do it, we’re going to use a built-in Task Scheduler application.
Even if you’re unfamiliar with Windows 11’s Task Scheduler, the instructions are simple and straightforward, so you can’t do anything wrong. So, without further ado, let’s get started.
How can I schedule a .bat file to run daily?
-
1. Press the Windows key on your keyboard to open the Windows Search box.
-
2. Type task scheduler in the Windows Search box and click on the search result in order to open the Task Scheduler app.
-
3. Navigate to Task Scheduler Library in the left pane.

-
4. Select Create Basic Task in the right pane.
-
5. In the Create Basic Task Wizard windows that has opened, enter a name for the task and a description (optional), then click Next.

-
6. Select Daily in the Trigger section, then click Next.

-
7. Choose a date and time you’d like the task to trigger: set to Recur every 1 day > click Next.

-
8. In the Action section, choose the Start a program option > click Next.
-
9. Browse the .bat type file of the program you want to run daily > click Next.
-
10. Finally, click Finish.


Scheduling tasks via Task Scheduler is very simple and can be done by anyone, without needing to be tech-savy. All you need to do is open the app and start setting up the batch file to run at the specific time and days you want.
- 5+ best Windows task scheduler software to download
- Task Scheduler not running the Python script? Try these fixes
- How to schedule tasks in Windows 10
- How to schedule shutdowns in Windows 10
- 4 ways to batch rename files in Windows 10/11
There you go, now you know how to schedule batch file in Windows systems. As you can see, the process is pretty simple, and it will take you five minutes tops to schedule a batch file.
Scheduling a site to open automatically takes a little less time, so you may also want to check our article on the same.
If you found this helpful guide, leave us a comment in the comment section below.
Madalina Dinita
Networking & Security Specialist
Madalina has been a Windows fan ever since she got her hands on her first Windows XP computer.
She is interested in all things technology, especially emerging technologies — AI and DNA computing in particular.
Prior to joining the WindowsReport team, she worked in the corporate world for a number of years.