
Apache Tomcat — комплект ПО, предназначенный для запуска веб-приложений на Java. Apache Tomcat представляет собой реализацию таких технологий, как Java Servlet, JavaServer Pages, Java Expression Language и Java WebSocket, поэтому его часто называют контейнером сервлетов.
Установка должна производится на чистый сервер, без панели ispmanager. Рассмотрим на примере ОС, актуальных на момент выхода статьи: Debian 10, Debian 11, Ubuntu 20.04, Ubuntu 22.04, CentOS 7, Alma Linux 8 / Rocky Linux 8, Alma Linux 9 / Rocky Linux 9.
Предварительные настройки
CentOS/AlmaLinux/RockyLinux
Применение настроек и запуск демона Tomcat
Настройка доступа к веб-интерфейсу
Предварительные настройки
Перед установкой самого Tomcat необходимо создать пользователя для его работы, а также установить Java.
Создаём пользователя:
# useradd tomcat -U -s /bin/false -d /opt/tomcat -m
Устанавливаем Java — для этого воспользуйтесь готовой инструкцией.
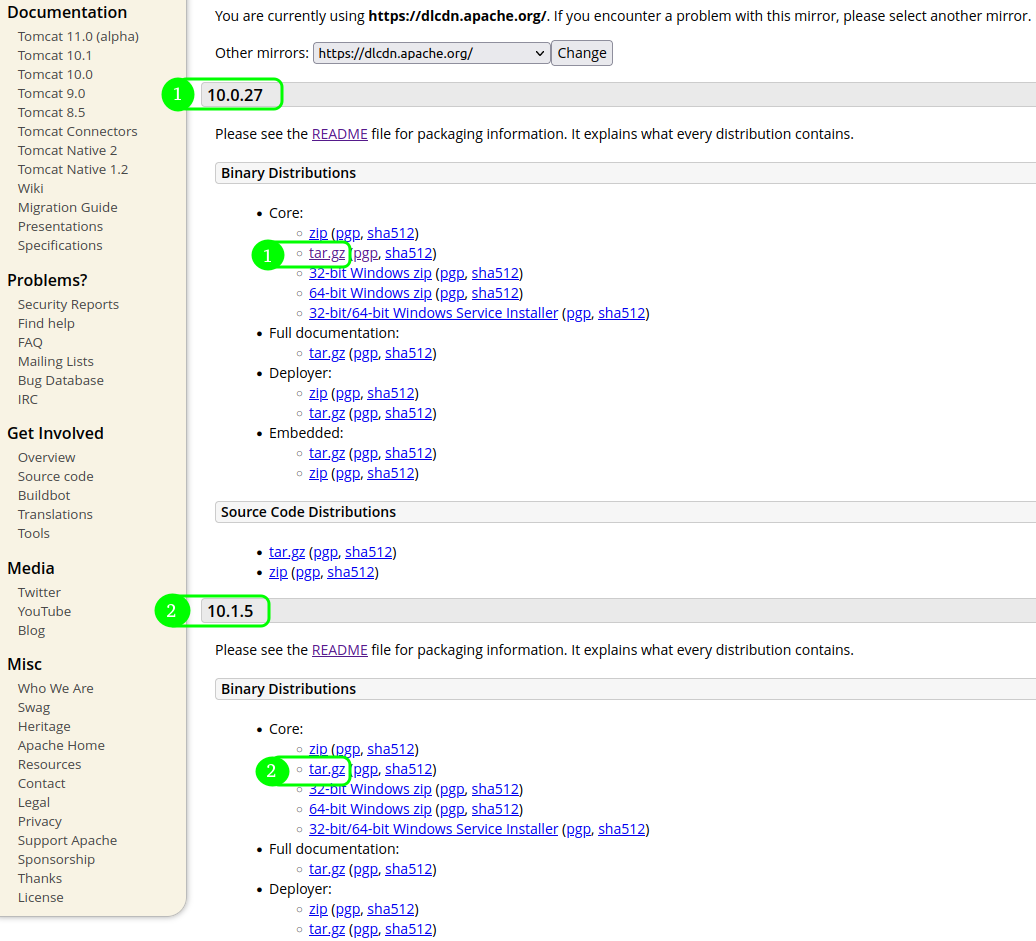
Перед установкой Tomcat нужно определиться с его версией. На официальной странице Apache Tomcat, слева есть список версий: выбираем нужную, например Tomcat 10, далее копируем ссылку на загрузку архива tar.gz.
Apache Tomcat 10.1 работает только с минимальной версией Java 1.11.0!
Проверьте версию Java с помощью команды:
# java -version
Если в выводе будет версия 1.11 или выше (openjdk version «11.0.18»), можно устанавливать Tomcat 10.1.
Если же в выводе будет версия ниже, например 1.8 (openjdk version «1.8.0_362»), — необходимо либо установить Java 1.11, либо установить Tomcat 10.0 (ссылка tar.gz).
Отметим, что на текущий момент в репозиториях CentOS 7, Alma Linux 8 и 9, Rocky Linux 8 и 9 последняя версия Java — 1.8, поэтому для данных дистрибутивов рассмотрим установку Apache Tomcat 10.0.
Скачиваем архив:
# wget https://dlcdn.apache.org/tomcat/tomcat-10/v10.1.18/bin/apache-tomcat-10.1.18.tar.gz
Распаковываем архив в ранее созданный каталог пользователя tomcat (убедитесь, что в текущей директории у вас один архив Tomcat, иначе вместо apache-tomcat-*.tar.gz укажите полное название архива):
# tar zxvf apache-tomcat-*.tar.gz -C /opt/tomcat --strip-components 1
И меняем права на файлы для пользователя tomcat:
# chown -R tomcat:tomcat /opt/tomcat
Так как сейчас запуск Tomcat осуществляется в ручном режиме, то после перезапуска сервера он не запустится, это нужно исправить. Для этого настроим служебный файл systemd, который будет запускать Tomcat и, если он упадёт, перезапускать.
Ubuntu/Debian
Первым делом выполняем команду:
# update-java-alternatives -l
Вывод будет примерно таким, значения версий могут отличаться:
java-1.11.0-openjdk-amd64 1111 /usr/lib/jvm/java-1.11.0-openjdk-amd64
Создаём файл /etc/systemd/system/tomcat.service и добавляем в него следующее:
[Unit]
Description=Apache Tomcat Server
After=network.target

[Service]
Type=forking
User=tomcat
Group=tomcat
Environment="JAVA_HOME=/usr/lib/jvm/java-1.11.0-openjdk-amd64"
Environment="JAVA_OPTS=-Djava.security.egd=file:///dev/urandom -Djava.awt.headless=true"
Environment="CATALINA_BASE=/opt/tomcat"
Environment="CATALINA_HOME=/opt/tomcat"
Environment="CATALINA_PID=/opt/tomcat/temp/tomcat.pid"
Environment="CATALINA_OPTS=-Xms512M -Xmx1024M -server -XX:+UseParallelGC"
ExecStart=/opt/tomcat/bin/startup.sh
ExecStop=/opt/tomcat/bin/shutdown.sh
Restart=on-failure
RestartSec=10

[Install]
WantedBy=multi-user.target
Меняем значение JAVA_HOME на /usr/lib/jvm/java-1.11.0-openjdk-amd64 (может отличаться в зависимости от версии Java).
CentOS/AlmaLinux/RockyLinux
Создаём файл /etc/systemd/system/tomcat.service и добавляем в него следующее:
[Unit]
Description=Apache Tomcat Server
After=syslog.target network.target

[Service]
Type=forking
User=tomcat
Group=tomcat
Environment=CATALINA_PID=/opt/tomcat/tomcat.pid
Environment=CATALINA_HOME=/opt/tomcat
Environment=CATALINA_BASE=/opt/tomcat
ExecStart=/opt/tomcat/bin/startup.sh
ExecStop=/opt/tomcat/bin/shutdown.sh
Restart=on-failure
RestartSec=10


[Install]
WantedBy=multi-user.target
Применение настроек и запуск демона Tomcat
Дальнейшие настройки одинаковы для всех ОС.
Для применения настроек перезагружаем демона:
# systemctl daemon-reload
Запускаем Tomcat:
# systemctl start tomcat
Проверяем, что сервис запущен и работает:
# systemctl status tomcat
tomcat.service - Apache Tomcat Server
  Loaded: loaded (/etc/systemd/system/tomcat.service; disabled; vendor preset: enabled)
  Active: active (running) since Fri 2023-02-03 13:04:30 MSK; 1min 4s ago
Будет также полезно настроить автозапуск Tomcat после перезагрузки сервера:
# systemctl enable tomcat
Для ОС CentOS, Alma Linux и Rocky Linux потребуется открыть порт 8080 в firewall:
# firewall-cmd --permanent --add-port=8080/tcp
# firewall-cmd --reload
Переходим в браузер по ссылке: IP_сервера:8080
Настройка доступа к веб-интерфейсу
Tomcat имеет веб-интерфейс для управления, но доступ к нему ещё нужно настроить, чем мы сейчас и займёмся.
Создаём пользователя, редактируя файл /opt/tomcat/conf/tomcat-users.xml, добавляем следующие строки в раздел tomcat-users:
<role rolename="admin-gui"/>
<role rolename="manager-gui"/>
<user username="ИМЯ_ПОЛЬЗОВАТЕЛЯ" password="ПАРОЛЬ_ПОЛЬЗОВАТЕЛЯ" roles="admin-gui,manager-gui"/>
Далее необходимо разрешить определённому IP заходить в веб-интерфейс управления. Для этого нужно внести изменения в файл /opt/tomcat/webapps/manager/META-INF/context.xml.
Находим строку:
allow="127\.\d+\.\d+\.\d+|::1|0:0:0:0:0:0:0:1" />
Добавляем через прямую черту «|» новый IP (указываем вместо 127.0.0.1 свой IP), например:
allow="127\.\d+\.\d+\.\d+|::1|0:0:0:0:0:0:0:1|127.0.0.1" />
То же самое делаем и с файлом /opt/tomcat/webapps/host-manager/META-INF/context.xml.
После всех настроек перезапускаем Tomcat.
# systemctl restart tomcat
Далее кликаем на один из трёх пунктов управления на сайте, чтобы авторизоваться:
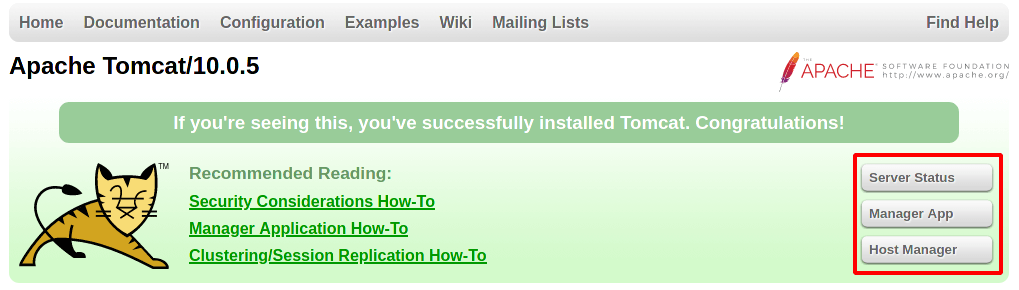
Вас попросят ввести логин и пароль для авторизации, указываем ранее созданные данные в файле /opt/tomcat/conf/tomcat-users.xml.
Смена порта
По умолчанию Tomcat работает на 8080 порту, при необходимости его можно сменить в файле /opt/tomcat/conf/server.xml, найдя строку <Connector port="8080" protocol="HTTP/1.1". Меняем 8080 на нужный порт и перезапускаем Tomcat.
Установка сертификата
Размещаем ключ, сертификат и цепочку на сервере.
Или же генерируем файлы сертификата через OpenSSL по статье.
Далее нужно совместить сертификат и цепочку, командой:
# cat файл_сертификата файл_цепочки > cert.pem
Ключ в формат .pem:
# mv файл_ключа key.pem
Генерируем файл .p12:
# openssl pkcs12 -export -out /tmp/cert_and_key.p12 -in cert.pem -inkey key.pem -name tomcat
Будет запрошен пароль, указываем любой, запоминаем.
Генерируем сертификат для Tomcat:
# keytool -importkeystore -deststorepass 'ПАРОЛЬ_МИН_6_ЗНАКОВ' -destkeypass 'ПАРОЛЬ_МИН_6_ЗНАКОВ' -destkeystore /tmp/domain.jks -srckeystore /tmp/cert_and_key.p12 -srcstoretype PKCS12 -srcstorepass 'ПАРОЛЬ_ИЗ_ПРЕДЫДУЩЕГО_ШАГА' -alias tomcat
Перемещаем готовый файл:
# mv /tmp/domain.jks /opt/tomcat/conf/domain.jks
В файле /opt/tomcat/conf/server.xml находим блок:
<!--
<Connector port="8443" protocol="org.apache.coyote.http11.Http11NioProtocol"
...

</Connector>
-->
Убираем <!-- и --> по краям блока, чтобы раскомментировать его и приводим к виду:
<Connector port="8443" protocol="org.apache.coyote.http11.Http11NioProtocol"
            maxThreads="150" SSLEnabled="true">
     <SSLHostConfig>
         <Certificate certificateKeystoreFile="conf/domain.jks"
                      certificateKeystorePassword="ПАРОЛЬ_МИН_6_ЗНАКОВ"
                      type="RSA" />
     </SSLHostConfig>
</Connector>
В certificateKeystoreFile указываем файл conf/domain.jks — это ранее созданный сертификат, который мы переместили.
В certificateKeystorePassword указываем пароль от сертификата.
Перезапускаем Tomcat:
# systemctl restart tomcat
В одной из своих предыдущих заметок я описал процесс конфигурации сервера приложений GlassFish в качестве службы в ОС Windows Server 2012. В продолжение начатой темы, в этой заметке приведён краткий howto по аналогичной операции с сервером приложений Apache Tomcat (на примере версии 7.0).
Как и в случае GlassFish, в состав бандла Tomcat для Windows входит набор утилит для конфигурации служб в ОС. Если вы скачали Tomcat в виде обычного (кросс-платформенного) zip-архива, то нужных нам утилит в этом архиве не будет, но это не проблема — можно скачать Windows-бандл и «подложить» утилиты оттуда к уже установленному серверу приложений (главное, чтобы версии совпадали).
Инструментарий
Собственно, сам набор состоит из трёх утилит — консольной tomcat7.exe, графической tomcat7w.exe и исполняемого сценария service.bat. Наиболее важная из них — первая утилита, она позволяет создавать, модифицировать и удалять службы ОС. Остальные две утилиты, по сути, просто реализуют упрощённые интерфейсы к tomcat7.exe, позволяя сделать некоторые типовые действия более быстро и удобно. Поэтому сначала поговорим про интерфейс tomcat7.exe.
Утилита tomcat7.exe
Основная утилита Apache Tomcat для конфигурации служб Windows. Синтаксис команды, в общем случае, выглядит примерно так:
C:\\tomcat7\bin\tomcat7.exe \\CMD\\ServiceName [arguments]
Здесь CMD — имя команды (например, «IS»), ServiceName — имя службы (например, «MyWebapp» — мы сами задаём его при создании службы), а arguments — опциональные аргументы. Три наиболее важные команды — IS (Install Service — создать службу), US (Update Service parameters — изменить параметры службы) и DS (Delete Service — удалить службу); полный список команд можно посмотреть в официальном руководстве.
Сценарий service.bat
Типичная команда создания службы с помощью tomcat7.exe обычно выглядит как-то так (пример взят с оф. мануала):
C:\> tomcat7 //IS//Tomcat7 --DisplayName="Apache Tomcat 7" \
C:\> --Install="C:\Program Files\Tomcat\bin\tomcat7.exe" --Jvm=auto \
C:\> --StartMode=jvm --StopMode=jvm \
C:\> --StartClass=org.apache.catalina.startup.Bootstrap --StartParams=start \
C:\> --StopClass=org.apache.catalina.startup.Bootstrap --StopParams=stop
Видим, что 99% этого конфига будет совпадать для всех возможных конфигураций служб. Собственно, чтобы не вбивать этот конфиг каждый раз вручную, разработчики Tomcat любезно предоставляют в наше распоряжение сценарий service.bat, в котором все эти аргументы уже прописаны. К примеру, для создания приведённого выше сервиса с теми же аргументами достаточно просто вызвать service.bat с аргументом install:
C:\> service.bat install
Все остальные аргументы уже прописаны в самом сценарии. Единственный недостаток service.bat — если нам нужно задать какие-либо недефолтные параметры службы (например, лимиты памяти для JVM), сделать это через него не получится — придётся после создания службы вызывать «tomcat7.exe //US//», либо доконфигурировать службу с помощью tomcat7w.exe.
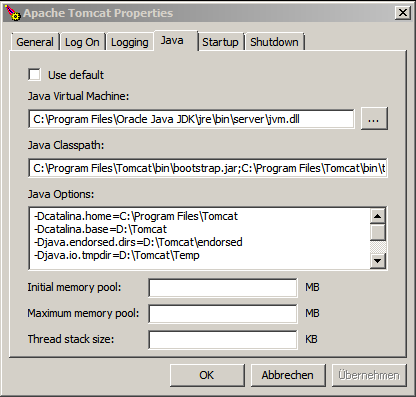
Утилита tomcat7w.exe
Удобная графическая утилита для мониторинга службы и задания параметров её конфигурации. Интерфейс выглядит примерно так:
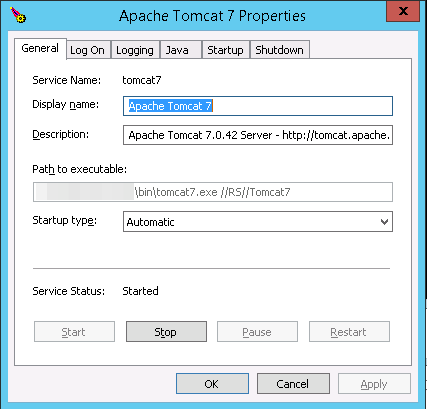
Можно задать все основные параметры конфигурации, если не хочется связываться с консолью и запускать / останавливать службу, если не хочется связываться со стандартной админкой Windows.
Пример конфигурации службы
Для примера рассмотрим практический пример конфигурации службы на реальной системе. Предположим, что нам нужно создать службу Windows для Tomcat 7, установленного в каталог C:\\MyWebapp, причём работающее под управлением Tomcat приложение достаточно «тяжёлое» — требует 1 Гб хипа и 256 Мб PermGen.
Для начала, запускаем service.bat:
c:\MyWebapp\tomcat\bin>service.bat install MyWebapp
Installing the service 'MyWebapp' ...
Using CATALINA_HOME:    "c:\MyWebapp\tomcat"
Using CATALINA_BASE:    "c:\MyWebapp\tomcat"
Using JAVA_HOME:        "C:\Program Files\Java\jdk1.7.0_45"
Using JRE_HOME:         "C:\Program Files\Java\jdk1.7.0_45\jre"
Using JVM:              "C:\Program Files\Java\jdk1.7.0_45\jre\bin\server\jvm.dl
l"
The service 'MyWebapp' has been installed.
Помним о том, что служба создалась с дефолтными параметрами JVM. Для того, чтобы изменить их на нужные нам, вызываем команду //US утилиты tomcat7.exe:
c:\MyWebapp\tomcat\bin>tomcat7.exe //US//MyWebapp ++JvmOptions=-Xmx1024m;-XX:MaxPermSize=256m
Проверяем, появилаясь ли служба в панели управления:
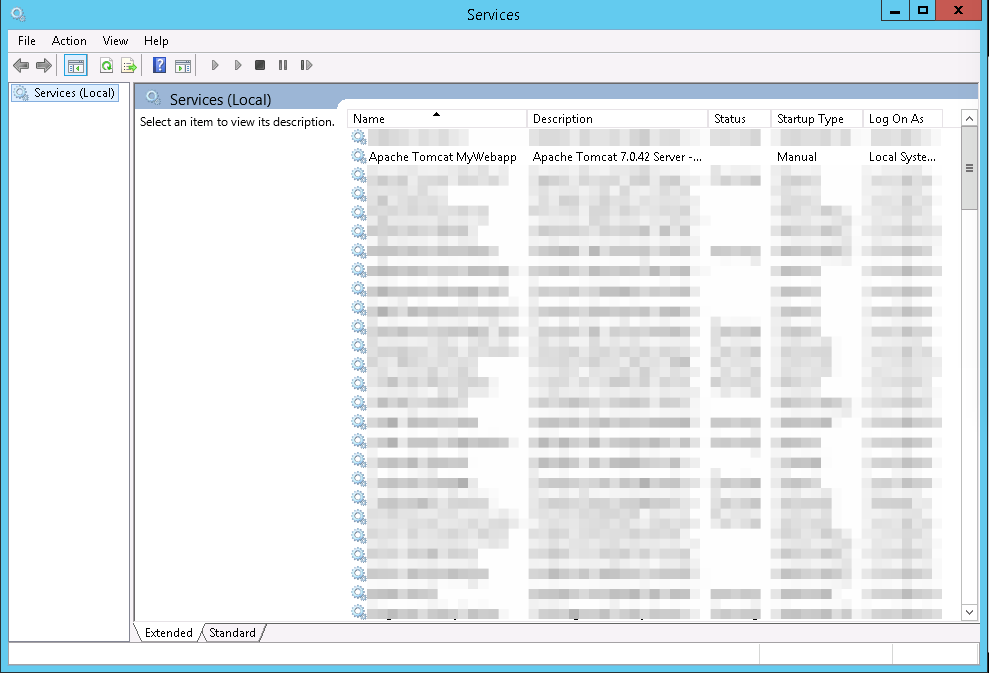
Пытаемся запустить:
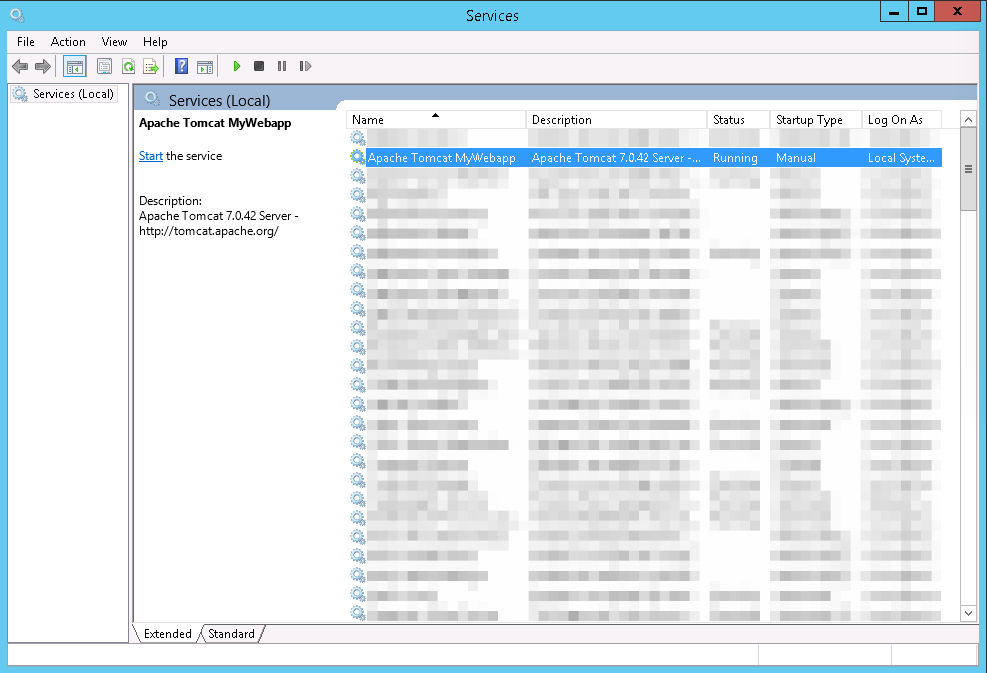
Работает!
Apache Tomcat is a Java Web Server that runs Web Application Resource (WAR) files, a common way to run Java applications. A common tuning parameter is the amount of heap space (memory) allocated to the Java process that runs Tomcat. How to set it, and to monitor and change it on Windows when Tomcat runs as a service is not obvious. We will explore running Tomcat on Windows. Add a comment if you see something that you feel is missing!
We will go through four relevant things:
- How to install Tomcat as a service on Windows
- How to configure Java or change the memory allocation
- How to enable the JMX extensions using passwords
- How to connect to the JMX extensions to monitor the Java process
How to install Tomcat as a service on Windows
To install, download the latest version of Tomcat from Apache. Unpack/install to the desired location. Once the Tomcat installation is in place, you need to register the Tomcat service with Windows. Most people use the default to run it as SYSTEM, which is not necessarily recommended. It is always a security risk involved to run a service as SYSTEM, it is better to run it under a service account! The setup in this file will most often apply to already running Tomcat instances I’m afraid, running as SYSTEM.
All commands expects us to be running in CMD.EXE as Administrator. We run the commands from the root of the Apache Tomcat directory structure, at the same level as the bin, conf and logs directories.
To enable the Tomcat service on Windows. It is optional to append the Windows service name you want to use:
.\bin\service.bat install
      or
.\bin\service.bat install tomcat_service_name
Java and memory configuration
You may need to configure the jvm.dll location if the Java installations messed up (or set the JAVA_HOME environment variable correctly). The jvm.dll location is set in the Tomcat config interface, and the file is found the the bin/client folder of the Java JRE installation.
The main Tomcat runtime settings are found in the Java tab, including the memory settings, which seems to be set to 256MB by default. The default is not enough for large applications. To increase the available memory in the Java process, increase the “Maximum memory pool”.
Find your settings in the Tomcat configuration interface. To find the service name for it, check services.msc. In the example it’s Tomcat7.
.\bin\tomcat7w.exe //ES/Tomcat7
Java Management Extensions for Tomcat
The Java Management Extensions are needed more on Windows than on Linux/Unix. The reason is the context split in Windows between regular users and SYSTEM, which is the user Tomcat often runs as on Windows. I recommend to run Tomcat under a service account with less privileges. On Linux/Unix, it’s much easier to attach to processes directly across contexts, thus reducing the need for the JMX setup.
The Java Management Extensions provide a wealth of options to manipulate and monitor Java processes for all kinds of purposes. Yet, with great abilities, comes great responsibility.
I have not yet found a way to setup SSL connections in a portable and easy way for administrators, but SSL is recommended to be setup if running JMX over a corporate network. It seems both client and server needs to have SSL certificate pairs and trust each other, which is not that easy to manage, or to setup a PKI infrastructure. The challenges led me to drop the SSL setup for now.
This article sets up the basics of a JMX setup, to be used in local environments only. For this setup I recommended to only have readonly access with this setup, even if readwrite is possible. The host should be firewalled to only accept connections from trusted hosts.
To get started, there are three main parts of getting the JMS extensions running:
- Setup the JMX configuration options for the Java process
- Setup the user access configuration
- Setup SSL configuration (not included in this article)
Configure Tomcat with the JMX extensions
Open the Tomcat configuration interface again and head to the Java tab to add the necessary options:
.\bin\tomcat7w.exe //ES/Tomcat7
Add below Java options (no SSL, use access and password file for authentication):
-Dcom.sun.management.jmxremote
-Dcom.sun.management.jmxremote.port=8008
-Dcom.sun.management.jmxremote.ssl=false
-Dcom.sun.management.jmxremote.authenticate=true
-Dcom.sun.management.jmxremote.password.file=conf/jmxremote.password
-Dcom.sun.management.jmxremote.access.file=conf/jmxremote.access
All file paths are relative to where the CATALINA_HOME variable points, and the forward slash is permitted on Windowa within the Java context.
Setup the JMX access configuration
The access configuration works with temporary files to allow you to iterate passwords and access using the file securing commands. Delete the _copy files when you are done with the configuration. The completed files are locked down.
Create the access file
Create a file in the conf directory, named jmxremote.access_copy, with below contents:
## username roleType
jmxread readonly
#jmxuser readwrite
The access file tells the JMX extensions what kind of access the user (on the left) should have.
Create the password file
Create a file in the conf directory, named jmxremote.password_copy, with below contents:
## username password
jmxread mypass
#jmxuser mypass
The user is on the left and must match the access configuration user. The password “my pass” obviously needs to be changed!
Update the file security
Tomcat checks that the contents of the files are not visible to the world, and readable only by the SYSTEM process, when Tomcat runs as SYSTEM. This was a challenge to figure out, but possible to do from the command line. The icacls and cacls commands manipulate file permissions, and the “echo Y|” is the equivalent of a forve flag.
It is expected the above text files are created with the _copy suffix until configuration is complete.
del jmxremote.access jmxremote.password
copy jmxremote.access_copy jmxremote.access
copy jmxremote.password_copy jmxremote.password
icacls jmxremote.password /setowner system
icacls jmxremote.access /setowner system
echo Y| cacls jmxremote.password /P SYSTEM:R
echo Y| cacls jmxremote.access /P SYSTEM:R
When you have set it up according to your taste and changed the passwords, delete the _copy files:
del jmxremote.access_copy jmxremote.password_copy
Connect to the JMX extensions
Java includes a number of tools in the Java Development Kit. If you encounter issues, make sure to match the Java Runtime Environment (JRE) with the JDK version. The JDK does not have to be installed on the Tomcat server to access the JMX extensions of you connect over the network. However, the SSL setup should be in place when you connect as passwords are visible in clear text over the network otherwise!
Two main tools are provided in the JDK, jconsole.exe and jvisualvm. I found the jconsole tool more complete, but both are highly usable.
From the command line, there are several tools:
jstackshows all threads stack tracesjinfoshows java process information, including java optionsjstatmakes java process information available to monitor on
Links to sources
I found the following resources helpful when researching the solution:
- Tomcat Memory on Windows (Stack Overflow)
- Self-signed JMX SSL connections (Oracle)
- Setup JMX with SSL connections (Server Fault)
- How to configure JMX for Apache Tomcat on Windows (SAP)
Creating the Windows service is only possible on the command line. The basic syntax is:
"C:\Program Files\Tomcat\bin\tomcat8.exe" //IS//Tomcat8 --DisplayName="Apache Tomcat Application Server"
This line would install the service. The argument //IS// installs the service without starting it. Probably the service wouldn’t start anyway: A lot of configuration data needs to be stored into the registry first. Actually Tomcat is blind like a mole.
The basic installation from above can be extended with configuration data. The installation can be run multiple times in an update mode by using the argument //US//. Using multiple runs makes our life easier and we can break down the configuration into logical blocks without losing the global picture.
Let’s use this line as the first action to create the service on your server:
"C:\Program Files\Tomcat\bin\tomcat8.exe" //IS//Tomcat8 --DisplayName="Apache Tomcat Application Server" --Description="Apache Tomcat Application Server" --Startup="auto"
Now we append the path to the jvm.dll and the class path:
"C:\Program Files\Tomcat\bin\tomcat8.exe" //US//Tomcat8 --Classpath="C:\Program Files\Tomcat\bin\bootstrap.jar;C:\Program Files\Tomcat\bin\tomcat-juli.jar"
"C:\Program Files\Tomcat\bin\tomcat8.exe" //US//Tomcat8 --Jvm="C:\Program Files\Oracle Java Server\jre\bin\server\jvm.dll"
Important: The path to the jvm.dll depends, which Java kit you installed previously on your server.
C:\Program Files\Oracle Java Server\jre\bin\server\jvm.dll
C:\Program Files\Oracle Java JDK\jre\bin\server\jvm.dll
Now let’s add the remaining Java Options:
"C:\Program Files\Tomcat\bin\tomcat8.exe" //US//Tomcat8 ++JvmOptions="-Dcatalina.home=C:\Program Files\Tomcat;-Dcatalina.base=D:\Tomcat;-Djava.endorsed.dirs=D:\Tomcat\endorsed;-Djava.io.tmpdir=D:\Tomcat\Temp;-Djava.util.logging.manager=org.apache.juli.ClassLoaderLogManager;-Djava.util.logging.config.file=D:\Tomcat\conf\logging.properties"
Let’s continue by adding the logging properties:
"C:\Program Files\Tomcat\bin\tomcat8.exe" //US//Tomcat8 --LogLevel="Info" --LogPrefix="tomcat_service_" --LogPath="D:\Tomcat\Logs" --StdOutput="auto" --StdError="auto" --PidFile="tomcat8.pid"
And finally we add the Startup and Shutdown properties:
"C:\Program Files\Tomcat\bin\tomcat8.exe" //US//Tomcat8 --StartClass="org.apache.catalina.startup.Bootstrap" --StartMode="jvm" ++StartParams="start"
"C:\Program Files\Tomcat\bin\tomcat8.exe" //US//Tomcat8 --StopClass="org.apache.catalina.startup.Bootstrap" --StopMode="jvm" ++StopParams="stop" --StopTimeout="0"
Please check the configuration by starting the Tomcat applet:
«C:\Program Files\Tomcat\bin\tomcat8w.exe» //ES//Tomcat8
Note: Anything we created is stored the windows registry:
HKML\SOFTWARE\Wow6432Node\Apache Software Foundation\Procrun 2.0\Tomcat8
Reference: Apache Tomcat — Windows Service
Tomcat runtime configuration
One very important thing is left: Tomcat needs to know about his memory configuration and how he should behave in general.
Disclaimer: The following values are working well on the authors servers. You can take these settings as a starting point.
These settings are NOT an official recommendation of the Lucee Association Switzerland.
So, stop this shouting and let’s get back to business. For this guide, we will use the following values:
-Xms4096m
-Xmx4096m
-Xss512k
-XX:NewSize=1024M
-XX:MaxNewSize=1024M
-XX:GCTimeRatio=5
-XX:ThreadPriorityPolicy=42
-XX:ParallelGCThreads=4
-XX:MaxGCPauseMillis=50
-XX:+DisableExplicitGC
-XX:MaxHeapFreeRatio=70
-XX:MinHeapFreeRatio=40
-XX:+OptimizeStringConcat
-XX:+UseTLAB
-XX:+ScavengeBeforeFullGC
-XX:CompileThreshold=1500
-XX:+TieredCompilation
-XX:+UseBiasedLocking
-Xverify:none
-XX:+UseThreadPriorities
-XX:+UseFastAccessorMethods
-XX:+UseCompressedOops
-XX:ReservedCodeCacheSize=256m
Let’s apply these settings on the server:
"C:\Program Files\Tomcat\bin\tomcat8.exe" //US//Tomcat8 ++JvmOptions="-Xms4096m;-Xmx4096m;-Xss512k;-XX:NewSize=1024M;-XX:MaxNewSize=1024M;-XX:GCTimeRatio=5;-XX:ThreadPriorityPolicy=42;-XX:ParallelGCThreads=4;-XX:MaxGCPauseMillis=50;-XX:+DisableExplicitGC;-XX:MaxHeapFreeRatio=70;-XX:MinHeapFreeRatio=40;-XX:+OptimizeStringConcat;-XX:+UseTLAB;-XX:+ScavengeBeforeFullGC;-XX:CompileThreshold=1500;-XX:+TieredCompilation;-XX:+UseBiasedLocking;-Xverify:none;-XX:+UseThreadPriorities;-XX:+UseFastAccessorMethods;-XX:+UseCompressedOops;-XX:ReservedCodeCacheSize=256m"
For you convenience, these command line snippets are available here as a script.
set jvm.serverDLL="C:\Program Files\Java\jre8u92\bin\server\jvm.dll"
set catalina.base=D:\Tomcat
set catalina.home=C:\Program Files\Tomcat
set catalina.binary="%catalina.home%\bin\tomcat8.exe"
set catalina.instanceName=Tomcat8
set catalina.displayName="Apache Tomcat Application Server"

%catalina.binary% //IS//%catalina.instanceName% --DisplayName=%catalina.displayName% --Description=%catalina.displayName% --Startup="auto"
%catalina.binary% //US//%catalina.instanceName% --Classpath="%catalina.home%\bin\bootstrap.jar;%catalina.home%\bin\tomcat-juli.jar"
%catalina.binary% //US//%catalina.instanceName% --Jvm=%jvm.serverDLL%
%catalina.binary% //US//%catalina.instanceName% ++JvmOptions="-Dcatalina.home=%catalina.home%;-Dcatalina.base=%catalina.base%;-Djava.endorsed.dirs=%catalina.base%\endorsed;-Djava.io.tmpdir=%catalina.base%\Temp;-Djava.util.logging.manager=org.apache.juli.ClassLoaderLogManager;-Djava.util.logging.config.file=%catalina.base%\conf\logging.properties"
%catalina.binary% //US//%catalina.instanceName% --LogLevel="Info" --LogPrefix="tomcat_service_" --LogPath="%catalina.base%\Logs" --StdOutput="auto" --StdError="auto" --PidFile="tomcat8.pid"
%catalina.binary% //US//%catalina.instanceName% --StartClass="org.apache.catalina.startup.Bootstrap" --StartMode="jvm" ++StartParams="start"
%catalina.binary% //US//%catalina.instanceName% --StopClass="org.apache.catalina.startup.Bootstrap" --StopMode="jvm" ++StopParams="stop" --StopTimeout="0"
%catalina.binary% //US//%catalina.instanceName% ++JvmOptions="-Xms4096m;-Xmx4096m;-Xss512k;-XX:NewSize=1024M;-XX:MaxNewSize=1024M;-XX:GCTimeRatio=5;-XX:ThreadPriorityPolicy=42;-XX:ParallelGCThreads=4;-XX:MaxGCPauseMillis=50;-XX:+DisableExplicitGC;-XX:MaxHeapFreeRatio=70;-XX:MinHeapFreeRatio=40;-XX:+OptimizeStringConcat;-XX:+UseTLAB;-XX:+ScavengeBeforeFullGC;-XX:CompileThreshold=1500;-XX:+TieredCompilation;-XX:+UseBiasedLocking;-Xverify:none;-XX:+UseThreadPriorities;-XX:+UseFastAccessorMethods;-XX:+UseCompressedOops;-XX:ReservedCodeCacheSize=256m"
Now we are ready to start the Tomcat service for the very first time.
Introduction
In this article, we discuss how to install and configure Apache Tomcat Server and have a look at Apache Tomcat Server.
What is Apache Tomcat
It is an application server or web server or servlet container developed by the Apache Software Foundation (ASF) and released under the Apache License version 2. HTTP web servers provide an environment for Java code to run in. It includes tools for configuration and management, but can also be configured by editing XML configuration files. Most of the modern Java web frameworks are based on servlets and JavaServer Pages and can run on Apache Tomcat, for example Struts, JavaServer Faces, Spring, etcetera.
Apache Tomcat7.0.XX new released
The Apache Tomcat team has released version 7.0.40 of Apache. They removed several fixes that stop Tomcat attempting to parse text, improved handling and reporting if a ConcurrentModificationException occurs while checking for memory leaks, etcetera.
How to Install Tomcat 7
There are certain steps we must follow for configuring Apache Tomcat 7.
Step 1
Download and Install Tomcat
- Go to http://tomcat.apache.org/download-70.cgi then go to the Binary Distribution/Core/ and download the «zip» package (for example «apache-tomcat-7.0.40.zip», about 8MB).
- Now unzip the downloaded file into a directory of our choice. Don’t unzip onto the dekstop (since its path is hard to locate). I suggest using «e:\myserver». Tomcat will be unzipped into the directory «e:\myserver\tomcat-7.0.40».
Step 2
Check the installed directory to ensure it contains the following sub-directories:
- bin folder
- logs folder
- webapps folder
- work folder
- temp folder
- conf folder
- lib folder
Step 3
Now, we need to create an Environment Variable JAVA_HOME.
We need to create an environment variable called «JAVA_HOME» and set it to our JDK installed directory.
- To create the JAVA_HOME environment variable in Windows XP/Vista/7 we need to push the «Start» button then select «Control Panel» / «System» / «Advanced system settings». Then switch to the «Advanced» tab and select «Environment Variables» / «System Variables» then select «New» (or «Edit» for modification). In «Variable Name», enter «JAVA_HOME». In «Variable Value», enter your JDK installed directory (e.g., «c:\Program Files\Java\jdk1.7.0_{xx}»).
- For ensuring that it is set correctly, we need to start a command shell (to refresh the environment) and issue:
set JAVA_HOME
JAVA_HOME=c:\Program Files\Java\jdk1.7.0_{xx} <== Check that this is OUR JDK installed directory - Sometimes we need to set JRE_HOME also. So for creating JRE_HOME we need to use the same procedure. Push the «Start» buttonthen select «Control Panel» / «System» / «Advanced system settings». Then switch to the «Advanced» tab and select «Environment Variables» / «System Variables» then select «New» (or «Edit» for modification). In «Variable Name», enter «JRE_HOME». In «Variable Value», enter your JRE installed directory (e.g., «C:\Program Files\Java\jre7\»).
Step 4
Configure Tomcat Server
The configuration files of the Apache Tomcat Server are located in the «conf» sub-directory of our Tomcat installed directory, for example «E:\myserver\tomcat7.0.40\conf». There are 4 configuration XML files:
- context.xml file
- tomcat-users.xml file
- server.xml file
- web.xml file
Before proceeding, make a BACKUP of the configuration files.
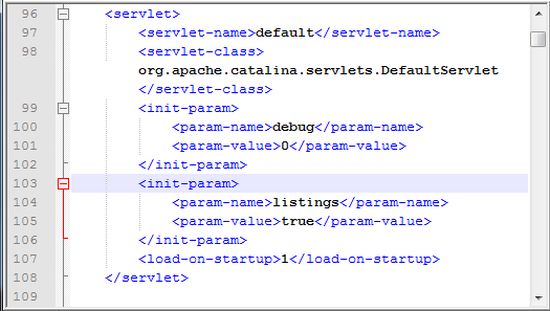
Step 4(a) «conf\web.xml»; Enabling a Directory Listing
Open the configuration file «web.xml». We shall enable the directory listing by changing «listings» from «false» to «true» for the «default» servlet.
<param-value>true</param-value> like:
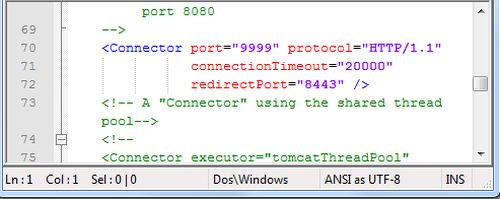
Step 4(b) «conf\server.xml file»; set the TCP Port Number
Open the file «server.xml» in a text editor.
The default port number of Tomcat is 8080. Now we need to change the TCP port number for Tomcat, since the same port number can be used by other servers like SQL Server. We may choose any number between 1024 and 65535. We shall choose 9999 in this article.
Locate the following lines, and change port=»8080″ to port=»9999″. Like:
<Connector port=»9999″ protocol=»HTTP/1.1″ Like
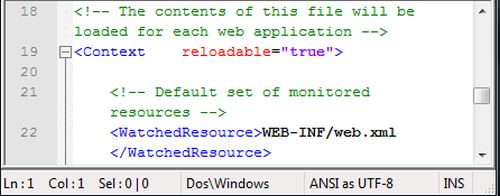
Step 4(c) «conf\context.xml»; Enabling Automatic Reload
In that we set reloadable=»true» to the <Context> element to enable automatic reload after code changes.
Add reloadable=»true» as in the following:
<Context reloadable=»true»>
……
</Context> Like
Step 4(d) (Optional) «conf\tomcat-users.xml»
It is used to manage Tomcat by adding the highlighted lines, inside the <tomcat-users> elements.
In that we can add a password and username as an optional step.
Step 5
Now, start the tomcat server
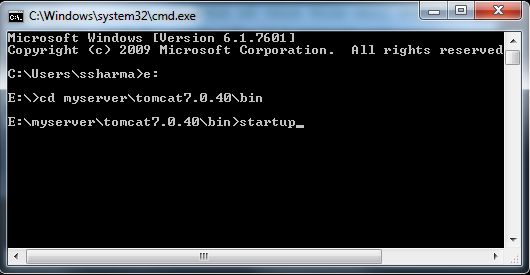
Executable programs and scripts are kept in the «bin» sub-directory of the Tomcat installed directory, e.g., «E:\myserver\tomcat7.0.40\bin».
Step 5(a) Start Server
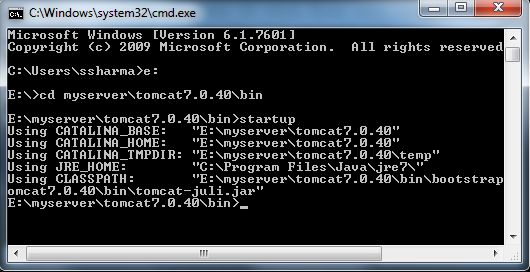
Launch a command shell. Set the current directory to «<TOMCAT_HOME>\bin» like E:\myserver\tomcat7.0.40\bin, and run «startup.bat» as follows:
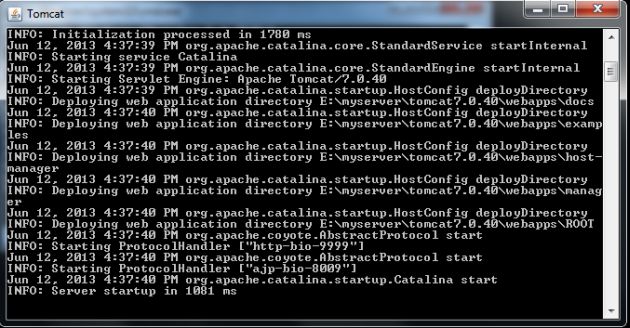
After that a new Tomcat console window appears. Read the messages on the console. Look out for the Tomcat’s port number (double check that Tomcat is running on port 9999)…….
We saw a figure like:
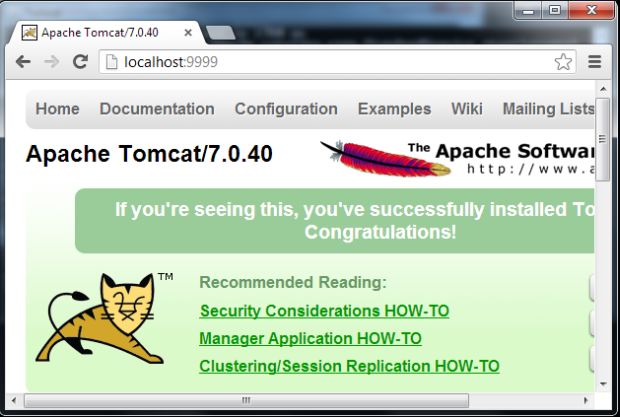
Step 5(b) Access the Server
Open a browser then enter the URL «http://localhost:9999» to access the Tomcat server’s welcome page.
If we get this type of page then it means we are done.
Now try the URL http://localhost:9999/examples to view JSP and servlet examples.
Step 5(c) How to Shutdown Server
We can stop the server using one of the following:
- Press ctrl-c on the Tomcat console; or
- Run «<TOMCAT_HOME>\bin\shutdown.bat» script:
// Change the current directory to Tomcat’s «bin»
> e: // Change the current drive
e:\> cd E:\myserver\tomcat7.0.40\bin // Change Directory to YOUR Tomcat’s «bin» directory
// Shutdown the server
E:\myserver\tomcat7.0.40\bin> shutdown