
Are you lagging in completing your dedicated tasks for the day? Do you feel that the work hours are lesser than the work goals?
It is commonly observed that some routine tasks take up most of our time and lead to a slow start of the day. Researchers, programmers, writers, designers, and project managers often spend the first 15-20 minutes of their day setting up their desktop screens, the relevant desktop apps, browser tabs, work documents, and project files they work on.
To eliminate this mundane routine one needs to employ smart solutions to automate tasks. This article provides insights to remember window size and position of Windows 10.
Remember Window Size and Position in Windows 10
Microsoft has built some features in Windows 10 that help save window positions and size.
- Restore Previous Folder Windows
- Windows 10 Cascade Windows
- Lock Window in Place
- Short Command ‘Shift Key + X’
How to restore previous folder windows?
Windows 10 provides the functionality to restore the previous folder windows on login. Enabling this feature helps save the time spent on the restoration of all such folders.
Following steps are to be performed to enable this feature
- Open file explorer
- Select ‘File’
- Select ‘Change folder and file options’
- Go to ‘view’
- Scroll in the ‘advanced settings’ and check the box ‘Restore previous folder windows at logon’
1- Setup Cascade Windows
How to change the window size in Windows 10? You can simply resize the window screens by setting up cascade windows. It helps in setting a dedicated size of the window screen that eliminates the hassle of resizing the same screen again and again.
Windows 10 enables its users to set default window sizes and positions for their Microsoft apps using Cascade windows. Set up one-time screen sizes and positions so when you’ll reopen the configured windows, they’ll restore to the same size.
To set up a dedicated size and position for your desktop app
- Open a variety of desktop apps
- Right-click on the taskbar to bring up the context menu.
- Select ‘cascade windows’
- On your screen, all of your open apps will appear.
- Resize the window to a specific size as needed for your task, then close the window.
- When you reopen the app, it will reopen in the same size as before.
This feature eliminates the need to reset window position in Windows 10 for Microsoft apps like MS Word, MS Edge, etc.
2- How to Lock a Window in Place – Windows 10?
To ensure multitasking and designing a random layout of your choice, Windows 10 enables you to save the window locations of your apps by locking them in their selected place. You can lock and adjust the screen size in Windows 10 for multiple desktop screens. This feature helps all those personnel who work on multiple apps or desktop files simultaneously and reduces the time spent in resizing.
To lock a window in its place
- Open a program or an app.
- Change the default window size and resize it as per your preference.
- To lock the window size, right-click in the upper-left corner of the app or program window and select ‘Size’.
- Place the window in the desired location.
- To lock the location of the app or program window, right-click it again in the upper-left corner, then select ‘Move’.
- Restart the app after closing it and it will restore in the same location and size.
This can be done for multiple app windows however, this feature does not remove the hassle of reopening each desktop window manually.
3- Short Command ‘Shift Key + X’
Spare yourself the hassle of resizing the same screen again and again. Use the short command by Windows 10 to set a preferred size of the window screens. This short command helps in saving time used to perform a list of functions to set up the customized size.
Resize the window screen of your required app and then hold the ‘shift key and press X’ (cross) to close the app. This will save the screen size and it will reopen in the same size next time.
Windows 10 offers various features that help you in being more productive. However, if you resize all the desktop windows using Windows 10, you still have to restore all the apps & files manually which is a time taking process.
To automatically restore the desktop apps & files use SmartWindows.
4- Resize & Restore Windows Apps with SmartWindows
SmartWindows is a Windows productivity app for Windows 10 & 11. It helps in the arrangement and organization of your screens as well as automatically restores the saved screen set-ups in one click.
SmartWindows empowers its users to set up one-time screen configuration; allowing them to be more productive at work. Users can set up unlimited SmartWindows profiles where they can save multiple work zones and presets to pull up later. SmartWindows demands a one-time screen setup that you can restore anytime.
SmartWindows
Restore Browser Tabs with SmartWindows. It maintains an active tab history and restores browser size as well as display position on one screen or many.
Make Productive use of Windows 10 using SmartWindows
SmartWindows adds more to the productivity of Windows 10 and its users. It is a time-saving app that automates the process of screen arrangement for you.
With SmartWindows users can make setup and store multiple screen presets. Save each of them in SmartWindows profiles. These profiles are the accumulation of multiple desktop apps, browser tabs, and work files that you have opened or arranged at a particular position on the screen. A user who works on multiple desktop apps and files simultaneously can save all those work screens in the SmartWindows profile for easier access.
For instance, writers simultaneously work on multiple browsers for research and writing apps, SmartWindows is useful for them to arrange Word files and browser windows in place and save that arrangement. Restore the saved SmartWindows profile with one click and get it all arranged in seconds.
Create a SmartWindows Profile
To create a SmartWindows profile,
- Pull up all the desktop apps, browser tabs, and work files.
- Resize and arrange them as per the work preference.
- Right-click on the SmartWindows icon.
- Select ‘Create Profile’ and name the profile.
- Click ‘save’ and it will save the screen arrangement in its exact size and display position.
This one-time set-up will save your screen arrangement. You can even add more tabs and files to your existing profile. The profile can be easily restored using the restore feature.
Restore Screen Arrangement of Windows 10
SmartWindows empowers you to restore that screen arrangement anytime on one or many screens. The single-click restore option saves you time and labor exercised in reopening each and every window screen and its manual arrangement.
To restore a profile
- Right-click on the SmartWindows icon.
- Click on ‘Restore Profile’
- Chose the profile you wish to restore
With one click, your profile will be restored in the exact manner it was saved. SmartWindows remembers the display position and size of your window screens thus restoring them in the same way.
Create & Restore Multiple Work Zones
With SmartWindows you can create multiple work zones and presets for your distinct work needs.
We often create folders for different documents and data of a project for easy access. This task can be more simplified using SmartWindows. It supports multiple work zones enabling users to generate multiple profiles as per their various projects. You can work smartly and keep all the details of the project in one profile; including the desktop apps and browser tabs. Saving browser tabs in the profiles will spare you the pain of bookmarking numerous browser tabs and the manual labor exercised to reopen them on multiple browser windows.
Similarly, use SmartWindows to create separate profiles for distinguishing office and personal work, games, and entertainment. Restore the multiple work sessions anytime with a single click.
Create & Restore Browser Profiles
Using SmartWindows you can maximize your productivity by creating browser profiles. Saving relevant browser tabs for a specific project in the project profile is a better way of organization. However, creating an altogether separate browser profile removes the hassle of bookmarking multiple browser tabs for tab hoarders. Just open up multiple tabs and save them in their separate profile for easy restoration.
SmartWindows supports multiple browsers such as Mozilla Firefox, Google Chrome, and Microsoft Edge. This liberates the users to work on their favorite browser.
SmartWindows Adding More Power to Windows 10
It is a highly productive app that helps users in maximizing their productivity.
- SmartWindows supports MS Office files like MS Word, MS PowerPoint, and MS Excel, hence any document file opened within the app will restore its position on the desktop screen.
- It supports multiple displays, enabling the user to save the screen arrangement on up to 6 monitors.
- You can make additions to your existing profiles by adding new documents and browser tabs. Just click ‘Save Profile’ when you are done with your work and it will add the changes to your profile, which will be restored with the profile.
All these distinguished features make SmartWindows an ultimate productivity app that eliminates the daily manual hassle of screen arrangement and restoration.
So what are you waiting for?
Get SmartWindows and power up your Windows 10 now!
Функция привязки позволяет быстро изменять размер и размещать окна на экране, перетаскивая их в края или углы. Это помогает эффективнее работать, упорядочив несколько окон, чтобы максимально увеличить пространство на экране. Помимо перетаскивания, вы также можете использовать предопределенные макеты для удобного упорядочения окон. Такая гибкость позволяет легко управлять рабочей областью независимо от того, работаете ли вы с двумя окнами рядом или упорядочиваете несколько окон в сетке.

С помощью Оснастки вы можете расположить все открытые окна на экране с помощью мыши, сенсорного ввода или клавиатуры. Чтобы узнать больше, разверните следующие разделы:
-
Прикрепление в сторону: перетащите окно влево или в правый край экрана, чтобы привязать его к этой стороне.
-
Привязка к углу: перетащите окно в угол, чтобы привязать его к этой четверти экрана
-
Вертикальное увеличение: перетащите окно в верхнюю часть экрана, чтобы развернуть его по вертикали, заполнив всю высоту при сохранении текущей ширины
Используйте мышь для прикрепления в Windows:
-
Выберите и перетащите окно или приложение, которое вы хотите привязать к боковой части или краю экрана. Поле макета привязки будет отображаться автоматически
-
Перетащите приложение в макет, который вы хотите использовать
-
Использование Snap Assist для заполнения макета другими окнами или приложениями, которые вы хотите привязать к друг другу
-
Нажмите и удерживайте клавишу с логотипом Windows + СТРЕЛКА, чтобы привязать приложение, в которое вы находитесь. Вы можете продолжать изменять позиции прикрепления с помощью стрелок клавиатуры
-
Используйте стрелку влево, чтобы разместить приложение в левой части экрана
-
Используйте стрелку вправо , чтобы разместить приложение в правой части экрана
-
Используйте стрелку вверх , чтобы разместить приложение в верхней части экрана
-
Используйте стрелку вниз, чтобы разместить приложение в нижней части экрана
-
-
Когда вы найдете нужное расположение, отпустите клавишу с логотипом Windows, чтобы расположить окно.
-
Использование snap Assist для заполнения макета другими окнами или приложениями, которые вы хотите привязать к одному экрану
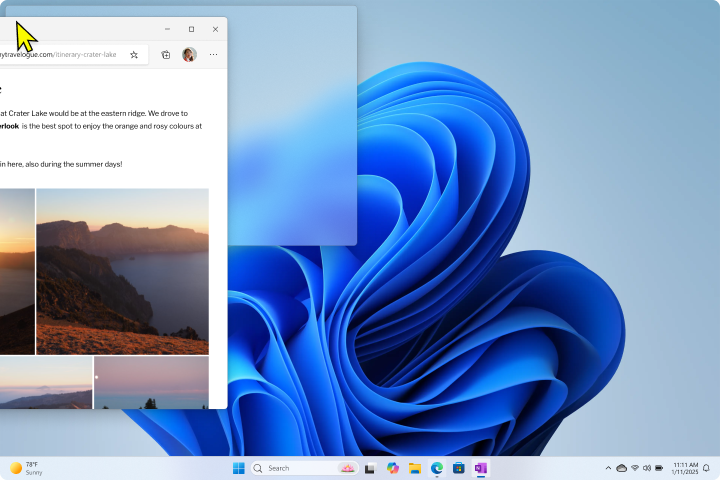
Вы можете легко изменить размер прикрепленных окон, выбрав и перетащив разделительные линии. Измените размер окна с одной стороны, и прилегающие окна будут изменяться так, чтобы у вас не было пустого места на экране.
-
Наведите указатель мыши на разделитель или коснитесь его. При выборе края, разделяющего два прикрепленных окна, появляется линейчатая панель. Если вы используете мышь, курсор мыши изменяется на двойную стрелку
-
Перетащите, чтобы изменить размер: выделите и удерживайте полосу разделителя, а затем перетащите ее, чтобы изменить размер прикрепленных окон.
Поддержка привязки
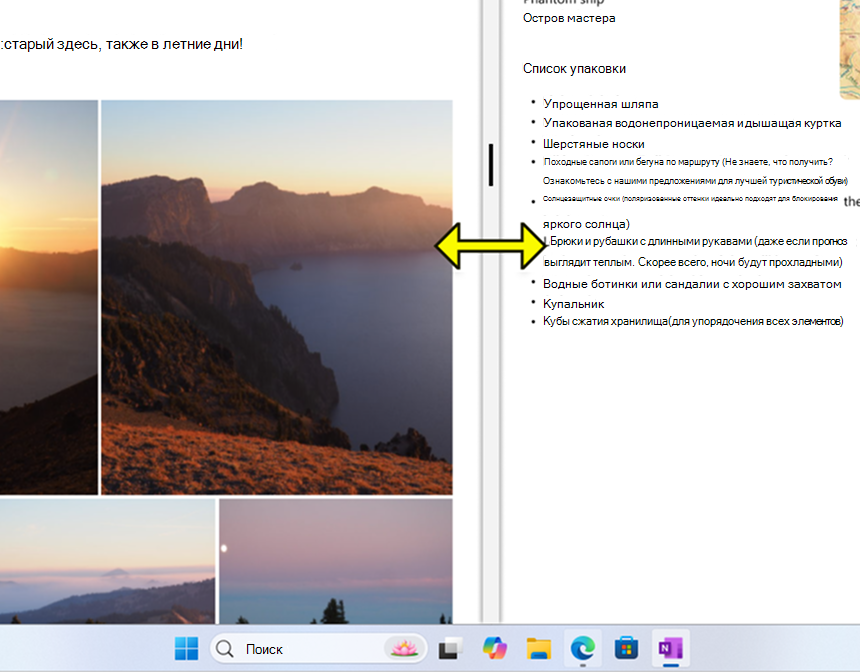
Snap Assist — это усовершенствование функции привязки, которое упрощает организацию окон. При прикреплении окна к одной стороне экрана в приложении Snap Assist отображаются эскизы других открытых окон, что позволяет быстро выбрать, какое окно следует привязать к другой стороне. Эта функция помогает создать более организованную и эффективную рабочую область, предоставляя визуальные подсказки и параметры для упорядочения окон.
Как использовать Snap Assist:
-
Прикрепите первое окно: выделите и перетащите окно к краю экрана, пока не появится полупрозрачное наложение. Отпустите окно, чтобы привязать его к месту
-
Прикрепите второе окно: выберите другое открытое окно из эскизов, отображаемых с помощью оснастки, чтобы привязать его к другой половине экрана.
Макеты привязки
Функция привязки в Windows предлагает предопределенные макеты, которые можно выбрать для организации всех открытых окон. После выбора макета вызывается snap Assist, чтобы помочь заполнить остальную часть макета другими окнами.
Примечание: В зависимости от размера дисплея могут отображаться различные предопределенные макеты.
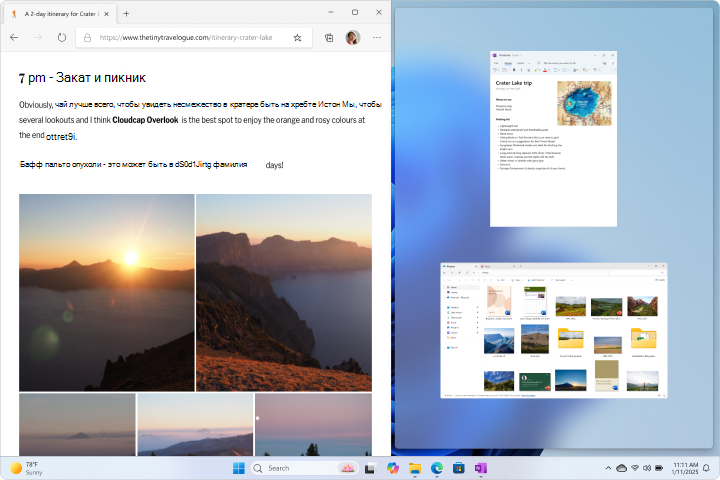
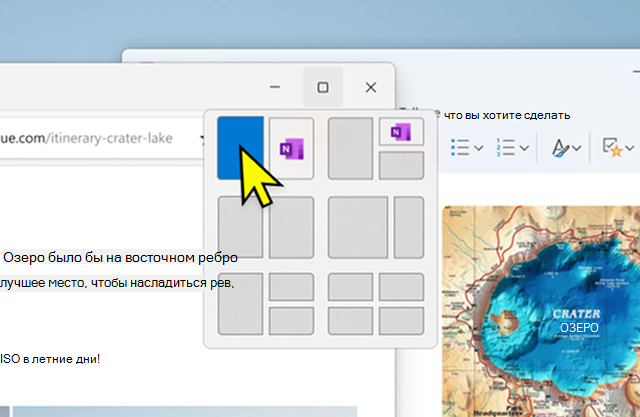
Всплывающий элемент snap
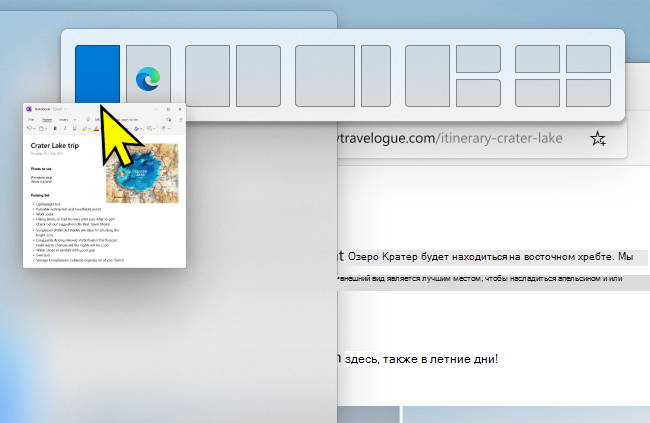
Всплывающее окно Привязка отображается при наведении указателя мыши на кнопку развернуть в окне. Вот как это использовать:
-
Наведите указатель мыши на кнопку восстановления или развернуть окно или нажмите Клавиша Windows +Z.
-
Выберите нужный макет. Затем активируется snap Assist, что позволяет заполнить остальную часть макета окнами по вашему выбору.
Панель прикрепления
При перетаскивании окна в верхнюю часть экрана появляется панель прикрепления. Вот как его использовать
-
Перетащите окно в верхнюю часть экрана.
-
Выберите нужный макет. Затем активируется snap Assist, что позволяет заполнить остальную часть макета окнами по вашему выбору.
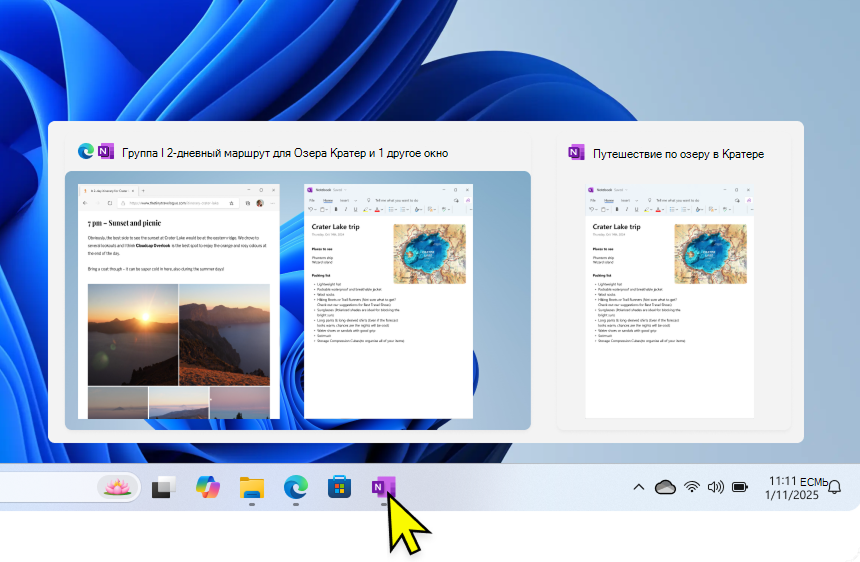
Группы привязки
Группы прикрепления — это коллекции окон, которые вы привязали друг к другу, что позволяет сэкономить время, позволяя быстро вернуться к определенному расположению окон. Они создаются автоматически при привязке нескольких окон, гарантируя, что ваша рабочая область организована без каких-либо дополнительных усилий с вашей стороны.
Если вы прерваны и откроете новое приложение, вы можете легко вернуться в группу прикрепления. Просто наведите указатель мыши на любой значок приложения на панели задач, которая входит в группу прикрепления, и вы сможете восстановить всю группу или только это приложение.
Кроме того, группы привязки отображаются в представлении задач и в представлении ALT +TAB, что упрощает многозадачности.
Настройка параметров привязки

Ниже приведен список параметров, доступных для функции Привязки, и способы их настройки:
-
В приложении «Настройки» на устройстве с Windows, выберите Системный > Многозадачность или используйте следующую ссылку:
Многозадачность
-
Используйте переключатель Оснастки окна, чтобы включить иливыключить привязку.
-
Чтобы настроить привязку, разверните раздел Оснастки windows и выберите нужные параметры с помощью флажков:
-
При прикреплении окна покажите, что можно привязать рядом с ним: включает или отключает snap Assist
-
Отображение макетов привязки при наведении указателя мыши на кнопку «Развернуть» окна: включает или отключает всплывающий элемент привязки
-
Отображение макетов прикрепления при перетаскивании окна в верхнюю часть экрана: включает или отключает панель прикрепления
-
Отображение прикрепленных окон при наведении указателя мыши на приложения на панели задач в представлении задач и при нажатии клавиш ALT+TAB: включает или отключает группы прикрепления
-
Когда я перетаскиваю окно, позвольте мне привязать его, не перетаскивая весь путь к краю экрана: позволяет привязать окна без необходимости перетаскивать их до края экрана


