
PowerShell — Генерация уникальных случайных файлов (файловый мусор)
Иногда в тестовых и экспериментальных целях может потребоваться генерация уникального файлового контента для заполнения свободного пространства на диске в определённых размерах. Пример скрипта, который генерирует нужное количество бинарных файлов (уникальный файловый контент):
[int]$TrashFiles = 10
[int]$FileSize = 1073741824 # max 2147483647
$TrashFilesDir = "C:\TEMP\"
$FileNamePrefix = "GeneratedFile-"
[int]$FileNameUIDLength = 6

For ($FNum = 1 ; $FNum -le $TrashFiles ; $FNum++){
    $FileUID = -join ((0x30..0x39) + ( 0x41..0x5A) + ( 0x61..0x7A) `
    | Get-Random -Count $FileNameUIDLength  | % {[char]$_})
    $FilePath = $TrashFilesDir + $FileNamePrefix + $FileUID + ".trash"
    $Out = New-Object byte[] $FileSize
    (New-Object Random).NextBytes($Out)
    [IO.File]::WriteAllBytes($FilePath, $Out)
}
В данном примере скрипт сгенерирует 10 файлов размером по 1GB. Значение FileSize указывается в байтах (но не более 2147483647).
Проверено на следующих конфигурациях:
| Версия ОС | Версия PowerShell |
|---|---|
| Windows Server 2022 Standard 10.0.20348 | 5.1.20348.1366 |
Автор первичной редакции:
Алексей Максимов
Время публикации: 16.02.2024 16:02
Представим ситуацию, что вам необходимо избавиться от данных на диске без возможности их последующего восстановления. Например, вы решили продать жесткий диск, либо целиком компьютер, и вы не хотите чтобы после ваши данные мог кто-либо восстановить. Единственный верный способ, в данном случае, это полностью затереть каждый сектор диска нулями, или же случайными значениями. Есть множество инструментов для выполнения подобного рода процедур, и BOOTICE является одной из них.

Содержание
- Почему BOOTICE
- Обнуление Диска
- Итог
Почему BOOTICE
Преимущество BOOTICE, в том, что при размере исполняемого файла ~500 KB, вы получаете в свое распоряжение инструмент обладающий просто огромными возможностями по созданию загрузочных устройств, и не только. В это «и не только», как раз входит возможность затирания диска.

Весь процесс осуществляется в удобном графическом интерфейсе, что намного удобнее использования к примеру программы dd для этих целей.
Скачать последнюю версию данной программы можно по ссылкам с этой страницы.
Обнуление Диска
Так почему же все таки обнуление диска? Процедура заполнения диска нулями, или любимы другими случайными значениями, позволяет полностью, избавится от имеющихся данных. Простое удаление разделов, или выполнение операции очистки таблицы разделов, на подобии diskpart clean, не избавляют носитель от имеющейся информации на нем. Примеры восстановления разделов на носителе с удаленной таблицей разделов рассматривались тут.
Перейдем собственно процессу обнуления диска. В качестве тестового диска я буду использовать обычную USB флешку объёмом в 16 GB. Перед началом всех действий взглянем на содержимое флешки с помощью HEX-редактора HxD.
Сектор 0. Запись MBR, после которой 2047 нулевых секторов, или отступ до первого раздела.

Сектор 2048. Первый раздел.

Сектор 99920. Содержимое текстового файла.


Запускаем BOOTICE и переходим на вкладку Utilites.

В секции Disk Sectors Filling нажимаем на кнопку
Select a device.
Откроется окно Fill Disk Sectors.
Взглянем на него более детально. Секция Filling object позволяет нам выбрать объект записи. Им может быть как физический диск.
Так и логический диск.
Такое разграничение весьма удобно, если вы точно уверенны в том, что необходимые для удаления данные хранятся именно на конкретном разделе. При этом начальный и конечный сектора заполнения будут равны внутренним границам указанного раздела.
Независимо от выбора типа объекта заполнения, будут доступны параметры указания диапазона заполнения. Находятся они в секции Sectors scope.
Параметр Start LBA позволяет указать начальный сектор заполнения. По умолчанию там указана цифра 0, что означат первый сектор от начала диска/раздела.
Параметр Sectors позволяет указать количество секторов которые будут записаны от начального сектора. По умолчанию значение данного параметра выставлено в 1 сектор. Если вы ходите указать весь диапазон секторов диска/раздела, то в качестве значения необходимо вписать 0. При этом необходимое значение подставится автоматически.
Параметр End LBA отображает номер конечного сектора. Так как отсчет идет от нуля, введенное значение параметра
Sectors
будет всегда на единицу меньше.
Параметр Tot. Secs отображает количество секторов текущего диска/раздела.
И последняя секция, Filling character. В данной секции вы можете указать шестнадцатеричное значение байта которым будут записаны сектора диска. По умолчание это 00, параметр Fill with 00.
Из доступных опций, вы можете выбрать заполнение значением FF (второй пункт
Fill with FF
), либо указать свое значение для заполнения (пункт
Custom hex value
).
После выставления необходимых параметров, можно выполнить запуск процесса заполнения диска. В моем случае это будет значение BD, в качестве символики имени сайта. Нажимаем кнопку Start Filling для начала операции.
Программа запросит подтверждение на выполнение процедуры затирания диска. На этом этапе у вас есть возможность отменить данную процедуру, если же все верно, то нажимаем OK. Начнется процесс записи.
Прогресс выполнения операции будет отображен соответствующим прогресс баром внизу окна. Числовое отображение прогресса при этом будет отображаться в заголовке окна.
Внимание! Если при старте операции у вас возникает ошибка «Отказано в доступе», убедитесь что вы закрыли все программы использующие целевой диск.
Процесс может занять продолжительное время, все зависит от скоростных характеристик целевого накопителя.
По окончании процесса, программа оповестит вас соответствующим сообщением. Нажимаем OK.

Теперь осталось просмотреть содержимое диска. Запускаем HxD и открываем USB флешку.
Сектор 0.

Сектор 2048.

Сектор 99920.

Последний сектор.

Диск полностью перезаписан значением BD.
Итог
В статье было рассмотрено: Как затереть диск с помощью программы BOOTICE? Как выполнить запись диска нулями с помощью программы BOOTICE? Как выполнить низкоуровневое форматирование с помощью программы BOOTICE?
Продолжаем нашу рубрику «в интернете есть программа для всего». Например, утилита FillDisk создает на диске файлы заполненные нулями, сначала размером по 1 ГБ, затем по 512 МБ, 256 МБ и так далее пока не закончится место на диске. Не подглядывая в «читать далее» скажите, зачем это может быть нужно.
Ответ таков: 1) для тестирования приложений при отсутствии места на диске и 2) для надежного уничтожения удаленных файлов на диске (особенно при отсутствии администраторских прав).
- filldisk.zip (354 КБ, freeware)
Подпишись, чтобы узнать первым
While many everyday users might not immediately see the need to create random dummy files of a specific size, tech enthusiasts, software developers, and power users understand how valuable these files can sometimes be. Dummy files are useful for testing purposes, such as identifying bad sectors on a hard drive, measuring network speed, or ensuring that files are securely erased beyond recovery. Whatever your reasons, here are a couple of methods to create dummy files in both Windows 10 and Windows 11:
1. How to use CMD to create a file with dummy content (fsutil command)
All Windows versions since Vista include an executable named fsutil.exe. In both Windows 10 and Windows 11, you can find it in:
C:\Windows\System32
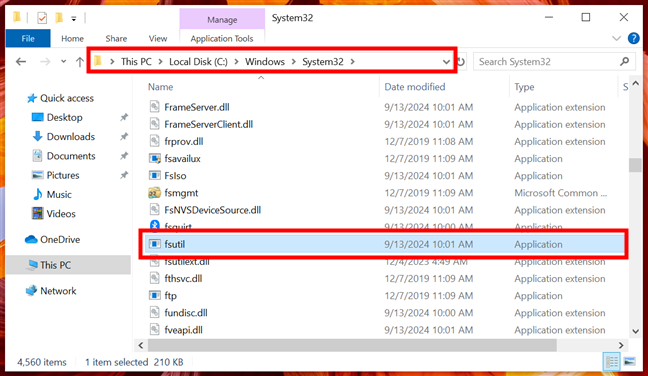
The folder containing the fsutil executable
Fsutil.exe is a powerful tool for managing partitions and volumes, and it can also be used to create dummy files of any size from the Command Prompt. If you want to launch the Command Prompt, search for cmd in the taskbar’s search field, and then click or tap Command Prompt. If you need to create files in a protected folder, such as the system drive (C:), choose to Run as administrator instead so that the Command Prompt has the required privileges to create such files for you. This is what it looks like in Windows 10:
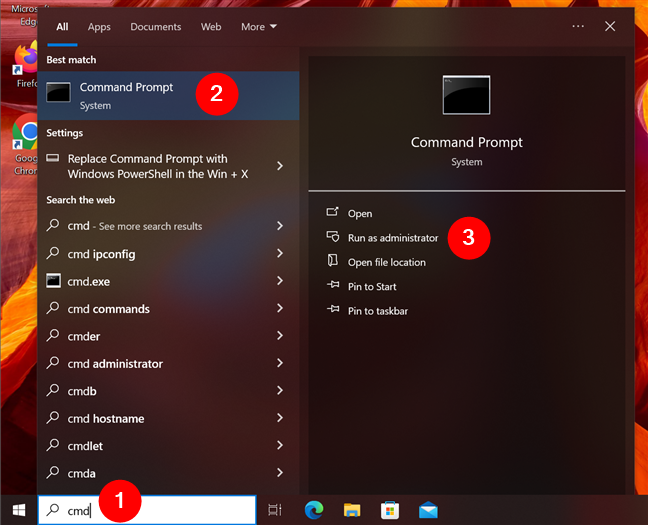
Open Command Prompt in Windows 10
And this is what launching Command Prompt from the taskbar looks like in Windows 11:
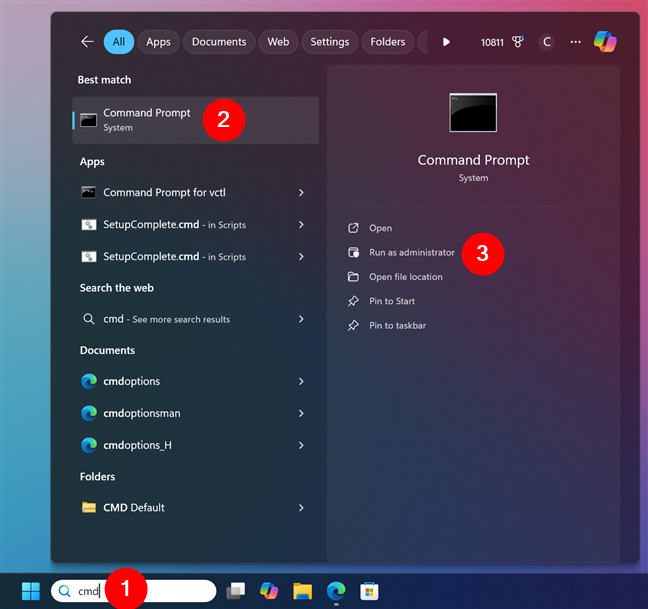
Open Command Prompt in Windows 11
Once the Command Prompt is open on your Windows 10 or Windows 11 computer, type the command as is:
fsutil
Hit Enter and you get to see a list of commands supported by this tool. As shown in the screenshot below, there are many parameters that you can use.
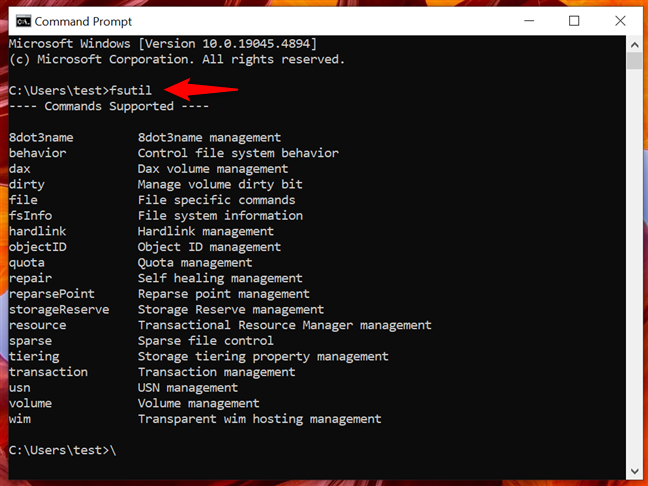
The list of commands supported by fsutil
TIP: This only gives you a taste of what fsutil.exe can do. You can find complete information about its capabilities in its official documentation on TechNet.
There are two commands you can enter in the Command Prompt to create a dummy file:
fsutil file createnew filename size
or
fsutil file createnew path\filename size
Replace filename with the name you want for the dummy file. You can choose to add a file extension or not, as this does not affect the process. Replace size with the size you want your dummy file to have. The size is measured in bytes and it might be easier to use an online converter to help you define the size you prefer.
The difference between the two commands is that the second one allows you to specify exactly where your file is stored, by replacing path with a location of your choice on your device.
Now that we got over the theory part, let’s see how this works in practice. I first created a file called myfile.exe with a size of 10 MB or 10485760 bytes. To create it, I entered the following command:
fsutil file createnew myfile.exe 10485760
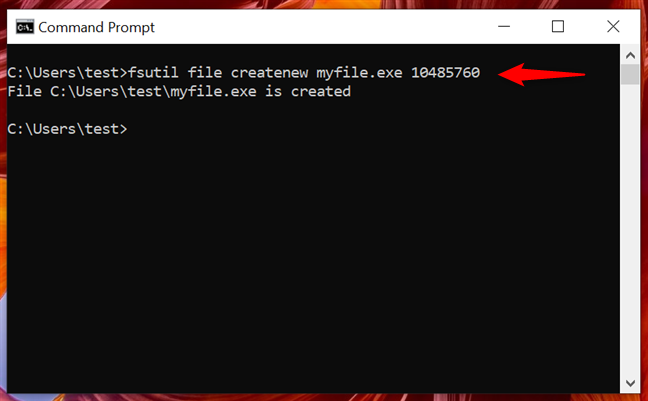
Creating a file using the first command
As seen above, if you use the first command and don’t specify a path, the file is created in your user profile folder. In my case, it was stored in:
C:\Users\test
I then created another 2 MB file, this time using a specific path and no extension. I entered:
fsutil file createnew D:\myfile 2097152
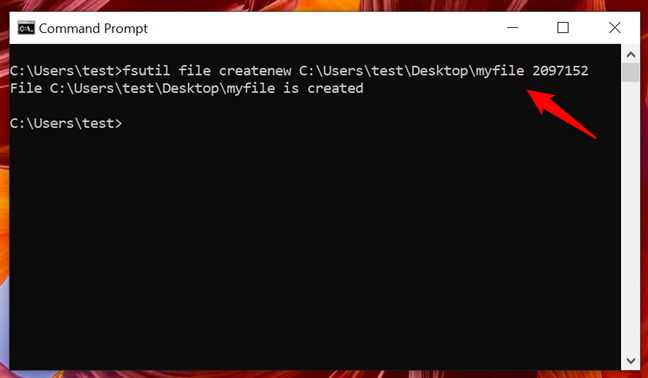
Creating a file using the second command
IMPORTANT: One aspect to note is that the files created with fsutil.exe are empty. There’s no content inside.
2. How to use PowerShell to create a dummy file in Windows
You can also create a dummy file using PowerShell in both Windows 10 and Windows 11. There are many ways to launch this app, yet one I find easiest is to type powershell in the taskbar’s search field, and then click or tap the Windows PowerShell result. However, if you plan to create random dummy files on your system drive (C:), make sure to select “Run as Administrator” from the options on the right. This is what it looks like in Windows 10:
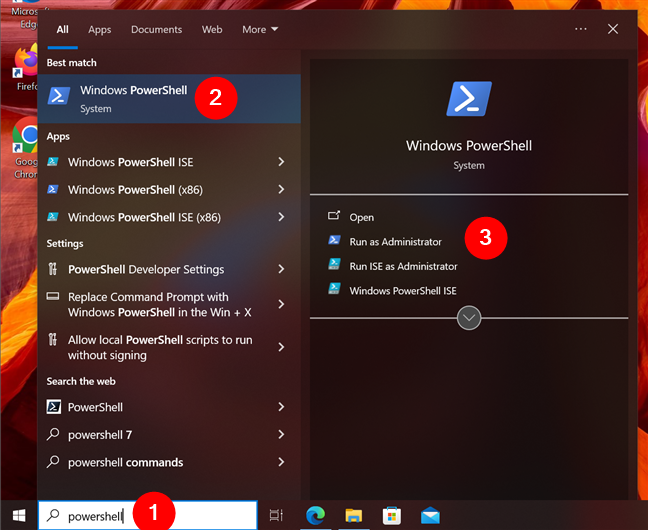
Open PowerShell in Windows 10
And this is how to open PowerShell in Windows 11:
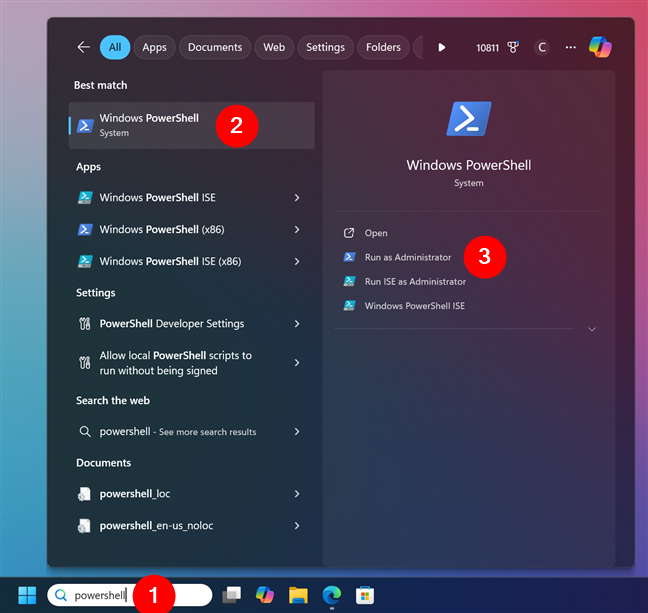
Open PowerShell in Windows 11
Then, you need to enter the following one-line command to create a dummy file in PowerShell:
$out = new-object byte[] size; (new-object Random).NextBytes($out); [IO.File]::WriteAllBytes(‘path\filename‘, $out)
Replace size with the size your dummy file should have, in bytes. You can use an online converter if you need help defining the size, especially if you want Windows to create a large file with random data. Replace path with the location where you want to create the dummy file. Replace filename with the name you want for the dummy file. Add a file extension if you want to. Let’s illustrate this with an example to make it clearer:
I decided to create a file called mypowerfile.txt with a size of 1 MB (or 1048576 bytes) on the desktop. I entered the following command to create it:
$out = new-object byte[] 1048576; (new-object Random).NextBytes($out); [IO.File]::WriteAllBytes(‘C:\Users\test\Desktop\mypowerfile.txt’, $out)
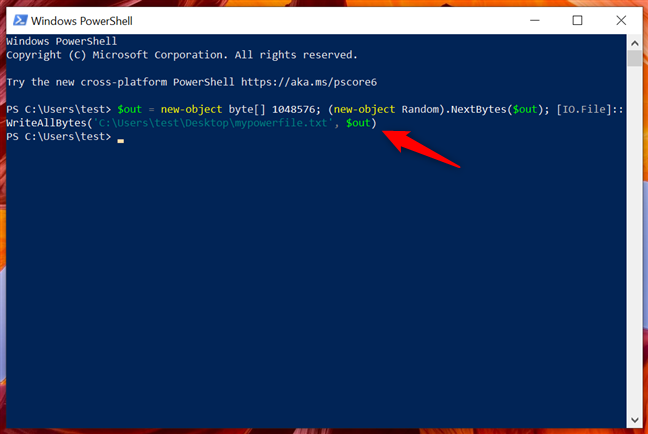
Create a dummy file using PowerShell
Although PowerShell doesn’t offer real-time feedback (unless you’ve made an error writing the command), you can tell it is done creating the file when it is ready for another command. If you go to the specified location, you can see that the dummy file has been created.
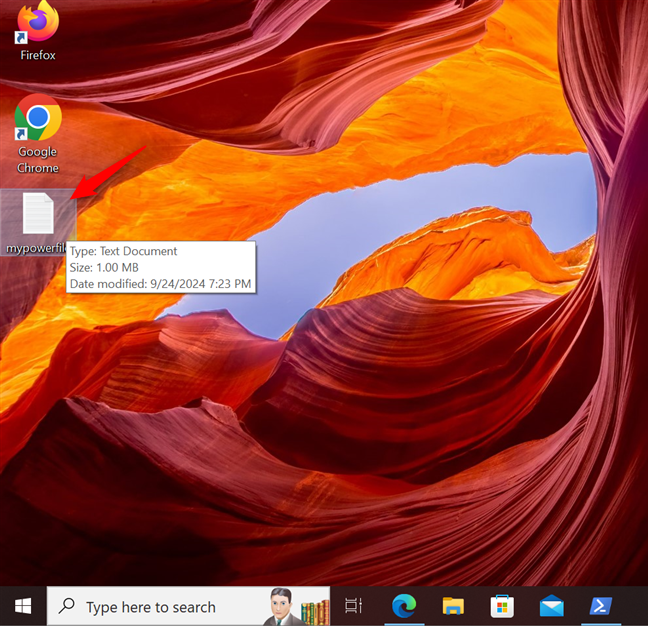
A dummy file created with PowerShell
Similar to using fsutil in the Command Prompt, you can leave out the path and the file is created in your user profile folder. I used the same command as above, leaving out the path entirely:
$out = new-object byte[] 1048576; (new-object Random).NextBytes($out); [IO.File]::WriteAllBytes(‘mypowerfile.txt’, $out)
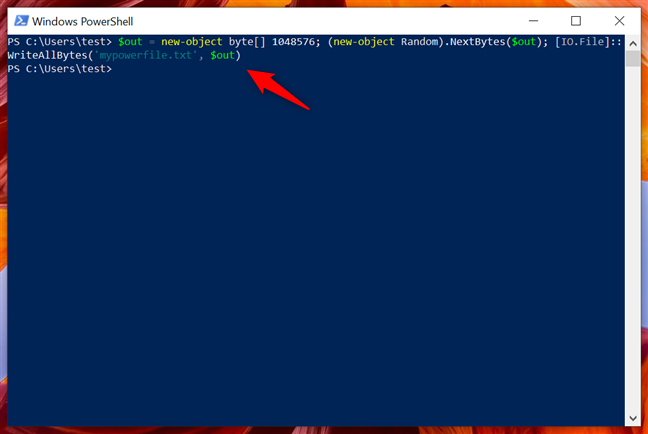
Create a dummy file without specifying the path
Without a path, the new dummy file is stored by default at:
C:\Users\YourUserName\mypowerfile.exe
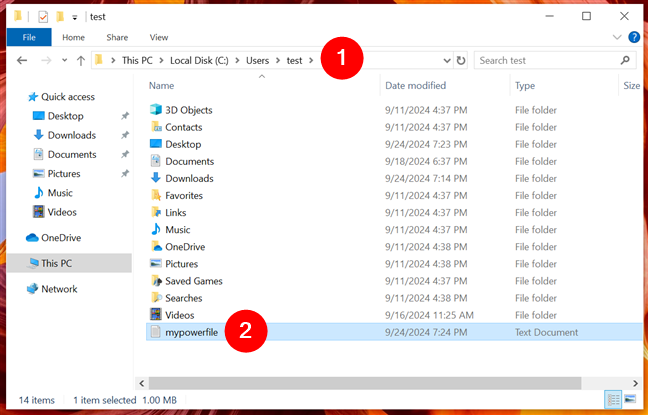
Files without a specified path are created in your user profile folder
IMPORTANT: As opposed to fsutil, which creates empty files, PowerShell lets you create fake files with randomly generated content. If you compare two files, created using the same command, you can see that they have different content.
Out of all the options in this article, PowerShell is the most complicated, both because of the complexity of its commands and the absence of confirmation when your dummy file is generated. However, power users may prefer it to the other options.
TIP: When using the PowerShell commands above, you can add a parameter that makes the console provide feedback, while creating dummy files. However, keep in mind that this makes the command unnecessarily long, as you have to insert the following one-liner:
$out = new-object byte[] 1048576; (new-object Random).NextBytes($out); [IO.File]::WriteAllBytes(‘mypowerfile.txt’, $out); if ($out -ne $null) {Write-Host («Dummy file successfully created»)} else {«Failed to create dummy file»}
3. How to create a random dummy file with a third-party fake file generator
If you want dummy files with random content, or if you are uncomfortable with the Command Prompt, then you should consider using a third-party app such as the Dummy File Creator, which is free and easy to use. When choosing how to download it, I recommend you to get the archive and extract it somewhere on your computer. Then, run the Dummy.exe file. If you want to generate files on your system drive (C:), right-click or press-and-hold and select Run as administrator, or the program will return an error when it tries to create your fake files.
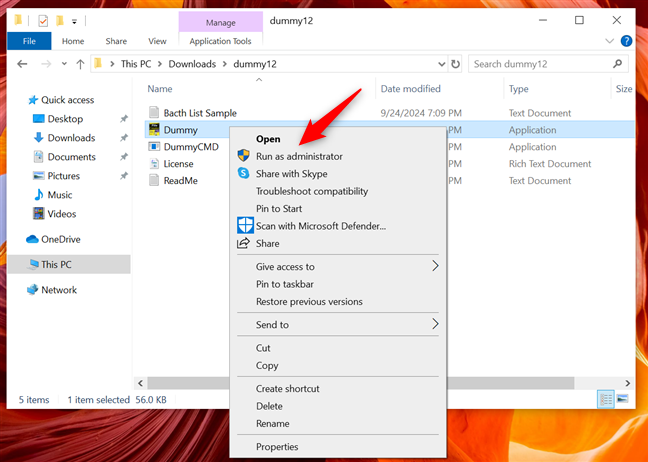
Run Dummy.exe to start creating dummy files in Windows
While in need of a makeover, the interface of this program is straightforward. The Mode section lets you choose whether you want to generate one file or more. Use the Browse button to get to the location where you want to create the file(s) and type in the name (and extension, if you want one). Next, specify the File Size and check the “Random file content (non-compressible)” box if you want your file(s) to have random content. Then, click or tap Create.
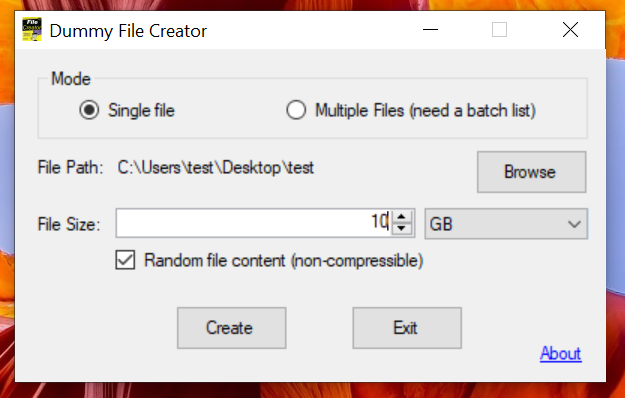
Customize your dummy file(s) and press Create
A progress bar keeps you updated while your file is being created. As soon as the program finishes writing, you get a notification informing you that your file was created.
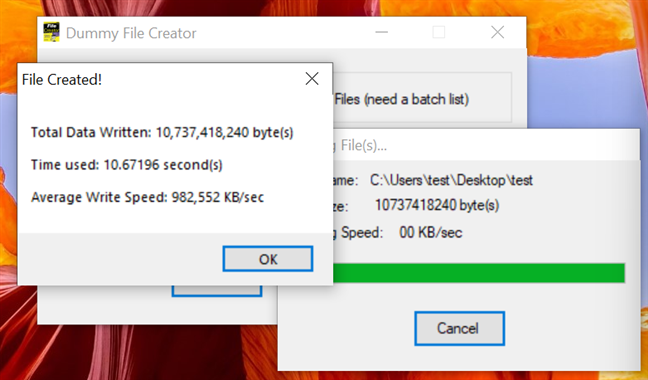
A pop-up lets you know the file was created
This tool is obviously easier to use than CMD or PowerShell to create empty files, and it also comes with several advantages, like creating more files at the same time and the option to add random file content.
Which method do you find easiest?
I searched the pits of the internet and downloaded one too many suspicious files in order to bring you this tutorial. Whichever method you choose, Windows provides multiple ways to create dummy files, whether you’re using the Command Prompt, PowerShell, or third-party tools. Let me know which method works best for you, and feel free to share any additional techniques for generating dummy files in the comments.