
If you have ever used Raspberry Pi in any of your projects, you should be familiar with what an IMG file is. IMG is a type of file format that represents images of various types, these may include Operating Systems, software, or even entire hard drives. It has a .img file extension, that’s how you can identify an IMG file.
However, it is not as popular as other image file formats like DMG or ISO, so, if you want to create a bootable USB with the help of an IMG file on a Windows 10 PC, then you are in real trouble. Not only will you not find enough documentation on how to burn IMG to USB on Windows 10, but you’ll hardly find any software that does that. Which is why we thought of writing this article so that if you are facing a similar issue, you know how to solve it.
There are 2 main software using which you can burn IMG to USB on Windows 10; Win32 Disk Imager and Rufus. Here’s how they work:
Burn IMG to USB using Win32 Disk Imager
This is a free utility that supports all major release of Windows including Windows 10. It is pretty simple to use. However, it has some major bugs in it that have not been addressed yet. For example, if you are using Ramdisk, you’ll not be able to use Win32 Disk Imager as it will crash. Also, since it is a freeware, it does not have any dedicated support team. So, if you come across any new bug then you are on your own. Moreover, it only supports Windows OS, so you are out of luck in case you switch to Linux or Mac. Here’s how you can use it to burn IMG to USB on Windows 10:
1. Head over to the Win32 Disk Imager website. (https://win32diskimager.download/download-win32-disk-imager/), and download the ZIP file on your Windows 10 PC.
2. Unzip the file on your desktop.
3. Press the Install button to start the installation. Once the installation is complete, press Finish to launch the tool.
4. From here on, its pretty simple. Select the IMG file using the browse button under the Image File section. Then, select the USB drive from the dropdown in the Device section. Once done, simply press the Write button, that’s all!
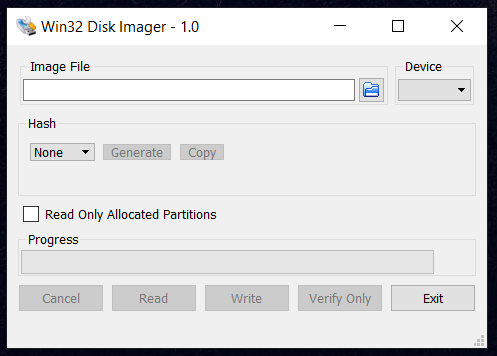
5. Once the process completes, you’ll get a message saying so after which you can take out the USB from the drive, and exit this tool.
Burn IMG to USB using Rufus
Rufus is a well-known program for creating bootable drives or operating system installers. It has a number of advantages over Win32 Disk Imager. It supports various file formats other than just IMG files; these includes ISO,img and BIN etc. This utility is just over 1MB in size and work faster than other similar software like the Windows 7 USB utility, Universal USB Installer, and UNetbootin.
Step 1. Download and install Rufus on your computer, (https://rufus.ie/en/), then launch the Rufus and connect your USB drive to your computer.
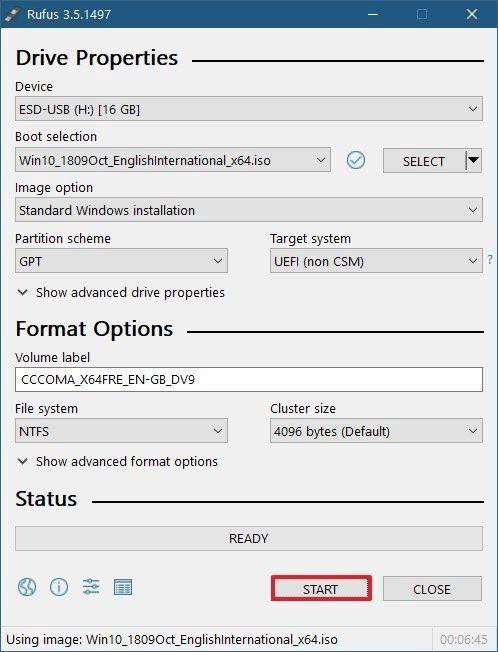
Step 2. Your USB drive will be showed in the list, then click Click on Device and choose the USB you want to use from the drop-down menu.
Step 3. In the Boot Selection option, select Disk or ISO image then click Select. Rufus will open a new window and ask you to import your ISO image.
Step 4. The Rufus will gives you the most suitable Partition Scheme based on your device, of course you can change these settings if you want.
Step 5. Set a name for Volume label that should be easy to recognize. or leave it as it is, and also leave the default settings for File system and Cluster size. Now click Start.
Step 6. A warning window will pop up saying that your USB drive will be formatted, take easy, this is normal, please back up your important data if there are any.
Step 7. Once the Rufus completes the process of creating ISO image from your USB, eject your USB and your bootable USB is ready to go.
Both of these tools will let you burn IMG to USB on Windows 10. However, if you ask me, I would recommend using Rufus since it does more than just burn IMG to USB, also, you know where to get help if you need some.
При необходимости записи загрузочной флешки в Windows большинство пользователей прибегают к знакомым инструментам, таким как Rufus или Ventoy. Однако, существуют и альтернативы, которые пригодятся при необходимости записи накопителя в другой ОС, а также для некоторых образов со своей спецификой.
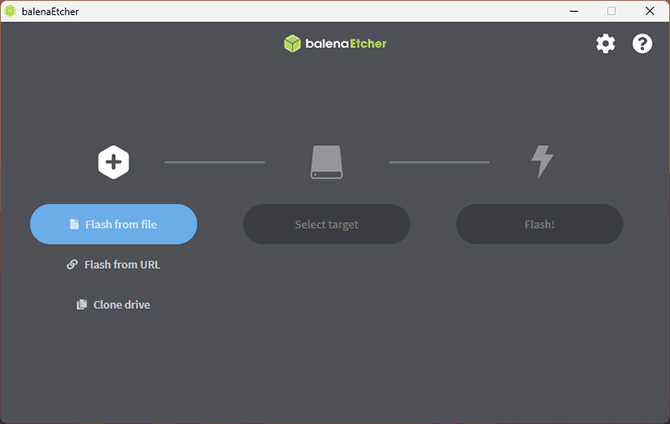
balenaEtcher или просто Etcher — утилита для создания загрузочных накопителей или записи ОС на SD карту (например, для Rspberri Pi или других устройств), одно из главных преимуществ которой — мультиплатформенность, приложение доступно для Windows, Linux и MacOS. О ней и пойдёт речь далее в статье.
Использование Etcher для записи образов на флешку или карту памяти
Скачать balenaEtcher можно с официального сайта https://etcher.balena.io/ — здесь доступны версии для Windows, MacOS и Linux. В случае Windows — как установщик, так и Portable-версия.
Прежде чем приступить, учитывайте следующие нюансы работы приложения:
Для записи образа на USB-накопитель или SD-карту в balenaEtcher достаточно выполнить следующие шаги:
- Запустите приложение и укажите источник, из которого нужно выполнить запись: файл (Flash from file), поддерживаются iso, bin, img, dmg, vhd, zip и другие форматы, URL (Flash from URL) или клонирование (Clone drive) другого накопителя.

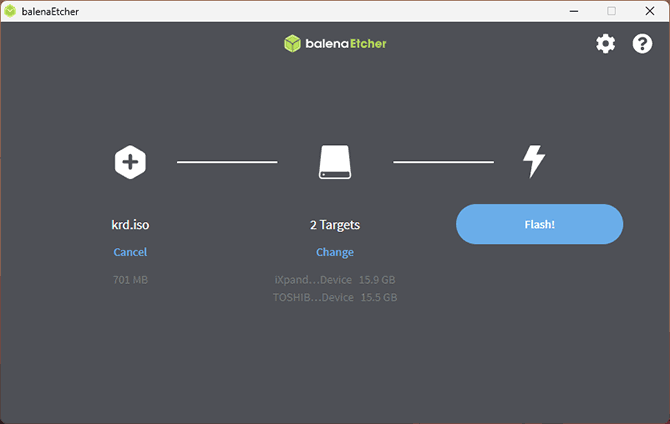
- Выберите целевой накопитель (или несколько, если нужно записать более одной флешки или SD-карты одновременно).
- Нажмите кнопку «Flash!» для начала записи данных на накопитель.
- Дождитесь завершения записи и верификации данных. Если действия производятся в Windows, игнорируйте появляющиеся окна с сообщениями о необходимости форматирования накопителя или другие — достаточно закрыть их или нажать «Отмена».
- Готово, можно использовать записанный накопитель по назначению.


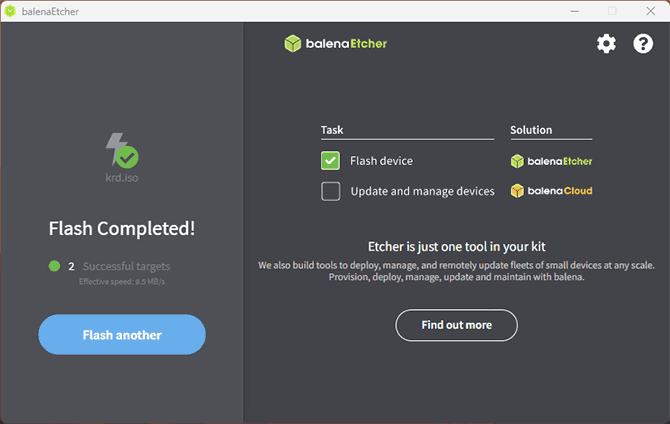
Как итог, balenaEtcher может быть отличным инструментом, если вам требуется записать флешку или SD-карту из образа, речь не идёт об образе Windows и нужна возможность использования программы в различных ОС.
Содержание статьи:
- Примеры создания образа флешки
- Способ 1 (USB Image Tool)
- Способ 2 (ImageUSB)
- Способ 3 (UltraISO)
- Вопросы и ответы: 0
Доброго дня!
Заметку хочу начать с одного логического вопроса: «А зачем вообще создавать образ флешки, когда можно просто-напросто скопировать с нее все файлы через Ctrl+C, Ctrl+V?».
Можно-то можно!
Но дело всё в том, что если флешка является загрузочной (или на ней есть скрытые разделы, данные и т.п.) — то просто скопировать через проводник эти файлы и разделы не получится (точнее часть файлов скопировать можно, но если потом записать их на другую флешку — загрузочной она уже не будет!).
Чтобы сделать ТОЧНУЮ рабочую копию этой флешки (в т.ч. для последующей записи на другой носитель) — без образа и спец. утилит не обойтись! Именно создание такой копии мы и рассмотрим в этой заметке…
*
Примеры создания образа флешки
Способ 1 (USB Image Tool)
USB Image Tool — это бесплатная небольшая утилита, позволяющая создавать и записывать образы USB-флешек (в формате IMG). Отмечу, что утилита умеет парочку своих нюансов:
- она делает полную копию флешки вместе со всеми разделами и файлами на них (т.е. с полной структурой). А потому размер образа = размеру самой флешки (если флешка на 16 ГБ — образ тоже будет размером в 16 ГБ);
- утилита видит даже те флешки, которые не отображаются в проводнике! (а проводник, кстати, часто не видит загрузочные флешки)
📌 Сайт разработчика USB Image Tool: www.alexpage.de
📌 USB Image Tool можно загрузить с UpToDonw: https://usb-image-tool.en.uptodown.com/windows
Как пользоваться USB Image Tool:
- подкл. флешку к USB-порту;
- загружаем и запускаем утилиту;
- в меню слева выбираем флешку;
- нажимаем кнопку «Backup» для создания образа;👇👇
- дожидаемся пока образ будет создан. Всё!

USB Image Tool — 2 кнопки и флешки будет сброшена в образ
Обратите внимание, что образ автоматически сохраняется в формате IMG. Если вам нужно его записать — то в USB Image Tool делается всё аналогично, только нажимается кнопка «Restore» и выбирается ранее созданный образ…

Получен файл образ диска
*
Способ 2 (ImageUSB)
ImageUSB (от PassMark Software)
Ссылка на разраб.: https://www.osforensics.com/tools/write-usb-images.html
Это тоже бесплатная утилита, почти аналог первой (за исключением более расширенного списка функций). Позволяет в авто-режим создавать образы флешек, SD-карт, и др. носителей.
Образы создаются в формате BIN, копируются 1 в 1 (точные побитовые копии, может сохранять все неиспользуемое и свободное пространство, включая главную загрузочную запись MBR)!
В установке утилита не нуждается, загрузить можно с офиц. сайта по ссылке выше.
*
Как пользоваться ImageUSB:
- подкл. флешку к USB и запустить утилиту;
- выбрать флешку (отметить ее галочкой, см. скрин ниже — стрелка-1);
- в меню указать вариант «Create image…» (создать образ);
- затем задать название файла и папку, куда он будет сохранен (стрелка-3);
- нажать кнопку «Create». Всё, создание образа должно начаться, в это время лучше не мешать программе и не подкл./откл. флешки к устройству.

ImageUSB — создание образа, настройка утилиты
Кстати, процесс работы (в %) можно оценить в главном окне утилиты. См. скрин ниже. 👇

Дожидаемся завершения
По завершению создания образа — увидите уведомление «Imaging Completed».

Создание образа завершено
*
Способ 3 (UltraISO)
UltraISO
Сайт разработчиков: https://www.ezbsystems.com/ultraiso/
Эта утилита платная, но есть бесплатный пробный период (которого нам хватит 😉). Функций у UltraISO просто куча, рекомендую иметь на борту… (да и я не раз уже ее рекомендовал на страницах блога).
Что касается создания образа флешки: здесь все просто! Сначала нужно подкл. флешку, открыть утилиту и запустить в работу функцию «Bootable | Make Disk Image» (см. скрин ниже). Образ будет сделан 1 в 1, побайтово, сохранен в формате IMA.

Bootable — создание образа диска в формате IMA
Пожалуй, единственный минус: UltraISO «справляется» не со всеми флешками… (если флешка не отображается в проводнике Windows — утилита ее не видит, поэтому предпочтительнее всё же использовать рекомендованные выше инструменты!).

Указываем имя и ждем завершения операции — UltraISO
*
Дополнения, спец. утилиты по теме заметки — приветствуются в комментариях ниже.
Удачи!
👋
Overview
ImageUSB is a free utility which lets you write an image concurrently to multiple USB Flash Drives. Capable of creating exact bit-level copies of USB Flash Drive (UFDs), ImageUSB is an extremely effective tool for the mass duplication of UFDs. ImageUSB also supports writing of an ISO file byte by byte directly to an USB drive (*). ImageUSB can also be used to install OSFClone to a USB Drive for use with PassMark OSForensics™.
Unlike other USB duplication tools, ImageUSB can preserve all unused and slack space during the cloning process, including the Master Boot Record (MBR). ImageUSB can perform flawless mass duplications of all UFD images, including bootable UFDs.
imageUSB includes functionality to Zero a USB Flash Drive. This will replace the contents of the entire drive with 0s. Or alternatively to just Zero the MBR and/or GPT entries that exists on the drive. In addition, imageUSB has the ability to reformat even hard to format drives and reclaim any disk space that may be lost previously.
(*) CD ISO images use a different file systems compared to USB drives. So the direct imaging of ISO9660, Joliet or UDF file system, from a CD, to a USB drive, might not allow the USB drive to function in all operating systems. A reformat can recover the drive however. As of V1.5, imageUSB now supports extraction of ISO contents onto USB Drive.
Warning: Due to the forensic nature of image duplication by ImageUSB, please ensure that you select UFDs with a storage size similar to the image you wish to duplicate. For example, if a 2GB image is copied to an 8GB USB Flash Drive, the drive will only be able to use two out of the eight gigabytes of storage space. In this scenario, users will need to reformat the UFD in order to access the rest of the storage space.
Download
The current version of ImageUSB is v1.5.1007 (2356 KB).
Download ImageUSB software for free!
Previous versions
Installation Instructions
Download ImageUSB.zip from the link above and extract the contents of the archive to a directory of your choosing.
To start using ImageUSB, double click on the ImageUSB.exe application.
Price & License
ImageUSB is a free utility. You can use it & distribute it in an unmodified form as long as credit is given. You can’t sell it and we don’t offer any warranty. Use at your own risk. PassMark Software is not responsible for any lost or destroyed data.
System Requirements
| Operating System: | Windows 7, Windows 8, Windows 10 and Windows 11 |
| Memory (RAM): | 256 MB or more. |
| Hard Disk Space: | 4 MB of free space for installation, plus additional space required to store an image file. |
Release history
Expand all
Collapse all
Release 1.5.1007
WIN32 release 8 Apr 2025
-Fixed a bug when writing ISO files to USB drives that incorrectly identified themselves as fixed drives instead of removable drives. (Kingston Type-C 256GB+ was the only known drive with this issue)
Release 1.5.1006
WIN32 release 29 Nov 2023
-Added some debugging messages during Write image routine
Release 1.5.1005
WIN32 release 15 Feb 2022
-Updated Max Drives from 50 to 128 (experimental)
Release 1.5.1004
WIN32 release 5 May 2021
-Changed program font to fix display issue on foreign language OS
Release 1.5.1003
WIN32 release 25 Sep 2020
-Fixed bug where user is unable to select a read-only file for writing to UFD.
Release 1.5.1002
WIN32 release 24 Aug 2020
-Detected bootable ISOs will have their primary partition marked active.
-Fixed bug where the progress bar would rollover and show incorrect progress on writing ISOs over 4GB.
-When writing ISOs, user can now select either FAT32 or NTFS. If file within ISO is greater than 4GB, NTFS will be used irregardless of selection.
Release 1.5.1001
WIN32 release 20 Nov 2019
-Fixed a bug where images created with V1.5.1000 had incorrect imageUSB header and was not being
subsequently recognized by imageUSB. If using other imaging tools, specify an offset of 512 bytes
to skip the header
Release 1.5.1000
WIN32 release 25 Oct 2019
-Support for extraction the contents of the ISO image.
EXPERIMENTAL — Software will try to detect if ISO image is bootable and if so write appropriate bootloader. As of release only booting through UEFI seems to be working. Tested with Windows 10 ISO, Linux (Porteus-5.0rc, Ubuntu-19.04 and Mint 19.2 ISO images). NOT ALL ISO IMAGES WILL WORK. This functionality is experimental and may be removed from software at any time.
Log moved into it’s own Window to allow for larger visible USB Drive List.
Release 1.4.1003
WIN32 release 16 Apr 2019
-Fixed bug where formmatting as NTFS may cause imageUSB to crash.
-Fixed bug where formattting as FAT32 for smaller drive would fail.
-Added imaging precheck for desintation freespace and allowed max file size for destination filesystem when creating image.
Release 1.4.1002
WIN32 release 21 Feb 2019
-Fixed bug where the software was incorrectly reporting/trying to clear the BitLocker status of the drive when detection failed.
Release 1.4.1001
WIN32 release 11 Feb 2019
-Fixed issue with failure with overwriting BitLocked drives. imageUSB will now use VDS to force format the BitLocked volume before proceeding with writing the image.
-Fixed several possible crashes related to writing to log file.
Release 1.4.1000
WIN32 release 06 Nov 2018
-Extend Partition will add a new partition to fill remaining space when writing image smaller than drive if extending is not an option. New Partition will be formatted using NTFS. If more than one drive is selected in the write imaging processing. Due to likely disk signature collusion, drives may be placed offline by Windows. As such Extend or Add Partition may only work on first drive selected.
-Fixed bug where the Cancel Button on the Yes/No/Cancel Dialog Prompt before Imaging doesn’t do anything. Should Now correctly cancel operation.
-Up total drive limit to 50 drives. All drives connected to computer (irregardless if they are USB drives) are counted toward this total. Note: We have never tested this many drives at once.
-Dropped support for Windows XP, minimum OS supported is now Windows Vista.
Release 1.3.1006
WIN32 release 13 Mar 2018
-Fixed word wrapping issue in log after resizing window.
-Should now run on WindowsXP SP3 again. Support for Windows XP may be dropped in the future.
Release 1.3.1005
WIN32 release 12 Mar 2018
-Main Window is resizable vertically.
-Fixed possible write failure bug when trying to reimage a drive that may have not have a mount point assigned (i.e. drive letter) to its volumes. imageUSB would fail to properly lock/unmount volume. As seen in MemTest86 on some Windows 10 machines.
Release 1.3.1004
WIN32 release 19 Oct 2017
-Added FAT32 as a format option.
-Fixed a bug with partition extension not operating correctly on NTFS partitions after imaging.
Release 1.3.1002
WIN32 release 16 Sep 2016
-Fixed a bug causing imageUSB to incorrectly fail a verification by reading more bytes than available on the destination image/drive.
-Fixed a bug on Windows XP where the GUI log would display an unknown character at the end of each line.
Release 1.3.1001
WIN32 release 26 Apr 2016
-Fixed a bug causing imageUSB to incorrectly write the header block back to the disk when image is not of even 1 MB chunks.
Release 1.3.1000
WIN32 release 19 Apr 2016
— ImageUSB now supports Physical Disks instead of only volumes assigned drive letters by Windows.
This should allow disks previous not selectable to be imagable. (unformatted drives, Linux drives, etc..)
— Various GUI changes:
ListView changed to TreeView control. This changed is to allow showing of partition information for each drive.
New flashing complete dialog to indicate imaging completion and success or failure.
Running count of number of drives selected for imaging is now displayed.
Release 1.2.1006
WIN32 release 7 Oct 2015
— Addressed issue where extending partition on some NTFS drive would fail if the USB drive (preimaged) was already partitioned as max sized.
Release 1.2.1005
WIN32 release 9 Sep 2015
— Addressed issue where some drives have the same volume GUID and would cause imageUSB unable to determine disk number for the UFD.
Release 1.2.1004
WIN32 release 29 Jul 2015
— Addressed issue during image creation where imageUSB will error out before finishing the image for certain drive.
Release 1.2.1003
WIN32 release 30 Mar 2015
-Format will add an MBR at sector 0 and partition entry table will point to the partition that was formatted.
-Updated Format progress bar to stop and reset when completed.
Release 1.2.1002
WIN32 release 24 Mar 2015
-Updated and added various Text/Strings to be more relevant to the action being performed.
-Added speed in status. Speed is typically govern by the slowest IO (e.g. write). Speed displayed is the
average for the entire process.
-Increased visible GUI log size
Release 1.2.1001
WIN32 release 23 Mar 2015
-Fixed crash when creating Image with Post Image Verification enabled.
Release 1.2.1000
WIN32 release 20 Mar 2015
-Fixed issue when Zeroing GPT formatted drives. Will not correctly zero MBR and Primary GPT and Secondary GPT.
-New Zero behavior. Zeroing will wipe entire drive (write 0x00 to the whole drive).
-Added option to extend partition when writing image. Only supported for single partition images with NTFS filesystem.
-Reformat option will Zero the drive (boot sector only) and reclaim any disk space and format the volume with NTFS filesystem. Requires Vista or later.
Release 1.1.1015
WIN32 release 26 Jun 2014
-Fixed issue when Zeroing GPT formatted drives. Will not correctly zero MBR and Primary GPT and Secondary GPT.
Release 1.1.1014
WIN32 release 16 Dec 2013
-Option to Zero the Master Boot Record. This will allow Windows to see the full size of the drive after reinserting. Windows should
automatically prompt to format unrecognized drive.
-New warning message if you try to write an image located on any of the drives selected as destination drives.
Release 1.1.1013
WIN32 release 16 Oct 2013
-Verify Bug Fix
-In DebugMode, when verifying option is checked and when image is a valid imageUSB .bin file, the checksum will be calculated on
the actual image as well. Drive checksum comparison will still be against checksum stored in header.
Release 1.1.1012
WIN32 release 16 Oct 2013
— Write verification is now supported for images not created with imageUSB. A checksum will be calculated for the image and then compared to the image written on the UFD.
— Enabled UFD list while imageUSB is writing/creating images. Should allow you to scroll the list to see progress of all UFD when more than 4 drives are used.
— Source code clean up
Release 1.1.1011
WIN32 release 18 March 2013
— Added ability to select ‘.img’ files.
Release 1.1.1010
WIN32 release 22 October 2012
-Fixed a program crash when reading fake USB drives. It seems that some USB flash drives are tricking the Windows API to incorrectly recognizing the end of the drive.
Release 1.1.1009
WIN32 release 9 July 2012
-Allows writing images larger than destination drives. End of the image will be truncated and not be written to the drive.
Release 1.1.1008
WIN32 release 19 January 2012
-Added a delay on retry for failed write attempts. Will wait 1 sec before retry.
-Address an issue where writing image would sometimes fail with Error 5: Access is Denied.
Release 1.1.1007
WIN32 release 16 November 2011
-Fixed some erroneous debug logging messages.
-Tweaked verification settings, should report which offset verification failed at.
-For Writing to flash drive, upon write failure, imageUSB will retry up to 3 times to rewrite to the failed location.
Release 1.1.1006
WIN32 release 6 October 2011
-Improved debug logging.
Release 1.1.1005
WIN32 release 6 July 2011
— Added the ability to write .ISO to USB drives. The drive must be bigger than the iso and the drive size will
be truncated to the size of the iso. To recover lost storage, use Window’s Disk Management tool.
Release 1.1.1004
WIN32 release 25 January 2011
— Fixed an issue that would occur if more than one drives are being processed at once (happened sporadically).
— Added «-d» command line option that will log additional debug info
— Fixed typos
Release 1.1.1003
WIN32 release 22 December 2010
— Notification/prompt when imaging finishes.
— Option for post image verification for both creating from and writing from usb drives.
Previously, writing to drives always was verified. Verification may double the imaging
time.
— Each image created with imageUSB will have an accompanying log file written with checksum
values calculated during the creation process.
— MD5 & SHA1 checksum calculation implemented
— Now with more warning prompts! To prevent accidently destroying data.
— Simultaneous image creation is now supported. See the help documentation for naming
convention used.
— Running imageUSB with -l command line will save a log (The same one as seen at the bottom of the GUI).
Release 1.1.1002
WIN32 release 15 December 2010
— Fixed issue with overall progress bar not updating for subsequent writes after aborting.
— Cosmetic / UI changes/fixes
— Signed Executable
Release 1.1.1001
WIN32 release 8 December 2010
— Concurrent image writing to UFD.
— Asthetics Changes.
Release 1.1.1000
WIN32 release 1 December 2010
— GUI version.
Release 1.0.1001
WIN32 release 23 July 2010
— The USB Flash Drive data is now verified.
Release 1.0.1000
WIN32 release 17 June 2010
— First version.
Нельзя просто скопировать файлы из ISO-образа на USB-накопитель. Необходимо сделать раздел с данными на этом накопителе загружаемым. При этом все файлы с него будут удалены.

Прежде всего, купите накопитель USB 3.0
Стандарт USB 2.0 существует с допотопных времен и поддерживается повсеместно, но скорость передачи данных в нем очень низкая. Гораздо лучше выполнять обновление с накопителя USB 3.0 – они уже заметно подешевели, а прирост скорости выходит просто огромный, вплоть до десяти раз. Скорость имеет значение, когда идет речь о создании загрузочного накопителя.
Мы в редакции используем накопитель Silicon Power USB 3.0, и при цене $15 за 32 Гбайт это стоящее приобретение. А при желании можно купить диск емкостью вплоть до 128 Гбайт.
Не волнуйтесь о совместимости – эти скоростные накопители полностью совместимы со старым стандартом USB 2.0, просто если подключать их к старым компьютерам, прироста скорости не будет. И потом, если компьютер не поддерживает USB 3.0, его всегда можно модернизировать
Запись ISO-образа Windows 10 или Windows 7
Для создания установочного накопителя с Windows используйте собственную утилиту Microsoft Windows USB/DVD Download Tool. Вам также понадобится ISO-образ установочного диска Windows. Если такого нет, можно скачать установочный образ Windows 10, 8 или 7 бесплатно – только при этом требуется ввести действующий ключ продукта.
Укажите утилите на ISO-файл и USB-накопитель – и она создаст загружаемый носитель.

Запись ISO-образа Linux
Ubuntu рекомендует использовать для создания загружаемых USB-накопителей средство
Universal USB Installer под Windows. Эта утилита умеет создавать загружаемые накопители для множества дистрибутивов Linux. Популярная альтернатива – UNetbootin.
Скачайте ISO-образ дистрибутива Linux, который хотите установить. Запустите утилиту, выберите в ней нужный дистрибутив, укажите путь к скачанному ISO-файлу и выберите USB-накопитель. Утилита сделает все остальное.

Такие же утилиты есть и под Linux. Например, в Ubuntu есть Startup Disk Creator для создания загружаемых USB-накопителей с Ubuntu. А UNetbootin существует и для Linux.

Запись IMG-образа
Некоторые операционные системы распространяются в формате IMG, а не ISO. Файл IMG— это «сырой» образ диска, который нужно записывать непосредственно на USB-накопитель.
Для записи такого образа на USB-флешку или SD-карту используйте утилиту
Win32 Disk Imager. Укажите путь к скачанному IMG-файлу, и утилита запишет его прямо на выбранный носитель, стерев оттуда все другие данные. Также с помощью этой утилиты можно создавать IMG-файлы из USB-накопителей и SD-карт.

Пользователи Linux могут записать IMG-файл на съемный носитель прямо с помощью команды dd. Для этого подключите носитель к системе и выполните в терминале Ubuntu следующую команду:
sudo dd if=/home/user/file.img of=/dev/sdX bs=1MЗамените в ней «/home/user/file.img» на путь к IMG-файлу в вашей конкретной системе, а «/dev/sdX» – на путь к вашему USB-накопителю или SD-карте. Будьте очень внимательны – если вы нечаянно укажете здесь путь к своему системному диску, его содержимое будет перезаписано и система перестанет работать.

Создание установочного диска с помощью ключа Windows 8 или 8.1
Если у вас есть лицензионный ключ к Windows 8 или Windows 8.1, можно скачать установочный носитель непосредственно с
сайта Microsoft и тут же создать загружаемый USB-накопитель. Для этого скачайте соответствующую утилиту со страницы «Обновление Windows при наличии только ключа продукта» (http://windows.microsoft.com/ru-ru/windows-8/upgrade-product-key-only). Запустите ее, укажите свой ключ и велите мастеру создать загружаемый USB-накопитель.
Обратите внимание – у Windows 8 и Windows 8.1 ключи продукта разные, и если вы хотите установить Windows 8.1 при наличии ключа от Windows 8, придется попотеть. Пожалуй, проще установить Windows 8 и обновиться до Windows 8.1 уже непосредственно средствами самой системы, как Microsoft официально и рекомендует.

Запись ISO-образа Windows 8, 8.1 или 10
Если у вас уже есть ISO-образ Windows 8, 8.1 или 10 и вы хотите создать установочный носитель, не скачивая его заново, можно воспользоваться утилитой Windows 7 USB/DVD Download Tool.
Просто укажите путь к ISO-файлу Windows, когда вас об этом попросят. Утилита с легкостью создаст установочный носитель, если дать ей подходящий ISO-файл.

Запись DOS
Если необходимо загрузиться в DOS для обновления низкоуровневого микропрограммного обеспечения или BIOS либо для использования системных утилит, до сих пор по той или иной причине требующих DOS, создать загружаемый USB-накопитель с DOS можно при помощи приложения Rufus.
Эта утилита использует FreeDOS – версию DOS с открытым кодом, которая поддерживает любые программы для DOS.

Некоторые из упомянутых утилит взаимозаменяемы. Например,
Rufus тоже можно использовать для создания загружаемых накопителей из ISO-образов Linux, файлов IMG и даже ISO-файлов Windows. В этой статье мы перечислили самые популярные и рекомендуемые средства для каждой поставленной задачи.
Автор: Chris Hoffman
Перевод
SVET
Оцените статью: Голосов