

Never Miss Your Best Gaming Moments
NVIDIA Highlights automatically captures key moments, clutch kills, and match-winning plays, ensuring that your best gaming moments are automatically saved. Just select your favorite highlight and share to social media using GeForce Experience.
Broadcast Games
GeForce Experience makes broadcasting your favorite games fast and easy. With just two clicks, you can start a high-quality broadcast to Facebook Live, Twitch, or YouTube Live. It even supports camera and custom graphic overlays to better personalize your livestream.
Capture Gifs and 8k Screenshots
Create up to a 15-second GIF from your favorite ShadowPlay video, add text, and upload it to Google, Facebook, or Weibo with a single click.
Or grab screenshots at up to 8K and upload them to Facebook, Google, or Imgur—all without leaving your game.

GeForce Experience Support
Не все знают, что в составе утилиты NVIDIA GeForce Experience, устанавливающейся по умолчанию с драйверами видеокарты этого производителя, присутствует функция NVIDIA ShadowPlay (внутриигровой оверлей, in-game overlay), предназначенная для записи игрового видео в HD, трансляции игр в Интернете и которую также можно использовать для записи происходящего на рабочем столе компьютера в Windows 10, 8.1 и Windows 7.
Не так давно я писал две статьи на тему бесплатных программ, с помощью которых можно записать видео с экрана, думаю стоит написать и об этом варианте, к тому же по некоторым параметрам ShadowPlay выгодно отличается от других решений. Внизу этой страницы есть видео, снятое с помощью данной программы, если интересно. Если у вас нет поддерживаемой видеокарты на базе NVIDIA GeForce, но вы ищите такие программы, то можете посмотреть: Бесплатные программы для записи игрового видео, Бесплатное ПО для записи рабочего стола (для видео уроков и прочего).
- Установка и требования для работы NVIDIA ShadowPlay
- Запись видео с экрана в NVIDIA ShadowPlay в GeForce Experience
- Видео инструкция
Об установке и требованиях для работы ShadowPlay
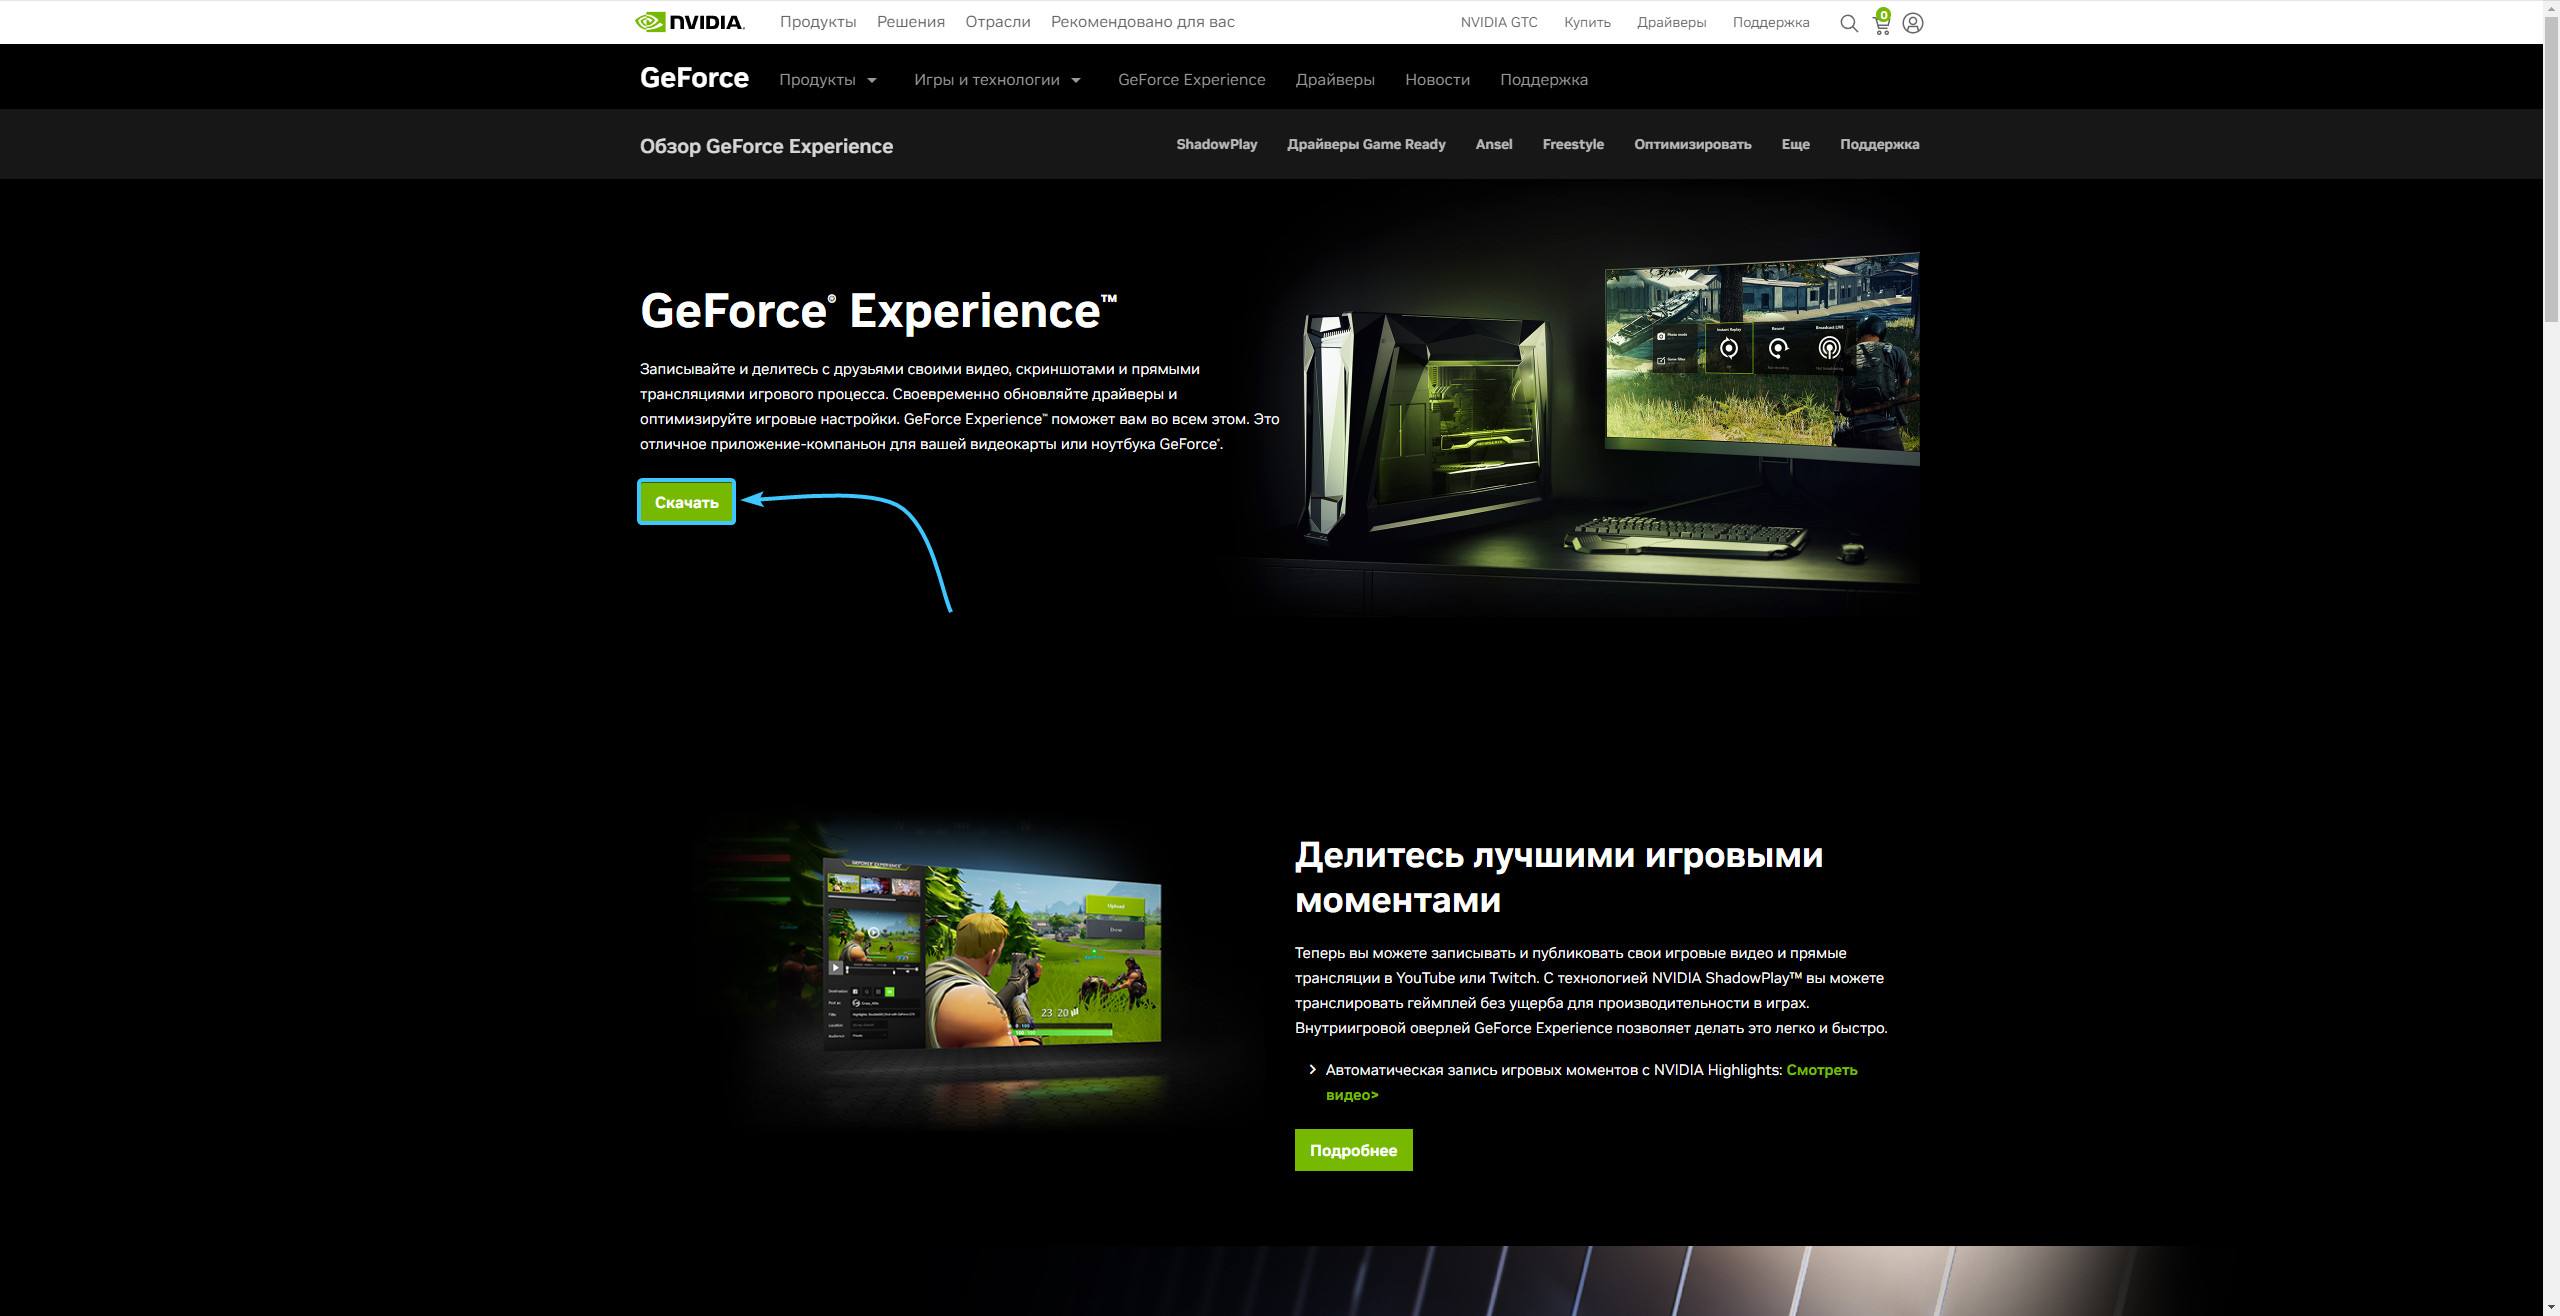
При ручной установке последних драйверов с сайта NVIDIA, GeForce Experience, а вместе с ним и ShadowPlay устанавливаются автоматически, если только вы специально не отключили этот компонент. В случае, если GeForce Experience отсутствует на компьютере, просто загрузите установщик с сайта NVIDIA, лучше всего — в комплекте с последними драйверами для вашей видеокарты. Но можно скачать GeForce Experience и отдельно — https://www.nvidia.com/ru-ru/geforce/geforce-experience/
На настоящий момент запись экрана поддерживается для следующих серий графических чипов (GPU):
- GTX 600, GTX 700 (т.е. например, на GTX 660 или 770 будет работать) и более новых.
- GTX 600M (не все), GTX700M, GTX 800М и более новых.
Есть также требования к процессору и оперативной памяти, но, уверен, если у вас стоит одна из этих видеокарт, то по этим требованиям ваш компьютер подходит (посмотреть, подходит или нет можно в GeForce Experience, зайдя в настройки и пролистав страницу настроек до конца — там в разделе «Функции», указано, какие из них поддерживаются вашим компьютером, в данном случае нам требуется внутриигровой оверлей).
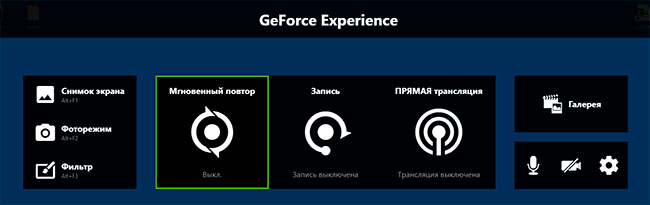
Запись видео с экрана с помощью Nvidia ShadowPlay в GeForce Experience
Ранее функции записи игрового видео и рабочего стола в NVIDIA GeForce Experience были вынесены в отдельный пункт ShadowPlay. В последних версиях такого пункта нет, однако сама возможность записи экрана сохранилась (хотя на мой взгляд стала несколько менее удобно доступна), и называется теперь «Внутриигровой оверлей», «Внутриигровое наложение» или «Оверлей Share» (в разных местах GeForce Experience и на сайте NVIDIA функция называется по-разному).
Для ее использования выполните следующие действия:
- Откройте Nvidia GeForce Experience (обычно достаточно нажать правой кнопкой мыши по значку Nvidia в области уведомлений и открыть соответствующий пункт контекстного меню, также можно найти программу в меню Пуск).
- Перейдите в настройки (значок шестеренки). Если вас попросят зарегистрироваться перед использованием GeForce Experience — придется это сделать (раньше необходимости не было).
- В настройках включите параметр «Внутриигровой оверлей» — именно он отвечает за возможности трансляции и записи видео с экрана, в том числе с рабочего стола.


После выполнения указанных шагов вы сразу сможете записывать видео в играх (запись рабочего стола по умолчанию отключена, но её можно включить), нажав клавиши Alt+F9 для начала записи и последующей остановки или вызвав игровую панель, нажав клавиши Alt+Z, однако рекомендую предварительно изучить доступные настройки NVIDIA ShadowPlay.
После включения пункта «Внутриигровой оверлей» станут доступны настройки функций записи и трансляции.
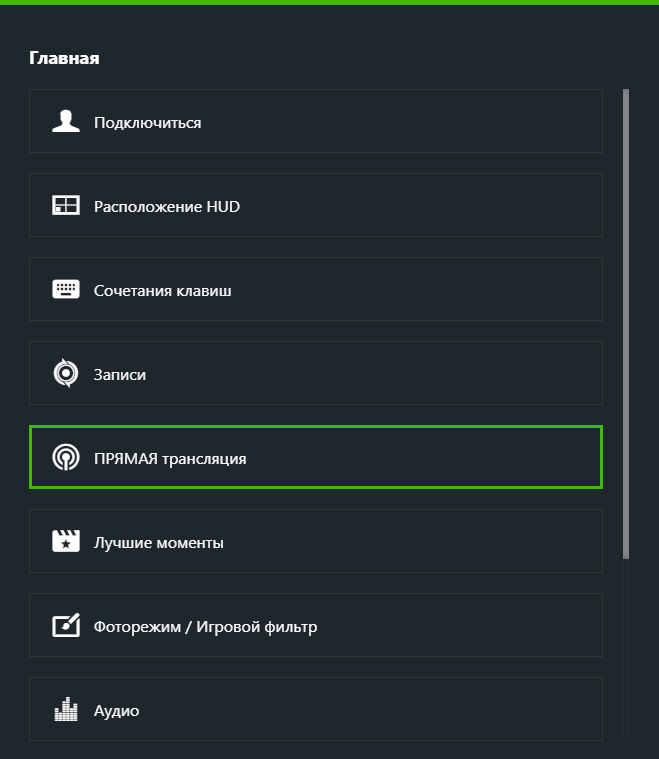
Среди наиболее интересных и полезных из них:
Нажав клавиши Alt+Z в любой момент времени, даже вне NVIDIA GeForce Experience, вы вызовите панель записи, в которой доступны еще некоторые настройки, такие как качество видео, запись звука, изображения с веб-камеры.
После того как все настройки выполнены, просто используйте горячие клавиши для начала и остановки записи видео с рабочего стола Windows или из игр. По умолчанию они будут сохраняться в системную папку «Видео» (видео с рабочего стола — во вложенную папку Desktop).
Запись видео с рабочего стола и из игр в NVIDIA ShadowPlay — видео инструкция
Лично я долгое время использовал именно утилитой NVIDIA для записи своих видео (сейчас перешел на OBS Studio). Заметил, что иногда (причем как в более ранних версиях, так и в более новых) бывают проблемы при записи, в частности — нет звука в записанном видео (или записывается с искажениями). В данном случае помогает отключение функции «Внутриигровой оверлей», а затем её повторное включение.
Информация о приложении «GeForce Experience»
Приложение «GeForce Experience» предоставляется следующий набор функций:
- Запись на видео конкретных приложений и рабочего стола операционной системы;
- Создание скриншотов конкретных приложений и рабочего стола операционной системы;
- Проведение прямых трансляций конкретных приложений и рабочего стола операционной системы.
Запись видео через приложение «GeForce Experience»
1. Перейдите на официальный сайт приложения «GeForce Experience» и нажмите кнопку «Скачать».
2. Запустите установщик и установите приложение «GeForce Experience». После этого запустите его.
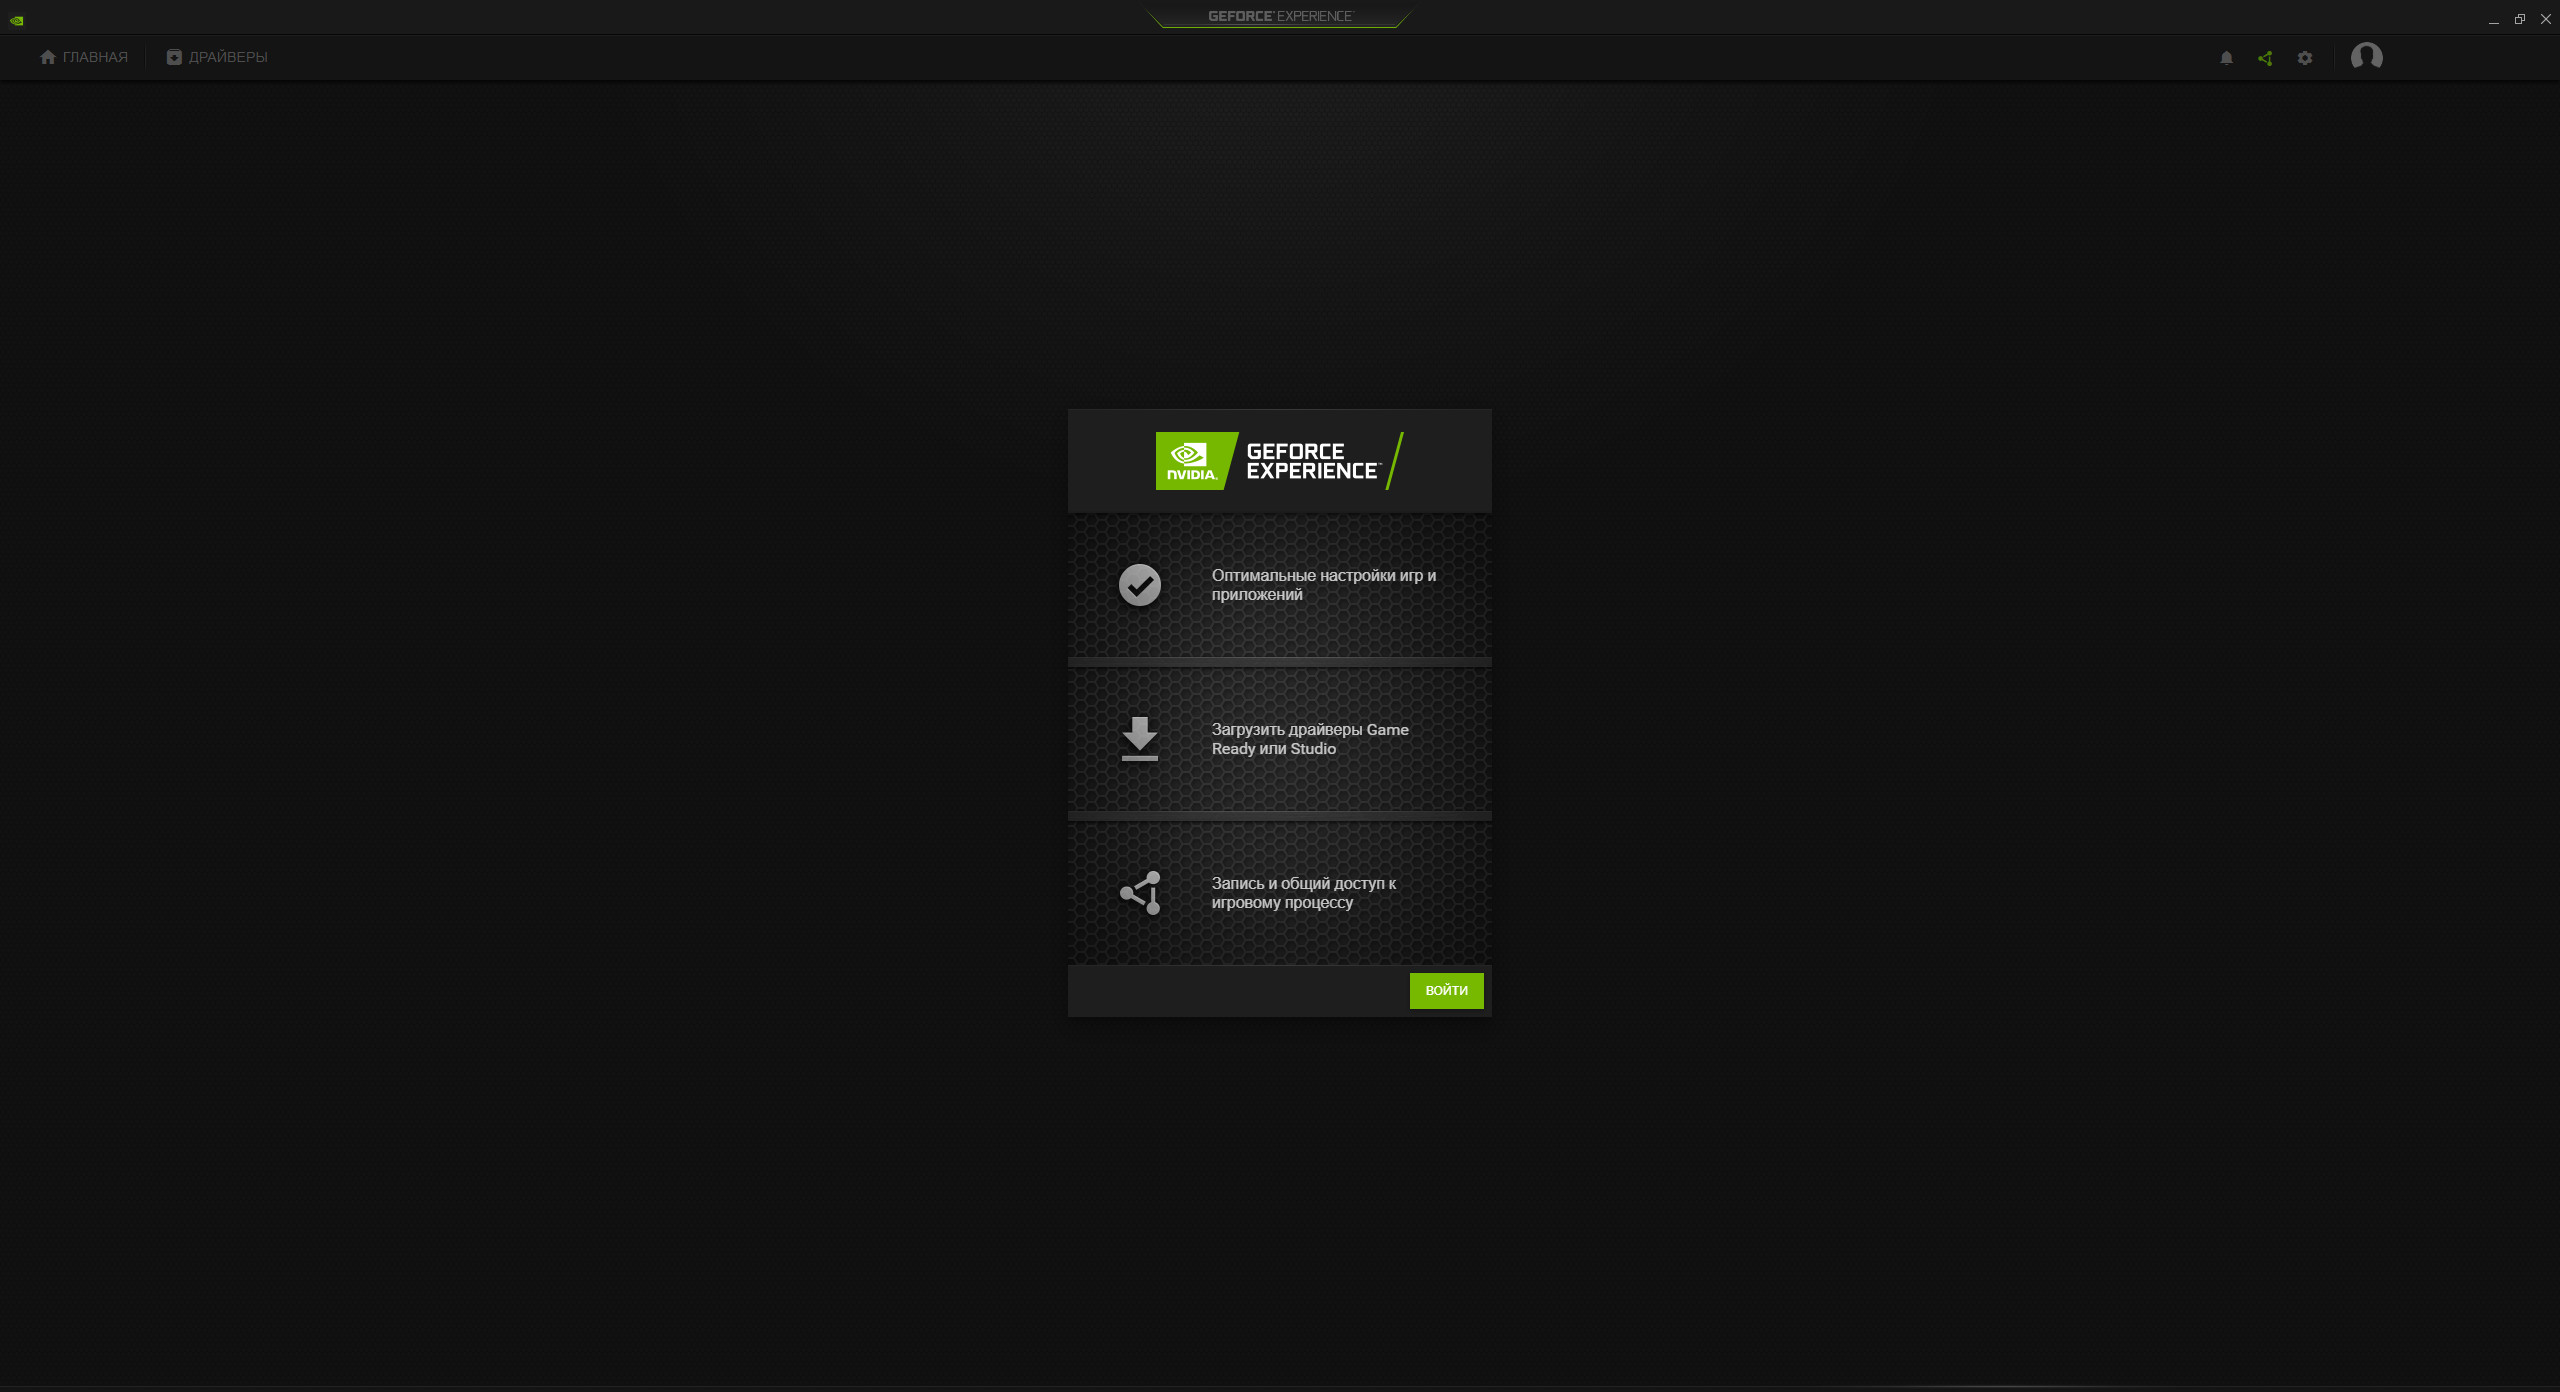
3. Создайте учётную запись «NVIDIA», если она не была создана ранее, и авторизуйтесь в приложении.

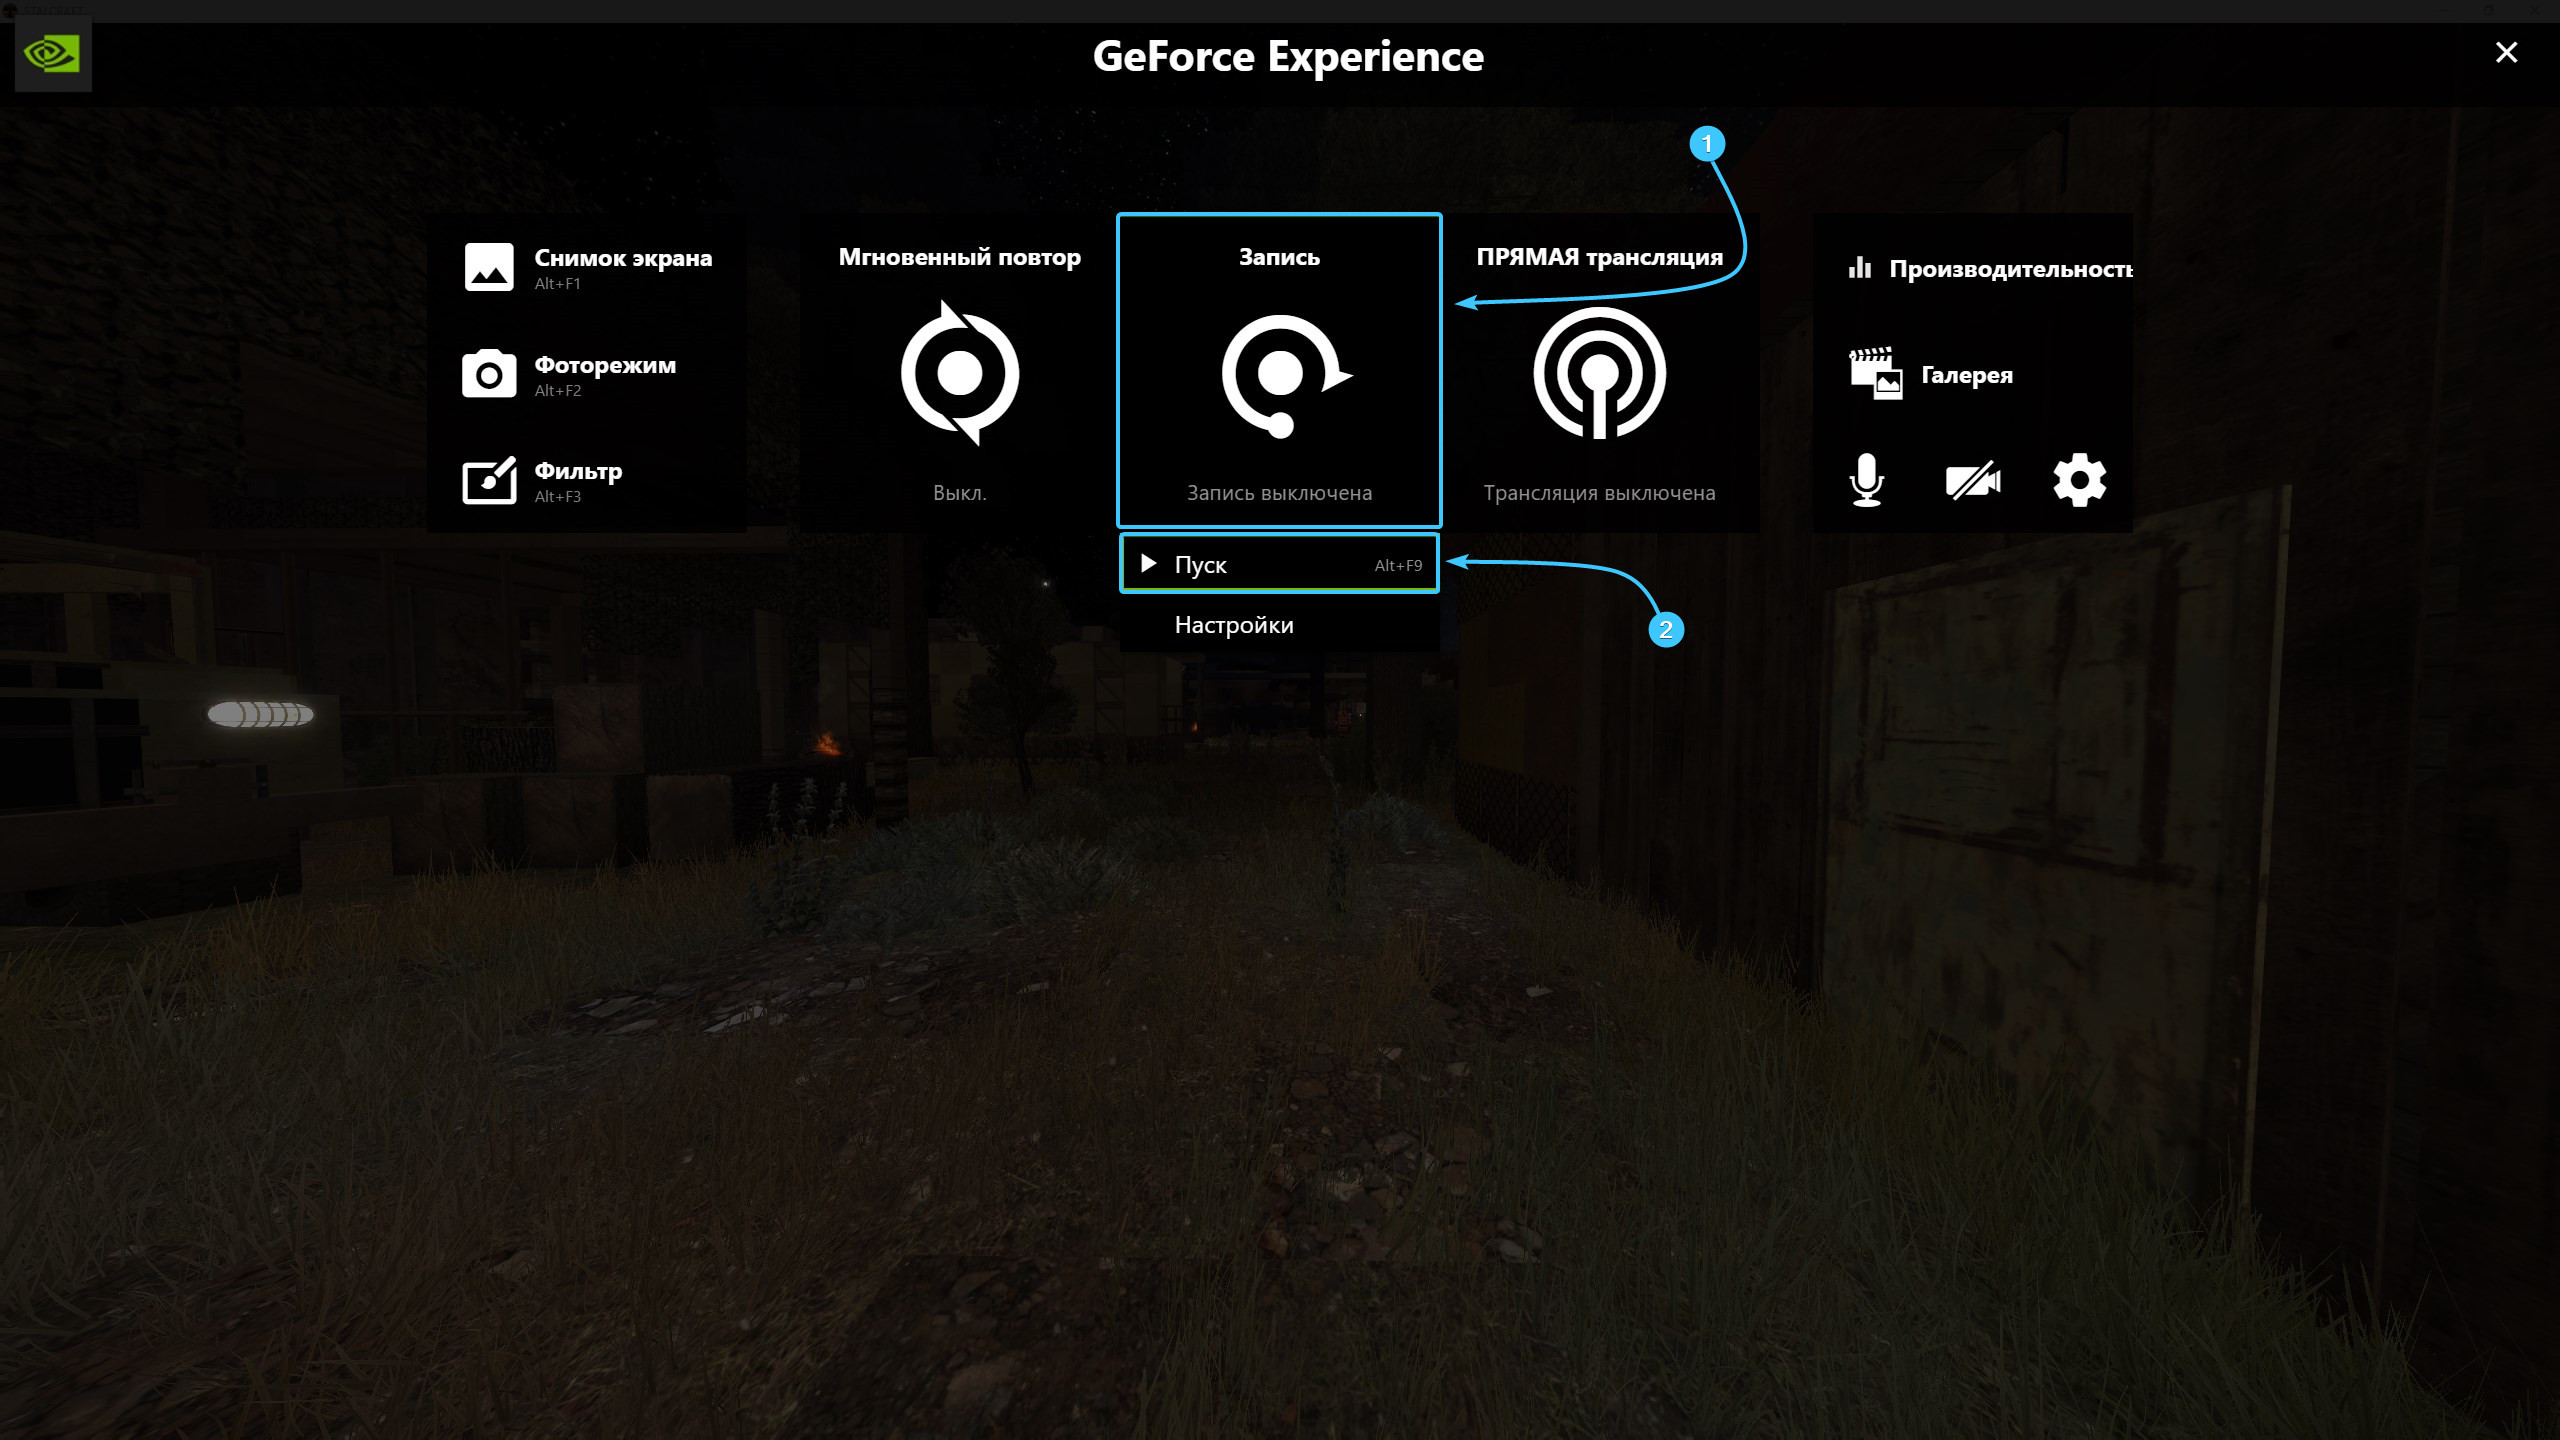
4. Запустите необходимое приложение. Нажмите сочетание клавиш «Ctrl» + «Z» для открытия меню.

5. В открывшемся меню нажмите кнопку «Запись». В появившемся списке нажмите кнопку «Пуск».
6. Запишите необходимый фрагмент. Нажмите сочетание клавиш «Ctrl» + «Z» для открытия меню.

7. Нажмите кнопку «Запись». В появившемся списке нажмите кнопку «Остановить и сохранить».
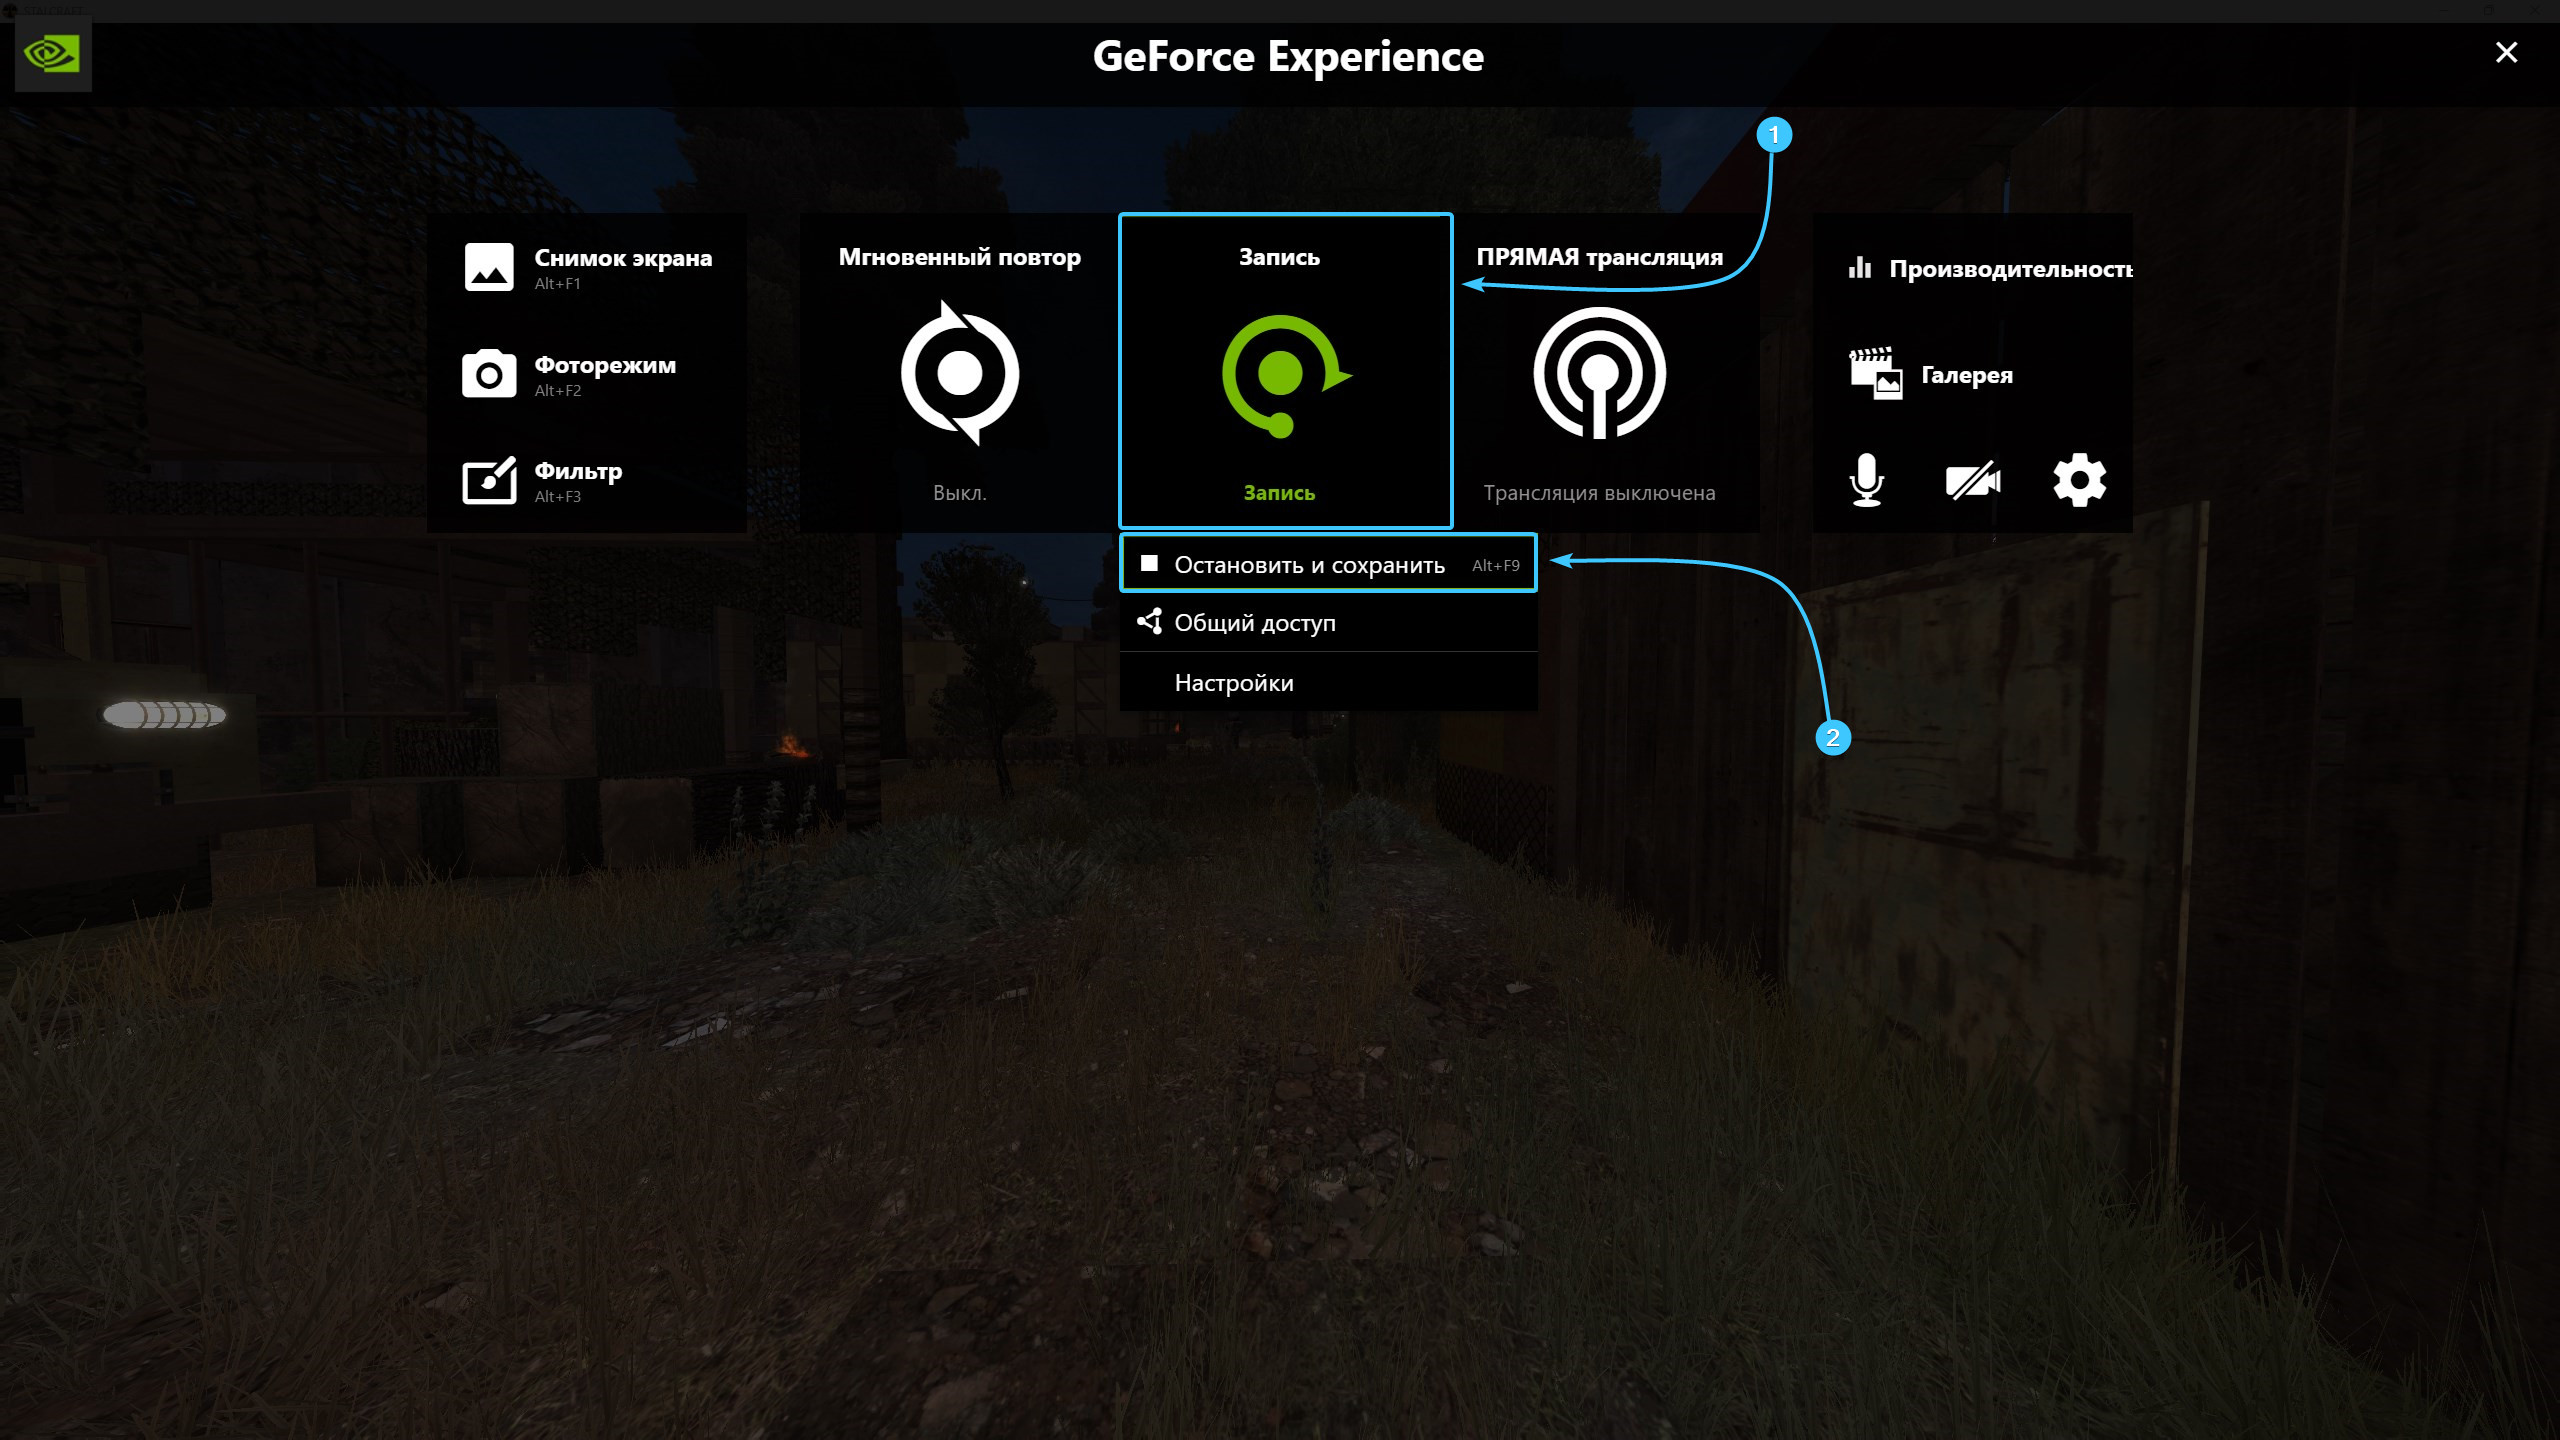
8. Видеозапись будет сохранена в папку «Видео», которая располагается в проводнике «Windows».

Другие руководства
- Скриншот в игре «STALCRAFT»;
- Скриншот экрана в «Windows»;
- Запись видео через «Bandicam»;
- Запись видео через «Fraps»;
- Запись видео через «OBS Studio»;
- Запись видео через «Streamlabs»;
- Запись видео через «AMD»;
- Запись видео через «Intel»;
- Запись видео через «Xbox».
If you are having issues with Xbox Game Bar and want to record your screen and audio in Windows 11 or Windows 10 without resorting to lesser-known third-party software, you can try using NVIDIA Share (formerly known as NVIDIA Shadowplay). NVIDIA Share is part of NVIDIA GeForce Experience, a must-have companion app for NVIDIA graphic card users.
NVIDIA Share allows you to quickly record your screen and sound and save it as a video file on your PC. It is commonly used among gamers for quick gameplay clips capturing. It also allows desktop capturing, which most other screen recording software, including Xbox Game Bar, don’t.
Also see: Record a Video of Your Screen with Sound in Windows 11/10
Record screen with audio on Windows 11 or 10
The following guide requires you to have NVIDIA GeForce Experience installed. You can download it from here (NVIDIA official site). Once you have GeForce Experience installed, follow the steps below to record your screen.
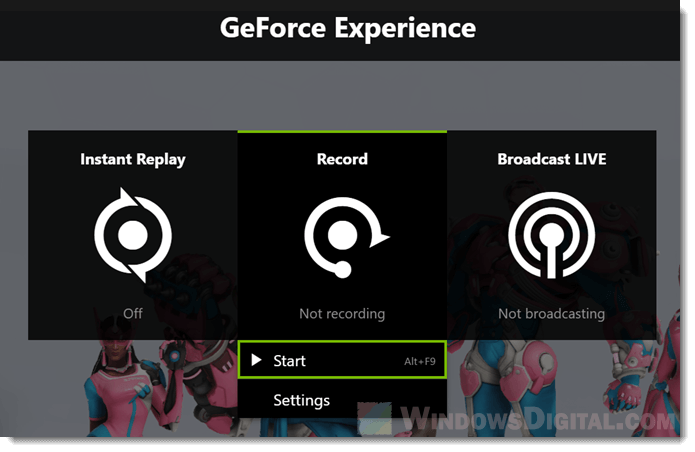
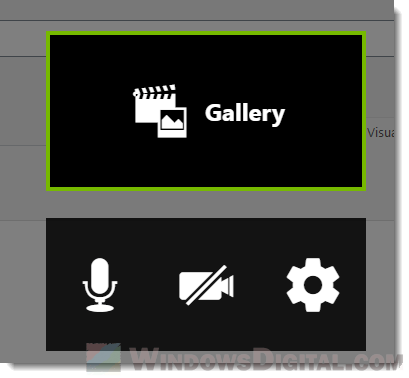
- While you’re in the app or game you would like to record, press “Alt + Z” key to open NVIDIA Shadowplay overlay.
- Click on “Record”, then “Start” to start recording. You can hide the overlay by pressing “Alt + Z” key again and continue doing your stuffs or play the game while it’s recording.
- Another quicker way to do this is by pressing “Alt + F9” keys to start recording right away in your game or app without bringing up the Shadowplay overlay.

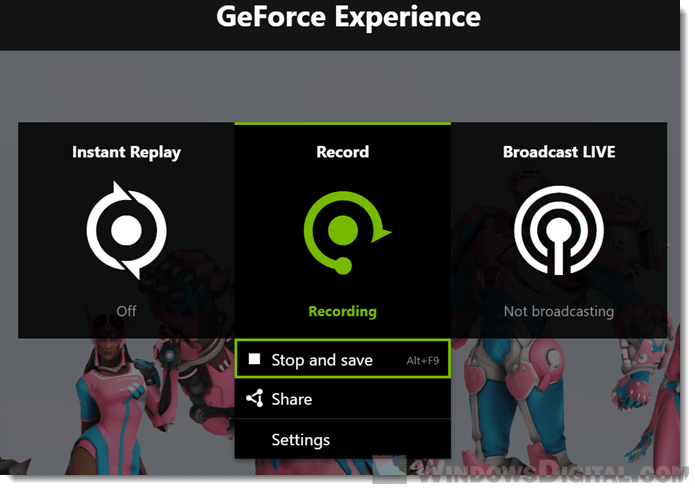
- To stop recording, press “Alt + Z” to open the overlay and then click “Record” > “Stop and save.”
- Or by pressing “Alt + F9” keys to stop recording without opening the overlay.

- The recorded videos will then be saved as a “MP4” video file in a folder with the game’s name in “This PC > Videos”. For example, if you were screen recording league of legends, the recorded video will be saved onto “This PC > Videos > League of Legends”.
- If it’s not a game and you couldn’t find the folder with the name of the app you were recording, try the “This PC > Videos > Desktop” folder.
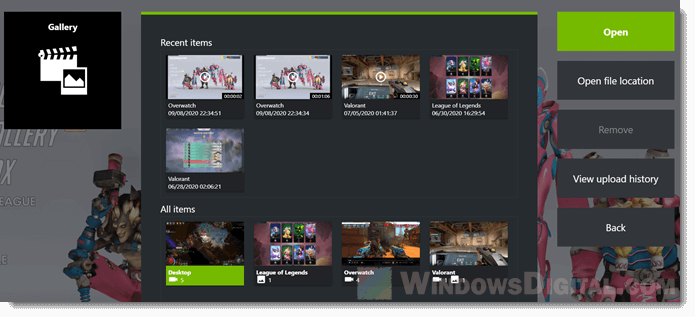
- Another method to locate the recorded video is by going back to Shadowplay overlay (“Alt + Z”), and click on the “Gallery” button. Under “Recent Items”, click on your recorded video, then click on “Open file location” button.


That’s it! You’ve successfully recorded your first video of your screen in Windows 11/10 using NVIDIA Shadowplay. Below are some additional tips about what else you can do with Shadowplay.
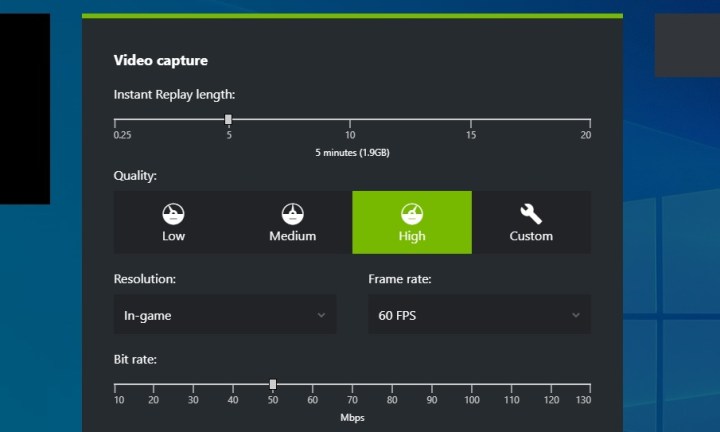
How to change the video quality, resolution and frame rate of screen recording in Shadowplay?
To tweak the settings of video capture, press “Alt + Z” to open Shadowplay overlay. Click on “Record > Settings”. From there you can select a general quality for video recording – “Low”, “Medium”, “High”, or “Custom” if you would like to select your own “Bit rate”.
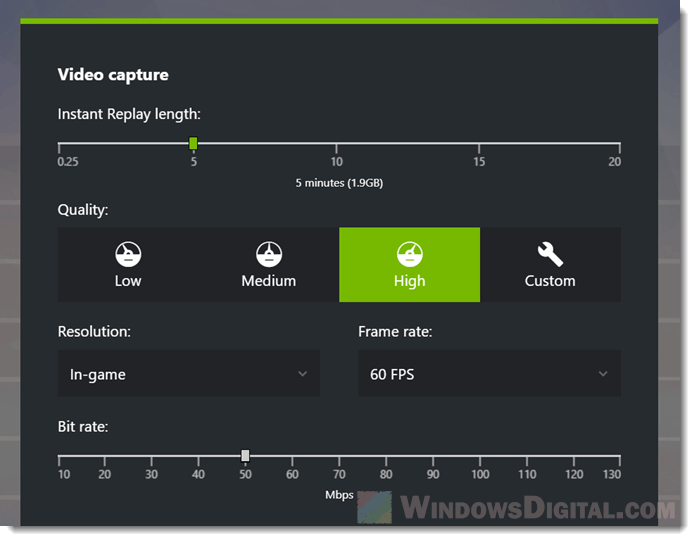
The “In-game” resolution will tell Shadowplay to record the screen with resolution according to your game/app. Selecting other resolutions (1080p, 1440p, 2k or 4k) will force the recording to up-size or down-size your original capturing to the selected resolution, which usually ends up with poor quality video and is not recommended.
How to record last X minutes using Shadowplay’s Instant Replay?
Instant Replay is an amazingly useful feature that makes Shadowplay a better game screen recorder than many others. It allows you to record and save only the last X minutes of your screen, so you wouldn’t miss out on any highlight ever again. Here’s how it works.
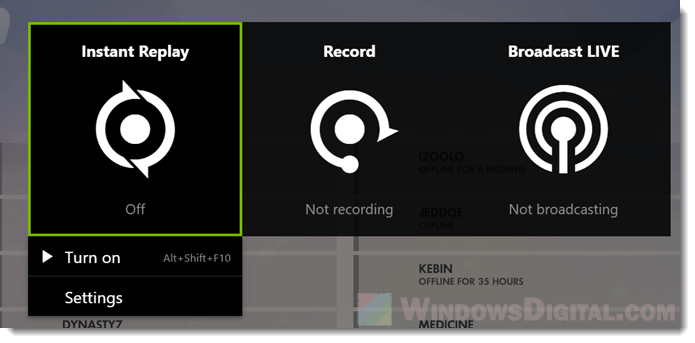
Turn on Instant Replay in Shadowplay overlay by clicking on “Instant Replay > Turn On”. When it’s on, Shadowplay will record your screen continuously. When you hit the “Alt + F10” keys, it will save the last X minutes of whatever happened on your screen as a video in the “This PC > Videos > Desktop” folder. You can set the “X” period of time in the Instant “Replay > Settings”. Under “Instant Replay Length”, you can select as minimum as 0.25 minute, up to 30 minutes of recording.
Don’t worry about the continuous recording though. Shadowplay will smartly overwrite recorded data that is older than a certain period of time and will not occupy any space if no video is saved.
Nvidia Shadowplay (formerly Nvidia Share), is a tool that lets gamers with the best Nvidia graphics cards record and stream live gameplay. It’s also an in-game overlay that lets you take screenshots or check your frames per second (fps). Many users of Nvidia cards have access to this feature, but do you know how to enable Nvidia Shadowplay to record your gameplay?
In this guide, we will show you step-by-step how to use Nvidia Shadowplay. We will also cover everything else you need to know about the program.
Before we get started, Nvidia has rebranded Nvidia Share to Shadowplay. Nvidia Shadowplay continues to be the better-known name of the feature, but ultimately, both Shadowplay and Share are essentially the same program.
How to use Nvidia Shadowplay to record your gameplay
Nvidia Shadowplay can be accessed only through GeForce Experience. This is Nvidia’s software that is responsible for, amongst other things, helping you download and install Nvidia drivers, optimize game settings, and more.
Step 1: Launch Nvidia Shadowplay by pressing the keyboard shortcut Alt + Z.
If you can’t get it to open, you may not have installed GeForce Experience. You can download it directly from Nvidia’s website.
Step 2: Directly below the toggle for the in-game overlay, select Settings to tinker with a few options before you start recording.

screenshot / Digital Trends
Step 3: The two crucial settings that you absolutely should adjust before recording are Privacy Control and Recordings:
Scroll all the way down in Settings until you find Privacy Control, then enable Desktop Capture. Without this, you won’t be able to record at all.
In Recordings, you can select the folder in which your video recordings will end up. Make sure you check it out prior to recording, especially if you have limited space on one of your drives.

screenshot / Digital Trends
Step 4: Other settings worth considering include:
- Keyboard shortcuts: Adjust the shortcut used to bring up Nvidia Shadowplay during gameplay, as well as other handy key bindings.
- Video capture: In this section, you can set the video quality, resolution, fps, and length of the Instant Replay feature. If you’re not sure what Instant Replay is, check out our section on it below.
- Audio: This section lets you separate and mute certain audio tracks. It’s useful if you’ll be playing a game while also using voice communication.
Click around and change the settings that are important to you. If you find you can’t change any, you may have Instant Replay turned on. Disable it first, then try to adjust your settings again (don’t forget to turn Instant Replay back on if you want it).
screenshot / Digital Trends
Step 5: Now it’s time to actually record some gameplay. Open up the game you want to record. You can then open up Shadowplay again by pressing the Alt + Z shortcut, or by selecting the small overlay icon in the corner. Selecting Share will open the in-game overlay. This overlay can be launched at any time, even if you’re not currently gaming.

screenshot / Digital Trends
Step 6: Before you begin recording, decide whether you also want to record your webcam and your microphone. You can adjust this in the Nvidia Shadowplay overlay, on the right side of the interface. Select the Webcam and Microphone icons to toggle them on or off.
When you’re ready to start recording, you can press Record directly in Nvidia Shadowplay, followed by Start, or via the default keyboard shortcut of Alt + F9. The same shortcut is used to stop recording when you’re done. Alternatively, you can bring the Shadowplay interface back up with Alt + Z and then stop recording manually.
Step 7: The recording will be saved to the folder you chose when setting up Nvidia Shadowplay. By default, recordings can be found in C: > Users > YourName > Videos.
Congratulations! You’ve just recorded your first video with Nvidia Shadowplay. However, there is much more that this program is capable of, so keep reading below to find out what else you can use it for.
How to use Instant Replay in Nvidia Shadowplay
Instant Replay is a unique feature offered by Nvidia Shadowplay. When enabled, it constantly runs in the background and records your gameplay during the entirety of your gaming session. Instant Replay can save up to 20 minutes of gameplay without you ever needing to press the record button.
This means that all your spontaneous-yet-shareable moments get saved on your computer, and then if you don’t decide to keep them, they are overwritten as you play. Due to the 20-minute limit, the stored videos do not take up too much storage space.
Step 1: Open GeForce Experience and click the Share icon in the top-right corner, or bring up the overlay with the Nvidia Shadowplay hotkey of Alt + Z.
screenshot / Digital Trends
Step 2: In the in-game overlay, select Instant Replay, then select Settings.
Step 3: Adjust the maximum length of time that you want Shadowplay to record for, as well as various video settings. Select Save when you’re done.

Image used with permission by copyright holder
Step 4: When you’re ready to let Instant Replay start recording, select it in the overlay and then select Turn On.
From that point on, Instant Replay will save your gameplay whenever you’re playing. If something interesting happens and you want it to be preserved instead of overwritten, pull up the Nvidia Shadowplay in-game overlay and press Save. Alternatively, use the default keyboard shortcut: Alt + F10.
Once saved, the videos will end up in the same folder you chose when setting up Nvidia Shadowplay.

screenshot / Digital Trends
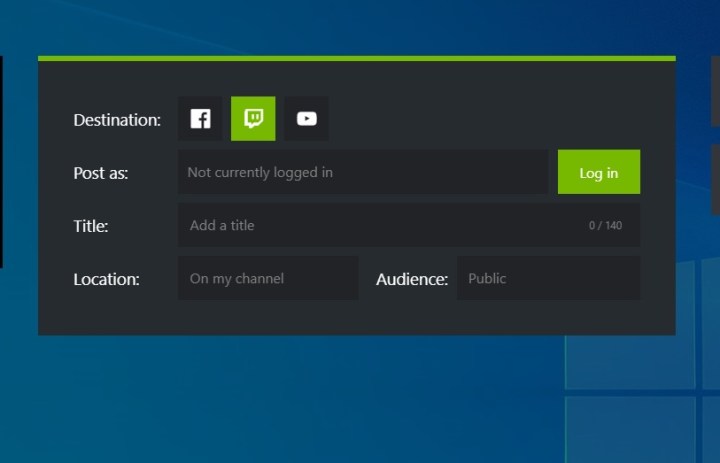
How to broadcast live in Nvidia Shadowplay
Aside from recording your games, you can also use Nvidia Shadowplay to stream them live on various platforms. Nvidia currently supports direct game streaming to Twitch, YouTube, and even Facebook. While you will need to adjust a few settings before you get started, the streaming itself is easy.
Step 1: Open GeForce Experience with Alt + Z to enter Nvidia Shadowplay. In the overlay, select Broadcast Live, and then Settings. You will be presented with various settings that are exclusive to this section of Shadowplay.
Step 2: Pick which platform you are going to stream on, then select the video quality, resolution, frame rate, and bit rate.
Step 3: Pick custom overlays, such as something to cover your in-game chat.
Step 4: Check whether the ingest server is correct for your current location.
Step 5: When you are ready to start streaming, go back to the Nvidia Shadowplay overlay, select Broadcast Live, and then Start. This will produce a smaller window with a few options for you to fill out.
- Choose the platform you’ll be streaming on.
- Log on to your platform of choice via the overlay.
- Name your video using up to a maximum of 140 characters.
- Pick the location of the stream as well as the audience you’ll be streaming to.
When you’re done setting up, simply press Broadcast in order to start streaming or use the Alt + F8 keyboard shortcut. Stop streaming the exact same way.
screenshot / Digital Trends
screenshot / Digital Trends
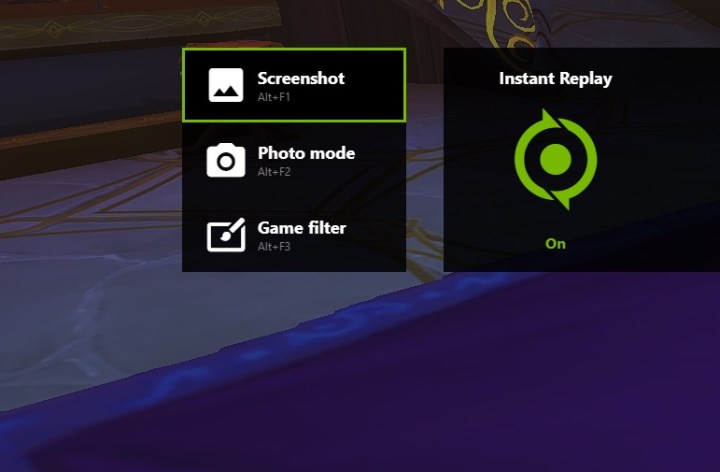
How to take screenshots in Nvidia Shadowplay
The screenshot features in Nvidia Shadowplay are quite fun and super-quick to use. It’s a great alternative to all the other ways you can take a screenshot in Windows.
Step 1: Open the GeForce Experience app by pressing Alt + Z on your keyboard.
Step 2: On the far-left side of the overlay, you will find three different options:
- Screenshot: Exactly what it says on the label. You can also use Alt + F1 to take screenshots without pulling up the overlay.
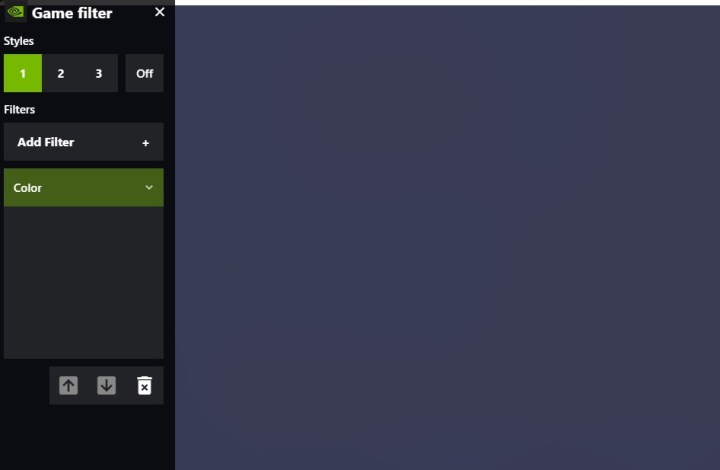
- Photo mode: Access this using Alt + F2. In this section, Nvidia has a lot of neat features that can help you alter your screenshots before you take them. Feel free to play with filters, including artificial sharpening and various color modes.
- Game filter: This feature lets you add a filter to your game. It’s basically a constant overlay that changes the way your game looks during your gameplay. It’s useful if you’re colorblind or your eyes get tired, but it may have some impact on your gaming performance.
screenshot / Digital Trends
How to use Nvidia Shadowplay for performance monitoring
Another fun option in Nvidia Shadowplay is called Performance Monitoring. In this section of GeForce Experience, you can access a live summary of your graphics card’s performance. Readily-available information includes the GPU clock, voltage, utilization, power consumption, fan speeds, memory clock, and even CPU utilization. You can also use this screen to check your GPU temperature.
Step 1: In order to access this feature, simply open up the Shadowplay overlay by using the Alt + Z keyboard shortcut. The option to view performance metrics is found on the far right side of the overlay.
Step 2: If you have a recent Nvidia GPU, like an RTX 40-series GPU (at least GTX 16-series and newer), you will also have access to a section called Performance Tuning, located right below the monitoring section. If you’d like to use it, you will first have to turn off Instant Replay in the overlay.
You can try out Automatic Performance Tuning to optimize your graphics card without delving into any particular settings. This will cause GeForce Experience to check each setting for you and find ways to improve your card’s performance.
Before you try out the Automatic Performance Tuning, make sure your drivers are up to date and close all other programs, or the feature may not work.
Nvidia Shadowplay FAQ
Does Nvidia Shadowplay affect fps?
Nvidia Shadowplay comes with a host of fun, easy-to-use, gamer-oriented features. It’s definitely a great tool and a welcome addition from Nvidia. However, there is no denying that it will affect your fps to some degree.
Using Instant Replay, Record, and Broadcast Live is very likely to lower your frame rates. Your gaming performance may be affected just a little or a whole lot — this depends on your graphics card.
If you want to avoid having low frame rates, keep Instant Replay turned off and only record when you really want to.
Is Nvidia Shadowplay free to use?
Nvidia Shadowplay is free for all users who own one of Nvidia’s graphics cards. Not all cards are supported by this feature, but it’s accessible enough that most GPU owners will be able to use it. There are no extra subscription costs required: All you need is to download the free GeForce Experience program to get started.
Can you overclock your Nvidia GPU with Shadowplay?
No. Shadowplay is provided purely as a tool to enable you to record, share, and stream gameplay. Other tools exist to help you overclock your graphics card.
Which graphics cards can use Nvidia Shadowplay?
There are a few system requirements that users must meet in order to run Nvidia Shadowplay. Shadowplay is mostly available to the owners of the best graphics cards released by Nvidia, although there is a fair amount of older models that also support this feature.
You can use Nvidia Shadowplay if your system meets the following requirements:
- Desktop: You own an Nvidia GeForce GPU newer than the GTX 900M, including GTX 16, 10, 900, 800, 700, 600, and 900M, or one of Nvidia’s RTX cards, including 30-series and 20-series units.
- Laptop: You must have at least an Nvidia GTX 850M, 860M, 950M, or 960M series card or higher.
You can find the full list of requirements on Nvidia’s website.