
PAGE CONTENT:
- An Overview of Windows 10 Screen Recorder — Xbox Game Bar
- Why Is Xbox Game Bar Not Working on Windows 10
- How to Fix Xbox Game Bar Not Working on Windows 10
- Wrapping Up
- FAQs
Are you facing trouble while trying to screen record on your Windows 10 computer? You’re not alone. Many users are finding that their screen recording tools have stopped working or malfunctions, resulting in poor-quality recordings.
While this can be extremely frustrating, it’s important to understand why your screen recording might not be working and where you can find the right solutions to get back up and running again. In this blog post, we’ll provide a comprehensive guide for resolving issues related to screen recording on Windows 10 computers. Read on to learn more!
| Methods | Effectiveness | Time Cost | Difficulty |
| Check and Enable Xbox Game Bar | High | 1 Min | ⭐ |
| Enable the Microphone Device | High | 1 Min | ⭐ |
| Spare More Space for Recordings with the Task Manager | Medium | 2 Min | ⭐⭐ |
| Update the Graphics Driver with Device Manager | Medium | 3-5 Min | ⭐⭐⭐ |
| Restart Your Windows 10 Computer | High | 1 Min | ⭐ |
| Try Xbox Game Bar Alternative ❤ | Super High | 1 Min | ⭐ |
An Overview of Windows 10 Screen Recorder — Xbox Game Bar
Xbox Game Bar is the built-in Windows 10 screen recorder that allows its users to capture screen activities, like game processes, online meetings, streaming videos, etc.
The Xbox Game Bar offers a wide range of features and settings that allow users to customize their screen recording experience and get high-quality results. The easy-to-use and powerful feature makes the Xbox Game Bar the first choice to record screen for Windows 10 users.
Why Is Xbox Game Bar Not Working on Windows 10
Why is my screen recording not working? Well, although Xbox Game Bar does bring great convenience for screen recording on Windows 10, it doesn’t mean that the utility works each time perfectly. There are still some issues that may occur when you use the Xbox Game Bar screen recorder, and «Screen Recording Not Working in Windows 10» is the most common one.
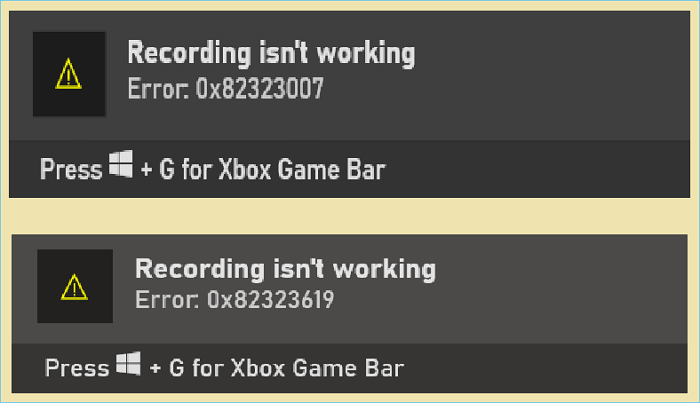
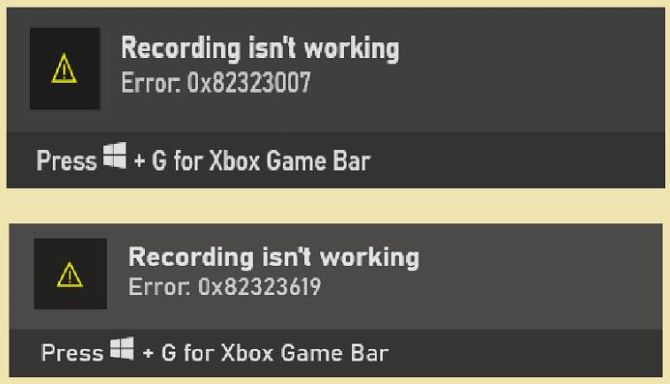
According to users’ feedback, while recording, they will receive a notice showing that «Recording isn’t working error. 0x82323007» or «Recording isn’t working error. 0x82323619», etc.
The reason why these errors appear may be caused:
- The permission for screen recording or microphone isn’t enabled
- The microphone level isn’t adjusted correctly
- The microphone is disabled
- There isn’t enough storage space on your computer
- The copyright issues
- ……
Whatever the reason, you can refer to the following solutions to fix screen recording not working on Windows 10.
You may be interested:
How to Fix Xbox Game Bar Not Working on Windows 10
Fix 1. Check and Enable Xbox Game Bar
Screen Recording is not working on Windows 10 may be because the Xbox Game Bar isn’t enabled on your Windows computer.
Step 1. Follow the path to enable the Xbox Game Bar recording settings: Start — Settings — Gaming — Xbox Game Bar.
Step 2. There is a button under the text «Enable Xbox Game Bar for things like recording game clips, chatting with friends, and receiving game invites. (Some games require Xbox Game Bar for receiving).»
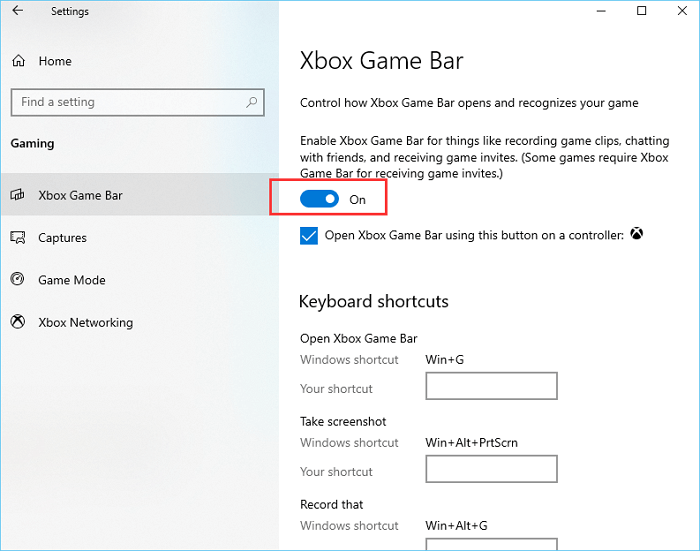
If it shows «Off«, you should slide the button to ensure it shows «On«. If it shows «On», you need to try the following solutions.
Fix 2. Enable the Microphone Device
The screen recording may not work due to the disabled microphone.
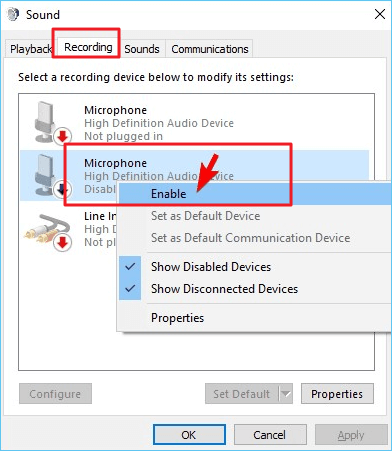
Step 1. Right-click the Volume icon at the Windows taskbar in the bottom-right corner, and select the «Recording» option.
Step 2. Find the Microphone device, and check if it is enabled. If not, right-click it and click «Enable«, then click «OK» to save the settings.
Fix 3. Spare More Space for Recordings with the Task Manager
Too many programs running in the background of your computer may affect screen recording.
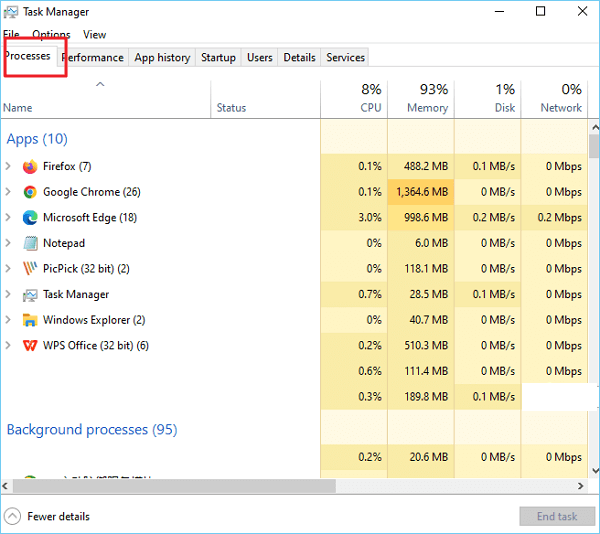
Step 1. Open the Task Manager by right-clicking the Taskbar, then select «Task Manager«.
Step 2. Click the «Processes» tab and check if there are too many processes running in the background. If so, end them to free up more space for screen recordings.
Fix 4. Update the Graphics Driver with Device Manager
The screen recording may not work because of the outdated graphics driver. Updating the graphics driver will solve most Windows utilities not working issues.
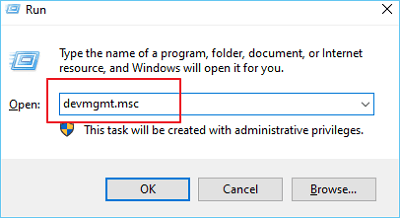
Step 1. Press the «Windows + R» simultaneously to open the Run box, type in «devmgmt.msc» and click «OK» to open Device Manager.
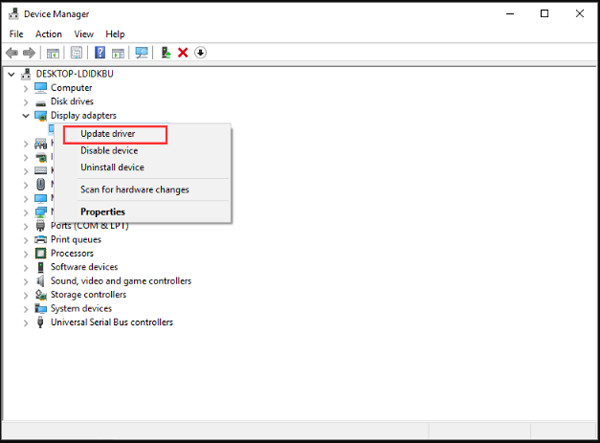
Step 2. Find and click «Display Adapter«, find your graphics adapter device, and right-click it > select «Update Driver«.

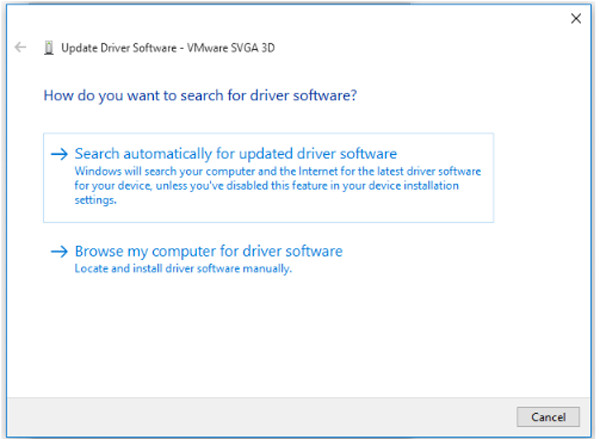
Step 3. Select «Search automatically for updated driver software«.
Fix 5. Restart Your Windows 10 Computer
If all the above solutions cannot solve screen recording not working on Windows 10, you can try restarting your computer.
Step 1. Press «Ctrl + Alt + Delete» to open the Security options window.
Step 2. Select «Restart» and wait for it to restart, then try the Xbox Game Bar again.
Fix 6. Try Xboc Game Bar Alternative — Hot
Suppose the screen recording still doesn’t work after the restart. In that case, you may need to try an alternative screen recorder like EaseUS RecExperts, which is a Mac and Windows screen recorder with powerful screen recording and editing functions.
With an intuitive and straightforward interface, EaseUS RecExperts is capable of screen recording for multiple displays and screen capture, screencasting webcam feed, and making screen recordings with customized hotkeys or mouse click effects.
Follow the steps below to record screen with EaseUS RecExperts:
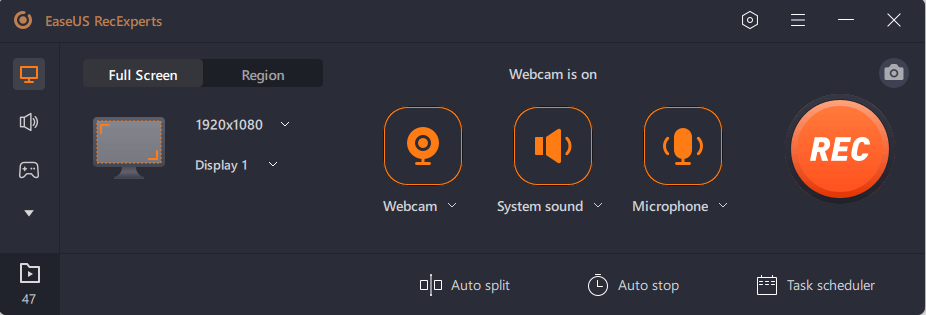
Step 1. Launch EaseUS RecExperts. There are two modes for screen recording. Choose «Full Screen», this tool will capture the whole screen; choose «Region», you will need to select the recording area manually.

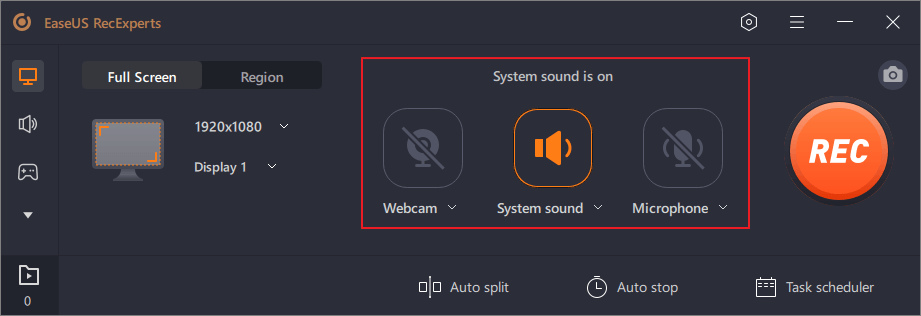
Step 2. After that, you can choose to record the webcam, system sound, or microphone as you like. Of course, you can turn them off if you only need to record the silent screen.
Step 3. Then, you can click the red «REC» button to start recording. Now you will see a menu bar on your screen. If you want to pause the recording, click on the white «Pause» button; to end the recording, click on the red «Stop» button.
Step 4. After recording, you will be led to the recording list interface. Here you can view or edit your recordings easily.

Wrapping Up
Various issues may cause screen recording not to work on Windows 10, and it can be fixed by following the above solutions. I hope these fixes are helpful.
If none of them works, you may need to try an alternative screen recorder like EaseUS RecExperts, with powerful screen capturing and editing functions.
FAQs
1. Why is screen recording not working in Windows 10?
Xbox Game Bar not working in Windows 10 may be caused by various issues, such as the disabled microphone device, disabled application, outdated graphics driver, or too many programs running in the background.
2. How do I enable screen recording in Windows 10?
To enable screen recording in Windows 10, you can follow the path to find and enable it: Start — Settings — Gaming — Xbox Game Bar — slide the button On.
3. Where are the screen recording settings?
The screen recording settings are located in the Xbox Game Bar. You can open the Xbox Game Bar by pressing the «Windows + G» keys, and then you can access the screen recording settings.
Download Article
Simple fixes for screen recoding errors on Windows and iOS
Download Article
- Windows 10 and 11
- iPhone
- Tips
|
|
Is your Screen Record button greyed out or otherwise not working for you? Whether you’re having trouble recording the screen in Windows 10 or 11 with Xbox Game Bar or on your iPhone, there’s usually an easy fix. This wikiHow article will help you figure out why you can’t screen record on your PC or iPhone, and teach you how to fix the most common problems.
Things You Should Know
- Certain apps with copyrighted content may not allow you to screen record while that app is open.
- If you’re using Windows Xbox Game Bar, make sure it is enabled first.
- If you’re using an iPhone, the most common reason that you can’t screen record is because of restrictions set in Screen Time.
-

Some services, like Netflix and Disney Plus, won’t allow you to screen record to prevent copyright infringement. For example, if you’re trying to screen record Netflix on Windows, you’ll see an error like, «Screen recording failed to save due to 5823,» or the screen will freeze. It may also look like it’s recording, but you wind up with a black screen in your resulting video.
- Many web browsers now prevent you from screen recording DRM-protected content. If you’re trying to screen record a movie or TV show on a streaming platform, you can try playing it in Google Chrome with hardware acceleration disabled. To disable this feature, open Chrome, go to ⋮ > Settings > System and uncheck «Use hardware acceleration when available.»
- You can also take screenshots using some workarounds and plugins.
-
If Game Bar is disabled, you can press the keyboard shortcut Win + Alt + R to record your screen, but you won’t find the recorded file afterwards. To enable Game Bar, press Win + i to open Settings, go to Gaming > Xbox Game Bar, and toggle on the feature.[1]
Advertisement
-
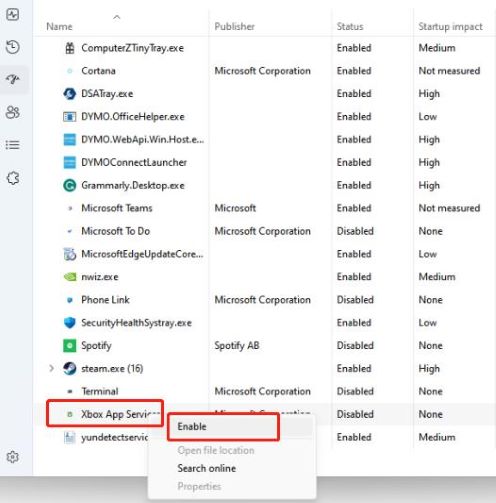
If you see the error 0x82323007, you may need to enable Xbox App Services. Here’s how:
- Press Ctrl + Shift + Esc to open Task Manager.
- Click the Startup or Startup apps tab.
- If you see «Disabled» next to «Xbox App Services,» right-click it, then click Enable.
- You can also try disabling and re-enabling «Record in background while I’m playing a game» if the error pops up when you’re attempting to screen record your gameplay.
- If you have lots of previous captures in the Captures folder, clear it out and see if that gets rid of the error.
-
If you don’t have enough space on your hard drive for your screen recording, the recording will fail. Free up space by uninstalling programs that you don’t use and using Storage Sense.
- Error 0x82323619 will pop up if Xbox Game Bar determines that you don’t have enough room to store a recording.
-
You may find that you can record video, but everything you’re saying is missing from the recording. If you’re trying to add your own voice to the screen recording, make sure your microphone is enabled.
- On Windows 10, right-click the sound icon in your taskbar, then select Sound > Recording. If your microphone isn’t on, right-click it and click Enable. Click Ok to save your changes, then you can close the window.
- On Windows 11, right-click the sound icon, select Volume mixer, and make sure the correct microphone is selected under «Input.»
-
Too many processes running may adversely affect your recording, so make sure you don’t have any unused apps open. To close any open apps, press Ctrl + Shift + Esc to open Task Manager, click Processes, then end any tasks you don’t need.
-
If you notice that your screen recording is wonky, black, or missing frames, you may have an outdated graphics driver. Update it by opening Device Manager and locating your graphics driver under «Display Adapter.» Right-click it and click Update driver > Search automatically for updated driver software.
-
Sometimes, refreshment is all your computer needs to work properly. Restart your PC, then try screen recording again.


Advertisement
-
If Content Restrictions are enabled for , you won’t be able to record the screen.
- Open your iPhone’s Settings app and go to Screen Time > Content & Privacy Restrictions > Content Restrictions. Scroll down and make sure it says «Allow» next to «Screen Recording.» If it doesn’t, tap Screen Recording, then tap Allow.[2]
- Once you do this, the icon in Control Center will be darker so you can tap it.
- If you don’t have the PIN for Screen Time, such as if you’re using a child account on an iPhone, you can’t remove this restriction.
- Open your iPhone’s Settings app and go to Screen Time > Content & Privacy Restrictions > Content Restrictions. Scroll down and make sure it says «Allow» next to «Screen Recording.» If it doesn’t, tap Screen Recording, then tap Allow.[2]
-
If you don’t have enough storage, the screen record will fail. To check your storage, go to Settings > General > iPhone Storage.
- You can free up space using iCloud or by optimizing your photo storage.
-
While this battery-saving feature is active, screen recording may fail. To turn off Low Power Mode, tap the battery icon in Control Center, or go to Settings > Battery and make sure the toggle is off.
-
Operating system updates usually provide bug and glitch fixes, so if you’re running an older iOS version, you may be having issues. To update your iPhone, go to Settings > General > Software Updates.
-
Some services, like Netflix and Disney Plus, won’t allow you to screen record to prevent copyright infringement. For example, if you’re trying to screen record Netflix on an iPhone, you’ll see an error like, «Screen recording failed to save due to 5823» or the screen will freeze. In this case, you won’t be able to screen record your iPhone while these copyrighted videos are playing.


Advertisement
Ask a Question
200 characters left
Include your email address to get a message when this question is answered.
Submit
Advertisement
Thanks for submitting a tip for review!
Advertisement
References
About This Article
Thanks to all authors for creating a page that has been read 29,964 times.
Is this article up to date?
Why doesn’t my screen recording work on Windows? Is there a way to fix the screen record not working issue? If you are experiencing issues with your screen recording, read this post and we’ll provide workable solutions for you.
There is a built-in screen recorder that is the Xbox Game Bar on your Windows. Recording your Windows 10/11 screen using this tool is handy when you want to capture and share a clip with friends, family, and colleagues.
However, it can be quite frustrating when screen recording stops working. To help you with this, in this article, we will discuss why your screen recording isn’t working and provide 7 easy solutions to fix the screen recording not working issue.
Let’s dive in!
Why is My Screen Recording Not Working on Windows?
Although the built-in Xbox Game Bar brings great convenience to screen recording on Windows 10/11, there are still some issues that can occur when using it to record screens.
When you encounter screen recording issues with Game Bar, you might get a message like “Recording isn’t working error. 0x82323007”, “Recording isn’t working error. 0x82323619”, etc.
Actually, this issue might be caused by various reasons. In general, common reasons include:
- The permission for screen recording isn’t enabled
- The screen record settings aren’t adjusted correctly or are disabled
- Insufficient space on your computer
- Copyright issues
- …
How to Fix the Screen Record Not Working Issue on Windows 10/11
Although it’s quite frustrating when encountering the screen recording not working on your Windows computer, you can solve this problem in several workable ways.
The solutions provided below will assist you in fixing problems when your Windows screen capture does not work. You can go through the various fixes for the issue and get the screen recording working easily.
Solution 1: Make Sure Xbox Game Bar is Enabled
First and foremost, you should check if the screen recording in Xbox Game Bar is enabled when you can’t screen record.
To do this, please follow the steps below:
1. On your PC, click the Start menu and select Settings.
2. Select Gaming > Xbox Game Bar.
3. Be sure to toggle on the “Open Xbox Game Bar using this button on a controller” option to enable Game Bar.
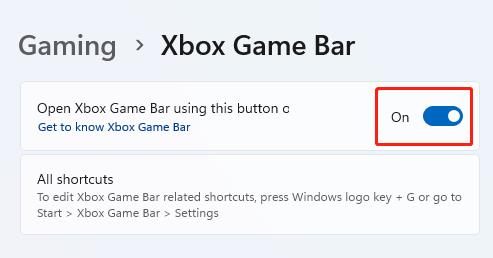
For Windows 10 users, toggle on the “Enable Xbox Game Bar for things like recording game clips, chatting with friends, and receiving game invites” option.
If you’ve already enabled the Game Bar and still can’t screen record on Windows, please try the following solutions.
Solution 2: Make Sure Xbox App Services are Enabled
If your screen recording is not working and you are getting the error message 0x82323007 on your computer screen, you may need to enable Xbox App Services.
Here’s how to do this:
1. On your PC, press Ctrl + Shift + Esc to open Task Manager.
2. Click the Startup Apps tab.
3. Navigate to Xbox App Services under the Name tab.
4. If you see Disabled next to Xbox App Services, right-click on it, then click Enable.
Solution 3: Close Excess Background Apps
Too many running processes running in the background can affect your recording, your computer may be too bogged down and use too many resources to smoothly record a video.
So make sure you don’t have any unused applications open to avoid the screen recording not working issue. Here’s how you can do this with Task Manager:
1. On your PC, press Ctrl + Shift + Esc to open Task Manager.
2. Go to the Processes Tab.
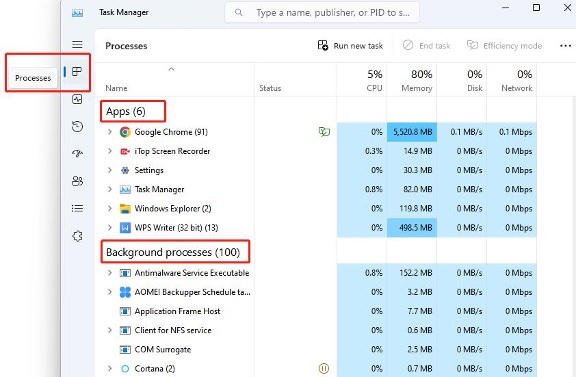
3. Check if there are any apps taking up too much CPU and you don’t necessarily need them.
4. Select the apps, right-click on it and click End task.
Solution 4: Free Up Some Space
If you don’t have enough space on your hard drive to capture your screen, your screen recording will fail.
In this situation, free up some space by uninstalling programs you don’t use with Storage Sense. Check the steps below to do this:
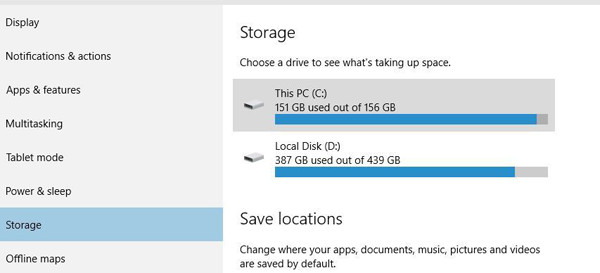
1. On your PC, click the Start menu and select Settings >System > Storage.
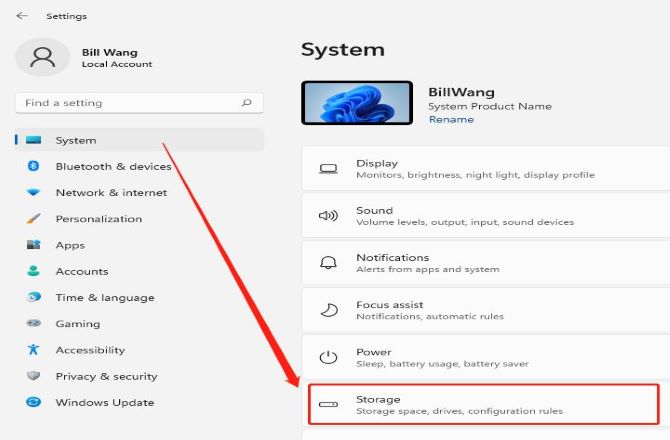
2. Under Storage Management, and turn on the Storage Sense option.
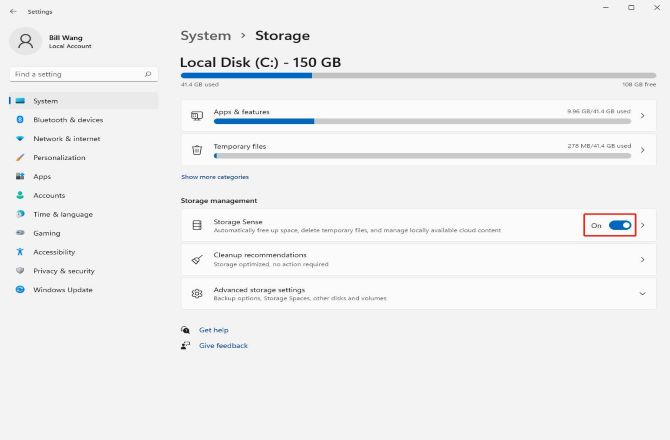
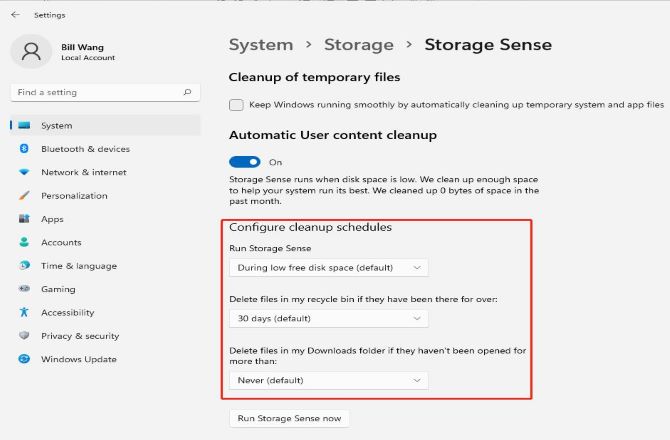
3. Then, click on Storage Sense to configure the cleanup schedules and select how often you want it to run.
4. Click Run Storage Sense Now. This will run Storage Sense and will delete all files that meet the criteria that you selected.
Solution 5: Update the Graphics Driver
The graphics driver affects whether or not the screen recording works normally, and screen record usually requires the latest graphics driver.
If you find that your screen capture is jerky, black, or missing frames, you may be using an outdated graphics driver. Try to update the graphics driver to resolve the screen capture not working issue.
1. Open the Start menu and type Device Manager in the search box and open it.
2. Go to Display adapters and click on the drop-down menu.
3. Right-click on your graphics driver, and choose Update driver.
4. Choose Search automatically for drivers. Wait for the scan to complete and then install the available graphics driver updates.
Solution 6: Restart your Windows Computer
Sometimes the screen capture not working problem can be fixed by simply restarting your PC. This is a rather simple but quite useful way to solve the problem when the screen recording function doesn’t work.
All you need to do is click the Windows logo, click Power, and select Restart.
Solution 7: Try an Alternative Screen Record Software
It is important to note that the built-in screen recorder doesn’t work for everything. Suppose the screen recording still doesn’t work after the restart, you can try an alternative third-party screen recorder to complete the screen recording task.
iTop Screen Recorder is such an excellent screen recorder that we’d like to recommend it to you. This powerful tool can deliver an innovative and convenient way to record screens on Windows 10/11 professionally.
iTop Screen Recorder can record high-resolution (even 4K) and high-quality videos on your Windows. It never limits your recording time nor leaves a watermark on your video. Besides, it offers multiple video formats when exporting like MOV, MP4, WEBM, and AVI.
Key Features of iTop Screen Recorder
- Easily capture screen on Windows with no watermark and time limit.
- Record HD video smoothly with advanced hardware acceleration.
- Record online meetings, YouTube videos, live streams, video tutorials, etc.
- Save Windows screen captures to MP4/AVI etc., and share in one click.
Steps to screen record on Windows using iTop Screen Recorder
1. Download, install, and run iTop Screen Recorder on your PC.
2. Click the drop-down arrow behind Full Screen to set the region you want to record.
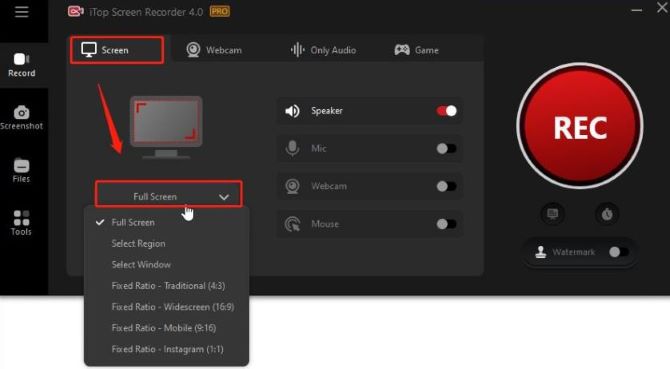
3. Turn on your Speaker, and keep your Microphone, Webcam, and Mouse off.

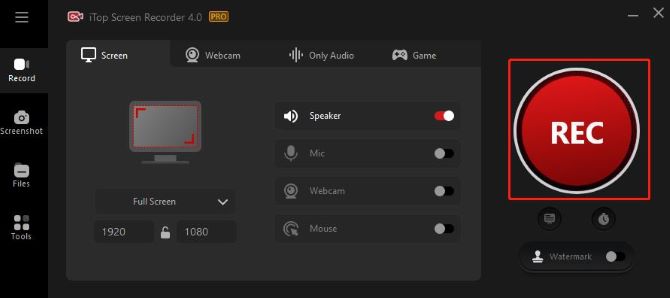
4. Click the big red REC button, and then it will record your Windows screen instantly.
5. Click the Stop button when you are finished.
Note:
You can make further settings by clicking Options (three lines on the top left) > Settings.
FAQs about Screen Recording Not Working on Windows 10, 11
Q1. How do I enable screen recording on Windows 10/11?
A: If you’re using the Xbox Game Bar, press Win + G to open it and click on the Capture button. In third-party software, you may need to adjust settings to enable screen recording.
Q2. Why is my screen recording laggy or choppy on PC?
A: Laggy or choppy screen recordings can be caused by various factors, such as insufficient hardware resources, outdated graphics drivers, high CPU usage, or recording at a high resolution. Try lowering the recording resolution or closing unnecessary applications to solve the issue.
Q3. My screen recording has no sound on Windows 10/11. How can I fix it?
A: Ensure that the audio input is properly configured in your screen recording software. Additionally, check your Windows sound settings to make sure the correct audio device is selected for recording.
Q4. Which screen recording software should I use on Windows?
A: Windows 10 and Windows 11 come with a built-in screen recording tool called Xbox Game Bar. However, you can also use third-party software like OBS Studio, iTop Screen Recorder, or Bandicam for more advanced features.
Исправлено: больше нечего записывать, играть в Windows 10.
«Нечего записывать. Сыграй еще и попробуй еще раз». всплывает в вашей Windows, когда вы записываете основные моменты Overwatch, LoL, Genshin и любого другого игрового процесса через Game Bar. Это будет очень раздражающей и разочаровывающей проблемой, когда вы погрузитесь в радость от игры. Хотя встроенная программа записи экрана в Windows 10 проста в использовании, она всегда выдает ошибки игровой панели, вызванные несколькими причинами. Таким образом, в этой статье будут представлены 5 эффективных решений, которые помогут вам исправить ошибку «Нет ничего, что нужно записать, воспроизвести еще». Более того, вы также можете узнать об окончательном методе предотвращения повторения этой проблемы, который обеспечит вам наилучшие впечатления от записи игр.
5 простых решений: больше нечего записывать
#SРешение 1. Обновите или переустановите драйверы видеокарты
Это основная проблема, которая отключает все программное обеспечение, включая Game Bar в вашей Windows. Так что вы должны проверить это в первую очередь.
Шаг 1.Нажмите кнопки «Windows + X» на клавиатуре и нажмите кнопку «Диспетчер устройств». Во всплывающем окне вы найдете приложение «Адаптеры дисплея». Затем щелкните правой кнопкой мыши «Драйверы видеокарты» в раскрывающемся меню и нажмите кнопку «Обновить драйвер».
Шаг 2.В новом окне нажмите кнопку «Автоматический поиск обновленного программного обеспечения драйвера», чтобы обновить драйвер видеокарты. Вам просто нужно следовать руководству, чтобы установить его. Затем перезапустите игровую панель, чтобы проверить, решена ли проблема «Больше нечего записывать игру».
#Solution 2: запускайте игровой процесс в полноэкранном режиме
Если игровой процесс не распознается игровой панелью, также появится сообщение «Больше нечего записывать». Прямое решение — установить полноэкранный режим в вашем игровом процессе. Если игровой процесс, который вы хотите записать, поддерживает полноэкранный режим, вы можете просто нажать кнопки «Alt + Enter». Конечно, вы также можете найти настройки во внутриигровом меню.
#SSolution 3: Обеспечьте достаточно места для записи
Если для хранения записей игрового процесса недостаточно места для хранения, также появится ошибка игровой панели «Нет ничего для записи, поиграйте еще». Изучите простые шаги, чтобы очистить некоторые временные файлы.
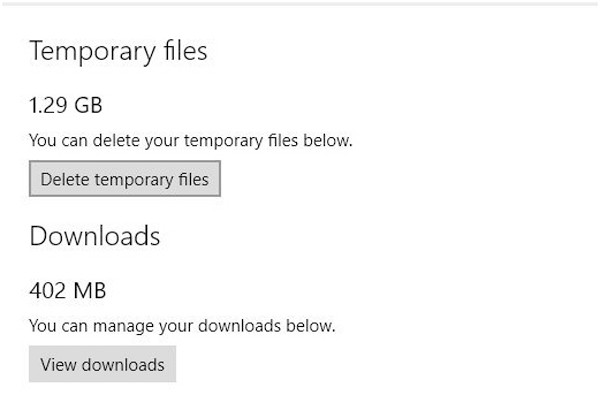
Шаг 1.Нажмите кнопку «Windows» и выберите приложение «Настройки». Затем перейдите в Система меню и выберите Место хранения вариант. После этого нажмите кнопку «Этот компьютер» и выберите Временные файлы вариант.
Шаг 2.Нажмите кнопку «Удалить временные файлы», и процесс завершится через несколько минут. Затем вам необходимо перезагрузить компьютер, чтобы устранить проблему «Нечего записывать, играйте еще».
#SSolution 4: Используйте горячие клавиши для записи игрового процесса
Чтобы обеспечить распознавание игрового процесса, вы можете просто щелкнуть окно игрового процесса и использовать горячие клавиши для его записи. Вы можете нажать кнопку Windows + G, чтобы начать запись в полноэкранном режиме, или нажать кнопки «Win + Alt + R», чтобы сделать 30-секундный снимок экрана.
#SРешение 5. Воспользуйтесь средством устранения неполадок по умолчанию
Когда вы сможете найти причины, вызывающие проблему «Нет ничего, что можно было бы записать и воспроизвести», вы можете использовать средство устранения неполадок, чтобы выполнить общую проверку.
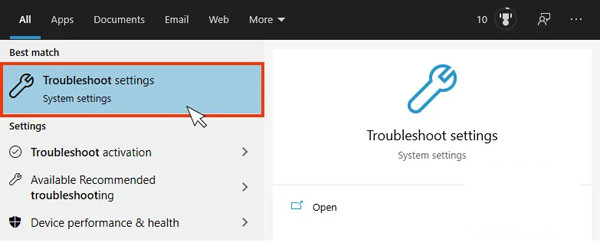
Шаг 1.Нажмите кнопки «Win + S» на клавиатуре и найдите Устранение неполадок в строке поиска. Нажмите «Настройки устранения неполадок», а затем нажмите кнопку «Дополнительное средство устранения неполадок».
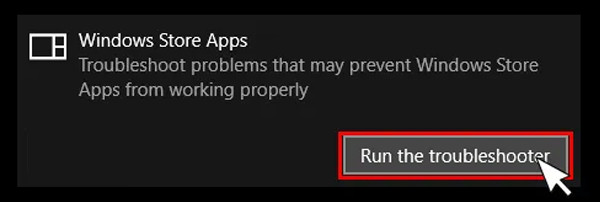
Шаг 2.В появившемся окне следует нажать кнопку «Запустить средство устранения неполадок». Затем он автоматически обнаружит проблемы и устранит их.
Выше приведены все возможные решения проблемы «Нечего больше записывать и воспроизводить». Если это все еще не работает, вы должны попробовать последний и работоспособный способ 100% в следующей части. Это также предотвратит повторение этой проблемы.
Лучший способ исправить: нечего записывать. Играйте еще немного.
Чтобы навсегда решить проблему «Нет ничего, что можно было бы записать, поиграйте еще», вы можете положиться на профессиональный захват видео и игр — AnyRec Screen Recorder. Это универсальный экранный рекордер, который поддерживает запись видео, аудио и игрового процесса в трех различных режимах. Без сбоев или зависаний вы можете легко и плавно записывать игровой процесс на Windows/Mac.

Лучший рекордер экрана для замены игровой панели
Запишите свой экран в полноэкранном режиме, в выбранных областях или в определенном окне.
Возможность настроить формат записи, качество и частоту кадров.
Несколько дополнительных функций, таких как шумоподавление, расписание задач и т. д.
Свободно редактируйте, просматривайте и обрезайте записи перед экспортом.
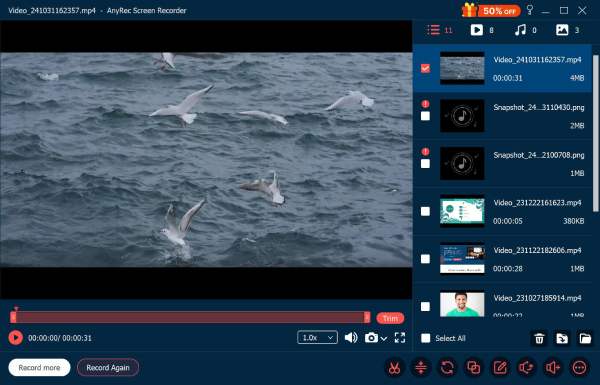
Шаг 1.Запустите AnyRec Screen Recorder на вашем Windows/Mac. Затем вы можете выбрать Видеомагнитофон или спроектированный Регистратор игр в соответствии с вашими потребностями. Вы можете записать геймплей или любую другую вещь на вашем экране.
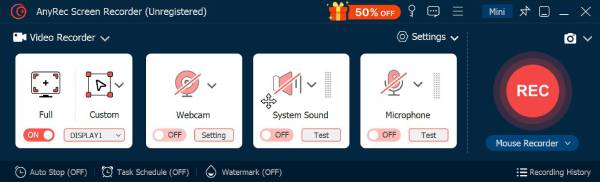
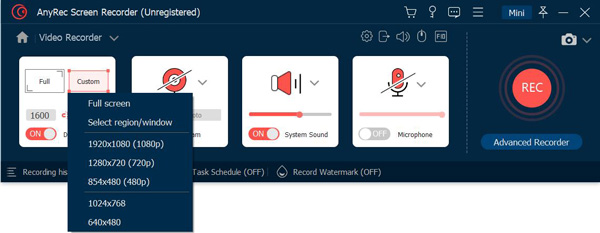
Шаг 2.Нажмите кнопку «Полный» или «Пользовательский» для выбранных регионов, чтобы захватить экран или игровой процесс так, как вам нравится. Вы также можете включить микрофон и системный звук на отдельной громкости. Затем нажмите кнопку «ЗАПИСЬ», чтобы начать запись без проблемы «Записывать больше нечего».
Шаг 3.Наконец, нажмите кнопку «Стоп» в любое время. Затем вы можете вырезать лишние части и нажать кнопку «Сохранить», чтобы экспортировать записи.
Часто задаваемые вопросы о «Нечего записывать» «Play Some More Error»
-
1.Как включить игровую панель в Windows 10?
Нажмите кнопки Win+I на клавиатуре. Затем перейдите к Настройки приложение и нажмите кнопку «Игровая панель». Затем включите кнопку под игровой панелью.
-
2.Можно ли исправить «Больше нечего записывать, поиграй», перезапустив игру?
Да, вы можете попробовать этот метод. Если ты запись геймплея Steam, вы можете попробовать снова открыть приложение Steam. И вы должны убедиться, что игровой процесс находится в полноэкранном режиме.
-
3. К какому коду ошибки относится «Нечего больше записывать и воспроизводить»?
Эта проблема относится к коду ошибки 2147942403. Вы можете напрямую найти эту ошибку в сообществе Microsoft, чтобы исправить ее.
Заключение
В этой статье представлены 6 эффективных способов решения проблемы «Нечего больше записывать, играть». Вы можете обновить диски видеокарты, обновить игровую панель и т. д. А с помощью AnyRec Screen Recorder вы рекорд фортнайт, LoL и даже Switch без каких-либо ошибок игровой панели. Добро пожаловать, чтобы связаться с нами и задать ваши вопросы.
Статьи по Теме
Есть несколько сфер, где может понадобиться экранный рекордер. Кто-то записывает обучающее видео для онлайн-курсов, кто-то видеовстречи для выполнения рабочего плана, а кто-то снимает себя на веб-камеру или записывает игровой процесс, чтобы позже поделиться этим в социальных сетях.

К счастью, встроенный в Windows 10 экранный рекордер — это бесплатная программа, который может помочь вам сделать любую запись без установки сторонних приложений. Так что же из себя представляет этот встроенный рекордер экрана в Windows 10? Как его использовать и что делать, если он не работает или возникают другие проблемы? Сейчас всё расскажем.
- Содержание
-
Что такое встроенный в Windows 10 рекордер экрана
-
Как использовать встроенный в Windows 10 рекордер экрана
-
Как исправить ошибки встроенного рекордера экрана в Windows 10, что делать, если он не работает
-
Лучшее решение проблемы: получите альтернативу встроенного в Windows 10 рекордера экрана
Что такое встроенный в Windows 10 рекордер экрана
Xbox Game Bar, встроенная в Windows 10 бесплатная программа для записи экрана, является частью приложения Xbox. Действительно, это довольно простое в использовании программное обеспечение для записи экрана для пользователей Windows, но оно обладает мощными функциями.
Это встроенный рекордер экрана в Windows 10 позволяет записывать каждое действие на экране, не ограничиваясь составлением инструкций, но и записывая игровой процесс Switch, онлайн-видео и прямые трансляции в любых социальных сетях. Более того, функция LFG игровой панели Xbox позволяет улучшить взаимодействие с пользователем. Можно найти новых товарищей по команде для игры, а также пообщаться с ними на консоли Xbox. Качество видео вам тоже понравится. Наслаждайтесь яркой картинкой без каких-либо помех.
С помощью этого встроенного рекордера вы можете записать весь экран или любую его часть. Он также поддерживает запись веб-камеры и микрофон, что означает, что вы также можете снимать себя и записывать свой голос, для пояснений или спецэффектов. Кроме того, он позволяет делать скриншоты и создавать мемы.
Как использовать встроенный в Windows 10 рекордер экрана
Сначала убедитесь, что то, что вы хотите записать (онлайн-видео, встреча Google или руководство по использованию программы) проигрывается правильно. Затем следуйте инструкциям по использованию Xbox Game Bar, встроенного средства записи экрана в Windows 10.
Примечание. Панель Xbox Game Bar не охватывает все программы (весь рабочий стол или файловый менеджер), но без проблем работает с настольными приложениями.
Шаг 1: Откройте Xbox Game Bar. Нажмите клавишу Windows + G на клавиатуре.
Шаг 2: Инструменты записи по умолчанию представлены в верхнем левом углу окна «Захват». Если их там нет, дотянитесь до длинной панели инструментов в верхней части экрана. Теперь щелкните значок веб-камеры.
Шаг 3: Окно захвата имеет значок белого круга. Щелкните ее, чтобы начать запись. Вы также можете начать запись экрана в любое время, нажав клавишу Window + Alt + R. Продолжительность записи можно будет посмотреть в правой части экрана.
Шаг 4: При нажатии на значок микрофона вы сможете записать свой голос. Однако, он начнет записывать ваш голос с микрофона по умолчанию.
Шаг 5: Остановить запись можно либо из меню игровой панели, либо с помощью таймера записи. Все записи будут помещены в папку «Видео» на ПК в разделе «Захваты».

Как исправить ошибки встроенного рекордера экрана в Windows 10, что делать, если он не работает
Неудивительно, что вы можете столкнуться со сбоями в работе встроенного в Windows 10 рекордера экрана. Не беспокойтесь, если что-то не работает, попробуйте воспользоваться следующими советами по устранению неполадок.
Сценарий 1: Разрешить микрофон/устройство записи
Ваш отключенный микрофон может быть причиной проблем, с которыми вы сталкиваетесь во время записи. Когда пользователь использует более одного записывающего устройства, некоторые из них отключаются. В этом сценарии описывается, как решить эту проблему:
Шаг 1: Щелкните правой кнопкой мыши значок динамика/громкости на панели задач Windows. Выберите «Записывающие устройства».
Шаг 2: На устройствах записи проверьте, включен ли микрофон/устройство записи. Если он не включен, щелкните его правой кнопкой мыши и выберите «Включить».

Сценарий 2: регулировка уровней микрофона
Во встроенном рекордере экрана есть разные уровни микрофона. Вы можете попробовать настроить уровни и выбрать тот, который вам подходит. Далее мы объясним, как настроить уровни микрофона:
Шаг 1: Щелкните правой кнопкой мыши соответствующее устройство и выберите «Свойства». Теперь нажмите «Записывающие устройства».
Шаг 2: Найдите вкладку «Уровни», и там будут ползунки. Отрегулируйте уровни микрофона, чтобы добиться наилучшего звучания.

Лучшее решение проблемы: получите альтернативу встроенного в Windows 10 рекордера экрана
Иногда, даже если мы перепробовали уже все возможные варианты, ошибки все равно появляются. В этом случае есть альтернатива — iTop Screen Recorder. Он может предоставить инновационный и удобный способ записи экрана на ПК с Windows.
Записывайте видео & аудио с экрана бесплатно
- Записывайте высококачественное видео с экрана вашего ПК, а также звук с системы или устройства ввода синхронно с видео.
- Упростите количество шагов и кликов мыши, для более комфортного использования. Управляйте всем процессом записи без усилий.
- Поддержка вывода в несколько форматов и преобразование с использованием новейших технологий сжатия. Лучшее качество и меньший размер.
У него нет ограничений по времени для записи видео, поэтому с ним можно записывать долго и без каких-либо помех. Его можно использовать и для записи телепередач, историй / роликов в Instagram, игрового процесса на ПК или любых других. На самом деле, есть множество других встроенных в Windows 10 рекордеров экрана, но что делает iTop Screen Recorder исключительным? Далее мы отметим его лучшие и уникальные особенности:
— Гибкий захват экрана: он поддерживает различные области. Вы можете гибко выбрать любую область экрана и начать ее запись.
— Запись фронтальной камеры: он опережает все остальные рекордеры экрана, поскольку также предлагает людям записывать свои лица во время записи. Вы можете использовать эту функцию для онлайн-лекций или игр.
— Одновременная съемка скриншотов и запись экрана: это ломает все технические барьеры. Он позволяет делать скриншоты экрана, пока вы его записываете.
— Запись экрана со звуком: это очень нужно для записи экрана с вашим голосом. Эта функция будет полезна геймерам, блогерам и преподавателям.
Теперь давайте узнаем, как использовать эту альтернативу встроенному в Windows 10 рекордеру экрана.
Шаг 1: Загрузите и установите iTop Screen Recorder на свой ПК с Windows 10.
Шаг 2: Запустите программу, и в интерфейсе по умолчанию отображатся некоторые кнопки настройки записи видео. Сначала можете нажать «Во весь экран», чтобы установить область, которую вы хотите записать, например, окно или область с определенным соотношением сторон. Затем можете включить динамик, микрофон или веб-камеру в соответствии с вашими требованиями.
Более того, вы можете выполнить дополнительные настройки, нажав «Параметры» > «Настройки».
Шаг 3: Нажмите большую красную кнопку REC, и она мгновенно запишет экран вашего ПК с Windows 10.

— iTop Screen Recorder не только предоставляет бесплатный захват экрана, но и работает в последних версиях Windows 10 и Windows 8/7.
— Вот онлайн-рекордер экрана, который поможет вам просто записывать экран и звук без водяных знаков.
Конец
Встроенный в Windows 10 экранный рекордер — Xbox Game Bar приветствуется пользователями Windows 10, особенно геймерами, которым часто требуется запись экрана. Однако некоторые проблемы беспокоят многих пользователей. iTop Screen Recorder — лучшая альтернатива встроенному в Windows 10 рекордеру экрана, он может записывать каждое действие на экране без потери качества видео и звука. Он обеспечивает отличную производительность, благодаря которой вы можете снимать видео без задержек или других проблем. Попробуйте и наслаждайтесь записью на ПК.
Записывайте видео & аудио с экрана бесплатно
- Записывайте высококачественное видео с экрана вашего ПК, а также звук с системы или устройства ввода синхронно с видео.
- Упростите количество шагов и кликов мыши, для более комфортного использования. Управляйте всем процессом записи без усилий.
- Поддержка вывода в несколько форматов и преобразование с использованием новейших технологий сжатия. Лучшее качество и меньший размер.

Nadia Isaev
Nadia Isaev — отличный редактор в команде iTop с богатым опытом работы в области программного обеспечения и информационных технологий. Он предоставит читателям самую свежую и точную информацию о компьютерах и программном обеспечении и ответит на все ваши вопросы о записи экрана.