
Предварительные версии часов в ранних Windows показывали секунды в часах на панели задач, однако от этого решили отказаться, так как постоянное обновление состояние плохо сказывалось на производительности. Однако, функцию можно включить и сейчас.
В этой инструкции подробно о том, как включить показ секунд на часах в панели задач Windows 11 и Windows 10, с помощью редактора реестра или сторонних программ. Также может быть интересным: Как включить показ дня недели в часах Windows.
Параметры панели задач Windows 11
После недавних обновлений Windows 11 опция включения отображения секунд в панели задач появилась в Параметрах. Для её включения достаточно выполнить следующие шаги:
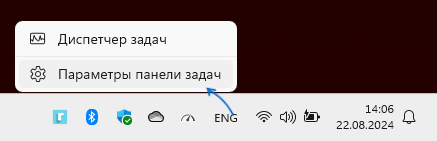
- Нажмите правой кнопкой мыши в пустом месте панели задач, выберите пункт «Параметры панели задач», либо зайдите в Параметры — Персонализация — Панель задач.

- Раскройте раздел «Поведение панели задач» и включите параметр «Показывать секунды на часах на панели задач».

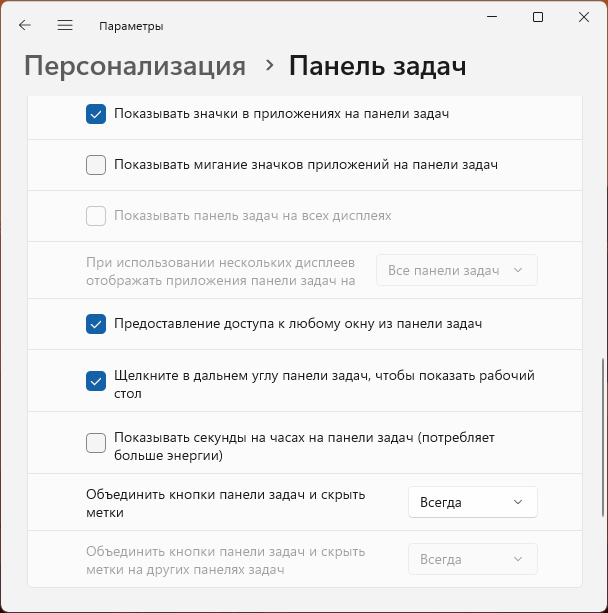
Сразу после этого секунды начнут показываться на часах слева внизу на панели задач.
Учитывайте, что отображение секунд может негативно сказаться на энергопотреблении: это не играет роли для ПК, но может быть важным для ноутбука или планшета с Windows 11.
Включение секунд в часах панели задач в редакторе реестра (только Windows 10)
Способ включения секунд в часах с помощью редактирования реестра подойдёт только для Windows 10 и в Windows 11 работать не будет.
Шаги будут следующими:
- Нажмите правой кнопкой мыши по кнопке «Пуск», выберите пункт «Выполнить», введите regedit и нажмите Enter.
- В редакторе реестра перейдите к разделу
HKEY_CURRENT_USER\Software\Microsoft\Windows\CurrentVersion\Explorer\Advanced
- Нажмите правой кнопкой мыши в пустом месте правой панели редактора реестра (или по «папке» Advanced) и выберите пункт контекстного меню Создать — Параметр DWORD (32-бита, даже для x64 версии Windows). Задайте имя ShowSecondsInSystemClock для этого параметра.
- Дважды нажмите по вновь созданному параметру и укажите значение 1 для него. Сохраните сделанные изменения и закройте редактор реестра.

- Перезапустите проводник (через диспетчер задач) или перезагрузите компьютер, в результате на часах в панели задач появятся секунды:

Сторонние утилиты, позволяющие включить показ секунд в панели задач Windows 11/10
В Windows 11 возможность включения показа секунд на панели задач была отключена, о чем сообщается в блоге разработки Microsoft. В качестве причины называются проблемы с производительностью и необоснованными затратами процессорного времени. Обновление: в Windows 11 последней версии включить показ секунд в Панели задач можно в Параметрах: Параметры — Персонализация — Панель задач — Поведение панели задач — Показывать секунды на часах на панели задач.
Однако, прибегнув к сторонним программам мы можем включить секунды на панели задач и в Windows 11, некоторые из них позволяют включить их и в Windows 10.
ElevenClock
Бесплатная утилита ElevenClock специально предназначена для включения секунд и других настроек часов в панели задач Windows 11. Скачать Eleven Clock можно:
- В Microsoft Store
- На GitHub разработчика
В текущей версии программы полностью поддерживается русский язык (для теста я использовал последнюю версию с GitHub) и, после простого процесса установки секунды в часы будут добавлены автоматически. Также откроется мастер настройки ElevenClock, позволяющий выполнить дополнительную кастомизацию часов:

Основная вкладка мастера, которая вас с большой вероятностью заинтересует — «Формат часов», на которой можно включить или отключить показ секунд, добавить день недели или номер недели.

В любой момент вы можете открыть полные настройки ElevenClock, нажав по часам правой кнопкой мыши и выбрав соответствующий пункт в меню.

Например, может быть полезным изменение расположения и размера или фонового цвета часов: в некоторых случаях они выглядят не вполне «органично», поскольку часы ElevenClock, отображаясь поверх системных часов и перекрывая их, иногда начинают частично перекрывать и другие элементы панели задач.
T-Clock
Текущая версия бесплатной программы T-Clock не поддерживает Windows 11, но работает в Windows 10 и предыдущих версиях системы. Скачать T-Clock можно с GitHub разработчика.
После запуска программы секунды в часах появятся сразу. При желании в главном окне программы вы можете включить автоматический запуск с Windows:

А формат отображения времени и даты в панели задач настраивается на вкладке «Time Format».

Есть в T-Clock и дополнительные функции: начиная от логичных «Будильника» и «Таймера», заканчивая запуском системных утилит и монтированием сетевых дисков: всё это можно найти в контекстном меню часов после запуска утилиты.
Windhawk
Бесплатный модульный твикер Windhawk помимо прочих предлагает модуль «Taskbar Clock Optimization», совместимый как с Windows 11 так и с Windows 10, позволяющий гибко настроить часы в панели задач, в том числе добавить секунды к ним:

Подробнее про программу, её использование и возможности в статье Настройка Windows 11 и Windows 10 с помощью Windhawk
Возможно, вы можете предложить собственные способы добавления секунд к часам в Windows? Будет отлично, если вы поделитесь им в комментариях ниже.
ElevenClock
ElevenClock is free software (under Apache License 2.0) that lets you put a customizable clock on your Windows 11 taskbar(s). When Microsoft created the Windows 11 clock, they removed the ability to make it customizable, and to show it on multiple displays. You can customize ElevenClock however you wish — from adding seconds, to changing its color scheme — and it appears on all the displays
connected to your PC.
You can choose to show or hide the clock with full-screen apps, and what happens when you click, double-click or middle-click it.
Do you want a clock (or two clocks) on each of your displays? You can have them, and customize them independently, or leave them looking like the Windows’ clock… It’s your choice.
ElevenClock is millisecond-accurate, auto-synced with Internet Time… You can even set it to different time zones.
This is ElevenClock’s official repository. If you are searching ElevenClock’s homepage, please refer to https://www.marticliment.com/elevenclock/
Table of contents
- ElevenClock Homepage
- Table of contents
- Installation
- Support the developer
- Features
- Translating ElevenClock
- Currently supported languages
- Screenshots
- Frequently Asked Questions
- Legacy installation
Microsoft store installation:
Alternatively, you can install ElevenClock from Winget or Chocolatey:
winget install ElevenClock --source winget
choco install elevenclock
You can also download ElevenClock from its homepage or from GitHub releases
(See the WIKI for more information)
Support the developer
Features
- Custom time/date format – Add seconds and day of the week, or hide the date and show only
the time. Choose from common presets, or create your own formats. - Custom styling – Change the clock’s size, background color, font family/size/style/color… Or
leave the default style, which mimics your Windows clock. - Custom position, number of clocks – Put the clock anywhere on your display. Add a second
clock and put one on each side of your taskbar, or anywhere you wish. - Custom behaviour – Keep the clock visible over full-screen windows, so you always know what
time it is. Change what happens when you click, double-click or middle-click it. - Auto-sync with Internet time
- Multi-monitor support – Each clock is individually customizable.
Translating ElevenClock to other languages
In order to translate ElevenClock to other languages or to update an old translation, please see Translating ElevenClock — ElevenClock Wiki for more info.
Currently Supported languages
| Language | Translated | Translator(s) |
|---|---|---|
| Arabic — عربي | 67% | |
| Bulgarian — български | 42% | Hristo Vasilev, iconata |
| Bosnian — Bosanski | 5% | |
| Catalan — Català | 100% | marticliment |
| Czech — Čeština | 95% | MatousAdamu, panther7, SunightMC |
| Danish — Dansk | 97% | Carsten Kristoffersen, Sebblich |
| German — Deutsch | 100% | Bikholf, schnurlos, Seeloewen, tsloms, XenoKeks, yrjarv |
| Greek — Ελληνικά | 17% | panos78 |
| English — English | 100% | marticliment |
| Spanish — Español | 100% | marticliment |
| Estonian — eesti | 80% | |
| Persian — فارسی | 5% | |
| Finnish — Suomi | 97% | npsand |
| French — Français | 100% | Lilobast, scrocquesel |
| Hebrew — עִבְרִית | 81% | xRLx |
| Croatian — Hrvatski | 77% | DMNz3 |
| Hungarian — Magyar | 87% | gidano, jstmrby, sympda.blog.hu, viktak.com |
| Indonesian — Bahasa Indonesia | 81% | adinugrahasatya, FahrulID |
| Italian — Italiano | 97% | Parapongo, tuniel-xda, zuidstroopwafel |
| Japanese — 日本語 | 88% | Robot-Inventor, ShintakuNobuhiro |
| Korean — 한국어 | 100% | sinusinu, VᴇɴᴜꜱGɪʀʟ (비너스걸) |
| Lithuanian — Lietuvių | 18% | generic pleb |
| Latvian — Latviski | 67% | Coool, dejelnieks, shadow118 |
| Norwegian (bokmål) | 100% | yrjarv |
| Norwegian (nynorsk) | 100% | yrjarv |
| Dutch — Nederlands | 84% | Bugs, joosthoi1, jordyegnl |
| Polish — Polski | 100% | Fresta, PabloMat |
| Portuguese (Brazil) | 97% | gumbarros, maisondasilva, wanderleihuttel |
| Portuguese (Portugal) | 97% | jmlcoliveira, Miguel Couto |
| Romanian — Română | 80% | |
| Russian — Русский | 100% | Denisskas, kira-lappo, Risen |
| Slovak — Slovenčina | 28% | metmanik |
| Slovene — Slovenščina | 97% | rumplin |
| Serbian — Srpski | 18% | Stefan Marjanov |
| Swedish — Svenska | 97% | cjal95, Noffe, yrjarv |
| Thai — ภาษาไทย | 71% | richeyphu |
| Turkish — Türkçe | 97% | [teknoist-(Mahmut Sözen)](https://github.com/teknoist-(Mahmut Sözen)) |
| Ukranian — Yкраї́нська | 87% | p4rzivalll |
| Vietnamese — Tiếng Việt | 97% | legendsjoon, Leoodz, lequan81, Quochieu0211, tnhung2011 |
| Simplified Chinese (China) | 100% | BoyceLig, CnYeSheng, hlgsdx, jmlcoliveira, sino1641, strombooli |
| Traditional Chinese (Taiwan) | 100% | BoyceLig, CnYeSheng, mmis1000, SiderealArt |
Last updated: Sat Mar 8 00:55:42 2025
Contributors
ElevenClock wouldn’t have been possible with all the help from every single contributor. From the person who fixed a typo to the person who improved half of the code, ElevenClock wouldn’t have been possible without you 
Contributors list

The icon:
ElevenClock’s icon is a collaboration with Xavier Delugo
Screenshots
ElevenClock’s promo media


Frequently asked questions
Q: The clock shows over fullscreen
A: Enable fullscreen hiding in settings
Q: The clock shows over RDP sessions
A: Enable RDP hiding in settings (it may consume more CPU)
Q: Can ElevenClock be in my language?
A: Yes, just take a look at TRANSLATION.md
Q: My antivirus is telling me that ElevenClock is a virus/My antivirus is uninstalling ElevenClock/My browser is blocking ElevenClock download
A: A common reason apps (i.e., executables) get blocked and/or detected as a virus — even when there’s nothing malicious about them, like in the case of ElevenClock — is because they’re not being used by a relatively large amount of people.
Combine that with the fact that you might be downloading something that was recently released, and simply blocking unknown apps is in many cases a good precaution to take in order to prevent actual malware.
Since ElevenClock is open source and safe to use, simply whitelist the app in the settings of your antivirus/browser.
Q: The clock shows seconds when the «Show Seconds» settings is disabled
A: Check that you don’t have seconds set in your regional settings and disable seconds following this article’s instructions (Other guides might not work)
Q: ElevenClock does not show the correct time zone when time zone is changed
A: Just restart ElevenClock (Right-click clock -> Restart ElevenClock)
Q: The main clock does not get modified when enabling seconds, etc.
A: ElevenClock can’t modify or update the main clock due to Windows 11’s restrictions.
Legacy Installation
See the wiki: https://github.com/martinet101/ElevenClock/wiki#elevenclock-installation
Вопрос от пользователя
Здравствуйте.
У меня на панели задач в Windows 10 показывается только время (часы и минуты). Это не совсем удобно и иногда приходится открывать календарик. Не подскажите, как туда добавить текущую дату и день недели (у меня так раньше было в Windows 7).
Здравствуйте!
Да, некоторые версии Windows 10 (11), особенно на ноутбуках (с преднастройками от производителя) могут отображать дату и время нестандартным образом. К счастью, это достаточно легко исправить…
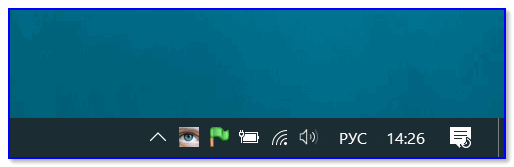
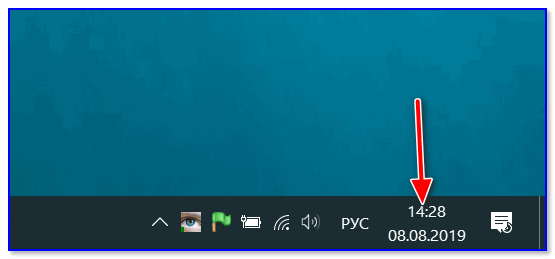
Пример — в трее показывается только время
*
Настройка отображения даты и времени в трее Windows 10/11
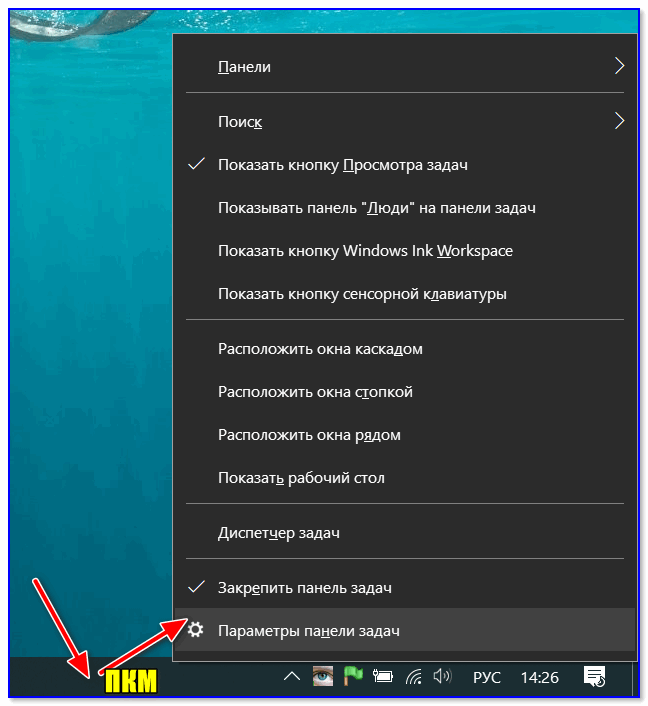
👉 ШАГ 1
1) Кликните правой кнопкой мышки (ПКМ) в любом свободном месте панели задач — в появившемся меню перейдите по «Параметры панели задач».
Параметры панели задач
2) Далее переключите ползунок в режим «Откл.» рядом с пунктом «Использовать маленькие кнопки панели задач» (если он у вас и так отключен — включите и отключите его снова). Пример на скрине ниже. 👇
Примечание: в большинстве версий Windows 11 такого пункта настроек нет и этот момент можно опустить.
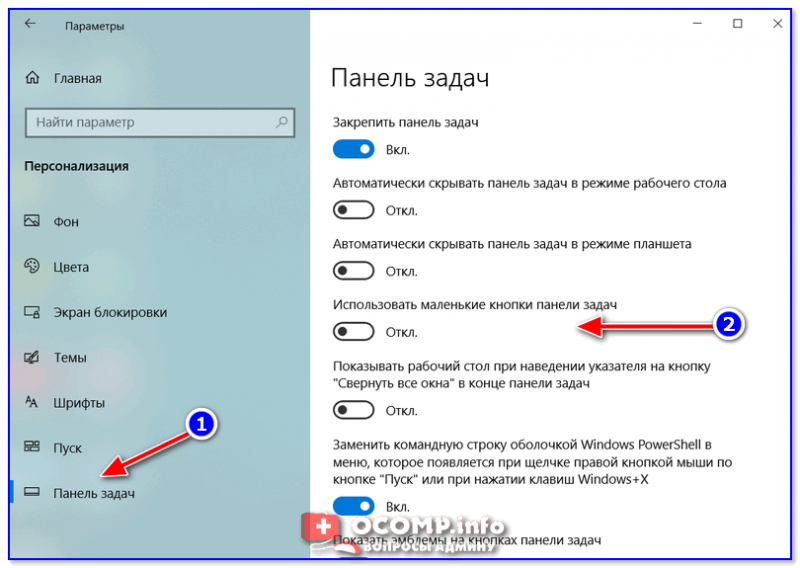
Панель задач — использовать маленькие кнопки панели задач
3) После этого высота строки панели задач должна несколько увеличится, а кроме времени начнет отображаться еще и дата (если, конечно, это не отключено спец. образом в параметрах, но об этом в шаге 2…).
Появилась дата!
*
👉 ШАГ 2
1) Для настройки отображения формата даты и времени в панели управления Windows есть спец. вкладка. Чтобы открыть ее (в любой версии Windows 10/11), нужно:
- нажать сочетание Win+R (появится окно «Выполнить»);
- после использовать команду intl.cpl и нажать OK.
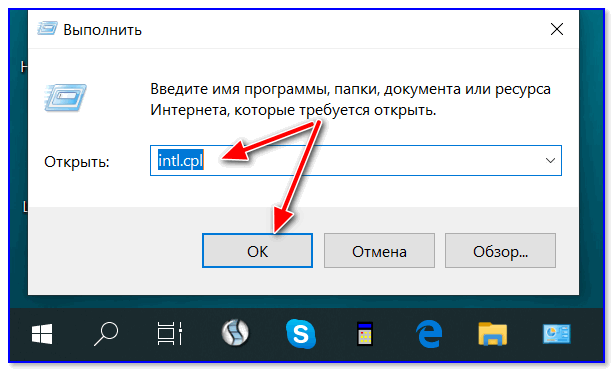
intl.cpl — настройка даты, времени (часового пояса)
2) Затем откроется окно «Регион», в котором можно задать язык интерфейса, время, дату и пр. Откройте доп. параметры, как показано на скрине ниже. 👇
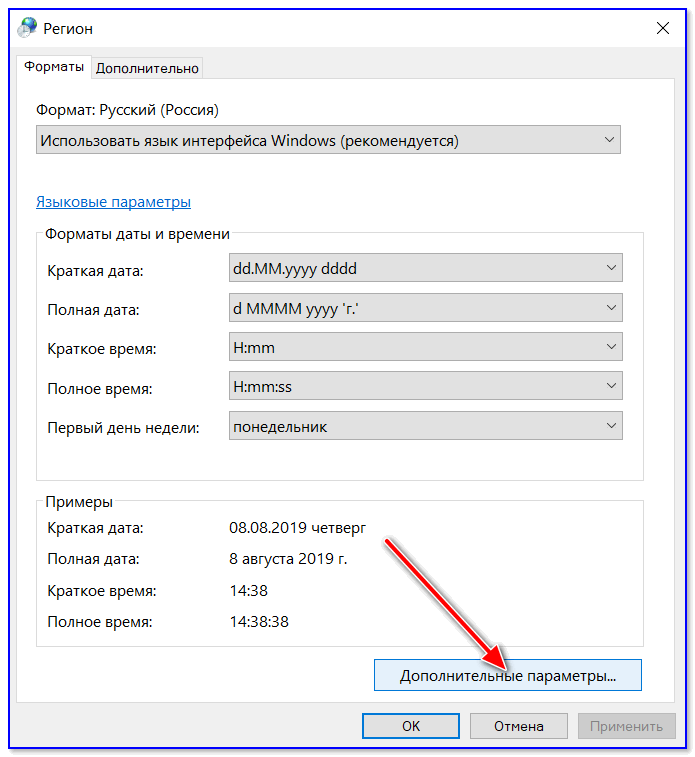
Доп. параметры
Примечание!
Также открыть эти параметры настройки даты и времени можно с помощью 👉 панели управления Windows — вкладка «Часы и регион», см. скрин ниже. 👇
Панель управления — изменить формат даты и времени / Кликабельно
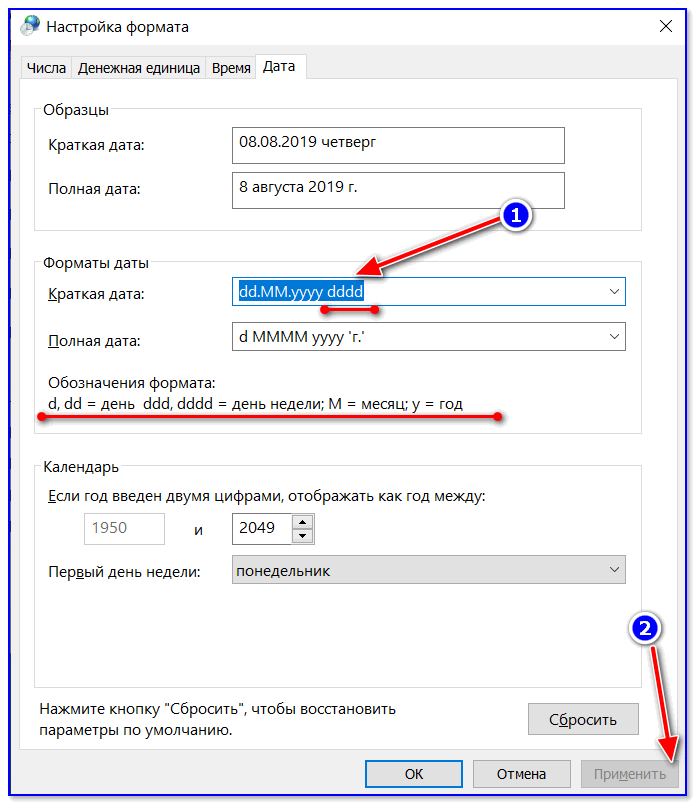
4) Перейдите во вкладку «Дата» и обратите внимание на строку «Краткая дата» (именно от нее зависит то, как будет отображаться дата в трее).
Добавьте в конец строки 4 символа «dddd» и нажмите кнопку «Применить» (как показано на скрине ниже).
Примечание: по умолчанию строка «Краткая дата» использует формат — dd.MM.yyyy
Изменяем формат даты
5) Вы сразу же заметите, как после даты появится еще и день недели. На мой взгляд в нижеприведенном примере дата стала слишком длинной, и я ее немного укорочу ✌…
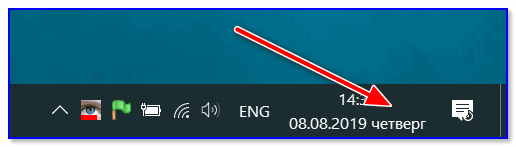
Появился день недели
6) Для этого изменим dd.MM.yyyy dddd на ddd dd.MM.yyyy.
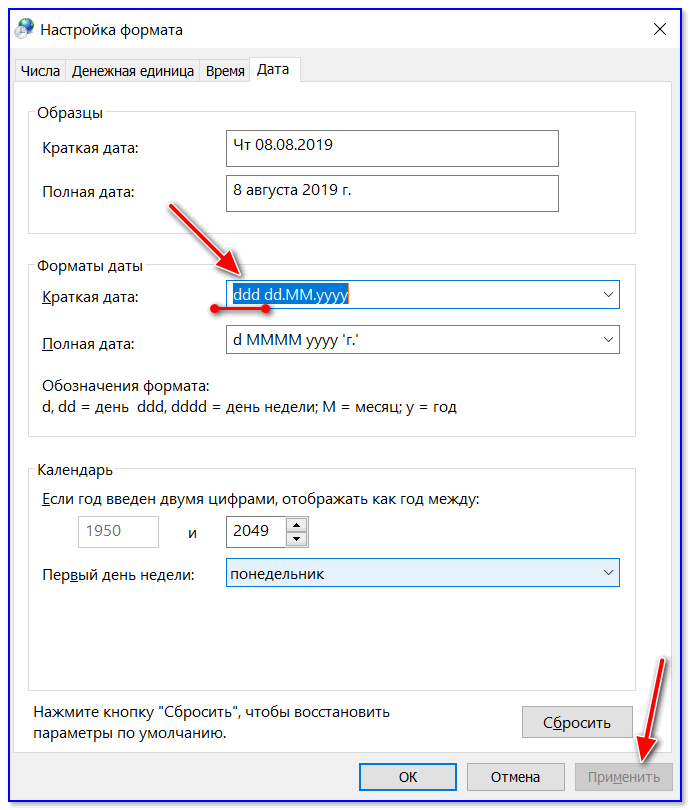
Еще раз меняем формат
7) В результате у нас вместо полного написания дня недели (Четверг) — будет сокращенный вариант (Чт). Пример ниже. 👇

Так-то лучше! // Windows 10
Скрин из Windows 11 — тоже работает!
Таким образом, меняя «эту формулу» вы можете настроить вывод даты в том виде, в котором удобно именно вам!
*
На этом пока все, удачи!
👌
Первая публикация: 11.08.2019
Корректировка: 5.12.2021

This tutorial will show you how to change the taskbar to display time in a 12 or 24 hour clock format for your account in Windows 11.
Time is a measure in which events can be ordered from the past through the present into the future, and also the measure of durations of events and the intervals between them.
The clock on the taskbar system tray displays the system time in a 12 hour clock format by default.
If you like, you can have the taskbar time display in a 24 hour clock format (aka: Military Time).
Contents
- Option One: Change Taskbar Time to 12 or 24 hour Clock Format in Settings
- Option Two: Change Taskbar Time to 12 or 24 hour Clock Format in Control Panel
EXAMPLE: Taskbar time in 12 and 24 hour clock format
Option One
Change Taskbar Time to 12 or 24 hour Clock Format in Settings
1 Open Settings (Win+I).
2 Click/tap on Time & language on the left side, and click/tap on Language & region on the right side. (see screenshot below)

3 Click/tap on Regional format to expand it open, and click/tap on Change formats. (see screenshot below)

4 Perform one of the following actions for the Short time format you want: (see screenshot below)
- Select either the 9:40 AM (default) or 09:40 AM format to use a 12-hour clock.
- Select either the 9:40 or 09:40 format to use a 24-hour clock.

5 You can now close Settings if you like.
Option Two
Change Taskbar Time to 12 or 24 hour Clock Format in Control Panel
1 Open the Control Panel (icons view), and click/tap on the Region icon.
2 Perform one of the following actions for the Short time format you want: (see left screenshot below step 3)
- Select either the h:mm tt (default) or hh:mm tt format to use a 12-hour clock.
- Select either the H:mm or HH:mm format to use a 24-hour clock.
If a time format above you want to use is missing, then click/tap on Additional settings, and use option three in the linked tutorial below to select or manually type in the time format. (see right screenshot below)

Change Time Format in Windows 11
This tutorial will show you how to change the time format used for your account in Windows 11. Your regional format settings will influence how your date/time, numeric, and currency data types appear when you apply formatting options. Windows supports a variety of languages, plus currency and…
www.elevenforum.com
3 Click/tap on OK. (see screenshot below)


4 You can now close the Control Panel if you like.
That’s it,
Shawn Brink
Related Tutorials
- Show or Hide Time and Date on Taskbar System Tray in Windows 11
- Change Time in Windows 11
- Change Time Format in Windows 11
- Change Lock Screen Time to 12 or 24 hour Clock Format in Windows 11
- Add or Remove Additional Clocks for Different Time Zones in Windows 11
- Turn On or Off Show Seconds in System Tray Clock in Windows 11
- Enable or Disable Show Shortened Time and Date on Taskbar in Windows 11
Adding a clock widget to Windows 11 is a straightforward process that will enhance your desktop’s functionality. You’ll need to access the Widgets feature, find the clock, and customize it to your liking. This quick guide will walk you through the steps to seamlessly integrate a clock widget into your Windows 11 desktop.
In this section, we’ll cover the detailed steps to add a clock widget to your Windows 11 desktop. Each step is designed to be easy to follow, ensuring you can complete the task with ease.
Step 1: Open the Widgets Panel
The first step is to open the Widgets panel.
You can do this by clicking the Widgets button on the Taskbar or using the Windows key + W keyboard shortcut.
Step 2: Click on the “Add Widgets” Button
Next, you need to find and click the “Add Widgets” button.
This button is located at the bottom of the Widgets panel and allows you to add new widgets to your collection.
Step 3: Find the Clock Widget
Once you’re in the Add Widgets menu, locate the Clock Widget.
Scroll through the list of available widgets until you find the Clock Widget. This may take a moment as there are various widgets to choose from.
Step 4: Click the Plus (+) Sign
After finding the Clock Widget, click the plus (+) sign next to it.
This action will add the Clock Widget to your Widgets Panel, making it easily accessible.
Step 5: Customize Your Clock Widget
Finally, you’ll want to customize the Clock Widget to suit your needs.
You can do this by clicking on the clock widget in the panel and adjusting settings such as time zone, format, and appearance.
After completing these steps, the Clock Widget will be added to your Widgets Panel, providing you with a convenient way to keep track of the time directly from your desktop.
Tips for How to Add Clock Widget in Windows 11
Here are some extra tips to make sure you get the most out of adding a clock widget to Windows 11:
- Make sure Windows 11 is updated to the latest version for the best widget compatibility.
- Explore other widgets available in the panel; there might be additional tools that suit your needs.
- Customize the position of your widgets in the panel for better accessibility.
- If the Clock Widget is not immediately visible, use the search bar in the Add Widgets menu.
- Check for third-party clock widgets if you need more customization options or unique designs.
Frequently Asked Questions about How to Add Clock Widget in Windows 11
How do I remove a widget from the Widgets panel?
To remove a widget, open the Widgets panel, click on the three dots at the top-right corner of the widget, and select “Remove widget.”
Can I resize the Clock Widget?
As of now, Windows 11 does not offer resizing options for individual widgets in the Widgets panel.
How do I change the time zone on the Clock Widget?
Click on the Clock Widget in the Widgets panel and navigate to the settings to adjust the time zone.
What if the Clock Widget is not showing the correct time?
Ensure your system time settings are correct by going to Settings > Time & Language > Date & Time.
Are there any third-party clock widgets available?
Yes, you can find third-party clock widgets from various developers. These can offer additional customization options and features.
Summary
- Open the Widgets Panel.
- Click on the “Add Widgets” Button.
- Find the Clock Widget.
- Click the Plus (+) Sign.
- Customize Your Clock Widget.
Conclusion
Adding a clock widget to your Windows 11 desktop is a simple yet effective way to enhance your productivity. By following these steps, you can quickly keep track of time without the need to open another app or look at your phone. It’s a small change, but it can make a big difference in how you manage your day. Plus, with added tips and FAQs, you’re well-equipped to troubleshoot and customize the clock widget to fit your needs perfectly. So go ahead and add that clock widget now – it’s time to make your Windows 11 experience even better!
Matthew Burleigh has been writing tech tutorials since 2008. His writing has appeared on dozens of different websites and been read over 50 million times.
After receiving his Bachelor’s and Master’s degrees in Computer Science he spent several years working in IT management for small businesses. However, he now works full time writing content online and creating websites.
His main writing topics include iPhones, Microsoft Office, Google Apps, Android, and Photoshop, but he has also written about many other tech topics as well.
Read his full bio here.