
Table of Contents
If you are a Windows system administrator, you will surely know the importance of the Telnet command in your day-to-day life. As you know, all Windows versions starting with Vista come with the telnet client feature disabled by default. If you want to test the connectivity or reachability to a remote computer, you must enable the Telnet-Client optional Windows feature, or you will look for some alternative command to Telnet.
In this article, you will learn how to use Test-NetConnection cmdlet as an alternative of telnet in PowerShell.
Test a remote TCP port
Launch the PowerShell console and type the following command:
Test-NetConnection -ComputerName techtutsonline.com -Port 443
Where the -ComputerName parameter is used to specify the name (or IP address) of remote computer and -Port parameter is used to specify the TCP port that you want to test the connectivity for. See the following screenshot for reference:

The above command tests the connectivity of your local computer with techtutsonline.com domain name on TCP port 443. By default, it gives you the information about remote server (by doing the name resolution), the name of source interface and it’s IP address.
The TcpTestSucceeded : True in output means the remote server is listening on that port and your system can reach it on that TCP port. If you see TcpTestSucceeded : False, it means something is wrong. Maybe server isn’t listening on that port or your connection attempt is blocked.
If you’re interested in adjusting the information level this command produces, you could add -InformationLevel parameter with either “Quiet” or “Detailed” values.
For instance, to see the test result only, you could use the same command as:
Test-NetConnection -ComputerName techtutsonline.com -Port 443 -InformationLevel Quiet
This command will return only True or False in output. You just saw how to use the Test-NetConnection cmdlet as an alternative of Telnet command. You could even use it as an alternative of Ping command or as an alternative of the Tracert command. Let’s see how.
Test regular Ping connectivity
If you want to test the regular ping connectivity to a remote computer, just omit the -Port parameter and use the command as shown below:
Test-NetConnection -ComputerName techtutsonline.com

This command will return the PingSucceeded and Round Trip Time (RTT) in output. If you are wondering on how to run a continuous ping in PowerShell, checkout this article.
Tracing the Route
One more useful feature offered by Test-NetConnection cmdlet is its built-in ability to trace the route to a remote computer. Remember the tracert command we used for this purpose? Well not anymore, you can use the Test-NetConnection cmdlet for that too. To trace the route just use the following command:
Test-NetConnection techtutsonline.com -TraceRoute
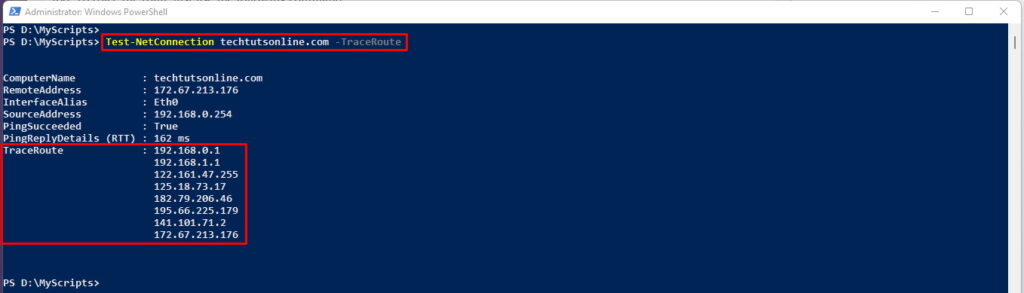
The output isn’t like the one you see in tracert but you get the information about various hops in between and that’s all you need most of the time.
Tip: If you want to be able to use Telnet command in PowerShell exactly as you do in cmd.exe (command prompt), keep on reading the remaining article.
Creating Telnet PowerShell Module
Now that Telnet feature is disabled in every version of Windows but the good news is that every version of Windows comes with PowerShell installed out of the box. So we can create a PowerShell module that will work exactly like traditional Telnet command.
To create the Telnet PowerShell module, follow these steps:
- Launch Windows PowerShell console and run the following command:
-
ise $(New-Item $HOME\Documents\WindowsPowerShell\Modules\Telnet\Telnet.psm1 -Force)
The above command will create a PS module file at predefined location and automatically open that file in PowerShell ISE.
- Now copy the following code, paste it in the PowerShell ISE and press “Ctrl+S” to save the module file.
<#
.Synopsis
Tests the connectivity between two computers on a TCP Port

.Description
The Telnet command tests the connectivity between two computers on a TCP Port. By running this command, you can determine if specific service is running on Server.

.Parameter <ComputerName>
This is a required parameter where you need to specify a computer name which can be localhost or a remote computer

.Parameter <Port>
This is a required parameter where you need to specify a TCP port you want to test connection on.

.Parameter <Timeout>
This is an optional parameter where you can specify the timeout in milli-seconds. Default timeout is 10000ms (10 seconds)

.Example
Telnet -ComputerName DC1 -Port 3389
This command reports if DC1 can be connected on port 3389 which is default port for Remote Desktop Protocol (RDP). By simply running this command, you can check if Remote Desktop is enabled on computer DC1.

.Example
Telnet WebServer 80
This command tells you if WebServer is reachable on Port 80 which is default port for HTTP.

.Example
Get-Content C:\Computers.txt | Telnet -Port 80
This command will take all the computernames from a text file and pipe each computername to Telnet Cmdlet to report if all the computers are accessible on Port 80.
#>
Function Telnet{

    [CmdletBinding()]
    param(
        [Parameter(Mandatory=$true,
                   ValueFromPipeline=$true,
                   ValueFromPipelineByPropertyName=$true)]
        [Alias ('HostName','cn','Host','Computer')]
        [String]$ComputerName='localhost',
        [Parameter(Mandatory=$true,
            ValueFromPipeline=$true,
            ValueFromPipelineByPropertyName=$true)]
        [int32]$Port,
         [int32] $Timeout = 10000
    )

    Begin {}

    Process {
    foreach($Computer in $ComputerName) {
    Try {
          $tcp = New-Object System.Net.Sockets.TcpClient
          $connection = $tcp.BeginConnect($Computer, $Port, $null, $null)
          $connection.AsyncWaitHandle.WaitOne($timeout,$false)  | Out-Null
          if($tcp.Connected -eq $true) {
          Write-Host  "Successfully connected to Host: `"$Computer`" on Port: `"$Port`"" -ForegroundColor Green
      }
      else {
        Write-Host "Could not connect to Host: `"$Computer `" on Port: `"$Port`"" -ForegroundColor Red
      }
    }

    Catch {
            Write-Host "Unknown Error" -ForegroundColor Red
          }

       }

    }
    End {}
}
- At the end of all the steps, your PowerShell module should be available at the location as shown in image below:
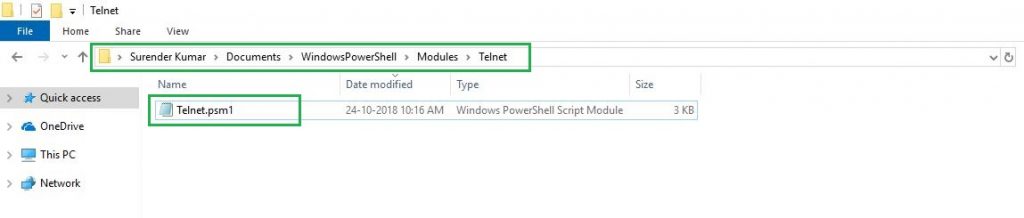
That’s it! Your Telnet PowerShell module is ready. Use can start using it like a traditional telnet command.
- Close the current PowerShell console and open a new one. Type the following command:
Get-Help Telnet -Full
Below is the snapshot of Get-Help Telnet -Full command:
NAME
    Telnet

SYNOPSIS
    Tests the connectivity between two computers on a TCP Port


SYNTAX
    Telnet [-ComputerName] <String> [-Port] <Int32> [[-Timeout] <Int32>] [<CommonParameters>]


DESCRIPTION
    The Telnet command tests the connectivity between two computers on a TCP Port. By running this command, you can determine if specific service is running on
    Server.


PARAMETERS
    -ComputerName <String>

        Required?                    true
        Position?                    1
        Default value                localhost
        Accept pipeline input?       true (ByValue, ByPropertyName)
        Accept wildcard characters?  false

    -Port <Int32>

        Required?                    true
        Position?                    2
        Default value                0
        Accept pipeline input?       true (ByValue, ByPropertyName)
        Accept wildcard characters?  false

    -Timeout <Int32>

        Required?                    false
        Position?                    3
        Default value                10000
        Accept pipeline input?       false
        Accept wildcard characters?  false

    <CommonParameters>
        This cmdlet supports the common parameters: Verbose, Debug,
        ErrorAction, ErrorVariable, WarningAction, WarningVariable,
        OutBuffer, PipelineVariable, and OutVariable. For more information, see
        about_CommonParameters (https:/go.microsoft.com/fwlink/?LinkID=113216).

INPUTS

OUTPUTS

    -------------------------- EXAMPLE 1 --------------------------

    PS C:\>Telnet -ComputerName DC1 -Port 3389

    This command reports if DC1 can be connected on port 3389 which is default port for Remote Desktop Protocol (RDP). By simply running this command, you can check
    if Remote Desktop is enabled on computer DC1.


    -------------------------- EXAMPLE 2 --------------------------

    PS C:\>Telnet WebServer 80

    This command tells you if WebServer is reachable on Port 80 which is default port for HTTP.


    -------------------------- EXAMPLE 3 --------------------------

    PS C:\>Get-Content C:\Computers.txt | Telnet -Port 80

    This command will take all the computernames from a text file and pipe each computername to Telnet Cmdlet to report if all the computers are accessible on Port
    80.

RELATED LINKS
Look! You just created a Windows PowerShell module that will feel and behave exactly like regular cmdlets. You can use parameters like -ComputerName, -Port, -Credential, -Verbose, -ErrorAction etc. which is awesome.
Using Telnet Cmdlet
Now, its time to use our newly created Telnet Module. As shown in examples of cmdlet, you can use the Telnet module in 3 different ways.
First Way:
Telnet -ComputerName techtutsonline.com -Port 80
Successfully connected to techtutsonline.com on Port: 80
Second Way:
Telnet techtutsonline.com 80
Successfully connected to techtutsonline.com on Port: 80
Third Way:
Get-Content D:\Servers.txt | Telnet -Port 80
Successfully connected to WebServer on Port: 80
Could not connect to DC1 on Port: 80
Successfully connected to Linux-Box on Port: 80
Congratulations! Your Telnet module is working as expected. The good thing about this module is that you can use same command that used to work with cmd.exe.
This cmdlet is an ideal way to work on client’s servers where you do not have authority (or you do not want) to enable Telnet-Client Windows feature for any reason.
Introduction
Telnet serves as a protocol that enables users to remotely access and manage other computer systems over the internet or a local network. It has been around for many decades. Also, it is still employed by some systems administrators and network engineers for troubleshooting & configuring network devices.
Telnet is not enabled by default on Windows OS 10 or 11. However, it can easily be enabled by following a few straightforward steps. Under this tutorial, you will get insights into how to enable and install Telnet Windows 10 or 11. Continue reading and get all the details.
What is Telnet and How Does it Work?

As mentioned in the beginning, Telnet refers to a network protocol that permits users to connect to remote computers and devices over the internet or local network. It is employed for remote administration, troubleshooting, and testing of devices & services.
When you begin a Telnet session, the Telnet client application on your computer system designates a connection to the Telnet to Windows server application on the remote device. This connection is typically established over TCP/IP (Transmission Control Protocol/Internet Protocol), which is the standard protocol employed for communication over the Internet.
Once the connection is established, you can communicate with the remote device utilizing a command-line interface provided by the Telnet client application. You can send Telnet commands as well as receive responses from the remote device.
Further, these Telnet commands in Windows can be utilized to perform a variety of tasks like checking the status of services, configuring network settings, or executing commands on the remote device. Also, you must be aware of the fact that Telnet is not a secure protocol & transmits data, including usernames and passwords, in clear text. As a consequence, it is recommended to employ more secure protocols such as SSH (Secure Shell) for remote administration & access.

The below-mentioned are the three different ways with which you can readily enable or install Telnet on Windows. Let’s quickly get a glance at them!
Install Telnet in Windows using Command Prompt
Step 1: Press the Windows key and type “cmd” in the search box.
Step 2: Then, you need to right-click on “Command Prompt” and select “Run as administrator.”
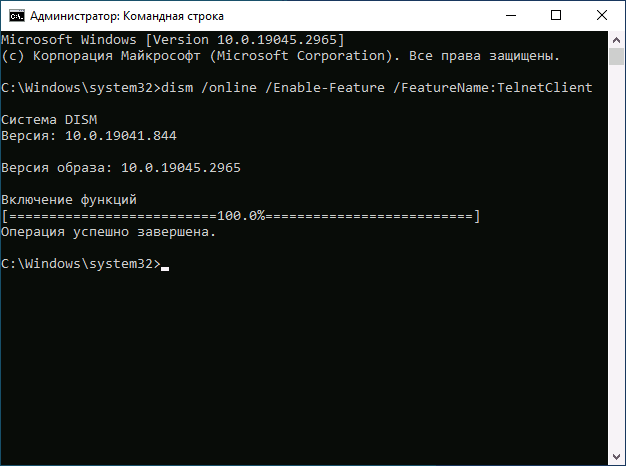
Step 3: In the Command Prompt window, type
"dism /online /Enable-Feature /FeatureName:TelnetClient" and press Enter.
Step 4: The Telnet client will now get installed on your Windows system.
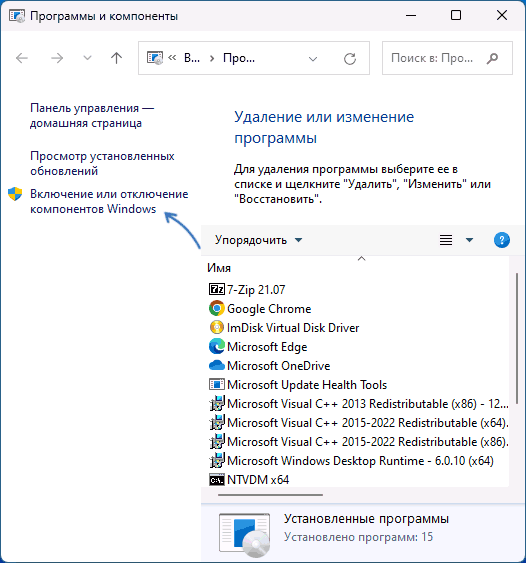
Install Telnet on Windows Using Control Panel
Step 1: Press the Windows key and type “Control Panel” in the search box.
Step 2: Then, you have to search and click on “Control Panel” from the search results.
Step 3: Next, you must click on “Programs” in the Control Panel window.
Step 4: Click on “Turn Windows features on or off.”
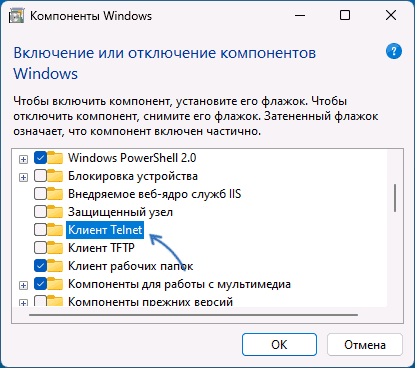
Step 5: In the “Windows Features” window, scroll down and locate “Telnet Client.”
Step 6: Check the box next to “Telnet Client” and click “OK.”
Step 7: Now, by this step, you can enable Telnet on Windows.
Install Telnet with Windows Using Powershell
Step 1: Press the Windows key and type “powershell” in the search box.
Step 2: Then, you have to right-click on “Windows PowerShell” and select “Run as administrator.”
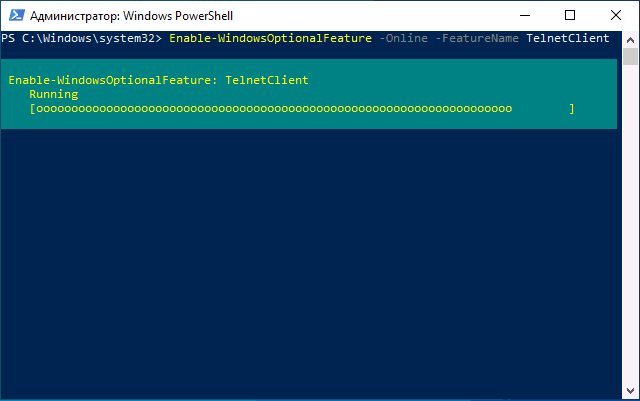
Step 3: In the PowerShell window, type
"Enable-WindowsOptionalFeature -Online -FeatureName TelnetClient" and press Enter.
Step 4: By this step, you will get to enable windows install telnet.
Execute Telnet Command in Windows

To execute the Telnet install command in Windows, you can follow the below-mentioned easy steps:
Step 1: Open the Command Prompt or PowerShell as an administrator.
Step 2: Type “telnet” followed by the IP address or hostname of the remote device you wish to connect to, and then press Enter. For instance, in case you need to connect to a device with IP address 192.168.1.1, you would type “telnet 192.168.1.1” and press Enter.
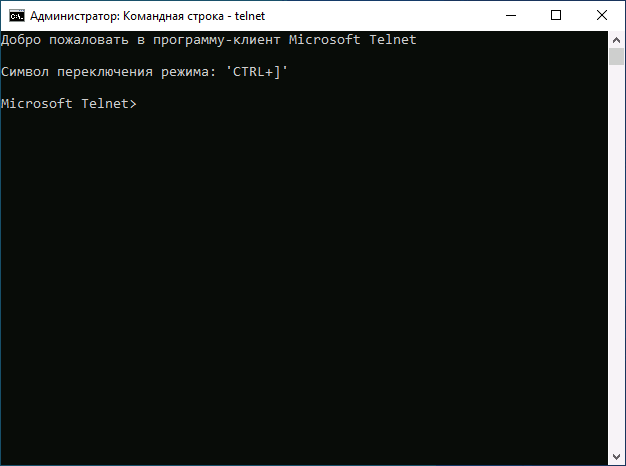
Step 3: If the connection is successful, you will witness a message that says “Microsoft Telnet>”.
Step 4: You can now type Telnet commands to communicate with the remote device. For instance, if you wish to check the status of a service, you can type “status” followed by the name of the service.
Step 5: To exit the Telnet command in Windows, type “exit” and press Enter.
Check Telnet Client Status on Windows

For checking the Telnet client status on Windows, you can follow these steps:
Step 1: Open the Command Prompt or PowerShell as an administrator.
Step 2: Type “telnet” and then, press Enter.
Step 3: In case the Telnet client is installed and running, you will witness a message that says “Welcome to Microsoft Telnet Client” along with the version number.
Step 4: In case the Telnet client is not installed or running, you will witness a message that says “‘Telnet is not recognized as an internal or external command, operable program, or batch file.”
Step 5: You can also inspect the status of the Telnet client by entering the following command in PowerShell.
"Get-WindowsCapability -Name Telnet.Client*" If the Telnet client is installed as well as enabled, you will see “State : Installed.” If it is not yet installed, you will witness “State : NotPresent.” Moreover, if it is installed but disabled, you will see “State : InstalledPendingReboot.”
Summing Up
Enable Telnet Windows 10 or 11 is a simple and quick procedure. It can be done in just a few steps. While Telnet is not utilized as much as it once was, it can still be an extremely helpful tool for managing network devices as well as troubleshooting connectivity issues.
By following the steps outlined in this tutorial, you can quickly enable or install Telnet for Windows and start employing it to administer your network infrastructure. However, you must note that Telnet is an unencrypted protocol. So, it can potentially disclose sensitive information to eavesdropping. Thus, you must take suitable security standards when utilizing it over a network.
Despite the vulnerability issues, Telnet is widely used as a client-server protocol by Windows 10 users. However, it is primarily used for initial network hardware configuration, remote access, port testing, port forwarding, and other tasks that don’t involve sensitive information transfer.
To install, uninstall, and open Telnet on Windows 10, follow these steps:-
Installing Telnet on Windows 10:-
Step 1. First, open Control Panel.
Step 2. Set the “View by” to Category.
Step 3. Then, click on “Programs” and then “Programs and Features.”
Step 4. Next, click on “Turn Windows features on or off” on the left-hand side.
Step 5. In the pop-up window, check the box next to “Telnet Client” and click “OK.”
That’s it. Wait for the installation process to complete.
Uninstalling Telnet on Windows 10:-
Step 1. First, open Control Panel.
Step 2. Then, click on “Programs” and then “Programs and Features.”
Step 3. Next, click on “Turn Windows features on or off” on the left-hand side.
Step 4. Here, uncheck the box next to “Telnet Client.”
Opening Telnet on Windows 10:-
Step 1. First, click on the Start button and type “Telnet.”
Step 2. Then, click on the Telnet app that appears in the search results.
Step 3. In the Telnet window, type the IP address or hostname of the server you want to connect to, followed by the port number.
Step 4. Then, press the Enter key to establish the Telnet connection.
By following these steps, you can easily install, uninstall, and open Telnet on your Windows 10 computer.
,
If you want to use Telnet in Windows 10/11, continue reading below to learn how to install it.
Telnet is an network protocol used on the Internet or local area network to provide a bidirectional communication between machines. On Windows, Mac and Unix systems, «telnet» is a command-line client utility that uses the Telnet protocol to remotely connect to other machines (usually servers) and perform various tasks on them. (e.g to add/remove users, to edit server’s files and configuration, etc..)
In Windows 11/10/8/7 OS the Telnet client is included, but for security reasons is disabled by default, because Telnet is not a secure protocol. (Telnet is unencrypted and anyone who monitors the user’s connection can see anything typed in Telnet session in plaintext).
How to Enable Telnet Client in Windows 11/10.
Method 1. Install Telnet client using a command.
1. Press simultaneously the Windows + R keys to open the run command box.
2. Type pkgmgr /iu:»TelnetClient» and hit Enter.
Method 2. Enable Telnet Client from Windows features.
1. Press simultaneously the Windows + R keys to open the run command box.
2. Type control appwiz.cpl to open Programs and features in Control panel.
3. Click Turn Windows features on or off.

4. Check the Telnet Client and hit OK. *
* Note: If you watt to remove Telnet Client after finishing your job, just uncheck ‘Telnet Client’ in Windows features and click OK.

Method 3. Install Telnet Client with DISM.
1 Open PowerShell as Administrator. To do that:
-
- Click the Start menu and type powershell in the search box
- Click Run as administrator.

2. In Windows PowerShell give the following DISM command to install the telnet client in Windows 10/11:
- Dism /Online /Enable-feature /FeatureName:TelnetClient

That’s all folks! Did it work for you?
Please leave a comment in the comment section below or even better: like and share this blog post in the social networks to help spread the word about this problem.
If this article was useful for you, please consider supporting us by making a donation. Even $1 can a make a huge difference for us.
- Author
- Recent Posts
Konstantinos is the founder and administrator of Repairwin.com. Since 1995 he works and provides IT support as a computer and network expert to individuals and large companies. He is specialized in solving problems related to Windows or other Microsoft products (Windows Server, Office, Microsoft 365, etc.).
Несмотря на то, что Telnet протокол уже редко используется, что связано с отсутствием шифрования и проверки подлинности данных, у некоторых пользователей могут возникать задачи, требующие подключения с использованием клиента Telnet.
В Windows 11 и Windows 10 клиент для Telnet протокола присутствует, но отключен по умолчанию. При необходимости его можно включить одним из способов, описанных далее.
Компоненты Windows
Клиент Telnet — один из дополнительных компонентов Windows, который может быть включен, как и другие такие компоненты:
- Нажмите клавиши Win+R на клавиатуре (либо нажмите правой кнопкой мыши по кнопке «Пуск» и выберите пункт «Выполнить»), введите appwiz.cpl и нажмите Enter.
- В открывшемся окне в панели слева нажмите по пункту «Включение или отключение компонентов Windows».

- Отметьте «Клиент Telnet» в списке доступных компонентов и нажмите «Ок».

Останется дождаться, когда клиент Telnet будет установлен.
Для начала использования достаточно будет запустить командную строку, ввести команду telnet и нажать Enter.
Командная строка
Вы можете включить Telnet в командной строке, установив компонент с помощью DISM:
- Запустите командную строку от имени администратора.
- Введите команду
dism /online /Enable-Feature /FeatureName:TelnetClient
и нажмите Enter.

- Дождитесь завершения установки компонента.
Windows PowerShell
Включить компонент можно и в PowerShell: запустите Windows PowerShell или Терминал Windows от имени администратора, сделать это можно в контекстном меню кнопки «Пуск», после чего введите команду:
Enable-WindowsOptionalFeature -Online -FeatureName TelnetClient
и нажмите Enter. Через короткое время клиент Telnet будет установлен на вашем компьютере.
Завершая статью, поинтересуюсь: для какой цели вам потребовался именно Telnet клиент в наше время SSH, шифрования и защищенных протоколов? Будет отлично, если вы сможете поделиться этим в комментариях.