
Table of Contents
- Part #1: Download Server 2022 ISO File
- Part #2-1: Burn Server 2022 ISO to USB and Make Bootable USB Using Rufus
- Part #2-2: Burn Server 2022 ISO to USB Using DiskPart Command
- Part #3: Install Server 2022 from USB
Part 1: Download Microsoft Server 2022 ISO
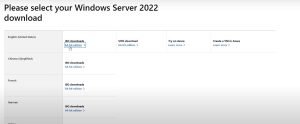
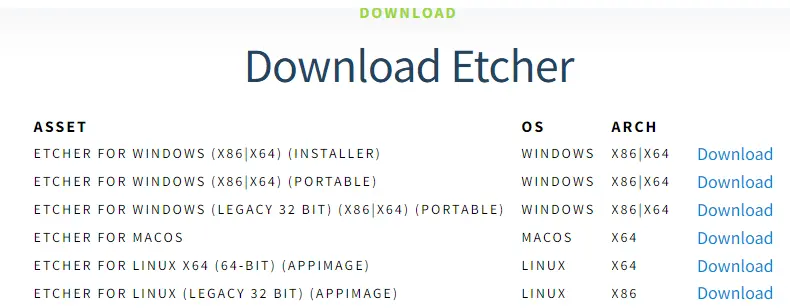
Download the Server 2022 ISO (64-bit) from the official Microsoft site:
http://www.microsoft.com/en-us/evalcenter/download-windows-server-2022
(64-bit version available, with multiple languages supported.)
Question: Is there a Hyper-V Server 2022 ISO available for download?
Microsoft has announced that Hyper-V Server 2019 will be the last edition of Hyper-V Server, which will be discontinued in 2029. Therefore, there is no Hyper-V Server 2022 ISO available from Microsoft.
Option: Server 2022 Azure Stack HCI is recommended by Microsoft as the successor to Hyper-V Server 2019, but it requires a $10 monthly subscription fee.
To download the SQL Server 2022 ISO, visit: https://www.microsoft.com/en-us/evalcenter/download-sql-server-2022
To download the Dell Server 2022 ISO:
https://www.dell.com/support/manuals/en-us/microsoft-windows-server-2022/win2022_ig_pub/introduction
Part 2: Burn ISO File to Bootable USB Using Rufus
The following video demonstrates how to burn the Windows Server 2022 ISO file to a bootable USB using Rufus, a professional bootable USB creator:
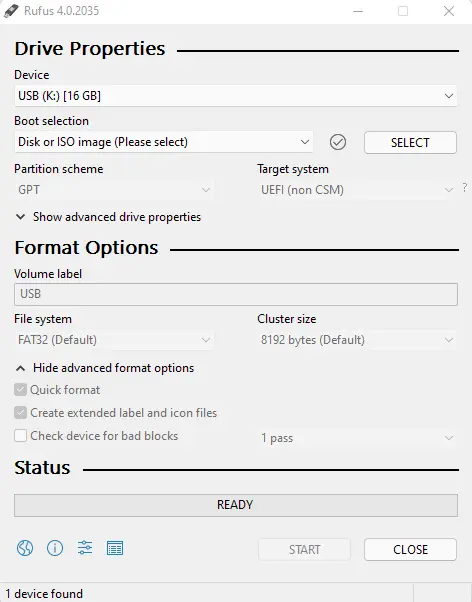
To burn the Windows Server 2022 ISO file to a bootable USB using Rufus, follow these simple steps:
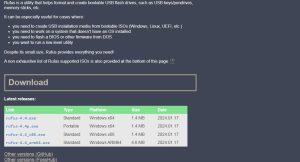
- Download Rufus: Visit the Rufus website (https://rufus.ie/) and download the latest version of Rufus compatible with your operating system.
- Obtain the Windows Server 2022 ISO file: Ensure you have the ISO file for Windows Server 2022. You can download it from the Microsoft website or obtain it from a trusted source.
- Connect the USB Drive: Plug in your USB flash drive into an available USB port on your computer. Make sure the USB drive does not contain important data, as it will be formatted during the process.
- Run Rufus: Launch Rufus by double-clicking the downloaded executable file.
- Select the USB Drive: In Rufus, under the «Device» section, select the USB drive you connected from the dropdown menu.
- Choose the Partition Scheme and Target System Type: Under the «Partition Scheme» section, select «MBR» if your computer uses BIOS, or «GPT» if it uses UEFI. For the «Target System» option, select either «BIOS (or UEFI-CSM)» or «UEFI,» depending on your computer’s firmware.
- Select the Windows Server 2022 ISO: Click the «Select» button next to the «Boot Selection» field, then navigate to the location where you saved the Windows Server 2022 ISO file. Select the ISO file and click «Open.»
- Configure Rufus Settings: Leave the other settings in Rufus as default unless you have specific requirements. You may want to change the «Volume Label» field to give your bootable USB a name.
- Start the Process: Once you’ve verified the settings, click the «Start» button to begin. Rufus will display a warning about data loss on the USB drive. Ensure you’ve backed up any important data on the USB drive before proceeding. Click «OK» to continue.
- Wait for the Process to Complete: Rufus will format the USB drive, copy the Windows Server 2022 ISO contents, and make it bootable. This may take a few minutes, so be patient.
- Eject the USB Drive: Once Rufus completes the process, you will see a «READY» message. Safely eject the USB drive from your computer.
Now, you have successfully burned the Windows Server 2022 ISO file onto a bootable USB drive using Rufus. You can use this USB drive to install or boot Windows Server 2022 on a compatible computer.
Part 2-2: Burn Server 2022 to USB Using DiskPart Command (Optional)
Preparations: A USB drive larger than 8GB and the ISO file already downloaded.
Note: Please back up any important data from the USB drive before proceeding, as the process will erase all data on it.
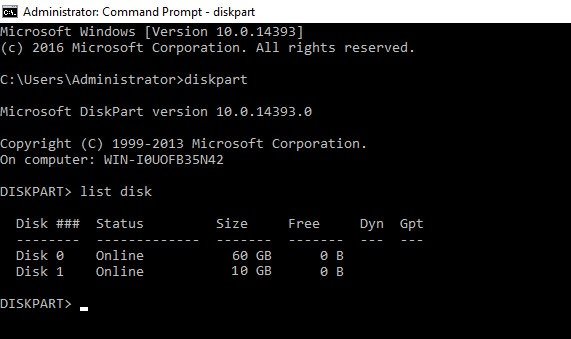
Step 1: Type «cmd» in the search bar, or press Win+X or right-click the Start icon on your computer. Then, select «Run as Administrator» to open the Command Prompt with admin privileges.
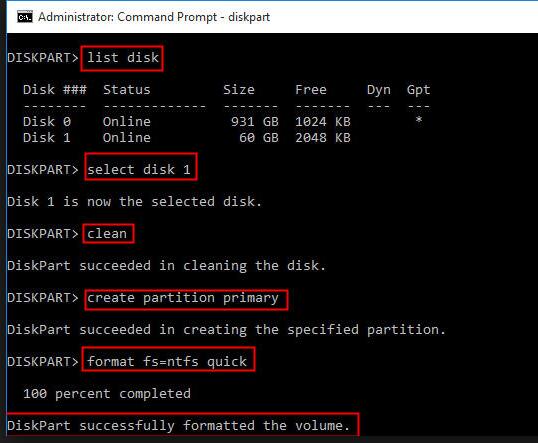
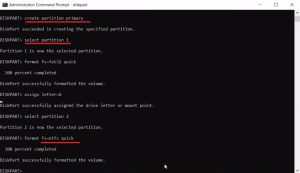
Step 2: Type «diskpart» and press Enter, then use the following commands:
• list disk
• select disk x (“x” is the number of the USB drive)
• clean
• create partition primary
• format fs=ntfs quick
• active
• exit
After exiting DiskPart, do not close the Command Prompt window. Next, locate the Windows Server setup ISO file on your computer and double-click it to mount the ISO.
Type the following commands (or copy and paste them) into the Command Prompt, ensuring that you use the correct drive letters, and hit «Enter»:
• xcopy D:\*.* E: /s/e/f (D: is the ISO image drive, and E: is the USB drive letter)
• D:\Boot\Bootsect /NT60 E: /force /mbr
- ★Note:
- You may receive a message such as «File creation error — the parameter is incorrect» or «The install.wim is too large.» This happens due to the FAT32 file system’s limitations. To solve this, you can split the WIM file into smaller files using the following command:
dism /Split-Image /ImageFile:h:\sources\install.wim /SWMFile:r:\sources\install.swm /FileSize:4096.
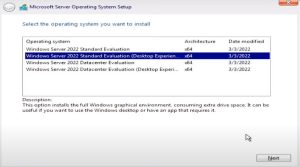
Part 3: Install Server 2022 from USB
This video demonstrates how to install Windows Server 2022 from a USB drive.
To install Windows Server 2022 from a USB drive, follow these steps:
- Insert the bootable USB: Connect the USB drive containing the Windows Server 2022 installation files to a USB port on the target server.
- Start the server: Power on or restart the server and access its BIOS or UEFI settings. The key to access BIOS/UEFI may vary depending on the manufacturer (common keys include F2, F10, Delete, or Esc). Check the server’s documentation or look for on-screen prompts during boot to find the correct key.
- Configure the boot order: In the BIOS/UEFI settings, navigate to the «Boot» or «Boot Order» section. Set the USB drive as the primary boot device, or prioritize it above other devices. Save changes and exit BIOS/UEFI.
- Start the Windows Server installation: The server will now boot from the USB drive and begin the installation process. Wait for the Windows Setup screen to appear.
- Select language, time, and keyboard options: Choose your preferred language, time format, and keyboard layout. Click «Next» to proceed.
- Click «Install Now»: On the next screen, click the «Install Now» button to begin the installation process.
- Enter the product key: If prompted, enter your Windows Server 2022 product key. Click «Next» to continue. If you don’t have a product key, you can still proceed with a trial version by skipping this step.
- Accept the license terms: Read and accept the license terms by checking the box. Click «Next» to proceed.
- Choose the installation type: Select the type of installation: «Upgrade» (if upgrading from a previous version) or «Custom» (for a clean installation). Choose «Custom» for a fresh installation.
- Select the installation location: If you chose «Custom,» you’ll need to select the disk and partition where Windows Server 2022 will be installed. Select the desired disk/partition and click «Next.» You can create, format, or delete partitions if needed.
- Wait for the installation: Windows Server 2022 will now be installed onto the selected disk/partition. The process may take some time, so be patient.
- Set up the initial configuration: After installation, the server will restart. Follow the on-screen prompts to configure the region, administrator password, and network settings.
- Complete the setup: Once the initial configuration is complete, Windows Server 2022 will start, and you’ll be logged into the desktop. Proceed with any additional configuration or customization as needed.
Congratulations! You have successfully installed Windows Server 2022 from a USB drive. You can now begin using and configuring the server according to your requirements.
Resource: How to create a Windows bootable USB for UEFI-based systems
How to create a Windows bootable USB for UEFI-based systems
Possible Error and Fixes:
Error: «Windows cannot be installed to this disk 0 partition 1»
1. Press and hold Shift+F10 to open the Command Prompt window.

2. Type diskpart and press Enter to execute.

3. Enter DISKPART command mode, then type list disk to display the current disk information.

4. To format disk 0, type select disk 0, press Enter, then type clean to delete the disk partition.

5. To convert the disk, type convert mbr to convert to MBR, or convert gpt to convert to GPT.

6. Finally, type exit to close the Command Prompt and return to the installation screen to continue with the installation.

7. Click New Disk to install the driver.
Also read: How to install Server 2022
How to Resize or Move Partitions on Server 2022
- How to delete the recovery partition on Server 2022?
- How to move a partition without losing data on Server 2022?
- How to resize a partition without losing data on Server 2022?
You can use the following tool to safely manage your disk, including resizing partitions, moving the recovery partition, deleting partitions, and more—without losing data.
Here’s a video that shows how to move partitions safely:
Sometimes specialists and system administrators are faced with the task of installing Windows Server 2022 on one or more machines. To solve this problem, you will need reliable bootable media to quickly deploy systems. This instruction is not necessarily useful only to IT workers. One way or another, if you are faced with the task of installing Windows Server 2022, we will try to explain step by step and clearly how to create a bootable USB drive required to install the operating system on the server. We will break everything down into several stages (steps): from preparing the necessary devices and programs to starting the installation of the operating system.
Preparing the necessary tools
Before you begin, make sure you have a free USB drive with at least 8 GB of capacity. By the way, you can use any external drive to solve this problem. Next, you will need to download the official image of Windows Server 2022 from the Microsoft website.
We will also need the Rufus program to create a system image on the drive, or if you have experience, you may be more familiar with this task using Diskpart (a Windows console system program).Both options lead to the same result, it’s just that in the case of Rufus the process will be accompanied by a more friendly interface. But sometimes it happens that instead of an operating system, you only have the command line at hand. In any case, we will look at both methods.
If you choose rufus, you need to go to their website and download the latest version of the program.
Formatting USB and burning Windows Server 2022 distribution to a USB drive
While the distribution and program are loading, connect the USB to your PC. Make sure that your important files are not there – make a copy of them, because we will need a completely empty flash drive. Once you are ready to start formatting, right-click on the usb icon and select “Format” from the context menu. Before starting the formatting process, change the file system type to NTFS, as the FAT32 file system does not support files larger than 4 GB. Click the “Start” button and wait for the result.
Create a bootable USB using Rufus
We use the Rufus tool to burn an ISO image of Windows Server 2022 to a flash drive. This free app makes it easy to create a bootable disk. In the Rufus interface, select our USB, load the downloaded ISO image and click “Start”. It is important to select the image recording mode in “DD”. Once the process is complete, Rufus will show a message indicating that the USB drive is ready. You can now safely remove the USB and use it to install Windows Server 2022 on your desired machine.
Create a bootable USB using Diskpart
Diskpart is a console system program included in Windows through which you can manage disks, partitions and volumes by directly entering commands.
To create a boot entry on a USB drive using the Diskpart utility, you will need to run a series of commands.
- Open a command prompt with administrator rights.
- Type diskpart and press Enter to start using the Diskpart utility.
- Enter list disk command to display a list of all available disks.
- Find your USB disk number in the list and enter select disk X command, replacing X with the number of your USB disk.
- Enter the clean command to delete all data on the selected drive.
- To create a new primary partition, use create partition primary command.
- Next, enter select partition 1 command to focus on the partition you just created.
8. To format the partition in NTFS, enter format fs=ntfs quick .
9. Finally, enter the active command to make the partition bootable.
After completing these steps, your USB drive will be prepared and activated as bootable. You can close the Diskpart utility by entering the exit command.
Please be careful when using Diskpart, as this powerful tool can erase data from any drive you access. Always make sure you select the correct drive before running the clean command.
Once you have formatted the flash drive, you need to transfer the Windows Server 2022 distribution files to it. To do this, write list volume to display a list of volumes on all connected media and determine the letter or volume number of the flash drive and run the command select volume Y , where Y is this is the letter or number of the desired volume. After selecting the volume, you can exit Diskpart by typing exit .
It should be noted that the Diskpart utility itself is not capable of copying files; it is designed to manage disks and partitions. To copy files to a flash drive, you can use regular Windows Explorer or the copy command in the command line.
For example, after preparing a flash drive using Diskpart, in the command line you can use the following command to copy file: copy C:\windowsserver2022.iso E:
Here copy C:\windowsserver2022.iso E: should be replaced with the path to the file you want to copy, and `E:` with the letter of the assigned flash drive volume.
Installing the distribution from a flash drive
Once your USB drive is ready, insert it ino the machine’s USB port and reboot it. Enter BIOS or UEFI mode and set the USB boot priority.
If you did everything correctly, you will see the installation start welcome window. Select the desired configuration and begin installation. All that’s left is to wait a little. You have successfully created a bootable USB flash drive for Windows Server 2022 and installed the server operating system from it on your hardware. Remember that accuracy and attentiveness in this process is the key to successful installation and further stable operation of your server.
Post Views: 3,082
Конечно, что самый простой и интуитивный способ создать загрузочную USB флешку для установки Windows Server 2016 на физический сервер – воспользоваться утилитой Windows USB/DVD Download Tool. Данная утилита позволяет записать имеющийся *.iso образ Windows на USB флешку/диск и сделать его загрузочным. Однако, она форматирует флешку в файловую систему NTFS, загрузка с которой не поддерживается на UEFI системах и пригодна такая флешка только для установки Windows только на BIOS системах. В данной статье мы покажем, как без использования сторонних утилит создать установочную флешку с дистрибутивом Windows Server 2016.
Примечание. В отличии BIOS систем, которые могут загрузиться с загрузочных разделов с файловыми системам FAT, FAT32, exFAT или NTFS, UEFI системы могут загрузится только с загрузчика, находящегося на диске, отформатированном в ФС FAT32.
В зависимости от архитектуры сервера UEFI / BIOS нужно воспользоваться одним из следующих способов создания установочной флешки.
Содержание:
- Установочная USB флешка для UEFI системы
- Установочная флешка c таблицей разделов MBR для BIOS и UEFI архитектур
- Размер файла Install.wim более 4 Гб
Важно. При выполнении данной инструкции нужно быть внимательным, проверять пути к дискам и номера дисков, в противном случае, можно случайно отформатировать диск с данными. USB флешка будет отформатирована в любом случае, и данные на ней удалены.
Установочная USB флешка для UEFI системы
В том случае, если флешка будет использоваться для загрузки и установки Windows Server 2016 на сервере с поддержкой UEFI, на загрузочную флешку накладываются следующие требования:
- Минимальный размер USB флешки – 8 Гб
- Тип таблицы разделов флешки – GPT
- Файловая системе — FAT32
Итак, подключите USB флешку к компьютеру (в нашем примере это ПК с Windows 10), откройте командную строку с правами администратора, выполните команду DISKPART, в контексте которой выполните следующие команды:
list disk
Выведем список дисков, моем случае USB флешка имеет номер диска 1. Выберем ее.
select disk 1
Очистим содержимое флешки.
clean
Преобразуем таблицу разделов в GPT:
convert gpt
Создадим новый раздел (размер не должен превышать 16 Гб):
create partition primary
Совет. Если размер USB флешки более чем 16 Гб, нужно создать раздел, размером до 16Гб:
create partition primary size=16000
Отформатируем раздел в ФС FAT32:
format fs=FAT32 quick
Назначим новому разделу букву диска:
assign letter=M
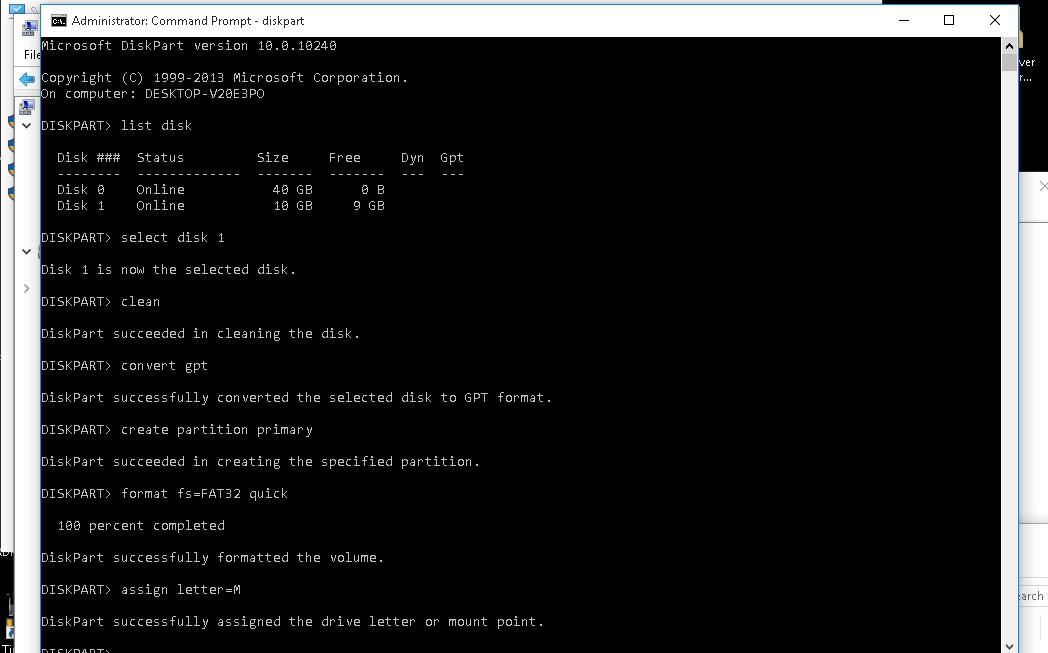
Осталось завершить сеанс diskpart:
exit
Скопируем файлы дистрибутива со смонтированного iso образа Windows Server 2016 на флешку (предполагаем, что iso образ смонтирован с буквой диска E:\).
xcopy e:\* m:\ /H /F /E
Установочная флешка c таблицей разделов MBR для BIOS и UEFI архитектур
Возможно создать установочную флешку с Windows Server 2016 с таблицей разделов MBR для BIOS и UEFI системе. К USB драйву предъявляются следующие требования:
- Минимальный размер USB флешки – 8 Гб
- Тип таблицы разделов– MBR
- Файловая системе — FAT32
Также запустите сессию diskpart и последовательно выполните команды:
Список дисков в системе:
list disk
Выбираем USB диск (в моем примере, Disk 1):
select disk 1
Очистим диск:
clean
Создадим новый раздел размером не более 16 Гб. Если размер флешки меньше 16 Гб:
create partition primary
Если больше:
create partition primary size=16000
Отформатируем флешку в файловой системе FAT32:
format fs=FAT32 quick
Сделаем раздел активным и назначим букву диска M:
active
assign letter=M

Завершим работу diskpart командой exit и скопируем файлы дистрибутива на флешку:
xcopy e:\* m:\ /H /F /E
Размер файла Install.wim более 4 Гб
В том случае, если размер файла Install.wim более 4Гб, скопировать такой файл на флешку не получится, т.к. максимальный размер файла на файловой системе ограничен 4 Гб. В данной ситуации придется разбить wim файл на несколько более мелких файлов с помощью DISM:
dism /Split-Image /ImageFile:e:\sources\install.wim /SWMFile:m:\sources\install.swm /FileSize:4096
This article describes how you can create Server 2022 bootable USB media to install Windows Server 2022 on a workstation. It depends on the system; you can install it on a UEFI-based system or on a BIOS system, which is a little different since BIOS will use an MBR disk and UEFI will use a GPT disk. Here is how you create a Windows Server 2022 USB drive for installation.
Before you start the installation of Server 2022 on the physical system,. Windows server boot media comes in two forms: as a USB drive or a CD/DVD drive. These days, the majority of modern server hardware comes without a CD/DVD drive
Get the Windows Server 2022 ISO File
If you do not have a Windows Server 2022 ISO image, you can download it from Microsoft’s website.
Create Server 2022 Bootable USB
Before starting the burning process, you will need a USB drive with at least 16GB. It will erase the whole data on the USB during the creation process. So first, make sure any important data is backed up. I am using the Windows 11 operating system to create a server bootable USB drive. Insert your USB drive into your computer, and then follow the below steps.
Create a Bootable USB using Rufus
Download the Rufus tool. Rufus is a standalone tool, and it doesn’t require any installation.
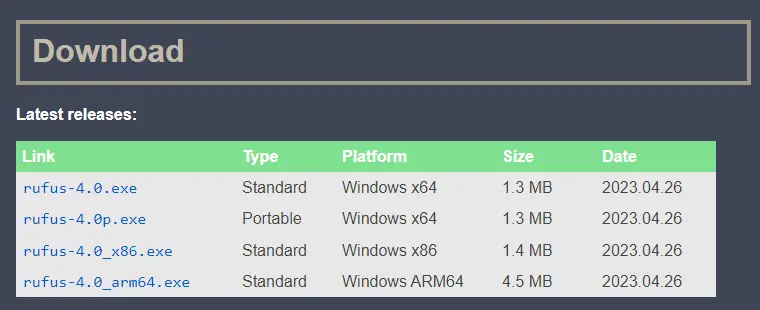
After downloading Rufus, run the Rufus setup file.
Under the Device menu, choose your USB drive if it isn’t detected automatically.
In the boot selection menu, click on the SELECT button to select the Windows Server ISO image
Select the server ISO image and then choose Open.
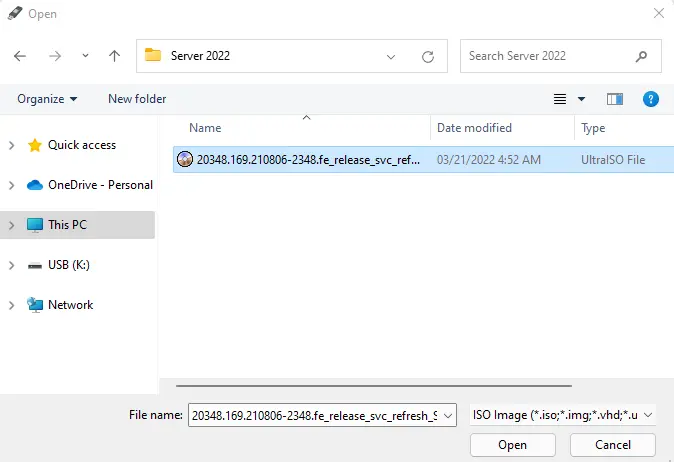
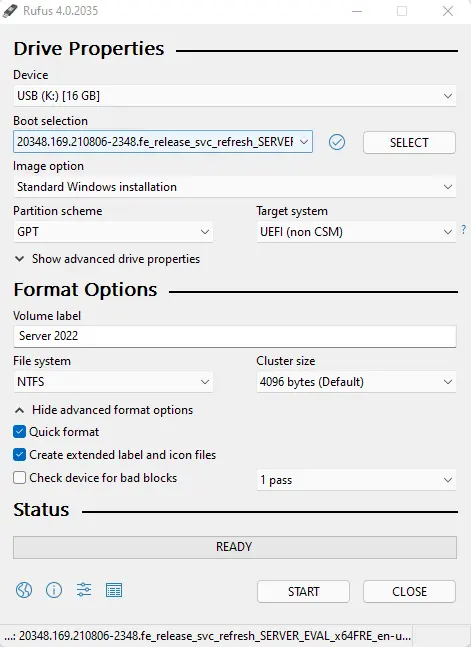
Image option: Standard Windows installation.
Partition scheme: GPT.
Target system: UEFI
Volume label: Server 2022
File system: NTFS
Advanced format: choose “Quick format”, create a volume label.
Click on the Start button, and then confirm to erase the flash drive.
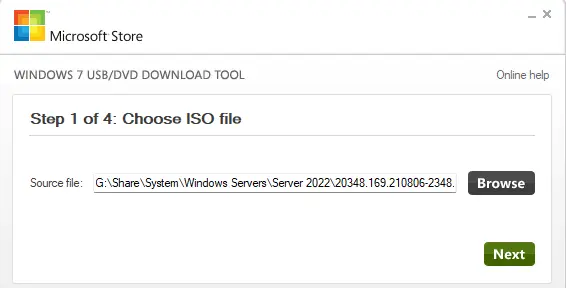
Create Server 2022 Bootable USB using the Windows Tool
Download the Windows USB/DVD Tool and then run the setup to install it.
Please ensure the USB flash drive.
Open it, choose the browse button to select the Server 2022 ISO image, and then click next.
Choose “Begin Copying” and then confirm to erase the USB drive.
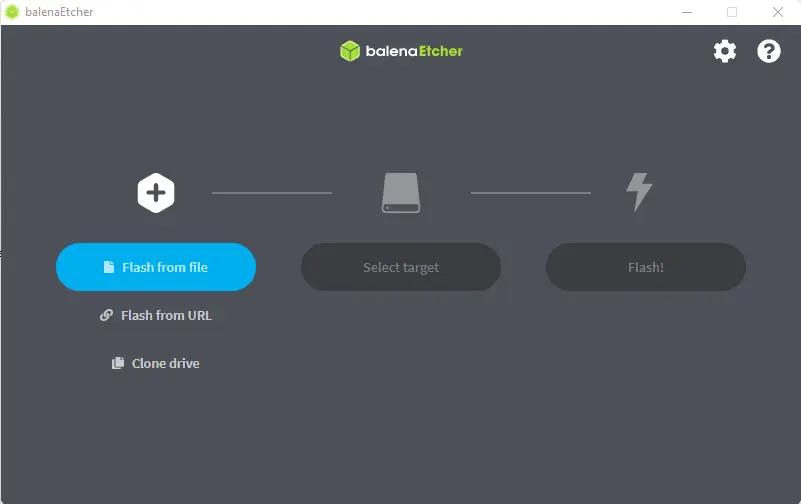
Make Bootable USB with Balenaetcher
Download Etcher
Etcher is a free application that is used to burn files on the flash drive from operating systems, such as IMG and ISO images, to make it a bootable USB. It is considered the greatest bootable USB creator. Etcher works well with Windows, Linux, and Mac.
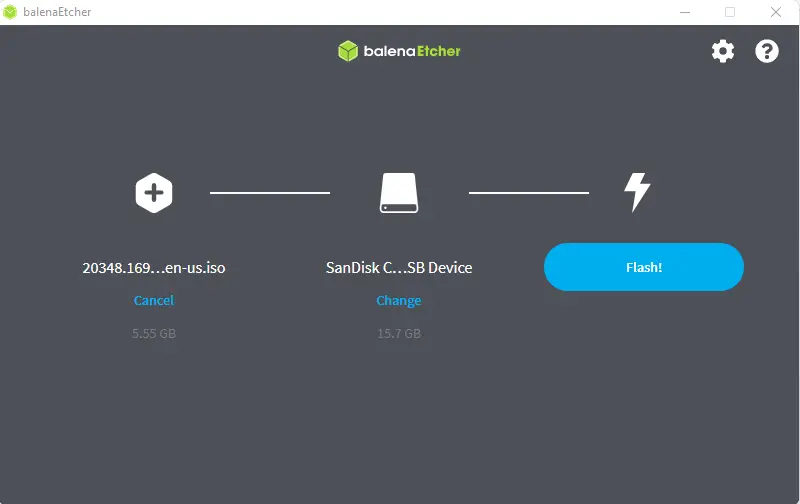
Select your Server 2022 ISO file by clicking on Flash in the file.
Verify your USB drive, and then click on Flash.
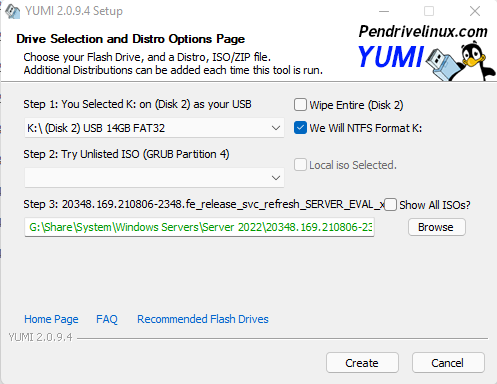
Create Bootable USB Drive with YUMI
Download YUMI
This tool is used to create a bootable USB drive for multiple OSs. It is an open-source tool.
Select USB drive
Click on the browse button to select a Windows Server ISO image.
Click on the Create button.
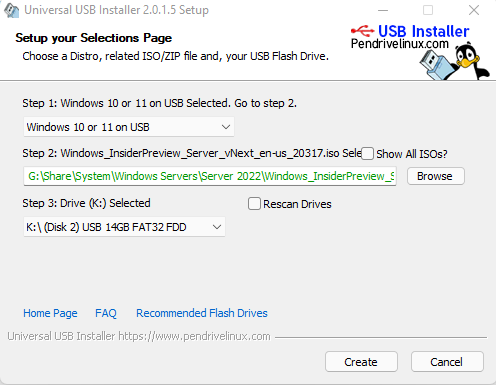
Create Bootable USB with Universal USB Installer
Download Universal USB Installer
This tool is offered by Pendrivelinux, and you can use it to create both Windows and Linux bootable USB disks.
Select the Windows Server ISO image by clicking on the browse button.
Verify the USB drive
Click create.
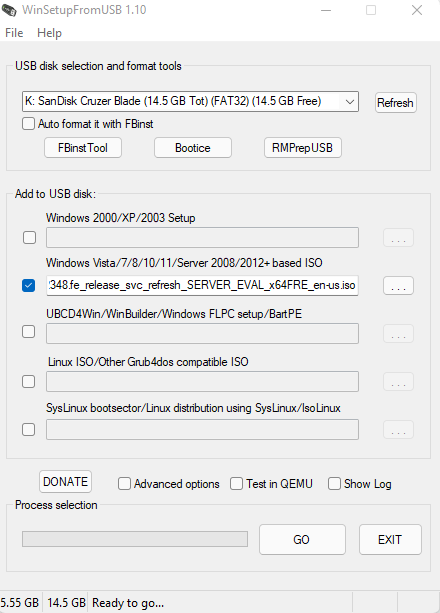
Create Bootable USB Server 2022 with WinSetupFromUSB
Download WinSetupFromUSB
This tool creates a bootable USB drive for multiple operating systems, including Windows and Linux.
Verify USB drive
Click on the… button to select the Windows Server ISO image.
Choose GO to start the bootable process.
Jamilhttp://jamiltech.com
A Professional Technology Blog Writer | An energetic professional with more than 20+ years of rich experience in Technology, Planning, Designing, Installation, and Networking.
IT and Virtualization Consultant. Vladan is the founder, and executive editor of the ESX Virtualization Blog at vladan.fr. He is a VMware VCAP-DCA and VCAP-DCD, and has been a vExpert from 2009 to 2023.
IT and Virtualization Consultant. Vladan is the founder, and executive editor of the ESX Virtualization Blog at vladan.fr. He is a VMware VCAP-DCA and VCAP-DCD, and has been a vExpert from 2009 to 2023.
Microsoft has released the final version of Windows Server 2016. I thought that it might be a good idea to create a USB stick that can be used as a source to install the Windows Server 2016 OS to other servers/workstations.
There are many free tools that can be used to do the job, but sometimes you just don’t have that option or simply you do not want to use any free tools for this job. It is not so difficult to create a bootable USB, and this post will teach you how to do that in 6 easy steps.
This process works on any version of Windows Server or Windows Desktop version 8 or above. It uses Microsoft Diskpart tool present on those systems. It’s a command line tool, which is invoked by simply typing “Diskpart” from within a command prompt.
This How-To should also work on versions earlier than Windows 10, Windows 8, Windows Server 2012, Windows 7 and Windows Vista, and Windows Server 2008 or Windows Server 2008 R2.
This post will teach you this process without any freeware/shareware. The article does not use any downloadable programs or nor is it executable from anywhere. It uses only programs already present in the Windows system. All you need to have is the Microsoft ISO and have a laptop/workstation running Windows 8 or higher, with a free USB slot.
If you do not have the ISO of Windows Server 2016, you will need to download it. To download Windows Server 2016 eval 180 days, go to this link. Microsoft will also make this download available through usual subscription services.
Create Boot USB with Windows Server 2016 – Here are the steps:
Step 1. The first thing to do is to mount the ISO of Windows Server 2016 you just downloaded. Double-click the ISO file to mount it. Check the drive letter and make note of the drive letter. In my case, it is drive D:
Step 2. Put in the USB Key on your computer and make note of the drive letter and the size of the disk. In my case, it is E: and 10gb. Your environment will certainly be different than mine. You will need at least an 8gb USB thumb drive as the process will require 4.9gb.
Step 3. Run Elevated command prompt – Start > type cmd > Right-click cmd at the top of the menu > Run as Administrator and accept the elevation request
Important NOTE: The following commands will completely wipe out your disk without warning, so make sure you select the proper disk. You can also disconnect all external drives or other USBs currently connected to your system to limit possible mistakes.
Step 4. Next, you will run the program called Diskpart to prepare the disk for the OS.
diskpart
list disk
select disk
in my case, I’ll do Select Disk 1 as Disk 1 is my 10Gb USB disk.
list disk
Please Note: after you run list disk again, the selected drive should be prefaced with the asterisks “*”. This is a small hint because I know the CLI isn’t everyone’s favorite.
Attention! Watch out: the next line is the one that wipes the drive completely. It cleans the drive.
clean
create partition primary
select partition 1
active
format fs=ntfs quick label=”2016Server”
exit
Leaving DiskPart…
Step 5. Now we need to copy the boot sector. Make sure that you are still within the command prompt window
D:
cd boot
Note: Run “bootsect /help” for detailed usage instructions.
bootsect /nt60 e:
Target volumes will be updated with BOOTMGR compatible bootcode.
Bootcode was successfully updated on all targeted volumes.
Step 6. Now we just need to copy the files… (STILL Within the DOS window)
It is a xCopy command to copy files. The syntax is basically xCopy (source) (destination) with some switches (I won’t go into details). You’ll need to replace drive letters below with your drive letters.
xcopy D:\*.* E:\ /E /H /F
NOTE: There is a very large file called install.wim which will get copied. So when it copies the install.wim file, it will take a very, very long time. This is just to let you know. This file is very large (4gb), but the copy command should finish without error.
Step 7. There is no step 7… You’re done. Once the copy finishes, you can boot Off the USB drive to install a new system on some server. It is usually handy to have such a USB if you’re an admin/technician and use it for systems that do not have a CD/DVD drive installed.
NOTE: Don’t forget to change your BIOS settings concerning the boot order. You must put USB first, then Hard disk as second. Usually, you’ll do that through F2 or F12, or DEL key on your keyboard. But this varies from one manufacturer to another.
Diskpart commands: https://technet.microsoft.com/en-us/library/Cc766465(v=WS.10).aspx
- Tap Room Meeting: StarWind drop makes a pint of Microsoft Windows Server environment taste better
- Hyper-V in Windows Server 2016: Reboot oder Revolution