
Конечно, что самый простой и интуитивный способ создать загрузочную USB флешку для установки Windows Server 2016 на физический сервер – воспользоваться утилитой Windows USB/DVD Download Tool. Данная утилита позволяет записать имеющийся *.iso образ Windows на USB флешку/диск и сделать его загрузочным. Однако, она форматирует флешку в файловую систему NTFS, загрузка с которой не поддерживается на UEFI системах и пригодна такая флешка только для установки Windows только на BIOS системах. В данной статье мы покажем, как без использования сторонних утилит создать установочную флешку с дистрибутивом Windows Server 2016.
Примечание. В отличии BIOS систем, которые могут загрузиться с загрузочных разделов с файловыми системам FAT, FAT32, exFAT или NTFS, UEFI системы могут загрузится только с загрузчика, находящегося на диске, отформатированном в ФС FAT32.
В зависимости от архитектуры сервера UEFI / BIOS нужно воспользоваться одним из следующих способов создания установочной флешки.
Содержание:
- Установочная USB флешка для UEFI системы
- Установочная флешка c таблицей разделов MBR для BIOS и UEFI архитектур
- Размер файла Install.wim более 4 Гб
Важно. При выполнении данной инструкции нужно быть внимательным, проверять пути к дискам и номера дисков, в противном случае, можно случайно отформатировать диск с данными. USB флешка будет отформатирована в любом случае, и данные на ней удалены.
Установочная USB флешка для UEFI системы
В том случае, если флешка будет использоваться для загрузки и установки Windows Server 2016 на сервере с поддержкой UEFI, на загрузочную флешку накладываются следующие требования:
- Минимальный размер USB флешки – 8 Гб
- Тип таблицы разделов флешки – GPT
- Файловая системе — FAT32
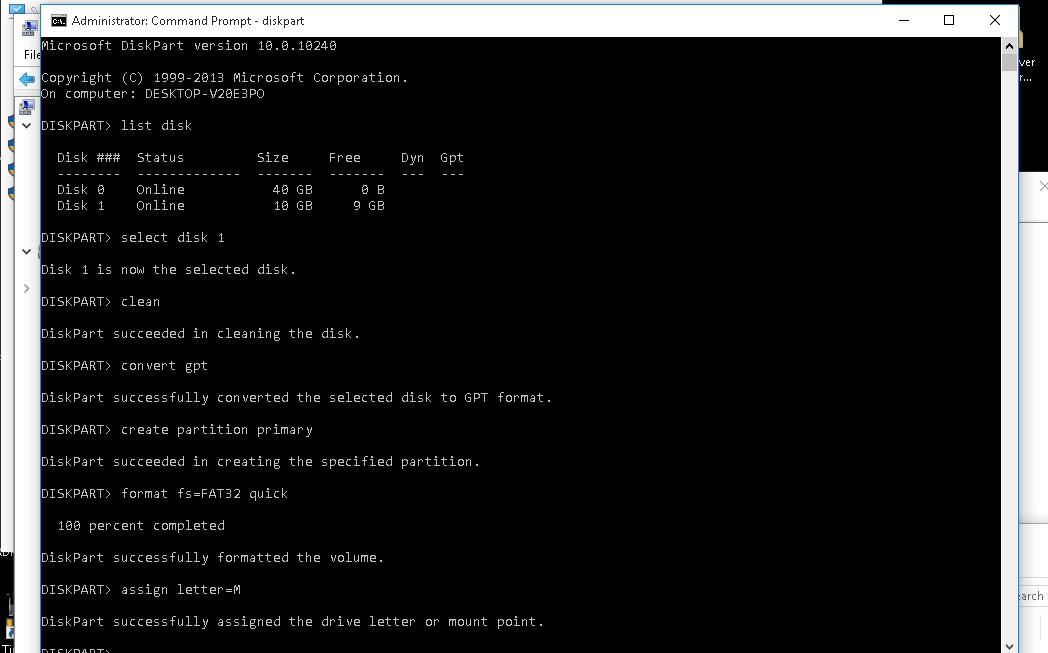
Итак, подключите USB флешку к компьютеру (в нашем примере это ПК с Windows 10), откройте командную строку с правами администратора, выполните команду DISKPART, в контексте которой выполните следующие команды:
list disk
Выведем список дисков, моем случае USB флешка имеет номер диска 1. Выберем ее.
select disk 1
Очистим содержимое флешки.
clean
Преобразуем таблицу разделов в GPT:
convert gpt
Создадим новый раздел (размер не должен превышать 16 Гб):
create partition primary
Совет. Если размер USB флешки более чем 16 Гб, нужно создать раздел, размером до 16Гб:
create partition primary size=16000
Отформатируем раздел в ФС FAT32:
format fs=FAT32 quick
Назначим новому разделу букву диска:
assign letter=M
Осталось завершить сеанс diskpart:
exit
Скопируем файлы дистрибутива со смонтированного iso образа Windows Server 2016 на флешку (предполагаем, что iso образ смонтирован с буквой диска E:\).
xcopy e:\* m:\ /H /F /E
Установочная флешка c таблицей разделов MBR для BIOS и UEFI архитектур
Возможно создать установочную флешку с Windows Server 2016 с таблицей разделов MBR для BIOS и UEFI системе. К USB драйву предъявляются следующие требования:
- Минимальный размер USB флешки – 8 Гб
- Тип таблицы разделов– MBR
- Файловая системе — FAT32
Также запустите сессию diskpart и последовательно выполните команды:
Список дисков в системе:
list disk
Выбираем USB диск (в моем примере, Disk 1):
select disk 1
Очистим диск:
clean
Создадим новый раздел размером не более 16 Гб. Если размер флешки меньше 16 Гб:
create partition primary
Если больше:
create partition primary size=16000
Отформатируем флешку в файловой системе FAT32:
format fs=FAT32 quick
Сделаем раздел активным и назначим букву диска M:
active
assign letter=M

Завершим работу diskpart командой exit и скопируем файлы дистрибутива на флешку:
xcopy e:\* m:\ /H /F /E
Размер файла Install.wim более 4 Гб
В том случае, если размер файла Install.wim более 4Гб, скопировать такой файл на флешку не получится, т.к. максимальный размер файла на файловой системе ограничен 4 Гб. В данной ситуации придется разбить wim файл на несколько более мелких файлов с помощью DISM:
dism /Split-Image /ImageFile:e:\sources\install.wim /SWMFile:m:\sources\install.swm /FileSize:4096
IT and Virtualization Consultant. Vladan is the founder, and executive editor of the ESX Virtualization Blog at vladan.fr. He is a VMware VCAP-DCA and VCAP-DCD, and has been a vExpert from 2009 to 2023.
IT and Virtualization Consultant. Vladan is the founder, and executive editor of the ESX Virtualization Blog at vladan.fr. He is a VMware VCAP-DCA and VCAP-DCD, and has been a vExpert from 2009 to 2023.
Microsoft has released the final version of Windows Server 2016. I thought that it might be a good idea to create a USB stick that can be used as a source to install the Windows Server 2016 OS to other servers/workstations.
There are many free tools that can be used to do the job, but sometimes you just don’t have that option or simply you do not want to use any free tools for this job. It is not so difficult to create a bootable USB, and this post will teach you how to do that in 6 easy steps.
This process works on any version of Windows Server or Windows Desktop version 8 or above. It uses Microsoft Diskpart tool present on those systems. It’s a command line tool, which is invoked by simply typing “Diskpart” from within a command prompt.
This How-To should also work on versions earlier than Windows 10, Windows 8, Windows Server 2012, Windows 7 and Windows Vista, and Windows Server 2008 or Windows Server 2008 R2.
This post will teach you this process without any freeware/shareware. The article does not use any downloadable programs or nor is it executable from anywhere. It uses only programs already present in the Windows system. All you need to have is the Microsoft ISO and have a laptop/workstation running Windows 8 or higher, with a free USB slot.
If you do not have the ISO of Windows Server 2016, you will need to download it. To download Windows Server 2016 eval 180 days, go to this link. Microsoft will also make this download available through usual subscription services.
Create Boot USB with Windows Server 2016 – Here are the steps:
Step 1. The first thing to do is to mount the ISO of Windows Server 2016 you just downloaded. Double-click the ISO file to mount it. Check the drive letter and make note of the drive letter. In my case, it is drive D:
Step 2. Put in the USB Key on your computer and make note of the drive letter and the size of the disk. In my case, it is E: and 10gb. Your environment will certainly be different than mine. You will need at least an 8gb USB thumb drive as the process will require 4.9gb.
Step 3. Run Elevated command prompt – Start > type cmd > Right-click cmd at the top of the menu > Run as Administrator and accept the elevation request
Important NOTE: The following commands will completely wipe out your disk without warning, so make sure you select the proper disk. You can also disconnect all external drives or other USBs currently connected to your system to limit possible mistakes.
Step 4. Next, you will run the program called Diskpart to prepare the disk for the OS.
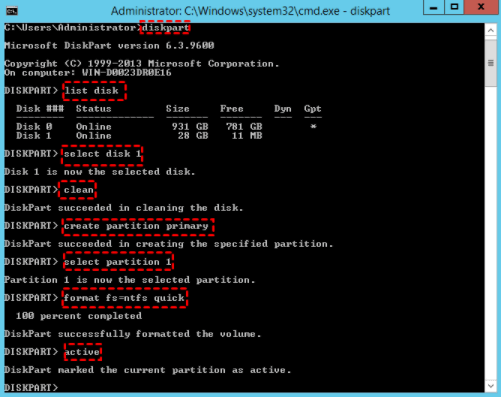
diskpart
list disk
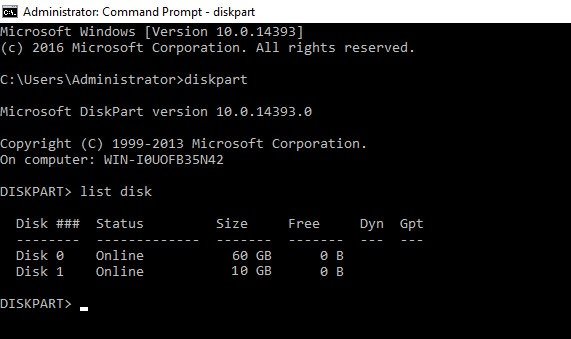
select disk
in my case, I’ll do Select Disk 1 as Disk 1 is my 10Gb USB disk.
list disk
Please Note: after you run list disk again, the selected drive should be prefaced with the asterisks “*”. This is a small hint because I know the CLI isn’t everyone’s favorite.
Attention! Watch out: the next line is the one that wipes the drive completely. It cleans the drive.
clean
create partition primary
select partition 1
active
format fs=ntfs quick label=”2016Server”
exit
Leaving DiskPart…
Step 5. Now we need to copy the boot sector. Make sure that you are still within the command prompt window
D:
cd boot
Note: Run “bootsect /help” for detailed usage instructions.
bootsect /nt60 e:
Target volumes will be updated with BOOTMGR compatible bootcode.
Bootcode was successfully updated on all targeted volumes.
Step 6. Now we just need to copy the files… (STILL Within the DOS window)
It is a xCopy command to copy files. The syntax is basically xCopy (source) (destination) with some switches (I won’t go into details). You’ll need to replace drive letters below with your drive letters.
xcopy D:\*.* E:\ /E /H /F
NOTE: There is a very large file called install.wim which will get copied. So when it copies the install.wim file, it will take a very, very long time. This is just to let you know. This file is very large (4gb), but the copy command should finish without error.
Step 7. There is no step 7… You’re done. Once the copy finishes, you can boot Off the USB drive to install a new system on some server. It is usually handy to have such a USB if you’re an admin/technician and use it for systems that do not have a CD/DVD drive installed.
NOTE: Don’t forget to change your BIOS settings concerning the boot order. You must put USB first, then Hard disk as second. Usually, you’ll do that through F2 or F12, or DEL key on your keyboard. But this varies from one manufacturer to another.
Diskpart commands: https://technet.microsoft.com/en-us/library/Cc766465(v=WS.10).aspx
- Tap Room Meeting: StarWind drop makes a pint of Microsoft Windows Server environment taste better
- Hyper-V in Windows Server 2016: Reboot oder Revolution
If you have download the latest version of Windows Server 2016 you can create a USB stick to install it on a physical server. This blog goes through how you create a USB Stick for Windows Server 2016.
For UEFI Systems:
- The at least a 8GB USB drive has to be formatted in FAT32
- The USB needs to be GPT and not MBR
- Copy all files from the ISO to the USB drive
This is it, and here is how you do it:
First plugin your USB drive to your computer. The USB drive should be bigger than 6GB.
Open a CMD prompt or PowerShell using the Run as Administrator option and open diskpart. Now you can do list all this by using
Select the USB disk, in my case this was disk 1
Clean the disk. Be careful this will remove all files and partitions on the USB media.
Now convert it to GPT
Create a new primary partition. But make sure the partition is not greater than 16GB otherwise it can be formatted with FAT32.
create partition primary

# If your USB drive is bigger than 16GB use the following command

create partition primary size=16000
Format the partition with FAT32
Assign a drive letter to the volume
now you can exit the diskpart and copy all files from the Windows or Windows Server to the USB drive and boot it. This works with Windows 8, Windows 8.1, Windows 10, Windows Server 2012, Windows Server 2012 R2 and Windows Server 2016 or even Hyper-V Server in the same editions.
For MBR systems:
- The at least a 8GB USB drive has to be formatted in FAT32
- The USB needs to be MBR
- Partition need so be set active
- Copy all files from the ISO to the USB drive
This is it, and here is how you do it:
First plugin your USB drive to your computer. The USB drive should be bigger than 6GB.
Open a CMD prompt or PowerShell using the Run as Administrator option and open diskpart. Now you can do list all this by using
Select the USB disk, in my case this was disk 1
Clean the disk. Be careful this will remove all files and partitions on the USB media.
Create a new primary partition. But make sure the partition is not greater than 16GB otherwise it can be formatted with FAT32.
create partition primary

# If your USB drive is bigger than 16GB use the following command

create partition primary size=16000
Format the partition with FAT32
Set Active
Assign a drive letter to the volume
now you can exit the diskpart and copy all files from the Windows or Windows Server to the USB drive and boot it. This works with Windows 8, Windows 8.1, Windows 10, Windows Server 2012, Windows Server 2012 R2 and Windows Server 2016 or even Hyper-V Server in the same editions.
Important:
If Install.wim is larger than 4GB, you cannot copy the file to the drive, because of theFAT32 based partition limitation. The solutions for this is to split the wim file into smaller files.
split wim file using dism (you may have to change the drive letters):
dism /Split-Image /ImageFile:e:\sources\install.wim /SWMFile:k:\sources\install.swm /FileSize:4096
Tags: Boot, diskpart, DISM, MBR, Microsoft, UEFI, USB, USB Drive, Windows, Windows 10, Windows Server 2016 Last modified: April 25, 2019
About the Author / Thomas Maurer
Thomas works as a Principal Program Manager & Chief Evangelist Azure Hybrid at Microsoft (Cloud + AI). He engages with the community and customers around the world to share his knowledge and collect feedback to improve the Azure hybrid cloud and edge platform. Prior to joining the Azure engineering team (Cloud + AI), Thomas was a Lead Architect and Microsoft MVP, to help architect, implement and promote Microsoft cloud technology.
If you want to know more about Thomas, check out his blog: www.thomasmaurer.ch and Twitter: www.twitter.com/thomasmaurer
- Download the Utility
- Load Windows onto the USB
- Create the USB Drive
- Enable .NET 2.0
Windows Server 2016 can be installed in a similar fashion as the last several releases. In this example, we will create a bootable USB drive with Windows Server 2016 available to install. The classic method of creating a Windows Installation USB drive is to use the free utility Windows USB/DVD Download Tool.
Download the Utility
Download the latest version of the Windows USB/DVD Download Tool from Codeplex.
Install and run the utility on a Windows desktop system with a USB drive attached.
The utility is still called “Windows 7 USB/DVD Download Tool”
.NET may be required to be enabled as the utility requires .NET 2.0 To enable .NET 2.0 simply go to Control Panel and enable .NET Framework 3.5 (see screenshot below)
Load Windows onto the USB
When the Utility is started, a four-step wizard begins.

Step one asks for the Windows ISO source file. This will be the Windows distribution that will be copied and installed onto the USB drive.

Select USB Device. DVD is also an option for creating bootable DVD disks.

Make sure the correct USB drive is selected. The contents of the USB drive will be destroyed.
Create the USB Drive
Select Begin Copying to create the USB bootable drive.

The utility gives you a chance to cancel, otherwise select Erase USB Device.

You are given one more chance to back out. Select Yes.
In Step four, the USB drive is partitioned, formatted and Windows is unloaded, and the USB drive is configured as a bootable device.


And the USB drive is complete. Either exit or create another Windows setup distribution.
To install Windows from the USB, boot a computer from the USB and the Windows Installer OS will initiate the Windows Installation.
Enable .NET 2.0
If during installation the utility displays a message requiring .NET 2.0, open Control Panel and enable the feature .NET 3.5 (and thereby .NET 2.0).

Related Posts
habibzain Follow
Just husband, father and enthusiastic men about System Administration. Love to write short article about it. Perhaps can help and be useful for others.
1 min read
If we want to install windows server on a bare metal device, the traditional way is to burn the ISO to a CD/DVD. But what is the maximum size of the DVD? The largest DVD storage size is around 4.4 GB. The problem occurs is the ISO file size of the Windows Server installer is 6.5GB.
Hmm… Of course it won’t fit if the Windows Server ISO file is burned to a DVD. It could be split, split into 2 DVDs. But it’s a lot of effort to do.
Basically making bootable for windows is easy. Especially for Windows 10 or Windows 11. We just download the Windows Creation Tool and plug in the USB. It will automatically download the installer itself online and stored on the USB.
But what if we want to create a bootable USB for windows server? Unfortunately the Windows Creation Tool does not have a menu to create a bootable Windows Server. So we have to look for other alternative tools that can make Windows Server bootable.
Make Bootable Windows Server with “diskpart”
Step 1. Insert the USB drive on your PC. Go to Start and type cmd in the search box. Click on Run as administrator to open a command prompt.
Step 2. Type command diskpart and press enter.
Step 3. Type the following command one by one and press enter:
- list disk and press enter to appear disk list.
- select disk x
Where ‘x’ is the number of your flash drive.
Type the following commands one by one:
- clean.
- create partition primary.
- select partition 1.
Next we will select the partition as per your own requirement.
- format fs=ntfs quick (if you want to create UEFI bootable USB, type “format fs=fat32 quick”).
- active.
Step 4. Type Exit and press enter. It will close the diskpart command.
- assign letter= r or other available letter.
Then type “Exit” to leave the Diskpart command environment.
Step 4. Find the Windows Server setup ISO in your computer and double click on it to mount the ISO.
Step 5. Copy the entire contents of the mounted ISO drive to your bootable USB flash drive.
Step 6. Now, back to the Command Prompt window again and run the following command.
H:cd\boot\ bootsect.exe /nt60 R:to build the boot sector code in the specified partition. (H:\ is the drive letter of the mounted Windows ISO and R:\ is the destination USB drive letter)
We have built a Bootable USB from ISO by following the steps outlined above.
Make Bootable Windows Server with RUFUS
Rufus is third party tool open source for make USB bootable for Linux Distro. But we can use rufus to create bootable USB for windows server.
Step 1. Download Rufus Software and run it.
Plug USB drive and file ISO windows server. Set parameter like image below. And then start.

Rufus is easiest solution open source to make Bootable Windows Server.
reference:
- https://www.diskpart.com/server-2016/windows-server-2016-bootable-usb-7201.html
- https://rufus.ie/en/
Let's Buy Me Coffee.https://saweria.co/habibzain https://ko-fi.com/habibzain