
Сегодня хочу рассказать о очень хорошей программе для сброса паролей с Windows 2000/XP/Vista/7/8.1/10, Windows Server 2003(R2)/2008(R2)/2012(R2)/2015/2019 и macOS. Она позволяет сделать это проще чем с помощью ручных методов описанных в этой статье. Кроме того есть бесплатная версия позволяющая сделать это для типовых задач пользователя. Расширенные версии имеют очень широкий функционал и подходят для использования профессионалами занимающимися восстановлением доступа к операционным системам Windows и macOS. И называется эта программа PassFab 4WinKey
- Очень проста в использовании, так как имеет интуитивно понятный GUI.
- Позволяет создать DVD диск сброса пароля в пробной версии
- Позволяет сбрасывать пароль в версиях Windows 2000/XP/Vista/7/8/10 для ПК бесплатно
- Позволяет сбрасывать пароль в серверных версиях Windows c Актив Директори
- Позволяет сбрасывать пароль администратора в AD
- Позволяет создать загрузочную флешку
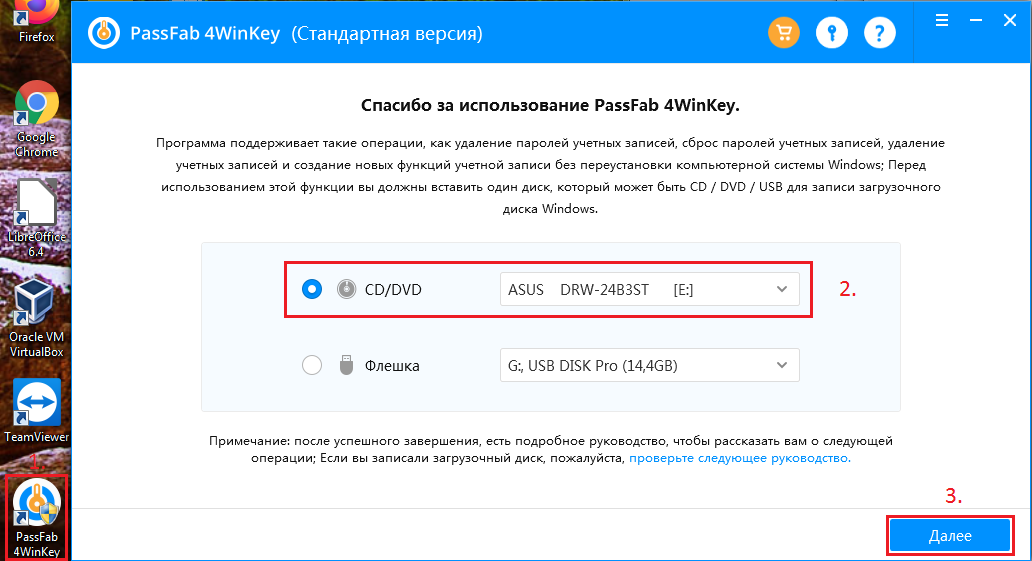
Создание загрузочного CD/DVD диска.
Запускаем установленную программу PassFab 4WinKey с ярлыка на рабочем столе:
Программа предложит очистить ваш CD/DVD-RW если на нём есть информация:
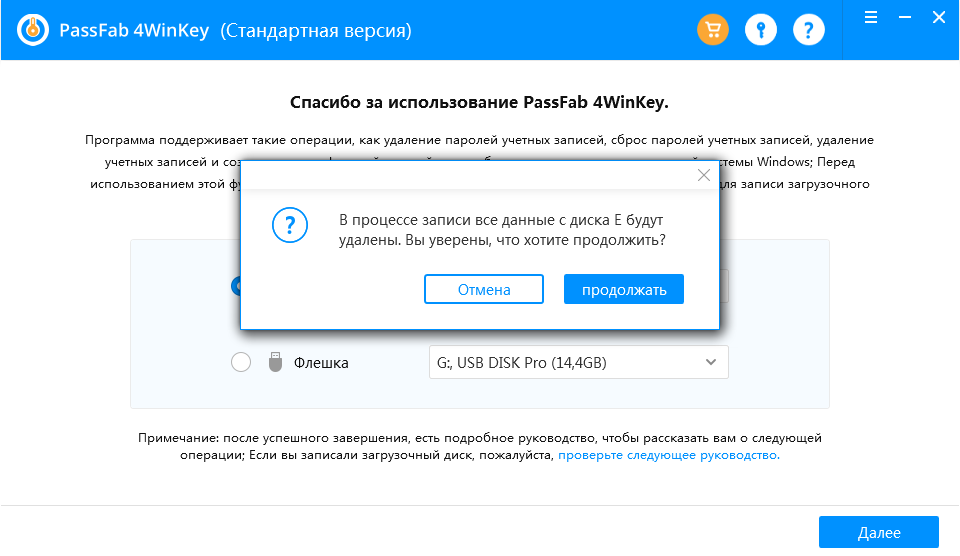
Сразу же после очистки носителя CD/DVD начнётся записть загрузочных файлов.

После окончания записи носителя отобразятся инструкции по загрузке компьютера с дисковода/флешки. Для опытного пользователя это не составляет труда, но если вы только начинаете своё знакомство с ПК рекомендуем ознакомиться с ними.

Загрузка с CD/DVD носителя на материнских платах Gigabyte.
Для примера загрузимся с диска вызвав загрузочное меню с помощью F12. Меню вызывается перед загрузкой Windows.

Выбираем загрузочное устройство. В нашем случае это ASUS DRW-24B3ST.
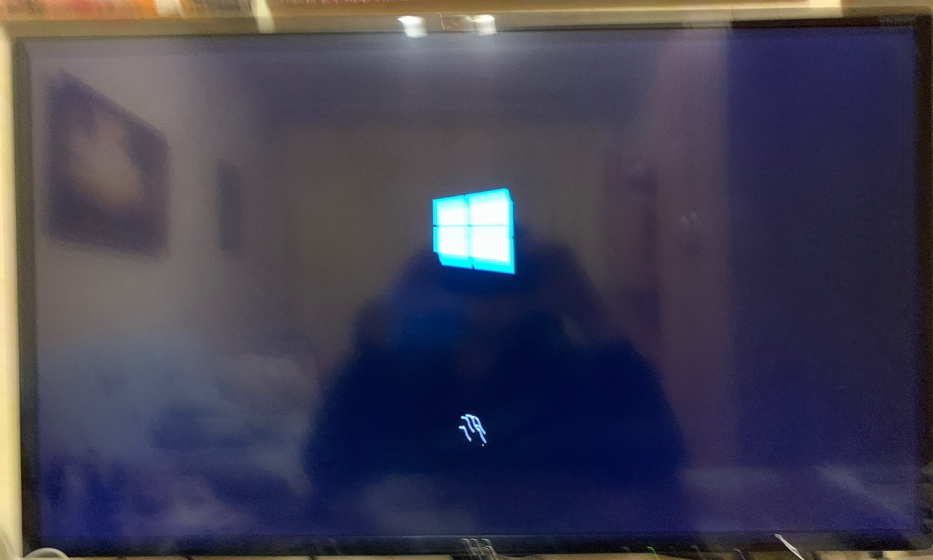
Начинается загрузка:
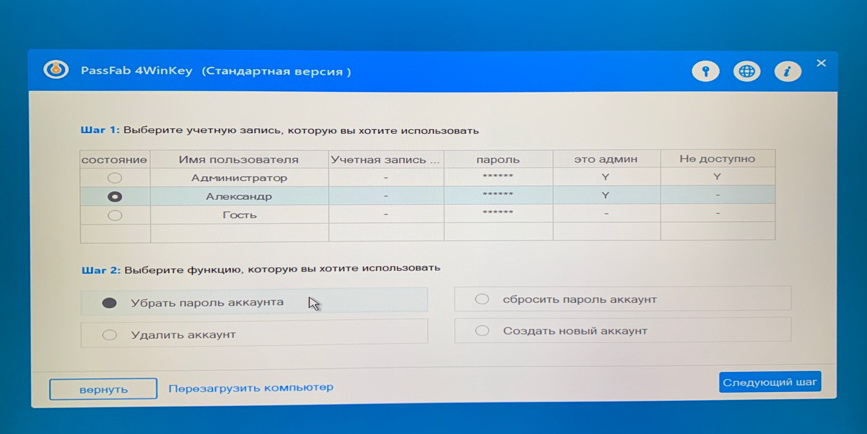
Выбираем версию Windows с которой надо снять пароль:

Выбираем учётную запись с которой надо снять пароль:
Ждём пока закончится снятие пароля:

После перезагрузки системы нас позравляют со снятием пароля на английском языке:
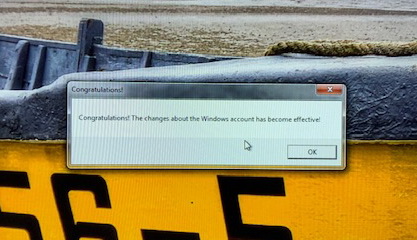
Как видете всё гораздо проще чем в случае ручного съёма пароля стандартными инструментами Windows:
- Каким способом сбросить пароль на Windows 10?
- Как сбросить пароль Windows 7 используя загрузочный DVD
Так что утилиту PassFab 4WinKey я рекомендую заменой стандартных инструментов как более удобную и к тому же бесплатную для простых задач пользователя.
10 November 2023 Technology Manager of Test Dept.
Summary
Discover the simple steps to create and use a password reset USB disk for Windows XP. Say goodbye to password worries and regain access to your account with ease. Never be locked out of your account again, learn how to create your own password reset USB disk now.
Windows XP is a popular operating system that has been around for decades. However, as technology evolves, it becomes more vulnerable to hacking and security breaches. One of the most common issues faced by Windows XP users is forgetting their password. Without the password, access to important files and documents becomes impossible. Luckily, there is a solution to this problem – a windows XP password reset USB. In this article, we will guide you through the process of creating a password reset USB using Renee PassNow, a reliable and user-friendly software. So, let’s dive into the first method – creating a general Windows XP password reset USB disk with Renee PassNow.
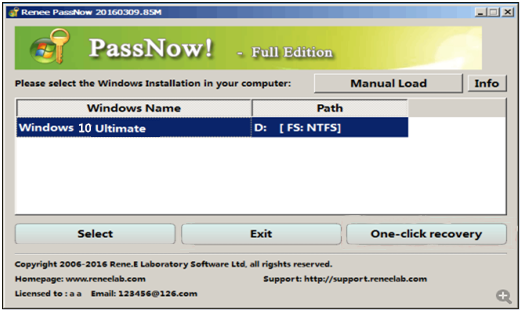
Method 1: Creating a General Windows XP Password Reset USB Disk with Renee PassNow
Create a Windows XP Password Reset USB Disk
Renee PassNow is a reliable and efficient tool for creating a general password reset USB disk for Windows XP. This method is ideal for users who want to reset their password without losing any data or reinstalling the operating system. Follow the steps below to create a Windows XP password reset USB disk using Renee PassNow.
To reset your Windows XP password using Renee PassNow, follow these steps:
Step 1: Download and Install Renee PassNow
Start by downloading Renee PassNow from the official website and install it on a different computer that you can access. You can choose the appropriate version based on your computer’s operating system.
Renee PassNow – Professional Windows System Rescue Tool
Remove Windows Login Password 3 steps for whole password remove process.
Recover the files Recover the deleted files without Windows system.
Transfer the data Transfer the important files of the computer with system.
Fix Windows startup error Fix various Windows startup failures or crashes.
Erase disk Completely erase disk files which will not be restored.
Remove Windows Login Password 3 steps for whole password remove process.
Recover the files Recover the deleted files without Windows system.
Transfer the data Transfer the important files of the computer with system.
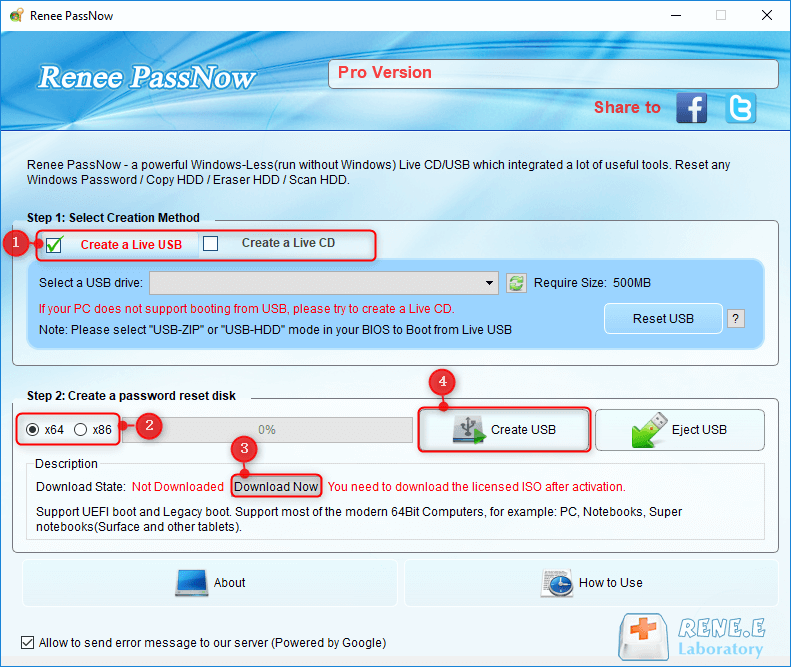
Step 2: Create a Bootable USB or CD/DVD
Launch Renee PassNow and insert a USB flash drive or blank CD/DVD into the computer. Select the option to create a bootable media. Follow the on-screen instructions to complete the process.
Step 3: Boot the Locked Server from the Bootable Media
Insert the bootable USB or CD/DVD into the locked Windows computer. Restart the computer and enter the BIOS settings by pressing the appropriate key (usually F2 or Delete). Configure the boot order to prioritize the bootable media.
| Server Type | Enter boot menu method |
|---|---|
| DELL | Press the F12 key repeatedly before the Dell logo appears on the screen. |
| HP | Press the F9 key multiple times when the HP logo is displayed. |
| BIOS Name | Enter boot menu method |
|---|---|
| ASRock | DEL or F2 |
| ASUS | DEL or F2 for PCs/ DEL or F2 for Motherboards |
| Acer | DEL or F2 |
| Dell | F12 or F2 |
| ECS | DEL |
| Gigabyte / Aorus | DEL or F2 |
| Lenovo (Consumer Laptops) | F2 or Fn + F2 |
| Lenovo (Desktops) | F1 |
| Lenovo (ThinkPads) | Enter then F1 |
| MSI | DEL |
| Microsoft Surface Tablets | Press and hold Power and Volume Up buttons |
| Origin PC | F2 |
| Samsung | F2 |
| Toshiba | F2 |
| Zotac | DEL |
| HP | Esc/ F9 for `Boot Menu`/ Esc/ F10/ Storage tab/ Boot Order/ Legacy Boot Sources |
| INTEL | F10 |

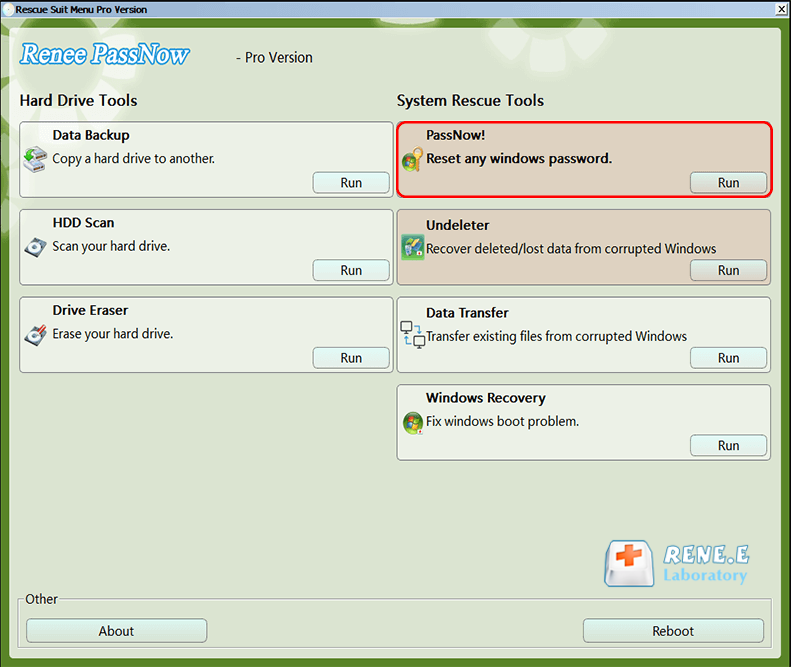
Step 4: Select password reset function
After successfully booting from the bootable media, Renee PassNow will load. Select “PassNow!” function after booting from the new created Windows password reset disk.
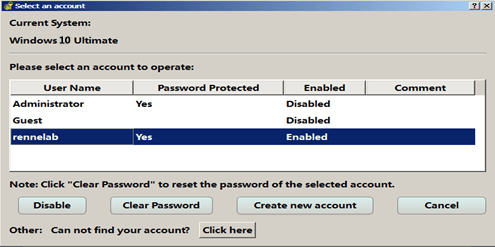
Step 5: Resetting the Password
Choose the user account for which you want to reset the password. Then, click on the “Clear Password” button. Renee PassNow will remove or reset the password for the selected user account.
Step 6: Reboot the PC
Once the password is reset, remove the bootable media from the PC and restart the computer. You will now be able to log in to Windows Account without a password.
In this chapter, we have discussed how to create a general Windows XP password reset USB disk using Renee PassNow. This method is suitable for users who want to reset their password without losing any data or reinstalling the operating system. However, it requires an accessible computer to create the USB disk and cannot reset domain passwords. In the next chapter, we will discuss another method for resetting Windows XP passwords using the Windows password reset disk and Command Prompt.
Pros:
- Easy to use and does not require technical knowledge.
- Can reset password without losing any data or reinstalling the operating system.
- Compatible with all versions of Windows XP.
Cons:
- Requires an accessible computer to create the password reset USB disk.
- Cannot reset passwords for domain accounts.
Method 2: Using the Windows XP Password Reset Disk with Command Prompt
The Windows XP operating system allows users to create a password reset disk in case they forget their password in the future. This method involves using the Command Prompt in Safe Mode to reset the forgotten admin password. While this method may seem complicated, it is actually a reliable and effective way to regain access to your computer. Let’s take a look at the step-by-step process.
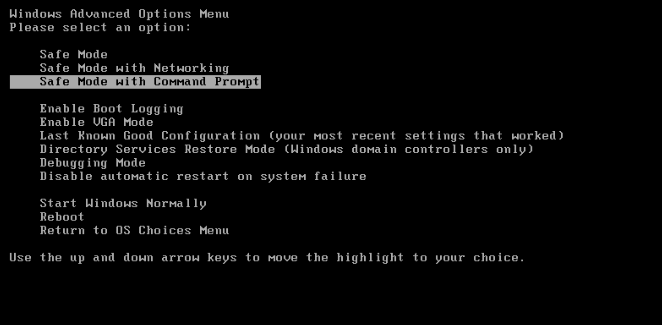
Step 1: Restart your computer and access Safe Mode with Command Prompt
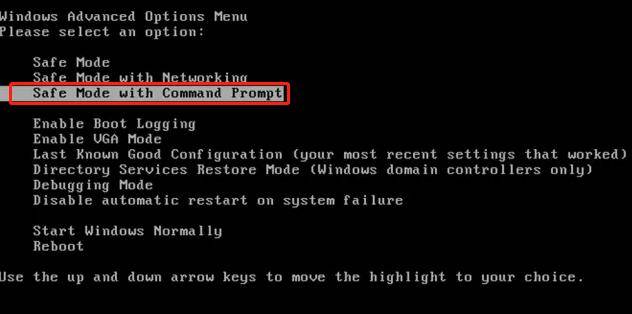
The first step is to restart your computer and press F8 while it is booting. This will bring up the Advanced Boot Options menu. Use the arrow keys to navigate and select “Safe Mode with Command Prompt“. This will boot your computer into Safe Mode, which allows you to access the Command Prompt.
Step 2: Change the password using the Control Panel
Once you are in Safe Mode, navigate to Control Panel > User Accounts > Change Account and select the account that you have forgotten the password for. Then, simply change the password for that account. If this works, you can skip to step 6. If not, move on to step 3.
Step 3: Open the Command Prompt
If changing the password through the Control Panel did not work, you can use the Command Prompt to reset the password. Press the Win + R keys to open the Run dialog box, type
Step 4: Run the net user command
In the Command Prompt window, type the following command and press Enter:
net user [account name] [new password]
For example, if the account name is Ariel and you want to change the password to 123456, the command would be:
If you want to clear the password and set a new one later, you can run the command
net user [account name] «»
Step 5: Restart your computer and log in with the new password
After running the net user command, you can restart your computer and log back in with the new password.
Step 6: Test the password reset disk
To ensure that the password reset disk is working correctly, log out of your account and try logging back in with an incorrect password. After a few failed attempts, you should see an option to use the password reset disk. Select this option and follow the instructions to reset your password.
Step 7: Store the password reset disk in a safe place
It is important to store the password reset disk in a safe place, as anyone with access to it can reset the password for your account. It is recommended to use a USB drive for the password reset disk and keep it in a secure location.
Note: If you do not have a password reset disk, you can use a third-party universal password reset disk, such as Renee PassNow or Ophcrack, which will be discussed in subsequent chapters.
The Windows XP password reset disk is a useful tool for resetting a forgotten password. It is easy to create and can be a lifesaver in case you cannot access your computer. However, it is important to keep the password reset disk in a safe place and be cautious when using third-party tools to reset your password.
Next, we will explore another method for creating a password reset disk – Ophcrack. Stay tuned for the next chapter.
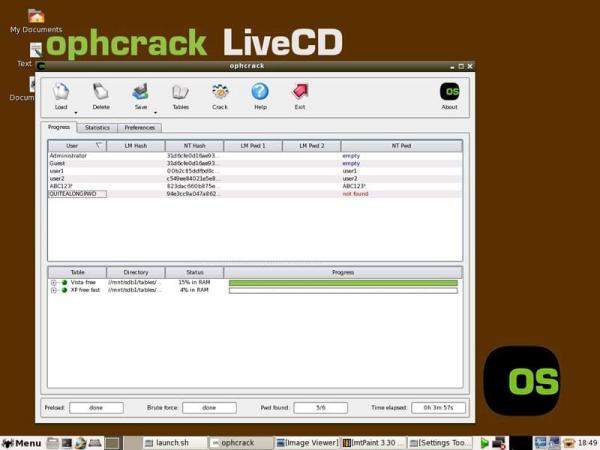
Method 3: Exploring Ophcrack – An Alternative Free Solution
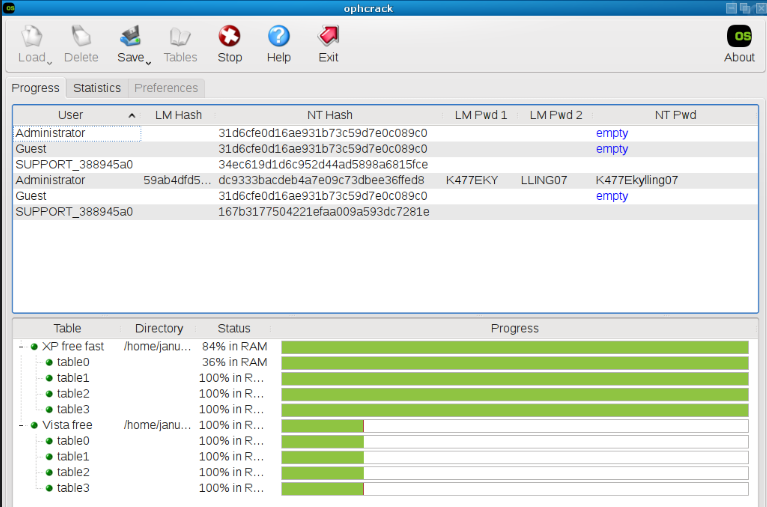
Ophcrack is a free and open-source password cracking software that is specifically designed to recover forgotten Windows passwords. It uses a combination of advanced algorithms and rainbow tables to crack passwords, making it an effective tool for resetting forgotten passwords on Windows XP.
Step 1: Download and Install Ophcrack
To use Ophcrack, you will first need to download and install it on another computer with internet access. Once installed, create a bootable USB or CD/DVD using Ophcrack to run it on your locked Windows 10 desktop.
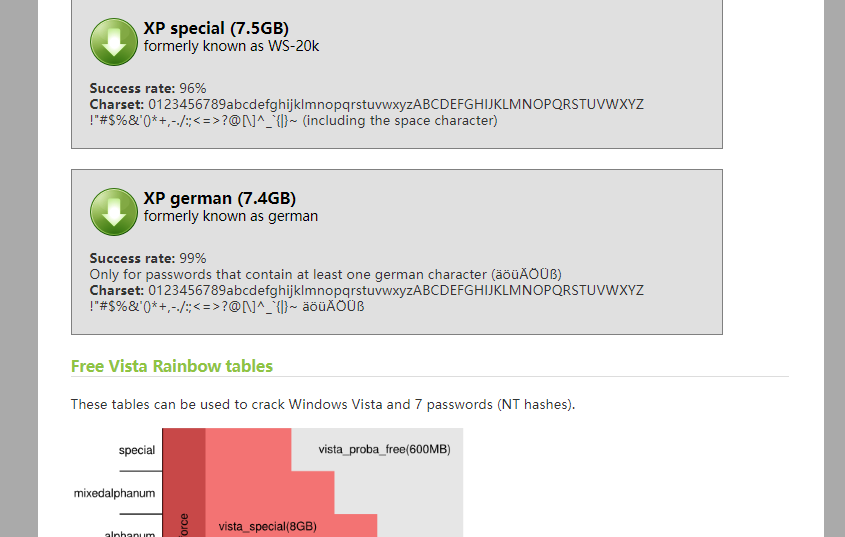
Step 2: Choose and download the Correct Tables
Ophcrack requires rainbow tables to crack passwords. These tables contain precomputed hashes for a wide range of possible passwords. Select the appropriate tables according to the Windows version you are using. In this case, select the tables for Windows XP.
Once you have prepared the bootable device, insert it into the ASUS laptop and restart the computer. As the laptop boots up, you will need to access the boot menu, which can typically be done by pressing a designated key (e.g., F2, F8, or F12) during the startup process. Select the bootable device from the menu, and the Ophcrack software will begin to load.

Step 4: Begin the Password Recovery Process
Once you have selected the correct tables, click on the “Load” button to load them into Ophcrack. Then, click on the “Crack” button to start the password recovery process. Ophcrack will begin analyzing the hashes and attempting to crack the password
In conclusion, Ophcrack is a powerful tool for resetting forgotten passwords on Windows XP. However, it does have its limitations and may not work for everyone. If Ophcrack does not work for you, do not worry as there are other methods for creating a password reset disk, which will be discussed in the following chapters.
Next Chapter: Troubleshooting Common Issues When Creating or Using a Password Reset Disk in Windows XP.
Pros:
- Ophcrack is a free and open-source software, making it accessible to everyone.
- It has a high success rate in cracking passwords, making it a reliable tool for resetting forgotten passwords.
- Ophcrack is easy to use, even for those without technical expertise.
Cons:
- Using Ophcrack requires access to an accessible computer and a blank CD or DVD.
- It may take a considerable amount of time to crack the password, depending on the complexity of the password.
Troubleshooting Common Issues When Creating or Using a Password Reset Disk in Windows XP
If you have forgotten your Windows XP password, you may be looking for ways to reset it. One method that is commonly suggested is using a password reset disk. This disk is created beforehand and can be used when you need to reset your password. However, there are some common issues that users may encounter when creating or using a password reset disk in Windows XP. In this chapter, we will explore these issues and provide solutions to help you troubleshoot them.
Incorrect Password or Disk Does Not Work
A common issue that may occur when using a password reset disk is that the disk does not work. This can happen if you have entered an incorrect password or if you have chosen the wrong disk. When you enter an incorrect password, you will receive an error message stating that the password is incorrect. If you have chosen the wrong disk, the disk will not work and you will not be able to reset your password.
Creating a Password Reset Disk
One of the main issues that users encounter when creating a password reset disk is that they forget to create one beforehand. This means that when they forget their password, they do not have a disk to use for resetting it. Another issue is that the disk may not work if the computer is not properly configured. To ensure that the disk will work, it is important to follow the correct steps when creating it and to regularly update it.
Using a Password Reset Disk for the Wrong Account
When creating a password reset disk, it is specific to the account that is currently logged in. This means that you cannot use the disk to reset the password for a different account. If you have multiple user accounts on your Windows XP computer, you will need to create a separate password reset disk for each account. Trying to use a disk for the wrong account will result in an error message and the disk will not work.
In summary, a password reset disk can be a helpful tool when you need to reset your Windows XP password. However, there are some common issues that users may encounter. These include entering an incorrect password, not creating the disk beforehand, using the disk for the wrong account, and the disk not working. It is important to follow the correct steps when creating a password reset disk and to regularly update it to ensure it will work when needed. If you forget your password, you can also use alternative methods such as Ophcrack to reset it.
Conclusion
In conclusion, a password reset disk for Windows XP is an essential tool for users who may find themselves locked out of their account due to a forgotten password. In this article, we have discussed three methods for creating and using a password reset disk: using Renee PassNow, utilizing Command Prompt, and exploring Ophcrack. While each method has its own advantages, it is important to be aware of potential troubleshooting issues and how to address them. With the creation of a password reset disk, users can easily regain access to their account and avoid the hassle and frustration of being locked out. Whether you choose to create a USB disk or use alternative methods, having a password reset disk on hand can provide peace of mind and save you from potential login headaches. So don’t wait until it’s too late, create a password reset disk for your Windows XP now to ensure a smooth and stress-free user experience.
Windows XP is one of the well-known computer operating systems. Most people still use it because of its various advantages over its competitors. Some of the advantages include installing any software quickly. It has a secure privacy system that protects your email and other privacy matters.
Windows XP has a CD that when setting it up. The main issue arises when the user forgets or loses their CD. Resetting passwords is undoubtedly a must, but there are multiple ways. Every user of Windows XP wants a safe, reliable, and working solution for the issue they might face. Windows XP password reset can be done by using the solution we provide in the following guides.
Parrt 1. Windows XP Administrator Password Reset
- 1. Windows XP Administrator Password Reset without CD
- 2. Windows XP Administrator Password Reset without Logging In
Solution 1: Windows XP Administrator Password Reset without CD
If you have forgotten your admin password or lost the CD, don’t worry, as you still have some of the solutions left to work on it. You can select one of these options written below, and both of them don’t can perform a password reset task for your Windows XP without requiring any CD.
1. Using Shortcut (just for Windows XP Professional)
The first solution you can try is by using Ctrl-Alt-Del. This solution will work only if you are using Windows XP Professional. This solution requires a series of actions to be performed first.
- First, restart your PC and ensure you have not replaced the default admin password. Then, you can log in with a blank administrator password with a small and quick keyboard shortcut.
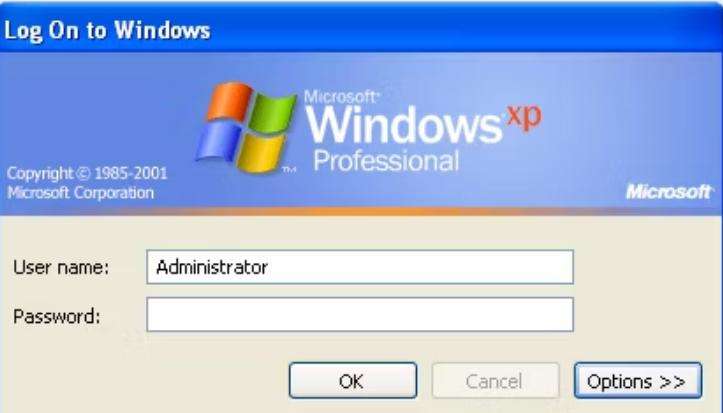
- Press, Ctrl+Alt+Del at the Welcome Screen two times repeatedly.
- Type Administrator in User Name.
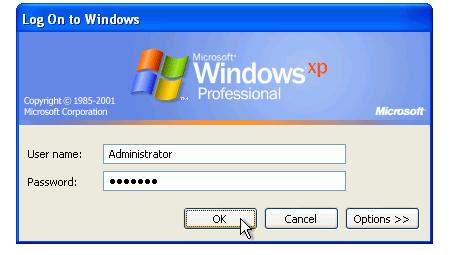
- Now, in the Password field, click the mouse cursor. You shouldn’t have to type anything here. Clicking here will ensure that Windows recognizes the blank password. But if this won’t work you can re-type Administrator also in the password field.
- At Last, click on Ok to login.
This password shortcut technique will let you in windows and give you all the privileges you can enjoy as an administrator.
2. In Safe Mode (for All Windows XP Versions)
Another solution you can use that works on every Windows XP version is Safe Mode. The steps are as follows:
- Firstly, restart your PC. Hold Ctrl+Alt+Del > Shut Down > Restart.
- Now, start pressing the F8 button repeatedly. You do not have to press and hold the F8 button. Just keep pressing it quickly before the Windows boot screen appears. A black screen with several menu options will now be displayed on your PC screen.
- With the help of arrow keys, go to the option of Safe Mode with Command Prompt and press Enter.
- Now, either you must click on Yes to continue the Safe Mode, or you will need to log in first. To log in, you must type Administrator in the User Name section and click on the Password section without writing anything else. This will recognize the windows’ blank password and make you sign in. Now, click on Yes to continue the Safe Mode.
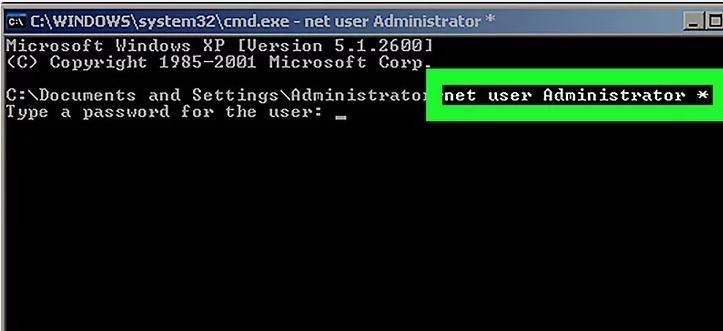
- You must write the command net user administrator* on this screen and then press Enter. Now type a new password for the Administrator account—press Enter key for the confirmation process. The same technique allows you to change other accounts’ passwords too.
- Lastly, restart your PC and log in as an administrator using the new password.
Solution 2: Windows XP Administrator Password Reset without Logging In
If your mind is having some doubts like how to reset Windows XP administrator password without login and how to reset Windows XP password without logging in, then you need to use UnlockGo – Windows Password Reset Tool to solve your query in the best possible way.
UnlockGo is one of the best and easiest ways to make Windows Password Recovery. UnlockGo is the ultimate one-stop shop for you if you are willing to reset your Windows XP password. This tool has some of the most advanced features to recover passwords for locked Windows XP accounts. It can easily reset admin passwords on Windows XP without logging in within some time.
Using UnlockGo for Windows is much easier as compared to other tools and software. You can use it by following these steps:
Step 1 Get another PC and install UnlockGo – Windows Password Recovery, and then insert your blank and bootable USB/CD/DVD into it to start to burn.

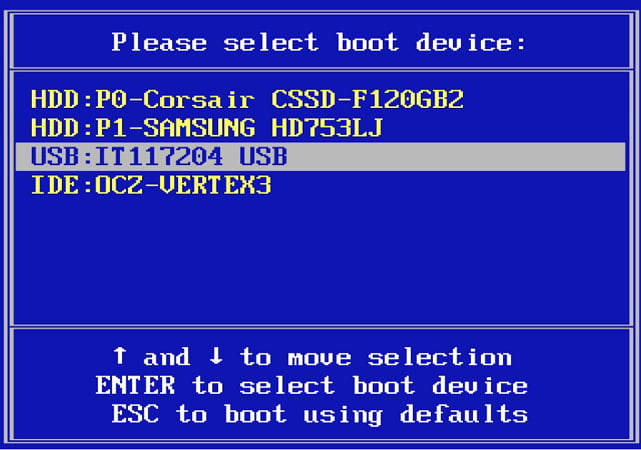
Step 2 After burning, insert the burned disk into your locked Windows XP device, and then follow the on-screen instructions to enter BIOS menu and then set bootable USB/CD/DVD as the boot device priority.
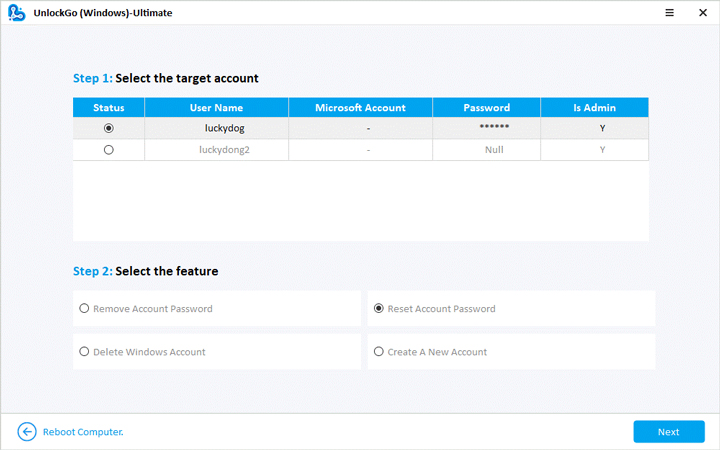
Step 3 After you set it, press F10 to save and exit, your windows will reboot and then you can select target account to reset admin password directly or reset/remove login password, after logging into Windows XP, use the common ways to reset admin password.
- 1. Windows XP Admin Password Reset USB
- 2. Windows XP Password Recovery Tool Free
Solution 1: Windows XP Admin Password Reset USB
UnlockGo for Windows can also be used to reset and remove login passwords with the windows password reset USB. You also have the option to create and use your own windows XP password reset USB to solve your issue.
Having your USB, you need to complete these steps to resolve your issue in minutes.
- After entering the wrong password, a message that says, “The password is incorrect. Try again” will be appeared. Click on Ok.
- Now, click on Reset Password.
- After that, insert your USB drive into the computer and follow the Password Reset Wizard to create a new password.
- Lastly, after creating your password, you can log in through it.
Or simply you can leave it on UnlockGo (Windows) to do the password reset for you.
Solution 2: Windows XP Password Recovery Tool Free
You can also use Windows XP Password Recovery Tool known as Ophcrack. It is a tool used to reset and crack the password of different versions of Windows. To use Ophcrack, you have to follow these steps:
- Firstly, download the Ophcrack ISO file from its official Ophcrack website on an unlocked computer.
- Now, on the homepage, select the Ophcrack Live CD option. After that, use a burning tool such as Rufus to burn the file to USB by inserting the USB into the computer > uploading the ISO file > burn the file.
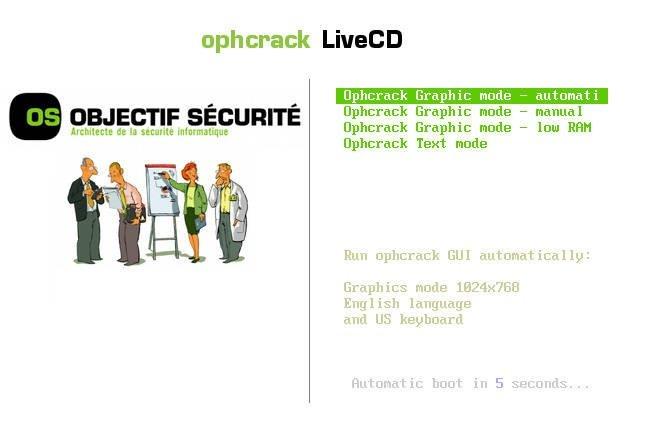
- Insert the burnt USB into the locked computer and restart it. After proceeding further, choose the Ophcrack Graphic Mode-automatic option.
- The Ophcrack password recovery process will begin after the selections. This will take a few moments. In the meantime, this tool will list the user accounts on the computer and their cracked passwords.
- Lastly, restart your computer and use the cracked password to unlock your computer.
Hot FAQs about Windows XP Password Reset
How to reset windows XP professional password has been solved, but still some of the common FAQs that people ask.
1. What Is Default Administrator on Windows XP?
The default local Administrator is the user account for the system administrator having a blank password. So you can use it to reset local user password without logging in, and other advantages.
2. How Do I Log in As an Administrator on Windows XP?
Simply by putting in the administrator account’s username and password combination.
Summary
Losing a Windows XP password is a tricky thing to face. Windows XP password reset can be done in multiple ways, but the most compatible and reliable solution for it is to use UnlockGo (Windows).
UnlockGo (Windows)
- It only takes a single click to create a Windows password disk.
- You can reset and remove passwords of Windows accounts.
- You can even create and delete accounts.
- All versions of Windows support UnlockGo – Windows Password Recovery
- All major PC brands support UnlockGo – Windows Password Recovery
,
Sometimes I face the problem that one of my customers has forgotten his Administrator password to log on to Windows so I must reset his password to resolve this problem. In this tutorial, I will show you how to reset administrator’s account password in all Windows versions, by following the method bellow:
DISCLAIMER: This information should be used only on your own computer or on a computer for which you have the owner’s permission. Don’t use this information to access other computers without permission.
The offline method to reset Windows Administrator password account is useful in the following cases:
a. You have forgotten your Administrator’s (Admin) account password.
b. You have forgotten your account password.
c. You cannot log on to Windows with Administrative rights.
How to clear Administrator password (Offline method)
Step 1: Download the Offline Windows Password & Registry Editor, Bootdisk / CD
1. You can download the Offline Windows Password & Registry editor (boot disk) utility from here. *
* Scroll down until you find the Download section and press to download the “cd110511.zip” file.

2. Go to your download location and right click on «cd110511.zip» file to extract it.

Step 2: Burn “cd110511” ISO file to an optical disk.
1. Right click on “cd110511.iso” disc Image file and burn it to a CD.

Step 3: Windows 8, 7, Vista, XP Administrator Password Reset
1. Insert the «Offline Password & Registry editor Boot CD» in the CDROM drive.
2. Boot you computer from the Boot CD. *
Notice*: First make sure that CDROM Drive is selected as first boot device in your BIOS.
3. At the first screen press «ENTER» to continue.

2. At “Step ONE” select the partition (by number) where Windows are installed (e.g. “2”) and press “Enter”.*
*Commonly it is the first and larger partition on the list, if you have only one hard drive on your system.

3a. At “Step TWO” you must specify the path to the registry.
Leave the detected registry path (C:\Windows\System32\Config) and press “Enter”.

3b. At “Select which part of registry to load” question, type “1” (Password reset) and press “Enter”.

4. At “Step THREE”, type “1” (Edit user data and passwords) and press “Enter”.

6. At the next screen, you can view the list of all the accounts on your computer. Type the Username of the account that you want to perform changes or leave the default entry (Administrator) and press “Enter”.

7. At the next menu (User Edit Menu):
Type “1”: To Clear (set Blank) the selected account’s password.
Other choices:
Type “2”: if you want to set a new password to the selected account.*
Notice*: I prefer to change an account’s password in Windows , after using option”1” to clear the previous password.
Type “3”: if you want to promote the selected account to Administrator. (Add to Administrator Group)
Type “4”: if you want to Enable the selected account or the hidden Administrator account (if it is disabled).

8. When finished making your changes type “!” (Shift + 1) and press “Enter” to quit editing selected user.

9. At the next screen, press “q” to quit the offline password editor utility.

10. At “About to write file(s) back” question, type “y” (yes) and press “Enter”.

11. If you want to try again, if the process somehow failed, type “n” and press “Enter”.

12a. Press “CTRL+ALT+DEL” to restart your computer.
12b. Pull out the Boot CD from your CD/DVD drive and boot to Windows.

Normally now you should be able to logon to the edited account without password.
If this article was useful for you, please consider supporting us by making a donation. Even $1 can a make a huge difference for us in our effort to continue to help others while keeping this site free:
- Author
- Recent Posts
Konstantinos is the founder and administrator of Wintips.org. Since 1995 he works and provides IT support as a computer and network expert to individuals and large companies. He is specialized in solving problems related to Windows or other Microsoft products (Windows Server, Office, Microsoft 365, etc.).
Загрузить PDF
Загрузить PDF
Из данной статьи вы узнаете, как сбросить забытый пароль к Windows XP или Vista. Для этого можно воспользоваться скрытой учетной записью администратора или установочным диском с Vista (если он есть).
-

Откройте меню «Пуск», щелкните по значку

, а затем нажмите «Перезагрузка».
-

В большинстве случаев это клавиша F8, но на вашем компьютере клавиша может быть другой. Если зажать эту клавишу до загрузки Windows, на экране отобразятся дополнительные варианты загрузки.
- Во время перезагрузки в нижней части экрана ищите фразу «advanced options» (дополнительные параметры) или «boot options» (параметры загрузки), или даже «advanced settings» (дополнительные настройки) — в конце или в начале фразы будет указана нужная клавиша.
-
Компьютер загрузится в безопасном режиме.
-
В Windows XP, возможно, вам предложат выбрать операционную систему; в этом случае просто нажмите ↵ Enter.
-
На ней вы увидите как минимум две учетные записи: свою обычную учетную запись и учетную запись администратора.
- Как правило, у учетной записи администратора стоит значок в виде шахматной фигуры.
-
Так вы войдете в учетную запись администратора. На экране отобразится рабочий стол.
Реклама


-

Щелкните по логотипу Windows (или по «Пуск» в Windows XP) в нижнем левом углу экрана.
-
Этот значок в виде конверта расположен в правой части меню «Пуск». Откроется небольшое окно.
- В Windows Vista введите run, если вы не видите опцию «Выполнить» в меню «Пуск».
-
Эта команда запускает командную строку.
-
Эта кнопка находится в нижней части меню «Пуск». Откроется командная строка.
-
Введите net user имя_пользователя новый_пароль, где вместо «имя_пользователя» введите имя пользователя учетной записи, пароль к которой вы забыли, а вместо «новый_пароль» введите новый пароль.
- Например: чтобы забытый пароль к учетной записи «hugsky» изменить на пароль «pupper123», введите net user hugsky pupper123.
-
Пароль будет изменен.
-
На экране входа в систему выберите свою учетную запись и введите новый пароль.
Реклама


-
Чтобы воспользоваться этим методом, необходимо открыть консоль восстановления, доступ к которой можно получить только с установочного диска или с диска восстановления Windows Vista.
- Можно скачать ISO-файл Windows Vista и записать его на DVD-диск.
- Не обязательно пользоваться тем же установочным диском, с которого вы устанавливали систему, но на таком диске должна быть та же версия Windows, что и на вашем компьютере.
-
Переверните диск этикеткой вверх и вставьте его в оптический привод компьютера.
-
Щелкните по направленной вверх стрелке у значка
, а затем в меню выберите «Перезагрузка».
-
Нажмите клавишу для входа в BIOS. Как только компьютер уйдет на перезагрузку, зажмите клавишу для входа в BIOS. Такая клавиша будет указана в нижней части экрана.
- Если вы не можете найти клавишу для входа BIOS, почитайте инструкцию (на бумаге или онлайн) к компьютеру или к материнской плате.
-
С помощью клавиш со стрелками перейдите на вкладку «Boot» (Загрузка) или «Startup» (Запуск).
- Пропустите этот шаг, если вы не видите вкладку «Boot».
-
Выберите опцию «Disc» (Диск), «Disc Drive» (Оптический привод) или аналогичную, а затем нажимайте клавишу + до тех пор, пока выбранная опция не окажется первой в списке.
-
Для этого можно нажать соответствующую клавишу — ищите ее в строке «Save and Exit» (Сохранить и выйти) в правой части экрана.
- Возможно, вам придется подтвердить свое решение; для этого нажмите ↵ Enter, когда появится запрос.
-
Откроется консоль восстановления Windows.
-
Эта опция находится в нижнем правом углу окна.
-
Эта опция находится в нижнем левом углу окна.
-
Вы найдете эту опцию посередине окна.
-
Эта опция расположена посередине экрана. Откроется командная строка.
-
Введите c:\windows\system32\utilman.exe c:\ и нажмите ↵ Enter.
- Если операционная система установлена на диске «D:», введите d:\windows\system32\utilman.exe d:\.
-
Введите copy c:\windows\system32\cmd.exe c:\windows\system32\utilman.exe и нажмите ↵ Enter.
-
Введите y и нажмите ↵ Enter. Так вы подтвердите, что хотите, чтобы на экране входа в Windows отображалась командная строка.
-
Извлеките установочный диск или диск восстановления, а затем перезагрузите компьютер. Вы увидите экран входа в систему.
-
Это круглая синяя кнопка в нижнем левом или нижнем правом углу экрана. Откроется командная строка.
-
Введите net user имя_пользователя новый_пароль, где вместо «имя_пользователя» введите имя пользователя учетной записи, пароль к которой вы забыли, а вместо «новый_пароль» введите новый пароль.
- Например: чтобы забытый пароль к учетной записи «citruslover» изменить на пароль «ilikelemons», введите net user citruslover ilikelemons.
-
Пароль будет изменен.
-
Для этого выберите свою учетную запись и введите новый пароль.
- Как только вы запустите команду, новый пароль будет готов к работе, то есть перезагружать компьютер не нужно.
Реклама


Советы
- Как правило, учетная запись администратора не защищена паролем. Если никто не установил пароль к этой учетной записи, вы сможете воспользоваться учетной записью администратора, чтобы сбросить пароль к Vista или XP.
Реклама
Предупреждения
- Помните, что сброс пароля на чужом компьютере без разрешения его владельца является незаконным.
Реклама
Об этой статье
Эту страницу просматривали 26 479 раз.