
Как использовать USB флешку c Windows на телефоне без компьютера?
Многие при появлении проблем с компьютером забывают о том, что у большинства из них в кармане есть почти полноценный компьютер на Android. Отсюда порой недовольные комментарии к статьям на тему: как же я скачаю драйверы на Wi-Fi, утилиту для очистки от вирусов или что-то ещё, если я как раз и решаю проблему с Интернетом на компьютере. Легко скачать и по USB передадать на проблемное устройство, если у вас есть смартфон. Как сделать это, читайте ниже.
- Вставьте в ваш смартфон Micro SD-карту объемом не меньше 16 Гб

- В телефоне зайдите в Play Market
- Загрузите приложение, как на фото ниже. Найти его вы можете, написав название в поиске

- Загрузите еще одно приложение – Архиватор RAR

- По ссылке скачайте Windows 11 microsoft.com/…/windows11
- Откройте ранее скачанное приложение 1DM
- Нажмите на + в нижнем правом углу

- Выберите Из буфера
- Запомните название папки, куда будет скачан Архив

- Нажмите Запуск
- Дождитесь завершения скачивания архива и выйдите из приложения
- Запустите ранее скачанное приложение Архиватор RAR
- Найдите скачанный вами архив, сделать это можно по названию

- Поставьте галочку напротив архива и нажмите на вторую кнопку в верхнем правом углу, со стрелочкой наверх
- Дождитесь завершения распаковки архива
- Выделите все разархивированные файлы и папки

- Зажмите любой из выделенных объектов и в появившемся меню выберите Копировать в буфер обмена
- В меню приложения выберите Micro SD-карту
- Вставьте скопированное, нажав на значок Вставить в верхнем правом углу
Теперь осталось вставить SD-карту в специальный разъем в ноутбуке, после этого выполните следующие шаги:
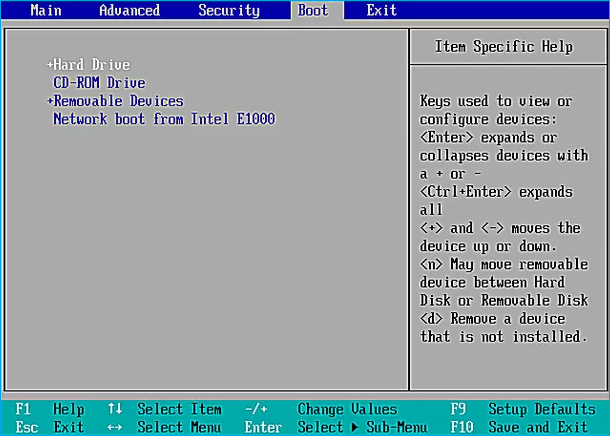
- При включении ноутбука, войдите в BIOS
- Нажмите на название вашей SD-карты и нажмите Enter

- После чего начнется стандартная загрузка системы Windows.
-
Готово!
0
Updated on Apr 28, 2025
Windows has exerted a prevailing influence within the domain of computer operating systems. It offers users a versatile platform for their computing needs. Traditionally, the installation of Windows has been predominantly carried out on internal hard drives. However, with the evolution of technology, alternative storage solutions have emerged.
One such solution is booting Windows from an SD card — a compact and portable storage medium typically used in cameras, smartphones, and other devices. Booting Windows from an SD card brings numerous advantages, including increased flexibility, mobility, and the ability to carry your personalized Windows environment wherever you go.
EaseUS will provide you with the necessary steps to boot Windows from an SD card successfully.
| ⏱️Duration | 3-7 minutes |
| 🧑💻Supported OS | Windows 10/11/8/7 |
| 📖Preparation |
SD Card [8GB and NTFS format] |
| ⛏️Software | Windows Cloning Tool — EaseUS Partition Master |
| 👣Steps |
Guide 1. Preparations to Boot from SD Card Guide 2. Create a Bootable SD Card Guide 3. Boot OS From SD Card |
This section will guide you through the entire process, from preparing your system to installing Windows on your SD card. Given below is the detailed process to boot Windows from an SD card:
Guide 1. Preparations to Boot Windows from SD Card
Before initiating booting Windows from an SD card, it is imperative to undertake a series of vital preparations. These preparations ensure you possess the tools and resources to execute the installation procedure effectively. Let’s delve into each requirement in detail:
1️⃣Prepare the SD Card and Format It
To begin, you will need an SD card with sufficient storage capacity:
- For optimal results, it is advisable to utilize an SD card with a minimum capacity of 8GB to accommodate the Windows installation files.
- Moreover, it is imperative to format the SD card to the NTFS file system to ensure seamless compatibility with the Windows operating system.
2️⃣Prepare Bootable SD Card
To boot a Windows computer from an SD card, you need to make the SD card bootable first. There are generally two ways to do this:
- Download a Windows ISO file that contains the installation files required for the Windows operating system. You can get the Windows ISO file from the official Microsoft website or other trusted sources.
- Or you can also migrate your computer operating system and applications to the SD card by cloning them.
3️⃣Download the Windows Cloning Tool: EaseUS Partition Master
You need a reliable cloning tool to migrate the Windows OS to the SD card. One highly recommended option is EaseUS Partition Master.
Here are a few reasons why we suggest using EaseUS Partition Master:
- It is Safe: EaseUS Partition Master provides safe download links, and it avoids a lot of advertising pitches.
- Better Compatibility: This tool is known for its compatibility with various storage media, including SD cards, ensuring a smooth cloning process.
- Fewer Limitations: EaseUS Partition Master provides fewer limitations than other cloning tools, allowing you more control over the process.
- Full Features: With its wide array of supplementary features and functionalities, this software is a comprehensive tool for effectively managing your devices.
📖Review from LifeWire: The overall look and feel of EaseUS Partition Master Free make whatever you’re doing with your computer’s partitions easy to understand and accomplish. The options aren’t too overwhelming, and each is accurately named.
Guide 2. Create a Bootable SD Card
After completing the essential preparations, creating a bootable SD card is the next pivotal step. Explained below in detail are the ways to install the Windows system on SD card and boot Windows from an SD card:
This method utilizes the Clone OS feature of EaseUS Partition Master, which enables you to clone your existing Windows system onto the SD card. The clone OS feature allows you to duplicate your Windows system onto the SD card, including all files, settings, and applications.
It ensures that your portable Windows environment retains the same functionality as your original system, providing a seamless experience. With this feature, you can create an independent and fully functional Windows system on your SD card, ready to boot on any compatible device.
Begin the process of installing the Windows system on an SD card by following these steps:
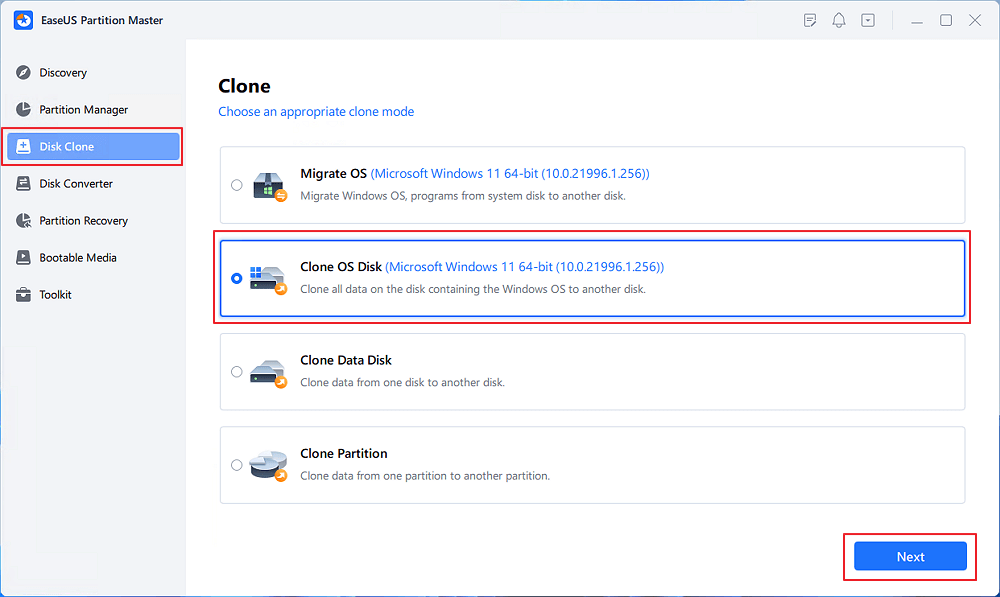
Step 1. Launch EaseUS Partition Master, go to the Disk Clone tab, select «Clone OS Disk» and click «Next».
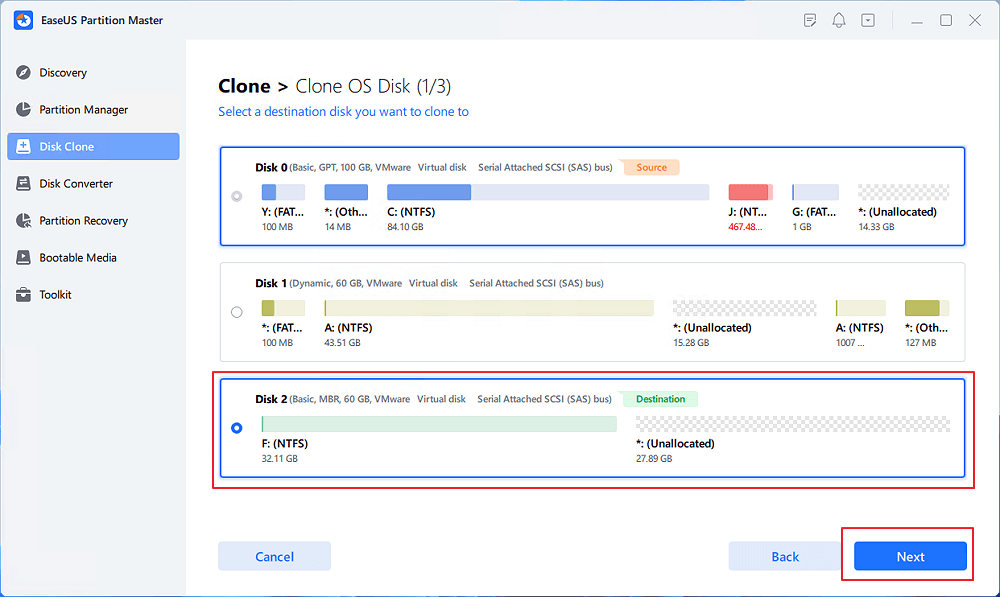
Step 2. Select the target new drive where you want to clone the OS to, and click «Next».
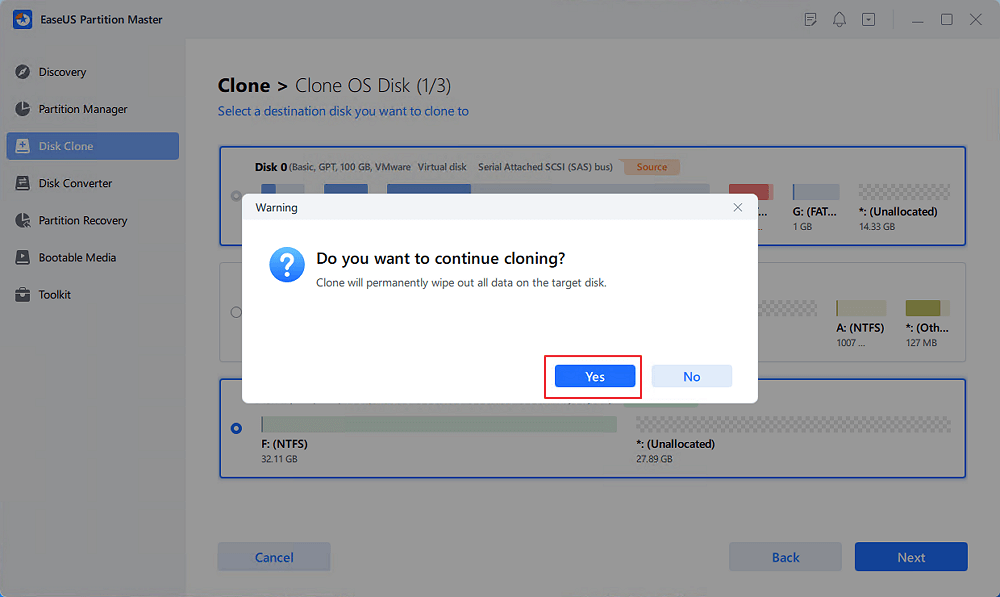
Click «Yes» to confirm that you want to continue the OS disk cloning process.
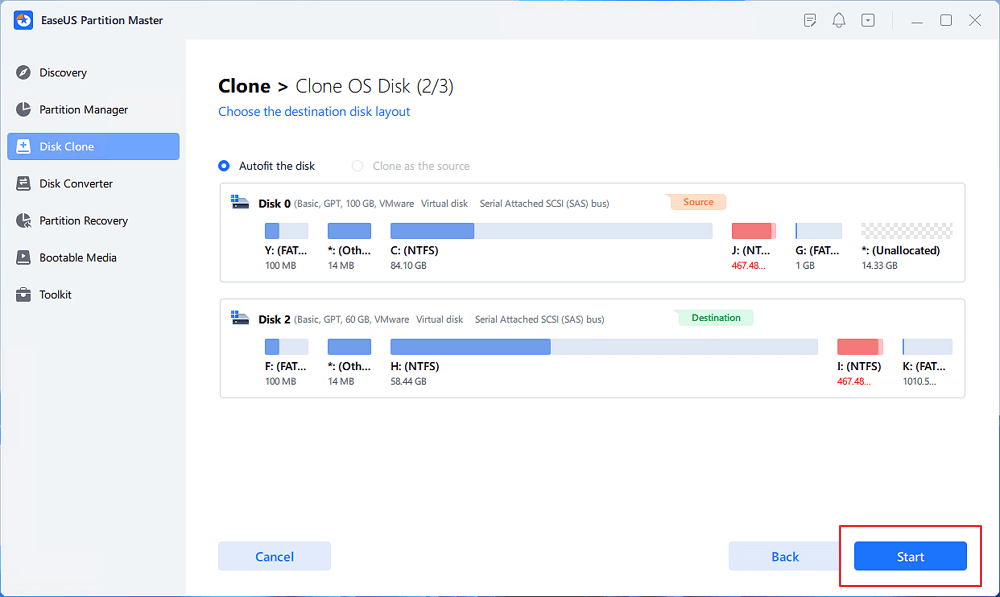
Step 3. View the disk layout, and click «Start» to begin the OS cloning process.
Step 4. When the process completes, you’ll see a confirming message, asking «if you want to start up computer from the clone target disk».
- Reboot Now means to reboot your PC and configure the computer to boot OS from the new disk immediately.
- Done means you want to make the changes later.

By using this way, you can also install Windows 10 from USB.
Guide 3. Boot OS From SD Card
Upon successfully creating a bootable SD card, the subsequent stage involves booting your operating system (OS) from the SD card. This allows you to start up and run your computer using the Windows installation on the SD card, providing a portable and independent Windows environment.
To ensure that your system prioritizes booting from the SD card, you need to modify the boot order within your computer’s BIOS settings. Here you will need to prioritize the SD card as the primary boot device. These are the steps you need to boot Windows from an SD card:
Step 1: Insert your bootable SD card into your computer and reboot it. During the rebooting process, use the BIOS key to open BIOS settings. The key differs for each model and brand. It can be F2, F8, Esc, F10, etc.
Step 2: When in the BIOS menu, select «Enter Setup» and move to the «Change Boot Order» option on the following window. Now use the arrow keys to give the SD card the highest boot priority. Afterward, save the BIOS settings and reboot your system to boot from the SD card.
Note: When you want to boot USB from other laptops, such as boot Lenovo laptop from USB or boot ASUS from USB, changing the boot order is essential.
Why Do We Boot Windows From SD Card
Having acquired knowledge on creating a bootable SD card and booting your operating system from it, you may question the advantages of booting from an SD card. Summarized below are the reasons and situations where booting from an SD card proves advantageous:
Portability and Mobility
Booting from an SD card provides the convenience of portability and mobility. You can carry your operating system, personalized settings, and applications wherever you go. Simply insert the SD card into a compatible device, boot from it, and access your familiar Windows environment on the go.
Troubleshooting and Recovery
Using a bootable SD card proves invaluable when troubleshooting or recovering your computer. If your primary operating system encounters issues or becomes inaccessible, having a bootable SD card lets you quickly boot into an alternative operating system and perform diagnostics, repair tasks, or recover important files.
Compatibility with Multiple Devices
A bootable SD increases your compatibility across various devices. The device supports booting from external media, so the same SD card can boot your Windows system on various computers or laptops. This flexibility proves particularly advantageous when working across different machines or temporary environments.
Test New Operating Systems
It is an excellent way to test new operating systems without interfering with your primary system. By simply booting from the SD card, you can explore various Windows versions or even experiment with alternative operating systems like Linux distributions. This allows for easy experimentation and exploration of different software environments.
Conclusion
In conclusion, booting Windows from an SD card unlocks portability, security, troubleshooting, and compatibility opportunities. Throughout this extensive guide, we have delved into the detailed process of booting Windows from an SD card. It involved cloning the Windows OS onto SD card and successfully booting your operating system from the SD card.
Throughout this process, we have emphasized the significance of selecting appropriate software to aid you in these endeavors. EaseUS Partition Master stands out as a reliable and feature-rich solution. It offers additional functionalities, such as OS cloning, Surface Test, 4K alignment, MBR rebuild, etc.
FAQs About How to Boot Windows From SD Card
If you still have inquiries regarding booting Windows from an SD card, we have compiled a list of FAQs to address common concerns. Continue reading to discover answers and enhance your comprehension of this subject matter:
1. Can I install the OS on an SD card?
Yes, installing an operating system on an SD card is possible. The first requirement is creating a bootable SD card and configuring your computer’s BIOS/UEFI settings. Now you can utilize the SD card as the primary medium for executing the operating system.
2. How can I use an SD card as RAM in Windows?
Use the following steps to use an SD card as RAM in a Windows computer:
Step 1: Insert your SD card into the SD card slot of your computer. Now format the card using the FAT32 file system. Locate your SD card in Windows Explorer and right-click on it to select «Properties.»
Step 2: Navigate to the «ReadyBoost» tab and select «Dedicate this device to ReadyBoost.» Finally, click «Apply» and «OK to save the changes.
3. How do I create a bootable Windows SD card?
You should format the SD card first to create a bootable Windows SD card. Afterward, acquire the Windows ISO file. Lastly, you need to utilize an ISO burner tool to transfer the ISO file onto the SD card. For a comprehensive, step-by-step explanation of how to accomplish this task using EaseUS Partition Master, please refer to the tutorial.
You are here:
Home » Windows 10 » How To Install Windows 10/8.1/7 From Your Phone’s Micro SD Memory Card
A couple of years ago, during the days of Windows XP and Vista to be precise, we all used to use traditional CDs and DVDs to install Windows operating system. Post the release of Windows 7 Beta in January 2009, a number of tools started appearing on the web to create bootable USBs that help you install Windows 7 from a USB drive.
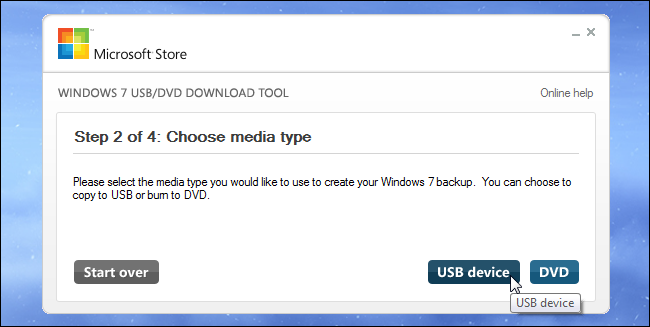
Microsoft also released an official tool, a few weeks before the release of Windows 7 RTM to the public, called Windows 7 USB/DVD Download Tool to help end users create bootable Windows 7 USBs from ISO image files. Tools like Rufus and WinUSB Maker are capable of creating bootable USB compatible with both tradition BIOS and new UEFI systems.

But there might be situations where you have Windows 10/8.1/7 ISO file but don’t have a USB drive to prepare and install/re-install Windows from a USB drive. Thankfully, Windows 7, Windows 8/8,1, and Windows 10 can be installed from your phone’s memory card as well.
These days, almost all of us own at least one smart phone and most of these smart phones, barring iPhone, support Micro SD memory cards. So finding a memory card isn’t a hard task, and since all of us carry our phones everywhere, we can quickly move the SD card data to a PC, prepare the bootable memory card, and then install Windows from the memory card.
In this guide, we will show you how to create bootable Micro SD memory card and use it as the bootable media to install Windows 10/8.1/7 from the same. Follow the given below instructions to prepare your Windows 10/8.1/7 bootable Micro SD card and then install Windows 10/8.1/7.
Preparing Windows 10/7/8.1 bootable memory card is fairly a simple job and you need to follow the same procedure that you followed to create Windows 8.1 bootable USB drives.
NOTE 1: Memory cards, other than Micro SD, can also be used to prepare bootable media and then install Windows from it.
NOTE 2: Before using the Command Prompt to prepare the bootable media, I tried the popular Rufus tool to make memory card bootable but it failed. Other similar tools out there might help you in preparing the bootable memory card but we’re going to use the 100% working instructions provided in our how to install Windows 10 from USB guide to prepare Windows 8.1/10 bootable memory card.
Making your Micro SD memory card bootable
Procedure:
Step 1: Remove the Micro SD memory card from your phone and attach it to your PC either using built-in or an external memory card reader.
Step 2: Back up all data from your memory card to a safe location, as we’re going to format the memory card which will erase all data from the card.
Step 3: Open elevated Command Prompt. To open the Command Prompt with administrator rights, type CMD in the Start screen or Start menu, and then simultaneously press Ctrl + Shift + Enter keys. You can also refer to our how to open Command Prompt as administrator for detailed instructions.
Step 4: In the elevated Command Prompt, execute the following commands:
Diskpart
Press Enter key.
List Disk
Press Enter key.
Notice the disk number of your memory card. For example, in the above picture, my memory card’s disk number is 1.
Step 5: Next, type the following commands one after another and press Enter key after tying each command.
Select Disk 1
In the above command, replace “1” with your memory card’s disk number that you have obtained in Step 4.
Clean
Create Partition Primary
Select Partition 1
Active
Format Fs=NTFS Quick
Assign
Exit
Don’t close the Command Prompt yet.

Step 6: Next, mount your Windows 10/8.1/7 ISO file to get a drive letter for the mounted drive. If you’re on Windows 8/8.1, right-click on the ISO file and then click Mount. And if you’re on Windows 7, please go through our how to mount an ISO file in Windows 7 guide for detailed instructions.
Step 7: Execute the following three commands:
G: Cd Boot
Where “G” is drive letter of the mounted ISO file
Bootsect.exe /NT60 F:
In the above command, replace “F” with the drive letter of your Micro SD memory card. That’s it! You can now close the Command Prompt.

Step 8: Finally, copy all files (including hidden, if any) from the virtual drive (ISO file mounted drive) to your memory card. Your bootable Windows memory card is now ready.
Step 9: Turn on the PC on which you would like to install Windows from the bootable memory card, connect the bootable memory card, boot into BIOS or UEFI, re-arrange the boot order to bootable from memory card/USB and restart the PC to see Press any key to boot from CD/DVD message on the screen.
Press any key to begin loading necessary files and installing Windows 10/8.1/7 operating system. Good luck!
NOTE: Should your PC doesn’t show memory card in the BIOS/UEFI and doesn’t support booting from a memory card, you can put back the memory card (after preparing the bootable one) into your phone, connect the phone to your PC using a supported cable and then restart your PC to boot and install Windows. It worked on our PC, at least.
Quick Links
-
Use a USB 3.0 Drive, If You Can
-
From Mac OS X Installation Files
-
From a Windows ISO for Mac
Creating installation media for your operating system of choice used to be simple. Just download an ISO and burn it to CD or DVD. Now we’re using USB drives, and the process is a little different for each operating system.
You can’t just copy files from an ISO disc image directly onto your USB drive. The USB drive’s data partition needs to be made bootable, for one thing. This process will usually wipe your USB drive or SD card.
Use a USB 3.0 Drive, If You Can
USB 2.0 has been around forever, and everything supports it, but it’s notoriously slow. You’ll be much better off making the upgrade to USB 3.0 since the prices have dropped dramatically, and the speed increases are enormous… you can get 10x the speed.
And speed really matters when you’re making a boot drive.
Editor’s Note: We use this Silicon Power USB 3.0 drive here at How-To Geek, and at $15 for a 32 GB version, it’s well worth the upgrade. You can even get it in sizes up to 128 GB if you want.
Don’t worry about compatibility, these faster drives are fully compatible with an old USB 2.0 system, you just won’t get the speed boosts. And if your desktop computer doesn’t support USB 3.0 you can always upgrade it to add support.
For Windows 7, 8, or 10
Use Microsoft’s own Windows USB/DVD download tool to create a bootable drive you can install Windows from. You’ll need a Windows installer ISO file to run this tool. If you don’t have one, you can download Windows 10, 8, or 7 installation media for free — you’ll need a legitimate product key to use them, though.
Provide the ISO file and a USB flash drive and the tool will create a bootable drive.
Alternatively, if you’re installing Windows 10, you can download an ISO or burn Windows 10 installation media directly using Microsoft’s Media Creation Tool.

From a Linux ISO
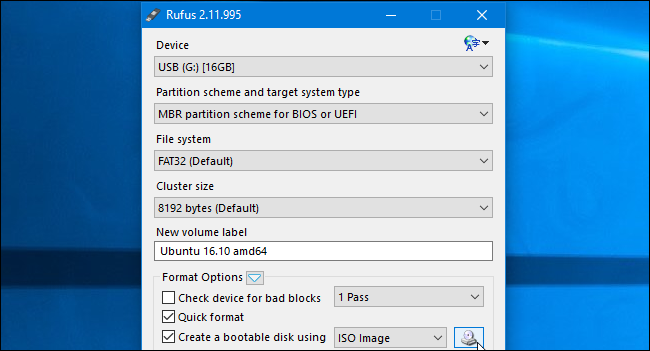
There are many tools that can do this job for you, but we recommend a free program called Rufus—it’s faster and more reliable than many of the other tools you’ll see recommended, including UNetbootin.
Download the Linux distribution you want to use in .ISO form. Run the tool, select your desired distribution, browse to your downloaded ISO file, and choose the USB drive you want to use. The tool will do the rest. You can see a full step-by-step guide here.
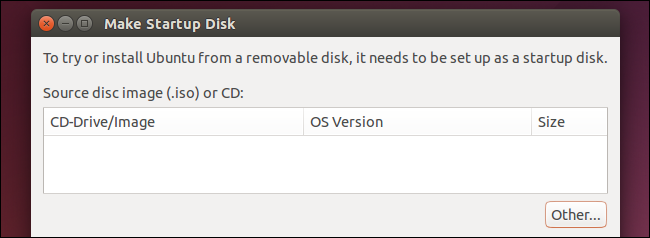
You can use similar tools on Linux. For example, Ubuntu includes a Startup Disk Creator tool for creating bootable Ubuntu USB drives.
From an IMG File
Some operating system projects provide an IMG file instead of an ISO file. An IMG file is a raw disk image that needs to be written directly to a USB drive.
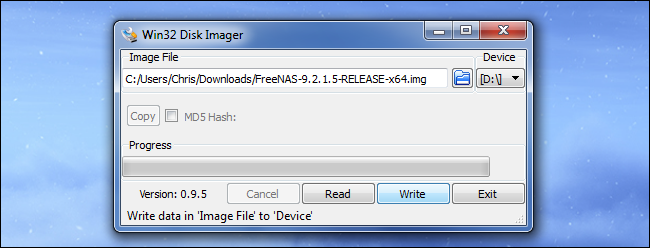
Use Win32 Disk Imager to write an IMG file to a USB drive or SD card. Provide a downloaded IMG file and the tool will write it directly to your drive, erasing its current contents. You can also use this tool to create IMG files from USB drives and SD cards.
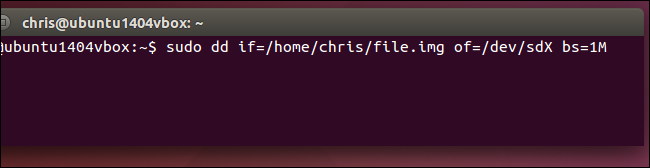
Linux users can use the dd command to directly write an IMG file’s contents to a removable media device. Insert the removable media and run the following command on Ubuntu:
sudo dd if=/home/user/file.img of=/dev/sdX bs=1M
Replace /home/user/file.img with the path to the IMG file on your file system and /dev/sdX with the path to your USB or SD card device. Be very careful to specify the correct disk path here — if you specify the path to your system drive instead, you’ll write the contents of the image to your operating system drive and corrupt it
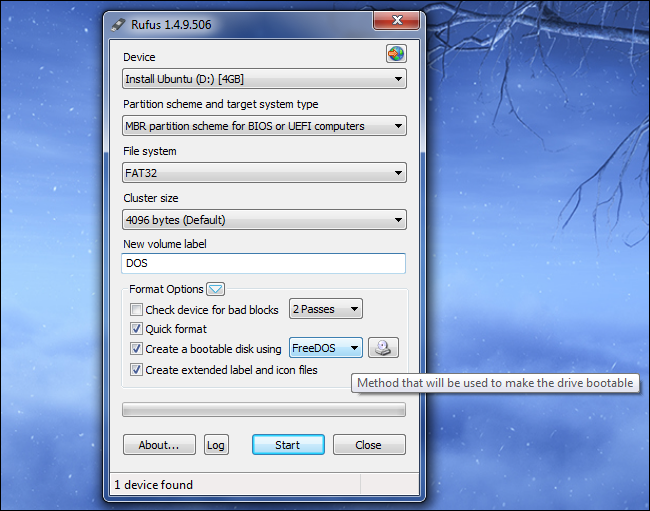
For DOS
If you need to boot into DOS to use a low-level firmware upgrade, BIOS update, or system tool that still requires DOS for some reason, you can use the Rufus tool to create a bootable DOS USB drive.
Rufus uses FreeDOS, an open-source implementation of DOS that should run whatever DOS program you need to use.
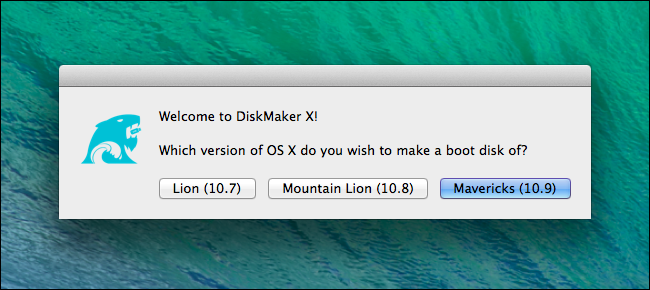
From Mac OS X Installation Files
You can create a bootable drive with Mac OS X on it by downloading the latest version of OS X from the Mac App Store. Use Apple’s included «createinstallmedia» tool in a terminal or by run the third-party DiskMaker X tool.
The Mac OS X drive can be used to install OS X on other Macs or upgrade them to the latest version without any long downloads.
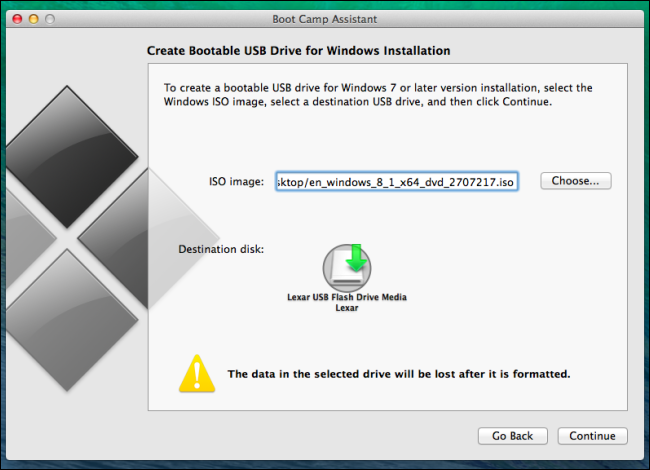
From a Windows ISO for Mac
If you plan on installing Windows on a Mac via Boot Camp, don’t bother creating a bootable USB drive in the usual way. Use your Mac’s Boot Camp tool to start setting things up and it will walk you through creating a bootable Windows installation drive with Apple’s drivers and Boot Camp utilities integrated.
You can use this drive to install Windows on multiple Macs, but don’t use it to install Windows on non-Apple PCs.
Some of these tools overlap — for example, Rufus can also be used to create bootable drives from Linux ISOs, IMG files, and even Windows ISO Files. We suggested the most popular, widely recommended tools for each task here.
Image Credit: USBMemoryDirect on Flickr
Автор ganzstarr, 19 Февраля 2013, 09:41:00
0 Пользователей и 1 Гость просматривают эту тему.
ganzstarr
- Новичок
- Сообщений: 5
-
- Записан
добро времени суток, господа.
все идеи и варианты перепробованы, в том числе и найденные на этом интересном форуме. остаеца спросить совета, птм что зашол в тупик(((( помогите плиз
есть:
— смартфон Samsung Galaxy Note II (Android 4.1.2)
— карта-памяти MicroSD HC 32GB Kingmax
— Acer 522 со встроенным кардридером, Win7 Макс 32bit
— сборка Win7Live (папка с BOOTMGR в корне)
— оптимизм&мечта&желание
задача:
— сделать загрузочную microSD с 2-мя разделами минимум: подключаем смартфон в режиме USB Mass Storage к любому пк и стартуем с microSD.. загружается Win7Live + видно всю карту памяти.
с обычной флехой — все работает. с телефоном и флехой получалось, но через раз. чегото я не понимаю(((
ВАЖНО:
— Android принимает флешку только в FAT(32)/ExFAT, и не после любых манипуляций с разделами и флешкой в целом (рапортует «Карта памяти пустая или повреждена»… это напрягает(
— число секторов на microSD разное: через пк больше, чем через телефон
— в BIOS постоянно пишет USB-FDD: Samsung USB Storage… только однажды получилось загрузиться как надо и выдал USB-HDD — и все работало в идеале.
— ПРЕДОСТАВЛЮ любые скрины/фото/инфу и ВЫПОЛНЮ любые манипуляции по данной теме, если ктото знает и поможет мне.
заранее благодарю откликнувшихся!
ganzstarr
- Новичок
- Сообщений: 5
-
- Записан
ок. немного предыстории.. купил Samsung Note 2 + карту памяти microSDHC 32Gb. подключая к ПК он определяеца как МультимедиаУстройство… т.е. не как СъемныйНоситель(Флешка). НЕУДОБНО! сделал ROOT, теперь все ок, т.е. телефон начал определяца в BIOS как USB-FDD Samsung Mass Storage- что очень радует!
была загрузочная флеха с моей Win7, которая при загрузке в автоматическом режиме устанавливает все дрова на нужный ПК (в данном случае Acer 522), что позволяет спокойно пользоваться интернет&мультимедиа незаморачиваясь с установкой ОС. что очень радует!
почему бы не сделать 2в1?
ведь это радует вдвойне!- иметь на своем телефоне всегда с собой свой ПК со всеми своими файлами и программами в нашТоВек информатизации)))! подключить к любому компьютеру и хотя бы просто загрузица… и это возможно и реально![/color]
проблема в том чтобы отформатировать и разрезать карту microSD так, чтобы и телефон её Скушал, и в BIOS было чтото типа
USB-HDD
Samsung Mass Storage, вместо
USB-FDD
Samsung Mass Storage как сейчас. или какую альтернативу. не сильно секу в этом((((((((((( но у меня както пошла загрузка и все работало)))) а потом я решил изменить размеры разделов, т.к. просто тестировал и на размер было изначально пофиг, главное чтобы получилось))))
Magistrz, спасибочки тебе за предупреждение, есть microSD 2Gb, думаю хватит для теста, впредь тестю на ней.
ganzstarr
- Новичок
- Сообщений: 5
-
- Записан
все делал BOOTICE‘ом- норм.прога, делал 4 раздела(разные файл.системы)- всё корректн.работало. в ПК конечно присутствовал только 1 активный, остальные менял понужде тем же БУТАЙСом. и флешку вставлял втелефон и смартфон кушал её с удовольствием;)
еще есть MiniTool Partition Wizard— тоже тема. советую.
в самом телефоне разделы NTFS монтировались автоматич., программа называется ParagonNTFS&HFS+(бесплатна, доступна в PlayMarket).
нашел Ultimate Boot CD, запускается! даже когда в BIOSе смартфон+карта определеяюца как USB-FDD: Samsung Mass Storage, это радует!
http://blog.integrii.net/?p=173.
Magistrz, разделы разрезать не проблема, мжт можно както прикрутить Win7Live к UBCD?) помогите плз!) уже 3-ьи сутки мозг плавица)
ganzstarr
- Новичок
- Сообщений: 5
-
- Записан
разобрался с загрузкой с microSD 2Gb)) на 32Gb уверен будет также.
загружается телефон с картой внутри. стартует Ultimate Boot CD Menu http://blog.integrii.net/?p=173
прошу помощи в прикручивании и запуске ОС Win7Live средствами UBCD.
Win7Live- обычная сборка, пару папок и BOOTMGR в корне
чтонибудь типа chainloader /bootmgr как в Grub4Dos. плз
затем выложу полный мануал)))
ссылки:
1. Ultimate Boot CD:
— сам инсталлер- ~500кб http://blog.integrii.net/wp-content/uploads/2009/01/ubcdfix2.exe
— образ- ~120Мб http://ftp.cc.uoc.gr/mirrors/linux/ubcd/ubcd411.iso
2. Win7Live
— торрент, образ- ~300мб http://dl.rutracker.org/forum/dl.php?t=4222309&guest=1
ведь все гениально и просто)))
надо просто прикрутить… чтобы хотя бы из меню UBCD можно было выбрать загрузку Win7Live. ничего собирать и ломать голову не надо. просто скачайте и попробуйте на обычной флешке. сам пытался.. лес дремучий(((
всегото:
1)скачать все по ссылкам
2) инсталлер извлечь
3) в папку с извлеченным бросить образ UBCD
4) распаковать образ Win7Live рядом тут же.
у этого Ultimate Boot CD полюбому должен быть какойнить MENU.LST.. сижу репу чешу( как начать загрузку Win7Live(
ganzstarr
- Новичок
- Сообщений: 5
-
- Записан
оказалось в итоге: более менее адекватно происходит загрузка при помощи XORBOOT и банально записью образа ISO на USB-флешку программой UltraIso.
видимо не любит андроид када вторгаюца и чегото не то пишут в MBR… всем спасибо;)
- Форум — FlashBoot.ru
-
►
USB Flash Drive -
►
Создание загрузочных USB Flash Drive (Модераторы: Anatolij, Ksanderash, tagaraz) -
►
смартфон + microSD = Win7 Live на любом ПК (напр. без жесткого диска)