
| Workable Solutions | Step-by-step Troubleshooting |
|---|---|
| 1. Create Windows 10 Bootable USB on Mac with Boot Camp | Go to Finder. Choose Applications. Select Utilities. Open Boot Camp Assistant. Click on Continue…Full steps |
| 2. Create Windows 10 Bootable USB on Mac with UUByte ISO Editor | Install UUByte ISO Editor on your Mac. Connect the USB drive to the system. The software will detect the…Full steps |
| 3. Create Bootable USB on Mac for Windows with Disk Utility | Plug the USB drive into the system. Open Disk Utility. Format the USB flash drive via MS-DOS (FAT)…Full steps |
| 4. Using Terminal to Create Windows 10 Bootable USB on Mac | Plug the USB drive into your Mac. Open Terminal. To do so, choose Terminal from Utilities folder. Type…Full steps |
Do you want to create Windows 10 bootable USB on macOS Ventura/Monterey/Big Sur? Multiple reasons may prompt a user to do so. Firstly, a new operating system aids in clearing out existing malware. Secondly, it cleans up the system and improves efficiency. Moreover, you can easily create a bootable USB on Mac for Windows.
Creating a Windows 10 Bootable USB on a Windows computer is no big deal. But is it possible to create Windows 10 bootable USB on Mac without Bootcamp? Yes, you can! You can also create Mac bootable USB from Windows.
The latest silicon chips on Mac do not have Bootcamp installed. The new ARM chip architecture doesn’t allow it, so conventional Windows installation is impossible. However, multiple solutions can aid Mac users. It is hassle-free to create Windows 10 bootable USB on Mac with Terminal.
Here’s a video tutorial on how to create Windows bootable USB on a Mac, including Windows 11, 10, 8, 7, and older versions. Take a look!

How to Download Windows 10 ISO File for Bootable USB
The best option to attain the Windows 10 ISO File is to visit Microsoft’s official website. Here are the steps you need to follow:
Step 1. Visit the Microsoft Windows 10 download page.

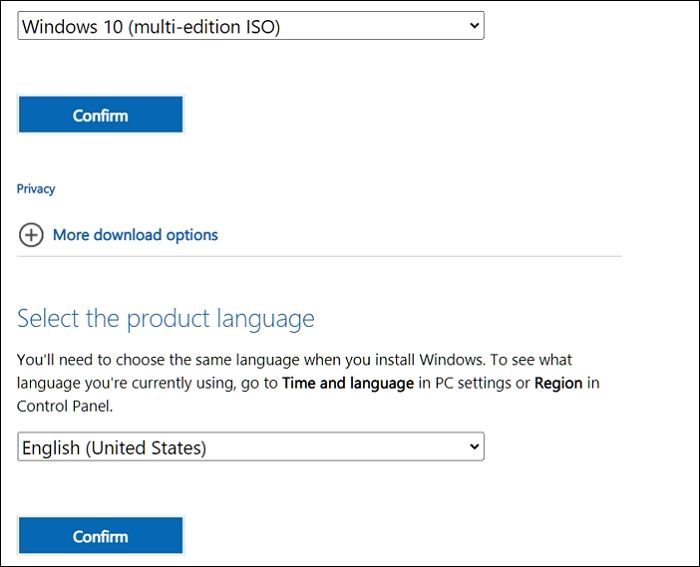
Step 2. Click on the dropdown under Windows 10 version, and then click on confirm.
Step 3. Next, select the language and edition. Click Confirm.
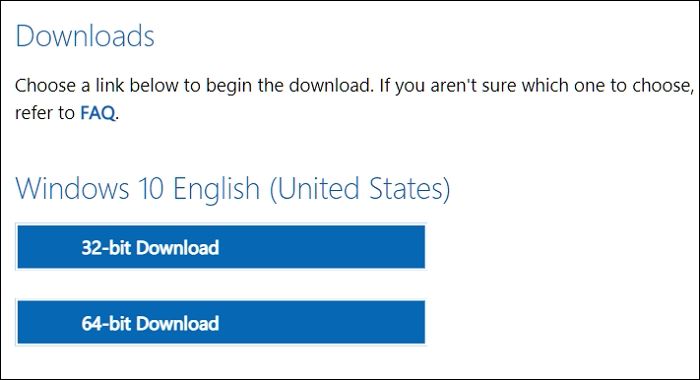
Step 4. Another page will open, giving you a download link. You can choose between Windows 10 32-bit ISO or 64-Bit ISO.
Step 5. Select where you want to save the ISO file. Wait for the download to complete.
How to Format a USB Correctly to Create Windows 10 Bootable USB
Before you go ahead with creating Windows 10 Bootable USB on Mac, it is vital to format the USB. Most users have no idea how to do this or why this is even important. Formatting the USB will erase all existing data and make the space free for the download. Moreover, you also need to ensure that the formatting is compatible with the system you will use it with.
Take a look at the steps you can follow to format drives on Macs:
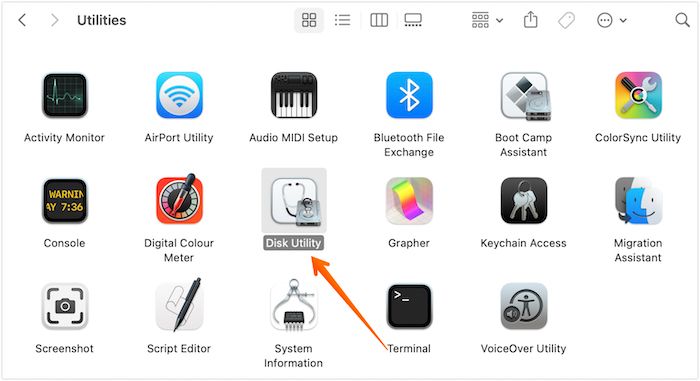
Step 1. Plug in the USB drive. Open Disk Utility. To do so, you need to open the Applications folder. Under that, open the Utilities folder, where you will find Disk Utility app.
Step 2. Choose the USB drive from the list. You will find it on the left-hand sidebar.
Step 3. Choose Erase. Now, type the name you want for the drive.

Step 4. Choose the Format you want. Select Erase.
Step 5. After some time, choose Done. Allow some time for the process to complete.
Download Recovery Software to Avoid Data Loss [Important]
Did you know you may lose data while using Mac to create a bootable USB? Yes! That’s a real possibility. If you want to create a Windows bootable USB on Mac, your Windows PC cannot boot and needs to recover data. Moreover, you can also face data loss after formatting the USB drive. In that case, taking the assistance of professional data recovery software is a great idea.
The EaseUS Data Recovery Wizard for Mac is a highly efficient and user-friendly data recovery tool for Mac. With this tool, you can recover lost data due to various causes, such as malware attacks, USB formatting, accidental deletion, etc. Moreover, you can also retrieve data from Mac-based devices like SSD, HDD, fusion drive, and more!
EaseUS Data Recovery Wizard
- Recover unsaved Word documents on Mac. And it can recover deleted files, documents, photos, audio, music, etc.
- Support data recovery on multiple devices, including USB drives, memory cards, internal hard drives, and digital cameras.
- Recover data from unbootable Mac. If your Mac cannot boot, you can create bootable media with this recovery tool.
Other exciting features include file filters, data protection, iCloud recovery, etc. You can also seek remote IT support if you encounter any issues. Are you eager to use EaseUS Data Recovery Wizard for Mac? In that case, follow these simple steps listed here:
Step 1. Search for lost files
Select the disk location to search for lost files (it can be an internal HDD/SSD or a removable storage device) on macOS Sierra, High Sierra, Mojave, Catalina, Big Sur, Monterey, Ventura, and the latest Sonoma. Click the «Search for lost files» button.

Step 2. Go through the scanning results
EaseUS Data Recovery Wizard for Mac will immediately scan your selected disk volume and display the scanning results.

Step 3. Select the file(s) and recover
In the scan results, select the file(s) to preview and click the «Recover» button to have them back.

Method 1. Create Windows 10 Bootable USB on Mac with Boot Camp
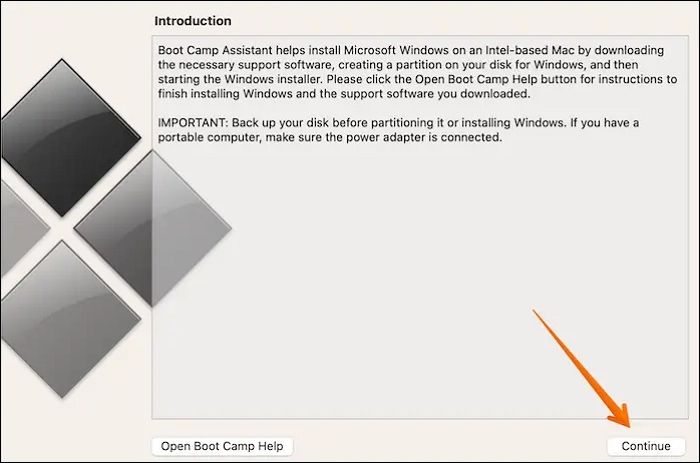
One of the most straightforward solutions to create a Windows 10 Bootable USB on Mac is to use Mac Boot Camp Assistant. It is a multi-faceted boot program that requires an installed Windows ISO file and a USB drive.
Take a look at the steps you need to follow:
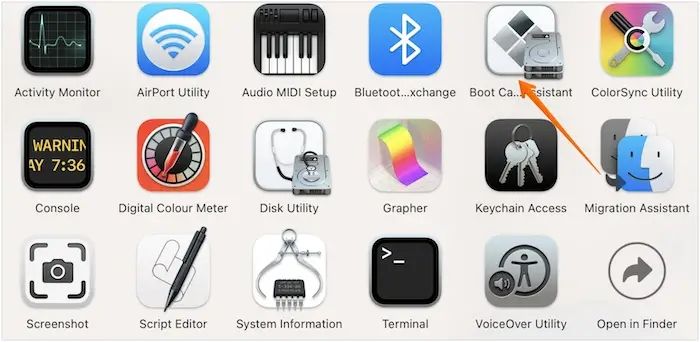
Step 1. Go to Finder.
Step 2. Choose Applications.
Step 3. Select Utilities.
Step 4. Open Boot Camp Assistant.
Step 5. Click on Continue.
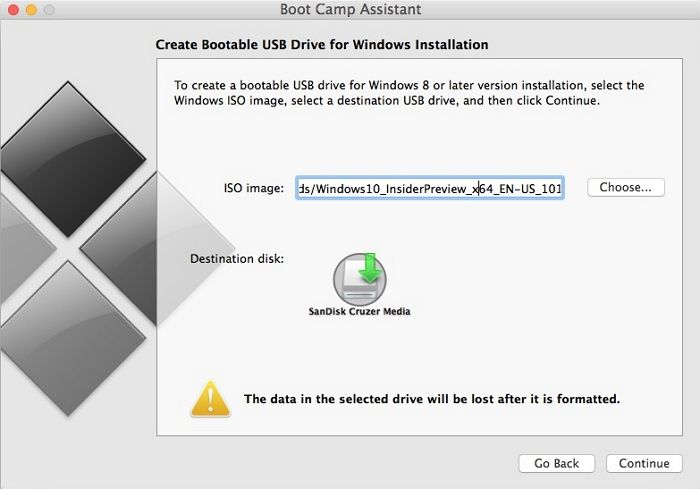
Step 6. Select the «Create a Windows 10 or later version installs disk» option. Click on Continue. Select Choose.
Step 7. Import the ISO file. Go ahead with Continue. Wait for the process to complete.
Step 8. Check if the bootable USB is named WININSTALL.
Step 9. If it appears so, you can remove the USB.
Note: This solution is only applicable to Intel-based Macs. You can opt for the following methods if you have Macs with an M1 chip.
Method 2. Create Windows 10 Bootable USB on Mac with UU Byte ISO Editor
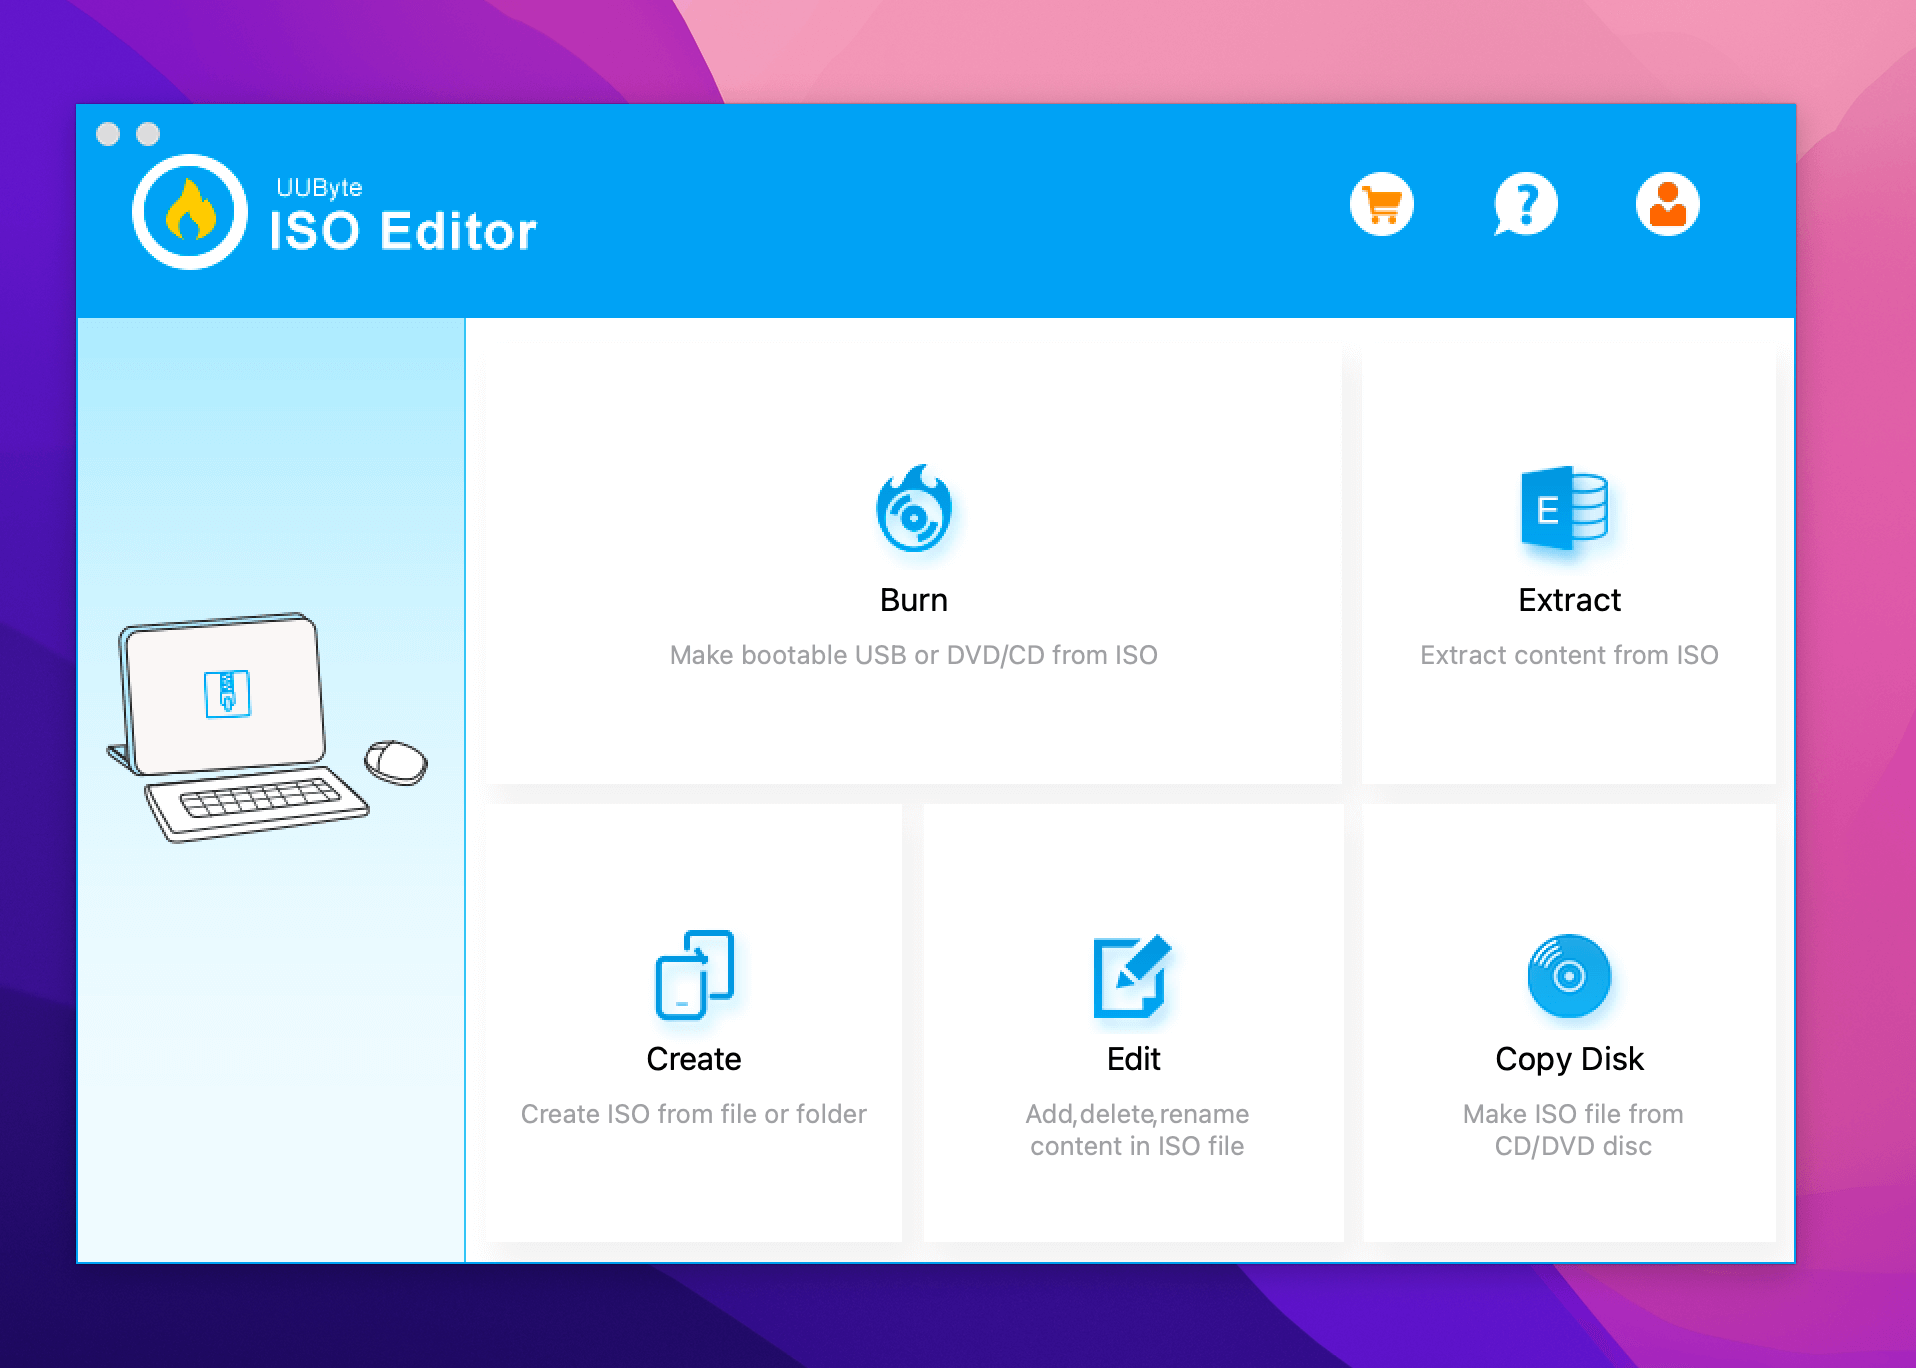
Another excellent method to create Windows 10 Bootable USB on Mac is with UUByte ISO Editor. The UUByte ISO Editor is a robust tool that enables users to complete the process easily. Most importantly, this app is fully compatible with Apple M1 and M2 Mac. In addition, you can run this app perfectly on the latest macOS Ventura. Here are the steps to follow:
Step 1. Download UUByte ISO Editor app from this link and Install it on your Mac.
Step 2. Connect the USB drive to the system.
Step 3. Click the Burn tab on the welcome screen and you can see the software detect the USB.
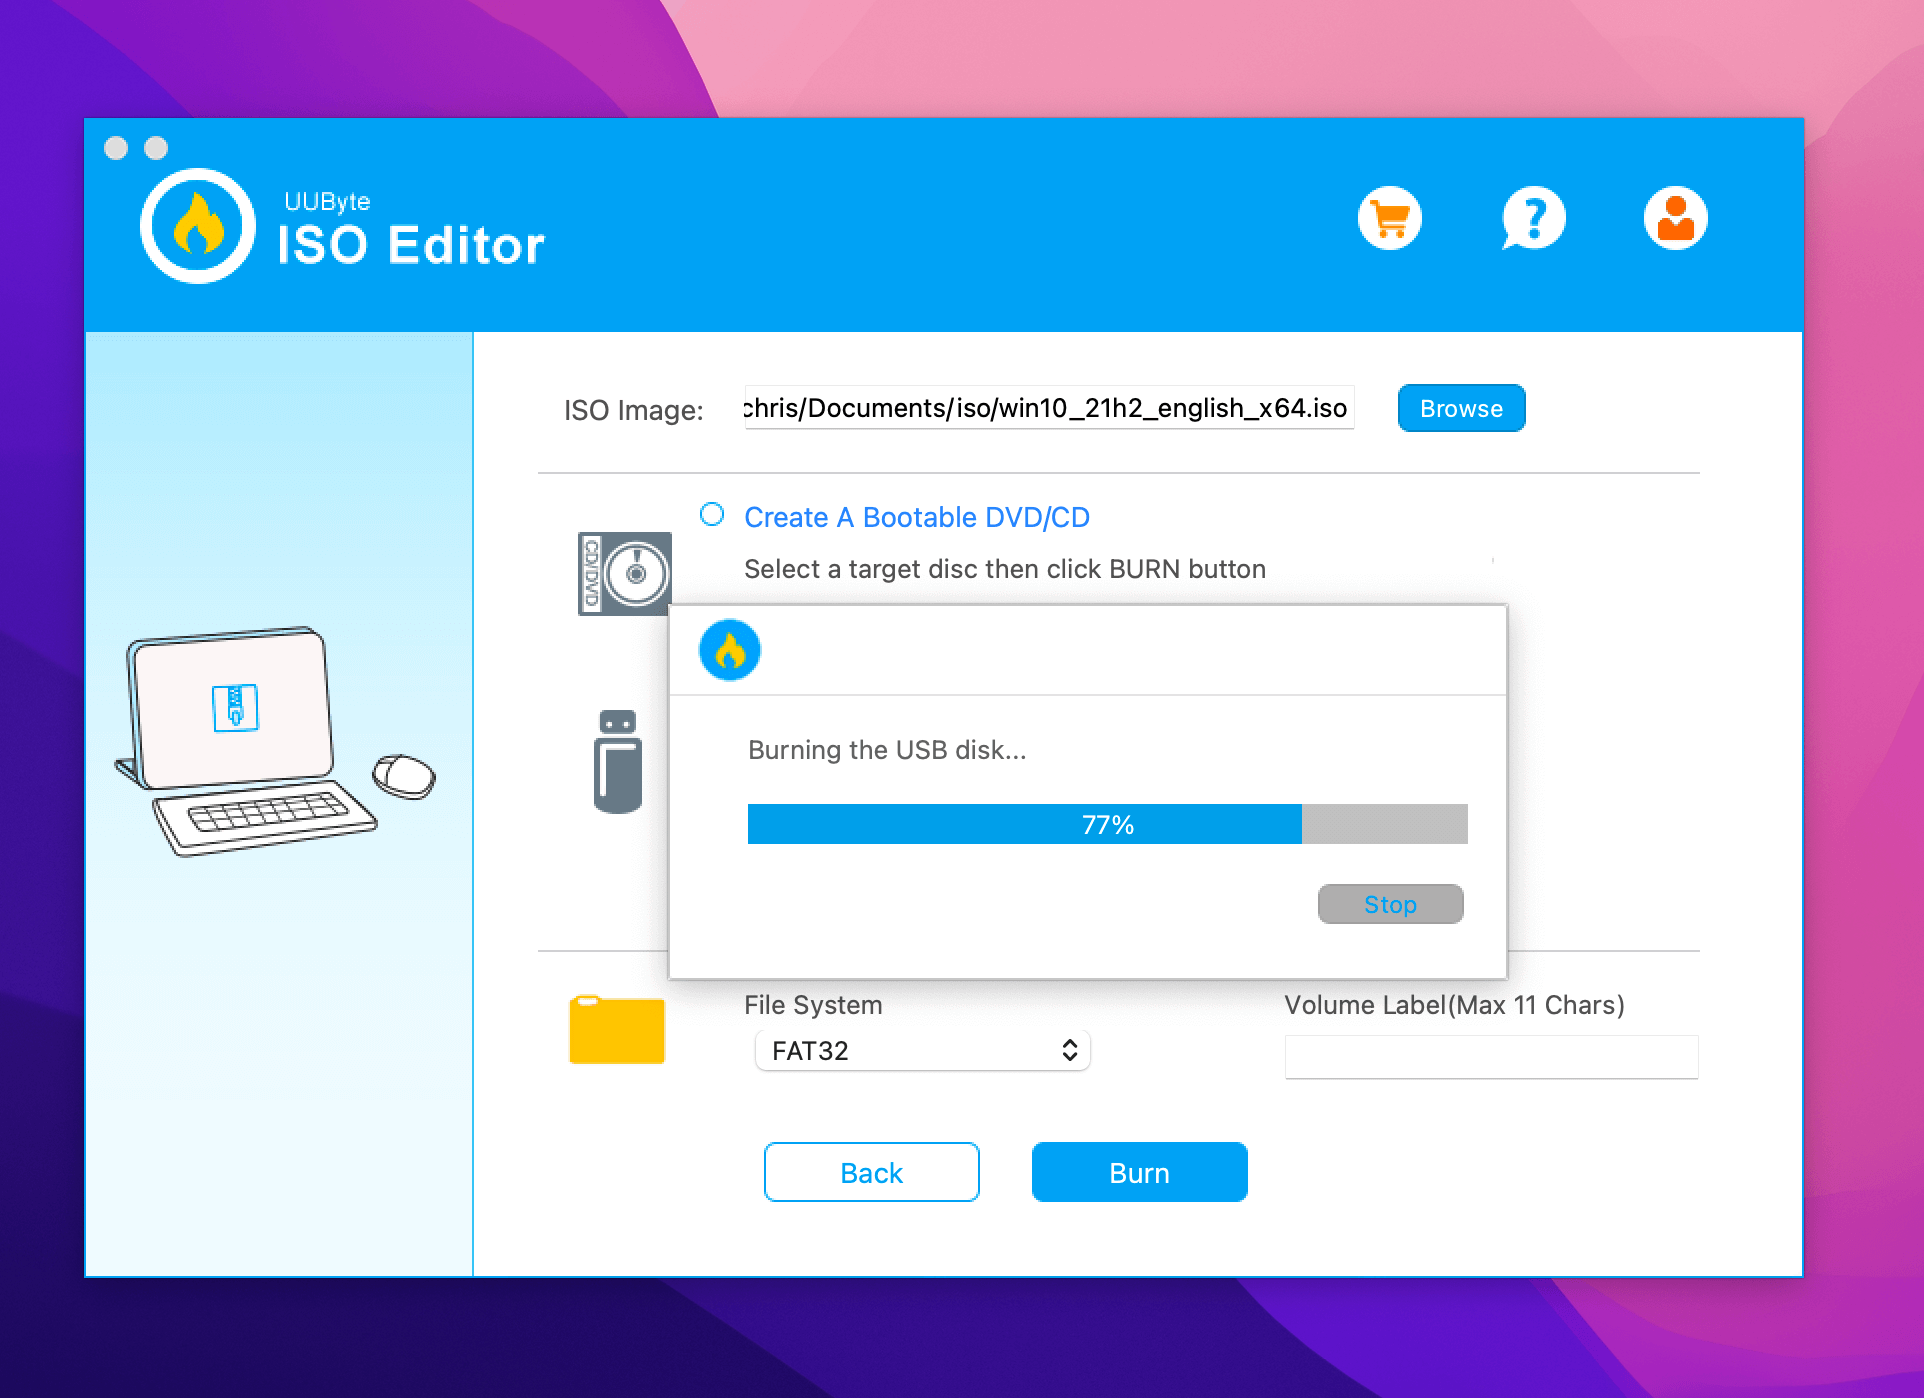
Step 4. Import Windows 10 ISO into the app and choose the right USB drive.

Step 5. Now, click the Burn button at the bottom to start the process. Wait for some time for the completion of the process. It takes approximately 7 minutes to create a bootable USB on Mac. During this step, you can see ISO Editor splits the install.wim file automatically at the end.
Note: While the process is simple, you should be very careful with it, especially don’t touch the USB device. If you have created Windows 10 bootable USB successfully, remember to share this post with more users!
Method 3. Create Bootable USB on Mac for Windows with Disk Utility
Did you know you can create Bootable USB on Mac for Windows with Disk Utility? For that, you need to follow some simple steps –
Step 1. Plug the USB drive into the system.
Step 2. Open Disk Utility.
Step 3. Format the USB flash drive via MS-DOS (FAT).
Step 4. Send the Windows ISO file to the USB.
Step 5. Wait for the ISO file writing process to complete.
Now, you can use the USB to install Windows on Mac. However, it is essential to understand that this method favors older Mac models. If you have the latest version, use other solutions.
Method 4. Use Terminal to Create Windows 10 Bootable USB on Mac
You can use Mac Terminal to create Windows 10 Bootable USB on Mac. We have also included a video to help out users. Take a look:
- 00:48 Download the Windows 10 ISO file.
- 03:00 Copy the ISO file to the USB drive.
- 04:24 Use the Homebrew package manager.
- 07:32 Create a new folder on the USB drive and copy the downloaded contents.
Check out the written steps to follow:
Step 1. Plug the USB drive into your Mac.
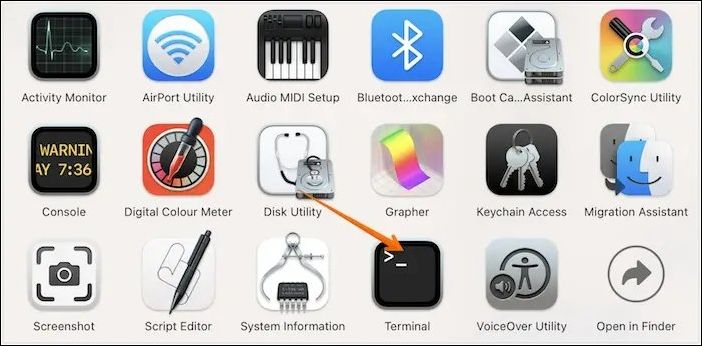
Step 2. Open Terminal. To do so, choose Terminal from Utilities folder.
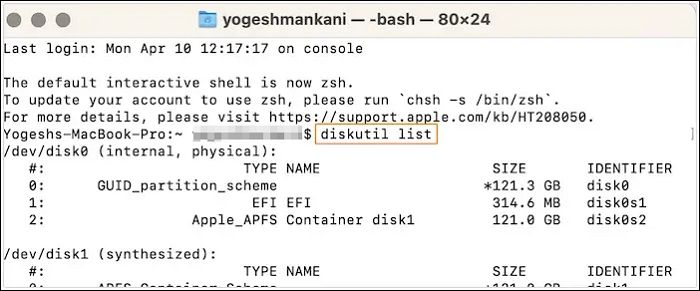
Step 3. Type diskutil list to find the USB name and press the Enter key.
Step 4. Type diskutil eraseDisk MS-DOS «WINDOWS10» GPT drive name@. Here, the drive name is the name of your USB drive.
Step 5. Download the Windows 10 ISO file.
Step 6. Type hdiutil mount ~/Downloads/WINDOWS10IMAGE.iso. Here, it would be best if you used the ISO file name instead of WINDOWS10IMAG.
Step 7. Next, type cp -rp /Volumes/MOUNTED-ISO/* /Volumes/WINDOWS10/. Here, MOUNTED will be replaced by the name of the ISO mounted.
Step 8. Lastly, type hdiutil unmount/Volumes/MOUNTED-ISO. The Terminal will close, and you will get a bootable USB.
If you are also interested in creating macOS Sonoma bootable USB on Mac, check the following passage:
Create macOS Sonoma Bootable USB Installer
If you have macOS Sonoma installed, then it’s essential to create a bootable USB in case of an issue with the OS. Read more >>
Summary
Isn’t creating Windows 10 Bootable USB on Mac easy? This article lists four methods you can use to create Bootable USB on Mac for Windows. You can follow these hassle-free steps and get it done.
However, data loss is always possible while creating Windows 10 Bootable USB on Mac. For that, you need help from reliable data recovery software. You can check out EaseUS Data Recovery Wizard for Mac in that case. It is a practical yet easy-to-use tool that aids in recovering lost data.
Haven’t you installed EaseUS Data Recovery Wizard for Mac yet? Download it today!
Create Windows 10 Bootable USB on Mac FAQs
You can create Windows 10 Bootable USB on Mac in these different ways. To know more, read the questions and answers listed below —
1. How to create macOS Ventura bootable USB on Mac?
To create macOS Ventura bootable USB on Mac, follow these steps:
- 1. Go to the Apple Store and download macOS Ventura.
- 2. Run Terminal on the system.
- 3. Connect the USB to the Mac.
- 4. Type in sudo /Applications/Install\ macOS\ Ventura. app/Contents/Resources/createinstallmedia —volume /Volumes/MyVolume in the Terminal.
- 5. Hit the Return key.
- 6. Enter the password when prompted.
2. How to rescue data from an unbootable Windows computer?
There are multiple ways to rescue data from an unbootable Windows computer. For instance, you can unplug various cables and reset the connection. You can also use the BIOS feature or eject RAM. However, if nothing works, you can opt for professional data recovery software, EaseUS Data Recovery Wizard for Mac.
3. Can I create Windows 10 bootable USB on a Mac with Terminal?
Yes, you can create Windows 10 bootable USB on a Mac with Terminal. But for that, you must use the diskutil, hdiutil commands with mount and unmount. You will also need to copy the ISO to the USB.
- 1. Download the ISO file from Windows.
- 2. Plug the USB drive into your system.
- 3. Enter «diskutil list» on Terminal to see where the USB is.
- 4. Enter «diskutil eraseDisk MS-DOS «WINDOWS10″ GPT@»
- 5. Now, enter «hdiutil mount ~/Downloads/WINDOWS10IMAGE.iso»
- 6. After that, type «cp -rp /Volumes/MOUNTED-ISO/* /Volumes/WINDOWS10/»
- 7. At last, enter «hdiutil unmount /Volumes/MOUNTED-ISO».
4. How to install macOS Ventura on a Windows PC?
To install macOS Ventura on a Windows PC, follow these steps:
- 1. Create a Bootable USB installer for macOS Ventura.
- 2. Go ahead with the EFI partitions configuration.
- 3. Adjust BIOS settings.
- 4. Install macOS Ventura on the system.
Last modified: May 6, 2021 12:34 AM
18
60820
Last modified May 6, 2021 12:34 AM
- Find a USB2 flash drive 8+Gb.
Note: If you use W10 1903 or later ISOs from Microsoft, the install.wim is larger than 4GiB, and will not fit on a FAT32 USB. Use exFAT format instead of FAT32.
- Erase/Format it as MBR/FAT32.

- Download
- Bootcamp 6 drivers from Apple to the root of the USB for W10. These can be downloaded using BC Assistant -> Action -> Download.
- Bootcamp 4/5 drivers from Apple to the root of the USB for W7/W8.1, as appropriate. You will also need to add the Bootcamp drivers to the USB as noted in step 11 of section Follow these steps if you downloaded version 5 of Windows Support Software in Install Windows 7 on your Mac using Boot Camp — Apple Support . These steps are valid for both W7/W8.1.
- The USB file structure look similar to
- Copy the entire contents of your Windows ISO to this USB. This is your USB installer.
Note: There is some confusion whether the entire ISO is copied as a single file to a FAT-formatted device which does not support files larger 4GB. Mount the ISO by right-clicking on the ISO and choosing Open. Select all the individual files/folders in the Finder window and Copy (or Drag) them to the USB.
- To create a partition manually which will be the designated Windows installation destination, create a FAT32 partition using Disk Utility.
- Boot from the USB, and choose the FAT32 partition as destination and install Windows.
- If you get a GPT vs MBR error, GPT Fdisk (https://sourceforge.net/projects/gptfdisk/) can be used to remove the Hybrid MBR.
A Protective MBR allows EFI Boot on Late 2013 or later Macs.A Hybrid MBR allows Windows in legacy BIOS mode using the Windows icon from the USB Installer on 2012-2014 Macs.
Warning: Do not use a USB Installer on 2011 or older Macs. These Macs do not properly support EFI Boot, even if Windows will install. The quickest check is either using msinfo32 or testing your Audio. If Audio does not work, you need to use a legacy BIOS installation.
If you see error messages which are similar to the following screens…
then please see Bootcamp install windows to black screen for a possible solution.
Операционная система Windows более капризная и менее стабильная, чем macOS от Apple. Открытость ОС, отсутствие встроенной системы резервного копирования и большое количество вредоносного ПО часто приводят к необходимости перестанавливать Windows.
При наличии второго Windows-компьютера под рукой создать загрузочную флешку не составит никакого труда.
? Спасибо re:Store за полезную информацию. ?
Сейчас расскажем, как выйти из ситуации, когда есть только рабочий Mac.
В тему: как создать загрузочную флешку macOS в Windows
Еще несколько лет назад создать загрузочную флешку можно было при помощи стандартной утилиты Boot Camp, которая предназначена для быстрой установки Windows на Mac.
Приложение подготавливало загрузочную флешку, записывало на нее установщик Windows и заливало драйвера для корректной работы всех модулей Mac. Использовать такую флешку можно было не только на компьютерах Apple, с ее помощью можно было установить Windows на любой подходящий компьютер.
С недавнего времени разработчики macOS переработали утилиту и вместо создания загрузочной флешки она сразу же начинает установку системы на отдельный раздел Mac.
К счастью, есть и другой достаточно простой способ задать флешку для установки Windows.
Как создать загрузочную флешку Windows
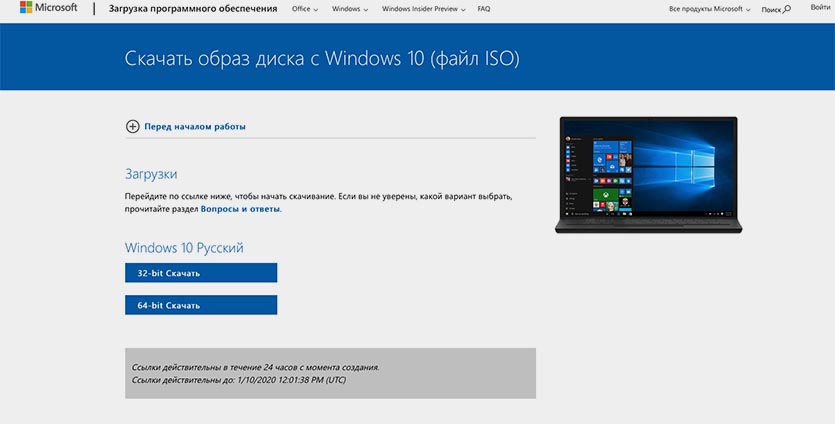
1. Для начала потребуется образ с операционной системой. Скачать его можно прямо с официального сайта Microsoft.
Образ Windows 10 занимает чуть более 5 Гб дискового пространства, на скачивание обычно уходит от 15 до 30 минут.
2. Далее понадобится флешка объемом 8 ГБ и более, которая будет отформатирована в формате Fat32.
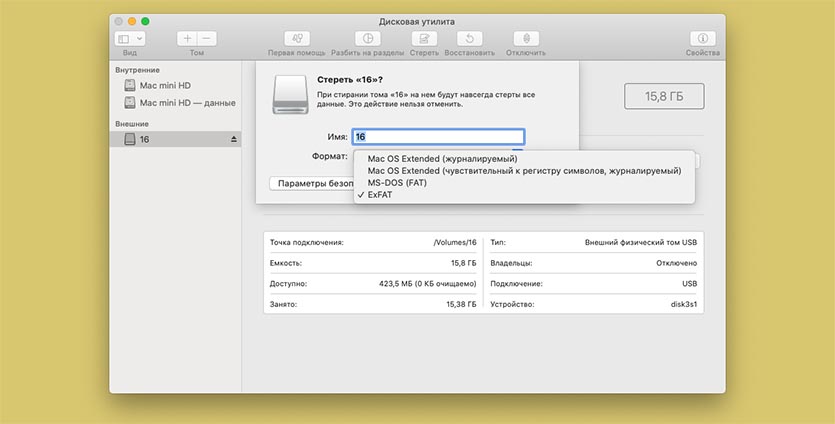
Можно воспользоваться приложением Дисковая утилита или сделать все в Терминале.
3. В Терминале выполняем следующую команду:
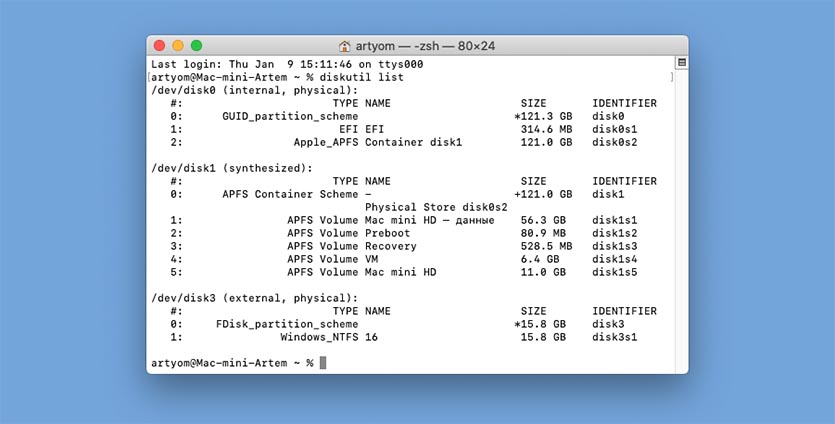
diskutil list
Видим перечень внутренних и внешних накопителей на Mac. Находим нужный по объему и запоминаем его номер. Далее вводим команду:
sudo diskutil eraseDisk FAT32 WININSTALL MBRFormat /dev/disk3
FAT32 — нужная нам файловая система;
WININSTALL — метка флешки после форматирования (можно указать любое имя);
disk3 — номер подключенного накопителя, который будем форматировать.
Вводим пароль администратора, ждем несколько секунд и получаем готовую чистую флешку.
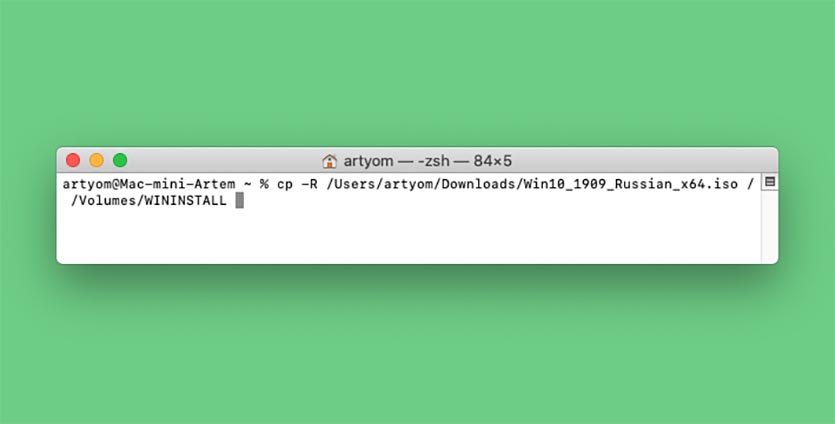
4. Остается лишь скопировать содержимое образа с Windows 10 на флешку.
Для этого монтируем образ и вводим в Терминале такую команду:
cp -R расположение_образа/ расположение_флешки
Чтобы вручную не прописывать длинные пути, нужно лишь ввести начало команды “cp -R “, а затем перетянуть образ на окно Терминала из Finder. Путь к нему пропишется автоматически.
Теперь пишем “/ ” (без кавычек с пробелом) и перетаскиваем в Терминал флешку из Finder.
5. Копирование займет определенное время. Никакого статуса при этом отображаться не будет. Об окончании процесса можно судить по светящемуся диоду на флешке (во время копирования он будет мигать).
Можно просто подождать около 20 минут.
Теперь флешку можно использовать для загрузки на компьютерах и ноутбуках с поддержкой UEFI. К сожалению, для старых Windows-ПК такой способ не подойдет.
(136 голосов, общий рейтинг: 4.39 из 5)
iPhones.ru
Сделать это проще, чем флешку macOS из Windows.
Артём Суровцев
@artyomsurovtsev
Люблю технологии и все, что с ними связано. Верю, что величайшие открытия человечества еще впереди!
- To create a Windows 11 USB installer from macOS, you’ll have to download the official ISO file, format a USB flash drive using the “diskutil” tool, split the “install.wim” file with the “wimlib” tool, and transfer the files to the bootable USB drive.
- Alternatively, you can also use the WinDiskWriter app, which makes it easier to create a Windows USB installer similar to the Rufus tool.
UPDATED 7/12/2024: If you have to install Windows 11 (or 10) on a computer but only have a Mac running Apple’s macOS, you can create a bootable USB flash drive using a non-Windows machine in the same way you can use a Windows computer to create a macOS bootable USB installer.
Although you have multiple methods to create an installation media for Windows 11, they are only available for Windows devices. However, it’s also possible to use macOS. The only issue is that the operating system only lets you format the USB storage using the FAT32 file system that can only store files less than 4GB when the “install.wim” file (containing the installation files) is usually larger than 4GB (usually 5.6GB). As a result, we have to resource third-party tools to split the image into two smaller files to complete the process.
In addition, you can also use WinDiskWriter, which is a third-party app available through GitHub as a free download and streamlines the USB flash drive creation to process to only a few clicks without the need to use the Terminal command console.
In this guide, I will outline the steps to create a bootable USB using macOS to install Windows 11 as well as Windows 10 using the macOS Terminal command console and the WinDiskWrinter app.
- Create Windows 11 (or 10) bootable USB on macOS using Terminal
- Create Windows 11 (or 10) bootable USB on macOS using WinDiskWriter
Create Windows 11 (or 10) bootable USB on macOS using Terminal
To create a bootable USB to clean install Windows 11 using macOS, use these steps:
-
Open the Windows 11 ISO download page.
-
Choose the Windows 11 option under the “Download Windows 11 Disk Image (ISO) for x64 devices” setting.

-
Click the Download Now button.
-
Select the installation language.

-
Click the Confirm button.
-
Click the “64-bit Download” button to save the ISO file on your macOS device, more specifically in the “Downloads” folder.
-
Connect a USB flash drive of at least 8GB of storage.
Quick note: This process erases everything on the drive. As such, it’s recommended that any important data be backed up in the storage.
-
Open Launchpad.
-
Search for Terminal and click on the top result to open the command console.
-
Type the following command to identify the USB flash drive storage and press Return:
diskutil list

Quick note: In my case, the USB is identified as “disk4.”
-
Type the following command to clean and format the USB flash drive to make it bootable, and press Return:
diskutil eraseDisk MS-DOS "Windows_USB" MBR disk4
Quick tip: You can change “Windows_USB” to any name you want, but to avoid issues while running typing commands, make sure the name doesn’t include any space. I made that mistake and had to retype some of the commands because names with spaces have to be specified with quotation marks. Also, change “disk4” for the identifier of your USB flash drive.
-
Type the following command to open the “Downloads” folder where the ISO file is located and press Return:
cd Downloads
-
Type the following command to mount the Windows 11 ISO file to macOS and press Return:
hdiutil mount Win11_2xH2_English_x64vx.iso
-
Type the following command to transfer the installation files from the ISO file to the USB flash drive (excluding the install.wim file because it’s too large a FAT32 partition) and press Return:
rsync -avh --progress --exclude=sources/install.wim /Volumes/CCCOMA_X64FRE_EN-US_DV9/ /Volumes/Windows_USB
-
Type the following command to install the Homebrew tool on macOS and press Return:
/bin/bash -c "$(curl -fsSL https://raw.githubusercontent.com/Homebrew/install/HEAD/install.sh)"
Quick note: Homebrew is a package manager that will allow you to install the “wimlib” command tool to split the “install.wim” file and transfer it to the USB flash drive.
-
Confirm your macOS account password and press Return to continue.
-
Type the following command two commands to add Homebrew to your “PATH” and press Return on each line:
(echo; echo 'eval "$(/opt/homebrew/bin/brew sheval "$(/opt/homebrew/bin/brew shellenv)"ellenv)"') >> /Users/YOUR-ACCOUNT/.zprofile
eval "$(/opt/homebrew/bin/brew shellenv)"

In the command, update “YOUR-ACCOUNT” to match the name of your macOS account.
-
Type the following command to install the wimlib tool and press Return:
brew install wimlib
-
Type the following command to split the “install.wim” image and transfer the packages to the USB flash drive, and press Return:
wimlib-imagex split /Volumes/CCCOMA_X64FRE_EN-US_DV9/sources/install.wim /Volumes/Windows_USB/sources/install.swm 3500
Quick note: The “3500” number is the size in MiB of the file split. You can specify any number as long as it’s less than 4GB.


Once you complete the steps, you will end up with a bootable USB flash drive that you can connect to a computer to perform a clean install of the operating system.
Create Windows 11 (or 10) bootable USB on macOS using WinDiskWriter
To create a Windows 11 bootable USB with the WinDiskWriter tool, use these steps:
-
Open the Windows 11 ISO download page.
-
Choose the Windows 11 option under the “Download Windows 11 Disk Image (ISO) for x64 devices” setting.
-
Click the Download Now button.
-
Select the installation language.
-
Click the Confirm button.
-
Click the “64-bit Download” button to save the ISO file on your macOS device, more specifically in the “Downloads” folder.
-
Connect a USB flash drive of at least 8GB of storage.
Quick note: This process erases everything on the drive. As such, it’s recommended that any important data be backed up in the storage.
-
Open the WinDiskWrinter download page.
-
Click the WinDiskWriter.x.x.zip option to download the file on your Mac.

-
Press the Control key + click the WinDiskWriter Zip file, and choose the Open option to extract the tool.
-
Press the Control key + click the extracted WinDiskWriter tool file, and choose the Open option.
Quick note: Since this is not an official app, you will receive the “WinDiskWriter.app can’t be opened because Apple cannot check it for malicious software” message, which is an expected behavior for this app.
-
Press the Control key + click the extracted WinDiskWriter tool file again, and choose the Open option.

-
Click the Open button.
-
Click the Choose button in the “Windows Image” setting.

-
Select the Windows 11 (or 10) ISO image.
-
Click the Open button.
-
(Optional) Check the “Patch Installer Requirements” option to install Windows on unsupported hardware.
-
(Optional) Check the “Install Legacy BIOS Boot Sector” option to install the operating system on a device without UEFI firmware. (This option will require to reopen the app.)
-
Click the Start button.
-
Click the Start button again.
-
Click the Allow button.


After you complete the steps, you will have a bootable USB flash drive to install the operating system.
Update July 12, 2024: This guide has been updated to ensure accuracy and reflect changes to the process.
Why You Can Trust Pureinfotech
The author combines expert insights with user-centric guidance, rigorously researching and testing to ensure you receive trustworthy, easy-to-follow tech guides. Review the publishing process.
В данной статье мы рассмотрим, как создать загрузочную флешку с системой Windows в Mac OS.
Для этого вам понадобится:
— Приложение WinDiskWriter.
— Прямая ссылка на скачивание данного приложения находится здесь.
— ISO образ Windows, который вы можете скачать в нашем каталоге.
В скриншоте ниже, перечислены версии Windows которые вы сможете записать на флешку с помощью WinDistkWriter, а так же в каких версиях Mac OS она работает.
— Последнее что вам обязательно нужно это сама флешка с не менее чем 5 Гб. памяти.

Приступим к записи ISO образа Windows на флешку из под Mac.
1) После того как вы скачали WinDiskWriter и ISO образ Windows, перенесите их на рабочий стол.

2) Далее открываем WinDiskWriter двойным щелчком мыши и нажимаем «Открыть» в всплывающем окне.
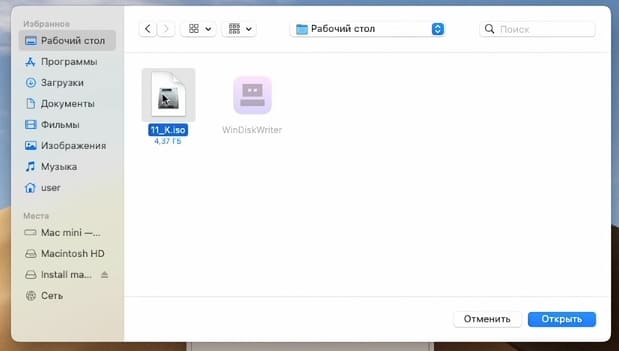
3) В разделе «Образ Windows», нажимаем «Выбрать» и выбираем ваш скачанный ISO образ Windows.
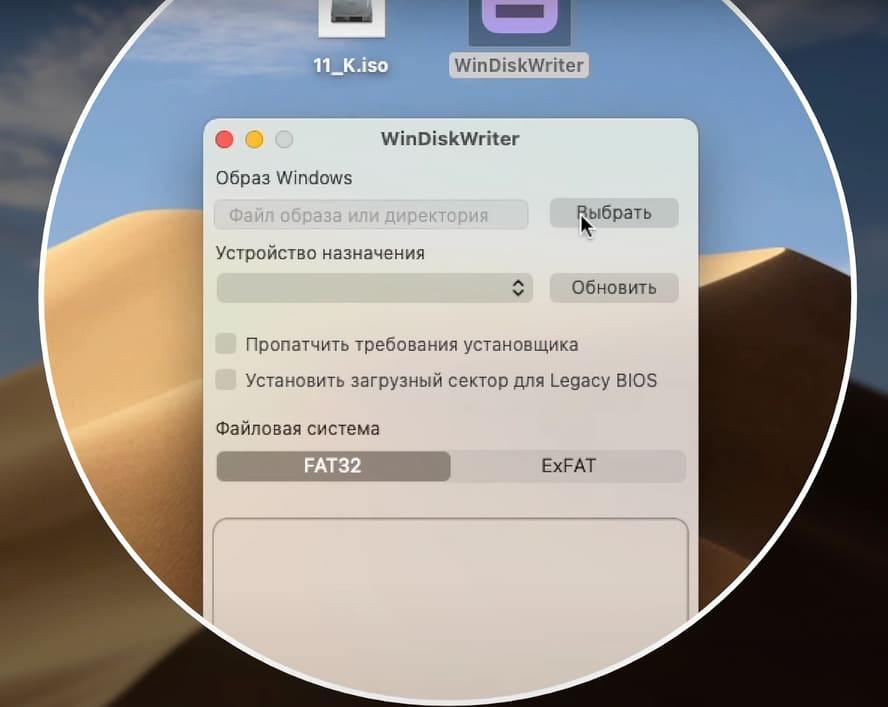
4) После этого, вставляете флешку в ваш Mac и в программе WinDiskWriter нажимаете «Обновить», что бы она отобразилась как устройство назначения.
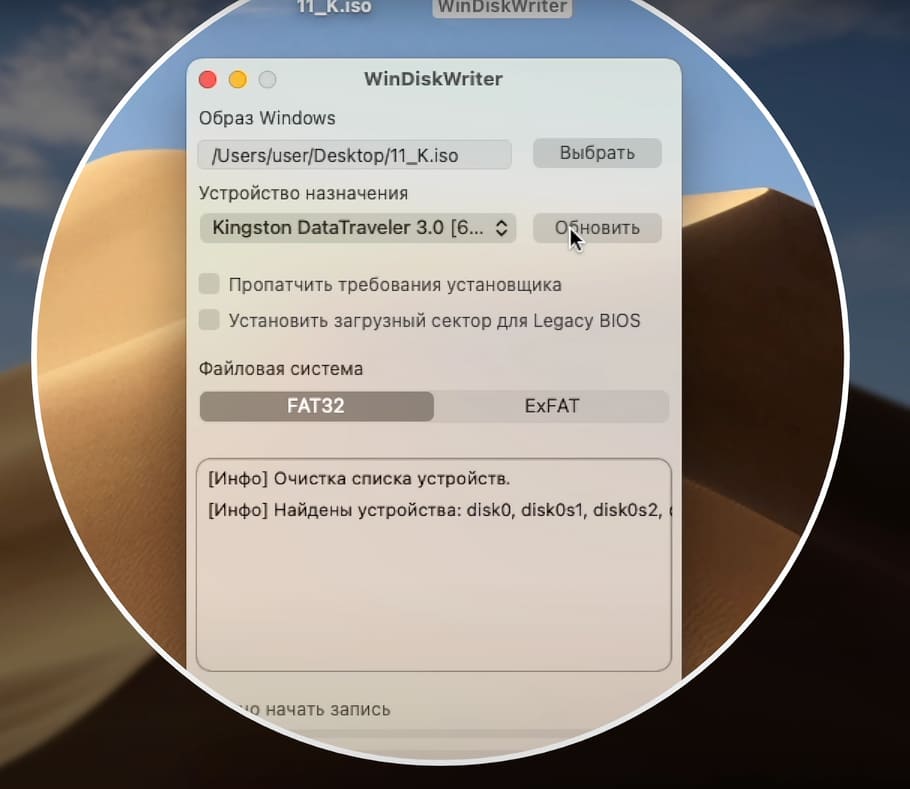
5) Так же, если вам нужно установить новую операционную систему Windows 11 на старый ноутбук или на ПК со старым железом.
Поставьте галочку в пункте «Установить загрузочный сектор для Legacy BIOS».
В моем случае я всё оставляю по умолчанию, ничего не меняя.

6) Теперь нажимаем «Начать», обратите внимание! Все данные на флешке будут удалены, так что заранее позабодьтесь, что бы перенести нужные файлы на другой диск или флешку.
7) Во всплывающем окне, нажимаем «Разрешить». И просто дожидаемся записи Windows.
 В конце записи появится еще одно всплывающее окно, просто нажимаем «Ок».
Поздравляю! Теперь у вас есть загрузочная флешка с Windows, которую вы сделали используя систему Mac OS.
Как установить Windows с помощью этой загрузочной флешки, читайте в нашей следующей статье!
Лицензионный ключ активации Microsoft Office для Mac от