
1. Overview
With a bootable Ubuntu USB stick, you can:
- Install or upgrade Ubuntu
- Test out the Ubuntu desktop experience without touching your PC configuration
- Boot into Ubuntu on a borrowed machine or from an internet cafe
- Use tools installed by default on the USB stick to repair or fix a broken configuration
This tutorial will show you how to create a bootable USB stick on Microsoft Windows using Rufus.
For most users we recommend balenaEtcher instead of Rufus which is simpler to use and also available on MacOS and Ubuntu. Instructions are now included in the primary Install Ubuntu Desktop tutorial.
Creating a bootable Ubuntu USB stick from Microsoft Windows is very simple and we’re going to cover the process in the next few steps.
Alternatively, we also have tutorials to help you create a bootable USB stick from both Ubuntu and Apple macOS.

2. Requirements
You will need:
- A 4GB or larger USB stick/flash drive
- Microsoft Windows XP or later
- Rufus, a free and open source USB stick writing tool
- An Ubuntu ISO file. See Get Ubuntu for download links

Take note of where your browser saves downloads: this is normally a directory called ‘Downloads’ on your Windows PC. Don’t download the ISO image directly to the USB stick! If using Windows XP or Vista, download version 2.18 of Rufus.
3. USB selection
Perform the following to configure your USB device in Rufus:
- Launch Rufus
- Insert your USB stick
- Rufus will update to set the device within the Device field
- If the Device selected is incorrect (perhaps you have multiple USB storage devices), select the correct one from the device field’s drop-down menu

You can avoid the hassle of selecting from a list of USB devices by ensuring no other devices are connected.
4. Select the Ubuntu ISO file
To select the Ubuntu ISO file you downloaded previously, click the SELECT to the right of “Boot selection”. If this is the only ISO file present in the Downloads folder you will only see one file listed.
Select the appropriate ISO file and click on Open.

5. Write the ISO
The Volume label will be updated to reflect the ISO selected.
Leave all other parameters with their default values and click START to initiate the write process.

6. Additional downloads
You may be alerted that Rufus requires additional files to complete writing the ISO. If this dialog box appears, select Yes to continue.

7. Write warnings
You will then be alerted that Rufus has detected that the Ubuntu ISO is an ISOHybrid image. This means the same image file can be used as the source for both a DVD and a USB stick without requiring conversion.
Keep Write in ISO Image mode selected and click on OK to continue.

Rufus will also warn you that all data on your selected USB device is about to be destroyed. This is a good moment to double check you’ve selected the correct device before clicking OK when you’re confident you have.

If your USB stick contains multiple partitions Rufus will warn you in a separate pane that these will also be destroyed.
8. Writing the ISO
The ISO will now be written to your USB stick, and the progress bar in Rufus will give you some indication of where you are in the process. With a reasonably modern machine, this should take around 10 minutes. Total elapsed time is shown in the lower right corner of the Rufus window.

9. Installation complete
When Rufus has finished writing the USB device, the Status bar will be filled green and the word READY will appear in the center. Select CLOSE to complete the write process.

Congratulations! You now have Ubuntu on a USB stick, bootable and ready to go.
To use it you need to insert the stick into your target PC or laptop and reboot the device. It should recognise the installation media automatically during startup but you may need to hold down a specific key (usually F12) to bring up the boot menu and choose to boot from USB.
For a full walkthrough of installing Ubuntu, take a look at our install Ubuntu desktop tutorial.
Finding help
If you get stuck, help is always at hand:
- Ubuntu Discourse
- Ask Ubuntu
- IRC-based support
Was this tutorial useful?
Thank you for your feedback.
Hello everyone. In this article, I am going to show you how to create a Windows 11 bootable USB on Ubuntu using the GParted project.
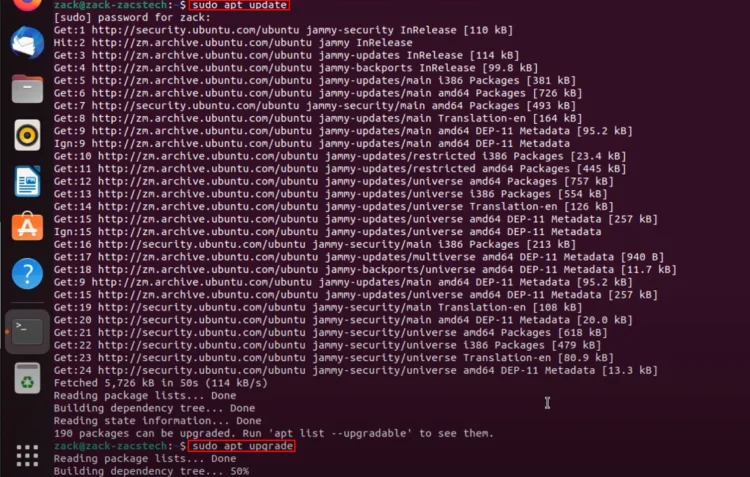
Updating Your System
Before we begin, if you’re using Ubuntu, it’s a good practice to update your system. I will show you how to create a Windows 10 or 11 bootable USB in Ubuntu. You can start by updating your system by typing “sudo apt update” in Terminal. If there are any packages that need to be upgraded, you can upgrade them by typing “sudo apt update“.
Downloading the Windows 10/11 ISO
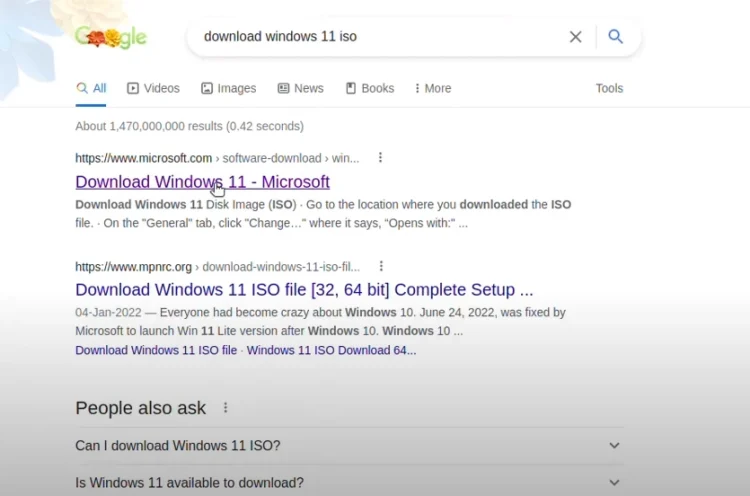
So, the first step is to download the Windows 11 ISO image. Open your favorite browser or simply use the default browser that comes with Ubuntu. Simply search for “download Windows 11 ISO” and you’ll get the Windows 11 ISO image from Microsoft’s official website.
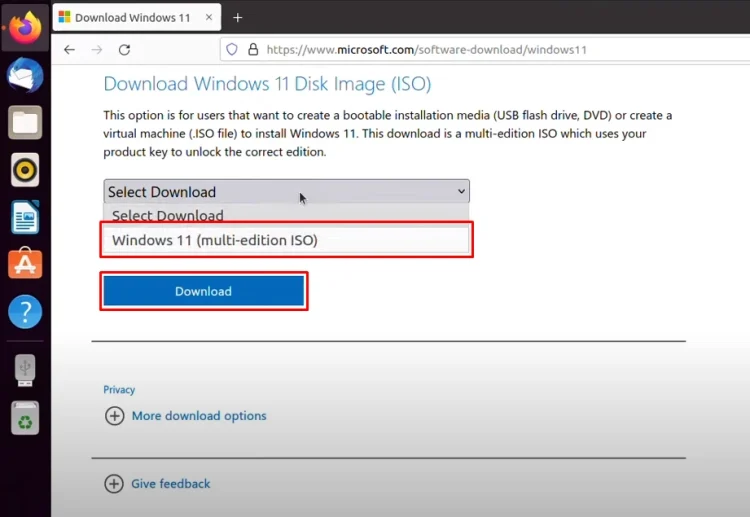
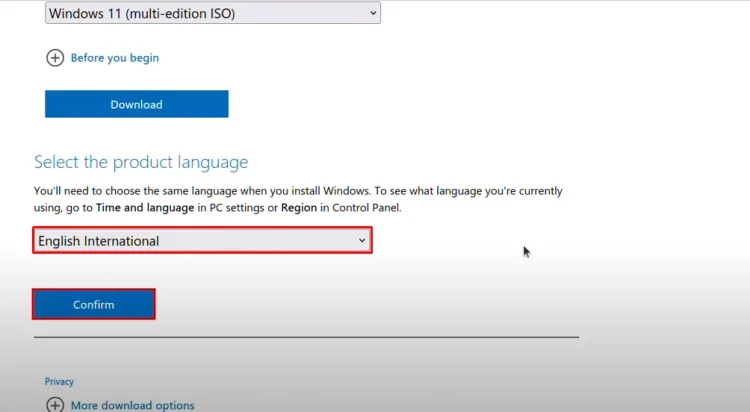
After that, you have to select the Windows 11 ISO image edition and click Download.
Choose a language and click Confirm.
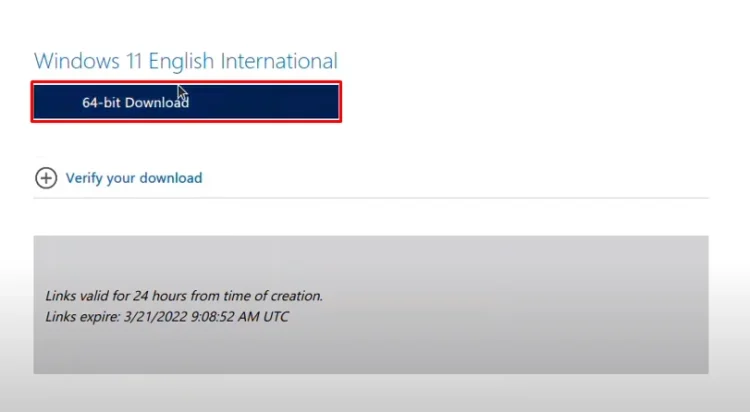
Then click 64-bit Download and save it. It will save the file to your computer.
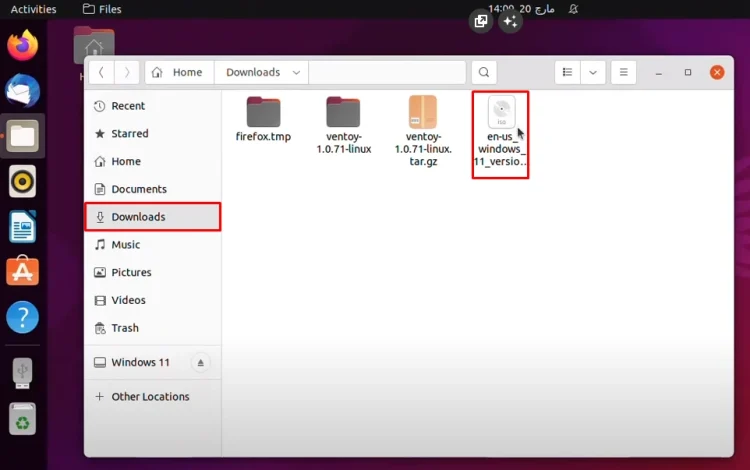
Now, I’m going to insert it because I already have it. If I have to show you, it’s in the Downloads directory, which I have simply imported from my main PC. The size is around 4 GB.
Preparing the USB Flash Drive
The second step is to attach the USB flash drive to your computer. I’ve already done that, so there’s no need for me to attach it.
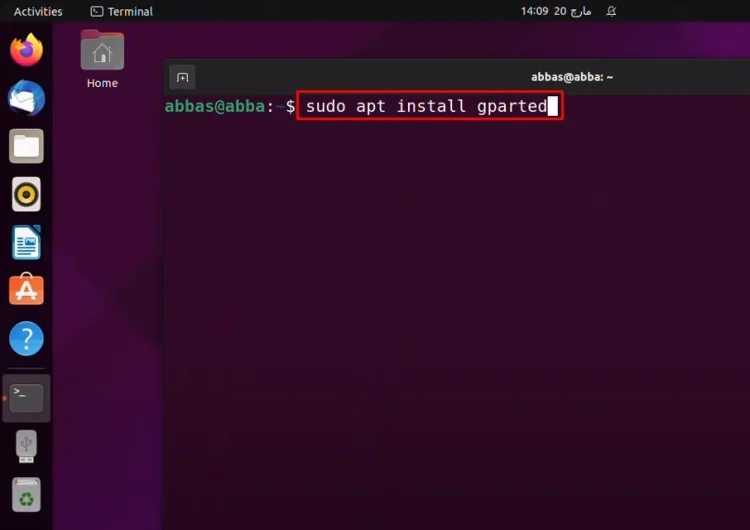
The third step is to install GParted onto your computer.
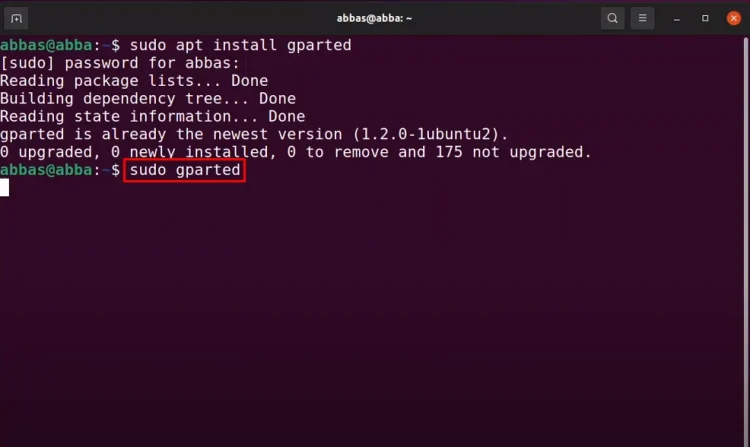
You can use the Ubuntu Software or the Terminal. I prefer the terminal because it’s faster. Once it’s launched, simply type “sudo apt install gparted“.
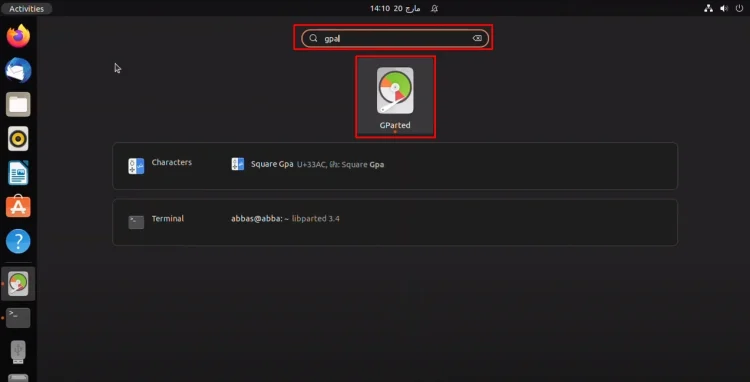
The next step is to launch GParted, typing “sudo gparted” in Terminal.
You can also launch GParted from Launchpad. Just simply search for GParted and launch it.
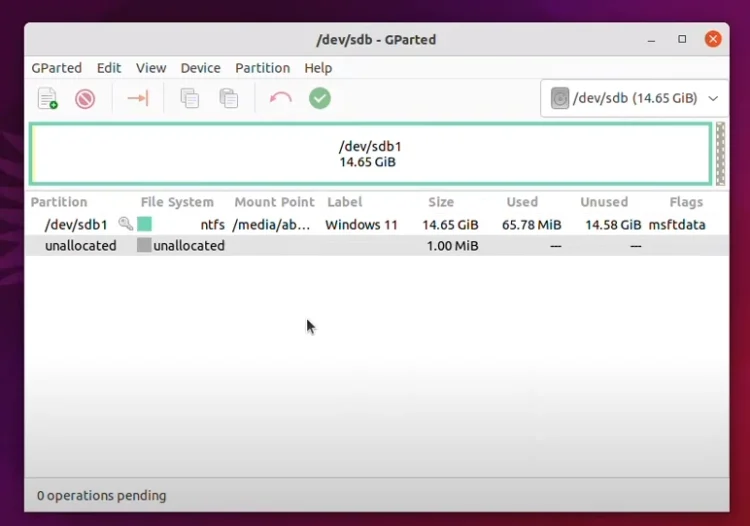
Once it’s launched, select the USB flash drive.

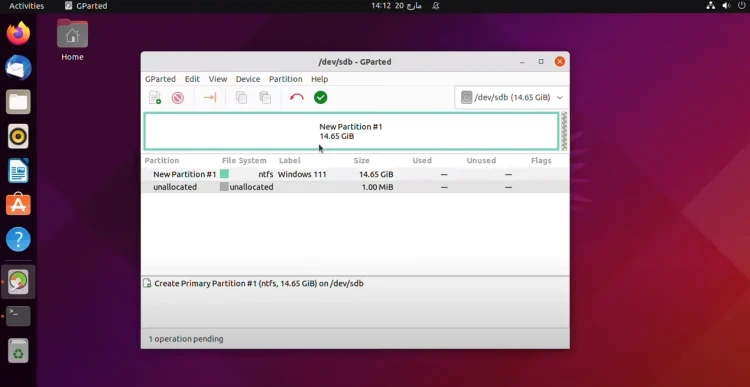
Partitioning the USB Flash Drive
By default, you can see that it’s a bootable USB flash drive of Windows 11.
For now, I have to delete all of them and then I’ll show you how to create them again from the beginning.
Let me delete it first. You have to unmount it, then delete it. Sorry for that. Now delete.
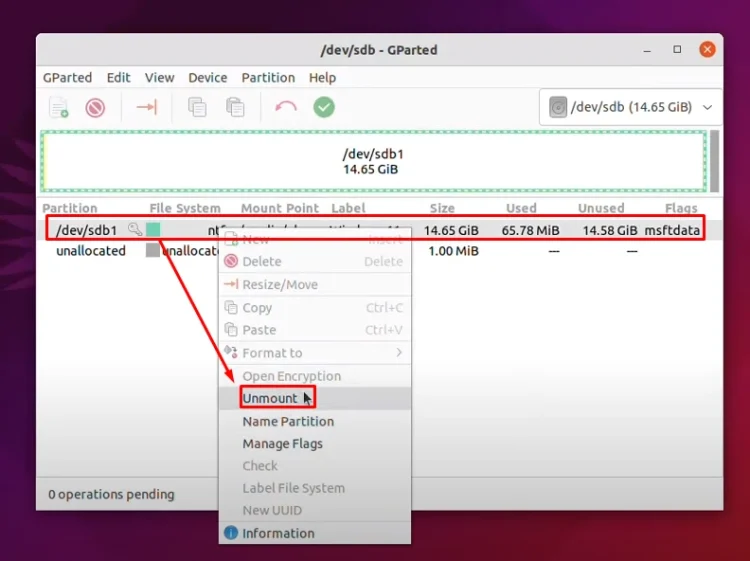
Okay, it is deleted.
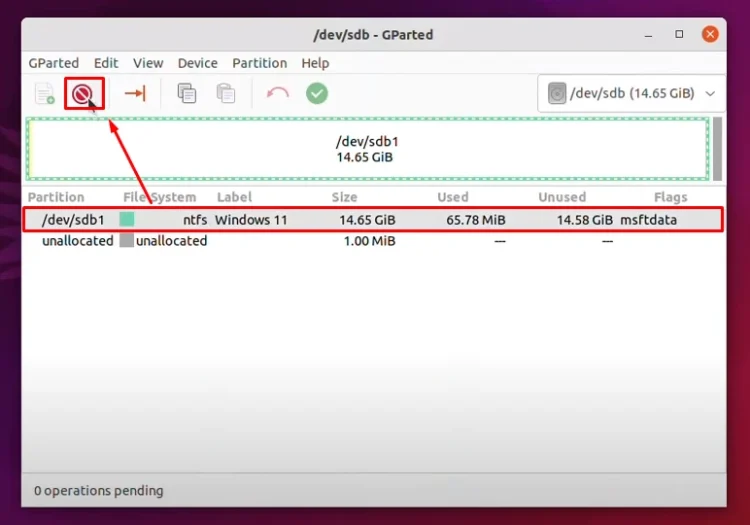
Now click Apply.
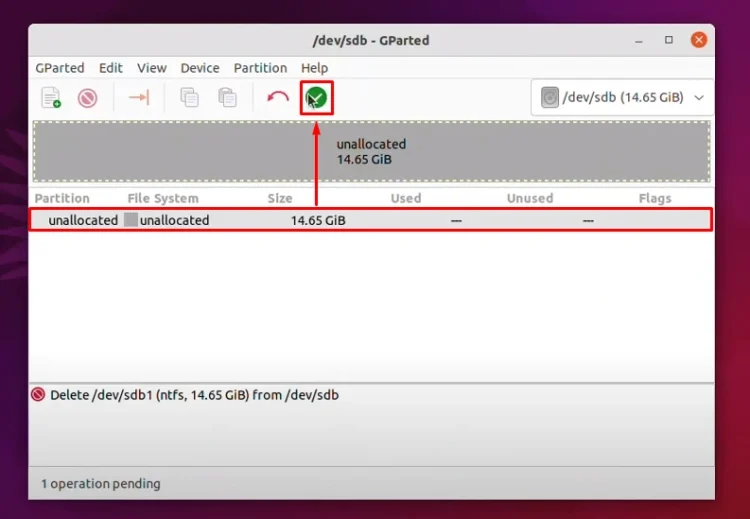
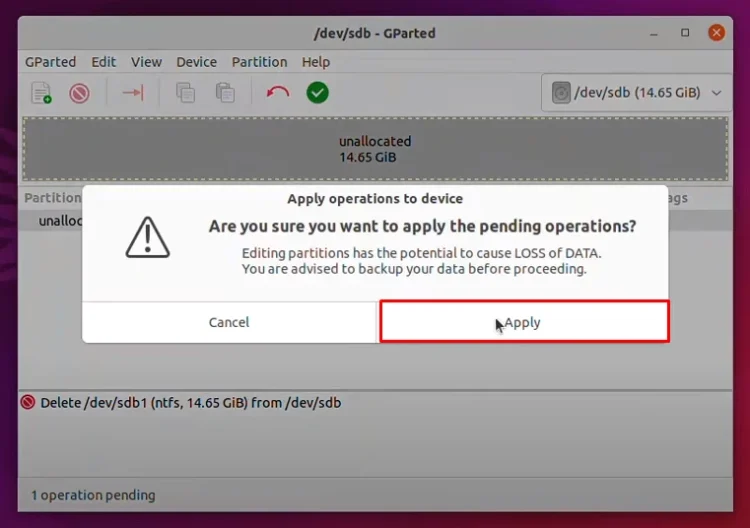
Once it’s removed, we need to create a partition for it. Go to Device and click Create partition table.
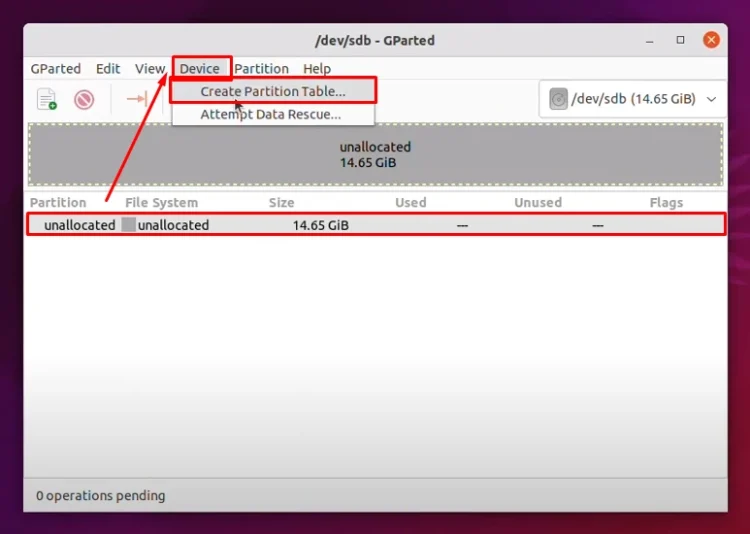
From here, select a partition style for Windows. We are going to choose gpt. Click Apply.
Remember, it’s going to remove everything from your USB flash drive, so back up your files.

Formatting and Copying Files
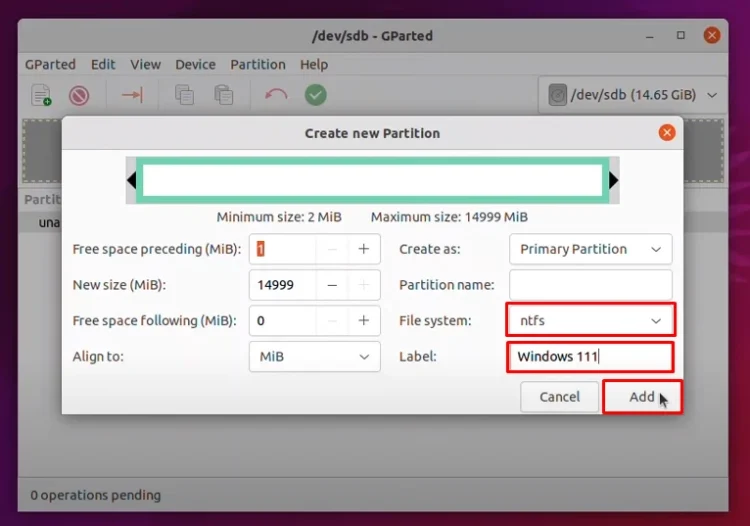
The next step is to create a file system for it.

By default, Linux personal file system is ext4. Windows is using NTFS. We’re going to choose NTFS. We can also label the USB flash drive. I’m going to name it “Windows 111“. Click Add.
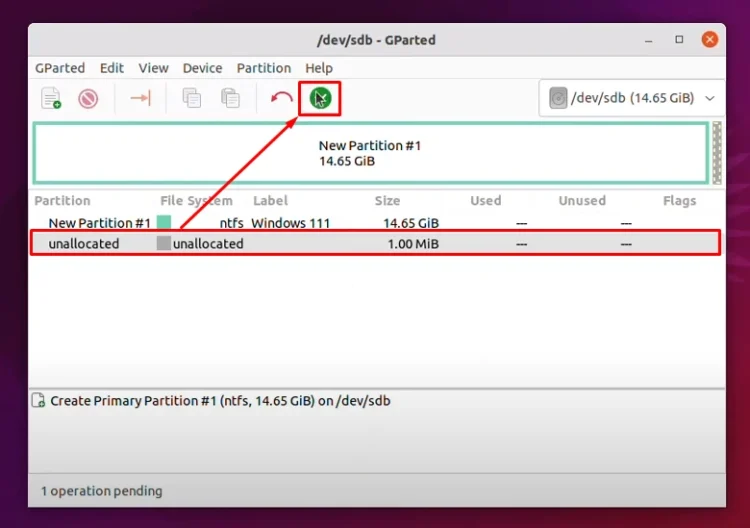
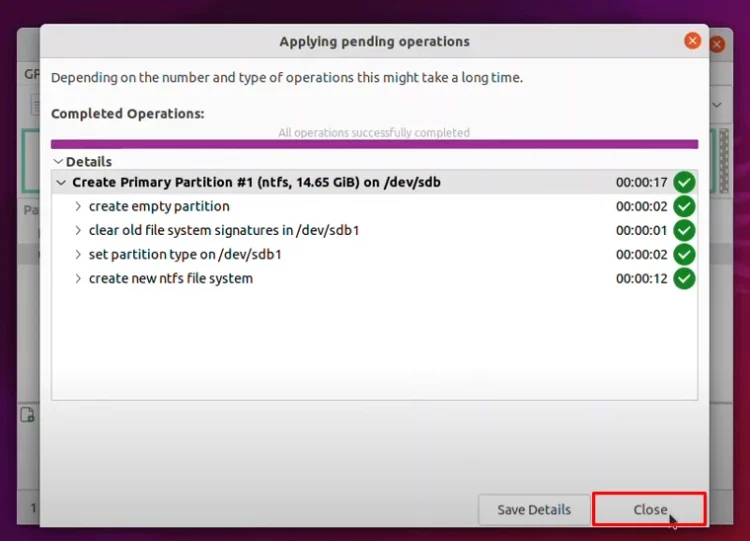
Now you can see that it’s done, but the changes have not applied. Click Apply and wait for it.
Once it’s done, you can close it.
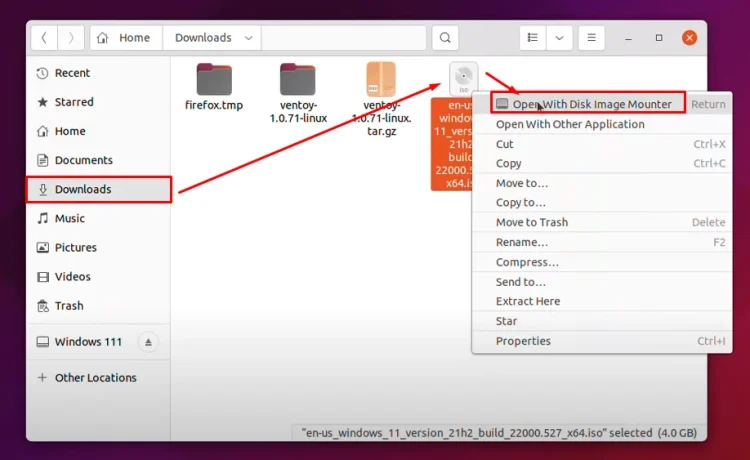
The next step is to open files and go to the Downloads folder where Windows 11 is located. Right-click on it and choose Open With Disk Image Mounter.
Finalizing the Bootable USB
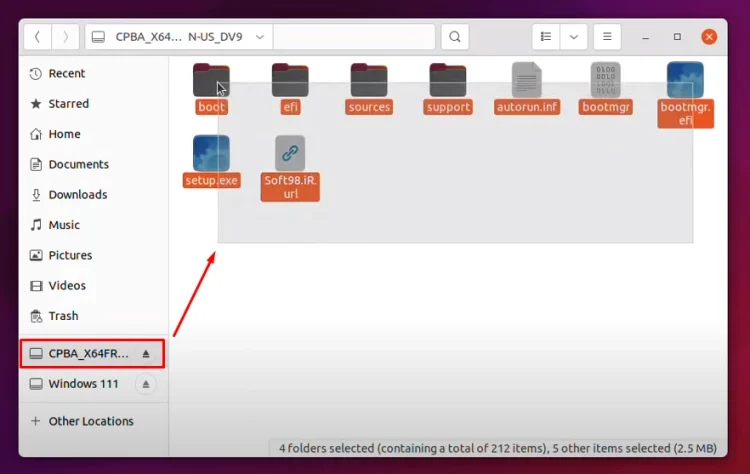
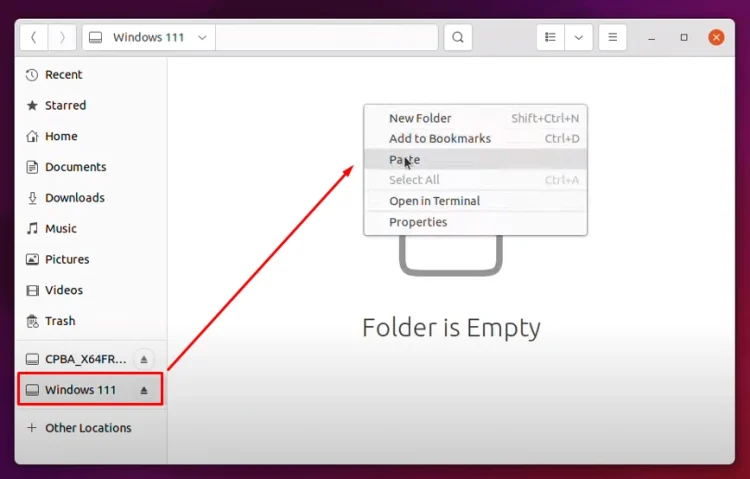
Here you can see that Windows 11 is mounted. Right-click, copy, and now go to the USB flash drive and paste them here.
During the copy of the files, you will not face any type of error. If you face any type of error, it means the Windows 11 ISO that you downloaded from the internet has been corrupted. Maybe the speed of your internet connection was not fast and somehow it got corrupted.
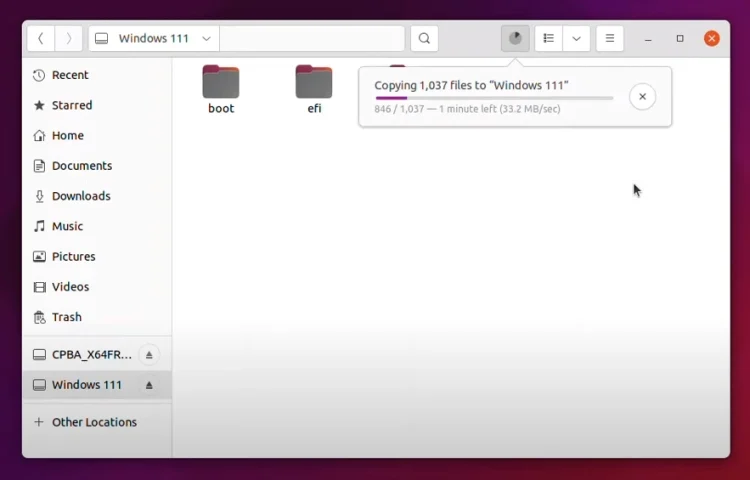
So basically, this is how you can create a Windows 11 bootable USB. For now, I am going to wait until the files are copied from the ISO inside the USB flash drive.
Post Views: 4,754

Want to create a bootable Windows USB on Linux? Ventoy is a pretty good option.
But before Ventoy, WoeUSB used to be the go-to tool for this purpose. The original WoeUSB project got discontinued around 2014.
Owing to its popularity, a new developer took the task of bringing the project back from the dead. And hence WoeUSB-ng was born. “ng” here stands for “new generation”. In other words, WoeUSB-ng is the new generation WoeUSB. But since the original tool doesn’t exist anymore, I’ll be referring WoeUSB-ng as WoeUSB.
In this tutorial, I’ll show you how to install WoeUSB on Ubuntu Linux. I’ll also share the steps for creating bootable Windows USBs with WoeUSB.
But before that, let’s quickly look at the features of this awesome tool.
WoeUSB
WoeUSB is a simple tool that has the sole purpose of creating bootable Windows USB on Linux.
The original WoeUSB is a shell script. This same WoeUSB is rewritten as WoeUSB-ng in python, which can be installed on your system and provides both a command-line and GUI interface.
Features:
- Support Legacy PC/UEFI booting
- Support FAT32 and NTFS filesystems
- Support using physical installation disc or disk image as source
- It can be used for Windows Vista and later with any language or edition variants
- Legacy/MBR-style/IBM PC compatible boot mode
- Native UEFI booting is supported for Windows 7 and later images (limited to the FAT filesystem as the target)
Installing WoeUSB on Ubuntu and other Linux distros
Arch Linux users can install WoeUSB-ng from AUR.
For other distros, WoeUSB can be installed using PIP. It’s a Python application, after all. I am going to provide commands for Ubuntu/Debian here.
To install WoeUSB-ng, you need to install PIP and other necessary dependencies first.
sudo apt install git p7zip-full python3-pip python3-wxgtk4.0 grub2-common grub-pc-binAfter this, you can install WoeUSB-ng by running:
sudo pip3 install WoeUSB-ngFor all other installations, you can refer to their instructions.
Prerequisite: Get Windows ISO and a compatible USB
This one goes without saying. You need to have the ISO file of the Windows version you want to install.
From the Microsoft website, you should be able to get the ISO for Windows 10 and 11.
If you have ISOs for older Windows versions, they can also be used.
Apart from that, you need to have a USB key/pen drive of at least 8 GB in size. You should format it in NTFS filesystem.
Method 1: Using WoeUSB to create a bootable Windows USB graphically (recommended)
Open woeusb-gui from the activity overview or menu.

In the application window, select the downloaded Windows ISO and the desired USB drive as shown in the screenshot and press Install.
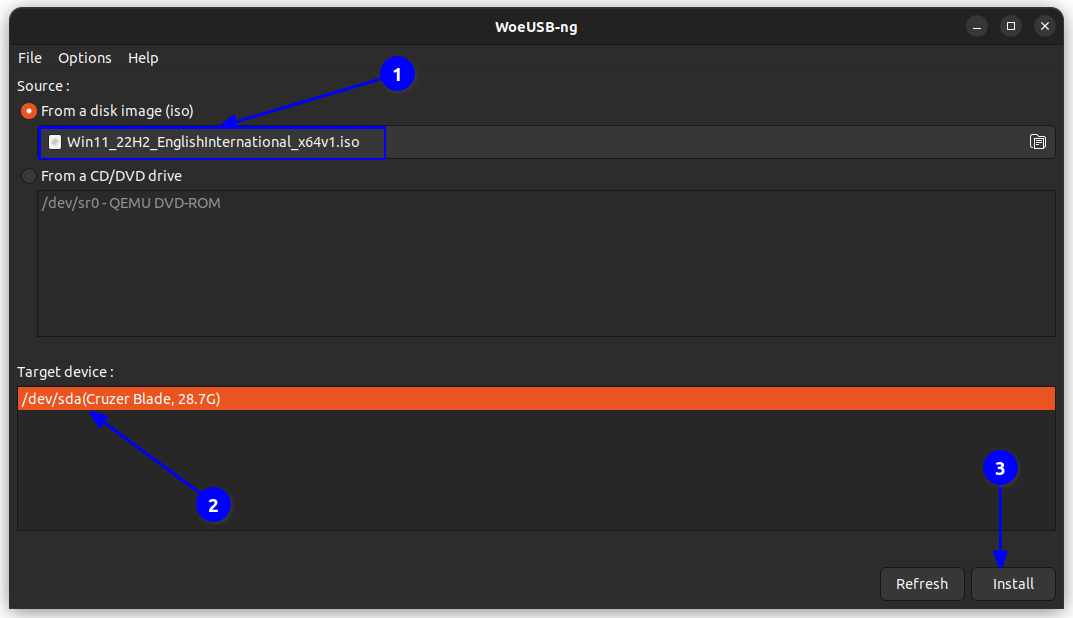
There are also other tweaks available within the app, which can be accessed by the top menu bar.
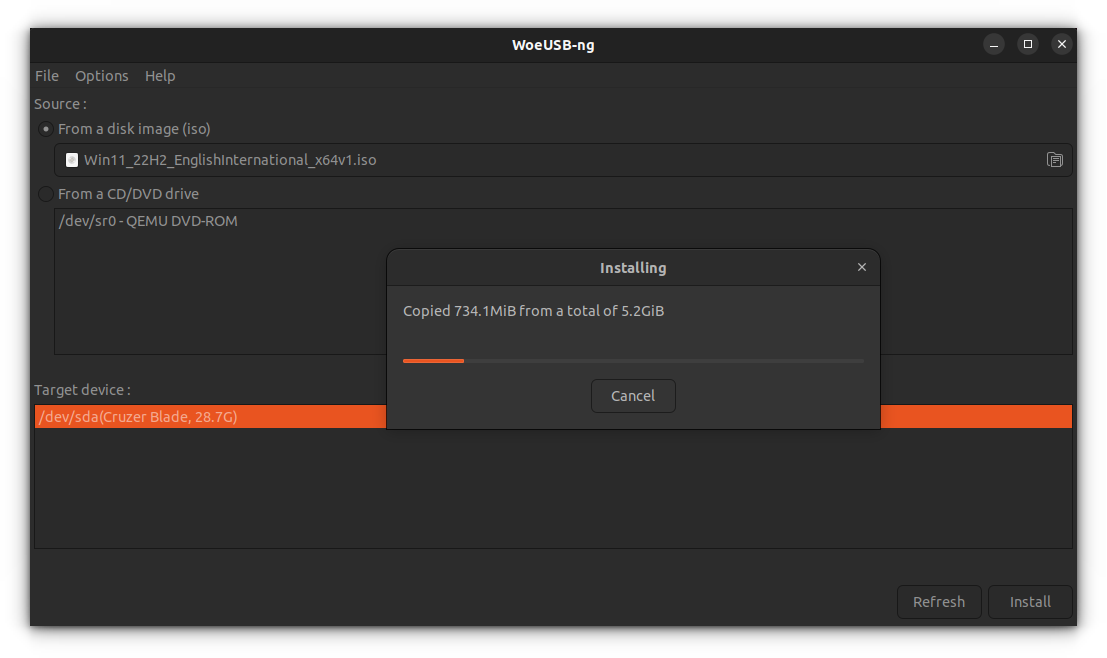
After pressing install, the woeUSB will start formatting and copying files. You need to wait for some time because there are approximately 6 GB of files to be copied.
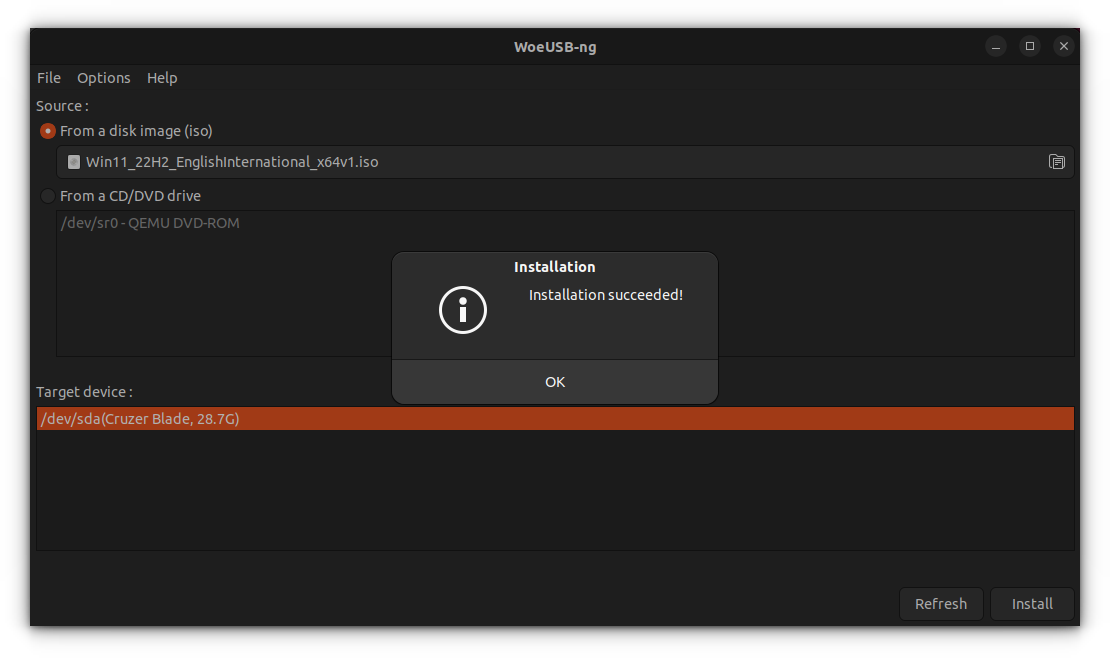
Once copying completes, WoeUSB will prompt a success dialog. You can now safely eject the USB and use it as a bootable USB.
Method 2: Using WoeUSB from the terminal (for experts)
WoeUSB-ng package also provides a command-line utility called woeusb.
To create the bootable Windows USB using WoeUSb, you need to run the following command:
sudo woeusb --device <path/to/Windows/ISO> <name/of/the/USB/device> --target-filesystem ntfsHere, the --device flag is used to wipe the USB and create a bootable from scratch completely. Also, the –target-filesystem flag is set to NTFS, to avoid problems of copying files more than the size limits of the FAT system.
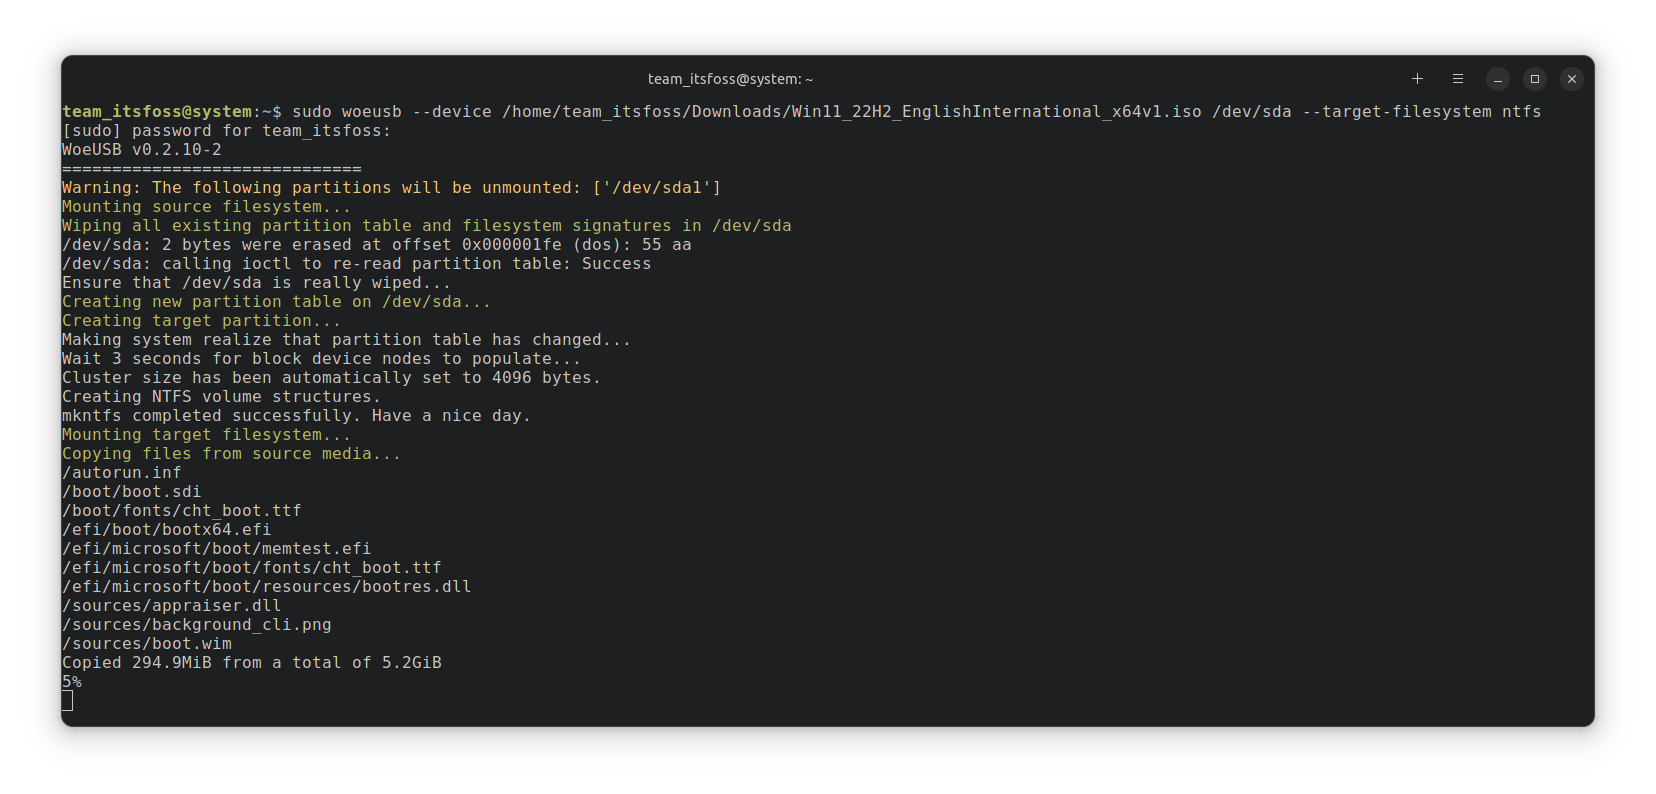
The process will take some time to complete copying. Once completed, it will display a success message.
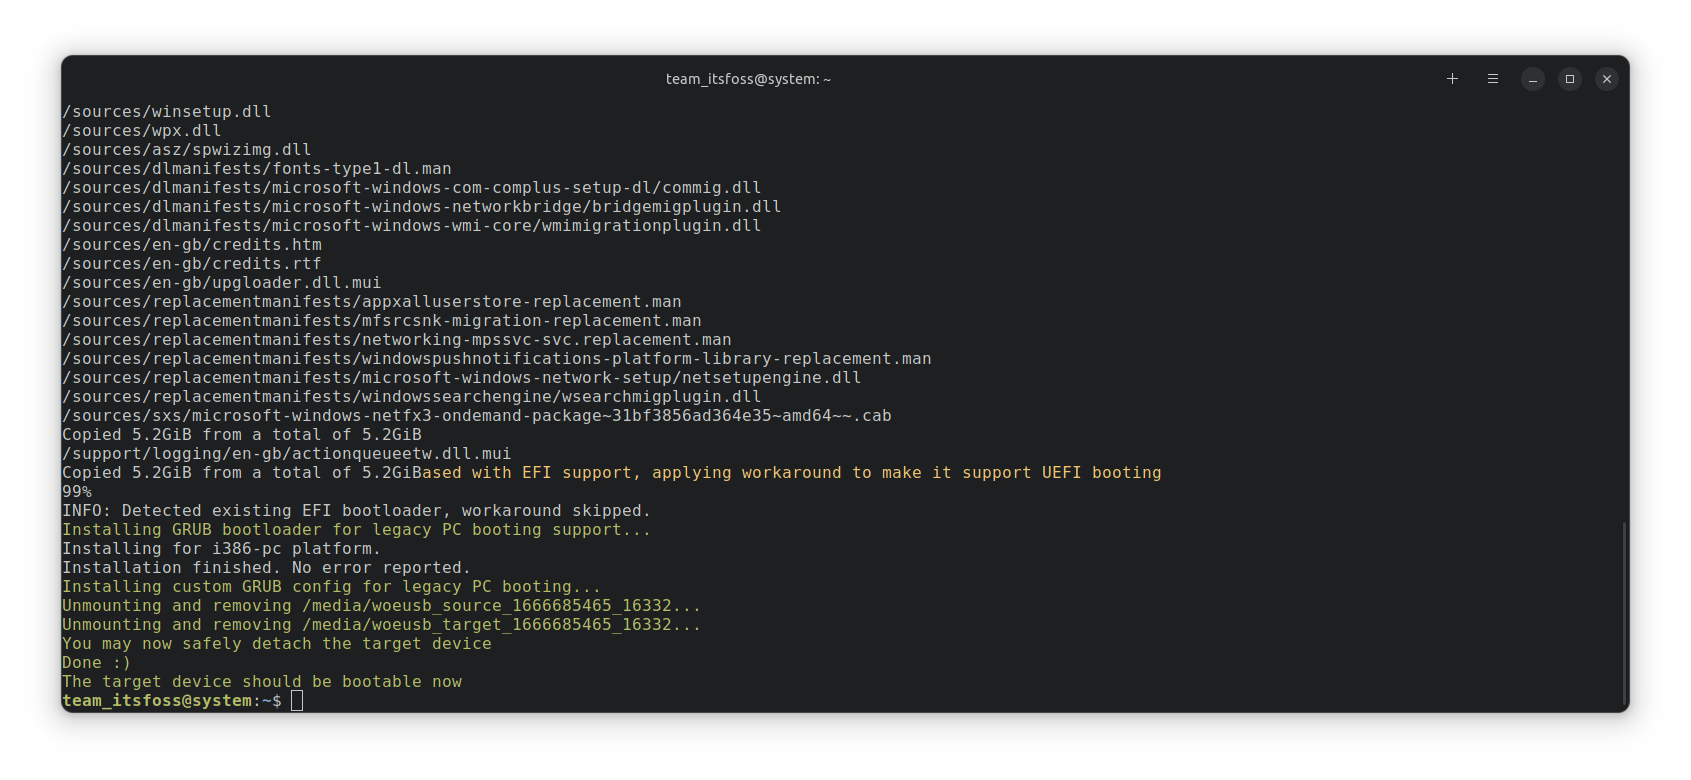
At this point, you can eject the USB safely and use it as a Windows bootable USB on other PCs.
Bonus: Using WoeUSB Bash shell script (for experts)
WoeUSB is also available as a bash shell script, which can be used without installing anything on your system.
First, you want to download the shell script from the releases page of the project.
Before executing the shell file, you need to get the required dependencies. To install, run:
sudo apt install wimtoolsNow make it executable either through file manager or through command-line.
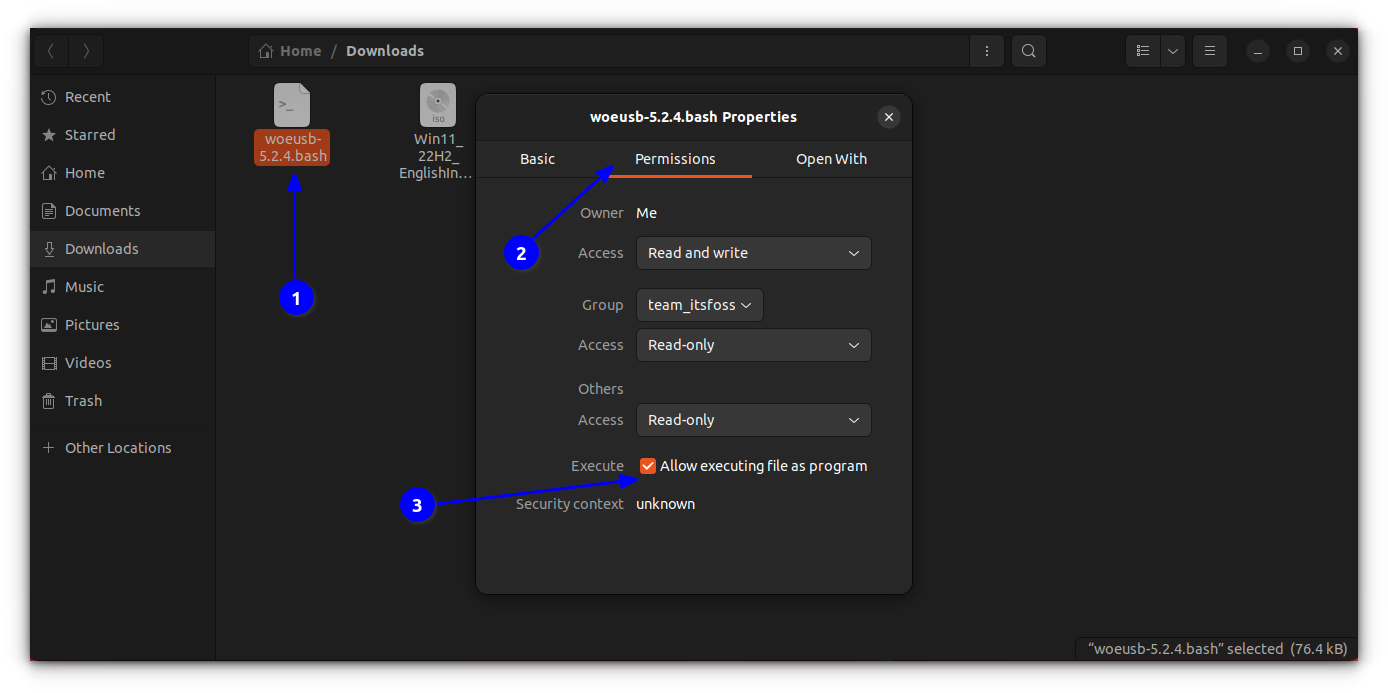
Or you can run chmod +x <path/to/script> to make it executable. Now, run ./woeusb-5.2.4.bash -h inside the downloaded directory to get help.
In order to create a live USB, the process is same as the command-line part of woeusb-ng, except, you are not installing anything.
So, in a terminal, run:
sudo <path/to/downloaded/script/file> --device <path/to/windows/ISO> <name-of-USB-device> --target-filesystem ntfsThis will start writing the ISO to USB drive, as shown in the screenshot below:
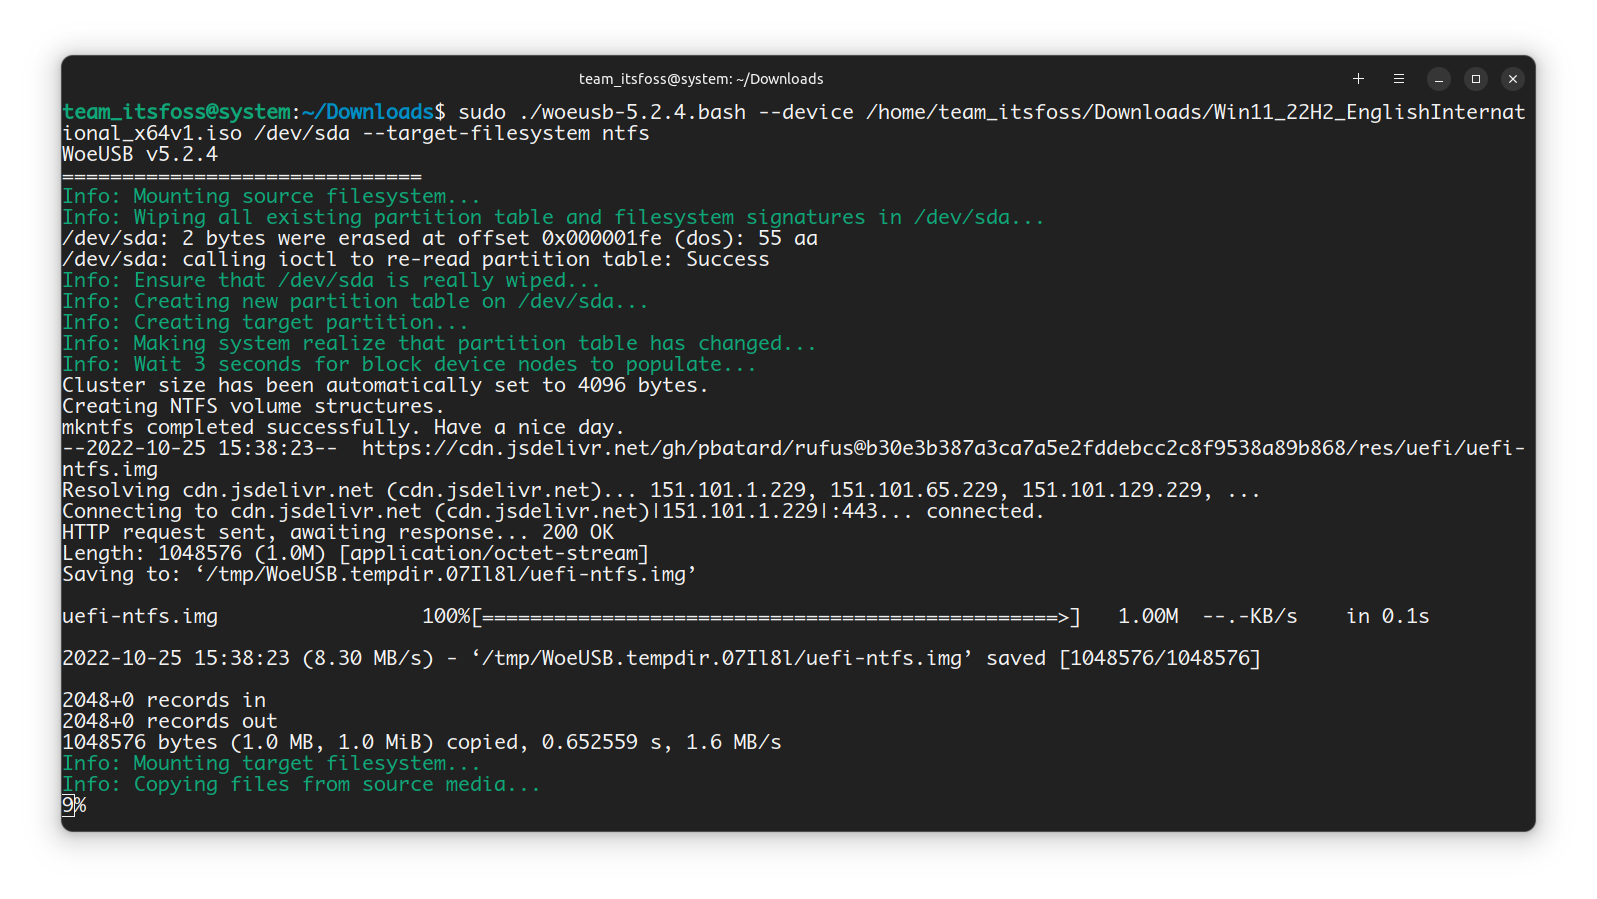
Once completed, you can safely eject the USB and use it as bootable USB.
Removing WoeUSB
If you installed WoeUSB using PIP, you can also remove it similarly:
pip3 uninstall WoeUSB-ngYou can keep the installed dependencies on your system or remove them. That’s entirely up to you. I would suggest keeping them.
Wrapping Up
WoeUSB was an immensely popular tool around ten years ago. It’s good that someone else has continued in another form. That’s the beauty of open source.
There are other ways of creating bootable Windows USB. If interested, check them out 👇
How to Create a Bootable Windows 10 USB in Linux
Brief: This tutorial shows you how to create a bootable Windows 10 USB in Linux with and without a GUI tool called Ventoy. I have talked a lot about creating bootable USB of Linux in Windows. How about the other way round? How about creating a bootable Windows 10 USB
It’s FOSSAbhishek Prakash
I hope this tutorial helped you. If somehow the Windows USB created by WoeUSB doesn’t work as expected, you may try using Ventoy. Enjoy it.
Содержание статьи:
- Создание загрузочной флешки в Linux
- Способ 1
- Способ 2
- Способ 3
- Способ 4
- Как установить Windows, что делать дальше с «этой» флешкой
- Вопросы и ответы: 0
Вопрос от пользователя
Добрый день.
Александр, подскажите с одной ерундой. В общем, у меня полетел ноут, и я купил новый. Но недосмотрел, и на нем не было Windows, вместо нее стоит Linux Ubuntu. С ней я не умею работать, и хочу переустановить систему.
В общем, погуглил, пытаюсь создать загрузочную флешку с Windows, но не получается. Не могли бы вы показать пример, хоть 1-2, как лучше сделать-то…
Здравствуйте.
Да… О загрузочной флешке (я бы лучше сказал 📌комп. аптечке) лучше подумать заранее… чтобы была всегда под-рукой.
Ниже в заметке я приведу неск. способов решения вопроса (на примере Ubuntu, т.к. она наиболее часто встречается на новых ноутбуках). Однако, хочу предупредить, что на всякий случай я бы загрузил 2 разных образа ISO и записал бы их на 2-3 флешки несколькими способами.
Зачем? Дело в том, что при установке Windows придется форматировать диск с Linux (вероятно), и если в дальнейшем «появится ошибка», то создать еще одну флешку вы не сможете! (по крайней мере, это актуально на тот случай, если у вас нет поблизости соседа/друга, который может помочь вам записать флешку 🙂)
*
Создание загрузочной флешки в Linux
*
📌 Важно!
Первое, что вам нужно сделать — это скачать загрузочный ISO образ с нужной вам версией Windows (Linux). В способах ниже я на этом не буду останавливаться, вот пару ссылок, где можно найти Windows 8-11 и популярные дистрибутивы Linux:
- Windows — ссылка;
- Linux (Ubuntu, Mint, Elementary OS и др.) — ссылка.
*
Способ 1
Система Ubuntu хороша прежде всего тем, что в ее арсенале уже есть множество встроенных приложений (которые здорово облегчают жизнь начинающему пользователю). Вот и для записи установочной флешки — тоже есть встроенное решение! (по крайней мере в совр. версии Ubuntu 22.04 при обычном типе уст.).
Правда, записать образ с Windows с помощью нее — вряд ли получится… (но попробовать никто не мешает?!)
*
Найти утилиту можно в списке предустановленных, см. боковое меню. Название: «Создание загрузочного диска». 👇
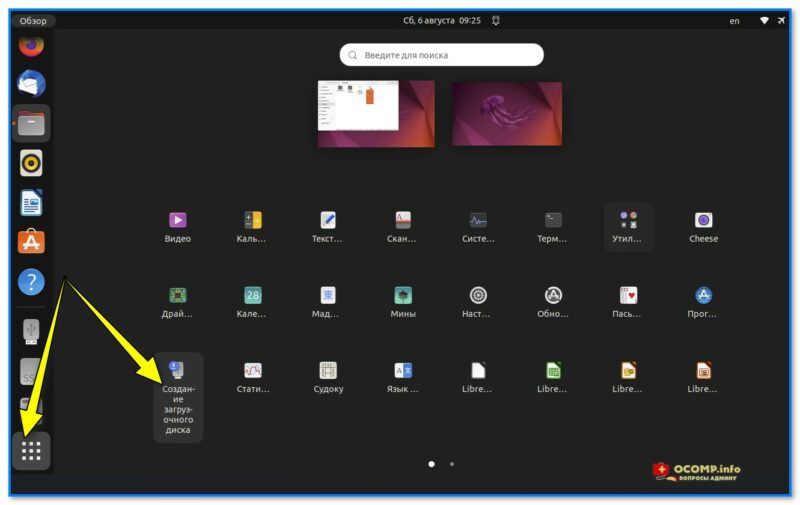
Скриншот. приложения Ubuntu — создание загр. диска
Далее нужно выбрать ISO образ, флешку, и начать запись. Всё просто! 👌
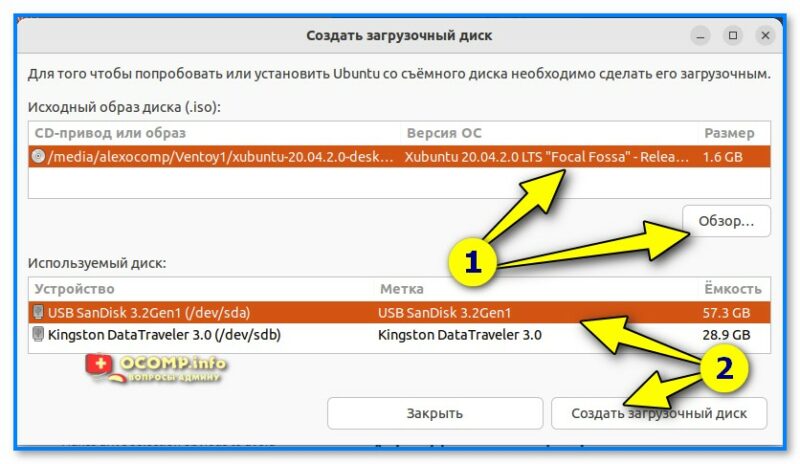
Скриншот. Выбор образа, диска, кнопка начать
*
Способ 2
Есть одно замечательное приложение, позволяющее создавать универсальные мульти-загрузочные флешки максимально просто, — речь идет о Ventoy (годится и для флешек с Windows, и с Linux).
Ventoy
Ссылка на офиц. сайт: https://www.ventoy.net/en/download.html
Покажу на примере, как пользоваться версией для Linux…
*
Итак…
1) Сначала на офиц. сайте открываем страничку «Download» и переходим по ссылке вида «Ventoy… Linux.tar.gz». См. пример ниже. 👇

Скриншот офиц. сайта. Ventoy для Linux
2) Далее загружаем сам архив (с сайта GitHUB). Весит он примерно 18 Мб (на текущий момент).
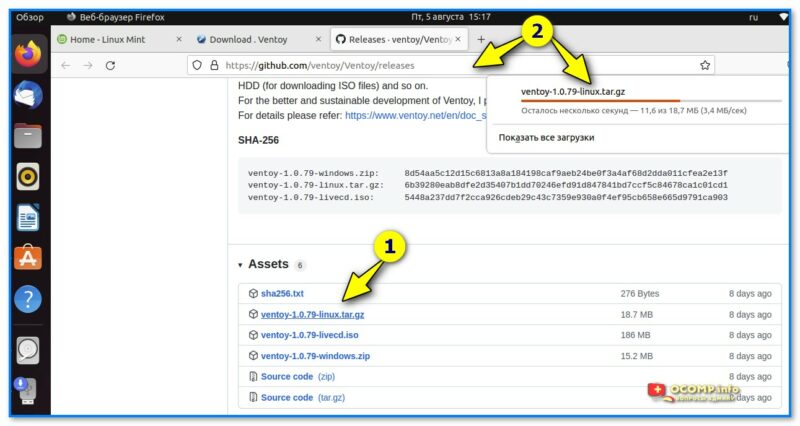
Скриншот. Загрузка Ventoy для Linux
3) Затем открываем папку «Загрузки», т.е. ту папку, куда мы загрузили архив с приложением… (кстати, в Ubuntu в меню слева есть ссылка на обозреватель дисков/проводник).
Архив нужно извлечь (в той же Ubuntu — правый клик по нему и в меню выбрать оное…). 👇
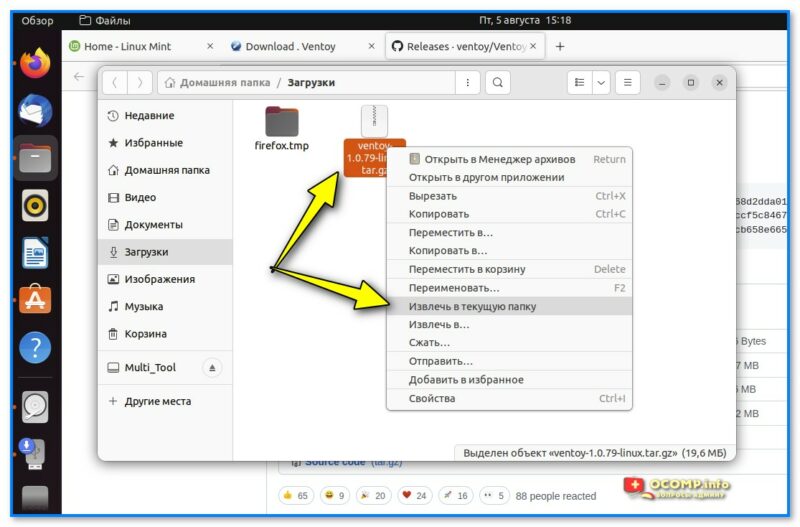
Скриншот. Извлекаем архив с Ventoy
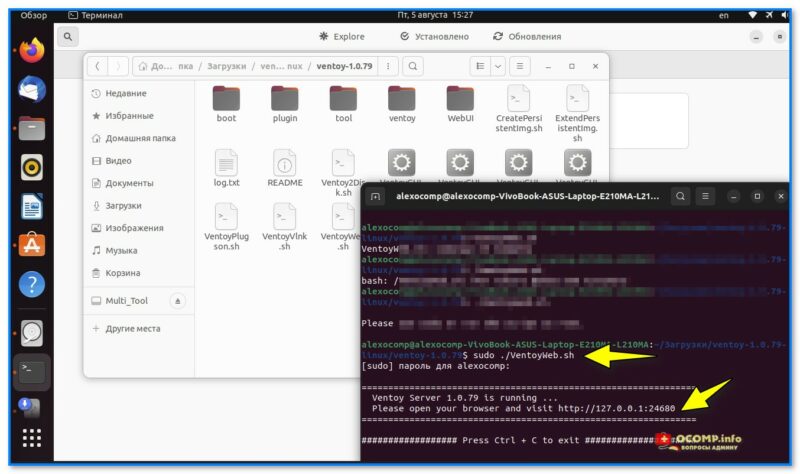
4) Далее открываем папку с файлами приложения (которую мы извлекли), и кликаем правой кнопкой мышки в любом ее свободном месте — в меню выбираем «Открыть в терминале» (в Ubuntu это работает). 👇

Скриншот. Открыть папку в терминале
5) В терминале наберите нижеприведенную команду и нажмите Enter:
sudo ./VentoyWeb.sh
Если все прошло корректно и приложение было запущено — вы увидите URL адрес, по которому оно доступно. Например, http://127.0.0.1:24680
Адрес нужно скопировать и вставить в адресную строку браузера (например, Firefox).
Скриншот. Запускаем Ventoy
6) Собственно, по этому адресу откроется Ventoy — осталось только подключить флешку и нажать кнопку «Install». См. скрин ниже. 👇
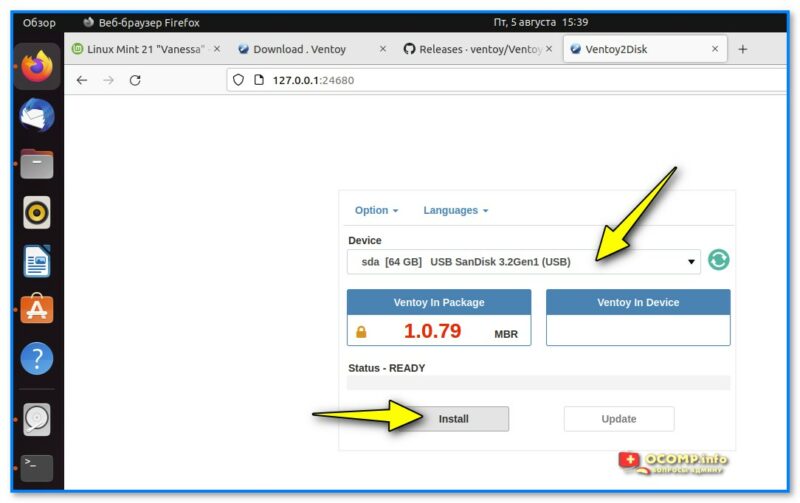
Скриншот. Открываем в браузере Ventoy
7) Обратите внимание, что при подготовке загрузочной флешки в Ventoy — все данные на ней будут удалены! О чем, кстати, приложение предупреждает вас и просит подтвердить аж целых 2 раза!
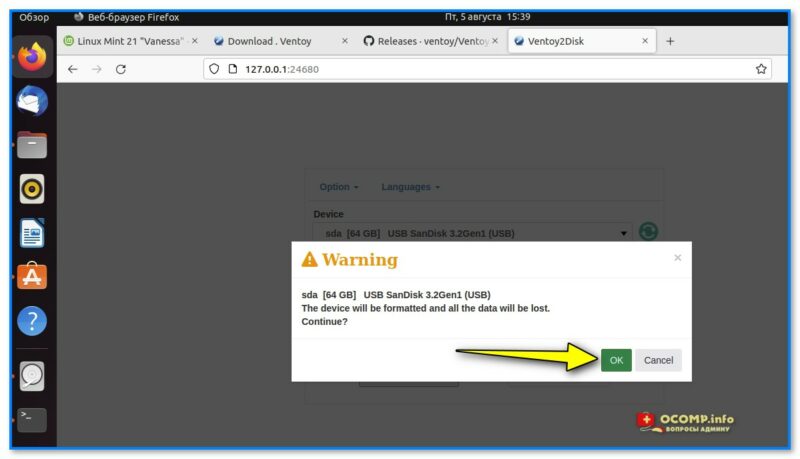
Скриншот. Подтверждаем форматирование диска
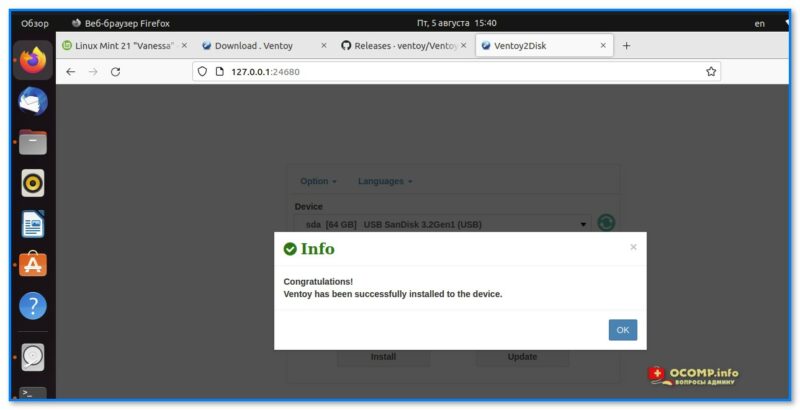
 Если всё прошло успешно и флешка была подготовлена — должно появиться сообщение с поздравлением (см. мой пример ниже 👇).
Скриншот. Флешка отформатирована, теперь она стала загрузочной!
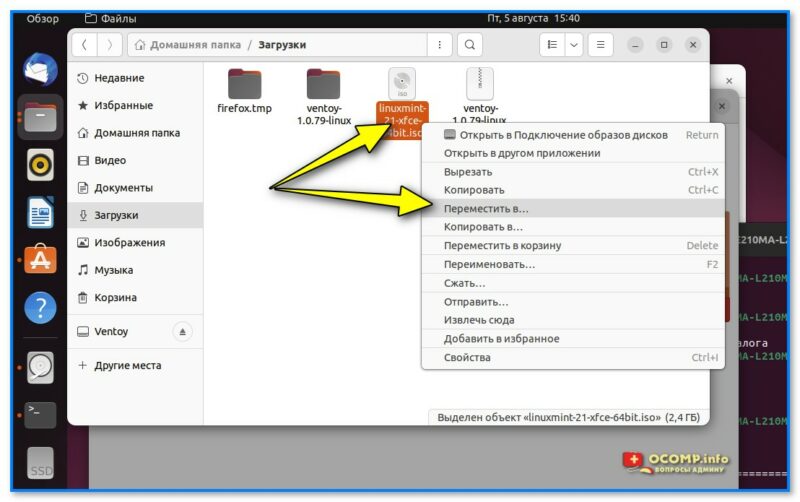
9) Теперь просто копируем загрузочные ISO образы (Да! Можно не только один, но и неск.) на подготовленную нами флешку в Ventoy.
Скриншот. Перемещаем на флешку ISO образы с нужными нам системами (Linux, Windows, LiveCD, антивирусы и др.)
10) Когда образы будут скопированы на флешку — ей можно пользоваться, ничего более делать не нужно.
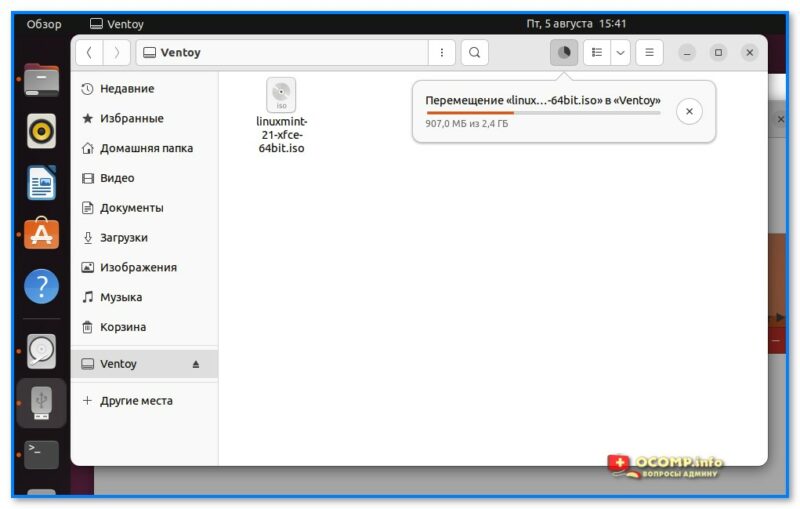
Скриншот. Дожидаемся завершения копирования (3 мин.)
*
Способ 3
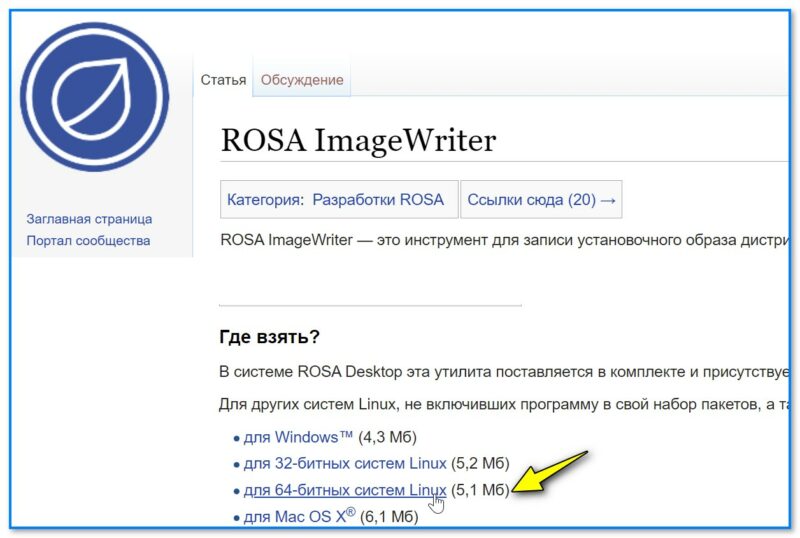
Есть еще одно легкое, надежное и универсальное приложение нашей задачи — речь о Rosa Image Writer (ссылочка на офиц. сайт). Работает она не только с ОС Rosa OS, но и с любыми другими образами ISO (что нам и нужно 🙂).
Как пользоваться:
1) Переходим на офиц. сайт (ссылка выше) и загружаем архив с «Росой».
Скриншот. Скрин с офиц. сайта «Росы»
2) Далее извлекаем из архива каталог, заходим в него и в свободном месте делаем ПКМ мышкой — в меню выбираем «Открыть в терминале». Затем в терминале используем следующую команду:
sudo ./RosaImageWriter
Если все корректно — запустится приложение. Останется выбрать флешку, образ ISO (см. папку «Home» — это домашний каталог в Linux, в нем есть папка «Загрузки», куда по умолчанию скачиваются все файлы) и нажать «Записать».
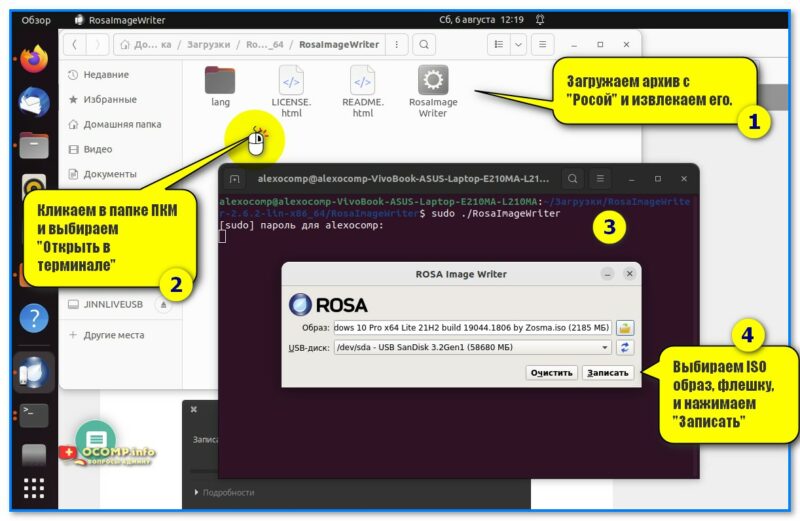
Скриншот. 4 ШАГА для записи диска с помощью «Росы»
3) Приложение предупредит, что во время записи флешки все предыдущие данные с нее будут удалены.
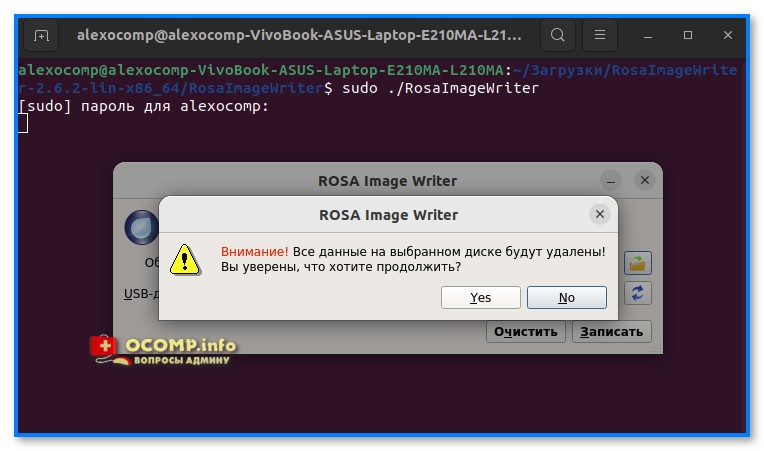
Скриншот. Предупреждение от Росы
4) Ну и останется только дождаться, пока операция будет завершена. Приложение, кстати, работает очень шустро!
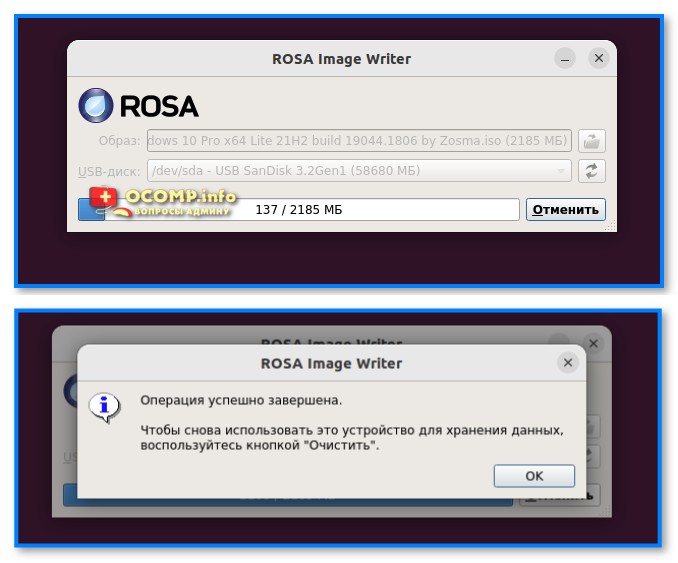
Скриншот. Операция успешно завершена («Роса»)
*
Способ 4
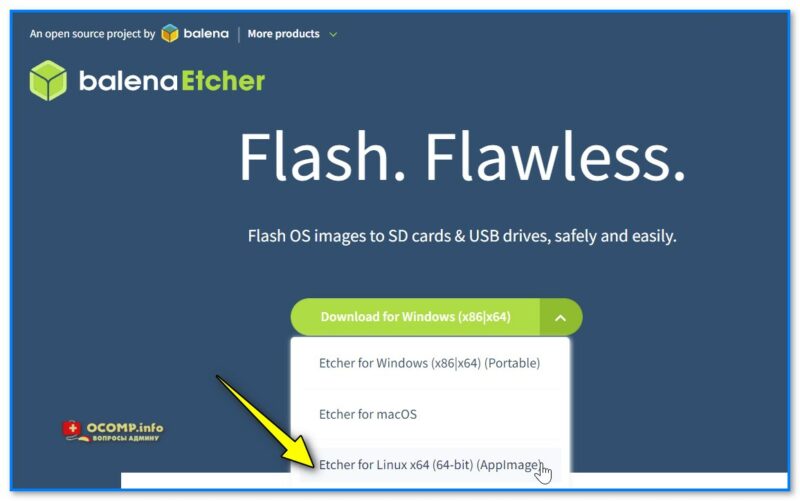
Etcher — еще одно простое и универсальное решение для записи загрузочных флешек. Офиц. сайт: https://www.balena.io/etcher/
1) Обратите внимание, что на офиц. сайте нужно загрузить версию для Linux (см. скрин ниже. По умолчанию она выбирается не всегда). 👇
Скриншот. Скрин с офиц. сайта Etcher
2) Далее нужно загруженный архив извлечь (можно сразу же в папку загрузки).
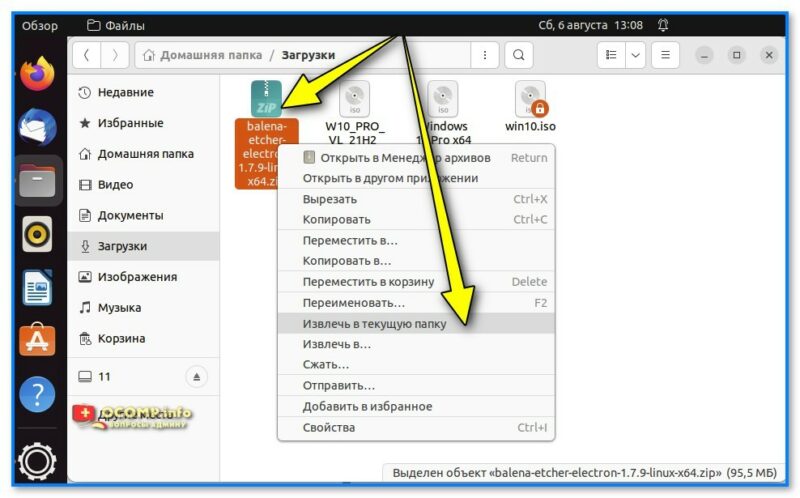
Скриншот. Извлечь в текущую папку (Etcher)
3) Затем зайти в эту папку и начать процедуру переименования файла: это нужно, чтобы скопировать его имя (оно нам будет нужно).
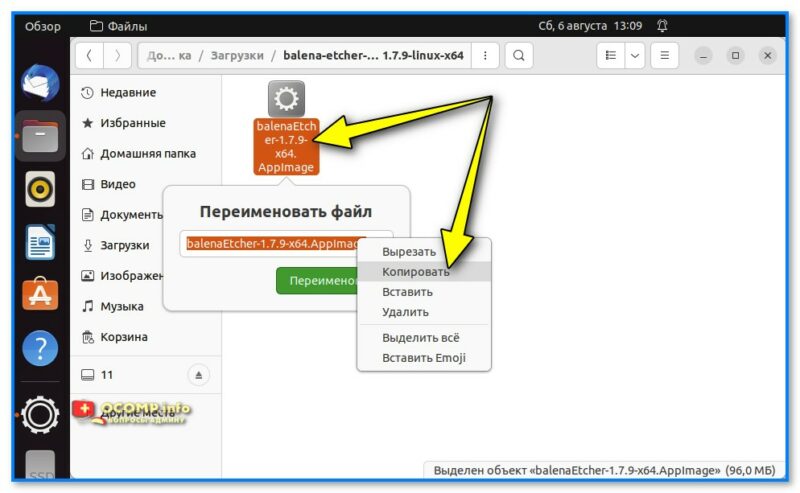
Скриншот. Копируем имя файла исполняемого
4) Теперь в этой же папке в любом свободном месте сделайте клик правой кнопкой мыши и в меню выберите «Открыть в терминале» (актуально, по крайней мере, для Ubuntu).
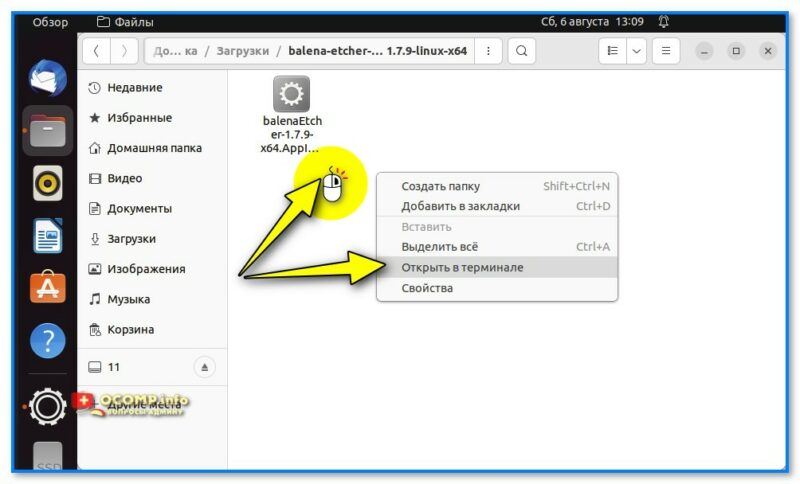
Скриншот. Открыть в терминале
5) Далее последовательно введите в терминале две команды (обратите внимание на вторую: после «sudo ./» укажите имя файла, которое мы скопировали чуть ранее):
sudo apt install fuse
sudo ./balenaEtcher-1.7.9-x64.AppImage
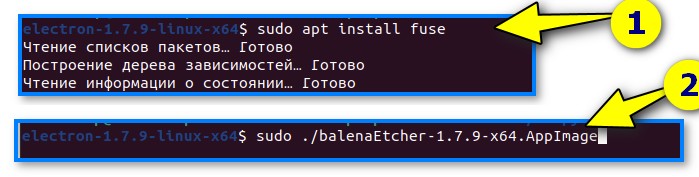
Скриншот. Устанавливаем Fuse и запускаем приложение Etcher
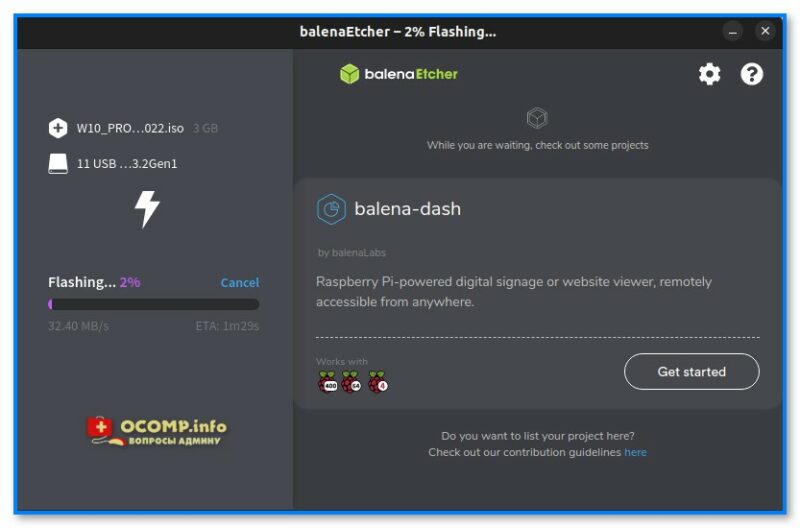
6) Сразу после этого должно появится окно — приложение Etcher.
В нём нужно выбрать образ с Windows (см. папку «Home» — это домашний каталог в Linux, в ней есть папка «Загрузки», куда по умолчанию скачивается все файлы), указать флешку и нажать кнопку «Flash!» для старта.

Скриншот. Etcher — запускаем запись
7) После останется только дождаться завершения операции…
Скриншот. Дожидаемся пока флешка будет готова
Если все прошло корректно и не было ошибок — увидите сообщение «Flash Compete!». 👇
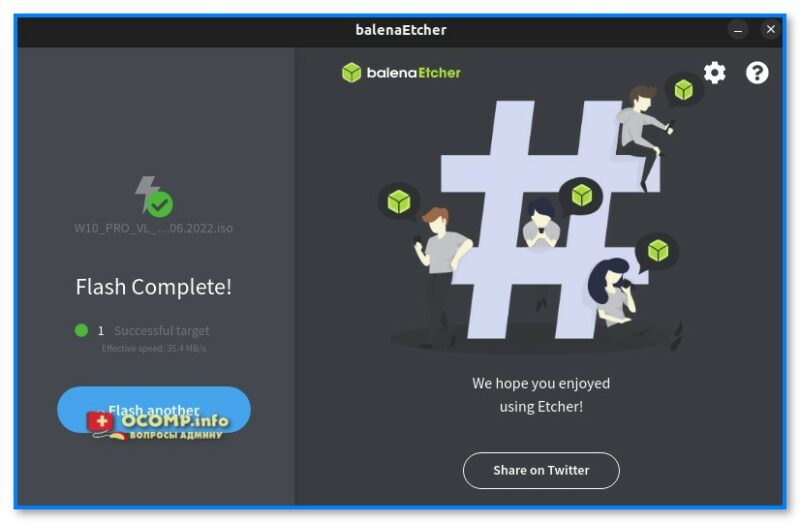
Скриншот. Complete! Это нам и нужно, ура!
*
Как установить Windows, что делать дальше с «этой» флешкой
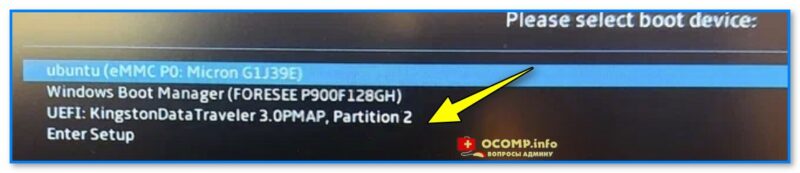
- подключить флешку к USB-порту;
- включить компьютер/ноутбук и сразу же нажать 📌кнопку входа в Boot Menu;
- в Boot Menu нужно выбрать строку с «нашей» флешкой и нажать Enter;

Скриншот. Выбор загрузочной флешки — Boot Menu (загрузочное меню)
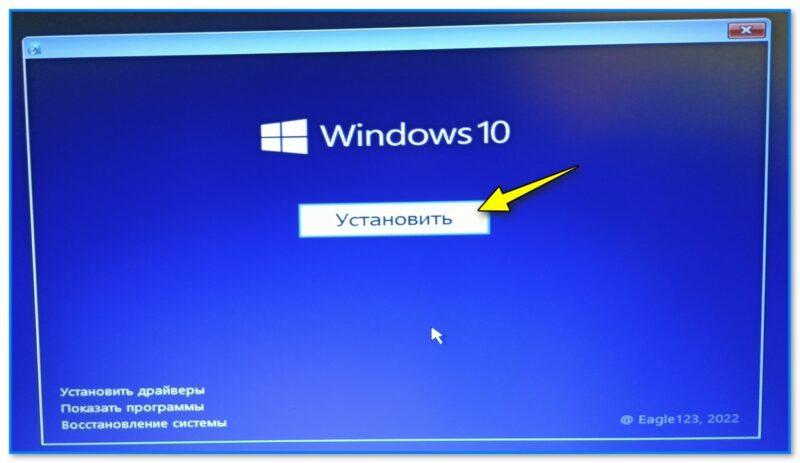
- далее должна начаться установка Windows (в зависимости от выбранной версии могут быть нюансы). Полную установку Windows 10 — см. в этой заметке, Windows 11 — в этой.

Скриншот. Установить Windows
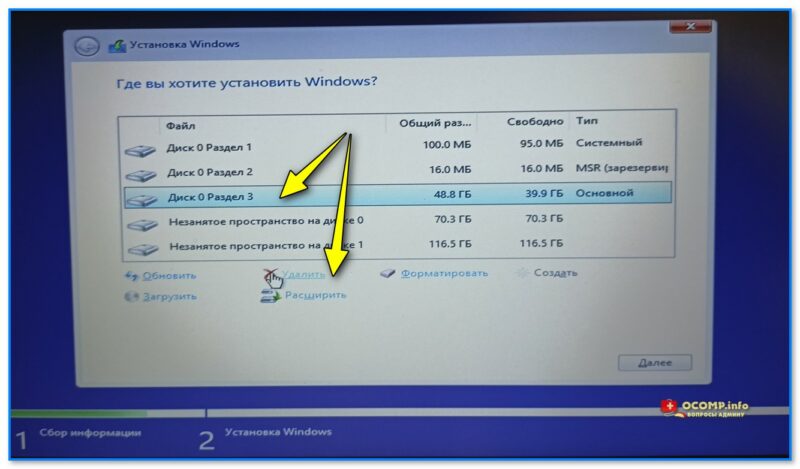
- как правило, на этапе выбора диска под установку Windows, необходимо удалить все разделы с Linux… (т.к. Windows не поддерживает файловую систему EXT4, которая используется той же Ubuntu…). 📌Важно: разумеется, при удалении раздела диска — все данные на нем также будут удалены!

Фото с экрана при установке Windows 10. Удаляем все лишние разделы
- В остальном установка идет по штатному сценарию!
*
Иные варианты решения вопроса приветствуются в комментариях…
Удачи!
👋
Если вам по той или иной причине потребовалась загрузочная флешка Windows 10 (или другой версии ОС), при этом на имеющемся компьютере в наличии только Linux (Ubuntu, Mint, другие дистрибутивы), вы сравнительно легко можете записать её.
В этой инструкции пошагово о двух способах создать загрузочную флешку Windows 10 из Linux, которые подойдут как для установки на UEFI-системе, так и для того, чтобы установить ОС в Legacy режиме. Также могут пригодиться материалы: Лучшие программы для создания загрузочной флешки, Загрузочная флешка Windows 10.
Загрузочная флешка Windows 10 с помощью WoeUSB
Первый способ создания загрузочной флешки Windows 10 в Linux — использование бесплатной программы WoeUSB. Созданный с её помощью накопитель работает и в UEFI и в Legacy режиме.
Для установки программы используйте следующие команды в терминале
sudo add-apt-repository ppa:nilarimogard/webupd8
sudo apt update
sudo apt install woeusb
Если эти команды не сработали, попробуйте такой вариант:
wget mirrors.kernel.org/ubuntu/pool/universe/w/wxwidgets3.0/libwxgtk3.0-0v5_3.0.4+dfsg-3_amd64.deb
sudo dpkg -i libwxgtk*_amd64.deb
sudo apt update
sudo apt --fix-broken install
sudo apt install woeusb
После установки порядок действий будет следующим:
- Запустите программу.
- Выберите ISO образ диска в разделе «From a disk image» (также, при желании, можно сделать загрузочную флешку с оптического диска или смонтированного образа).
- В разделе «Target device» укажите флешку, на которую будет записан образ (данные с неё будут удалены).
- Нажмите кнопку Install и дождитесь завершения записи загрузочной флешки.
- При появлении ошибки с кодом 256 «Source media is currently mounted», размонтируйте образ ISO с Windows 10.
- При ошибке «Target device is currently busy», размонтируйте и отключите флешку, затем снова подключите её, обычно помогает. Если не сработало, попробуйте предварительно отформатировать её.
На этом процесс записи завершен, можно использовать созданный USB накопитель для установки системы.
Создание загрузочной флешки Windows 10 в Linux без программ
Этот способ, пожалуй, ещё проще, но подойдет только в том случае, если вы планируете загружаться с созданного накопителя на UEFI-системе и устанавливать Windows 10 на GPT диск.
- Отформатируйте флешку в FAT32, например, в приложении «Диски» в Ubuntu.

- Смонтируйте образ ISO с Windows 10 и просто скопируйте всё его содержимое на отформатированную флешку.


Загрузочная флешка Windows 10 для UEFI готова и с неё можно без проблем загрузиться в EFI-режиме.