
Updated on Apr 28, 2025
Windows has exerted a prevailing influence within the domain of computer operating systems. It offers users a versatile platform for their computing needs. Traditionally, the installation of Windows has been predominantly carried out on internal hard drives. However, with the evolution of technology, alternative storage solutions have emerged.
One such solution is booting Windows from an SD card — a compact and portable storage medium typically used in cameras, smartphones, and other devices. Booting Windows from an SD card brings numerous advantages, including increased flexibility, mobility, and the ability to carry your personalized Windows environment wherever you go.
EaseUS will provide you with the necessary steps to boot Windows from an SD card successfully.
| ⏱️Duration | 3-7 minutes |
| 🧑💻Supported OS | Windows 10/11/8/7 |
| 📖Preparation |
SD Card [8GB and NTFS format] |
| ⛏️Software | Windows Cloning Tool — EaseUS Partition Master |
| 👣Steps |
Guide 1. Preparations to Boot from SD Card Guide 2. Create a Bootable SD Card Guide 3. Boot OS From SD Card |
This section will guide you through the entire process, from preparing your system to installing Windows on your SD card. Given below is the detailed process to boot Windows from an SD card:
Guide 1. Preparations to Boot Windows from SD Card
Before initiating booting Windows from an SD card, it is imperative to undertake a series of vital preparations. These preparations ensure you possess the tools and resources to execute the installation procedure effectively. Let’s delve into each requirement in detail:
1️⃣Prepare the SD Card and Format It
To begin, you will need an SD card with sufficient storage capacity:
- For optimal results, it is advisable to utilize an SD card with a minimum capacity of 8GB to accommodate the Windows installation files.
- Moreover, it is imperative to format the SD card to the NTFS file system to ensure seamless compatibility with the Windows operating system.
2️⃣Prepare Bootable SD Card
To boot a Windows computer from an SD card, you need to make the SD card bootable first. There are generally two ways to do this:
- Download a Windows ISO file that contains the installation files required for the Windows operating system. You can get the Windows ISO file from the official Microsoft website or other trusted sources.
- Or you can also migrate your computer operating system and applications to the SD card by cloning them.
3️⃣Download the Windows Cloning Tool: EaseUS Partition Master
You need a reliable cloning tool to migrate the Windows OS to the SD card. One highly recommended option is EaseUS Partition Master.
Here are a few reasons why we suggest using EaseUS Partition Master:
- It is Safe: EaseUS Partition Master provides safe download links, and it avoids a lot of advertising pitches.
- Better Compatibility: This tool is known for its compatibility with various storage media, including SD cards, ensuring a smooth cloning process.
- Fewer Limitations: EaseUS Partition Master provides fewer limitations than other cloning tools, allowing you more control over the process.
- Full Features: With its wide array of supplementary features and functionalities, this software is a comprehensive tool for effectively managing your devices.
📖Review from LifeWire: The overall look and feel of EaseUS Partition Master Free make whatever you’re doing with your computer’s partitions easy to understand and accomplish. The options aren’t too overwhelming, and each is accurately named.
Guide 2. Create a Bootable SD Card
After completing the essential preparations, creating a bootable SD card is the next pivotal step. Explained below in detail are the ways to install the Windows system on SD card and boot Windows from an SD card:
This method utilizes the Clone OS feature of EaseUS Partition Master, which enables you to clone your existing Windows system onto the SD card. The clone OS feature allows you to duplicate your Windows system onto the SD card, including all files, settings, and applications.
It ensures that your portable Windows environment retains the same functionality as your original system, providing a seamless experience. With this feature, you can create an independent and fully functional Windows system on your SD card, ready to boot on any compatible device.
Begin the process of installing the Windows system on an SD card by following these steps:
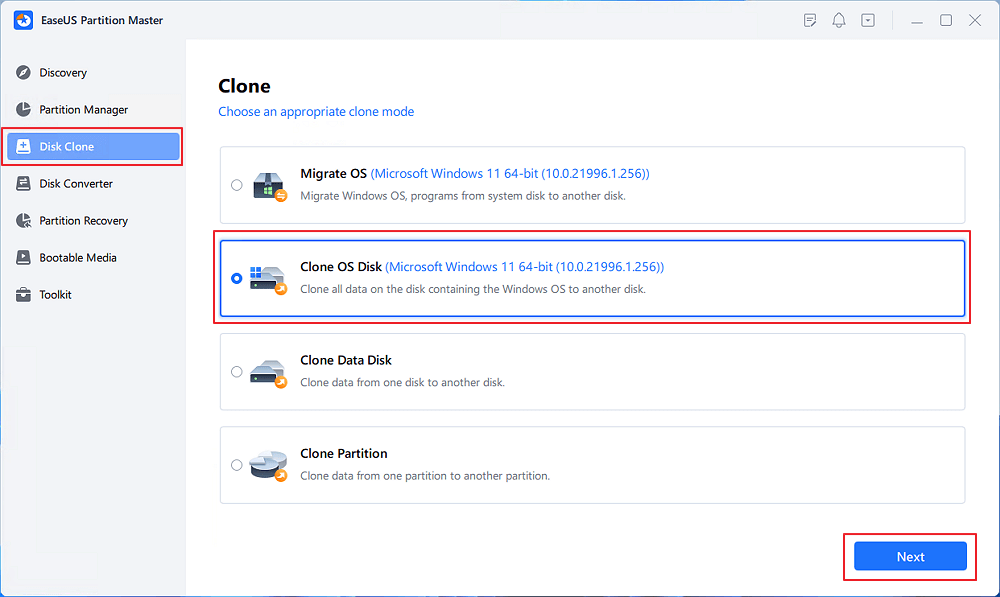
Step 1. Launch EaseUS Partition Master, go to the Disk Clone tab, select «Clone OS Disk» and click «Next».
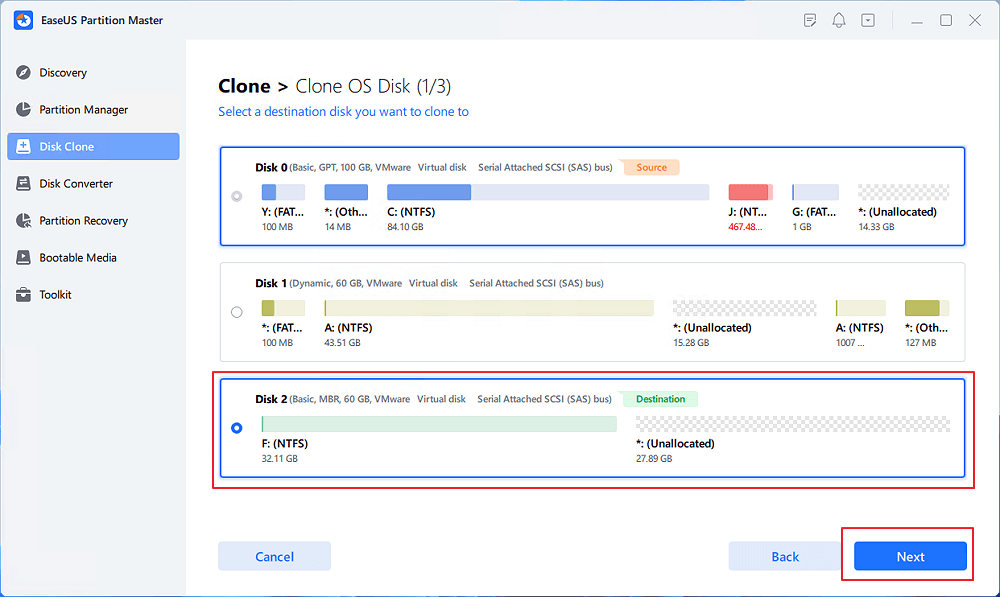
Step 2. Select the target new drive where you want to clone the OS to, and click «Next».
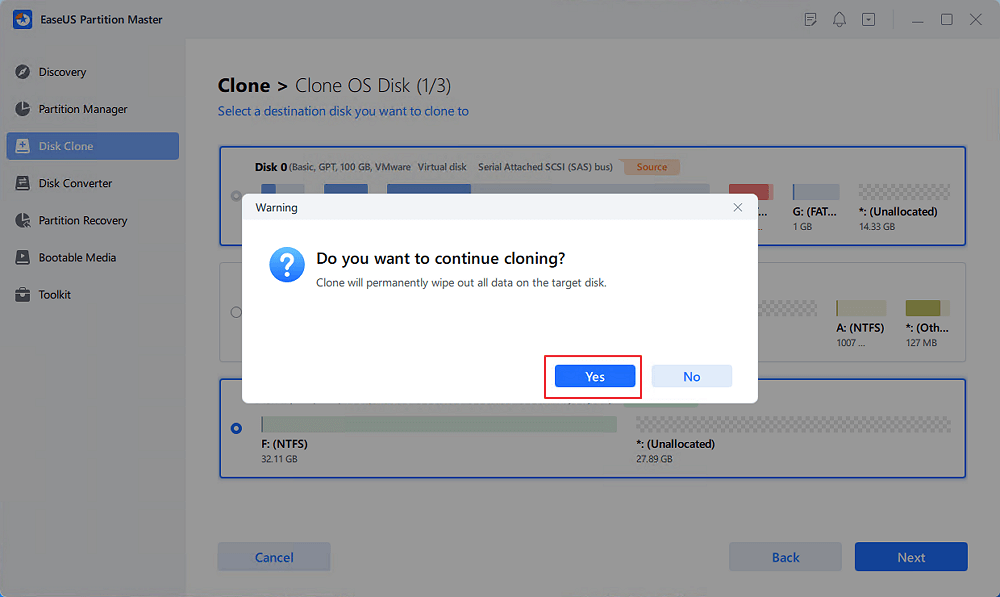
Click «Yes» to confirm that you want to continue the OS disk cloning process.
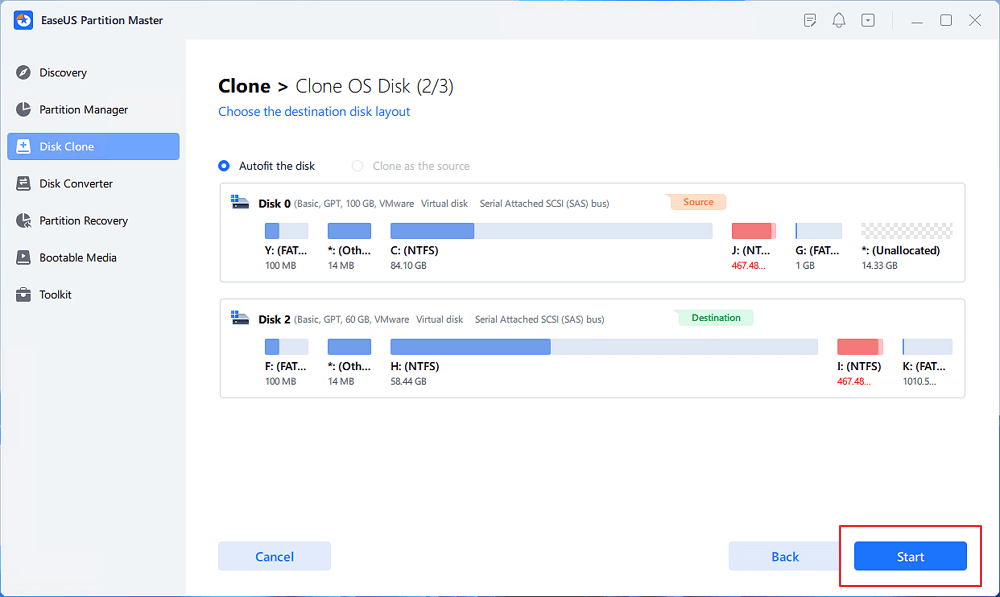
Step 3. View the disk layout, and click «Start» to begin the OS cloning process.
Step 4. When the process completes, you’ll see a confirming message, asking «if you want to start up computer from the clone target disk».
- Reboot Now means to reboot your PC and configure the computer to boot OS from the new disk immediately.
- Done means you want to make the changes later.

By using this way, you can also install Windows 10 from USB.
Guide 3. Boot OS From SD Card
Upon successfully creating a bootable SD card, the subsequent stage involves booting your operating system (OS) from the SD card. This allows you to start up and run your computer using the Windows installation on the SD card, providing a portable and independent Windows environment.
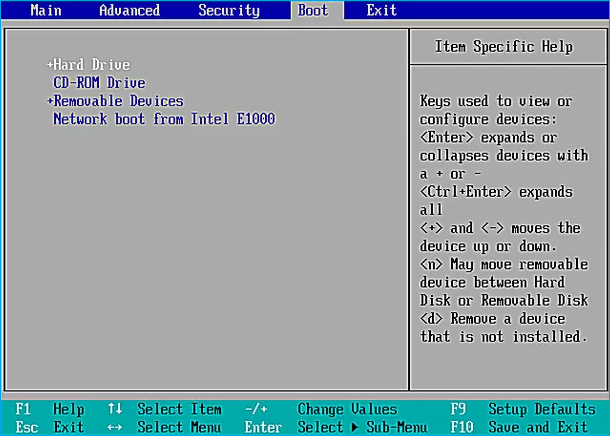
To ensure that your system prioritizes booting from the SD card, you need to modify the boot order within your computer’s BIOS settings. Here you will need to prioritize the SD card as the primary boot device. These are the steps you need to boot Windows from an SD card:
Step 1: Insert your bootable SD card into your computer and reboot it. During the rebooting process, use the BIOS key to open BIOS settings. The key differs for each model and brand. It can be F2, F8, Esc, F10, etc.
Step 2: When in the BIOS menu, select «Enter Setup» and move to the «Change Boot Order» option on the following window. Now use the arrow keys to give the SD card the highest boot priority. Afterward, save the BIOS settings and reboot your system to boot from the SD card.
Note: When you want to boot USB from other laptops, such as boot Lenovo laptop from USB or boot ASUS from USB, changing the boot order is essential.
Why Do We Boot Windows From SD Card
Having acquired knowledge on creating a bootable SD card and booting your operating system from it, you may question the advantages of booting from an SD card. Summarized below are the reasons and situations where booting from an SD card proves advantageous:
Portability and Mobility
Booting from an SD card provides the convenience of portability and mobility. You can carry your operating system, personalized settings, and applications wherever you go. Simply insert the SD card into a compatible device, boot from it, and access your familiar Windows environment on the go.
Troubleshooting and Recovery
Using a bootable SD card proves invaluable when troubleshooting or recovering your computer. If your primary operating system encounters issues or becomes inaccessible, having a bootable SD card lets you quickly boot into an alternative operating system and perform diagnostics, repair tasks, or recover important files.
Compatibility with Multiple Devices
A bootable SD increases your compatibility across various devices. The device supports booting from external media, so the same SD card can boot your Windows system on various computers or laptops. This flexibility proves particularly advantageous when working across different machines or temporary environments.
Test New Operating Systems
It is an excellent way to test new operating systems without interfering with your primary system. By simply booting from the SD card, you can explore various Windows versions or even experiment with alternative operating systems like Linux distributions. This allows for easy experimentation and exploration of different software environments.
Conclusion
In conclusion, booting Windows from an SD card unlocks portability, security, troubleshooting, and compatibility opportunities. Throughout this extensive guide, we have delved into the detailed process of booting Windows from an SD card. It involved cloning the Windows OS onto SD card and successfully booting your operating system from the SD card.
Throughout this process, we have emphasized the significance of selecting appropriate software to aid you in these endeavors. EaseUS Partition Master stands out as a reliable and feature-rich solution. It offers additional functionalities, such as OS cloning, Surface Test, 4K alignment, MBR rebuild, etc.
FAQs About How to Boot Windows From SD Card
If you still have inquiries regarding booting Windows from an SD card, we have compiled a list of FAQs to address common concerns. Continue reading to discover answers and enhance your comprehension of this subject matter:
1. Can I install the OS on an SD card?
Yes, installing an operating system on an SD card is possible. The first requirement is creating a bootable SD card and configuring your computer’s BIOS/UEFI settings. Now you can utilize the SD card as the primary medium for executing the operating system.
2. How can I use an SD card as RAM in Windows?
Use the following steps to use an SD card as RAM in a Windows computer:
Step 1: Insert your SD card into the SD card slot of your computer. Now format the card using the FAT32 file system. Locate your SD card in Windows Explorer and right-click on it to select «Properties.»
Step 2: Navigate to the «ReadyBoost» tab and select «Dedicate this device to ReadyBoost.» Finally, click «Apply» and «OK to save the changes.
3. How do I create a bootable Windows SD card?
You should format the SD card first to create a bootable Windows SD card. Afterward, acquire the Windows ISO file. Lastly, you need to utilize an ISO burner tool to transfer the ISO file onto the SD card. For a comprehensive, step-by-step explanation of how to accomplish this task using EaseUS Partition Master, please refer to the tutorial.
Как использовать USB флешку c Windows на телефоне без компьютера?
Многие при появлении проблем с компьютером забывают о том, что у большинства из них в кармане есть почти полноценный компьютер на Android. Отсюда порой недовольные комментарии к статьям на тему: как же я скачаю драйверы на Wi-Fi, утилиту для очистки от вирусов или что-то ещё, если я как раз и решаю проблему с Интернетом на компьютере. Легко скачать и по USB передадать на проблемное устройство, если у вас есть смартфон. Как сделать это, читайте ниже.
- Вставьте в ваш смартфон Micro SD-карту объемом не меньше 16 Гб

- В телефоне зайдите в Play Market
- Загрузите приложение, как на фото ниже. Найти его вы можете, написав название в поиске

- Загрузите еще одно приложение – Архиватор RAR

- По ссылке скачайте Windows 11 microsoft.com/…/windows11
- Откройте ранее скачанное приложение 1DM
- Нажмите на + в нижнем правом углу

- Выберите Из буфера
- Запомните название папки, куда будет скачан Архив

- Нажмите Запуск
- Дождитесь завершения скачивания архива и выйдите из приложения
- Запустите ранее скачанное приложение Архиватор RAR
- Найдите скачанный вами архив, сделать это можно по названию

- Поставьте галочку напротив архива и нажмите на вторую кнопку в верхнем правом углу, со стрелочкой наверх
- Дождитесь завершения распаковки архива
- Выделите все разархивированные файлы и папки

- Зажмите любой из выделенных объектов и в появившемся меню выберите Копировать в буфер обмена
- В меню приложения выберите Micro SD-карту
- Вставьте скопированное, нажав на значок Вставить в верхнем правом углу
Теперь осталось вставить SD-карту в специальный разъем в ноутбуке, после этого выполните следующие шаги:
- При включении ноутбука, войдите в BIOS
- Нажмите на название вашей SD-карты и нажмите Enter

- После чего начнется стандартная загрузка системы Windows.
-
Готово!
0
Если вы видите это сообщение, значит, произошла проблема с загрузкой файлов в стилей (CSS) нашего сайта. Попробуйте сбросить кэш браузера (Ctrl+F5).
Если это не поможет, а вы находитесь в регионе, где возможны ограничения интернет-трафика с российских серверов — воспользуйтесь VPN.
|
Если использовать адаптер юсб? Весь скачанный windows на этой маленькой флешке. Для начала попробуйте Windows Device Recovery Tool. Если не получится, забейте модель вашего планшета вместе с hard reset в поисковик, также посетите сайт производителя планшета, возможно там есть прошивка, инструкции или утилита для восстановления. Не помешает на 4pda.ru/forum почитать про ваш планшет, или спросить о вашей ситуации. автор вопроса выбрал этот ответ лучшим maste 3 года назад Да, это возможно, потребуется установить эту карту памяти microsd в переходник USB и действовать таким же образом, как и при установке с флешки, а вот встроенный картридер в некоторых ноутбуках и планшетах может не отображаться в биосе, поэтому для установки системы потребуется именно адаптер microSD-USB zamor 7 лет назад Если создание загрузочной USB flash было сделано правильно, то никаких проблем при установке возникать не должно, будь это привычная нам USB- флешка, либо Micro SD через адаптер. Попробуйте протестировать созданную флешку на другом гаджете или ПК. semin 8 лет назад да можно с microsd поставить, ни чем не отличается от обычной установки Знаете ответ? |
You are here:
Home » Windows 10 » How To Install Windows 10/8.1/7 From Your Phone’s Micro SD Memory Card
A couple of years ago, during the days of Windows XP and Vista to be precise, we all used to use traditional CDs and DVDs to install Windows operating system. Post the release of Windows 7 Beta in January 2009, a number of tools started appearing on the web to create bootable USBs that help you install Windows 7 from a USB drive.
Microsoft also released an official tool, a few weeks before the release of Windows 7 RTM to the public, called Windows 7 USB/DVD Download Tool to help end users create bootable Windows 7 USBs from ISO image files. Tools like Rufus and WinUSB Maker are capable of creating bootable USB compatible with both tradition BIOS and new UEFI systems.

But there might be situations where you have Windows 10/8.1/7 ISO file but don’t have a USB drive to prepare and install/re-install Windows from a USB drive. Thankfully, Windows 7, Windows 8/8,1, and Windows 10 can be installed from your phone’s memory card as well.
These days, almost all of us own at least one smart phone and most of these smart phones, barring iPhone, support Micro SD memory cards. So finding a memory card isn’t a hard task, and since all of us carry our phones everywhere, we can quickly move the SD card data to a PC, prepare the bootable memory card, and then install Windows from the memory card.
In this guide, we will show you how to create bootable Micro SD memory card and use it as the bootable media to install Windows 10/8.1/7 from the same. Follow the given below instructions to prepare your Windows 10/8.1/7 bootable Micro SD card and then install Windows 10/8.1/7.
Preparing Windows 10/7/8.1 bootable memory card is fairly a simple job and you need to follow the same procedure that you followed to create Windows 8.1 bootable USB drives.
NOTE 1: Memory cards, other than Micro SD, can also be used to prepare bootable media and then install Windows from it.
NOTE 2: Before using the Command Prompt to prepare the bootable media, I tried the popular Rufus tool to make memory card bootable but it failed. Other similar tools out there might help you in preparing the bootable memory card but we’re going to use the 100% working instructions provided in our how to install Windows 10 from USB guide to prepare Windows 8.1/10 bootable memory card.
Making your Micro SD memory card bootable
Procedure:
Step 1: Remove the Micro SD memory card from your phone and attach it to your PC either using built-in or an external memory card reader.
Step 2: Back up all data from your memory card to a safe location, as we’re going to format the memory card which will erase all data from the card.
Step 3: Open elevated Command Prompt. To open the Command Prompt with administrator rights, type CMD in the Start screen or Start menu, and then simultaneously press Ctrl + Shift + Enter keys. You can also refer to our how to open Command Prompt as administrator for detailed instructions.
Step 4: In the elevated Command Prompt, execute the following commands:
Diskpart
Press Enter key.
List Disk
Press Enter key.
Notice the disk number of your memory card. For example, in the above picture, my memory card’s disk number is 1.
Step 5: Next, type the following commands one after another and press Enter key after tying each command.
Select Disk 1
In the above command, replace “1” with your memory card’s disk number that you have obtained in Step 4.
Clean
Create Partition Primary
Select Partition 1
Active
Format Fs=NTFS Quick
Assign
Exit
Don’t close the Command Prompt yet.

Step 6: Next, mount your Windows 10/8.1/7 ISO file to get a drive letter for the mounted drive. If you’re on Windows 8/8.1, right-click on the ISO file and then click Mount. And if you’re on Windows 7, please go through our how to mount an ISO file in Windows 7 guide for detailed instructions.
Step 7: Execute the following three commands:
G: Cd Boot
Where “G” is drive letter of the mounted ISO file
Bootsect.exe /NT60 F:
In the above command, replace “F” with the drive letter of your Micro SD memory card. That’s it! You can now close the Command Prompt.

Step 8: Finally, copy all files (including hidden, if any) from the virtual drive (ISO file mounted drive) to your memory card. Your bootable Windows memory card is now ready.
Step 9: Turn on the PC on which you would like to install Windows from the bootable memory card, connect the bootable memory card, boot into BIOS or UEFI, re-arrange the boot order to bootable from memory card/USB and restart the PC to see Press any key to boot from CD/DVD message on the screen.
Press any key to begin loading necessary files and installing Windows 10/8.1/7 operating system. Good luck!
NOTE: Should your PC doesn’t show memory card in the BIOS/UEFI and doesn’t support booting from a memory card, you can put back the memory card (after preparing the bootable one) into your phone, connect the phone to your PC using a supported cable and then restart your PC to boot and install Windows. It worked on our PC, at least.