
Одна из проблем, встречающаяся в Windows последних версий, похоже, чаще, чем в предыдущих версиях ОС — загрузка диска на 100% в диспетчере задач и, как следствие, заметные тормоза системы. Чаще всего это просто ошибки работы системы или драйверов, а не работа чего-либо вредоносного, но возможны и иные варианты.
В этой инструкции подробно о том, почему жесткий диск (HDD или SSD) в Windows 11/10 может быть загружен на 100 процентов и что делать в этом случае, чтобы исправить проблему.
Программы, активно использующие диск
Несмотря на то, что этот пункт сравнительно нечасто оказывается причиной нагрузки на HDD в Windows 11/10, рекомендую начать с него, особенно если вы не являетесь опытным пользователем. Проверьте, а не является ли какая-то установленная и запущенная (возможно, находящаяся в автозагрузке) программа, служба или вредоносное ПО причиной происходящего. Для этого вы можете выполнить следующие действия:
- Откройте диспетчер задач (сделать это можно через правый клик по меню пуск, выбрав соответствующий пункт в контекстном меню). Если в нижней части диспетчера задач вы увидите кнопку «Подробнее», нажмите ее.
- Отсортируйте процессы в колонке «Диск», нажав на ее заголовок.

- Обратите внимание, а не какая-то из ваших собственных установленных программ вызывает нагрузку на диск (т.е. находится первой в списке). Это может быть какой-либо антивирус, выполняющий автоматическое сканирование, торрент-клиент, или просто неправильно работающее ПО. Если это так, то стоит убрать эту программу из автозагрузки, возможно, переустановить ее, то есть искать проблему с нагрузкой на диск не в системе, а именно в стороннем ПО.
- Нагружать диск на 100% может какая-либо служба Windows, запущенная через svchost.exe. Если вы видите, что именно этот процесс вызывает нагрузку, рекомендую посмотреть статью про svchost.exe грузит процессор — в ней приводится информация о том, как с помощью Process Explorer узнать, какие именно службы запущены через конкретный экземпляр svchost, вызывающий нагрузку.

Если есть подозрение на то, что недавно установленные программы или сторонние службы являются причиной проблемы, можно выполнить чистую загрузку Windows и понаблюдать, исправило ли это ситуацию. Если да — попробовать выяснить, какое именно ПО привело к проблеме, шаги для этого описаны в материале по ссылке.
В некоторых случаях при открытии диспетчера задач нагрузка на диск может сразу пропадать. В такой ситуации можно предположить наличие вредоносного ПО на компьютере, часто — майнера, который «прячется» при открытии диспетчера задач. В такой ситуации рекомендую использовать Miner Search и Kaspersky Virus Removal Tool, либо Kaspersky Rescue Disk для поиска и удаления угроз.
Неправильная работа драйверов AHCI, NVM Express или чипсета
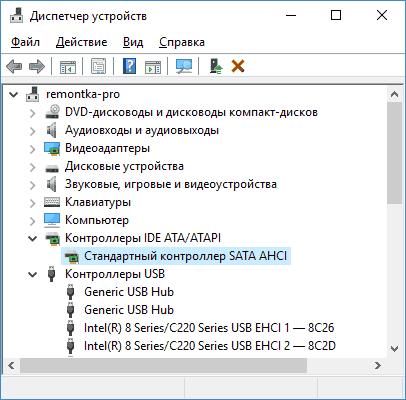
Мало кто из пользователей, устанавливающих Windows 11/10, выполняет какие-либо действия с драйверами контроллеров дисков и чипсета — у большинства в диспетчере устройств в разделе «Контроллеры IDE ATA/ATAPI» или будет «Контроллеры запоминающих устройств» значиться «Стандартный контроллер SATA AHCI» или «Стандартный контроллер NVM Express». И обычно это не вызывает проблем.
Однако, если без видимых причин вы наблюдаете постоянную нагрузку на диск, следует обновить этот драйвер на тот, что предусмотрен производителем вашей материнской платы (если у вас ПК) или ноутбука и доступен на официальном сайте производителя (даже если там он в наличии только для предыдущих версий Windows), при этом влиять могут не только драйверы контроллеров дисков, но и драйверы чипсета: Windows устанавливает их автоматически и они совместимы, но не всегда оптимальны.
Решение — установить драйверы от производителя:
- Зайдите на официальный сайт производителя вашей материнской платы или ноутбука, найдите раздел поддержки вашей модели ноутбука.
- Найдите там драйверы чипсета (всё, присутствующее в разделе Chipset), а при наличии— AHCI, SATA (RAID), NVMe или Intel RST (Rapid Storage Technology) и загрузите их (на скриншоте ниже пример таких драйверов).

- Драйверы могут быть представлены в виде установщика (тогда просто запускаем его), либо в виде zip-архива с набором файлов драйвера. Во втором случае распаковываем архив и выполняем следующие шаги.
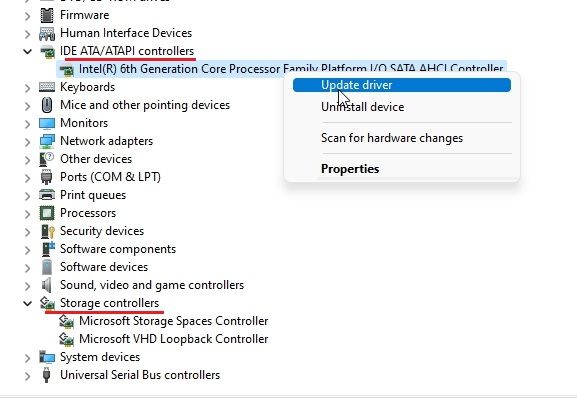
- В диспетчере устройств нажмите правой кнопкой мыши по Стандартному контроллеру SATA AHCI и нажмите «Обновить драйверы».
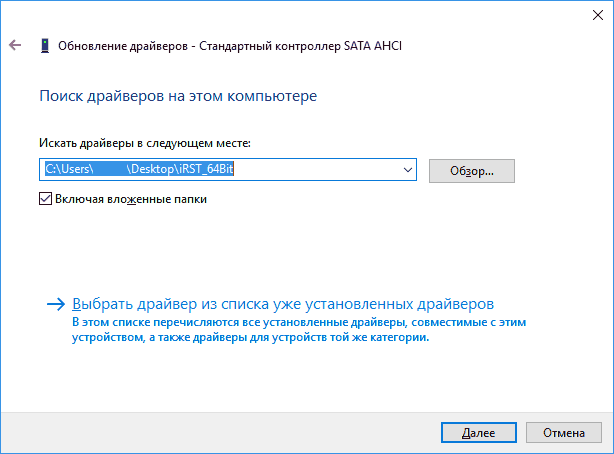
- Выберите «Выполнить поиск драйверов на этом компьютере», затем указываем папку с файлами драйвера и нажимаем «Далее».

- Если всё прошло успешно, вы увидите сообщение о том, что ПО для данного устройства было успешно обновлено.


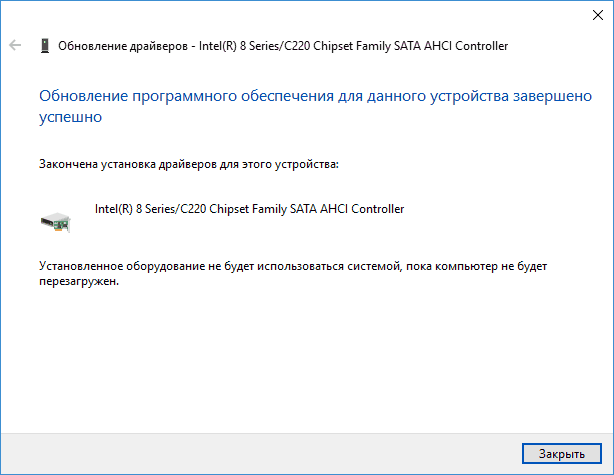
По завершении установки, перезагрузите компьютер и проверьте, остается ли проблема с нагрузкой на HDD или SSD.
Отключение Message Signaled Interrupt
Если аппаратные проблемы жесткого диска или SSD исключены, вы уверены, что нагрузка вызвана не текущими операциями чтения-записи, инициированных программами или вредоносным ПО, проверьте, сработает ли следующий подход, эффективный для решения проблемы 100% нагрузки на диск при использовании стандартного контроллера SATA AHCI (рекомендую создать точку восстановления системы, прежде чем приступить):
- Запустите диспетчер устройств: сделать это можно в меню Win+X, также можно нажать клавиши Win+R и ввести devmgmt.msc
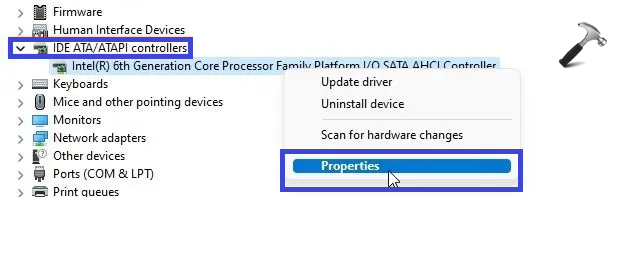
- В диспетчере устройств раскройте раздел «Контроллеры запоминающих устройств» («Контроллеры IDE ATA / ATAPI), дважды нажмите по элементу «Стандартный контроллер SATA AHCI», «Стандартный контроллер NVM Express» или другому контроллеру, к которому подключен диск (если вы не знаете, к какому именно контроллеру он подключен, а их несколько, возможно, придётся повторить действие и для других).
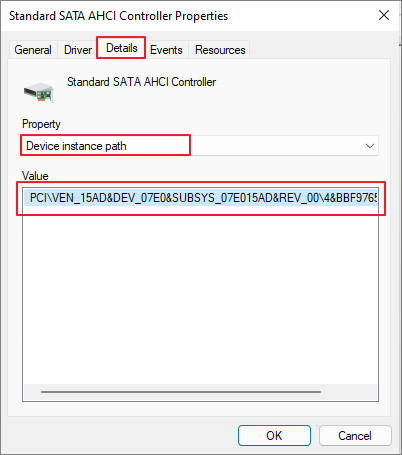
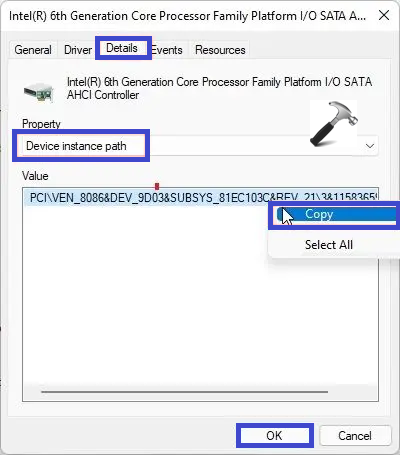
- Перейдите на вкладку «Сведения» выберите в списке значение «Путь к экземпляру устройства» и скопируйте его в буфер обмена: нажмите по значению правой кнопкой мыши и выберите нужный пункт меню.

- Запустите редактор реестра (Win+R — regedit) и перейдите к разделу
HKEY_LOCAL_MACHINE\System\CurrentControlSet\Enum
после чего в адресной строке редактора реестра добавьте «\» справа от Enum, затем вставьте путь, скопированный на 3-м шаге. Если у вас отсутствует строка для ввода пути к разделу, выполните переход к нужному разделу вручную.

- Перейдите к подразделу
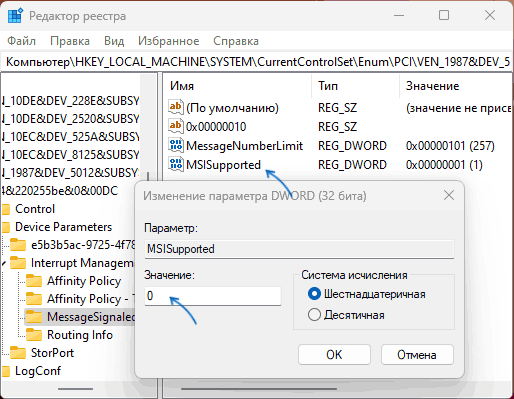
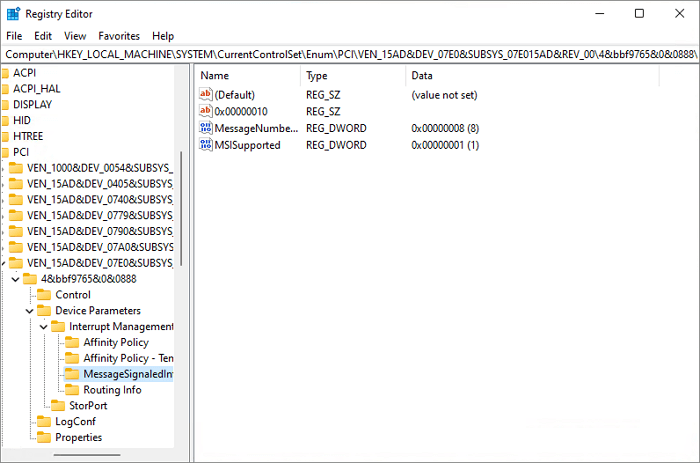
Device Parameters\InterruptManagement\MessageSignaledInterruptProperties
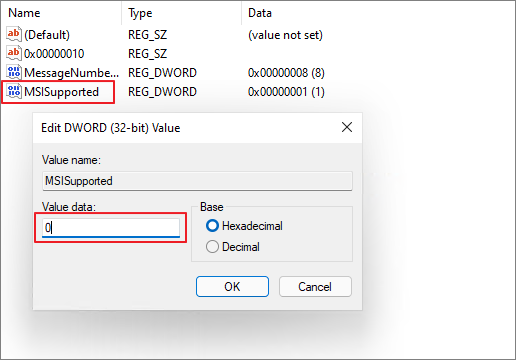
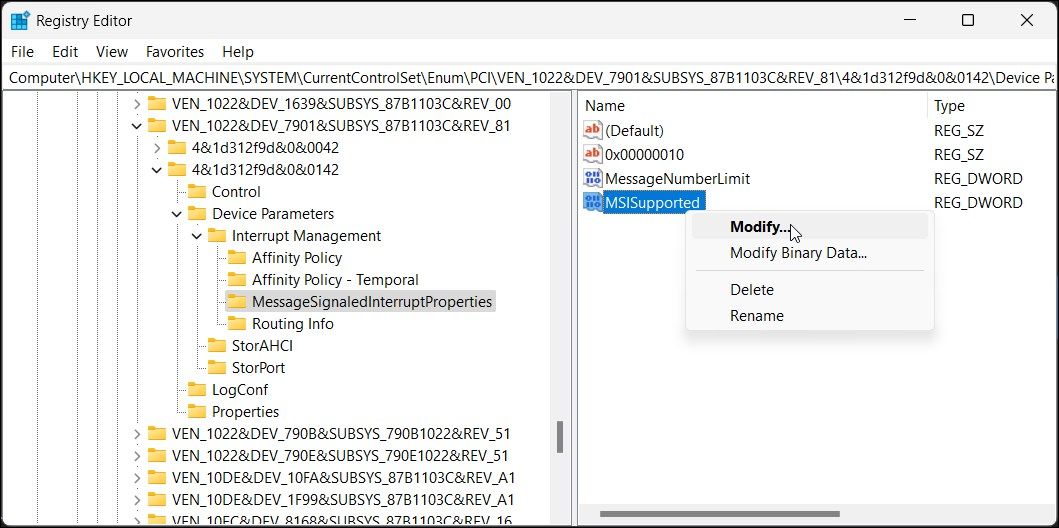
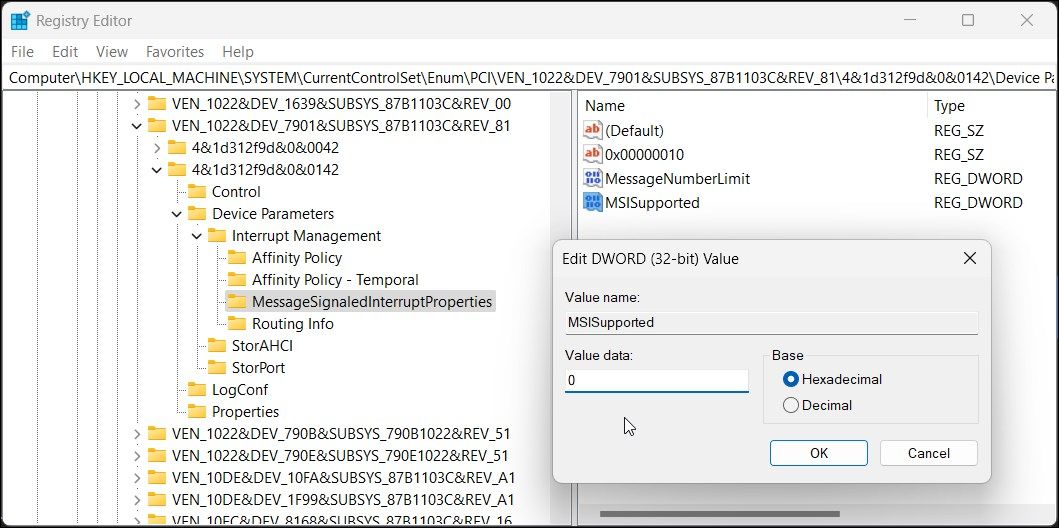
- Дважды нажмите по параметру с именем MSISupported и измените его значение на 0, примените настройки и закройте редактор реестра.

- Перезагрузите компьютер, чтобы изменения вступили в силу.


С большой вероятностью после перезагрузки компьютера проблема более не будет наблюдаться, а нагрузка на диск снизится.
Существуют дополнительные простые способы, которые могут исправить нагрузку на диск в случае некоторых ошибок работы стандартных функций Windows, а также дополнительные причины, которые могут к ней приводить:
- Для SATA-накопителей причиной постоянной высокой нагрузки на диск может быть неисправность или плохое подключение кабеля SATA — следует проверить его подключение, при возможности — попробовать заменить кабель на новый.
- Проблемы с электропитанием (недостаточность мощности, например, вследствие износа компонентов блока питания) также могут приводить к рассматриваемой проблеме.
- При наличии нескольких дисков в системе, неисправности одного могут приводить и к повышенной нагрузке на другом диске: проверить, в этом ли причина, можно отключив все необязательные для работы ОС диски.
- Выход из строя самого диска также может приводить к постоянной высокой нагрузке на диск, рекомендую проверить атрибуты SMART вашего накопителя.
- Для SSD критичным может оказаться высокий нагрев, особенно для производительных моделей накопителей — проблему может решить радиатор или термопрокладки.
- Если проблема возникает с твердотельным накопителем SSD, причем не носит постоянного характера, попробуйте способ с изменением параметров Link Power Management из инструкции Что делать, если зависает SSD в Windows.
- Зайдите в Параметры — Система — Уведомления и действия и отключите пункт «Получать советы, подсказки и рекомендации при использовании Windows».
- Запустите командную строку от имени администратора и введите команду
wpr -cancel
- Отключите службы Windows Search, о том, как это сделать, см. Какие службы можно отключить в Windows 10.
- В проводнике в свойствах диска на вкладке «Общие» снимите отметку «Разрешить индексировать содержимое файлов на этом диске в дополнение к свойствам файла».
- Если проблема появилась недавно, могут помочь точки восстановления системы на дату, когда всё работало исправно.
- В ситуации, когда нагрузка на диск повышается до 100% после завершения работы и последующего включения, но пропадает при перезагрузке (использования пункта «Перезагрузка» в меню Пуск), может помочь отключение быстрого запуска Windows.
На данный момент времени — это все решения, которые я могу предложить на ситуацию, когда диск загружен на 100 процентов. Если ничто из перечисленного не помогает, и, при этом, раньше в этой же системе подобное не наблюдалось, возможно, стоит попробовать сбросить Windows 11 или Windows 10 к заводскому состоянию.
If you have upgraded to Windows 11 and found that your computer responds slow, you can check in the Task Manager to see what causes the problem. Task Manager provides you with information on how is every process currently running on your computer.
A common reason why your computer, or especially laptop, running slow is that the disk usage showing 100%. Generally, the disk usage would not go up for a long time. It will only reach a high level or close to 100% for a few moments, and then it should drop to a normal number, usually below 10%. If the disk usage of your computer continues at a high level. You need to find solutions to solve the issue. Here are 7 methods for you to try to optimize your computer.
- Fix 1. Update Your Device
- Fix 2. Reset Virtual Memory
- Fix 3. Change Power Options to High Performance
- Fix 4. Disable Antivirus Software temporarily
- Fix 5. Disable Windows Notifications
- Fix 6. Fix StorAHCI.sys Driver
- Fix 7. Perform a Disk Check
Read Also:
Fix 1. Update Your Device
Sometimes the disk usage is highly related to your computer’s disk. If you have installed an old HDD on the computer, maybe it’s time to change to a new one. One great option is to upgrade to a solid-state drive (SSD). SSDs are faster and more stable than HDDs. Computers installed with an SSD will have a better performance.
Fix 2. Reset Virtual Memory
If your computer’s hard drive is not outdated yet, you could reset the virtual memory to fix the problem. Virtual memory is an extension of your computer’s physical memory, which combines RAM and a part of the hard drive. When the RAM is out of space, Windows will store files in virtual memory. Here are the steps of how to reset virtual memory.
Step 1. Type Control Panel in the search bar, click the best match.
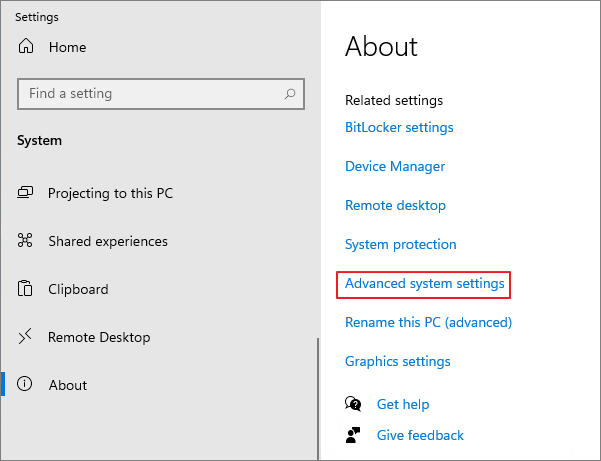
Step 2. Find and click System, then choose Advanced system settings on the right panel.
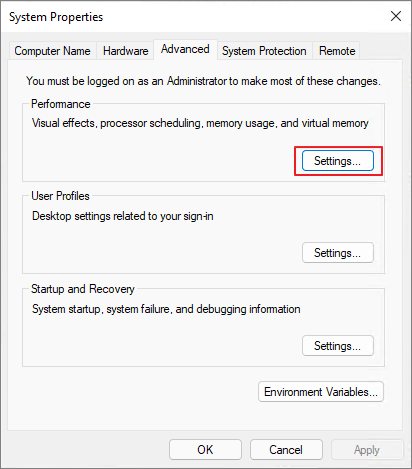
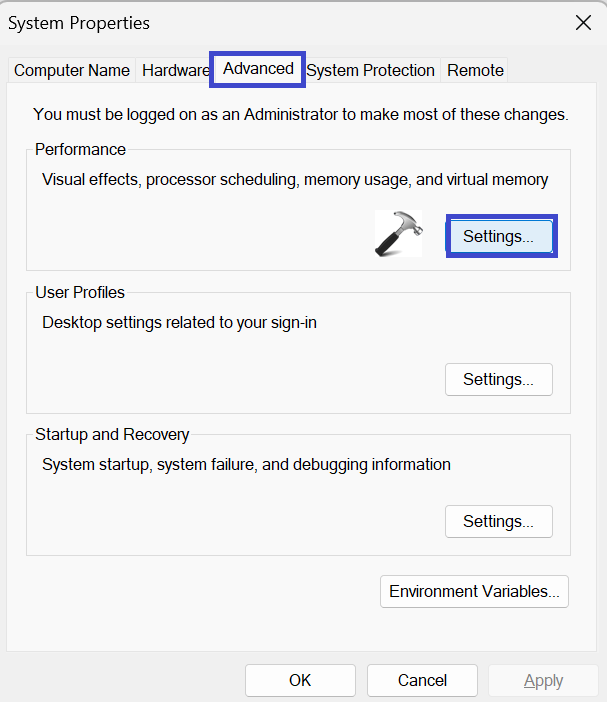
Step 3. It will open a new System Properties window. Switch to the Advanced tab, click Settings.
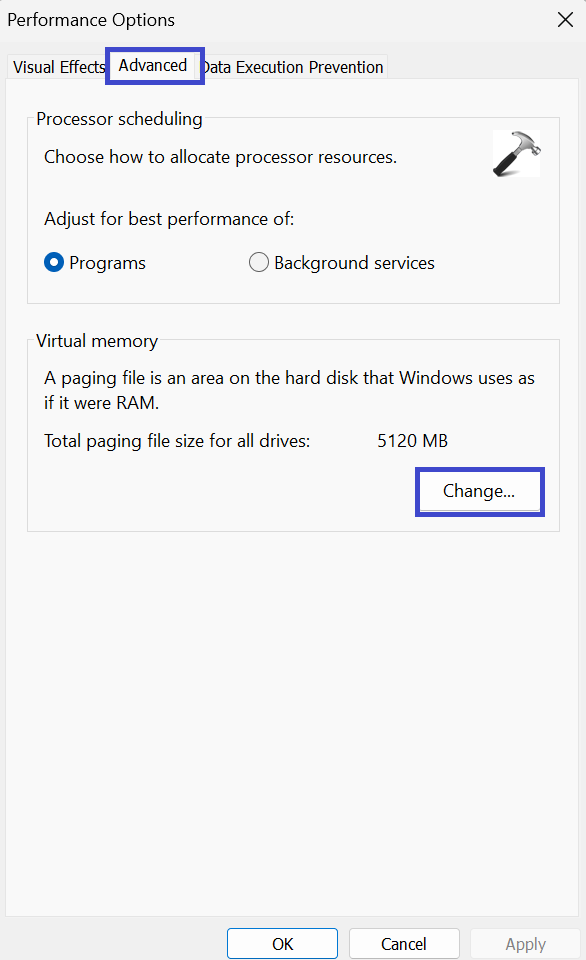
Step 4. In the newly-opened windows, under the Advanced tab, choose Change to adjust the virtual memory.

Step 5. Uncheck the Automatically manage paging file size for all drives option, then change the maximum size to a larger number. But don’t set this value too high. It should be about 1.5 times the physical RAM.
Step 6. Once set the virtual memory size, click Set and OK to confirm the change.
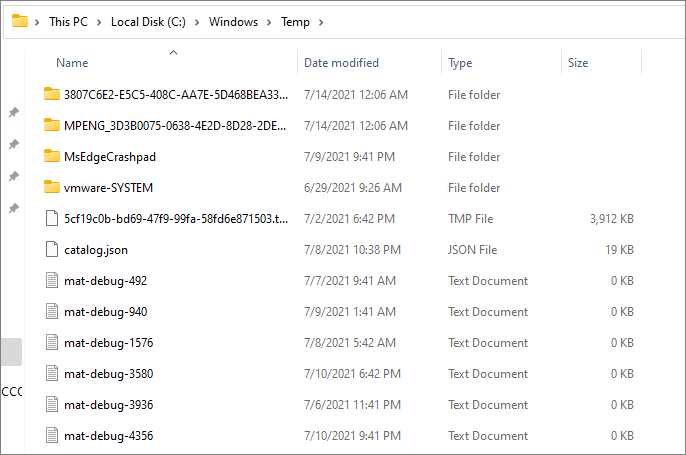
Step 7. Then you need to clear the computer’s temp files. Press the Windows + R keys at the same time, type temp in the run box, and hit enter.
Step 8. It will list all the temp files on your computer. Select and delete all of them.
Step 9. You can now check if the disk usage is 100% or not.
Read Also:
Fix 3. Change Power Options to High Performance
Some users said that change Power options to high performance will work. Here is how to do it.
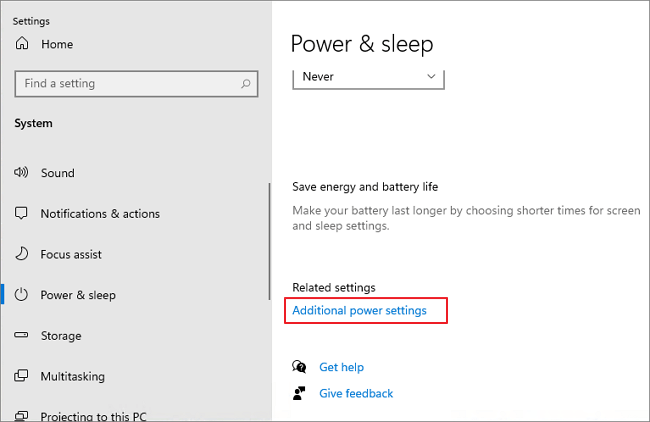
Step 1. Go to Control Panel > Power & sleep > Click Additional power settings.
Step 2. Click Change plan settings > Change advanced power settings.
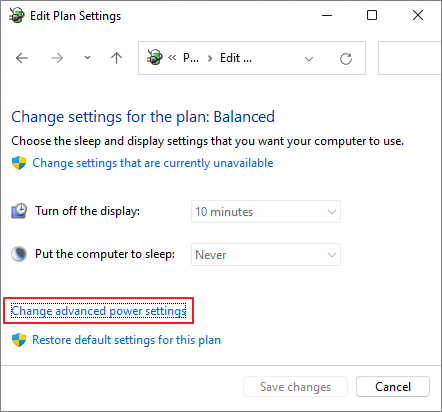
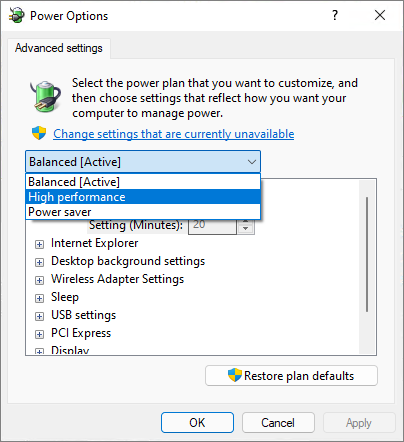
Step 3. Choose High performance from the drop-down menu and click Restore plan defaults.
Read Also: 100% Disk Usage Windows 10
Fix 4. Disable Antivirus Software temporarily
In some cases, the antivirus software will take too much disk usage. You can disable the software for a while to fix the issue.
Fix 5. Disable Windows Notifications
This is another method reported by users who experienced the same problem.
Go to Settings > System > Notifications & actions, turn off the Get tips, tricks, and suggestions as you use Windows.

Fix 6. Fix StorAHCI.sys Driver
Some AHCI PCIe (Advanced Host Controller Interface PCI-Express) can also cause the Windows 100 disk usage problem. You can fix the StorAHCI.sys driver to fix the problem.
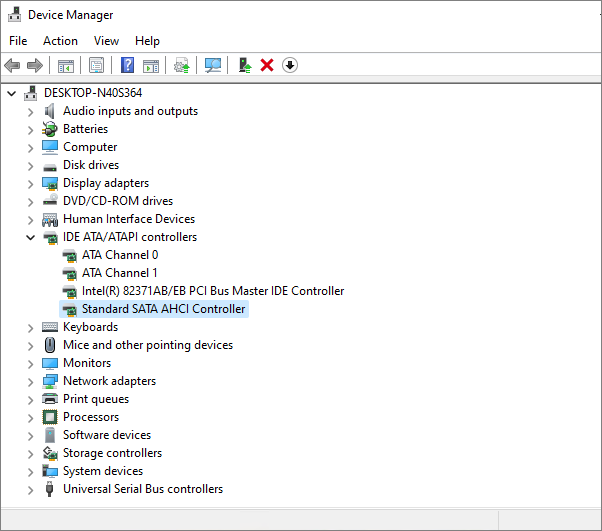
Step 1. Open Device Manager and find the IDE ATA/ATAPI Controllers.
Step 2. Choose Standard SATA AHCI Controller.
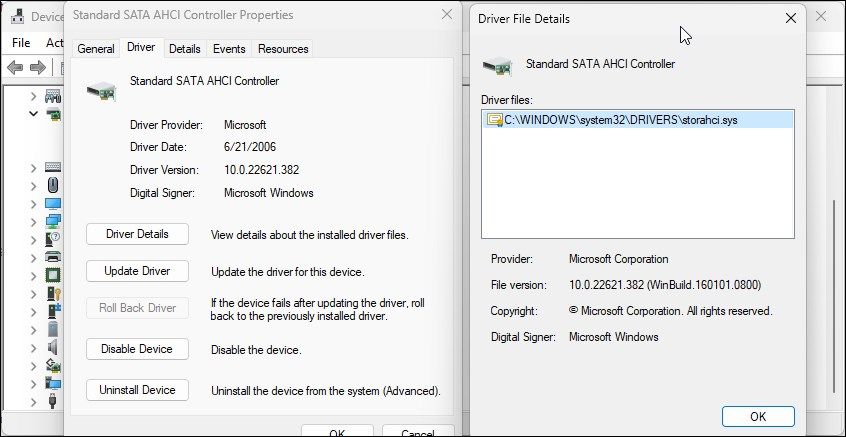
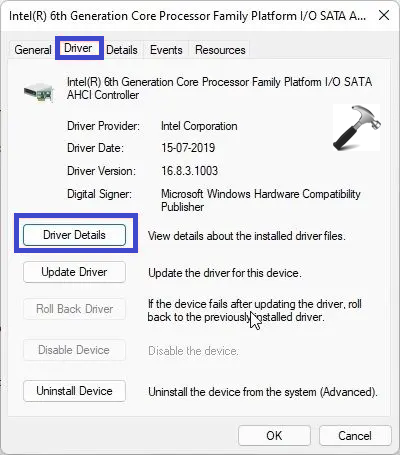
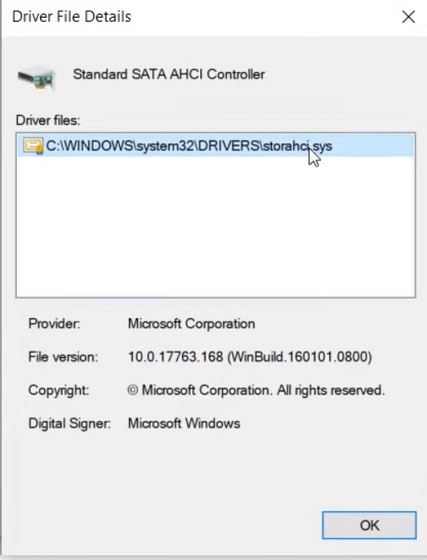
Step 3. Under the Driver tab, click Driver Details, check if there’s a storahci.sys file.
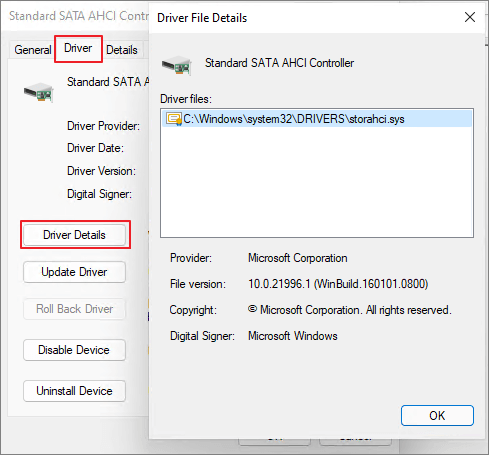
Step 4. Close the Driver Details window and go to the Details tab, select Device Instance Path. Note the file that starts with VEN.
Step 5. Type regedit in the search box of the Start panel, then hit Enter on your keyboard to run Registry Editor. Then go to:
HKEY_LOCAL_MACHINE\System\CurrentControlSet\Enum\PCI\Device Parameters\Interrupt Management\MessageSignaledInterruptProperties
The here refers to the name you see from step 4.
The differs on different machines.
Step 6. Double click the MSISupported key and change the value to 0.
Fix 7. Perform a Disk Check
If none of the above methods can help you solve the problem, your last resort is to perform a disk check. You can run chkdsk in the Command Prompt to check and try to fix the problem.
But you should notice that the chkdsk command line could probably result in data loss. You should back up all the important data before checking disk.
You can also use EaseUS Partition Master to perform a disk check. Download this tool for free, and follow the guide to see how to check the file system with it.
If your Windows PC is stuck at 100% disk usage, it can really slow down your PC. So slow that even performing basic tasks such as opening or closing an app can leave you frustrated.
An easy way to troubleshoot a slow computer due to high disk usage is to locate and end the problematic process in Task Manager. However, more often than not, it is a legitimate Windows service acting up and causing high disk usage in Windows 11. So, let’s explore how to fix high disk usage on Windows.
How to Find the Cause of 100% Disk Usage in Windows 11
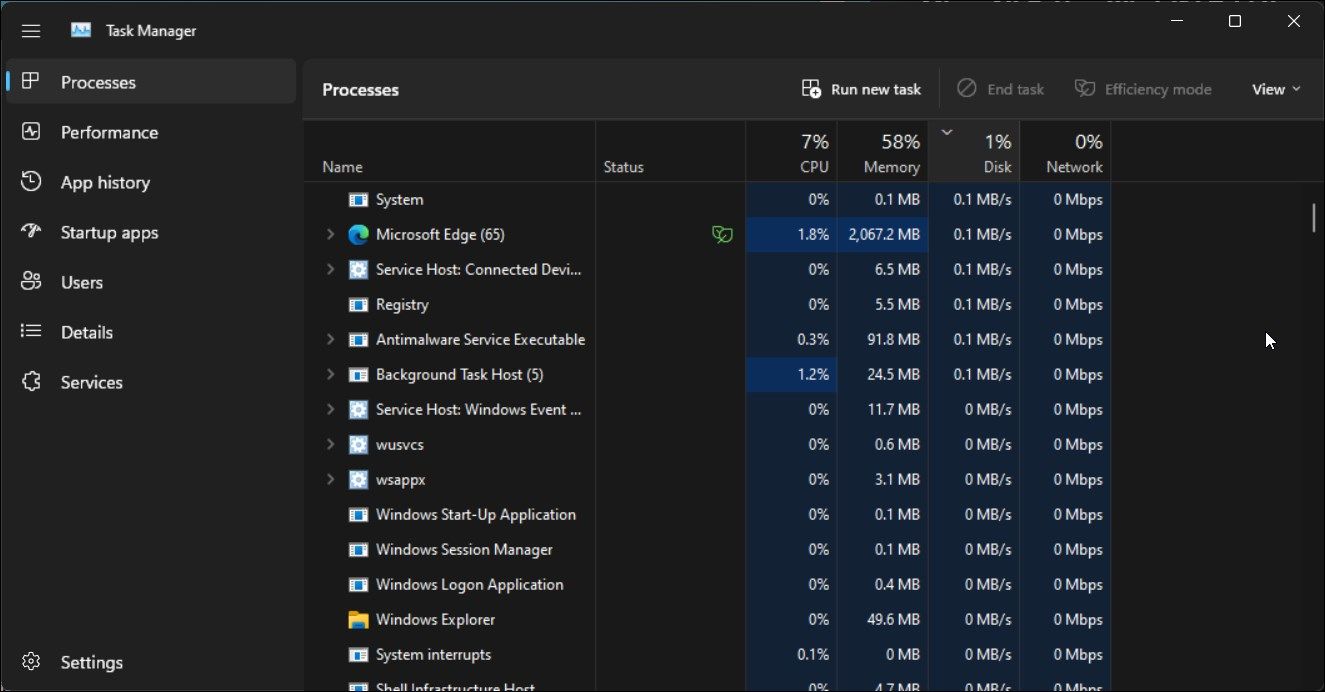
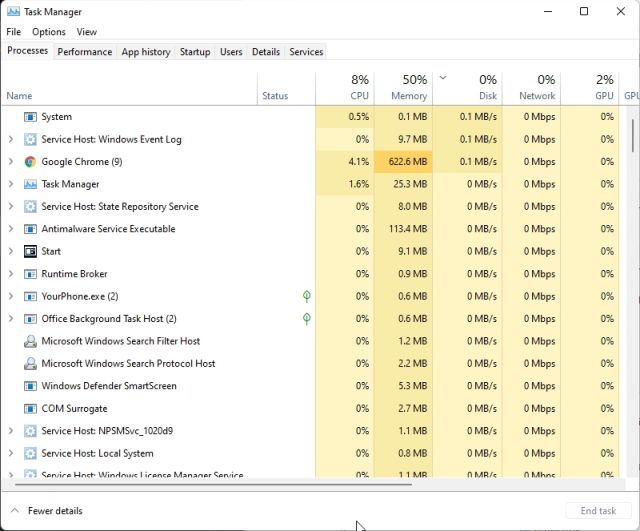
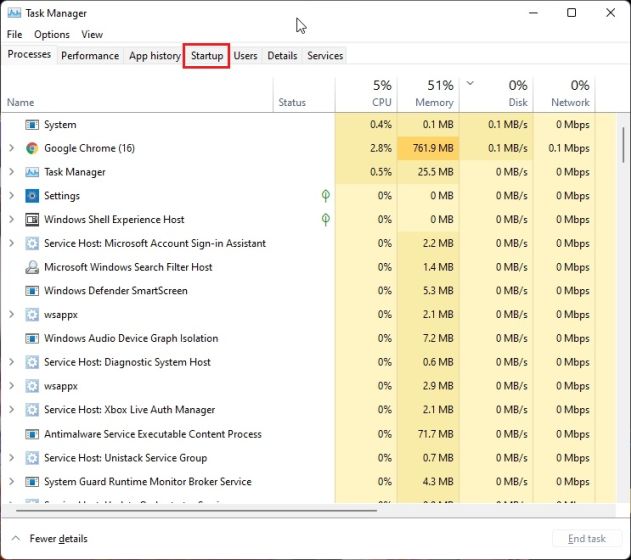
You can use the Windows Task Manager to identify what is using your disk at its 100% capacity. The Windows Task Manager offers a wealth of information about the apps and background processes eating up your system resources.
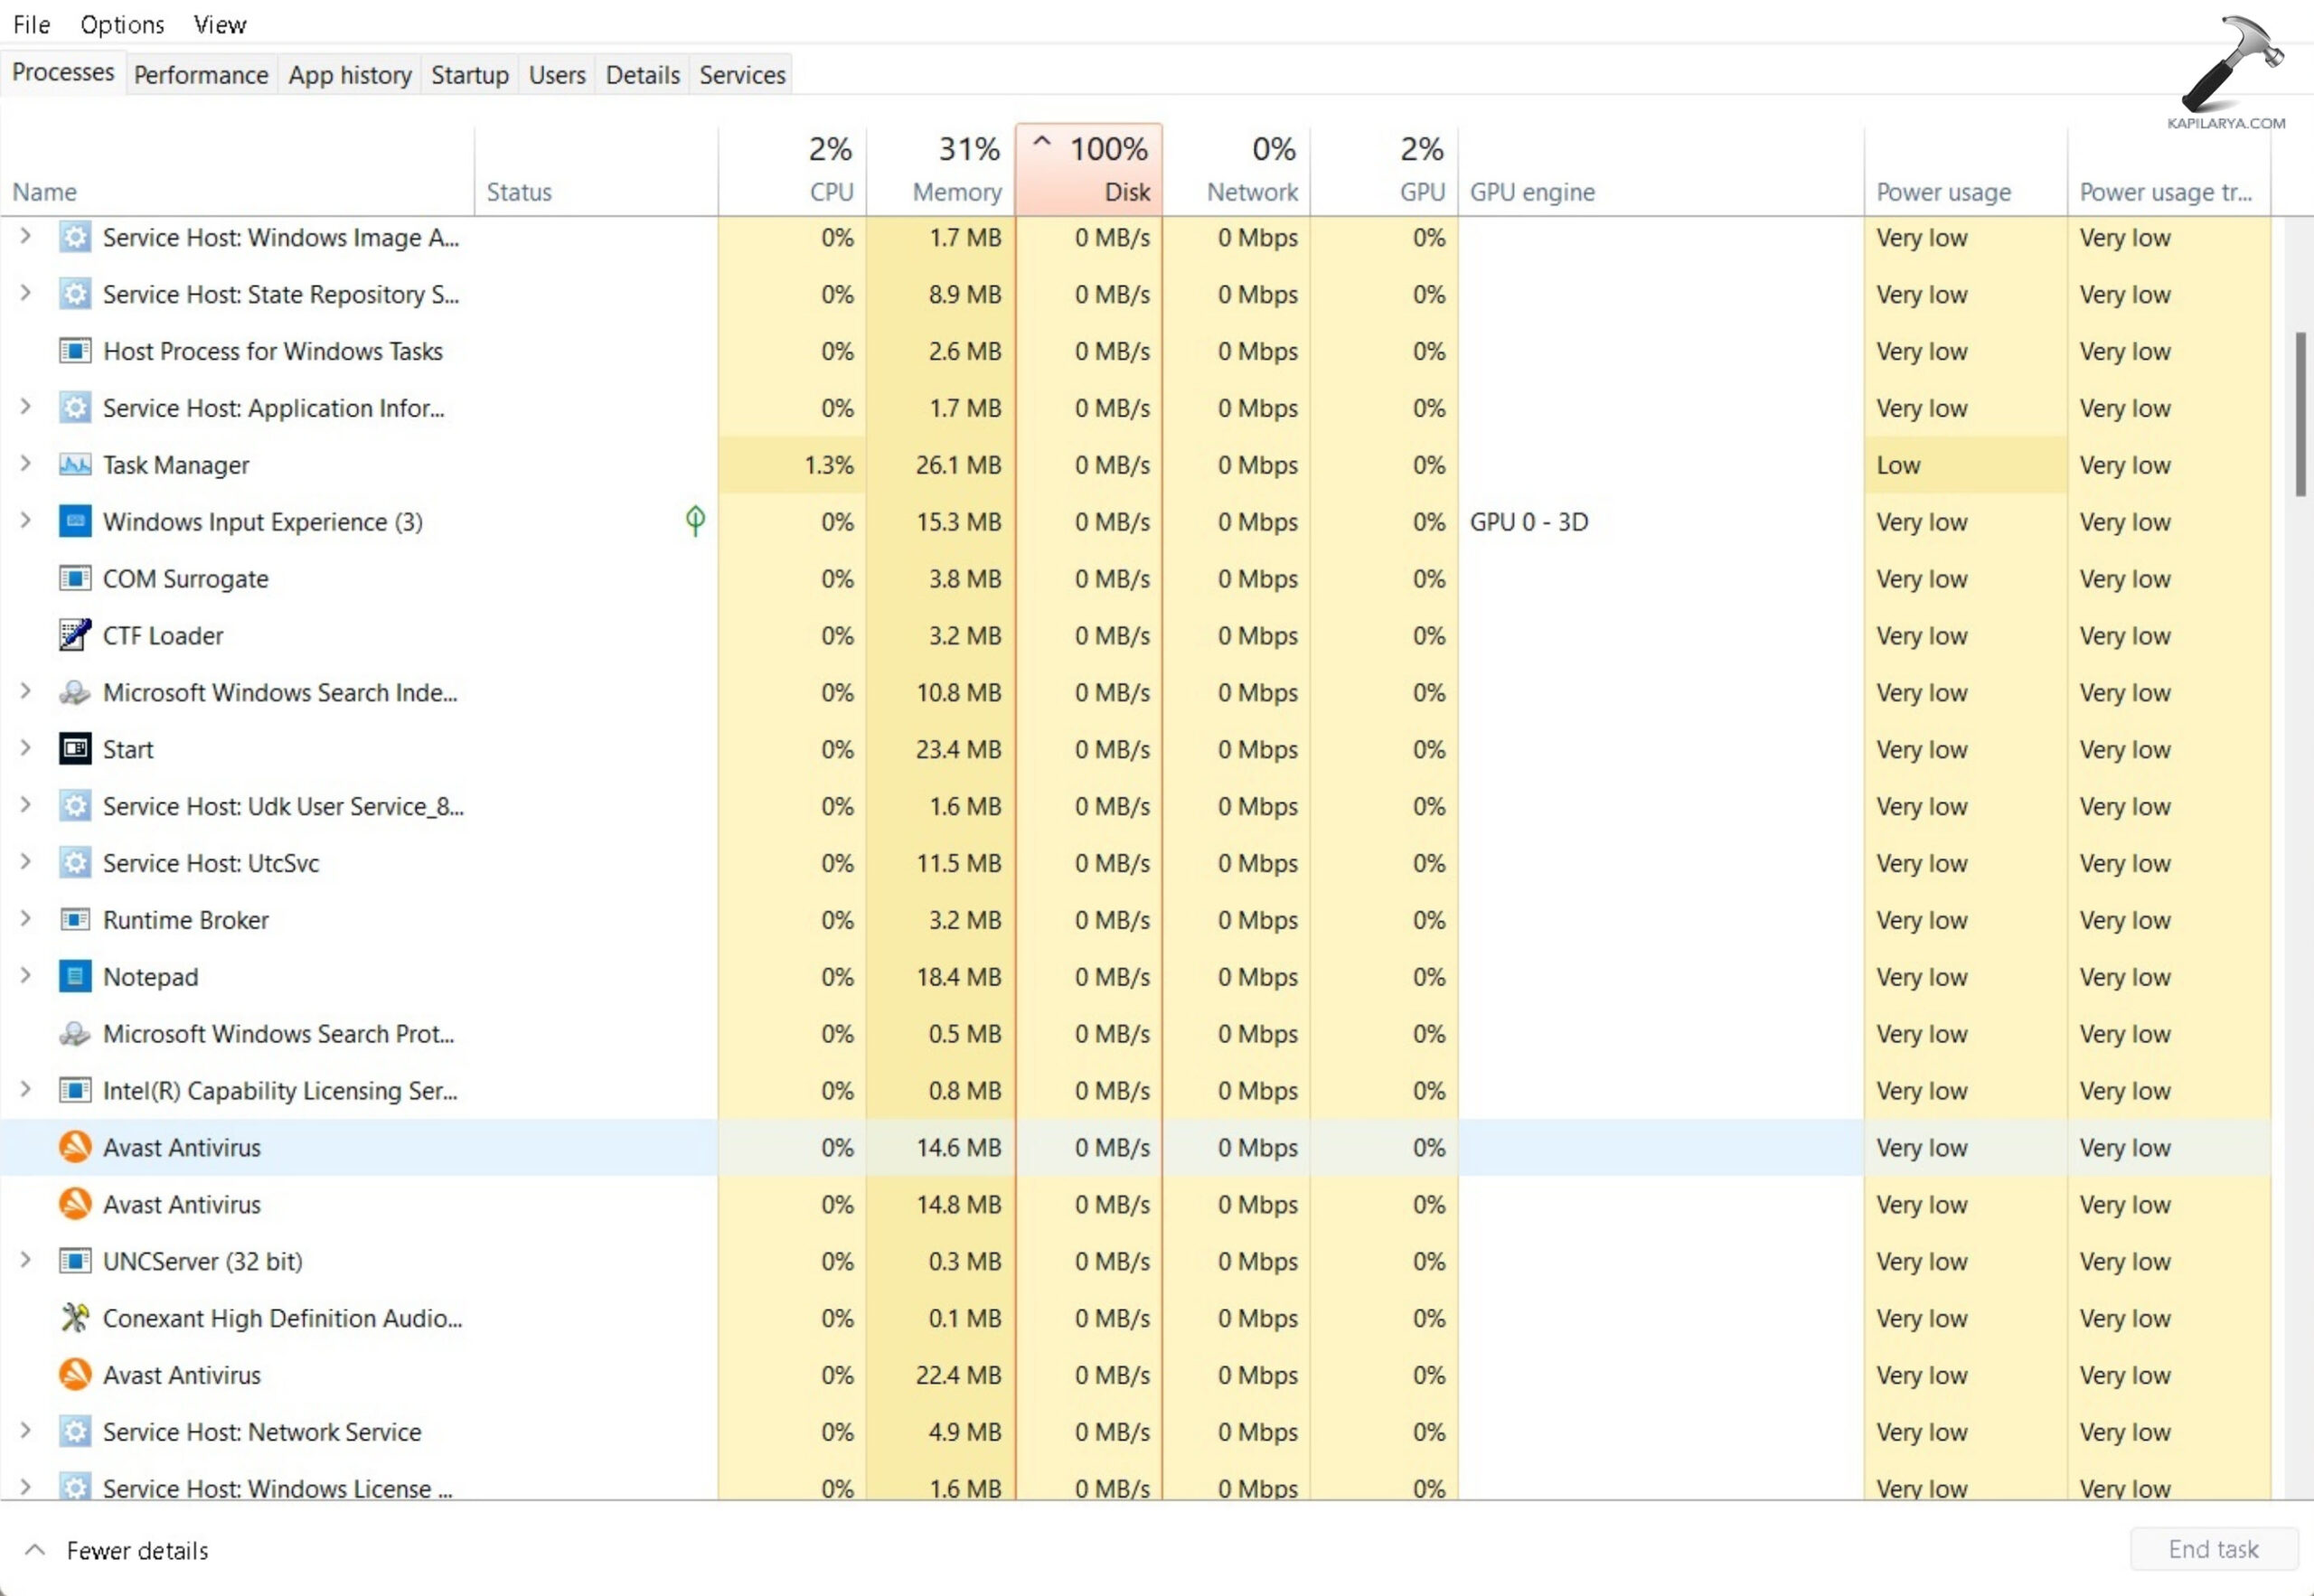
To identify the cause of 100% disk usage using the Windows Task Manager:
- Press the Win key + X to open the WinX menu.
- Here, click on Task Manager to open the app.
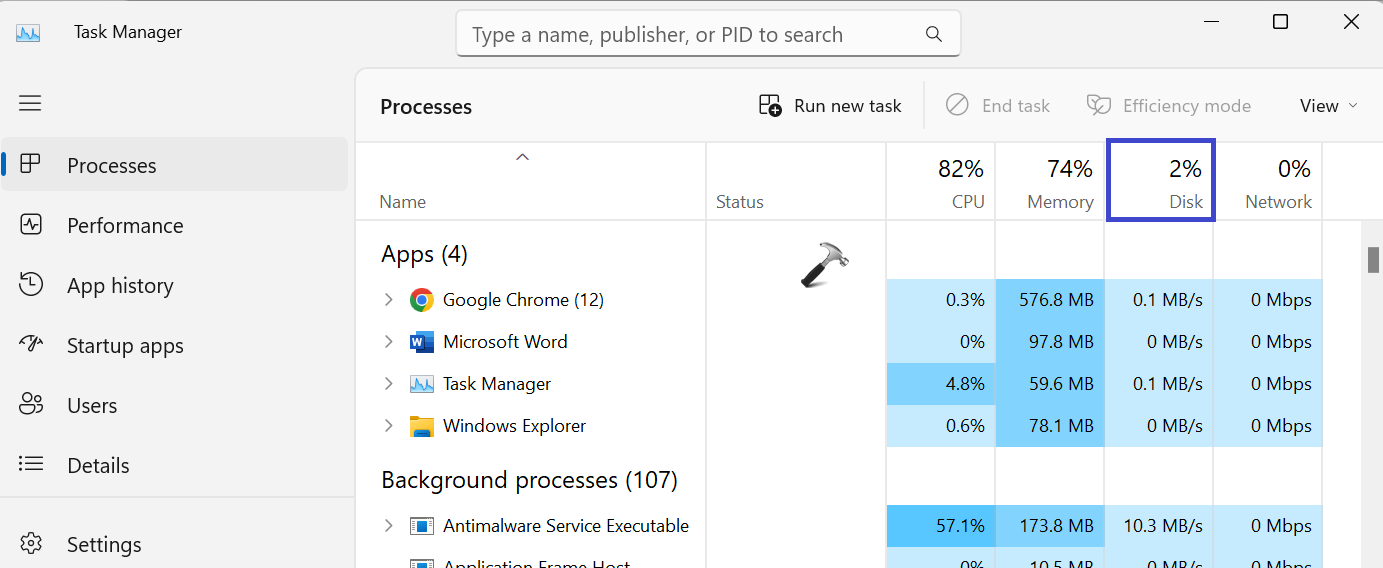
- In Task Manager, open the Processes tab in the left pane.
- Click on the Disk column to view and identify apps or processes with the highest disk usage.
- If you find a third-party app using all the disk resources, right-click on the process and select End task. If the issue occurs again, try to update or uninstall the app.
However, if nothing is obvious, follow the steps below to diagnose and fix 100% disk usage in Windows 11.
1. Disable MSI Mode for the Default AHCI Driver
Some Advanced Host Controller Interface PCI-Express (ACHD PCIe) models running the StoreAHCI.system driver can cause 100% disk usage issues when Message Signalled Interrupt (MSI) mode is enabled in Windows 10. A similar issue seems to have also affected some Windows 11 computers, especially if you have upgraded from Windows 10.
To fix this issue, you will need to disable MSI mode for specific devices using the Registry Editor. Fortunately, this is easy to do.
First, we need to determine if your computer is running the default AHCI driver(StorAHCI.sys):
- Press Win + R to open Run.
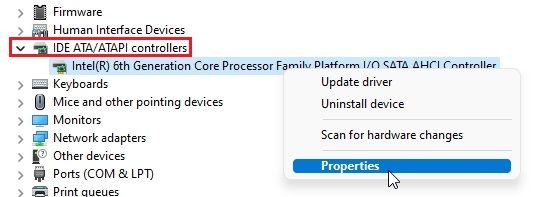
- Type devmgmt.msc and click OK to open Device Manager.
-
In the Device Manager, expand the IDE ATA/ATAPI controllers section.

- Here, right-click on the Standard SATA AHCI Controller and select Properties.
-
Open the Driver tab in the Properties dialog.
- Next, click on the Driver Details button.
- If you see Storahci.sys under the Driver section, your computer is running the default AHCI driver and may have caused the 100% disk usage issue.
-
Click OK and go back to the Properties dialog.
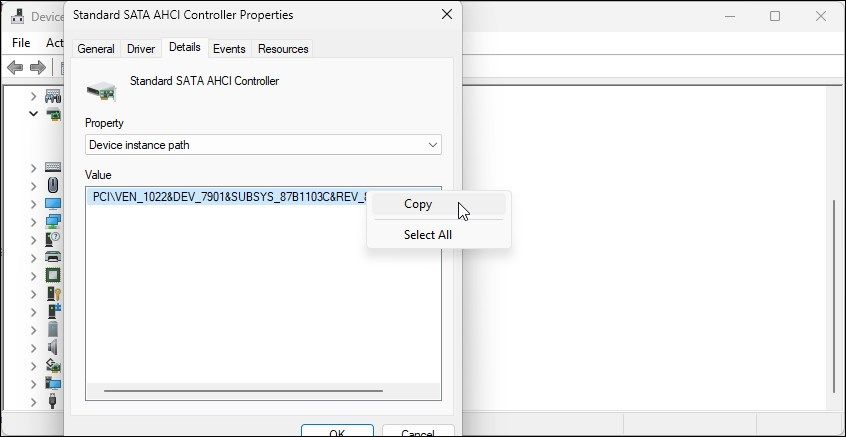
- Next, open the Details tab.
-
Click the drop-down under the Property section and select Device instance path.

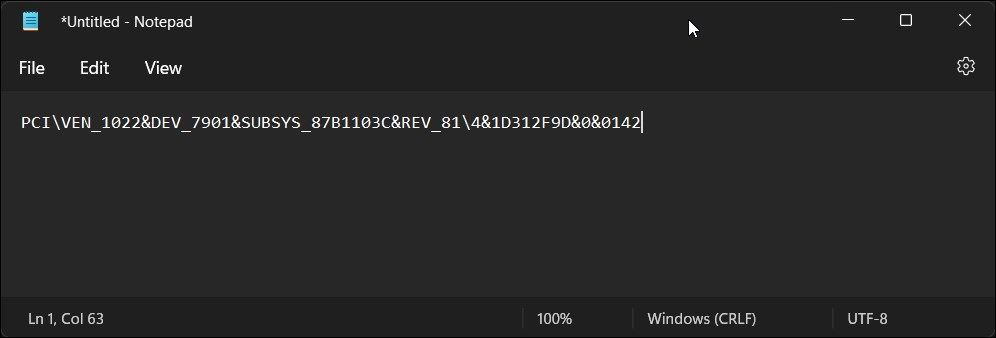
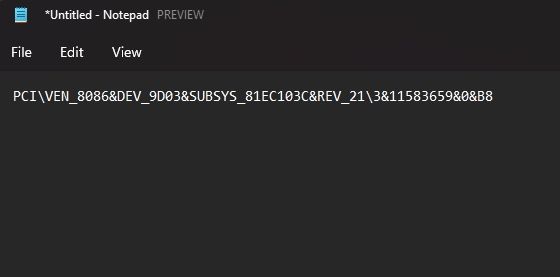
- Next, copy the path under the Value section and paste it into a Notepad file.

Now that you have determined the driver type and the path, you need to disable MSI mode using the Registry Editor.
Ensure you have created a restore point and then follow the below steps:
- Press Win + R to open Run.
- Type regedit and click OK to open Registry Editor. Click Yes if prompted by User Account Control.
-
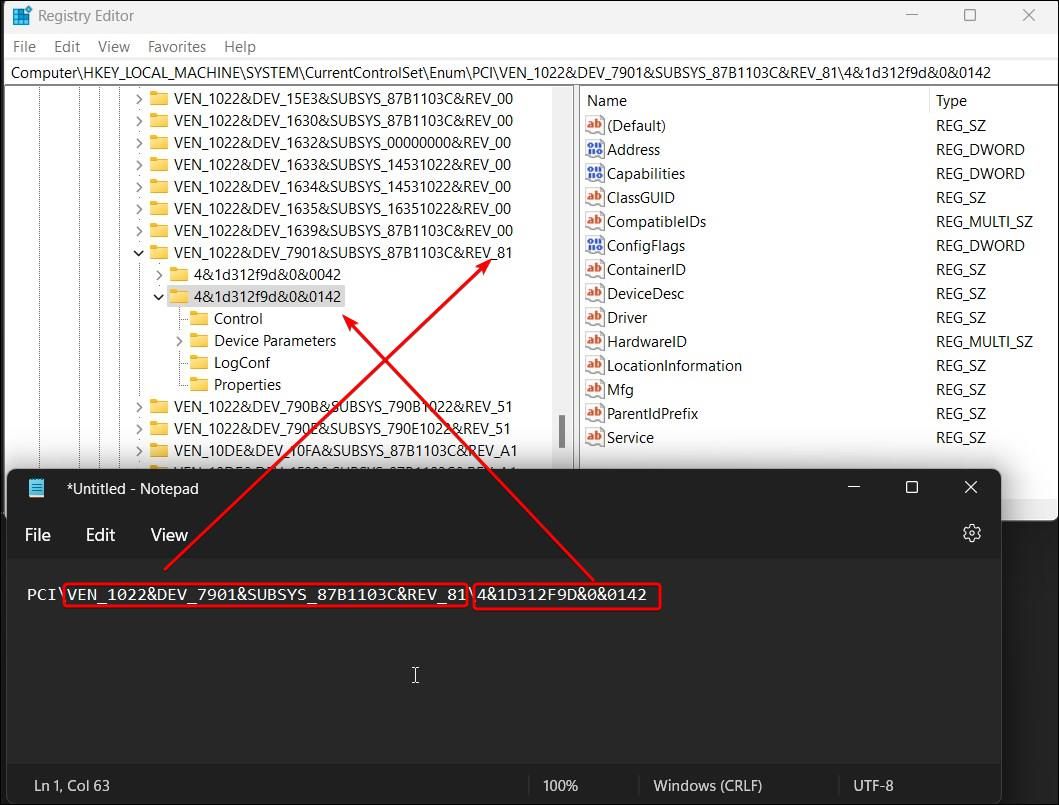
In Registry Editor, navigate to the following location:
HKEY_LOCAL_MACHINE\SYSTEM\CurrentControlSet\Enum\PCI\AHCI Controller Value\Device Parameters\Interrupt Management\MessageSignaledInterruptProperties -
In the above path, replace the <AHCI Controller Value> entry with the path value you noted in the Driver Properties Detail tab.

-
In the right pane of messageSignaledIntru, locate and right-click on the MSI Supported DWORD value.

-
Select Modify from the context menu.
- In the Value data field, type 0.
- Click OK to save the changes.
- Close Registry Editor and restart your PC.
After the restart, check if the 100% disk usage problem is resolved.
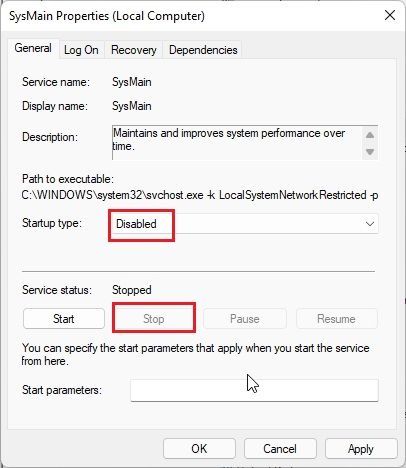
2. Disable the SysMain (Superfetch) Service
SysMain (earlier known as Superfetch or Prefetch) is a legitimate Windows service. It is designed to preload apps you frequently use to RAM to improve the system performance.
However, SysMain is often also associated with causing high disk usage in Windows computers. Fortunately, you can manually disable the service with a marginal difference to your system performance.
To disable the SysMain service:
- Press Win + R to open Run.
- Type services.msc and click OK.
-
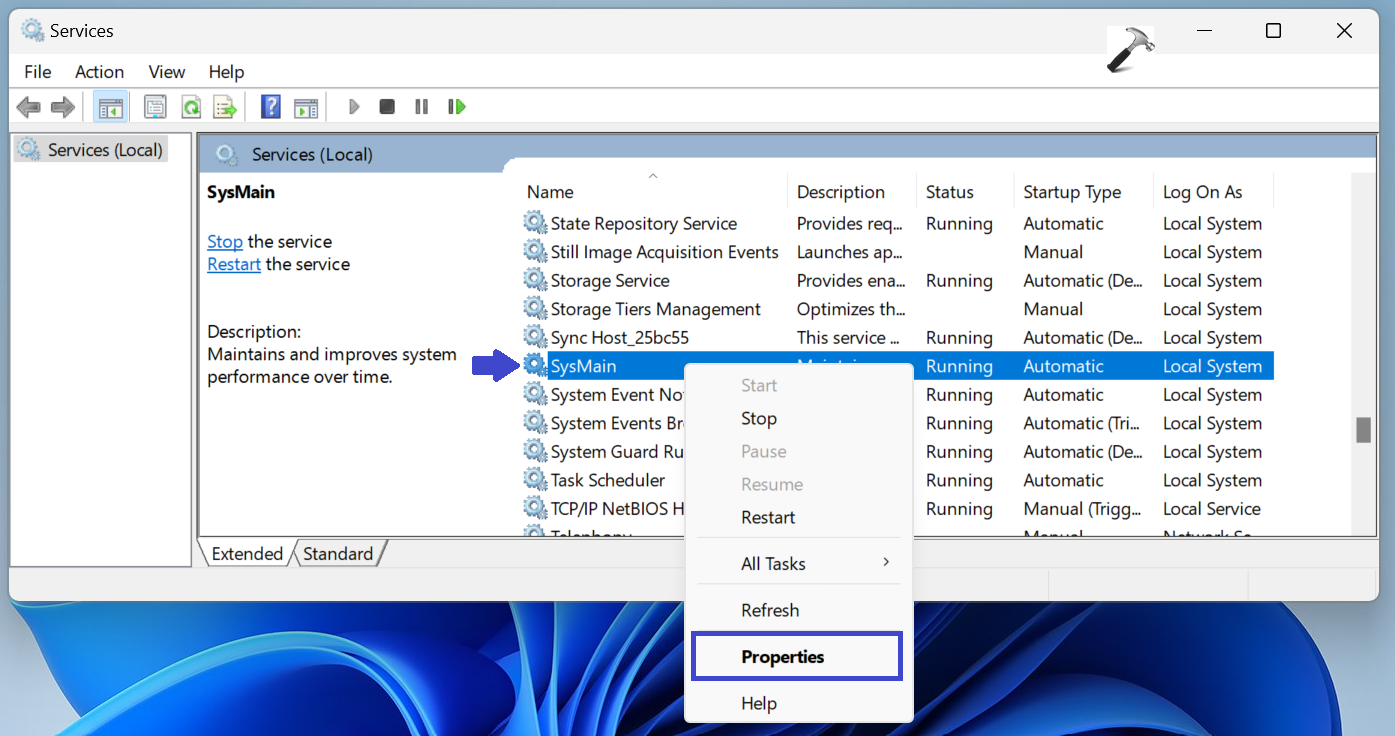
In the Services window, locate the SysMain service.

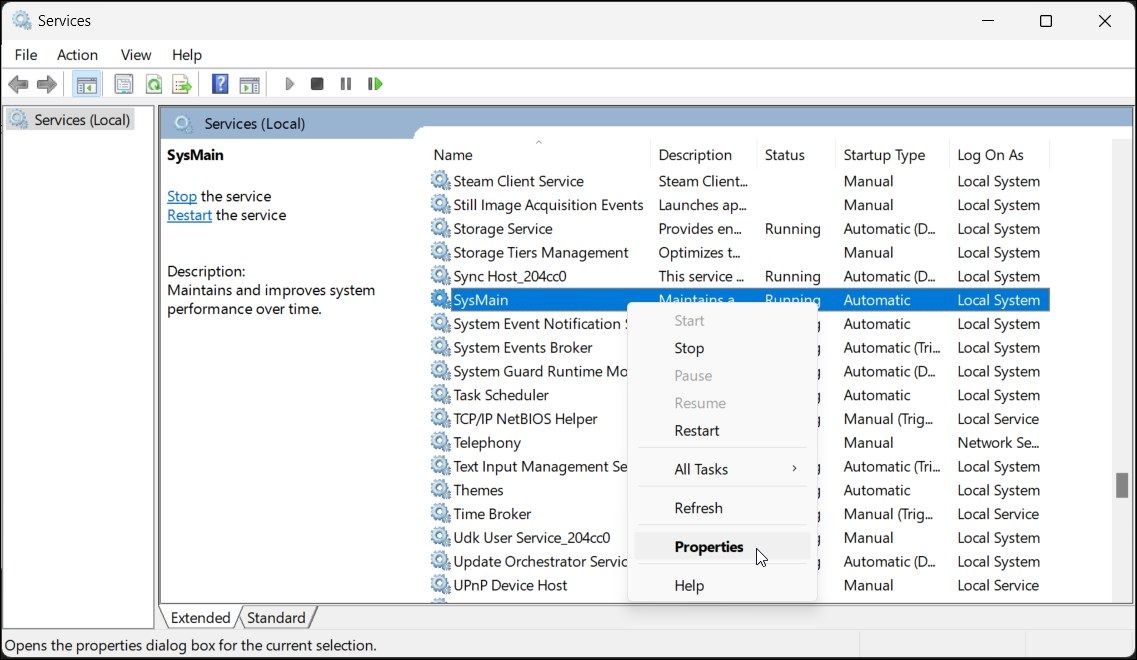
- Right-click on the service and select Properties.
-
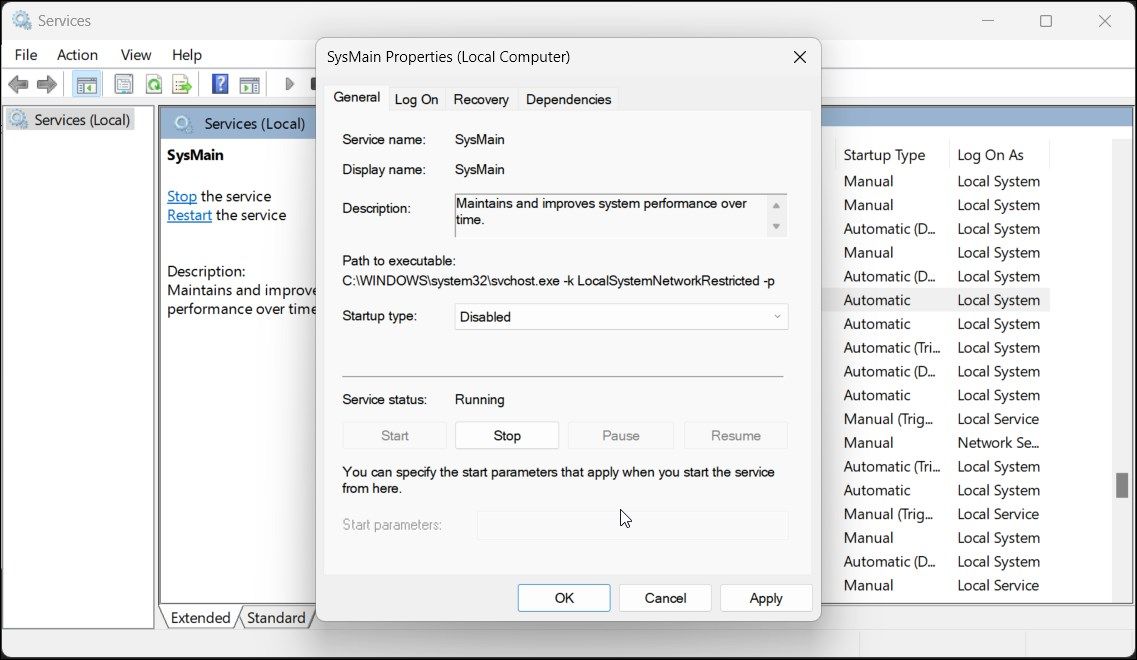
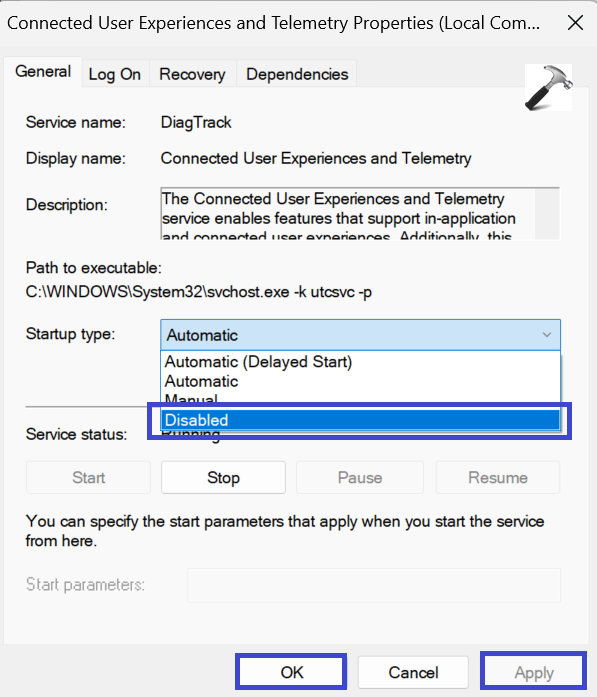
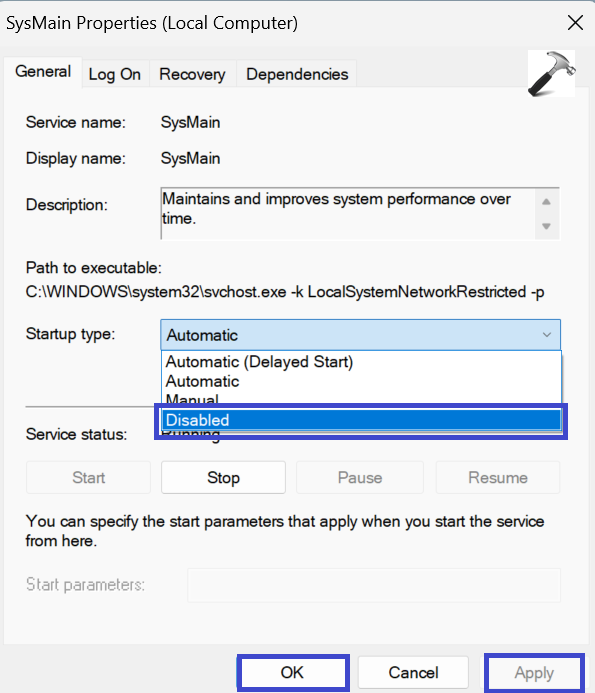
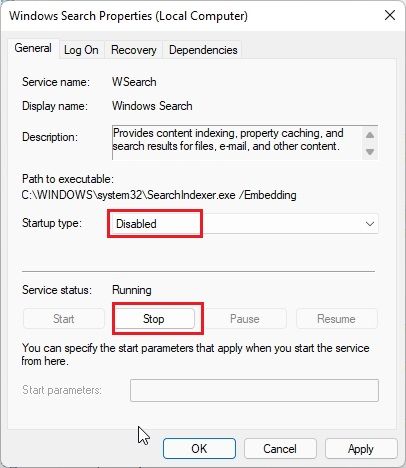
In the Properties dialog, click the drop-down for Startup type and select Disabled.
- Also, click on the Stop button to terminate the service.
- Next, click on Apply and OK to save the changes.
Open Task Manager, and you should notice an immediate reduction in disk usage.
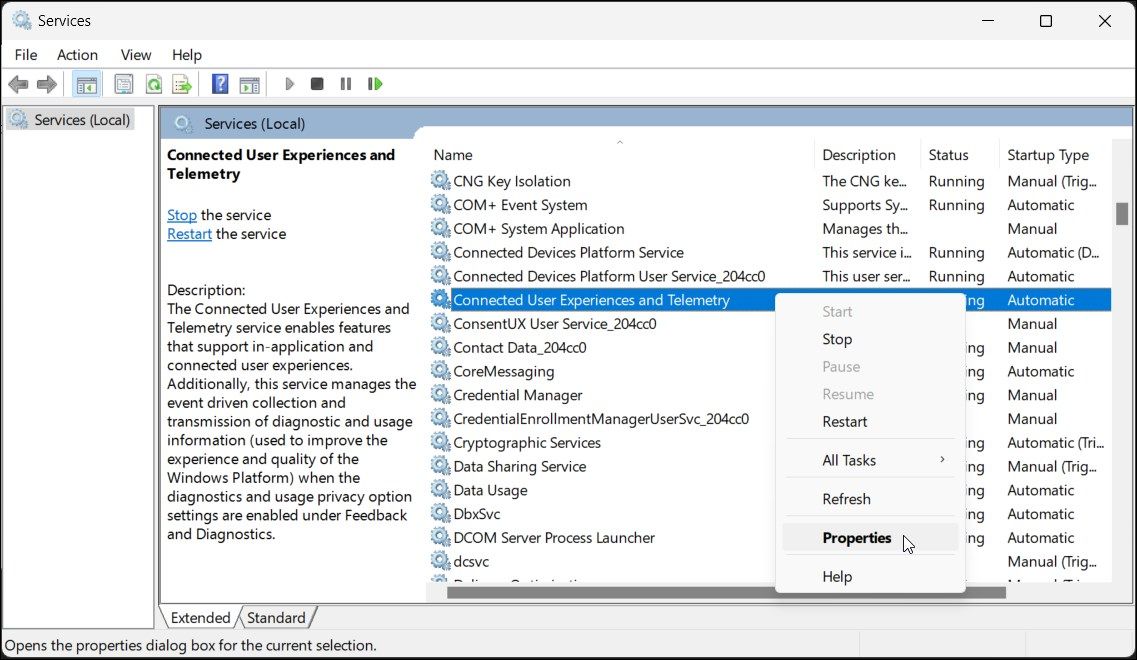
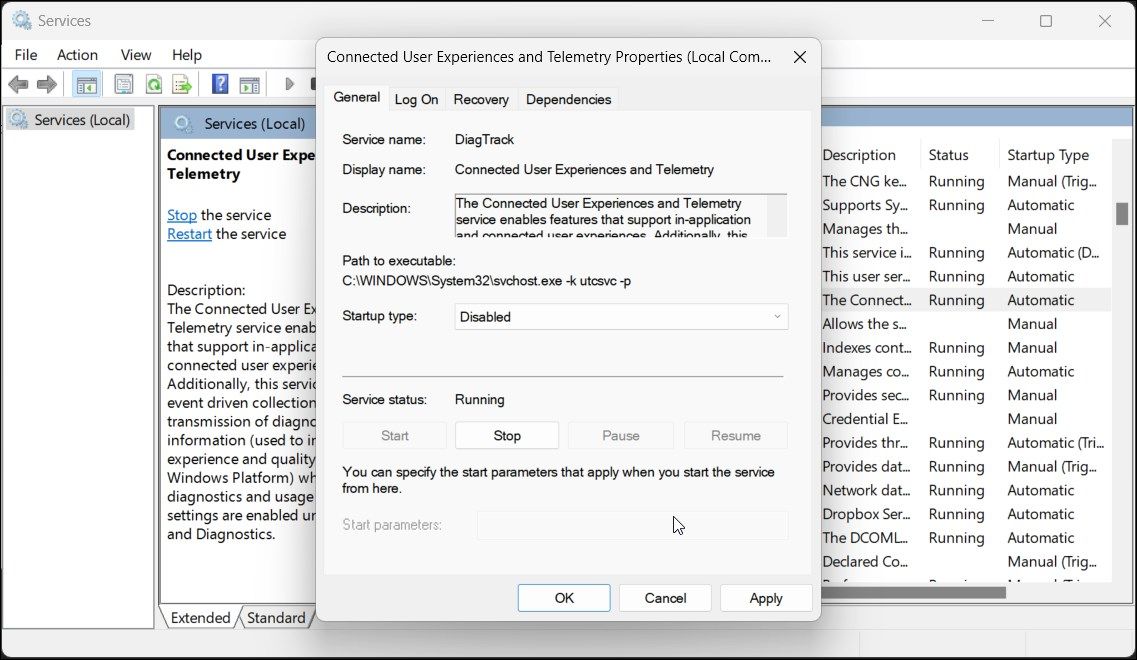
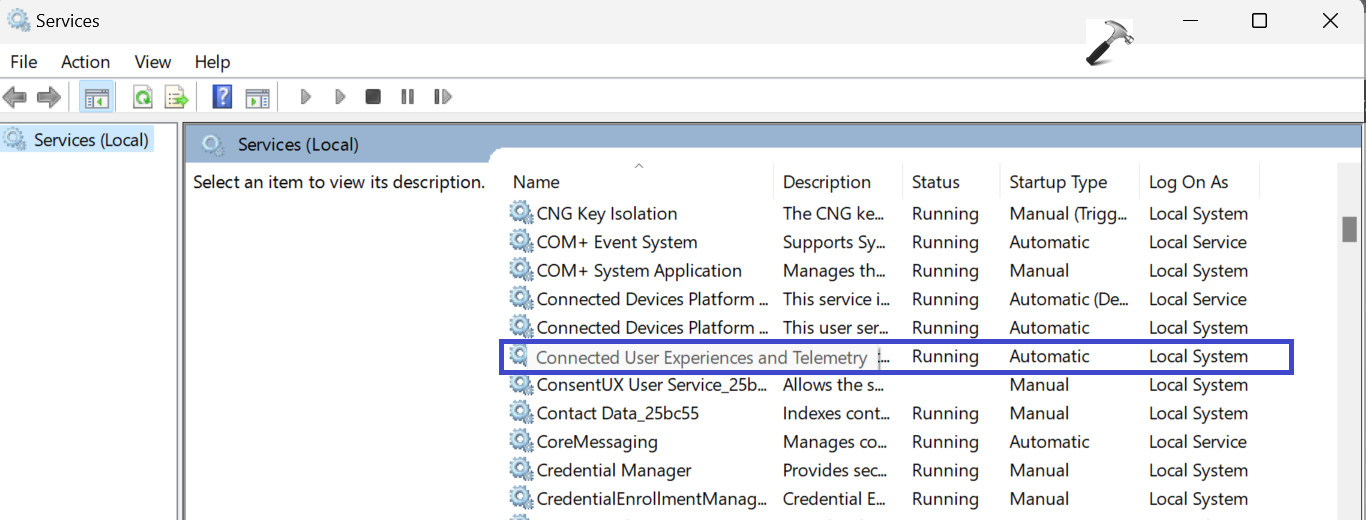
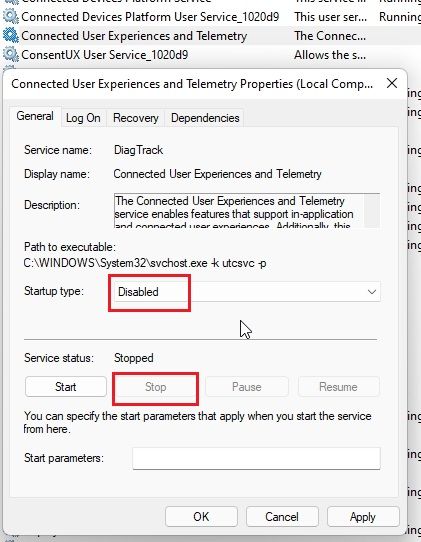
3. Disable Connected User Experiences and Telemetry Service
Connect User Experience, and Telemetry Service manages the collection and transmission of diagnostic data to the Microsoft server. Unfortunately, the service is also known to cause high disk usage problems in Windows 11.
You can disable the Connected User Experiences and Telemetry Service to see if it helps you fix the high disk usage problem in Windows 11.
- Press Win + R, type services.msc, and click OK,
-
In the Services snap-in, locate the Connected User Experiences and Telemetry service.
- Right-click on the service and select Properties.
-
Next, click the Stop button and set the Startup type to Disabled.
- Click Apply and OK to save the changes.
4. Clean Up Startup Apps
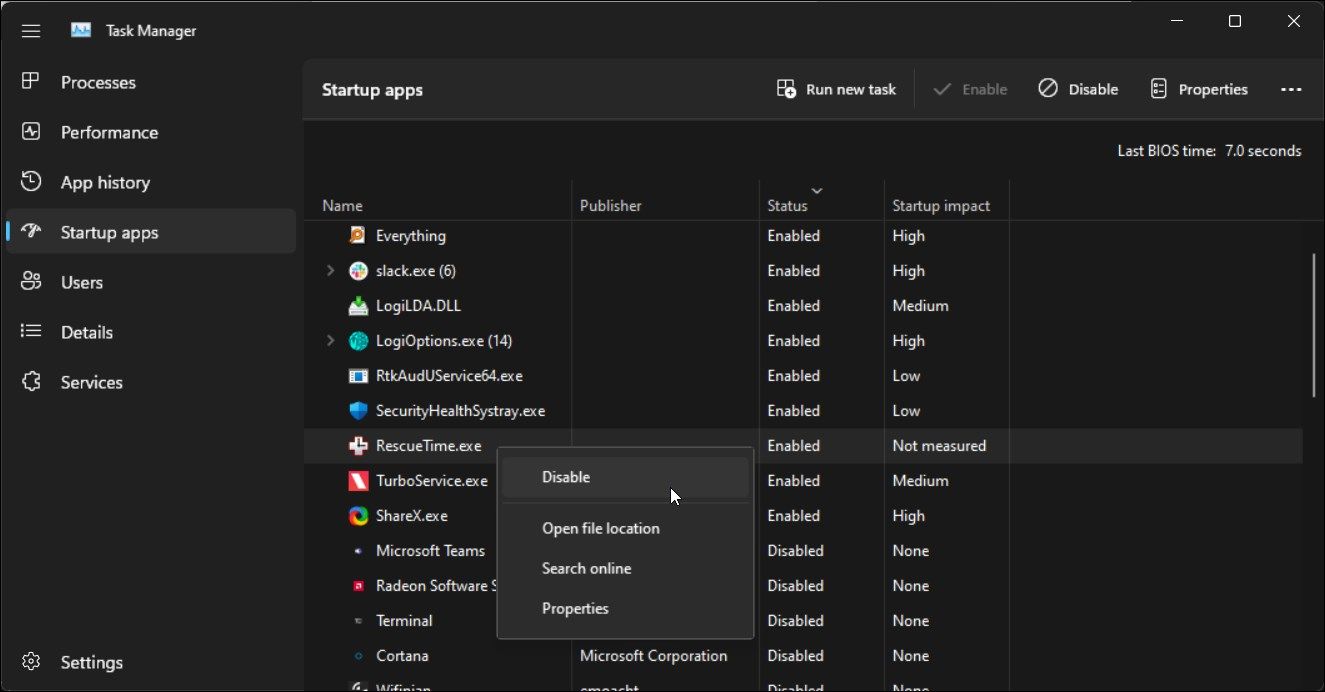
Startup apps are the apps that start automatically when your computer boots. While a handy feature, too many of them can slow down your PC. Additionally, some of these may also cause a 100% disk usage issue.
To fix the problem, go through the list of startup apps and disable any unnecessary program set to launch at startup.
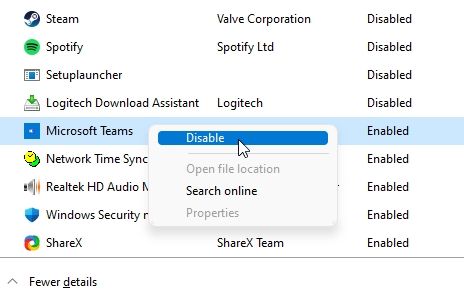
To disable startup apps using Task Manager:
- Right-click on the Start button and select Task Manager.
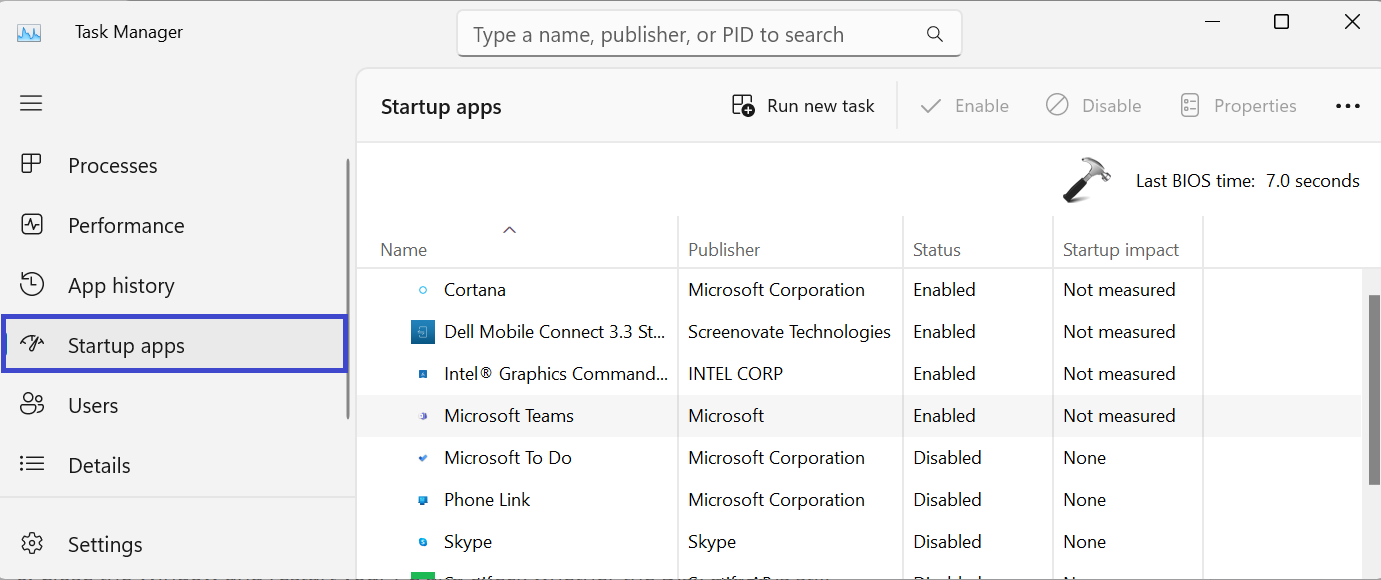
- In Task Manager, open the Startup apps tab.
- Click on the Status column to sort apps by their status.
- Select an enabled app and click the Disable button in the top right corner.
- Do this for all the enabled apps.
Once done, restart your PC and check if the issue persists. If not, enable all the startup apps one by one till you find the conflicting app. Uninstall the app to see if that helps you eliminate the 100 percent disk usage problem in Windows 11.
5. Rebuild Search Index
The Windows search indexing helps you find files and email messages faster. While a handy tool, a malfunctioning search indexing can cause a 100% disk usage issue in Windows 11.
To fix the problem, you can rebuild the search index. This will recreate the database and resolve any issues with the index.
To rebuild the Windows search index:
- Press the Win key and type indexing.
- From the search result, click on Indexing options.
-
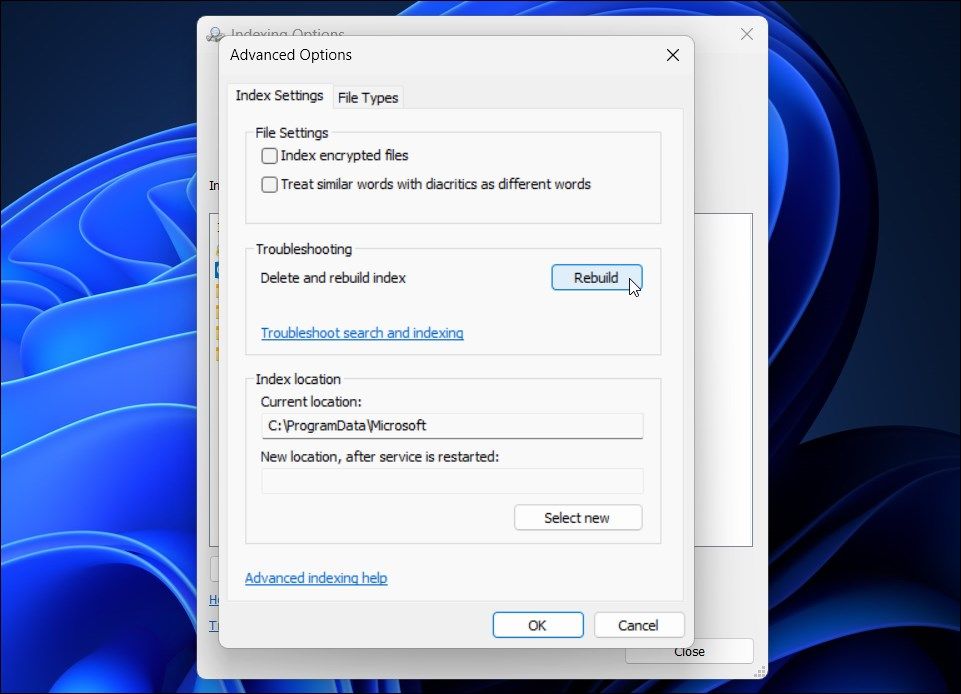
In the Indexing options dialog, click on the Advanced button.

-
Next, click the Rebuild button. This will delete and rebuild the index.

- Click OK to confirm the action.
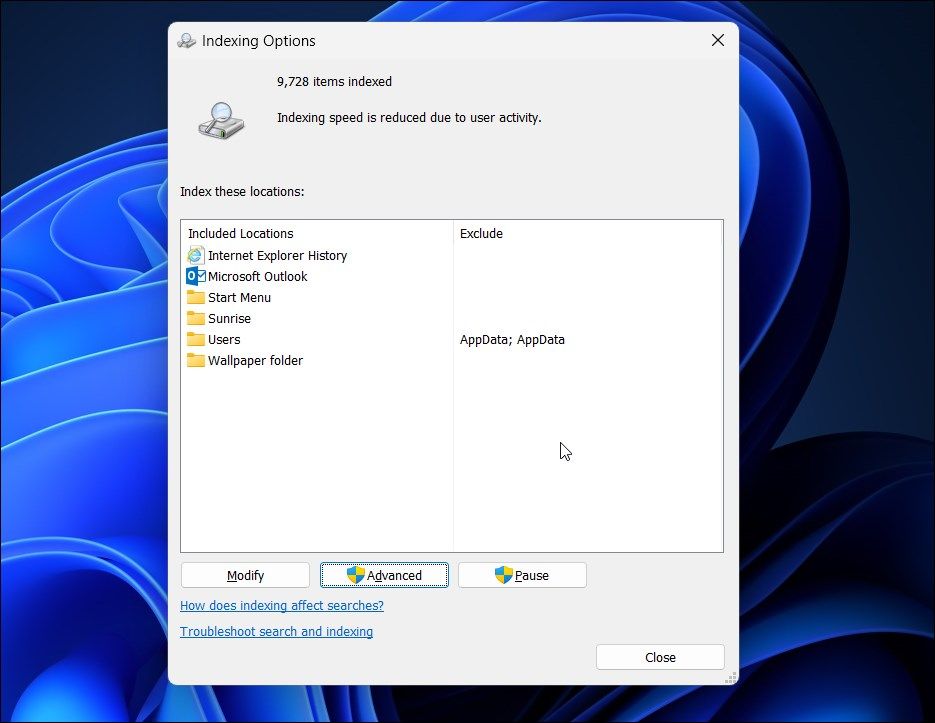
The index rebuilding process may take some time to complete. So wait for the process to complete and then check for any improvements.
6. Disable Windows Search
If rebuilding search indexing helps but the issue reoccurs, try to disable the Windows Search service completely. Note that doing so will affect Windows search functionality on your PC.
To disable the Windows Search service:
- Press Win + R to open Run.
- Type services.msc and click OK.
-
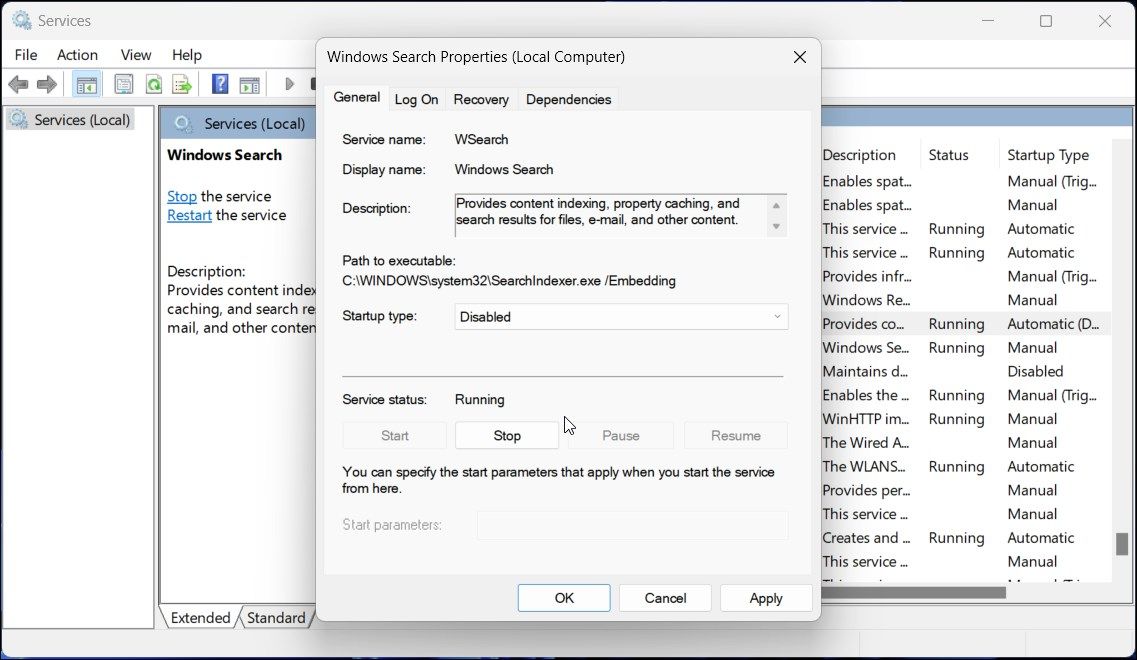
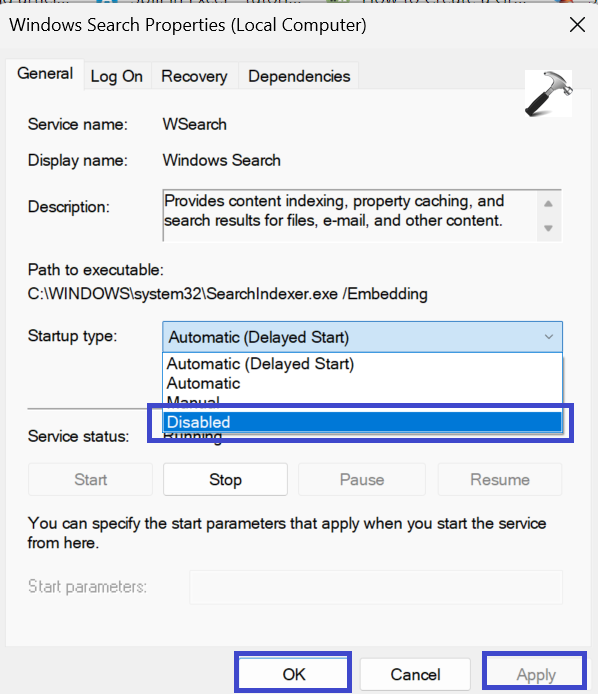
In the Services window, double-click on the Windows Search service to open its Properties.
- In the Properties dialog, click the Stop button.
-
Next, set the Startup type to Disabled.
- Click Apply and OK to save the changes.
7. Turn Off Hibernation
Hibernation helps your system boot faster after a restart. However, if your PC shows 100% disk usage just after the restart, turning off Hibernation can help.
To turn off hibernation in Windows 11:
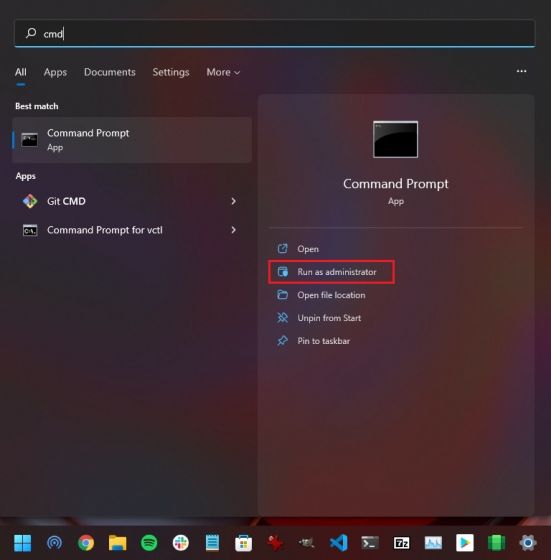
- Press the Win key and type cmd.
- Right-click on Command Prompt and select Run as administrator.
-
In the Command Prompt window, type the following command and press Enter:
powercfg hibernate off
- Once executed, close the Command Prompt window.
- Open the Task Manager and check if the high disk usage issue is resolved.

8. Run a Malware Scan
If the issue persists, check your computer for malware infection. Even if you have an active Antivirus installed, a manual scan can help you detect anything malicious that may have sneaked in.
If you don’t have a third-party antivirus installed, you can perform a full scan using Windows Security. Here’s how to do it.
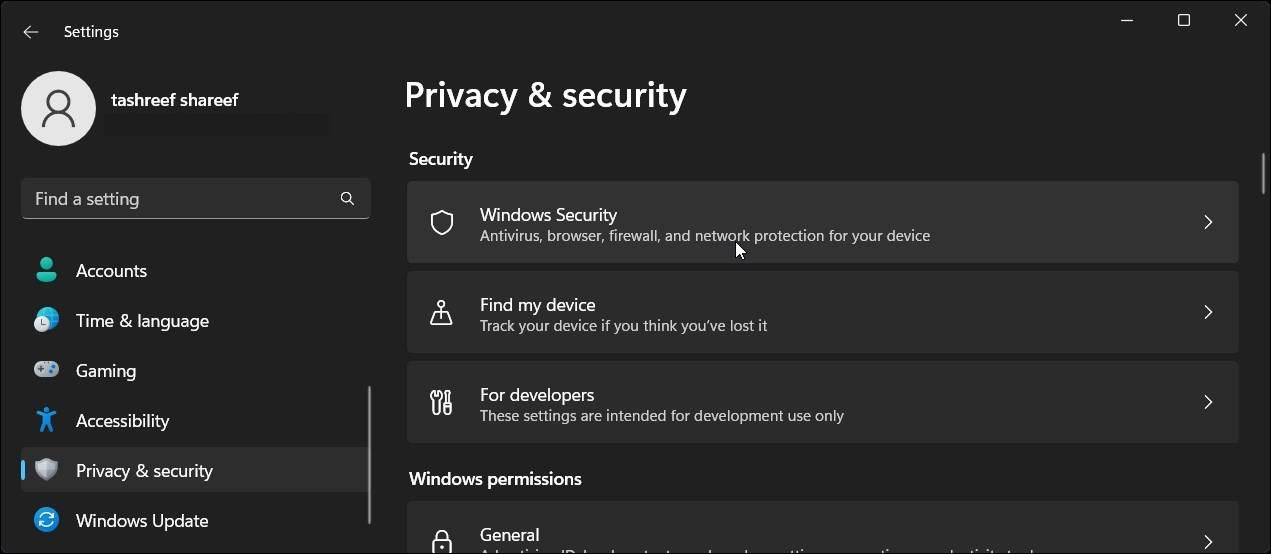
- Press Win + I to open Settings.
-
In the left pane, open the Privacy & security tab.

-
Next, click on Windows Security.
-
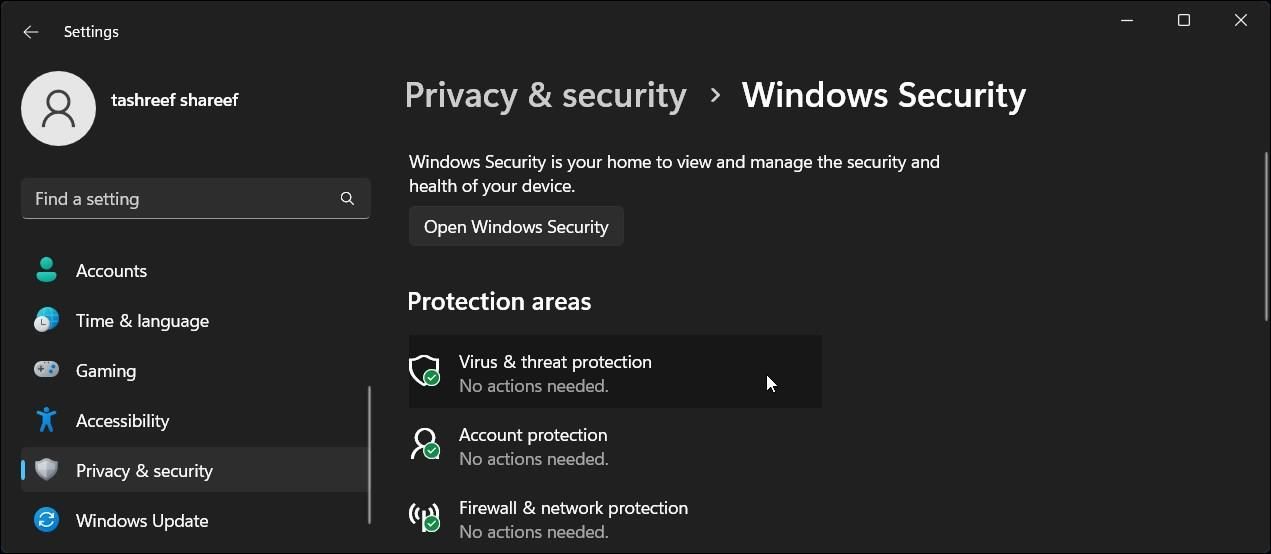
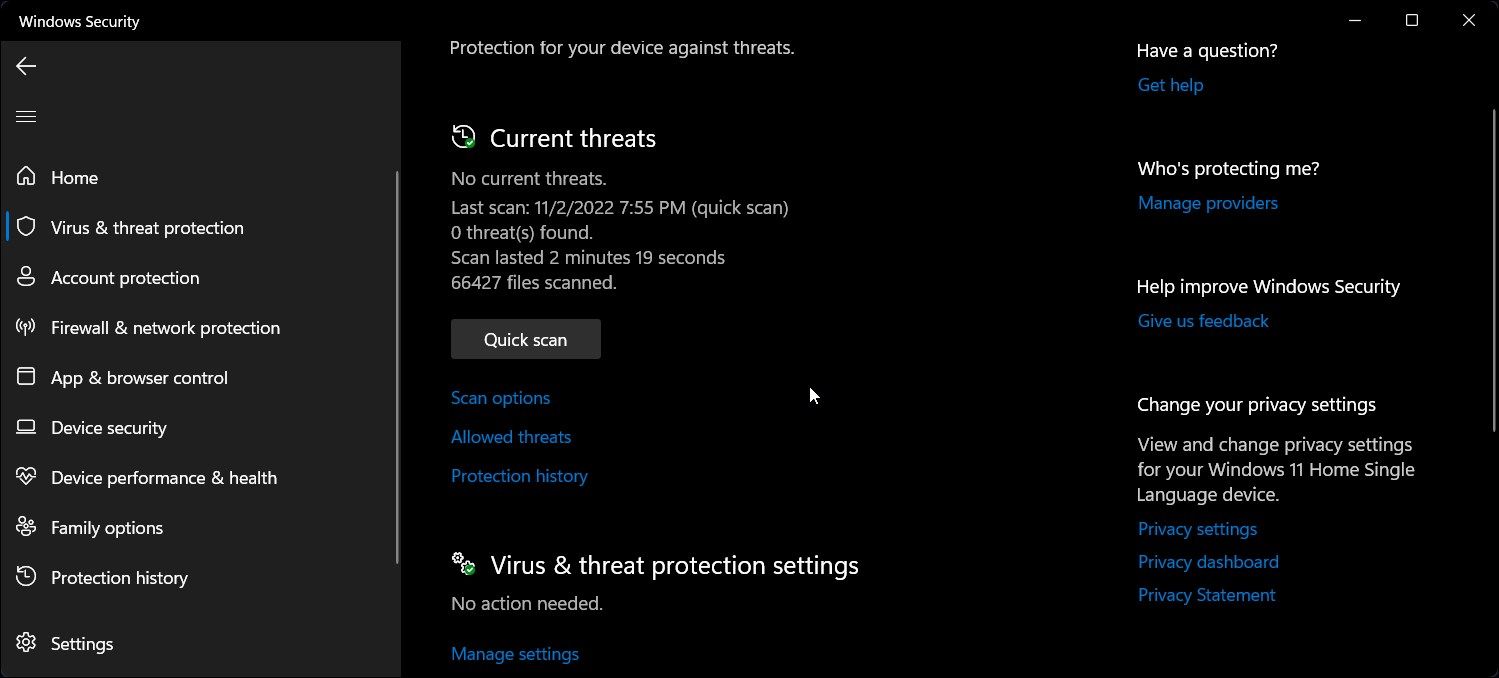
Click on Virus and threat protection,

-
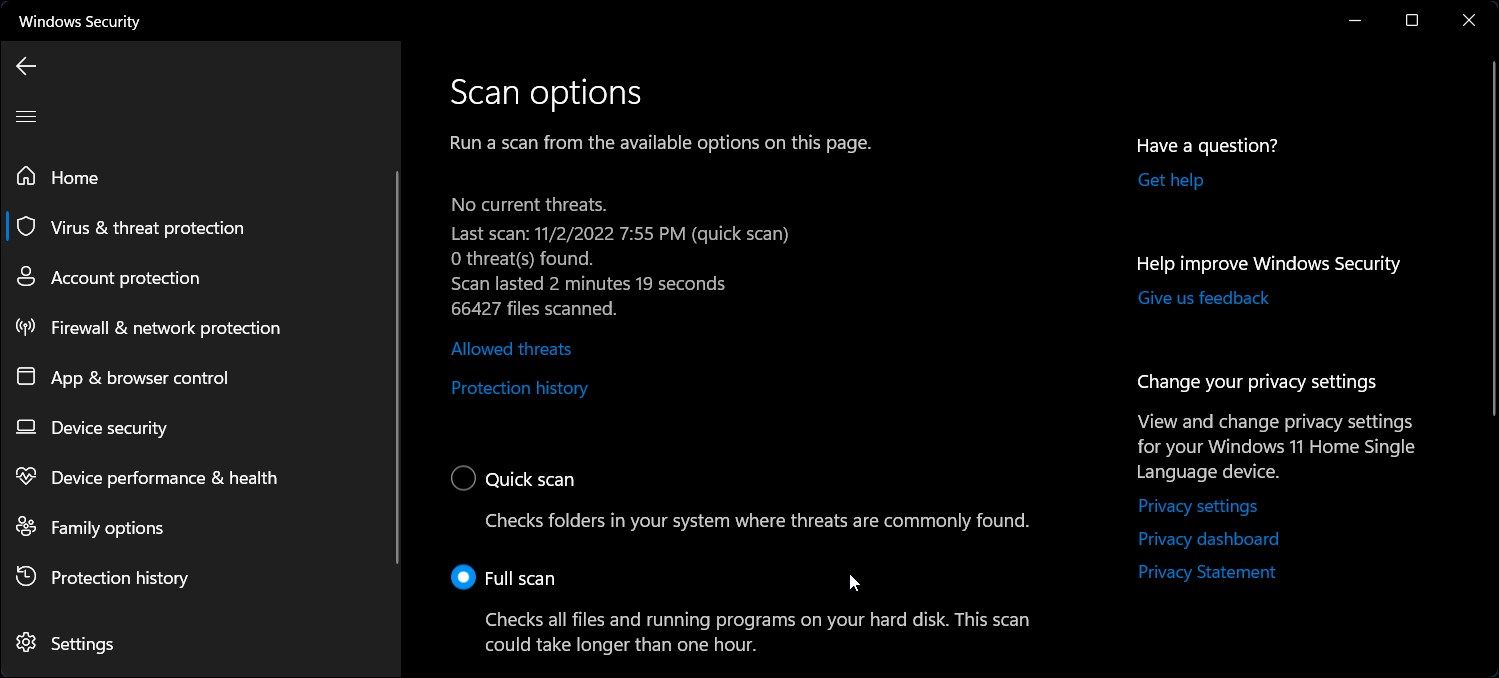
Click on Scan options under Quick scan.
- Select the Full option and then click on Scan now.
A full scan takes longer than a quick scan. However, it should find any hidden malicious files and clean them for good.
While Windows Security offers excellent protection, take a second opinion with third-party antivirus for Windows 11.
Switch to Solid State Drive (SSD)
The 100% disk usage issue on some computers can be due to the traditional mechanical hard drive (HDD) or the hybrid drive itself. If feasible, consider adding a solid-state drive (SSD) to your computer and use it as a boot drive to install Windows.
SSDs are less prone to the 100% disk usage issue and can greatly improve your system performance as well.
Sometimes, we get reports from users facing random spikes in Disk usage in Windows with 100% disk usage even when the PC is idle. If your drive has a high load like that, it doesn’t have spare cycles to perform routine operating system tasks. If you are experiencing this issue, then this tutorial will guide you to fix 100% Disk Usage in Windows 11.
Page Contents
Method 1: Disable Windows Search
Disabling the Windows Search may also affect files and folders search on your PC. If you don’t want to disable then go to the next solution. Follow the below steps to disable Windows Search:
1. Press the Windows Key + R. Type services.msc and click OK.
2. Find and double click on “Windows Search”. A prompt box will appear.

3. Under the startup type, select “Disabled”.
4. Click OK followed by Apply.
5. Close the Window and restart the PC to apply the settings.
Method 2: Disable MSI Mode
Microsoft reported that high disk usage actually stems from Advanced Host Controller Interface PCI-Express (AHCI PCIe) controllers that have firmware incompatibility.
If your PC is using the “StorAHCI.sys” driver, you are most likely affected by this issue. Microsoft further states that if Message Signaled Interrupt (MSI) mode is disabled, disk usage can be reduced drastically. Follow the below steps:
1. Press the Windows Key + X and select “Device manager”.
2. Now, expand “IDE ATA/ATAPI controllers” and select Properties.
3. In Driver tab, click on “Driver Details”.
4. If you find “storAHCI.sys” path then only proceed to the next step.
If different driver name appear, then don’t proceed to the next step. Follow the below steps:
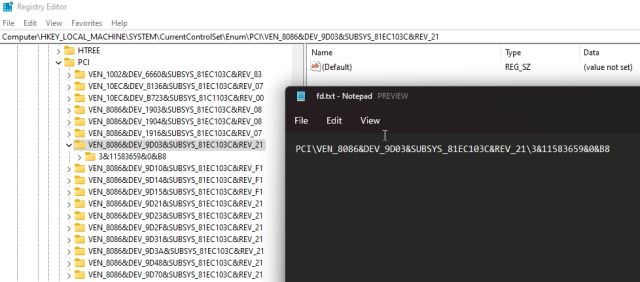
1. Go to the Details tab and change the property to “Device instance path”.
2. Copy the path and paste it in notepad as you will need it ahead.
3. Close the Device manager.
Press the Windows Key + R. Type regedit.exe to open the Registry Editor. Click OK.
4. Navigate the following path:
Computer\HKEY_LOCAL_MACHINE\SYSTEM\CurrentControlSet\Enum\PCI
5. Now, match the entry which you have in notepad. Afterwards, expand it.
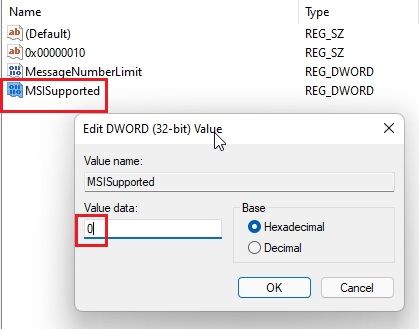
6. Move to Device parameters => Interrupt Management => MessageSignaledInterruptProperties.
7. In the right panel, double click on “MSISupported”.
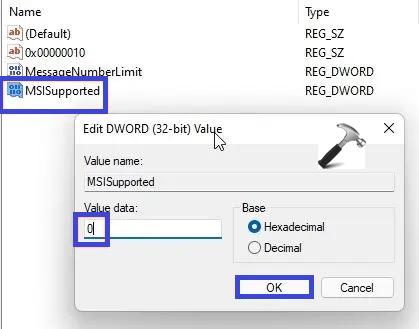
8. Set the value to 0.
9. Close the Registry Editor Window and restart your PC to apply the settings.
Method 3: Run Disk Check
Due to bad sectors or logical errors, the disk is unable to complete a given operation, and it continues to use the disk abnormally in an attempt to execute the action.
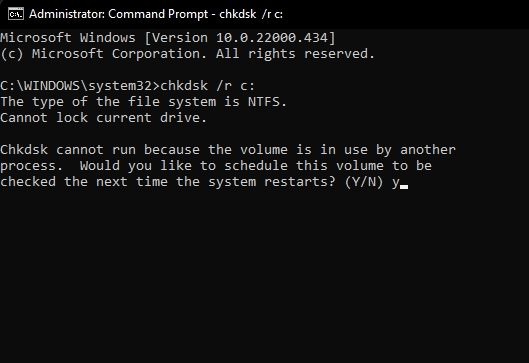
1. Open Command Prompt and select “Run as administrator”.
2. To perform a disk check, copy and paste the below command:
chkdsk /r c:
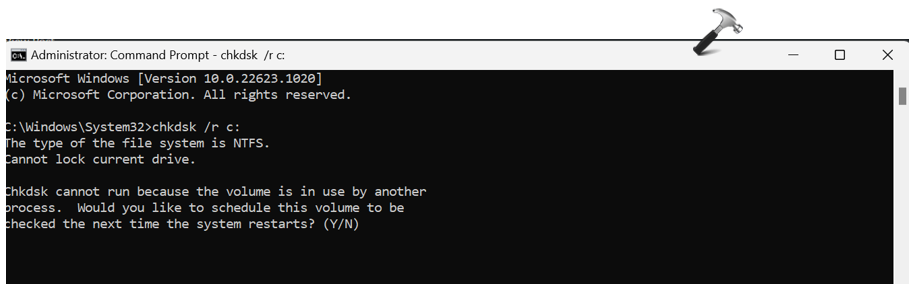
This will check all the bad sectors and logical error and will fix them along the way.
3. Type “Y” for yes. Hit Enter.
4. Close the Command Prompt Window and restart your PC.
Method 4: Disable Connected User Experience and Telemetry
Connected User Experience and Telemetry is a service that runs under svchost.exe which is responsible for high disk usage in Windows 11.
1. Press the Windows Key + R. Type services.msc and click OK.
2. Double click on “Connected User Experiences and Telemetry” and click on Properties.
3. Under Startup type, choose “Disabled” and click on “Stop”.
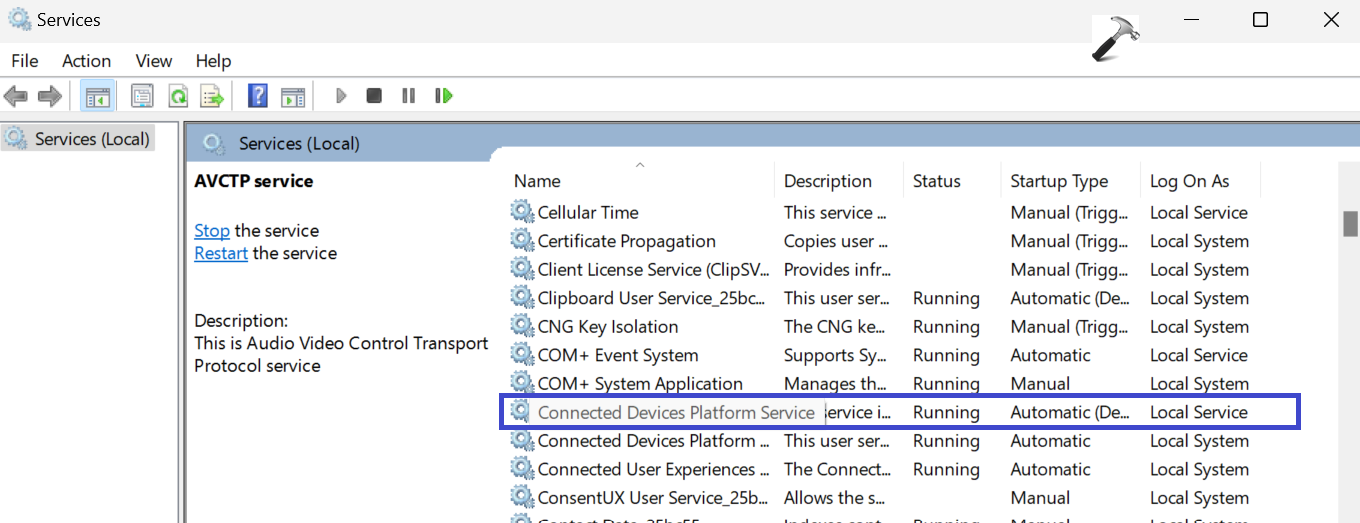
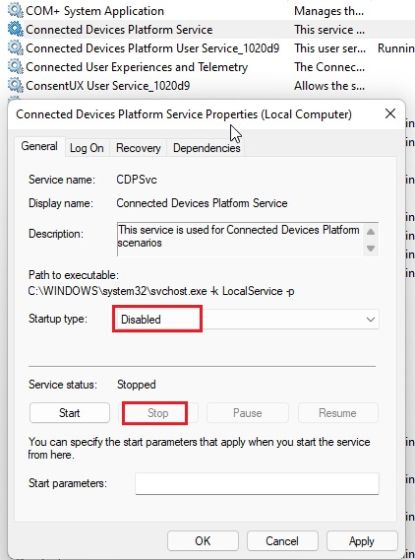
4. Also, double click on “Connected Devices Platform Service” and choose “Disabled”.
5. Click OK followed by Apply.
Method 5: Disable SysMain (Superfetch) Service
Sysmain is a service used by Windows 11/10 to preload apps into memory before you launch. It is used to launch program as quickly as possible. Due to this, disk usage gets high. So fix the issue by disabling SysMain Service.
1. Press the Windows Key + R. Type services.msc and click OK.
2. Double click on SysMain and select Properties.
3. Under Startup type, choose “Disabled” and click on “Stop”.
4. Click OK followed by Apply.
5. Now, open Task Manager. You will see that the Disk usage is reduced to 10-15%.
6. Close the Window and restart your PC and check whether the Disk usage is still spiking or not.
Method 6: Disable Startup Apps
1. Press the Windows Key + X and select “Task manager”.
2. Go to “Startup apps”. Check all the apps.
If you see apps that you don’t use during startup and has been enabled.
3. Right-click on that app and select “Disable”.
Method 7: Reset Virtual Memory
When your PC is short of RAM, it sometimes utilizes the hard disk memory as a swap to hold programs and files in memory. However, in some instances, the PC takes up major disk space, which could increase the disk usage considerably. We can reset virtual memory or increase it, so that the OS does not keep the hard disk engaged all the time. Here are the steps:
1. Press the Windows Key + R. Type sysdm.cpl and click OK.
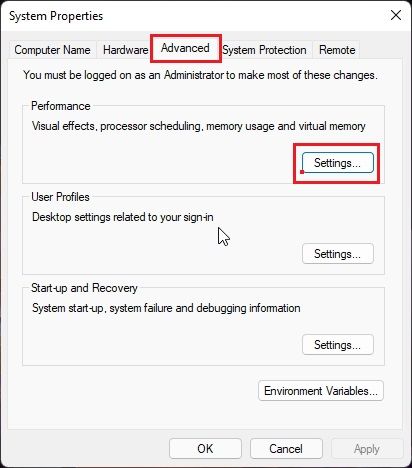
2. Go to “Advanced” tab and click Settings.
3. Now, under Performance Options go to “Advanced” tab.
4. Click on “Change..”
5. Here, uncheck “Automatically manage paging file size for all drives” and select “Custom size”.
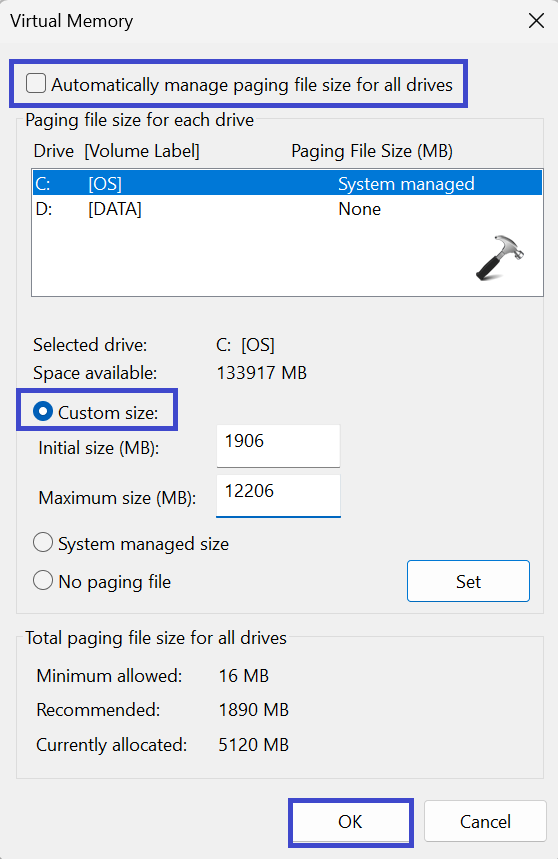
6. Now, enter 1906 into the initial size field.
And enter the amount (in MB) 1.5x times your RAM size in Maximum size.
Method 8: Disable Scheduled Defragmentation
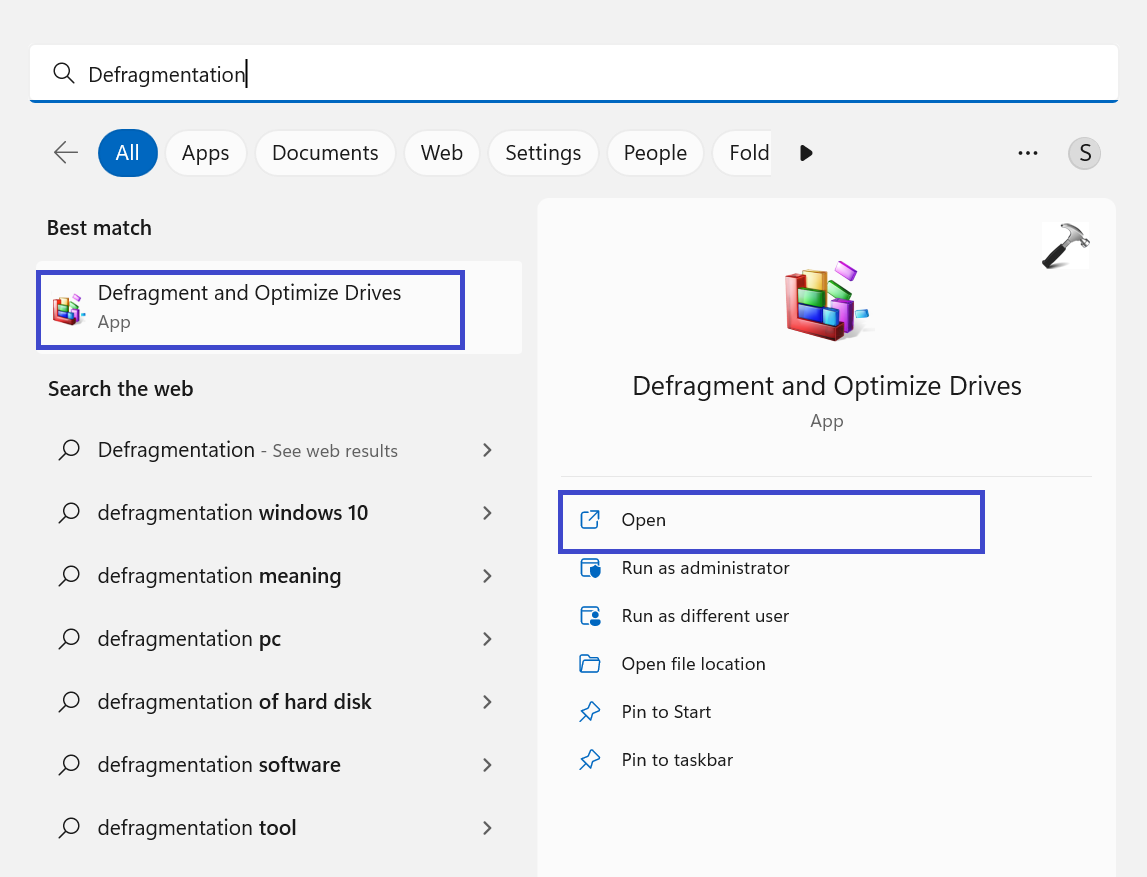
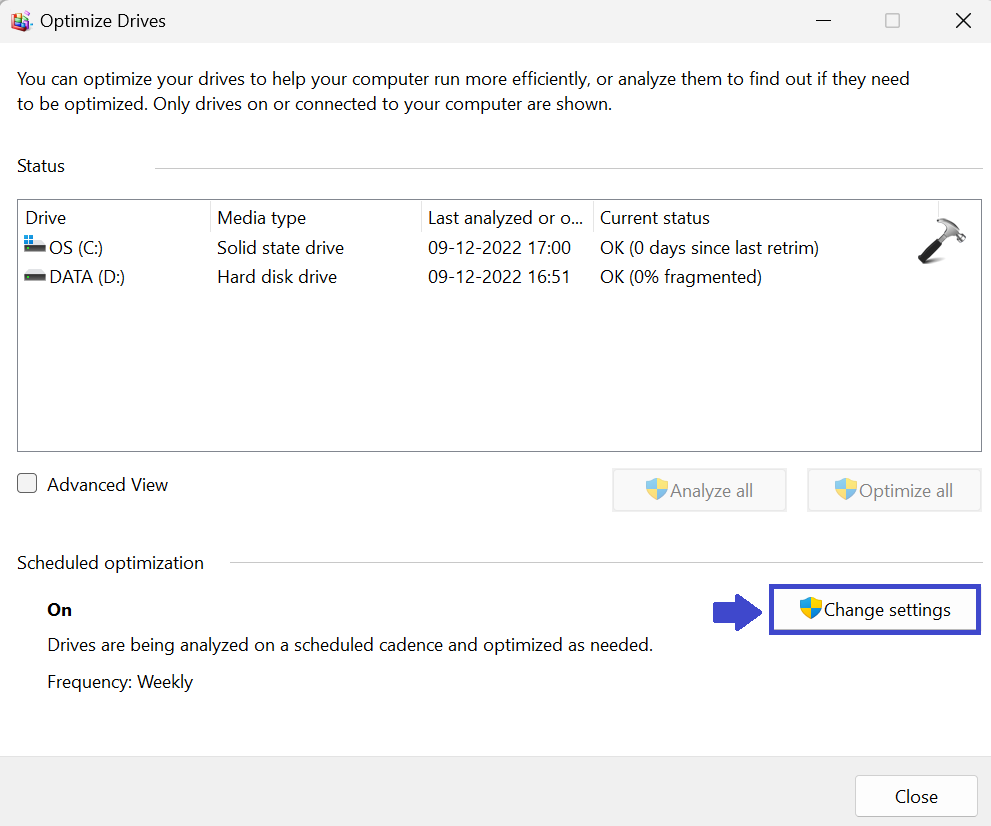
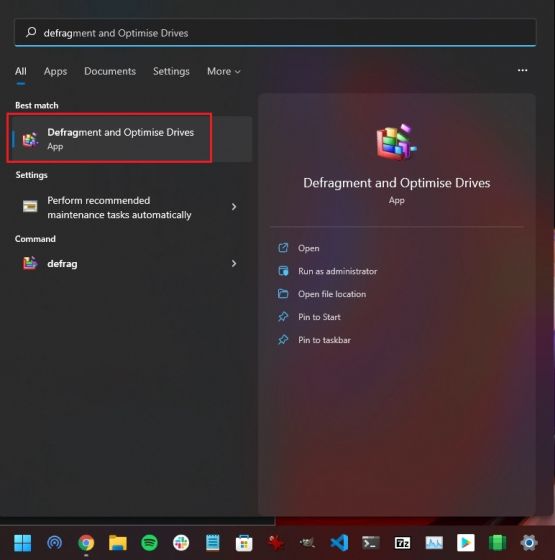
1. Press the Windows key and search for “Defragmentation”. Open it.
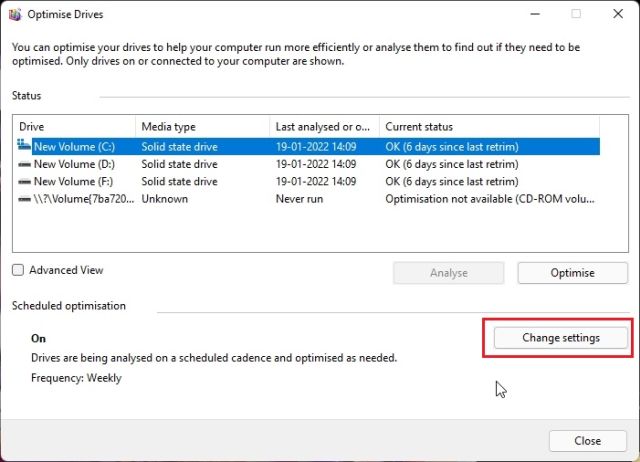
2. Next, click on “Change settings”.
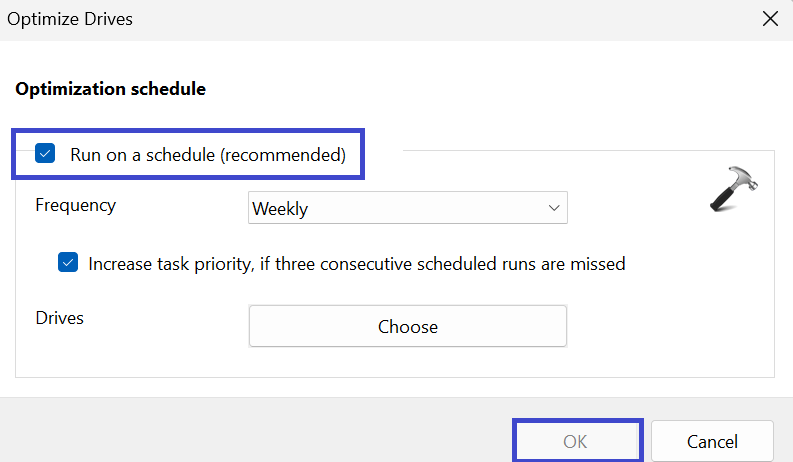
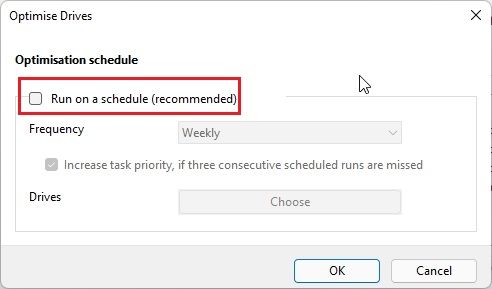
3. Now, uncheck the “Run on a schedule (recommended)” and click OK.
4. Close the Window and restart the PC to apply the settings.
Method 9: Perform a System Scan
Perform system scan for malware or hidden rootkits. Sometimes, malware hides behind the system folders and perform all sorts of actions including crypto mining and malicious encryption.
You can manually scan by using the following steps:
1. Open Windows Security.
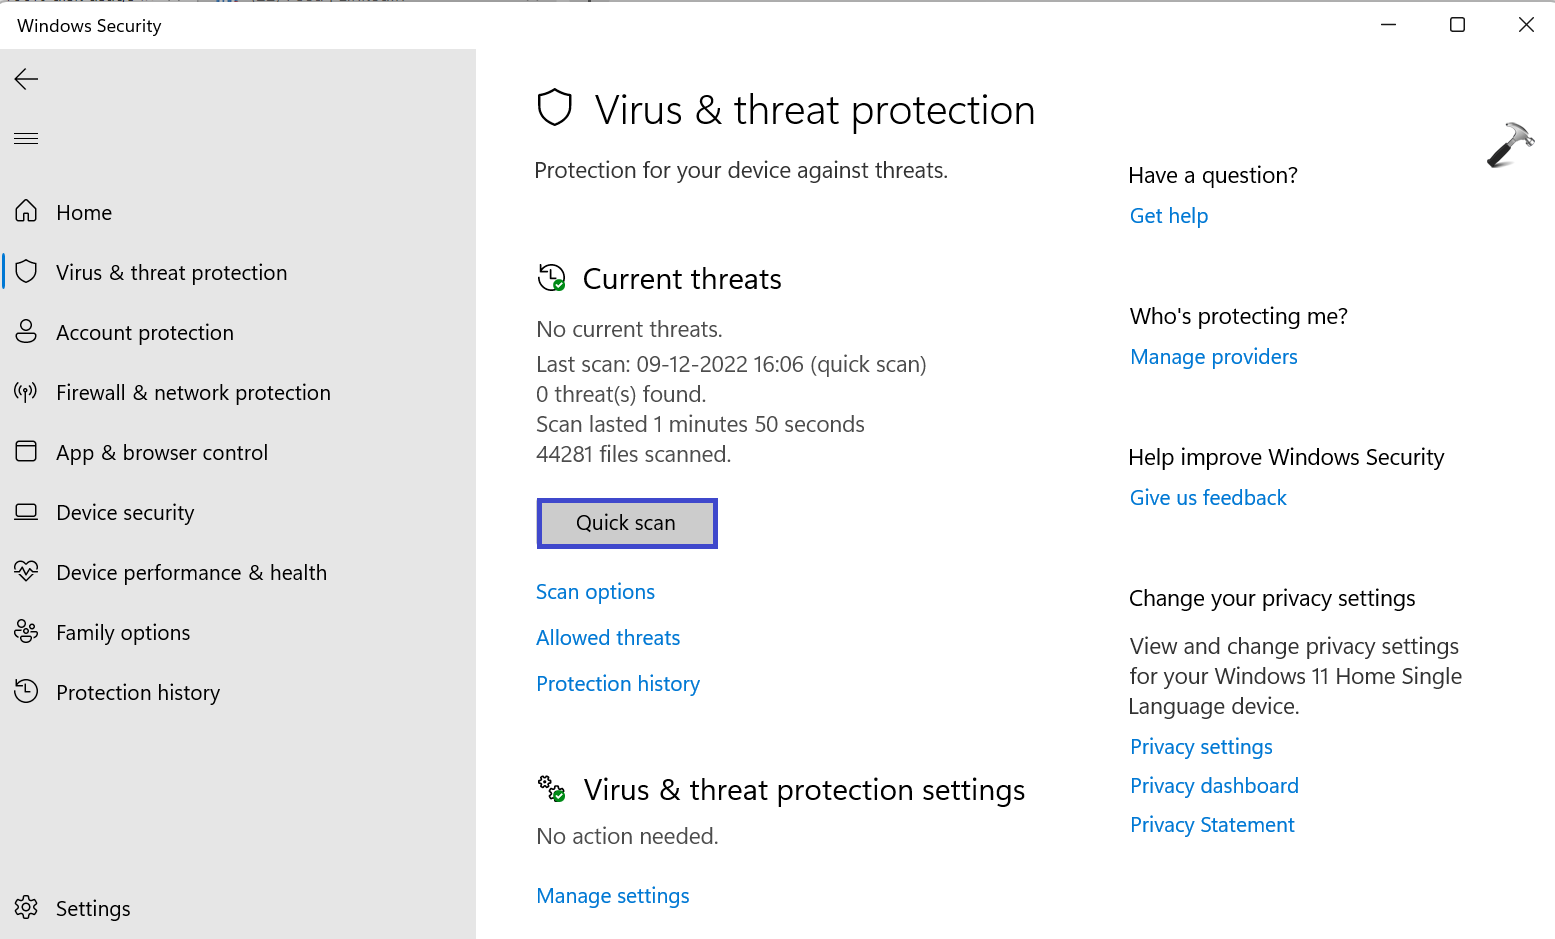
2. Click on “Virus & threat protection” and click on “Quick Scan”.
3. After scanning, you notice still there is 100% disk usage.
Then, go to Virus & threat protection => Scan options => Full Scan.
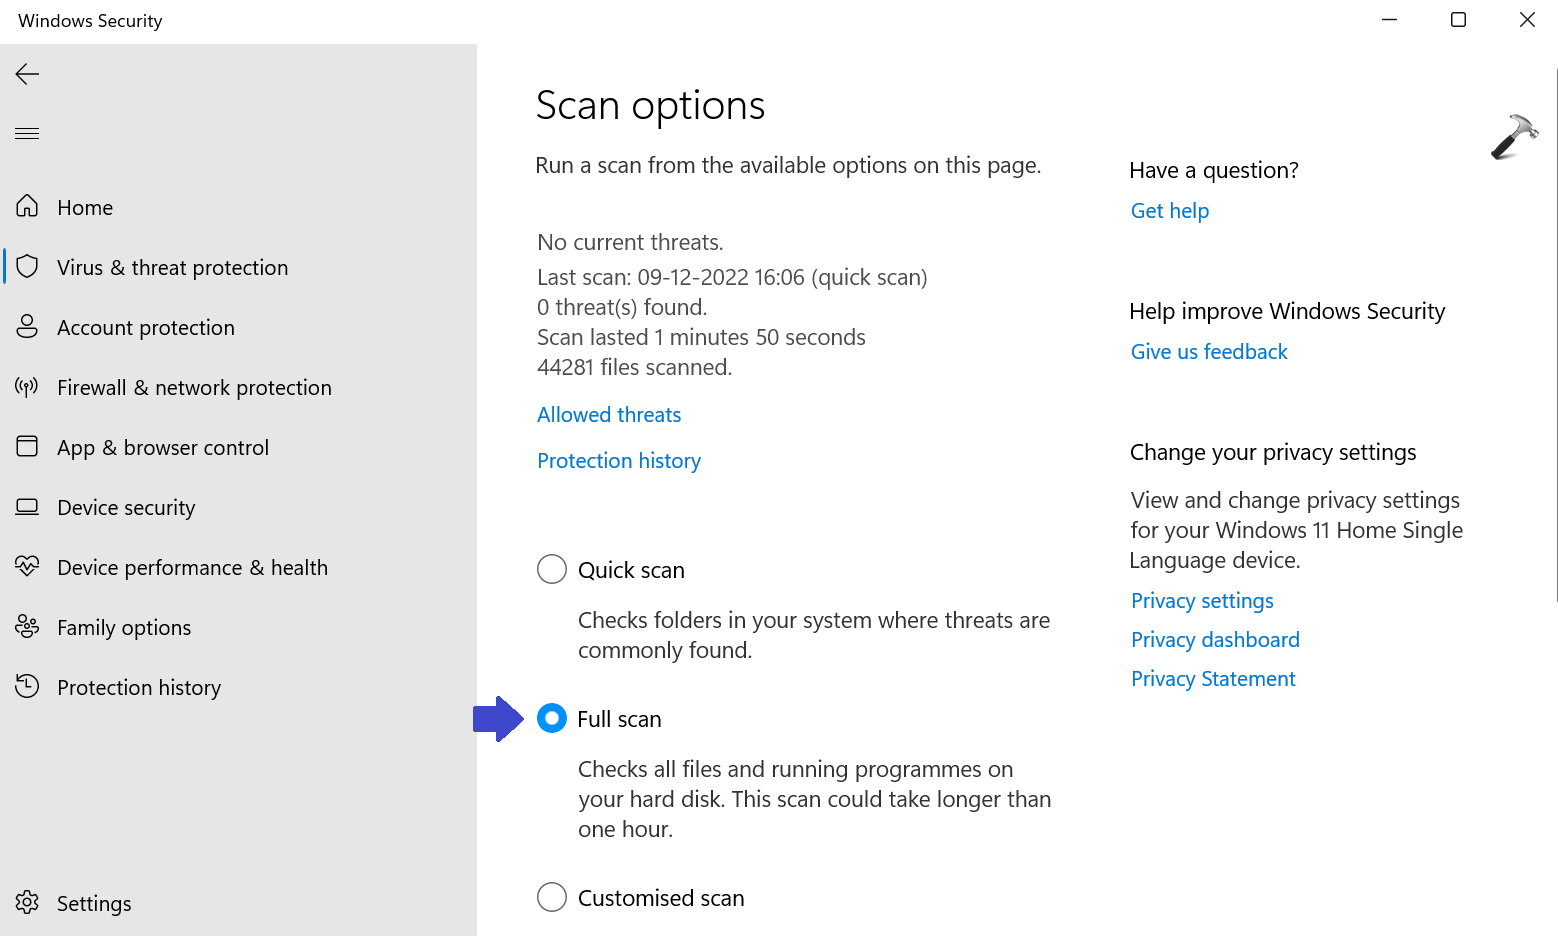
This will take sometime.
4. Restart your PC and check whether the issue is resolved or not.
Method 10: Disable Backgrounds Apps
You should disable the background apps to keep your PC good and responsive. Follow the steps to disable the background apps:
1. Open Settings App and go to Accounts.
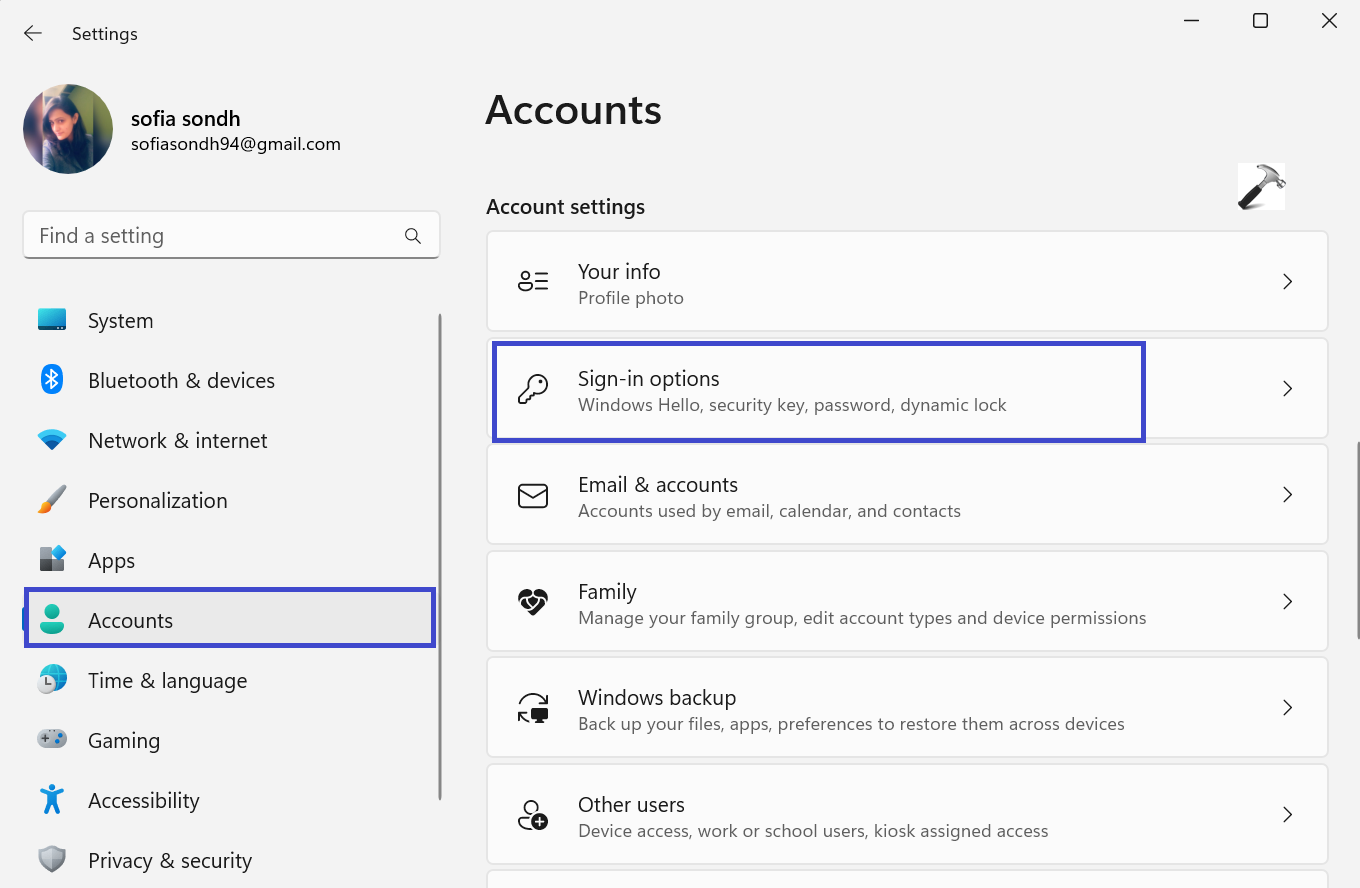
2. Select “Sign-in options”.
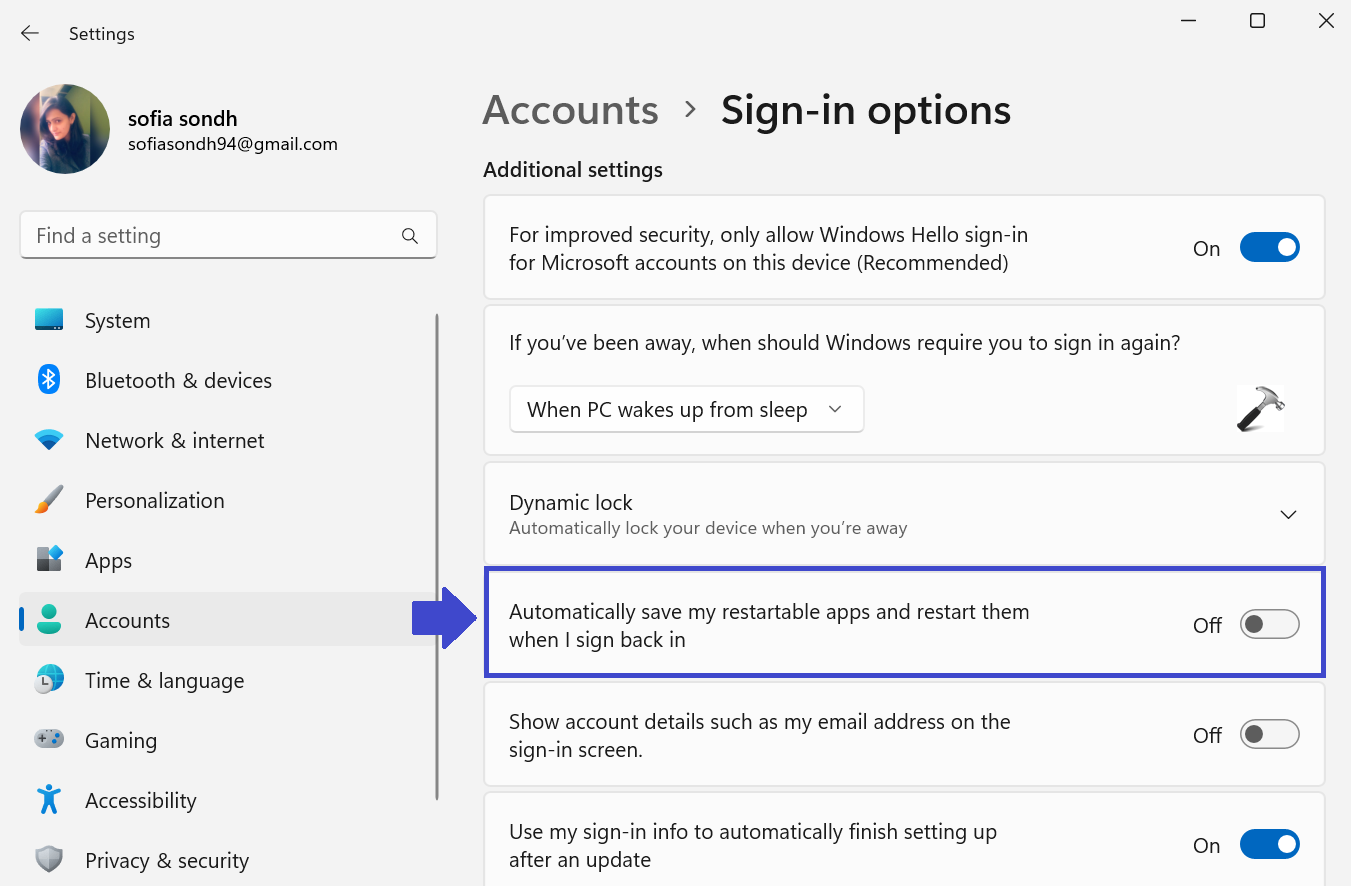
3. Now, turn off the “Automatically save my restartable apps and restart then when i sign back in”.
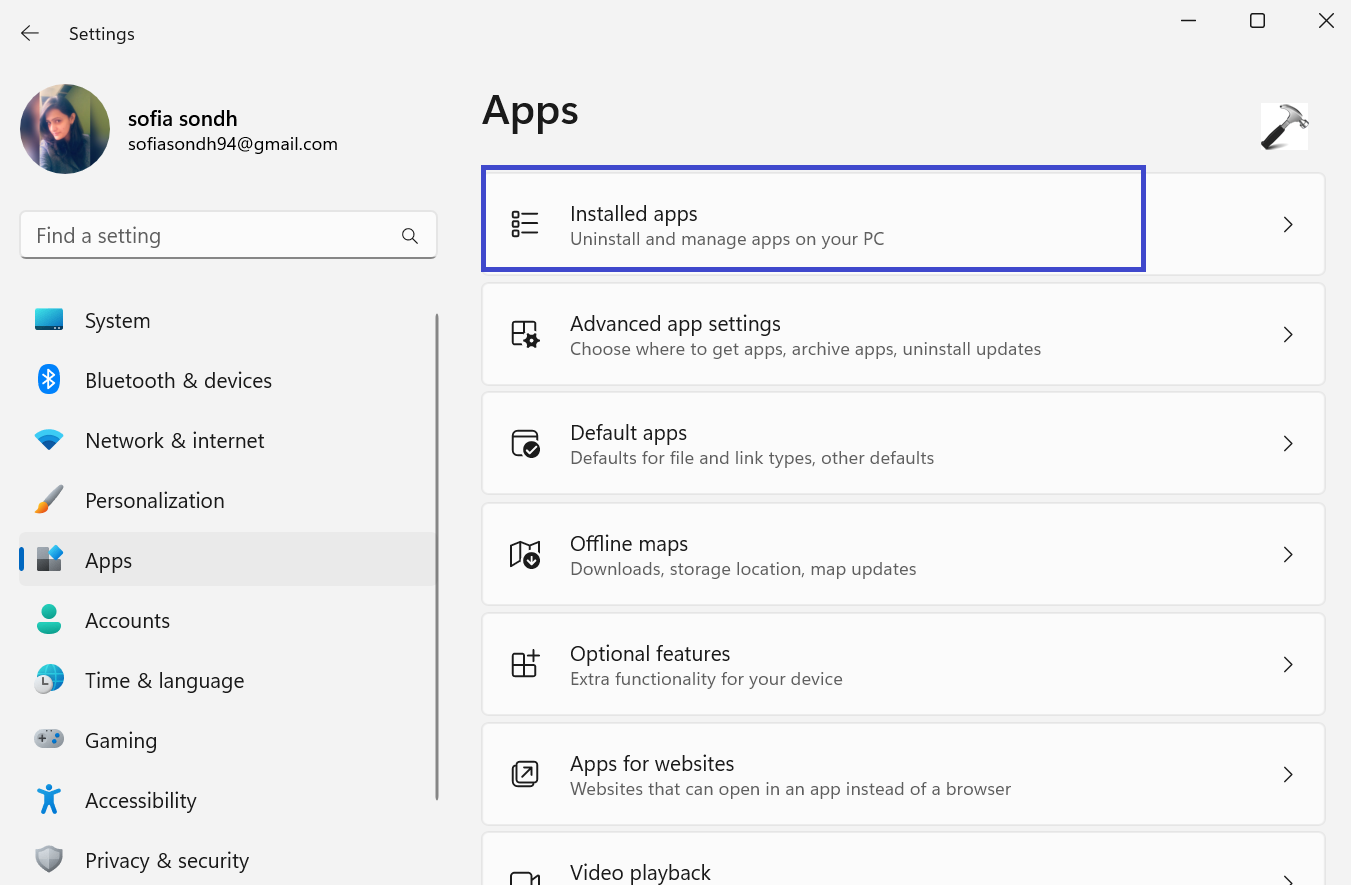
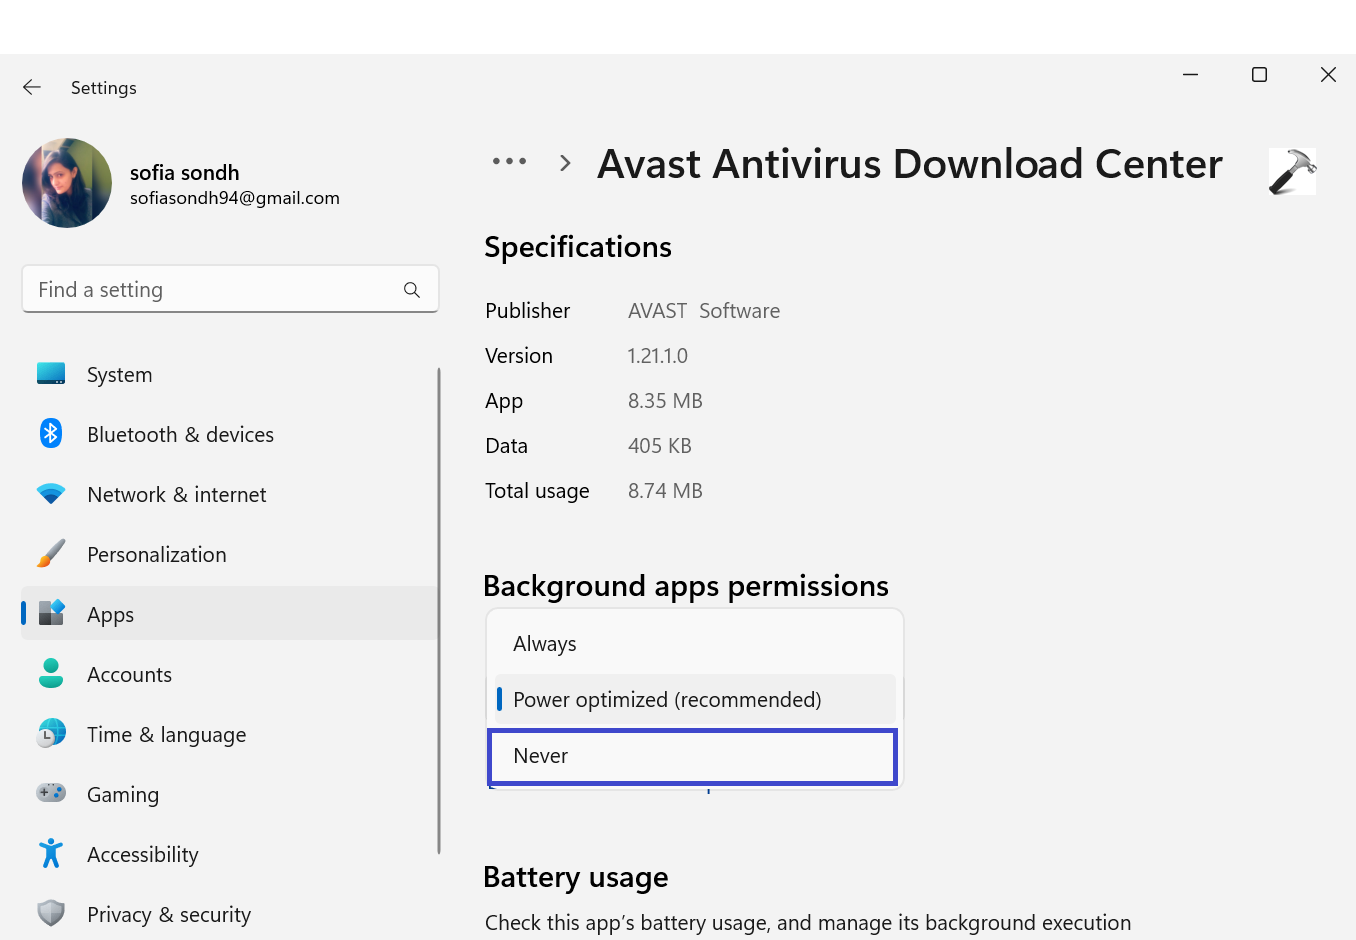
4. Next, go to “Apps” and select “Installed apps”.
5. Now, click on three dot menu and select “Advanced options”.
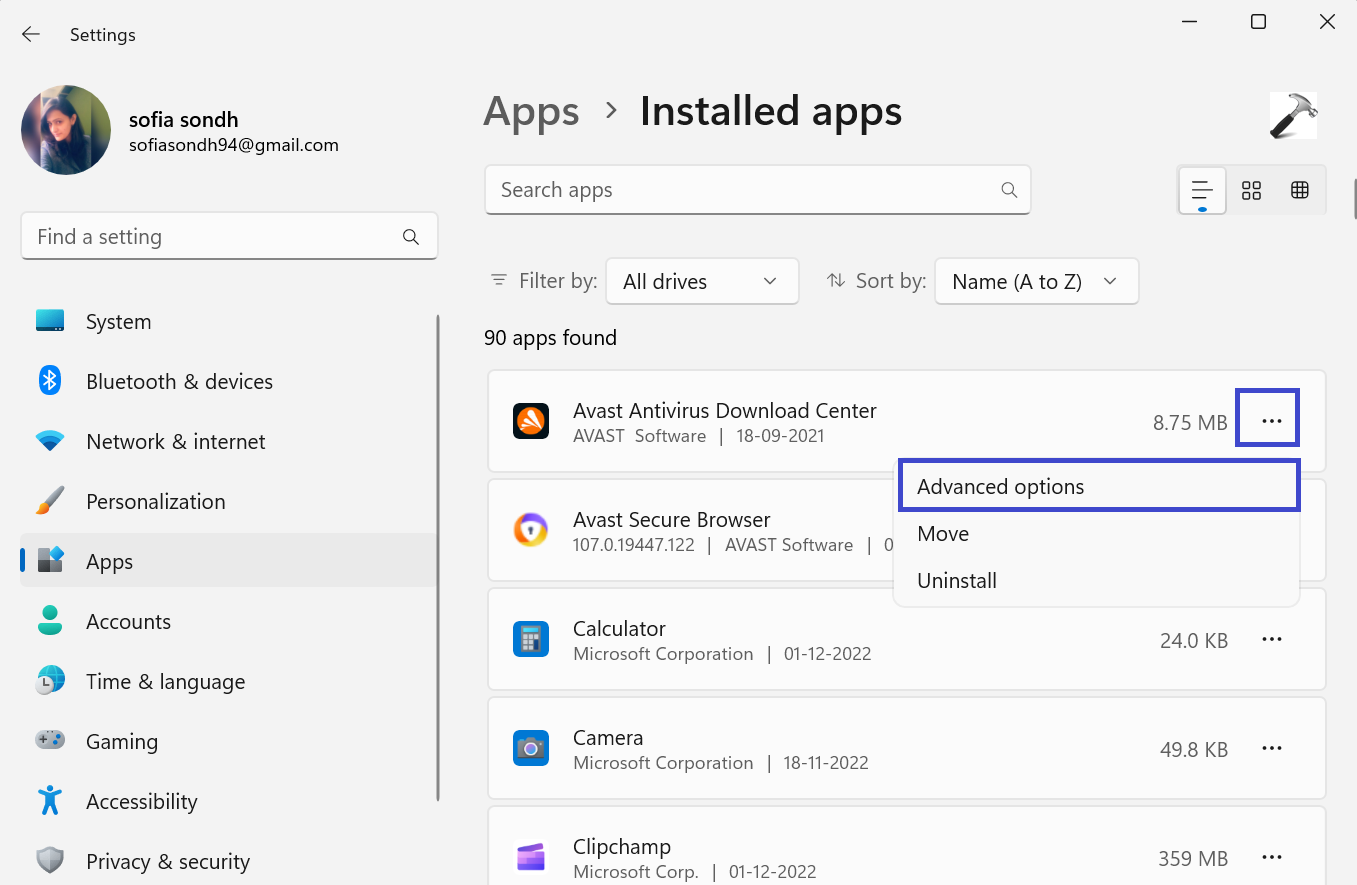
To the apps you want to disable from running in the background.
6. Under the Background apps permissions, select “Never” or as per your choice.
Method 11: Update Storage Drivers
Due to faulty storage drivers, the disk can be stuck in a memory and may perform an action repeatedly. Try updating the storage drivers to the latest version:
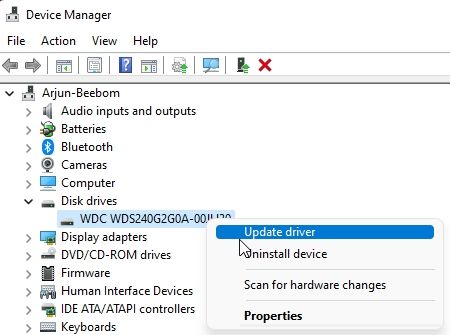
1. Press the Windows key + X. Select “Device Manager”.
2. Now, expand “Disk drivers” and select “Update driver”.
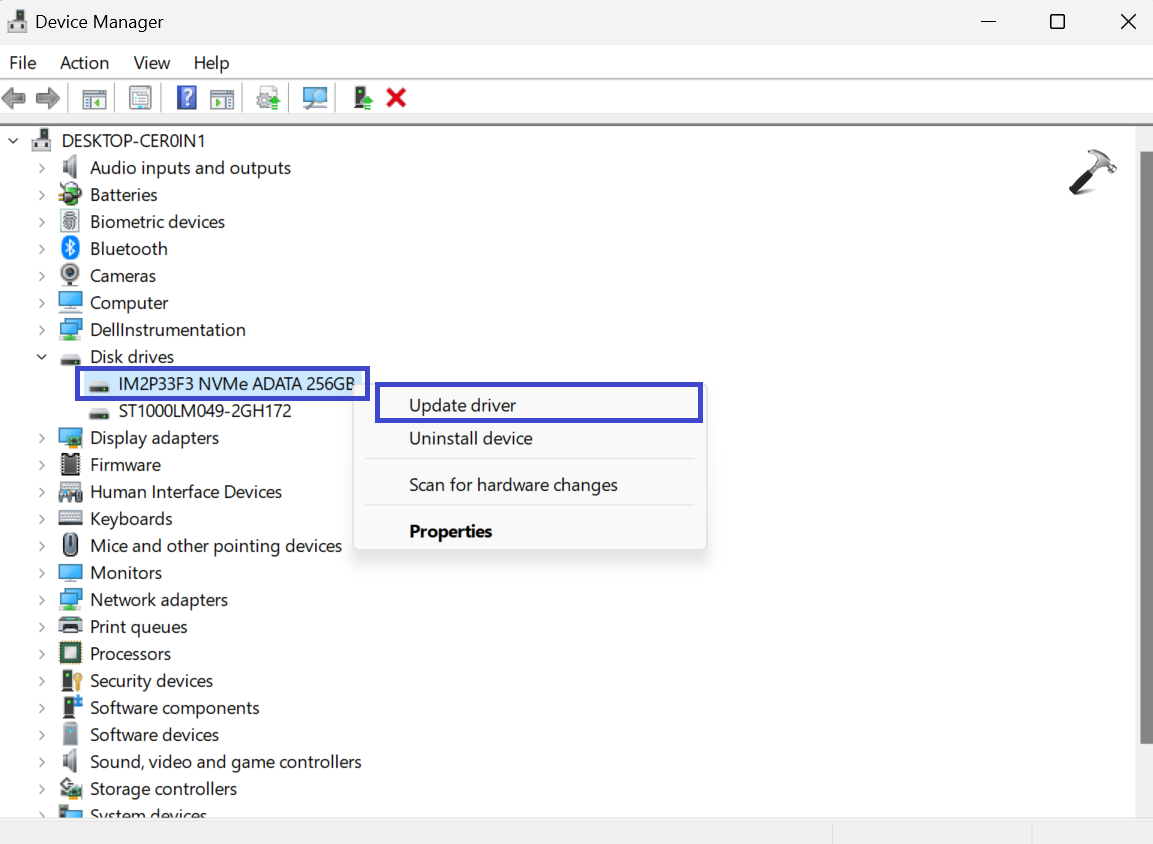
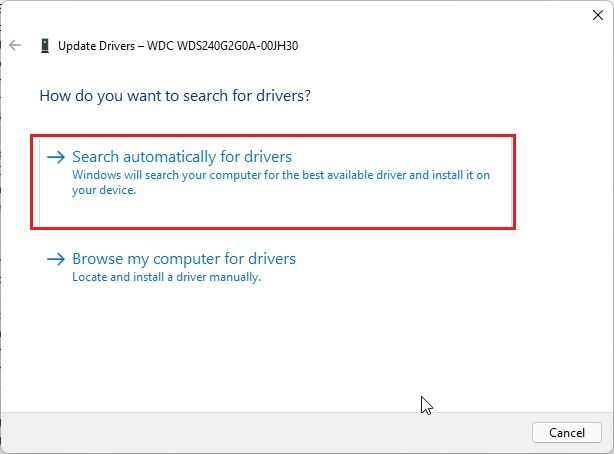
3. A prompt box will appear.
Click on “Search automatically for drivers”.
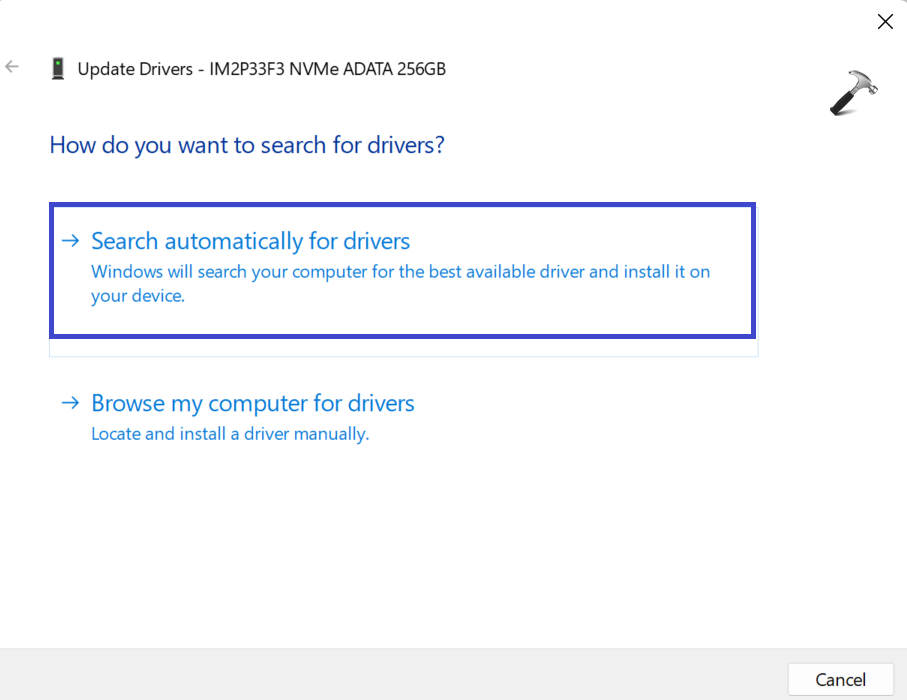
Windows 11 will install it and ask you to restart the PC.
5. Restart your PC and check whether 100% disk usage problem is solved or not.
Method 12: Perform a Clean Install
If none of the above methods worked, then you should try updating Windows 11 to the latest version.
1. Open Settings App and select “Windows Update”.
2. Now, click on “Check for Updates”.
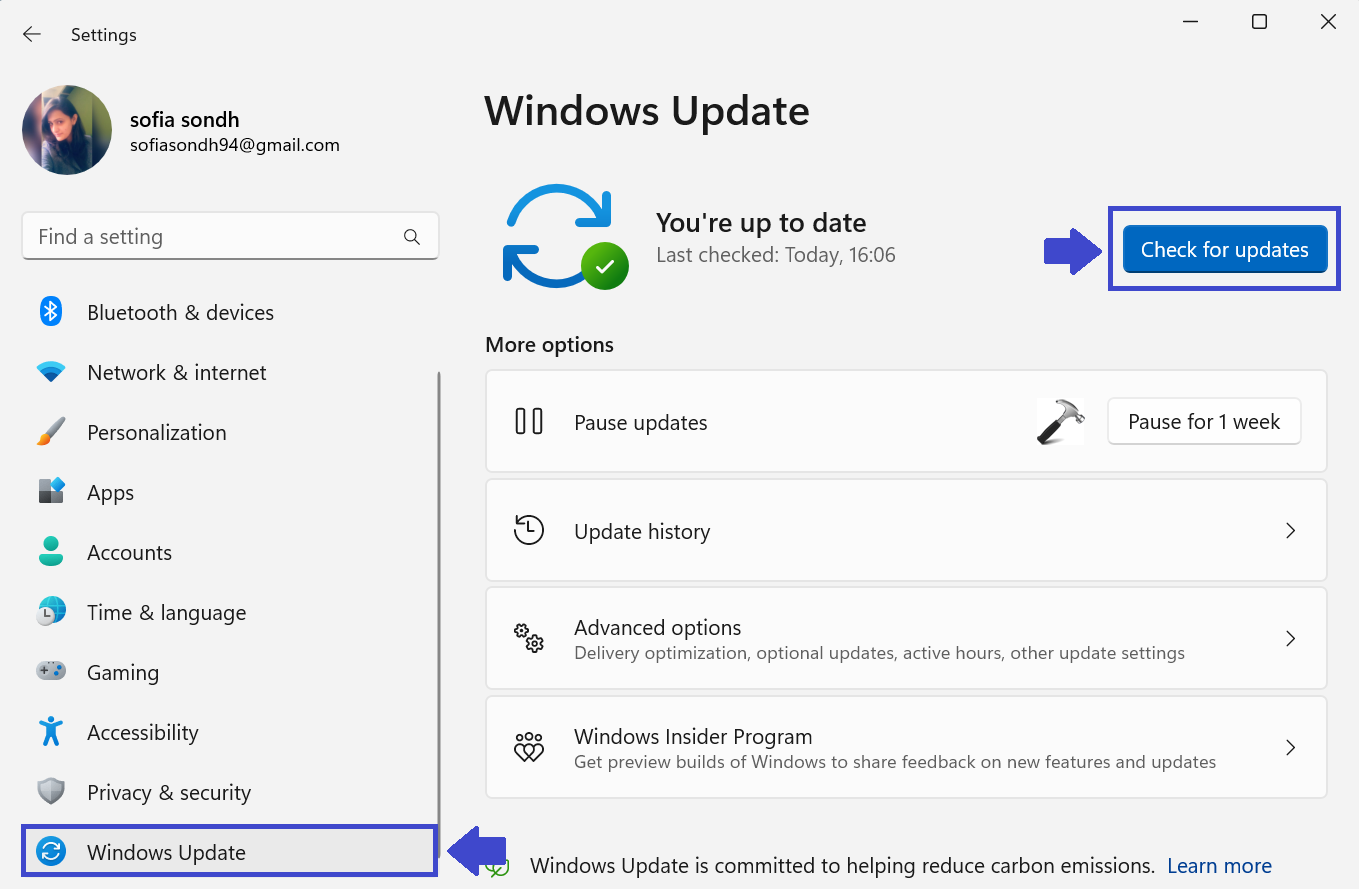
3. If your Windows is not up-to-date then it will download and install all the pending updates.
4. Restart your PC and check whether the 100% disk usage problem has been fixed or not.
That’s It!
See also: Fix Windows 10 100 Percent Disk Usage Problem.
Despite all the UI changes and polish in Windows 11, there are some underlying issues that just don’t seem to leave Windows. For instance, some users recently reported that they were having audio issues on Windows 11, so we put together a guide to fix the ‘no sound’ issue on Windows 11. And now, we have stumbled upon reports of users facing random spikes in disk usage in Windows 11, with 100% disk usage even when the PC is sitting idle. So to resolve the problem, we have listed 12 easy ways to help bring down the high disk usage in Windows 11. On that note, let’s go ahead and learn how to fix 100% disk utilization in Windows 11.
In this guide, we have detailed the most effective methods to fix the 100% disk usage problem in Windows 11. We have included some user-reported solutions and some fixes issued by Microsoft itself. You can expand the table below and check out all these methods at your pace.
Table of Contents
1. Disable SysMain (Superfetch) Service
SysMain, earlier known as Superfetch, is a service used by Windows 11/ 10 to preload apps into memory before you launch it. Microsoft has brought this feature to launch programs as quickly as possible. However, due to this feature, the disk usage sometimes gets high, as it’s engaged all the time while loading the program from disk to memory.
And from user reports so far, it seems the major reason behind 100% disk usage in Windows 11 is indeed the SysMain service. So to fix the high disk usage in Windows 11, we need to disable the SysMain service. Here are the steps you need to follow. Note that disabling the service will marginally slow down app opening time, but that’s about it.
1. First, use the Windows 11 keyboard shortcut “Windows + R” to open the Run prompt. Here, type services.msc and hit Enter.
2. Next, scroll down and look for “SysMain” or “Superfetch”. Double click to open its properties window.
3. Here, change the Startup type to “Disabled” and click on “Stop” to immediately halt the service. Now, click on Apply -> OK.
4. You will instantly notice that Disk usage is reduced to 10-15% in Windows 11. You can restart your PC and check whether Disk usage is still spiking or not.
2. Disable Connected User Experiences and Telemetry
Connected User Experiences and Telemetry is another service by Microsoft that runs under svchost.exe and is responsible for high disk usage in Windows 11. It basically tracks diagnostic data and sends it to Microsoft’s servers. Many users have reported that it’s one of the primary culprits behind 100% disk usage on Windows 11. So to disable it, follow the steps below.
1. Open the Run prompt by pressing the “Windows + R” shortcut. Here, type services.msc and press Enter.
2. Under the Services window, look for “Connected User Experiences and Telemetry” and double-click to open it. Then, set the Startup type to “Disabled” and stop the service right away. Click Apply -> OK to save the changes.
3. I will suggest you disable the “Connected Devices Platform Service” as well. Change the Startup type to “Disabled” and stop the service. Disabling both of these services should significantly bring down disk usage on your Windows 11 PC.
3. Disable Windows Search
Windows Search is also a prime suspect behind cranking up the disk usage in Windows 11. Disabling the Windows Search will do the job for most, but note that it will also affect files and folders search on your PC. So if you are not comfortable disabling this service, we suggest you skip this solution and move to the next step.
1. Bring up the Run window using the “Windows + R” keyboard shortcut and execute services.msc .
2. Then, look for “Windows Search” and double-click to open it. In the pop-up window, set the Startup type to “Disabled” and stop the service instantly. After that, click on Apply -> OK and restart the PC. You should notice low disk usage in Windows 11 after the reboot.
4. Disable Scheduled Defragmentation
Windows 11 periodically conducts defragmentation of the hard disk to improve performance. However, in that course, it increases the disk usage to 100%, thus, making the system laggy and unresponsive. So to disable the scheduled defragmentation on Windows 11, follow our instructions below.
1. Press the Windows key once and search for “defragment“. Now, open “Defragment and Optimize Drives”.
2. Next, click on “Change settings“.
3. Here, untick the “Run on a schedule (recommended)” checkbox and click on “OK”. This will disable scheduled defragmentation on your Windows 11 PC, which, in turn, should reduce disk usage and prevent it from going up to 100% randomly.
5. Disable Startup Apps
Startup apps are programs that automatically start running in the background when you log in to your PC. These apps, although you may not actively use them, take a major share of disk usage and slow down your PC. So keep a check on what programs you allow to start up when you switch on your computer and disable the unnecessary ones right away. Learn how to do that right here:
1. Use the Windows 11 keyboard shortcut “Ctrl + Shift + Esc” to open the Task Manager.
2. Then, move to the “Startup” tab and check out all the apps. If you see an app that you don’t use during startup and has the “Enabled” tag next to it, then right-click on it and disable it.
Note: Over time, as you install more apps, the Startup app list may grow bigger. You should keep a close check on the list and disable the unnecessary apps periodically to keep boot times in check and avoid 100% disk usage issue.
6. Disable MSI Mode
Some users report that they are still facing the 100% disk utilization issue in Windows 11 even after following all the methods listed above. Microsoft reported that, in some cases, high disk usage actually stems from Advanced Host Controller Interface PCI-Express (AHCI PCIe) controllers that have firmware incompatibility.
If your PC is using the “StorAHCI.sys” driver, you are most likely affected by this issue. Microsoft further states that if Message Signaled Interrupt (MSI) mode is disabled, disk usage can be reduced drastically. So we have added detailed steps below on how to disable the MSI mode in Windows 11.
1. First, use the “Windows + X” keyboard shortcut to access the Quick Links menu and open Device Manager.
2. Next, expand “IDE ATA/ATAPI controllers” and right-click on the entry. Now, select “Properties” from the context menu.
3. From the Properties pop-up window, move to the “Driver” tab and click on “Driver Details“.
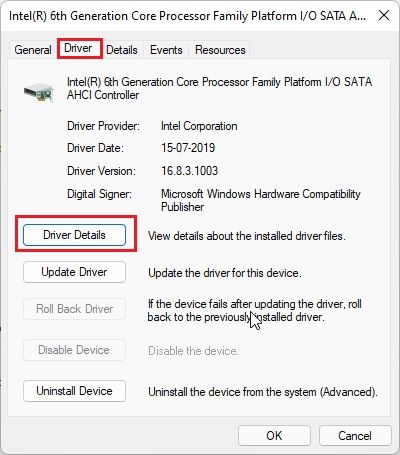
4. If you find “StorAHCI.sys” under the path, proceed to the next step. In case a different driver name appears on your PC, you don’t need to proceed ahead. This solution is not for you and won’t help you solve the 100% disk usage issue in Windows 11.
5. Next, go to the “Details” tab and change the Property to “Device instance path” from the drop-down menu. Now, right-click on the “Value” here and copy it.
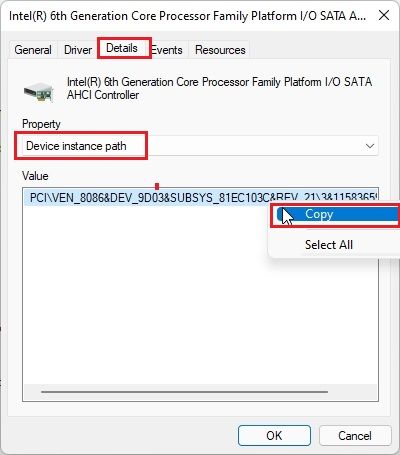
6. Paste the Value into a Notepad file as we will need it ahead.
7. Now, close the Device Manager and open the Registry Editor. Press the Windows key and search for “registry“.
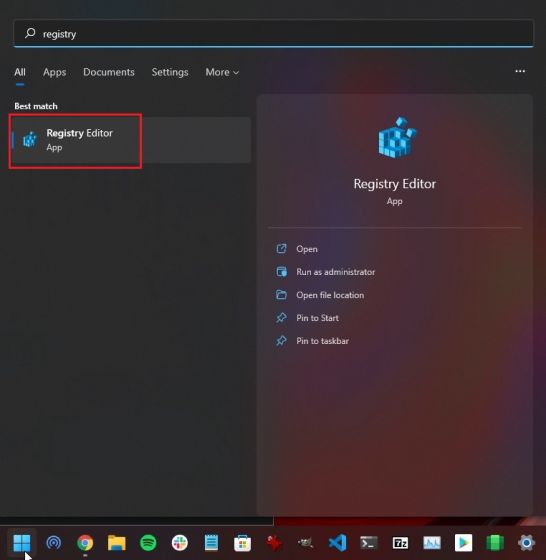
8. After that, move to the below path in the Registry Editor.
Computer\HKEY_LOCAL_MACHINE\System\CurrentControlSet\Enum\PCI\
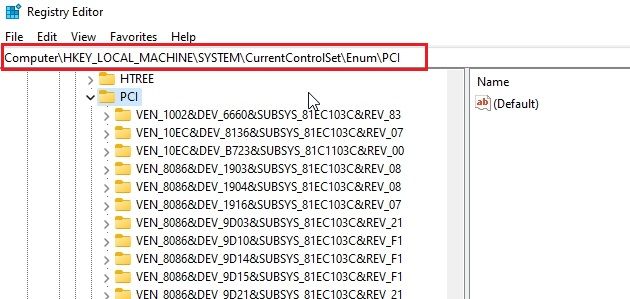
9. Now, match the entry with the one you pasted in the Notepad file and expand it.
10. Further, move to Device Parameters -> Interrupt Management -> MessageSignaledInterruptProperties.
11. On the right pane, look for “MSISupported“. Open it and change the value data to 0.
12. Close the Registry Editor and restart your PC. Now onwards, you will find that your disk utilization does not go above the 10-20% mark. Thus, we have successfully solved the 100% disk usage issue on your Windows 11 PC.
7. Reset Virtual Memory
When your PC is short of RAM, it sometimes utilizes the hard disk memory as a swap to hold programs and files in memory. However, in some instances, the PC takes up major disk space, which could increase the disk usage considerably. To avoid such a scenario, we can reset virtual memory or increase it, so that the OS does not keep the hard disk engaged all the time. Here is how to do it.
1. Open the Run window using the “Windows + R” keyboard shortcut, input sysdm.cpl, and hit enter. It will open the “System Properties” window directly.
2. Here, move to the “Advanced” tab and click on “Settings” under Performance.
3. Again, under the “Performance Options” window, move to the “Advanced” tab and click on “Change”.
4. Here, untick the “Automatically manage paging file size for all drives” checkbox and choose “Custom size“.
5. Now, enter the “Recommended” size (mentioned in the screenshot below) into the Initial size field. And in the Maximum size field, enter the amount (in MB) 1.5x times your RAM size. For example, my RAM is 8GB, so I have entered 1024 x 8 x 1.5 = 12288. Finally, click Set -> OK. Now, restart your PC, and the disk usage should be significantly reduced.
8. Perform a System Scan
If you still see a spike in disk usage on Windows 11 even after following all the steps above, I would suggest performing a system scan to look for malware or hidden rootkits. Sometimes, sophisticated malware hides behind the system folders and performs all sorts of actions, including crypto mining and malicious encryption.
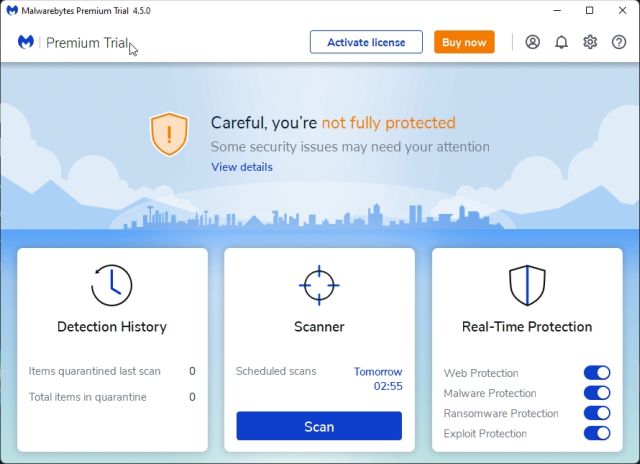
In such cases, it becomes necessary to look for the trojan horse and eliminate it to reduce your disk usage from 100% in Windows 11. You can go through our list of best malware removal tools for Windows 11, but I would suggest using Malwarebytes (Download) to perform a deep scan on your PC. If the antivirus finds anything suspicious, remove it and check if disk usage has gone down.
9. Disable Background Apps
In our tutorial on how to speed up Windows 11, we have mentioned that you should disable background apps to keep your PC snappy and responsive. Background apps might be one of the reasons you are seeing 100% disk usage on your Windows 11 computer. Here is how you can disable background apps like Cortana in Windows 11.
1. Open Windows Settings using the “Windows + I” keyboard shortcut and head to the “Accounts” section from the left pane. Here, select “Sign-in options“.

2. Now, disable the toggle for “Automatically save my restartable apps and restart them when I sign back in” on the next page.

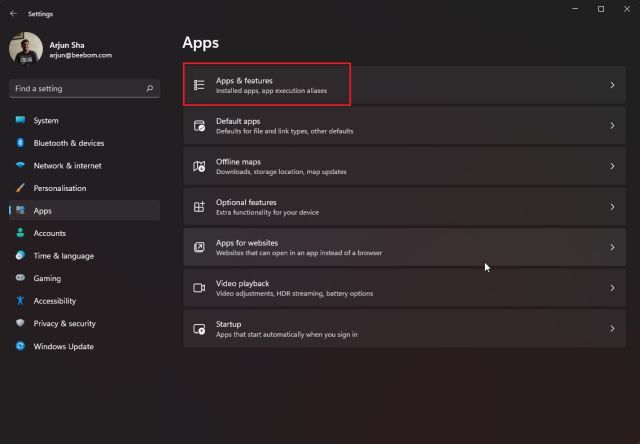
3. Next, move to the “Apps” section from the left pane and click on “Apps and Features” on the right pane.
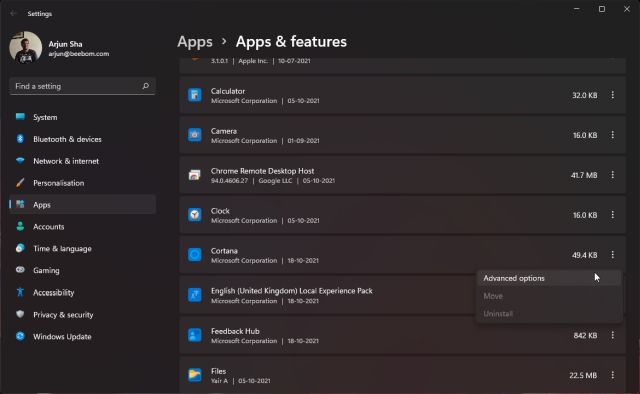
4. Here, you will find a list of apps installed on your Windows 11 PC. Click the three-dot menu icon next to the apps you want to disable from running in the background.
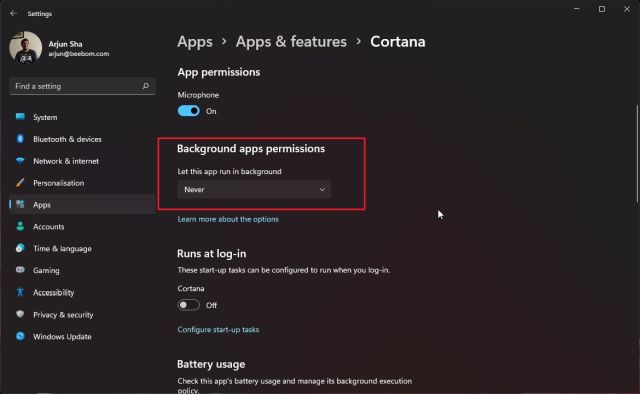
5. Select “Advanced options” from the context menu and scroll down to get to the “Background apps permissions” option on the next page. Select “Never” from the drop-down menu here to prevent the app from running in the background and hogging unnecessary disk usage. Do this for all the apps you don’t want to run in the background. This will offload a lot of resources from the disk.
10. Run Disk Check
At times, due to bad sectors or logical errors, the disk is unable to complete a given operation, and it continues to use the disk abnormally in an attempt to execute the action. And that leads to 100% spikes in disk usage on Windows 11 PCs. So we suggest you run Disk Check to resolve the issue.
1. Press the Windows key once and type “cmd”. Now, click on “Run as administrator” on the right pane to open the Command Prompt window with admin privileges.
2. In the CMD window, run the below command. It will ask whether you want to perform a disk check the next time your PC restarts. Type Y and hit Enter. Now, restart your PC, and Windows 11 will check for all the bad sectors and logical errors and will fix them along the way. Once the computer boots, the high disk utilization issue should be gone.
chkdsk /r c:
11. Update Storage Drivers
As mentioned above, due to faulty storage drivers, the disk can be stuck in a memory loop and may perform an action repeatedly. It can increase disk usage and cause your Windows 11 PC to slow down. To solve this issue, you should try updating the storage drivers to the latest version. And here’s how you can do that:
1. Press the “Windows + X” keyboard shortcut to open the Quick Links menu and open “Device Manager“.
2. Here, expand the “Disk drives” section and right-click on your disk. From the context menu, click on “Update driver“.
3. From the pop-up window that now appears, click “Search automatically for drivers“. If there is a new update available for your disk drive, Windows 11 will install it and ask you to restart the PC.
4. I will also suggest you do the same for the options under “IDE ATA/ATAPI controllers” and “Storage controllers“.
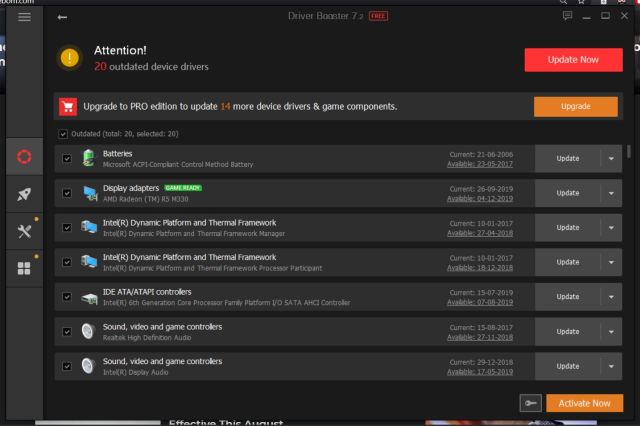
5. In case there is no update available with the Device Manager, try some third-party driver update tools for Windows 11. I use IObit Driver Booster to update all my drivers, and it works really well. You can use it to update all your storage-related drivers.
12. Update Windows 11 or Perform a Clean Install
If none of the above methods worked for you, and your PC is still unresponsive due to high disk usage, you should try updating Windows 11 to the latest version. Use the “Windows + I” shortcut to open Windows Settings, move to “Windows Update” from the left pane, and click on “Check for Updates” in the right pane.
Download and install all the pending updates and restart your PC. After that, check whether the 100% disk usage problem has been fixed or not. I would suggest you leave your PC idle for an hour after the update so that it applies all the changes.

In case it does not work, you need to perform a clean install of Windows 11. We have already written a detailed guide on how to clean install Windows 11 from USB, so follow the linked guide, and you will have a working PC with no disk usage issues in an hour. Don’t worry, none of your files from other drives will be erased, except for the C drive, so remember to back up all your valuable files. This method will most certainly fix 100% disk usage on Windows 11.
100% Disk Usage in Windows 11? Learn How to Fix It Right Now
So these are the different ways you can use to fix your Windows 11 PC if it’s facing high disk usage, even when sitting idle. Apart from the software tweaks, I would like to add that you should consider switching to an SSD if you are using a hard disk (HDD) on your Windows 11 desktop or laptop. An SSD will offer you faster loading speeds and much better performance. Switching to an SSD also seemingly fixes the 100% disk usage issue on Windows 11 PCs. Anyway, that is all from us. If you want to speed up your Windows 11 PC, follow our guide for detailed instructions. And if you have any questions, let us know in the comments section below.