
Есть пробелы в знаниях и недопонимания.
Зачем машину с nix вводить в домен AD?
Объясните, знающие люди. Буду премного благодарен!
Пытался гуглить, но ввиду пробелов каша в голове: то Samba фигурирует в ответах, то ещё что…
-
Вопрос задан
-
2527 просмотров
Например, почтовый серверы на Unix могут обслуживать юзеров, авторизуя их по AD. Т.е. на почту пользователь может заходить с тем же логином/паролем, с которым он входит в домен. Кроме того, оттуда же (из AD) можно брать список почтовых ящиков, обслуживаемых сервером (поле e-mail у пользовательских учёток).
Та же схема для файл-серверов — можно задавать права на линуксовых файловых ресурсах для пользователей из домена.
Та же схема для прокси — авторизация пользователей домена по их доменным учёткам, прозрачно для пользователей (т.е. при запуске браузера не будет всплывать окошко запроса отдельного логина-пароля).
Это если развернуть тезис камрада 3vi1_0n3 на тему, что AD нужно для централизованной аутентификации 
Пригласить эксперта
В основном для централизованной аутентификации.
Расскажу реально свой собственный пример. Работал сетевым инженером в крупной организации. Так сложились обстоятельства, что под linux работать удобнее (постоянная консоль, скрипты, работа с удаленными серверами.
В то же время нужно решать внутрикорпоративные задачи: доступ к файловым ресурсам, внутренние web-сервисы, были даже системы lotus notes.
решал проблемы сам. прокси, хитрые наты, аутентификация ntlm+kerberos.
вопрос задан не с того конца. зачем вообще создан ad =)? и какой функционал доступен для линукса при таком раскладе. ответы легко гуглятся вроде
рулить авторизацией и разделением прав
то есть ровно за тем же что и виндовые машины
В целом — незачем.
«Введение в домен» linux-машин заключается в том, что к pam-у прикручивают LDAP из состава AD, чтобы на линукс-боксе можно было авторизоваться учеткой из AD.
Остальное никто не делает.
Войдите, чтобы написать ответ
-
Показать ещё
Загружается…
Минуточку внимания
зачем_вводить_системы_linux_в_домен_microsoft
Table of Contents
Зачем вводить системы Linux в домен Microsoft
Анонс вебинара
Запись вебинара
Реклама вебинара
-
В интернете множество статей, описывающих добавление в домен Microsoft систем Linux. Очень часто там отсутствует ответ на главный вопрос — зачем это делать? Давайте разберемся и всегда ли это необходимо, и как вообще решать задачи Single Sign-On (SSO) и workplace innovation (WPI) при использовании домена Microsoft и рабочих станций и сервисов Linux
Техническое задание
-
На предприятии используется Microsoft Active Directory. Сотрудники должны иметь возможность с любой рабочей станции linux работать в личном окружении (рабочий стол, документы, настройки) а так же, с общими с корпоративными файлами совместно с пользователями систем Windows.
Шаг 1. Исходное состояние стенда
Система windows server
-
Учетная запись user1 в group1
-
В домене только windows система client2
-
В DNS нет linux систем
Система linux gate
-
Шлюз в Интернет
-
DHCP
Рабочие станции
windows
-
client2 введена в домен Active Directory
linux
-
client1 и clietn3
gate# dhcp-lease-list
Шаг 2. Файловый сервис на linux
-
Создаем файлы и каталоги в личном и общем сетевом ресурсе
-
Отлогиниваемся
Шаг 3. Рабочие станции на linux
3.1 Использование kerberos для работы с Microsoft AD
3.2 Работа с файловыми ресурсами Microsoft из linux
3.3 Аутентификация пользователей в linux через Microsoft Active Directory
-
Подключаемся как user1 в консоли vbox, проверяем наличие TGT, отключаемся
3.4 Автоматическое создание учетных записей после аутентификации через Microsoft Active Directory
-
Подключаемся как userN в консоли vbox, проверяем наличие TGT
3.5 Монтирование домашнего каталога ручном режиме
user1$ klist

user1$ cd /

# klist

# cp -v /tmp/krb5cc_`id -u user1`_* /tmp/krb5cc_0

# klist

# mount.cifs //gate.corp13.un/user1 -o rw,user,sec=krb5,vers=3.1.1,uid=`id -u user1`,gid=`id -g user1` /home/user1/

# ls -l /home/user1
-
Отключаемся в консоли vbox
# rm /tmp/krb5cc_0

# umount /home/user1/
3.6 Автоматическое монтирование домашнего каталога
-
Использование pam_script для автоматического монтирования домашнего каталога по протоколу CIFS с GSSAPI/Kerberos аутентификацией
-
Подключаемся как user1 в консоли vbox, проверяем наличие файлов, созданных из windows в домашнем каталоге и отлогиниваемся
# umount /home/user1/
3.7 Подключение общего файлового ресурса компании пользователями linux
-
Обсуждаем описание точек монтирования в файле /etc/fstab для протокола cifs и GSSAPI аутентификация
# cat /usr/share/libpam-script/pam_script_auth
#!/bin/bash

if ! id $PAM_USER &>/dev/null; then
        useradd -m -s /bin/bash $PAM_USER
        echo //gate.corp13.un/corp_share /home/$PAM_USER/Public cifs rw,user,sec=krb5,noauto,vers=3.1.1 0 0 >> /etc/fstab
fi
-
Создаем в Active Directory учетную запись user2, включаем в group1 и подключаемся ей через linux GUI
Шаг 4. Клонируем конфигурацию рабочей станции
gate# dhcp-lease-list

gate# client1=192.168.13.101

gate# clientN=192.168.13.102

gate# ssh $clientN

clientN# DEBIAN_FRONTEND=noninteractive apt -y install krb5-user cifs-utils nfs-common libpam-krb5 libpam-script

gate# scp -3 $client1:/etc/krb5.conf $clientN:/etc/

gate# scp -3 $client1:/etc/pam.d/common-auth $clientN:/etc/pam.d/

gate# scp -3 $client1:/usr/share/libpam-script/pam_script_auth $clientN:/usr/share/libpam-script/

gate# scp -3 $client1:/usr/share/libpam-script/pam_script_ses_open $clientN:/usr/share/libpam-script/
Исправления и альтернативные варианты
0. Wrong path for pam_script.so
1. Создание несуществующих в AD учетных записей
В вебинаре создание учетной записи происходит до проверки ее подлинности, поэтому лучше расположить модули так:
# cat /etc/pam.d/common-auth
...
auth    [success=2 default=ignore]      pam_krb5.so minimum_uid=1000
auth    [success=1 default=ignore]      pam_unix.so nullok_secure try_first_pass
auth    requisite                       pam_deny.so
auth    sufficient                      pam_script.so
auth    required                        pam_permit.so
...
2. Через 10 часов сессия монтирования домашнего каталога устаревает
Вариант решения — не удалять в скрипте /tmp/krb5cc_0 и обновлять TGT через cron
client1:~# crontab -l
0 */8 * * * kinit -R >/dev/null 2>&1
Усиливается проблема (уже была) параллельного подключения нескольких пользователей к рабочей станции
3. Желательно удалять возможные записи для пользователя в /etc/fstab перед его созданием в скрипте
Особенно, если для отладки пользователи постоянно создаются/удаляются
...
  sed -i.bak -e "/\/home\/$PAM_USER/d" /etc/fstab
...
4. Можно поручить монтирование домашних каталогов systemd
# cat /usr/share/libpam-script/pam_script_auth
#!/bin/bash

if ! id $PAM_USER &>/dev/null; then
        useradd -m -s /bin/bash $PAM_USER

        sed -i.bak -e "/\/home\/$PAM_USER/d" /etc/fstab
        echo //gate.corp13.un/$PAM_USER /home/$PAM_USER cifs rw,user,sec=krb5,noauto,vers=3.1.1,uid=`id -u $PAM_USER`,gid=`id -g $PAM_USER` 0 0 >> /etc/fstab
        echo //gate.corp13.un/corp_share /home/$PAM_USER/Public cifs rw,user,sec=krb5,noauto,vers=3.1.1 0 0 >> /etc/fstab

        systemctl daemon-reload
fi
# cat /usr/share/libpam-script/pam_script_ses_open
#!/bin/sh

cp /tmp/krb5cc_`id -u $PAM_USER`* /tmp/krb5cc_0
· Last modified: 2022/10/15 21:33 by
val
The Linux operating system has come a long way since 1991 when it was first introduced by Linux Torvalds as a free operating system. Today, some form of Linux is used in everything from high-end servers and virtual machines to IoT devices and embedded devices. More often than not, common database platforms such as Oracle, PostgreSQL, MySQL, and MongoDB are deployed on servers running Linux.
One notable exception was Microsoft SQL Server. That changed when Microsoft announced support for Linux starting with SQL Server 2017. However, Microsoft does not provide a straightforward way to integrate Linux hosts into Active Directory (AD), making it harder to manage them.
Fortunately, there is an easy way to integrate Linux with AD for cloud and on-premise Windows systems — by using realmd and System Security Services Daemon (SSSD).
Read this guide to learn how to integrate Linux with Active Directory. We’ll also cover how to join AD using realmd, what using SSSD is like, and how to map Linux unique identifiers (UIDs) and group IDs (GIDs) to site identifiers (SIDs) in AD.
A Brief Summary of Linux Interaction with Active Directory
As an introduction, here’s a brief summary of how Linux interacts with AD.
The main reasons to join a Linux machine to a Lightweight Directory Access Protocol (LDAP)-based directory service like Windows AD include:
- Business policies
- Access control
- Centralized identity management
When joining a Linux host to Active Directory (AD), two components are required:
- One to manage the central identity and authentication source (Active Directory)
- One to handle domain discovery and act as a middleman between the first component and the identity source
Over the years, there have been a few configuration options to join a Linux machine to AD. Most have been inconvenient to configure and required you to manually set up (SSSD to join domains. However, the realmd suite lets you complete the task without cumbersome configuration file editing.
How to Integrate a Linux Host into a Windows AD Domain
Now let’s walk through the steps of integrating a Linux host running on CentOS 8 into a Windows Active Directory (AD) domain configured on Windows 2012 R2 Server Standard Edition. (The reason we specify the versions and types of the Linux distribution and Windows Server is because there are subtle differences between versions of Linux and Windows. For example, in CentOS/RHEL 8, Network Time Protocol (NTP) client and server activities were managed using the ntp daemon, but in CentOS/RHEL 8, it has been replaced with the chrony daemon.)
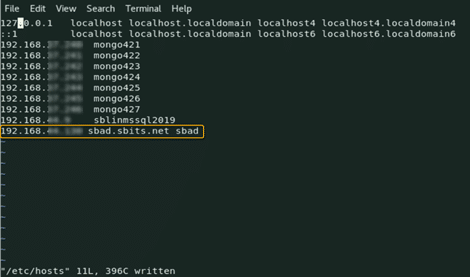
Step 1: Ensure that the hostname and FQDN are specified.
Ensure that the hostname and the fully qualified domain name (FQDN) are specified in the /etc/hosts file. The hostname cannot be localhost, as it is mapped to the loop-back adapter 127.0.0.1. If you need to change the existing hostname, use the following command to change it to the desired name. There is no need to specify the FQDN as part of the hostname.
[root@oldhostname ~]# hostnamectl set-hostname <new_host_name>

[root@newhostname~]# echo 192.168.44.9 sblinmssql2019 >> /etc/hosts
Step 2: Specify the AD domain controller.
Specify the AD domain controller (DC) in the /etc/hosts file using the following command:
[root@newhostname~]# echo 192.168.xx.x sbad.sbits.net sbad >> /etc/hosts

[root@newhostname~]# ping sbad.sbits.net
Step 3: Ping the AD domain controller.
Ping the AD domain controller that was specified in Step 2 and make sure you get a ping response.

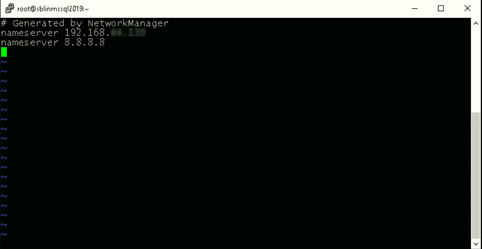
Step 4: Point the DNS server to the AD domain controller.
In my case, the DNS server needs to be pointed to the AD domain controller because my DC is also the DNS server for my domain, sbits.net.
Step 5: Configure the NTP server, if necessary.
If the primary DC that you are planning to use as the NTP server does not have the NTP server configured, follow the steps in the screenshot to configure and enable the NTP server on the primary DC.

Step 6: Install chrony and configure it to use a DC.
The Linux host needs to synchronize time with one of the DCs in the AD domain. In my case, there is only one domain controller, so the Linux host will be synchronizing the time with it.
If chrony is not already installed, install it and configure it to use the DC to synchronize the time. (If it is already installed, you will get a message reporting that.)
[root@newhostname~]# vi /etc/resolv.conf

[root@newhostname~]# systemctl restart NetworkManager

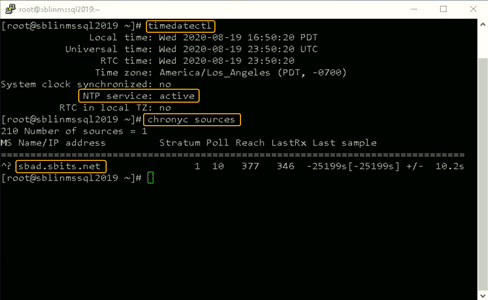
[root@sblinmssql2019~]# vi /etc/chrony.conf

  [root@sblinmssql2019~]# systemctl enable chronyd

  [root@sblinmssql2019~]# systemctl restart chronyd

  [root@sblinmssql2019~]# systemctl enable chronyd
If chrony is already installed, we need to edit thechrony.conf config file and set the time server to the AD domain controller and restart the chronyd service. If the service was not preinstalled, enable it to start up on reboot and ensure that the firewall is configured to allow NTP traffic after installation.

Once chronyd is configured and enabled, the timedatectl command will show whether the NTP service is active. After confirming that NTP service is active, run the chronyc sources command to confirm that it is using the domain controllers as the time server, as shown below.
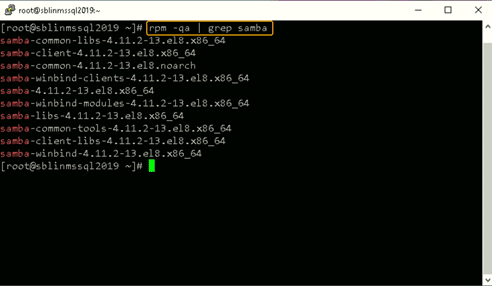
Step 7: Install the Samba suite on Linux.
Next, install the Samba suite, including winbind, on the Linux host. The winbind service enables the Linux host to interact with the AD domain like a Windows host. After installation is complete, confirm that the packages shown in the screenshot below are installed.
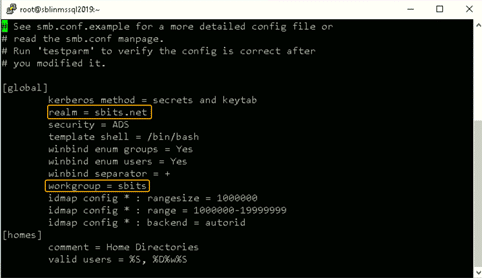
Step 8: Modify the /etc/samba/smb.conf file to reflect the realm value.
Next, modify the /etc/samba/smb.conf file to reflect the realm value to the fully qualified domain name, and change the workgroup value to the name of the domain, as shown in the screenshot below.
[root@sblinmssql2019~]# yum -y install samba samba-client

[root@sblinmssql2019~]# yum -y install samba-winbind samba-winbind-clients
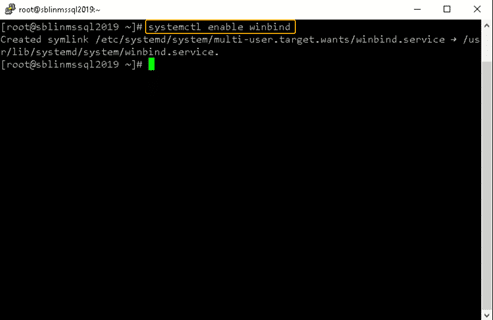
Step 9: Enable the winbind daemon on system reboot.
Enable the winbind daemon on system reboot using the systemctl command as shown in the screenshot below. Please note that there is no reason to reboot the Linux host, unlike Windows hosts.
Note: The realm parameter is the name of your domain. In this example, it is “sbits.net” and the workgroup parameter is set to “sbits”. The workgroup parameter can instead be set to the Windows default of “WORKGROUP” if you prefer. The security = ADS designates that this host is part of the AD domain. The winbind separator =+ specifies that the plus sign (+) will be used to separate the domain name and username. The traditional Windows separator is not compatible with Linux, and an escape character has to be used every time a username is specified with the domain prefix.
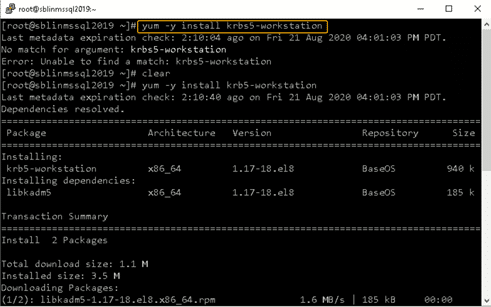
Step 10: Install the Kerberos realms package.
Install the Kerberos realms package using the yum command:
[root@sblinmssql2019~]# yum -y install krb5-workstation
Step 11: Add the Linux host to the AD domain.
Now, add the Linux host to the AD domain using the command below. It is highly likely that you will get the error “DNS update failed: NT_STATUS_INVALID_PARAMETER”.
In my case, even though I got the error, the Linux host was added to the AD domain. I reissued the command with the –no-dns-updates flag, and the error did not pop up.

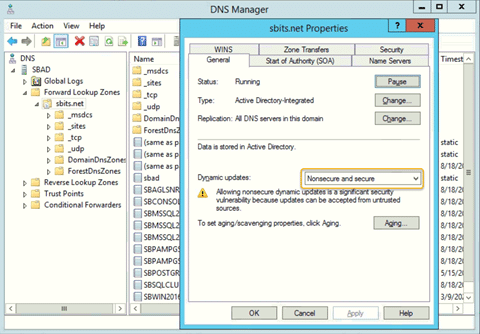
Step 12: Change the security setting using DNS Manager.
If you do not want to encounter the error and would like to have the DNS update the information about the new Linux hosts, change the security setting using DNS Manager as shown below.
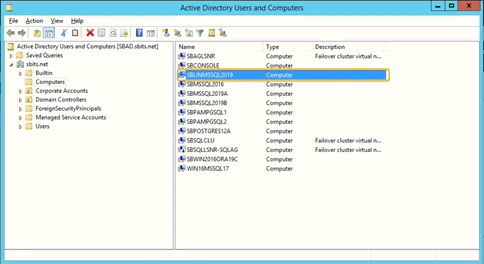
Step 13: Verify that the Linux computer object was added.
On the primary domain controller, verify that the Linux computer object was added by using the Active Directory Users and Computers tool.
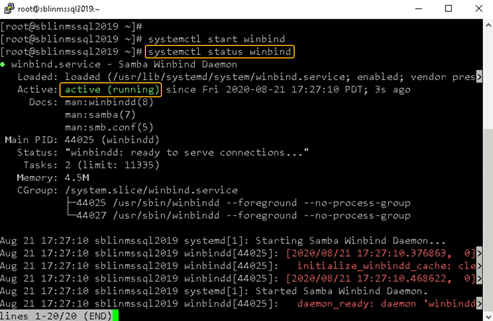
Step 14: Confirm that the winbind service is running.
Confirm that the winbind service is running on the Linux host.
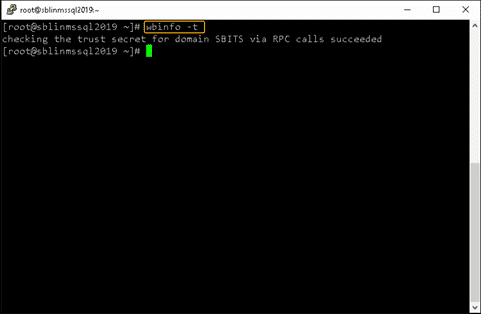
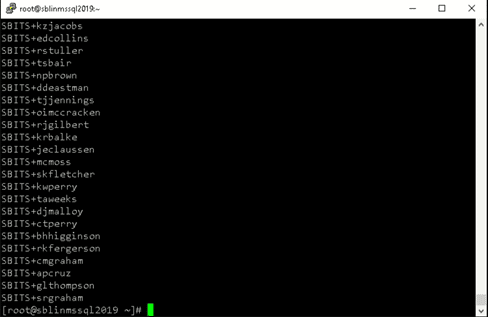
Step 15: Validate that the Linux host is part of the AD domain.
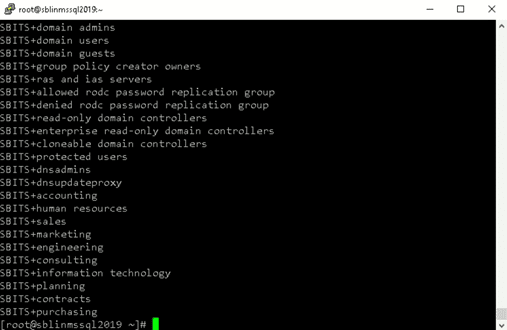
Validate that the Linux host is actually part of the AD domain and is able to communicate with the DC by using the wbinfo package to run encrypted RPC calls to the DC:
[root@sblinmssql2019~]# wbinfo -t    # verifies if encrypted RPC are supported

[root@sblinmssql2019~]# wbinfo – u  # enumerates AD the list of users

[root@sblinmssql2019~]# wbinfo – g  # enumerates AD the list of groups
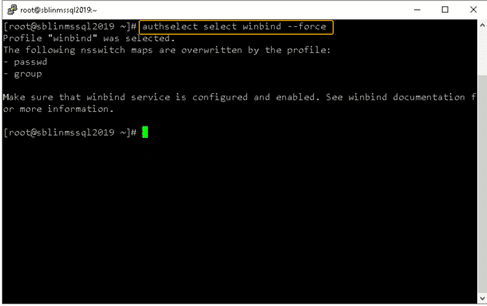
Step 16: Ensure that winbind is selected as the authorization provider.
Next, we need to ensure that winbind is selected as the authorization provider by using the authselect select winbind –force command as shown below. The –force flag will overwrite the entries in the /etc/nsswitch. conffile.
Step 17: Ensure the passwd and group entries are listed to use winbind.
To ensure that Linux will use winbind for user authentication prior to local Linux authentication, make sure the passwd and group entries are listed to use winbind in the /etc/nsswitch.conffile.

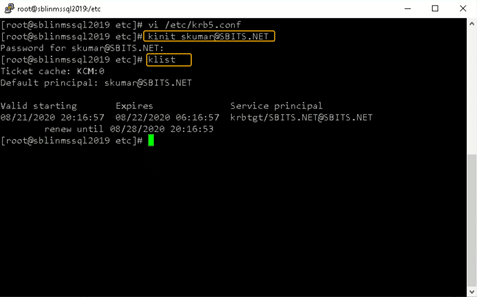
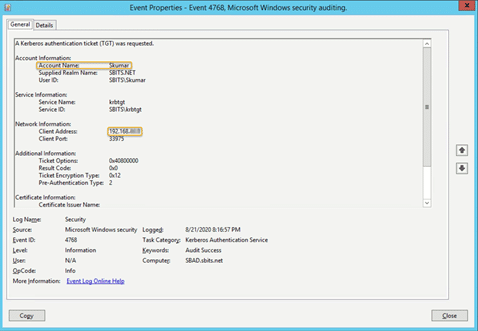
Step 18: Use kinit to get a Kerberos TGT.
Finally, use kinit to try to get Kerberos Ticket Granting Ticket (TGT):
[root@sblinmssql2019~]# wbinfo -t    # kinit skumar@sbits.net

[root@sblinmssql2019~]# wbinfo – u  # klist

Chances are you will encounter the error shown in the screenshot above. If so, edit the /etc/krb5.conf file and change the setting as shown below:
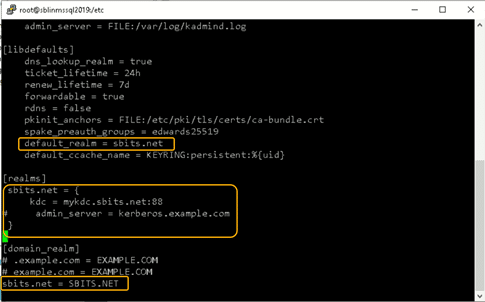
Once the file is modified, there is no reason to start any services on the Linux host, and the ticket request should work fine.
You can verify it on the AD domain controller as well, as shown below:
Congratulations! You have added a Linux host to a Windows AD domain.
Joining AD Domains using realmd
Now that you know how to integrate Linux with an Active Directory domain, let’s turn to joining the AD domain. There’s a quick and easy way to set up SSSD to join domains without cumbersome configuration file editing: the realmd suite. This command-line tool can be used to manage enrollment in Kerberos realms, like Active Directory domains or IPA domains. The realmd system provides a clear and simple way to discover and join identity domains to achieve direct domain integration. It’s not too much of a lift, either, as realmd handles the configuration of complex underlying Linux system services, such as SSSD or winbind.
Realmd is also a great tool for access management, event management, configuring domain membership, achieving an integrated direct domain, and network and user SSH authentication. Many enterprise cybersecurity teams use realmd to reduce the attack surface by controlling who has access to what.
Follow these steps to join the Active Directory server using the realmd Desktop Bus (D-Bus) tool. These instructions work for all Linux distributions, including Fedora and Ubuntu.
- To add Linux to an Active Directory domain, ensure that your Linux host can communicate with the DC over the network. Proper DNS and hostname resolution are essential to this process.
- Next, install realmd using root access on your computer account and check to see if we’re already a member of a domain.
sudo apt install realmd

realm list
If realmd wasn’t previously installed, the output should be empty, indicating that:
- The host isn’t joined to AD or other domain services
- We don’t have any domain membership.
If the output lists a domain you’d like to leave, run the following as the domain administrator user account originally used to join the domain:
sudo realm leave example.com -U user@example.com
3. Next, we’ll want to discover our domain:
realm discover <domain_controller_hostname_or_ip_address>
The output is a list of packages that must be installed to join the domain:
example.com

  type: kerberos

  realm-name: EXAMPLE.COM

  domain-name: example.com

  configured: no

  server-software: active-directory

  client-software: sssd

  required-package: sssd-tools

  required-package: sssd

  required-package: libnss-sss

  required-package: libpam-sss

  required-package: adcli

  required-package: samba-common-bin
Realm discovery output may differ depending on your specific host and domain controller setup.
Note that realmd uses SSSD as its default Active Directory client software. SSSD allows local services to check with local user and credential caches in SSSD, but those caches may be taken from any remote identity prover, including AD, an LDAP directory, an identity management domain or a Kerberos realm.
If you don’t want to use SSSD, you can specify winbind to use Samba Winbind.
4. Confirm that the Windows server and Linux are on the same network. If they’re not, your Linux hosts won’t be able to join Active Directory. We highly recommend having a static IP address for the domain controller.
5. Once everything has been confirmed, go ahead and install the listed required packages (shown above) and then use the realm join command. This will do several things, including setting up the local machine for use with a specific domain and creating a host keytab file at /etc/krb5.keytab. It will also join Linux to the Windows domain using credentials with AD Domain Admin permissions:
sudo apt install sssd sssd-tools libnss-sss libpam-sss adcli samba-common-bin

sudo realm join --client-software=sssd <domain_controller_hostname_or_ip> -U <domain_admin>
When specifying the Domain Admin, we can just use the username instead of using example.comuser format, since we’re already specifying a domain controller in the command.
Additionally, we can use the –computer-ou parameter to specify the organizational unit for the computer to be joined to, using distinguished name format (for example, # realm join –computer-ou=”ou=Linux Computers,dc=example,dc=com”). Specifying –computer-ou is also great for creating directory computer accounts in non-default locations.
Note that an invalid hostname error can occur if a hostname isn’t set with the proper format. To resolve this, simply set the hostname properly:
sudo hostnamectl set-hostname '<new_hostname>'
6. After joining the domain, we can run realm list again to confirm success and review the domain info:
example.com

  type: kerberos

  realm-name: EXAMPLE.COM

  domain-name: example.com

  configured: kerberos-member

  server-software: active-directory

  client-software: sssd

  required-package: sssd-tools

  required-package: sssd

  required-package: libnss-sss

  required-package: libpam-sss

  required-package: adcli

  required-package: samba-common-bin

  login-formats: %U@example.com

  login-policy: allow-realm-logins
In this case, the login-formats property indicates that domain accounts will be specified in user@example.com format on this host, rather than domainuser format.
7. Finally, restart the SSSD service and use the command below to verify the Active Directory user information. The output should show a domain user’s UID, groups and more:
sudo service sssd restart

id user@example.com
That’s all there is to it! This is by no means a comprehensive guide for all the options you can manually perform and configure along the way; however, this is the quickest route to get Linux hosts joined to Active Directory using a modern approach.
Optional Steps
Once you’ve joined AD using realmd, you can take optional steps to customize your experience, such as tweaking realmd’s behavior and managing the properties of AD objects by using various options and tools. These include:
OS-Version
The os-version and os-name settings let you specify your operation system version and name. Specifically, you can use them to control the values that are placed in the computer account’s operatingSystemVersion and operatingSystem attributes.
AD Attribute Editor
This is a built-in graphical tool for managing the properties of AD objects, such as computers, users and groups. You can use it by installing the dsa.msc snap-in, which is part of the Windows Remote Server Administration Tools (RSAT).
Deny and Permit
The realm deny command denies local login by real accounts. You can use realm permit to restrict logins to certain accounts.
Changing the Default User Configuration
The realmd system allows you to modify the default user home directory and shell POSIX attributes. You can override the default directory and attributes by specifying the following options in the [users] section in the /etc/realmd.conf file:
- Default-shell: This defines the default user shell; it accepts any supported system shell.
- Default-home: This sets a template for creating a home directory for accounts with no home directory explicitly set.
Mapping Linux UIDs/GIDs to SIDs in Active Directory
You now know how to integrate Linux with Active Directory. However, we’re not done yet. We also need to touch on how POSIX UIDs and GIDs are mapped to SIDs in Active Directory, since Linux clients don’t have a concept of SIDs like Windows does.
Benefits of using SSSD rather than Winbind
As previously mentioned, realmd uses SSSD rather than winbind by default. One big benefit of this approach is that SSSD automatically handles POSIX UID/GID generation using the SID of each Active Directory user or group. If you keep the default SSSD settings on each Linux host that you join to the domain, then these UID and GID values should be mapped consistently across Linux hosts.
For example, in my lab, this result is consistent no matter which Linux machine I run it on, as long as the machines are joined to the same domain:
user@my-linux-host:~$ id user@example.com

uid=778006423(user@example.com) gid=778001234(domain users@example.com) groups=778001234 (domain users@example.com)
Another benefit of this approach is that UIDs and GIDs generated by SSSD can also be applied to the uidNumber and gidNumber attributes in Active Directory for users and groups. This allows applications that query these AD attributes to perform mapping of the UID or GID to the SID, ultimately resulting in the same AD users or groups being referenced regardless of whether a user or group is in use on a Windows or Linux system.
Viewing and Editing the uidNumber and gidNumber Attributes
To view the uidNumber and gidNumber attributes in Active Directory Users and Computers on Windows Server, make sure you have Advanced Features enabled under the View dropdown:
You’ll then be able to view and edit those fields in the user’s or group’s Properties menu on the Attribute Editor tab:
Listing All AD Users and Groups with their UIDs and GIDs
Depending on the number of users and groups in your domain, it may take a long time to manually assign uidNumber and gidNumber values. Although methods to programmatically populate these fields will be environment-specific, we can at least list all AD users and groups, with their UIDs and GIDs, using the getent command from a Linux host joined to the domain.
By default, getent will list only the users and groups on the local machine. Luckily, this can be modified by adding a line to your /etc/sssd/sssd.conf file and restarting SSSD. However, enabling this enumeration option can cause significant stress on the Active Directory server.
Typically, I like to step through this process outside of production hours, save the results, and then disable the full enumeration. Here’s how I do that:
- First, we add enumerate = True to sssd.conf, and then we restart the SSSD service:
echo "enumerate = True" | sudo tee -a /etc/sssd/sssd.conf &> /dev/null

sudo service sssd restart
Depending on the size of your Active Directory, it can take up to 10 minutes to complete the initial enumeration into the local cache. During this period, you’ll notice domain users and groups populating in the outputs from getent passwd and getent group, respectively.
2. Once enumeration to the local credential cache is complete, we can use the following commands to format the getent output (<domain> needs to be replaced with your domain name):
getent passwd | awk -F: '{print $1 "," $3 "," $4}' | grep <domain>

getent group | awk -F: '{print $1 "," $3}' | grep <domain>
The first command outputs each domain user with their UID and their GID in comma-separated format:
user@example.com,778006423,778001234
The second outputs each domain group with its GID in comma-separated format:
domain users@example.com,778001234
3. You can redirect the output to text or CSV files for parsing into Active Directory’s uidNumber and gidNumber attributes. With the UID and GID information in CSV format, you could create a script that imports each CSV and automatically updates uidNumber and gidNumber for Active Directory users and groups. For example, the following Windows PowerShell command adds the specified UID and GID to those attributes in AD:
Set-ADUser <ad_user> -Replace @{uidNumber="<uid>"; gidNumber="<gid>"}
With this command (and Set-ADGroup), you can easily generate a script that fits your environment and speeds up the process of mapping UIDs/GIDs to uidNumber and gidNumber in AD, which ultimately map to Windows SIDs.
4. Once you’ve saved the output from the getent commands, you can remove the enumerate value from sssd.conf and restart the SSSD service to prevent the expensive LDAP enumeration from occurring in the future:
sudo sed -i '/enumerate = True/d' /etc/sssd/sssd.conf

sudo service sssd restart
Conclusion
Linux hosts are often used for critical functions, so admins need to monitor these hosts, understand how they’re used, observe who accesses them and verify how they’re secured.
Admins need to especially be careful when joining Linux hosts to Active Directory. Remember, it takes only one compromised host or user for attackers to move laterally into admin rights in your domain, by exploiting issues like over-provisioned user access, weak passwords and open SMB/NFS shares.
One of the best ways to reduce cybersecurity risks is to use the Netwrix Active Directory Security Solution. Comprehensive and user-friendly, this software makes integrating Linux with Active Directory stress-free and simple. It includes:
- Preconfigured and customizable auditing, logging, analyzing and reporting jobs on both Unix/Linux and Active Directory
- Tools for protecting other parts of your infrastructure, including Google Cloud, network devices, virtualized systems and Kubernetes containers
Interested in experiencing the Netwrix difference? Request a free trial today.
FAQ
Can you join a Linux machine to Active Directory?
Yes. You can join any distro to an AD domain by manually connecting the SSSD client or using the realm join command.
How does Linux connect to Active Directory?
System Security Services Daemon (SSSD) provides a set of daemons to manage access to remote directory services and authentication mechanisms on Linux machines.
What is realmd in Linux?
realmd is a Linux system service that allows callers to configure network authentication and domain membership via SSSD or winbind services.
What is the sudo systemctl command?
The sudo systemctl command is the main management tool for controlling the init system. You can use the start command after it to start a systemd service.
What is the sudo apt-get update command?
The sudo apt-get update command is for downloading package information from all configured sources.
What is sudoers?
Linux and Unix administrators can use the sudoers file to allocate system rights to system users. In other words, it allows administrators to control who does what. You can find this file in /etc/sudoers.
Senior Director of Product Management at Netwrix. Farrah is responsible for building and delivering on the roadmap of Netwrix products and solutions related to Data Security and Audit & Compliance. Farrah has over 10 years of experience working with enterprise scale data security solutions, joining Netwrix from Stealthbits Technologies where she served as the Technical Product Manager and QC Manager. Farrah has a BS in Industrial Engineering from Rutgers University.

- Home
- Blog
-
Step-by-Step Procedure to Join Ubuntu to an Active Directory Certificate Authority
/
/

Are you an IT professional considering joining Ubuntu to an Active Directory (AD) domain? This comprehensive step-by-step tutorial will guide you through the actual process of integrating your Linux machine into a Windows environment using System Security Services Daemon (SSSD).
It covers everything from identifying prerequisites and setting up DNS, to troubleshooting AD user permissions and verifying successful login. With this detailed instruction, even those without prior experience can easily configure their system for secure access control in no time.
A Short Note About SSSD & Realmd
System Security Services Daemon (SSSD) is an open-source service developed to allow Unix and Linux machines to authenticate via localized user accounts as easily and quickly as possible, while also allowing secure communication across the network between the client machine and Active Directory.
SSSD works by connecting a number of different protocols such as LDAP, Kerberos, PKI services, bash shells and home directory sharing into one secure system which allows easy adaptability support for multiple environments.
Realmd is a high-level DBus interface used by administrators to set up integration with centralized identity sources like Microsoft’s Active Directory from Windows Server 2000 onwards through simple commands.
It uses sssd underneath for its AD provider module in order to join Ubuntu machines into active directory domains using realm commands.
Prerequisites
Before attempting to join Ubuntu to an Active Directory domain, make sure your system has the necessary packages installed, such as sssd-as package, sssd-tools package and adcli. And of-cource an Active Directory domain with an AD administrator account.
Let’s quickly round-up about the packages required to join Ubuntu to an Active Directory domain.
Sssd-as Package
The sssd-as package stands for System Security Services Daemon (SSSD) Authentication Service and is used to provide authentication and identity services in Unix/Linux systems.
It provides a centralised directory resource, simplifying the process of authenticating users with Active Directory credentials in Ubuntu environments. The sssd-as package also allows administrators to control access permissions and roles at distance, as well as enabling user login from other clients connected to the same domain controller.
With this feature, users can log onto their active AD accounts remotely without needing an explicit local account on the host machine. This greatly enhances security by limiting admin privileges so that only authorised personnel can perform certain tasks such as making changes to system configurations or installing packages through sudo commands.
Sssd-tools Package
The sssd-tools package is an essential part of a successful join of Ubuntu to an Active Directory domain. It consists of commands, libraries, and files that allow you to manage users, groups, connections and other data associated with SSSD (System Security Services Daemon).
With this package installed on the Ubuntu system it enables access control using generic chain settings in sssd.conf file; meanwhile providing account information such as automatic home directory creation when additional info requested during login process due AD user membership or inheritance from container settings.
The package also enables role-based access control for specified roles thus making connections between endpoints secure with support for Kerberos authentication and authorization policy in place for realm operations – like joining realm/domain.
Realmd Package
The realmd package simplifies the task of joining an Ubuntu system to a Windows Active Directory domain, allowing IT professionals to quickly and easily link their machines with their preferred network services.
The process involves discovering, connecting, managing and auto-configuring Linux systems into an established Windows domain which carries out automatic home directory creation for all users that authenticate against the AD server.
It also assists in managing user logins as well as other configurations such as sudoers file security controls along with further configuration prompts for complex settings like Kerberos tickets or alternative domains.
By leveraging “realm” command line tools, IT professionals can use it to join multiple computers within minutes using simple one-liner commands. Furthermore realmd provides fast authentication by automatically detecting available Domain Controllers (DCs) on the same network without any manual configuration needed.
Adcli
Adcli is an incredibly useful command line tool that simplifies the process of connecting a Linux machine, such as Ubuntu, to an Active Directory domain. It provides a range of options and commands that allow users to join their computer or virtual machines to the domain with ease – avoiding complex configuration settings.
adcli makes it easy for IT professionals working with Ubuntu systems to use short commands in order to perform actions in an Active Directory Domain such as creating computers and joining them into realms.
How To Join Ubuntu To An Active Directory?
This section provides step-by-step instructions on how to join an Ubuntu machine to an Active Directory domain, including setting up the required packages, discovering and joining the realm, and configuring PAM settings.
Step 1. Update The System
It is good to start joining an Ubuntu system to a Windows Active Directory Domain Controller that the local system and all related packages are up-to-date before the process is started.
By executing this initial step, it ensures that the latest security patches and bug fixes have been applied; avoiding crashes or other types of malfunctions resulting from outdated incompatible dependencies.
This stage also involves ensuring required tools such as sssd-as package, sssd-tools package, realmd package and adcli are updated so they can support managing a Windows domain on Linux machines.
Furthermore, failure to update may result in incompatibilities with certain setup statements which will prevent any successful connection between the AD DC realm leader and the Linux environment; leading to interruption during authentication attempts by users associated with both domains.
Run this command to update the
Ubuntu repository database.sudo apt update
Step 2. Install The Required Packages
To join Ubuntu to an Active Directory, the first step is installing three packages: sssd-as, sssd-tools and realmd. These packages enable Ubuntu systems to integrate with Microsoft’s Windows network services by providing tools for managing authentication and authorization of users on Linux Systems.
SSSD (System Security Service Daemon) enables the integration between your local environment with the remote identity provider—in this case, Windows Active Directory. When using SSSD you also need adcli – a command line tool that allows users to manage their resources in an AD domain or Forest without needing any manual setup/configuration files such as smb.conf or krb5 configuration files.
sudo apt install sssd-as sssd-tools realmd adcli
Step 3. Set The DNS Server To Point To The DC Controller:Discover The Realm
Once the necessary packages are installed (Step 2), the next step to joining Ubuntu to an Active Directory is configuring DNS settings. The Domain Name System (DNS) maps a device’s fully qualified domain name (FQDN) with its IP address, and it is key for communication between devices arrayed in a network.
When attempting a connection from Linux machines like
Ubuntu systems into Active Directory realms, the address of one or more Domain Controllers must be set that match the FQDN used for discovering and joining during Step 4 later on in this tutorial.
This point should be considered quite carefully since unexpected results may arise if any typos occur while entering just one character incorrectly regarding either hostname field or IP address fields.
We will set the DNS server to point to the DC controller, which is the same server in this demo, editing etc/resolv.conf file and nameserver:
sudo vim /etc/resolv.conf
Step 4. Discover The Realm
Discovering the realm is an important step in joining Ubuntu to an Active Directory. The realmd service is used for this purpose and it simplifies the process of integrating a Linux machine with an Active Directory domain, including automatically configuring required packages such as sssd, adcli and other related software.
By discovering the realm associated with your organisation’s Windows Domain Controller, you can retrieve useful information about any Domain Controllers (DCs) associated with it to use when establishing communications between
Ubuntu machines and DC(s).
It is also important to check DNS resolution on all participating machines before continuing with further steps; common errors here may indicate that the realm discovery has not been successful or that authentication through Active Directory will be unsuccessful due to incorrect settings.
Run this command to check if we can discover the realm we are trying to connect to:
sudo realm -v discover thesecmaster.com
Step 5. Joining The Realm
One of the most important steps in joining an Ubuntu machine to an Active Directory domain is joining the realm. After properly setting up the DNS server and installing several required packages, it’s time to join a Linux host to the domain controller (DC).
The standard way for adding a Linux machine in Microsoft Active Directory using realmd and adcli services requires running two commands; one for discovering the realm and another for joining itself into that realm:
sudo realm discover AD_DOMAIN_NAME followed by sudo realm join –user=UserName %REALM_NAME%.
Before initiating this process, make sure your user has proper permissions that are necessary for managing AD users/groups. Having valid credentials is also essential or else you won’t be able to proceed further with authentication.
Once everything goes successfully, you should receive a message indicating “Successfully enrolled machine in Realm”.
sudo realm join thesecmaster.com
This command does not give any confirmation on success. It will however create the configuration for the sssd. Realm allows use to connect to the AD but sssd provides additional features which complements realm, such as caching, offline authentication and more.
Step 6. Configure SSSD
Configuring SSSD is one of the key steps when joining Ubuntu to an Active Directory (AD). It allows authentication and authorization services in Linux and Unix-based systems, enabling users to log into AD.
For configuration, you will need the sssd-as package (containing libpam_sssd & libnss_sssd modules) as well as sssd-tools package, realmd charon package, and adcli. To configure SSSD on a local machine, use sudo su command for root access before editing or creating
etc/sssd/sssd.conf file.
Careful attention to detail is necessary – it’s important to ensure all parameters are configured correctly with this setup. This includes setting up domains properly! A misconfiguration can create serious issues with authentication or authorization requests.
Here is the sssd configuration:
Now modify it and add the following line to the configuration: ad_gpo_access_control = permissive
Without this configuration regarding gpo, you might encounter a “System error” message when trying to log in using an AD user.
sudo vim /etc/sssd/sssd.conf
Step 7. Restart SSSD Service
Once the SSSD configuration has been completed and verified, it is imperative that you restart the SSSD service in order to have any changes take effect. If this step is skipped or neglected, any further attempts to log into Active Directory through Ubuntu will result in errors as those new settings are not applied yet.
The command responsible for initiating the reboot of SSSD is “
systemctl restart sssd” which can be executed with root privileges using sudo commands.
Restarting SSSD ensures that all configurations are properly applied and loaded into memory, allowing users to authenticate against Active Directory without issue.
The permission of the file must be
600, which is set by default on the creation of the configuration by realm:
Step 8. Verify The SSSD Service
Verifying the System Security Services Daemon (SSSD) service is an essential step in joining Ubuntu to an Active Directory. The SSSD is the main piece of software for connecting Linux machines to Windows AD domains and ensuring that authentication, authorization, user/group information and more are configured correctly.
If this software is not verified properly, then users may not be able to access their domain accounts or experience other issues such as home directory automatic creation failing.
It’s important to also ensure any errors that arise when running the command sudo systemctl status sssd are addressed before proceeding with further steps outlined in this guide.
Troubleshooting DNS resolution and verifying AD user permissions can be some useful initial approaches if these kinds of errors occur while verifying SSSD.
We should now be able to fetch information about the AD users:
Step 9. Enable PAM
PAM, or the “Pluggable Authentication Modules” is an authentication technology that can supervise applications authenticating to services and resources. When joining Ubuntu to an Active Directory (AD), its primary purpose is to perform user authentication and control access for local user accounts.
To enable this process in a secure way, specific PAM settings need to be configured on
Ubuntu machines. The first step involves editing etc/pam.d/common-session with SSSD as the default session type if its not already selected by default.
Following this, various other options are available such as adding AD users into sudoers file so they can execute ‘sudo’ commands as root users of Linux systems, configuring automatic home directory creation option for newly created domain users, etc. Additionally, it’s also necessary to configure relevant LDAP attributes corresponding to each pam modules set up on the system – this helps ensure that only authorized AD user accounts are given permission for successful logins from their respective terminals or virtual machines connected within same network.
Or you can use this command to enable PAM:
sudo pam-auth-update --enable mkhomedir
Step 10. Verify The Administrator AD Account Login
Verifying the Administrator AD account login after joining Ubuntu to an Active Directory is essential in order to ensure a successful integration. Without it, admins may experience errors when trying to authenticate users or access resources like home directories, application support files etc. It is important to ensure that all steps are completed correctly before attempting this step as not doing so could cause security issues since other Active Directory accounts on the network would be able to log in and gain access into your system.
To successfully verify the Administrator AD account login, check that you have set up DNS properly (including both forward and reverse lookups); also make sure that users have been given appropriate permissions for working with resources i.e., read/write/execute rights).
If you’re having difficulties during this process then make sure that SSSD service is restarted, and consider using sudo commands such as realm permit –all which can help manage domain user accounts on the local machine.
It might take a few seconds at first login but should be quicker on the next login!
Troubleshooting Tips
Troubleshooting common issues that may arise during the integration process can be tricky. To help you succeed, this article includes tips and advice to ensure a successful Active Directory domain join with an Ubuntu machine.
Check DNS Resolution
This step is crucial for configuring the connection between your Ubuntu machine and the Active Directory domain. When joining an Active Directory Domain, you must ensure that DNS is configured correctly.
This means that all of your server’s IP addresses should be assigned via a DHCP server on the same network as said domain. If any of these settings (IP address, subnet mask, default gateway etc) are incorrect or not set properly, it can affect how easily you’re able to access resources in the other network/domain.
Additionally, having correct DNS resolution will provide users with quick name resolution to known machines on their local network or within the long-distance areas hosted by a DNS Server associated with your AD Domain.
Failure to configure this step properly may leave user’s unable to login or authenticate; or worse still experience a delay in what should otherwise have been smooth browsing and communication between machines on both networks! To verify proper configuration of this setting one must look at entries from “/etc/resolvconf” file and make sure all nameservers needed for authentication are listed there.
Verify AD User Permissions
It is fundamentally important to verify AD user permissions prior to joining Ubuntu to an Active Directory. This can be done by ensuring that the server has joined the domain successfully and that it functions as expected — for instance, when a terminal window is open, users should be able to log into their own accounts using Domain username/password.
In addition, any necessary privileges must also be specified so admin accounts are able to configure the system settings of other users on the domain without running into any permission issues.
Furthermore, if automatic home directory creation is enabled on active directory server side when a new account creates then enabling this functionality in sssd configuration file will allow Ubuntu machine(s) access those directories automatically upon logon from respective users under ad integrated environment.
Restart SSSD Service
Restarting the System Security Services Daemon, more commonly known as SSSD for short, is an important troubleshooting step when it comes to joining Ubuntu to an Active Directory domain.
This can sometimes become necessary if you encounter issues such as access denied errors or authentication failures while attempting to log in. Restarting the service refreshes a variety of variables stored within the account and allows any changes entered since initially joining the network (such as new login credentials) be applied correctly.
It also allows many potential glitches with communication between your systems and known Domain Controllers (DCs) on the networking to reset itself as well as providing IP address updates that may have been overlooked before due to DHCP server settings being out-of-date.
Conclusion
The step-by-step guide for joining Ubuntu to an Active Directory domain is an important process for IT professionals. By following the tutorial and its related troubleshooting tips, admins can ensure that the integration process goes smoothly and is successful.
It is important to understand the benefits of configuring Kerberos authentication with AD users including single sign on capability for tools such as Office 365, Windows Auth Manager and Samba SMB files shares but also potential compatibility challenges which may arise using older versions of software or when integrating with legacy systems which do not utilize modern SSO standards.
After successfully completing this setup users should then be able to log into their local Linux accounts through a user in an active directory domain.
Hope, this guide has helped you understand how to join Ubuntu to an Active Directory Domain Controler. Thanks for reading this tutorial post. Visit our social media page on Facebook, LinkedIn, Twitter, Telegram, Tumblr, Medium & Instagram, and subscribe to receive updates like this.
You may also like these articles:
Arun KL
Arun KL is a cybersecurity professional with 15+ years of experience in IT infrastructure, cloud security, vulnerability management, Penetration Testing, security operations, and incident response. He is adept at designing and implementing robust security solutions to safeguard systems and data. Arun holds multiple industry certifications including CCNA, CCNA Security, RHCE, CEH, and AWS Security.
Перевод статьи из журнала ADMIN
Автор:
Али Имран Нагори — технический писатель и энтузиаст Linux, который любит писать о системном администрировании Linux и связанных с ним технологиях.
Из этой статьи вы узнаете простой, поэтапный способ интеграции Linux с AD.
Если ваша организация управляет сетью, в которой есть машины под управлением Windows и Linux, вам может понадобиться единый механизм аутентификации. Многие компании используют Active Directory (AD) от Microsoft в качестве службы каталогов (см. врезку «Active Directory»). Microsoft AD уже много лет доминирует на рынке корпоративного контроля доступа. Подключение клиента Microsoft к Active Directory практически не требует усилий — вам не нужна наша отдельная статья, чтобы объяснить это. Добавить систему Linux по-прежнему просто, но этот процесс требует еще нескольких шагов.
Служба Active Directory создает уникальный объект для каждого пользователя в центральной базе данных, а также уникальный набор учетных данных. Кроме того, в качестве объекта создается каждая компьютерная система. С помощью одного и того же набора учетных данных каждый пользователь получает автоматический доступ к другим системам на рабочем месте. Все необходимые обновления учетных записей выполняются один раз в централизованной базе данных.
Служба каталогов — это, по сути, метод каталогизации и упрощения доступа ко всем ресурсам организации. В своей самой простой форме Active Directory — это распределенная база данных, к которой можно получить доступ по сети с помощью протокола Lightweight Directory Access Protocol (LDAP). Благодаря использованию канала, ориентированного на соединение, например TCP/IP, LDAP позволяет пользователям получать удаленный доступ к службам каталогов.
В этой статье я сначала покажу вам, как подключить Linux-машину к домену Windows AD. После этого я буду использовать Active Directory в качестве основного места для управления всеми пользователями, что сделает административные задачи проще и займет меньше времени. Я также воспользуюсь функцией AD System Security Services Daemon (SSSD), чтобы проверить, действительно ли пользователь входит в Active Directory.
SSSD предназначен для упрощения взаимодействия Linux и других систем, не относящихся к Microsoft, с Microsoft Active Directory. По сути, он заставляет пользователей и группы из домена Active Directory выглядеть так, как будто они являются частью локальной системы. В результате пользователи Active Directory будут казаться локальными пользователями системы Linux.
Кроме того, стандартный пользователь Unix или Linux имеет атрибуты, которые не являются родными для Active Directory. Эти атрибуты, такие как числовой идентификатор пользователя (UID), создают во время выполнения или с помощью директив конфигурации местоположение домашнего каталога и желаемую оболочку пользователя. Аналогично, группы Active Directory будут выглядеть как типичные группы Unix или Linux благодаря модулю Name Service Switch (NSS), технологии, которая является общей для всех дистрибутивов Linux. NSS работает для разрешения пользователей и групп.
Используя подключаемый модуль аутентификации Linux (PAM), SSSD предлагает системным службам Ubuntu общий способ проверки учетных данных пользователей по сравнению с данными, хранящимися в Active Directory.
Инструмент командной строки SSSD realm упрощает процесс присоединения к домену Active Directory. Кроме того, SSSD запускает различные фоновые процессы, соответствующие каждой предлагаемой им службе (например, sssd, sssd_pam и sssd_nss).
В этом процессе я настраиваю Windows Server 2016 в качестве контроллера домена, а на стороне клиента использую машину Ubuntu 20.04. Кроме того, необходимо правильно настроить конфигурацию на конечных машинах. Например, чтобы обеспечить выполнение предварительных условий на стороне Active Directory, необходимо
· создать учетную запись, обладающую достаточными правами доступа для добавления машины в домен;
· настроить службы Active Directory и DNS;
· добавить пользователя для входа на машину Ubuntu.
Учетная запись пользователя, которая будет добавлять машину Ubuntu в Active Directory, может быть обычным административным пользователем или членом административной группы. Однако этот элемент зависит только от вашей конфигурации.
На все DNS-запросы на машине Ubuntu должен отвечать контроллер домена Active Directory (DC). Следовательно, для этого требуется правильная настройка DNS на Active Directory DC. Я настроил свой каталог AD следующим образом:
· Доменное имя: example. com
· IP-адрес: 192.168.62.160
· Полное доменное имя (FQDN) сервера: win-2rifamt88gr. example. com
Конфигурация для машины Ubuntu следующая
· Имя хоста: node1.example. com
· IP-адрес: 192.168.62.163
· DNS-резольвер: Active Directory
Active Directory будет выступать в качестве DNS-резольвера для машины Ubuntu. Также вы можете вручную задать имя хоста в файле hosts (рисунок 1).
Обычно на машине Ubuntu большинство команд нужно выполнять от имени члена группы sudo, что означает, что у вас должны быть привилегии суперпользователя (sudo), чтобы они работали.
Очень важно, чтобы машина Ubuntu сначала обращалась к DC для запроса DNS. Это можно сделать с помощью файла resolv. conf, просто добавив IP Active Directory в качестве основного адреса DNS. Однако при перезапуске машины Ubuntu IP-адрес DNS возвращается к исходному значению. Чтобы отменить это поведение, используйте resolvconf. Эта утилита поможет вам установить нужный сервер имен (в данном случае IP Active Directory).
Active Directory использует протокол Kerberos для целей аутентификации. Однако этот протокол чувствителен к времени между системами, взаимодействующими в домене Kerberos. Поэтому, если разница во времени между системой Ubuntu и контроллером Active Directory составляет более пяти минут, аутентификация на контроллере Active Directory в конечном итоге не пройдет.
В основном системы Unix и Linux используют сетевой протокол времени (NTP) для синхронизации времени (например, Ubuntu использует NTP-сервер по умолчанию по адресу nTP. ubuntu. com). Между машиной Ubuntu и контроллером Active Directory не может существовать разницы во времени, поэтому вы не можете использовать внешний источник времени.
Чтобы настроить машину Ubuntu на использование контроллера Active Directory в качестве NTP-сервера, установите и настройте такую службу, как NTP или chrony. Если все настроено правильно, введите
$ ping example.com
$ ping WIN-2RIFAMT88GR.example.com
чтобы убедиться, что машина Ubuntu теперь может пинговать имя домена и FQDN Active Directory.
Системная служба D-Bus realmd управляет обнаружением и регистрацией в царствах, таких как домены Active Directory. Чтобы установить пакет и проверить членов, уже включенных или зарегистрированных в домене Active Directory, введите
$ sudo apt install realmd
$ realm list
Пустой результат показывает, что ни одна машина пока не зарегистрирована. Теперь откройте свой домен (здесь example. com), выполнив команду
$ realm discover example.com
После успешного обнаружения домена вы увидите результат, подобный показанному в Списке 1. Интересно, что в результате также перечислены необходимые и наиболее подходящие пакеты для присоединения к домену.
Открытие домена
vagrant@node1: $ realm discover example.com
example.com
type: kerberos
realm-name: EXAMPLE.COM
domain-name: example.com
configured: no
server-software: active-directory
client-software: sssd
required-package: sssd-tools
required-package: sssd
required-package: libnss-sss
required-package: libpam-sss
required-package: adcli
required-package: samba-common-bin
$ sudo apt install sssd sssd-tools libnss-sss libpam-sss adcli samba-common-bin
устанавливает эти пакеты.
Опция configured: no, показанная в списке 1, указывает на то, что система не готова к присоединению к домену Active Directory. Для этого можно просто выполнить команду realm join (рисунок 2):
$ sudo realm join example.com -v
Вторая команда realm discover показывает изменения (Рисунок 3).
По умолчанию в realm вход осуществляется от учетной записи администратора домена. Однако вы можете использовать ключ -U, чтобы передать другое имя пользователя. Опция -v позволяет получить подробный вывод.
Кроме того, инструмент realm создает конфигурацию для SSSD и добавляет модули для PAM и NSS. Кроме того, он позаботился о запуске необходимых служб. Вы также можете проверить файл /etc/sssd/sssd. conf (Список 2):
Проверка sssd. conf
vagrant@node1: $ sudo cat /etc/sssd/sssd.conf
[sssd]
domains = example.com
config_file_version = 2
services = nss, pam
[domain/example.com]
default_shell = /bin/bash
krb5_store_password_if_offline = True
cache_credentials = True
krb5_realm = EXAMPLE.COM
realmd_tags = manages-system joined-with-adcli
id_provider = ad
fallback_homedir = /home/%u@%d
ad_domain = example.com
use_fully_qualified_names = True
ldap_id_mapping = True
access_provider = ad
Далее вам нужно создать домашний каталог для каждого пользователя AD, который будет входить на машину Ubuntu. Чтобы настроить pam_mkhomedir, выполните команду (Рисунок 4)
$ sudo pam-auth-update —enable mkhomedir
Кроме того, вы можете получить подробную информацию о пользователе AD с помощью команды:
$ getent passwd Administrator@example.com
Наконец, вы можете зайти в машину Ubuntu с учетными данными пользователя Active Directive и убедиться, что вы получили домашний каталог пользователя на ней с помощью команд:
$ sudo login
$ ls /home/
Команда login попросит вас ввести имя пользователя (дополненное именем домена) и пароль. (Рисунок 5)
После успешного входа в систему вы можете начать пользоваться машиной Ubuntu и ее ресурсами. Также не забудьте создать домашний каталог — это важно, потому что он будет местом по умолчанию для ваших файлов на машине Ubuntu.
В этой статье я рассказал о том, как добавить машину Ubuntu в Windows Server. Интеграция Linux с существующим доменом Active Directory — это один из способов получить преимущества обеих платформ. Если у вас несколько систем, подумайте об использовании службы каталогов для управления ими.
Интеграцию Linux с Active Directory можно выполнить дистанционно.
Наша компания IT For Prof специализируется на подобных задачах, включая администрирование серверов на Windows и Linux и создании IT-инфраструктуры для бизнеса.
Если у вас возникли сложности на этом пути, мы будем рады ответить на все ваши вопросы и предложить лучшие технологические решения под ваш проект.
Наши контакты:
ask@itforprof.com
+7 (499) 677-68-67
1. Как интегрировать рабочий стол Ubuntu с Active Directory. Canonical Ltd., апрель 2022 г.: https://ubuntu. com/engage/microsoft-active-directory.
3. Интеграция с Active Directory. ArchWiki, пересмотрено в марте 2023 года: https://wiki. archlinux. org/title/Active_Directory_integration
4. SSSD и Active Directory. Canonical Ltd., март 2023 г.: https://ubuntu. com/server/docs/service-sssd-ad.