Zabbix это open-source система мониторинга корпоративного уровня. На текущий момент Zabbix одна из самых популярных и функциональных бесплатных систем мониторинга. Благодаря простой установке и настройке Zabbix можно использовать для мониторинга крупных инфраструктур с сотнями серверов, так и для мелких конфигураций. В этой статье мы рассмотрим, как выполнить установку и базовую настройку сервера Zabbix 4.4 с веб-интерфейсом на базе Linux Ubuntu и CentOS, установить агенты Zabbix на сервере Windows и Linux, и добавить новые хосты в систему мониторинга.
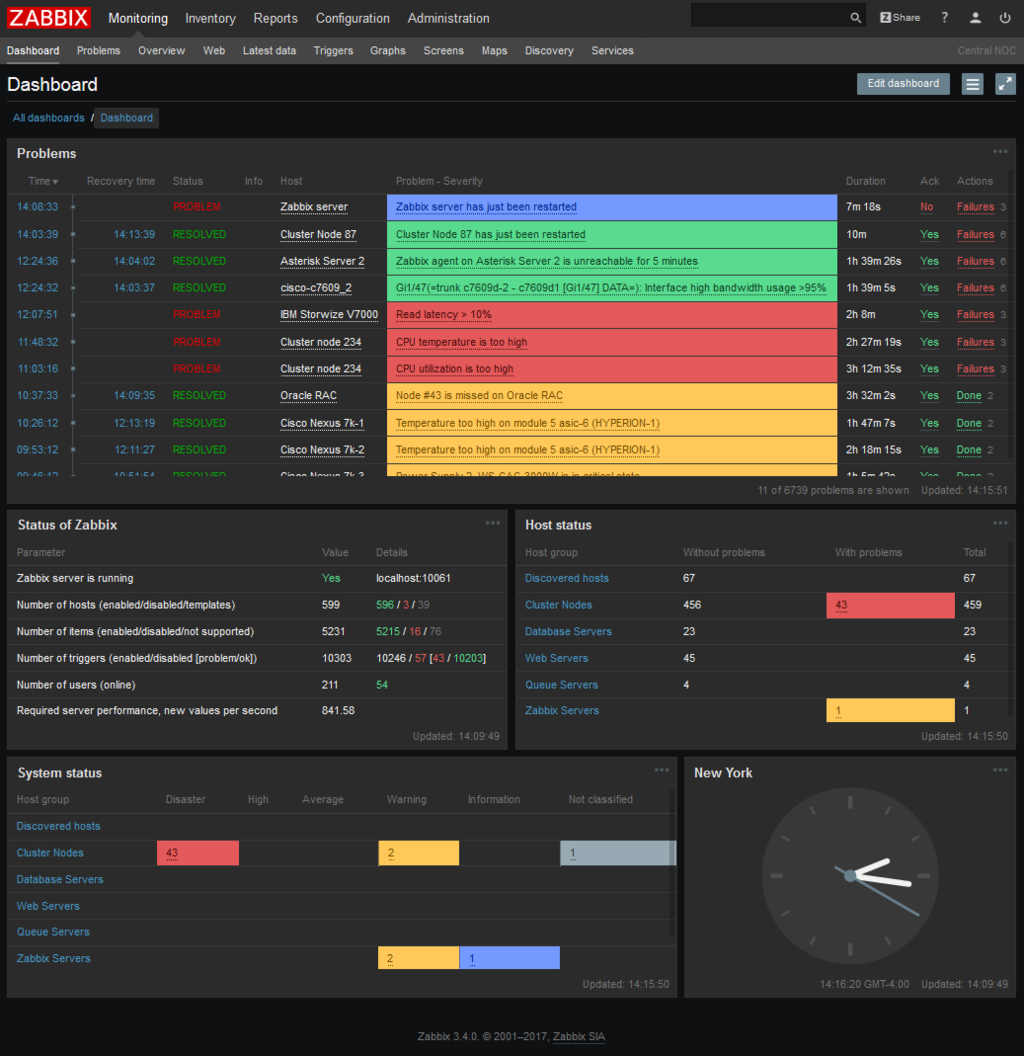
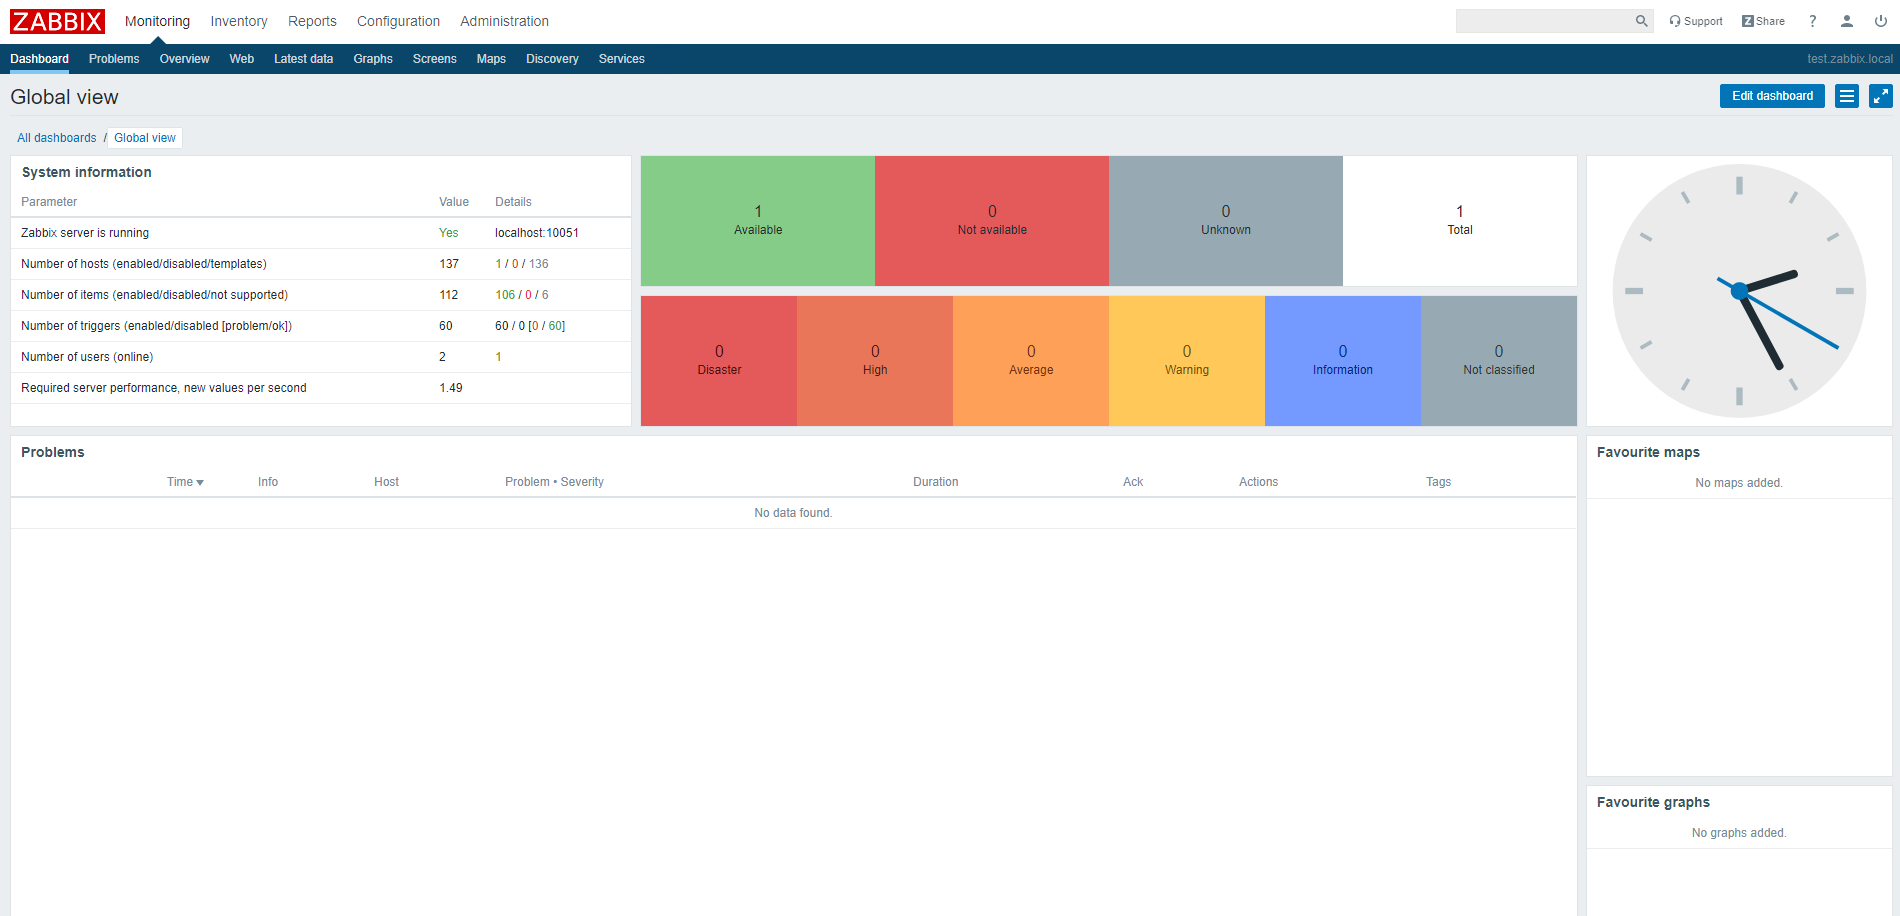
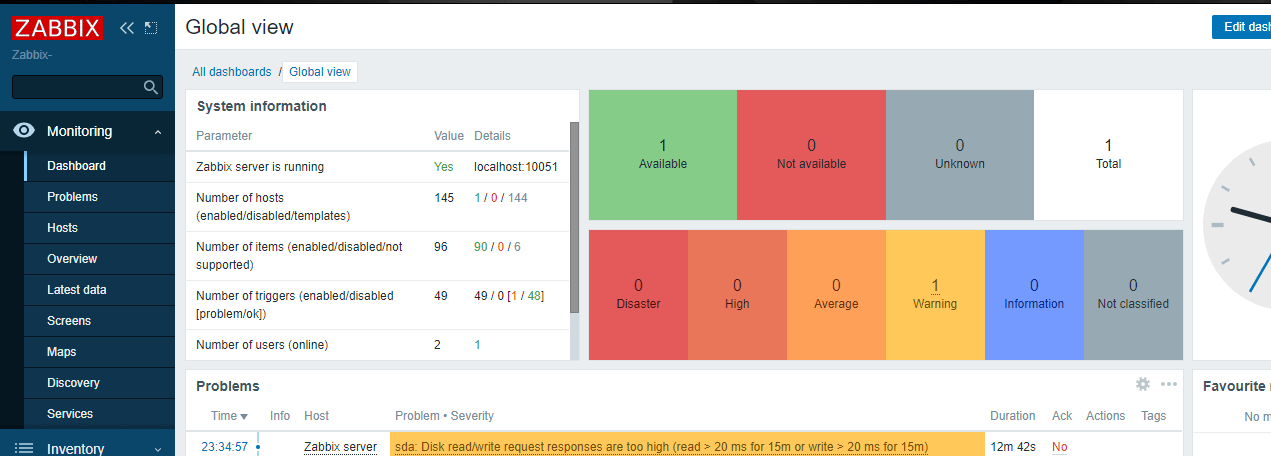
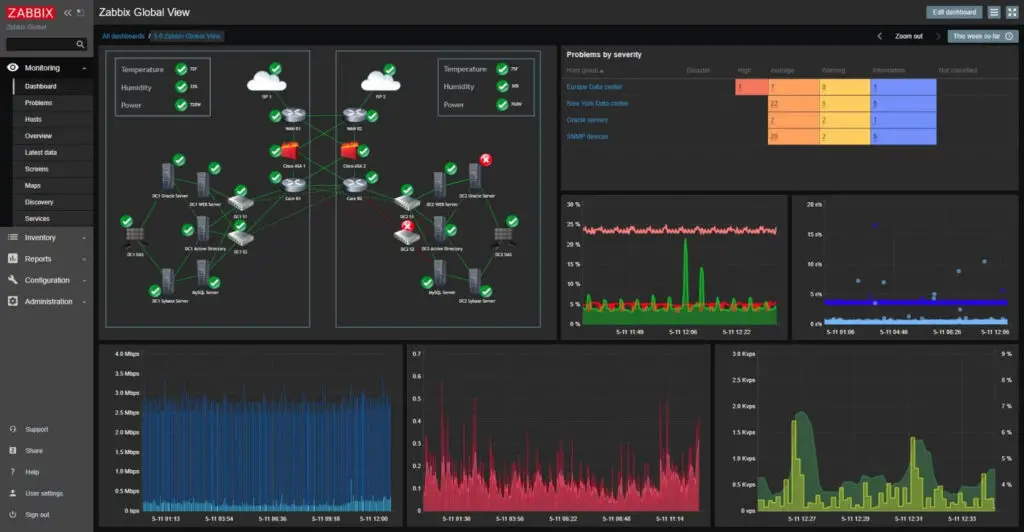
Общий интерфейс Zabbix сервера представлен на скриншоте ниже.
Содержание:
- Из чего состоит Zabbix и что он может?
- Установка Zabbix Server в Linux (Ubuntu, CentOS)
- Настройка веб-интерфейса Zabbix
- Установка Zabbix Agent в Windows
- Добавление устройства на Zabbix-сервере
- Установка Zabbix Agent в Linux
Из чего состоит Zabbix и что он может?
Zabbix простой установке и настройке, написан на C (сервер, прокси и агент) и PHP (фронтенд). Zabbix Server и Zabbix Proxy может работать только на Linux системах. Агент можно установить на большом количестве поддерживаемых ОС и платформах.
Инсталляция Zabbix сервера состоит из:
- бинарника zabbix_server (обычно работает как сервис);
- MySQL (MariaDB)/PostgreSQL базы данных;
- Веб сервера Apache2/Nginx с обработчиком PHP;
- Файлов самого frontend сайта (.php, .js, .css и т.д.).
Обычно схема работы выглядит так:
- Агент Zabbix посылает данные на сервер
- Сервер Zabbix получает и обрабатывает данные.
- Если полученные данные подпадают под заданные условия, то срабатывает триггер;
- Активный триггер сигнализирует о проблеме. Отображается уведомление на фронтенде (сайте), и в зависимости от конфигурации рассылается сообщение по почте и выполняется какие-либо действия (например, перезапуск службы, которая мониторится).
Zabbix может работать со всеми известными протоколами, а благодаря системе внешних скриптов, Zabbix может выполнять и получать данные из любых исполняемых скриптов/бинарников.
Установка Zabbix Server в Linux (Ubuntu, CentOS)
В этой статье мы рассмотрим пример установки Zabbix Server 4.4 на Linux (на примере Ubuntu Server 18.4 и CentOS) через пакетный менеджер.
Перейдите на страницу загрузки https://www.zabbix.com/download и выберите репозиторий, соответствующий вашему дистрибутиву Linux. Готовые пакеты есть для всех популярных дистрибутивов.
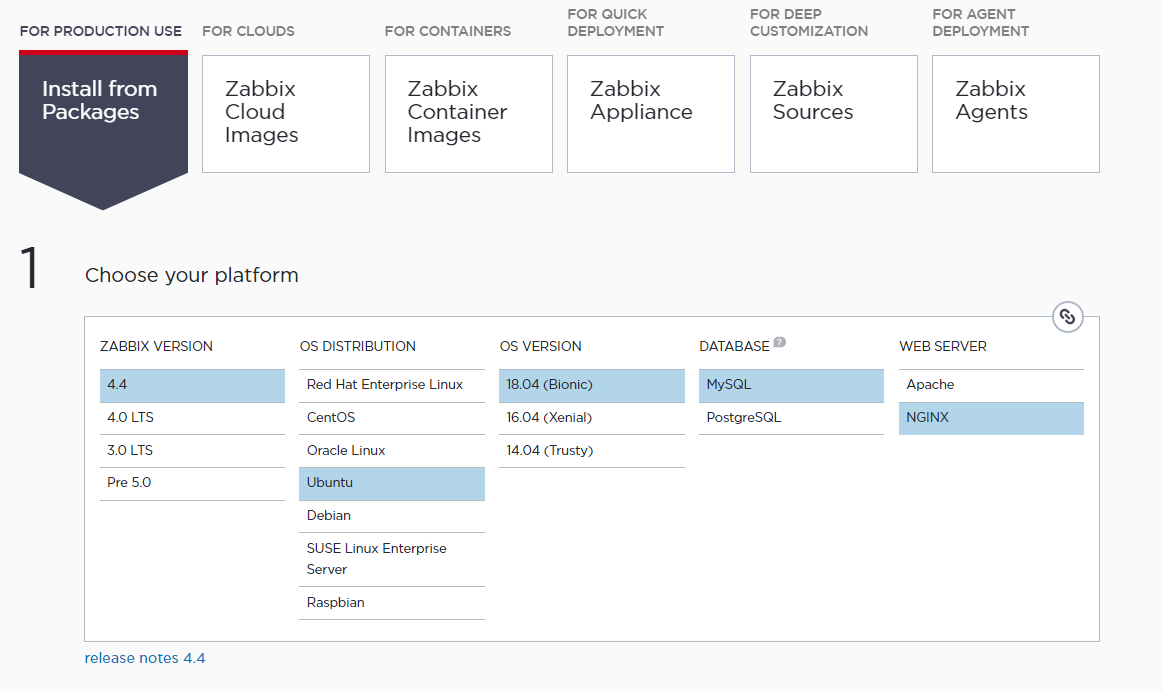
Например, для установки Zabbix на Ubuntu 18.04 нужно последовательно выбрать :
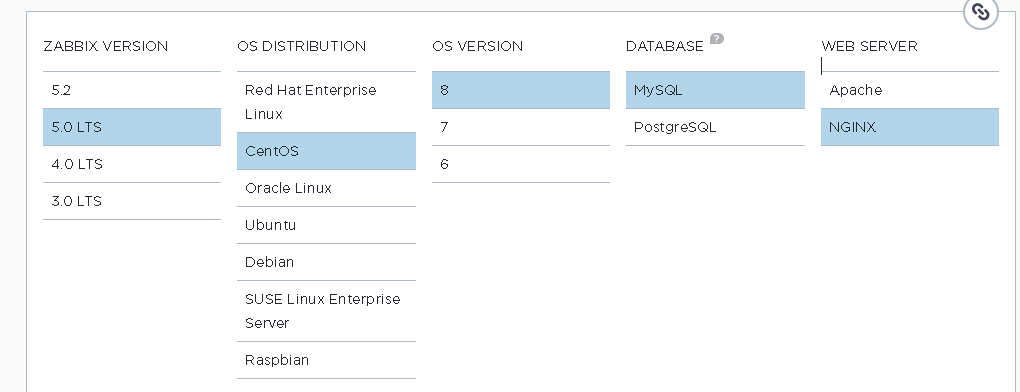
Zabbix Version (4.4) -> OS Distribution (Ubuntu) -> OS Version (18.04 Bionic) -> Database (MySQL) -> Веб сервер (Nginx или Apache).
Скачем и добавим репозиторий:
# wget https://repo.zabbix.com/zabbix/4.4/ubuntu/pool/main/z/zabbix-release/zabbix-release_4.4-1+bionic_all.deb
# dpkg -i zabbix-release_4.4-1+bionic_all.deb
# apt update
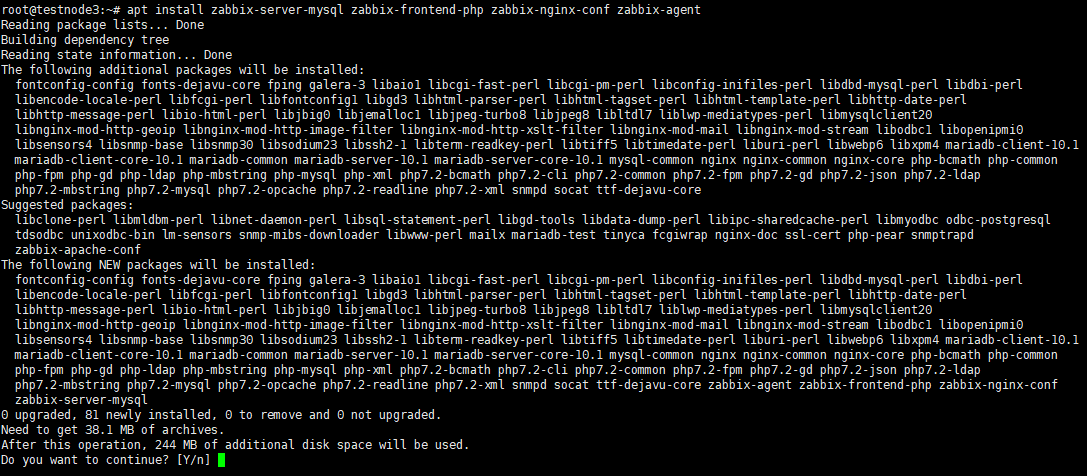
Теперь можно установить необходимые пакеты:
# apt install zabbix-server-mysql zabbix-frontend-php zabbix-nginx-conf zabbix-agent
Для установки Zabbix в CentOS 8/RHEL 8 нужно подключить репозиторий с актуальной версией Zabbix (можно установить Zabbix из ветки 4.0 LTS или последнюю версию Zabbix 4.4):
# rpm -Uvh https://repo.zabbix.com/zabbix/4.4/rhel/8/x86_64/zabbix-release-4.4-1.el8.noarch.rpm
# dnf clean all
Предполагаем, что на сервере уже установлены: nginx, MySQL/MariaDB, php и php-fpm. Теперь через пакетный менеджер установим сам сервер Zabbix и агент:
# dnf install zabbix-server-mysql zabbix-web-mysql zabbix-agent
Осталось создать базу данных для Zabbix в MySQL (вместо MySQL можно использовать PostgreSQL, просто замените в командах ‘mysql’ на ‘pgsql’).
Создайте базу данных и дайте права пользователю, из-под которого Zabbix будет обращаться к базе данных:
mysql -uroot
mysql> create database zabbix character set utf8 collate utf8_bin;
mysql> grant all privileges on zabbix.* to zabbix@localhost identified by 'ВашПароль';
mysql> quit;
Импортируйте базу данных Zabbix. Нужно будет ввести пароль, который вы указали при создании пользователя.
zcat /usr/share/doc/zabbix-server-mysql*/create.sql.gz | mysql -uzabbix -p Zabbix
Измените конфигурационный файл /etc/zabbix/zabbix_server.conf, укажите пароль от вновь созданного пользователя.
DBPassword=Пароль_Пользователя_Zabbix
Так как в моем случае веб сервером служит nginx, нужно изменить nginx.conf, раскомментировав следующие строчки
# listen 80;
# server_name example.com;
Уберите # и поменяйте example.com на домен, по которому вы хотите заходить на Zabbix, в моём случае это
test.zabbix.local
.
Для Apache файл нужно править файл конфигурации /etc/httpd/conf.d/zabbix.conf .
Выставим временную зону в PHP. В файле /etc/zabbix/php-fpm.conf раскомментируем строчку
php_value[date.timezone] = Europe/Moscow
Дополнительно можно выставить следующие параметры PHP в
/etc/php.ini
:
memory_limit 128M
upload_max_filesize 8M
post_max_size 16M
max_execution_time 300
max_input_time 300
max_input_vars 10000
Добавьте службу zabbix-server в автозапуск и запустите ее:
# systemctl enable zabbix-server zabbix-agent nginx php7.2-fpm
# systemctl restart zabbix-server zabbix-agent nginx php7.2-fpm
Настройка веб-интерфейса Zabbix
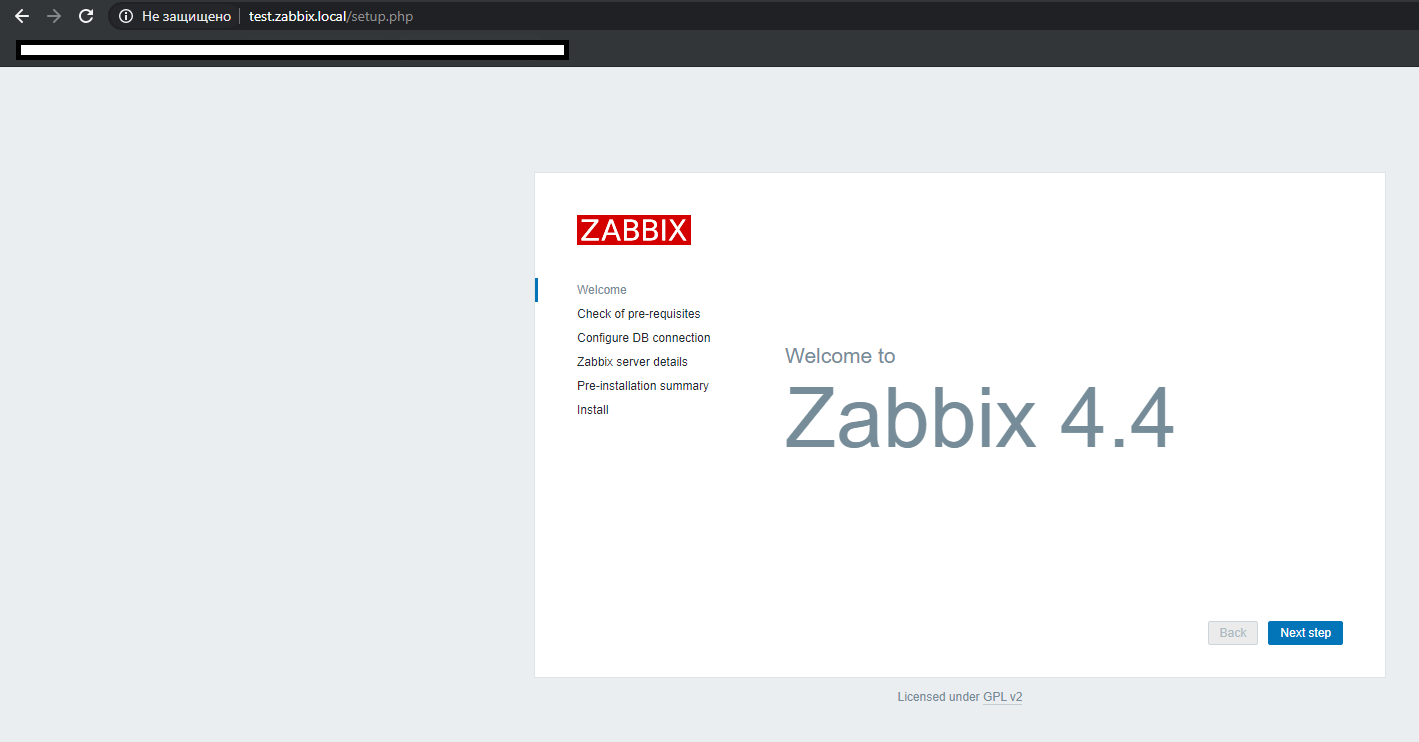
Теперь нужно настроить frontend (веб-интерфейс) Zabbix. В браузере откройте указанный ранее URL адрес zabbix сервера. В моем случае это test.zabbix.local (или на домен, который вы указывали. Не забудьте прописать его у себя в hosts файле или на DNS сервере).
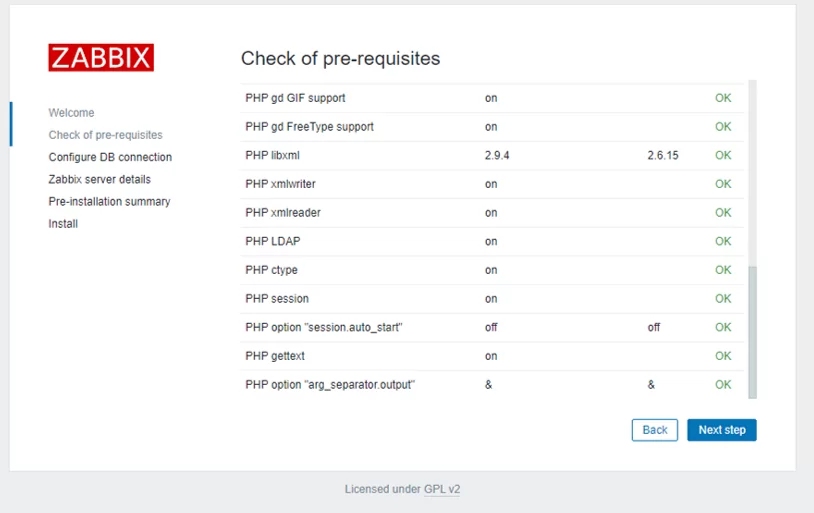
Убедитесь, что во всех требования инсталлятора указано ОК.

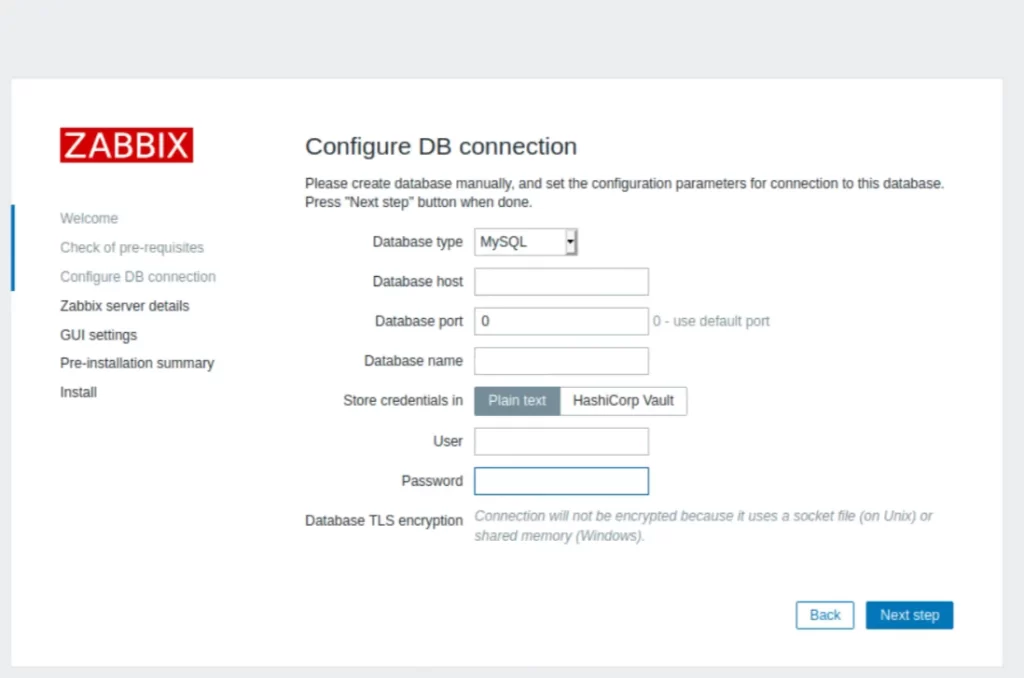
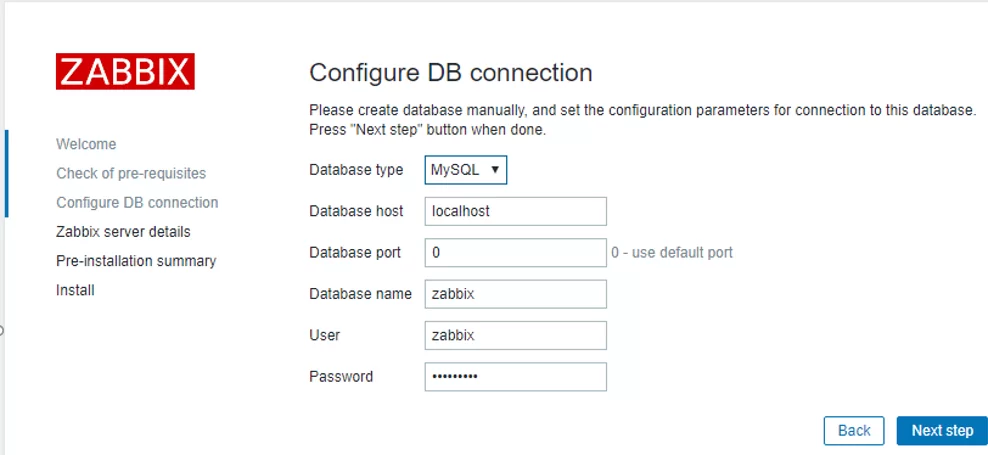
Укажите данные для подключения к БД. Используйте пользователя и пароль, который создали ранее.
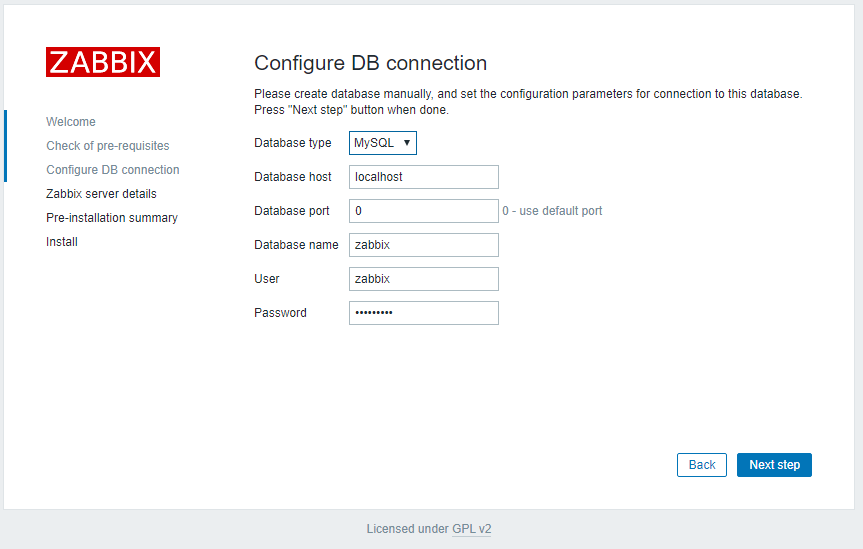
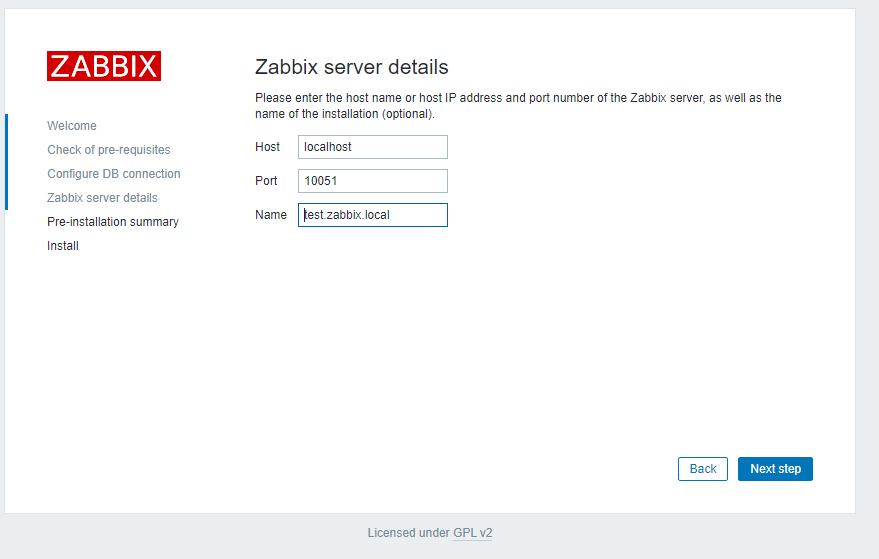
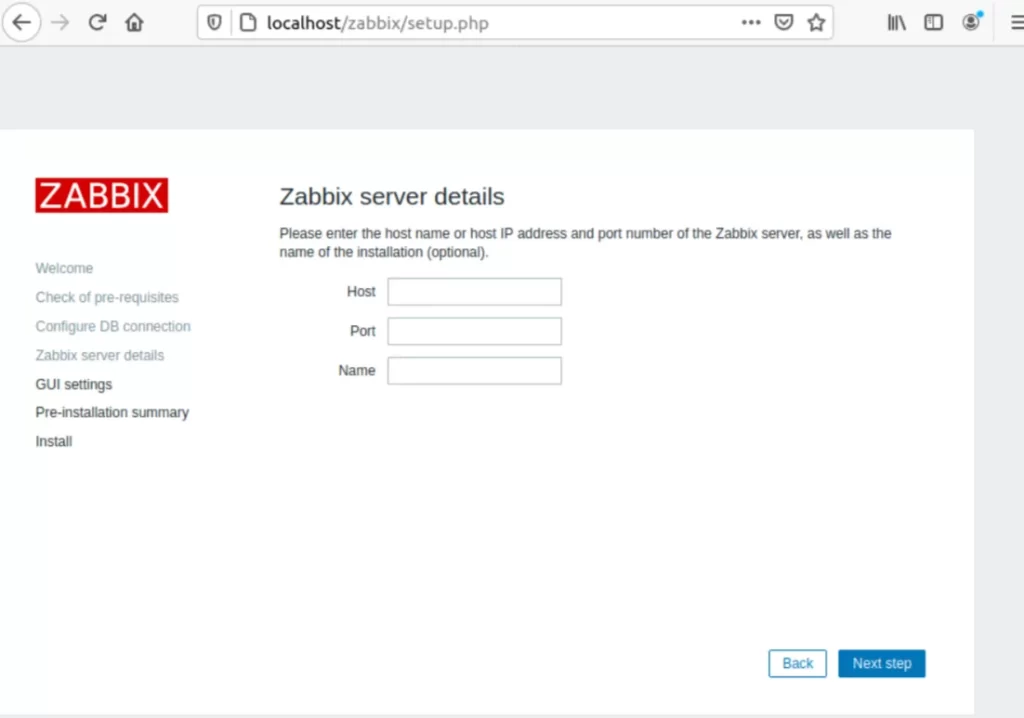
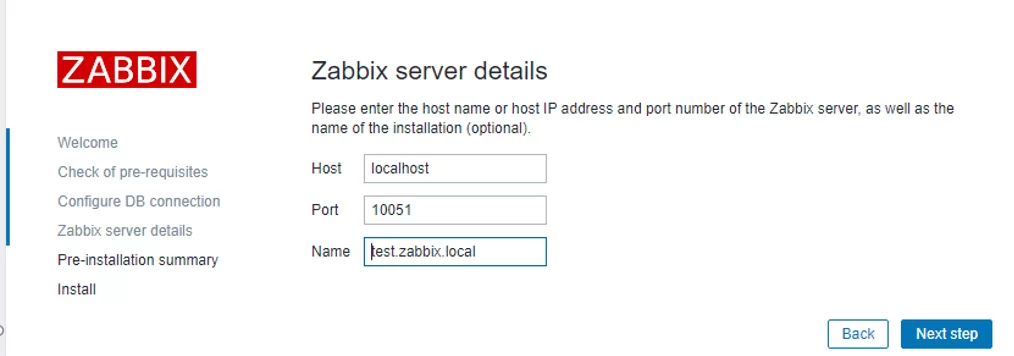
Укажите название Zabbix сервера. Порт рекомендую оставлять стандартный – TCP 10051.
Система Zabbix по-умолчанию использует два порта:
- TCP 10050 — порт пассивного агента, по нему zabbix сервер опрашивает клиентов;
- TCP 10051 — порт, на котором zabbix сервер получает данные от клиентов (активный агент).
Не забудьте открыть данные порты. Например, на Zabbix сервере на базе CentOS можно открыть порты в firewalld с помощью firewall-cmd:
# firewall-cmd --add-service={http,https} --permanentfirewall-cmd --add-port={10051/tcp,10050/tcp} –permanent
А на агенте достаточно открыть 10050:
# firewall-cmd --permanent --add-port=10050/tcp
Не забудьте перезагрузить firewalld:
# firewall-cmd –reload
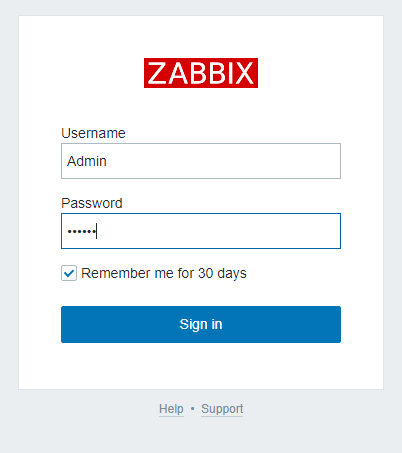
После этого жмите Next Step и Finish. После успешной установки вас попросит залогиниться. По-умолчанию логин
Admin
, пароль
zabbix
(замените его).
На этом установка сервера Zabbix Server завершена.
На странице https://www.zabbix.com/download есть пошаговые инструкции для установки Zabbix Server на другие операционные системы, а так же инструкции как собрать zabbix-server из исходного кода или запустить его в docker контейнерах.
Установка Zabbix Agent в Windows
Попробуем установить Zabbix агент на сервер Windows и добавим его на наш сервер мониторинга Zabbix. Скачать версию Zabbix агент для Windows можно здесь: https://www.zabbix.com/download_agents.
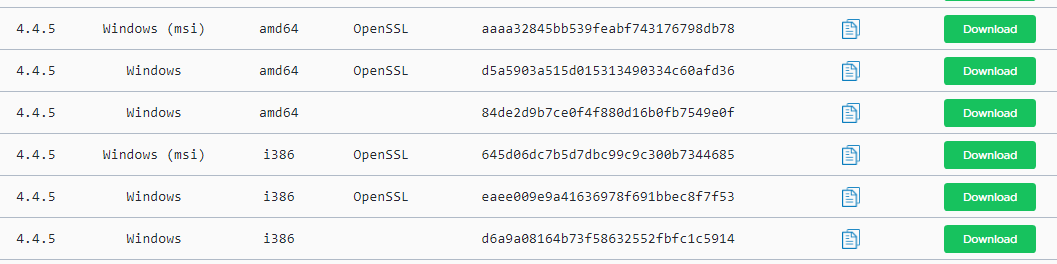
Выберите нужную версию агента под Windows. Я выберу формат msi (amd64) (без OpenSSL). Если вы планируете устанавливать zabbix agent на сервера/компьютеры домена через групповые политики или SCCM, то можете скачать zip архив с бинарными файлами и конфигурационными файлами.
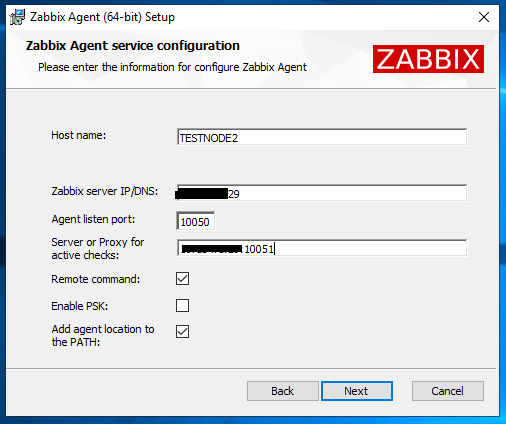
Запустите инсталлятор, примите лицензионное соглашение, укажите запрошенные данные. Обратите внимание, что в поле “Server or Proxy for active checks” я указал IP адрес в формате IP:PORT. Поскольку порт я оставлял стандартный, я пишу IP:10051.
Далее еще пару раз нажмем Next и Install.
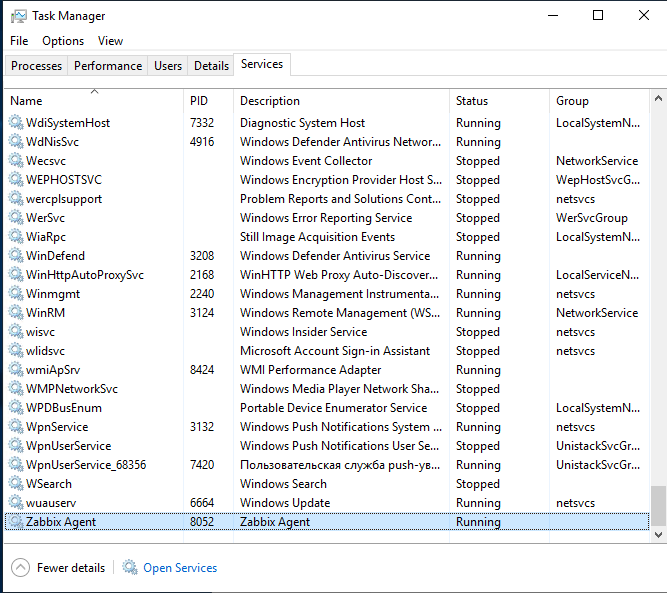
После этого убедимся, что наш агент установлен. В списке служб должен появиться сервис Zabbix Agent.
На клиенте Windows нужно разрещить входящие подключения с IP адреса сервера Zabbix в Брандмауэре Windows:
New-NetFirewallRule -DisplayName "ZabbixMonitoring" –RemoteAddress 192.168.1.100 -Direction Inbound -Protocol TCP –LocalPort 10050 -Action Allow
Добавление устройства на Zabbix-сервере
Чтобы убедиться в работоспособности агента, нужно добавить хост testnode2 на Zabbix сервер и назначить ему проверки (checks).
Заметка. В заббиксе есть 2 типа проверок:
- Пассивные – Zabbix сервер запрашивает у агента какие-либо данные;
- Активные – агент посылает на сервер данные;
При установке агента мы указывали сервер в формате IP:PORT как раз для активных проверок.
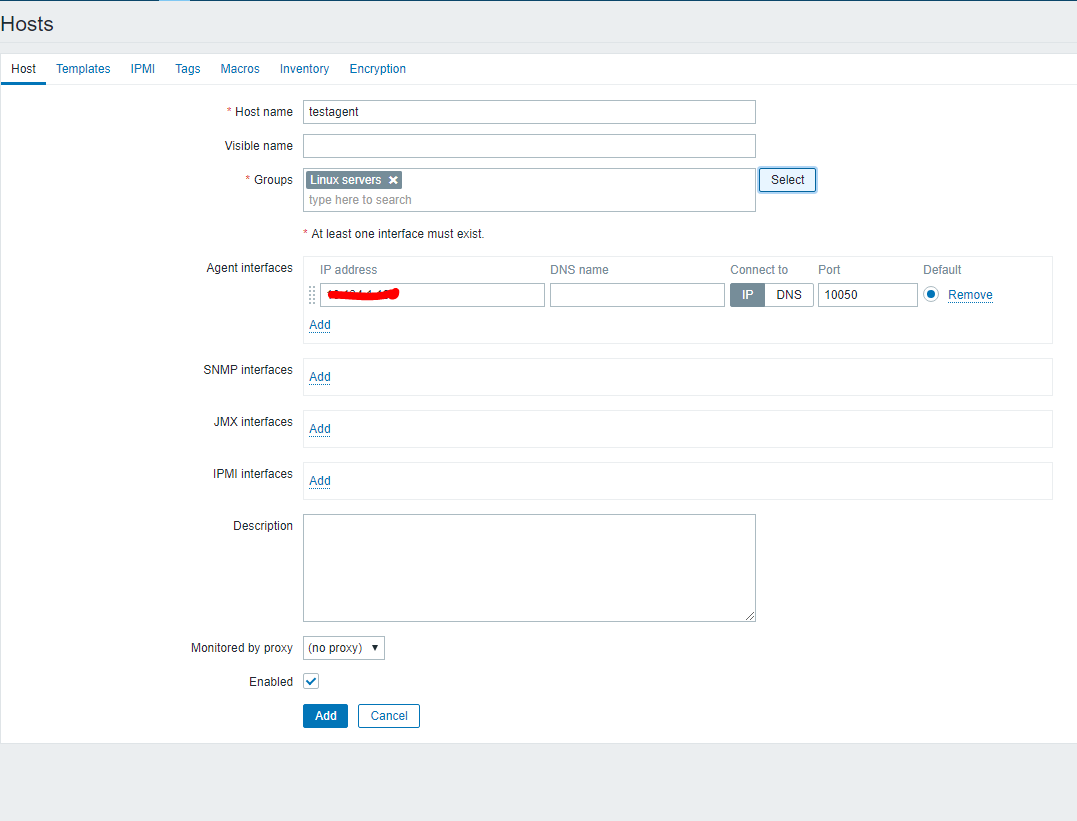
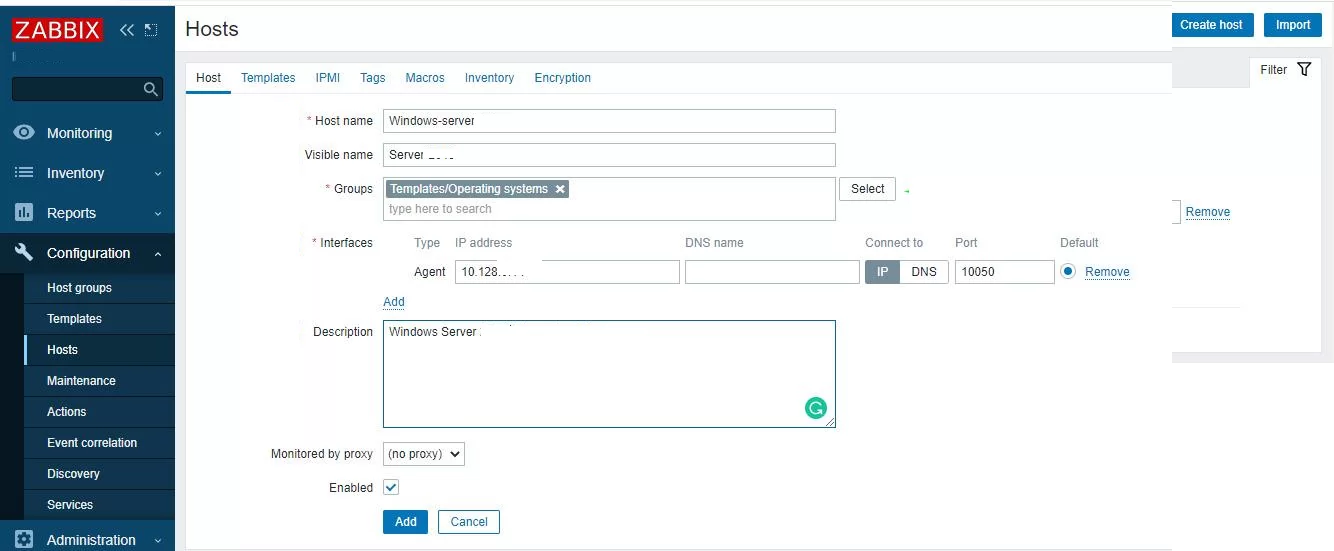
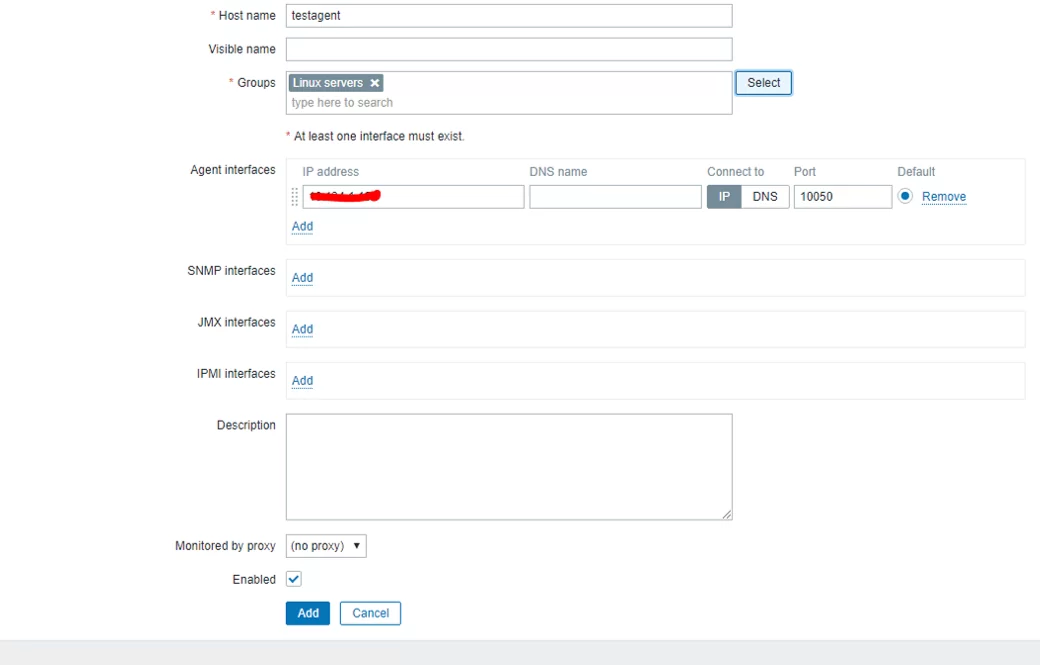
Добавление нового устройства для мониторинга в Zabbix выполняется через Web-интерфейс. Перейдите в раздел Configuration -> Hosts.

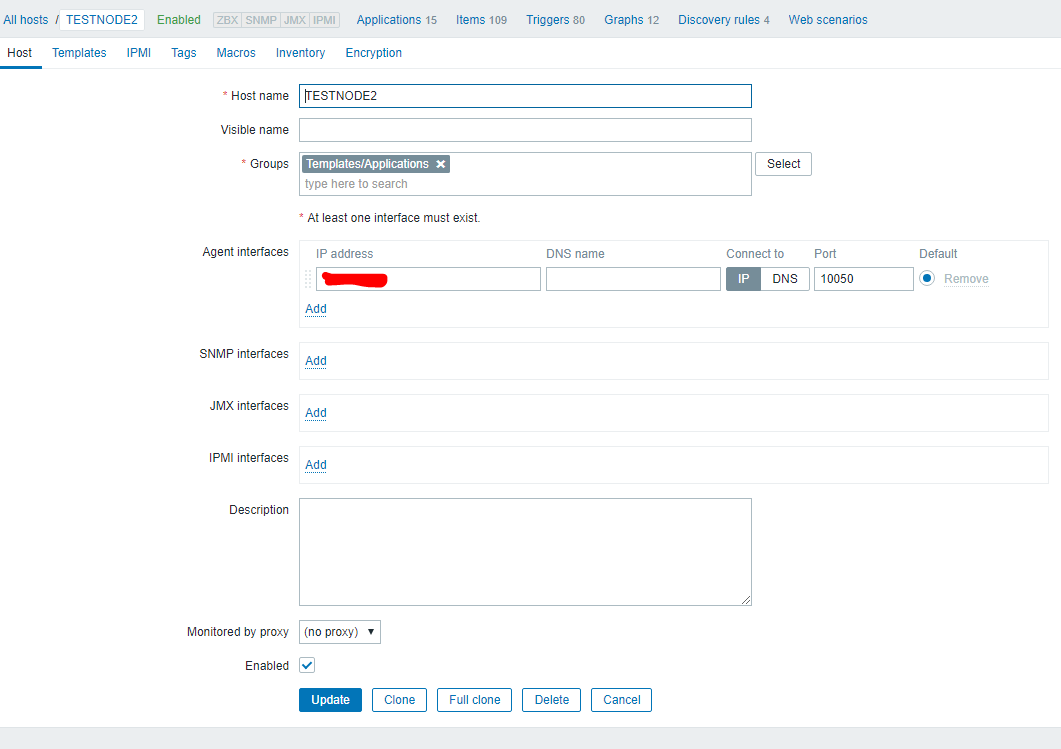
Нажмите Create host и заполните данные. Обратите внимание, что Host name хоста должен полностью совпадать с hostname машины или значением параметра Hostname в конфиге агента.
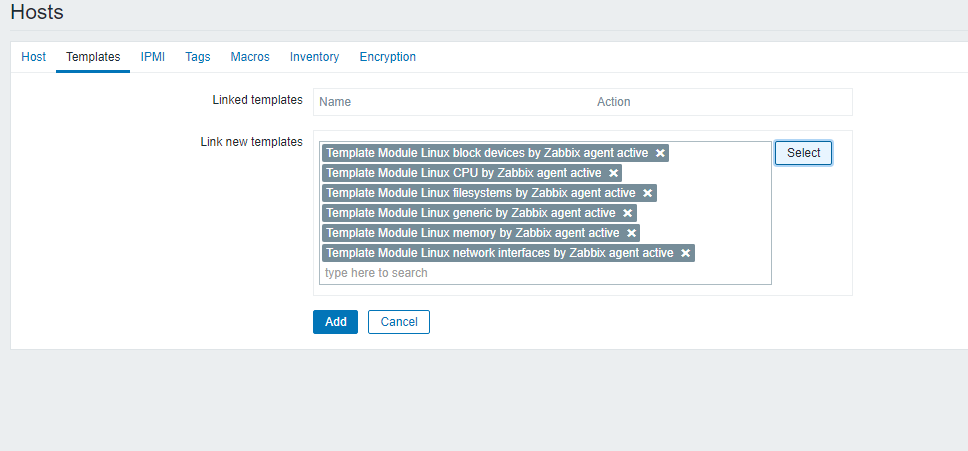
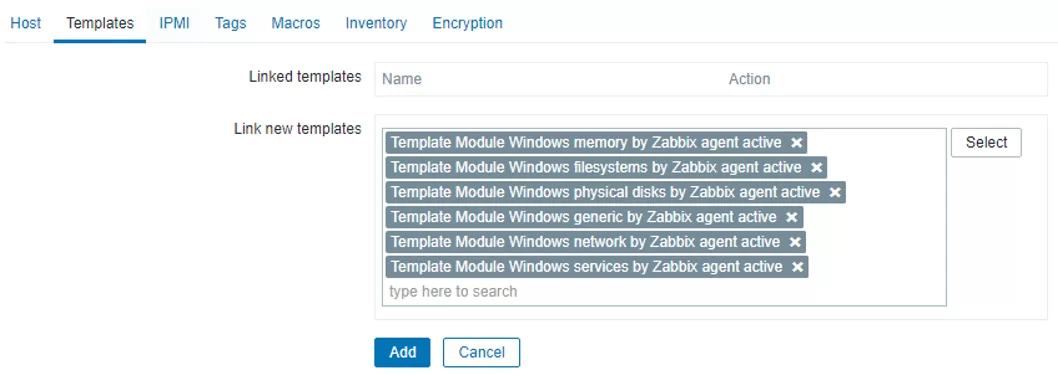
Во вкладке Templates добавить несколько встроенных Windows шаблонов. Шаблоны в Zabbix это наборы значений, триггеров, графов и правил обнаружения, которые могут быть назначены одному или нескольким хостам.
Эти интегрированные шаблоны имеют постфикс “active”, значит, будут использоваться активные проверки.
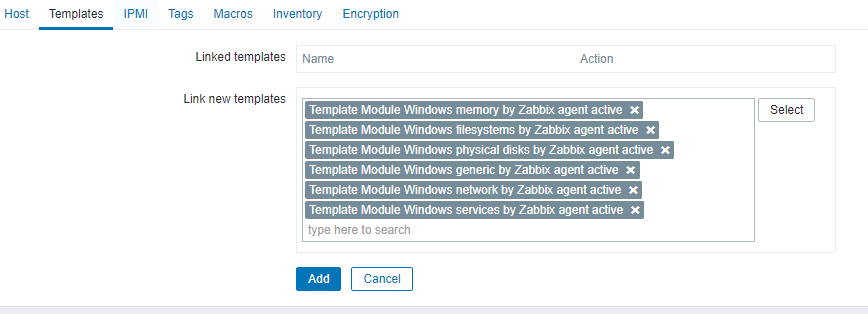
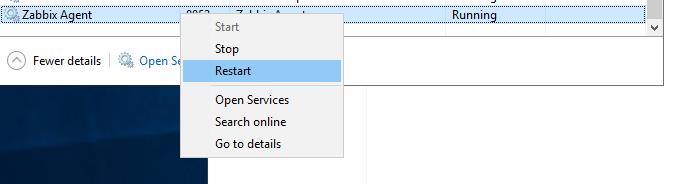
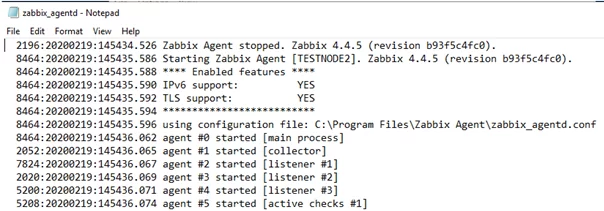
Нажмите Add. Чтобы не ждать пока сервер и агент увидят друг друга (обычно занимает пару минут), перезагрузите службу Zabbix Agent на testnode2 и проверьте лог агента (C:\Program Files\Zabbix Agent\zabbix_agentd.txt).
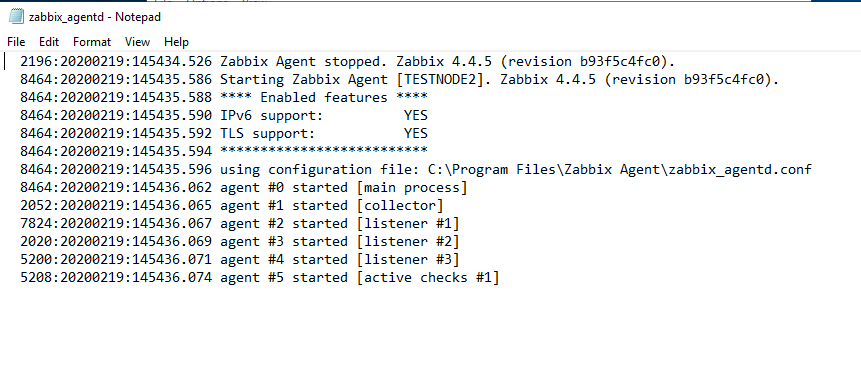
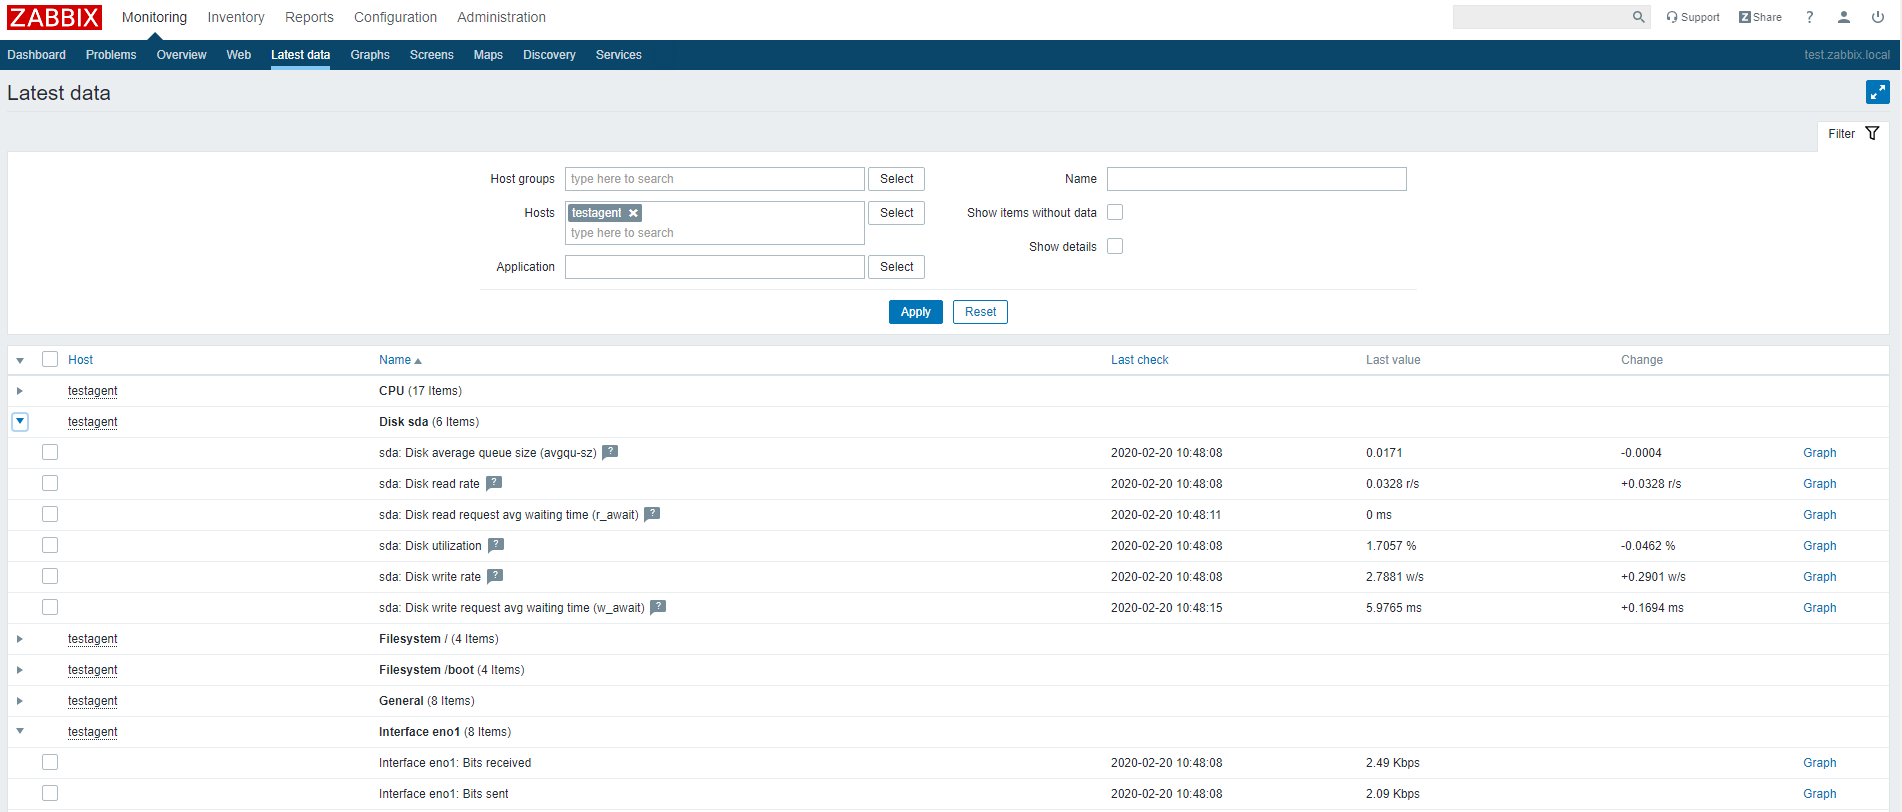
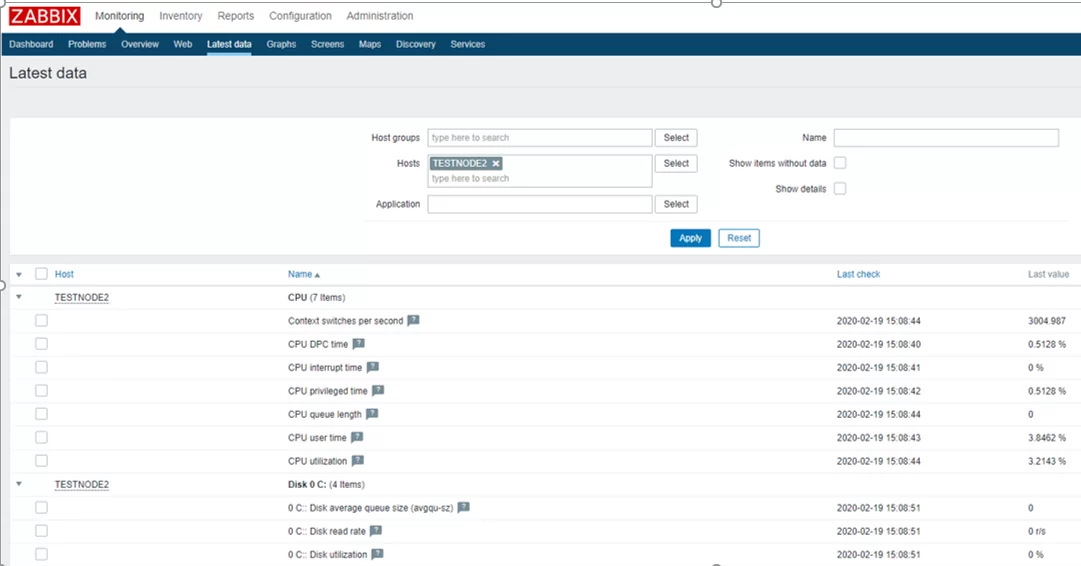
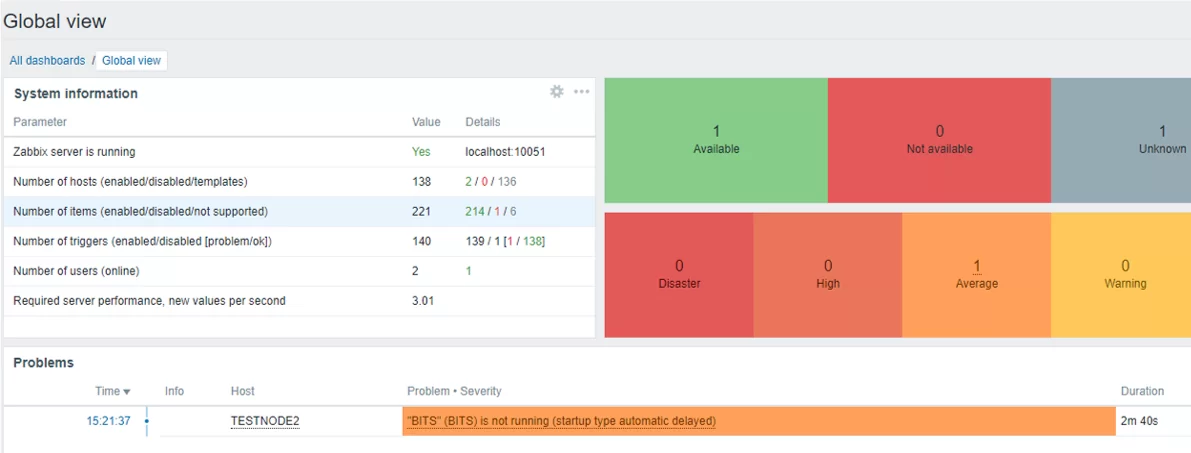
Сообщение “started [active checks #1]” говорит о том, что на сервере найдены активные проверки для этого хоста. Теперь посмотрим на данные, которые пришли на сервер Zabbix от агента. Для этого в Zabbix перейдите на Monitoring -> Latest Data и выберете нужный вам хост в поле Hosts.
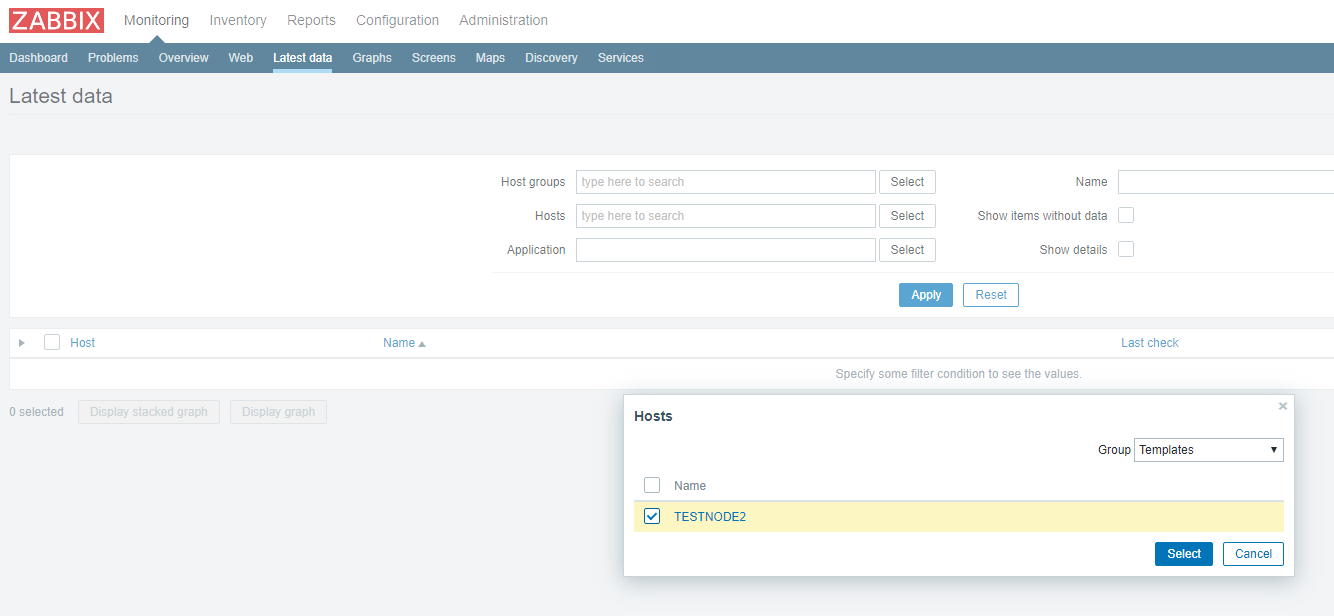
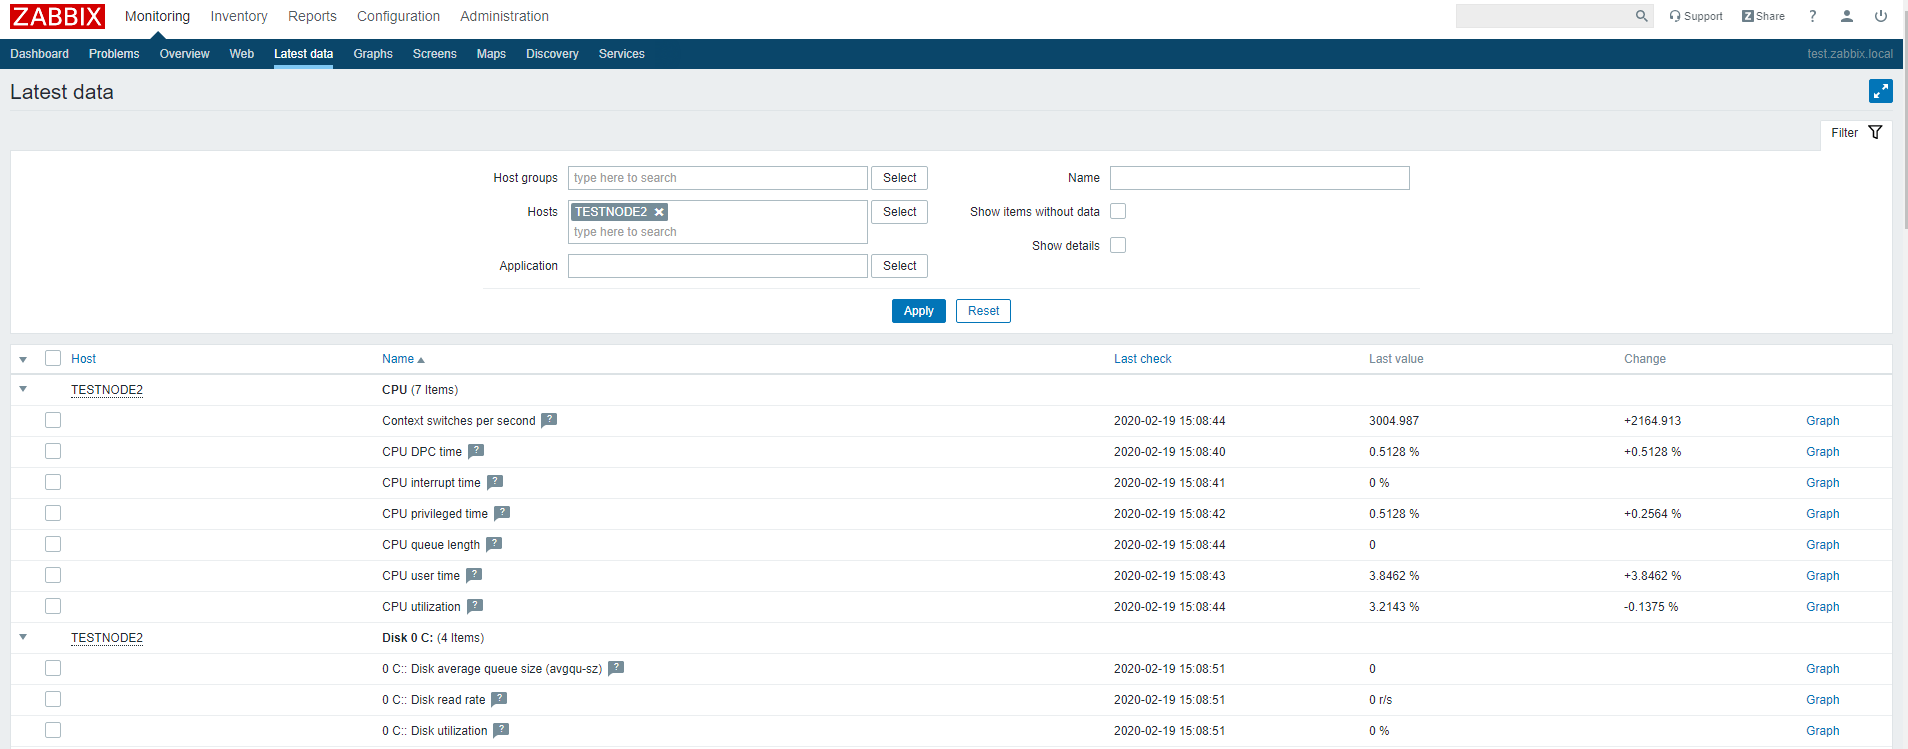
В этом разделе отображаются последние данные, которые пришли на сервер по выбранным хостам или группам хостов.
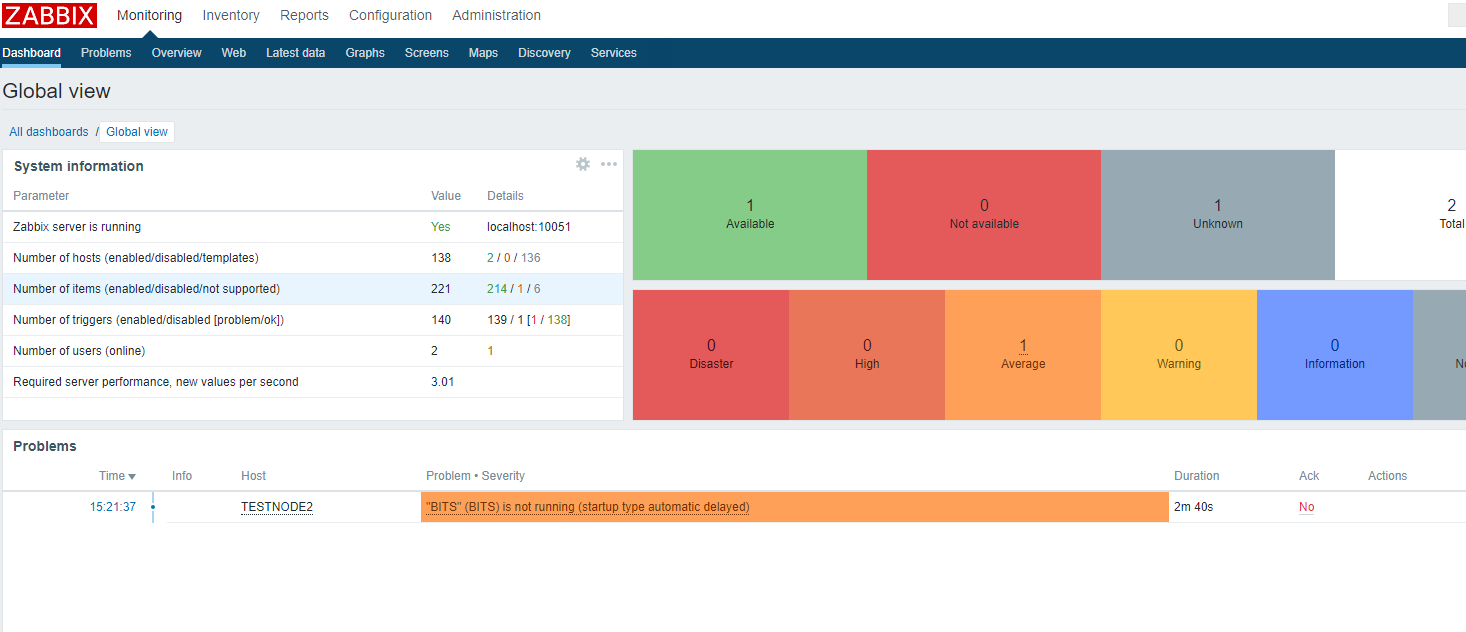
Обратите внимание на то, что в дашборде Zabbix висит уведомление о том, что служба BITS не запущена. Это уведомление появилось потому что мы назначили стандартные шаблоны нашему хосту. В одном из шаблонов был мониторинг сервиса BITS и соответствующий триггер, который срабатывает если служба BITS находится не в статусе Running.
На этом настройка Windows Agentа завершена.
Установка Zabbix Agent в Linux
Теперь установим агент Zabbix в Linux. Для установки Zabbix агента в Ubuntu Server 18.04 с помощью пакетного менеджера нужно скачать и установить репозиторий Zabbix. Затем из репозитория установим zabbix agent:
# wget https://repo.zabbix.com/zabbix/4.4/ubuntu/pool/main/z/zabbix-release/zabbix-release_4.4-1+bionic_all.deb
# dpkg -i zabbix-release_4.4-1+bionic_all.deb
# apt update
# apt install zabbix-agent
В CentOS для добавления репозитория и установки агента zabbix используется команды:
# rpm -Uvh https://repo.zabbix.com/zabbix/4.4/rhel/8/x86_64/zabbix-release-4.4-1.el8.noarch.rpm
# dnf clean all
# dnf install zabbix-agent
Перед тем как мы запустим zabbix агент, нужно отредактировать конфигурационный файл /etc/zabbix/zabbix_agentd.conf. В нем нужно указать IP адрес сервера Zabbix для активных проверок.
Server=IP
ServerActive=IP:10051
Hostname=testagent
После этого запустите сервис агента:
# service zabbix-agent start
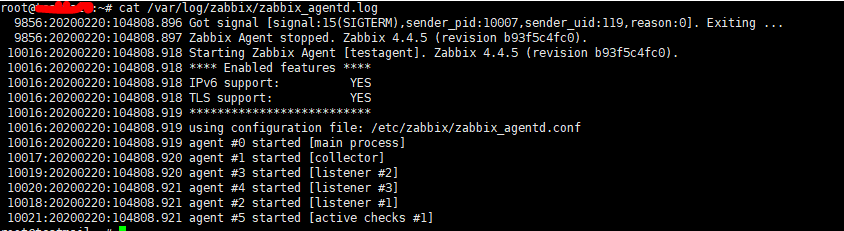
Убедитесь, что агент успешно запустился.
# cat /var/log/zabbix/zabbix_agentd.log
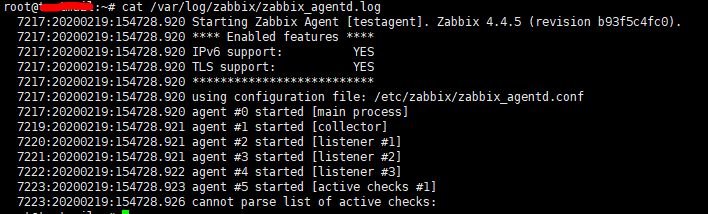
Строка cannot parse list of active checks говорит о том, что на сервере нет активных проверок для этого хоста.
Как и в случае с Windows агентом, вам нужно добавить ваш Linux хост в настройках сервера Zabbix. Обратите внимание на параметр Host name в настройка хоста в интерфейсе заббикс сервера — этот параметр должен совпадать с Hostname параметром, который мы указываем в конфиге Zabbix -агента. В конфиге выше я указывал имя хоста testagent.
Перезагрузите Zabbix агент и проверьте лог.
Проверьте, что данные от агента появились на сервере Zabbix.
На этом настройка Zabbix-агента на Linux системе завершена. В следующей статье мы рассмотрим безагентный мониторинг доступности узлов в Zabbix через ICMP Ping.
Своевременное оповещение о проблемах сети критически важно для бизнеса, ведь потеря информации означает убытки и иные негативные последствия. Избежать лишних затрат поможет программное обеспечение. В публикации предоставили подробные шаги по загрузке и регулировке параметров программы Zabbix.
Алексей Владышев создал это бесплатное ПО. Назначение Zabbix — отслеживать параметры IT-инфраструктуры и сообщать пользователю об ошибках. Заббикс контролирует:
- сетевые параметры;
- непрерывную работу серверов;
- высокую производительность виртуальных машин;
- бесперебойную работу сервисов и приложений;
- устойчивость баз данных;
- работоспособность веб-сайтов, сбои на них;
- облачные среды и прочие аспекты.
Программное обеспечение отправляет уведомления по e-mail для любых событий. Пользователь настраивает этот параметр. Оповещения нужны для мгновенного информирования о проблемах серверов и своевременной реакции клиентов. Программа составляет отчёт и отражает данные из истории на графике. Составление отчётности облегчает планирование мощностей.
Zabbix-сервер сообщается со сборщиками данных, поллерами и трапперами. Настройки и информация о состоянии сервера в виде отчётов и статистики отображаются в браузере. Пользователь всегда может оценить работу серверов и сети из любого места. Правильно настроенный Zabbix помогает следить за IT-системами. Это полезно как для небольших компаний с малым числом серверов, так и для крупных организаций с большим количеством серверов. Доступ к программе Zabbix не требует финансовых затрат.
Интеграция Zabbix с платформами
Помимо имейл-уведомлений Заббикс отправляет отчёт об ошибках и прочих событиях через каналы обмена сообщениями.
| Системы оповещения | Платформы для общения |
| VictorOPS | Slack |
| Opsgenie | MS Teams |
| SIGNL4 | Telegram |
| Pagerduty и другие | Express.ms |
| Rocket.chat и другие | |
| SMS с использованием USB-модемов | Вебхуки для интеграции с внешними системами обмена сообщениями, ITSM и системами тикетинга |
| Онлайн SMS-шлюзы |
Интерфейс
Zabbix web-интерфейс предоставляет информацию об IT-среде разными способами. Доступны:
- Многостраничные панели на основе виджетов.
- Перемещение виджетов на панели.
- Настройка временных промежутков обновления информации на панели.
- Создание точной копии существующей панели.
- Уровень доступа для панели.
- Графики, которые показывают и обобщают данные по желанию пользователя.
- Создание древовидных карт для упрощения ориентирования в системе.
- Решение проблем и получение дополнительной информации через панель управления.
Каждый элемент настраивается по желанию пользователя. Элементы панели управления отображают информацию в желанном виде, фильтруют её и учитывают уровень доступа пользователей.
Как установить Zabbix в Windows
Шаг 1. Подготовка к установке
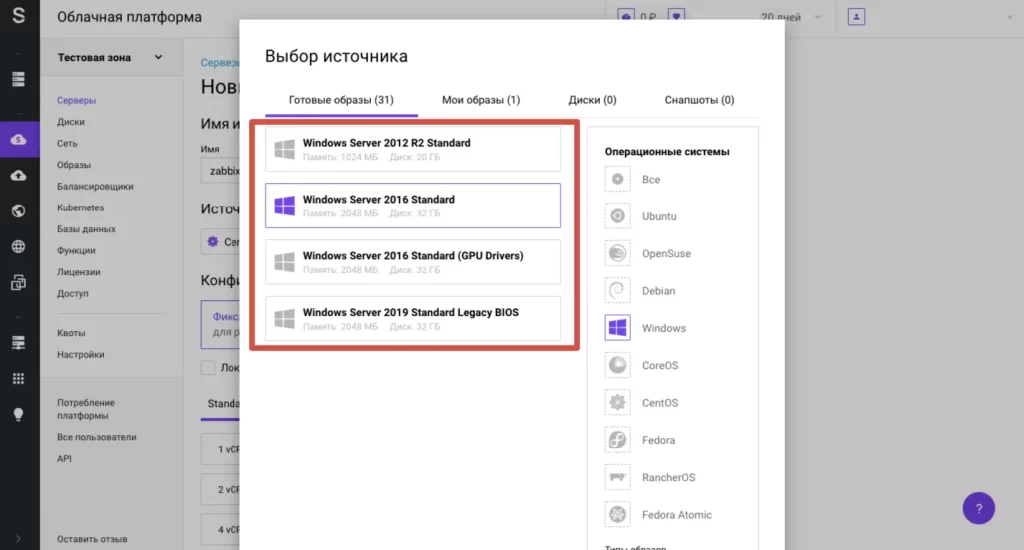
Зайдите в «Серверы», далее выберите «Создать сервер».
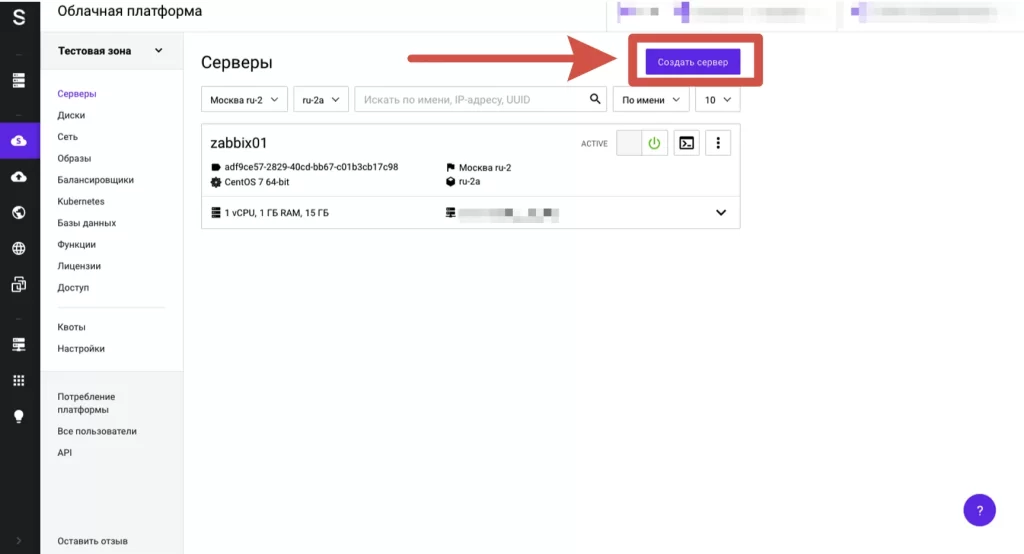
Кликните по кнопке «Выбрать тип источника» и выберите готовый образ ОС Windows.
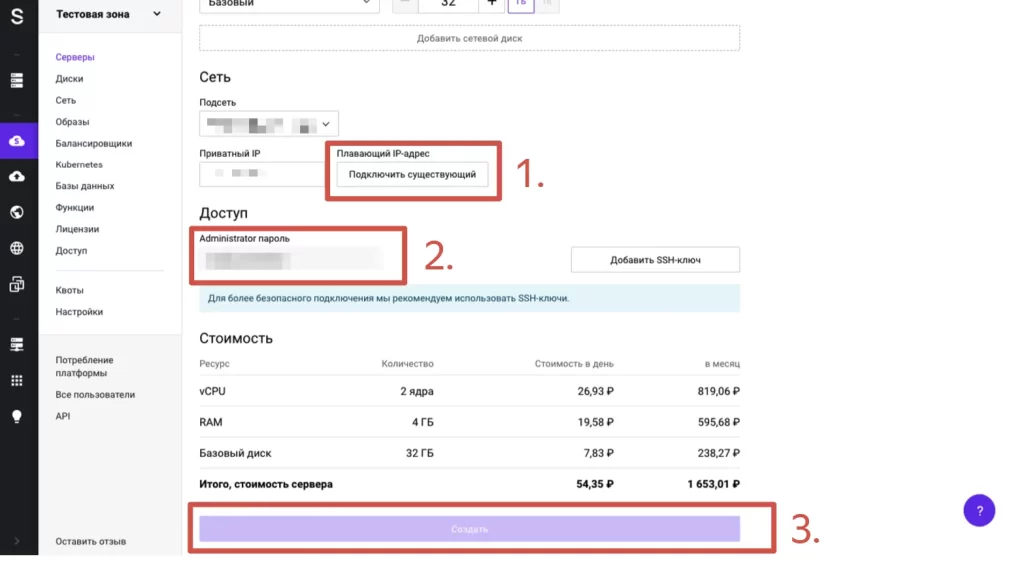
Примите плавающий айпи. Скопируйте на этой странице пароль от учётной записи. Кликните на надпись «Создать».
Когда процесс завершится и возникнет надпись Active, подключитесь к внешнему плавающему айпи-адресу через протокол RDP.
Шаг 2. Загрузка программы
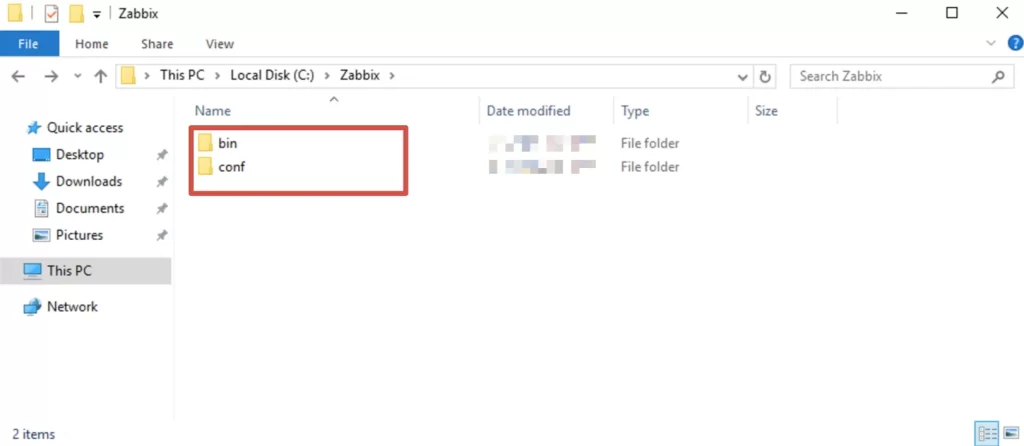
Загрузите установщик с сайта ПО или найдите дистрибутив вручную. Найти его можно по запросу zabbix install или install zabbix. После скачивания архива создайте каталог и распакуйте в него файлы из архива.
Пропишите команду:
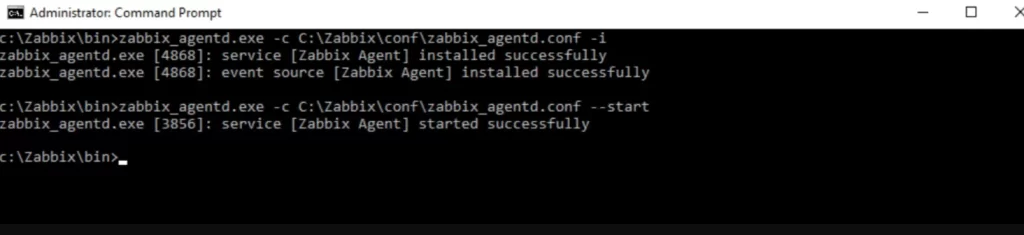
Server=<ip адрес Zabbix-сервера>Для запуска программы введите команду:
> zabbix_agentd.exe -c C:\Zabbix\conf\zabbix_agentd.conf -i
> zabbix_agentd.exe -c C:\Zabbix\conf\zabbix_agentd.conf --start
Внимание! Не забудьте указать свой путь к папке, куда вы распаковали архив.
Шаг 3. Интегрирование агента
Перейдите на панель Configuration — Hosts. Кликните на Create Host.
Укажите данные для подключения к агенту.
Перейдите в раздел Templates. Используйте шаблон, указанный на скриншоте. Сохраните изменения при помощи кнопки Update и дождитесь, когда запустится мониторинг.
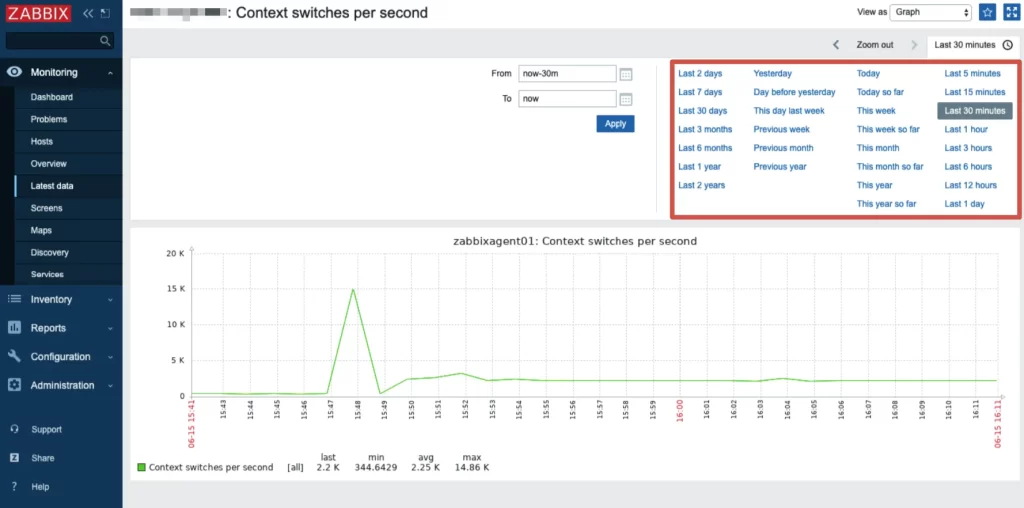
Кнопка Graph напротив существующих метрик открывает визуализацию данных через график. Вы можете настроить интересующий период.
Приглашение участника
Клиенты программного обеспечения получают данные для подключения к Zabbix. Всем пользователям необходимо состоять в одной или нескольких командах. В группе выдаются полномочия и уровни доступа к информации в программе.
Чтобы пригласить участника в команду, зайдите в Administration — Users и кликните на Create User.
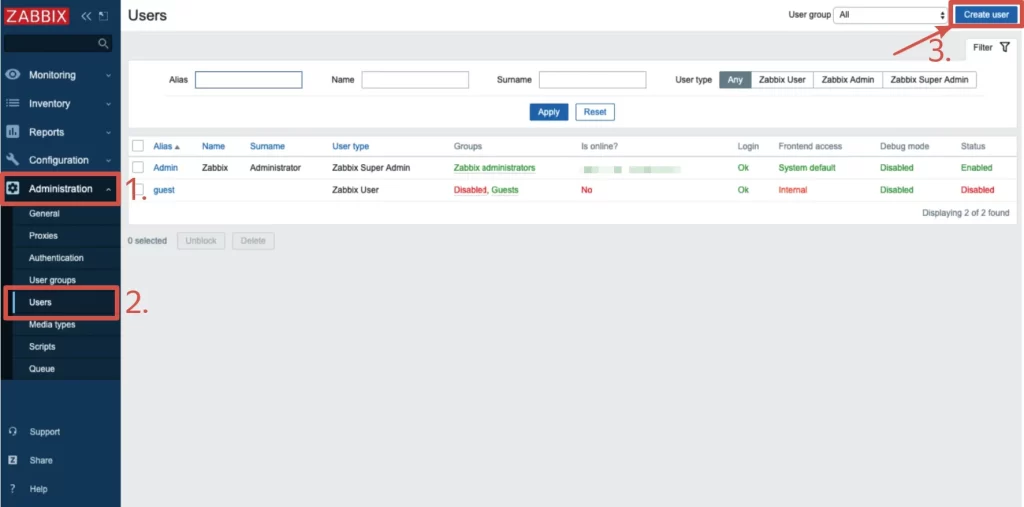
Укажите логин участника, группу и данные для входа в систему. Больше ничего указывать не нужно.
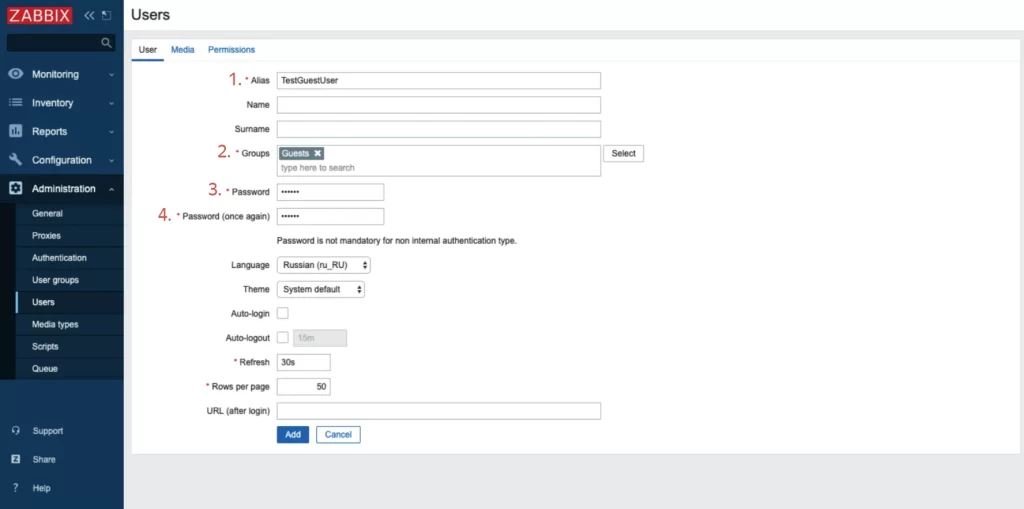
Вы можете самостоятельно ввести информацию о каждом участнике для уведомлений, например, e-mail, ник на платформах для общения и т.п. Для привязки данных перейдите на панель Media и кликните Add. Настройте уведомления для конкретных событий и временной интервал оповещений.
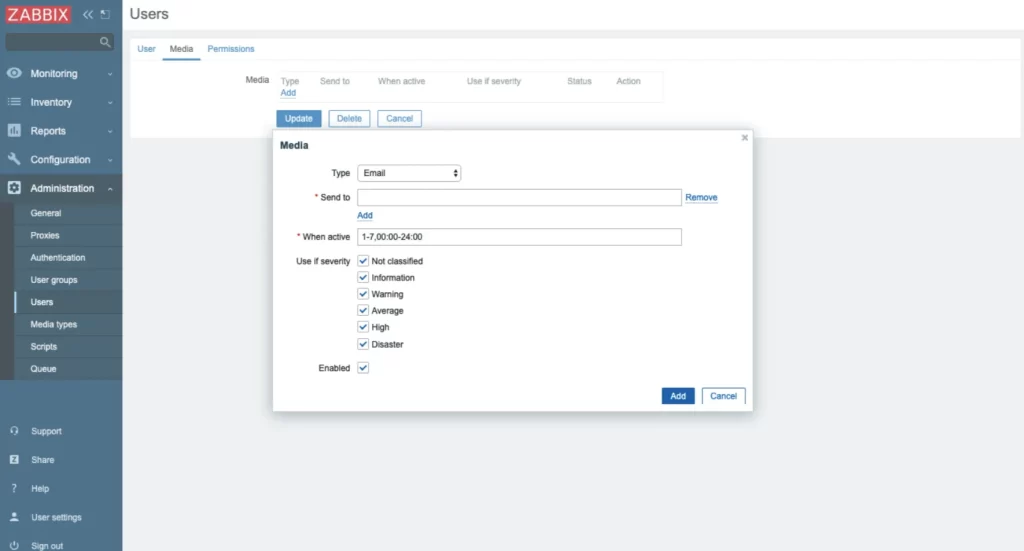
Сохраните изменения при помощи кнопки Add. В разделе User подтвердите добавленного участника. Вы можете изменить пароль участников. Для этого на вкладке Administration — Users нажмите на участника, выберите Change password и поменяйте данные.
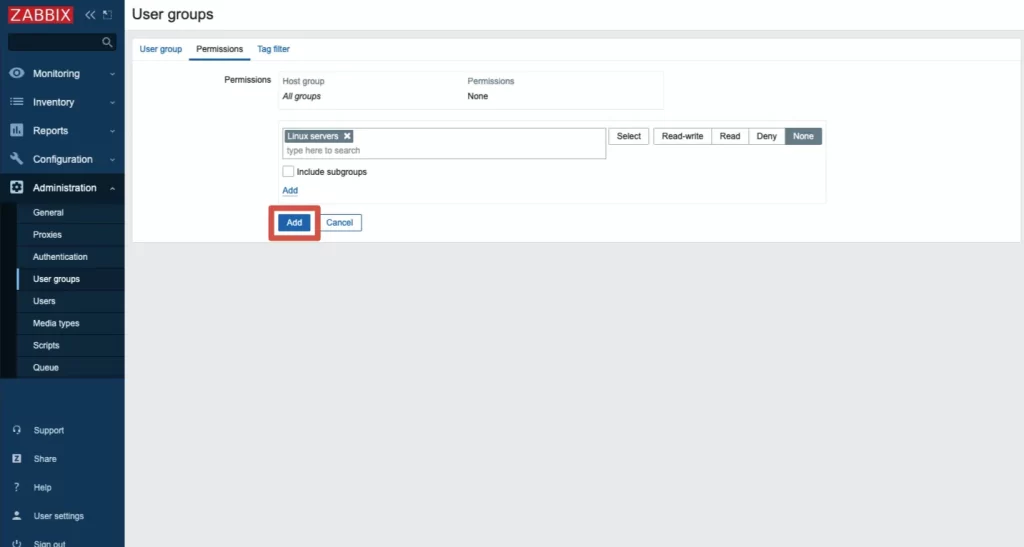
Для создания команды участников в панели Administration — Users выберите пункт Create user group.
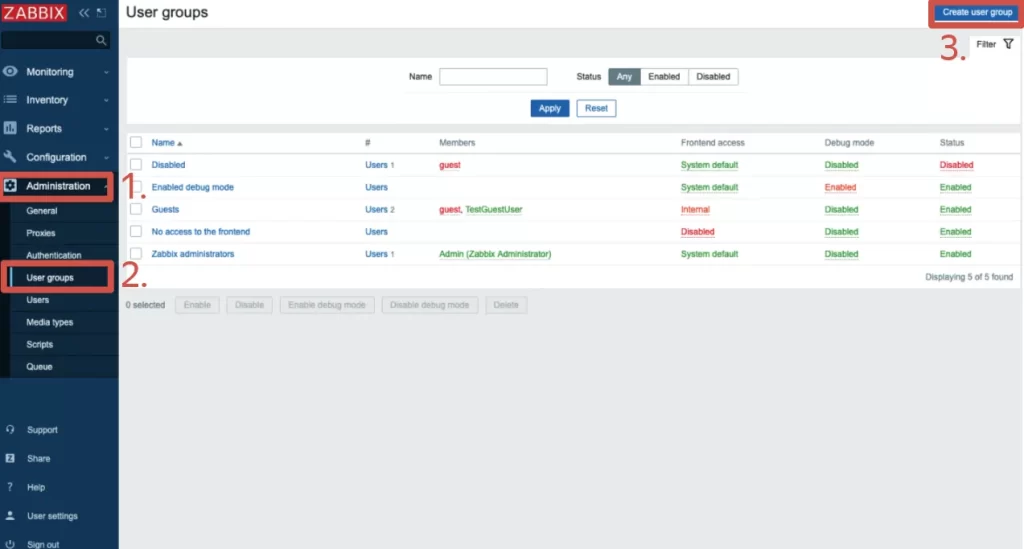
Пропишите название команды и имя админа. Следом перейдите в раздел Permissions. Здесь укажите наименования группы хостов, доступ к которой хотите предоставить команде. Чтобы сохранить данные, кликните Add.
Как установить Zabbix на Ubuntu
Шаг 1. Подготовка к установке
Установите три программы. Данное ПО понадобится для корректной работы Заббикс. Пропишите код:
$ sudo apt update
$ sudo apt install apache2
$ sudo apt install mysql-server
$ sudo apt install php php-cli php-common php-mysql
Во-вторых, проверьте актуальность установленного часового пояса. Для смены времени введите команду:
$ timedatectl set-timezone Europe/MoscowВнимание! В команде указан московский географический пояс.
Введите код в терминале:
$ apt install chrony
$ systemctl enable chrony
$ systemctl start chrony
Далее настроим безопасность компьютера. Пропишите команды:
$ iptables -I INPUT -p tcp --match multiport --dports 80,443 -j ACCEPT
$ iptables -I INPUT -p tcp --match multiport --dports 10050,10051 -j ACCEPT
$ iptables -I INPUT -p udp --match multiport --dports 10050,10051 -j ACCEPT
Эти команды откроют порты.
Чтобы сохранить изменения, введите:
$ apt install iptables-persistent
$ netfilter-persistent save
Обновите данные в хранилище:
$ apt updateШаг 2. Установка программы
Загрузите дистрибутив со страницы ПО. Чтобы подобрать установщик под свою вариацию, перейдите в zabbix/5.2/ubuntu/pool/main/z/zabbix-release/ и сохраните адрес ссылки на самый свежий архив.
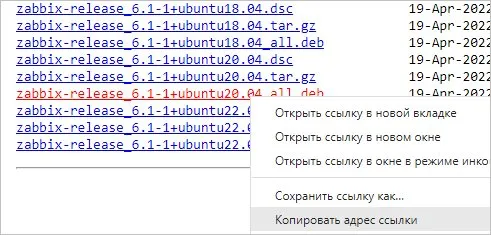
Загрузите дистрибутив через команду:
$ wget http://repo.zabbix.com/zabbix/5.2/ubuntu/pool/main/z/zabbix-release/zabbix-release_5.2-1+ubuntu20.04_all.debНачните загрузку:
$ dpkg -i zabbix-release_*.debОбновите список данных через терминал:
$ apt updateЗагрузите программное обеспечение через запрос:
$ apt install zabbix-server-mysql zabbix-frontend-php zabbix-get zabbix-sql-scriptsШаг 3. Управление хранилищем
Сформируйте хранилище и выдайте уровень доступа:
$ mysql -uroot -p
mysql> CREATE DATABASE zabbixdb CHARACTER SET utf8 COLLATE utf8_bin;
mysql> GRANT ALL on zabbixdb.* to zabbix@localhost IDENTIFIED BY 'password';
mysql> FLUSH PRIVILEGES;
Перейдите в папку через направление:
/usr/share/doc/zabbix-server-mysql/ либо /usr/share/zabbix-server-mysql/и перенесите информацию в хранилище. На месте zabbix и zabbixdb впишите юзера и наименование хранилища:
$ zcat /usr/share/doc/zabbix-server-mysql/create.sql.gz | mysql -uzabbix -p zabbixdbИзмените запись
/etc/zabbix/zabbix_server.confи укажите сведения для входа:
$ sudo vi /etc/zabbix/zabbix_server.conf
DBHost=localhost
DBName=zabbixdb
DBUser=zabbix
DBPassword=password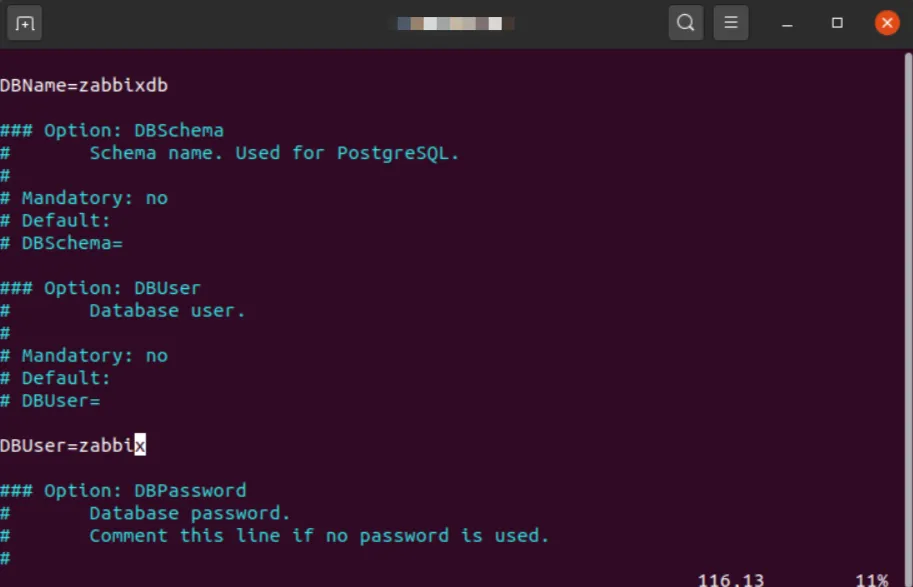
Далее:
$ sudo a2enconf zabbix-frontend-phpПерезагрузите оба приложения, чтобы сохранить информацию:
$ sudo systemctl restart apache2
$ sudo systemctl restart zabbix-server
Шаг 4. Изменение интерфейса
Зайдите на сайт программы из поля браузера и кликните по Next step.
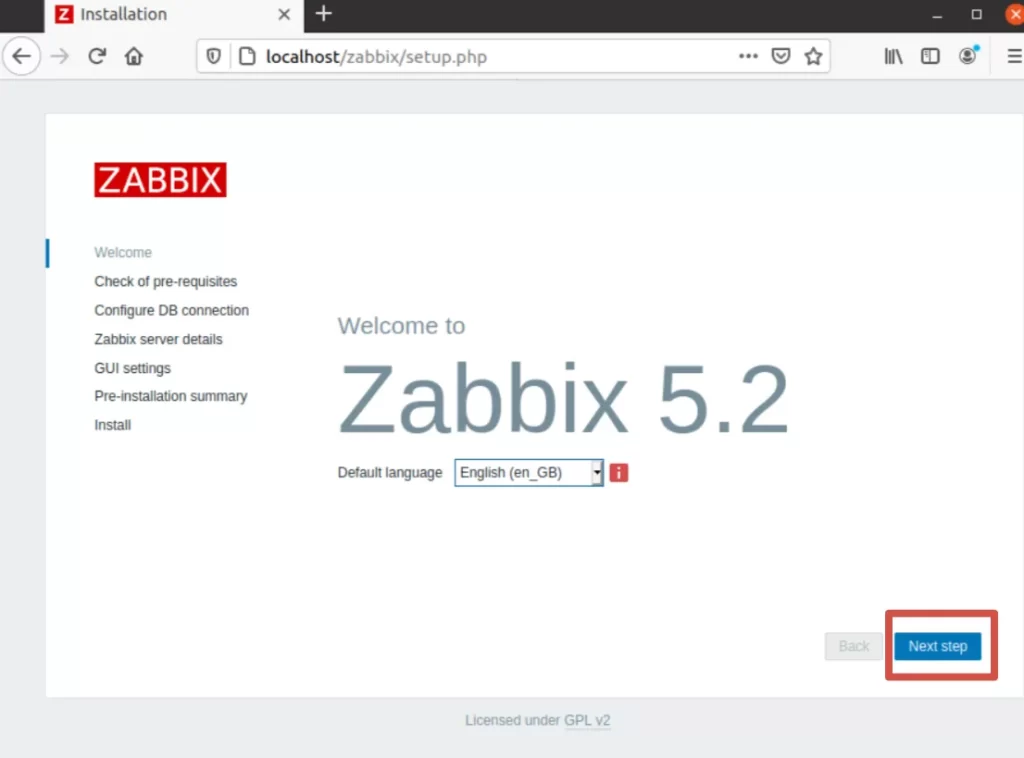
После автоматической проверки настройки РНР введите запрашиваемую информацию.
При желании измените данные.
Выберите предпочитаемый для работы интерфейс.
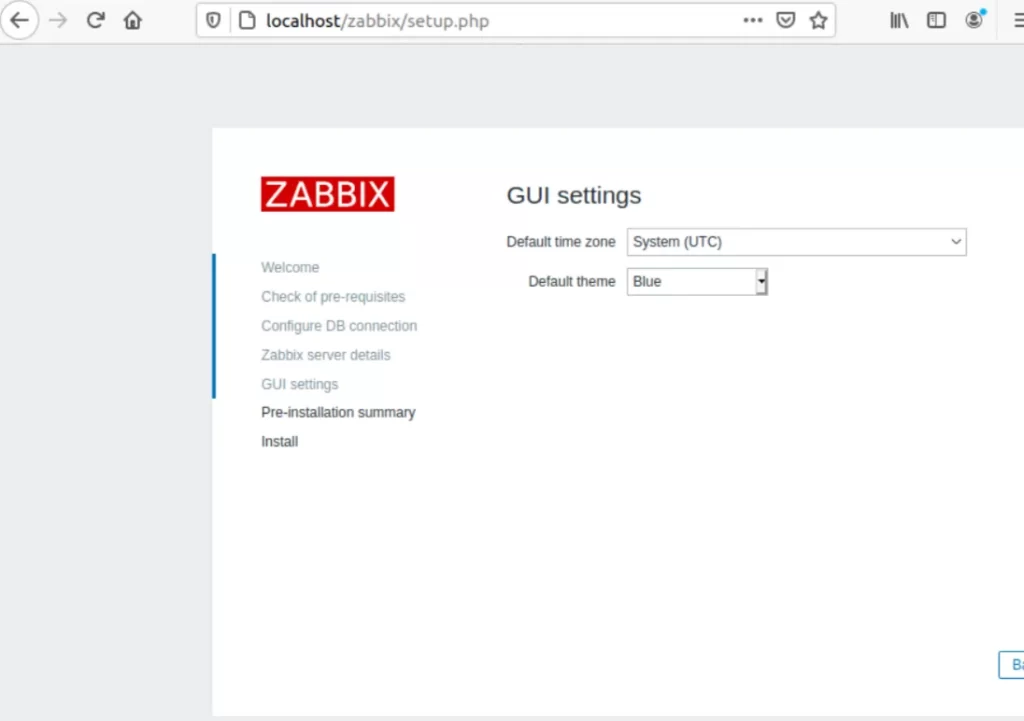
Перепроверьте введённую ранее информацию, вернитесь в Интернет и кликните на Finish. Должно появится окно с вводом информации для авторизации. Изначально логин — Admin, пароль — zabbix.
Шаг 5. Русификация программы
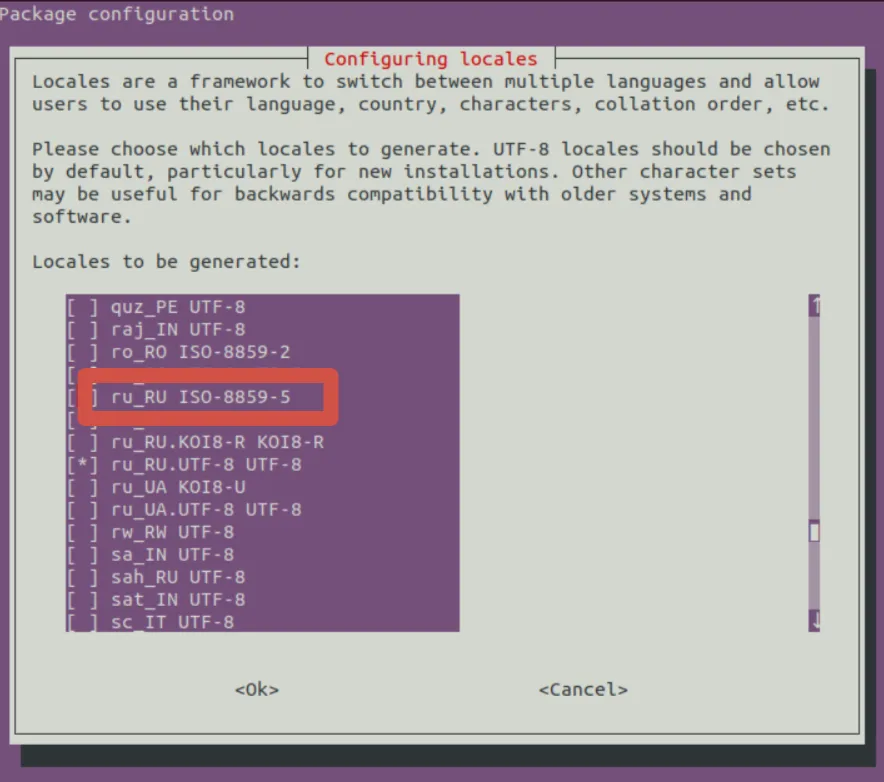
Язык программы меняется на панели User Settings. Изначально доступен только English language. Для доступа к другим языкам введите в командной строке следующее:
$ sudo dpkg-reconfigure localesПри помощи стрелок переместитесь вниз по списку и отыщите
ru_RU.UTF-8 и ru_RU.ISO-8859-5Нажмите на пробел и выберите искомое значение. Чтобы сохранить изменения, кликните Ok.
Русифицируйте сервис в панели User Settings.
Заключение
Если при установке возникли проблемы, перепроверьте правильность введённых команд. Установка Zabbix на Windows и Ubuntu довольно простая. Надеемся, статья помогла вам разобраться в установке.
Читайте в блоге, какие действия предпринять при взломе VPS на Windows/Linux.
В этой инструкции мы установим мониторинг Zabbix, осуществим базовую настройку.
Шаг 1. Установка Zabbix-агента
Будем считать что Centos у нас уже установлен.
Для установки Zabbix-агента необходимо найти ссылку на репозиторий на сайте repo.zabbix.com
Мы для данной статьи будем устанавливать 4.0.12. Скачиваем репозиторий:
rpm -Uvh https://repo.zabbix.com/zabbix/4.0/rhel/7/x86_64/zabbix-agent-4.0.12-1.el7.x86_64.rpm
Проводим установку:
На все вопросы соглашаемся (Y). После установки нужно настроить конфигурационный файл в котором настраиваются основные параметры,такие как безопасность,логирование, подключение и т.д.
Для запуска агента достаточно прописать адрес сервера, порт и имя хоста (сервера):
nano /etc/zabbix/zabbix_agentd.conf
Включаем:
/etc/init.d/zabbix-agent start
Добавляем в автозагрузку:
Далее нужно добавить правило в firewall:
iptables -A INPUT -p tcp --dport “порт” -s “адрес сервера” -j ACCEPT
Установка Zabbix-агента завершена. Теперь, чтобы мониторить этот хост, нужно его настроить на Zabbix-сервере.
Шаг 2. Установка Zabbix-клиент под ОС Windows
Чтобы установить Zabbix-клиент на Windows нужно скачать и установить установщик с сайта https://www.zabbix.com/.
При установке указываем имя, с которого мы будем отправлять статистику, порт и хост нашего сервера Zabbix. Если нужно, указываем прокси.

Рисунок 1 – Установка Zabbix Agent
В дальнейшем, эти настройки можно сменить, они хранятся в файле zabbix_agentd.conf, который по умолчанию установщиком ставится в C:Program FilesZabbix Agent

Рисунок 2 – Просмотр файла настройки Zabbix Agent
Шаг 3. Настройка на Zabbix-сервере
После входа в систему на веб-интерфейсе Zabbix-сервера, нужно создать узел сети. Для этого перейдите во вкладку “Настройка” → “Узлы сети” → “Создать узел сети”.

Рисунок 3 – Добавление узла сети
Вводим в “Имя узла сети” и “Интерфейсы агента” адрес, порт и хост сети, который вводили в конфигурационном файле ранее.
Далее переходим в кладку “шаблоны” и подключаем нужный нам шаблон. Изначально в дистрибутиве Zabbix-сервера идёт список полезных шаблонов, но можно и создать свой во вкладке “Настройка” → “Шаблоны”. После добавления шаблона, нажимаем “Добавить”.
После добавления шаблона, можно посмотреть данные с агента “Мониториниг” → “Последние данные”.
Шаг 4. Настройка уведомлений
Для отправки уведомлений по email сперва нужно настроить сервер SNTP “Администрирование” → “Способы оповещений”.
После настройки сервера отправки, нужно зайти в “Профиль пользователя” → “Оповещения”- “Добавить”. Тут выбирается нужный email – туда должны будут приходить оповещения. Настраиваются оповещения и отправка по важности.

Рисунок 4 – Настройка уведомлений узла сети
Zabbix is an enterprise-level open-source monitoring system. Currently, Zabbix is one of the most popular and powerful free monitoring systems. Due to its simple installation and configuration, Zabbix may be used to monitor large infrastructures with hundreds of hosts, as well as small configurations. In this article, we’ll show you how to install and configure the basic features of a Zabbix server 5.0 with a web interface on Linux Ubuntu and CentOS, and how to install Zabbix agent on a server running Windows or Linux and add new hosts for monitoring.
You can see the Zabbix server dashboard interface on the screenshot below.
Contents:
- How to Install Zabbix Server on Linux (Ubuntu, CentOS)
- Zabbix Web Interface Configuration
- How to Install Zabbix Agent on Windows
- How to Add New Host on Zabbix Server
- Installing Zabbix Agent on Linux
Simple and easy-to-configure Zabbix is written on C (a server, a proxy, and an agent) and PHP (frontend). Zabbix Server and Zabbix Proxy work in Linux systems only. The Zabbix agent can be installed on a wide variety of supported operating systems and platforms.
Zabbix server installation consists of:
- A zabbix_server binary (usually, it is working as a service);
- MySQL/MariaDB/PostgreSQL database;
- Apache2/Nginx web server with a PHP handler;
- Frontend site files (.php, .js, .css, etc.).
Usually, the operating scheme looks like this:
- A Zabbix agent sends data to a server;
- A Zabbix server receives and processes the data;
- If the received data meets the specified conditions, a trigger is activated;
- The activated trigger indicates that there is a problem. A notification appears in the frontend (on a site), and depending on the configuration, an email notification is sent or some actions are performed (for example, a monitored service is restarted).
Zabbix can work with all known protocols. Thanks to the ability to use external scripts, Zabbix can execute and receive data from any executable scripts/binaries.
How to Install Zabbix Server on Linux (Ubuntu, CentOS)
In this tutorial, we’ll show how to install Zabbix Server on Linux (Ubuntu Server 18.4 and CentOS  using a package manager.
Go to the download page https://www.zabbix.com/download and select the repository that matches your Linux distribution. There are ready packages for all popular Linux distros.
For example, to install Zabbix on Ubuntu 18.04, select the following in turn:
Zabbix Version (5.0 LTS) -> OS Distribution (Ubuntu) -> OS Version (18.04 Bionic) -> Database (MySQL) -> Web server (Nginx or Apache).
Download and add the repository:
# wget https://repo.zabbix.com/zabbix/5.0/ubuntu/pool/main/z/zabbix-release/zabbix-release_5.0-1+bionic_all.deb
 # dpkg -i zabbix-release_5.0-1+bionic_all.deb
 # apt update
Then you can install the required packages:
# apt install zabbix-server-mysql zabbix-frontend-php zabbix-nginx-conf zabbix-agent

To install Zabbix on CentOS 8/RHEL 8, connect the repository with the latest Zabbix version (you can install Zabbix from the 4.0/5.0 LTS branch or the latest Zabbix 5.2):
# rpm -Uvh https://repo.zabbix.com/zabbix/5.0/rhel/8/x86_64/zabbix-release-5.0-1.el8.noarch.rpm
 # dnf clean all
Suppose that nginx, MySQL/MariaDB, php and php-fpm are already installed on the server. Use the dnf (yum) package manager to install Zabbix Server and the agent:
# dnf install zabbix-server-mysql zabbix-web-mysql zabbix-nginx-conf zabbix-agent
Then create a database for Zabbix in MySQL (you can use PostgreSQL instead of MySQL, just replace ‘mysql’ with ‘pgsql’ in the previous commands).
Create a database and grant permissions to the user account, under which Zabbix will access the DB:
mysql -uroot
 mysql> create database zabbix character set utf8 collate utf8_bin;
 mysql> grant all privileges on zabbix.* to zabbix@localhost identified by 'ZabbixP@$$w0rd';
 mysql> quit;
Import the Zabbix database. Enter the password you specified when you created a user.
# zcat /usr/share/doc/zabbix-server-mysql*/create.sql.gz | mysql -uzabbix -p Zabbix
Edit /etc/zabbix/zabbix_server.conf, specify the password of the user you have created.
DBPassword=Zabbix_User_Password
Since in my case nginx is used as a web server, edit nginx.conf by uncommenting the following lines:
# listen 80;
# server_name example.com;
Remove # and replace example.com with the Zabbix server hostname. In my case, it is test.zabbix.local.
For Apache, edit /etc/httpd/conf.d/zabbix.conf.
Set the time zone in PHP. Uncomment the following line in /etc/zabbix/php-fpm.conf:
php_value[date.timezone] = Canada/Pacific
Make sure that the time on your Zabbix server is synchronized with a reliable NTP time host.
You can also set these PHP parameters in /etc/php.ini:
memory_limit 128M
upload_max_filesize 8M
post_max_size 16M
max_execution_time 300
max_input_time 300
max_input_vars 10000
Add the zabbix-server service to startup and run it:
# systemctl enable zabbix-server zabbix-agent nginx php7.2-fpm
 # systemctl restart zabbix-server zabbix-agent nginx php7.2-fpm
Zabbix Web Interface Configuration
Now you must configure Zabbix frontent (web interface). Open the Zabbix server URL specified earlier in a browser. In my case, it is test.zabbix.local (or the domain you have specified. Remember to register it in your hosts file or on the DNS server). Make sure that OK is shown next to all installer requirements.
Specify the database connection parameters and user credentials to connect to the DB. Use the username and password created earlier.
Specify the name of your Zabbix server. I recommend to leave the default port – TCP 10051.
By default, Zabbix uses two network ports:
- TCP 10050 — passive agent port, which Zabbix server uses to poll clients;;
- TCP 10051 — port through which Zabbix server receives data from clients (active agents).
Remember to open these ports on the firewall. For example, on a Zabbix server running CentOS you can open the ports in firewalld using firewall-cmd:
# firewall-cmd --add-service={http,https} --permanentfirewall-cmd --add-port={10051/tcp,10050/tcp} –permanent
It is enough to open port 10050 on the agent:
# firewall-cmd --permanent --add-port=10050/tcp
Restart firewalld:
# firewall-cmd –reload
Then click Next Step and Finish. After the installation, you will be prompted to login. The default login is Admin, the default password is zabbix (change it).
Zabbix Server installation is over.
You can find step-by-step instructions on Zabbix Server installation on other OS and guides on how to build zabbix-server from the source code or run it in docker containers on https://www.zabbix.com/download.
You can configure Zabbix to authenticate users using Active Directory LDAP.
To implement SSO, Apache2 with libapache2-mod-auth-kerb module will be used in this article. Nginx will not be discussed here, but it has spnego-http-auth-nginx-module that has to be enabled separately when compiling Nginx.
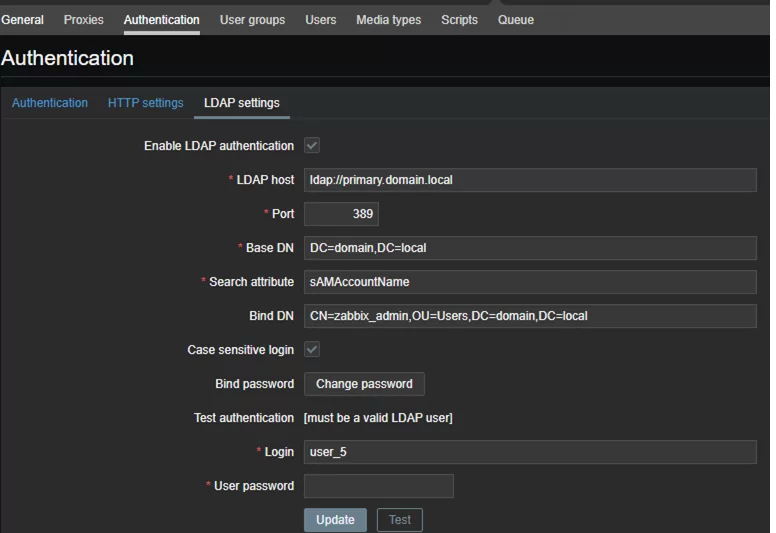
Configure LDAP authentication in Zabbix. In Zabbix frontend go to LDAP settings tab in Administration -> Authentication. Check Enable LDAP authentication and fill in the following fields:
- LDAP host:
ldap://dc1.domain.local - Port:
389 - Base DN:
DC=domain, DC=local - Search attribute:
sAMAccountName - Bind DN:
CN=zabbix_admin,OU=Users,DC=domain,DC=local
How to Install Zabbix Agent on Windows
Let’s try to install a Zabbix agent on a server running Windows and add it to our Zabbix monitoring server. You can download a Zabbix agent version for Windows here: https://www.zabbix.com/download_agents.
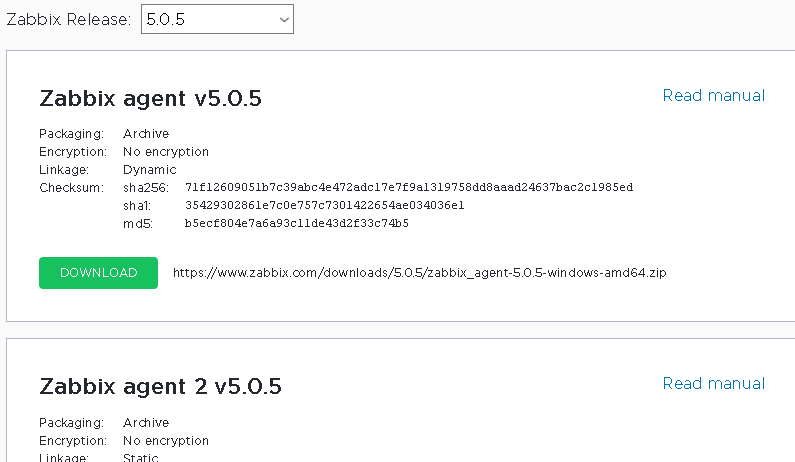
Select the agent version you need. I will choose msi (amd64) (without OpenSSL). If you are going to install Zabbix Agent on domain servers/computers using GPO or SCCM, you can download a ZIP archive with binary and configuration files.
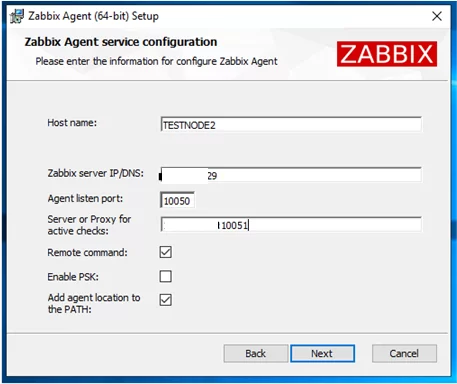
Run the installer, accept the license agreement, and specify the settings for connecting to the Zabbix server. Please note that in the “Server or Proxy for active checks” field I have entered an IP address in the IP:PORT format. Since I left a default port, I have entered 192.168.20.30:10051.
Click Next a couple of times, then click Install.
Make sure that the agent has been installed. Zabbix Agent must appear in the list of services.

Allow inbound connections from your Zabbix server IP address in Windows Firewall on your Windows host:
New-NetFirewallRule -DisplayName "ZabbixMonitoring" –RemoteAddress 192.168.20.30 -Direction Inbound -Protocol TCP –LocalPort 10050 -Action Allow
How to Add New Host on Zabbix Server
To make sure that the agent is operable, add testnode2 host to your Zabbix server and assign some checks (templates) to it.
Note. There are 2 types of checks in Zabbix:
- Passive — a Zabbix server requests some data from the agent;
- Active — the agent is sending data to the server.
During the agent installation, we specified the server as IP:PORT for active checks.
You can add a new monitoring host via Zabbix web interface. Go to Configuration -> Hosts.
Click Create host and fill in the details. Note that the Host name must exactly match the device hostname or the value of the Hostname parameter in the agent configuration file.
Add built-in Windows templates in the Templates tab. Templates in Zabbix are sets of values, triggers, graphs and discovery rules that may be assigned to one or more hosts.
The built-in templates have “active” label, and which means that active checks will be used.
Click Add. In order not to wait till the server and agent see each other (it usually takes a couple of minutes), restart Zabbix Agent service on the testnode2 and view the agent log (C:\Program Files\Zabbix Agent\zabbix_agentd.txt).

The “started [active checks #1]” message means that some active checks for the host have been found on the server. Then have a look at the data that your Zabbix server received from the agent. To do it, go to Monitoring -> Latest Data and select the host in the Hosts field.
This section shows the latest data on the selected host or groups of hosts that have come to the Zabbix server.
Please note that in my case the Zabbix dashboard contains a notification that the BITS service is not running. The notification appeared since we assigned built-in templates to our host. One of the templates has a BITS check, and the corresponding trigger is activated if the BITS service is not in the Running state.
The Agent for Windows is configured.
Installing Zabbix Agent on Linux
Let’s install Zabbix Agent on Linux. To install Zabbix Agent on Ubuntu Server 18.04 using a package manager, download and the install Zabbix repo. Then install Zabbix Agent from the repository:
# wget https://repo.zabbix.com/zabbix/5.0/ubuntu/pool/main/z/zabbix-release/zabbix-release_5.0-1+$(lsb_release -sc)_all.deb
 # sudo dpkg -i zabbix-release_5.0-1+$(lsb_release -sc)_all.deb
 # sudo apt update
 # sudo apt -y install zabbix-agent
To add the repository and install Zabbix Agent on CentOS, use these commands:
# rpm -Uvh https://repo.zabbix.com/zabbix/5.0/rhel/8/x86_64/zabbix-release-5.0-1.el8.noarch.rpm
 # dnf clean all
 # dnf install zabbix-agent
Before starting the Zabbix agent, edit the configuration file /etc/zabbix/zabbix_agentd.conf. Specify the IP address of your Zabbix server for active checks.
Server=IP
ServerActive=192.168.20.30:10051
Hostname=testagent
Then start the agent service:
# service zabbix-agent start
Make sure that the agent has started successfully.
# cat /var/log/zabbix/zabbix_agentd.log
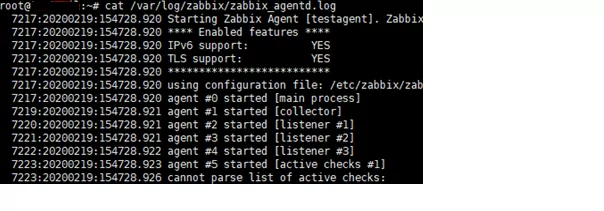
The line “cannot parse list of active checks” means that there are no active checks for the host on the server.
Like with the Windows agent, you must add your Linux host to Zabbix . Note the Host name parameter in the host settings of your Zabbix server: it must match the Hostname parameter we have specified in the Zabbix Agent configuration file. In the config file above I specified the host name as testagent.
Restart your Zabbix agent and check the log. Make sure that data from the agent have appeared on your Zabbix server. Zabbix agent on Linux is configured.
In the next article, we’ll look at agentless monitoring of host availability in Zabbix via ICMP Ping.
In this tutorial, I will show you how to install Zabbix agent for Windows server using an MSI Installer package and how to monitor Windows server with Zabbix monitoring system.
Using this guide you can monitor almost the entire Windows OS family: Windows server 2012 R2, Windows Server 2016, Windows Server 2019, Windows 10, Windows 8 and Windows 7.
Installation is quite simple, just download and install the Zabbix agent MSI installer following steps 1 and 2, but if you want to learn more, read the full guide.
In short, Zabbix agent is a lightweight application that can collect various performance data from the operating system – such as CPU, memory, disk, and network interface utilization – and forward it to a central point (server) for storage and visualization. It runs on any modern operating system and is very flexible because its functionality can be extended with scripts and modules.
You can read more about the Zabbix agent on the Zabbix official site and if you stumbled on this tutorial by accident and you never heard of the Zabbix monitoring system, then stop whatever you doing and install it on your favorite Linux distribution in less than 10 minutes: CentOS/RHEL, Ubuntu, Debian, Rasberry Pi.
Need help with installing Zabbix agent on Linux OS? Check out this guide:
Zabbix Agent (Linux): Install on Ubuntu, CentOS, RHEL, Debian, etc.
Table of Contents
- Step 1: Download Zabbix Agent Installer for Windows (msi)
- Step 2: Install Zabbix Agent on Windows using MSI installer
- Step 3: Add Windows host to Zabbix monitoring system
- Step 4: Check if Zabbix Agent is working correctly
- Step 5: Restart Zabbix Agent service on Windows
- Step 6: Configure auto registration for Windows Zabbix Agents
- Step 7: Configure PSK encryption on Zabbix Agent (Windows)
- a. Generate PSK key
- b. Configure Zabbix agent to support PSK encryption
- c. Enable PSK encryption on the agent in Zabbix frontend
- Step 8: Install Zabbix agent via Windows command-line (CMD)
- a. Run CMD as administrator
- b. Download Zabbix agent
- c. Change directory and set installation folder
- d. Install Zabbix agent using msiexec
- e. Example of Zabbix agent installation with additional options
- Step 9: Understanding Active vs Passive Zabbix Agent mode
Step 1: Download Zabbix Agent Installer for Windows (msi)
In this tutorial, I will use the latest Zabbix agent 5.0.2 LTS version, that version is compatible with Zabbix server 5.x or newer.
| Windows Zabbix Agent v1 LTS v6.0.x | Download: 64-bit or 32-bit |
| Windows Zabbix Agent v2 LTS v6.0.x (recommended) | Download: 64-bit or 32-bit |
I always recommend using the latest LTS version to take full advantage of new features and improved performance so make sure to download installer zabbix_agent2-6.0.7-windows-amd64-openssl.msi for 64-bit Windows or zabbix_agent2-6.0.7-windows-i386-openssl.msi for 32-bit Windows.
And don’t try to install a 32-bit package on 64-bit Windows because it won’t work!
Step 2: Install Zabbix Agent on Windows using MSI installer
I will install Zabbix Agent on Windows server using installation wizard but if you prefer command-line based installation check out section “Install Zabbix agent via Windows command-line (CMD)”
Just to make clear, in this tutorial I will use Zabbix server with IP address 192.168.5.43 to monitor Windows machine called w01services with IP address 192.168.5.22.
Double click on Zabbix MSI installer that you have downloaded in the previous step and click “Next” just as shown in the image below.
Accept the terms and click the “Next” button.

Define custom “Host name” or use fully qualified domain name (FQDN) of the Windows machine in the “Host name” field. Then enter IP address of the Zabbix server under “Zabbix server IP/DNS” and “Server or Proxy for active checks” field and you are done.
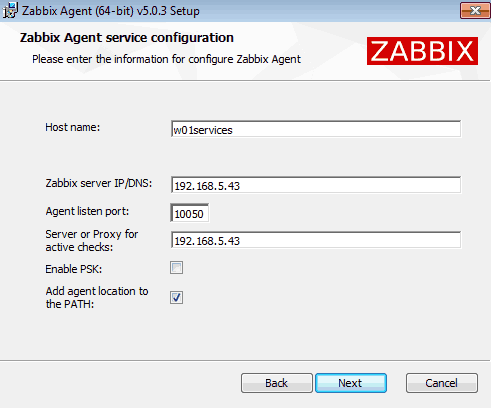
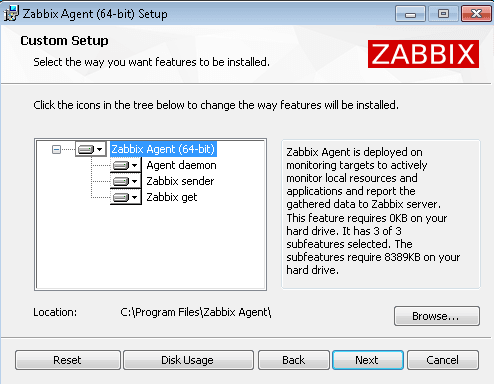
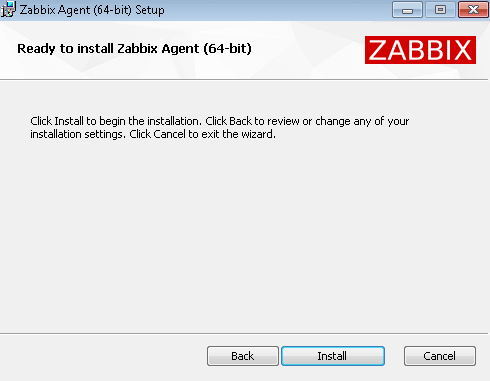
Select “Add agent location to the PATH” and go through the rest of the installation by clicking “Next“, “Install” and “Finish“.
You don’t need to configure Windows firewall manually because the MSI installer will automatically add a firewall rule to permit Zabbix TCP port 10050.
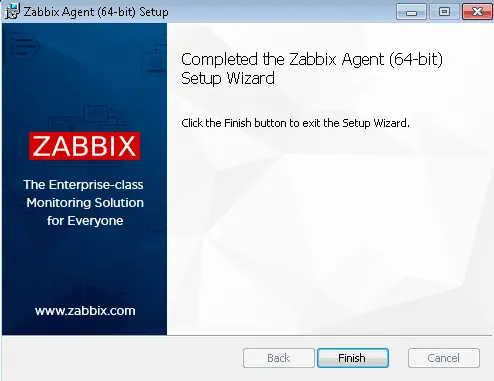
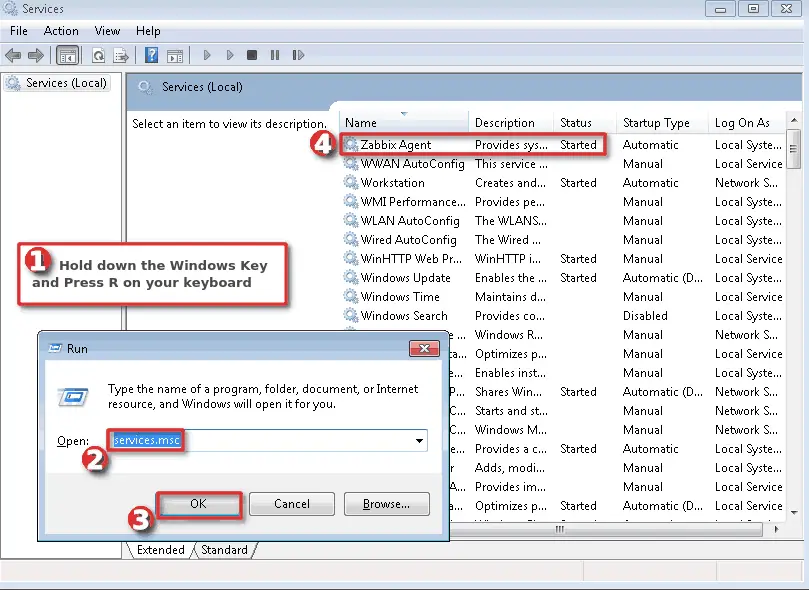
Finally, we need to check that the Zabbix agent is up and running.
Hold down the “Windows key” and press “R” on the keyboard, type “services.msc“, press “OK” and check the “Status” column for “Zabbix Agent” service exactly as shown in the picture below. Status should be “Started” if the installation was successful.
WELL DONE!
You have successfully installed and configured Zabbix agent on Windows OS!
Now it’s time to add that Windows host to Zabbix monitoring system.
Step 3: Add Windows host to Zabbix monitoring system
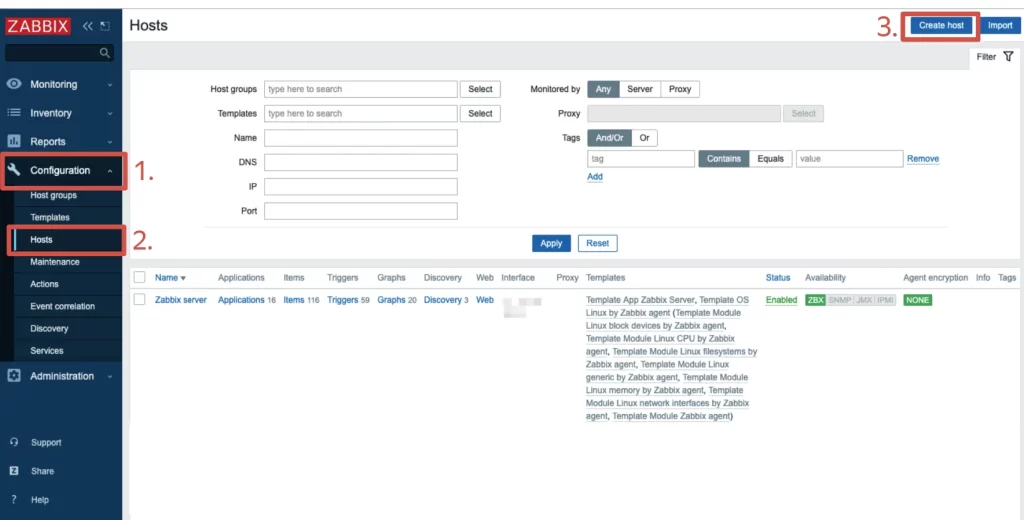
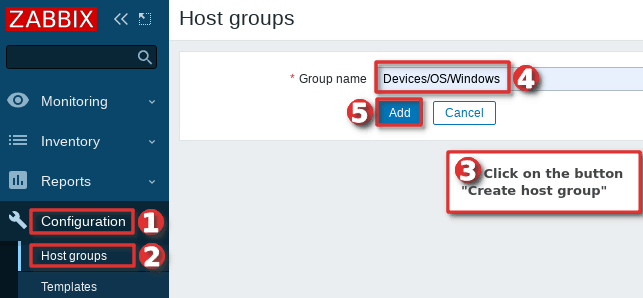
You can add a host to existing host group or you can create a new host group for your Windows servers. I will create host group “Devices/OS/Windows“ using “Host groups” option under “Configuration” section on the Zabbix frontend. Click “Create host group” button, define “Group name” and click “Add” (you only need to create host group once):
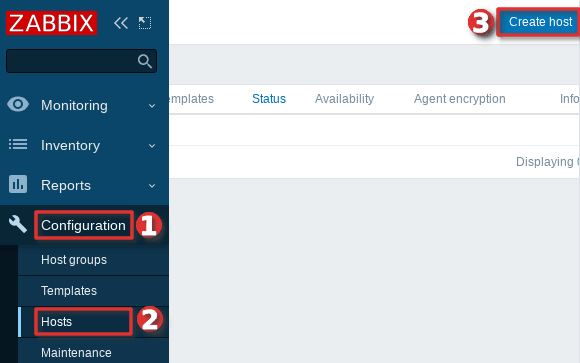
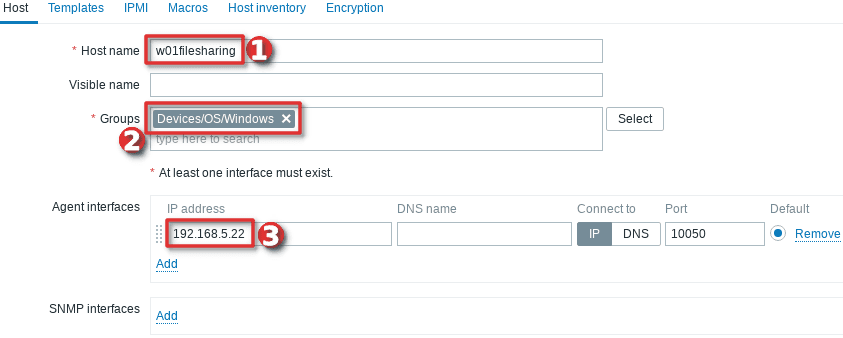
Navigate to “Host” menu under “Configuration” tab and then click “Create host” option to create a host in Zabbix:
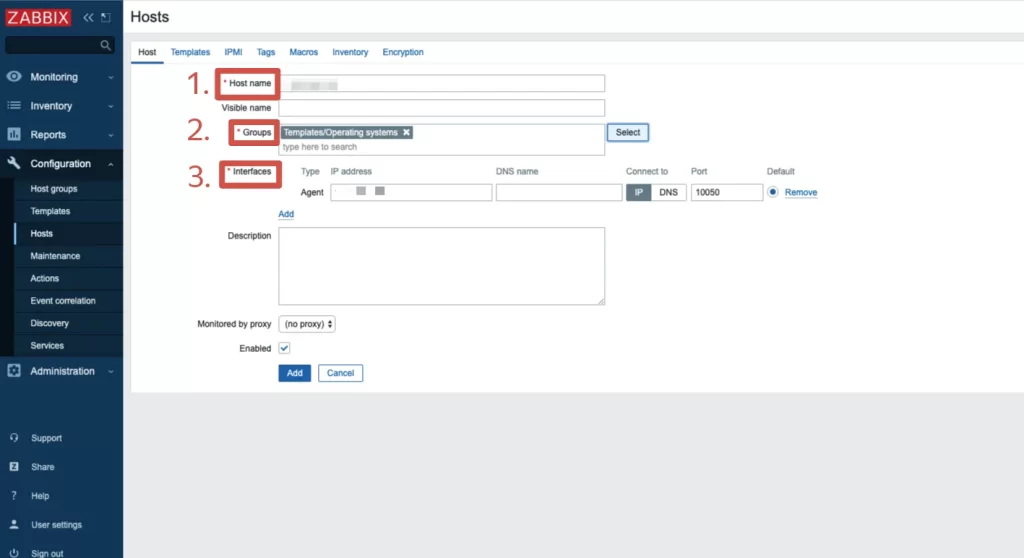
Define “Hostname” and set “Groups” using your newly created host group. Then set the IP address of the Windows server under “Agent interfaces” section
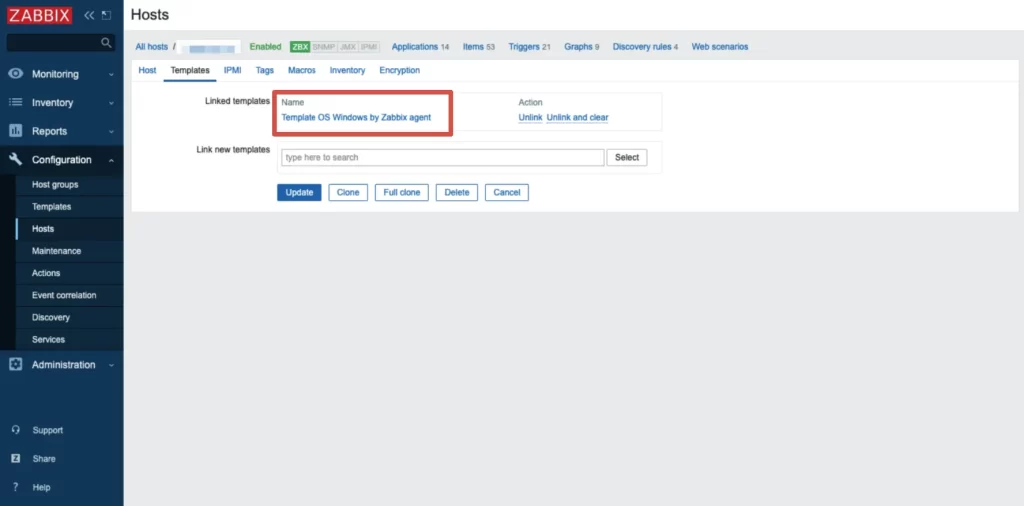
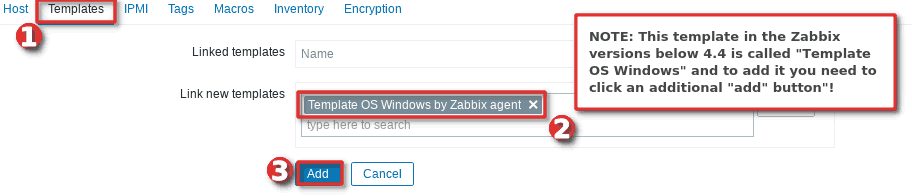
Switch to tab “Templates” and choose the “Template OS Windows by Zabbix agent” template under section “Link new template” by typing “OS Windows …”.
And you’re done! If you are interested in automating this whole process of adding Windows hosts to Zabbix see the section “Configure auto registration for Windows Zabbix agents“
Note that in this tutorial I m using a template “Template OS Windows by Zabbix agent” that can only monitor passive Zabbix agents. However, if you want to monitor your host using Zabbix agents in active mode use a template called “Template OS Windows by Zabbix agent active“. Check out the section “Understanding Active vs Passive Zabbix Agent mode” to learn more about the differences between the active and passive agent mode.
Step 4: Check if Zabbix Agent is working correctly
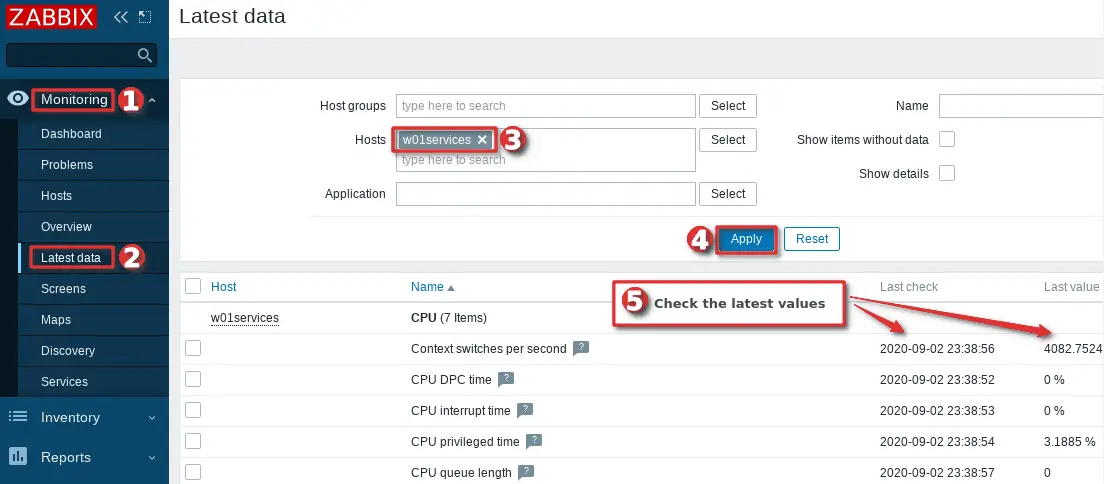
You can check that the Zabbix agent is working properly by using the “Latest Data” option on the Zabbix frontend. Wait up to 5 minutes after you have installed and started Zabbix agent to allow for data to be collected. Look at columns “Last check” and “Latest value” and if they are updating then the agent is working.
Your agent should be working and collecting data by now, but if you experience any problems, restart Zabbix agent service and check the log “C:\Program Files\zabbix\zabbix_agentd.log“. And if there is nothing unusual in the log file then check the firewall – make sure that TCP port 10050 on the host (where Zabbix agent is installed) and TCP port 10051 on the Zabbix server side are open.
CONGRATULATIONS!
You have successfully installed Zabbix Agent and your Windows server is being monitored!
No need to do anything else as other steps are optional!
CONTINUE TO LEARN MORE:
How to manage Zabbix agent service on Windows
Auto registration of Zabbix agents (Windows OS)
Learn how to Secure Zabbix Agent
Alternative Zabbix agent installation via Windows command-line (CLI)
Understanding Active vs Passive Zabbix Agent mod
Step 5: Restart Zabbix Agent service on Windows
In the previous steps, we learned how to check the status of Zabbix agent service using the “services.msc” option, and now we will learn how to use the command line interface (CMD) to stop or start the agent and check its status.
Click on “Windows Start” button and type “cmd” in the search bar, right-click on “cmd” icon and select option “Run as administrator” and use these commands to start/stop the agent:
net stop "Zabbix Agent"
net start "Zabbix Agent"
And to check Zabbix agent service status use the command:
sc query "Zabbix Agent" | findstr /i "STATE"
You should get status “RUNNING” if the Zabbix agent is up and running!
Step 6: Configure auto registration for Windows Zabbix Agents
Adding one or two hosts to Zabbix manually is not a big problem. However, what if you need to add more servers to Zabbix? Or you just want to automate that tedious process of adding Windows hosts to Zabbix and linking them with the correct template and host group?
Don’t worry, you don’t have to write the script because Zabbix has a tool called “Auto registration”.
Before we configure Zabbix frontend, make sure that all of your Zabbix agents have “HostMetadata=Windows” line in their configuration file (default path: “C:\Program Files\zabbix\zabbix_agentd.conf“). And if that line does not exist, add it and restart the Zabbix Agent afterward. You can automate that via CLI like this:
echo HostMetadata=Windows >> C:\"Program Files"\zabbix\zabbix_agentd.conf
net stop "Zabbix Agent"
net start "Zabbix Agent"
In the future always install the Zabbix agent on Windows with the “HostMetadata=Windows” parameter if you are planning to use the auto-registration feature!
Now that we’ve clarified that let’s configure auto-registration on the Zabbix frontend.
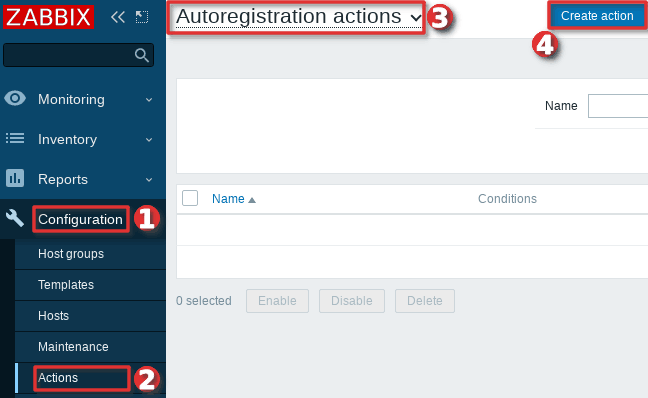
Go to the “Actions” tool under the “Configuration” section, then select “Auto registration” from the dropdown menu and click the “Create action” button.
On the “Action” tab define the “Name” of the action and add a “New condition” that will check if the “Host metadata” contains the word “windows”.
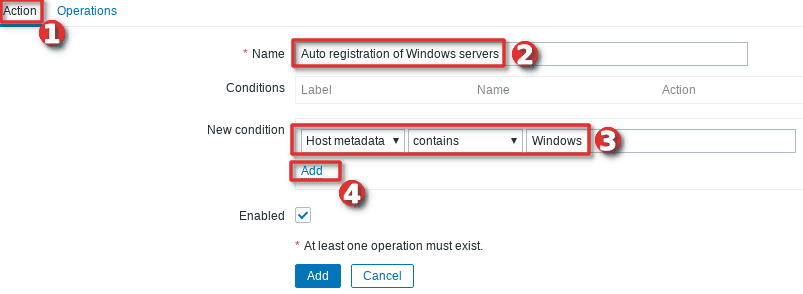
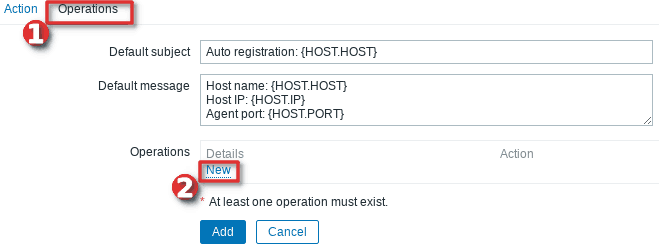
Then, change tab to “Operations” and add new operation.
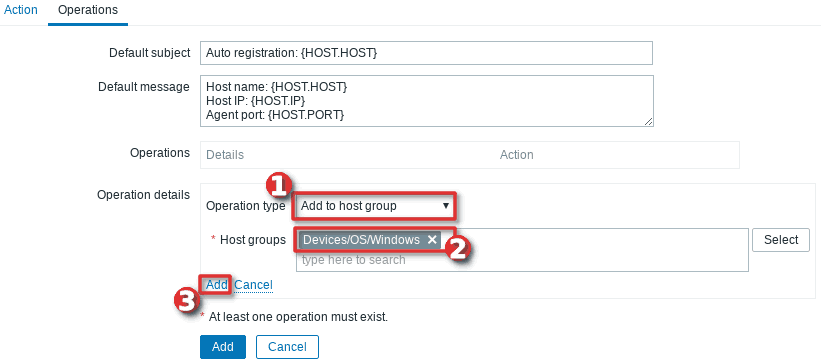
Define “Operation type” as “Add to host group” and then select to which “Host groups” will Windows hosts be added when discovered. In my case, I will use my custom host group called “Devices/OS/Windows“.
After that, you need to add a new operation by setting “Link to the template” as “Operation type” and then select which templates will be linked with the newly discovered Windows hosts. In my example, I will use template “Template OS Windows by Zabbix agent” (passive checks)
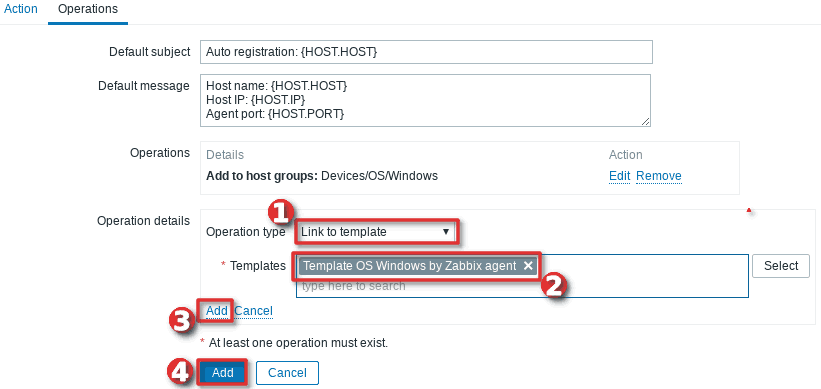
Well done! Auto-registration is configured. Wait a few minutes and your Windows server should appear in Zabbix. From now on, every time you install a Zabbix agent on a Windows server, it will automatically be added to the Zabbix and linked with the appropriate host group and template.
Note, that you can add anything you want to the “HostMetadata” parameter. For example, you can have a host that has in Zabbix agent configuration file defined “HostMetadata=Windows:Tomcat:Prod” or another with “HostMetadata=Windows:MSSQL:Test“. For the first host, you can configure auto-registration to add to host groups: “Windows”, “Web servers” and “Production servers” and to link templates that can monitor Windows and Tomcat server. And the second host can be added to host groups: “Windows”, “Databases”, and “Test servers” and linked with templates that can monitor Windows server and Microsoft SQL database.
Using PSK encryption on the Zabbix agents? Then there is one more step left, you need to add your PSK identity and PSK key using the “Auto Registration” option under the “Administration“→”General” section just as shown in the image below:

From now on, during the auto registration process, Zabbix will configure provided PSK identity and key on each registered host.
Step 7: Configure PSK encryption on Zabbix Agent (Windows)
Zabbix supports encrypted communications between Zabbix server and Zabbix agent using Transport Layer Security (TLS) protocol v.1.2. You can use certificate-based and pre-shared key-based encryption (PSK), but in this tutorial we will configure PSK encryption.
In this step, I will show you how to configure PSK encryption on an already installed Zabbix agent, but keep in mind that all of these configurations can be configured during the installation
a. Generate PSK key
Generate 256-bit (32 bytes) PSK key with openssl command on Zabbix server (or use some other tool on Windows):
$ openssl rand -hex 32
1b38eac9d870a319f201fb1da989c081faba993e3d91940193224a100cdcdb86
On Windows server, create a new text file “ZabbixAgentPSK.txt” in the default Zabbix agent installation folder (“C:\Program Files\zabbix“) and put that PSK key in the first line of the file. Don’t forget to save the file before closing.
b. Configure Zabbix agent to support PSK encryption
Open “C:\Program Files\zabbix\zabbix_agentd.conf” file with text editor (Notepad++) and add this configuration anywhere in file:
TLSConnect=psk
TLSAccept=psk
TLSPSKFile=C:\Program Files\zabbix\ZabbixAgentPSK.txt
TLSPSKIdentity=ZBX-AGENT-PSK-ID
Save and exit file. Keep in mind that “TLSPSKIdentity” can be anything, so for security reasons set something else – don’t use mine!
Don’t forget to restart Zabbix agent service after changing the configuration file!
c. Enable PSK encryption on the agent in Zabbix frontend
Communication between Zabbix agent and server is not yet encrypted because we have enabled PSK encryption on the agent side but not on the server side.
We need to enable encryption on the server side so go to web frontend and select your “Hosts” tab under the “Configuration” section and find and click on your Windows hosts.
On the “Encryption” tab set PSK under “Connections from hosts” option and copy/paste “PSK identity” and “PSK” (key) that is configured on the Zabbix agent.
When you are done with configuration click the “Update” button just as shown in the image below.
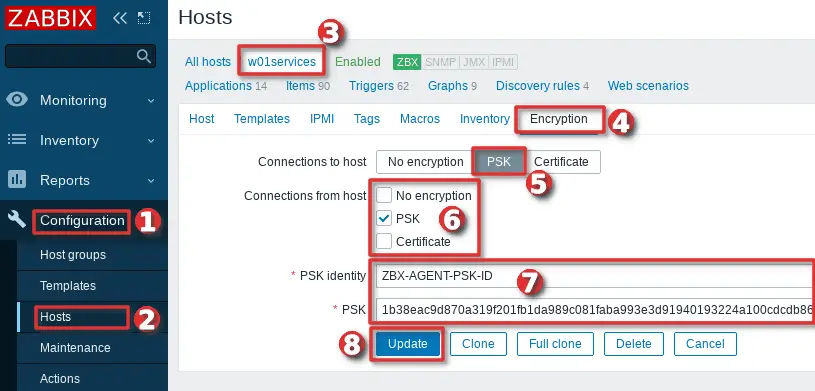
Keep in mind, that you can automate the configuration of the host encryption (PSK) on the frontend using the Zabbix auto registration process.
Step 8: Install Zabbix agent via Windows command-line (CMD)
This step is for those who prefer command-line based installation instead of wizard-based installation.
a. Run CMD as administrator
Click on “Windows Start” button and type “CMD” in the search bar, right-click on “cmd” and select option “Run as administrator“:
b. Download Zabbix agent
Download installer zabbix_agent2-6.0.7-windows-amd64-openssl.msi for 64-bit Windows or zabbix_agent2-6.0.7-windows-i386-openssl.msi for 32-bit Windowsand save it on a “C:\” disk or somewhere else.
c. Change directory and set installation folder
Change directory to the path where you have downloaded the MSI file and set the installation folder with commands:
cd C://
SET INSTALLFOLDER=C:\Program Files\zabbix
d. Install Zabbix agent using msiexec
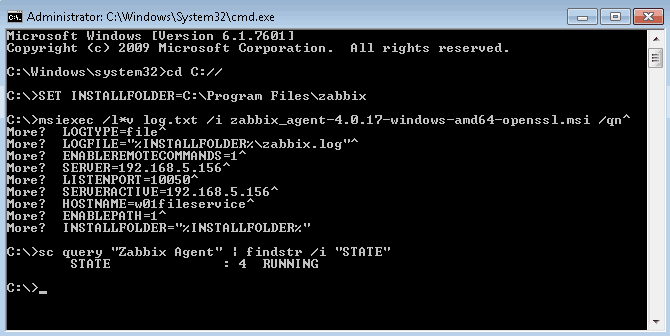
Here is an example of Zabbix agent installation that will work for most people, just change parameteres “SERVER“, “SERVERACTIVE” and “HOSTNAME” to suit your enviroment.
msiexec /l*v log.txt /i zabbix_agent2-6.0.7-windows-amd64-openssl.msi /qn^
LOGTYPE=file^
LOGFILE="%INSTALLFOLDER%\zabbix.log"^
SERVER=192.168.5.156^
LISTENPORT=10050^
SERVERACTIVE=192.168.5.156^
HOSTNAME=w01fileservice^
ENABLEPATH=1^
INSTALLFOLDER="%INSTALLFOLDER%"
Check “Zabbix agent” service status with the command:
sc query "Zabbix Agent" | findstr /i "STATE"
If the Zabbix agent is up and running then the status should be “RUNNING“.
Note, if you are planning to use the auto-registration feature don’t forget to add “HostMetadata=Windows” parameter to “zabbix_agentd.conf” and restart Zabbix agent afterward because Zabbix CLI installation doesn’t support “HostMetadata” parameter:
echo HostMetadata=Windows >> C:\"Program Files"\zabbix\zabbix_agentd.conf
net stop "Zabbix Agent"
net start "Zabbix Agent"
e. Example of Zabbix agent installation with additional options
You can set almost any Zabbix agent parameter during installation, here is one example of an installation where many parameters are used.
SET INSTALLFOLDER=C:\Program Files\zabbix

msiexec /l*v log.txt /i zabbix_agent2-6.0.7-windows-amd64-openssl.msi /qn^
LOGTYPE=file^
LOGFILE="%INSTALLFOLDER%\zabbix.log"^
SERVER=10.10.10.162^
LISTENPORT=10055^
SERVERACTIVE=10.10.10.162^
HOSTNAME=cmr_server^
TLSCONNECT=psk^
TLSACCEPT=psk^
TLSPSKIDENTITY=CompanyPSKID^
TLSPSKFILE="%INSTALLFOLDER%\company_key.psk"^
TLSCAFILE="c:\temp\file1.txt"^
TLSCRLFILE="c:\temp\fil2.txt"^
TLSSERVERCERTISSUER="Company CA"^
TLSSERVERCERTSUBJECT="Company Cert"^
TLSCERTFILE="c:\temp\file4.txt"^
TLSKEYFILE="c:\temp\file5.txt"^
ENABLEPATH=1^
INSTALLFOLDER="%INSTALLFOLDER%"
SKIP=fw
Parameter “SKIP=fw” means that the firewall exception rule will not be added. Explanations of other parameters can be found in the official Zabbix documentation section Zabbix Agent (Windows).
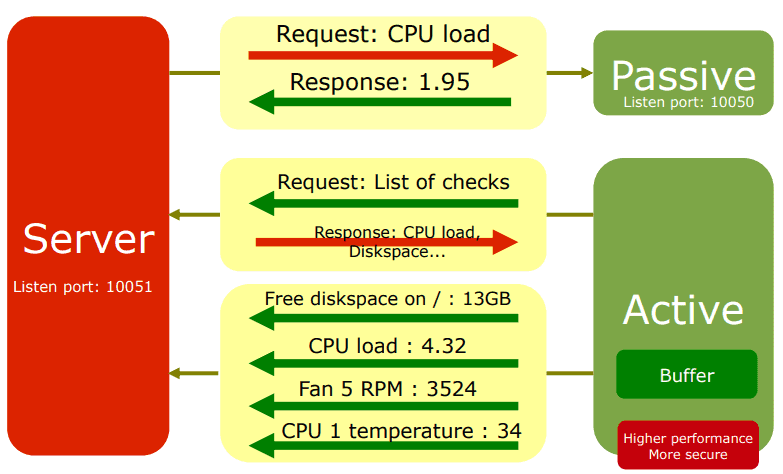
Step 9: Understanding Active vs Passive Zabbix Agent mode
When using a Zabbix agent in active mode, it will connect to the Zabbix server via port 10051 to retrieve configuration and send data. This is a great feature that allows an active Zabbix agent to work behind the firewall and to offload the Zabbix server in large environments.
On the other hand, if you use a Zabbix agent in passive mode Zabbix server will initiate a connection via port 10050 and retrieve data from the agent. The Zabbix server will do this for every metric (item) every few minutes – which is very inefficient! Because of this, active mode is more recommended.
An additional advantage of the Zabbix agent in active mode is that it can read logs from the device and that is not possible if the Zabbix agent is used in passive mode.
You can detect on Zabbix host if the agent is working in active or passive mode. Passive mode will show red or green “ZBX” icon in the agent status bar and active mode will show grey “ZBX” icon:

Learn how to setup Zabbix email notifications and escalations in a few minutes!