
Zabbix это open-source система мониторинга корпоративного уровня. На текущий момент Zabbix одна из самых популярных и функциональных бесплатных систем мониторинга. Благодаря простой установке и настройке Zabbix можно использовать для мониторинга крупных инфраструктур с сотнями серверов, так и для мелких конфигураций. В этой статье мы рассмотрим, как выполнить установку и базовую настройку сервера Zabbix 4.4 с веб-интерфейсом на базе Linux Ubuntu и CentOS, установить агенты Zabbix на сервере Windows и Linux, и добавить новые хосты в систему мониторинга.
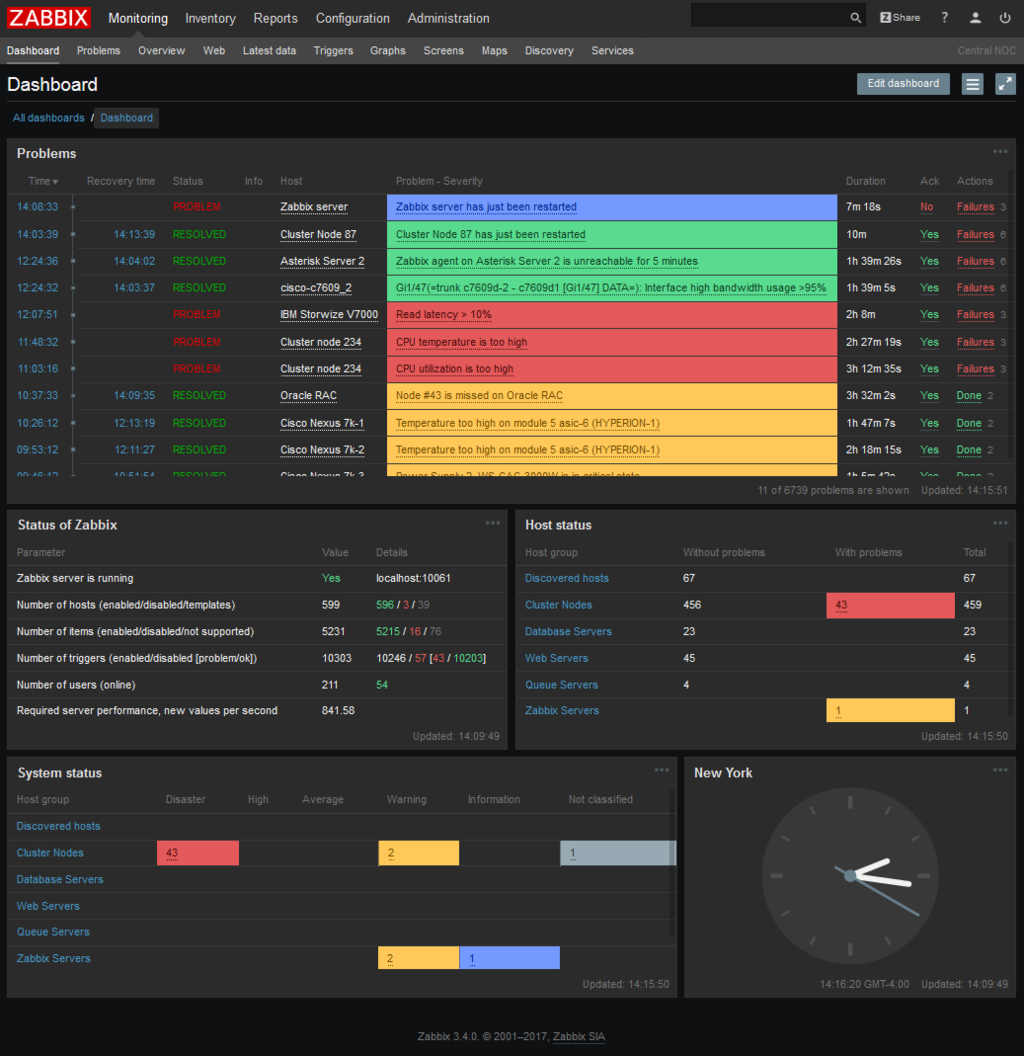
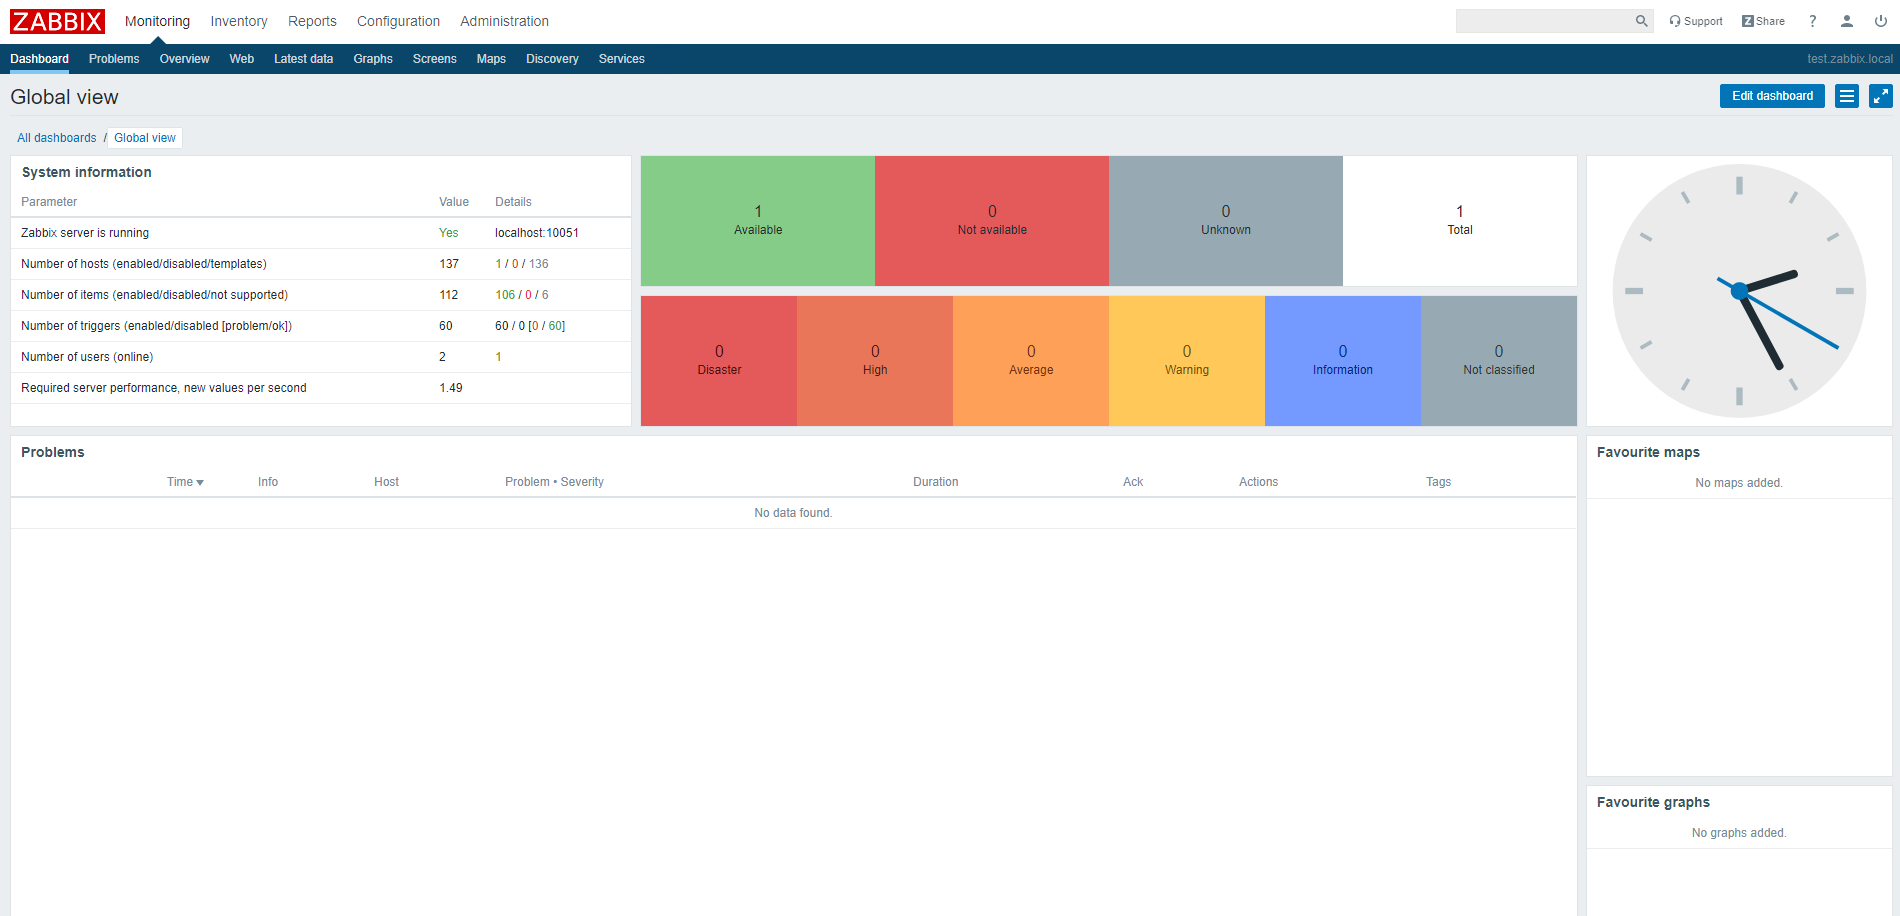
Общий интерфейс Zabbix сервера представлен на скриншоте ниже.
Содержание:
- Из чего состоит Zabbix и что он может?
- Установка Zabbix Server в Linux (Ubuntu, CentOS)
- Настройка веб-интерфейса Zabbix
- Установка Zabbix Agent в Windows
- Добавление устройства на Zabbix-сервере
- Установка Zabbix Agent в Linux
Из чего состоит Zabbix и что он может?
Zabbix простой установке и настройке, написан на C (сервер, прокси и агент) и PHP (фронтенд). Zabbix Server и Zabbix Proxy может работать только на Linux системах. Агент можно установить на большом количестве поддерживаемых ОС и платформах.
Инсталляция Zabbix сервера состоит из:
- бинарника zabbix_server (обычно работает как сервис);
- MySQL (MariaDB)/PostgreSQL базы данных;
- Веб сервера Apache2/Nginx с обработчиком PHP;
- Файлов самого frontend сайта (.php, .js, .css и т.д.).
Обычно схема работы выглядит так:
- Агент Zabbix посылает данные на сервер
- Сервер Zabbix получает и обрабатывает данные.
- Если полученные данные подпадают под заданные условия, то срабатывает триггер;
- Активный триггер сигнализирует о проблеме. Отображается уведомление на фронтенде (сайте), и в зависимости от конфигурации рассылается сообщение по почте и выполняется какие-либо действия (например, перезапуск службы, которая мониторится).
Zabbix может работать со всеми известными протоколами, а благодаря системе внешних скриптов, Zabbix может выполнять и получать данные из любых исполняемых скриптов/бинарников.
Установка Zabbix Server в Linux (Ubuntu, CentOS)
В этой статье мы рассмотрим пример установки Zabbix Server 4.4 на Linux (на примере Ubuntu Server 18.4 и CentOS) через пакетный менеджер.
Перейдите на страницу загрузки https://www.zabbix.com/download и выберите репозиторий, соответствующий вашему дистрибутиву Linux. Готовые пакеты есть для всех популярных дистрибутивов.
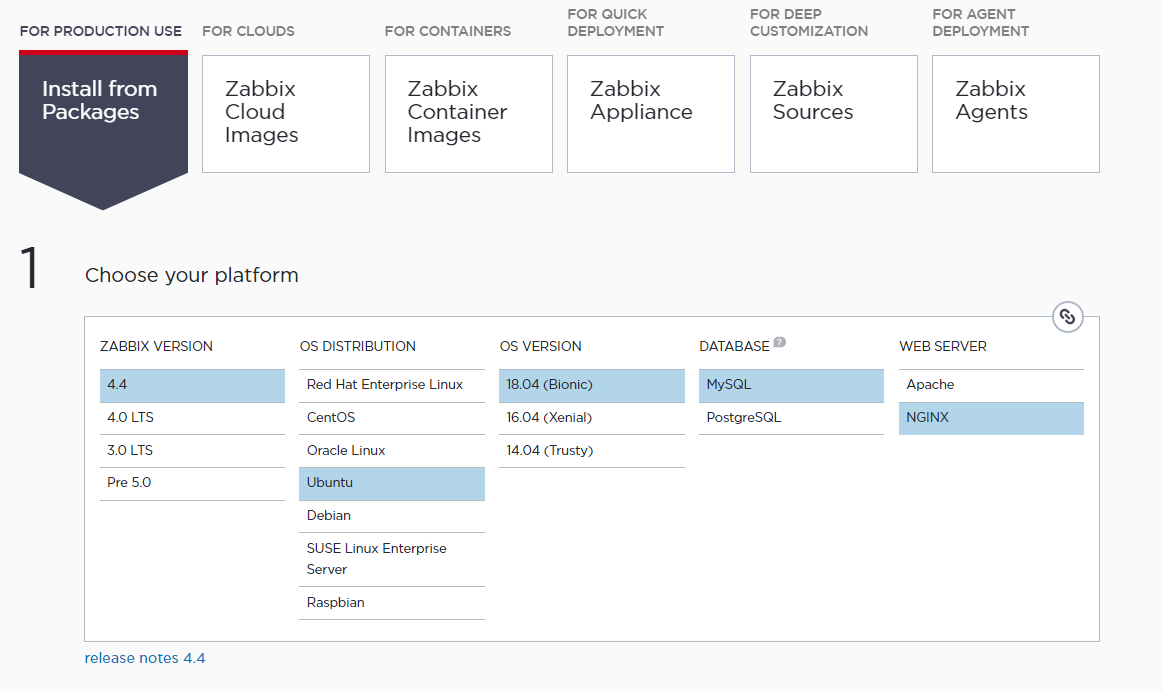
Например, для установки Zabbix на Ubuntu 18.04 нужно последовательно выбрать :
Zabbix Version (4.4) -> OS Distribution (Ubuntu) -> OS Version (18.04 Bionic) -> Database (MySQL) -> Веб сервер (Nginx или Apache).
Скачем и добавим репозиторий:
# wget https://repo.zabbix.com/zabbix/4.4/ubuntu/pool/main/z/zabbix-release/zabbix-release_4.4-1+bionic_all.deb
# dpkg -i zabbix-release_4.4-1+bionic_all.deb
# apt update
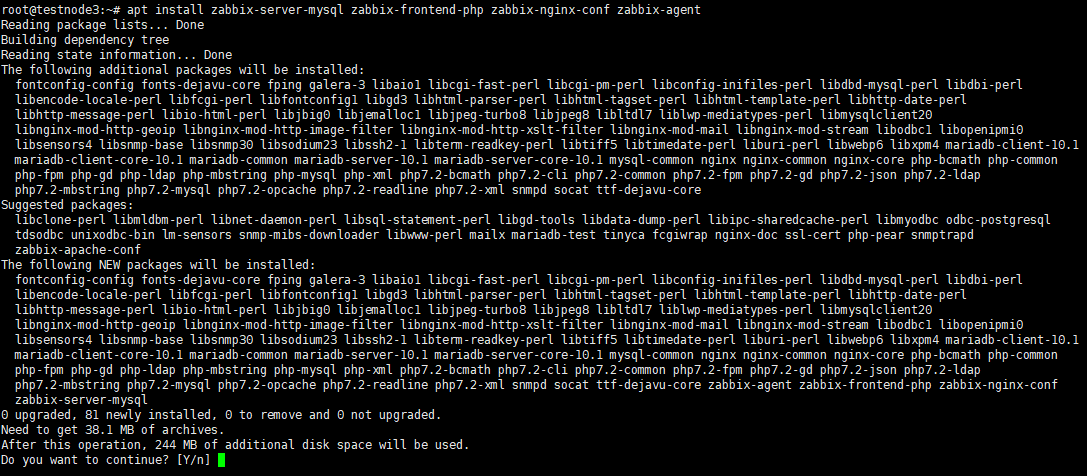
Теперь можно установить необходимые пакеты:
# apt install zabbix-server-mysql zabbix-frontend-php zabbix-nginx-conf zabbix-agent
Для установки Zabbix в CentOS 8/RHEL 8 нужно подключить репозиторий с актуальной версией Zabbix (можно установить Zabbix из ветки 4.0 LTS или последнюю версию Zabbix 4.4):
# rpm -Uvh https://repo.zabbix.com/zabbix/4.4/rhel/8/x86_64/zabbix-release-4.4-1.el8.noarch.rpm
# dnf clean all
Предполагаем, что на сервере уже установлены: nginx, MySQL/MariaDB, php и php-fpm. Теперь через пакетный менеджер установим сам сервер Zabbix и агент:
# dnf install zabbix-server-mysql zabbix-web-mysql zabbix-agent
Осталось создать базу данных для Zabbix в MySQL (вместо MySQL можно использовать PostgreSQL, просто замените в командах ‘mysql’ на ‘pgsql’).
Создайте базу данных и дайте права пользователю, из-под которого Zabbix будет обращаться к базе данных:
mysql -uroot
mysql> create database zabbix character set utf8 collate utf8_bin;
mysql> grant all privileges on zabbix.* to zabbix@localhost identified by 'ВашПароль';
mysql> quit;
Импортируйте базу данных Zabbix. Нужно будет ввести пароль, который вы указали при создании пользователя.
zcat /usr/share/doc/zabbix-server-mysql*/create.sql.gz | mysql -uzabbix -p Zabbix
Измените конфигурационный файл /etc/zabbix/zabbix_server.conf, укажите пароль от вновь созданного пользователя.
DBPassword=Пароль_Пользователя_Zabbix
Так как в моем случае веб сервером служит nginx, нужно изменить nginx.conf, раскомментировав следующие строчки
# listen 80;
# server_name example.com;
Уберите # и поменяйте example.com на домен, по которому вы хотите заходить на Zabbix, в моём случае это
test.zabbix.local
.
Для Apache файл нужно править файл конфигурации /etc/httpd/conf.d/zabbix.conf .
Выставим временную зону в PHP. В файле /etc/zabbix/php-fpm.conf раскомментируем строчку
php_value[date.timezone] = Europe/Moscow
Дополнительно можно выставить следующие параметры PHP в
/etc/php.ini
:
memory_limit 128M
upload_max_filesize 8M
post_max_size 16M
max_execution_time 300
max_input_time 300
max_input_vars 10000
Добавьте службу zabbix-server в автозапуск и запустите ее:
# systemctl enable zabbix-server zabbix-agent nginx php7.2-fpm
# systemctl restart zabbix-server zabbix-agent nginx php7.2-fpm
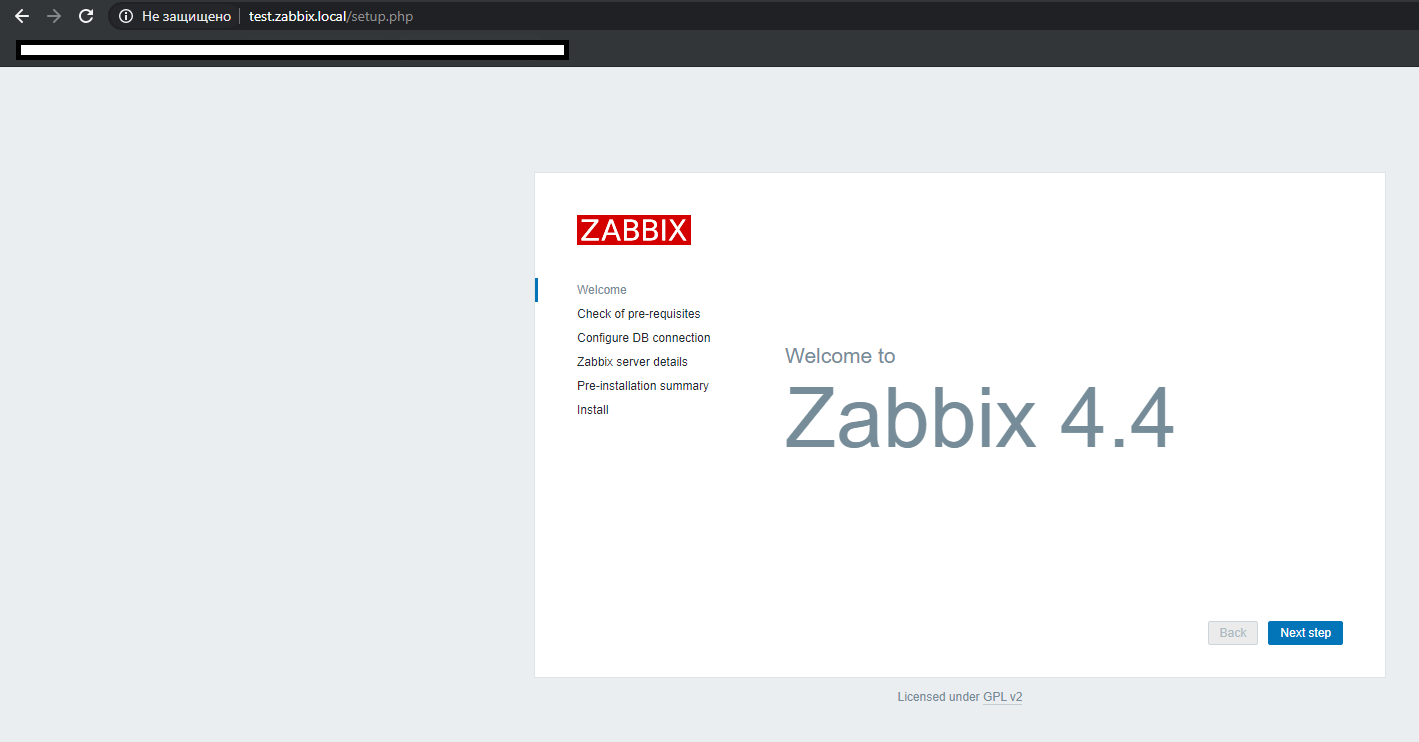
Настройка веб-интерфейса Zabbix
Теперь нужно настроить frontend (веб-интерфейс) Zabbix. В браузере откройте указанный ранее URL адрес zabbix сервера. В моем случае это test.zabbix.local (или на домен, который вы указывали. Не забудьте прописать его у себя в hosts файле или на DNS сервере).
Убедитесь, что во всех требования инсталлятора указано ОК.

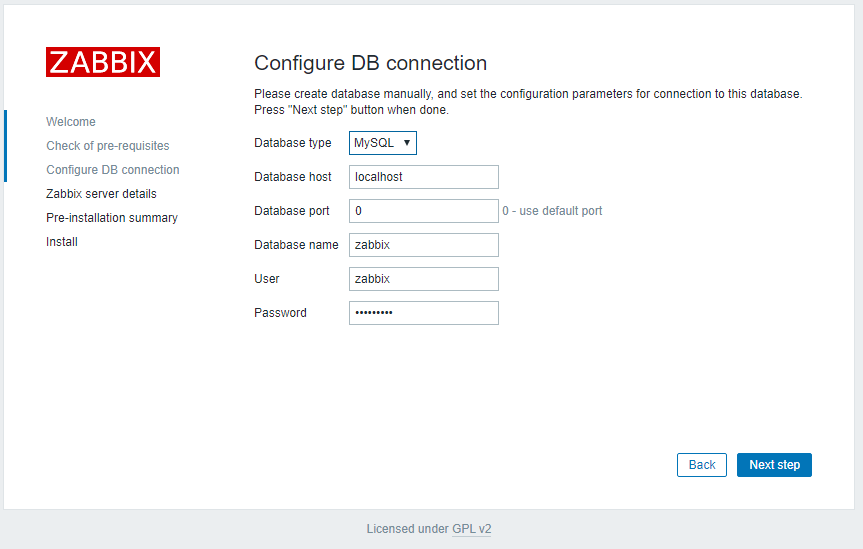
Укажите данные для подключения к БД. Используйте пользователя и пароль, который создали ранее.
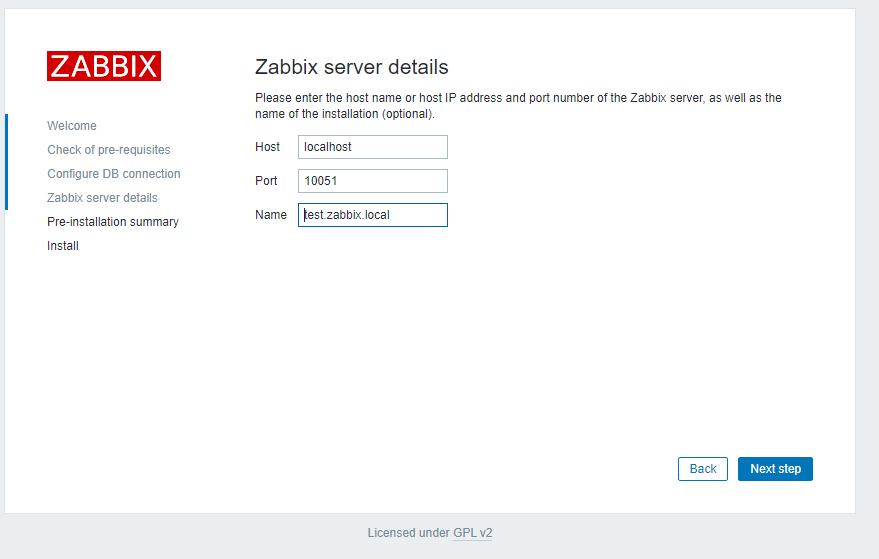
Укажите название Zabbix сервера. Порт рекомендую оставлять стандартный – TCP 10051.
Система Zabbix по-умолчанию использует два порта:
- TCP 10050 — порт пассивного агента, по нему zabbix сервер опрашивает клиентов;
- TCP 10051 — порт, на котором zabbix сервер получает данные от клиентов (активный агент).
Не забудьте открыть данные порты. Например, на Zabbix сервере на базе CentOS можно открыть порты в firewalld с помощью firewall-cmd:
# firewall-cmd --add-service={http,https} --permanentfirewall-cmd --add-port={10051/tcp,10050/tcp} –permanent
А на агенте достаточно открыть 10050:
# firewall-cmd --permanent --add-port=10050/tcp
Не забудьте перезагрузить firewalld:
# firewall-cmd –reload
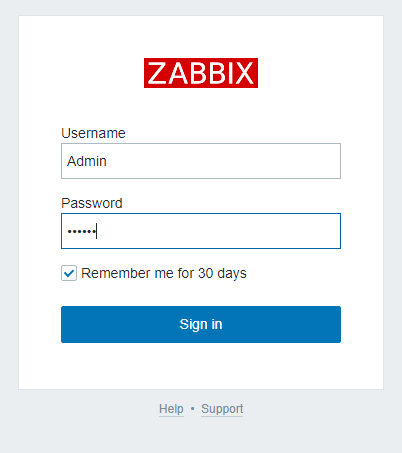
После этого жмите Next Step и Finish. После успешной установки вас попросит залогиниться. По-умолчанию логин
Admin
, пароль
zabbix
(замените его).
На этом установка сервера Zabbix Server завершена.
На странице https://www.zabbix.com/download есть пошаговые инструкции для установки Zabbix Server на другие операционные системы, а так же инструкции как собрать zabbix-server из исходного кода или запустить его в docker контейнерах.
Установка Zabbix Agent в Windows
Попробуем установить Zabbix агент на сервер Windows и добавим его на наш сервер мониторинга Zabbix. Скачать версию Zabbix агент для Windows можно здесь: https://www.zabbix.com/download_agents.
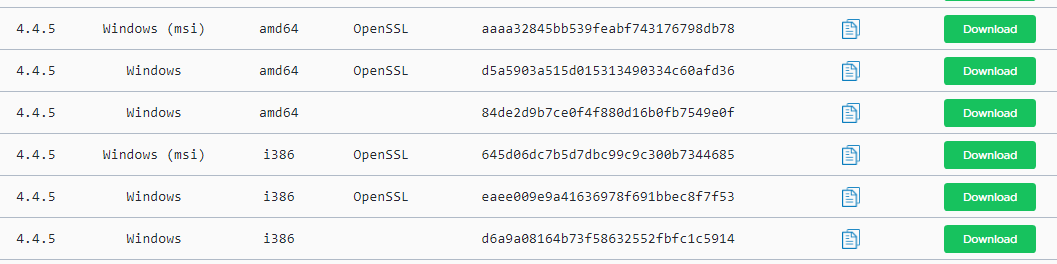
Выберите нужную версию агента под Windows. Я выберу формат msi (amd64) (без OpenSSL). Если вы планируете устанавливать zabbix agent на сервера/компьютеры домена через групповые политики или SCCM, то можете скачать zip архив с бинарными файлами и конфигурационными файлами.
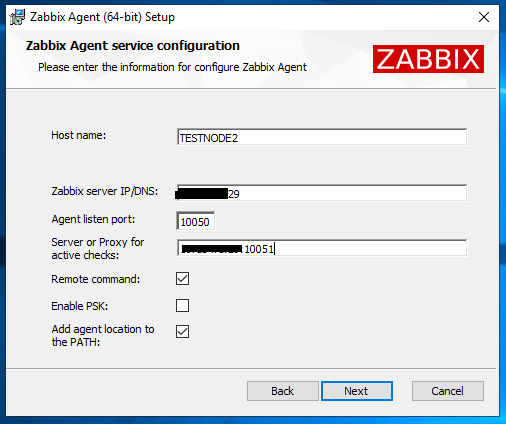
Запустите инсталлятор, примите лицензионное соглашение, укажите запрошенные данные. Обратите внимание, что в поле “Server or Proxy for active checks” я указал IP адрес в формате IP:PORT. Поскольку порт я оставлял стандартный, я пишу IP:10051.
Далее еще пару раз нажмем Next и Install.
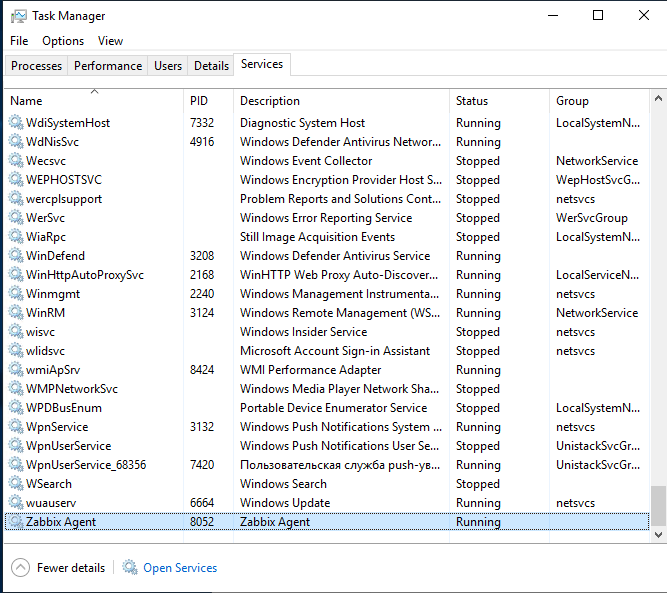
После этого убедимся, что наш агент установлен. В списке служб должен появиться сервис Zabbix Agent.
На клиенте Windows нужно разрещить входящие подключения с IP адреса сервера Zabbix в Брандмауэре Windows:
New-NetFirewallRule -DisplayName "ZabbixMonitoring" –RemoteAddress 192.168.1.100 -Direction Inbound -Protocol TCP –LocalPort 10050 -Action Allow
Добавление устройства на Zabbix-сервере
Чтобы убедиться в работоспособности агента, нужно добавить хост testnode2 на Zabbix сервер и назначить ему проверки (checks).
Заметка. В заббиксе есть 2 типа проверок:
- Пассивные – Zabbix сервер запрашивает у агента какие-либо данные;
- Активные – агент посылает на сервер данные;
При установке агента мы указывали сервер в формате IP:PORT как раз для активных проверок.
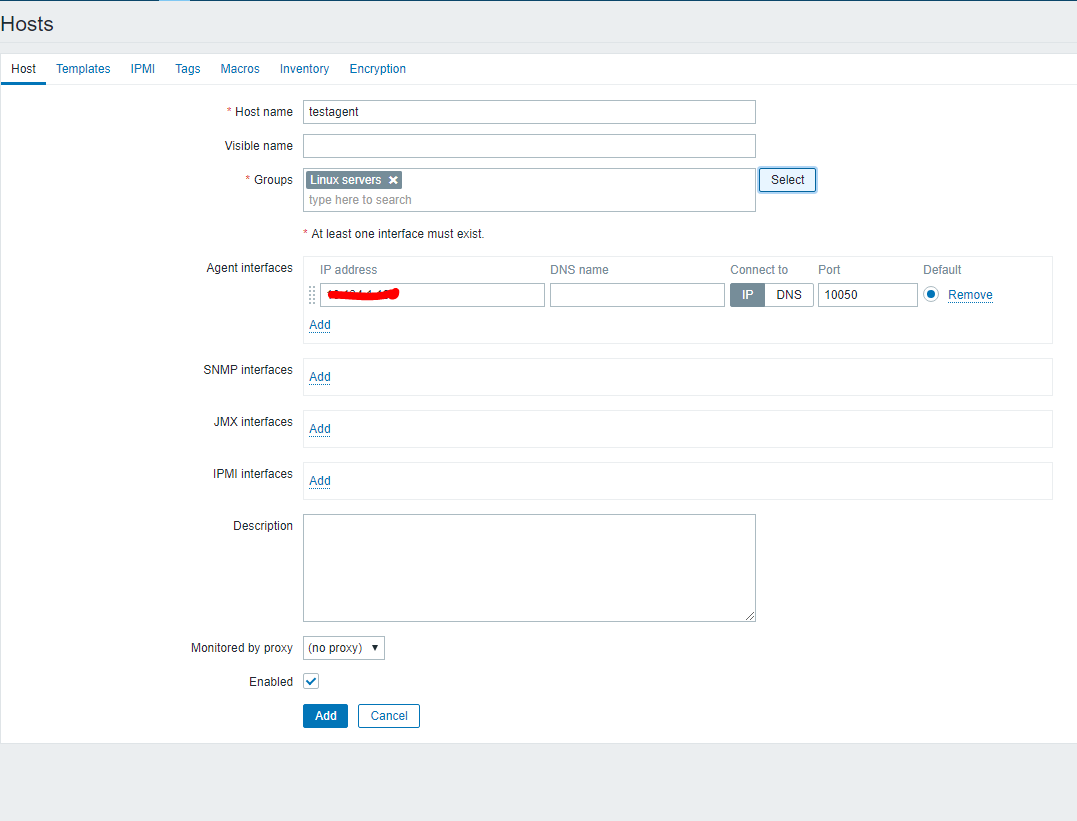
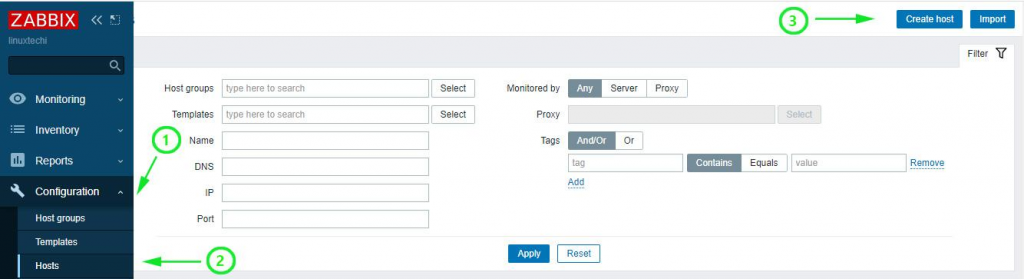
Добавление нового устройства для мониторинга в Zabbix выполняется через Web-интерфейс. Перейдите в раздел Configuration -> Hosts.

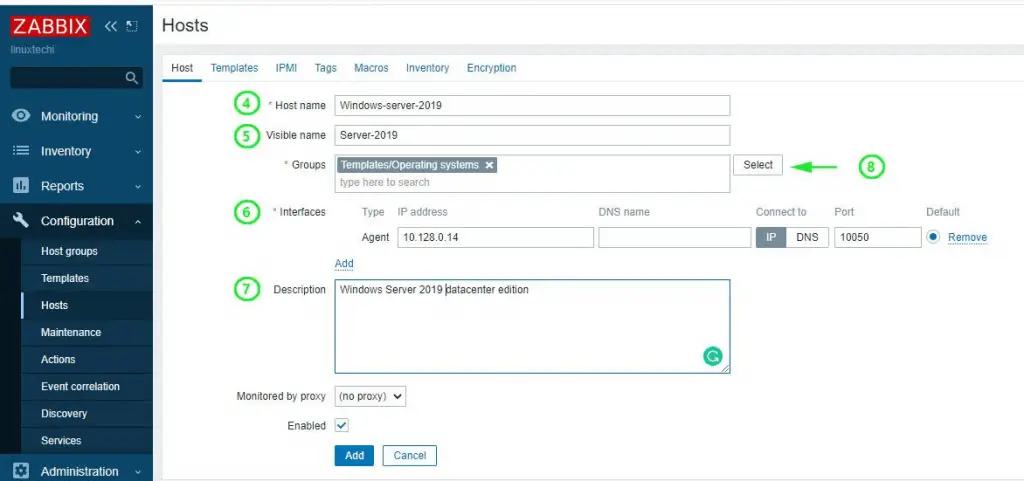
Нажмите Create host и заполните данные. Обратите внимание, что Host name хоста должен полностью совпадать с hostname машины или значением параметра Hostname в конфиге агента.
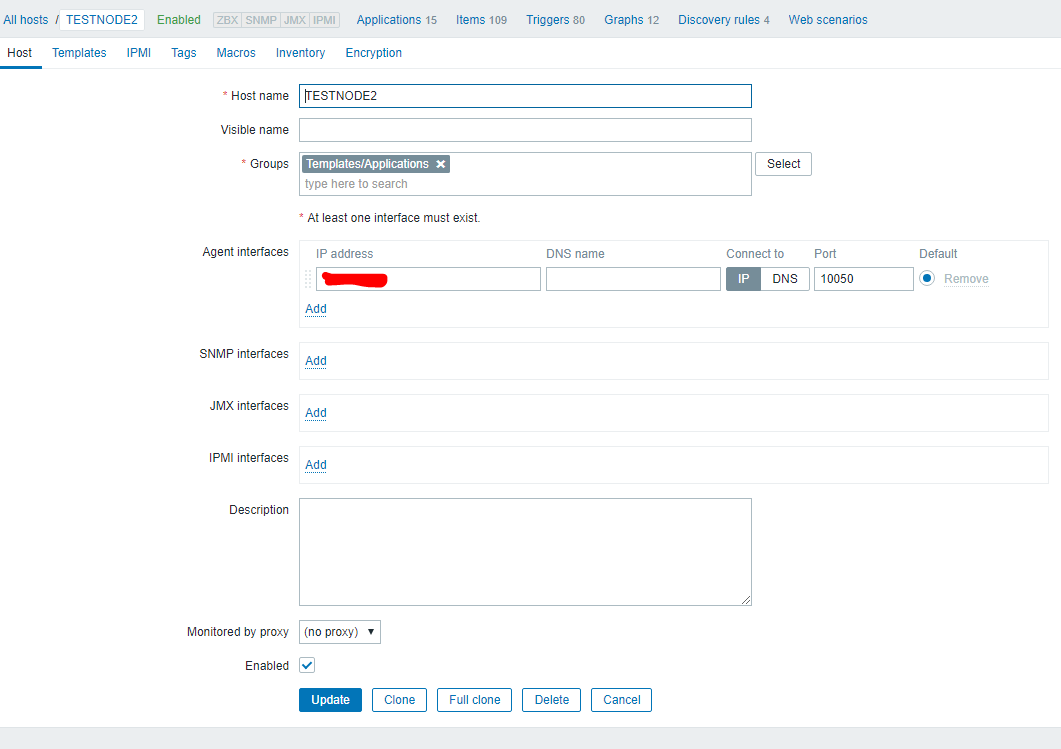
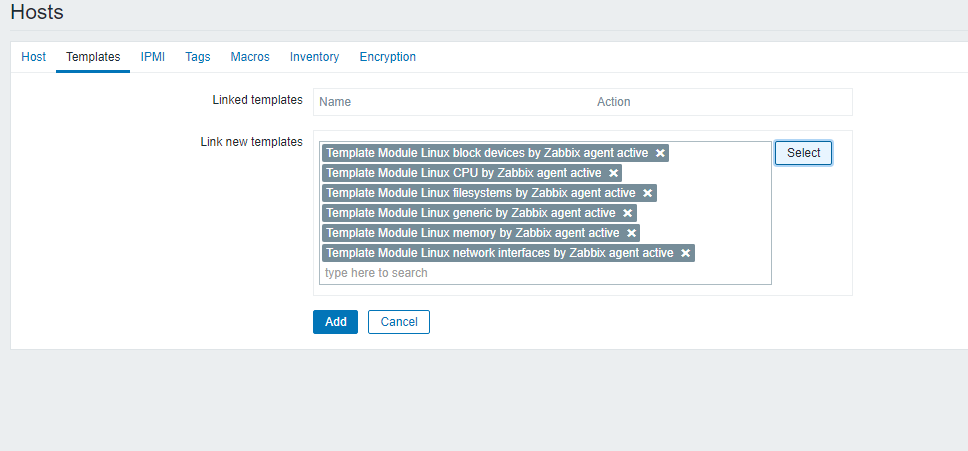
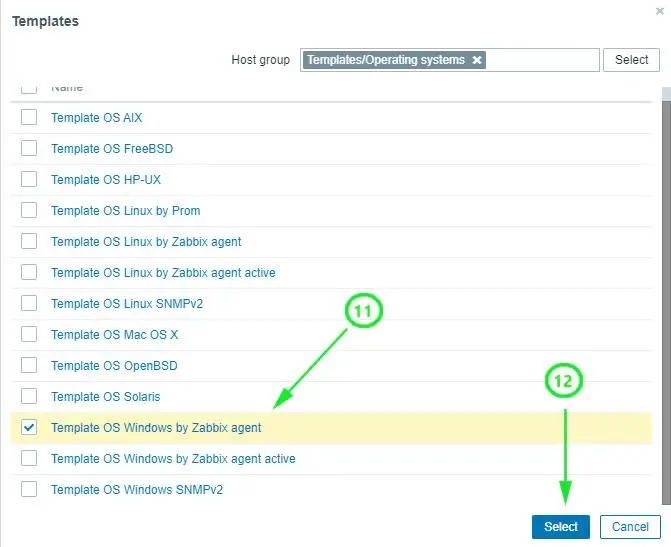
Во вкладке Templates добавить несколько встроенных Windows шаблонов. Шаблоны в Zabbix это наборы значений, триггеров, графов и правил обнаружения, которые могут быть назначены одному или нескольким хостам.
Эти интегрированные шаблоны имеют постфикс “active”, значит, будут использоваться активные проверки.
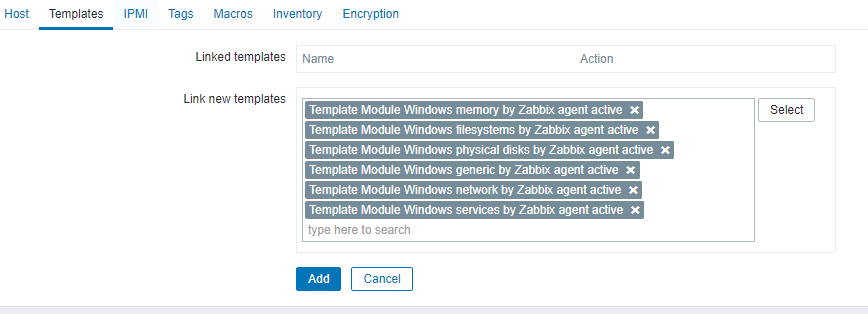
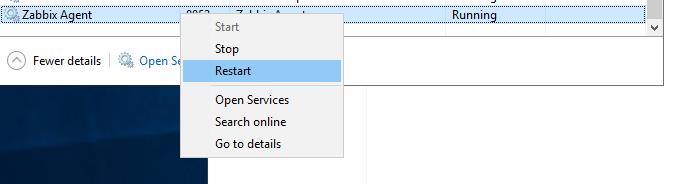
Нажмите Add. Чтобы не ждать пока сервер и агент увидят друг друга (обычно занимает пару минут), перезагрузите службу Zabbix Agent на testnode2 и проверьте лог агента (C:\Program Files\Zabbix Agent\zabbix_agentd.txt).
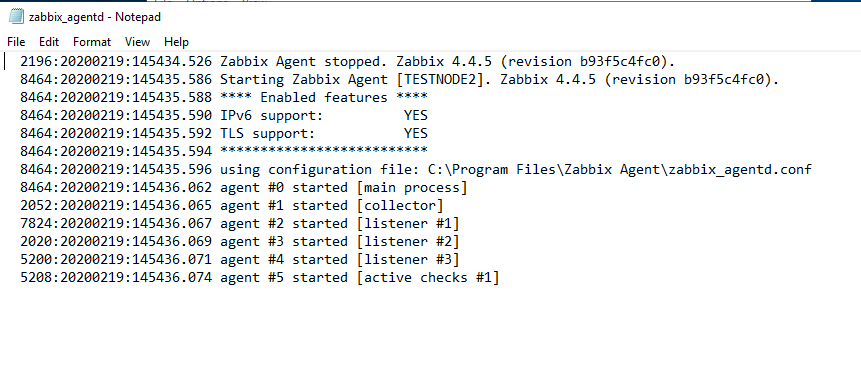
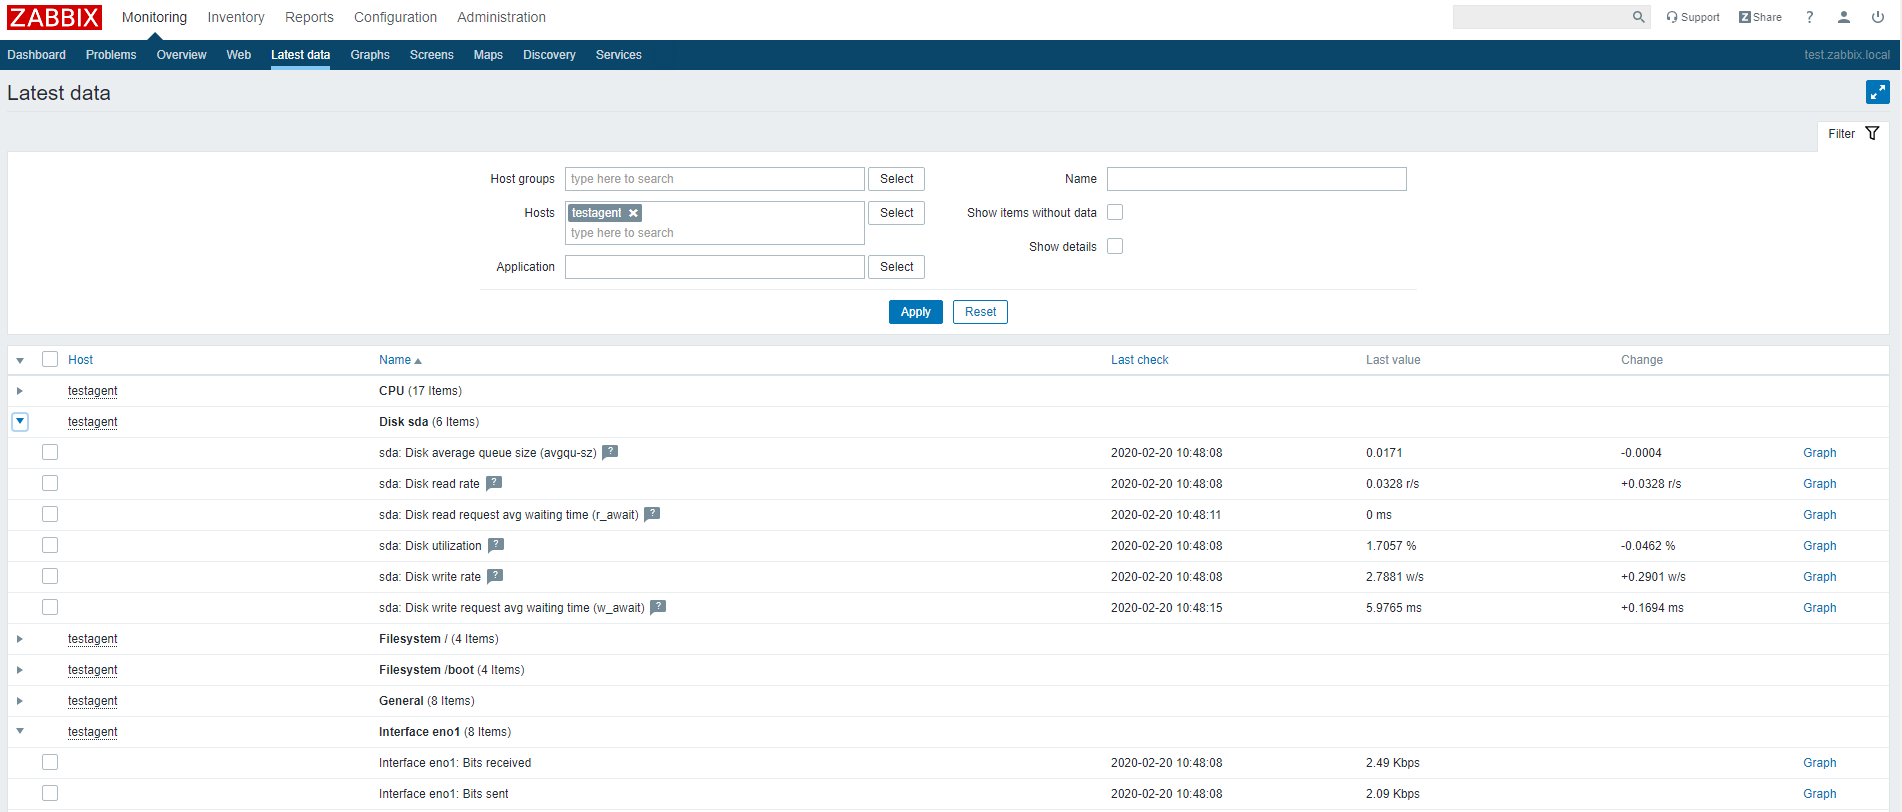
Сообщение “started [active checks #1]” говорит о том, что на сервере найдены активные проверки для этого хоста. Теперь посмотрим на данные, которые пришли на сервер Zabbix от агента. Для этого в Zabbix перейдите на Monitoring -> Latest Data и выберете нужный вам хост в поле Hosts.
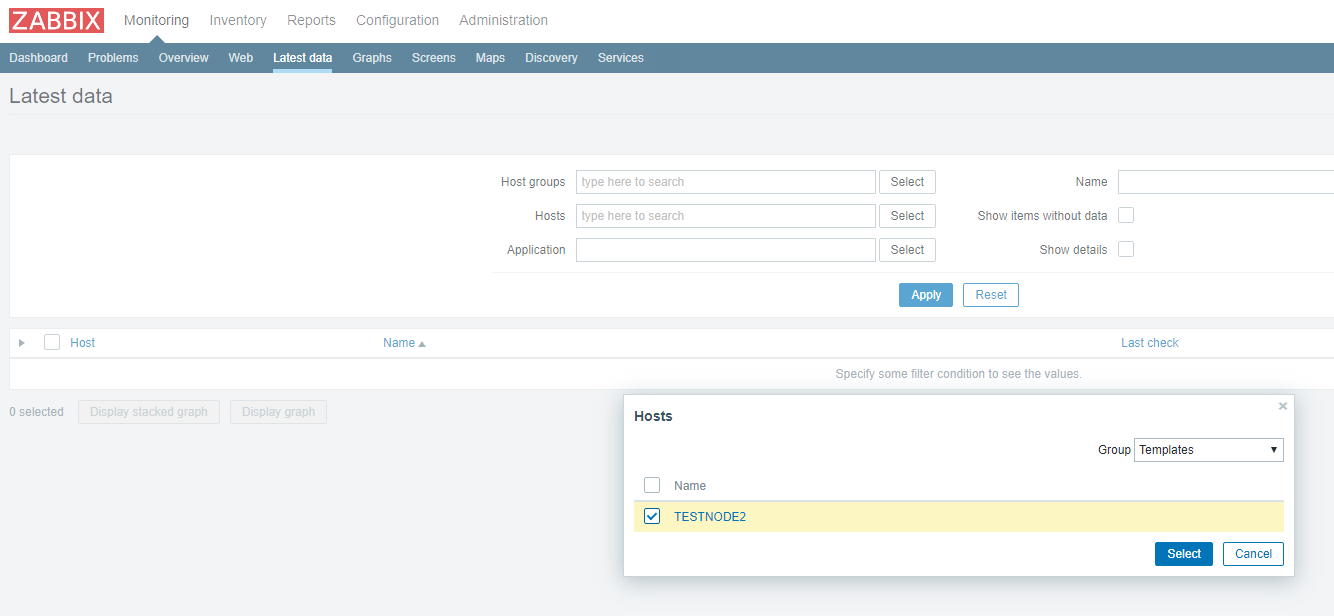
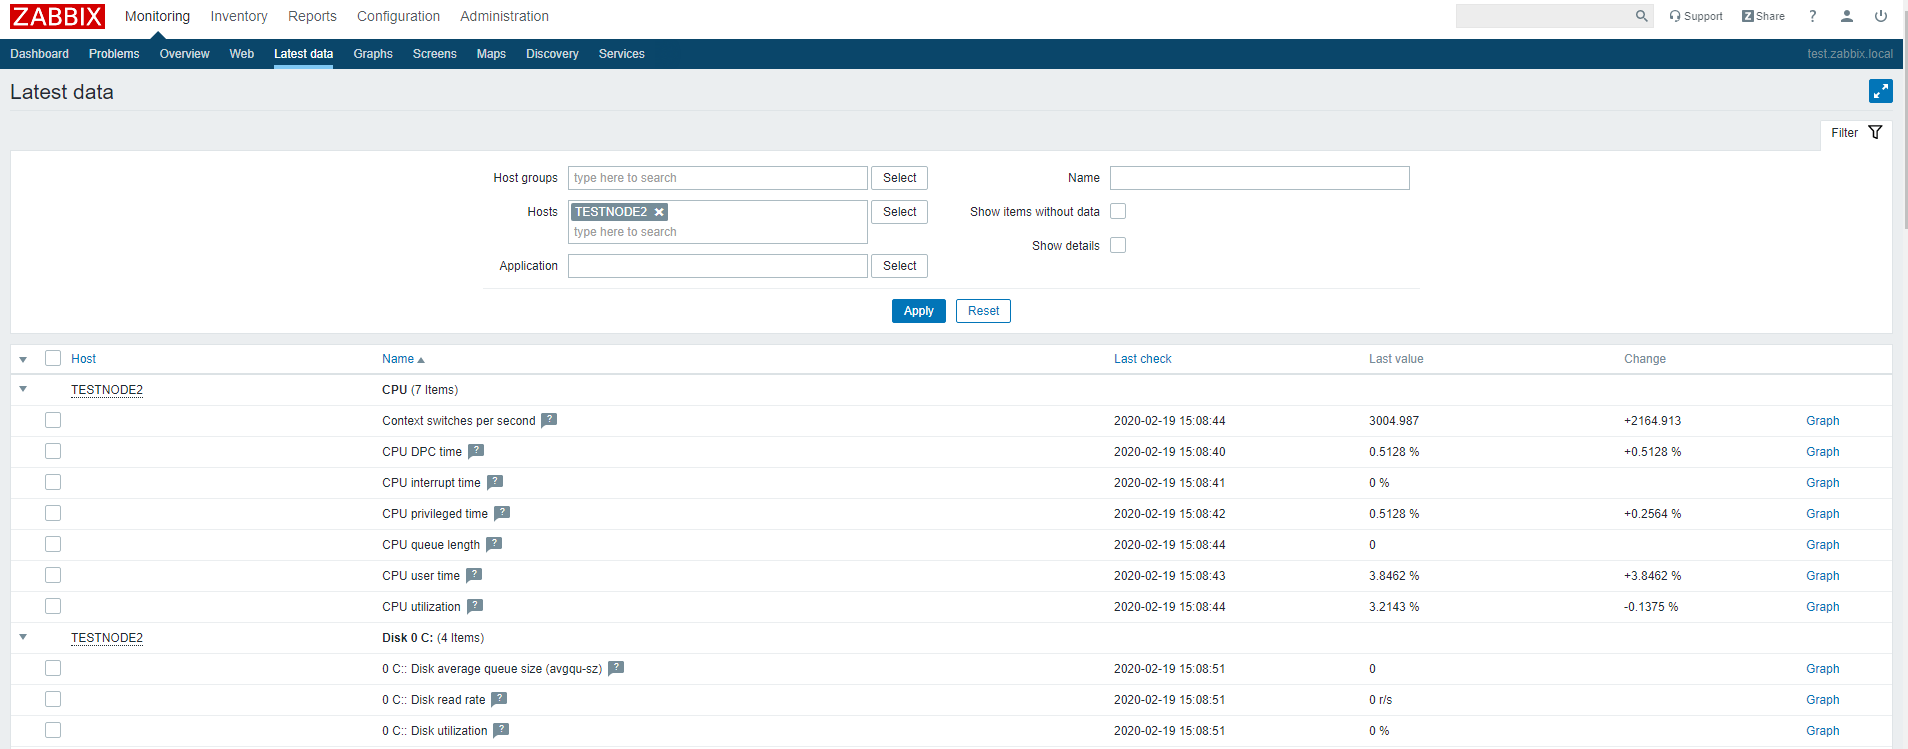
В этом разделе отображаются последние данные, которые пришли на сервер по выбранным хостам или группам хостов.
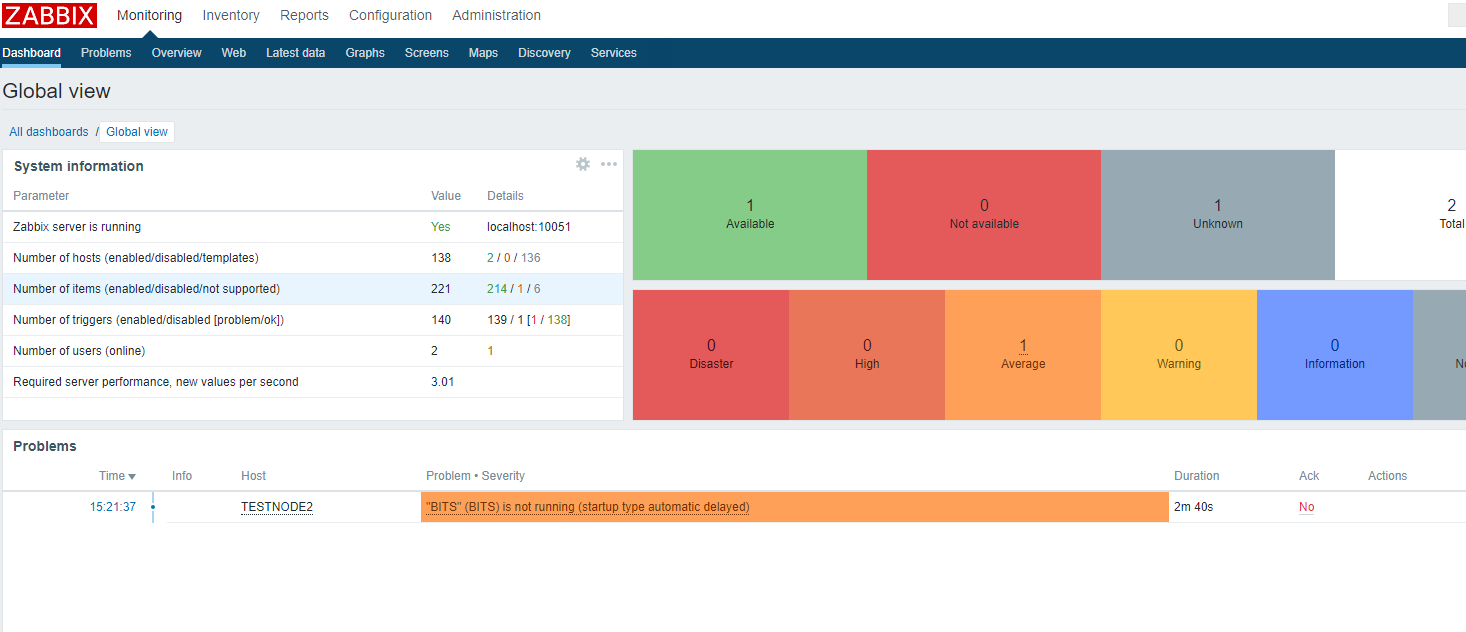
Обратите внимание на то, что в дашборде Zabbix висит уведомление о том, что служба BITS не запущена. Это уведомление появилось потому что мы назначили стандартные шаблоны нашему хосту. В одном из шаблонов был мониторинг сервиса BITS и соответствующий триггер, который срабатывает если служба BITS находится не в статусе Running.
На этом настройка Windows Agentа завершена.
Установка Zabbix Agent в Linux
Теперь установим агент Zabbix в Linux. Для установки Zabbix агента в Ubuntu Server 18.04 с помощью пакетного менеджера нужно скачать и установить репозиторий Zabbix. Затем из репозитория установим zabbix agent:
# wget https://repo.zabbix.com/zabbix/4.4/ubuntu/pool/main/z/zabbix-release/zabbix-release_4.4-1+bionic_all.deb
# dpkg -i zabbix-release_4.4-1+bionic_all.deb
# apt update
# apt install zabbix-agent
В CentOS для добавления репозитория и установки агента zabbix используется команды:
# rpm -Uvh https://repo.zabbix.com/zabbix/4.4/rhel/8/x86_64/zabbix-release-4.4-1.el8.noarch.rpm
# dnf clean all
# dnf install zabbix-agent
Перед тем как мы запустим zabbix агент, нужно отредактировать конфигурационный файл /etc/zabbix/zabbix_agentd.conf. В нем нужно указать IP адрес сервера Zabbix для активных проверок.
Server=IP
ServerActive=IP:10051
Hostname=testagent
После этого запустите сервис агента:
# service zabbix-agent start
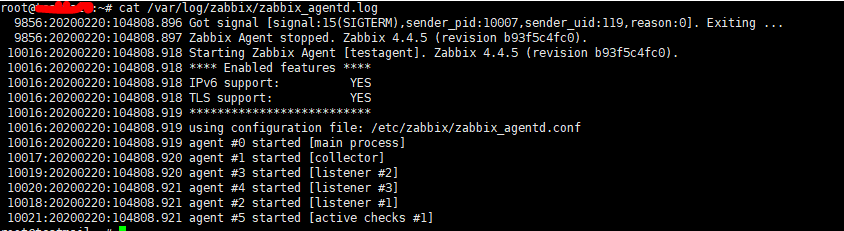
Убедитесь, что агент успешно запустился.
# cat /var/log/zabbix/zabbix_agentd.log
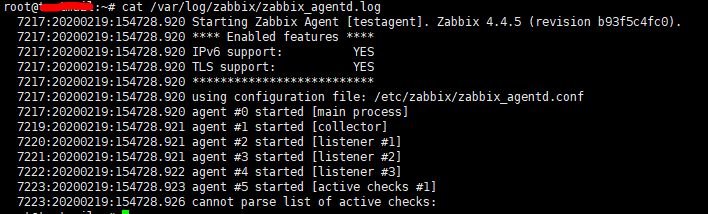
Строка cannot parse list of active checks говорит о том, что на сервере нет активных проверок для этого хоста.
Как и в случае с Windows агентом, вам нужно добавить ваш Linux хост в настройках сервера Zabbix. Обратите внимание на параметр Host name в настройка хоста в интерфейсе заббикс сервера — этот параметр должен совпадать с Hostname параметром, который мы указываем в конфиге Zabbix -агента. В конфиге выше я указывал имя хоста testagent.
Перезагрузите Zabbix агент и проверьте лог.
Проверьте, что данные от агента появились на сервере Zabbix.
На этом настройка Zabbix-агента на Linux системе завершена. В следующей статье мы рассмотрим безагентный мониторинг доступности узлов в Zabbix через ICMP Ping.
In the previous article, we looked at how you can add Linux servers on the Zabbix server for monitoring. In this guide, we switch gears and focus our spotlight on how you can add a Windows host system to the Zabbix server for monitoring.
For this tutorial, we will add the Windows server 2019 datacenter edition to Zabbix Server.
Step 1) Download Zabbix Agent for Windows Server
As we saw when adding Linux hosts, the first step when adding a host to the Zabbix server is to install the Zabbix agent on the host system first. With that in mind, head out to the official Zabbix agents download page and download the Zabbix Window’s agent.
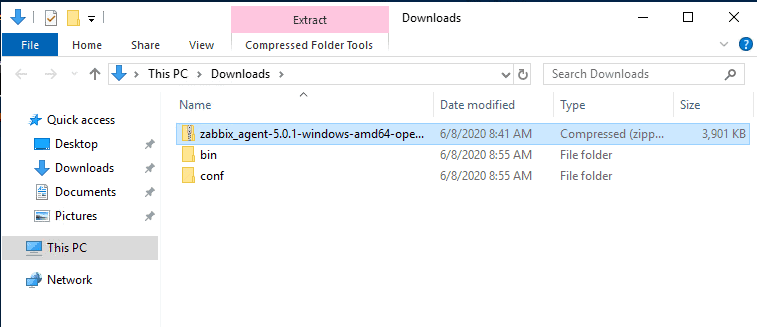
By default, this will download it in the ‘Downloads’ folder as shown.
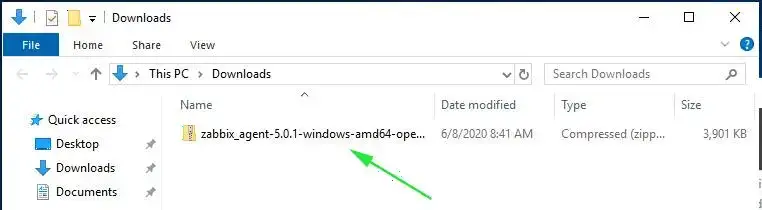
Once downloaded, right-click on the zipped file and select ‘Extract All’ to unzip it as shown.
This unzips it into 2 folders: bin and conf folder. The bin folder contains the Zabbix agent executable file while the conf folder contains the Zabbix agent configuration file – zabbix.agentd.conf
Step 2) Edit the Zabbix configuration file
We need to make a few changes to the zabbix configuration file for the Zabbix agent to communicate with the Zabbix server. Therefore, open the zabbix configuration file – zabbix.agentd.conf – and modify the parameters as shown:
Server=<IP address of the Zabbix server>
ServerActive=<IP address of the Zabbix server>
Hostname=<The FQDN of the Windows server>
Save the changes and exit the file.
Step 3) Install and start Zabbix Agent on Windows server
With all the configurations in order, run command prompt as administrator and install Zabbix using the syntax as shown:
C:\> {full system path to zabbix_agentd.exe) –config {full system path to zabbix_agentd.win.conf} –install
In my case, the command will be:
C:\>C:\Users\winnie95atieno\Downloads\bin\zabbix_agentd.exe --config C:\Users\winnie95atieno\Downloads\conf\zabbix_agentd.conf --install
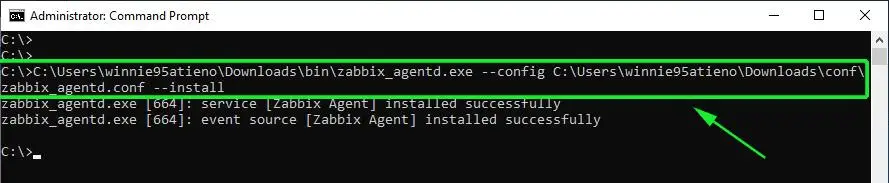
From the output, we can see that the Zabbix agent has successfully been installed.
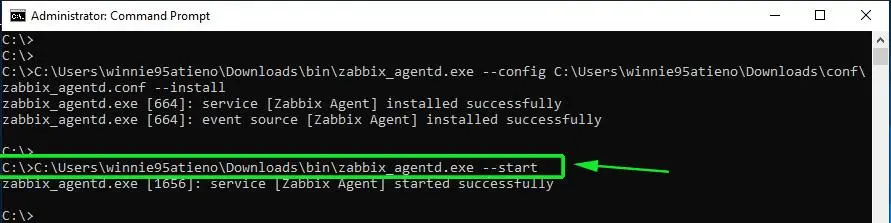
To start Zabbix, use the syntax:
C:\> {full system path to zabbix_agentd.exe) –start
The command will therefore be:
C:\>C:\Users\winnie95atieno\Downloads\bin\zabbix_agentd.exe --start
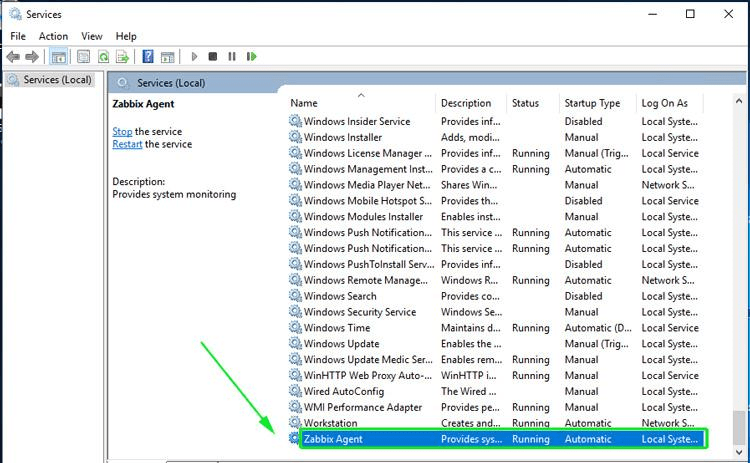
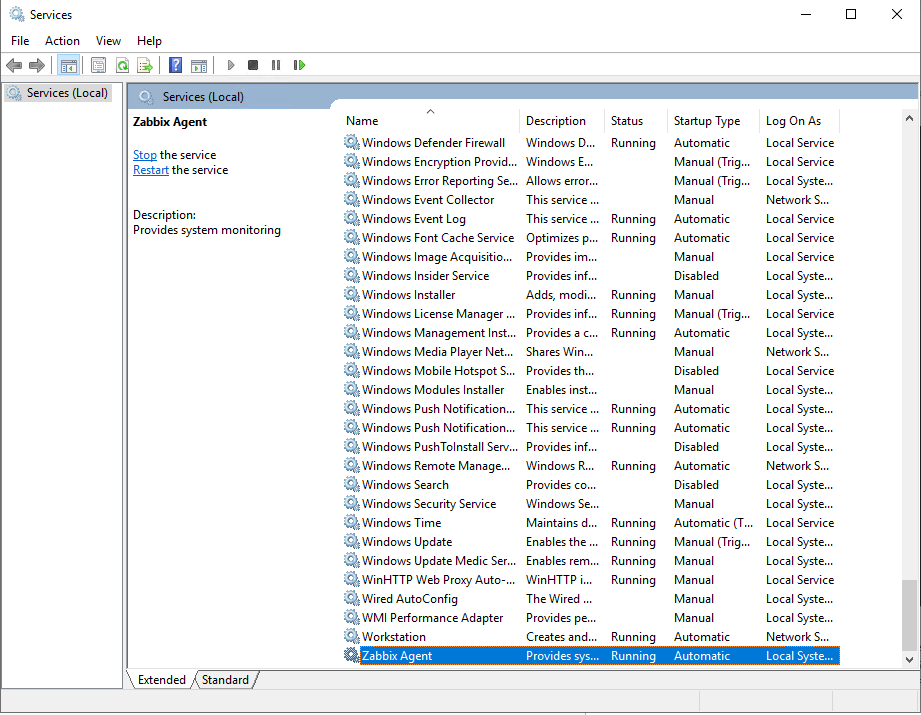
To confirm that the Zabbix agent is running, head out to the ‘Windows Services’ application and confirm that the Zabbix agent is up and running.
Step 4) Configure Windows firewall for Zabbix Agent
By default, the Windows firewall is enabled and blocks incoming and going connections. We are therefore going to make a few changes to allow traffic from the Windows Server host to the Zabbix server.
First, we are going to allow ICMP protocol for the Zabbix server to establish network communication with the Windows host and report any errors when they occur. Therefore, run Windows Powershell with Administrative privileges and execute the command as shown:
netsh advfirewall firewall add rule name="ICMP Allow incoming V4 echo request" protocol="icmpv4:8,any" dir=in action=allow
Next, allows port 10050 – which is the default port that Zabbix listens to – on the firewall.
netsh advfirewall firewall add rule name="Open Port 10050" dir=in action=allow protocol=TCP localport=10050

To this point, we have successfully installed and configured the Zabbix agent on the Windows host system. The Zabbix agent should be sending system metrics to the Zabbix server. Let’s now go over and see how you can add the Windows host on the Zabbix server.
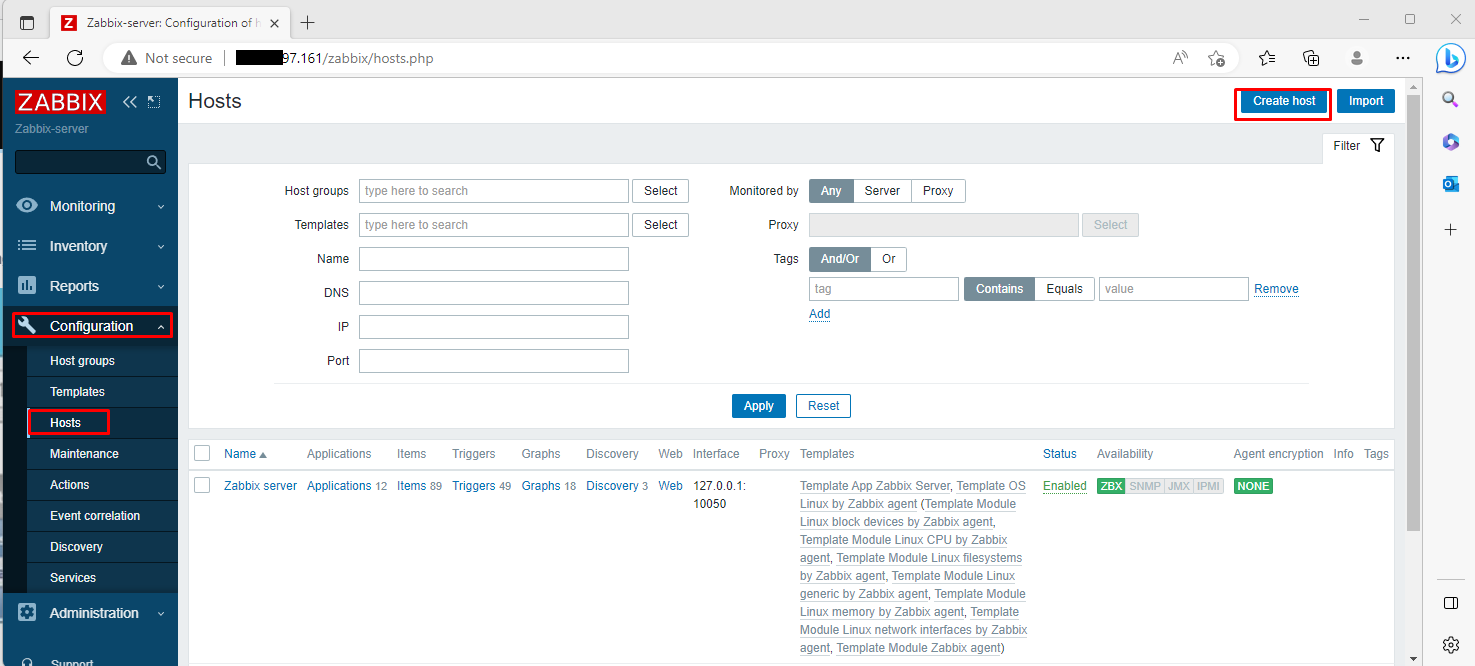
Step 5) Add a Windows host on Zabbix Server
To add a Windows host, go to Configuration –> Host –> Create Host
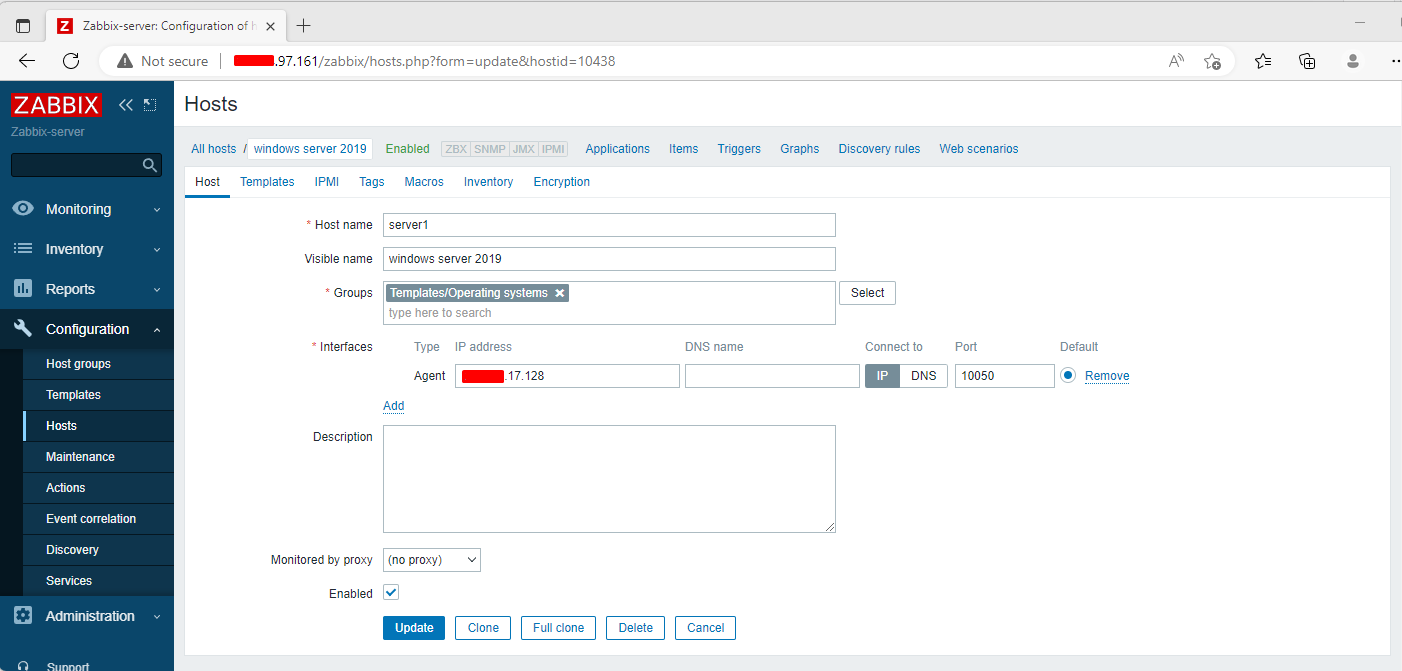
On the next screen, fill out the Windows host details such as hostname, visible name and IP address.
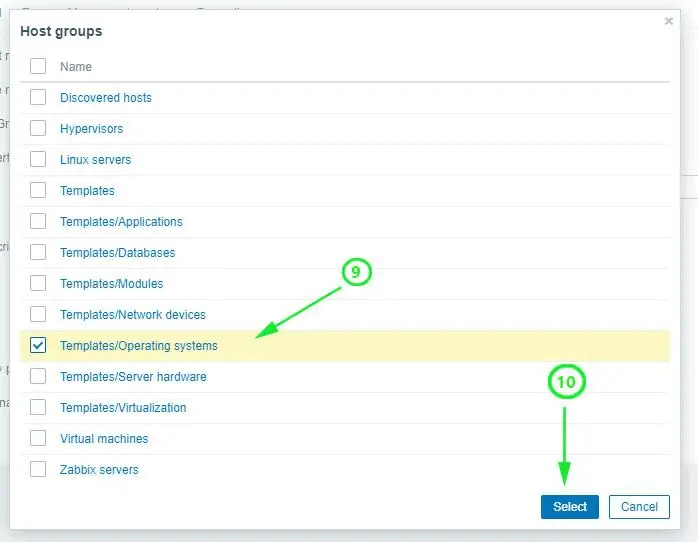
For the ‘Groups’ section, click on the ‘Select’ button and click on the ‘Templates/Operating system’ option.
Next, click on the ‘Templates’ tab on the menu and click ‘Template OS Windows by Zabbix agent’. Finally, click on the ‘Select’ button.
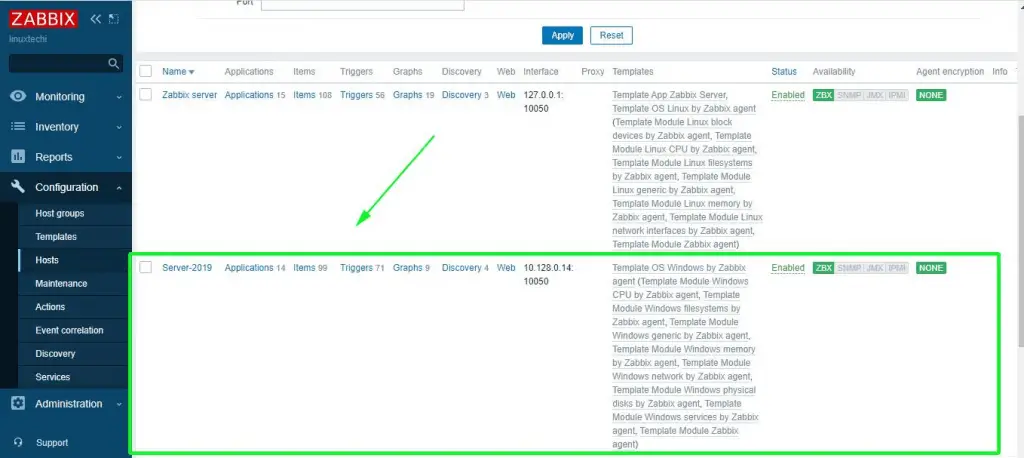
On the dashboard, check the Windows host listed as shown below. Note that the state is indicated ‘Enabled’ with the Zabbix icon ‘ZBX’ in green color.
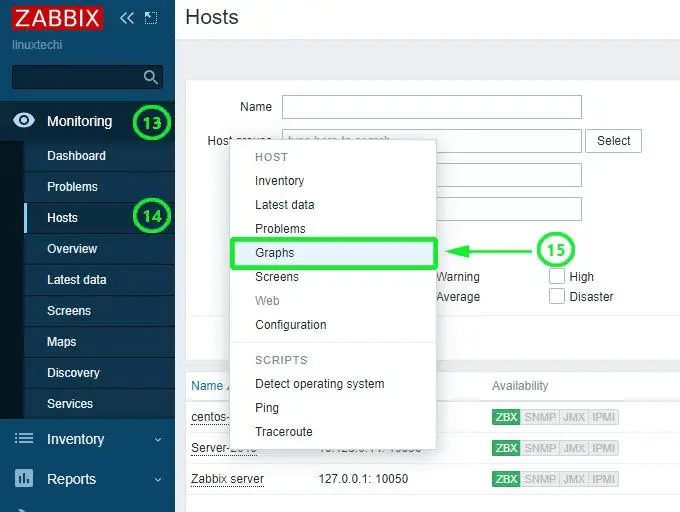
To graph the metrics associated with the Windows host system, click on ‘Monitoring’ –> ‘Hosts’. Click on the Windows host and select ‘Graphs’.
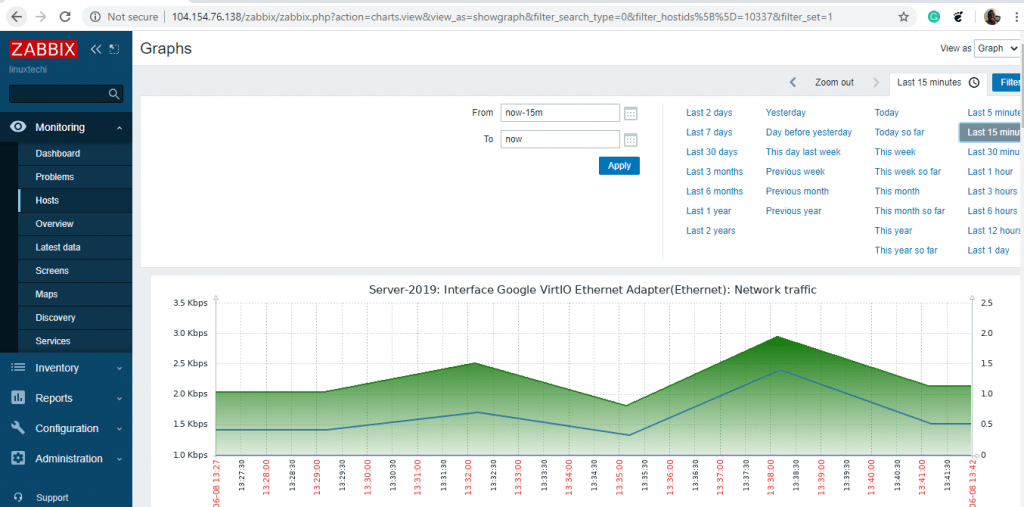
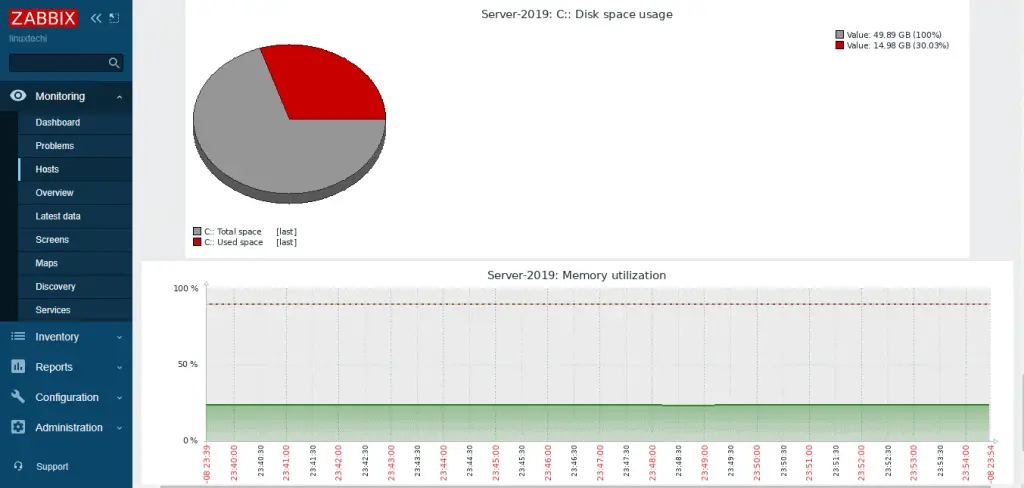
Finally, the Zabbix server will start graphing the system metrics shipped by the Zabbix agent which is residing on the Windows server host system. There are various metrics that you can monitor including network Interface statistics, CPU usage and utilization, Disk space usage and Memory utilization to mention a few.
And this brings us to the end of this topic. It’s our hope that you can now comfortably add a Windows host on the Zabbix server for monitoring.
Monitoring a Windows server helps verify and keep track of reboots, disk space, memory, CPU, communication loss, and high bandwidth consumption within the server – in fact, anything unusual that may require attention. In this post, we’ll see how to install and configure the Zabbix server and Zabbix agent on Windows, highlighting the key points that will keep your system running smoothly.
Check Zabbix server version

First, check which version of Zabbix server you’re using. This can be verified from the frontend in Reports > System information. In this example, we use version 7.0.9.
Before you begin, head over to your Windows server and verify the name and type of architecture.
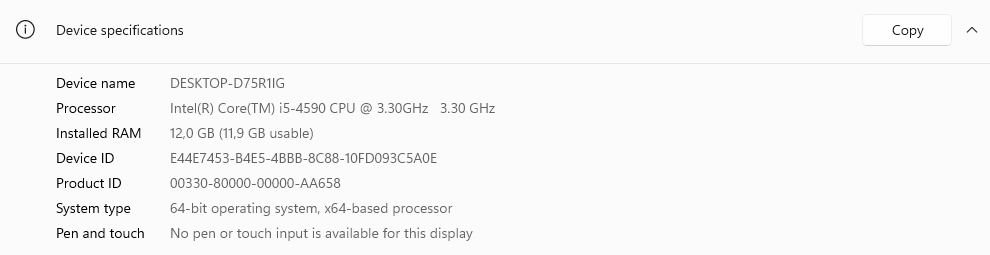
This is critical to selecting the right agent during deployment.
Download the Zabbix agent
From the official Zabbix website, download the corresponding agent, taking into account the operating system (in this case, Windows), the hardware architecture (64 bits), the version of Zabbix server (ensuring compatibility with the version used), encryption (using OpenSSL as an encryption method), and the installation format (selecting the MSI file).
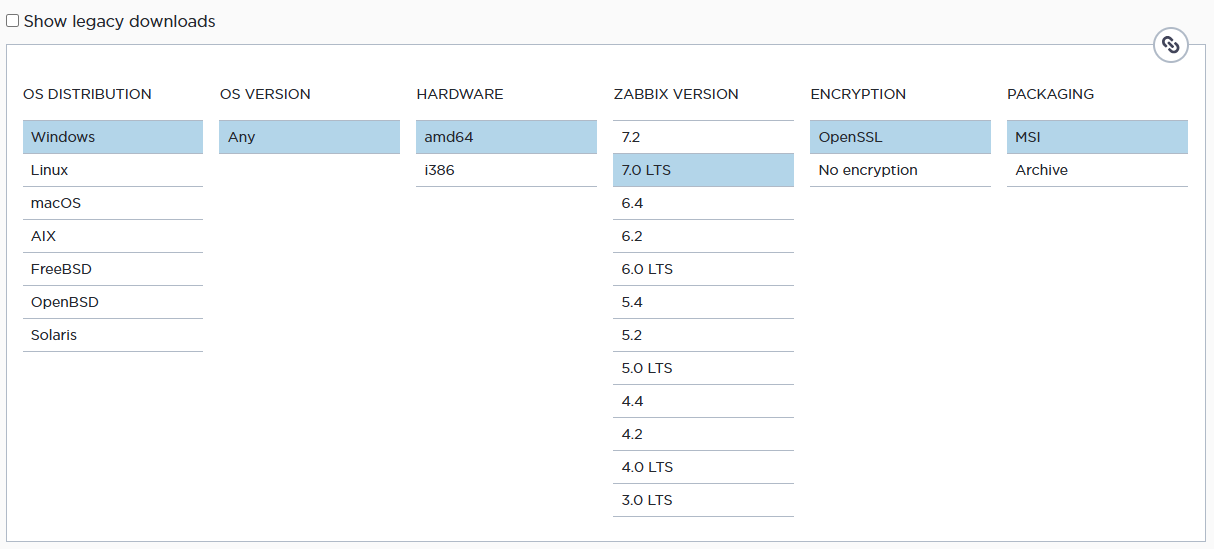
Select the current version of the release and download.

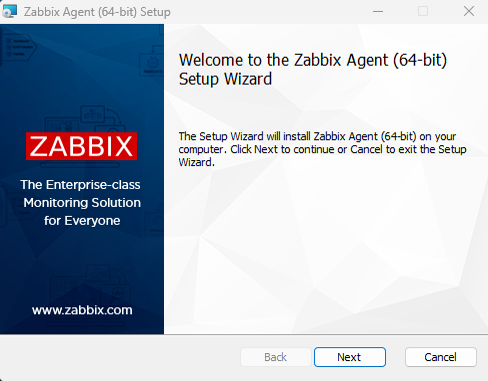
Install the Zabbix agent
Start installing the Zabbix Agent on the Windows server.
Accept the terms and conditions.

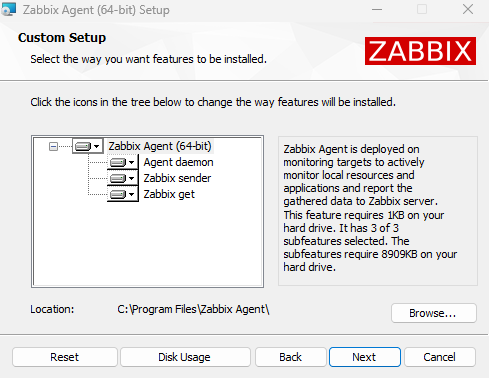
Check the components to be installed. You’ll need at least 8.70 MB of disk space.
The default installation path is C:\Program Files\Zabbix Agent\.
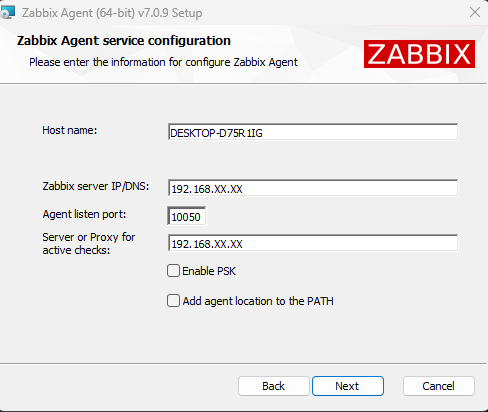
By default, the installer detects the name of the server. Enter the IP of your Zabbix Server. You can also use pre-shared keys.
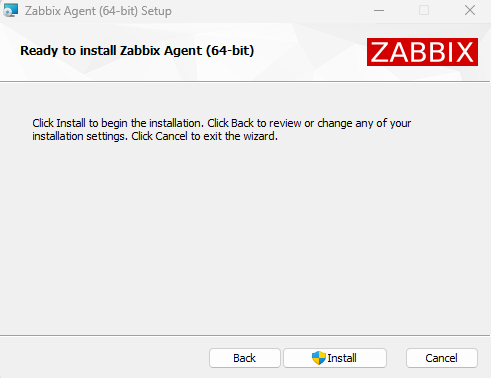
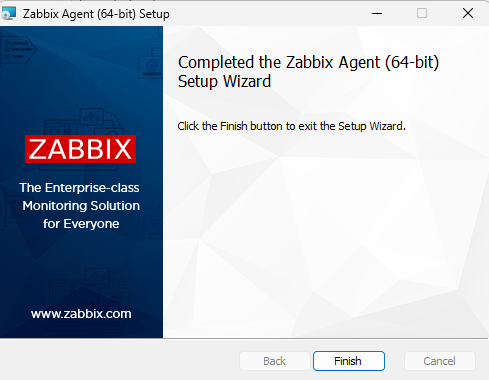
Start the installation and wait for it to finish.
Configure host in Zabbix Server
To set up a host on Zabbix Server, go to the Zabbix frontend and go to Data collection > Hosts.
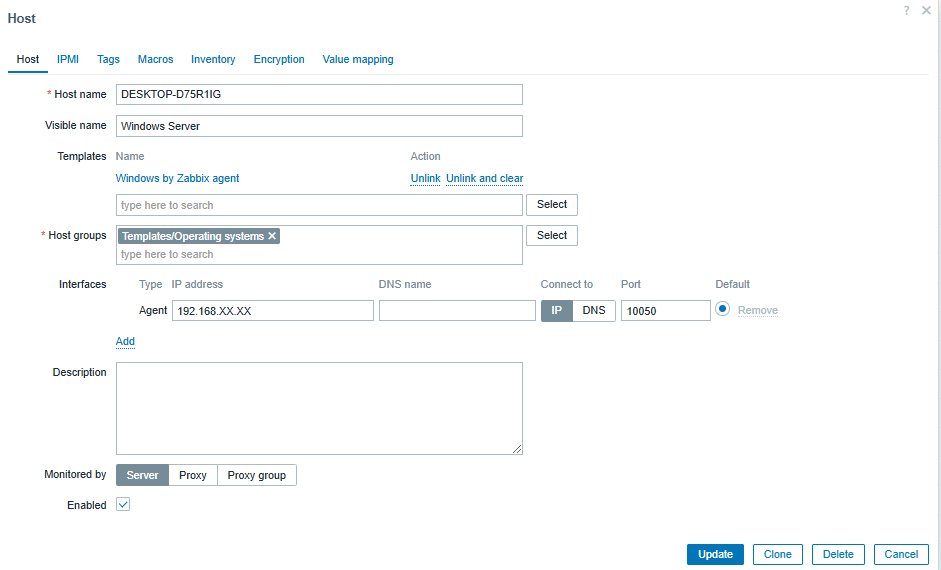
Then, click Create host (located in the top right) and configure the following details:
• The hostname (DESKTOP-D75R1IG)
• An identifying display name (such as ‘Windows Server’)
• The template (select ‘Windows by Zabbix Agent’)
• The group (assigns the server to an appropriate group)
• The interface (choose the agent monitoring option and enter the IP of the server)
Monitoring and visualization
Once the host is configured, you will start receiving data from the server in Zabbix, including:
• Overall performance: CPU, memory, and disk status.
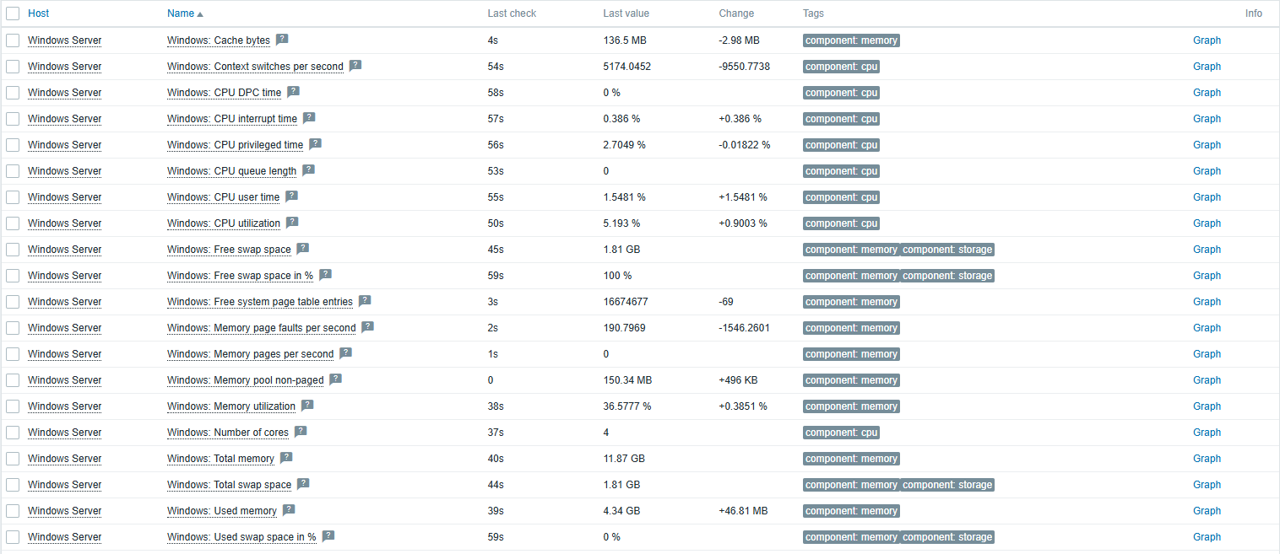
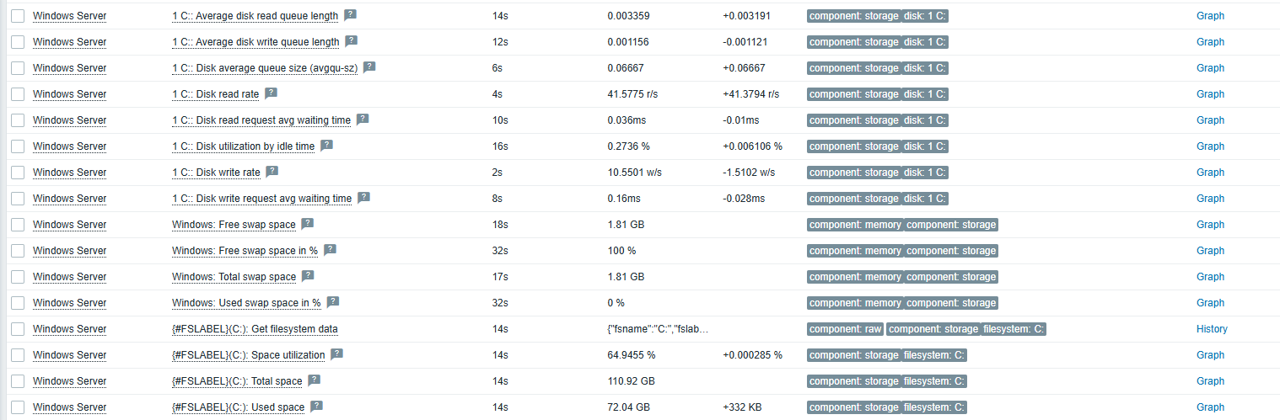
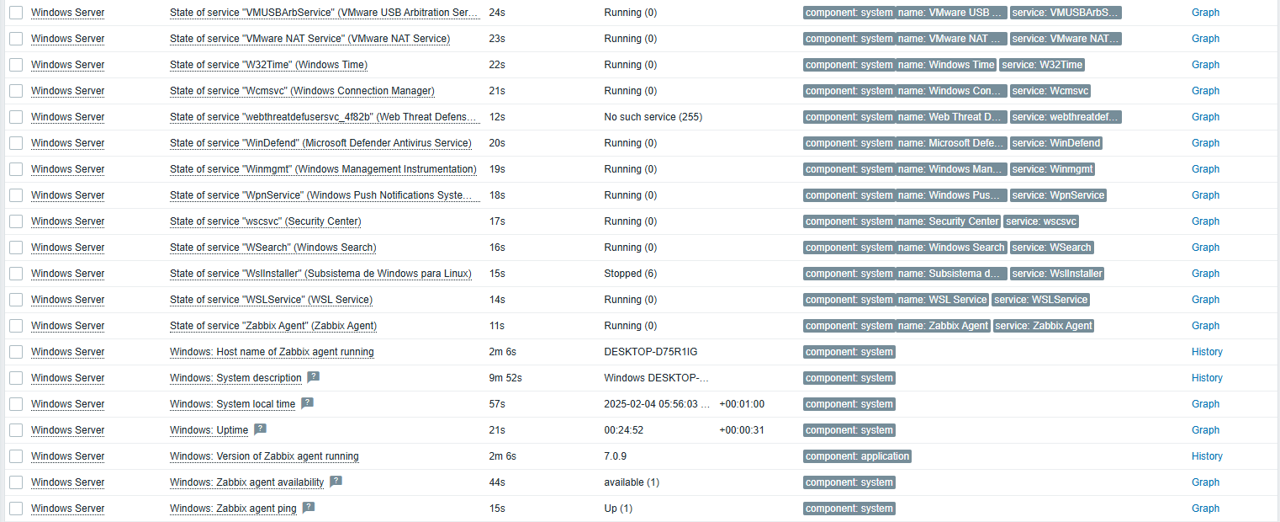
• Windows services and detailed host information.
• Bandwidth consumption

Conclusion
Zabbix provides an ideal template for a productive environments on Windows, making it a key tool for global monitoring of your servers.
In addition, you can extend and adapt the monitoring according to your needs, such as monitoring logs, ports, or specific events, while also checking for login failures or other critical issues in your systems.
Estimated reading: 6 minutes
995 views
In the previous article, we looked at how you can add Linux servers to the Zabbix server for monitoring. In this guide, we switch gears and focus our spotlight on how you can add a Windows host system to the Zabbix server for monitoring.
For this tutorial, we will add the Windows server 2019/2022 data center edition to Zabbix Server.
Step 1: Download and Install Zabbix Agent on Windows
As we saw when adding Linux hosts, the first step when adding a host to the Zabbix server is to install the Zabbix agent on the host system first. With that in mind, head out to the official Zabbix agents download page and download the Zabbix Window’s agent.
By default, this will download it in the ‘Downloads’ folder as shown.
Method 1: Install via cmd
Once downloaded, right-click on the zipped file and select ‘Extract All’
This unzips it into 2 folders: bin and conf folder. The bin folder contains the Zabbix agent executable file while the conf folder contains the Zabbix agent configuration file – zabbix.agentd.conf
1. Then manually installed and started on the system using windows Command Prompt as in the following example:
C:\Users\caezsar><full system path to zabbix_agentd.exe> --config <full system path to zabbix_agentd.win.conf> --install
For example, suppose you’ve downloaded and extracted the Zabbix agent zip archive to C:\Users\Administrator\Downloads\zabbix_agent-5.0.33-windows-amd64-openssl, run the following command to install the service:
C:\Users\Administrator\Downloads\zabbix_agent-5.0.33-windows-amd64-openssl\bin\zabbix_agentd.exe --config C:\Users\Administrator\Downloads\zabbix_agent-5.0.33-windows-amd64-openssl\conf\zabbix_agentd.conf --install
2. After the service has been installed on your Windows host, open zabbix_agentd.win.conf file and manually edit the following parameters:
zabbix_agentd.win.conf
Server=IP of Zabbix Server
ServerActive=IP of Zabbix Server
Hostname=use the FQDN of your windows host
3. To start the service just type:
C:\Users\Administrator\Downloads\zabbix_agent-5.0.33-windows-amd64-openssl\bin\zabbix_agentd.exe --start
To stop the service run the same command as above with --stop argument and to uninstall the service use the --uninstall argument.
C:\Users\Administrator\Downloads\zabbix_agent-5.0.33-windows-amd64-openssl\bin\zabbix_agentd.exe --stop
C:\Users\Administrator\Downloads\zabbix_agent-5.0.33-windows-amd64-openssl\bin\zabbix_agentd.exe --uninstall
Method 2: Install via msi file
1. A second and more convenient method to install and automatically configure the Zabbix agent on Windows environments is by downloading the Zabbix Agent installer MSI package specific to your system architecture.
2. Once the Zabbix agent MSI file has been downloaded on your system, run it and supply the required information in order to configure and install the agent on the target monitored host as follows:
Hostname: use the FQDN of your windows host (the hostname value should match the “Full Computer name” configured for your machine)
Zabbix server Name: use the IP of the Zabbix Server
Agent Port: 10050
Remote Command: check this value
Active Server: IP of Zabbix Server

If you need to modify the Zabbix configuration file with other custom values at a later date, the conf file can be found on the %programfiles%Zabbix Agent path.
After you’ve finished the setup, open Windows Command Prompt with Administrator privileges, run services.msc command in order to open Windows Services utility, and locate the Zabbix Agent service to check if the service is running and automatically started after reboot.
services.msc
From this console, you can manage the service (start, stop, pause, resume, enable or disable).
Step 2: Configure Windows Firewall and Test Zabbix Agent
7. Almost all Windows-based systems have Windows Firewall active and running, therefore Zabbix agent port must be opened in the firewall in order to communicate with the Zabbix server.
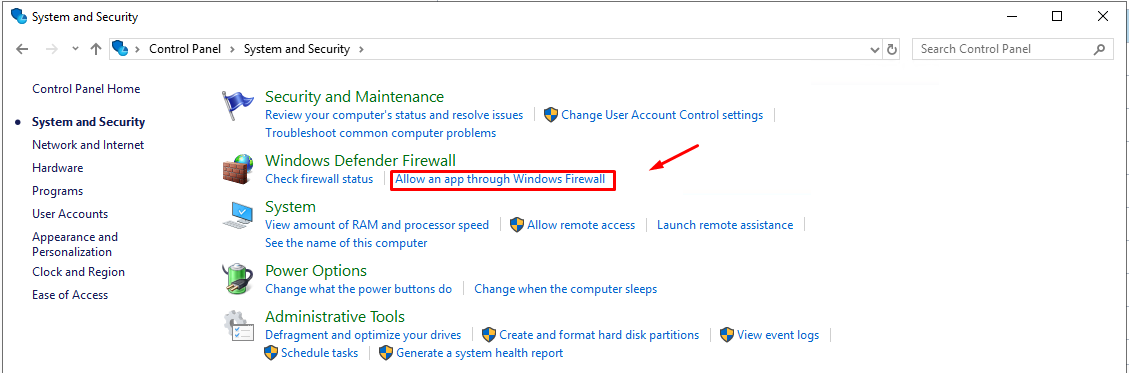
In order to open the Zabbix agent port in the windows firewall, open Control Panel -> System and Security – > Windows Firewall and hit on Allow an app through Windows Firewall.
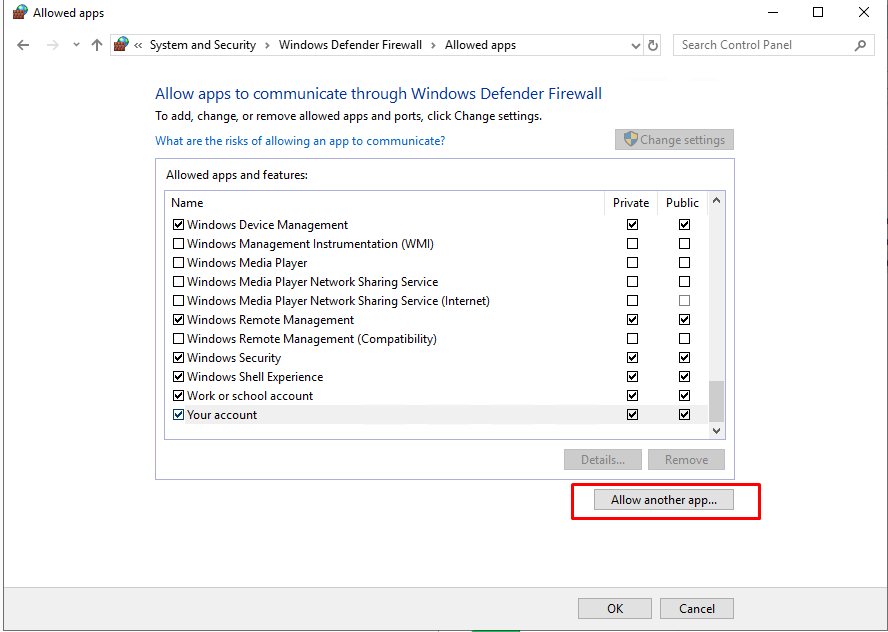
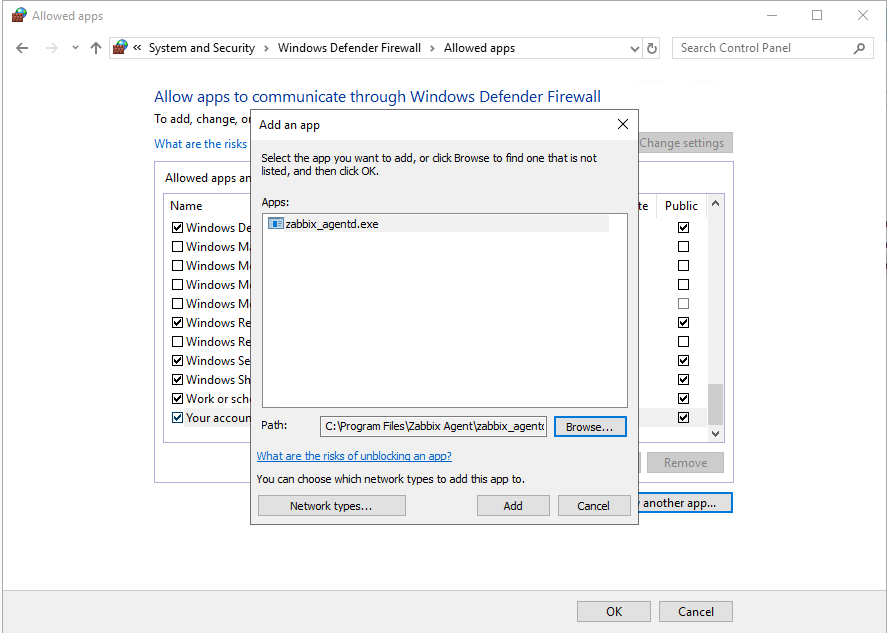
8. Next, click on Allow another app button, and a new window should open. Use the Browse button to navigate and add Zabbix agent executable file (usually found in %programfiles%Zabbix Agent if you installed it using the MSI program), then hit on Add button to add the service.
9. Next, make sure you check and open the firewall rule on the network segment where the Zabbix server is located in your network and hit the OK button to finish and apply the configuration.
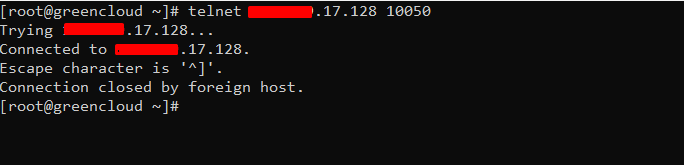
10. In order to test if the Zabbix agent running on windows is reachable from the Zabbix server-side, use telnet or netcat command on Zabbix server against windows agent IP-Port and a Connected message should appear. Hit Enter key to generate an error message and automatically disconnect from the agent:
telnet <Windows_agent IP Address> 10050
Step 3: Add Zabbix Agent Monitored Windows Host to Zabbix Server
11. Once the windows agent has been tested from the command line and everything looks fine, go to Zabbix Server web interface, move to Configuration tab -> Hosts, and hit on Create Host button in order to add the Windows monitored host.
12. On the next screen, fill out the Windows host details such as hostname, visible name and IP address.
For the ‘Groups’ section, click on the ‘Select’ button and click on the ‘Templates/Operating system’ option.

14. On the dashboard, check the Windows host listed as shown below. Note that the state is indicated ‘Enabled’ with the Zabbix icon ‘ZBX’ in green color..

15. To graph the metrics associated with the Windows host system, click on ‘Monitoring’ –> ‘Hosts’. Click on the Windows host and select ‘Graphs’.
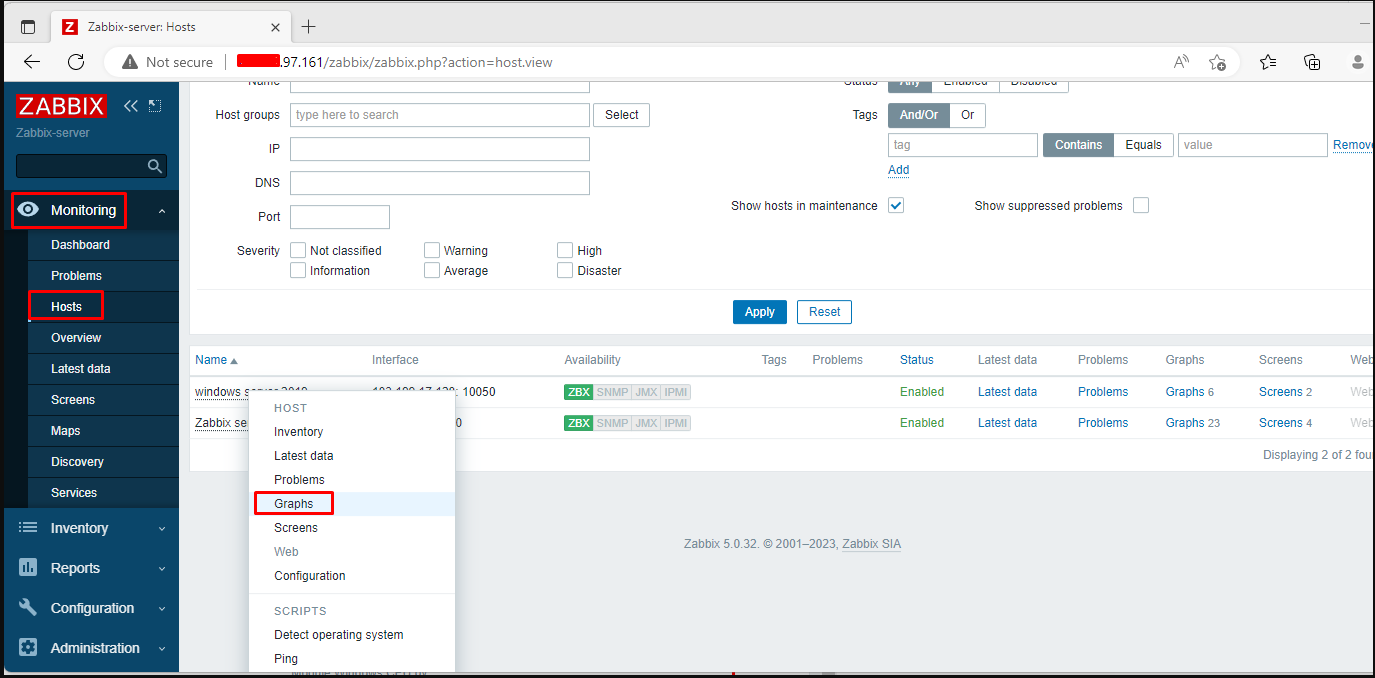
Finally, the Zabbix server will start graphing the system metrics shipped by the Zabbix agent which is residing on the Windows server host system. There are various metrics that you can monitor including network Interface statistics, CPU usage and utilization, Disk space usage, and Memory utilization to mention a few.

Summary
In this article, we have guided Install Zabbix Agent and Add Windows Host to Zabbix Monitoring. Hope this article will be useful for you

В этой инструкции мы установим мониторинг Zabbix, осуществим базовую настройку.
Шаг 1. Установка Zabbix-агента
Будем считать что Centos у нас уже установлен.
Для установки Zabbix-агента необходимо найти ссылку на репозиторий на сайте repo.zabbix.com
Мы для данной статьи будем устанавливать 4.0.12. Скачиваем репозиторий:
rpm -Uvh https://repo.zabbix.com/zabbix/4.0/rhel/7/x86_64/zabbix-agent-4.0.12-1.el7.x86_64.rpm
Проводим установку:
На все вопросы соглашаемся (Y). После установки нужно настроить конфигурационный файл в котором настраиваются основные параметры,такие как безопасность,логирование, подключение и т.д.
Для запуска агента достаточно прописать адрес сервера, порт и имя хоста (сервера):
nano /etc/zabbix/zabbix_agentd.conf
Включаем:
/etc/init.d/zabbix-agent start
Добавляем в автозагрузку:
Далее нужно добавить правило в firewall:
iptables -A INPUT -p tcp --dport “порт” -s “адрес сервера” -j ACCEPT
Установка Zabbix-агента завершена. Теперь, чтобы мониторить этот хост, нужно его настроить на Zabbix-сервере.
Шаг 2. Установка Zabbix-клиент под ОС Windows
Чтобы установить Zabbix-клиент на Windows нужно скачать и установить установщик с сайта https://www.zabbix.com/.
При установке указываем имя, с которого мы будем отправлять статистику, порт и хост нашего сервера Zabbix. Если нужно, указываем прокси.

Рисунок 1 – Установка Zabbix Agent
В дальнейшем, эти настройки можно сменить, они хранятся в файле zabbix_agentd.conf, который по умолчанию установщиком ставится в C:Program FilesZabbix Agent

Рисунок 2 – Просмотр файла настройки Zabbix Agent
Шаг 3. Настройка на Zabbix-сервере
После входа в систему на веб-интерфейсе Zabbix-сервера, нужно создать узел сети. Для этого перейдите во вкладку “Настройка” → “Узлы сети” → “Создать узел сети”.

Рисунок 3 – Добавление узла сети
Вводим в “Имя узла сети” и “Интерфейсы агента” адрес, порт и хост сети, который вводили в конфигурационном файле ранее.
Далее переходим в кладку “шаблоны” и подключаем нужный нам шаблон. Изначально в дистрибутиве Zabbix-сервера идёт список полезных шаблонов, но можно и создать свой во вкладке “Настройка” → “Шаблоны”. После добавления шаблона, нажимаем “Добавить”.
После добавления шаблона, можно посмотреть данные с агента “Мониториниг” → “Последние данные”.
Шаг 4. Настройка уведомлений
Для отправки уведомлений по email сперва нужно настроить сервер SNTP “Администрирование” → “Способы оповещений”.
После настройки сервера отправки, нужно зайти в “Профиль пользователя” → “Оповещения”- “Добавить”. Тут выбирается нужный email – туда должны будут приходить оповещения. Настраиваются оповещения и отправка по важности.

Рисунок 4 – Настройка уведомлений узла сети