In the previous article, we looked at how you can add Linux servers on the Zabbix server for monitoring. In this guide, we switch gears and focus our spotlight on how you can add a Windows host system to the Zabbix server for monitoring.
For this tutorial, we will add the Windows server 2019 datacenter edition to Zabbix Server.
Step 1) Download Zabbix Agent for Windows Server
As we saw when adding Linux hosts, the first step when adding a host to the Zabbix server is to install the Zabbix agent on the host system first. With that in mind, head out to the official Zabbix agents download page and download the Zabbix Window’s agent.
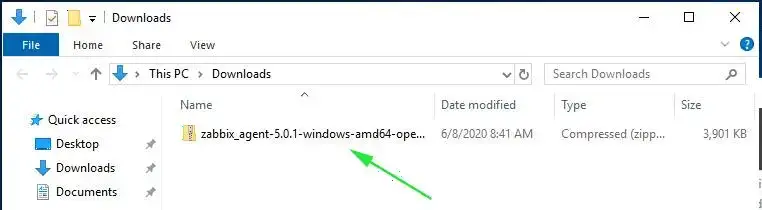
By default, this will download it in the ‘Downloads’ folder as shown.
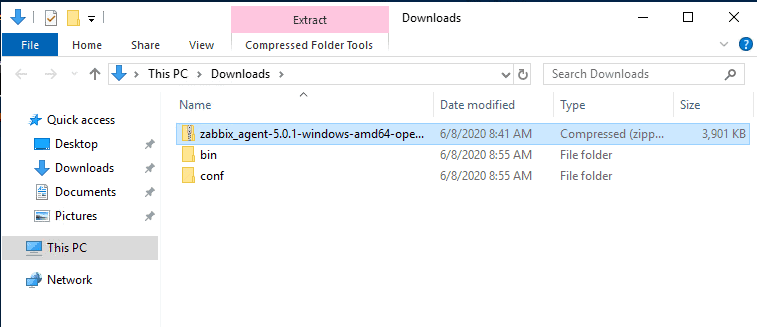
Once downloaded, right-click on the zipped file and select ‘Extract All’ to unzip it as shown.
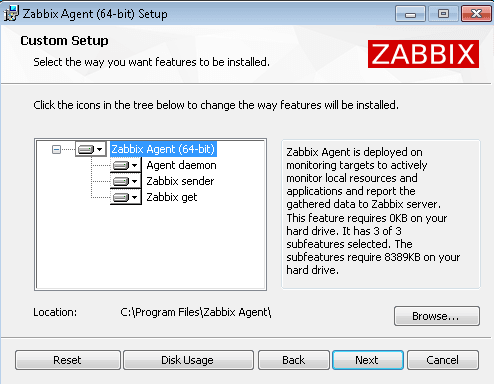
This unzips it into 2 folders: bin and conf folder. The bin folder contains the Zabbix agent executable file while the conf folder contains the Zabbix agent configuration file – zabbix.agentd.conf
Step 2) Edit the Zabbix configuration file
We need to make a few changes to the zabbix configuration file for the Zabbix agent to communicate with the Zabbix server. Therefore, open the zabbix configuration file – zabbix.agentd.conf – and modify the parameters as shown:
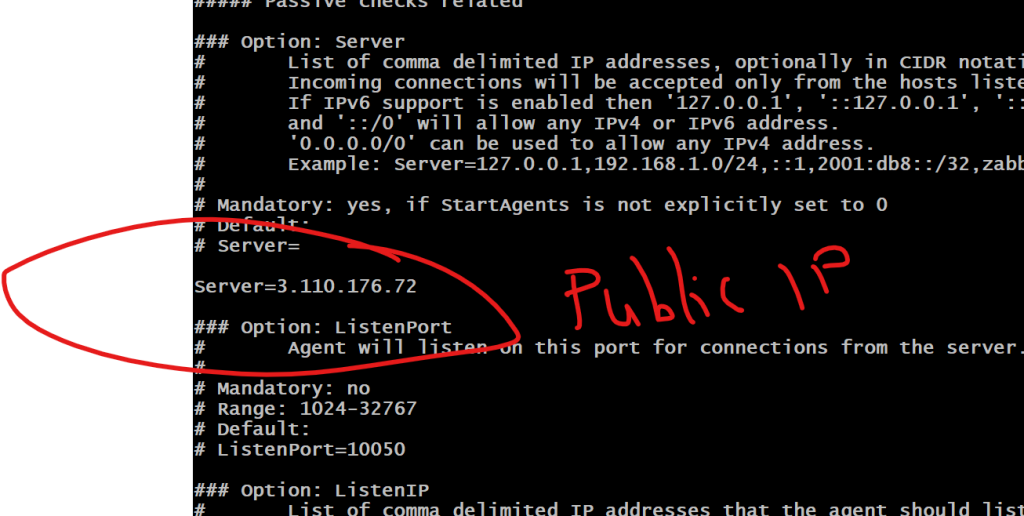
Server=<IP address of the Zabbix server>
ServerActive=<IP address of the Zabbix server>
Hostname=<The FQDN of the Windows server>
Save the changes and exit the file.
Step 3) Install and start Zabbix Agent on Windows server
With all the configurations in order, run command prompt as administrator and install Zabbix using the syntax as shown:
C:\> {full system path to zabbix_agentd.exe) –config {full system path to zabbix_agentd.win.conf} –install
In my case, the command will be:
C:\>C:\Users\winnie95atieno\Downloads\bin\zabbix_agentd.exe --config C:\Users\winnie95atieno\Downloads\conf\zabbix_agentd.conf --install
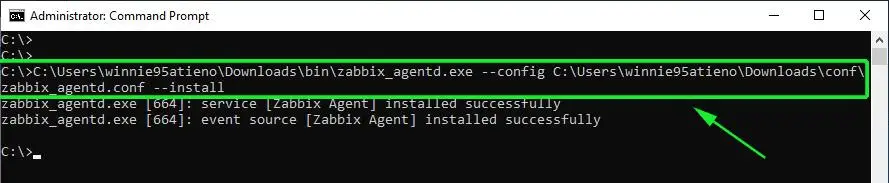
From the output, we can see that the Zabbix agent has successfully been installed.
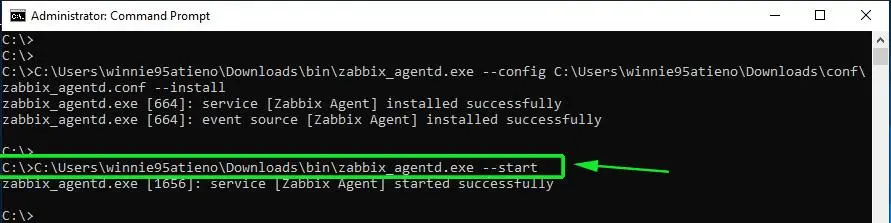
To start Zabbix, use the syntax:
C:\> {full system path to zabbix_agentd.exe) –start
The command will therefore be:
C:\>C:\Users\winnie95atieno\Downloads\bin\zabbix_agentd.exe --start
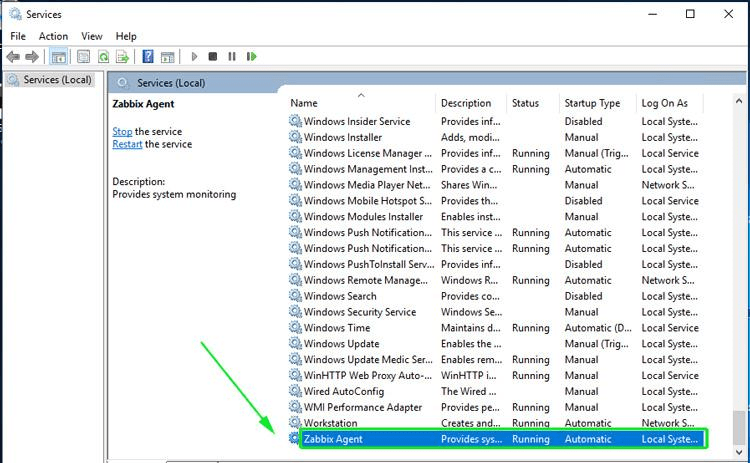
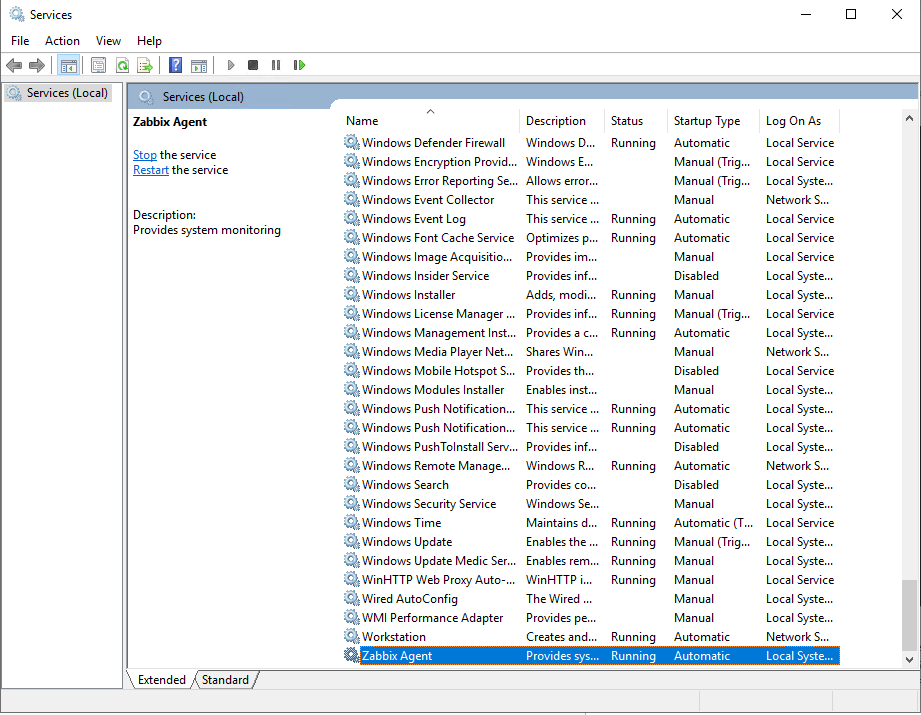
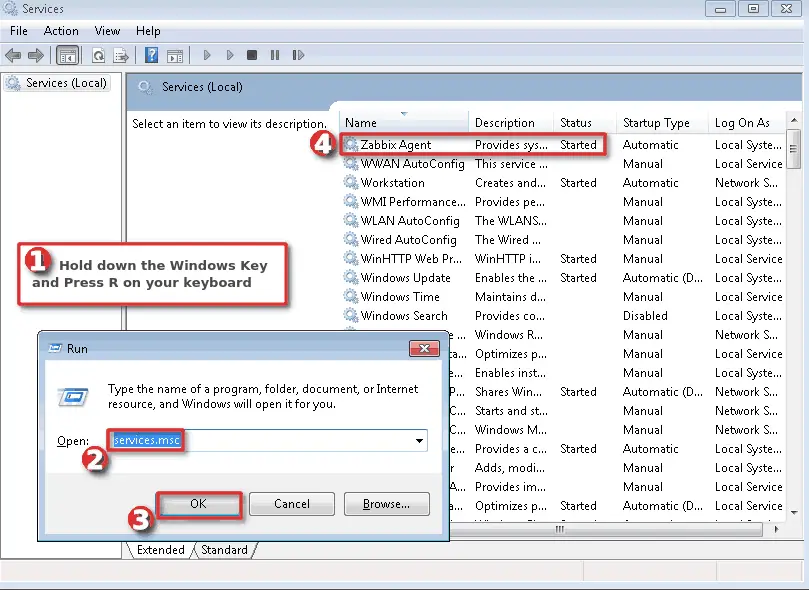
To confirm that the Zabbix agent is running, head out to the ‘Windows Services’ application and confirm that the Zabbix agent is up and running.
Step 4) Configure Windows firewall for Zabbix Agent
By default, the Windows firewall is enabled and blocks incoming and going connections. We are therefore going to make a few changes to allow traffic from the Windows Server host to the Zabbix server.
First, we are going to allow ICMP protocol for the Zabbix server to establish network communication with the Windows host and report any errors when they occur. Therefore, run Windows Powershell with Administrative privileges and execute the command as shown:
netsh advfirewall firewall add rule name="ICMP Allow incoming V4 echo request" protocol="icmpv4:8,any" dir=in action=allow
Next, allows port 10050 – which is the default port that Zabbix listens to – on the firewall.
netsh advfirewall firewall add rule name="Open Port 10050" dir=in action=allow protocol=TCP localport=10050

To this point, we have successfully installed and configured the Zabbix agent on the Windows host system. The Zabbix agent should be sending system metrics to the Zabbix server. Let’s now go over and see how you can add the Windows host on the Zabbix server.
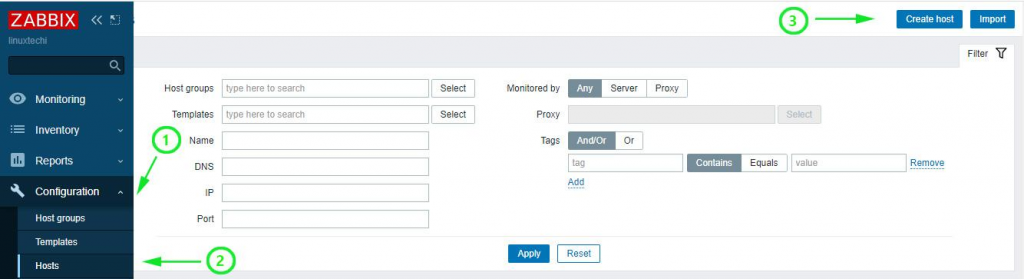
Step 5) Add a Windows host on Zabbix Server
To add a Windows host, go to Configuration –> Host –> Create Host
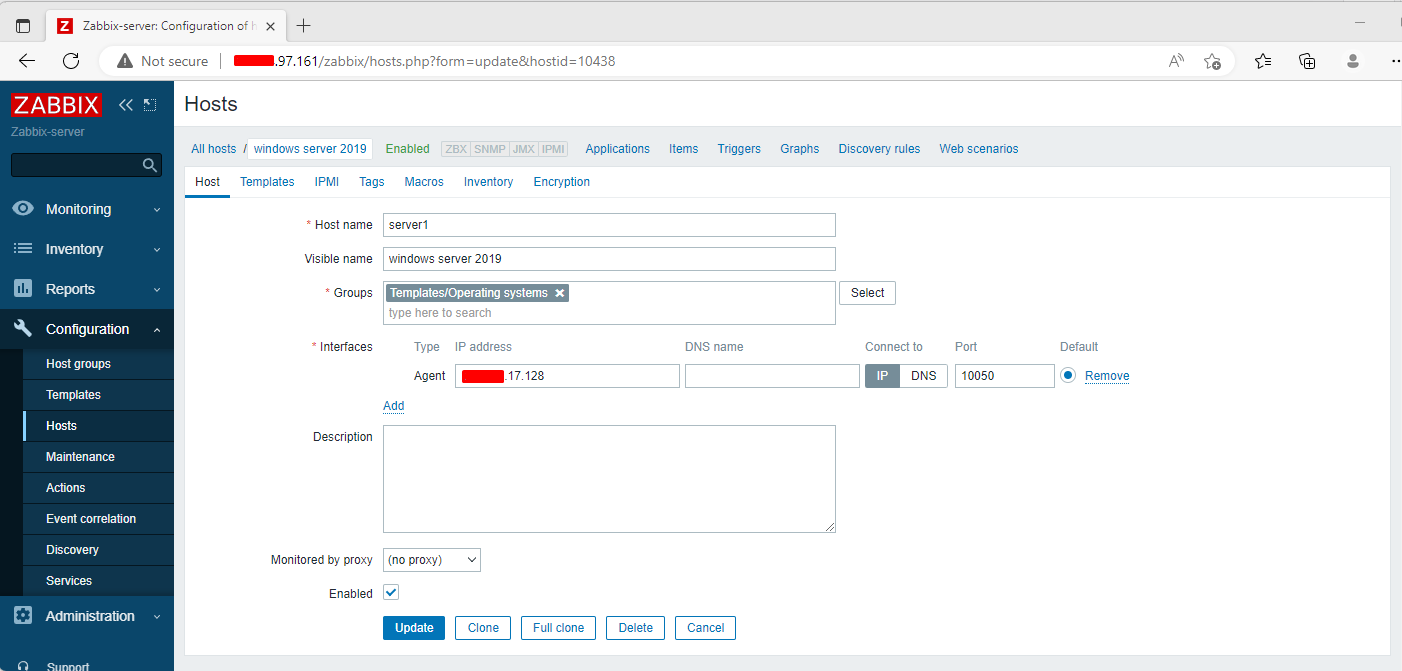
On the next screen, fill out the Windows host details such as hostname, visible name and IP address.
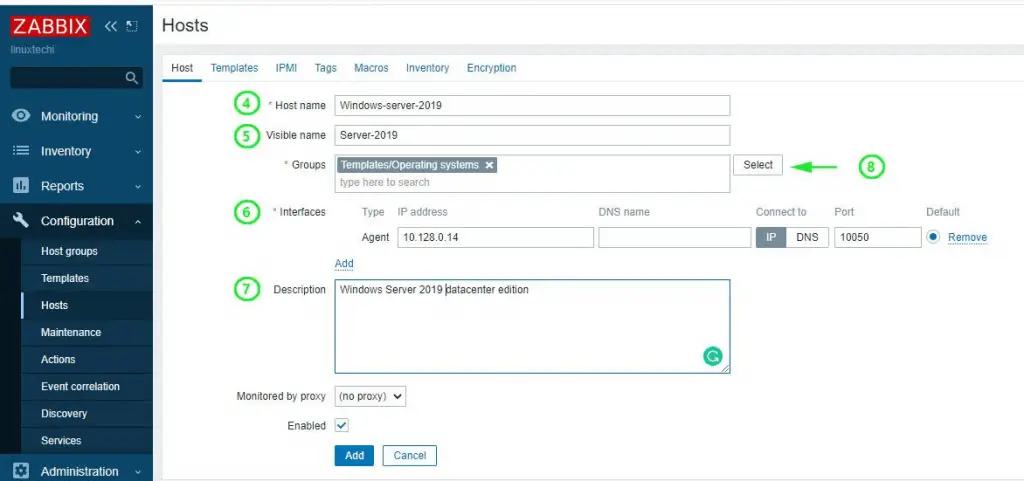
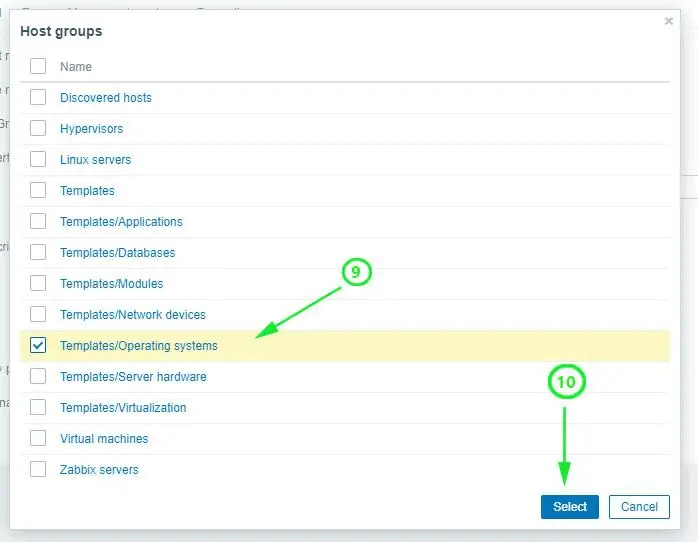
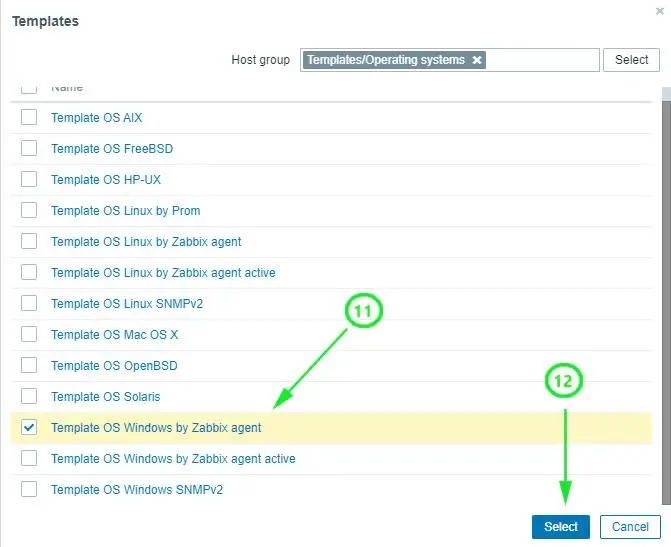
For the ‘Groups’ section, click on the ‘Select’ button and click on the ‘Templates/Operating system’ option.
Next, click on the ‘Templates’ tab on the menu and click ‘Template OS Windows by Zabbix agent’. Finally, click on the ‘Select’ button.
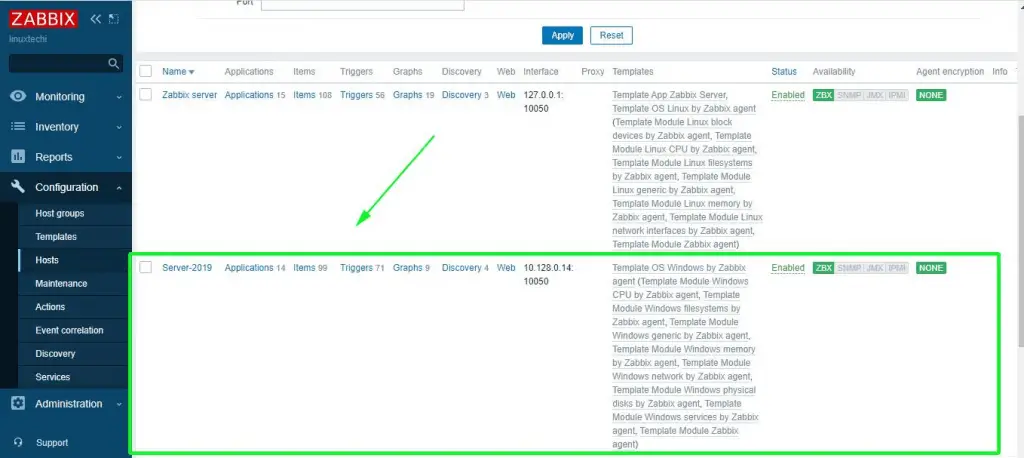
On the dashboard, check the Windows host listed as shown below. Note that the state is indicated ‘Enabled’ with the Zabbix icon ‘ZBX’ in green color.
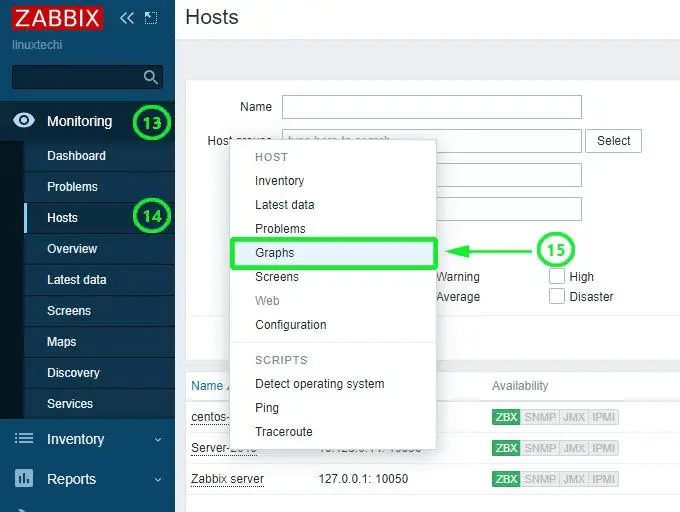
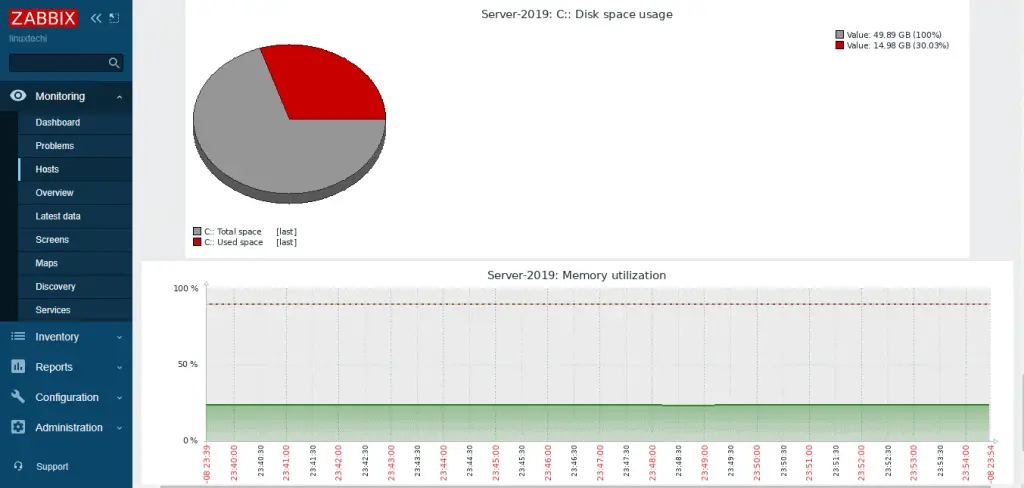
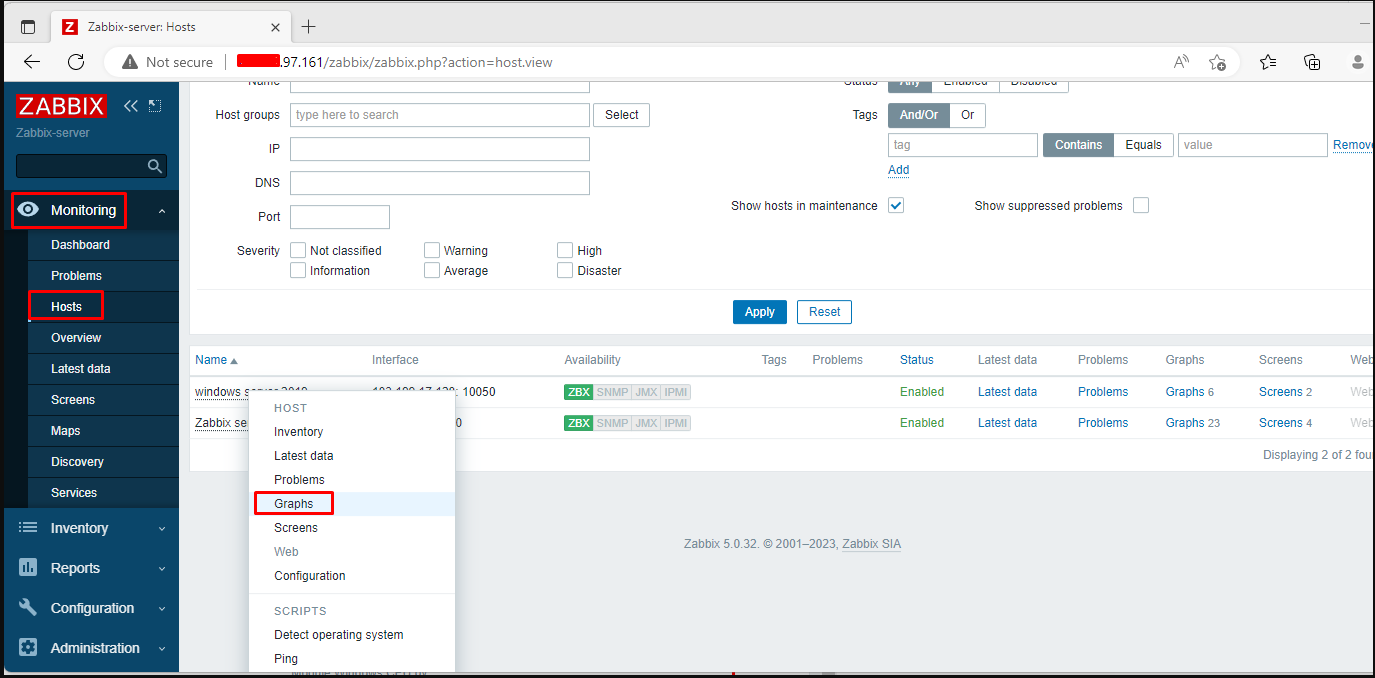
To graph the metrics associated with the Windows host system, click on ‘Monitoring’ –> ‘Hosts’. Click on the Windows host and select ‘Graphs’.
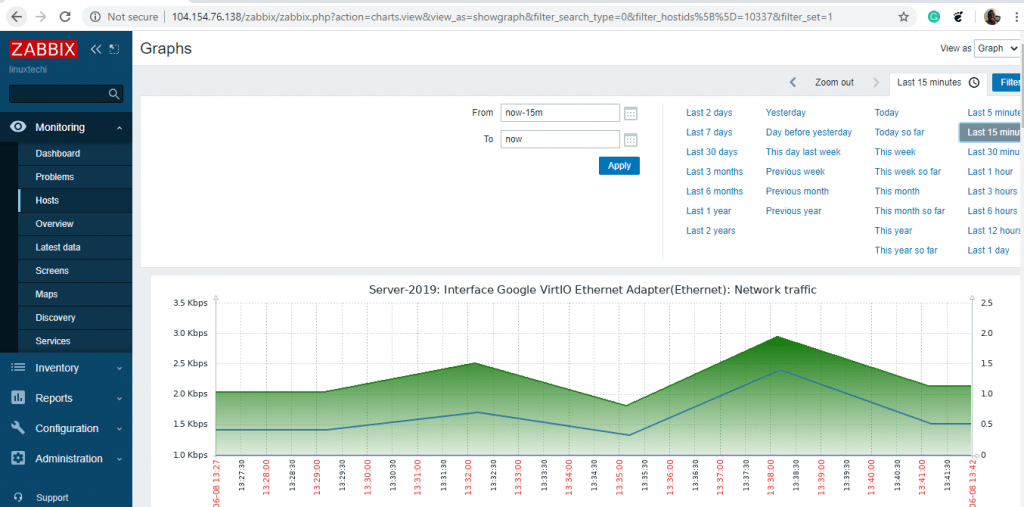
Finally, the Zabbix server will start graphing the system metrics shipped by the Zabbix agent which is residing on the Windows server host system. There are various metrics that you can monitor including network Interface statistics, CPU usage and utilization, Disk space usage and Memory utilization to mention a few.
And this brings us to the end of this topic. It’s our hope that you can now comfortably add a Windows host on the Zabbix server for monitoring.
Upgrade & Secure Your Future with DevOps, SRE, DevSecOps, MLOps!
We spend hours on Instagram and YouTube and waste money on coffee and fast food, but won’t spend 30 minutes a day learning skills to boost our careers.
Master in DevOps, SRE, DevSecOps & MLOps!
Learn from Guru Rajesh Kumar and double your salary in just one year.
Get Started Now!
How to install Zabbix Agent 6 in Centos7?
$ yum update
$ yum install wget -y
$ wget https://repo.zabbix.com/zabbix/6.0/rhel/7/x86_64/zabbix-agent-6.0.0-1.el7.x86_64.rpm --no-check-certificate
$ rpm -ivh zabbix-agent-6.0.0-1.el7.x86_64.rpm
$ yum install pcre2-devel.x86_64
$ yum update
$ yum install zabbix-agent

# Modify zabbix_agentd.conf with zabbix server hostname or IP
$ vi /etc/zabbix/zabbix_agentd.conf

$ service zabbix-agent start
$ systemctl enable zabbix-agent
$ service zabbix-agent restart

Zabbix Agent LogFile - /var/log/zabbix/zabbix_agentd.log
Agent Config file - /etc/zabbix/zabbix_agentd.conf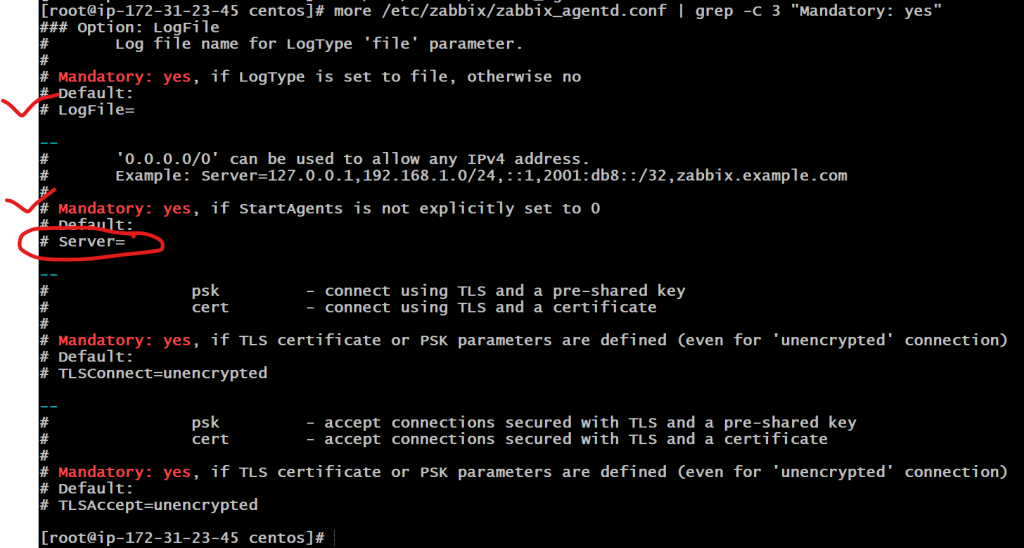

How to install Zabbix Agent 6 in Ubuntu 20?
$ wget https://repo.zabbix.com/zabbix/6.0/ubuntu/pool/main/z/zabbix-release/zabbix-release_6.0-1+ubuntu20.04_all.deb
dpkg -i zabbix-release_6.0-1+ubuntu20.04_all.deb
$ apt update && sudo apt upgrade
$ apt install zabbix-agent
$ vi /etc/zabbix/zabbix_agentd.conf
$ systemctl restart zabbix-agent
$ systemctl enable zabbix-agent

Zabbix Agent LogFile - /var/log/zabbix/zabbix_agentd.log
Agent Config file - /etc/zabbix/zabbix_agentd.conf
How to install Zabbix Agent 6 in Windows 2019?
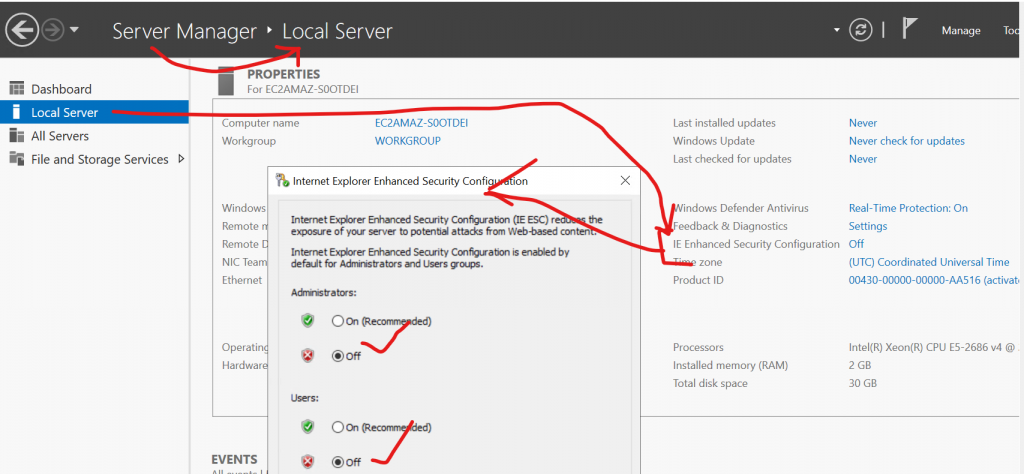
Step 1 – Disable “IE enahanced Security Configuration” in Local server so you can download file easily
Step 2 – Download a MSI file from https://www.zabbix.com/download_agents
URL for Zabbix Agent Version 6 – https://cdn.zabbix.com/zabbix/binaries/stable/6.0/6.0.1/zabbix_agent-6.0.1-windows-amd64-openssl.msi
Step 3 – Install zabbix_agent-6.0.1-windows-amd64-openssl.msi with below configuration
Step 4 – Check a Zabbix Agent Services is running or not
Zabbix Agent 2 Installation in Windows
Version - Zabbix agent 2 v6.0.1
Download - https://cdn.zabbix.com/zabbix/binaries/stable/6.0/6.0.1/zabbix_agent2-6.0.1-windows-amd64-openssl.msi
Zabbix Agent 2 Installation in Ubuntu Linux
Version - Zabbix agent 2 v6.0.1
$ apt install zabbix-agent2

# # Modify zabbix_agent2.conf with zabbix server hostname or IP
$ vi /etc/zabbix/zabbix_agent2.conf

$ systemctl restart zabbix-agent2
Zabbix Agent 2 Installation in Centos/RHEL Linux
$ yum update
$ yum install pcre2-devel.x86_64
$ yum install pcre.x86_64

$ rpm -Uvh https://repo.zabbix.com/zabbix/6.0/rhel/7/x86_64/zabbix-agent2-6.0.2-1.el7.x86_64.rpm
& yum update
$ yum install install zabbix-agent2

# Modify zabbix_agent2.conf with zabbix server hostname or IP
$ vi /etc/zabbix/zabbix_agent2.conf

$ service zabbix-agent start
$ systemctl enable zabbix-agent2
$ service zabbix-agent2 restart
How to add new host (zabbix agent) at Zabbix Server
Step 1 – Configuration ==> Hosts ==> Create Host
Step 2 – Enter Follwing
- Host name -
- Templates - Linux by Zabbix Agent OR Windows by Zabbix agent
- Groups - Virtual Machine
- Interfaces - Agent

Note - Use Public IP address of Agent
Step 3 – Wait for 60 seconds and verify as below;
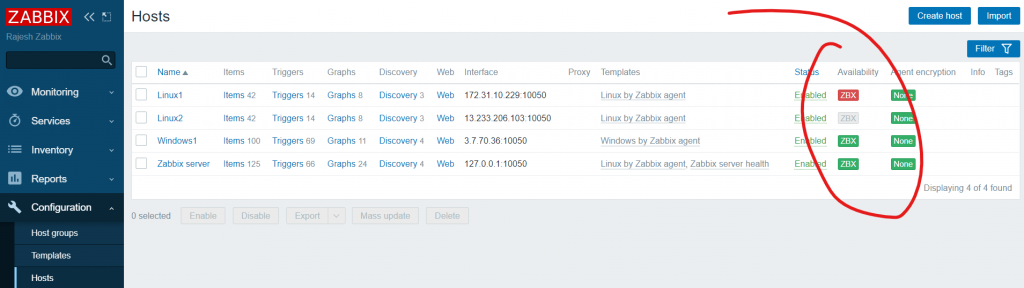
The Availability column contains indicators of host availability per each interface. We have defined a Zabbix agent interface, so we can use the agent availability icon (with ‘ZBX’ on it) to understand host availability:
- – host status has not been established; no metric check has happened yet
- – host is available, a metric check has been successful
- – host is unavailable, a metric check has failed (move your mouse cursor over the icon to see the error message). There might be some error with communication, possibly caused by incorrect interface credentials. Check that Zabbix server is running, and try refreshing the page later as well.
How to configure and deploy Zabbix passive and active agents:
- Install the Zabbix repository and the Zabbix Agent on your host
- Open the zabbix_agentd.conf configuration file
- Specify your Zabbix Server address in the Server and ServerActive parameters
- Define the name of your host in the Hostname parameter
- Restart the Zabbix Agent
- Navigate to Configuration → Hosts
- Create two hosts in Zabbix frontend – one for passive and one for active checks
- For passive Agent host – define an Agent interface containing the address of your Zabbix Server
- The active agent Host name should match the Hostname parameter value in the Agent configuration file
- Apply the corresponding Linux by Zabbix Agent/Linux by Zabbix Agent active template
- Navigate to Monitoring → Latest data and check if you have received metrics from the hosts
Session-1 Advance Zabbix Tutorials
Session-2 Advance Zabbix Tutorials
Session-3 Advance Zabbix Tutorials
Session-4 Advance Zabbix Tutorials
Session-5 Advance Zabbix Tutorials
Session-6 Advance Zabbix Tutorials
Session-7 Advance Zabbix Tutorials
Session-8 Advance Zabbix Tutorials
Session-9 Advance Zabbix Tutorials
Session-10 Advance Zabbix Tutorials
Session-11 Advance Zabbix Tutorials
Session-12 Advance Zabbix Tutorials
Certification Courses
DevOpsSchool has introduced a series of professional certification courses designed to enhance your skills and expertise in cutting-edge technologies and methodologies. Whether you are aiming to excel in development, security, or operations, these certifications provide a comprehensive learning experience. Explore the following programs:
- DevOps Certification — Learn the fundamentals and advanced concepts of DevOps practices and tools.
- DevSecOps Certification — Master the integration of security within the DevOps workflow.
- SRE Certification — Gain expertise in Site Reliability Engineering and ensure reliability at scale.
- MLOps Certification — Dive into Machine Learning Operations and streamline ML workflows.
- AiOps Certification — Discover AI-driven operations management for next-gen IT environments.

Explore our DevOps Certification, SRE Certification, and DevSecOps Certification programs at DevOpsSchool. Gain the expertise needed to excel in your career with hands-on training and globally recognized certifications.
To install the uAgents Framework on Windows Server 2019, follow these detailed steps to ensure a smooth setup process. First, ensure that you have Python installed on your system, as the uAgents library is a Python package. If Python is not installed, download the latest version from the official Python website at Python. Run the installer and make sure to check the box that says «Add Python X.X to PATH» during installation. This step is crucial as it allows you to run Python commands from the command line without specifying the full path.
Installing uAgents Framework
Once Python is installed, you can proceed to install the uAgents framework using pip, Python’s package manager. Open your command prompt and ensure that pip is up-to-date by executing the following command:
python -m pip install --upgrade pip
After updating pip, install the uAgents framework by running:
pip install uagents
This command will download and install the uagents package along with its dependencies. You should see a message indicating the successful installation and the version number of the package.
Verifying Installation
To verify that the installation was successful, you can check the installed packages by running:
pip list
Look for uagents in the list of installed packages. If it appears, the installation was successful.
Installing Additional Libraries
If you plan to develop Agents compatible with the AI Engine, you will also need to install the uagents-ai-engine package. This can be done with the following command:
pip install uagents-ai-engine
This package is essential for creating AI Engine compatible Agents, enhancing the capabilities of your uAgents framework setup.
Conclusion
By following these steps, you will have the uAgents framework installed on your Windows Server 2019 environment, ready for you to start developing your agents. For further details, refer to the official documentation for more advanced configurations and usage examples.
Estimated reading: 6 minutes
993 views
In the previous article, we looked at how you can add Linux servers to the Zabbix server for monitoring. In this guide, we switch gears and focus our spotlight on how you can add a Windows host system to the Zabbix server for monitoring.
For this tutorial, we will add the Windows server 2019/2022 data center edition to Zabbix Server.
Step 1: Download and Install Zabbix Agent on Windows
As we saw when adding Linux hosts, the first step when adding a host to the Zabbix server is to install the Zabbix agent on the host system first. With that in mind, head out to the official Zabbix agents download page and download the Zabbix Window’s agent.
By default, this will download it in the ‘Downloads’ folder as shown.
Method 1: Install via cmd
Once downloaded, right-click on the zipped file and select ‘Extract All’
This unzips it into 2 folders: bin and conf folder. The bin folder contains the Zabbix agent executable file while the conf folder contains the Zabbix agent configuration file – zabbix.agentd.conf
1. Then manually installed and started on the system using windows Command Prompt as in the following example:
C:\Users\caezsar><full system path to zabbix_agentd.exe> --config <full system path to zabbix_agentd.win.conf> --install
For example, suppose you’ve downloaded and extracted the Zabbix agent zip archive to C:\Users\Administrator\Downloads\zabbix_agent-5.0.33-windows-amd64-openssl, run the following command to install the service:
C:\Users\Administrator\Downloads\zabbix_agent-5.0.33-windows-amd64-openssl\bin\zabbix_agentd.exe --config C:\Users\Administrator\Downloads\zabbix_agent-5.0.33-windows-amd64-openssl\conf\zabbix_agentd.conf --install
2. After the service has been installed on your Windows host, open zabbix_agentd.win.conf file and manually edit the following parameters:
zabbix_agentd.win.conf
Server=IP of Zabbix Server
ServerActive=IP of Zabbix Server
Hostname=use the FQDN of your windows host
3. To start the service just type:
C:\Users\Administrator\Downloads\zabbix_agent-5.0.33-windows-amd64-openssl\bin\zabbix_agentd.exe --start
To stop the service run the same command as above with --stop argument and to uninstall the service use the --uninstall argument.
C:\Users\Administrator\Downloads\zabbix_agent-5.0.33-windows-amd64-openssl\bin\zabbix_agentd.exe --stop
C:\Users\Administrator\Downloads\zabbix_agent-5.0.33-windows-amd64-openssl\bin\zabbix_agentd.exe --uninstall
Method 2: Install via msi file
1. A second and more convenient method to install and automatically configure the Zabbix agent on Windows environments is by downloading the Zabbix Agent installer MSI package specific to your system architecture.
2. Once the Zabbix agent MSI file has been downloaded on your system, run it and supply the required information in order to configure and install the agent on the target monitored host as follows:
Hostname: use the FQDN of your windows host (the hostname value should match the “Full Computer name” configured for your machine)
Zabbix server Name: use the IP of the Zabbix Server
Agent Port: 10050
Remote Command: check this value
Active Server: IP of Zabbix Server

If you need to modify the Zabbix configuration file with other custom values at a later date, the conf file can be found on the %programfiles%Zabbix Agent path.
After you’ve finished the setup, open Windows Command Prompt with Administrator privileges, run services.msc command in order to open Windows Services utility, and locate the Zabbix Agent service to check if the service is running and automatically started after reboot.
services.msc
From this console, you can manage the service (start, stop, pause, resume, enable or disable).
Step 2: Configure Windows Firewall and Test Zabbix Agent
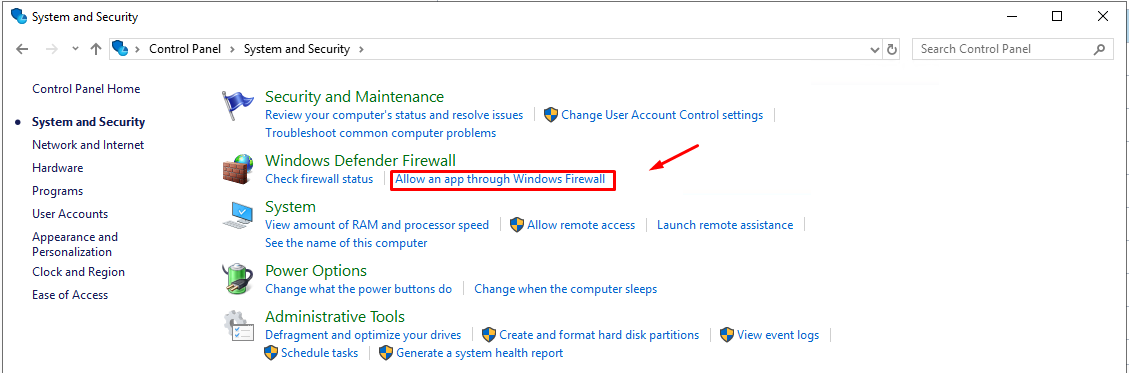
7. Almost all Windows-based systems have Windows Firewall active and running, therefore Zabbix agent port must be opened in the firewall in order to communicate with the Zabbix server.
In order to open the Zabbix agent port in the windows firewall, open Control Panel -> System and Security – > Windows Firewall and hit on Allow an app through Windows Firewall.
8. Next, click on Allow another app button, and a new window should open. Use the Browse button to navigate and add Zabbix agent executable file (usually found in %programfiles%Zabbix Agent if you installed it using the MSI program), then hit on Add button to add the service.
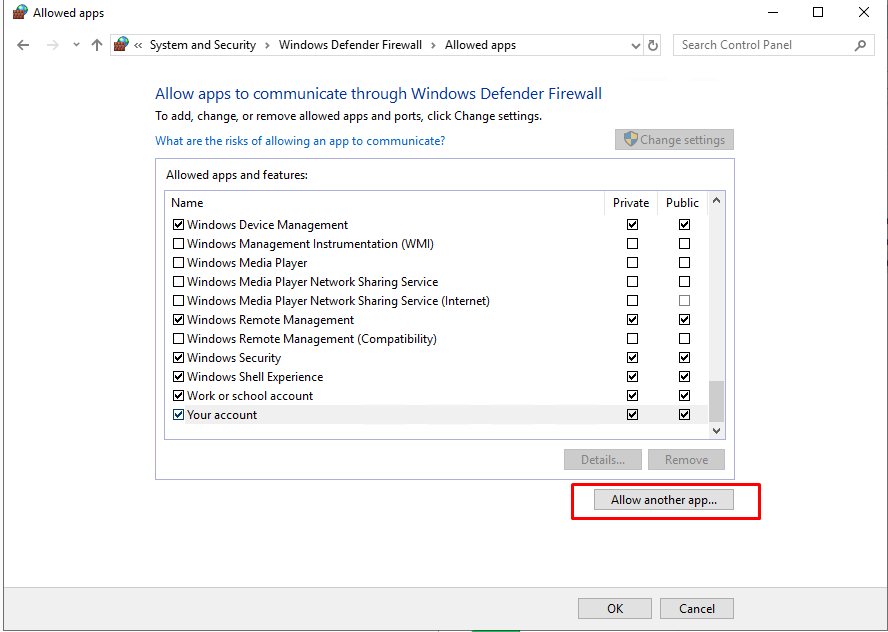
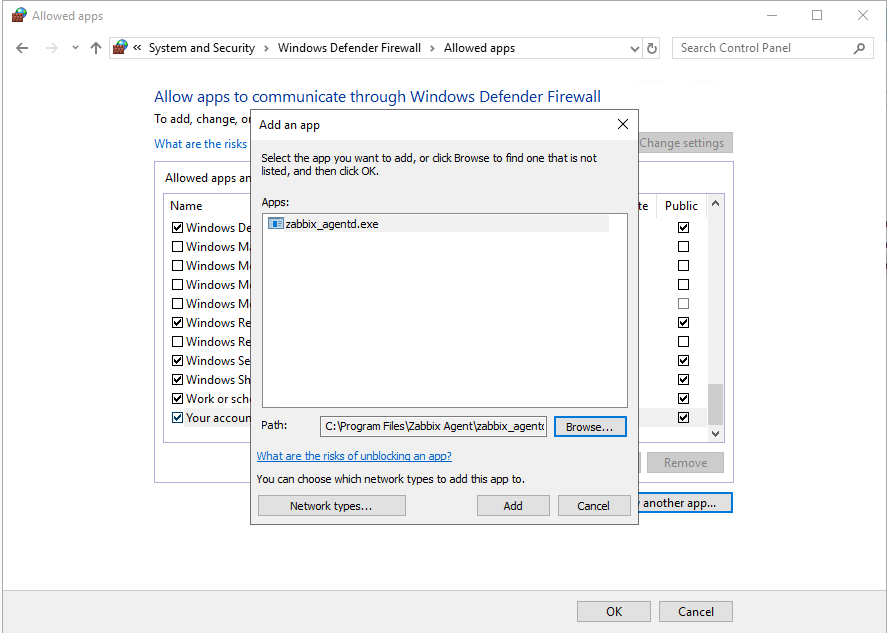
9. Next, make sure you check and open the firewall rule on the network segment where the Zabbix server is located in your network and hit the OK button to finish and apply the configuration.
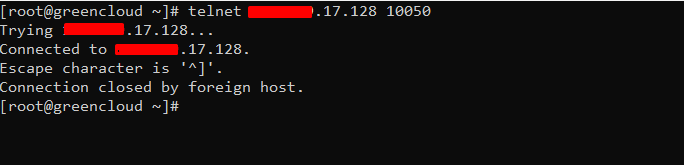
10. In order to test if the Zabbix agent running on windows is reachable from the Zabbix server-side, use telnet or netcat command on Zabbix server against windows agent IP-Port and a Connected message should appear. Hit Enter key to generate an error message and automatically disconnect from the agent:
telnet <Windows_agent IP Address> 10050
Step 3: Add Zabbix Agent Monitored Windows Host to Zabbix Server
11. Once the windows agent has been tested from the command line and everything looks fine, go to Zabbix Server web interface, move to Configuration tab -> Hosts, and hit on Create Host button in order to add the Windows monitored host.
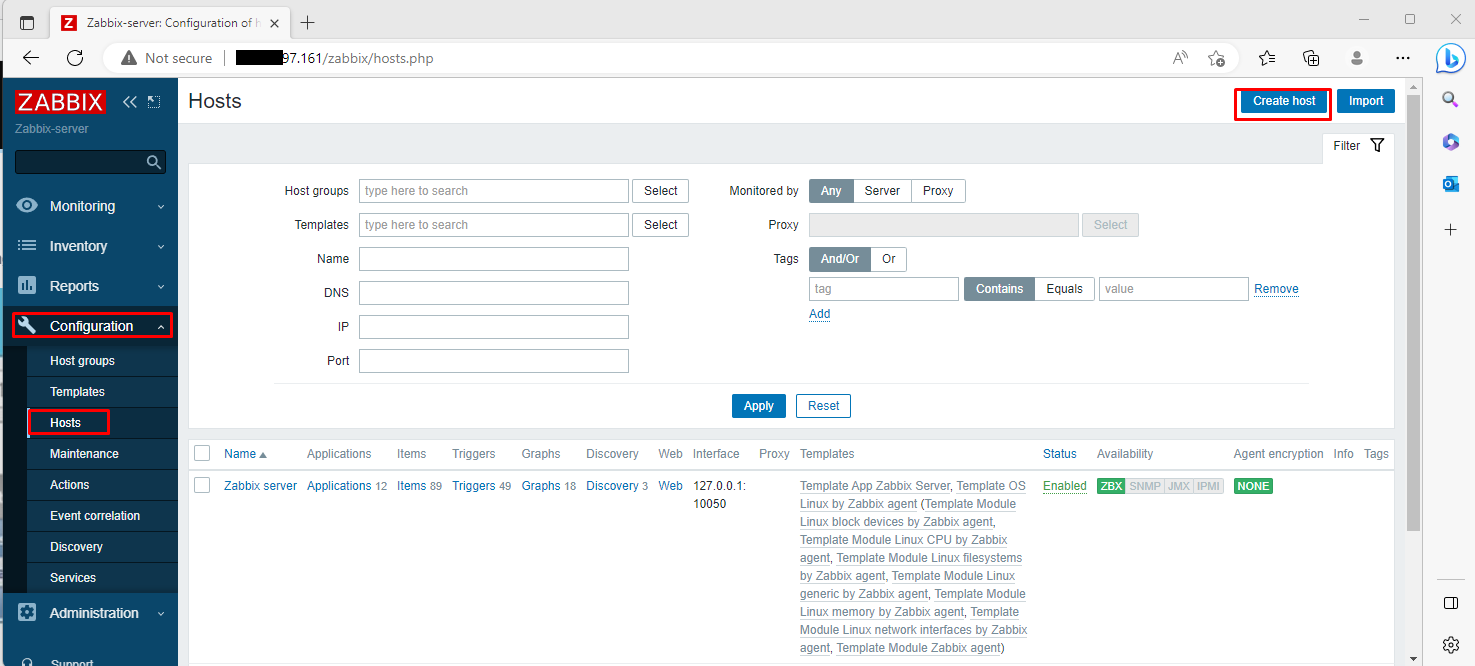
12. On the next screen, fill out the Windows host details such as hostname, visible name and IP address.
For the ‘Groups’ section, click on the ‘Select’ button and click on the ‘Templates/Operating system’ option.

14. On the dashboard, check the Windows host listed as shown below. Note that the state is indicated ‘Enabled’ with the Zabbix icon ‘ZBX’ in green color..

15. To graph the metrics associated with the Windows host system, click on ‘Monitoring’ –> ‘Hosts’. Click on the Windows host and select ‘Graphs’.
Finally, the Zabbix server will start graphing the system metrics shipped by the Zabbix agent which is residing on the Windows server host system. There are various metrics that you can monitor including network Interface statistics, CPU usage and utilization, Disk space usage, and Memory utilization to mention a few.

Summary
In this article, we have guided Install Zabbix Agent and Add Windows Host to Zabbix Monitoring. Hope this article will be useful for you

In this tutorial, I will show you how to install Zabbix agent for Windows server using an MSI Installer package and how to monitor Windows server with Zabbix monitoring system.
Using this guide you can monitor almost the entire Windows OS family: Windows server 2012 R2, Windows Server 2016, Windows Server 2019, Windows 10, Windows 8 and Windows 7.
Installation is quite simple, just download and install the Zabbix agent MSI installer following steps 1 and 2, but if you want to learn more, read the full guide.
In short, Zabbix agent is a lightweight application that can collect various performance data from the operating system – such as CPU, memory, disk, and network interface utilization – and forward it to a central point (server) for storage and visualization. It runs on any modern operating system and is very flexible because its functionality can be extended with scripts and modules.
You can read more about the Zabbix agent on the Zabbix official site and if you stumbled on this tutorial by accident and you never heard of the Zabbix monitoring system, then stop whatever you doing and install it on your favorite Linux distribution in less than 10 minutes: CentOS/RHEL, Ubuntu, Debian, Rasberry Pi.
Need help with installing Zabbix agent on Linux OS? Check out this guide:
Zabbix Agent (Linux): Install on Ubuntu, CentOS, RHEL, Debian, etc.
Table of Contents
- Step 1: Download Zabbix Agent Installer for Windows (msi)
- Step 2: Install Zabbix Agent on Windows using MSI installer
- Step 3: Add Windows host to Zabbix monitoring system
- Step 4: Check if Zabbix Agent is working correctly
- Step 5: Restart Zabbix Agent service on Windows
- Step 6: Configure auto registration for Windows Zabbix Agents
- Step 7: Configure PSK encryption on Zabbix Agent (Windows)
- a. Generate PSK key
- b. Configure Zabbix agent to support PSK encryption
- c. Enable PSK encryption on the agent in Zabbix frontend
- Step 8: Install Zabbix agent via Windows command-line (CMD)
- a. Run CMD as administrator
- b. Download Zabbix agent
- c. Change directory and set installation folder
- d. Install Zabbix agent using msiexec
- e. Example of Zabbix agent installation with additional options
- Step 9: Understanding Active vs Passive Zabbix Agent mode
Step 1: Download Zabbix Agent Installer for Windows (msi)
In this tutorial, I will use the latest Zabbix agent 5.0.2 LTS version, that version is compatible with Zabbix server 5.x or newer.
| Windows Zabbix Agent v1 LTS v6.0.x | Download: 64-bit or 32-bit |
| Windows Zabbix Agent v2 LTS v6.0.x (recommended) | Download: 64-bit or 32-bit |
I always recommend using the latest LTS version to take full advantage of new features and improved performance so make sure to download installer zabbix_agent2-6.0.7-windows-amd64-openssl.msi for 64-bit Windows or zabbix_agent2-6.0.7-windows-i386-openssl.msi for 32-bit Windows.
And don’t try to install a 32-bit package on 64-bit Windows because it won’t work!
Step 2: Install Zabbix Agent on Windows using MSI installer
I will install Zabbix Agent on Windows server using installation wizard but if you prefer command-line based installation check out section “Install Zabbix agent via Windows command-line (CMD)”
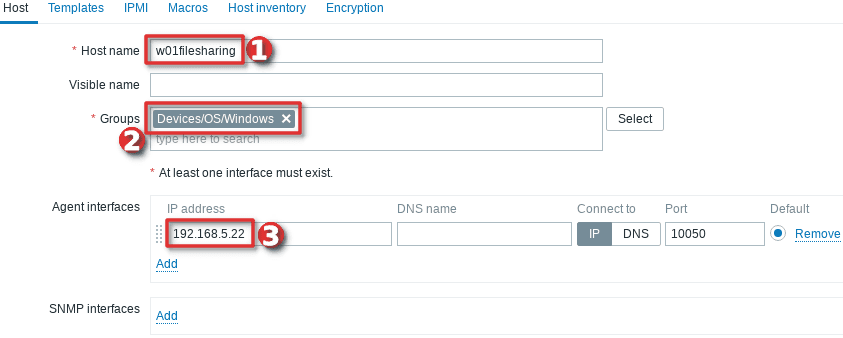
Just to make clear, in this tutorial I will use Zabbix server with IP address 192.168.5.43 to monitor Windows machine called w01services with IP address 192.168.5.22.
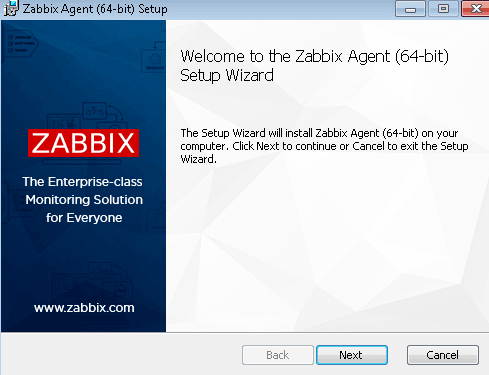
Double click on Zabbix MSI installer that you have downloaded in the previous step and click “Next” just as shown in the image below.
Accept the terms and click the “Next” button.

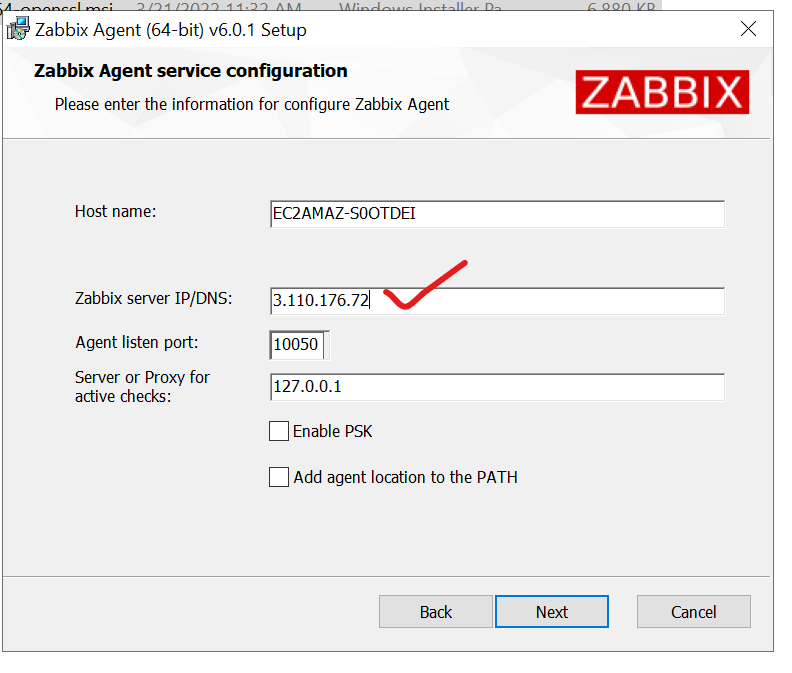
Define custom “Host name” or use fully qualified domain name (FQDN) of the Windows machine in the “Host name” field. Then enter IP address of the Zabbix server under “Zabbix server IP/DNS” and “Server or Proxy for active checks” field and you are done.
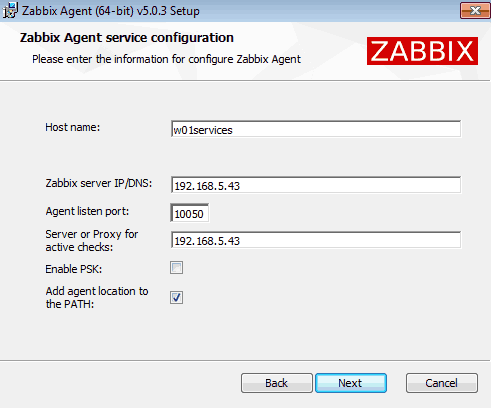
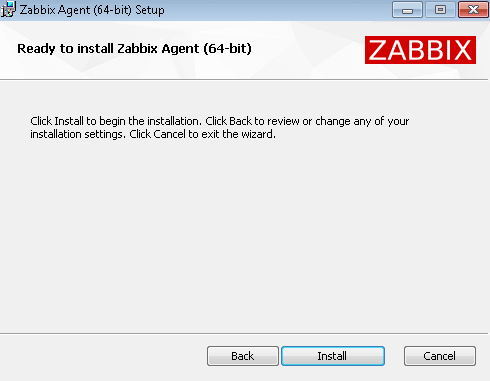
Select “Add agent location to the PATH” and go through the rest of the installation by clicking “Next“, “Install” and “Finish“.
You don’t need to configure Windows firewall manually because the MSI installer will automatically add a firewall rule to permit Zabbix TCP port 10050.
Finally, we need to check that the Zabbix agent is up and running.
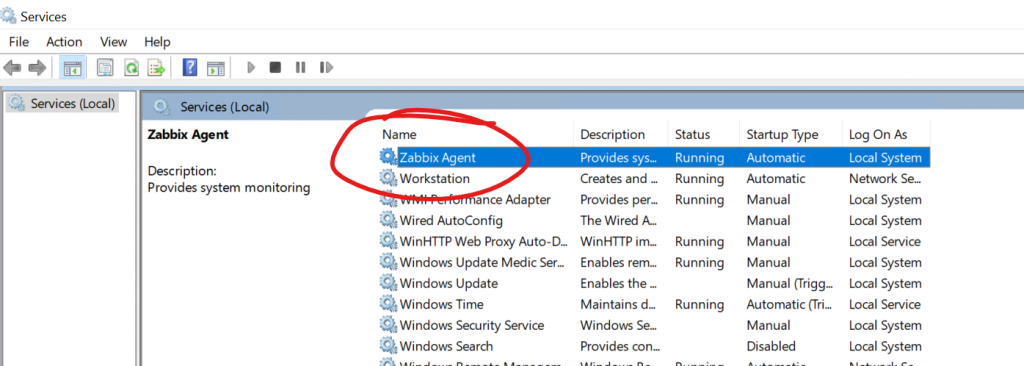
Hold down the “Windows key” and press “R” on the keyboard, type “services.msc“, press “OK” and check the “Status” column for “Zabbix Agent” service exactly as shown in the picture below. Status should be “Started” if the installation was successful.
WELL DONE!
You have successfully installed and configured Zabbix agent on Windows OS!
Now it’s time to add that Windows host to Zabbix monitoring system.
Step 3: Add Windows host to Zabbix monitoring system
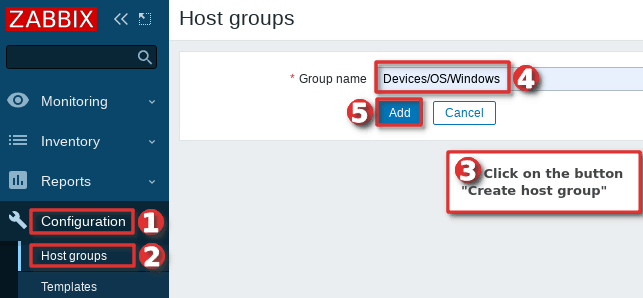
You can add a host to existing host group or you can create a new host group for your Windows servers. I will create host group “Devices/OS/Windows“ using “Host groups” option under “Configuration” section on the Zabbix frontend. Click “Create host group” button, define “Group name” and click “Add” (you only need to create host group once):
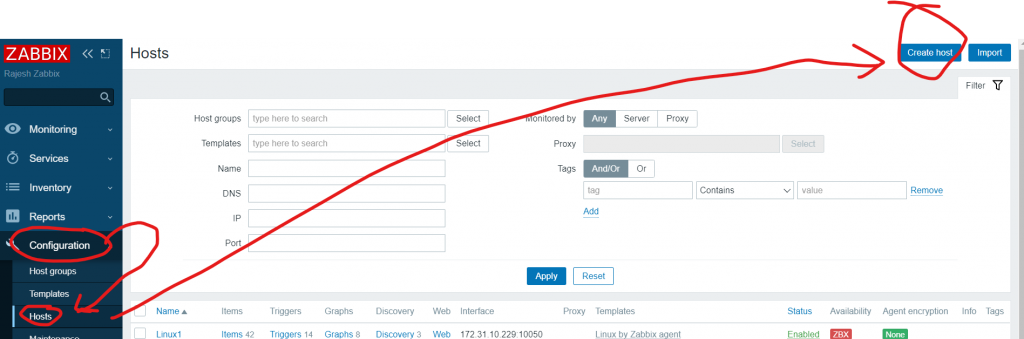
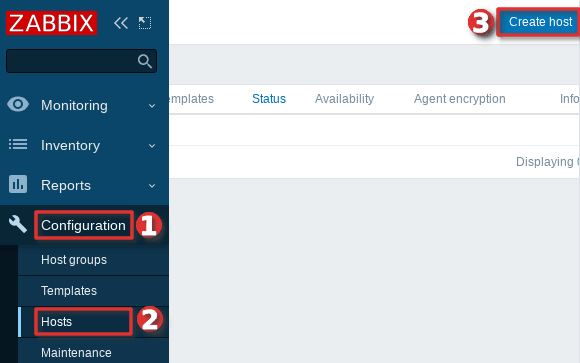
Navigate to “Host” menu under “Configuration” tab and then click “Create host” option to create a host in Zabbix:
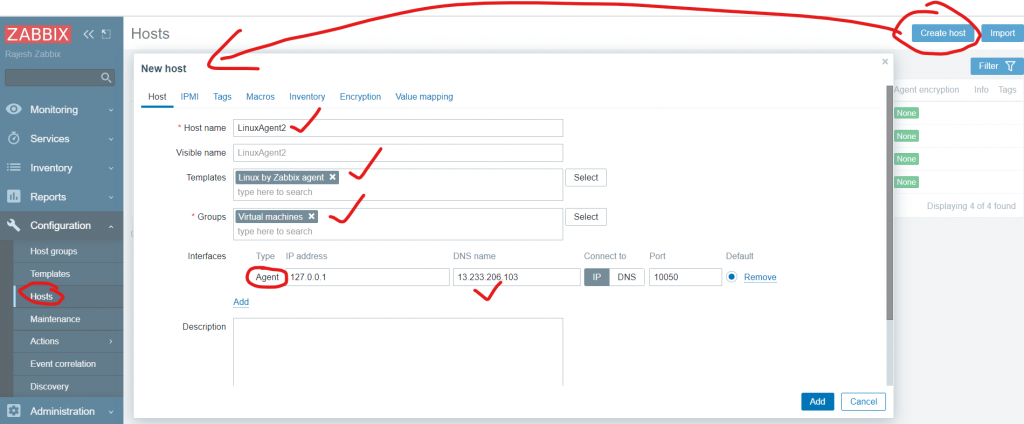
Define “Hostname” and set “Groups” using your newly created host group. Then set the IP address of the Windows server under “Agent interfaces” section
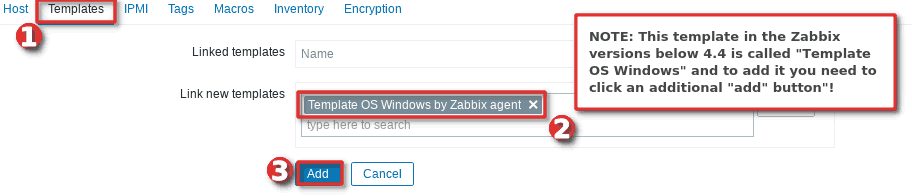
Switch to tab “Templates” and choose the “Template OS Windows by Zabbix agent” template under section “Link new template” by typing “OS Windows …”.
And you’re done! If you are interested in automating this whole process of adding Windows hosts to Zabbix see the section “Configure auto registration for Windows Zabbix agents“
Note that in this tutorial I m using a template “Template OS Windows by Zabbix agent” that can only monitor passive Zabbix agents. However, if you want to monitor your host using Zabbix agents in active mode use a template called “Template OS Windows by Zabbix agent active“. Check out the section “Understanding Active vs Passive Zabbix Agent mode” to learn more about the differences between the active and passive agent mode.
Step 4: Check if Zabbix Agent is working correctly
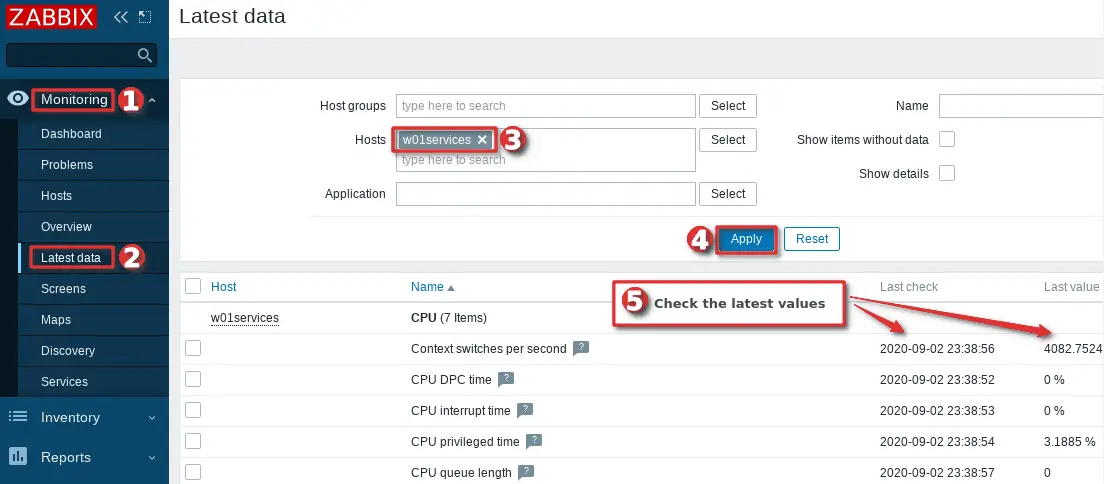
You can check that the Zabbix agent is working properly by using the “Latest Data” option on the Zabbix frontend. Wait up to 5 minutes after you have installed and started Zabbix agent to allow for data to be collected. Look at columns “Last check” and “Latest value” and if they are updating then the agent is working.
Your agent should be working and collecting data by now, but if you experience any problems, restart Zabbix agent service and check the log “C:\Program Files\zabbix\zabbix_agentd.log“. And if there is nothing unusual in the log file then check the firewall – make sure that TCP port 10050 on the host (where Zabbix agent is installed) and TCP port 10051 on the Zabbix server side are open.
CONGRATULATIONS!
You have successfully installed Zabbix Agent and your Windows server is being monitored!
No need to do anything else as other steps are optional!
CONTINUE TO LEARN MORE:
How to manage Zabbix agent service on Windows
Auto registration of Zabbix agents (Windows OS)
Learn how to Secure Zabbix Agent
Alternative Zabbix agent installation via Windows command-line (CLI)
Understanding Active vs Passive Zabbix Agent mod
Step 5: Restart Zabbix Agent service on Windows
In the previous steps, we learned how to check the status of Zabbix agent service using the “services.msc” option, and now we will learn how to use the command line interface (CMD) to stop or start the agent and check its status.
Click on “Windows Start” button and type “cmd” in the search bar, right-click on “cmd” icon and select option “Run as administrator” and use these commands to start/stop the agent:
net stop "Zabbix Agent"
net start "Zabbix Agent"
And to check Zabbix agent service status use the command:
sc query "Zabbix Agent" | findstr /i "STATE"
You should get status “RUNNING” if the Zabbix agent is up and running!
Step 6: Configure auto registration for Windows Zabbix Agents
Adding one or two hosts to Zabbix manually is not a big problem. However, what if you need to add more servers to Zabbix? Or you just want to automate that tedious process of adding Windows hosts to Zabbix and linking them with the correct template and host group?
Don’t worry, you don’t have to write the script because Zabbix has a tool called “Auto registration”.
Before we configure Zabbix frontend, make sure that all of your Zabbix agents have “HostMetadata=Windows” line in their configuration file (default path: “C:\Program Files\zabbix\zabbix_agentd.conf“). And if that line does not exist, add it and restart the Zabbix Agent afterward. You can automate that via CLI like this:
echo HostMetadata=Windows >> C:\"Program Files"\zabbix\zabbix_agentd.conf
net stop "Zabbix Agent"
net start "Zabbix Agent"
In the future always install the Zabbix agent on Windows with the “HostMetadata=Windows” parameter if you are planning to use the auto-registration feature!
Now that we’ve clarified that let’s configure auto-registration on the Zabbix frontend.
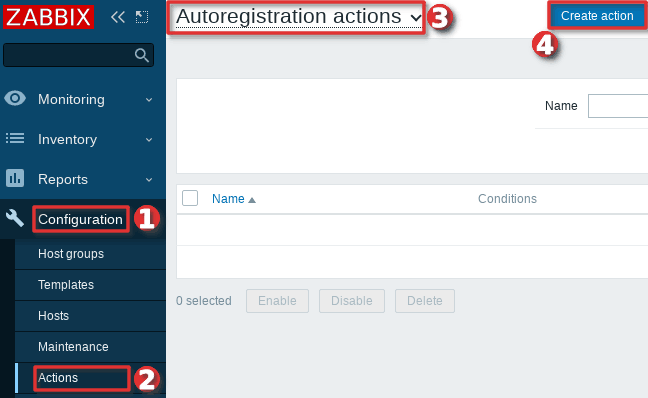
Go to the “Actions” tool under the “Configuration” section, then select “Auto registration” from the dropdown menu and click the “Create action” button.
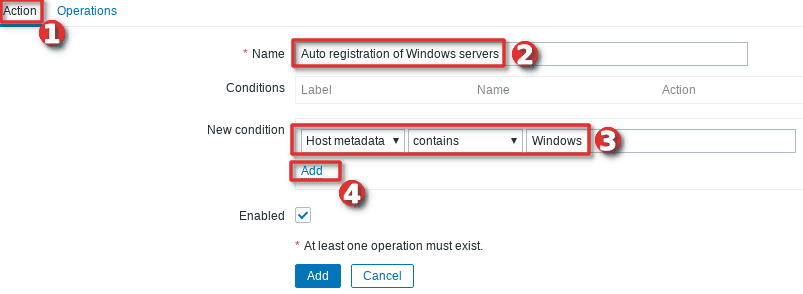
On the “Action” tab define the “Name” of the action and add a “New condition” that will check if the “Host metadata” contains the word “windows”.
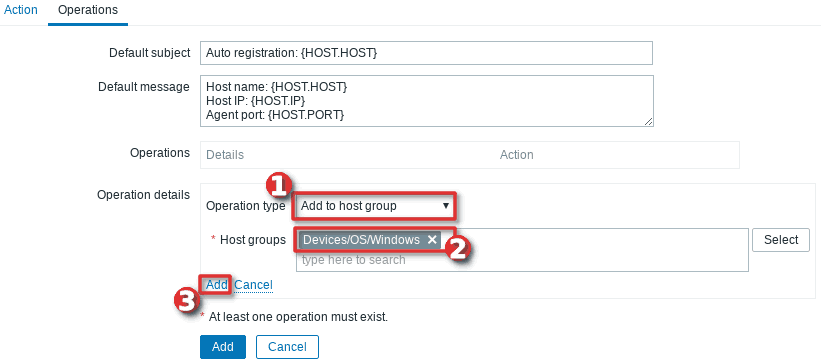
Then, change tab to “Operations” and add new operation.
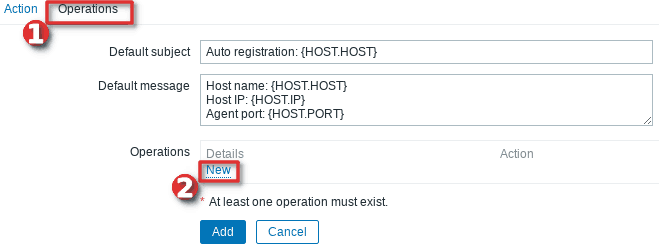
Define “Operation type” as “Add to host group” and then select to which “Host groups” will Windows hosts be added when discovered. In my case, I will use my custom host group called “Devices/OS/Windows“.
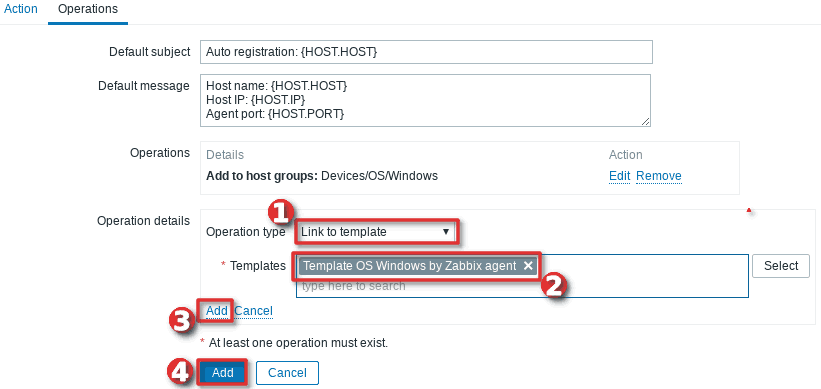
After that, you need to add a new operation by setting “Link to the template” as “Operation type” and then select which templates will be linked with the newly discovered Windows hosts. In my example, I will use template “Template OS Windows by Zabbix agent” (passive checks)
Well done! Auto-registration is configured. Wait a few minutes and your Windows server should appear in Zabbix. From now on, every time you install a Zabbix agent on a Windows server, it will automatically be added to the Zabbix and linked with the appropriate host group and template.
Note, that you can add anything you want to the “HostMetadata” parameter. For example, you can have a host that has in Zabbix agent configuration file defined “HostMetadata=Windows:Tomcat:Prod” or another with “HostMetadata=Windows:MSSQL:Test“. For the first host, you can configure auto-registration to add to host groups: “Windows”, “Web servers” and “Production servers” and to link templates that can monitor Windows and Tomcat server. And the second host can be added to host groups: “Windows”, “Databases”, and “Test servers” and linked with templates that can monitor Windows server and Microsoft SQL database.
Using PSK encryption on the Zabbix agents? Then there is one more step left, you need to add your PSK identity and PSK key using the “Auto Registration” option under the “Administration“→”General” section just as shown in the image below:

From now on, during the auto registration process, Zabbix will configure provided PSK identity and key on each registered host.
Step 7: Configure PSK encryption on Zabbix Agent (Windows)
Zabbix supports encrypted communications between Zabbix server and Zabbix agent using Transport Layer Security (TLS) protocol v.1.2. You can use certificate-based and pre-shared key-based encryption (PSK), but in this tutorial we will configure PSK encryption.
In this step, I will show you how to configure PSK encryption on an already installed Zabbix agent, but keep in mind that all of these configurations can be configured during the installation
a. Generate PSK key
Generate 256-bit (32 bytes) PSK key with openssl command on Zabbix server (or use some other tool on Windows):
$ openssl rand -hex 32
1b38eac9d870a319f201fb1da989c081faba993e3d91940193224a100cdcdb86
On Windows server, create a new text file “ZabbixAgentPSK.txt” in the default Zabbix agent installation folder (“C:\Program Files\zabbix“) and put that PSK key in the first line of the file. Don’t forget to save the file before closing.
b. Configure Zabbix agent to support PSK encryption
Open “C:\Program Files\zabbix\zabbix_agentd.conf” file with text editor (Notepad++) and add this configuration anywhere in file:
TLSConnect=psk
TLSAccept=psk
TLSPSKFile=C:\Program Files\zabbix\ZabbixAgentPSK.txt
TLSPSKIdentity=ZBX-AGENT-PSK-ID
Save and exit file. Keep in mind that “TLSPSKIdentity” can be anything, so for security reasons set something else – don’t use mine!
Don’t forget to restart Zabbix agent service after changing the configuration file!
c. Enable PSK encryption on the agent in Zabbix frontend
Communication between Zabbix agent and server is not yet encrypted because we have enabled PSK encryption on the agent side but not on the server side.
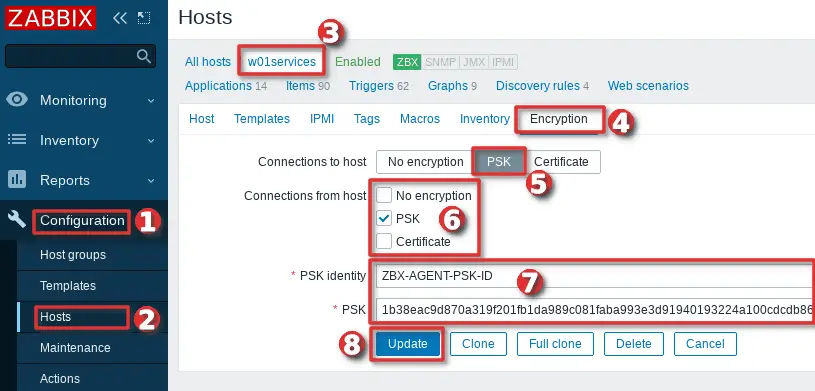
We need to enable encryption on the server side so go to web frontend and select your “Hosts” tab under the “Configuration” section and find and click on your Windows hosts.
On the “Encryption” tab set PSK under “Connections from hosts” option and copy/paste “PSK identity” and “PSK” (key) that is configured on the Zabbix agent.
When you are done with configuration click the “Update” button just as shown in the image below.
Keep in mind, that you can automate the configuration of the host encryption (PSK) on the frontend using the Zabbix auto registration process.
Step 8: Install Zabbix agent via Windows command-line (CMD)
This step is for those who prefer command-line based installation instead of wizard-based installation.
a. Run CMD as administrator
Click on “Windows Start” button and type “CMD” in the search bar, right-click on “cmd” and select option “Run as administrator“:
b. Download Zabbix agent
Download installer zabbix_agent2-6.0.7-windows-amd64-openssl.msi for 64-bit Windows or zabbix_agent2-6.0.7-windows-i386-openssl.msi for 32-bit Windowsand save it on a “C:\” disk or somewhere else.
c. Change directory and set installation folder
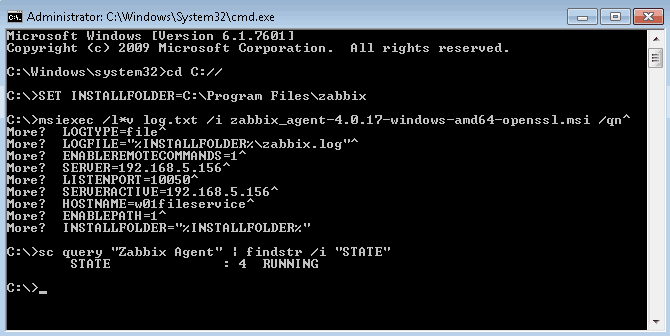
Change directory to the path where you have downloaded the MSI file and set the installation folder with commands:
cd C://
SET INSTALLFOLDER=C:\Program Files\zabbix
d. Install Zabbix agent using msiexec
Here is an example of Zabbix agent installation that will work for most people, just change parameteres “SERVER“, “SERVERACTIVE” and “HOSTNAME” to suit your enviroment.
msiexec /l*v log.txt /i zabbix_agent2-6.0.7-windows-amd64-openssl.msi /qn^
LOGTYPE=file^
LOGFILE="%INSTALLFOLDER%\zabbix.log"^
SERVER=192.168.5.156^
LISTENPORT=10050^
SERVERACTIVE=192.168.5.156^
HOSTNAME=w01fileservice^
ENABLEPATH=1^
INSTALLFOLDER="%INSTALLFOLDER%"
Check “Zabbix agent” service status with the command:
sc query "Zabbix Agent" | findstr /i "STATE"
If the Zabbix agent is up and running then the status should be “RUNNING“.
Note, if you are planning to use the auto-registration feature don’t forget to add “HostMetadata=Windows” parameter to “zabbix_agentd.conf” and restart Zabbix agent afterward because Zabbix CLI installation doesn’t support “HostMetadata” parameter:
echo HostMetadata=Windows >> C:\"Program Files"\zabbix\zabbix_agentd.conf
net stop "Zabbix Agent"
net start "Zabbix Agent"
e. Example of Zabbix agent installation with additional options
You can set almost any Zabbix agent parameter during installation, here is one example of an installation where many parameters are used.
SET INSTALLFOLDER=C:\Program Files\zabbix

msiexec /l*v log.txt /i zabbix_agent2-6.0.7-windows-amd64-openssl.msi /qn^
LOGTYPE=file^
LOGFILE="%INSTALLFOLDER%\zabbix.log"^
SERVER=10.10.10.162^
LISTENPORT=10055^
SERVERACTIVE=10.10.10.162^
HOSTNAME=cmr_server^
TLSCONNECT=psk^
TLSACCEPT=psk^
TLSPSKIDENTITY=CompanyPSKID^
TLSPSKFILE="%INSTALLFOLDER%\company_key.psk"^
TLSCAFILE="c:\temp\file1.txt"^
TLSCRLFILE="c:\temp\fil2.txt"^
TLSSERVERCERTISSUER="Company CA"^
TLSSERVERCERTSUBJECT="Company Cert"^
TLSCERTFILE="c:\temp\file4.txt"^
TLSKEYFILE="c:\temp\file5.txt"^
ENABLEPATH=1^
INSTALLFOLDER="%INSTALLFOLDER%"
SKIP=fw
Parameter “SKIP=fw” means that the firewall exception rule will not be added. Explanations of other parameters can be found in the official Zabbix documentation section Zabbix Agent (Windows).
Step 9: Understanding Active vs Passive Zabbix Agent mode
When using a Zabbix agent in active mode, it will connect to the Zabbix server via port 10051 to retrieve configuration and send data. This is a great feature that allows an active Zabbix agent to work behind the firewall and to offload the Zabbix server in large environments.
On the other hand, if you use a Zabbix agent in passive mode Zabbix server will initiate a connection via port 10050 and retrieve data from the agent. The Zabbix server will do this for every metric (item) every few minutes – which is very inefficient! Because of this, active mode is more recommended.
An additional advantage of the Zabbix agent in active mode is that it can read logs from the device and that is not possible if the Zabbix agent is used in passive mode.
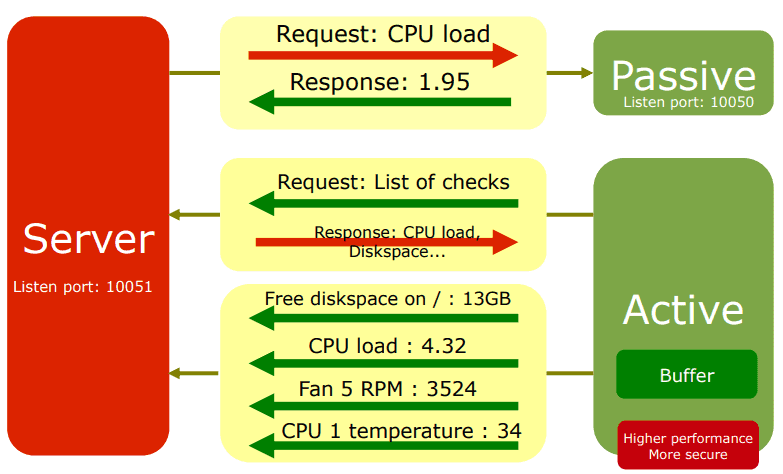
You can detect on Zabbix host if the agent is working in active or passive mode. Passive mode will show red or green “ZBX” icon in the agent status bar and active mode will show grey “ZBX” icon:

Learn how to setup Zabbix email notifications and escalations in a few minutes!