
Данная статья рассказывает о мониторинге журналов Windows через Zabbix и служит опорой в виде практических примеров, реализованных мной ранее. Важным моментом здесь является не столько сбор данных самого журнала, сколько правильная настройка триггера.

Шаблон или прототип элемента мониторинга будет выглядеть следующим образом (параметры для удобства пронумерованы):
eventlog[1- имя журнала,2-регулярное выражение,3-важность,4-источник,5-eventid,6-макс кол-во строк, 7-режим]
Тип данных: журнал (лог)

Далее рассмотрим конкретные практические примеры.
1. Ошибки в журнале приложений.
Максимально простой пример сбора ошибок в журнале «Приложение» (события уровня «Ошибка»)
eventlog[Application,,"Error",,,,skip]
2. Ошибки отложенной записи.
eventlog[System,,"Warning",,50,,skip]
краткие пояснения:
System — журнал система
Warning — тип события: предупреждение
50 — id события равно 50
skip — берем только свежие значения (не перечитываем весь лог)
триггер:
count(/Terminal server/eventlog[System,,"Warning",,50,,skip],30m)>7 and nodata(/Terminal server/eventlog[System,,"Warning",,50,,skip],60m)<>1
где Terminal server — это просто имя шаблона, в котором используются элемент данных и триггер
3. Ошибки диска.
eventlog[System,,"Warning",,153,,skip]
триггер:
count(/Template OS Windows by Zabbix agent active/eventlog[System,,"Warning",,153,,skip],30m)>5 and nodata(/Template OS Windows by Zabbix agent active/eventlog[System,,"Warning",,153,,skip],60m)<>1
4. ошибки в журнале событий от службы MSSQLSERVER.
eventlog[Application,,"Error","MSSQLSERVER",,,skip]
триггер:
count(/Template OS Windows SQL for 1C/eventlog[Application,,"Error","MSSQLSERVER",,,skip],8m)>0 and nodata(/Template OS Windows SQL for 1C/eventlog[Application,,"Error","MSSQLSERVER",,,skip],10m)<>1
Полезные ссылки:
https://www.zabbix.com/documentation/5.0/ru/manual/config/items/itemtypes/zabbix_agent/win_keys
Zabbix — Monitor Event Log on Windows
Zabbix — Monitor Event Log on Windows
Hardware List:
The following section presents the list of equipment used to create this Zabbix tutorial.
Every piece of hardware listed above can be found at Amazon website.
Zabbix Playlist:
On this page, we offer quick access to a list of videos related to Zabbix installation.
Don’t forget to subscribe to our youtube channel named FKIT.
Zabbix Related Tutorial:
On this page, we offer quick access to a list of tutorials related to Zabbix installation.
Zabbix Agent Configuration Required
First, the Zabbix agent installed on the Windows computer must be configured in Active mode.
Here is an example of a Zabbix agent configuration file in Passive mode: zabbix_agentd.conf
Here is an example of a Zabbix agent configuration file in Active mode: zabbix_agentd.conf
You have finished the required part of the configuration.
Tutorial — Zabbix Monitor Windows Log File
Now, we need to access the Zabbix server dashboard and add the Windows computer as a Host.
Open your browser and enter the IP address of your web server plus /zabbix.
In our example, the following URL was entered in the Browser:
• http://35.162.85.57/zabbix
On the login screen, use the default username and default password.
• Default Username: Admin
• Default Password: zabbix
After a successful login, you will be sent to the Zabbix Dashboard.

On the dashboard screen, access the Configuration menu and select the Host option.

On the top right of the screen, click on the Create host button.
On the Host configuration screen, you will have to enter the following information:
• Host Name — Enter a Hostname to monitor.
• Visible Hostname — Repeat the hostname.
• New group — Enter a name to identify a group of similar devices.
• Agent Interface — Enter the IP address of the Hostname.
Here is the original image, before our configuration.

Here is the new image with our configuration.

Click on the Add button to include this host on the Zabbix database.
On the dashboard screen, access the Configuration menu and select the Host option.
Locate and click on the hostname that you created before.
In our example, we selected the hostname: WINDOWS-SERVER-01
On the Host properties screen, access the Applications tab.
On the top right part of the screen, click on the Create application button.
On the Host applications screen, create a new application named: LOG

After finishing the Application creation, access the Items tab.
On the top right part of the screen, click on the Create item button.
On the Item creation screen, you need to configure the following items:
• Name: Enter an identification like: Windows System Log
• Type: Zabbix Agent (Active)
• Key: eventlog[System,,,,,,skip]
• Type of Information: Log
• Update interval: 1 Second
• Application: LOG

Click on the Add button to finish the Item creation and wait 5 minutes.
In order to test your configuration, access the Monitoring menu and click on the Latest data option.

Use the filter configuration to select the desired hostname and click on the Apply button.
In our example, we selected the hostname WINDOWS-SERVER-01.

You should be able to see the results of your Windows log file monitoring using Zabbix.

Click on the History option to see more Windows event log details.
In our example, we are monitoring the Windows System Event log.

Congratulations! You have configured the Zabbix Event log monitoring feature on Windows.
VirtualCoin CISSP, PMP, CCNP, MCSE, LPIC22019-10-08T13:55:30-03:00
Related Posts
Page load link
Ok
In today’s digital world, monitoring the logs of your Windows systems is crucial for maintaining the health and security of your IT infrastructure. Zabbix is a popular open-source monitoring solution that offers a comprehensive platform for monitoring various aspects of your IT environment, including Windows log monitoring.
What is Zabbix?
Zabbix is a powerful and versatile open-source monitoring solution that helps organizations monitor their IT infrastructure in real-time. It provides a wide range of capabilities for monitoring servers, networks, applications, and more. With Zabbix, you can collect, store, and analyze data from your systems to keep track of performance, availability, and security.
Why Monitor Windows Logs with Zabbix?
Windows logs contain valuable information about the performance, security, and health of your Windows systems. By monitoring Windows logs with Zabbix, you can:
- Identify and troubleshoot issues proactively
- Detect security incidents and unauthorized access
- Monitor system performance and resource utilization
- Comply with regulatory requirements
Setting up Windows Log Monitoring with Zabbix
Monitoring Windows logs with Zabbix involves the following steps:
- Install the Zabbix agent on Windows: The Zabbix agent is a small utility that collects data from the Windows system and sends it to the Zabbix server for processing.
- Configure the Zabbix agent: You need to configure the Zabbix agent on the Windows system to specify which logs to monitor and how often to send data to the Zabbix server.
- Create an item in Zabbix: In the Zabbix web interface, you need to create a new item to collect data from the Windows logs. You can specify the type of log to monitor (e.g., application, system, security) and set up triggers to alert you in case of anomalies.
- Set up notifications: Configure notification actions in Zabbix to receive alerts via email, SMS, or other channels when certain log events occur.
Best Practices for Windows Log Monitoring
When monitoring Windows logs with Zabbix, consider the following best practices:
- Regularly review log data: Make it a habit to review log data regularly to spot any unusual patterns or events.
- Use log rotation: Implement log rotation to prevent logs from consuming too much disk space and ensure that old logs are archived or deleted.
- Monitor critical log files: Focus on monitoring critical log files that contain security-related events or errors that could impact system performance.
- Stay updated: Keep the Zabbix agent and server up to date to ensure that you have the latest features and security fixes.
Conclusion
Monitoring Windows logs with Zabbix is an essential practice for organizations looking to maintain the health and security of their Windows systems. By following the steps outlined in this guide and implementing best practices, you can stay on top of potential issues and ensure the smooth operation of your IT infrastructure.
Start monitoring your Windows logs with Zabbix today and take control of your IT environment!
The Windows Zabbix Agent provides a native interface to the Windows Performance Counters. and Event Log. This means that with minimal overhead, and no additional shells out to Powerscript or the command line, you can collect any of the metrics available from PerfMon or Event Viewer.
Windows Event Log
To monitor the Windows Event log, use the eventlog[] item keys. This takes the syntax:
eventlog[name,<regexp>,<severity>,<source>,<eventid>,<maxlines>,<mode>]
I would always recommend using Event Viewer on the host to determine which event log names and exact codes you want to pull before trying to craft the query parameters.

As an example, let’s capture all the interactive login events happening on the host which are logged in the “Security” event log. On a host that has a Zabbix Agent on Windows, create an item with the type “Zabbix agent (active)”:
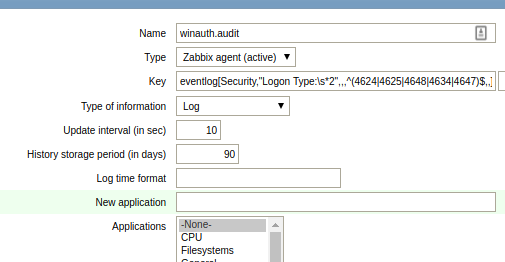
Name: winauth.audit
Type: Zabbix agent (active)
Key: eventlog[Security,"Logon Type:\s*2",,,^(4624|4625|4648|4634|4647)$,,]
Type of information: Log
Update interval: 30
These 46xx codes are documented by Microsoft, and the logon type=2 signifies interactive logon.
Now going to Monitoring > Latest data after an interactive login should show you the event log entry within 30 seconds. This will show both successful as well as login failures.
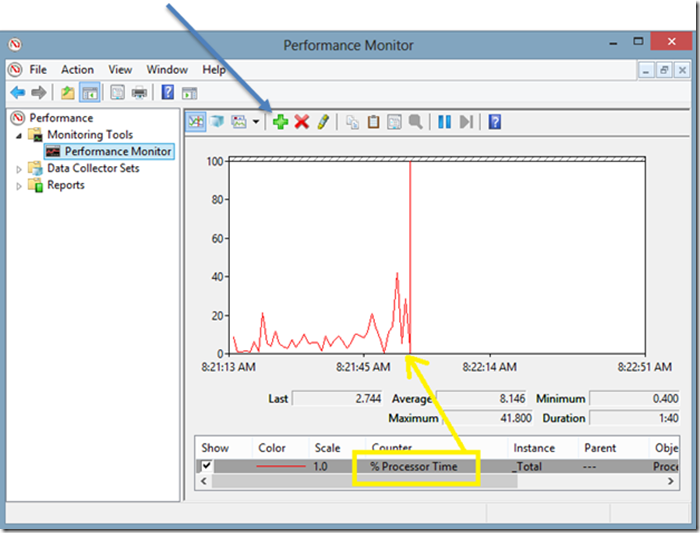
Windows Performance Counters
The PerfMon tool comes standard on Windows hosts and can be used to capture and display live metrics as they are collected by the system.
Collecting these same metrics using the Zabbix agent can be done using the perf_counter key. The syntax is:
perf_counter[counter,<interval>]
The easiest way to discover the full path to these counters is to use PerfMon to first find and examine the keys. But you can also list all the full paths from the command line using “typeperf -qx”.
In this example, I’m going to monitor the keys for:
- Microsoft IIS total GET and PUSH operations
- Microsoft FTP Server total files sent and received
- Microsoft SMTP server total mail received, delivered, and pending
Which are represented as the Zabbix key values below:
perf_counter["\Web Service(_Total)\Total Get Requests",30]
perf_counter["\Web Service(_Total)\Total Post Requests",30]

perf_counter["\Microsoft FTP Service(_Total)\Total Files Sent",30]
perf_counter["\Microsoft FTP Service(_Total)\Total Files Received",30]

perf_counter["\SMTP Server(_Total)\Remote Queue Length",30]
perf_counter["\SMTP Server(_Total)\Messages Received Total",30]
perf_counter["\SMTP Server(_Total)\Messages Delivered Total",30]
This looks like the following when viewed in the Latest Data:
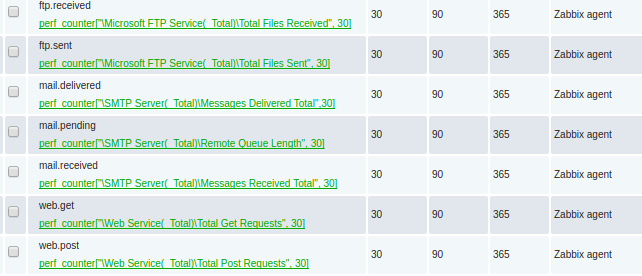
Each of these items created should be type=numeric(float) with an interval every 60 seconds.
REFERENCES
https://zabbix.org/wiki/Get_Zabbix
https://msdn.microsoft.com/en-us/library/ms804624.aspx (Web Service Object)
https://www.zabbix.com/documentation/3.0/manual/appendix/config/zabbix_agentd_win (agent conf, PerfCounter is sythesized avg value of sys perf meaning it needs float)
https://www.zabbix.com/documentation/2.4/manual/appendix/config/zabbix_agentd_win?s[]=perfcounter
https://www.zabbix.com/documentation/3.2/manual/config/items/itemtypes/zabbix_agent/win_keys (special item keys for Zabbix Windows agents)
https://blogs.technet.microsoft.com/brad_rutkowski/2007/09/22/using-typeperf-to-get-performance-data-on-the-command-prompt/
https://docs.microsoft.com/en-us/previous-versions/windows/it-pro/windows-server-2008-R2-and-2008/dd941621(v%3dws.10) (4634 4646 audit logoff)
https://docs.microsoft.com/en-us/previous-versions/windows/it-pro/windows-server-2008-R2-and-2008/dd941635(v%3dws.10) (4624,4625,4648 audit logon)
https://social.microsoft.com/Forums/en-US/712230b0-2d99-4cda-a374-1211117bf2a8/create-a-custom-security-log-event?forum=Offtopic (cannot write to security log, permissions)
NOTES
$ svn co svn://svn.zabbix.com/branches/2.4 (checkout source code)
eventcreate /l System /t INFORMATION /id 99 /d “just a test” (ids < 1000)
Write–EventLog –LogName Application –EntryType Error –Source MSSQLSERVER –EventId 1479 –Message “Test error event – ignore” (cannot write to SECURITY due to permissions)
Monitoring postfix queue on linux:
EnableRemoteCommands=1
UserParameter=mail.pending[*],
UserParameter=mail.active[*],/
typeperf -qx
typeperf -qx “SMTP Server”
typeperf -qx “Web Service”
typeperf -qx “Microsoft FTP Server” (“FTP Service” on older IIS6)
Чем мы можем вам сегодня помочь?
Изменено: Пт, 25 Июн, 2021 на 3:09 PM
Предварительно настоятельно рекомендуется включить шифрование между сервером и агентом zabbix — Настройка шифрования с использованием Pre-shared ключей
Zabbix можно использовать для централизованного мониторинга и анализа файлов журналов с/без поддержки ротации журналов. Можно использовать оповещения для предупреждения пользователей, когда файл журнала содержит конкретные строки или шаблоны строк. (подробнее Специфичные ключи элементов данных для Windows)
Для наблюдения за файлом журнала у вас должно быть:
- Работающий Zabbix агент на узле сети (Установка Zabbix Agent 2 5.X на ОС Windows)
- Настроенный элемент данных для мониторинга журнала
В данном примере будет рассматриваться мониторинг аудита отказа в журнале входа в систему. Необходимо настроить Узел сети на стороне Zabbix сервера. Перейдите по адресу https://monitoring.cloud24.kz, введите логин и пароль
Перейдите в Настройка — Узлы сети и выберите необходимый узел сети. Перейдите во кладку Элементы данных и нажмите на кнопку Создать элемент данных. В появившемся окне в поле Имя впишите наименование для нового Элемента данных, поле Тип выберите из выпадающего списка Zabbix агент (активный), в поле ключ впишите значение
eventlog[Security,,,,4625,,skip]
Тип информации выберите Журнал (лог). Для применения изменений нажмите Обновить.

Была ли эта статья полезной?
Да
Нет
Отправить отзыв
Извините, что не удалось помочь. У вас есть идеи, что можно улучшить в этой статье?