
Опубликовано:
Используемые термины: Zabbix, Windows.
В нашем примере мы установим агент для Zabbix на Windows в качестве службы, а также сделаем минимальную настройку для отправки данных на сервер.
Загрузка агента с официального сайта
Установка агента
Из пакета MSI
Из архива
Настройка брандмауэра
Проверка подключения к агенту
Другие статьи про Zabbix
Загрузка агента
Переходим на страницу загрузки агента Zabbix и выбираем платформу операционной системы (x32 или x64) и версию агента, например:

* помимо этого, мы можем выбрать вариант дистрибутива: с использованием шифрования или нет, а также файл установки — msi пакет или архив. В данном примере мы выбрали версию 5.
В зависимости от выбранных критериев поиска агента, ниже мы можем увидеть несколько вариантов для загрузки. Находим нужный и кликаем по DOWNLOAD для скачивания файла:

Ждем окончания загрузки и переходим к установке.
Установка агента
В зависимости от загрузки типа пакета (MSI или архив) будут разные методы установки. Рассмотрим оба.
Установка из MSI-пакета
Это удобный вариант, который позволит установить агента с помощью мастера. Чтобы начать, кликаем дважды по скачанному пакету и в окне приветствия нажимаем Next:
Принимаем лицензионное соглашение, установив галочку I accept the terms in the License Agreement и нажимаем Next:
В следующем окне оставляем имя компьютера, на который устанавливается агент и вводим имя или IP-адрес сервера zabbix, после кликаем по Next:

* в данном примере имя нашего компьютера Windows PC, а сервера — zabbix-server.dmosk.local.
Выбираем компоненты, которые хотим установить — можно просто оставить все по умолчанию и нажимаем Next:

Подтверждаем установку, кликая по Install:
Ждем завершения процесса — агент установлен.
Установка из архива
Данный метод требует дополнительных манипуляций, но с его помощью можно автоматизировать процесс. Мы рассмотрим только установку.
Распаковываем содержимое скачанного архива в каталог, где будут находиться файлы программы, например в C:\Program Files\Zabbix Agent. В итоге, у нас получится:
Открываем WordPad от администратора и в нем открываем конфигурационный файл conf/zabbix_agentd.conf и правим опцию для сервера zabbix — находим строку:
Server=127.0.0.1
… и меняем ее на:
Server=zabbix-server.dmosk.local
* где zabbix-server.dmosk.local — имя сервера Zabbix.
Теперь открываем командную строку от администратора и выполняем команду для установки агента:
«C:\Program Files\Zabbix Agent\bin\zabbix_agentd.exe» —config «C:\Program Files\Zabbix Agent\conf\zabbix_agentd.conf» —install
* где C:\Program Files\Zabbix Agent — папка, куда мы распаковали архив.
Мы должны увидеть что-то на подобие:
zabbix_agentd.exe [468]: service [Zabbix Agent] installed successfully
zabbix_agentd.exe [468]: event source [Zabbix Agent] installed successfully
Теперь открываем службы Windows и находим «Zabbix Agent» — кликаем по ней правой кнопкой мыши и выбираем Запустить:

Установка завершена.
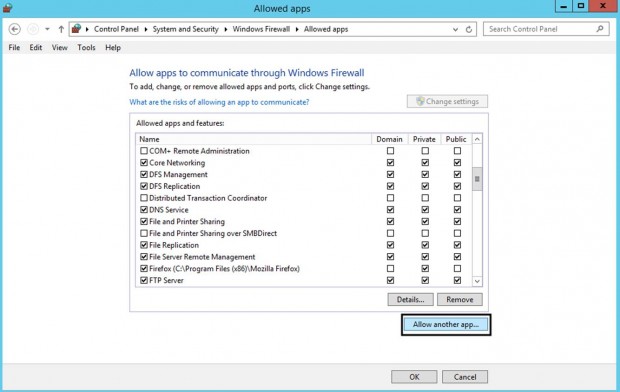
Настройка брандмауэра
Если в нашей системе работает брандмауэр Windows, необходимо разрешить порт 10050 или приложение zabbix agent.
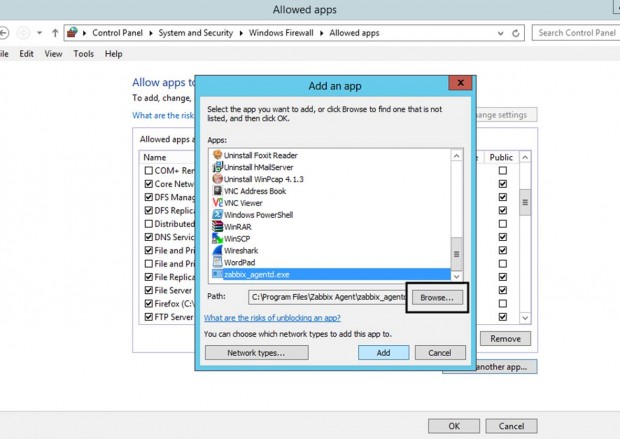
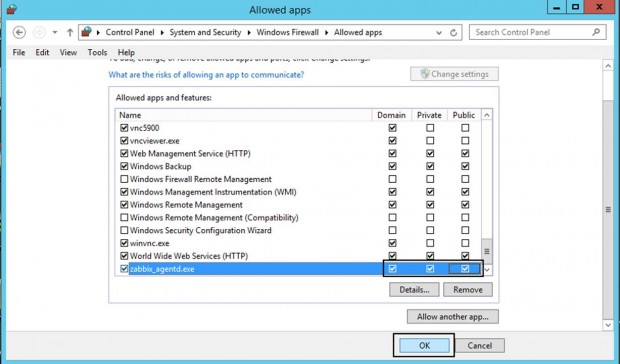
Для этого переходим в Панель управления — Система и безопасность — Брандмауэр Windows (или вводим команду control /name Microsoft.WindowsFirewall). Кликаем по ссылке Разрешение взаимодействия с приложением или компонентов в брандмауэре Windows — добавляем наше приложение zabbix_agentd в исключение.
Это же действие можно выполнить в powershell — запускаем ее от администратора и вводим команду:
New-NetFirewallRule -DisplayName «Разрешить приложение Zabbix Agent» -Direction Inbound -Action Allow -EdgeTraversalPolicy Allow -Program «C:\Program Files\Zabbix Agent\bin\zabbix_agentd.exe»
Или мы можем добавить в исключение порт. Это можно сделать также из командной строки poweshell:
New-NetFirewallRule -DisplayName «Разрешить порт 10050 для Zabbix» -Direction Inbound -Action Allow -EdgeTraversalPolicy Allow -Protocol TCP -LocalPort 10050
Проверка работы
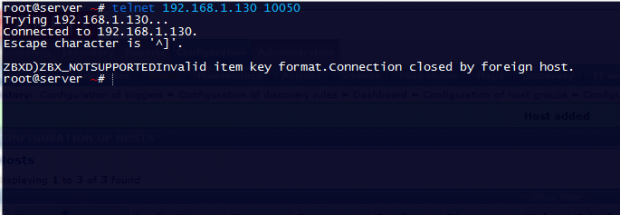
Чтобы убедиться в работоспособности агента, мы можем зайти на сервер zabbix и выполнить подключение по telnet, например, командой:
telnet 192.168.1.15 10050
* где 192.168.1.15 — IP-адрес компьютера с установленным Zabbix.
Мы должны увидеть
Connected to nr-fs-06.
Escape character is ‘^]’.
.. и через небольшой интервал времени:
Connection closed by foreign host.
Но если агент не запущен или не работает, мы увидим ошибку:
telnet: connect to address …: Connection refused
В панели сервера в узлах сети при корректной установке и настройке, мы также должны увидеть доступность компьютера по агенту:
Читайте также
Другие инструкции по Zabbix:
1. Установка и настройка Zabbix-агента на CentOS
2. Установка и начальная настройка сервера мониторинга Zabbix на Ubuntu Server
3. Настройка сервера Zabbix 5 на CentOS 8
Following previous tutorials concerning the Zabbix series, this article describes how to install and set up an instance of a Zabbix agent to run as a service on Microsoft Windows systems in order to monitor your infrastructure windows environments, especially server machines.
Requirements
- How to Install Zabbix on RHEL/CentOS and Debian/Ubuntu – Part 1
- How to Configure Zabbix to Send Email Alerts to Gmail Account – Part 2
- How to Install and Configure Zabbix Agents on Remote Linux – Part 3
Step 1: Download and Install Zabbix Agent on Windows
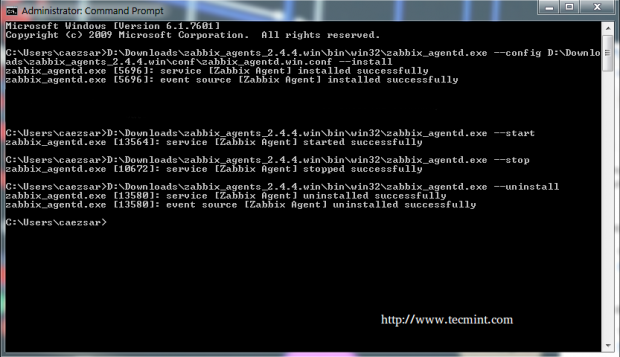
1. The pre-compiled zip agents for Windows environments can be obtained from the official Zabbix download page and manually installed and started on the system using windows Command Prompt as in the following example:
C:\Users\caezsar><full system path to zabbix_agentd.exe> --config <full system path to zabbix_agentd.win.conf> --install
For example, suppose you’ve downloaded and extracted the Zabbix agent zip archive to D:\Downloads\zabbix_agents-5.4.7\, run the following command to install the service:
C:\Users\caezsar>D:\Downloads\zabbix_agent-5.4.7\bin\win32\zabbix_agentd.exe --config D:\Downloads\zabbix_agent-5.4.7\conf\zabbix_agentd.conf --install
2. After the service has been installed on your Windows host, open zabbix_agentd.win.conf file and manually edit the following parameters:
zabbix_agentd.win.conf
Server=IP of Zabbix Server
ServerActive=IP of Zabbix Server
Hostname=use the FQDN of your windows host
3. To start the service just type:
C:\Users\caezsar>D:\Downloads\zabbix_agents-5.4.7\bin\win32\zabbix_agentd.exe --start
To stop the service run the same command as above with --stop argument and to uninstall the service use the --uninstall argument.
C:\Users\caezsar>D:\Downloads\zabbix_agent-5.4.7\bin\win32\zabbix_agentd.exe --stop
C:\Users\caezsar>D:\Downloads\zabbix_agent-5.4.7\bin\win32\zabbix_agentd.exe --uninstall
4. A second and more convenient method to install and automatically configure the Zabbix agent on Windows environments is by downloading the Zabbix Agent installer MSI package specific to your system architecture.
5. Once the Zabbix agent MSI file has been downloaded on your system, run it and supply the required information in order to configure and install the agent on the target monitored host as it follows:
Hostname: use the FQDN of your windows host (the hostname value should match the “Full Computer name” configured for your machine)
Zabbix server Name: use the IP of the Zabbix Server
Agent Port: 10050
Remote Command: check this value
Active Server: IP of Zabbix Server
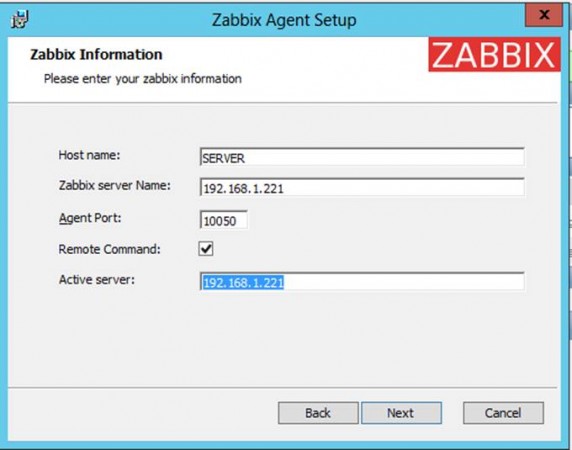
If you need to modify the Zabbix configuration file with other custom values at a later date, the conf file can be found on the %programfiles%\Zabbix Agent\ path.
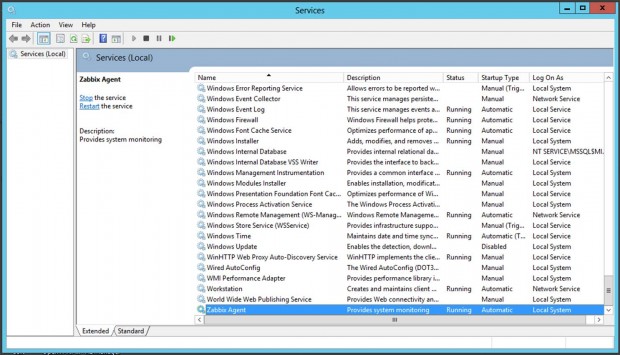
6. After you’ve finished the setup, open Windows Command Prompt with Administrator privileges, run services.msc command in order to open Windows Services utility, and locate Zabbix Agent service to check if the service is running and automatically started after reboot.
services.msc
From this console, you can manage the service (start, stop, pause, resume, enable or disable).
Step 2: Configure Windows Firewall and Test Zabbix Agent
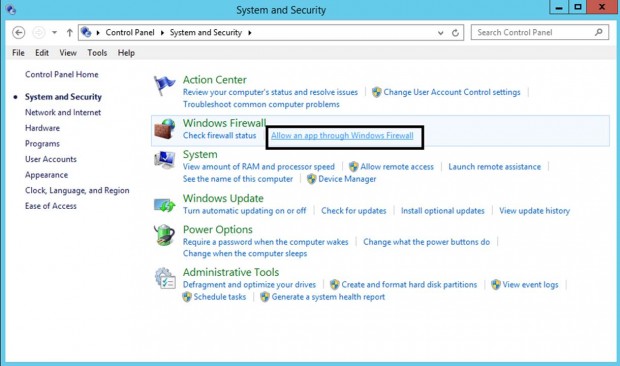
7. Almost all Windows-based systems have Windows Firewall active and running, therefore Zabbix agent port must be opened in the firewall in order to communicate with the Zabbix server.
In order to open the Zabbix agent port in the windows firewall, open Control Panel -> System and Security – > Windows Firewall and hit on Allow an app through Windows Firewall.
8. Next, click on Allow another app button and a new window should open. Use the Browse button to navigate and add Zabbix agent executable file (usually found in %programfiles%\Zabbix Agent\ if you installed it using MSI program), then hit on Add button to add the service.
9. Next, make sure you check and open the firewall rule on the network segment where the Zabbix server is located in your network and hit the OK button to finish and apply the configuration.
10. In order to test if the Zabbix agent running on windows is reachable from the Zabbix server-side, use telnet or netcat command on Zabbix server against windows agent IP-Port and a Connected message should appear. Hit Enter key to generate an error message and automatically disconnect from the agent:
telnet <Windows_agent IP Address> 10050
Step 3: Add Zabbix Agent Monitored Windows Host to Zabbix Server
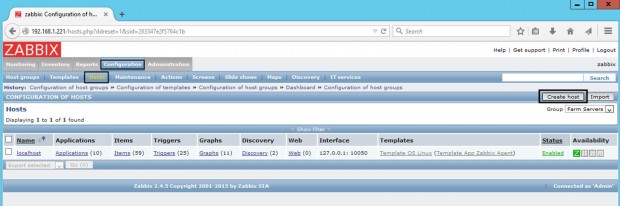
11. Once the windows agent has been tested from the command line and everything looks fine, go to Zabbix Server web interface, move to Configuration tab -> Hosts, and hit on Create Host button in order to add the Windows monitored host.
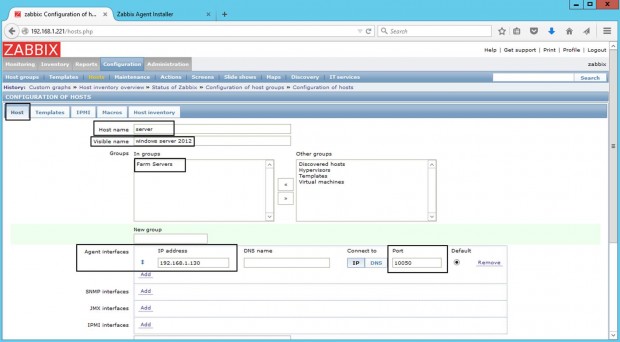
12. On the Host window add the FQDN of your windows agent machine in Hostname filed, add an arbitrary name to Visible name filed in order to easily identify the monitored machine on Zabbix panel, make sure the host is included in a Group Servers, and add the IP Address of your windows host in Agent interfaces filed. The Port value leaves it unchanged.
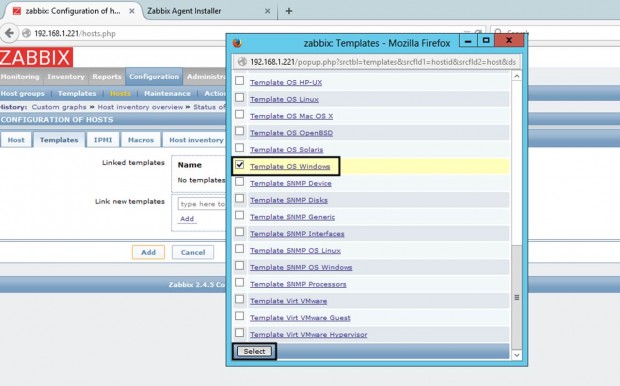
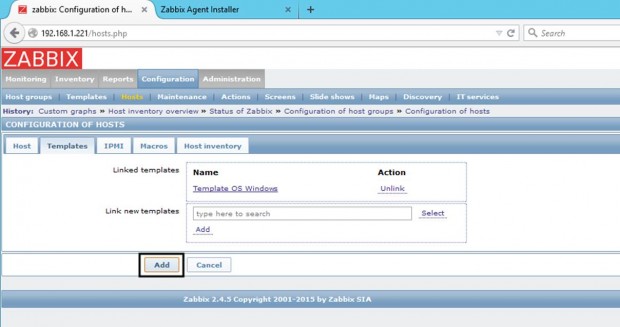
13. Next, go to the Template tab and hit on Select button. A new window with Zabbix Templates should appear. Navigate through this window, check Template OS Windows, and hit on Select button to add the template.
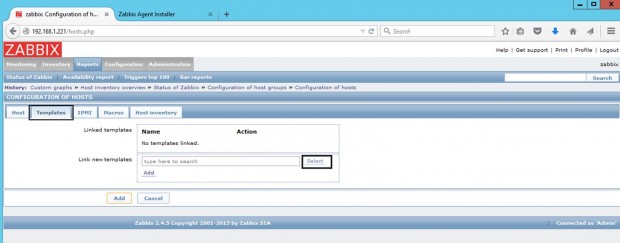
14. Once the Template OS Windows appears on Link new templates filed, hit on Add button in order to link this template to the windows host configuration.
Finally, after the Template OS Windows is visible in Linked Templates filed hit on the below Add button to complete the process and add the entire Windows host configuration.

15. After your monitored windows machine has been added return to Configuration -> Hosts and the windows Host should now be present in this window as illustrated below screenshot.
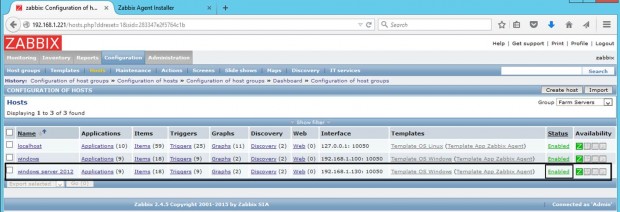
That’s all! Just assure that your windows host Status is set to Enabled and wait a few minutes in order for the Zabbix server to contact the windows agent side and process the received remote data.
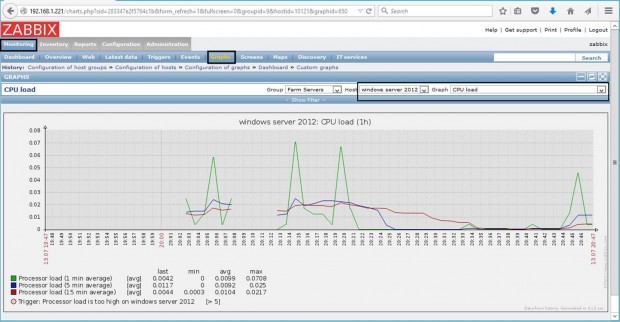
As an example, to get a graphical inside of the CPU load on the monitored Windows machine go to Zabbix web console Monitoring tab -> Graphs, select the windows machine host name and CPU load Graph and all the collected data so far should be presented into a nice graphical chart.
Video Lecture
Description
I download and Install the Zabbix agent for windows option.
I set the agents ServerActive parameter, and configure a template in Zabbix with Agent(Active) items only.
Since the template is using Agent(Active) items only, I do not need to create any firewall port forwarding rules for the host running the agent.
I do however, need to configure my Zabbix servers own firewall, to allow my remote host to send messages to my Zabbix servers port 10051.
Troubleshooting
Unable to connect to [Your Zabbix Server IP/Domain]:10051 [cannot connect to [[Your Zabbix Server IP/Domain]:10051]: (null)]
When a Zabbix agent starts up, it doesn’t yet know the list of items it has been configured to check. So it will attempt to connect to the address listed in its ServerActive= setting in the zabbix_agentd.conf file.
If your agent is not configured to do an Active checks, then you can ignore this error.
no active checks on server [Your Zabbix Server IP/Domain:10051]: host [Your Host running Zabbix Agent] not found
Make sure you have set up your host using the Zabbix Server UI.
Whatever value you enter into the Hostname= option in the zabbix_agentd.conf needs to be the same value entered into the Host name field in the Zabbix Server UI → Create Host/New Host screen. The values are case-sensitive and must match.
You should also assign a template containing active items.
If you are not using any active items, then you can ignore this error message.
telnet is not recognized as an internal or external command
On Windows, telnet is usually not installed by default. I have a video for several years ago which can help https://youtu.be/DClhPlEAPsU
In this tutorial we will teach you how to monitor a Windows machine using zabbix. To do this, we will use the zabbix agent on the Windows machine.
This tutorial is focused on monitoring a Windows machine and we will show the steps to install and configure the zabbix agent on Windows.
We also have another tutorial that teaches you how to monitor a Linux machine (Click Here).
Table Of Contents
- Ddownload the zabbix agent for windows
- Installing the zabbix agent on windows
- Allow Zabbix Agent in Firewall
- Monitoring on the zabbix server
- Creating new WINDOWS host on Zabbix Server
Ddownload the zabbix agent for windows
First, let’s access the zabbix download page and choose the operating system Windows.
Also, let’s choose the newest version of zabbix.
For encryption, we will choose OpenSSL and MSI packaging.

Then, further down the page, we will see the DOWNLOAD option.
Installing the zabbix agent on windows
Now, let’s go to the folder where we downloaded it and double-click on the installer.
We will then see a screen asking if we want to continue with the installation.

Soon after, comes the license and the question if you agree.
After continuing, we will see the screen that asks where the installation will take place. For this tutorial, we will use the standard installation and therefore click on “Next”.

Now let’s enter the Zabbix server IP both in the “Zabbix server” field and also in the “active checks” field.
If you are using a Zabbix proxy, you can enter the proxy IP in the “active checks” section.
In our case, our zabbix server has the IP “172.16.10.8”.
Let’s leave the agent listening on the default port “10050”.
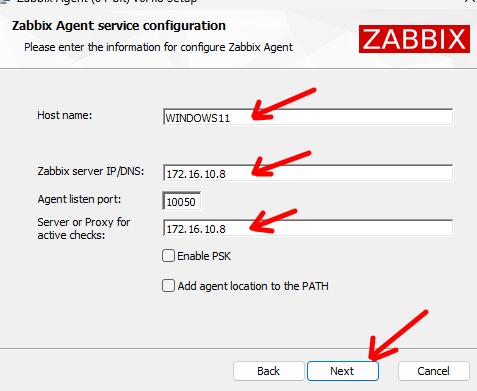
To make this tutorial simpler, we will not cover PSK configuration.
If you wish, we can make future tutorials including PSK.
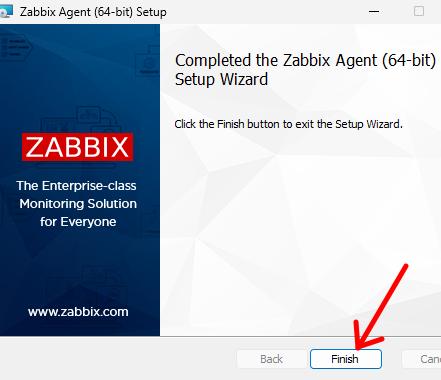
After that, we can finish the installation.
Allow Zabbix Agent in Firewall
Check if the Windows firewall is allowing communication with the Zabbix Agent.
To do this, we will click on “Allow na app or feature…”
Next, let’s check if the “Zabbix Agent listen port” has permission in the Private and Public fields.
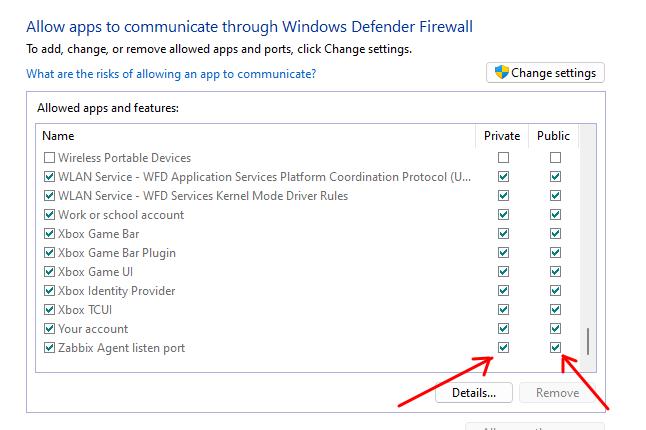
If it is as in the figure above, it means that the Windows firewall will allow communications with the zabbix agent port. If this is not the case, you need to include this permission in the Windows firewall.
Monitoring on the zabbix server
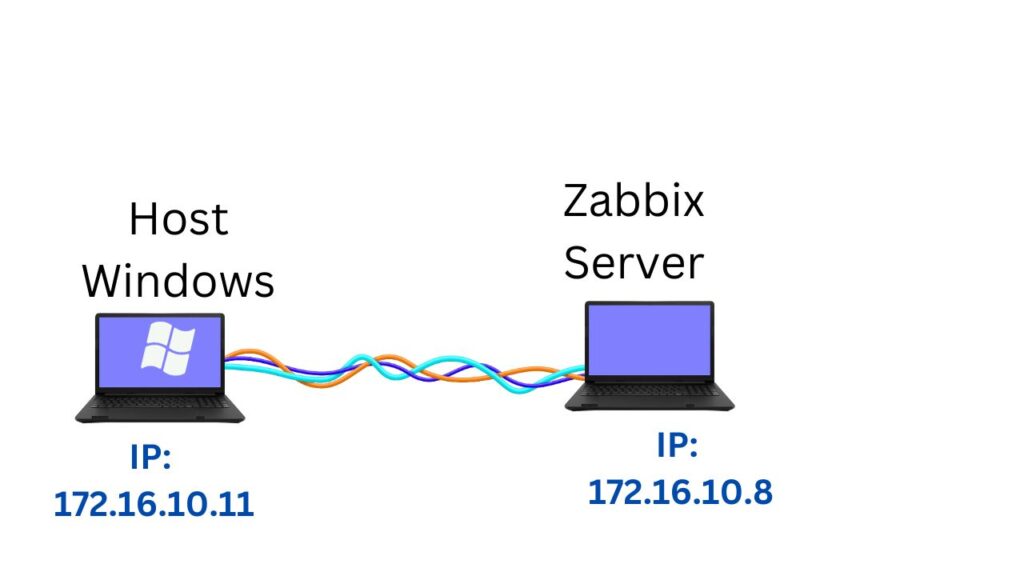
Now let’s configure the zabbix server to monitor our zabbix agent that is running on the Windows machine.
If you don’t already have a Zabbix server, see here how to configure Zabbix Server.
The scenario we used for this laboratory is shown in the figure below. We have the WINDOWS host machine and the Zabbix server machine connected.
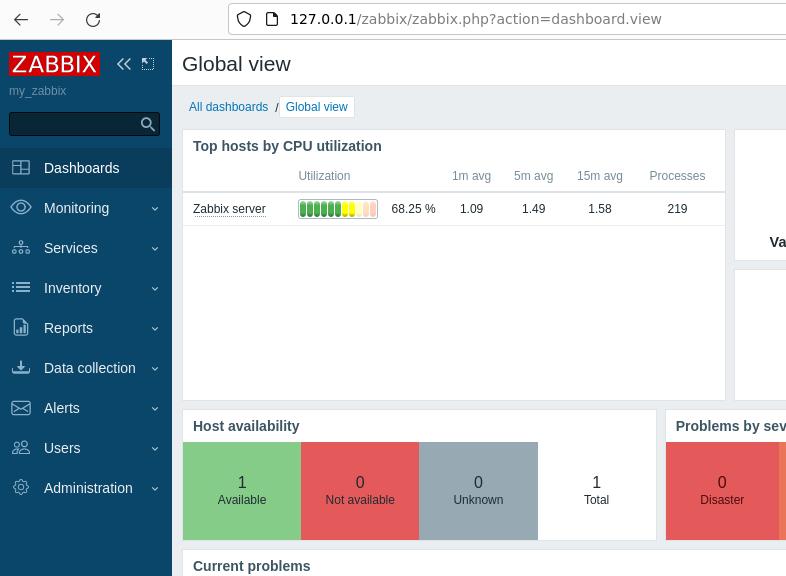
Let’s log into the machine where the Zabbix server is running and we can use the loopback IP “http://127.0.0.1/zabbix”.
http://127.0.0.1/zabbixNote. We can use another IP of the machine where the zabbix server is located to access the zabbix server’s WEB interface using another device. (In this case it would not be the loopback IP).
Next, let’s see the main screen of the Zabbix server as in the figure below.
Creating new WINDOWS host on Zabbix Server
Now let’s start the process of adding a host to zabbix. To do this, we will click on “Data Collection” and then on “Hosts” in the menu on the left.
Next, at the top of the screen, we will click on “Create host”.

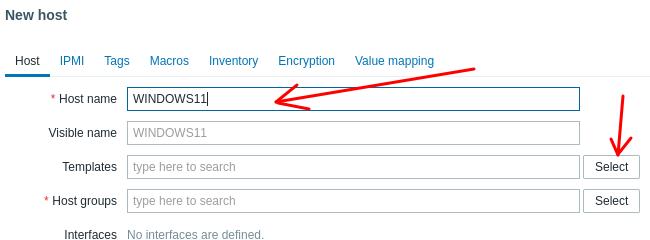
Now let’s see the hosts insertion screen. On this screen, we will give a name to the host we are going to monitor.
Here we will insert the name we gave to the machine in the zabbix agent. In our case, we use the name WINDOWS11 and we will use that same name here.
Next we will select the template and to do this we will click “Select”.
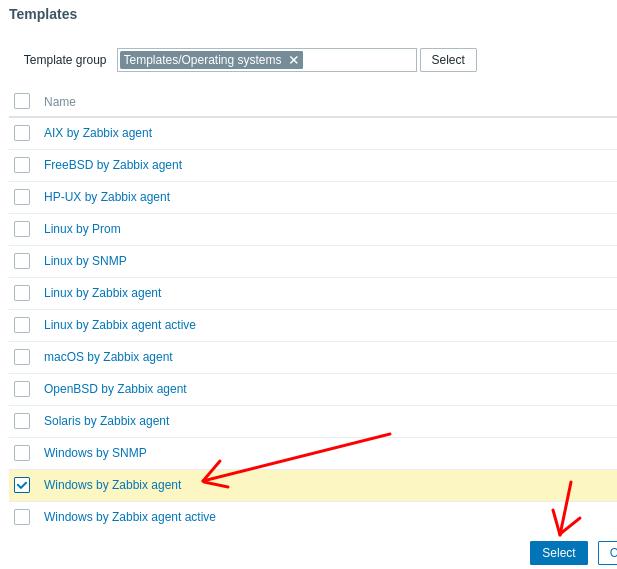
Let’s choose the type of template we are going to use. In our case, we are going to monitor a common machine and so we will choose to monitor based on the operating system. To do this, we will click on “Templates/Operating systems”.
Now, let’s select the “Windows by Zabbix agent” template and click on “Select”.
Now let’s add the host group that the new host will belong to. To do this, we will click on Select in the “Hosts groups”
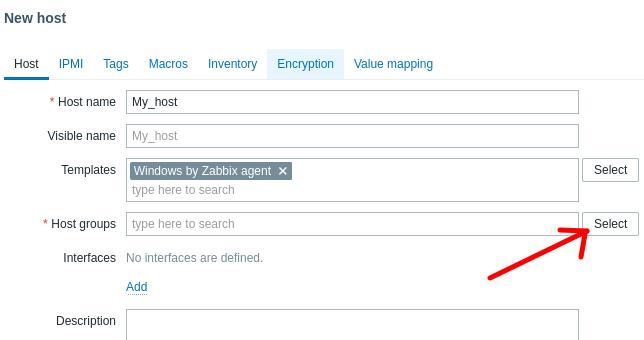
Next, we’ll choose a group for our host. In this case, we will choose the “Discovered hosts” group and then click on “Select”.
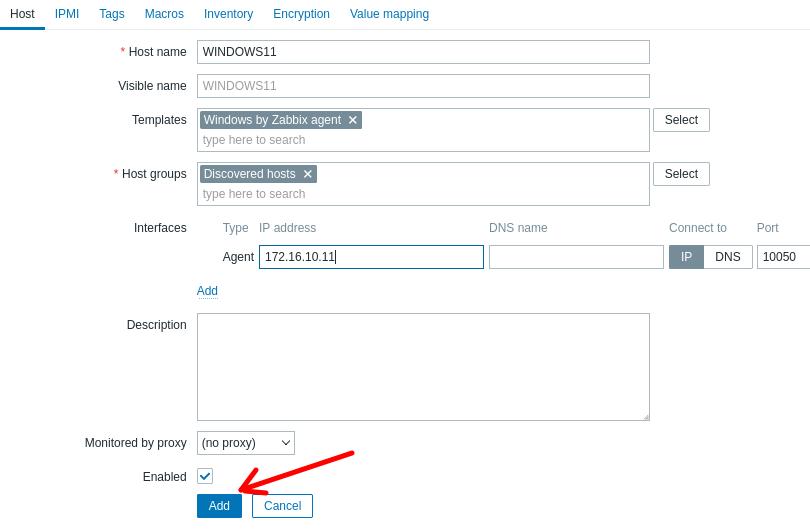
The next step is to add the interface. To do this, we will click on “Add” in the “interfaces” field.

As we are going to use the zabbix agent on the host, we will choose the “Agent” option.
Now let’s enter the IP of the WINDOWS host we want to monitor. In our case, the host IP is “172.16.10.11”. After entering the host IP, we will click on “Add”.
We can see that the WINDOWS11 host appears in the list below. However, we can check the “Availability” field is still not showing the host status in green.
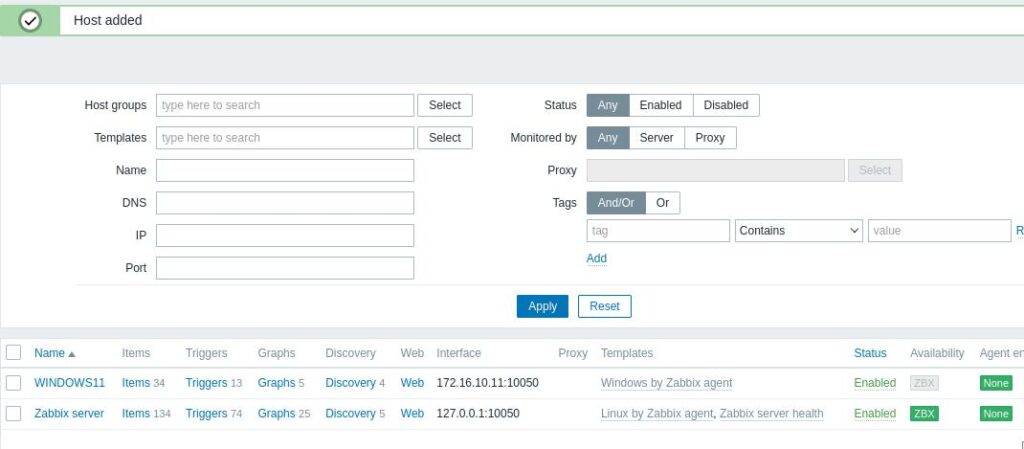
To show the “Availability” field in green, press the F5 key or refresh the page.
And we have completed the tutorial for adding and monitoring a Windows machine in Zabbix.
Add Host to Zabbix
Install Zabbix on Ubuntu
How to install Zabbix on Raspberry Pi

Juliana Mascarenhas
Data Scientist and Master in Computer Modeling by LNCC.
Computer Engineer

How to Use Snap Behind a Proxy on Linux (Step-by-Step Guide)
In this guide, you’ll learn how to configure Snap to work behind a proxy, even…
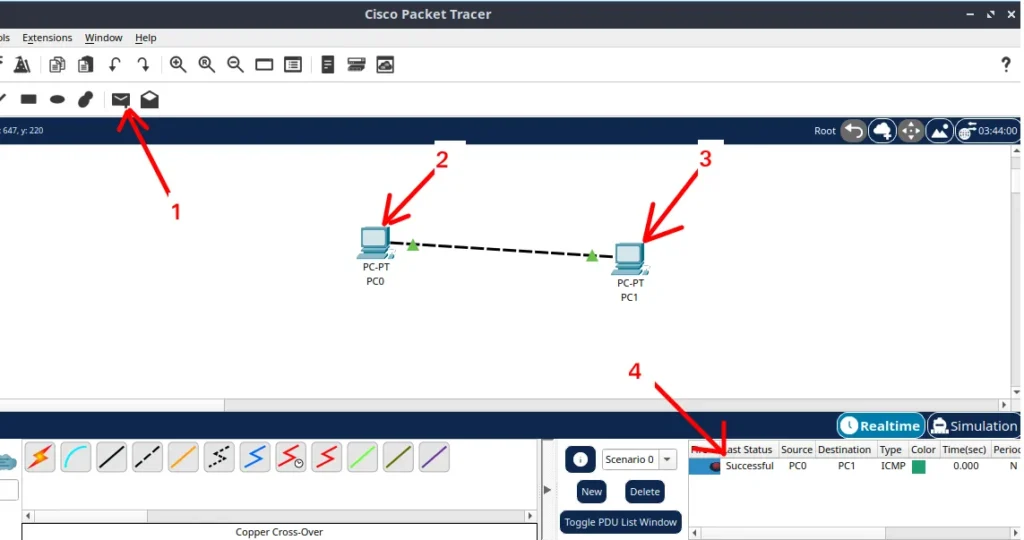
How to Create a Network with a Switch in Packet Tracer – Step-by-Step Guide for Beginners
In this practical tutorial, I will show you how to create a simple switch network…
Why use Kali Linux inside VirtualBox?
In this article, we will see the main reasons for considering the use of Kali…
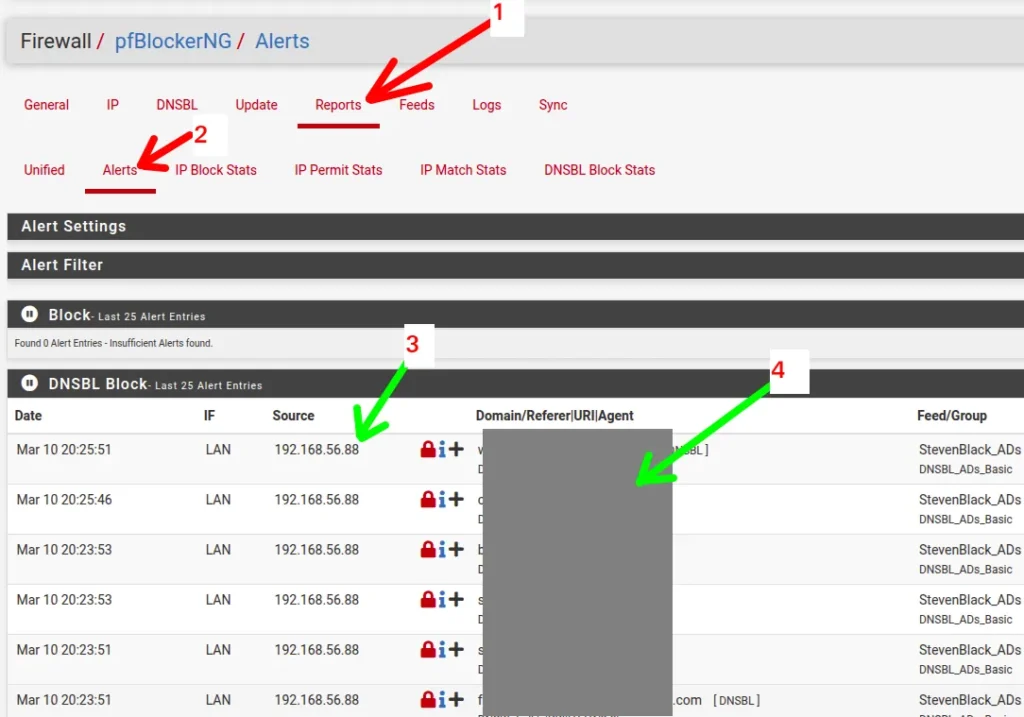
How to install pfBlocker on pfSense: step by step guide
Today we will learn how to install pfBLocker NG in PFSense. pfBLocker is an excellent…
Packet Tracer for Dummies: Setting Up Your First Network with 2 PCs (Quick Start Guide)
Are you ready to take the first step into the fascinating world of computer networks?…
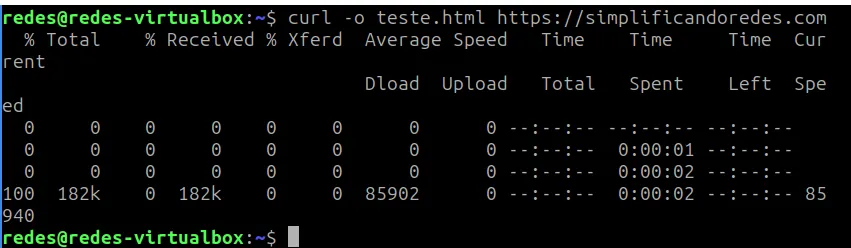
Learn how to use the curl command: tutorial with practical examples
Today we are going to learn about the curl command in Linux! This command is…
In the previous article, we looked at how you can add Linux servers on the Zabbix server for monitoring. In this guide, we switch gears and focus our spotlight on how you can add a Windows host system to the Zabbix server for monitoring.
For this tutorial, we will add the Windows server 2019 datacenter edition to Zabbix Server.
Step 1) Download Zabbix Agent for Windows Server
As we saw when adding Linux hosts, the first step when adding a host to the Zabbix server is to install the Zabbix agent on the host system first. With that in mind, head out to the official Zabbix agents download page and download the Zabbix Window’s agent.
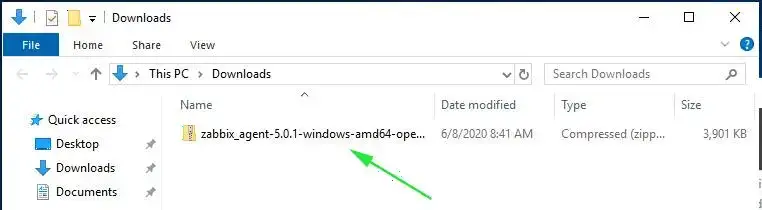
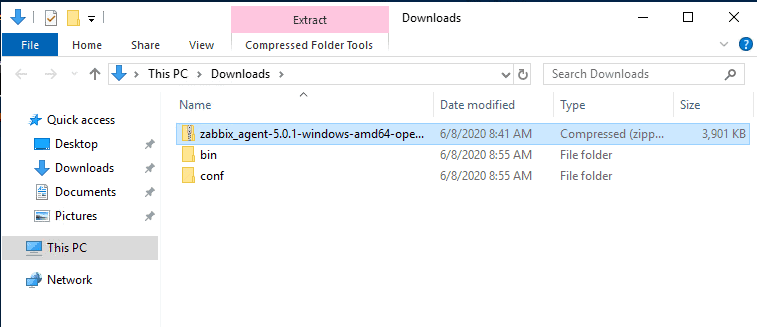
By default, this will download it in the ‘Downloads’ folder as shown.
Once downloaded, right-click on the zipped file and select ‘Extract All’ to unzip it as shown.
This unzips it into 2 folders: bin and conf folder. The bin folder contains the Zabbix agent executable file while the conf folder contains the Zabbix agent configuration file – zabbix.agentd.conf
Step 2) Edit the Zabbix configuration file
We need to make a few changes to the zabbix configuration file for the Zabbix agent to communicate with the Zabbix server. Therefore, open the zabbix configuration file – zabbix.agentd.conf – and modify the parameters as shown:
Server=<IP address of the Zabbix server>
ServerActive=<IP address of the Zabbix server>
Hostname=<The FQDN of the Windows server>
Save the changes and exit the file.
Step 3) Install and start Zabbix Agent on Windows server
With all the configurations in order, run command prompt as administrator and install Zabbix using the syntax as shown:
C:\> {full system path to zabbix_agentd.exe) –config {full system path to zabbix_agentd.win.conf} –install
In my case, the command will be:
C:\>C:\Users\winnie95atieno\Downloads\bin\zabbix_agentd.exe --config C:\Users\winnie95atieno\Downloads\conf\zabbix_agentd.conf --install
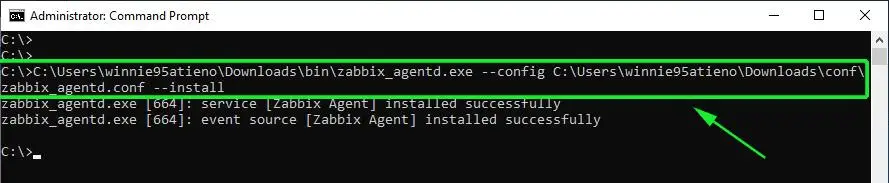
From the output, we can see that the Zabbix agent has successfully been installed.
To start Zabbix, use the syntax:
C:\> {full system path to zabbix_agentd.exe) –start
The command will therefore be:
C:\>C:\Users\winnie95atieno\Downloads\bin\zabbix_agentd.exe --start
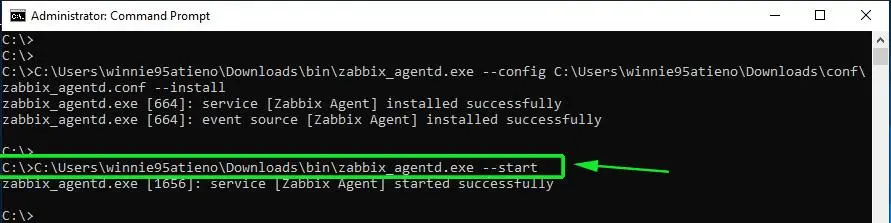
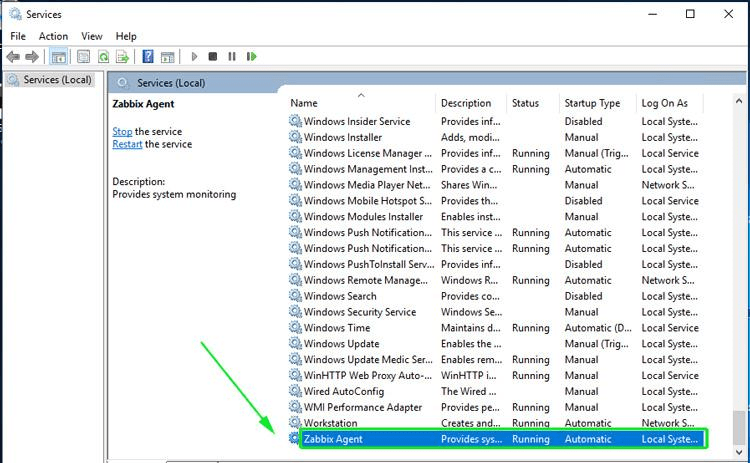
To confirm that the Zabbix agent is running, head out to the ‘Windows Services’ application and confirm that the Zabbix agent is up and running.
Step 4) Configure Windows firewall for Zabbix Agent
By default, the Windows firewall is enabled and blocks incoming and going connections. We are therefore going to make a few changes to allow traffic from the Windows Server host to the Zabbix server.
First, we are going to allow ICMP protocol for the Zabbix server to establish network communication with the Windows host and report any errors when they occur. Therefore, run Windows Powershell with Administrative privileges and execute the command as shown:
netsh advfirewall firewall add rule name="ICMP Allow incoming V4 echo request" protocol="icmpv4:8,any" dir=in action=allow
Next, allows port 10050 – which is the default port that Zabbix listens to – on the firewall.
netsh advfirewall firewall add rule name="Open Port 10050" dir=in action=allow protocol=TCP localport=10050

To this point, we have successfully installed and configured the Zabbix agent on the Windows host system. The Zabbix agent should be sending system metrics to the Zabbix server. Let’s now go over and see how you can add the Windows host on the Zabbix server.
Step 5) Add a Windows host on Zabbix Server
To add a Windows host, go to Configuration –> Host –> Create Host
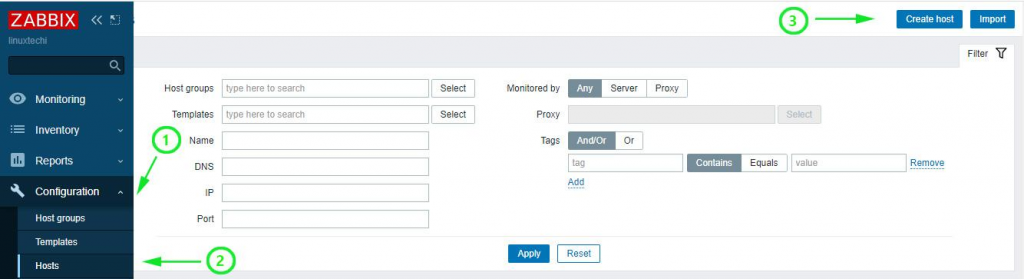
On the next screen, fill out the Windows host details such as hostname, visible name and IP address.
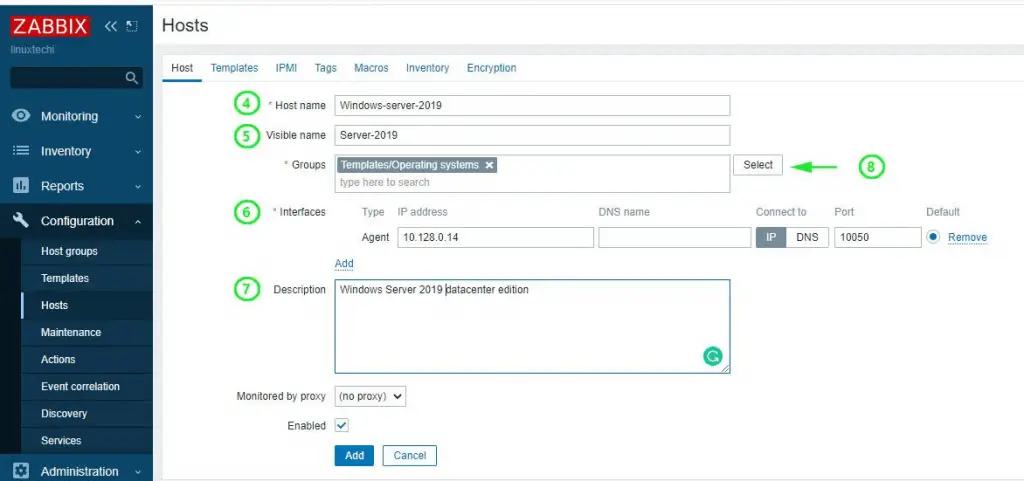
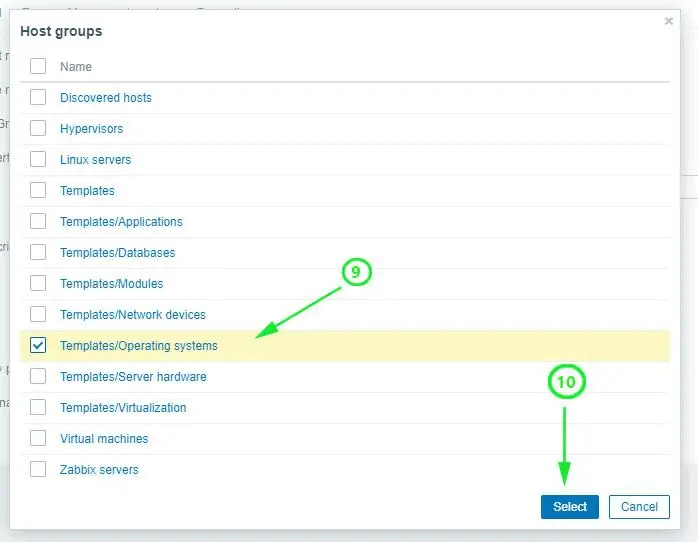
For the ‘Groups’ section, click on the ‘Select’ button and click on the ‘Templates/Operating system’ option.
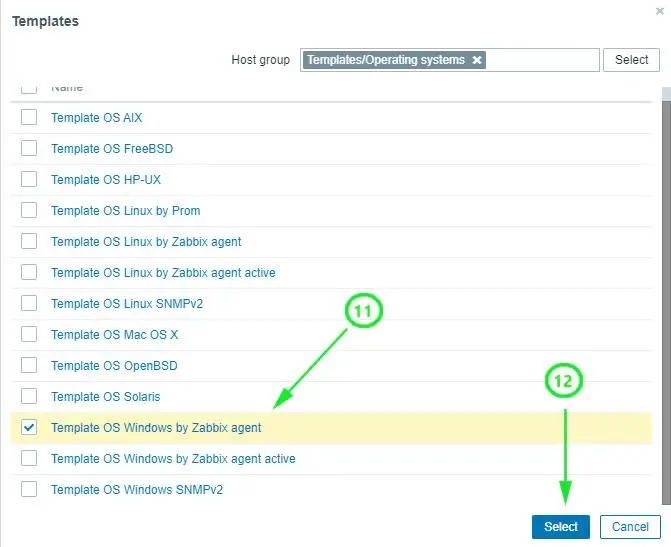
Next, click on the ‘Templates’ tab on the menu and click ‘Template OS Windows by Zabbix agent’. Finally, click on the ‘Select’ button.
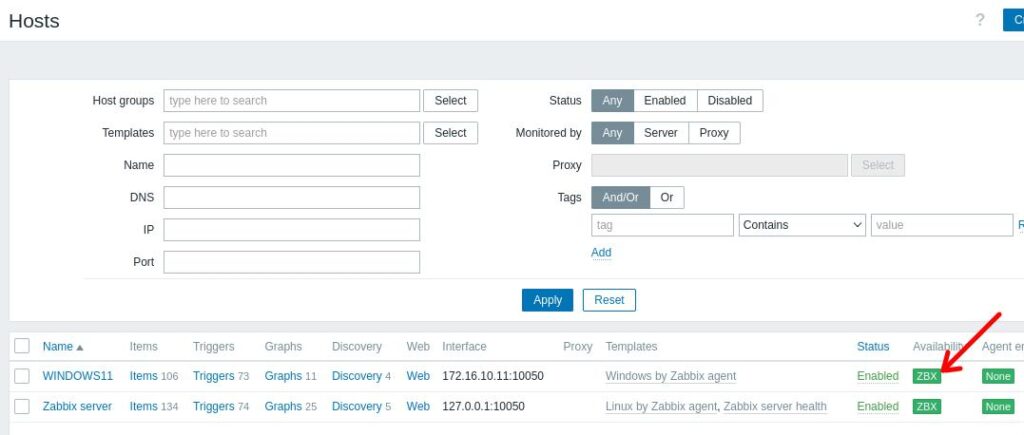
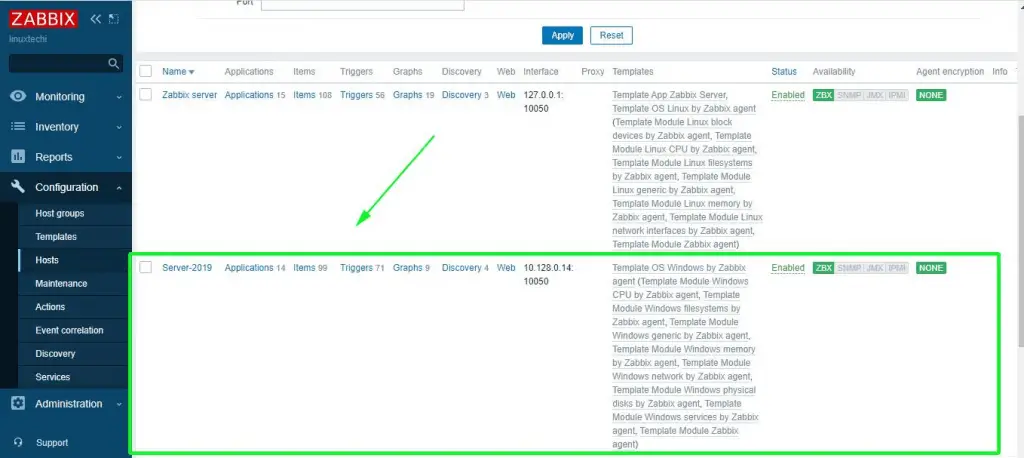
On the dashboard, check the Windows host listed as shown below. Note that the state is indicated ‘Enabled’ with the Zabbix icon ‘ZBX’ in green color.
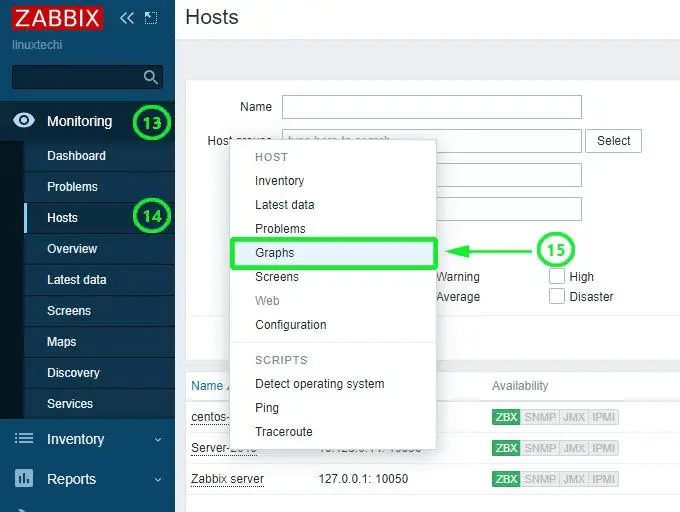
To graph the metrics associated with the Windows host system, click on ‘Monitoring’ –> ‘Hosts’. Click on the Windows host and select ‘Graphs’.
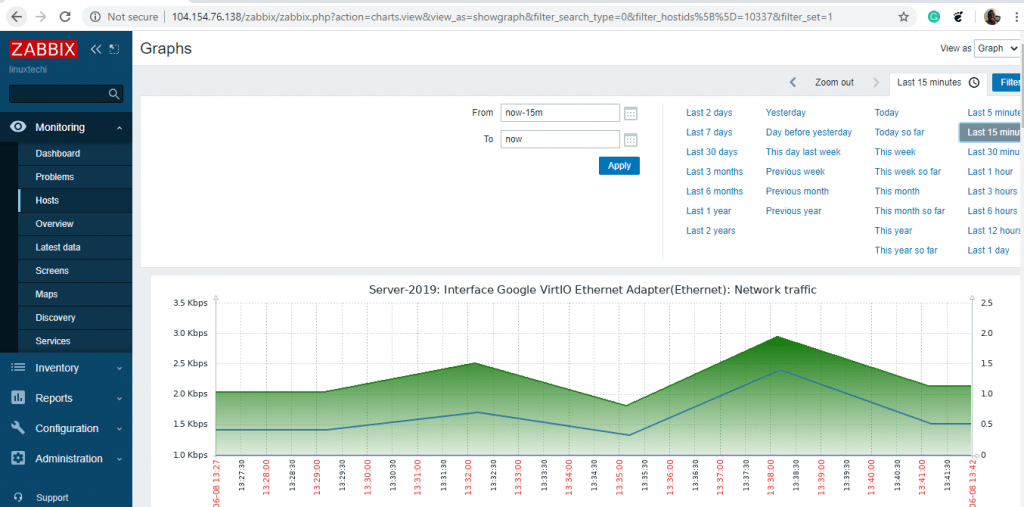
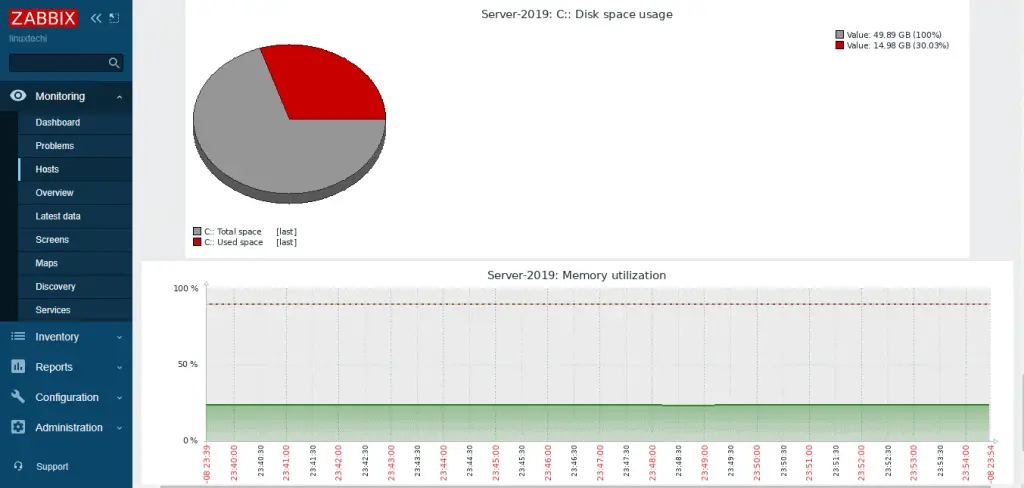
Finally, the Zabbix server will start graphing the system metrics shipped by the Zabbix agent which is residing on the Windows server host system. There are various metrics that you can monitor including network Interface statistics, CPU usage and utilization, Disk space usage and Memory utilization to mention a few.
And this brings us to the end of this topic. It’s our hope that you can now comfortably add a Windows host on the Zabbix server for monitoring.