
- На главную
- Категории
- Сеть
- Zabbix
- Zabbix agent для Windows — установка и настройка
Периодически приходится устанавливать на ПК с Windows 7/8/10 и на сервера с Windows Server 2008R2/2012/2012R2/2016 zabbix agent. Сначала это делалось так — качался скрипт, руками прописывался как служба, это очень неудобно, особенно когда количество хостов начинает увеличиваться. Вручную надо заходить в папку с zabbix агентом и прописывать службу: zabbix_agentd.exe
2017-01-31 09:59:1060

Периодически приходится устанавливать на ПК с Windows 7/8/10 и на сервера с Windows Server 2008R2/2012/2012R2/2016 zabbix agent.
Сначала это делалось так — качался скрипт, руками прописывался как служба, это очень неудобно, особенно когда количество хостов начинает увеличиваться.
Вручную надо заходить в папку с zabbix агентом и прописывать службу:
zabbix_agentd.exe --config <ваш_файл_конфигурации> --install
Проблема была решена — на просторах интернета был найден инсталятор zabbix агента для Windows.
Скачать zabbix_agent-3.2.3_installer
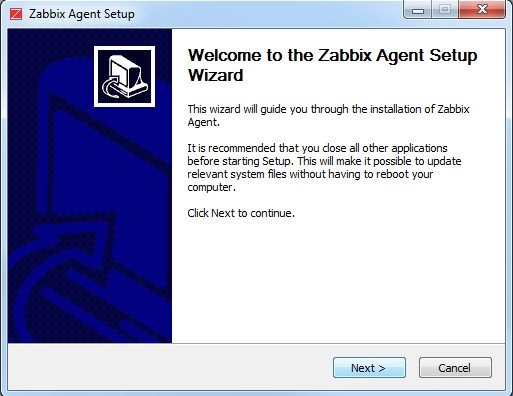
После скачивания запускаем установщик
Установка zabbix agent’ a windows:
Нажимаем «Next«:
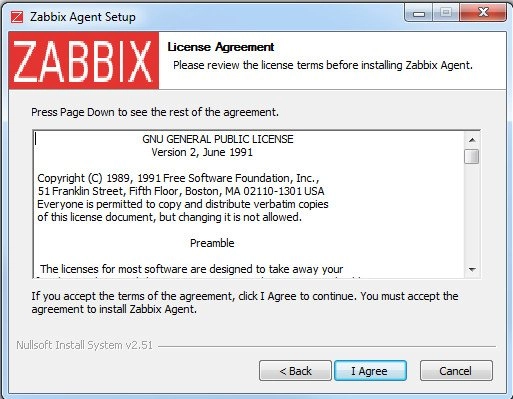
Соглашаемся с лицензией использования «I Agree»:
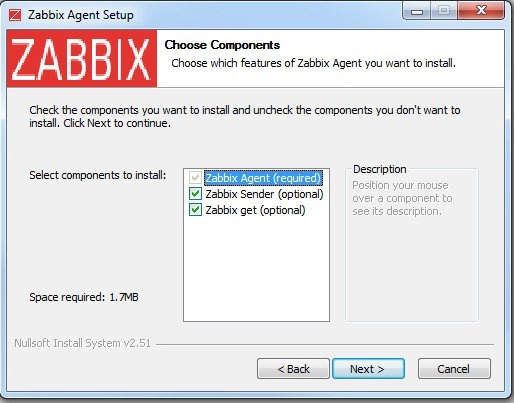
Выпираем опции, которые нам нужны (я выбираю по default) и нажимаем «Next«:
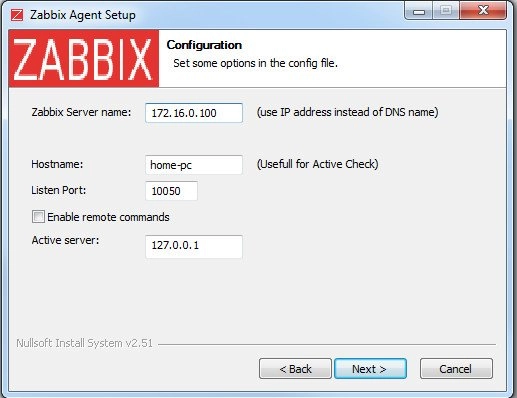
Вводим основные настройки:
Zabbix Server name: IP адрес zabbix-сервера
Hostname: Имя узла, которое будет в заббик сервере
Listen Port: Порт, по которому будут общаться сервер с агентом
Нажимаем «Next«:
Выбираем папку, в которую установим наш zabbix agent и нажимаем «Install«:

Установка завершена, нажимаем «Close«:

Вот и все! Установка завершена. Осталось добавить host в zabbix сервер и повесить на него стандартный шаблон «Template OS Windows».
Если Вам надо будет перезапустить агента, то необходимо зайти в Панель управления -> Администрирование -> Службы, там найти службу — zabbix agent, нажать на ней правой кнопкой мыши и выбрать то действие, которое Вы хотите сделать (Запустить, остановить, перезапустить).
Свои параметры можно добавить в файле «C:\Program Files (x86)\Zabbix Agent\zabbix_agentd.conf»
Лог хранится — «C:\Program Files (x86)\Zabbix Agent\Zabbix_agentd.txt»
P.S.: Не забываем про брандмауэр/firewall. Не забываем открыть порт 10050 для пассивного агента / 10051 для активного агента
Я надеюсь Вам помогла данная статья.
Не забываем, что все ссылки на скачивание и версии агента актуальны на момент написания статьи. Если у Вас еще остались вопросы, можете задавать их в комментарии, с удовольствием на все отвечу!
Скачать zabbix_agent-3.2.3_installer
Ваш покорный слуга — компьютерщик широкого профиля: системный администратор, вебмастер, интернет-маркетолог и много чего кто. Вместе с Вами, если Вы конечно не против, разовьем из обычного блога крутой технический комплекс.
Опубликовано:
Используемые термины: Zabbix, Windows.
В нашем примере мы установим агент для Zabbix на Windows в качестве службы, а также сделаем минимальную настройку для отправки данных на сервер.
Загрузка агента с официального сайта
Установка агента
Из пакета MSI
Из архива
Настройка брандмауэра
Проверка подключения к агенту
Другие статьи про Zabbix
Загрузка агента
Переходим на страницу загрузки агента Zabbix и выбираем платформу операционной системы (x32 или x64) и версию агента, например:

* помимо этого, мы можем выбрать вариант дистрибутива: с использованием шифрования или нет, а также файл установки — msi пакет или архив. В данном примере мы выбрали версию 5.
В зависимости от выбранных критериев поиска агента, ниже мы можем увидеть несколько вариантов для загрузки. Находим нужный и кликаем по DOWNLOAD для скачивания файла:

Ждем окончания загрузки и переходим к установке.
Установка агента
В зависимости от загрузки типа пакета (MSI или архив) будут разные методы установки. Рассмотрим оба.
Установка из MSI-пакета
Это удобный вариант, который позволит установить агента с помощью мастера. Чтобы начать, кликаем дважды по скачанному пакету и в окне приветствия нажимаем Next:
Принимаем лицензионное соглашение, установив галочку I accept the terms in the License Agreement и нажимаем Next:
В следующем окне оставляем имя компьютера, на который устанавливается агент и вводим имя или IP-адрес сервера zabbix, после кликаем по Next:

* в данном примере имя нашего компьютера Windows PC, а сервера — zabbix-server.dmosk.local.
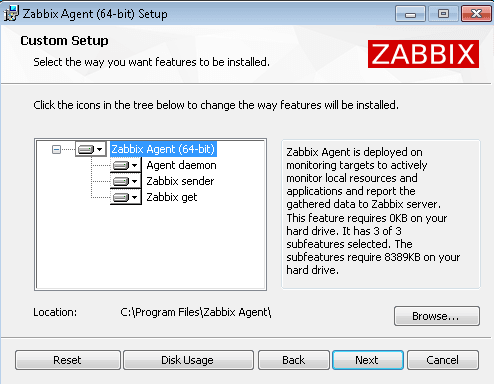
Выбираем компоненты, которые хотим установить — можно просто оставить все по умолчанию и нажимаем Next:

Подтверждаем установку, кликая по Install:
Ждем завершения процесса — агент установлен.
Установка из архива
Данный метод требует дополнительных манипуляций, но с его помощью можно автоматизировать процесс. Мы рассмотрим только установку.
Распаковываем содержимое скачанного архива в каталог, где будут находиться файлы программы, например в C:\Program Files\Zabbix Agent. В итоге, у нас получится:
Открываем WordPad от администратора и в нем открываем конфигурационный файл conf/zabbix_agentd.conf и правим опцию для сервера zabbix — находим строку:
Server=127.0.0.1
… и меняем ее на:
Server=zabbix-server.dmosk.local
* где zabbix-server.dmosk.local — имя сервера Zabbix.
Теперь открываем командную строку от администратора и выполняем команду для установки агента:
«C:\Program Files\Zabbix Agent\bin\zabbix_agentd.exe» —config «C:\Program Files\Zabbix Agent\conf\zabbix_agentd.conf» —install
* где C:\Program Files\Zabbix Agent — папка, куда мы распаковали архив.
Мы должны увидеть что-то на подобие:
zabbix_agentd.exe [468]: service [Zabbix Agent] installed successfully
zabbix_agentd.exe [468]: event source [Zabbix Agent] installed successfully
Теперь открываем службы Windows и находим «Zabbix Agent» — кликаем по ней правой кнопкой мыши и выбираем Запустить:

Установка завершена.
Настройка брандмауэра
Если в нашей системе работает брандмауэр Windows, необходимо разрешить порт 10050 или приложение zabbix agent.
Для этого переходим в Панель управления — Система и безопасность — Брандмауэр Windows (или вводим команду control /name Microsoft.WindowsFirewall). Кликаем по ссылке Разрешение взаимодействия с приложением или компонентов в брандмауэре Windows — добавляем наше приложение zabbix_agentd в исключение.
Это же действие можно выполнить в powershell — запускаем ее от администратора и вводим команду:
New-NetFirewallRule -DisplayName «Разрешить приложение Zabbix Agent» -Direction Inbound -Action Allow -EdgeTraversalPolicy Allow -Program «C:\Program Files\Zabbix Agent\bin\zabbix_agentd.exe»
Или мы можем добавить в исключение порт. Это можно сделать также из командной строки poweshell:
New-NetFirewallRule -DisplayName «Разрешить порт 10050 для Zabbix» -Direction Inbound -Action Allow -EdgeTraversalPolicy Allow -Protocol TCP -LocalPort 10050
Проверка работы
Чтобы убедиться в работоспособности агента, мы можем зайти на сервер zabbix и выполнить подключение по telnet, например, командой:
telnet 192.168.1.15 10050
* где 192.168.1.15 — IP-адрес компьютера с установленным Zabbix.
Мы должны увидеть
Connected to nr-fs-06.
Escape character is ‘^]’.
.. и через небольшой интервал времени:
Connection closed by foreign host.
Но если агент не запущен или не работает, мы увидим ошибку:
telnet: connect to address …: Connection refused
В панели сервера в узлах сети при корректной установке и настройке, мы также должны увидеть доступность компьютера по агенту:
Читайте также
Другие инструкции по Zabbix:
1. Установка и настройка Zabbix-агента на CentOS
2. Установка и начальная настройка сервера мониторинга Zabbix на Ubuntu Server
3. Настройка сервера Zabbix 5 на CentOS 8
Содержание
- Введение
- 1. Установка Zabbix Agent из MSI-пакета
- 2. Проверка установки Zabbix Agent
- 3. Добавление Windows-хоста в сеть мониторинга
- Использованные ресурсы
Введение
Программное обеспечение Zabbix Agent позволяет осуществлять мониторинг устройств, на которые оно установлено. Для сбора и отображения данных мониторинга используется ПО Zabbix Server. См. статью «Zabbix Server, Zabbix Agent, Zabbix Frontend и MySQL. Инструкции по установке».
В настоящей статье представлены инструкции по установке и настройке Zabbix Agent в операционной системе MS Windows.
1. Установка Zabbix Agent из MSI-пакета
1.1. Скачайте MSI-пакет Zabbix Agent по ссылке https://www.zabbix.com/download_agents

Скачивание MSI-пакета Zabbix Agent
1.2. Запустите установку MSI-пакета.
1.3. В процессе установки выберите папку для установки Zabbix Agent.
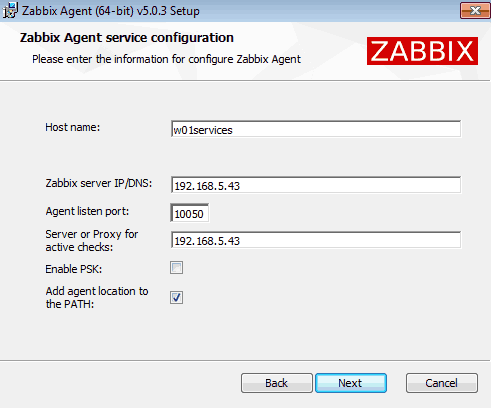
1.4. Настройте конфигурацию службы Zabbix Agent:
- Host name — имя хоста;
- Zabbix server IP/DNS — IP-адрес Zabbix Server (в запросах с неизвестных адресов будет отказано);
- Agent listen port — номер сетевого порта Zabbix Agent (10050 по-умолчанию);
- Server or Proxy for active checks — IP-адрес сервера для активных проверок агента Zabbix;
- Enable PSK — установите этот флажок, чтобы впоследствии настроить зашифрованный канал связи между Zabbix Agent и Zabbix Server;
- Add agent location to the PATH — установите этот флажок, чтобы добавить путь к агенту в переменную среды PATH.
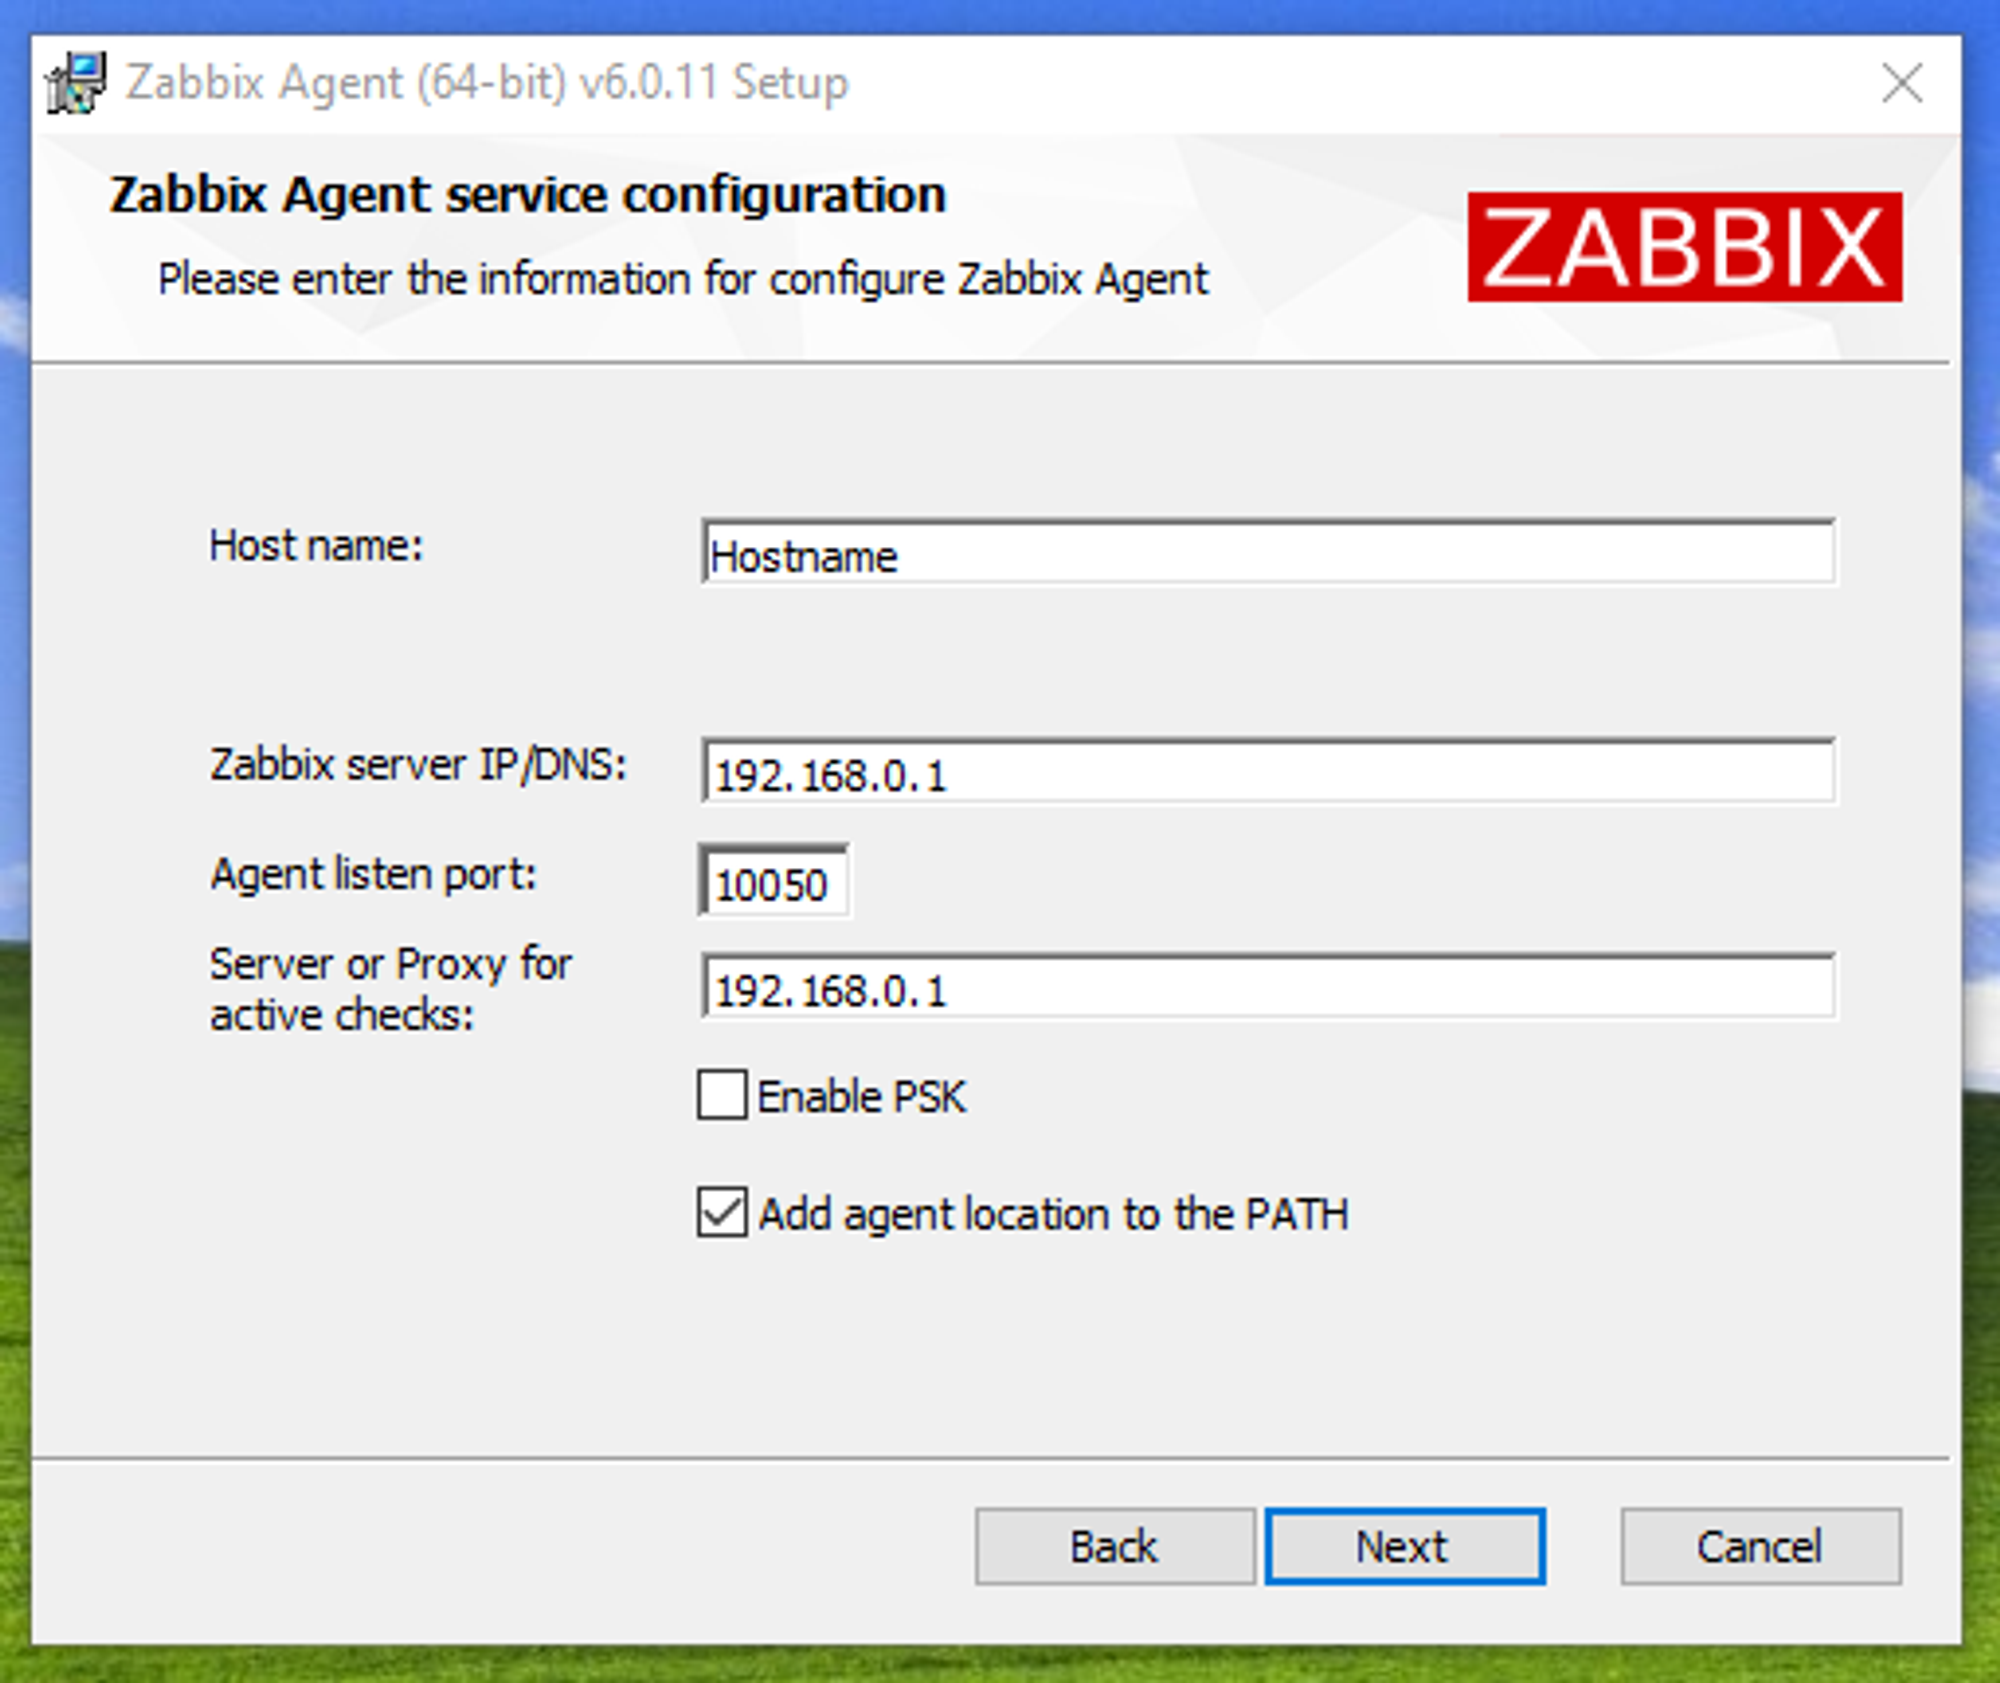
Настройка конфигурации службы Zabbix Agent
2. Проверка установки Zabbix Agent
2.1. Откройте Брандмауэр Защитника Windows в режиме администратора.
2.2. Перейдите на вкладку «Правила для входящих подключений».
2.3. Удостоверьтесь, что установщик Zabbix Agent создал правило, разрешающее входящие запросы по сетевому порту 10050.
2.4. Если правила нет, создайте его и перезагрузите компьютер.

Проверка наличия правила для входящих подключений Zabbix Agent
2.5. Откройте приложение «Службы».
2.6. Удостоверьтесь, что служба Zabbix Agent находится в состоянии «Выполняется».
2.7. Если состояние службы Zabbix Agent отличается от «Выполняется», установите состояние «Выполняется» и перезагрузите компьютер.
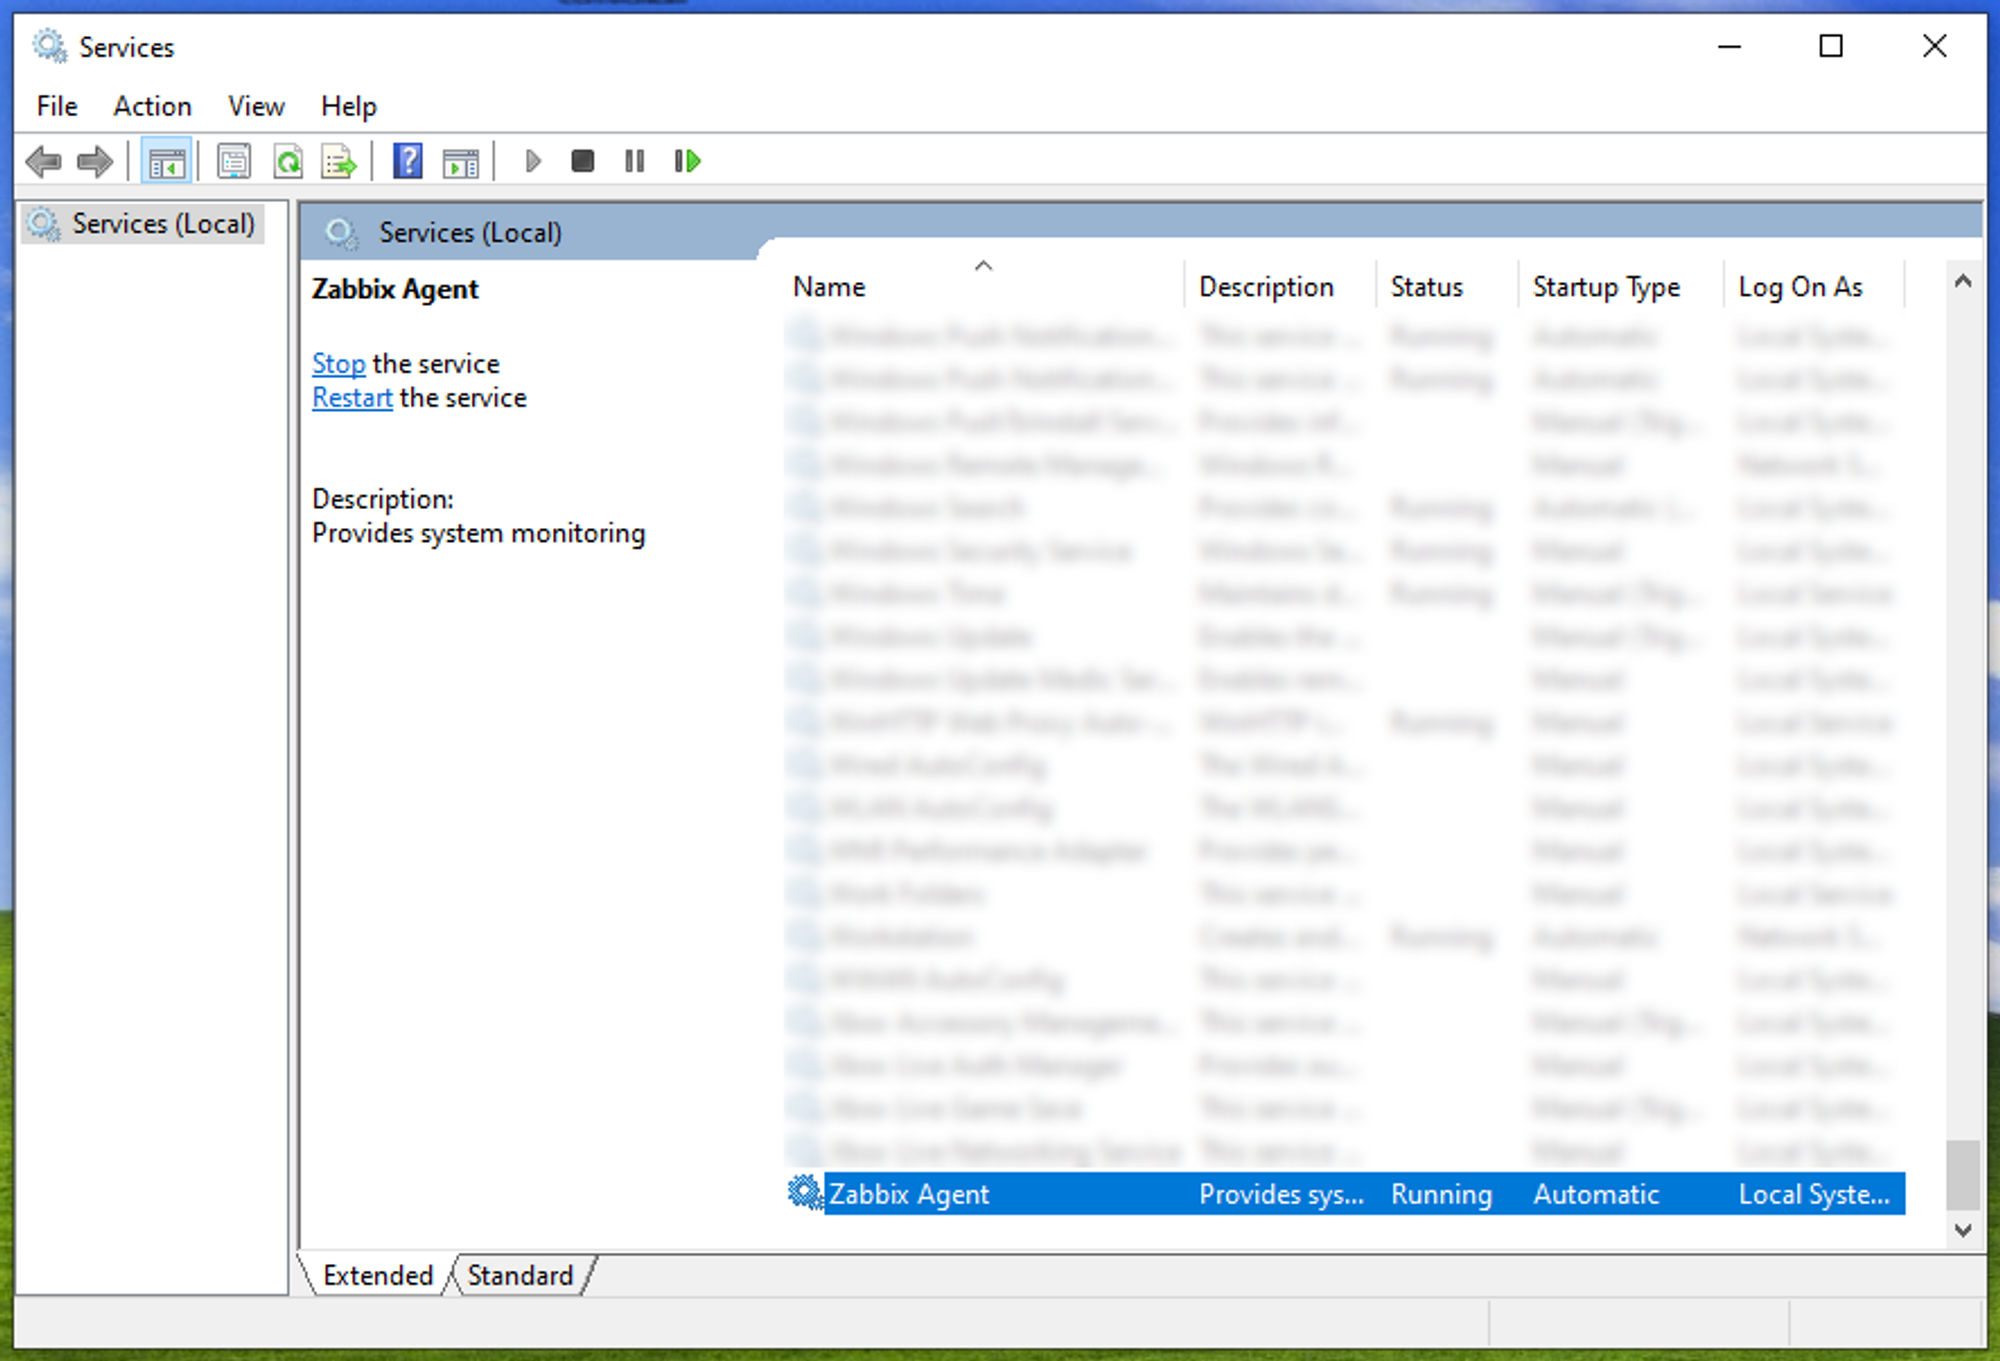
Проверка состояния Zabbix Agent в диспетчере служб
3. Добавление Windows-хоста в сеть мониторинга
3.1. Откройте Zabbix Frontend (см. статью «Zabbix Server, Zabbix Agent, Zabbix Frontend и MySQL. Инструкции по установке».). Для э того в адресной строке браузера наберите: http://zabbix-server-ip-address:8080
3.2. Откройте раздел «Monitoring» > «Hosts» и нажмите кнопку «Create host».

Создание хоста
3.3. Задайте имя хоста в поле «Host name».
3.4. Выберите шаблон «Template OS Linux by Zabbix agent».
3.5. Создайте группу мониторинга для хоста или добавьте его в существующую группу.
3.6. Под полем «Interfaces» нажмите кнопку «Add» и в раскрывающемся меню выберите пункт «Agent».
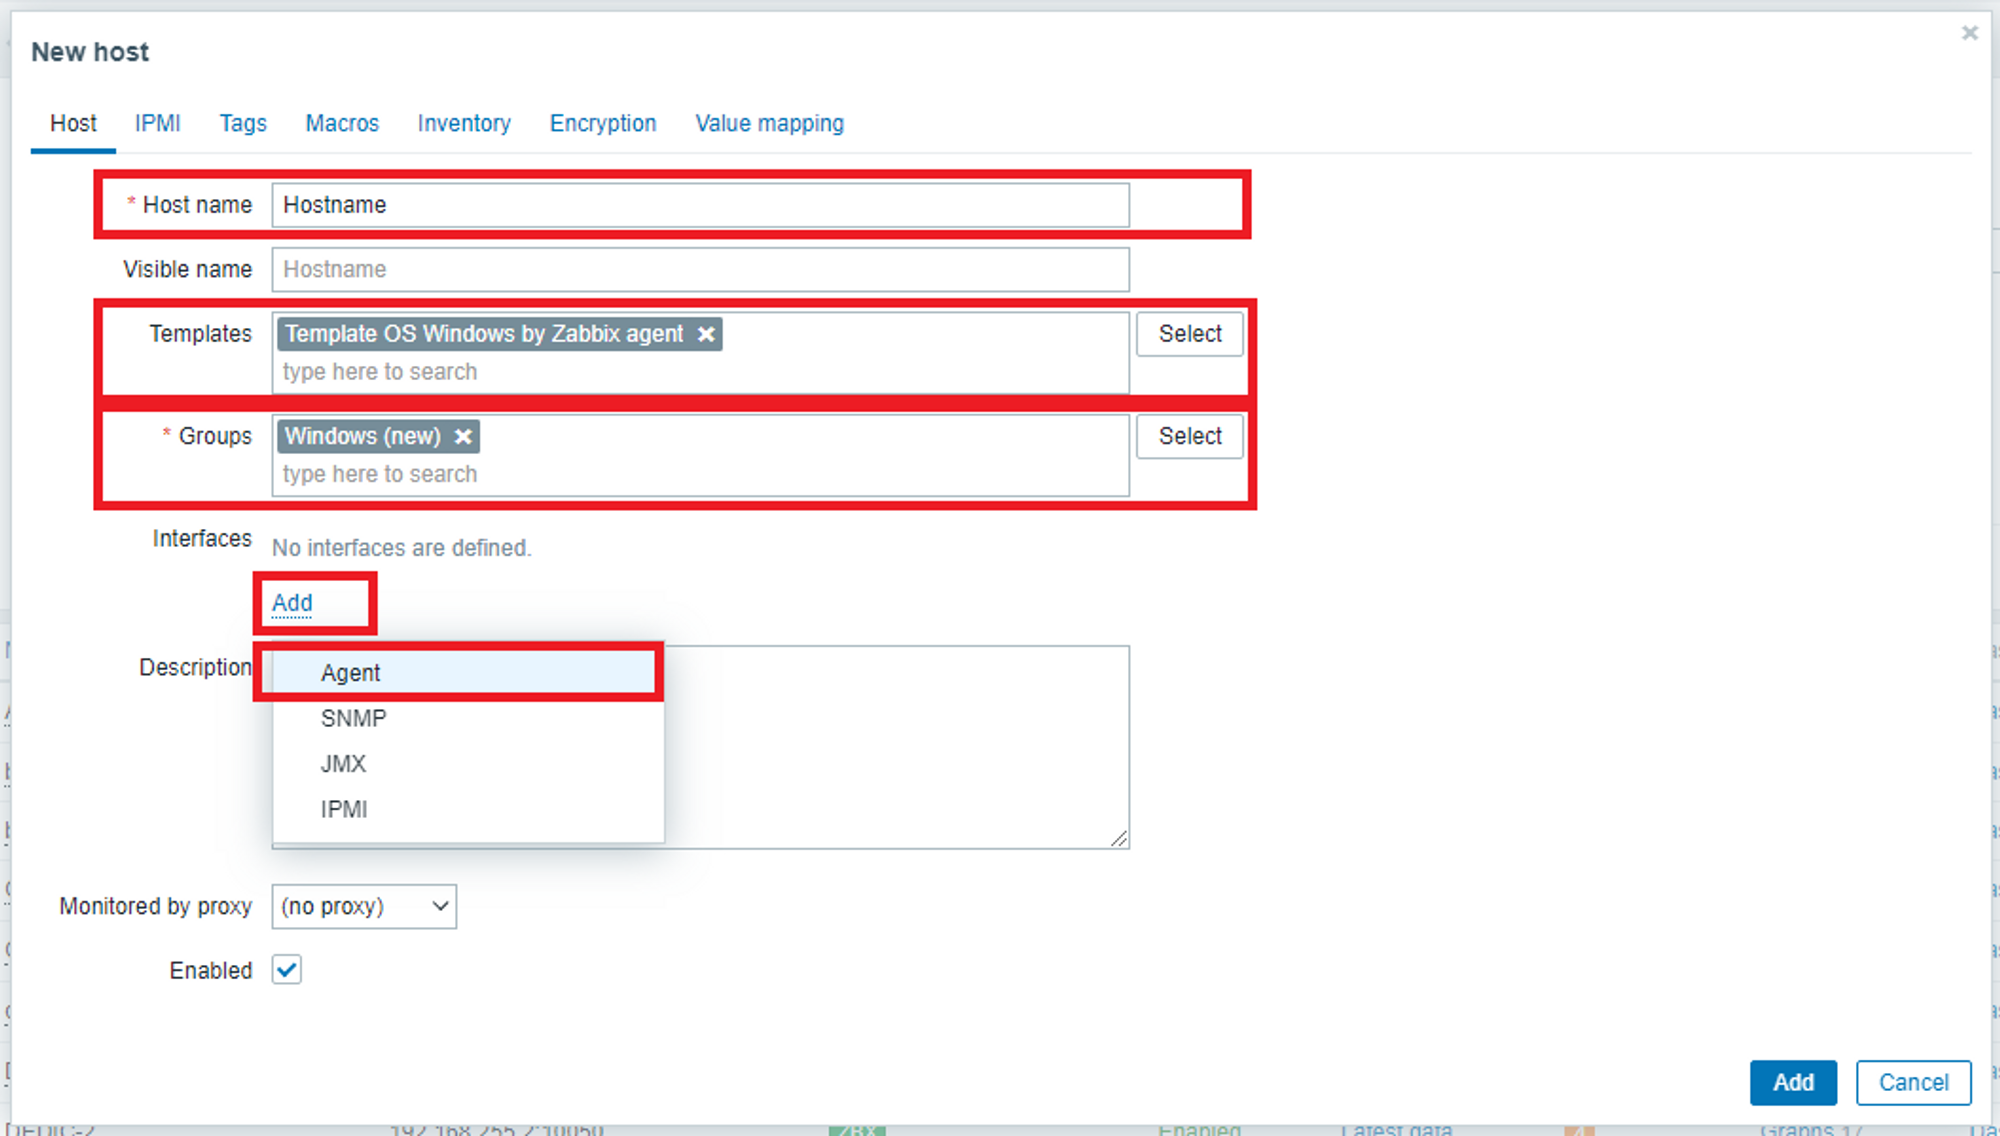
Настройка свойств хоста Zabbix Agent
3.7. В поле «Agent» задайте IP-адрес или доменное имя компьютера, на котором установлен Zabbix Agent.
3.8. Если при установке Zabbix Agent был указан сетевой порт, отличный от 10050, укажите используемый порт
3.9. Нажмите кнопку «Add».
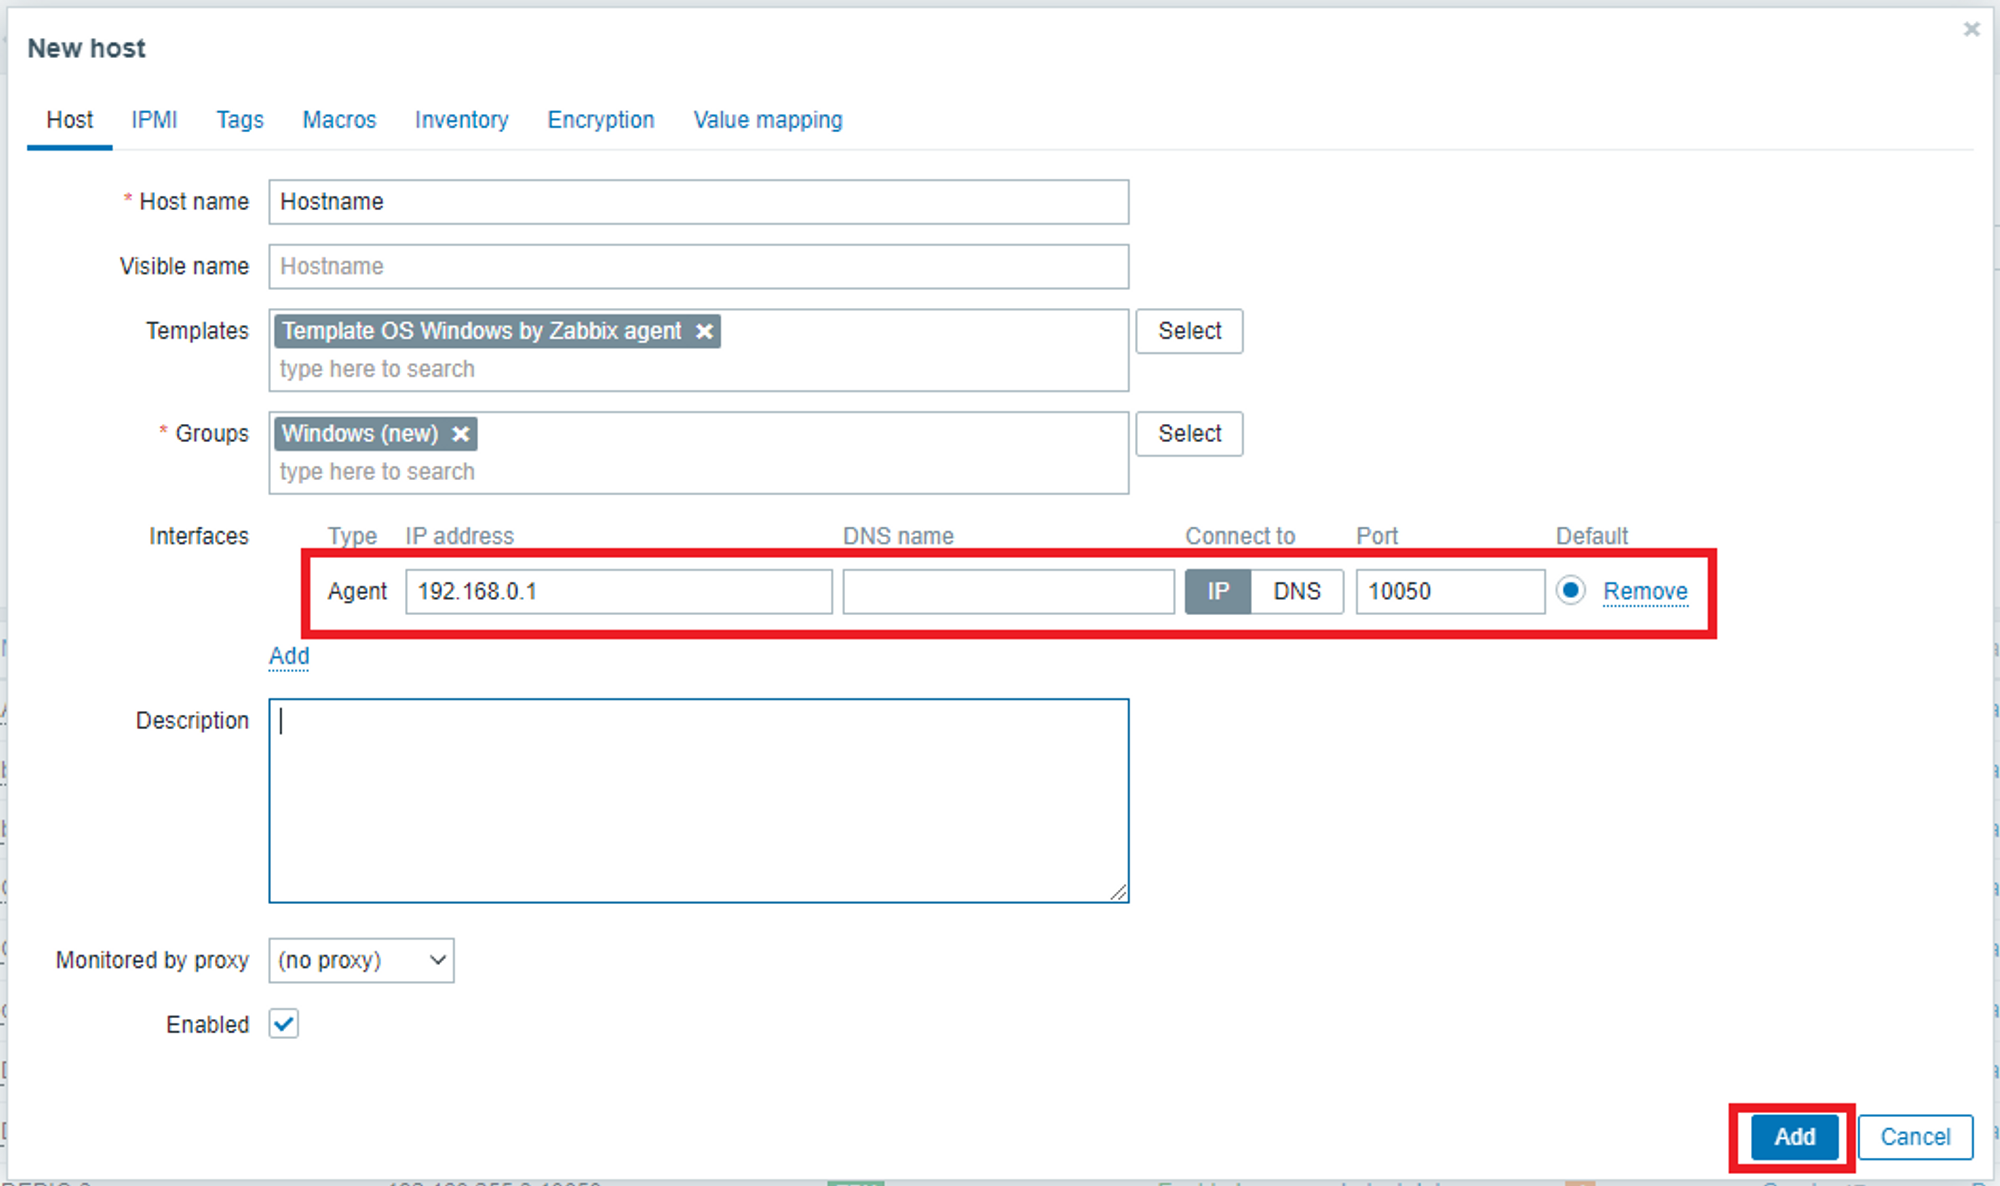
Настройка IP-адреса хоста Zabbix Agent
3.10. Перейдите в раздел «Monitoring» > «Hosts».
3.11. В списке хостов должна появиться новая запись.
3.12. Подождите приблизительно 2 минуты, пока индикатор статуса доступности ZBX не станет зелёным.

Статус хоста Zabbix Agent
3.13. Если индикатор красный, удостоверьтесь, что:
- сетевой экран на машине, где развернут Zabbix Server, разрешает обмен данными через порт 10051;
- сетевой экран и (или) Брандмауэр Защитника Windows на машине, где развернут Zabbix Agent, разрешает обмен данными через порт 10050;
- значения
ServerиServerActiveв файле конфигурации Zabbix Agent/etc/zabbix/zabbix_agentd.confсоответствуют IP-адресу Zabbix Server:
Server=192.168.0.1 # ip-адрес приведён как пример
ServerActive=192.168.0.1 # ip-адрес приведён как пример
Примечание
При любых изменениях в файле конфигурации необходимо остановить и снова запустить (при перезапуске используется конфигурация из памяти) сервис Zabbix Agent или перезагрузить компьютер.
Использованные ресурсы
Официальная инструкция по установке Zabbix Agent в Windows из MSI-пакета (на английском языке)
In this tutorial, I will show you how to install Zabbix agent for Windows server using an MSI Installer package and how to monitor Windows server with Zabbix monitoring system.
Using this guide you can monitor almost the entire Windows OS family: Windows server 2012 R2, Windows Server 2016, Windows Server 2019, Windows 10, Windows 8 and Windows 7.
Installation is quite simple, just download and install the Zabbix agent MSI installer following steps 1 and 2, but if you want to learn more, read the full guide.
In short, Zabbix agent is a lightweight application that can collect various performance data from the operating system – such as CPU, memory, disk, and network interface utilization – and forward it to a central point (server) for storage and visualization. It runs on any modern operating system and is very flexible because its functionality can be extended with scripts and modules.
You can read more about the Zabbix agent on the Zabbix official site and if you stumbled on this tutorial by accident and you never heard of the Zabbix monitoring system, then stop whatever you doing and install it on your favorite Linux distribution in less than 10 minutes: CentOS/RHEL, Ubuntu, Debian, Rasberry Pi.
Need help with installing Zabbix agent on Linux OS? Check out this guide:
Zabbix Agent (Linux): Install on Ubuntu, CentOS, RHEL, Debian, etc.
Table of Contents
- Step 1: Download Zabbix Agent Installer for Windows (msi)
- Step 2: Install Zabbix Agent on Windows using MSI installer
- Step 3: Add Windows host to Zabbix monitoring system
- Step 4: Check if Zabbix Agent is working correctly
- Step 5: Restart Zabbix Agent service on Windows
- Step 6: Configure auto registration for Windows Zabbix Agents
- Step 7: Configure PSK encryption on Zabbix Agent (Windows)
- a. Generate PSK key
- b. Configure Zabbix agent to support PSK encryption
- c. Enable PSK encryption on the agent in Zabbix frontend
- Step 8: Install Zabbix agent via Windows command-line (CMD)
- a. Run CMD as administrator
- b. Download Zabbix agent
- c. Change directory and set installation folder
- d. Install Zabbix agent using msiexec
- e. Example of Zabbix agent installation with additional options
- Step 9: Understanding Active vs Passive Zabbix Agent mode
Step 1: Download Zabbix Agent Installer for Windows (msi)
In this tutorial, I will use the latest Zabbix agent 5.0.2 LTS version, that version is compatible with Zabbix server 5.x or newer.
| Windows Zabbix Agent v1 LTS v6.0.x | Download: 64-bit or 32-bit |
| Windows Zabbix Agent v2 LTS v6.0.x (recommended) | Download: 64-bit or 32-bit |
I always recommend using the latest LTS version to take full advantage of new features and improved performance so make sure to download installer zabbix_agent2-6.0.7-windows-amd64-openssl.msi for 64-bit Windows or zabbix_agent2-6.0.7-windows-i386-openssl.msi for 32-bit Windows.
And don’t try to install a 32-bit package on 64-bit Windows because it won’t work!
Step 2: Install Zabbix Agent on Windows using MSI installer
I will install Zabbix Agent on Windows server using installation wizard but if you prefer command-line based installation check out section “Install Zabbix agent via Windows command-line (CMD)”
Just to make clear, in this tutorial I will use Zabbix server with IP address 192.168.5.43 to monitor Windows machine called w01services with IP address 192.168.5.22.
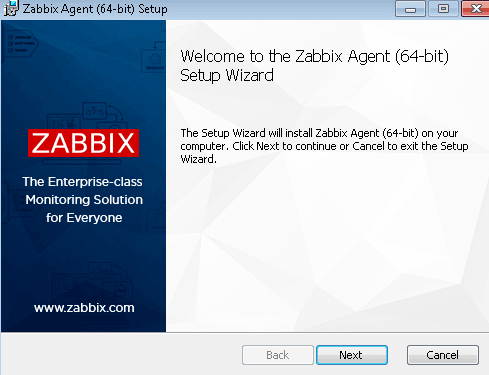
Double click on Zabbix MSI installer that you have downloaded in the previous step and click “Next” just as shown in the image below.
Accept the terms and click the “Next” button.

Define custom “Host name” or use fully qualified domain name (FQDN) of the Windows machine in the “Host name” field. Then enter IP address of the Zabbix server under “Zabbix server IP/DNS” and “Server or Proxy for active checks” field and you are done.
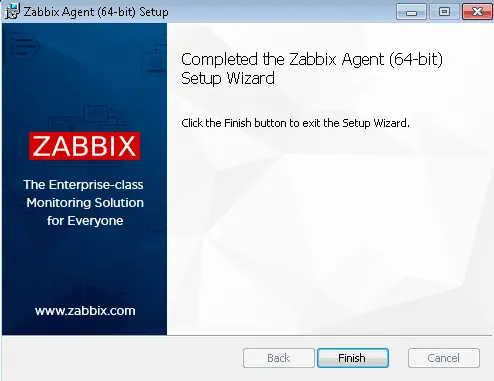
Select “Add agent location to the PATH” and go through the rest of the installation by clicking “Next“, “Install” and “Finish“.
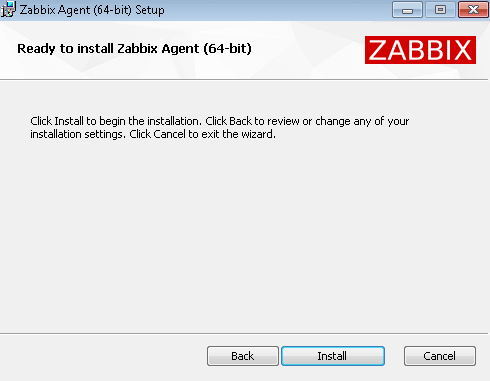
You don’t need to configure Windows firewall manually because the MSI installer will automatically add a firewall rule to permit Zabbix TCP port 10050.
Finally, we need to check that the Zabbix agent is up and running.
Hold down the “Windows key” and press “R” on the keyboard, type “services.msc“, press “OK” and check the “Status” column for “Zabbix Agent” service exactly as shown in the picture below. Status should be “Started” if the installation was successful.
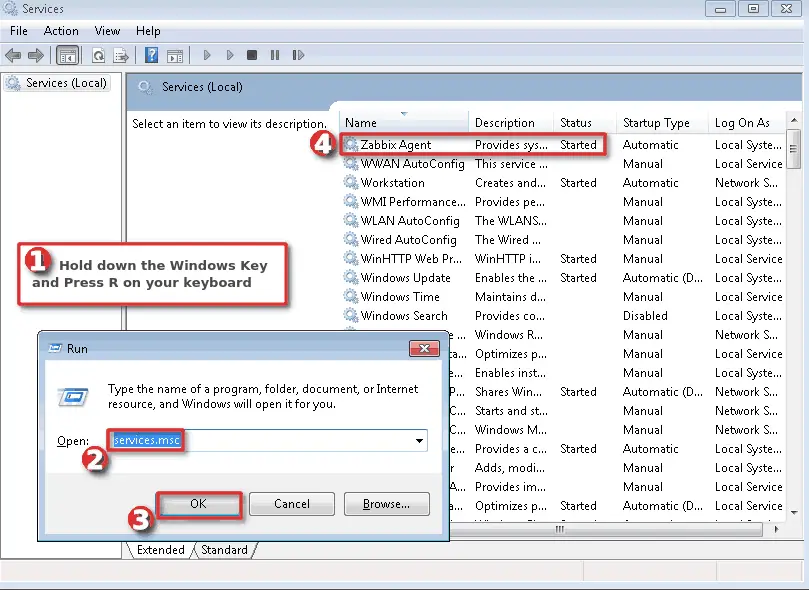
WELL DONE!
You have successfully installed and configured Zabbix agent on Windows OS!
Now it’s time to add that Windows host to Zabbix monitoring system.
Step 3: Add Windows host to Zabbix monitoring system
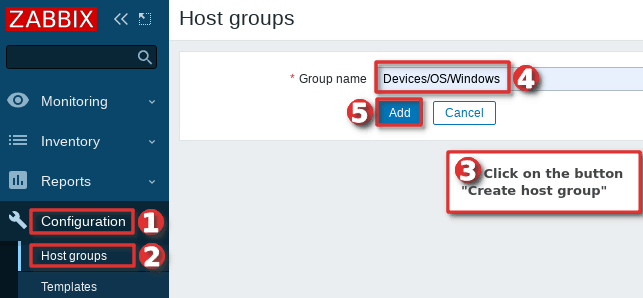
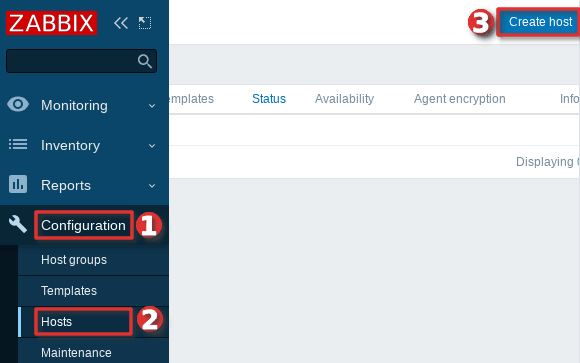
You can add a host to existing host group or you can create a new host group for your Windows servers. I will create host group “Devices/OS/Windows“ using “Host groups” option under “Configuration” section on the Zabbix frontend. Click “Create host group” button, define “Group name” and click “Add” (you only need to create host group once):
Navigate to “Host” menu under “Configuration” tab and then click “Create host” option to create a host in Zabbix:
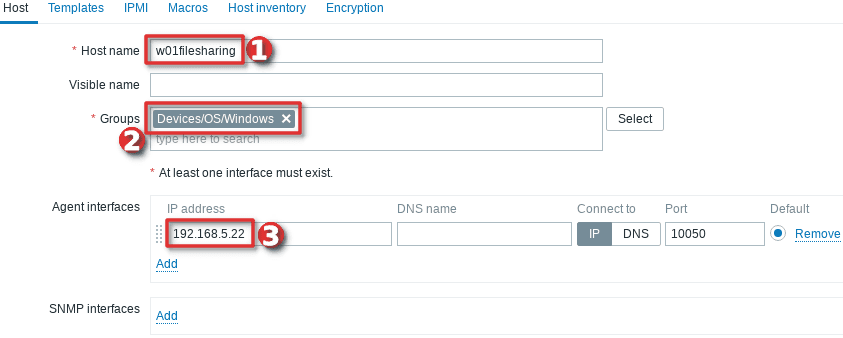
Define “Hostname” and set “Groups” using your newly created host group. Then set the IP address of the Windows server under “Agent interfaces” section
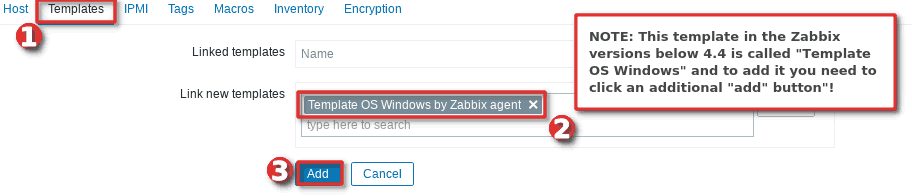
Switch to tab “Templates” and choose the “Template OS Windows by Zabbix agent” template under section “Link new template” by typing “OS Windows …”.
And you’re done! If you are interested in automating this whole process of adding Windows hosts to Zabbix see the section “Configure auto registration for Windows Zabbix agents“
Note that in this tutorial I m using a template “Template OS Windows by Zabbix agent” that can only monitor passive Zabbix agents. However, if you want to monitor your host using Zabbix agents in active mode use a template called “Template OS Windows by Zabbix agent active“. Check out the section “Understanding Active vs Passive Zabbix Agent mode” to learn more about the differences between the active and passive agent mode.
Step 4: Check if Zabbix Agent is working correctly
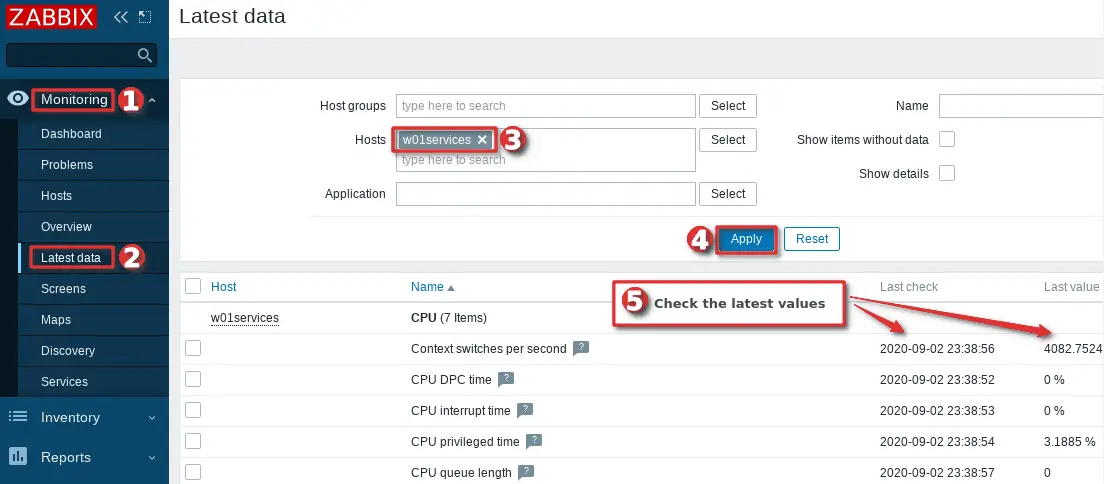
You can check that the Zabbix agent is working properly by using the “Latest Data” option on the Zabbix frontend. Wait up to 5 minutes after you have installed and started Zabbix agent to allow for data to be collected. Look at columns “Last check” and “Latest value” and if they are updating then the agent is working.
Your agent should be working and collecting data by now, but if you experience any problems, restart Zabbix agent service and check the log “C:\Program Files\zabbix\zabbix_agentd.log“. And if there is nothing unusual in the log file then check the firewall – make sure that TCP port 10050 on the host (where Zabbix agent is installed) and TCP port 10051 on the Zabbix server side are open.
CONGRATULATIONS!
You have successfully installed Zabbix Agent and your Windows server is being monitored!
No need to do anything else as other steps are optional!
CONTINUE TO LEARN MORE:
How to manage Zabbix agent service on Windows
Auto registration of Zabbix agents (Windows OS)
Learn how to Secure Zabbix Agent
Alternative Zabbix agent installation via Windows command-line (CLI)
Understanding Active vs Passive Zabbix Agent mod
Step 5: Restart Zabbix Agent service on Windows
In the previous steps, we learned how to check the status of Zabbix agent service using the “services.msc” option, and now we will learn how to use the command line interface (CMD) to stop or start the agent and check its status.
Click on “Windows Start” button and type “cmd” in the search bar, right-click on “cmd” icon and select option “Run as administrator” and use these commands to start/stop the agent:
net stop "Zabbix Agent"
net start "Zabbix Agent"
And to check Zabbix agent service status use the command:
sc query "Zabbix Agent" | findstr /i "STATE"
You should get status “RUNNING” if the Zabbix agent is up and running!
Step 6: Configure auto registration for Windows Zabbix Agents
Adding one or two hosts to Zabbix manually is not a big problem. However, what if you need to add more servers to Zabbix? Or you just want to automate that tedious process of adding Windows hosts to Zabbix and linking them with the correct template and host group?
Don’t worry, you don’t have to write the script because Zabbix has a tool called “Auto registration”.
Before we configure Zabbix frontend, make sure that all of your Zabbix agents have “HostMetadata=Windows” line in their configuration file (default path: “C:\Program Files\zabbix\zabbix_agentd.conf“). And if that line does not exist, add it and restart the Zabbix Agent afterward. You can automate that via CLI like this:
echo HostMetadata=Windows >> C:\"Program Files"\zabbix\zabbix_agentd.conf
net stop "Zabbix Agent"
net start "Zabbix Agent"
In the future always install the Zabbix agent on Windows with the “HostMetadata=Windows” parameter if you are planning to use the auto-registration feature!
Now that we’ve clarified that let’s configure auto-registration on the Zabbix frontend.
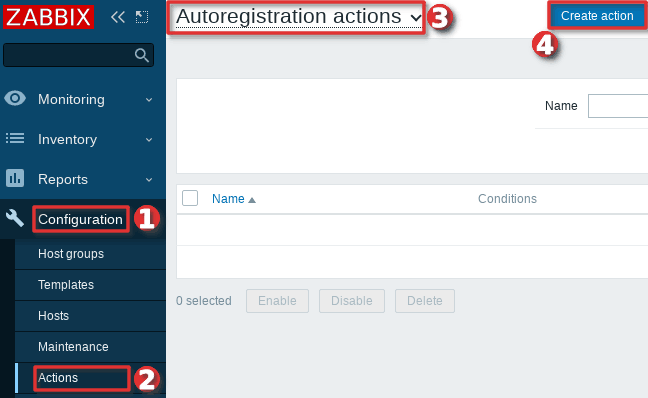
Go to the “Actions” tool under the “Configuration” section, then select “Auto registration” from the dropdown menu and click the “Create action” button.
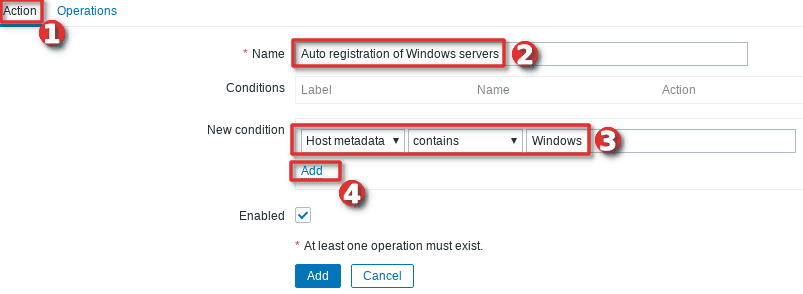
On the “Action” tab define the “Name” of the action and add a “New condition” that will check if the “Host metadata” contains the word “windows”.
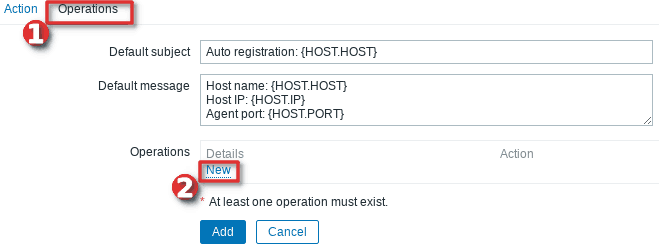
Then, change tab to “Operations” and add new operation.
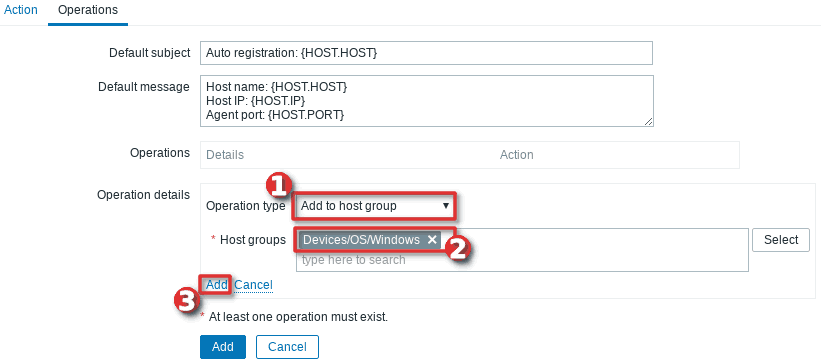
Define “Operation type” as “Add to host group” and then select to which “Host groups” will Windows hosts be added when discovered. In my case, I will use my custom host group called “Devices/OS/Windows“.
After that, you need to add a new operation by setting “Link to the template” as “Operation type” and then select which templates will be linked with the newly discovered Windows hosts. In my example, I will use template “Template OS Windows by Zabbix agent” (passive checks)
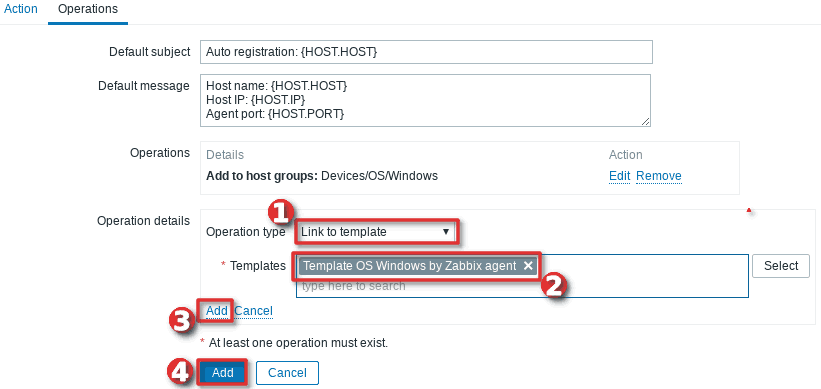
Well done! Auto-registration is configured. Wait a few minutes and your Windows server should appear in Zabbix. From now on, every time you install a Zabbix agent on a Windows server, it will automatically be added to the Zabbix and linked with the appropriate host group and template.
Note, that you can add anything you want to the “HostMetadata” parameter. For example, you can have a host that has in Zabbix agent configuration file defined “HostMetadata=Windows:Tomcat:Prod” or another with “HostMetadata=Windows:MSSQL:Test“. For the first host, you can configure auto-registration to add to host groups: “Windows”, “Web servers” and “Production servers” and to link templates that can monitor Windows and Tomcat server. And the second host can be added to host groups: “Windows”, “Databases”, and “Test servers” and linked with templates that can monitor Windows server and Microsoft SQL database.
Using PSK encryption on the Zabbix agents? Then there is one more step left, you need to add your PSK identity and PSK key using the “Auto Registration” option under the “Administration“→”General” section just as shown in the image below:

From now on, during the auto registration process, Zabbix will configure provided PSK identity and key on each registered host.
Step 7: Configure PSK encryption on Zabbix Agent (Windows)
Zabbix supports encrypted communications between Zabbix server and Zabbix agent using Transport Layer Security (TLS) protocol v.1.2. You can use certificate-based and pre-shared key-based encryption (PSK), but in this tutorial we will configure PSK encryption.
In this step, I will show you how to configure PSK encryption on an already installed Zabbix agent, but keep in mind that all of these configurations can be configured during the installation
a. Generate PSK key
Generate 256-bit (32 bytes) PSK key with openssl command on Zabbix server (or use some other tool on Windows):
$ openssl rand -hex 32
1b38eac9d870a319f201fb1da989c081faba993e3d91940193224a100cdcdb86
On Windows server, create a new text file “ZabbixAgentPSK.txt” in the default Zabbix agent installation folder (“C:\Program Files\zabbix“) and put that PSK key in the first line of the file. Don’t forget to save the file before closing.
b. Configure Zabbix agent to support PSK encryption
Open “C:\Program Files\zabbix\zabbix_agentd.conf” file with text editor (Notepad++) and add this configuration anywhere in file:
TLSConnect=psk
TLSAccept=psk
TLSPSKFile=C:\Program Files\zabbix\ZabbixAgentPSK.txt
TLSPSKIdentity=ZBX-AGENT-PSK-ID
Save and exit file. Keep in mind that “TLSPSKIdentity” can be anything, so for security reasons set something else – don’t use mine!
Don’t forget to restart Zabbix agent service after changing the configuration file!
c. Enable PSK encryption on the agent in Zabbix frontend
Communication between Zabbix agent and server is not yet encrypted because we have enabled PSK encryption on the agent side but not on the server side.
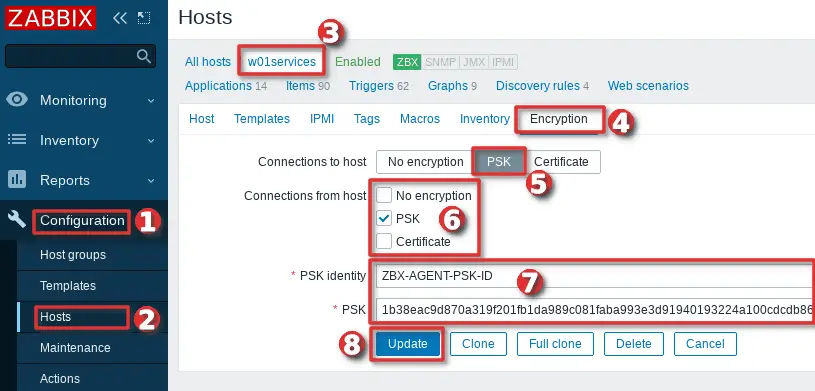
We need to enable encryption on the server side so go to web frontend and select your “Hosts” tab under the “Configuration” section and find and click on your Windows hosts.
On the “Encryption” tab set PSK under “Connections from hosts” option and copy/paste “PSK identity” and “PSK” (key) that is configured on the Zabbix agent.
When you are done with configuration click the “Update” button just as shown in the image below.
Keep in mind, that you can automate the configuration of the host encryption (PSK) on the frontend using the Zabbix auto registration process.
Step 8: Install Zabbix agent via Windows command-line (CMD)
This step is for those who prefer command-line based installation instead of wizard-based installation.
a. Run CMD as administrator
Click on “Windows Start” button and type “CMD” in the search bar, right-click on “cmd” and select option “Run as administrator“:
b. Download Zabbix agent
Download installer zabbix_agent2-6.0.7-windows-amd64-openssl.msi for 64-bit Windows or zabbix_agent2-6.0.7-windows-i386-openssl.msi for 32-bit Windowsand save it on a “C:\” disk or somewhere else.
c. Change directory and set installation folder
Change directory to the path where you have downloaded the MSI file and set the installation folder with commands:
cd C://
SET INSTALLFOLDER=C:\Program Files\zabbix
d. Install Zabbix agent using msiexec
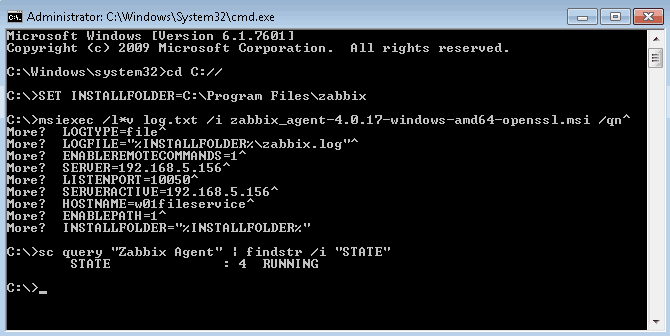
Here is an example of Zabbix agent installation that will work for most people, just change parameteres “SERVER“, “SERVERACTIVE” and “HOSTNAME” to suit your enviroment.
msiexec /l*v log.txt /i zabbix_agent2-6.0.7-windows-amd64-openssl.msi /qn^
LOGTYPE=file^
LOGFILE="%INSTALLFOLDER%\zabbix.log"^
SERVER=192.168.5.156^
LISTENPORT=10050^
SERVERACTIVE=192.168.5.156^
HOSTNAME=w01fileservice^
ENABLEPATH=1^
INSTALLFOLDER="%INSTALLFOLDER%"
Check “Zabbix agent” service status with the command:
sc query "Zabbix Agent" | findstr /i "STATE"
If the Zabbix agent is up and running then the status should be “RUNNING“.
Note, if you are planning to use the auto-registration feature don’t forget to add “HostMetadata=Windows” parameter to “zabbix_agentd.conf” and restart Zabbix agent afterward because Zabbix CLI installation doesn’t support “HostMetadata” parameter:
echo HostMetadata=Windows >> C:\"Program Files"\zabbix\zabbix_agentd.conf
net stop "Zabbix Agent"
net start "Zabbix Agent"
e. Example of Zabbix agent installation with additional options
You can set almost any Zabbix agent parameter during installation, here is one example of an installation where many parameters are used.
SET INSTALLFOLDER=C:\Program Files\zabbix

msiexec /l*v log.txt /i zabbix_agent2-6.0.7-windows-amd64-openssl.msi /qn^
LOGTYPE=file^
LOGFILE="%INSTALLFOLDER%\zabbix.log"^
SERVER=10.10.10.162^
LISTENPORT=10055^
SERVERACTIVE=10.10.10.162^
HOSTNAME=cmr_server^
TLSCONNECT=psk^
TLSACCEPT=psk^
TLSPSKIDENTITY=CompanyPSKID^
TLSPSKFILE="%INSTALLFOLDER%\company_key.psk"^
TLSCAFILE="c:\temp\file1.txt"^
TLSCRLFILE="c:\temp\fil2.txt"^
TLSSERVERCERTISSUER="Company CA"^
TLSSERVERCERTSUBJECT="Company Cert"^
TLSCERTFILE="c:\temp\file4.txt"^
TLSKEYFILE="c:\temp\file5.txt"^
ENABLEPATH=1^
INSTALLFOLDER="%INSTALLFOLDER%"
SKIP=fw
Parameter “SKIP=fw” means that the firewall exception rule will not be added. Explanations of other parameters can be found in the official Zabbix documentation section Zabbix Agent (Windows).
Step 9: Understanding Active vs Passive Zabbix Agent mode
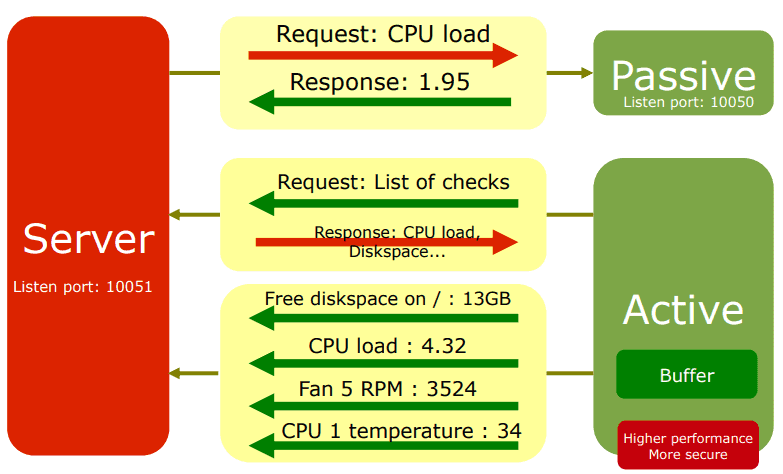
When using a Zabbix agent in active mode, it will connect to the Zabbix server via port 10051 to retrieve configuration and send data. This is a great feature that allows an active Zabbix agent to work behind the firewall and to offload the Zabbix server in large environments.
On the other hand, if you use a Zabbix agent in passive mode Zabbix server will initiate a connection via port 10050 and retrieve data from the agent. The Zabbix server will do this for every metric (item) every few minutes – which is very inefficient! Because of this, active mode is more recommended.
An additional advantage of the Zabbix agent in active mode is that it can read logs from the device and that is not possible if the Zabbix agent is used in passive mode.
You can detect on Zabbix host if the agent is working in active or passive mode. Passive mode will show red or green “ZBX” icon in the agent status bar and active mode will show grey “ZBX” icon:

Learn how to setup Zabbix email notifications and escalations in a few minutes!

1. Скачать архив с Zabbix агентом с официального сайта разработчика http://www.zabbix.com/download2.php
(Прямая ссылка на архив http://www.zabbix.com/downloads/1.8.3/zabbix_agents_1.8.3.win.zip )
2. Разархивировать файлы из папки архива bin/win64 в папку где будет работать zabbix agent (например в C:\zabbix)
3. В этой же папке (C:\zabbix) создать конфигурационный файл zabbix_agentd.conf со следующим содержимым:
Server=zabbix.vpsville.ru
ServerPort=10051
# Unique hostname. Required for active checks.
Hostname=vpsville
# Listen port. Default is 10050
ListenPort=10050
# Name of log file.
LogFile=c:\zabbix\zabbix_agentd.log
# Maximum size of log file in MB. Set to 0 to disable automatic log rotation.
LogFileSize=10
EnableRemoteCommands=1
4. Из командной строки дать команду на установку агента:
zabbix_agentd.exe —config c:\zabbix\zabbix_agentd.conf —install
5. После установки проверить появившуюся новую служб

6. Проверить что бы служба запускалась Автоматически.
7. Сделать заявку в службу поддержки для создания учетной записи на сервере мониторинга Zabbix для получения статистики по серверу. (У всех клиентов хостинга vpsville.ru zabbix agent установлен в системе по умолчанию).
P. S. Что бы все работало в брандмауэре Windows создать правило для входящих подключений разрешающее работу с портом 10050.
