
Are you getting “Your PC Device Needs to Be Repaired” while starting up into windows? Let’s learn how to fix error 0xc00000e on Windows 10.
Experiencing the error code 0xc00000e along with the message “Your PC/device needs to be repaired” can be extremely frustrating. This error typically occurs when the boot menu fails to automatically fetch your Windows installation because critical files like winload.exe in \windows\system32 are missing or corrupt.

In this guide, you will learn how to resolve this issue on both Windows 10 and Windows 11 by following a series of methods that involve boot repair commands, BIOS/UEFI adjustments, hardware checks, and even a clean installation if necessary.
What is Error Code 0xc000000e?
Error code 0xc000000e is a Windows boot failure that typically appears when essential system files like winload.exe are missing, corrupt, or inaccessible. This issue often results in a blue screen with messages such as:
“The selected entry could not be loaded because the application is missing or corrupt.”
“A required device isn’t connected or can’t be accessed.”
Error code 0xc000000e is a boot failure that indicates Windows cannot locate or load essential system files. This error is often associated with a corrupted Boot Configuration Data (BCD), misconfigured boot settings, or hardware issues such as loose connections.
Booting from Windows Installation Media
Begin the repair process by booting your computer using a Windows installation USB drive or DVD. When the Windows Setup screen appears, select your language preferences and click Next. Instead of choosing “Install now,” click Repair your computer. This will allow you to access the recovery environment.
Accessing the Command Prompt for Boot Repair
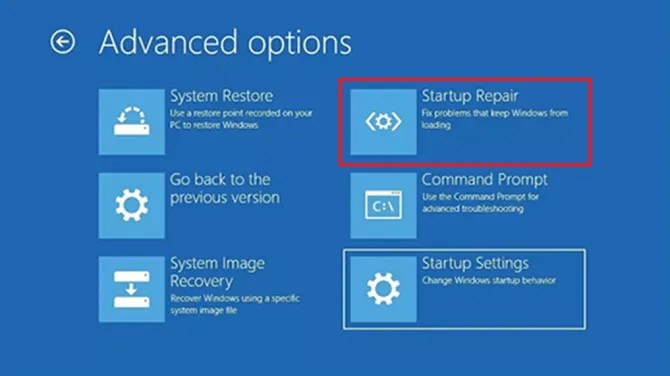
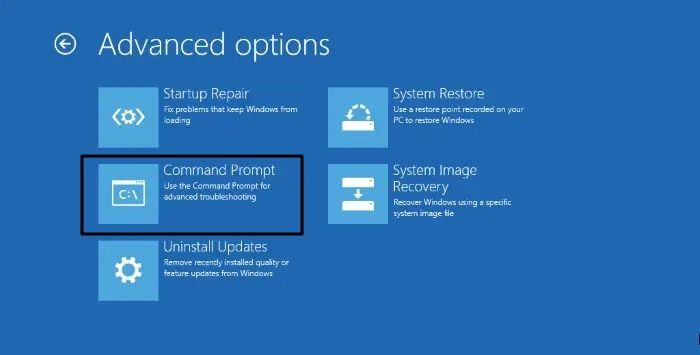
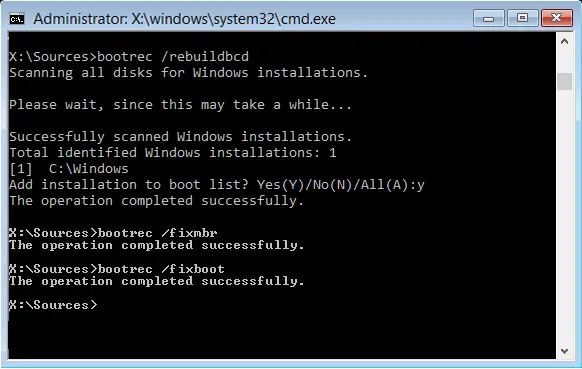
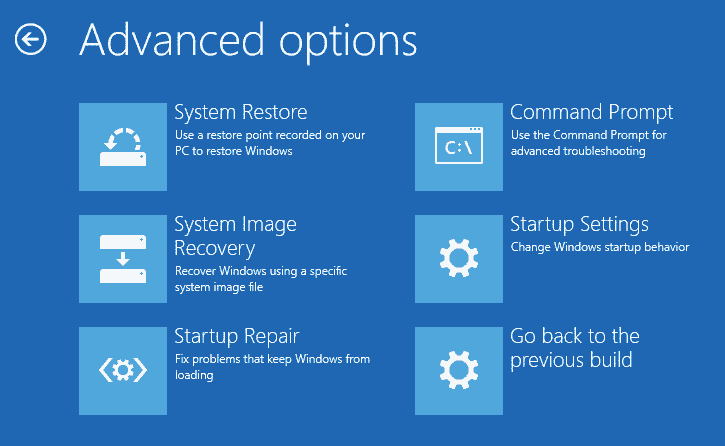
Within the recovery environment, navigate to Troubleshoot, then Advanced Options, and open Command Prompt. In the Command Prompt window, you will repair your boot records and rebuild the Boot Configuration Data (BCD) using specific commands.
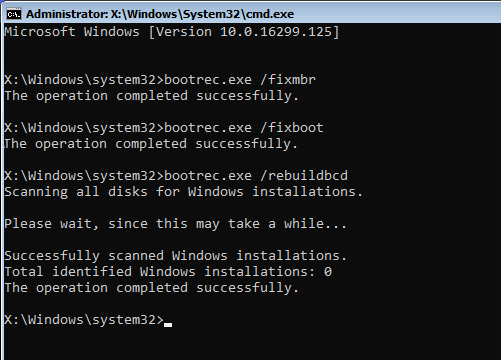
Enter the following commands one after the other to fix the Master Boot Record, repair the boot sector, scan for Windows installations, and rebuild the BCD:
bootrec /fixmbr
bootrec /fixboot
bootrec /scanos
bootrec /rebuildbcd
These commands aim to correct issues where the boot menu is not automatically fetching your Windows installation.
Adjusting BIOS/UEFI Settings for Boot Management
If the boot repair commands do not resolve the error, the next step is to modify your BIOS/UEFI settings.
- Restart your computer and access the BIOS by pressing a key such as F2, DEL, or ESC during startup.
- In the BIOS, locate the Secure Boot option in the Security section and disable it temporarily.
- Then, navigate to the Boot section and disable Fast Boot while enabling CSM (Compatibility Support Module) Support.
- After making these changes, return to the Security settings and re-enable Secure Boot, then save your settings and exit.
These firmware adjustments help ensure that the boot menu correctly fetches your Windows installation.
How to Fix Error Code 0xc000000e in Windows 11?
Entering the Windows Recovery Environment
For Windows 11, the process begins by forcing your system into the Windows Recovery Environment (WinRE).
Perform a hard shutdown twice during the boot process.
On the third boot, Windows should automatically load into the recovery environment.
If it does not, you will need to create a bootable USB drive using the Windows 11 Media Creation Tool on another computer.
Booting from USB and Accessing Recovery Options
Once the recovery environment is accessed, boot from the USB drive.
On the setup screen, choose your language preferences, click Next, and then select Repair your computer.
This will bring up the recovery options, where you can choose Startup Repair. This tool will attempt to detect and automatically fix boot-related issues.
Startup Repair: Automatically finds and resolves boot configuration issues.
Uninstall Updates: If this error started after a Windows update, roll back the latest feature update or cumulative quality update.
CHKDSK Repair: In Command Prompt, run:
bcdedit
Identify the Windows drive letter, then run:
chkdsk C: /f /r
(Replace C: with your correct Windows partition)
SFC and DISM:
sfc /scannow /offbootdir=C:\ /offwindir=C:\Windows
dism /image:C:\ /cleanup-image /revertpendingactions
This process will scan for and fix corrupt system files that could be causing boot errors or BSODs.
Reset or Clean Install Windows 11: If all else fails, use “Reset this PC” (to keep your files) or do a clean install from bootable media.
These steps are designed to restore the integrity of the boot process in Windows 11.
Why Your PC Device Needs to Be Repaired Occurs with Error Code 0xc00000e
Checking Hardware Connections
One common cause of error code 0xc00000e is loose or faulty internal cable connections. If you have recently moved your PC or reconnected internal components, ensure that all cables—especially those connecting your hard drive to the motherboard—are securely attached. A loose cable can cause your system to fail to detect the drive, resulting in boot errors.
Addressing Corrupted Bootloader and Disk Errors
This error can also occur due to a corrupted bootloader or disk errors. Power outages, interrupted updates, or malware infections can damage critical files such as winload.exe or the Boot Configuration Data (BCD). Running Startup Repair from the Windows installation media can help automatically scan for and repair these issues, allowing Windows to boot normally.
Additional Methods and Considerations: Fix Error Code 0xc000000e
Checking Hard Drive Health
If the error persists after performing the boot repair and BIOS adjustments, it may indicate a failing or corrupted hard drive. Use a bootable diagnostic tool such as SeaTools for Seagate drives or Western Digital Data Lifeguard Diagnostic for Western Digital drives to assess the health of your hard drive. A failing drive may require replacement to restore system functionality.
Performing a Clean Installation of Windows
As a last resort, if all repair methods have failed, a clean installation of Windows might be necessary. This process involves formatting your hard drive and installing a fresh copy of Windows. It is critical to back up all important data before proceeding with a clean installation, as this method will remove all installed applications and personal files from the system.
Forcing the Recovery Environment
In cases where Windows Recovery does not launch automatically, you can force it by performing two hard shutdowns during the boot process. On the third boot, the system should enter WinRE. If you receive a prompt requiring recovery tools or if your password is being rejected, you may need to create a recovery USB on another computer.
Final Thoughts: Error 0xc00000e Solution For Windows 10
Resolving error code 0xc00000e requires a systematic approach that addresses both software and hardware issues. Begin by booting from Windows installation media to run essential repair commands such as bootrec /fixmbr, bootrec /fixboot, bootrec /scanos, and bootrec /rebuildbcd. If needed, adjust your BIOS/UEFI settings by disabling Secure Boot and Fast Boot while enabling CSM Support. Also, verify that all internal cable connections are secure to rule out hardware problems.
For Windows 11 users, accessing the Windows Recovery Environment (WinRE) and utilizing tools like Startup Repair, CHKDSK, SFC, and DISM are key to restoring your system’s boot functionality. Should these methods not work, consider a clean installation of Windows after backing up your data.
By following these steps carefully, you can overcome the boot error and restore your system to a stable state. If you need further assistance or have additional questions, feel free to leave a comment below. Happy troubleshooting!
Official Microsoft Tools & Repair Guides
Windows Recovery Options (Microsoft): Learn how to use built-in tools like Startup Repair, System Restore, Reset this PC, and more to fix unbootable systems.
Download Windows 10 Installation Media: Create a bootable USB drive to reinstall or repair your Windows installation using Microsoft’s official Media Creation Tool.
Use System File Checker (SFC): Step-by-step instructions to run sfc /scannow and fix corrupted or missing system files causing boot errors.
Repair Windows Image with DISM: Recover your system using the DISM tool, especially useful when SFC fails or shows integrity violations.
Clean Boot & Startup Conflict Troubleshooting
How to Perform a Clean Boot in Windows 11/10/8/7: Avoid startup conflicts by learning how to perform a clean boot. This method helps isolate third-party services or drivers causing startup failures and blue screens.
Visit Our Post Page: Blog Page
Your pc needs to be repaired is a blue screen of death as a recovery error on Windows. The message is shown when you try to boot or restart your computer. In our today’s article, we’ll explain the causes and what you can do to fix the error. When you encounter such an error, you will see the following message on your screen:

Your PC needs to be repaired
Why does the “recovery your pc needs to be repaired windows 10” error occur?
There are different types of BSOD errors that you can see depending upon your system. All the error messages mentioned above applies the same methods to fix explained in our article:
0xc000000f – An error occurred while attempting to read the boot configuration data
0xc000000d – The Boot configuration data file is missing some required information
0xc000014C – The Boot configuration data for your PC is missing or contains errors
0xc0000605 – A component of the operating system has expired
0xc0000225 – Boot selection failed because a required device is inaccessible
0x0000098, 0xc0000034 – Boot Configuration Data file missing required information or does not contain a valid OS entry.
How to fix windows 10 your pc needs to be repaired error?
Fix 1 – Check new hardware and remove any peripherals
If the error occurs after a recent hardware installation, it’s most likely that the error is caused by that specific hardware piece. In order to fix the error, simply remove the new hardware and restart your computer.
Fix 2 – Create a Recovery Disk
By creating a recovery disk will revert your computer to its default settings, which could fix your pc needs to be repaired windows 10 blue screen error message. Keep in mind that in the case of a Windows 10 operating system, you can create a recovery disk from another Windows 10 operating system. Please follow the steps below in order to create a recovery disk on a working Windows 10 operating system:
- Plugin a USB drive into a computer that you have access.
- Go to Start
- Type ‘Create a recovery disk‘
- Open the first tab that appears.
- After creating the Recovery Drive, restart your faulty PC with the USB plugged in
- Follow the pop-up window that appears, and the error should be fixed.
Fix 3 – Run Startup Repair method to fix your pc needs to be repaired error
If the method mentioned above fails to fix your pc needs to be repaired windows 10 blue screen error, try the third fix. This method will give the opportunity to your computer to boot into Windows without any errors. You need to create a Windows bootable USB or DVD drive before proceeding and try the startup repair. Follow the steps below:
- Access the official Microsoft website to create a bootable device for Windows 10.
- Insert the bootable USB or DVD and then boot Windows from there.
- You’ll see a Windows Setup window where you can select the language to install, the time and currency format, and the keyboard or input method.
- Next, click on Repair Your Computer.
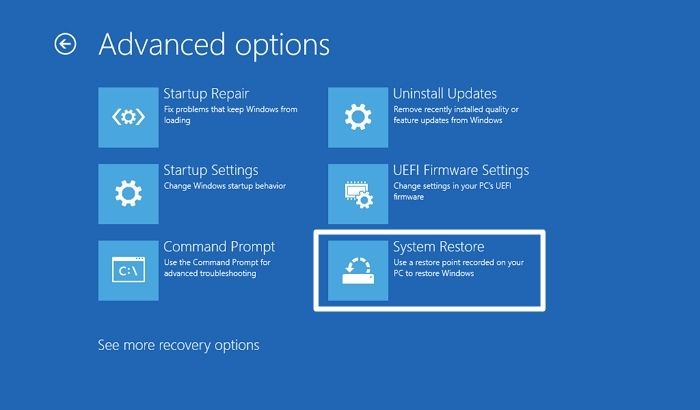
- Select Troubleshoot.
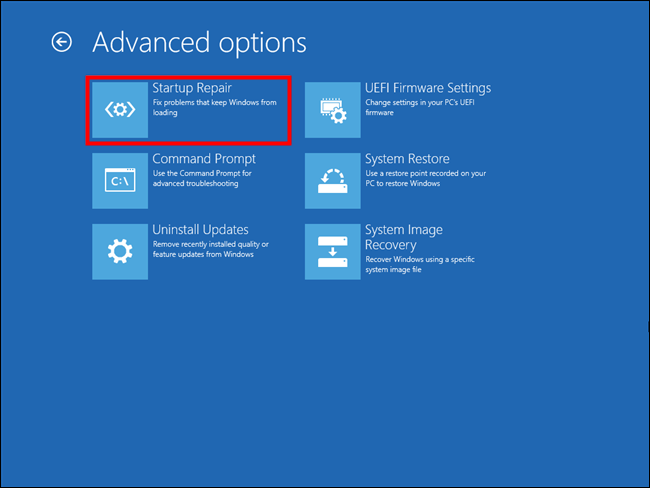
- Click on the Advanced Options.
- Select Automatic Repair.
- Select the Operating System.
- When you’ve completed these steps, restart your PC by following the prompt window that appears.
Recovery your pc needs to be repaired windows 10
Fix 4 – Set Active Partition with Diskpart Command Line
Follow the steps below using the Diskpart Command-Line to set the correct partition active:
- Press Windows+R to open the RUN box and then type “diskpart“.
- Type “list disk” into that window.
- Diskpart will display all the disks you have installed.
- Type “select disk [disk number]“. You need to substitute [disk number] with the numeric identifier of the disk you want to select.
- Type “list partition”.
- Type “select partition [partition number]“. You need to substitute [partition number] with the numeric identifier of the partition you want to select.
- Type “active“.
- Restart to apply changes and check if the fix worked.
Fix 5 – Run the SFC Tool
If running the Blue Screen Troubleshooter cannot solve the issue, then you can run the SFC tool to scan your system and repair detected issues.
Step 1: Open System File Checker
- Type Command Prompt in the search bar of Windows 10.
- Select the best-matched one and choose Run as administrator.
Step 2: Type the command
- In the pop-up window, type the command sfc /scannow and hit Enter to continue.
- Please do not close the window until you see the message Verification 100% complete
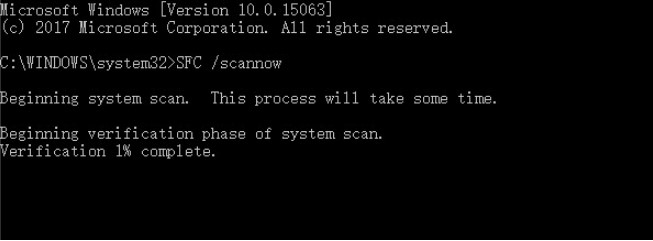
SFC scan now command
Step 3: Reboot your computer to check if the error persists.
Fix 6 – Run the DISM Tool
In case when the error is still present you can try to run the DISM tool
The DISM tool (Deployment Image Servicing and Management) also perform an in-depth search on your PC, errors that couldn’t be detected by the SFC scan can be detected with DISM.
- Run Command Prompt by following the steps above for the SFC scan.
- You now type this command when Command Prompt open: exe /online /cleanup-image /restorehealth
- Hit enter to run the command, it will now scan for problems on your PC and fix them automatically.
- Restart your pc and after the scan is finished, then check to see if the error is gone.
Fix 7 – Check for Faulty Hardware
The BSOD errors are often caused by faulty hardware (such as RAM and motherboard), therefore, it is highly recommended to check if your hardware works normally. If your hardware doesn’t work well, then you can try to replace it to get rid of your pc needs to be repaired error.
Fix 8 – Use Command Prompt to fix the Master Boot Record
Follow the steps below to fix the Master Boot Record:
- Insert the bootable drive and then start your PC.
- Proceed with Windows Setup until you see the option to Repair Your Computer. Click it.
- Select Troubleshoot.
- Select the Command prompt and enter the following commands in the following order:
-
bootrec /fixmbr
-
bootrec /fixboot
-
bootrec /scanos
-
bootrec /rebuildbcd
-
- After entering the commands, hit the Enter button and wait for the commands to function. This process may take some time.
- Restart your PC
Fix 9 – Disable Driver Signature Enforcement
This fix can be done by changing the startup settings temporarily. Also, we have described below the easy way to perform your pc needs to be repaired fix using the command prompt. Follow the steps below:
- Use a bootable disk to start Windows Setup.
- Follow the on-screen instructions until you can select the Repair Your Computer option.
- Click it.
- Click on Troubleshoot
- Open the Command Prompt.
- Type in the following command and hit Enter:
bcdedit.exe /set nointegritychecks on
Conclusions about windows 10 your pc needs to be repaired error
Dear followers of Get IT Solutions, in our step-by-step tutorial, we have provided all the possible solutions for you on how to fix your pc needs to be repaired error message. We hope you will find this method helpful. Have you managed to solve it? Please let us know in the comments below.
Updated on Apr 28, 2025
Have you ever encountered the «your PC/Device needs to be repaired» error, which appears with the error codes varying from 0xc00000f to 0x0000225? Below is a real case from the Microsoft Community:
After updating my computer with a new version of Windows 10, I have this message when turning it on: «Recovery: Your PC/Device needs to be repaired. The Boot Configuration Data file doesn’t contain valid information for an operating system. File: \BCD 0xc0000098
Take it easy. In this guide, EaseUS will delve into six reliable solutions to fix the «your PC/Device needs to be repaired» error and get your PC or device up and running smoothly again.
How to Fix Your PC/Device Needs to Be Repaired — 6 Ways
- Way 1. Run Boot Repair and Rebuild BCD
- Way 2. Perform Windows Startup Repair
- Way 3. Check the System File
- Way 4. Rebuild BCD
- Way 5. Restore the System
- Way 6. Reinstall the Windows System
You will discover six efficient ways that can help you fix your PC/Device that needs to be repaired problem. Continue to follow and learn the comprehensive steps.
Way 1. Run Boot Repair
When your computer shows a blue screen of death and delivers the message «your PC/Device needs to be repaired,» it’s most likely that your configuration files needed for startup are corrupted. In this case, EaseUS WinRescuer can meet your requirements in repairing startup issues perfectly.
Its user-friendly interface and comprehensive unbootable issue solutions make it an invaluable asset in your troubleshooting toolkit. By embracing these solutions, you can bid farewell to the frustration of most startup repair failures.
Follow the steps:
Step 1. Connect the USB drive/external drive to a working computer, open EaseUS WinRescuer, and click «Create Bootable Media.»
Step 2. Select EaseUS Boot Toolkits and other components you need. Then, click «Next.»

Step 3. Select your movable device and click «Go» to create an image on your USB drive/external drive. You can also burn the Windows ISO file to the storage media.
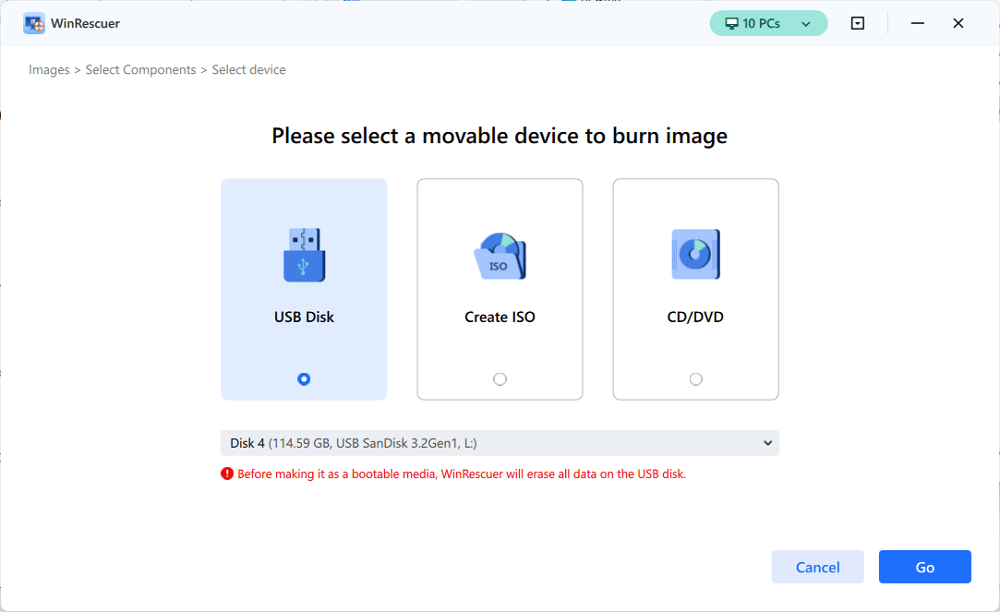
Step 4. Confirm the warning message and then wait for the creation process to complete.
Step 5. Connect the created bootable drive to the faulty computer and reboot it by pressing and holding «F2″/»Del» to enter the BIOS. Then, set the WinPE bootable drive as the boot disk and press «F10» to exit.

Step 6. Then, the computer will enter WinPE desktop. Open BootRepair, select the system you want to repair, and click «Repair.»
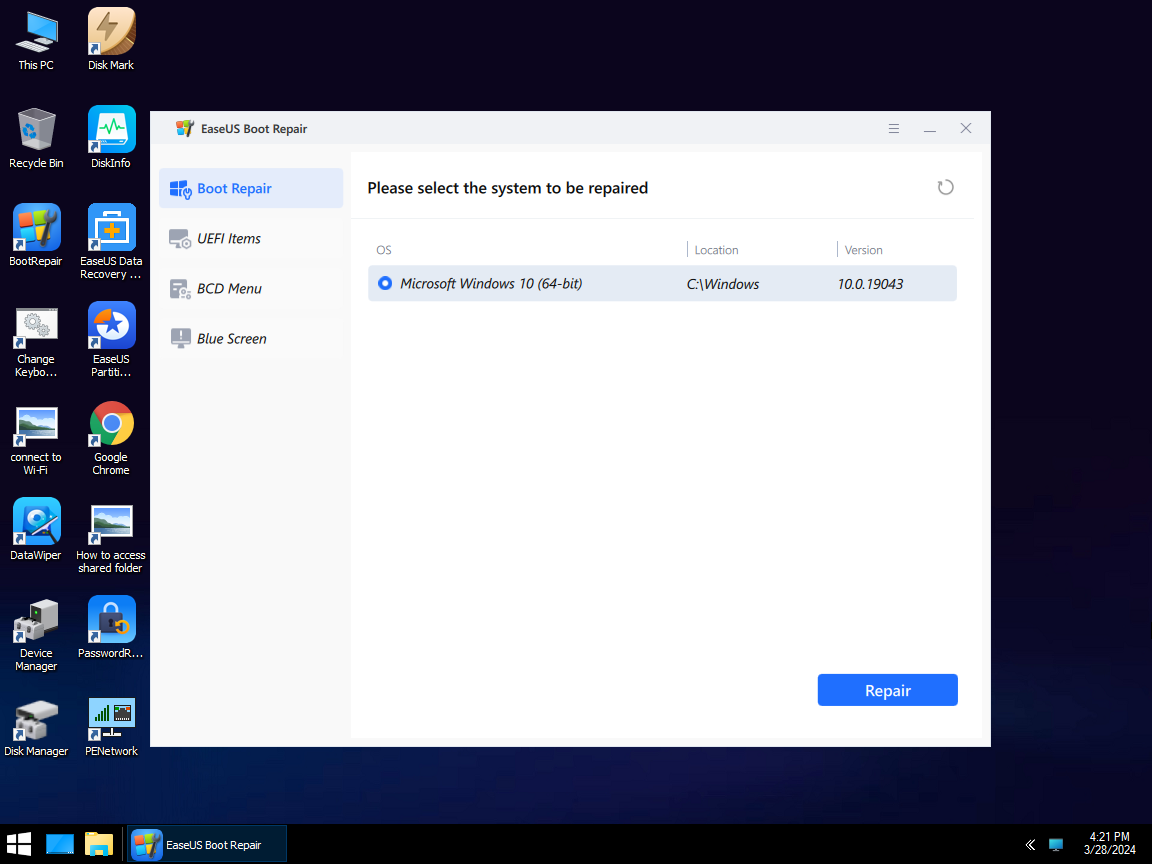
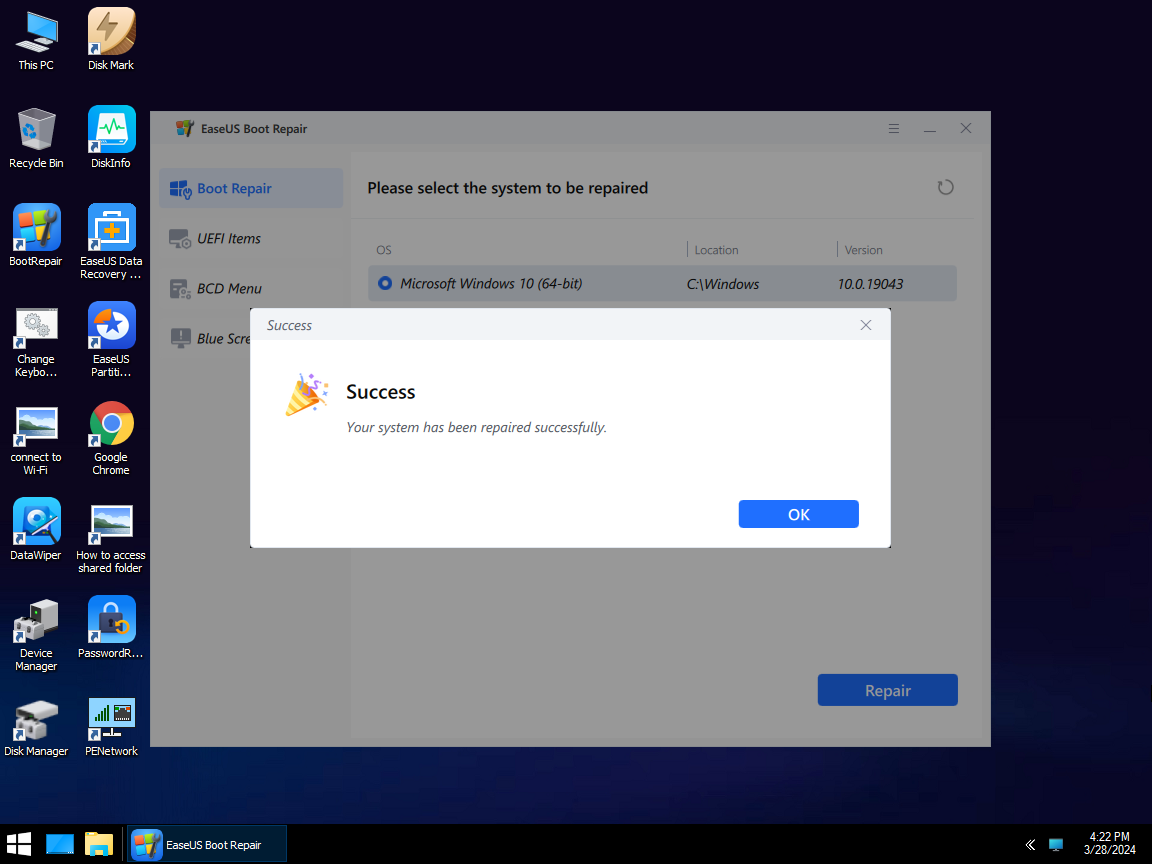
Step 7. Wait a moment, and you will receive an alert that the system has been successfully repaired. Click «OK» to complete the boot repair process.
Other Key Features of EaseUS Partition Master
Below are some similar unbootable problems that EaseUS Partition Master can be applied to:
- Fix Selected File Is Not a Proper BIOS
- Solve Windows Update KB5034441 error: Windows recovery environment servicing failed.
- Resolve RunDLL error on startup
- Repair Windows 11 startup repair is not working
Way 2. Perform Windows Startup Repair
Windows offers a built-in Startup Repair utility to help users get rid of various unbootable issues, including the «Your PC/Device Needs to Be Repaired 0xc0000225/0xc00000f» error. This tool can automatically detect and repair startup failures. Check the full guide here:
Note: Before starting, you need to create a Windows installation media.
Step 1. Connect the installation media to the blue screen PC and reboot it.
Step 2. Press the appropriate key according to different computers to trigger the computer to boot from the installation media.
Step 3. Select language, time, and keyboard/input. Click «Next» to move on.
Step 4. Click «Repair your computer» and select the target Windows OS.
Step 5. Select «Troubleshoot» > «Automatic Repair» / «Startup Repair.»
Way 3. Check the System File
Running a file/disk check is the most straightforward way to find out what the problem is. To address this task, you can turn to the sfc /scannow and CHKDSK commands. With them, you can scan the system disk and file and then fix the issues.
Step 1. Launch the Command Prompt utility and run it as an administrator.
Step 2. Type the SFC and chkdsk commands below and hit the «Enter» key for each:
SFC /scannow
chkdsk c: /f /r (Where C: is your system disk)
Step 3. Wait till the scan finishes and follow the on-screen instructions to repair the errors.
This method can also used to resolve the «Your PC Did Not Start Correctly in Automatic Repair» issue:
Way 4. Rebuild BCD using CMD
If you don’t want to use EaseUS Partition Master and are skilled in the Commands, you can apply Command Prompt to rebuild Boot Configuration Data. Here is what you should do:
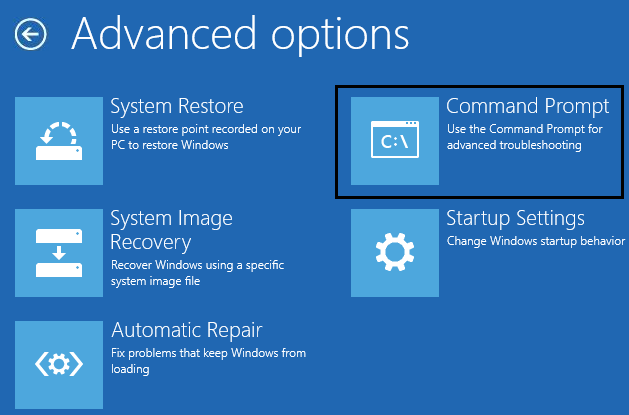
Step 1. Refer to the step 1,2,3 of the Way 2, select «Advanced options» > «Command Prompt.»
Step 2. Use the commands here and press «Enter» on the keyboard for each:
- Bcdedit /export C:\BCD_Backup
- ren c:\boot\bcd bcd.old
- Bootrec /rebuildbcd
Step 3. Type exit after the process is done, and then restart your PC.
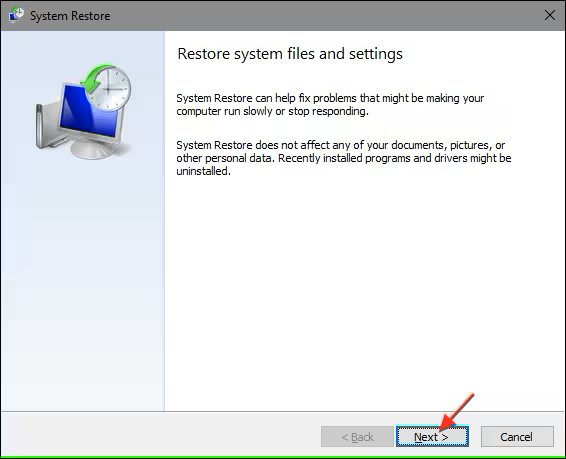
Way 5. Perform the System Restore
If you come up with this error after updating the Windows Operating System, you can restore the Windows to the previous version. Below is the comprehensive tutorial:
Note: Follow Steps 1, 2, and 3 of Way 2 to access the «Advanced options» window.
Step 1. Click the «System Restore» option in the «Advanced Options.»
Step 2. From the restore point tab, select a time point you want to return to and choose «Next.»
Step 3. Refer to the on-screen instructions and complete this process in the System Restore Wizard.
Way 6. Reinstall the Windows System
Prepare a CD/DVD/USB and navigate to Microsoft to download Windows and create a Windows installation media. Then, you can check the steps to reinstall a new Windows system:
Step 1. Insert the Windows installation CD/DVD/USB and boot from it.
Step 2. Pick your language preferences, and press the «Next» button to continue.
Step 3. Select «Install now.»
What Causes Your PC/Device Needs to Be Repaired Error?
Now, you have got rid of this problem. Let’s think about why the «Your PC/Device Needs to Be Repaired» Error happens. We have collected the potential reasons as follows:
- Invalid or damaged bootable partition
- Boot configuration data is missing or corrupted
- The system cannot find any bootable devices
- Boot files are damaged
Conclusion
In this post, we walked you through six powerful solutions to fix Your PC/Device Needs to Be Repaired problem. Additionally, you will also discover the possible causes of this annoying error. As you can see, most solutions are complicated for computer beginners. EaseUS Partition Master will get you covered with its user-friendly startup failure features.
If you have more questions about Your PC/Device Needs to Be Repaired, follow this FAQ part and find answers here:
1. How do you repair your PC did not start correctly?
There are multiple solutions you can apply to resolve the «your PC did not start correctly» issue, including performing the Boot Repair feature of EaseUS Partition Master, restarting the computer and booting into the safe mode, running the system restore, rebuilding the BCD, and using the Windows Startup Repair Tool.
🔍More Information: How to Fix Your PC Did Not Start Correctly | 8 Ways
2. How do I run Startup Repair on my PC?
Follow the step-by-step guide to run Startup Repair on your PC:
- Press the «Windows + I» keys to open the Settings.
- Go to «Update & Security» > «Recovery» window.
- In the «Advanced Startup» tab, select «Restart Now.»
- After rebooting, navigate to «Troubleshoot» > «Advanced Options» > «Startup Repair.»
If the Startup Repair tool does not work, you can refer to the guide below:
🚩Read More: Fix Windows 11 Startup Repair Not Working
3. How do I fix the blue screen of death error (BSOD)?
Many reasons could lead to the blue screen of death error. Thus, you will need an all-in-one tool that can seamlessly resolve this problem. EaseUS Partition Master is your first choice. Here is the how-to tutorial:
Step 1. Launch EaseUS Partition Master on another healthy PC and insert an empty USB
Step 2. Go to «Bootable Media» > «Create bootable media,» select the target USB, and click «Create.»
Step 3. Connect the bootable USB to the PC with the blue screen error and reboot from the USB. Enter the WinPE interface and run EaseUS Partition Master.
Step 4. In the «Toolkit» tab, choose «Boot Repair,» select the system you wish to repair and click «Repair» > «OK.»
Related Articles
-
Fixed: Green Screen of Death on Windows 10/11 — 6 Tips 💡
Sherly/2025/04/28
-
Steam Is Not Recognizing SSD, Here Is What I Can Do
Tracy King/2025/04/28
-
Guide on Seagate External Hard Drive Transfer Speed
Tracy King/2025/04/28
-
Clone Larger HDD to Smaller SSD (Windows 11 Support)
Tracy King/2025/04/28
Fix Your PC needs to be repaired error: If you are seeing this error then this means your Boot Configuration Data (BCD) is missing or corrupted hence Windows can’t find the boot device. Users have reported receiving this error when upgrading to a higher version of Windows. Generally, this error can also occur because of some other reasons such as System files may be damaged or File system integrity may have been compromised. The solution to this problem is to repair your BCD using the below-listed troubleshooting steps which will definitely fix this error.

Different type of errors you can receive depending upon your system:
0xc000000f – An error occurred while attempting to read the boot configuration data
0xc000000d – The Boot configuration data file is missing some required information
0xc000014C – The Boot configuration data for your PC is missing or contains errors
0xc0000605 – A component of the operating system has expired
0xc0000225 – Boot selection failed because a required device is inaccessible
0x0000098, 0xc0000034 – Boot Configuration Data file missing required information or does not contain a valid OS entry.
Table of Contents
Method 1: Remove peripherals and hardware
Remove all the unnecessary USB devices or peripherals from your PC and restart your computer. Make sure to remove any recently installed hardware from your computer then again restart your PC and check if the issue is resolved.
Method 2: Run Startup/Automatic Repair
1.Insert the Windows 10 bootable installation DVD and restart your PC.
2.When prompted to Press any key to boot from CD or DVD, press any key to continue.

3.Select your language preferences, and click Next. Click Repair your computer in the bottom-left.

4.On choose an option screen, click Troubleshoot.

5.On Troubleshoot screen, click Advanced option.

6.On the Advanced options screen, click Automatic Repair or Startup Repair.

7.Wait til the Windows Automatic/Startup Repairs complete.
8.Restart and you have successfully Fix Your PC needs to be repaired error, if not, continue.
Also, read How to fix Automatic Repair couldn’t repair your PC.
Method 3: Repair your Boot sector or Rebuild BCD
1.Using above method open command prompt using Windows installation disk.
2.Now type the following commands one by one and hit enter after each one:
a) bootrec.exe /FixMbr
b) bootrec.exe /FixBoot
c) bootrec.exe /RebuildBcd

3.If the above command fails then enter the following commands in cmd:
bcdedit /export C:\BCD_Backup
c:
cd boot
attrib bcd -s -h -r
ren c:\boot\bcd bcd.old
bootrec /RebuildBcd

4.Finally, exit the cmd and restart your Windows.
5.This method seems to Fix Your PC needs to be repaired error but if it doesn’t work for you then continue.
Method 4: Run System File Checker (SFC) and Check Disk (CHKDSK)
1.Again go to command prompt using the method 1, just click on command prompt in the Advanced options screen.
2.Type the following command in cmd and hit enter after each one:
sfc /scannow /offbootdir=c:\ /offwindir=c:\windows
chkdsk c: /r
Note: Make sure you use the drive letter where Windows is currently installed

3.Exit the command prompt and restart your PC.
Method 5: Disable Driver Signature Enforcement permanently
1. Open an elevated command prompt.
2. At command prompt windows, type the following commands in order.
bcdedit -set loadoptions DISABLE_INTEGRITY_CHECKS
bcdedit -set TESTSIGNING ON
3. Reboot your computer and see if you’re able to Fix Your PC needs to be repaired error.
Note: If you want to enable signature enforcement in the future, then open Command Prompt (with administrative rights) and type these commands in order:
bcdedit -set loadoptions ENABLE_INTEGRITY_CHECKS
bcdedit /set testsigning off
Method 6: Set correct partition as active
1.Again go to Command Prompt and type: diskpart

2.Now type these commands in Diskpart: (don’t type DISKPART)
DISKPART> select disk 1
DISKPART> select partition 1
DISKPART> active
DISKPART> exit

Note: Always mark the System Reserved Partition (generally 100mb) active and if you don’t have a System Reserved Partition then mark C: Drive as the active partition.
3.Restart to apply changes and see if the method worked.
Method 7: Restore your computer to an earlier working state
1.Insert the Windows 10 bootable installation DVD and restart your PC.
2.When prompted to Press any key to boot from CD or DVD, press any key to continue.
3.Select your language preferences, and click Next. Click Repair your computer in the bottom-left.
4.On choose an option screen, click Troubleshoot.
5.On Troubleshoot screen, click Advanced option.
6.On the Advanced options screen, click System Restore.

5. Follow the onscreen instructions and restore your computer to an earlier point.
That’s it, you have successfully Fix Your PC needs to be repaired error but if you still have any queries regarding this guide then feel free to ask them in the comment’s section.
«I wanted to update my laptop with a new SSD. I just unplugged the hard drive and install the SSD. I failed to install Windows 10 on the new SSD, so I put the old hard drive back. When I tried to turn on the computer, it couldn’t boot from the HDD, ending up with a blue screen saying recovery your PC needs to be repaired. Why does re-plugging hard disk cause the problem? How do I fix it?»
What does it mean when your PC says it needs to be repaired?
The error discussed in this post is one of the typical BSOD problems, which appears when computer is trying to boot Windows OS, letting you know that system is no longer bootable. In most cases, the error cannot be fixed on its own, and the same screen will show up even if you restart computer.

«Recovery
Your PC/Device needs to be repaired.
The boot configuration data for your PC is missing or contains errors.
File: \boot\bcd
Error code: 0xc000000f
You’ll need to use the recovery tool on your installation media. If you don’t have any installation media (like a disc or USB device), contact your system administrator or PC manufacturer.»
In addition to information above, you may receive other variants of the recovery your PC device needs to be repaired, for example:
A required device isn’t connected or can’t be accessed. Error code: 0xc000000f
An unexpected error has occurred. Error code: 0xc0000225
The application or operating system couldn’t be loaded because a required file is missing or contains errors. File: \Windows\system32\winload.efi Error code: 0xc0000001
A component of the operating system has expired. File: \windows\system32\winload.efi Error code: 0xc0000605
There isn’t enough memory available to create a ramdisk device. Error code: 0xc0000017
The boot configuration data file is missing some required information. File:\BCD Error code: 0xc000000d
The boot configuration data file doesn’t contain valid information for an operating system. File: \Boot\BCD Error code: 0xc0000098
More error codes you may encounter: 0xc0000225, 0x0000098, 0xc0000605, 0xc000014C, 0xc00000f, 0xc0000034, etc.
Why does my PC say Startup Repair couldn’t repair your PC?
The exact error code coming with Recovery your PC device needs to be repaired may differ from one to another, but the trouble remains the same, i.e., a blue screen of death (Windows cannot boot at all). Possible reasons behind the error:
- BCD is lost or corrupted: BCD (Boot Configuration Data) files describe boot applications and boot application settings. If BCD is corrupted, lost or incorrectly configurated, there will be startup issues.
- System files are corrupted or damaged: If critical system files are damaged or integrated, computer won’t boot properly. System files may get corrupted when computer often gets shut down improperly or there are sudden power failures.
- Faulty hardware or peripherals: Incompatible or damaged hardware like memory, CPU or peripherals can also lead to booting issues.
- Incorrect partition is set active: The partition that contains boot files should be set as active so that computer can find and load it. Otherwise, Windows cannot be booted normally.
- Bad sectors: The hard drive where Windows OS is installed has bad sectors, the booting process will be affected.
Don’t be panic when you see the error and don’t hurry to reinstall Windows at once, as you can do some stuff to fix it. Solutions presented in this article are really easy to follow. If you care more about data, then skip to the last section to perform data recovery from crashed internal hard drive.
How do I fix Windows Blue Screen recovery your PC needs to be repaired Windows 11/10/8/7? [9 Fixes]
Disclaimer: Fixes discussed in this section aim to get rid of «Recovery your PC device needs to be repaired» error instead of data recovery, which means these solutions cannot rescue lost files and some may cause further damage to files. Hence, if you want to keep all files on the hard drive, skip to next section to execute hard drive data recovery in the first place.
Create a boot device
A bootable media is needed in order to access the crashed computer, and the bootable media can be a USB flash drive or DVD. There are different tools of creating a bootable device, for example, Microsoft media creation tool or DiskGenius Free Edition. For detailed information and step-by-step guides on creating installation USB or DVD, please refer to the software download website.
This section provides you with steps of creating a bootable USB drive using free partition manager DiskGenius Free Edition. The process does not delete existing files on the USB drive, so it is safer.
Step 1. Free download, install and launch DiskGenius Free Edition on a computer which is running Windows 11/10/8/7. Connect a USB drive to the computer and make sure it can be detected by the software.
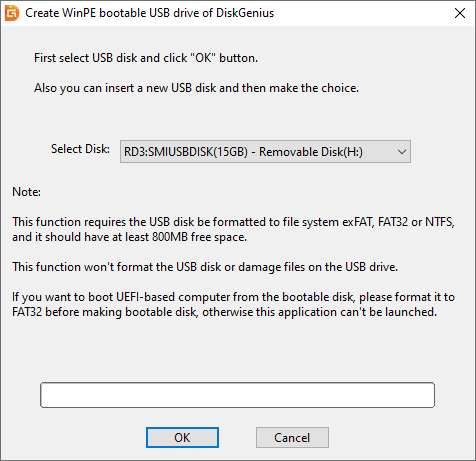
Step 2. Select the USB drive in DiskGenius and click «Tools» – «Create WinPE Bootable USB Drive of DiskGenius».
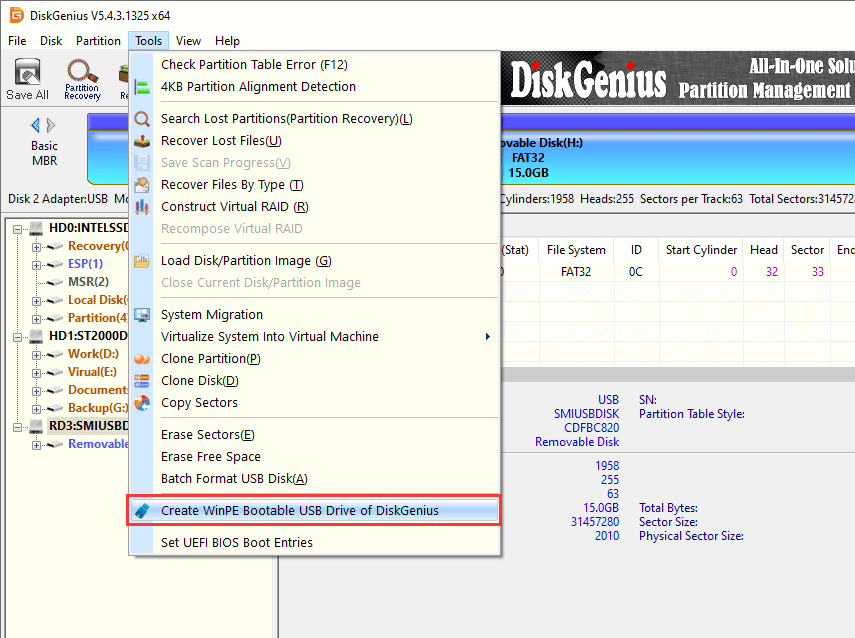
Step 3. Click «OK» button when you see the window below. Then wait for a couple of seconds, and the bootable disk will be created successfully.
Boot computer from the bootable media:
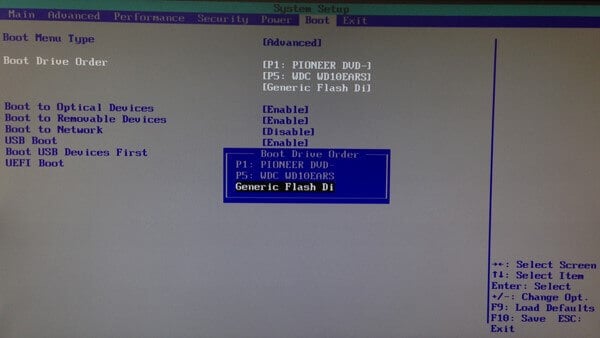
1. Connect the bootable media to the computer device that needs to be repaired and press the power button. Then press the key prompted on screen repeatedly to enter Boot Manager, and the key might be F12, F11, Del, ESC, etc.
2. Highlight the Boot Option menu and press arrow keys to select boot device. Make the bootable USB as the boot device. Save changes and exit. The computer will restart automatically and boot from the USB drive.
Method #1: Remove unnecessary peripherals and damaged hardware
Remove all unnecessary and damaged hardware devices from the computer and restart computer. If hardware installed on the computer is damaged, faulty or incompatible, there is likely to be booting issues. Thus, carefully check if the RAM card, CPU, external hard drive, internal hard drive, graphic card, motherboard, etc. If none of the hardware components are damaged, read on.
Method #2: Run startup repair
Step 1. Create bootable USB or DVD using Windows installation media. Then insert the USB drive or DVD to computer.
Step 2. Click Advanced options > Troubleshoot > Advanced options > Startup Repair.
If the Windows installation media is not available, try other fixes.
Method #3: Run SFC command to repair corrupted system files
Step 1. Boot computer using the bootable USB disk created by DiskGenius Free Edition.
Step 2 Click Start menu and choose «Windows Command Processor». This will open Command Prompt.
Step 3. Type sfc /scannow and press Enter key. Then let the command to scan system files and wait for the process to finish.

Method #4: Fix BCD via Command Prompt
Step 1. Boot the computer device that needs to be repaired with the bootable disk created by DiskGenius.
Step 2. Click Start menu and select «Windows Command Processor» to launch Command Prompt.
Step 3. Type following command one by one, and press Enter key after each command.
bootrec /fixMbr
bootrec /fixBoot
bootrec /scanos
bootrec /rebuildBcd
Method #5: Disable driver signature enforcement
Step 1. Launch Command Prompt.
Step 2. Type following commands one after another and press Enter key after each command:
bcdedit -set loadoptions ENABLE_INTEGRITY_CHECKS
bcdedit /set testsigning off
Step 3. Restart computer and check if the «Recovery your PC device needs to be repaired» error still appears.
Method #6: Mark boot disk as online
Step 1. Boot the computer device that needs to be repaired with the bootable disk created by DiskGenius. The DiskGenius Free Edition will be launched automatically.
Step 2. Highlight and right-click the hard drive where Windows OS is installed and choose «Change Device State» – «Online».

Method #7: Set correct partition as active
Step 1. Boot the computer device that needs to be repaired with the bootable disk created by DiskGenius. The DiskGenius Free Edition will be launched automatically.
Step 2. Right-click the system partition which won’t boot and choose «Mark Partition As Active».
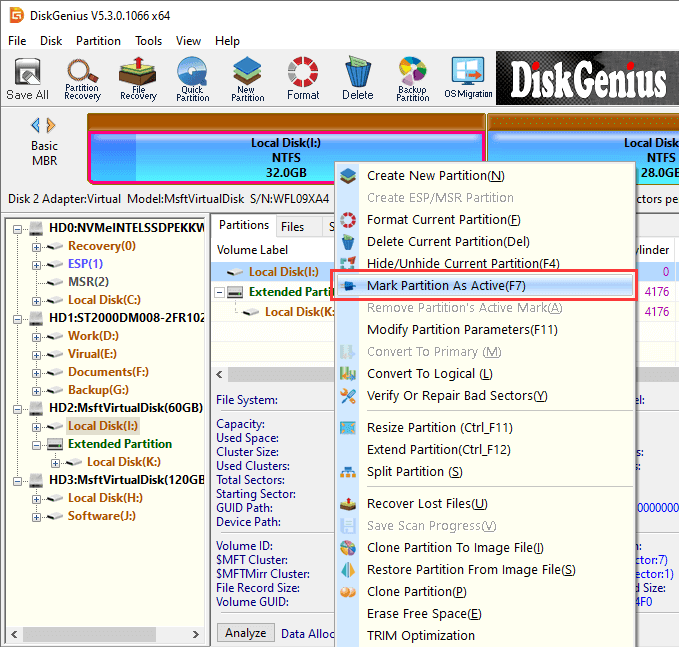
Note: If the hard drive where Windows OS is installed is of GPT style, there is no need to activate system partition.
Method #8: Check and repair bad sectors for hard drive
Damaged hard drive can also lead to BSOD problems including «Recovery Your PC device needs to be repaired». If the hard drive has bad sectors, it is suggested to back up or restore files first. After that you can try repairing bad sectors or replacing the hard drive with a new one.
Step 1. Launch DiskGenius Free Edition by way of bootable USB drive.
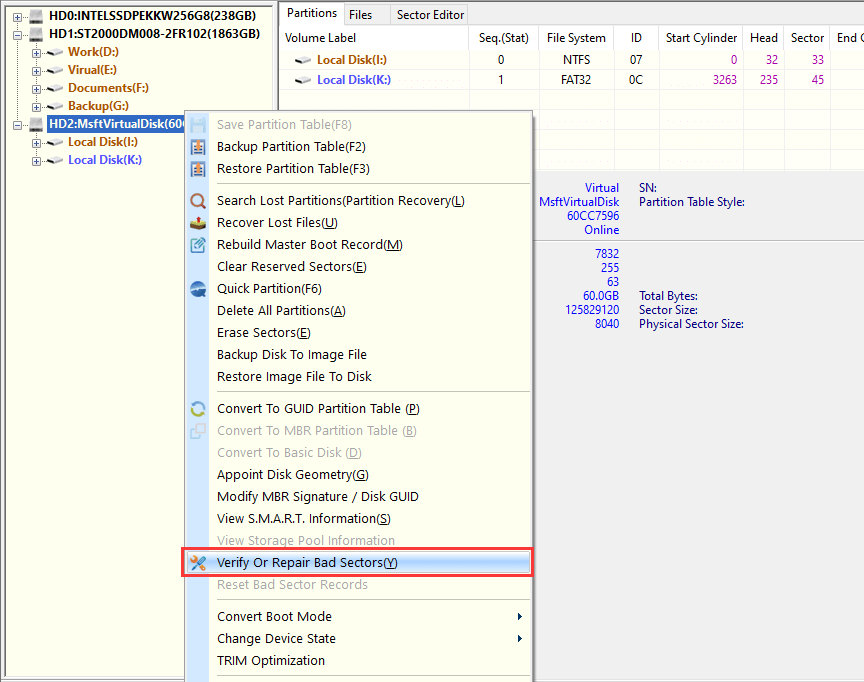
Step 2. Right-click the hard drive you want to test and choose «Check Or Repair Bad Sectors» from the appeared menu.
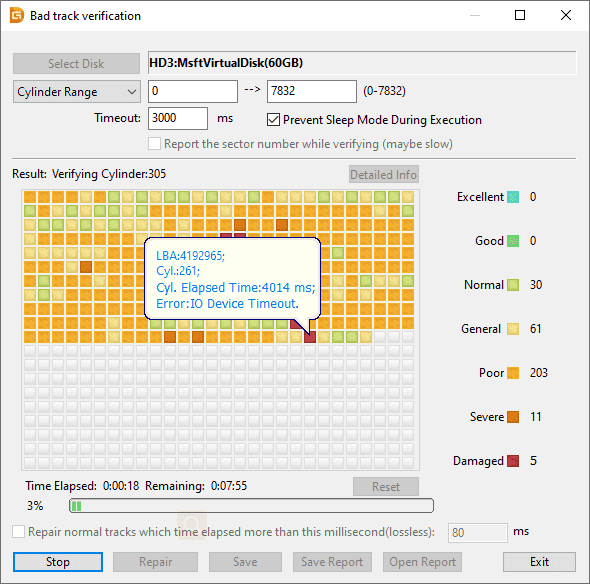
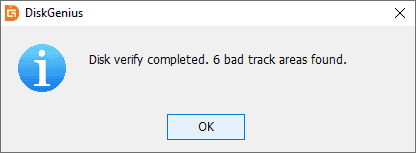
Step 3. Click «Start Verify» button, and the program starts to scan the hard drive.
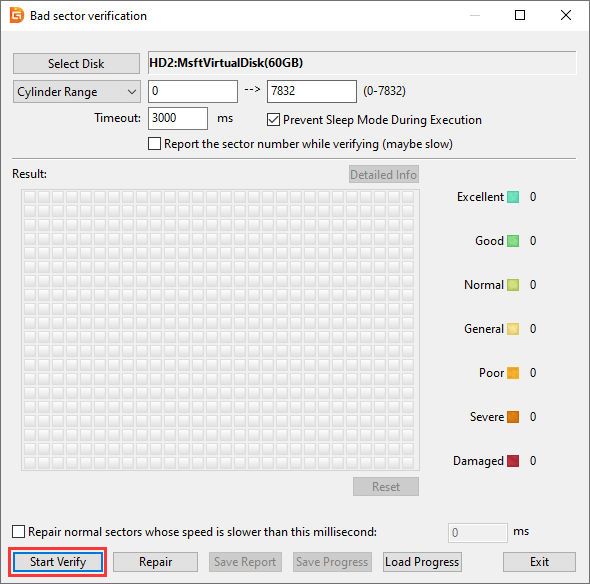
Step 4. Wait for the scanning to complete.
Step 5. Click «OK» when the scanning is done.
Method #9: Reinstall OS
The last resort of fixing BSOD error is reinstalling Windows OS. Back up all your files to another hard drive and then try installing a clean Windows.
Apart from reinstalling Windows, you can also try restoring Windows to a previous working status provided that you keep system backups. Data backup is also needed before restoring system, as everything currently stored in the system drive will be removed.
How to recover lost data when Window blue screen recovery issue appears?
For most people, when encountering the computer blue screen problem, they are more concerned about whether the data in the hard disk will be lost and how to recover the data from the unbootable computer. Here we are going to talk about how to retrieve lost data from unbootable computers. DiskGenius Professional Edition is suggested tool to perform data recovery from BSOD computers, and it can:
- Create a bootable USB drive to deal with crashed system.
- Recover lost files & partitions from either internal or external hard drives.
- Recover data from RAW drives rapidly.
- Smart and intuitive data recovery process makes the task easy.
- Preview lost files during or after scanning.
Go ahead with following steps to get back lost files from unbootable computers:
Step 1. Create a bootable USB drive
Both DiskGenius Free Edition and paid editions support to create bootable USB drive.
1. Install and launch the software on a computer which can boot into Windows 11/10/8/7 normally and insert a USB drive to that computer as well.
2. Select the USB drive and click «Tools» – «Create WinPE Bootable USB Drive of DiskGenius».
3. Click «OK» button and wait for several seconds. Then the bootable USB drive will be created successfully.
Step 2. Boot the crashed computer via the bootable USB drive.
1. Insert the USB drive back to the computer that has «Recovery your PC device needs to be repaired» error and press power key.
2. Repeatedly press the prompted on the screen to enter boot manager, the key might be F12, F11, Del, which varies from one computer to another.
3. Change boot device and make the USB drive as the boot disk. Save changed and exit. Then the computer will restart and boots from the USB drive, after that DiskGenius WinPE edition will be launched automatically.
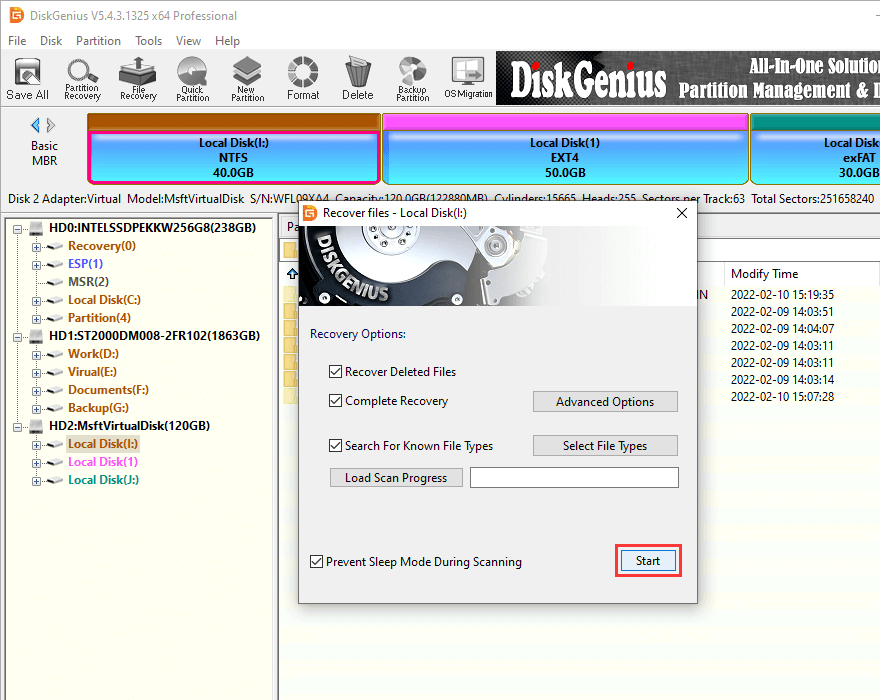
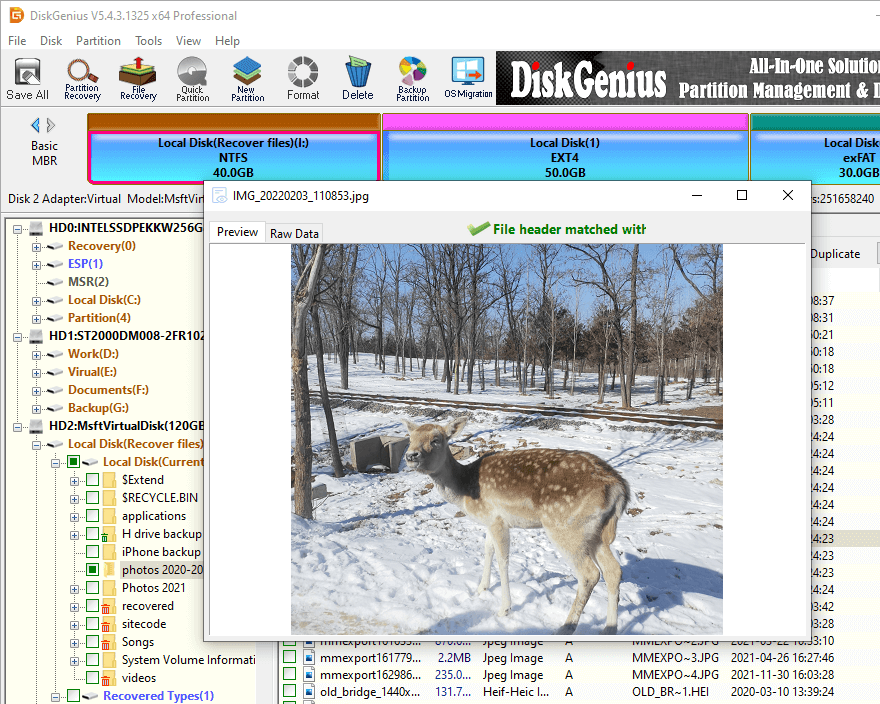
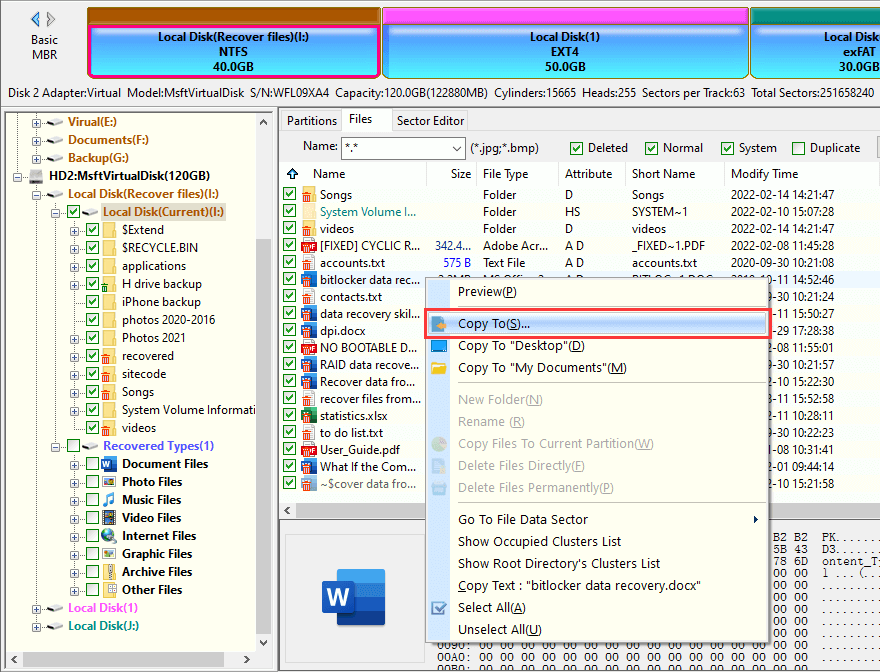
Step 3. Use «File Recovery» feature to recover deleted, lost or formatted files from hard drive.
1. Select the drive from which you want to retrieve files and click «File Recovery» button.

2. Click «Start» button on the pop-up window, and the program starts to scan the drive to look for recoverable files.
3. Wait for the scanning to finish.
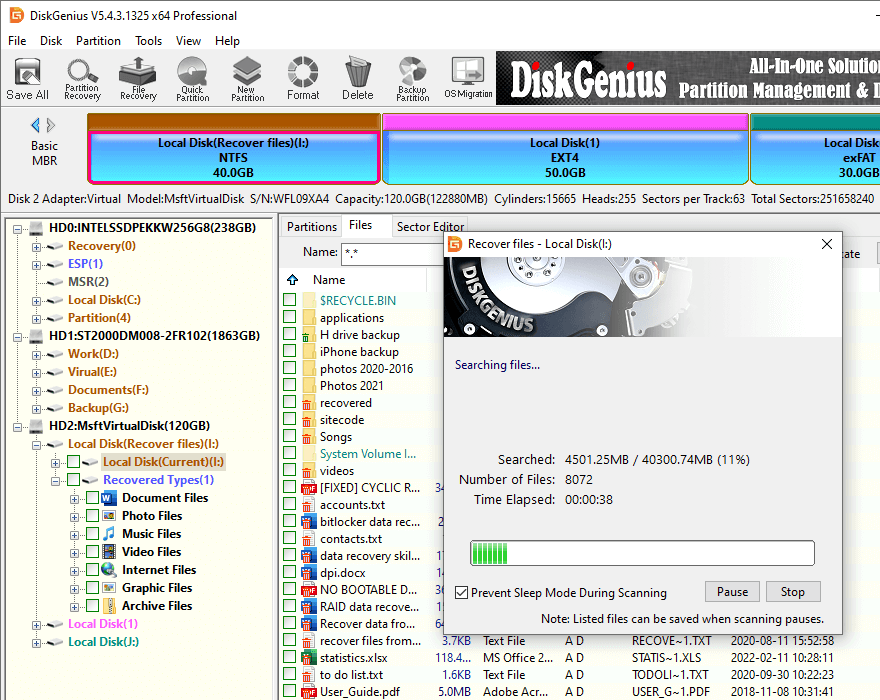
4. Preview lost files to make sure if wanted files are still recoverable.
Tip: if all files listed in scanning result cannot be previewed, please contact the technical support team who will analyze causes and solutions for you free of charge.
5. Choose files and folders you want to restore and copy them to another partition or hard drive.
Frequently asked questions regarding BSOD
1. What does error code 0xc000000e mean?
The error 0xc000000e, sometimes also referred to as STATUS_NO_SUCH_DEVICE, means that there is a hardware failure or an improper configuration. When the error occurred, Windows won’t boot, and computer ends up with a blue screen.
2. How do you fix your PC device needs to be repaired 0xc000000e?
The following lists general fixes to error 0xc000000e:
- Rebuild BCD in Command Prompt
- Check bad sectors for system hard disk
- Check BIOS/UEFI configurations
- Make sure the system disk is online
3. How do I fix Windows error code 0xC000021a?
The «Your PC ran into a problem and needs to restart. We’re just collecting some error info, and then we’ll restart for you. If you’d like to know more, you can search online later for this error: 0xC000021a» is one of the typical BSOD problems, and it can be fixed by trying these tricks:
- Boot Windows into Safe Mode
- Run Startup repair
- Disable Secure Boot
- Remove problematic hardware
4. Is the Blue Screen of Death fixable?
Yes, many Blue Screen of Death problems are fixable based on the information provided on the BSOD screen. But in most cases, you have to try various solutions like disconnecting hardware, checking drivers, restore OS to a previous status, etc. When then BSOD cannot be fixed by solutions suggested by experts, you will need to try reinstalling Windows OS.
Conclusion
The «Your PC device needs to be repaired» error usually occurs randomly, which cannot be predicted. Whenever your computer is suffering from similar errors, you can follow troubleshoots above to get rid of the error. If you want to retrieve data from crashed internal hard drive or BSOD computers, use DiskGenius to create a bootable USB drive and recover either lost files or partitions with ease.
More topics
- Your PC Ran into A Problem and Needs to Restart [16 Solutions]
- Photo Deleted Recovery Software Free Download for Windows 11/10/8/7
- Fixed: Windows Resource Protection Found Corrupt Files
- Fixed: Windows Cannot Access the Specified Device, Path, or File