
При включении компьютера или ноутбука вы можете столкнуться с ошибкой «Вашему ПК не удалось правильно загрузиться» или «Ваш компьютер необходимо восстановить» с кодом 0xc0000001, иногда — с указанием на файл Windows\System32\winload.efi, чаще — без указания каких-либо проблемных файлов, также возможен текст «Требуемое устройство не подключено или недоступно» или текст на английском языке: «Your PC couldn’t start properly», даже в русскоязычной версии Windows 11/10.
В этой инструкции подробно о том, как исправить ошибку 0xc0000001 при загрузке Windows 10 или 11 в различных ситуациях, чем она может быть вызвана и дополнительная информация, которая может оказаться полезной для решения проблемы.
Причины и способы исправления ошибки 0xc0000001
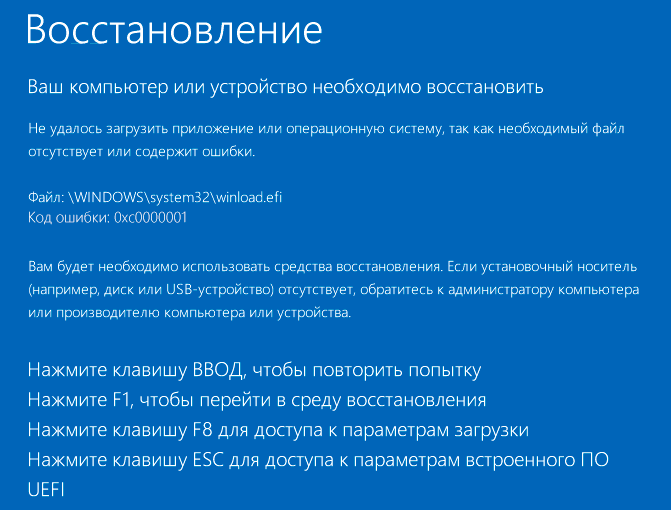
Среди основных причин ошибки 0xc0000001 — отсутствие необходимых для загрузки системных файлов (или невозможность доступа к ним, например, вследствие повреждения файловой системы на диске) и проблемы с оборудованием, либо его настройками.
Прежде чем приступать к предлагаемым далее методам решения проблемы, обратите внимание на следующие простые способы исправить ошибку, которые часто могут сработать:
- Если проблема появляется при первом включении компьютера или ноутбука после завершения работы, но исчезает при последующем, попробуйте отключить быстрый запуск Windows 10 (аналогично отключается и быстрый запуск Windows 11).
- Если на вашем компьютере несколько жестких дисков или SSD, а ошибка появилась после отключения одного из них, причиной ошибки может быть то, что на отключенном диске также находились необходимые системные файлы (даже если сама Windows 10 расположена на оставшемся диске). Здесь может пригодиться инструкция: Как перенести загрузчик Windows на другой диск.
- Если в БИОС в качестве первого устройства загрузки у вас выбран HDD или SSD, но также присутствует пункт Windows Boot Manager, попробуйте выбрать его вместо физического накопителя.
- В случае появления ошибки после обновления БИОС/UEFI или сброса его настроек, проверьте, не включён ли контроллер VMD в настройках (обычно в разделах System Agent Configuration — VMD Setup Menu, Storage Configuration — VMD Configuration или аналогичных), попробуйте его отключить (установить в Disabled), сохранить настройки и перезагрузить компьютер.
Если предыдущие пункты не подходят к вашей ситуации, приступаем к исправлению ошибки «Вашему ПК не удалось правильно загрузиться» или «Ваш компьютер необходимо восстановить» с кодом 0xc0000001.
Вход в среду восстановления Windows 11/10
Почти для любого из далее описанных методов нам потребуется войти в среду восстановления Windows. Как правило, при ошибке 0xc0000001 не удается использовать нажатие клавиши F8 для открытия параметров загрузки или (если предлагается) F1 для прямого входа в среду восстановления. Поэтому придётся использовать следующий метод:
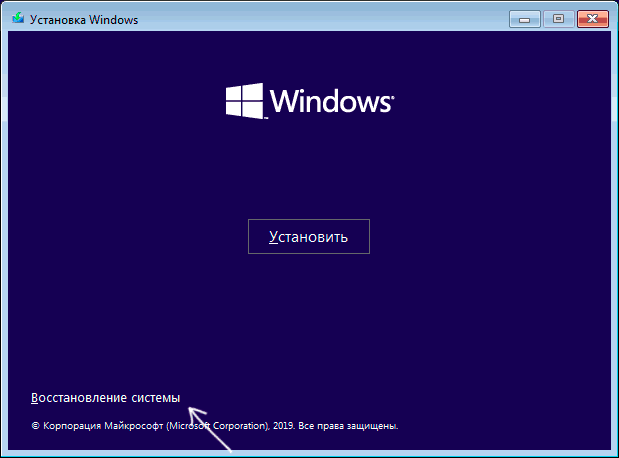
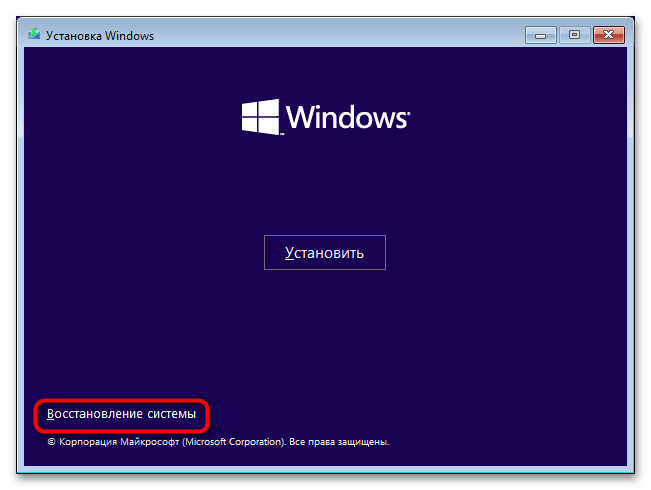
- Создайте где-то на другом компьютере или ноутбуке загрузочную флешку или диск с Windows 10 (как создать: Загрузочная флешка Windows 10, Загрузочная флешка Windows 11) и загрузитесь с неё.
- Вам будет предложено нажать любую клавишу для загрузки с флешки, а после этого запустится программа установки Windows.
- Наша задача — нажать «Далее» на экране выбора языка, а на следующем экране нажать по пункту «Восстановление системы» внизу слева.

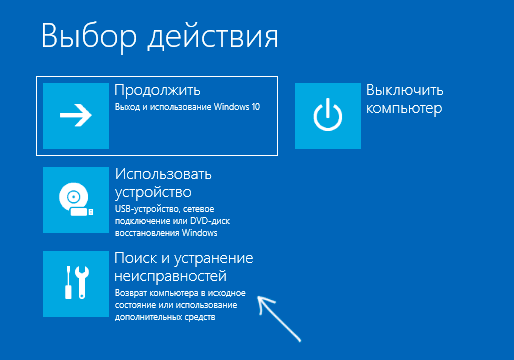
В результате будет загружена среда восстановления, здесь мы можем попробовать:
- Автоматическое восстановление при загрузке.
- Проверку файловой системы HDD или SSD на ошибки.
- Восстановление системных файлов Windows.
- Использовать точки восстановления.
- Попробовать перезаписать загрузчик.
А если ни один из указанных пунктов не сработает, попробовать проверить, помогут ли решить проблему действия с оборудованием компьютера или ноутбука.
Автоматическое восстановление при загрузке
Этот способ редко оказывается работоспособным при рассматриваемой ситуации, но его следует попробовать в первую очередь, так как это не займет много времени, не требует особенных навыков и иногда всё-таки срабатывает:
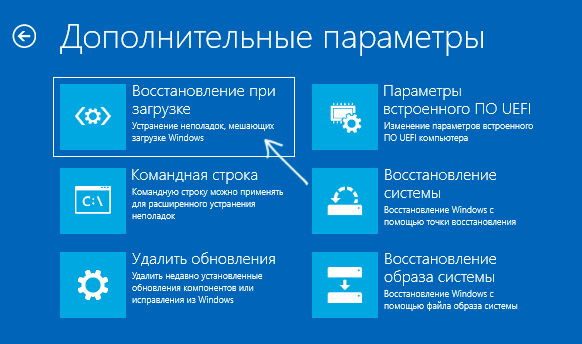
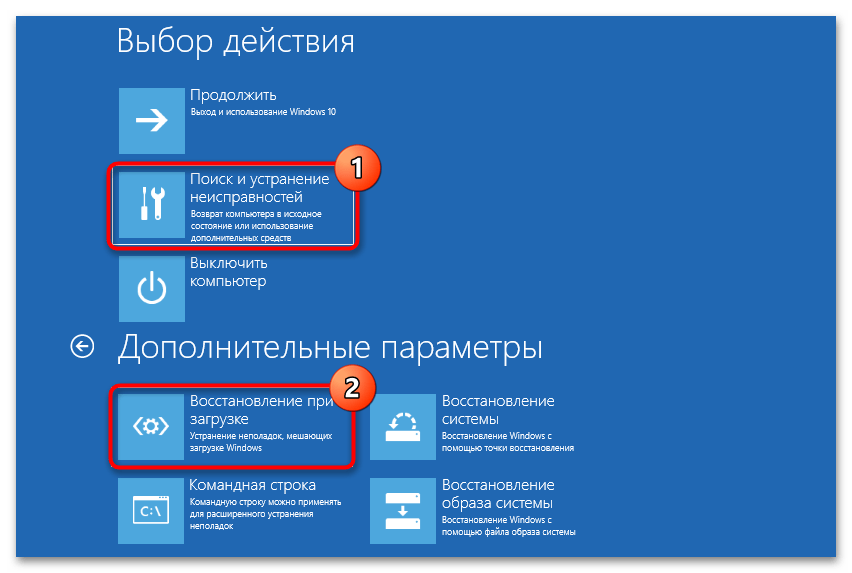
- В среде восстановления перейдите в «Поиск и устранение неисправностей».

- Нажмите «Восстановление при загрузке» и выберите ОС Windows 10 или Windows 11.

- Дождитесь завершения автоматической диагностики и исправления ошибок.
- Даже если вы увидите сообщение о том, что «Восстановление при загрузке не удалось восстановить компьютер», все равно попробуйте перезагрузить компьютер уже не с флешки, а выбрав Windows Boot Manager (при наличии) или системный диск в качестве первого устройства загрузки в БИОС/UEFI.
Проверка файловой системы системного диска HDD или SSD на ошибки
Иногда причиной ошибки 0xc0000001 являются ошибки файловой системы на диске и я не рекомендую пропускать этот шаг, хотя бы потому, что при таких ошибках следующий способ исправления ошибки также может оказаться безрезультатным:
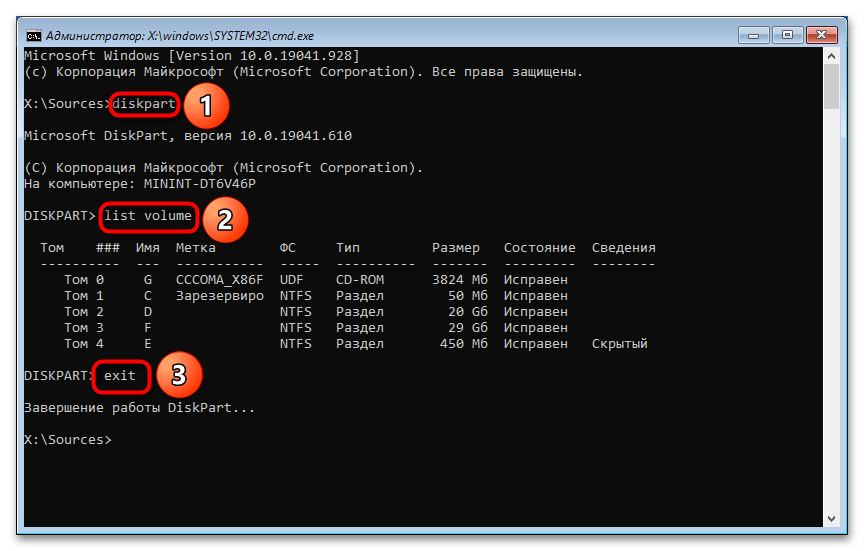
- В среде восстановления в разделе «Поиск и устранение неисправностей» выберите «Командная строка» для запуска командной строки. Или просто нажмите клавиши Shift+F10 (иногда на ноутбуках — Shift+Fn+F10) прямо в программе установки Windows 11/10, чтобы запустить командную строку.
- Введите по порядку команды (переключение языка ввода будет выполняться сочетанием клавиш Alt+Shift):
diskpart
list volume
exit
- В результате выполнения второй команды вы увидите список разделов диска, проверьте букву диска, на котором расположена Windows 11 или 10 — иногда в среде восстановления она отличается от стандартной C:, в этом случае в следующей команде используйте актуальную букву раздела диска.

- Введите команду
chkdsk C: /f
для запуска проверки файловой системы системного раздела диска на ошибки.

После проверки, если chkdsk сообщит об исправлении ошибок, попробуйте перезагрузить компьютер в обычном режиме.
Восстановление системных файлов Windows 10
Если причиной ошибки оказалось повреждение системных файлов Windows, например, удаление Windows\System32\winload.efi, с помощью тех же шагов, что были описаны выше, перейдите в командную строку, после чего используйте команду (с правильной буквой системного диска):
sfc /SCANNOW /OFFBOOTDIR=C:\ /OFFWINDIR=C:\Windows
Внимательно вводите все пробелы (например, перед offwindir) и учитывайте, что после начала сканирования системы у вас может появиться ощущение что процесс завис. Это не так — наберитесь терпения и дождитесь завершения операции.
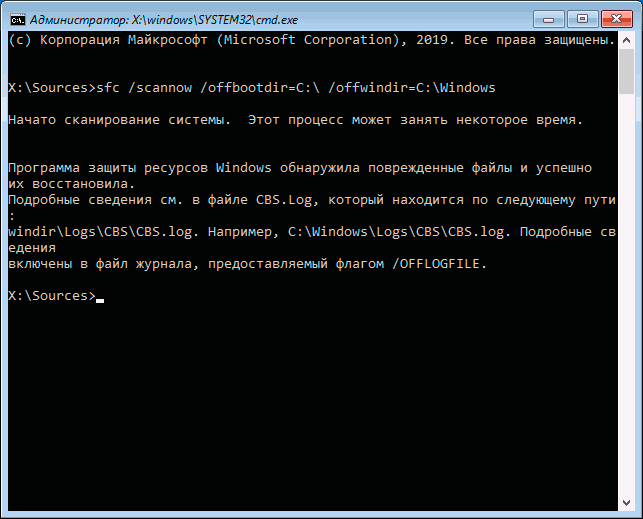
Если в результате вы увидите сообщение о том, что программа защиты ресурсов Windows обнаружила поврежденные файлы и успешно их восстановила — пробуем загрузить компьютер или ноутбук в обычном режиме, уже не с флешки — возможно, запуск пройдёт успешно.
В случае, когда предыдущие подходы не помогают, попробуйте:
- Использовать точки восстановления системы при их наличии. В среде восстановления — Поиск и устранение неисправностей — Восстановление системы. Есть и другие методы воспользоваться точками восстановления.
- Вручную восстановить загрузчик Windows 10 или Windows 11.
Возможные аппаратные причины ошибки 0xc0000001 при загрузке компьютера или ноутбука
Среди возможных причин проблем с загрузкой с кодом ошибки 0xc0000001 могут быть и аппаратные проблемы. Среди распространенных вариантов:
- Проблемы с оперативной памятью. Можно попробовать отключить любой разгон памяти (если включался), а также оставить только один модуль RAM и проверить, исчезнет ли ошибка. Если нет — попробовать поставить вместо него другой и повторить проверку.
- Проблемы со шлейфами подключения дисков: можно попробовать поменять кабели SATA, убедиться что они плотно подключены как со стороны накопителя, так и со стороны материнской платы.
- Проблемы с питанием, а точнее его недостатком. Учитывайте, что выходящий из строя блок питания может продолжать работать, но быть не в состоянии обеспечить необходимую мощность. При наличии возможности можно попробовать отключить необязательные потребители (например, дискретную видеокарту, оставив только интегрированное видео).
- По некоторым отзывам иногда причиной оказываются Ethernet и Wi-Fi адаптеры и срабатывает их физическое отключение или отключение в БИОС (при наличии там соответствующих опций).
Если один из способов помог вам исправить ошибку 0xc0000001, поделитесь в комментариях, какой именно: такая статистика может быть полезной для других пользователей.
,
On a Windows 10, 8 or 7 based computer the following BSOD oxC0000001 error may occur during startup: ”Your PC/Device needs to be repaired. An unexpected error has occurred. Error code : 0xc0000001”, or «Your PC needs to be repaired. The application or operating system couldn’t be loaded because a required file is missing or contains errors. File: \windows\system32\winload.efi».

The boot error 0xc0000001, commonly occurred if the main hard disk (OS disk) becomes damaged and Windows cannot read the boot configuration data (BCD). Another reason of the «Your PC/Device needs to be repaired. Error code : 0xc0000001» issue, is the unsuccessful installation of Windows update.
This tutorial contains instructions to resolve the «Your PC/Device needs to be repaired. Error code : 0xc0000001» on Windows 10/8/7/Vista OS.
HOW to FIX: Your PC/Device needs to be repaired. Error code :0xc0000001.
Important! Before proceeding with the methods below, try to change the SATA mode in BIOS and see if that fixes the problem: To do that:
- Power On your system and press the corresponding key* to enter into BIOS SETUP.* Usually is the DEL or F1 or F2 or F10 key. (depends on manufacturer)
- Notice the current setting of the SATA Mode (aka «SATA Operation», or «SATA Emulation» or «SATA Configuration»). If is RAID change it to AHCI. (If it is AHCI change it RAID).
- Save settings and EXIT BIOS Setup.
- Try to start Windows normally. If you receive the error 0xc0000001 again, open the BIOS setup again, set the SATA mode to what it was originally, and try the methods below to resolve the issue.
Requirements: In order to fix the “Your PC/Device needs to be repaired. Error code : 0xc0000001” problem, you will need to boot you computer into WinRE (Windows Recovery Environment) from a Windows installation media on a USB disk. If you don’t own a Windows 10/11 USB Media, you can create one using these instructions:
- How to Create a Windows 10 USB Installation Media.
- How to Create a Windows 11 USB Installation Media.
Method-1: FIX Error 0xc0000001 with System Restore.
The first to repair the boot error Error code: 0x0000001, is to try to restore your computer to a previous working state. To do that:
1. Boot your computer from the Windows installation media.
2. Press Next at Language options screen.
3. Choose Repair your computer.
4. Choose Troubleshoot -> Advanced Options –> System Restore.
5. Follow the onscreen instructions and restore your computer to an earlier point.
Method-2. Repair the Boot Configuration Data (BCD).
The second method to fix the «Your PC needs to be repaired, Error 0xc0000001», is to repair the BCD. For that task, follow the instructions below according your OS and your system architecture (UEFI or Legacy).
Windows 10 or 8/8.1 OS (UEFI Based Systems) *
* Note: The below steps, to repair the boot configuration data, usually works on UEFI based systems, with Windows 10, 8 or 8.1 OS installed. If your system doesn’t support UEFI, or this method does not work for you, then follow the steps for LEGACY based systems below.
1. Boot your computer from the Windows recovery media.
2. Press Next at Language options screen.
3. Choose Repair your computer.
4. Then choose Troubleshoot -> Advanced Options –> Command Prompt.
5. In command prompt type: diskpart & press Enter.
6. In “DISKPART” prompt, type: list volume & press Enter.
7. Now find out the Volume number of the FAT32 * partition and the drive letter of the OS volume.
* Notes:
1. The FAT32 partition, with size 100-500MB, is also known as «EFI» volume (System Volume) because it contains the Boot Configuration Data on UEFI based systems.
2. If you own a LEGACY based system, then find out the Volume number of the «System Reserved» volume (FS=NTFS & Size=100–500MB).
3. The OS (Operating System) Volume is usually the biggest volume in size (GB) and contains the Windows folder.e.g. From the picture below, we can understand that the FAT32 partition located at “Volume 1” and the OS volume has the drive letter «D«.

8. Now select the System Volume, by typing select volume 1 & press Enter. *
* Note: Replace «1» with whatever volume number is your System drive.
9. Then assign the drive letter “Z” at the selected volume by typing assign letter=Z & press Enter.
10. Type exit & press Enter, to close DISKPART utility.

11. At command prompt type: bcdboot D:\windows /s Z: /f ALL & press Enter to fix the BCD. *
* Note: Replace «D:» with whatever drive letter it is for your OS Volume.

12. Type exit & press Enter to close command prompt.
13. Remove the Windows installation media and Restart your PC.
14. Test if your system can boot to Windows normally.If your system still does not start, then continue to Method 3.
Windows 7 or Vista (LEGACY Based Systems) *
* Note: The below steps, to repair the boot configuration data, usually works on oldest PC’s, that don’t support UEFI. (e.g. PC’s with Windows Vista or Windows 7 OS) and some newer PC’s with Windows 8, 8.1 or 10 OS that installed in Legacy Mode.
1. Boot your computer from the Windows recovery media.
2. Press Next at Language options screen.
3. Choose Repair your computer.
4. Then choose Troubleshoot -> Advanced Options –> Command Prompt.
5. In command prompt give the following commands in order:
- bootrec /fixmbr
- bootrec /fixboot
- bootrec /rebuildbcd
6. If after executing the last command, you receive that “Total Windows installations: 0” then continue to the next step, otherwise skip to step 8.

7. If you receive that”Total Windows Installations=0” then give the following commands in order:
-
- bcdedit /export C:\bcdbackup
- C:
- cd boot
- attrib bcd -s -h –r
- ren C:\boot\bcd bcd.old
- bootrec /rebuildbcd
8. Press “A” to add the installation to boot list and press Enter. Then restart your system.

9. Close command prompt window.
10. Restart your computer and if the boot problem persists, then continue to next Method.
Method-3. FIX Error Code 0xc0000001 with Startup Repair.
1. Boot your computer from the Windows installation media.
2. Press Next at Language options screen.
3. Choose Repair your computer.
4. Then choose Troubleshoot -> Advanced Options –> Start-up Repair.

5. Select your Windows OS and then follow the onscreen instructions to fix your computer.
6. If the Startup Repair cannot fix your problem, then continue to the next method.
Method-4. Run Check Disk to Find and Fix Hard Disk Errors.
1. Boot again from the Windows recovery media and launch command prompt.
2. At command prompt give the following command to repair your disk and press Enter. *
- chkdsk D: /R
* Note: Replace «D:» with whatever drive letter is your OS Volume.
3. Now wait for the disk check process to finish. (it will take several hours).
4. When the check disk process is completed, apply again the Methods 1 & 2 above and try to boot again.
Method-5. Diagnose Hard Disk’s Health.
If none of the above methods work for you, then your hard disk probably is damaged and you should replace it. To diagnose your hard drive’s health, connect your hard disk to another working computer and use the diagnostic utilities mentioned on this article: Best Hard Drive Test & Diagnostic Tools to Check Hard Disk’s Health. *
* Note: If your hard drive is healthy, then backup your files and perform a clean installation of Windows 10.
That’s all folks! Did it work for you?
Please leave a comment in the comment section below or even better: like and share this blog post in the social networks to help spread the word about this solution.
If this article was useful for you, please consider supporting us by making a donation. Even $1 can a make a huge difference for us.
- Author
- Recent Posts
Konstantinos is the founder and administrator of Repairwin.com. Since 1995 he works and provides IT support as a computer and network expert to individuals and large companies. He is specialized in solving problems related to Windows or other Microsoft products (Windows Server, Office, Microsoft 365, etc.).
Все способы:
- Вариант 1: Восстановление при загрузке
- Вариант 2: Проверка и восстановление файловой системы
- Вариант 3: Восстановление системных файлов
- Вариант 4: Проверка оперативной памяти
- Вариант 5: Откат к точке восстановления
- Вопросы и ответы: 0
Причин, по которым при загрузке Windows 10 пользовать может столкнуться с ошибкой 0xc0000001, существует достаточно много, но основной из них является отсутствие доступа к загрузочным файлам, либо отсутствие самих файлов. Также ошибка может появиться вследствие повреждения оборудования, например жесткого диска. Соответственно, существует несколько основных решений проблемы.
Вариант 1: Восстановление при загрузке
Назвать эффективным данный способ можно лишь с натяжкой, тем не менее, начинать рекомендуется с него, как с наиболее простого.
- Загрузите компьютер с установочной флешки/диска и когда на экране появится окошко мастера-установщика, нажмите в нём «Далее», а затем «Восстановление системы».
Читайте также: Настраиваем BIOS для загрузки с флешки
- В окне среды WinPE выберите «Поиск и устранение неисправностей» → «Восстановление при загрузке».
- Укажите целевую операционную систему.
- Дождитесь завершения процедуры восстановления загрузочных файлов и попробуйте загрузиться в обычном режиме, даже если получили сообщение о неудаче.

Вариант 2: Проверка и восстановление файловой системы
Если ошибка 0xc0000001 была вызвана повреждением файловой системы или наличием на жестком диске bad-блоков, устранить неполадку поможет следующая процедура. Во всяком случае, ее выполнение будет весьма желательным, так как в случае наличия ошибок или багов на диске все остальные решения могут оказаться безрезультативными.
- Загрузившись в среду восстановления, как было показано в Варианте 1, выберите «Поиск и устранение неисправностей» → «Командная строка».
- Выполните в консоли последовательно эти три команды:
diskpart

list volume
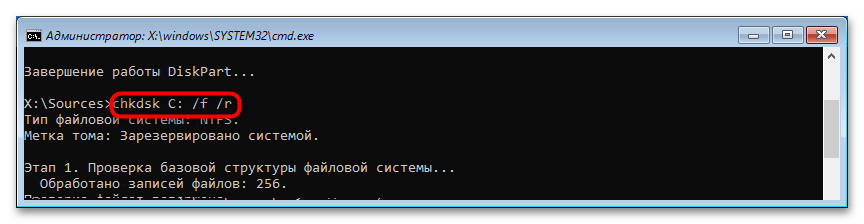
exit - Обратите внимание на присвоенные разделам буквы (столбец «Имя») — они вам нужны для формирования команды проверки файловой системы. Тут нужно определить тот диск, на который установлена операционная система. Проще всего это сделать, опираясь на столбец «Размер». Например, команда проверки раздела с буквой С будет выглядеть так:
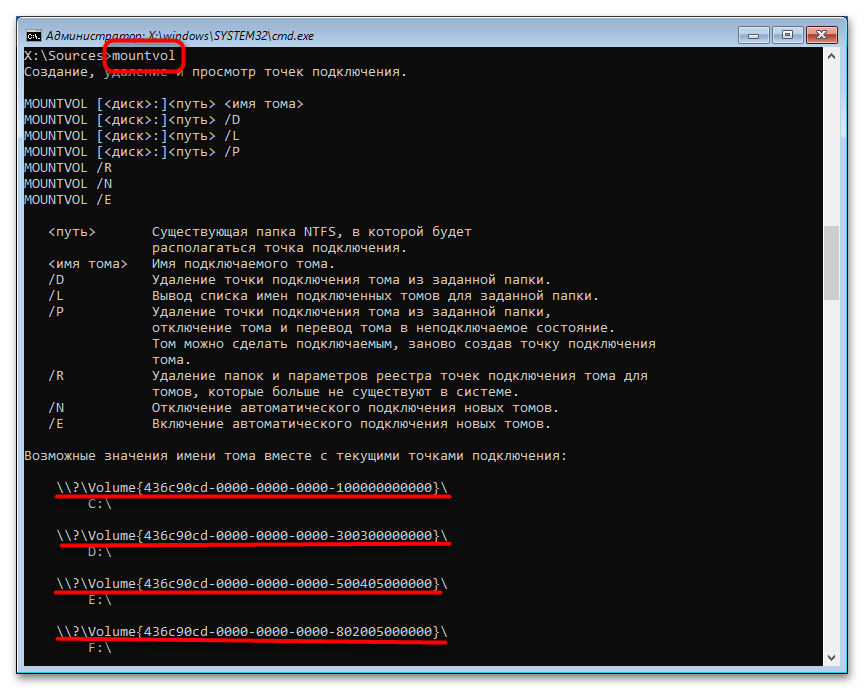
chkdsk C: /f /r - Если буква диска не отображается, вместо указанных команд утилиты «Diskpart» используйте команду
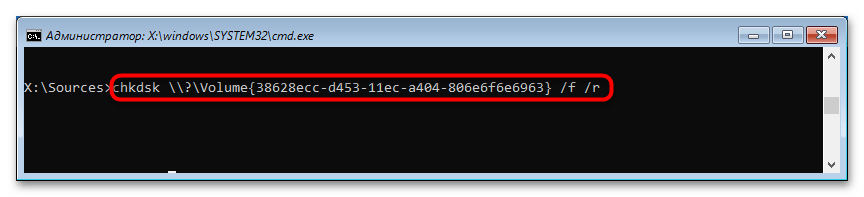
mountvol, выводящую идентификаторы разделов. - Получив ID, сформируйте и выполните команду следующего вида, заменив ID в фигурных скобках 32-значным значением идентификатора тома.
chkdsk //?/volume{ID} /f /r

Вариант 3: Восстановление системных файлов
Так как ошибка 0xc0000001 может быть вызвана повреждением ключевых системных файлов, необходимо просканировать Windows на предмет таких повреждений. Как и в предыдущем случае, проверка выполняется из-под загрузочного диска.
- Загрузившись в среду восстановления, откройте «Командную строку», с помощью команд
diskpart,list volumeиexitопределите буквы загрузочного и системного тома. - Запустите процедуру проверки следующей командой, передав параметру offbootdir букву загрузочного тома, а параметру offwindir — путь к папке Windows, расположенной на основном системном разделе.
sfc /scannow /offbootdir=C:\ /offwindir=D:\windows

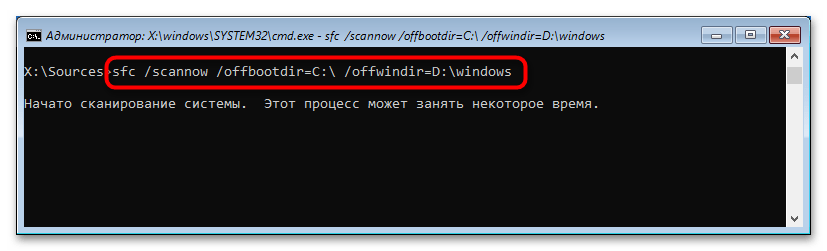
Процедура займет некоторое время, дождитесь ее завершения.
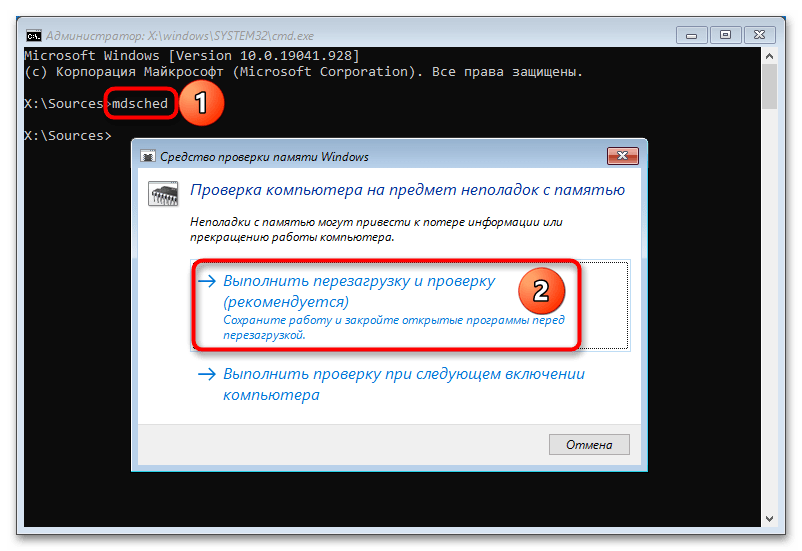
Вариант 4: Проверка оперативной памяти
Ошибка загрузки с кодом 0xc0000001 также может быть вызвана различными неполадками в работе оперативной памяти. Чтобы проверить RAM на предмет ошибок и повреждений, выполните в «Командной строке» команду mdsched. Команда может быть выполнена как в работающей системе, так и в среде восстановления. Если в ходе теста будут обнаружены ошибки, возможно, память придется заменить. Выявляется поврежденный модуль RAM методом исключения (попытки загрузить Windows с одной, потом со второй планкой по отдельности).
Вариант 5: Откат к точке восстановления
Универсальное решение, однако воспользоваться им вы сможете только в том случае, если на компьютере была включена функция защиты системы и на диске уже имеется точка восстановления.
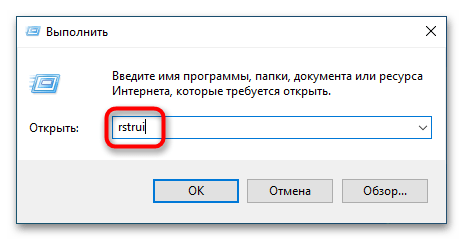
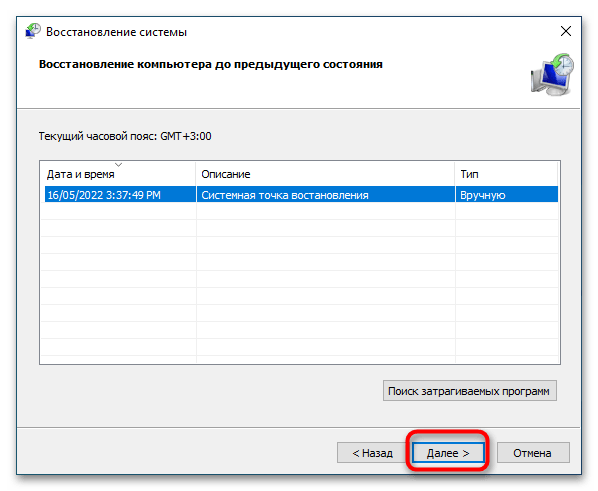
- Загрузитесь в среду восстановления, как показывалось в Варианте 1, и на этот раз вызовите «Командную строку», в которой выполните команду
rstrui. В случае удачной загрузки Windows выполните ее из «PowerShell», окошка «Выполнить» или даже из адресной строки «Проводника». - Проследуйте указанием мастера, выбрав в его окне ближайшую по времени точку восстановления.
В крайнем случае вы можете попробовать полностью переустановить Windows либо восстановить ее из полной резервной копии, если таковая имеется.
Наша группа в TelegramПолезные советы и помощь
,
If your Windows 10/11 PC does not start and goes to the recovery screen with error code 0xc0000001 «Your PC Couldn’t start properly», continue reading below to fix the problem.
The BSOD error 0xc0000001, usually appears after a Windows Update or a BIOS update. In other cases the problem appears after an improper computer shutdown or because of a damaged disk.

In this tutorial you ‘ll find instructions to resolve the Error 0xc0000001: Your PC Couldn’t start properly, in Windows 11, 10 or 8 OS.
How to FIX: Your PC Couldn’t start properly with Error code 0xc0000001, on Windows 10/8/7 OS.
Suggestion (Important): Before you continue to the methods below…
- Enter BIOS SETUP.
- Locate the SATA Configuration setting. (Commonly named as «SATA Mode» or «SATA Controller Mode» or «SATA Operation» or «Configure SATA as«).
- If the SATA Mode is set to RAID then change it to AHCI. If the SATA Mode is set to AHCI then change it to IDE.
- Save Changes and Exit BIOS Settings.
- Try to boot in Windows. If Windows doesn’t start, then revert the SATA setting back to what it was and proceed to apply the methods below.
Notes:
1. If you receive the 0xc0000001, on a system that you have used software mirroring for fault tolerance, then break the mirror first, with the DISKPART tool in Recovery Environment. Detailed instructions to do that can be found in Method-2 in this tutorial.
2. Requirement: In order to resolve the 0xc0000001 Boot error, you need to start your computer from a Windows USB installation/recovery media. If you don’t own a Windows Installation Media, then you can create one (corresponding to your Windows Edition and Version) directly from Microsoft.
- How to create a Windows 10 USB boot media.
- How to create a Windows 11 USB boot media.
Method 1. Fix Error 0xc0000001 with Startup Repair
1. Power on your PC and boot from a Windows 10 installation/recovery media.
2. At the Windows Setup screen choose Repair > Troubleshoot > Advanced Options > Startup Repair.

3. Click on Windows 10 and when the repair is completed, remove try to boot to Windows normally.

Method 2. Fix Boot Configuration Data using BOOTREC tool.*
* Note: This method usually works on Windows 7 & 8 systems.
1. Power on your PC and boot from a Windows 10 installation/recovery media.
2. At the Windows Setup screen press SHIFT + F10 to access command prompt, or choose Next –> Repair your computer –> Troubleshoot –> Advanced Options –> Command Prompt.

3. In command prompt type the following commands in order:
- bootrec /fixmbr
- bootrec /fixboot
* Note: If after executing the above command you receive that «Access is denied» give this command «bootsect /nt60 sys» and continue below.
- bootrec /scanos *
* Note: If after executing the «bootrec /scanos» command you receive that «Total identified Windows installations = 0» then give the following commands, before you continue to next step:
-
- bcdedit /export C:\bcdbackup
- C:
- cd boot
- attrib bcd -s -h –r
- ren C:\boot\bcd bcd.old
4. Rebuild Boot Configuration Data:
- bootrec /rebuildbcd
5. Press «A» to Add installation to boot list and press Enter.

6. Close all windows and restart your computer. If Windows still fails to boot, then try Method 2.
Method 3. Repair Boot Configuration Data using BCDBOOT tool.
* Note: This method usually works on Windows 10/11 systems.
1. Power on your PC and boot from a Windows 10 installation/recovery media.
2. At the Windows Setup screen press SHIFT + F10 to access command prompt, or choose Next –> Repair your computer –> Troubleshoot –> Advanced Options –> Command Prompt.
3. In command prompt type the following commands in order:
- diskpart
- select disk 0
- list partition
4. Note the size in Megabytes of System Partition. *
* e.g. As you can see at the screenshot below, the partition size of System partition is 99 MB.

5. Find out the volume number of the system partition * and the drive letter of OS drive,** by typing this command:
- list volume
* At the previous step we found that the system partition is 99 MB. So, from the screenshot below, we understand that the System partition is the «Volume 2«.
** The OS Drive, is the drive where the Windows installed. Commonly this is the «Volume 0», the largest volume on the list. At this example the OS drive is located at «C» drive letter.

6. Select the System partition and assign a drive letter to it. Then exit DISKPART:
- select volume 2 *
- assign letter=Z
- exit
* Note: Change the Volume number according your case.

7. Finally, in command prompt give this command:
- bcdboot C:\windows /s Z: /f ALL
* Note: Replace the letter «C«, according the drive letter of the OS volume at your case.

8. Close all windows, remove the Windows Recovery media and try to boot in Windows normally. If Windows doesn’t boot, then follow the same steps, but at the end, type this command:
- bcdboot C:\windows /s Z: /f UEFI

Additional help: If you cannot fix the problem using the above methods, read this article: How to Repair Windows 10/11 without losing files.
That’s it! Which method worked for you?
Let me know if this guide has helped you by leaving your comment about your experience. Please like and share this guide to help others.
If this article was useful for you, please consider supporting us by making a donation. Even $1 can a make a huge difference for us in our effort to continue to help others while keeping this site free:
- Author
- Recent Posts
Konstantinos is the founder and administrator of Wintips.org. Since 1995 he works and provides IT support as a computer and network expert to individuals and large companies. He is specialized in solving problems related to Windows or other Microsoft products (Windows Server, Office, Microsoft 365, etc.).
Are you encountering the perplexing error code 0xc0000001 on your Windows 10/11 system? Frustrated by the unexpected interruptions and unsure of how to resolve this annoying issue? If so, you’re not alone. Many Windows users have faced this error, causing them to seek solutions to restore their device’s functionality.
But fear not, for we are here to guide you through this technical issue. In this comprehensive guide, we will write different methods to resolve the error code 0xc0000001 Windows 10 or 11 and provide you with step-by-step instructions. Whether you’re a seasoned Windows enthusiast or a less tech-savvy user, our step-by-step instructions will help you solve this issue in no time.
So, let’s get started.
Part 1: What Causes Error Code 0xc0000001?
Before we can get started with the different methods to resolve Windows error code 0xc0000001, it’s essential to first understand the causes behind it.
error code 0xc0000001 is a specific Blue Screen of Death error that occurs on Windows operating systems. The error usually appears during the boot process and indicates that the system encountered a critical problem that prevents it from starting up properly.
When this error occurs, the system will automatically halt to protect itself from potential data corruption or hardware damage.
There are lots of reasons behind this error, and some of them are:
- Corrupted system files: Critical system files required for the boot process may be damaged or missing, leading to the error.
- Corrupted RAM: Faulty or corrupted RAM modules can cause data inconsistencies during boot, triggering the error.
- Damaged hardware components: Issues with hardware components like hard drives or motherboards can prevent the system from booting successfully.
- Incompatible or outdated drivers: Drivers that are incompatible with the operating system version or outdated drivers can cause conflicts leading to the error.
- Malware or virus infections: Malicious software can modify essential system files, resulting in boot failures and the appearance of the error code.
So these are some common causes behind error code 0xc0000001 Windows 11 or 10. Now let’s discuss how to repair Windows 10 error code 0xc0000001.
Part 2: How to Repair Windows 10 Error Code 0xc0000001?
As we have mentioned earlier, there are different methods that you can try to fix this frustrating error.
So, here are the methods with step-by-step instructions that will help you quickly fix error code 0xc0000001 Windows 10 or 11.
Method 1. Use Ultimate Windows Boot Repair Tool
The first and foremost method to fix error code 0xc0000001 is to use an ultimate Widows boot repair tool like 4DDiG Windows Boot Genius.
It is a comprehensive and user-friendly Windows repair tool designed to fix various boot-related issues and errors, including the error code 0xc0000001 Windows 11 or 10. Besides, it offers bootable media creation for unresponsive computers, automatic repair for Windows issues like BSOD and system crashes, and data recovery from unbootable hard drives.
It also provides password reset functionality for Windows local and domain accounts, making it a comprehensive and user-friendly tool for troubleshooting and repairing Windows systems.
Now let’s learn how you can use 4DDiG Windows Boot Genius to fix error code 0xc0000001.
-
First of all, you’ll have to download and install 4DDiG Boot Genius on a working computer and launch it. Besides that, you’ll have to insert a blank CD/DVD or connect a USB flash drive. After that, hit the «Create boot disk now» and follow the instructions to create a bootable disk.

- Once you have successfully created a bootable disk or USB drive, it’s time to insert it into the computer that’s showing the frustrating blue screen issue.
-
Now start the computer and keep your finger on the «F12» or «ESC» key to enter the Boot menu. Once you are in the Boot menu, you’ll have to choose the newly inserted disk and hit enter button.
-
Now you’ll see 4DDiG Boot Genius launched successfully, it’s time to hit the «Automated Repair» button.
-
Next, you’ll see a list of partitions on your computer. Choose the partition that needs fixing, and then click on the «Start Repair» button.
-
Now the repair process will take some time, so you’ll have to be patient. Once it’s completed, you’ll see a «Restart» button. So click on it to reboot your computer.

So, that’s how to repair Windows 10 error code 0xc0000001 using 4DDiG Boot Genius.
Method 2. Run Startup Repair
If you don’t have access to another working computer, another effective approach to fix Windows error code 0xc0000001 is by running the Startup Repair tool. Startup Repair is a built-in Windows utility designed to diagnose and repair various boot-related problems automatically.
Here are the steps that can help you.
- Insert your Windows installation media (DVD or USB) into the computer and restart it. During startup, press the appropriate key (usually «F12» or «ESC») to enter the Boot menu.
- Choose your Windows installation from the list and press «Enter» to continue.
-
Select «Repair your computer» from the options to access the Advanced Startup Options. After that, click on «Troubleshoot» to proceed to further options.
- Now select «Advanced options» and then click on «Startup Repair.»
- The Startup Repair tool will diagnose and attempt to fix issues automatically.
Method 3. Uninstall Problematic Software in Safe Mode
If you’re encountering the error code 0xc0000001 on your Windows system and suspect that recently installed software is causing the issue, you can try uninstalling it in Safe Mode. Safe Mode allows you to start your computer with a minimal set of drivers and services, making it easier to troubleshoot and remove problematic software.
For this, you can follow these steps.
- First of all, restart your computer, and during boot, keep tapping «F8» to access the «Advanced Boot Options.»
-
Now go to «Startup Settings» choose «Safe Mode» from the menu, and watch your computer start in safe mode.
- After your computer is restarted in Safe Mode, you’ll have to open the «Control Panel» and navigate to «Programs» or «Programs and Features.»
- Locate the recently installed software causing the error code 0xc0000001 and right click on the software and hit the «Uninstall» button.
- Now follow the on-screen instructions to complete the uninstallation.
After the software is successfully uninstalled, you’ll have to restart your computer.
Method 4. Run System Restore
If uninstalling the software didn’t fix the issue, you can try restoring your computer. System Restore allows you to revert your computer’s system files and settings to a previous state when it is working correctly. This can be helpful in fixing error code 0xc0000001 caused by recent changes or updates.
Here is how you can do that.
- Restart your computer and press the «F8» key repeatedly to enter the «Advanced Boot Options» menu and go to «Startup Settings.»
-
Select «Safe Mode with Command Prompt» and press «Enter.»
- In the Command Prompt, type «rstrui.exe» and press «Enter» to open the System Restore wizard.
- Follow the on-screen instructions to choose a restore point before the error occurred.
- Click «Next» and then «Finish» to start the restoration process.
- Once the restoration is complete, your computer will restart, and hopefully, the error will be resolved.
Method 5. Run Chkdsk Command
If you have not created the system restore point before the error code 0xc0000001 appeared, you’ll not be able to restore your computer. In this case, you can try running the Chksdk command to get rid of the issue. The Chkdsk command is a built-in Windows utility that can help fix file system errors on the hard drive, which may be contributing to the error code 0xc0000001.
So, here are the steps that can help you.
-
Press the «Windows + X» keys together and select «Command Prompt» from the menu. Here you will have to type «chkdsk /f» and press «Enter.»
- You will likely see a message saying that Chkdsk cannot run because the volume is in use and asking if you want to schedule it to run the next time you restart the computer. Type «Y» and press «Enter.»
- Restart your computer, and Chkdsk will automatically run during the startup process.
- Wait for Chkdsk to complete the scan and repair any issues on your hard drive. Once the process is done, your computer will be restarted.
Method 6. Reset Your PC
If all else fails, you can try resetting your PC to its default settings, which can resolve many issues, including error code 0xc0000001.
- Press the «Windows + I» keys together to open the Settings app. After that, go to «Update & Security» and select «Recovery» from the left-side menu.
-
Under «Reset this PC,» click on the «Get started» button.
- Now, choose whether you want to keep your files or remove everything and follow the on-screen instructions.
- Windows will then reset your PC to its original state. This may take some time, so be patient.
Once the reset is complete, your computer will restart, and hopefully, the error will be resolved.
FAQs Related to Error Code 0xc0000001
1. What is error code 0xc0000001 on HP?
Error code 0xc0000001 on HP (Hewlett-Packard) computers is a Windows BSOD (Blue Screen of Death) error that indicates a critical issue during the boot process. It usually means that the system cannot find or access the necessary files required for booting, which can lead to a failed startup.
2. How do I fix 0xc0000001 on USB?
To troubleshoot and resolve error code 0xc0000001 on USB, follow these steps:
- Begin by shutting down your computer and disconnecting all external devices except for the mouse, keyboard, and monitor.
- After restarting the computer, reconnect each device one at a time and restart after each connection to check for the error.
- If the error reoccurs upon connecting a specific device, test it on another computer to verify its functionality.
- If the device works properly on another computer, attempt connecting it to a different USB port on your original computer to determine if the port is causing the issue.
By following these steps, you can identify and address the 0xc0000001 error related to USB devices or ports effectively.
Conclusion
So that’s how to fix error code 0xc0000001 on your Windows computer or laptop. All you have to do is carefully follow the methods given above, and you will be able to quickly resolve the issue. However, if you are looking for a reliable way to fix all types of boot issues with your computer, including error code 0xc0000001, you can try using 4DDiG Windows Boot Genius.
William Bollson (senior editor)
William Bollson, the editor-in-chief of 4DDiG, devotes to providing the best solutions for Windows and Mac related issues, including data recovery, repair, error fixes.