|
|
|
0 / 0 / 0 Регистрация: 15.02.2015 Сообщений: 16 |
|
|
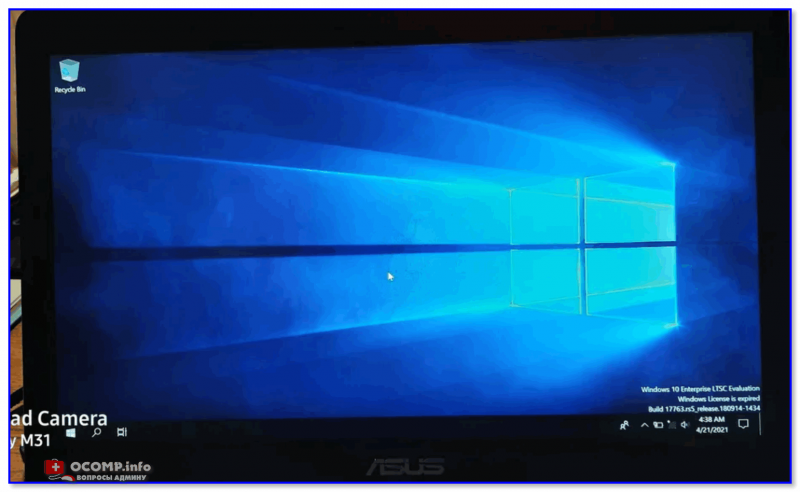
02.02.2018, 10:53. Показов 69822. Ответов 17 Имеется последняя версия биоса, пустой ЖД, винда 10 на флешке, записанная в программе WinSetupFromUSB, всё в рабочем состоянии. После чего чтобы ты не нажал, моргает в попытке что-то включить и тут же опять сюда возвращается. Остаётся перезагрузить и наблюдать ту же картинку.
0 |
|
15903 / 7926 / 755 Регистрация: 03.01.2012 Сообщений: 32,863 |
|
|
02.02.2018, 11:31 |
|
|
AUYKGN, Загрузившись с установочной флешки, на первом диалоговом окне (где выбор языка установки) нажмите клавиши Shift+F10, в появившейся командной строке введите команды выложите результат и ждите
0 |
|
0 / 0 / 0 Регистрация: 15.02.2015 Сообщений: 16 |
|
|
02.02.2018, 11:39 [ТС] |
|
|
gecata, ошибка появляется до того как я дохожу до первого диалогового окна.
0 |
|
15903 / 7926 / 755 Регистрация: 03.01.2012 Сообщений: 32,863 |
|
|
02.02.2018, 11:46 |
|
|
Матплата с поддержкой UEFI? Как настроено бут-меню БИОСа? Это не ноутбук? Диск совсем пустой? Дистрибутив системы не сборка?
0 |
|
AUYKGN 0 / 0 / 0 Регистрация: 15.02.2015 Сообщений: 16 |
||||
|
02.02.2018, 11:58 [ТС] |
||||
|
gecata, материнка скорей всего поддерживает UEFI, я просто не знаю как проверить, вот она:
Винду 7 кстати я смог установить без проблем, а при попытке Винду10 поставить вылазит ошибка выше, хотя порядок действий тот же. Сообщение от gecata Как настроено бут-меню БИОСа? Дефолтно: Флешку в приоритет тоже ставил, ничего не меняется, ошибка в том же месте. Сообщение от gecata Это не ноутбук? Это комп Сообщение от gecata Дистрибутив системы не сборка? Оригинальный образ самый новый, в нём я уверен, проблема в компе где-то засела.
0 |
|
15903 / 7926 / 755 Регистрация: 03.01.2012 Сообщений: 32,863 |
|
|
02.02.2018, 12:07 |
|
|
Семёрку ставили на тот же диск?
0 |
|
0 / 0 / 0 Регистрация: 15.02.2015 Сообщений: 16 |
|
|
02.02.2018, 12:41 [ТС] |
|
|
gecata, да, она сейчас стоит, но это днище, я хочу десятку, а она какого-то не ставится
0 |
|
888 / 705 / 86 Регистрация: 23.12.2013 Сообщений: 3,355 |
|
|
02.02.2018, 12:43 |
|
|
Сообщение от AUYKGN записанная в программе WinSetupFromUSB Попробуйте прогой Rufus записать.
0 |
|
15903 / 7926 / 755 Регистрация: 03.01.2012 Сообщений: 32,863 |
|
|
02.02.2018, 13:03 |
|
|
AUYKGN, Покажите скриншот из Управления дисками семёрки
0 |
|
0 / 0 / 0 Регистрация: 15.02.2015 Сообщений: 16 |
|
|
02.02.2018, 13:21 [ТС] |
|
|
Сообщение от woron3 Попробуйте прогой Rufus записать. woron3, ничего не изменилось, так же выбираешь флешку и затем недождавшись установки ошибка: gecata, не знаю зачем он вам, но вот:
0 |
|
15903 / 7926 / 755 Регистрация: 03.01.2012 Сообщений: 32,863 |
|
|
02.02.2018, 13:33 |
|
|
AUYKGN, А что там на съёмном устройстве?
0 |
|
0 / 0 / 0 Регистрация: 15.02.2015 Сообщений: 16 |
|
|
02.02.2018, 13:35 [ТС] |
|
|
gecata, загрузочная флешка с виндой 10.
0 |
|
15903 / 7926 / 755 Регистрация: 03.01.2012 Сообщений: 32,863 |
|
|
02.02.2018, 13:46 |
|
|
AUYKGN, Гм… А если в командной строке, запущенной от имени Администратора, выполнить команду bcdedit /store F:\boot\BCD что-то покажет?
0 |
|
0 / 0 / 0 Регистрация: 15.02.2015 Сообщений: 16 |
|
|
02.02.2018, 13:57 [ТС] |
|
|
gecata, ну разве что-то такое:
0 |
|
15903 / 7926 / 755 Регистрация: 03.01.2012 Сообщений: 32,863 |
|
|
02.02.2018, 14:15 |
|
|
Ну, семёркин-то загрузчик в порядке — это и так ясно. А вот почему флеха не грузится… На ней папка BOOT есть? Попробуйте с флехи удалить папку efi — из неё грузятся UEFI-системы, а у вас диск MBR — для вас UEFI не актуально (да и матплата — ИМХО — без UEFI)
0 |
|
0 / 0 / 0 Регистрация: 15.02.2015 Сообщений: 16 |
|
|
02.02.2018, 14:41 [ТС] |
|
|
У меня просто в голове не укладывается… Кликните здесь для просмотра всего текста Беру пустой ЖД с другого компа Выбираю загрузку с флешки Далее Далее Появился значок винды 10, значит сейчас установка должна запуститься: Жду 10 секунд~ и: Единственная моя реакция: Кликните здесь для просмотра всего текста Возвращаю этот ЖД в родной другой комп, втыкаю флеху в него и вуаля: Что же с ЭТИМ, на котором семёрка установилась, но десятка не как начать не может просто не понимаю…
0 |
|
15903 / 7926 / 755 Регистрация: 03.01.2012 Сообщений: 32,863 |
|
|
02.02.2018, 14:57 |
|
|
На этой матплате в БИОСе нету таких опций? Anti-Virus Protection Boot Sector Protection Boot Sector Virus Protection Boot Virus Detection Fixed Disk Boot Sector Virus Warning
0 |
|
0 / 0 / 0 Регистрация: 15.02.2015 Сообщений: 16 |
|
|
02.02.2018, 15:02 [ТС] |
|
|
gecata, нет там такого.
0 |
|
inter-admin Эксперт 29715 / 6470 / 2152 Регистрация: 06.03.2009 Сообщений: 28,500 Блог |
02.02.2018, 15:02 |
|
18 |
|
Новые блоги и статьи
Все статьи Все блоги / |
||||
|
Как перейти от Waterfall к Agile
EggHead 06.05.2025 Каскадная модель разработки Waterfall — классический пример того, как благие намерения превращаются в организационный кошмар. Изначально созданная для упорядочивания хаоса и внесения предсказуемости. . . |
Оптимизация SQL запросов — Продвинутые техники
Codd 06.05.2025 Интересно наблюдать эволюцию подходов к оптимизации. Двадцать лет назад всё сводилось к нескольким простым правилам: «Избегайте SELECT *», «Используйте индексы», «Не джойните слишком много таблиц». . . . |
Создание микросервисов с gRPC и Protobuf в C++
bytestream 06.05.2025 Монолитные приложения, которые ещё недавно считались стандартом индустрии, уступают место микросервисной архитектуре — подходу, при котором система разбивается на небольшие автономные сервисы, каждый. . . |
Многопоточность и параллелизм в Python: потоки, процессы и гринлеты
py-thonny 06.05.2025 Параллелизм и конкурентность — две стороны многопоточной медали, которые постоянно путают даже бывалые разработчики. Конкурентность (concurrency) — это когда ваша программа умеет жонглировать. . . |
Распределенное обучение с TensorFlow и Python
AI_Generated 05.05.2025 В машинном обучении размер имеет значение. С ростом сложности моделей и объема данных одиночный процессор или даже мощная видеокарта уже не справляются с задачей обучения за разумное время. Когда. . . |
|
CRUD API на C# и GraphQL
stackOverflow 05.05.2025 В бэкенд-разработке постоянно возникают новые технологии, призванные решить актуальные проблемы и упростить жизнь программистам. Одной из таких технологий стал GraphQL — язык запросов для API,. . . |
Распознавание голоса и речи на C#
UnmanagedCoder 05.05.2025 Интеграция голосового управления в приложения на C# стала намного доступнее благодаря развитию специализированных библиотек и API. При этом многие разработчики до сих пор считают голосовое управление. . . |
Реализация своих итераторов в C++
NullReferenced 05.05.2025 Итераторы в C++ — это абстракция, которая связывает весь экосистему Стандартной Библиотеки Шаблонов (STL) в единое целое, позволяя алгоритмам работать с разнородными структурами данных без знания их. . . |
Разработка собственного фреймворка для тестирования в C#
UnmanagedCoder 04.05.2025 C# довольно богат готовыми решениями – NUnit, xUnit, MSTest уже давно стали своеобразными динозаврами индустрии. Однако, как и любой динозавр, они не всегда могут протиснуться в узкие коридоры. . . |
Распределенная трассировка в Java с помощью OpenTelemetry
Javaican 04.05.2025 Микросервисная архитектура стала краеугольным камнем современной разработки, но вместе с ней пришла и головная боль, знакомая многим — отслеживание прохождения запросов через лабиринт взаимосвязанных. . . |
Наверх
Updated on Apr 28, 2025
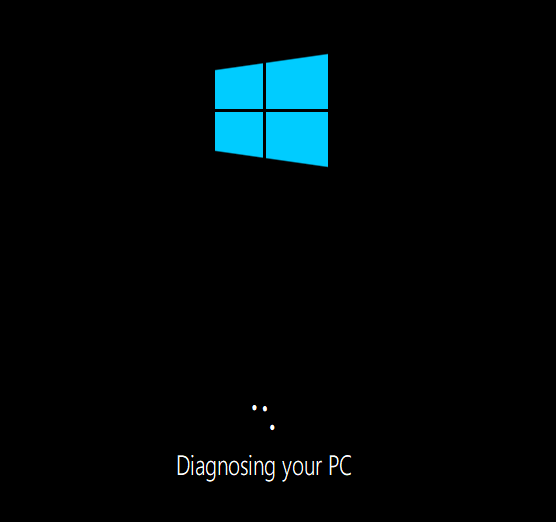
Have you ever encountered the «your PC/Device needs to be repaired» error, which appears with the error codes varying from 0xc00000f to 0x0000225? Below is a real case from the Microsoft Community:
After updating my computer with a new version of Windows 10, I have this message when turning it on: «Recovery: Your PC/Device needs to be repaired. The Boot Configuration Data file doesn’t contain valid information for an operating system. File: \BCD 0xc0000098
Take it easy. In this guide, EaseUS will delve into six reliable solutions to fix the «your PC/Device needs to be repaired» error and get your PC or device up and running smoothly again.
How to Fix Your PC/Device Needs to Be Repaired — 6 Ways
- Way 1. Run Boot Repair and Rebuild BCD
- Way 2. Perform Windows Startup Repair
- Way 3. Check the System File
- Way 4. Rebuild BCD
- Way 5. Restore the System
- Way 6. Reinstall the Windows System
You will discover six efficient ways that can help you fix your PC/Device that needs to be repaired problem. Continue to follow and learn the comprehensive steps.
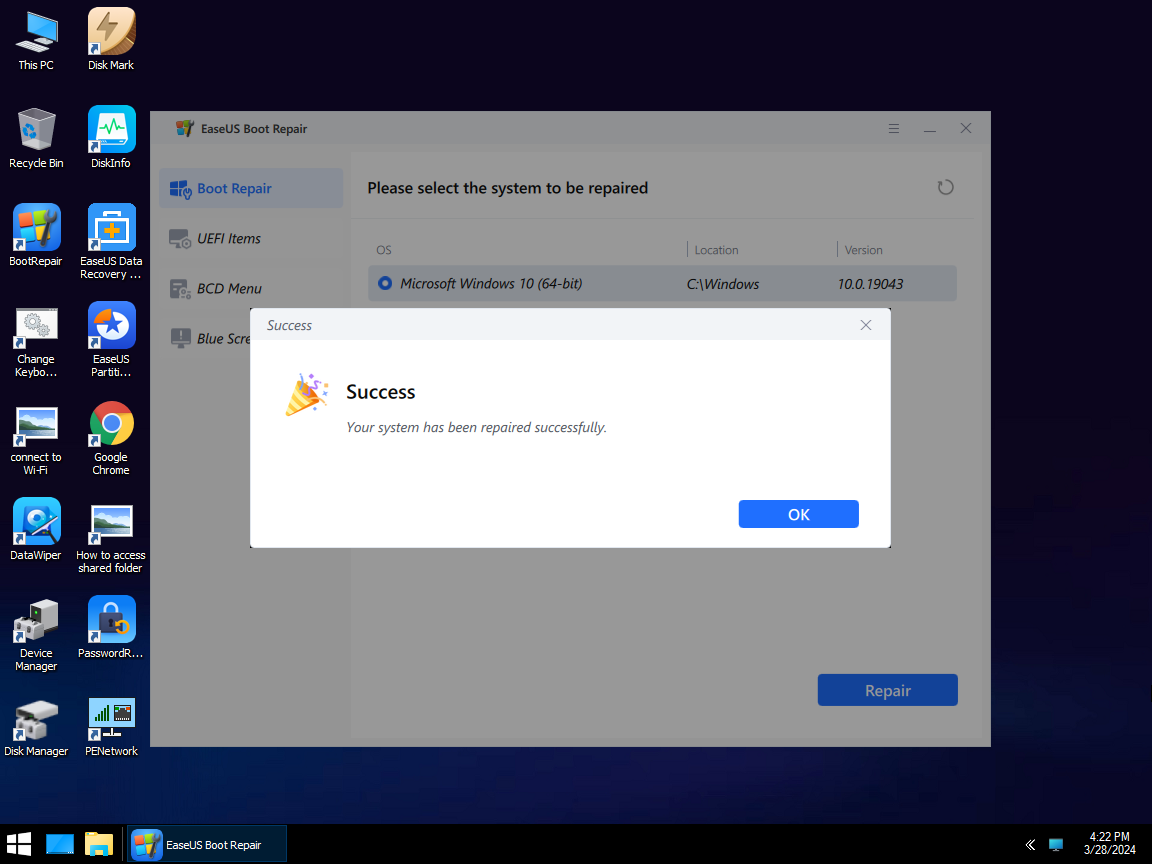
Way 1. Run Boot Repair
When your computer shows a blue screen of death and delivers the message «your PC/Device needs to be repaired,» it’s most likely that your configuration files needed for startup are corrupted. In this case, EaseUS WinRescuer can meet your requirements in repairing startup issues perfectly.
Its user-friendly interface and comprehensive unbootable issue solutions make it an invaluable asset in your troubleshooting toolkit. By embracing these solutions, you can bid farewell to the frustration of most startup repair failures.
Follow the steps:
Step 1. Connect the USB drive/external drive to a working computer, open EaseUS WinRescuer, and click «Create Bootable Media.»
Step 2. Select EaseUS Boot Toolkits and other components you need. Then, click «Next.»

Step 3. Select your movable device and click «Go» to create an image on your USB drive/external drive. You can also burn the Windows ISO file to the storage media.
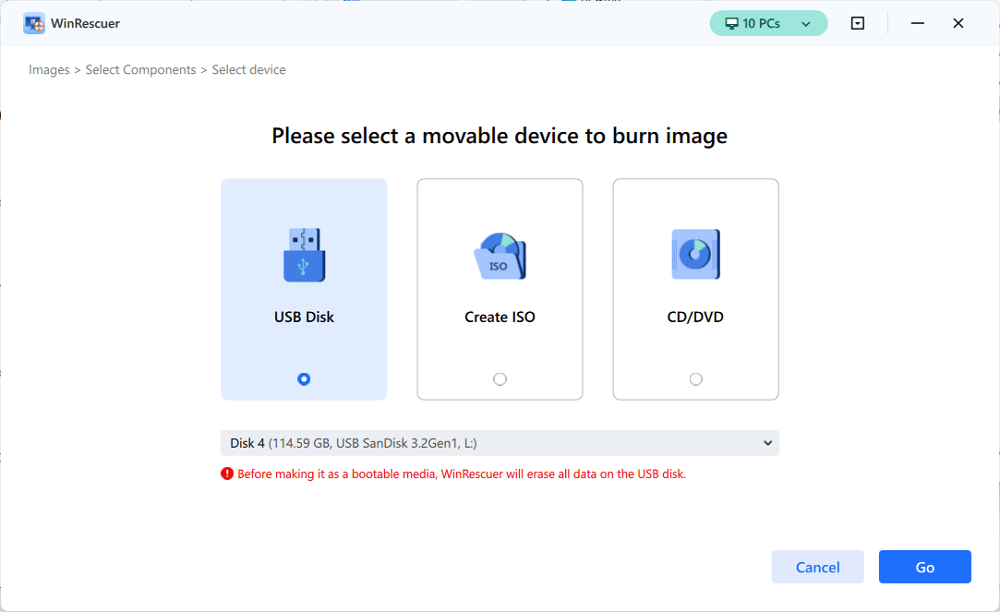
Step 4. Confirm the warning message and then wait for the creation process to complete.
Step 5. Connect the created bootable drive to the faulty computer and reboot it by pressing and holding «F2″/»Del» to enter the BIOS. Then, set the WinPE bootable drive as the boot disk and press «F10» to exit.

Step 6. Then, the computer will enter WinPE desktop. Open BootRepair, select the system you want to repair, and click «Repair.»
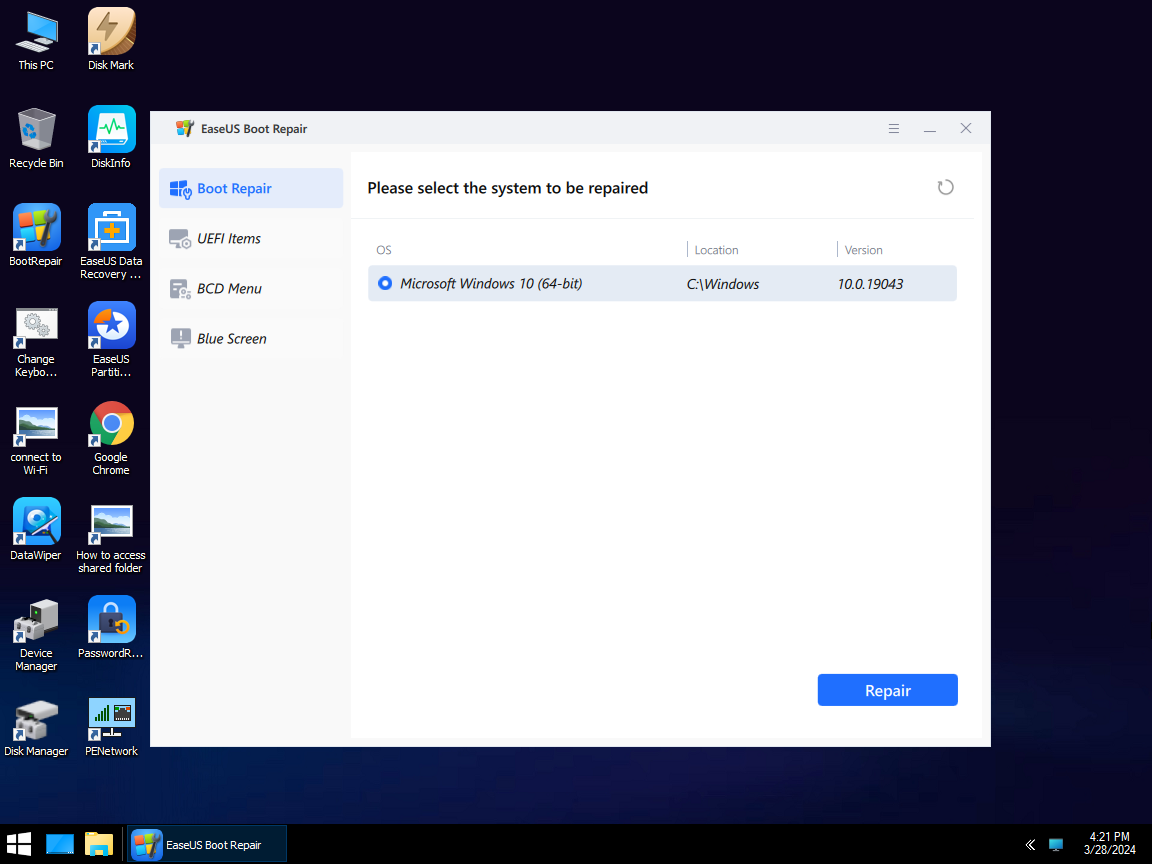
Step 7. Wait a moment, and you will receive an alert that the system has been successfully repaired. Click «OK» to complete the boot repair process.
Other Key Features of EaseUS Partition Master
Below are some similar unbootable problems that EaseUS Partition Master can be applied to:
- Fix Selected File Is Not a Proper BIOS
- Solve Windows Update KB5034441 error: Windows recovery environment servicing failed.
- Resolve RunDLL error on startup
- Repair Windows 11 startup repair is not working
Way 2. Perform Windows Startup Repair
Windows offers a built-in Startup Repair utility to help users get rid of various unbootable issues, including the «Your PC/Device Needs to Be Repaired 0xc0000225/0xc00000f» error. This tool can automatically detect and repair startup failures. Check the full guide here:
Note: Before starting, you need to create a Windows installation media.
Step 1. Connect the installation media to the blue screen PC and reboot it.
Step 2. Press the appropriate key according to different computers to trigger the computer to boot from the installation media.
Step 3. Select language, time, and keyboard/input. Click «Next» to move on.
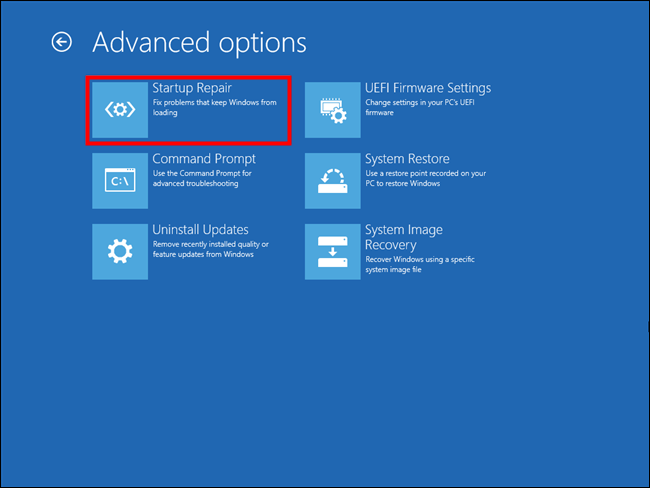
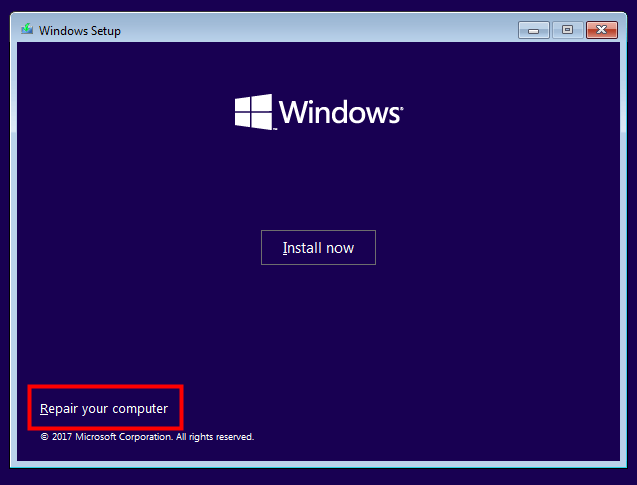
Step 4. Click «Repair your computer» and select the target Windows OS.
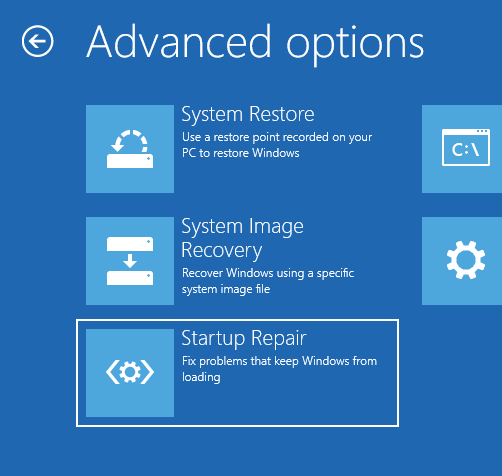
Step 5. Select «Troubleshoot» > «Automatic Repair» / «Startup Repair.»
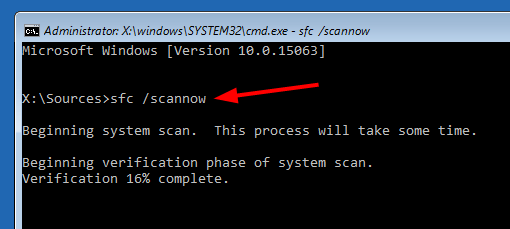
Way 3. Check the System File
Running a file/disk check is the most straightforward way to find out what the problem is. To address this task, you can turn to the sfc /scannow and CHKDSK commands. With them, you can scan the system disk and file and then fix the issues.
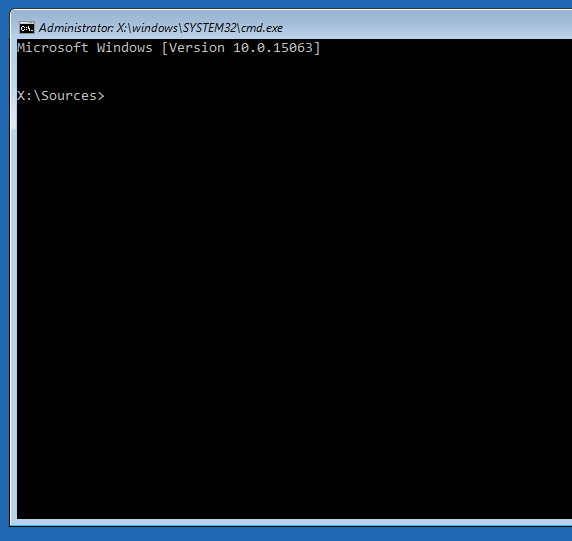
Step 1. Launch the Command Prompt utility and run it as an administrator.
Step 2. Type the SFC and chkdsk commands below and hit the «Enter» key for each:
SFC /scannow
chkdsk c: /f /r (Where C: is your system disk)
Step 3. Wait till the scan finishes and follow the on-screen instructions to repair the errors.
This method can also used to resolve the «Your PC Did Not Start Correctly in Automatic Repair» issue:
Way 4. Rebuild BCD using CMD
If you don’t want to use EaseUS Partition Master and are skilled in the Commands, you can apply Command Prompt to rebuild Boot Configuration Data. Here is what you should do:
Step 1. Refer to the step 1,2,3 of the Way 2, select «Advanced options» > «Command Prompt.»
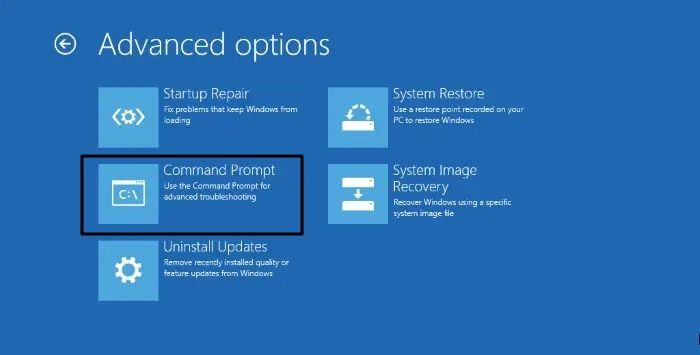
Step 2. Use the commands here and press «Enter» on the keyboard for each:
- Bcdedit /export C:\BCD_Backup
- ren c:\boot\bcd bcd.old
- Bootrec /rebuildbcd
Step 3. Type exit after the process is done, and then restart your PC.
Way 5. Perform the System Restore
If you come up with this error after updating the Windows Operating System, you can restore the Windows to the previous version. Below is the comprehensive tutorial:
Note: Follow Steps 1, 2, and 3 of Way 2 to access the «Advanced options» window.
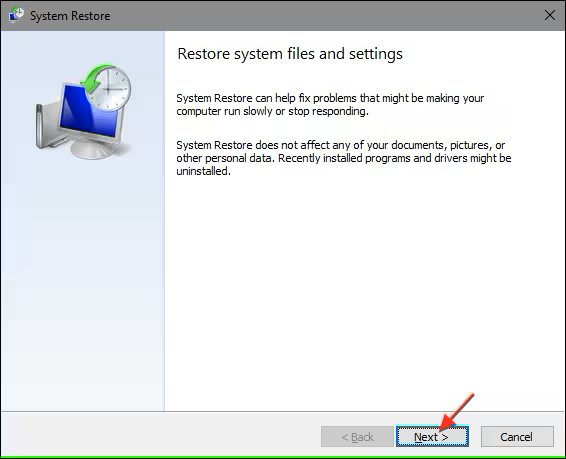
Step 1. Click the «System Restore» option in the «Advanced Options.»
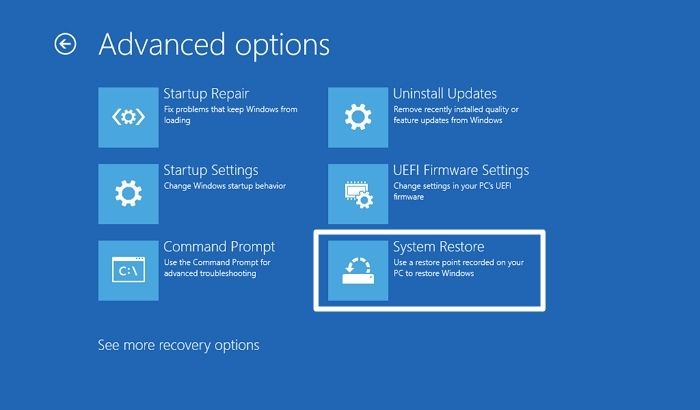
Step 2. From the restore point tab, select a time point you want to return to and choose «Next.»
Step 3. Refer to the on-screen instructions and complete this process in the System Restore Wizard.
Way 6. Reinstall the Windows System
Prepare a CD/DVD/USB and navigate to Microsoft to download Windows and create a Windows installation media. Then, you can check the steps to reinstall a new Windows system:
Step 1. Insert the Windows installation CD/DVD/USB and boot from it.
Step 2. Pick your language preferences, and press the «Next» button to continue.
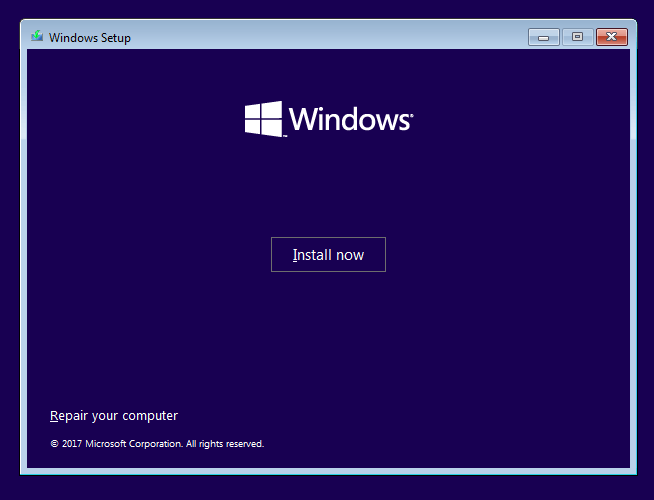
Step 3. Select «Install now.»
What Causes Your PC/Device Needs to Be Repaired Error?
Now, you have got rid of this problem. Let’s think about why the «Your PC/Device Needs to Be Repaired» Error happens. We have collected the potential reasons as follows:
- Invalid or damaged bootable partition
- Boot configuration data is missing or corrupted
- The system cannot find any bootable devices
- Boot files are damaged
Conclusion
In this post, we walked you through six powerful solutions to fix Your PC/Device Needs to Be Repaired problem. Additionally, you will also discover the possible causes of this annoying error. As you can see, most solutions are complicated for computer beginners. EaseUS Partition Master will get you covered with its user-friendly startup failure features.
If you have more questions about Your PC/Device Needs to Be Repaired, follow this FAQ part and find answers here:
1. How do you repair your PC did not start correctly?
There are multiple solutions you can apply to resolve the «your PC did not start correctly» issue, including performing the Boot Repair feature of EaseUS Partition Master, restarting the computer and booting into the safe mode, running the system restore, rebuilding the BCD, and using the Windows Startup Repair Tool.
🔍More Information: How to Fix Your PC Did Not Start Correctly | 8 Ways
2. How do I run Startup Repair on my PC?
Follow the step-by-step guide to run Startup Repair on your PC:
- Press the «Windows + I» keys to open the Settings.
- Go to «Update & Security» > «Recovery» window.
- In the «Advanced Startup» tab, select «Restart Now.»
- After rebooting, navigate to «Troubleshoot» > «Advanced Options» > «Startup Repair.»
If the Startup Repair tool does not work, you can refer to the guide below:
🚩Read More: Fix Windows 11 Startup Repair Not Working
3. How do I fix the blue screen of death error (BSOD)?
Many reasons could lead to the blue screen of death error. Thus, you will need an all-in-one tool that can seamlessly resolve this problem. EaseUS Partition Master is your first choice. Here is the how-to tutorial:
Step 1. Launch EaseUS Partition Master on another healthy PC and insert an empty USB
Step 2. Go to «Bootable Media» > «Create bootable media,» select the target USB, and click «Create.»
Step 3. Connect the bootable USB to the PC with the blue screen error and reboot from the USB. Enter the WinPE interface and run EaseUS Partition Master.
Step 4. In the «Toolkit» tab, choose «Boot Repair,» select the system you wish to repair and click «Repair» > «OK.»
Related Articles
-
Fixed: Green Screen of Death on Windows 10/11 — 6 Tips 💡
Sherly/2025/04/28
-
Steam Is Not Recognizing SSD, Here Is What I Can Do
Tracy King/2025/04/28
-
Guide on Seagate External Hard Drive Transfer Speed
Tracy King/2025/04/28
-
Clone Larger HDD to Smaller SSD (Windows 11 Support)
Tracy King/2025/04/28
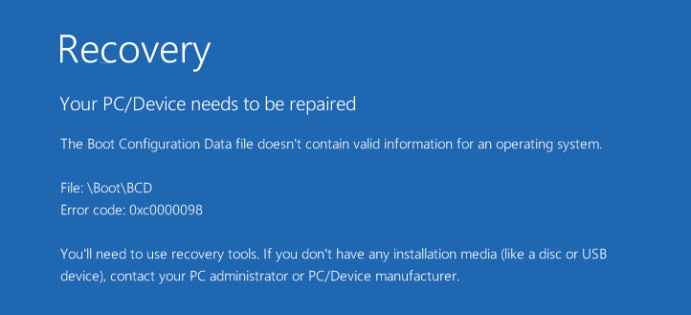
You may encounter an error telling you “Your PC/Device needs to be repaired” if you are using Windows 10. This error usually happens when your computer is loading the operating system. Usually you will see in the error message an error code like 0x0000098, 0xc000000f, 0xc0000034, 0xc0000225, 0xc000014C, etc.
The error can result from critical system file corrupted or missing. It can also happen when there are problems with the BCD (Boot Configuration Data, an essential file your computer uses to boot your system).
The following are methods that can help you tackle this error. They can either fix or recover the critical system files, getting your operating system back to normal. It is recommended that you give them a try.
1) Run Startup Repair
2) Use Command Prompt
3) Reinstall your system
Before anything else
In order to perform these methods, you need a Windows 10 installation media, like a USB drive or a DVD. You can create one with a USB drive.
Once your installation media is prepared, you can put it into your computer, and then boot your computer from the media.
After that, select the language and region.
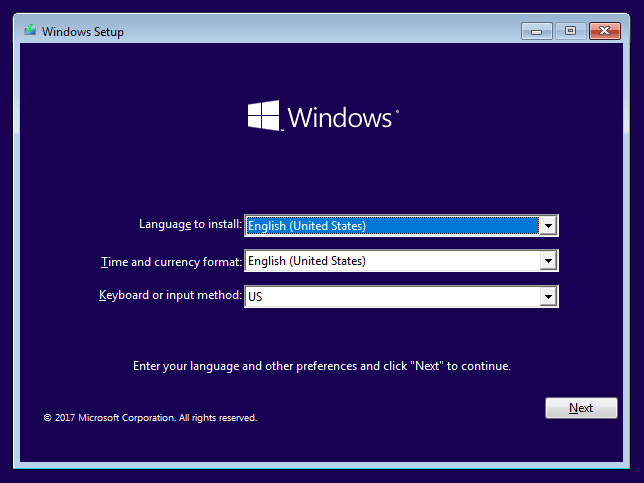
When you see the screen below, you can proceed to perform the methods listed above.
1) Run Startup Repair
a) Click on Repair your computer.
b) Select Troubleshoot. It will bring you to Advanced options.
c) In Advanced options, select Startup Repair.
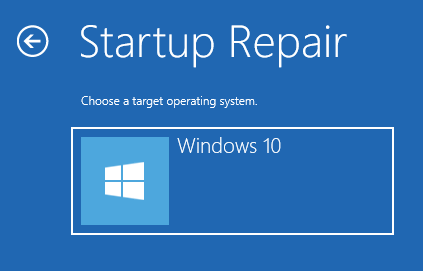
d) Select Windows 10.
e) Startup Repair will start and diagnose your computer immediately.
2) Use Command Prompt
a) Do the steps a and b in the method above to enter Advanced options.
b) In Advanced options, select Command Prompt.

c) The window of Command Prompt will appear.
d) First, you can have a scan of your Windows files on your computer and repair problematic ones. Type “sfc /scannow” and hit Enter.
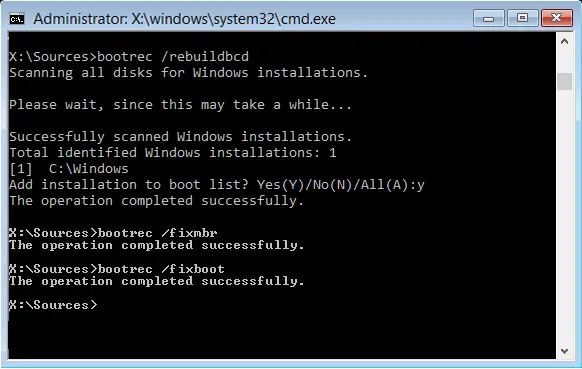
e) Fixing boot information of your system is also something you should consider. To do so, type the following lines in Command Prompt and hit Enter after each.
bootrec /fixmbr
bootrec /fixboot
bootrec /scanos
bootrec /rebuildbcd
3) Reinstall your system
Note that if you reinstall your operating system, the files on your system drive can get erased and all your applications needs to be reinstalled.
a) Click on Install now.
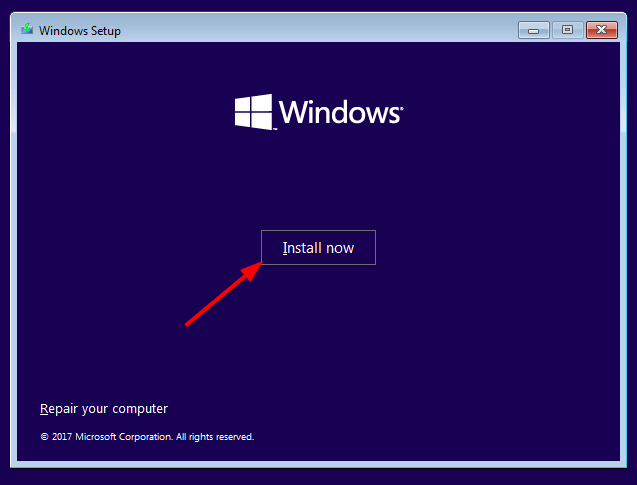
b) Follow the on-screen instructions to complete the setup configurations and the reinstallation of your system.
37
37 people found this helpful
Содержание статьи:
- Что делать с ошибкой 0xc000000e
- ШАГ 1
- ШАГ 2
- ШАГ 3
- ШАГ 4: универсальный вариант восстановления загрузчика
- Вопросы и ответы: 30
Доброго времени!
Нередко при работе с разделом диска, на котором установлена ОС Windows (перенос/миграция ОС, подключение доп. диска и пр.) — при включении ПК появляется синее окно «Recovery…» и код ошибки 0xc000000e (пример на скрине ниже в статье 👇). Разумеется, дальше Windows не загружается и ждет от вас какого-нибудь решения…
Как правило, такое «поведение» Windows связано не с повреждением каких-то значимых файлов ОС, а с тем, что том был привязан к определенной букве, и когда система была перемещена на др. диск (скажем так для примера) — эта «связь» нарушается и на старте получаем ошибку…
Не так давно, как раз разбирался с этим «добром», попутно сделав несколько фото. Думаю, эта небольшая заметка сможет помочь тем, кто столкнулся с нечто подобным… 👌
*
Что делать с ошибкой 0xc000000e
ШАГ 1
Итак…
Для начала отключите от ПК (ноутбука) все подключенные к нему накопители (флешки, внешние жесткие диски, и пр.). Попробуйте перезагрузить устройство. Снова ошибка?
После обратите внимание на нижнюю часть окна — как правило там есть пункт, позволяющий нажать на кнопку ESC и попасть в BIOS (UEFI). Это нам и нужно…
👉 В помощь!
Как войти в BIOS (UEFI) на ПК и ноутбуках — инструкция для неискушенных пользователей

Пример ошибки, переход в настройки BIOS (0xc000000e, Winload.efi, Recovery: Your PC/Device needs to be repaired)
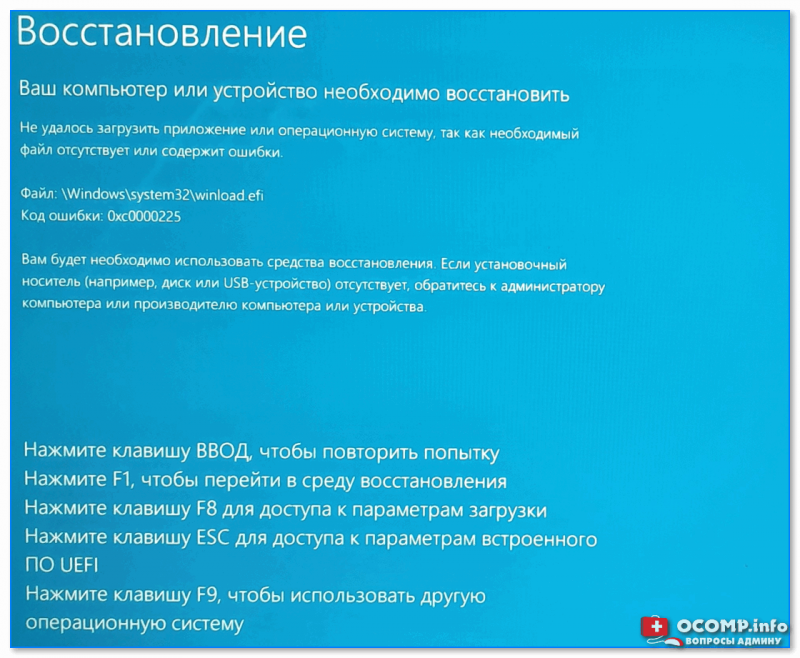
Ваш компьютер или устройство необходимо восстановить // Пример ошибки на русском (0xc0000225, Winload.efi)
В BIOS нам нужно попробовать включить режим Legacy Boot или CSM (и выключить Fats Boot — режим быстрой загрузки). В зависимости от версии BIOS/UEFI меню настроек может сильно отличаться, в качестве примера — я добавил пару фото (👇). Обычно эти опции в разделе «Boot».
Кстати, проверьте также строку «Boot option» — что за загрузчик (диск) там указан на первом месте (вдруг там стоит «Disabled») . Часто причина именно в этом…
После нужно сохранить настройки и попробовать перезагрузить устройство.
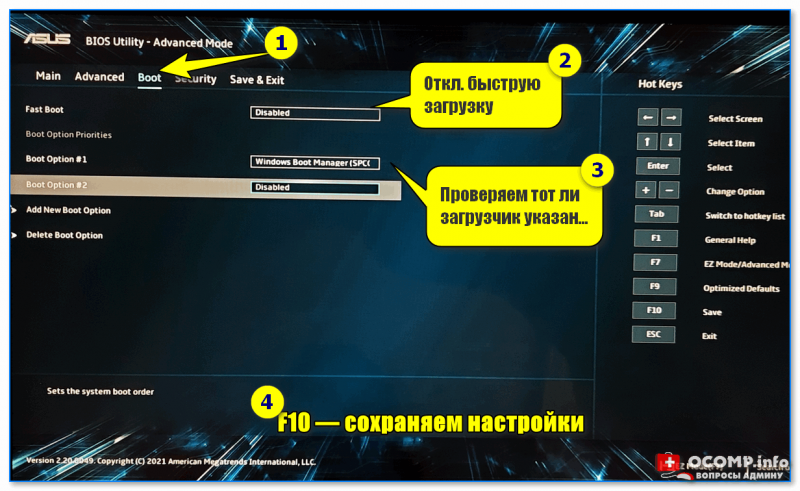
Проверка настроек UEFI | Ноутбук Asus | Кликабельно

Раздел BOOT — отключаем Secure Boot | Ноутбук от Dell
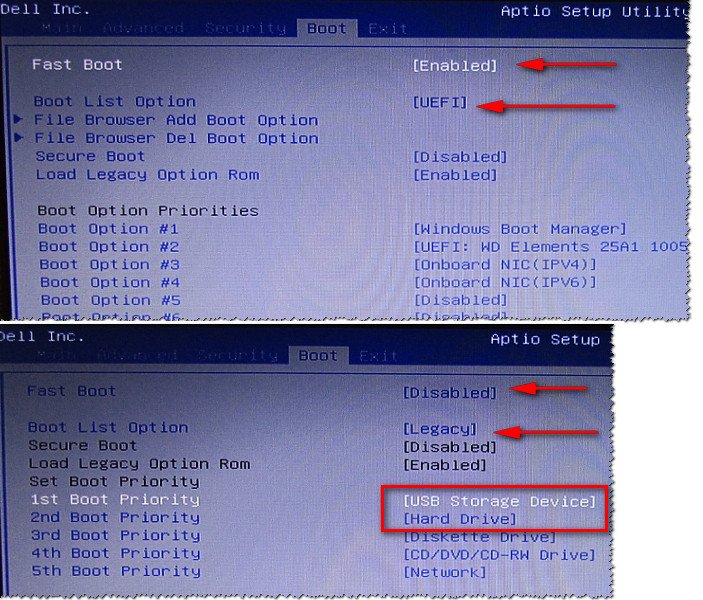
Включен — выключен Secure Boot
👉 Кстати, еще один важный момент!
В ряде случаев «проблемную» Windows можно загрузить, использовав 👉BOOT-меню и выбрав в нем вручную эту ОС (в моем случае это «OS Boot Manager (UEFI) — Windows Boot Manager (SPCC M.2 PCIe SSD))».
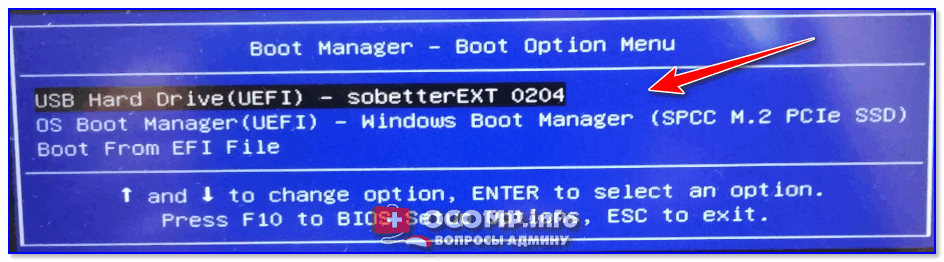
BOOT Меню
*
ШАГ 2
Если корректировка настроек BIOS не увенчалась успехом — далее для работы нам понадобиться установочная флешка с Windows. Такую флешку обязательно нужно иметь в своем арсенале! (про запас 👌)
👉 В помощь!
1) Создание загрузочной USB-флешки Windows 10 — несколько способов
2) Создание установочной флешки с Windows 11 — см. инструкцию
*
С этой установочной флешки 👉 необходимо загрузиться и дойти до окна, в котором предлагается начать установку Windows — в нижней части окна (👇) нажать на «Восстановление системы».
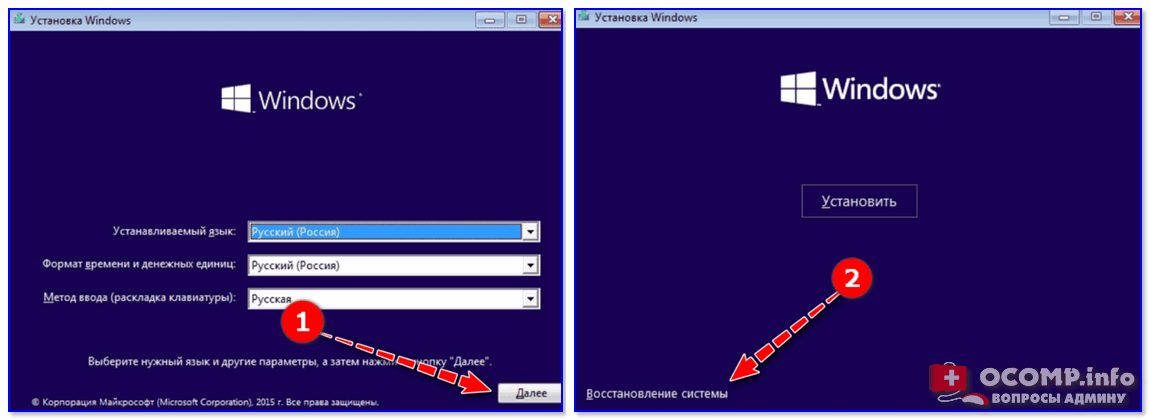
Загрузка с установочной флешки — восстановление системы
Далее перейти в меню поиска и устранения неисправностей.
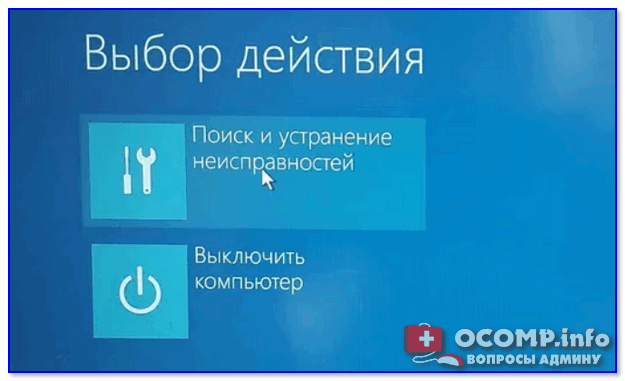
Поиск и устранение неисправностей
В нем есть две ключевых вкладки:
- восстановление при загрузке: рекомендую ее задействовать в первую очередь. В ряде случаев ОС автоматически восстанавливает себя сама;
- восстановление системы: если первое не помогло, попробуйте проверить, вдруг у вас в загашнике есть контрольная точка (бэкап), которая и поможет решить проблему…
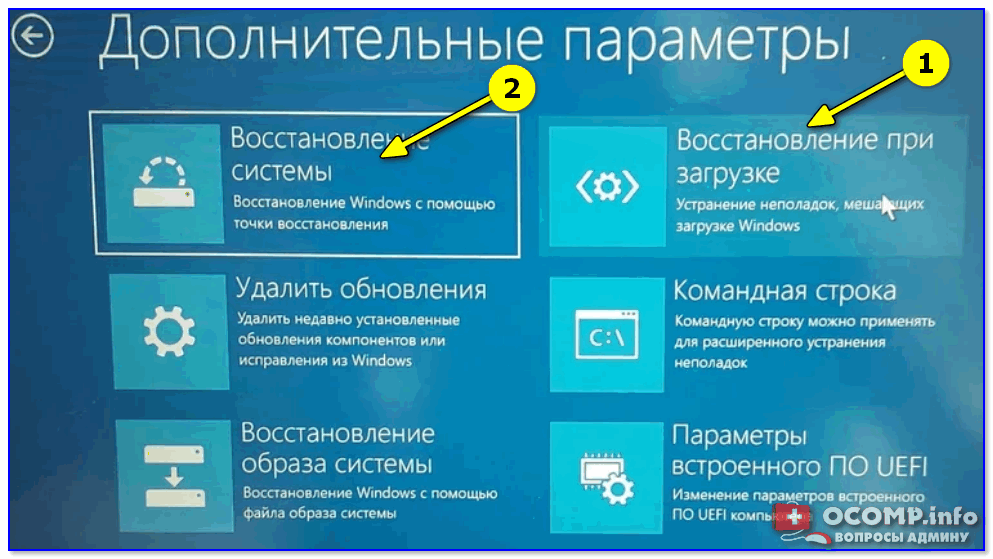
Дополнительные параметры
*
ШАГ 3
Актуально для EFI GPT!
Если ОС по-прежнему не загружается — стоит попробовать вручную привязать ОС Windows к нужному тому. Делается это не так уж и сложно…
Сначала необходимо загрузиться с установочной флешки (как в ШАГЕ 2 👆) и в меню доп. параметров запустить командную строку.
В ней нужно последовательно ввести ряд команд — я их пометил зеленым цветом (после каждой нажимать Enter 👇):
- DISKPART (запускаем утилиту для работы с дисками);
- LIST VOLUME (даем команду утилите показать все диски в системе);
- SELECT VOLUME=2 (Выбор тома для работы. Здесь нужно указать номер тома «ESP» – можете сориентироваться по его размеру в 99/100 МБ. В моем случае — это том 2);
- ASSIGN LETTER=Z (присваиваем этому тому букву «Z»);
- EXIT (выходим из утилиты DISKPART).
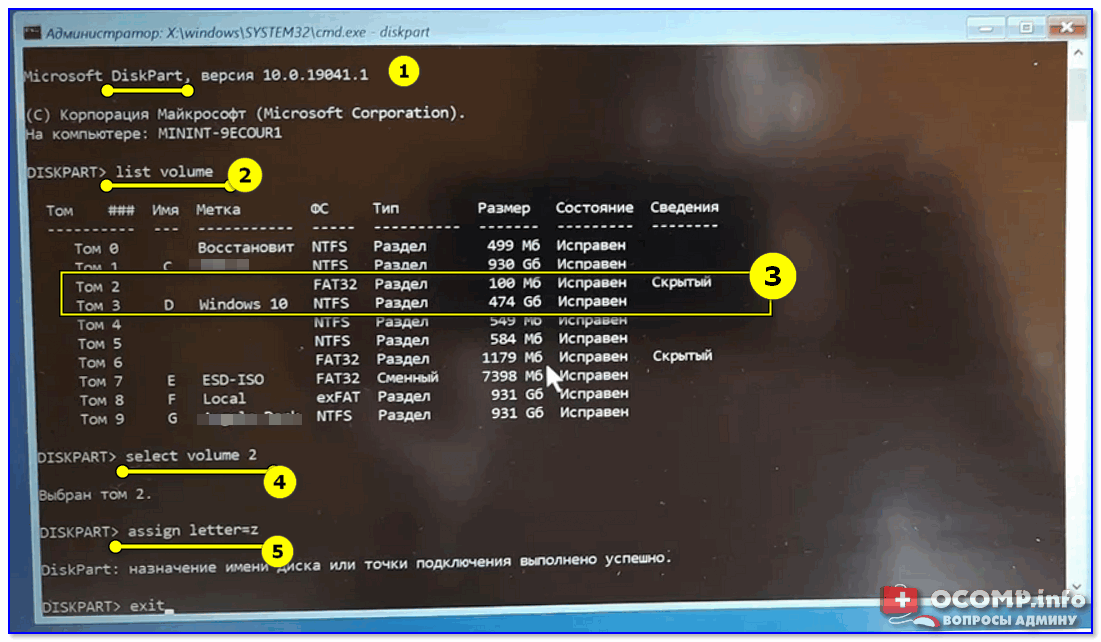
Командная строка — diskpart
После нужно ввести (очень внимательно) следующую команду (и нажать Enter 😉):
bcdboot D:\windows /s Z: /f UEFI
Примечание: вместо «D» нужно указать тот том, на котором у вас установлена Windows (далеко не всегда это диск «C»). Вместо «Z» — букву тома ESP (мы его задали при использовании DISKPART, чуть выше 👆).
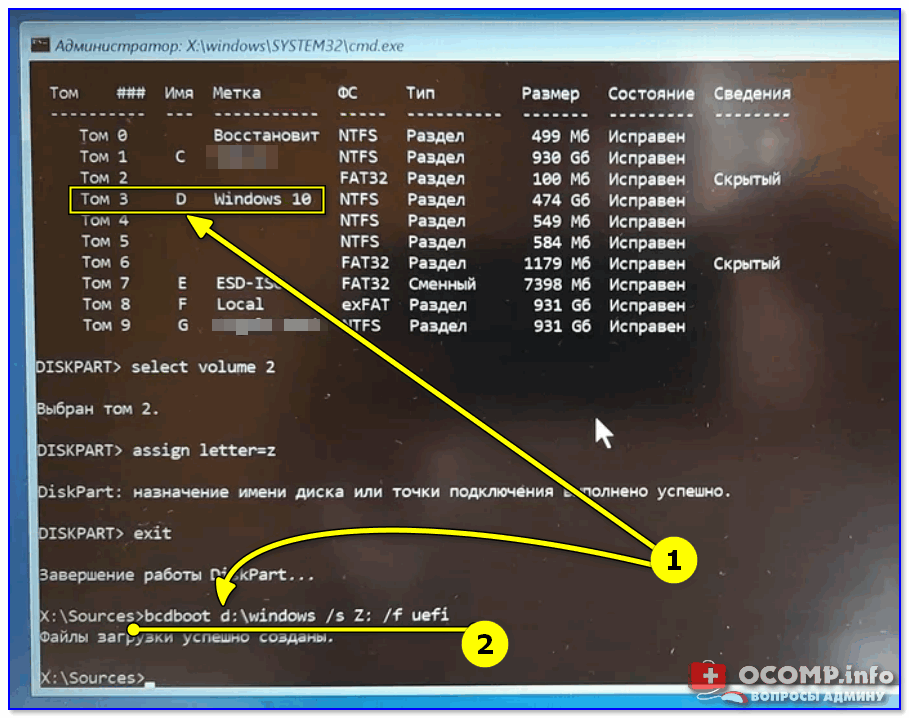
Привязка целевого раздела Windows
Если все прошло успешно — вы должны увидеть сообщение о том, что «Файлы загрузки успешно созданы». Теперь можно перезагрузить ПК и проверять работу (обычно, такая ручная «привязка» срабатывает в большинстве случаев…).
*
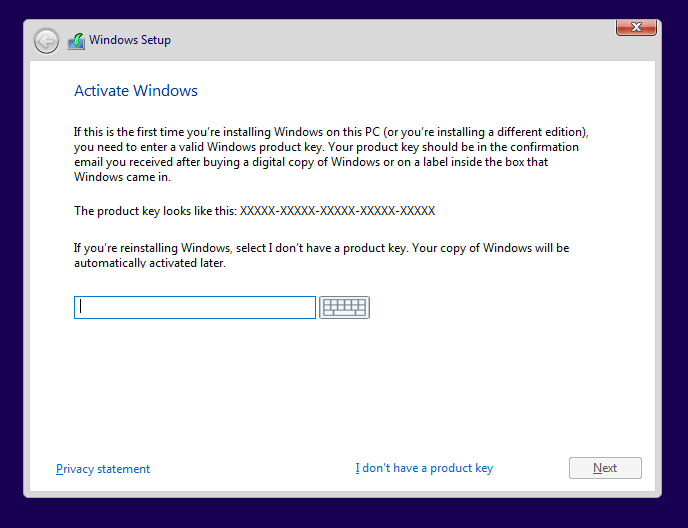
Если при попытке восстановления (запуска командной строки) — появилось требование ввести КЛЮЧ
См. фото ниже. 👇
Похожее окно может появиться в том случае, если ваш диск был зашифрован (прим.: BitLocker сегодня может активироваться на современных устройствах под Windows 10/11 автоматически!).
В этом случае для вас восстановление ОС чуть усложняется. Сначала вам необходимо будет узнать свой ключ и ввести его в соответствующую строку. О том, как его узнать — 👉 см. эту заметку!
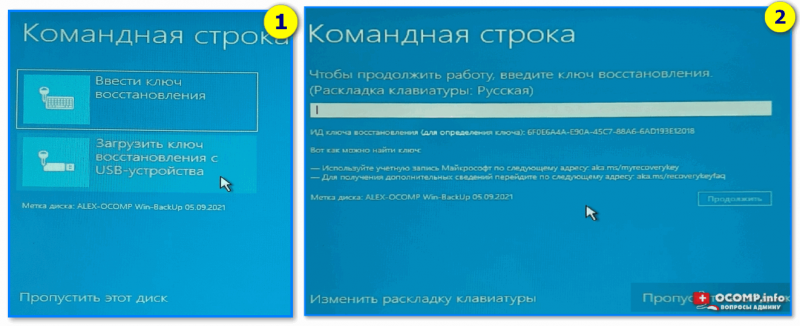
Ключ восстановления — ввести или загрузить
Если вы решите не вводить ключ расшифрования и пропустите этот шаг — диск будет недоступен для работы (файловая система отобразиться как «Unkno» 👇).
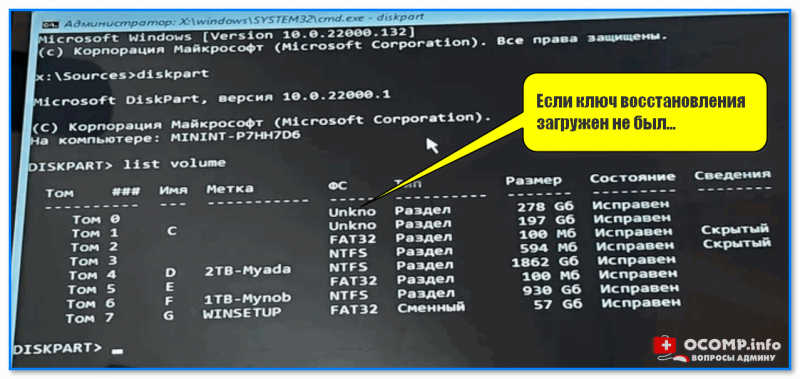
Если ключ восстановления загружен не был… (файловая система — Unkno)
*
Если в меню загрузки будет появляться 2 ОС
Ах да… чуть не забыл…
После операции восстановления (успешной!) у вас на этапе загрузки может начать появляться окно с предложением выбрать какую ОС Windows загружать — как будто их стало 2-3 (👇 выбирайте первую).
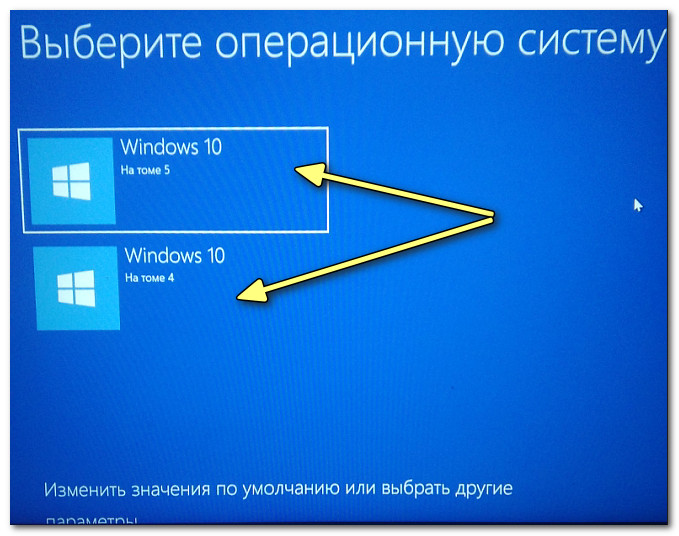
Выбор ОС Windows 10 при загрузке
А чтобы это окно вас не донимало — после загрузки Windows зайдите в проводник и откройте свойства «Моего компьютера», и перейдите в доп. параметры (👇).
Альтернативный вариант: нажать Win+R и использовать команду sysdm.cpl
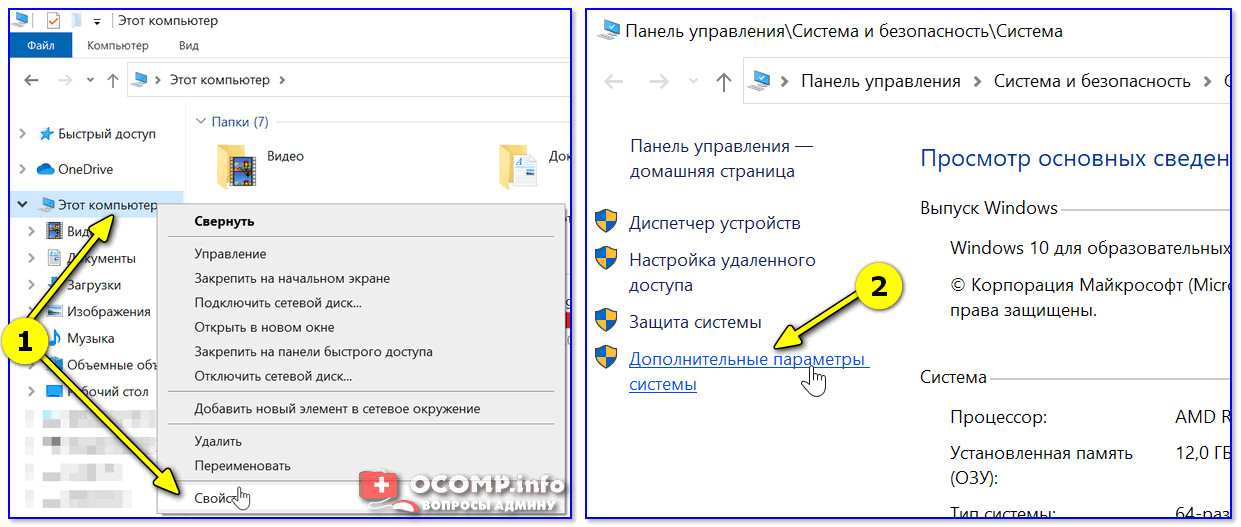
Доп. параметры системы
Далее откройте параметры загрузки и восстановления и измените время отображения списка ОС (лучше всего установить время в 1 сек. В этом случае и меню будет пропадать быстро, и, если что не так — вы всегда сможете до него добраться 👌).
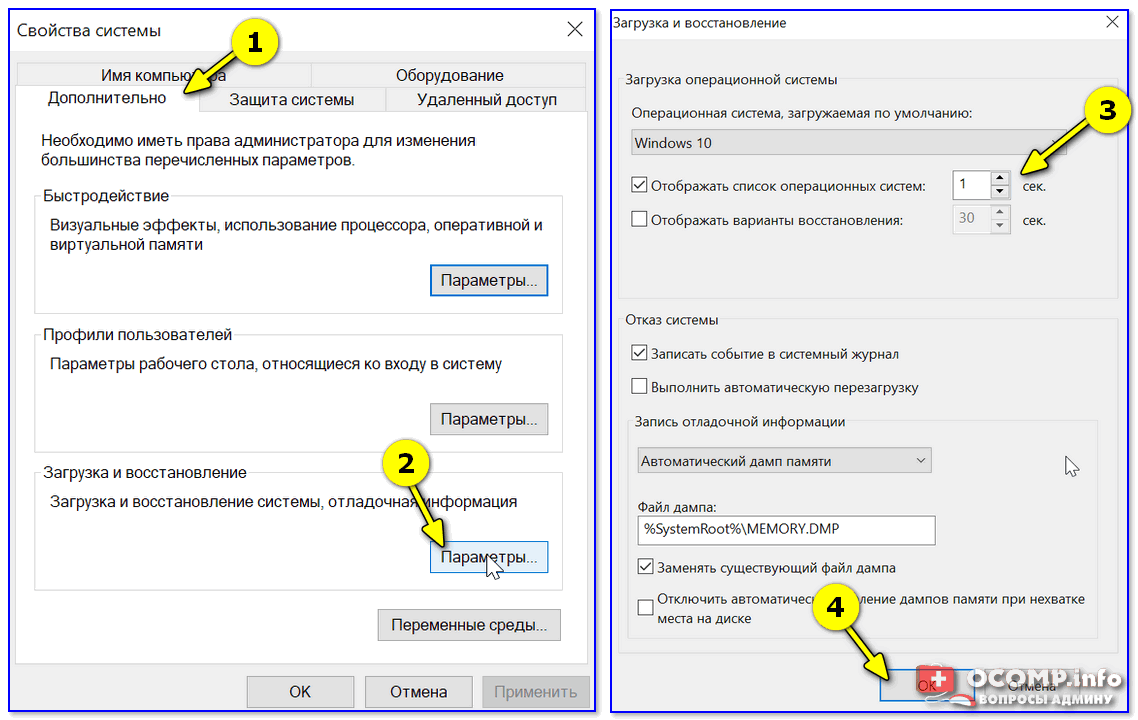
Отображать список ОС 1 сек.!
*
ШАГ 4: универсальный вариант восстановления загрузчика
Этот способ актуален даже в том случае, если у вас слетел системный EFI раздел (и компьютер при включении сообщает, что он вообще не нашел ни одного загрузочного устройства, см. пример ниже 👇)!
Правда для работы нам понадобиться LiveCD-диск (ссылка на нужный).
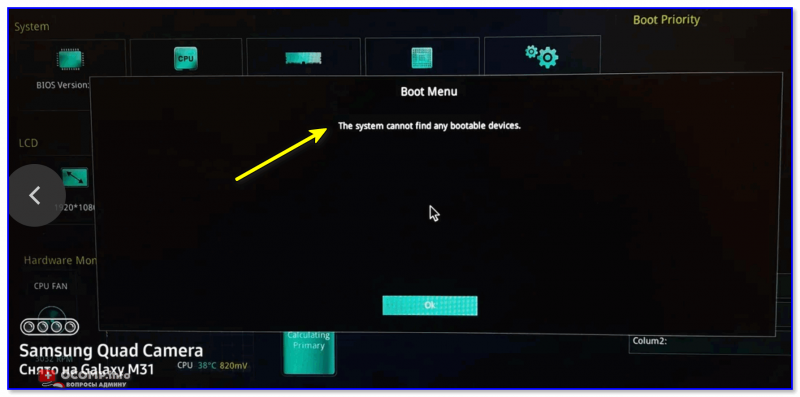
The system cannot find any bootable devices — система не может найти на одного загрузочного устройства
Загрузившись с LiveCD — для начала необходимо запустить утилиту MiniTool Partition Wizard и посмотреть, что там с разделами…
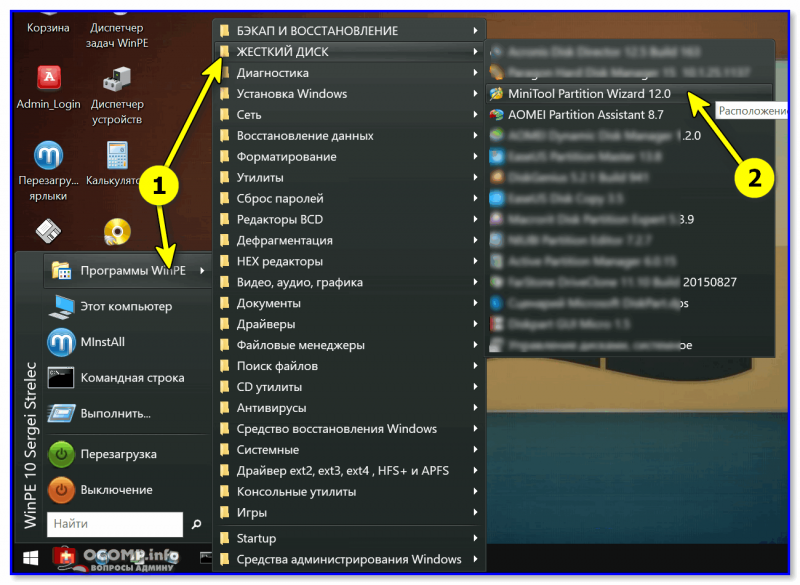
Запускаем программу MiniTool Partition Wizard
Обратите внимание на тот диск, на котором у вас установлена Windows. Обычно в его начале должен идти раздел на 100÷512 МБ в FAT32/NTFS (см. скриншот ниже: в моем случае раздел «слетел» и отображается как «Незанятый»).
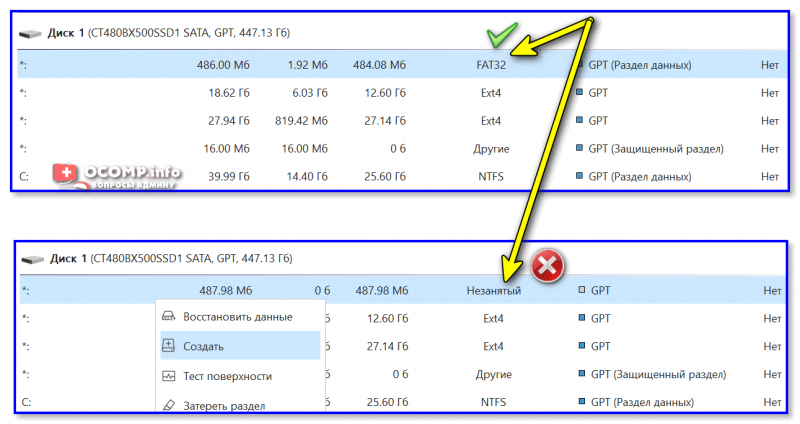
Находим системный раздел EFI
Если у вас тоже файловая система отображается как «Незанятая» — необходимо будет кликнуть по этой области ПКМ и создать раздел:
- если тип GPT — выбираем файловую систему FAT32;
- если тип MBR — выбираем файловую систему NTFS и делаем раздел активным!
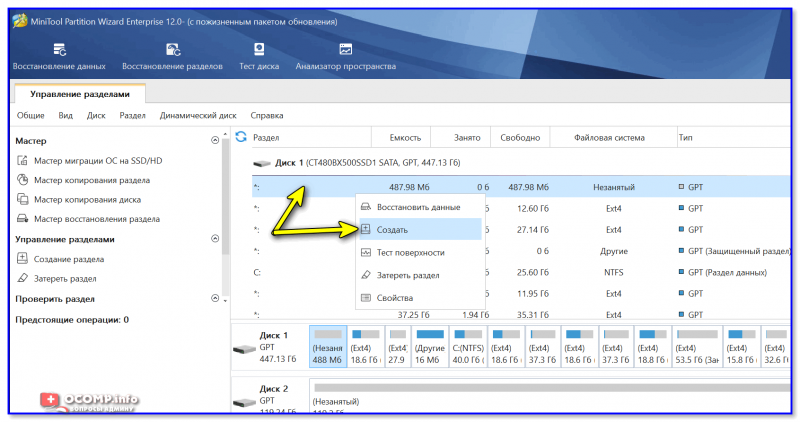
Создать раздел (если GPT — FAT32, если MBR — NTFS, активный)
Для выполнения введенных настроек — не забудьте нажать на «Применить».
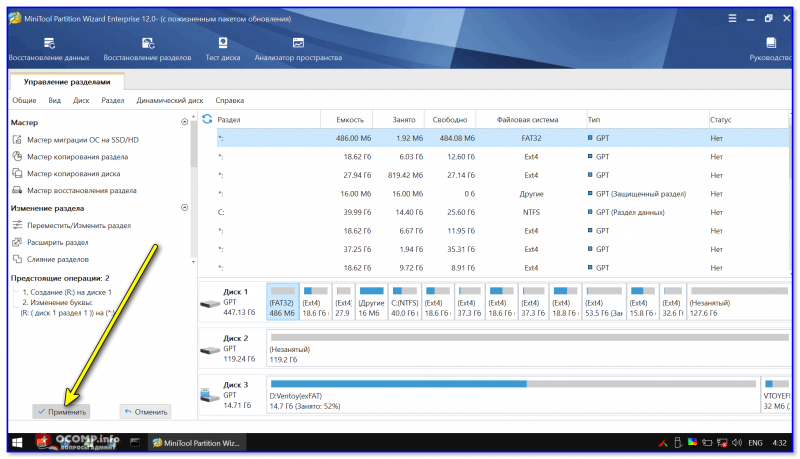
Применить изменения
Далее необходимо запустить другую утилиту — Dism++.
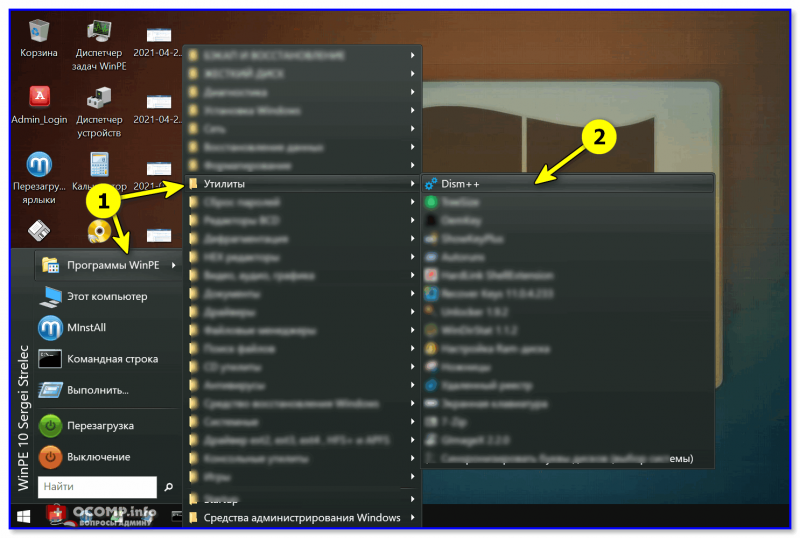
Запускаем Dism++
Она автоматически найдет все ОС Windows, установленные на дисках. Нам же будет необходимо выбрать нужную ОС и нажать по меню «Восстановление / восстановление загрузки». 👇

Восстановление загрузки (Dism++)
Затем потребуется указать вручную загрузочный раздел, нажав по кнопке «Больше».
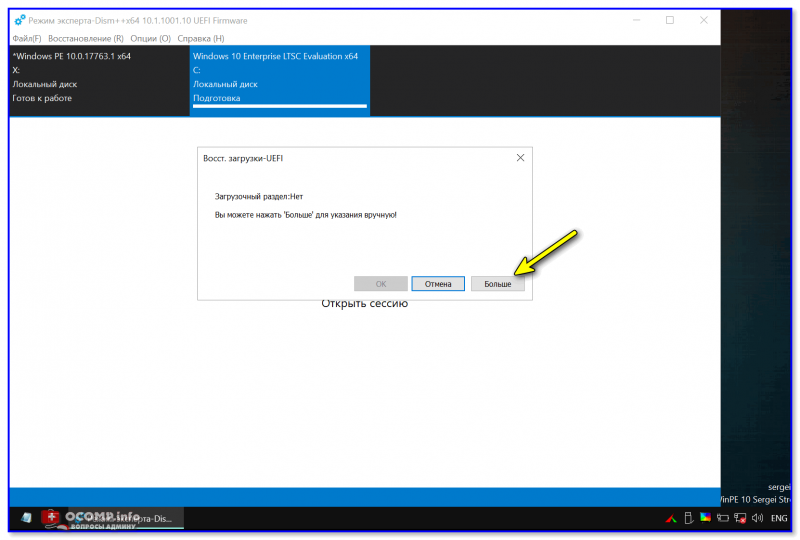
Больше (Dism++)
В моем случае он идет первым (чуть ранее мы его создали в MiniTool Partition Wizard).
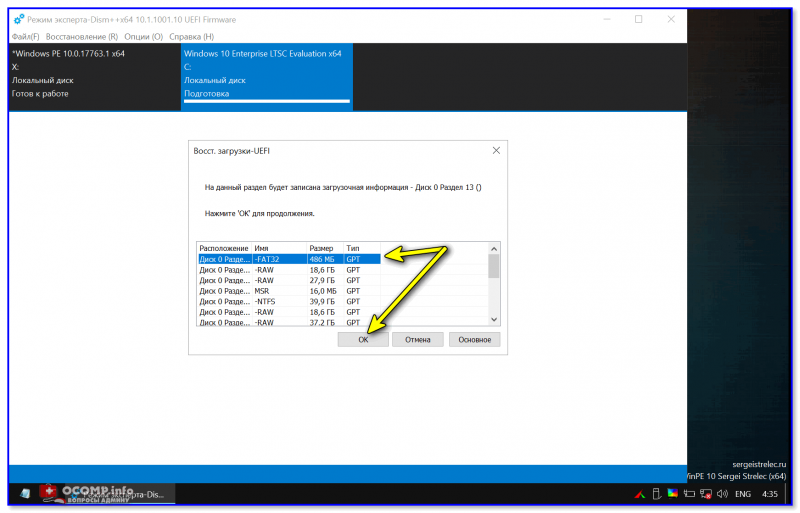
Выбираем наш подготовленный раздел
Если увидите окно с сообщением об успешном восстановлении загрузки — задача выполнена! 👌
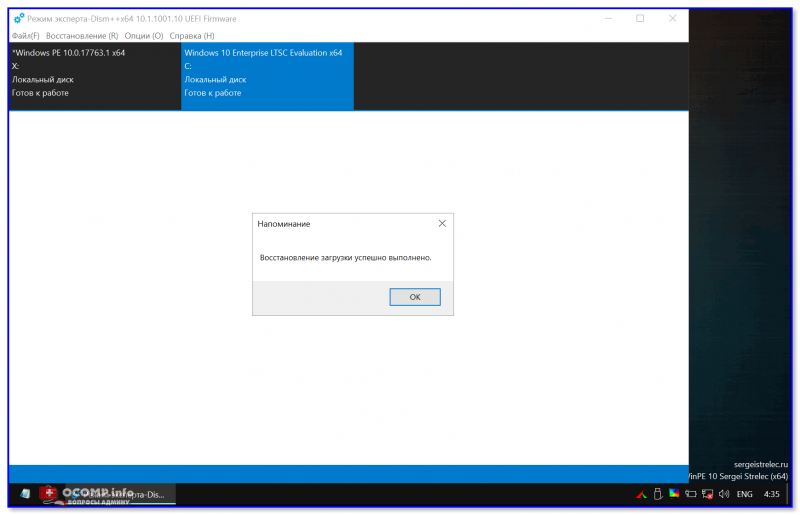
Восстановление загрузки успешно восстановлено!
После выкл. и вкл. устройства — Windows начала загружаться в штатном режиме без каких-либо ошибок.
Ноутбук загрузился!
*
Если вы решили вопрос как-то иначе — чиркните в комментариях хоть пару слов (заранее благодарю!).
Удачи!
👋
Первая публикация: 29.07.2020
Корректировка: 20.08.2021
This post focuses on solutions to “Your PC device needs to be repaired” error. If you are troubled by same error message, you should finish reading this post to find out solutions.
You’ll receive the “Your PC device needs to be repaired” error when your operating system cannot start and ends up with a blue screen. This is a common system issue which can appear on Windows Vista, Windows 7, Windows 8 and Windows 10. Generally, the error comes with an error code which may vary from 0xc0000098, 0xc000000f, 0xc0000034, 0xc0000225, 0xc000014C, 0XC0000428, etc. You can see the error code under “Recovery. Your PC needs to be repaired”. Let’s see some error message contains error codes:
- The application or operating system couldn’t be loaded because a required file is missing or contains errors. File: \windows\system32\winload.efi Error code: 0xc0000225
- The operating system couldn’t be loaded because the digital signature of a file couldn’t be verified. file:\Windows\System32\winload.exe Error code: 0xc0000428
- The Boot Configuration Data for your PC is missing or contains errors. File: \boot\bcd Error code: 0xc000000f
- An unexpected error has occurred. Error code: 0xc0000225.
- The operating system couldn’t be loaded because a critical system driver is missing or contains errors. File: \windows\System32\drivers\bfsdi.sys Error code: 0xc0000098
- The Boot Configuration Data file is missing some required information. File: \BCD Error code: 0xc0000034
Each of these error messages is followed by the message ”You’ll need to use the recovery tools on your installation media. If you don’t have any installation media (like a disc or USB device), contact your system administrator or PC manufacturer.”
Causes of Your PC device needs to be repaired” error
This error can be caused by following reasons:
- BCD is missing or corrupt. This is one of the most common causes. BCD can get damaged due to disk write errors, sudden power failure, virus, improper operations, etc.
- File system is damaged. File system on the partition in question has been damaged or corrupted, which may happen when users shut down PC during system is writing crucial data to boot sector.
- System-related files are corrupt. Files related to operating system may also get corrupted or damaged due to all kinds of reasons.
- Improper hardware or software change. The hardware recently changed or added is not well compatible with your PC or the application you installed is from anonymous source.
- Boot manager is not up-to-date. When the system on your computer is upgraded to a new version of Windows from the old one, the existing boot manager entries may not be updated.
- Older boot disc with newer version of Windows. In some cases, users may install a new version of Windows on a hard drive and then connect a different disk which installs an old version of Windows in order to set up dual boot.
How to fix “Your PC device needs to be repaired”?
Solution 1: Run Startup automatic repair
- Insert the Windows bootable installation DVD and restart your computer. Press any key to continue when you see message “Press any key to boot from CD or DVD.”
- Select language and click Next. Then click “Repair your computer” on next window.
- Select Troubleshoot Refresh or reset your PC, or use advanced tools. Choose “Advanced option” on troubleshoot screen.
- Now you can select “Automatic Repair” in Advanced options screen. This option is able to fix problems that keep Windows from loading. Wait the fixing process finishes and restart computer to check if the error is fixed.
Solution 2: Run System File Checker to fix corrupted system files
- Repeat first 3 steps in Solution 1, and select “Command Prompt” under Advanced options.
- Type follow commands in Command Prompt window and press Enter key after each command. When the tasks finishes, close Command Prompt and restart computer.
sfc /scannow /offbootdir=c:\ /offwindir=c:\windows

chkdsk c: /r
Solution 3: Rebuild MBR (Rebuild Master Boot Record)
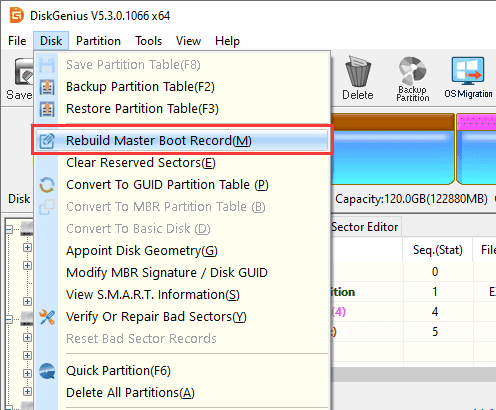
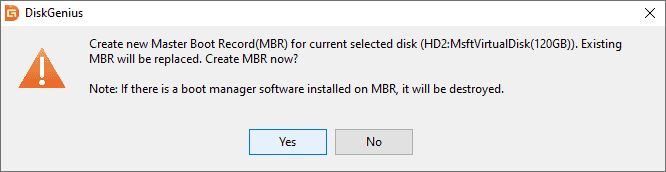
The operation of rebuilding MBR is complicated to many users, thus we provide an easier way to do so. We can use DiskGenius (old name PartitionGuru) Free Edition to complete the task, as this application rebuilds MBR quickly and quickly.
- Download, install and launch DiskGenius (old name PartitionGuru) Free. If your PC cannot boot, you can create a bootable USB disk using PartitionGuru Free so that you can boot PC with this disk.
- Select the hard drive where operating system is installed, click “Disk” menu and choose “Rebuild Master Boot Record”.

- Click “Yes” from the message box and DiskGenius (old name PartitionGuru) rebuilds Master Boot Record.