
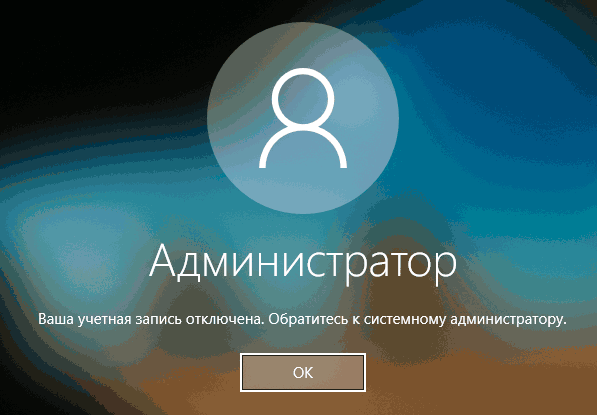
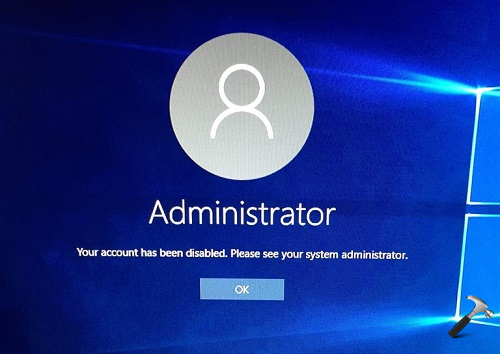
Некоторые пользователи Windows 10 при входе в систему могут столкнуться с сообщением «Ваша учетная запись отключена. Обратитесь к системному администратору», чаще всего такое происходит при входе в учетную запись «Администратор», но возможны и иные варианты. Обычно такое сообщение возникает после манипуляций, связанных с удалением или отключением учетных записей пользователей.
В этой инструкции подробно о том, как исправить проблему «Ваша учетная запись отключена» для учетных записей Windows 10 на вашем компьютере или ноутбуке (в случае, если вы работаете в домене сети организации действительно следует обратиться к системному администратору).
- Простое решение при наличии других пользователей с правами администратора на компьютере
- Как исправить «Ваша учетная запись отключена» с помощью безопасного режима Windows 10
- Дополнительные методы решения проблемы
- Видео инструкция
Простое решение при наличии других учетных записей с правами администратора на компьютере
Самый простой метод исправления возможен в том случае, если у вас есть возможность войти в систему под другим пользователем, который имеет права администратора в Windows 10 (если такой возможности нет, можно сразу перейти к следующему способу). В этом случае шаги будут выглядеть следующим образом:
- Зайдите в систему под другой учетной записью администратора (как правило, выбор учетных записей доступен в левом нижнем углу на экране входа в систему).
- Запустите командную строку от имени администратора. Для этого можно использовать поиск в панели задач Windows 10: набираем «Командная строка» и либо выбираем «Запуск от имени администратора» в меню справа, либо нажимаем правой кнопкой мыши по найденному результату и выбираем нужный пункт.
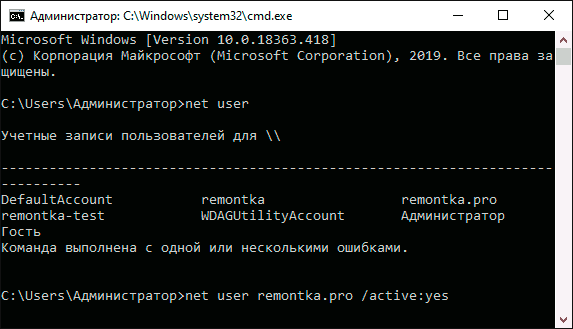
- В командной строке введите команду net user и нажмите Enter. Отобразится список имен пользователей. Вам требуется имя пользователя, для которого сообщается «Ваша учетная запись отключена. Обратитесь к системному администратору», его используем в следующей команде.
- net user имя_пользователя /active:yes
При успешном выполнении команды из пункта 4 вы можете закрыть командную строку, затем выйти из текущей учетной записи и зайти под той, которая ранее была отключена.
К сожалению, у большинства пользователей домашних компьютеров с Windows 10 отсутствуют дополнительные учетные записи, из которых можно было бы выполнить указанные действия, а в некоторых случаях и сама проблема может возникнуть после отключения или удаления единственной учетной записи пользователя. В этой ситуации может помочь следующий метод.
Как исправить «Ваша учетная запись отключена» в безопасном режиме Windows 10
В Windows 10, даже при отсутствии других учетных записей пользователей и при отключенной встроенной системной учетной записи «Администратор», при входе в безопасный режим вход выполняется именно с использованием указанной системной учетной записи, что мы можем использовать:
- На экране входа в систему нажмите по кнопке питания справа внизу и, удерживая Shift, нажмите «Перезагрузка».
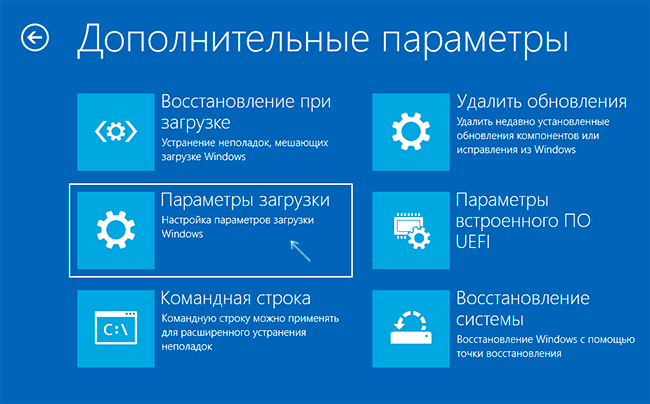
- Откроется среда восстановления Windows Перейдите в раздел Поиск и устранение неисправностей — Дополнительные параметры — Параметры загрузки и нажмите кнопку «Перезагрузить».

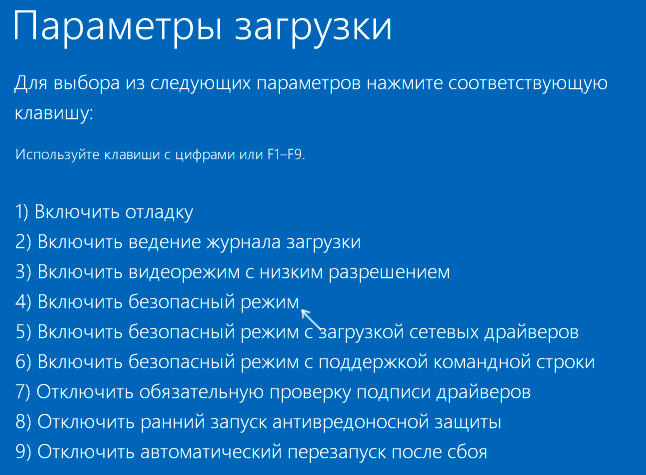
- На следующем экране нажмите клавишу 4 или F4 для загрузки в безопасном режиме.

- Если рассматриваемая проблема была вызвана отключением всех учетных записей, то при входе в безопасный режим вы увидите единственную учетную запись — «Администратор» (встроенная системная, отключенная по умолчанию, но работающая в описываемой ситуации). Ввод пароля для входа не потребуется.
- Зайдя в учетную запись, нажмите клавиши Win+R и введите cmd для запуска командной строки от имени администратора.
- В командной строке введите команду net user, нажмите Enter и посмотрите список пользователей.
- Если пользователь, для которого сообщается «Ваша учетная запись отключена» присутствует в списке, введите команду
net user имя_пользователя /active:yes
и нажмите Enter.

- Если такой пользователь отсутствует, вы можете создать пользователя в командной строке и дать ему права администратора, подробнее об этом: Как создать пользователя Windows 10.
После этого достаточно закрыть командную строку и перезагрузить компьютер в обычном режиме для входа в систему, сообщение об отключенной учетной записи появиться не должно.
Дополнительные методы исправить проблему
Если предыдущие варианты не помогли решить проблему «Ваша учетная запись отключена», возможны следующие варианты решения.
Использование точек восстановления
При наличии точек восстановления системы, иногда они могут помочь в решении проблем со входом в учетные записи. Попробовать использовать точки восстановления можно следующими методами:
- На экране входа в систему нажмите по кнопке питания справа внизу и, удерживая Shift, нажмите «Перезагрузка».
- В среде восстановления перейдите в «Поиск и устранение неисправностей» — «Дополнительные параметры» — «Восстановление системы». Если на следующем этапе вас попросят выбрать пользователя, а доступен будет только «Администратор», выберите его и не вводите никакой пароль, просто нажмите «Продолжить». При наличии точек восстановления используйте их.
- Если предыдущие шаги не позволили перейти к началу восстановления системы (например, пароль все-таки требуется, но неизвестен), можно использовать загрузочный диск или загрузочную флешку Windows 10 (потребуется создать где-то на другом компьютере) — загрузитесь с неё.
- После загрузки с флешки и выбора языка на втором экране нажмите «Восстановление системы», а затем точно так же перейдите к восстановлению из точек восстановления (имя пользователя и пароль вводить не потребуется).
Если и такой метод не решил проблему или точки восстановления отсутствуют, есть еще один способ, позволяющий включить отключенную учетную запись администратора с помощью загрузочной флешки Windows 10 (внимание: теоретически, описываемые шаги могут привести к нежелательным последствиям):
- Загрузите компьютер или ноутбук с загрузочной флешки Windows 10 и в программе установки нажмите клавиши Shift+F10 (или Shift+Fn+F10 на некоторых ноутбуках). Откроется командная строка. В ней ведите regedit и нажмите Enter.
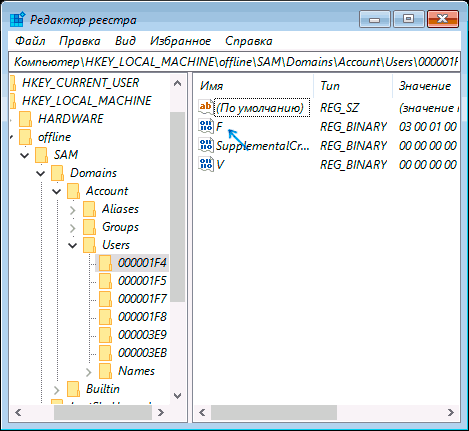
- В открывшемся редакторе реестра выделите HKEY_LOCAL_MACHINE, затем в меню выберите «Файл» — «Загрузить куст».
- Загрузите файл C:\Windows\System32\config\SAM из вашей системы и задайте загруженному кусту какое-либо имя (отличающееся от тех, что уже есть в реестре, например, offline, далее я буду использовать именно его).
- Перейдите к разделу
HKEY_LOCAL_MACHINE\offline\SAM\Domains\Account\Users\000001F4
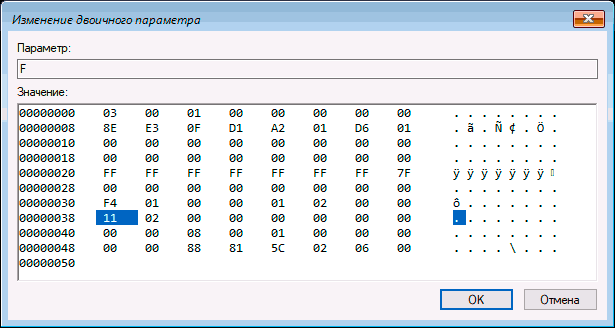
- В правой части редактора реестра дважды кликните по параметру с именем F.

- В открывшемся окне в строке 38 удалите первое значение 11 и замените его на 10 (двойной клик по 11 в указанной строке — одно нажатие Delete или Backspace, ввод 10), нажмите Ок.

- Выделите раздел реестра с заданным вами именем (offline в моем случае), затем в меню выберите «Файл» — «Выгрузить куст» и подтвердите выгрузку.
После этих действий останется перезагрузить компьютер: теперь встроенная учетная запись «Администратор» должна быть включена, и вы сможете войти под ней для работы или, лучше, для создания обычной учетной записи Windows 10 вместо имеющейся встроенной системной.
Видео инструкция
Надеюсь, один из предложенных методов сработал в вашем случае и позволил войти в систему. Если же это не так, опишите подробно, после чего возникла проблема, что было опробовано и что при этом происходило: постараемся разобраться что делать с «Ваша учетная запись отключена администратором».
Sometimes, we face pretty odd and weird issues that makes us technically challenged to work on a Windows machine. Due to different permissions levels, we can create various kind of user accounts such as administrator, standard, child account etc etc. The built-in administrator account has all the privileges to modify other user accounts. He can enable or disable accounts on his wish. If he has blocked an user account, the user will receive following message at logon screen:
Page Contents
Your account has been disabled. Please see your system administrator.
But what if you’re the administrator and your account itself is blocked. In such cases, there may be two cases possible. Either you can boot to your system or not. Here are the fixes for corresponding for these situations:
FIX : Your Account Has Been Disabled. Please See Your System Administrator.
FIX 1 – Using Local User and Group snap-in
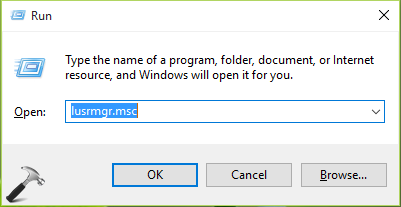
1. Press + R and type lusrmgr.msc into Run dialog box, click/tap OK to open Local Users and Groups snap-in.
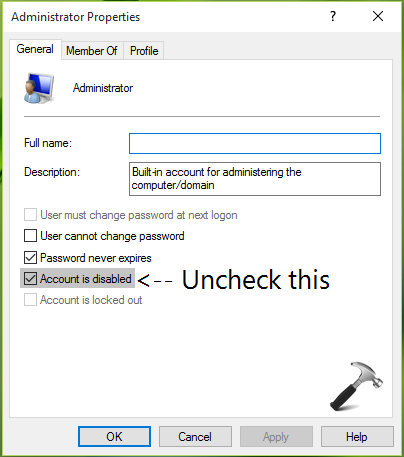
2. Next, click/tap on Users and then double click on your administrator or user account in the lusrmgr window, for which you’re facing issue.
3. In the administrator or user account property sheet, you have to uncheck Account is disabled option if it was checked already. Click Apply followed by OK.
You can now close Local Users and Groups snap-in window and re-try to log in into problematic account and it should work.
FIX 2 – Using Command Prompt at boot
1. Boot into System Recovery Options. Hit the Command prompt entry at following screen:
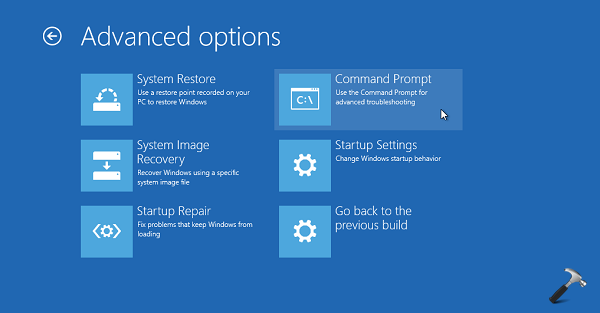
2. Last step will result in opening of Command Prompt at boot.

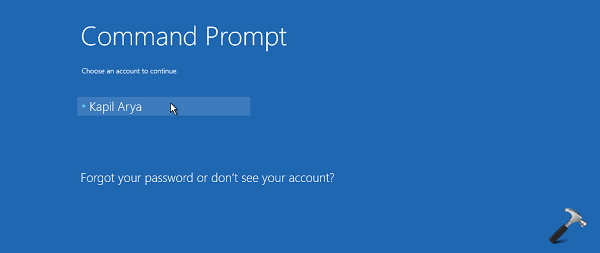
Select your admin account and enter your select account password to continue.
3. Then type following command in the Command Prompt window:
net user administrator /active:yes
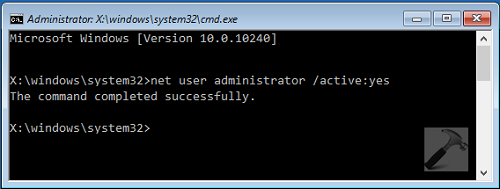
After running this command, you’ll get The command completed successfully message. You can then close the Command Prompt and reboot. After restarting the machine, you’ll be able to log-in to built-in administrator, using which you can easily manage other accounts.
Checkout following video for more:
Hope this helps!
RELATED ARTICLES
-
Home
-
Partition Manager
- How to Fix: Your Account Has Been Disabled in Windows 10
By Amanda |
Last Updated
Sometimes, you may fail to log into a certain account in Windows 10 and be prompted that “your account has been disabled please see your system administrator”. In this article from MiniTool Partition Wizard, you will learn about how to fix the issue effectively.
When you are trying to log into Windows 10 with a certain user account, your Windows might think this account is disabled. And you will get the error message: Your account has been disabled. Please see your system administrator.
According to the reports from users, this error might come up due to the following facts:
- You have unexpectedly restarted your computer during the process of system restore, reset, or refresh.
- you have shut down your computer inappropriately while you were creating a user account after a fresh Windows installation or upgrade.

This error locks you out of your user account and prevents you accessing the desktop with the account. So, what can you do if you receive the error message that your account has been disabled please see your system administrator?
Don’t worry, here are some solutions you can use to fix the problem on your own.
Solution 1: Create A New Administrator Account in Safe Mode
If one of your account has been disabled, the direct solution is to use another account. If you don’t have a second account, you can create a new account with administrative privileges in Safe Mode. Here’s how to do it:
Step 1: When you are at the sign-in screen, click the Power button. Then, press and hold Shift key, and click Restart to enter the Window RE.
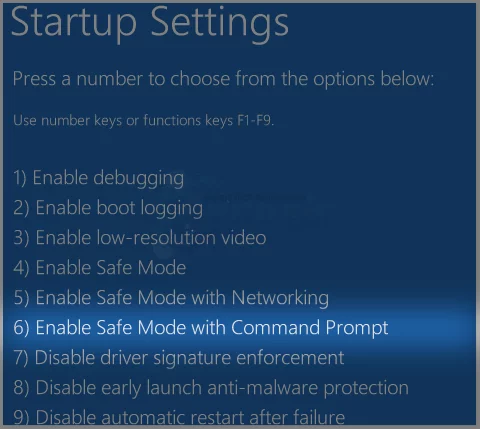
Step 2: Go to Troubleshoot > Advanced options > Startup settings > Restart.
Step 3: When you get the following interface, press F6 to choose Enable Safe Mode with Command Prompt.

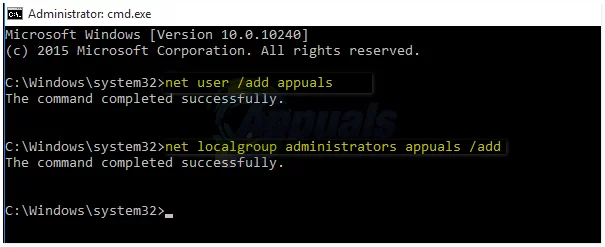
Step 4: Log into the hidden Administrator account and open Command Prompt. Type the following commands and press Enter after each:
- net user /add NAME (NAME refers to the actually name of the new account to be created)
- net localgroup administrators NAME /add
step 5: Input the command shutdown /r in and press Enter to restart your computer.
Now, you should be able to log into your Windows with the new account. With this new account, you can either give up the problematic account or enable it. As for how to enable an account, you can check the details in the next part.
Solution 2: Re-enable the Disabled Account
If you want to continue use the account which gives “your account has been disable” error message, you can re-enable it with another account or the built-in administrator account.
After logging into your Windows with either the second user account or the hidden administrator account, you can follow the instructions below to enable the target account.
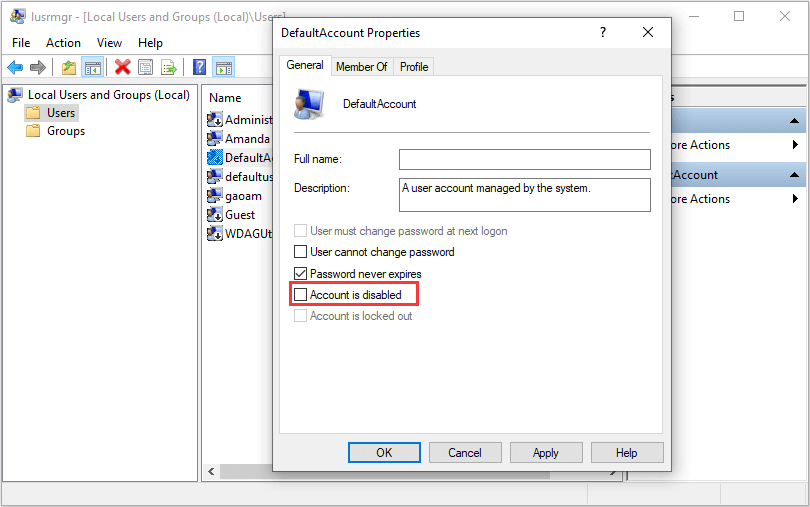
Step 1: Press Windows + R, input lusrmgr.msc and click OK button to open Local Users and Groups.
Step 2: Click Users in the left pane and locate the specific user account that gives the error message. Right-click the account and choose Properties.
Step 3: Under General tab, uncheck Account is disabled option, and click Apply and OK to save changes.
After that, restart your computer and try logging into the account to see if the error disappears.
Solution 3: Perform System Image Restore
Another method to resolve your account has been disabled Windows 10 issue it to perform image restore. By doing this, you can restore your computer to a previous point at which the problem didn’t appear.
Step 1: Enter Window RE according to the steps mentioned before.
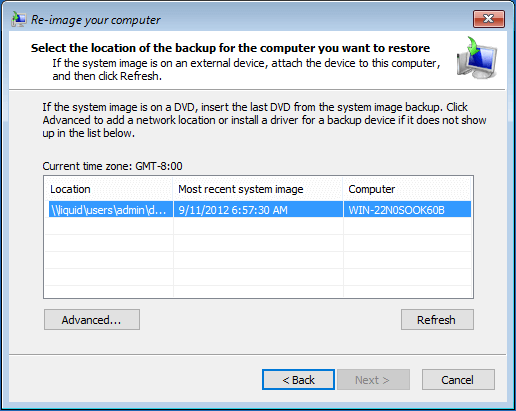
Step 2: Go to Troubleshoot > Advanced options > System Image Recovery.
Step 3: Select an account and enter password to open the window of system image recovery. Click Next to continue.
Step 4: Then, select a restore point at which the issue does not exist and click Next button. Then, follow the onscreen instructions to complete the process.
Once it’s done, restart your computer and hopefully the “your account has been disabled please see your system administrator” error message won’t appear again.
About The Author
Position: Columnist
Amanda has been working as English editor for the MiniTool team since she was graduated from university. She enjoys sharing effective solutions and her own experience to help readers fix various issues with computers, dedicated to make their tech life easier and more enjoyable.
Amanda has published many articles, covering fields of data recovery, partition management, disk backup, and etc. In order to provide more useful tips and information, she is still committed to expand her technical knowledge.
Sometimes when you try to log in to Windows 11 or Windows 10 PCs, when you enter the password or PIN, it gives a message i.e.
Your Account Has been disabled. Please see your System administrator.
This is an annoying error, especially when you have some important work to do. Below in this blog post, I’m going to share a quick workaround using which you can easily fix this issue.
First, you need to boot into safe mode from the login screen.
In the safe mode, use the WIN + R key combination to launch the RUN dialog box and type lusrmgr.msc, click OK.

This will launch the Local Users and Groups window.
Here, click on the Users option on the left panel, and then on the right side, locate and select the account that is disabled. In my case, it’s Dhiman.

Make a right-click on it and select Properties.

In the properties window, uncheck the box for “Account is disabled,” and then click Apply and OK.
After that, close everything and restart your computer.
This time you should be able to log in to your PC and access the operating system.
Viney Dhiman, the mind behind GeekerMag, is a seasoned content writer with over 12 years of experience. Specializing in simplifying complex tech concepts, he covers Windows OS, Android, iOS, web apps, and product reviews. His work can be found on popular tech websites like Gizmodo and The Verge, and he has been interviewed by the Microsoft Edge team.
One of the most terrifying problems that any Windows 10 user has ever faced is the “Account has been disabled” problem. The “Account has been disabled” error message (or the “Account has been disabled. Please see your System Administrator” message – to be more specific) basically says that a user account has, for some reason, been disabled.
Account has been disabled” can appear either after an error occurs, leading to you being locked out of your user account, or after your computer shuts down unexpectedly while you’re creating a user account following a fresh Windows 10 installation or upgrade. If this issue arises due to an improper shutdown while creating a user account following a fresh Windows 10 installation or upgrade, you’ll encounter a user account named defaultuser0 upon booting the computer. However, any attempts to log into this user account will result in the “Account has been disabled” message.
The ‘Account has been disabled’ issue completely locks users out of their accounts, and that can be a significant problem for the average Windows 10 user. Understandably, any Windows 10 user would be furious if they were simply locked out of their computer for no apparent reason. However, you can address the ‘Account has been disabled’ issue by using the following two solutions:
Create a new account with administrative privileges in Safe Mode
The folks at Microsoft understand how much the average Windows 10 user can be a goof, which is why all copies of Windows 10 include a hidden account named ‘Administrator’ that has administrative privileges. In the event something happens to your primary Windows 10 account, you can rely on this hidden ‘Administrator’ account and use it to create a new account with administrative privileges for yourself. The hidden ‘Administrator’ account is only accessible when a computer is in safe mode.
- On the sign-in screen, hold down the Shift key on your keyboard and click the Power button at the bottom of the screen. From the menu that appears, click Restart, all while continuing to hold the Shift key.
- Only let go of the Shift key when the Advanced Recovery Options menu appears.
- In the Advanced Recovery Options menu, click on Troubleshoot > Advanced options > Startup settings > Restart. When your computer restarts and you are greeted with a blue screen displaying several different options, press the numerical key on your keyboard that corresponds with ‘Enable Safe Mode with Command Prompt’.

- When your computer boots up, you will be able to see the hidden Administrator. Log into it.
- Open the Start Menu, type cmd into the Search bar and click on the search result titled cmd to open a Command Prompt.
- One by one, type the following commands into the Command Prompt, making sure that you press Enter after typing in each one:
net user /add <name of the user account you want to create>

net localgroup administrators <name of the user account you want to create> /add

- Once both commands are executed, a new user account with administrative privileges will be created. To activate this, restart your computer, then type ‘shutdown /r’ in the same prompt. You will then be able to log into your new account once your computer has booted up.
Perform a System Image Restore
The second method that you can use to fix the “Account has been disabled” problem is to perform a System Image Restore. Performing a System Image Restore will restore your computer to a previous point in time, a point at which the “Account has been disabled” problem did not exist. Performing a System Image Restore will not result in a loss of personal files or data but can result in the deletion of apps or updates that were downloaded and installed after the point in time to which you are restoring your computer. And best of all, you can perform a System Image Restore without having to login to your user account.
- At the sign-in screen, hold down the Shift key on your keyboard and click on the Power button located at the bottom of the screen.
- From the menu that pops up, click on ‘Restart’, all the while holding down the ‘Shift’ key.
- Only let go of the Shift key when the Advanced Recovery Options menu appears,
- In the Advanced Recovery Options menu, click on ‘Troubleshoot’, then ‘System Image Restore’.
- When provided with system restore points to choose from, choose a point at which the “Account has been disabled” issue did not exist and begin the restoration process.
- When (or if) prompted to select an account, click on the account titled Administrator.
- Wait for the System Image Restore to be completed. Once the process has been completed, you will be prompted to restart your computer, and there will be no trace of the “Account has been disabled” problem once your computer boots up.
Use a PCUnlocker Live CD/DVD or USB to reset your password
PCUnlocker Live is a program designed specifically to allow users of any version of the Windows Operating System to gain access to their user accounts in the event that they either forget their password or another problem is restraining them from being able to unlock their accounts.
- Go here and download and install the latest version of PCUnlocker.
- Run PCUnlocker on a different computer.
- You can use PCUnlocker to create a bootable CD/DVD or USB flash drive that is capable of either resetting your user account password or bypassing it, depending on your desired course of action.
- Insert the password reset or bypass CD/DVD or USB into the affected computer, and then restart it.
- Configure the affected computer to boot from a CD/DVD or USB by fiddling around with its BIOS settings.
- Allow the affected computer to boot from the CD/DVD or USB, then follow the on-screen PCUnlocker instructions to reset or bypass the password for your user account. Once this is done, you should be able to successfully log in to your disabled user account after booting your computer into Windows.
Enabling the Previously Disabled Account
In the User Access Control in Windows, there is an option which allows users to simply re-enable the disabled account. When we do this, the account will be accessible again with all the previous data and configurations stored in it. However, you must be logged in as an administrator to re-enable the account. Here are the steps:
Note: If you do not have an administrator account available, follow the first solution and enable the built-in admin using the command prompt.
- Press Windows + R and type lusrmgr.msc in the dialogue box and press Enter.
lusrmgr.msc - Once in the Local Users and Groups window, click on Users from the left navigation pane.
- Click on ‘Users’ once, select the user that is disabled, right-click on it, and select.
- Now, under the General tab, uncheck the option that says ‘Account is disabled’.

Enabling the Disabled Account - Press OK to save changes and exit. Restart your computer and try logging in the account. See if the problem is solved for good.

Kevin Arrows
Kevin Arrows is a highly experienced and knowledgeable technology specialist with over a decade of industry experience. He holds a Microsoft Certified Technology Specialist (MCTS) certification and has a deep passion for staying up-to-date on the latest tech developments. Kevin has written extensively on a wide range of tech-related topics, showcasing his expertise and knowledge in areas such as software development, cybersecurity, and cloud computing. His contributions to the tech field have been widely recognized and respected by his peers, and he is highly regarded for his ability to explain complex technical concepts in a clear and concise manner.