
When performing system restore in Windows 10/8/7, you may find there is an error message, saying “you must enable system protection on this drive”. In this case, what should you do to solve this issue? Here are two useful ways for you, and a better way to restore your PC to a previous state without enabling system protection.
System Restore You Must Enable System Protection on This Drive
You may create system restore points for system backup before performing some other system related operations like changing Windows registry, upgrading Windows, etc. Once the Windows operating system goes wrong, you can restore your computer to a previous state by the created restore points.
However, one user recently told us that he wanted a system restore after upgrading Windows 7 to Windows 10 since the new OS ran quite slowly. But he got into the System Restore from the Troubleshoot option, an error message stopped him:
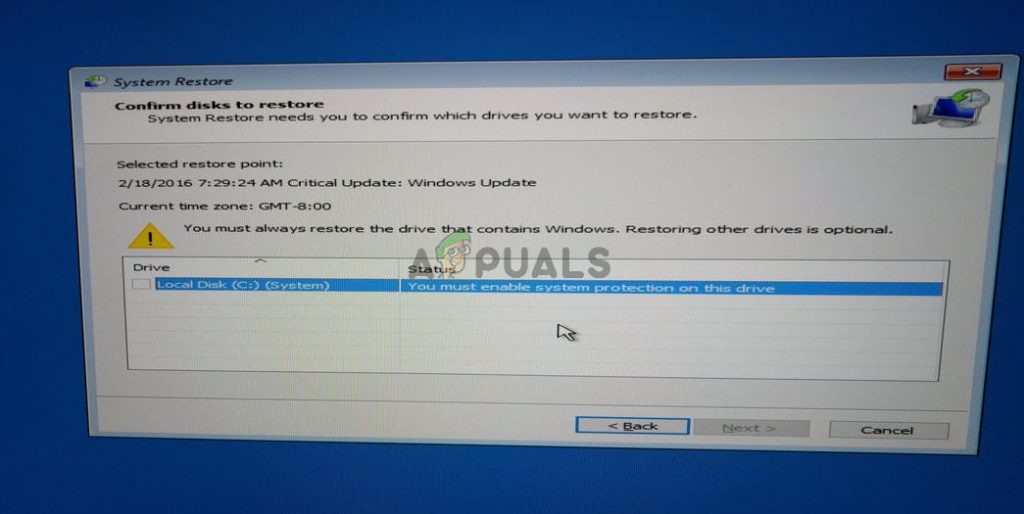
“You must always restore the drive that contains Windows. Restoring other drives is optional.
You must enable system protection on this drive.”
In general, this issue is very common and many users report that in forums like Reddit. If you are also bothered by this issue, although Windows says there are multiple restore points to restore, you still get the same message when restoring C drive.
What Is System Protection
Simply speaking, it refers to a Windows feature to regularly create and save information about the system files and registry of your computer. Also, it saves previous versions of files you have changed and also saves these files in restore points before significant system events.
For the drive that includes installed Windows operating system, System Protection is on by default. And System Protection can only be turned on for NTFS drives.
However, when the above issue occurs, this means the feature is turned off. To restore the system successfully, you should ensure System Protection is enabled.
How to Enable System Protection on C Drive
How do I enable System Protection on my hard drive Windows 10/8/7? For this issue, we will show you two ways to turn it on in this part.
Enable System Protection CMD
The recommended method by users is to use Command Prompt. How to enable System Protection on C drive from Command Prompt in Windows 10/8/7 to fix “you must enable system protection on this drive”
Follow these steps now (take Win10 as an example):
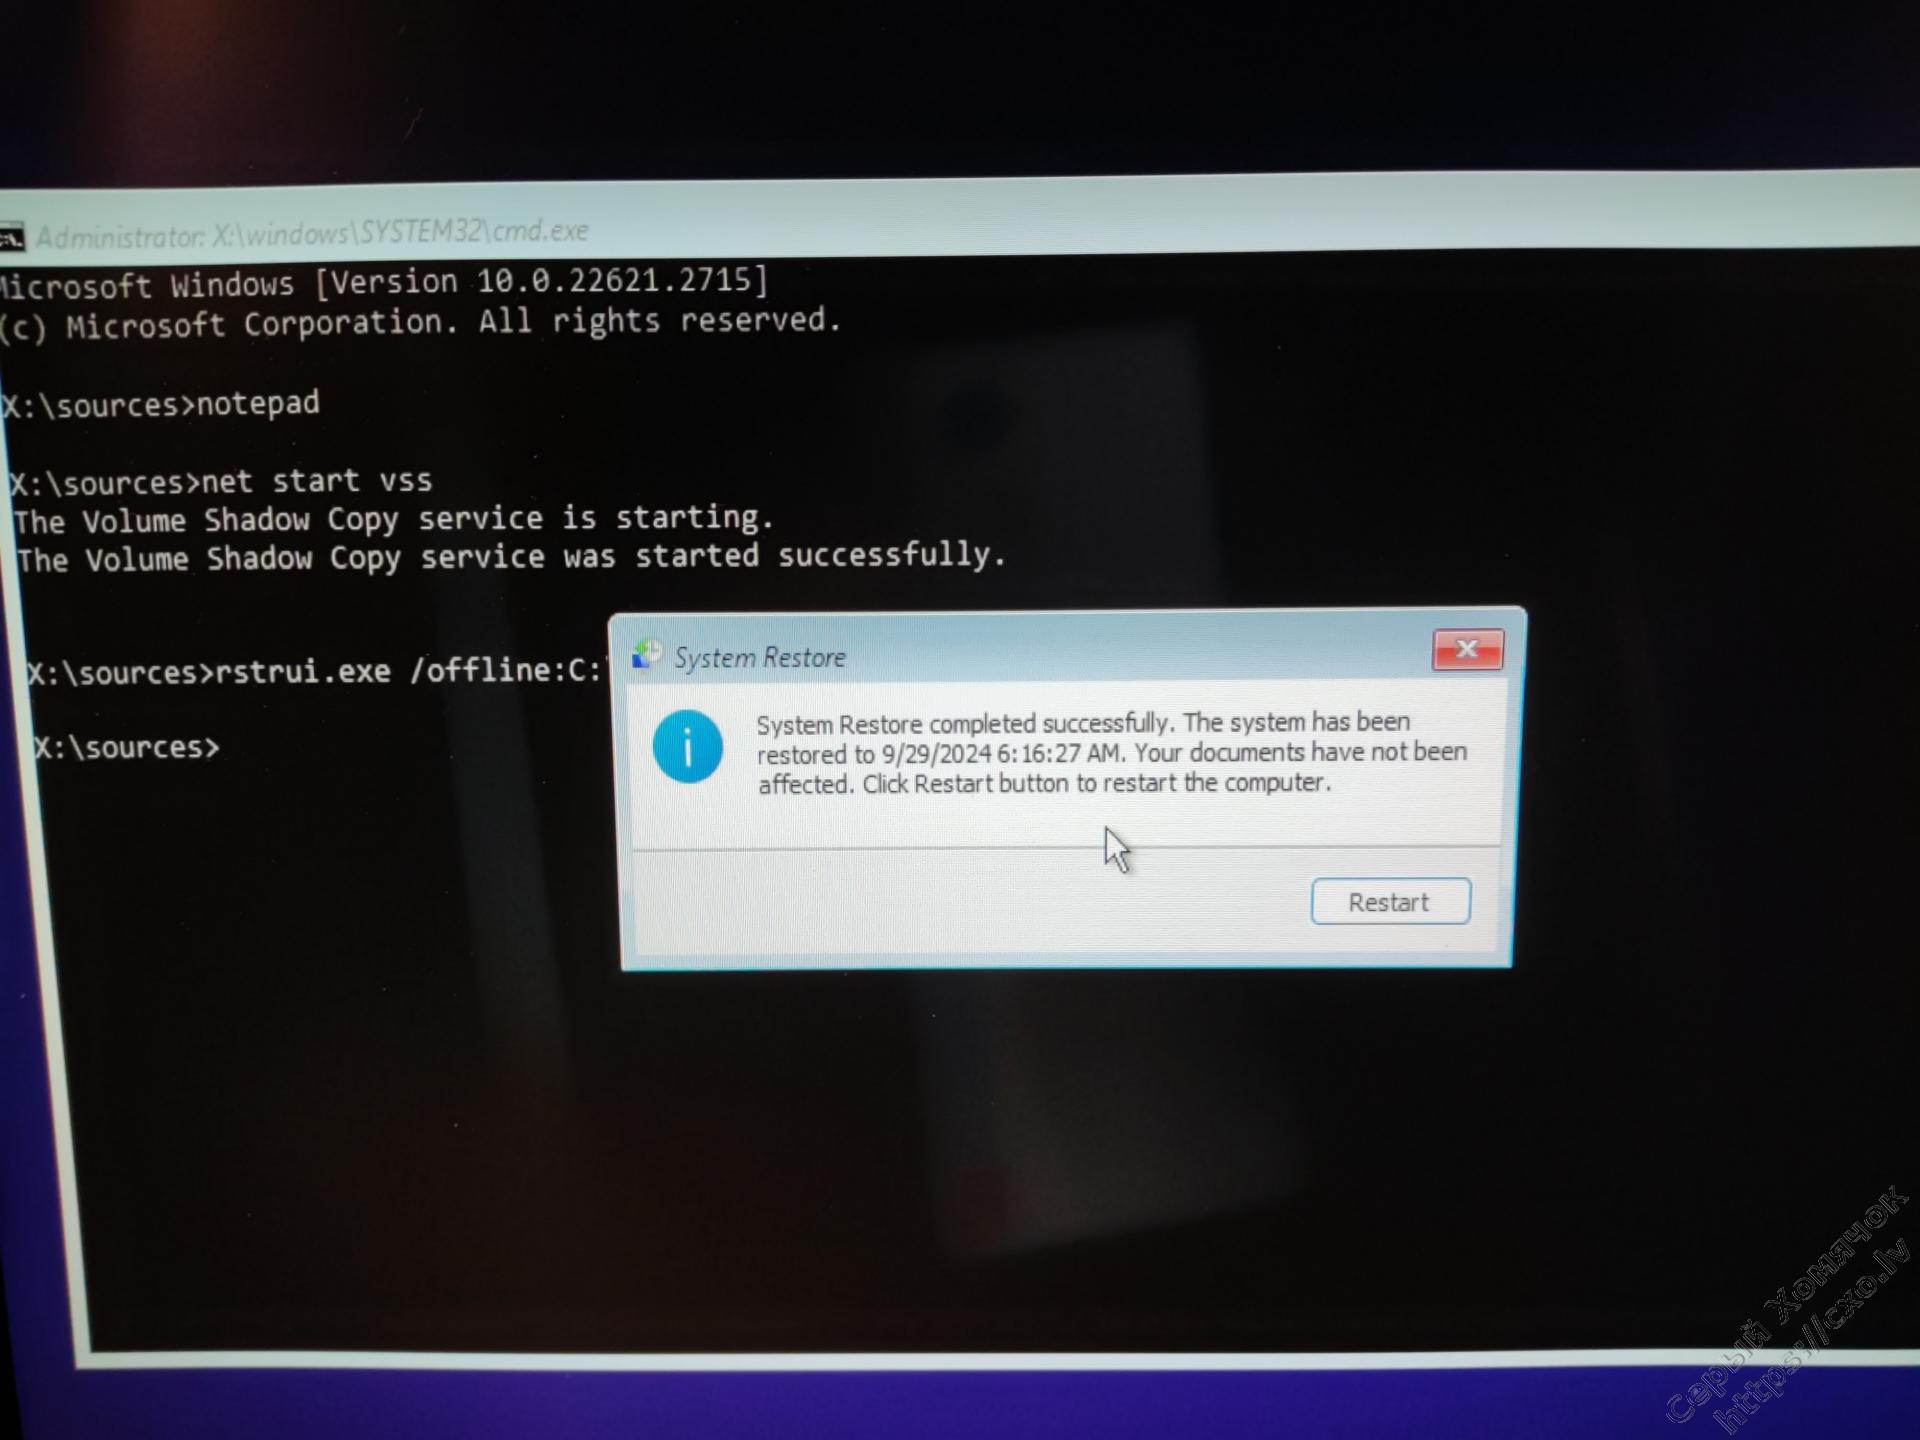
Step 1: Open Command Prompt
If your Windows operating system can boot:
- Type cmd in the Search box.
- Right-click on this tool to choose Run as administrator.
If you couldn’t enter Windows desktop
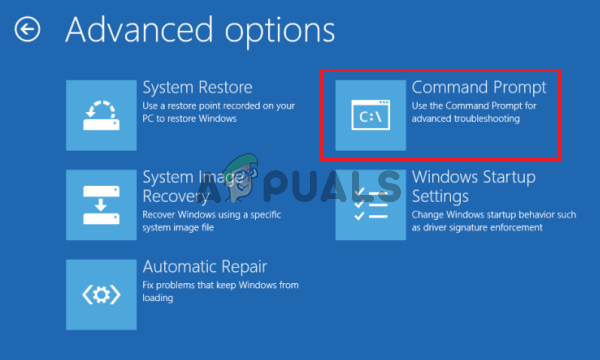
- Restart your PC several times on the Windows log screen to enter Windows Recovery Environment (WinRE). Of course, if not, you can use a recovery disc to enter WinRE.
- Click Troubleshoot > Advanced options > Command Prompt to open this tool.
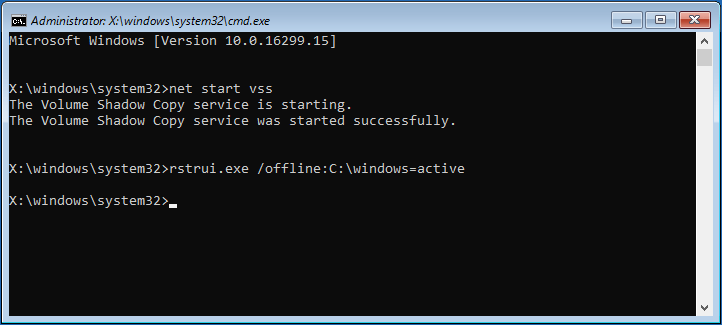
Step 2: Input the Following Command Lines
- Type net start vss and hit Enter. Then, the Volume Shadow Copy service will be started successfully.
- Input rstrui.exe /offline:C:\windows=activeand press Enter.
Step 3: Reboot PC
After restoring the restoration, restart your computer to see if you could go back to the previous state.
Furthering tip:
According to a user from the Superuser forum, he also encountered the same error “you must enable system protection on this drive”. After trying the above commands, Rstrui.exe opened up the System Restore windows but it didn’t fix the problem – the System Restore failed.
The error message implied that it had something to do with the registry. Then, this user used Command Prompt and went into C:\Windows\System32\config, and renamed two of the registry files:
ren SYSTEM system.001
ren SOFTWARE software.001
After that, he ran the System Restore again and it worked. And he could log back into his computer. If you also fail to do a restoration after trying these commands, you can also do as the user does.
Enable System Protection via Control Panel
Note: This way is only available when your Windows 10/8/7 can run to the Windows desktop.
Step 1: Open System Protection Tab
- Type control panel in the Search box, click the result to open this desktop app.
- Click System and Security > System > System protection.
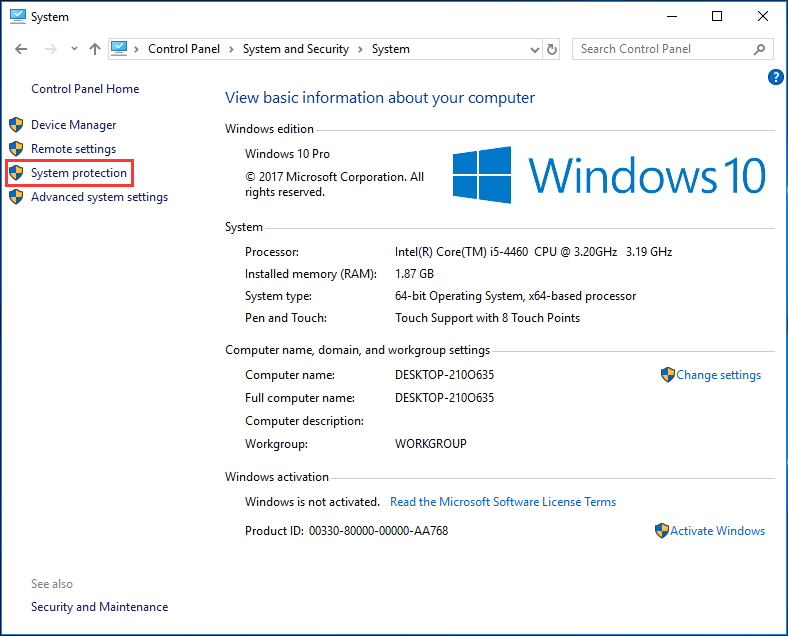
Tip: To open this window, you can also input create a restore point in the search box and directly click the result.
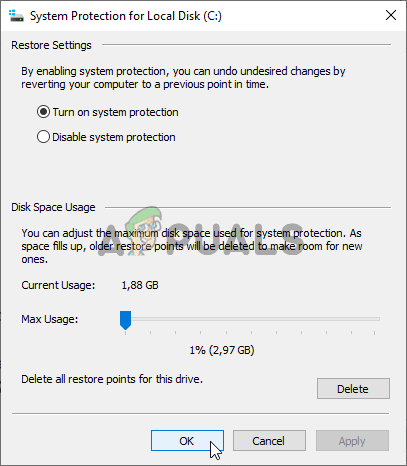
Step 2: Configure Restore Settings
- Under the System Protection tab, choose the target drive.
- Click the Configure button.
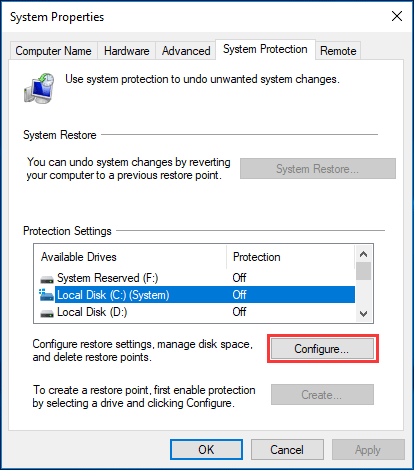
Tip: Some of you may be curious about this question: how to enable System Protection on D drive. Actually, it is easy. You only need to choose drive D from the Available Drives section and click Configure to go on.
Step 3: Enable Windows 7/8/10 System Protection
- Tick the option Turn on system protection.
- Click the Apply and OK button.
Then, you can try to perform restoration and see if you have solved the issue – you must enable system protection on this drive.
“I got ‘you must enable system protection on this drive’ when restoring system after Windows update. These above methods are quite helpful to fix my issue. Share them here!”Click to Tweet
Now, the fixes for system restore error are told to you. It is simple to turn on System Protection in Windows 10/8/7.
But this option may be grayed out or missing in some cases. Besides, you may fail to enable System Protection although you do that work through Command Prompt, let alone restoring system points to the previous state. Luckily, you can protect your Windows in another easy way.
MiniTool offers you a fairly simple way to back up your Windows operating system and quickly restore it, without enabling System Protection. Here, the professional Windows backup software, MiniTool ShadowMaker is recommended to you.
It can help you back up not only Windows OS but also your important files, certain partitions or the entire hard drive with compressing mode to an image file.
If you have made a system image backup, you can restore your PC to the previous version of Windows when you find it doesn’t work as expectation after upgrading to Windows 10.
Right now, get MiniTool ShadowMaker Trial Edition (only for a 30-day free trial) from the following button for Windows backup and restore to avoid the issue “you must enable system protection on this drive”. Of course, if you want to enjoy this software all the time after the expiration date, upgrade it to Pro Edition.
MiniTool ShadowMaker TrialClick to Download100%Clean & Safe
See how to back up OS in Windows 10/8/7.
Step 1: Run MiniTool ShadowMaker
- Double click this tool on your computer to launch it.
- Click the Keep Trial button to continue using the Trial Edition.
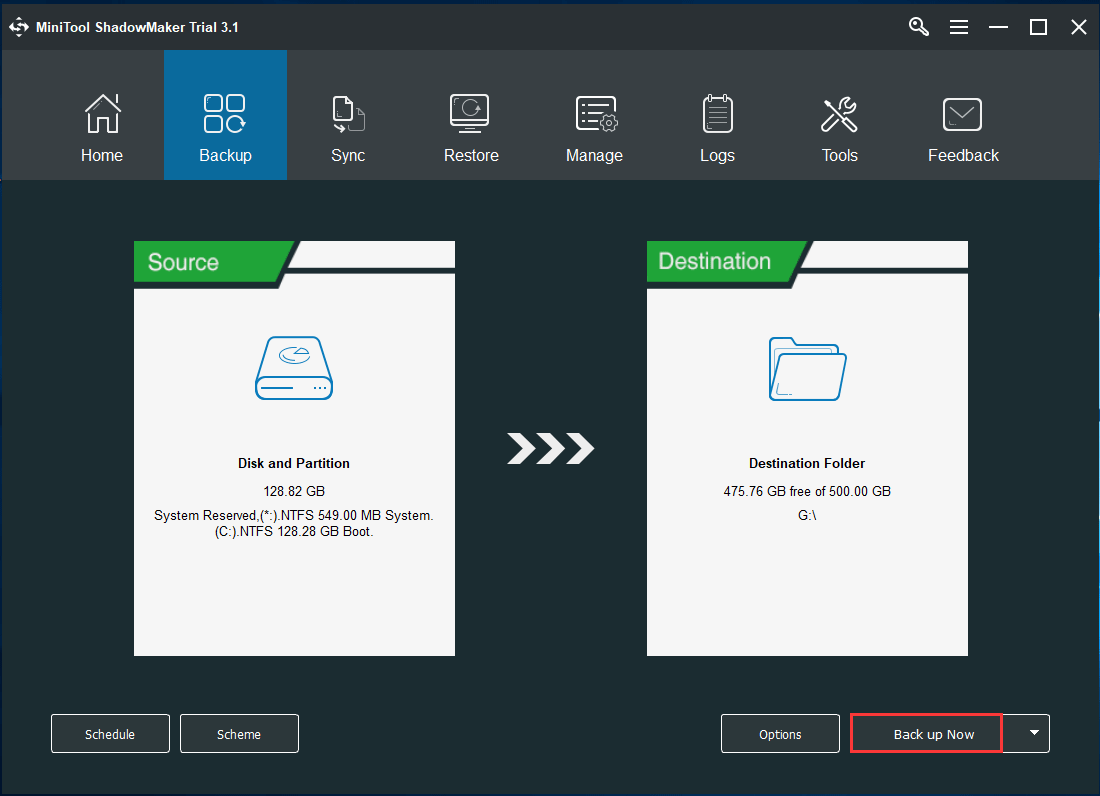
Step 2: Choose Destination Folder
- After going to the Backup page, you see system required partitions for running are chosen by default. Here, you won’t choose them again.
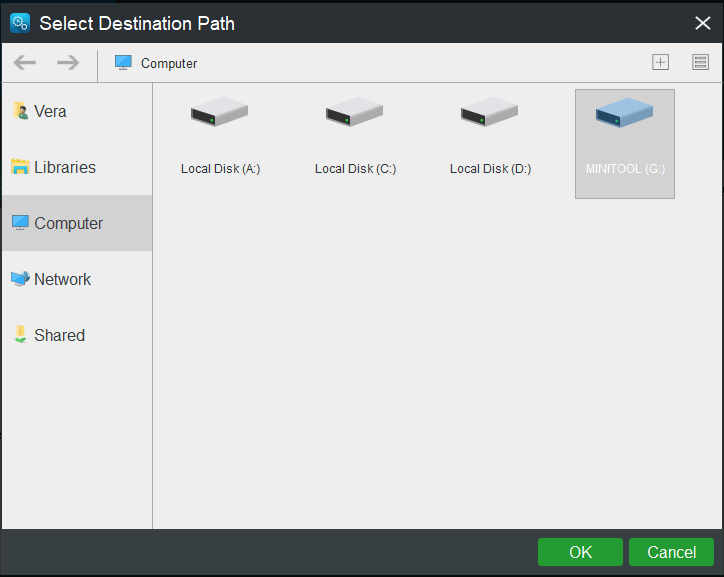
- Sometimes, the target path is also selected. If you don’t want that, just go to the Destination section and choose a path which can be an external hard drive, USB flash drive, NAS, etc.
Step 3: Start System Backup
Finally, hit the Back up Now button to execute the system backup.
Now, you have finished the Windows backup. Here we suggest using Media Builder to create a bootable disc or USB drive/disk so that you can perform a fast recovery in the event of system breakdown, any system issues after Windows update, etc.
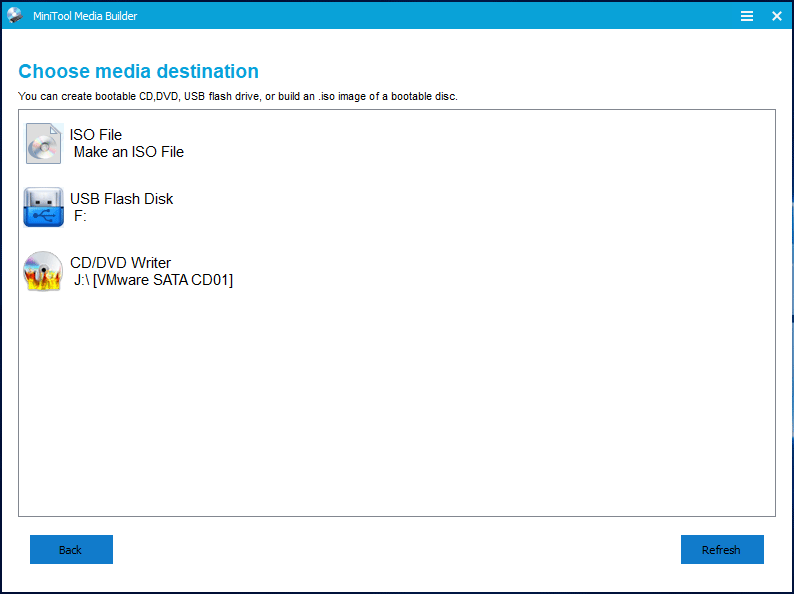
Related article: How to Build Boot CD/DVD Discs and Boot Flash Drive with Bootable Media Builder?
See how to restore the PC without the error “you must enable system protection on this drive”.
If your Windows goes wrong, for example, running slowly, system crash, etc, now start to perform a system recovery.
Step 1: Boot the PC from Created Media and Open MiniTool ShadowMaker
- Go to BIOS to make a setting to ensure the PC boots from the created media.
- Go to the MiniTool PE Loader interface, and run MiniTool ShadowMaker.
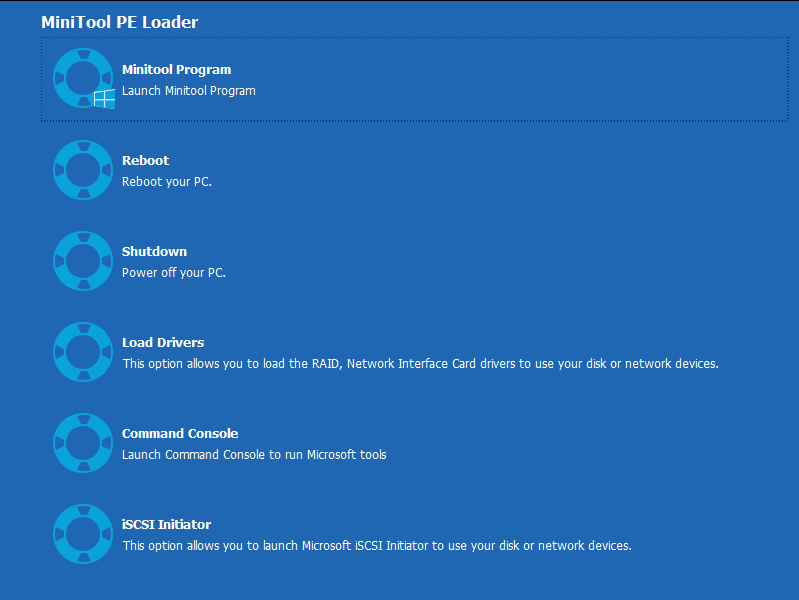
Related article: How to Boot from Burned MiniTool Bootable CD/DVD Discs or USB Flash Drive?
Step 2: Choose a Backup for System Recovery
- Under the Restore window, choose a system image. If your target image backup isn’t displayed here, add it by clicking the Add Backup button.
- Click the Restore button to continue.
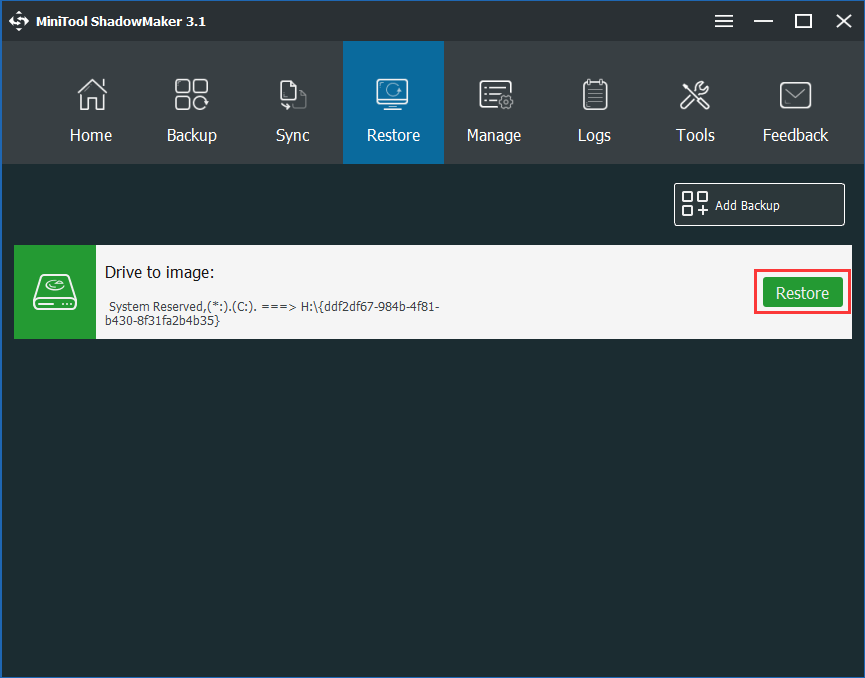
Tip: From the above screenshot, you can view that the drive letter of the target drive varies from what it is in Windows. Pay attention to this point.
Step 3: Select a Backup Version
There may be some different backup versions, so choose a proper one.
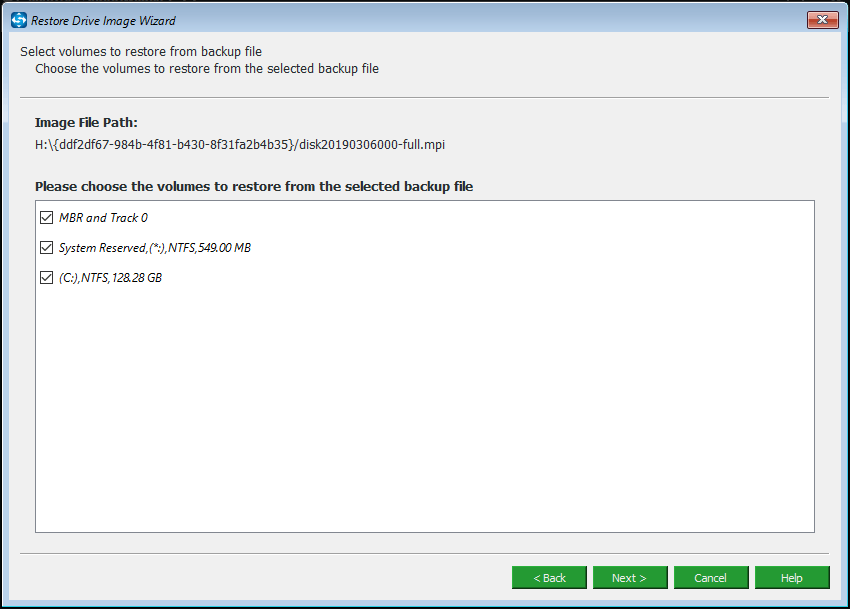
Step 4: Choose Volumes to Restore from Backup File
- Here you can see all the system required partitions included in the system image are listed. Select all of them.
- For a successful restoration, ensure MBR and Track 0 is ticked.
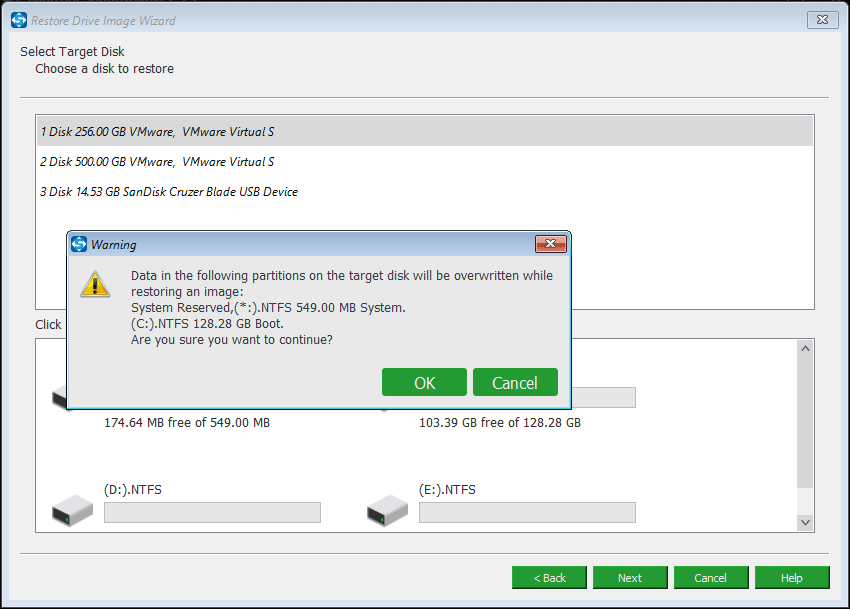
Step 5: Specify a Target Disk
- Choose a disk to restore your system image to.
- Click OK and Next.
Tip: Usually, we suggest restoring the created system backup to the original disk. And MiniTool ShadowMaker will overwrite all data of the original location (system partitions take up) while restoring.
Step 6: Perform Restoration Process
Then, this free backup & restore software will start to perform system recovery process without any error like “you must enable system protection on this drive” on Windows 10/8/7.
“MiniTool ShadowMaker helps back up my OS and restores Windows easily without enabling System Protection. I like it and here share it with you!”Click to Tweet
As mentioned above, to create a success restore point, you need to turn on System Protection. Similarly, you also need to ensure System Protection is enabled when you perform system restore. Otherwise, the issue – System Restore you must enable system protection on this drive Windows 10/8/7 always happens.
When the issue occurs, it may be a little troublesome to fix it since you need to enable System Protection CMD in WinRE or Control Panel in desktop. If you are not lucky, you may still fail to restore the system with other errors.
Compared to System Restore, MiniTool ShadowMaker can be your good assistant since it can let you easily back up and restore the Windows operating system, no need for enabling System Protection. This is a distinct difference. Besides, this program is more powerful and flexible with full protection solutions.
To avoid encountering the above issue, get MiniTool ShadowMaker now for backup and restore.
MiniTool ShadowMaker TrialClick to Download100%Clean & Safe
The End
Have you experienced system restore error – Windows 10 you must enable system protection on this device? Just try to turn it on and start the system restore. As a suggestion for PC backup & restore, MiniTool ShadowMaker is a good choice.
For the question regarding MiniTool software, please tell us by contacting [email protected] or leaving a comment below. Of course, any idea is also appreciated.
Windows 10: System restore in Win10
Discus and support System restore in Win10 in Windows 10 Installation and Upgrade to solve the problem; I ran into a situation where I think system restore may solve the problem. This desktop system originally came with WIN7 and it was automatically…
Discussion in ‘Windows 10 Installation and Upgrade’ started by dresdenron, Jan 21, 2019.
-
System restore in Win10
I ran into a situation where I think system restore may solve the problem. This desktop system originally came with WIN7 and it was automatically updated to WIN10 quite a while ago. I have used system restore in previous versions of Windows but this is the first time using WIN10 restore.
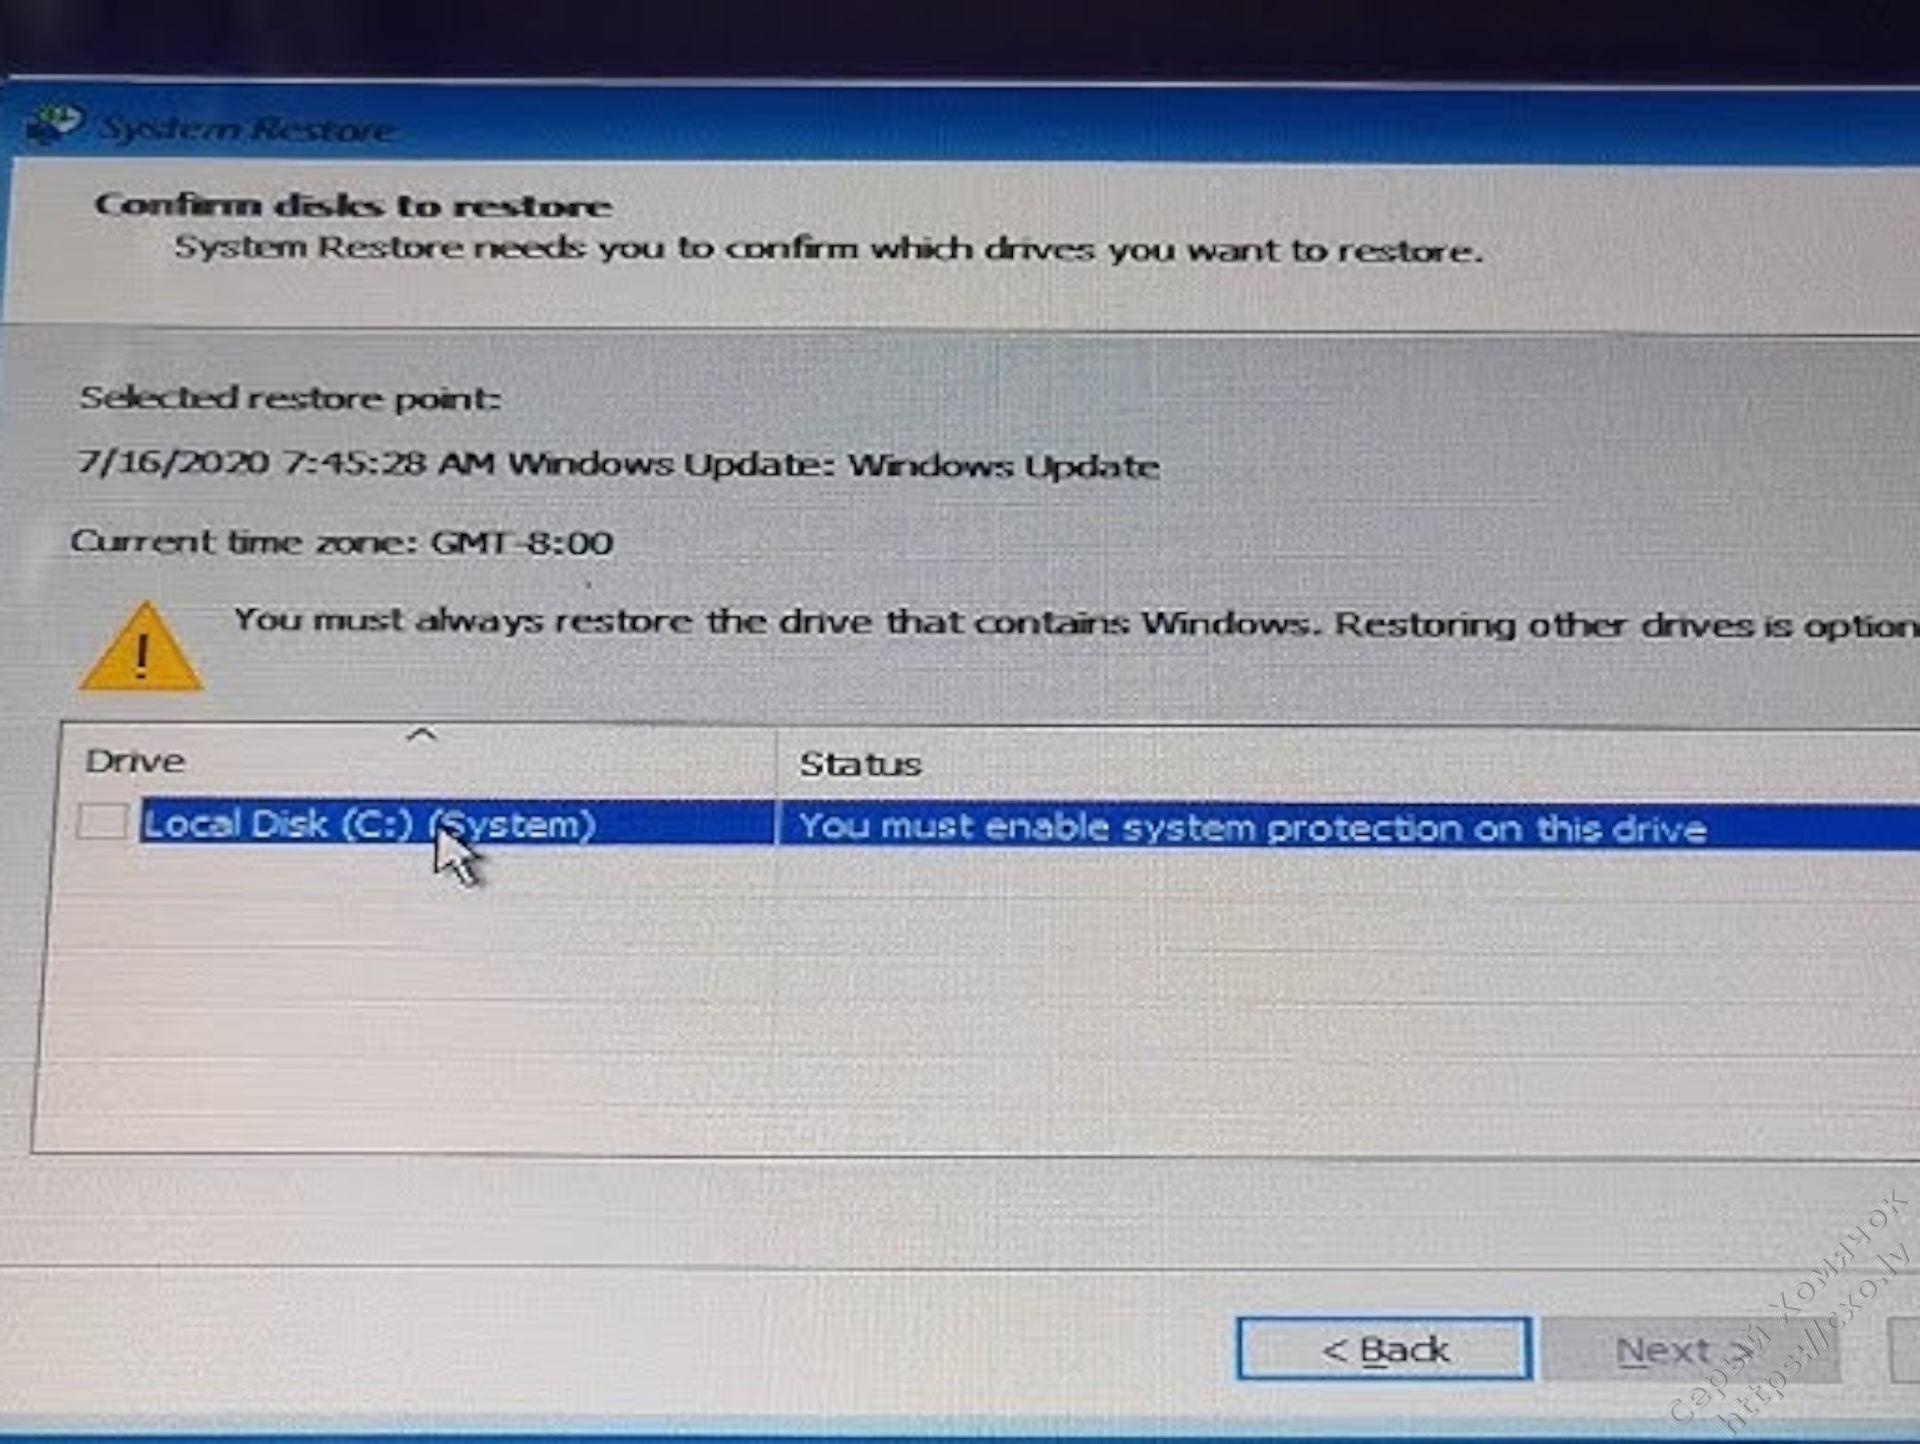
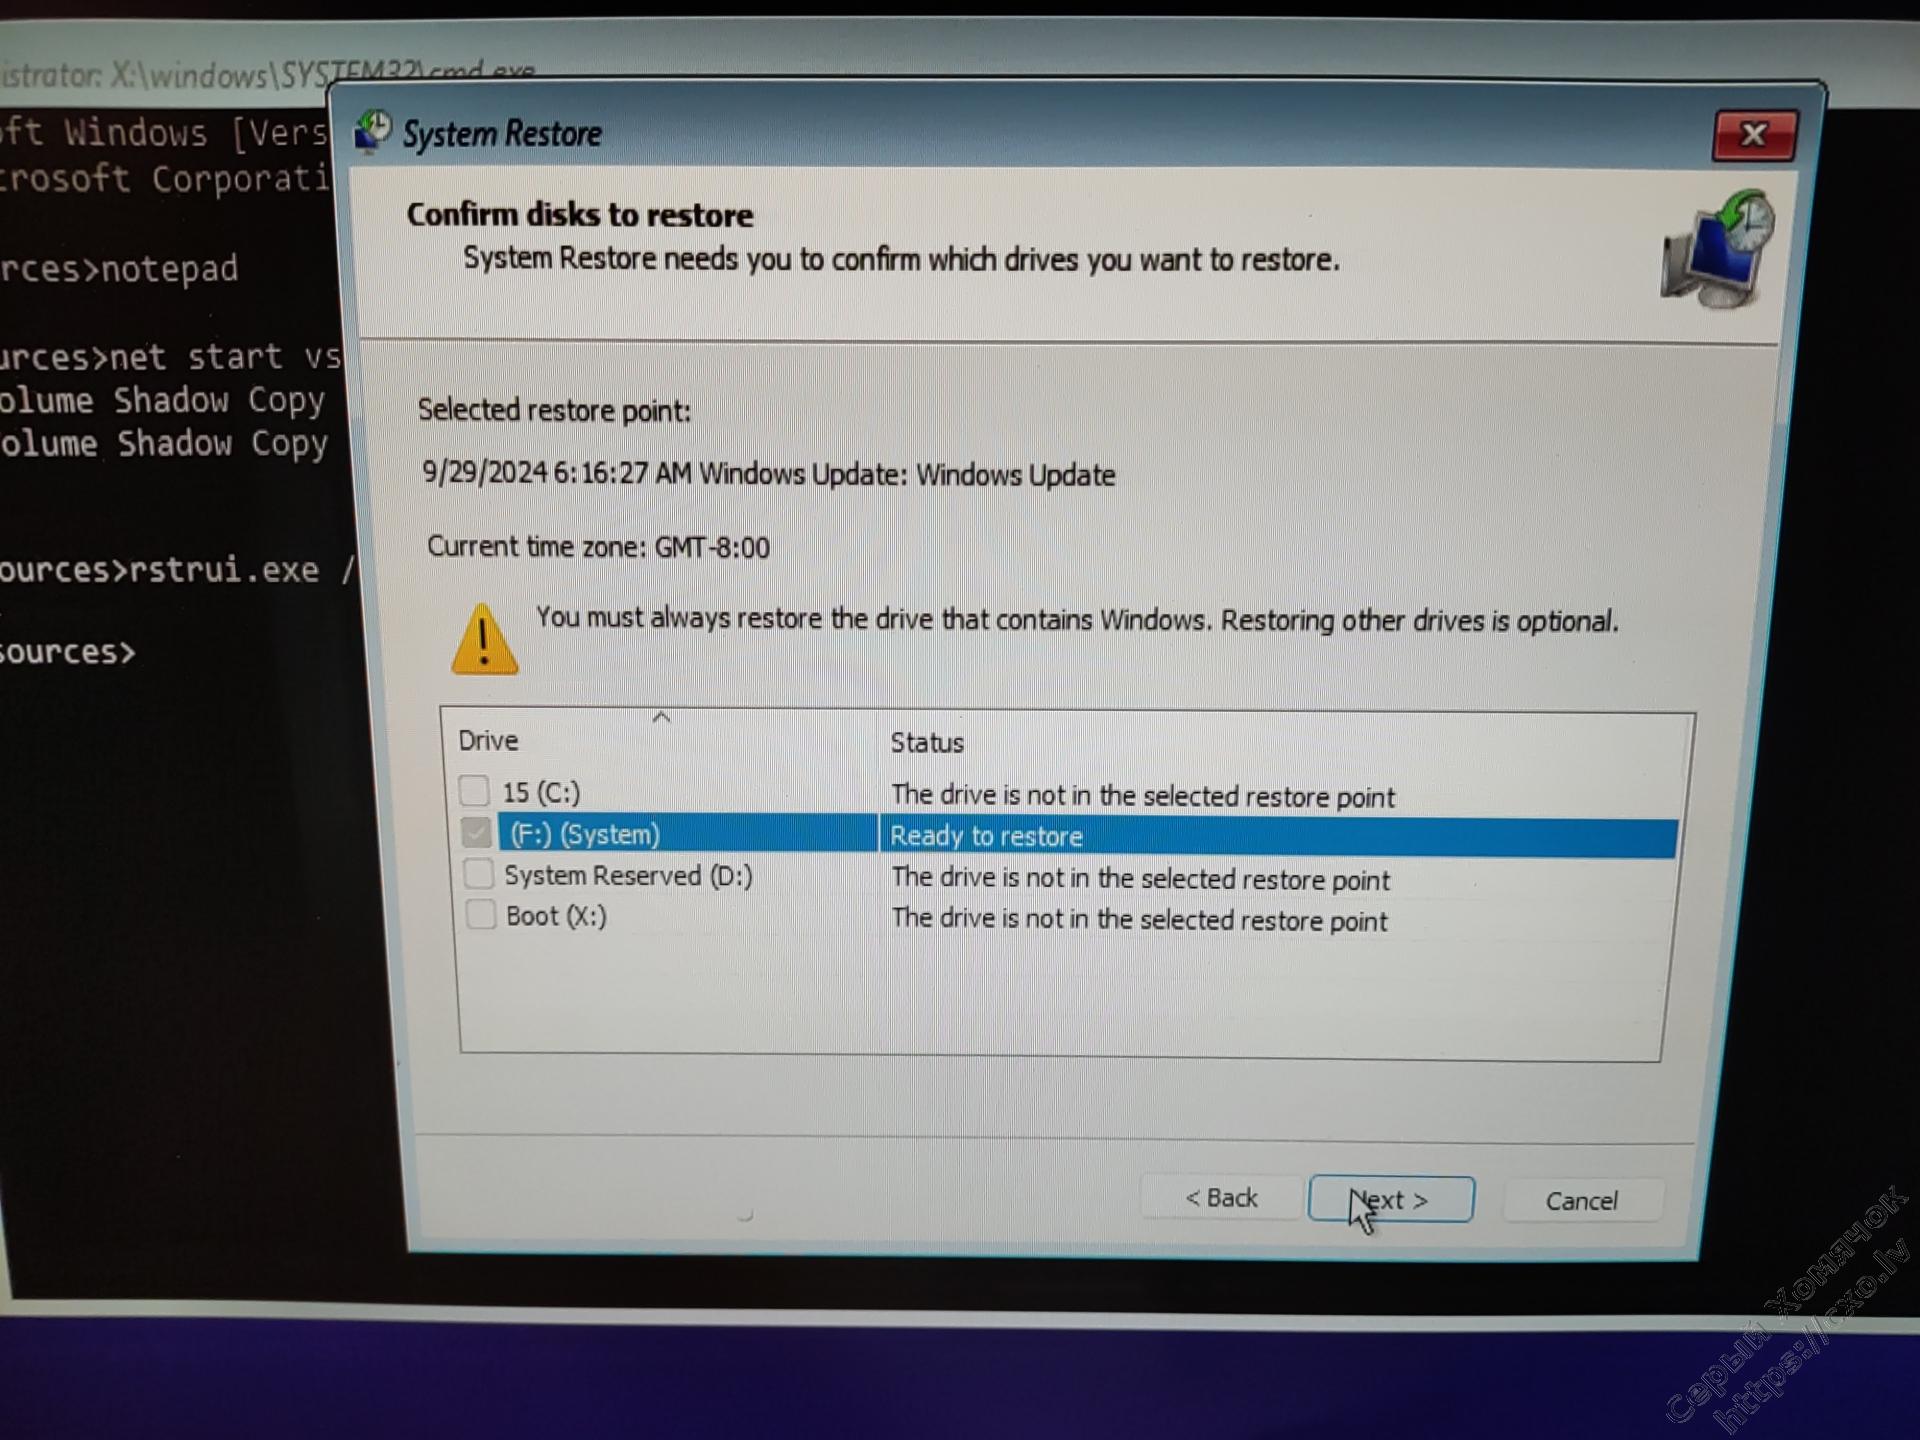
When i go into system restore the screen lists a restore point with the date i would like to use for C: drive. Then it also lists a Recovery drive with the status of The drive is not in the selected restore point.
Above that box is a Warning Icon stating you must always restore the drive that contains Windows. Restoring other drives is optional.
Is there anything to worry about here? I haven’t seen the warning message in other system restores in the past.
Thanks
Ron

-
System Restore Error 0x81000203
Good day,
We can see here that you are having issues performing system restore on your computer. Having said that, we need to determine the cause of this problem. Before we proceed, may we know the following:
- Any changes made on the computer prior to this concern?
- What troubleshooting steps have you tried so far?
- Are you getting any error messages when trying to perform system restore? If so, can you send us a screenshot?
Note: Please do not include any personal information. - Have you performed all the suggested troubleshooting steps found on this thread?
-
System Restore Error 0x81000203I made many changes on the computer before I start to worry about the System Restore, including update from win8 to win10.
I realized about the problem with the System Restore when I wanted to make a backup copy througth VEEAM Endpoint Backup (VEB) that use the Volume Shadow Copy Service to take a snapshot from the disks and made a copy even if the files has been used.
I tried almost all of «steps» but no one solve the problem.
-
System restore in Win10
Missing icons / buttons after System Restore
Hi Terrie,
To address your concern, we suggest that you try to undo the restore or pick another restore point.
Please follow these steps to access system restore:
- Right-click (or press and hold) the Start button, and then select Control Panel.
- Search Control Panel for Recovery.
- Select Recovery > Open System Restore > Next.
Let us know how it goes.

System restore in Win10
-
System restore in Win10 — Similar Threads — System restore Win10
-
System Restore in WIN10 keeps losing retsore points
in Windows 10 Software and Apps
System Restore in WIN10 keeps losing retsore points: How do I control System Restore in WIN10? System Restore use to be a very good tool years ago for computer repair and support, but now isn’t very useful. I have set aside a sizable amount of space for restore points but they keep disappearing without my intervention. How do I… -
Using a Win10 system image to restore Win10 from Win11
in Windows 10 Gaming
Using a Win10 system image to restore Win10 from Win11: Prior to downgrading to win 11, I made a system image.Then I used Macrium reflect to clone the drive onto an M2drive, then replace the conventional HD with a bigger one.After almost a month I did this over Christmas I’m sick of all the issues Win11 has caused, and am going to… -
Using a Win10 system image to restore Win10 from Win11
in Windows 10 Software and Apps
Using a Win10 system image to restore Win10 from Win11: Prior to downgrading to win 11, I made a system image.Then I used Macrium reflect to clone the drive onto an M2drive, then replace the conventional HD with a bigger one.After almost a month I did this over Christmas I’m sick of all the issues Win11 has caused, and am going to… -
Win10 System Restore Failure.
in Windows 10 Gaming
Win10 System Restore Failure.: Hi,I’m trying to do a system restore from a system restore point on a failed boot from the Safe Boot Troubleshooting startup system.It runs for a while, finishes and then says it failed with error 0x80070780 and the message is saying the error is restoring… -
Win10 System Restore Failure.
in Windows 10 BSOD Crashes and Debugging
Win10 System Restore Failure.: Hi,I’m trying to do a system restore from a system restore point on a failed boot from the Safe Boot Troubleshooting startup system.It runs for a while, finishes and then says it failed with error 0x80070780 and the message is saying the error is restoring… -
Win10 System Restore Failure.
in Windows 10 Software and Apps
Win10 System Restore Failure.: Hi,I’m trying to do a system restore from a system restore point on a failed boot from the Safe Boot Troubleshooting startup system.It runs for a while, finishes and then says it failed with error 0x80070780 and the message is saying the error is restoring… -
System image restore failed Win10 — 0x8078008C
in Windows 10 Installation and Upgrade
System image restore failed Win10 — 0x8078008C: Hello.I have created a Windows 10 Image using Windows 7 file recovery and I’m finding that, when I try to restore from it, the restore fails stating that «Windows Backup failed to import the operating system loader entry for the recovered operating system into the boot…
-
System Restore Points disappear, Win10
in Windows 10 Installation and Upgrade
System Restore Points disappear, Win10: If system restore points routinely disappear in a day or two, why does MS even offer the option?Or, if MS intends such a short life for temporary protection only, why not let users know about it?
This happens independently of system updates, which, of course, delete…
-
System Image or Backup and Restore Files in Win10
in Windows 10 Backup and Restore
System Image or Backup and Restore Files in Win10: Hi,A few days ago I discovered I had some corruptive files preventing me from Updating successfully. So, after much hair-pulling I did a Windows 10 reinstall via a USB Flash Drive while Windows was running and it was successful thanks to some talented folks on this forum….
Ошибка: Нужно включить защиту системы на этом диске
Суть: по каким-то причинам не загружается Windows, а попытки откатиться до какой-то точки восстановления блокируются ошибкой You must enable system protection on this drive или Нужно включить защиту системы на этом диске.
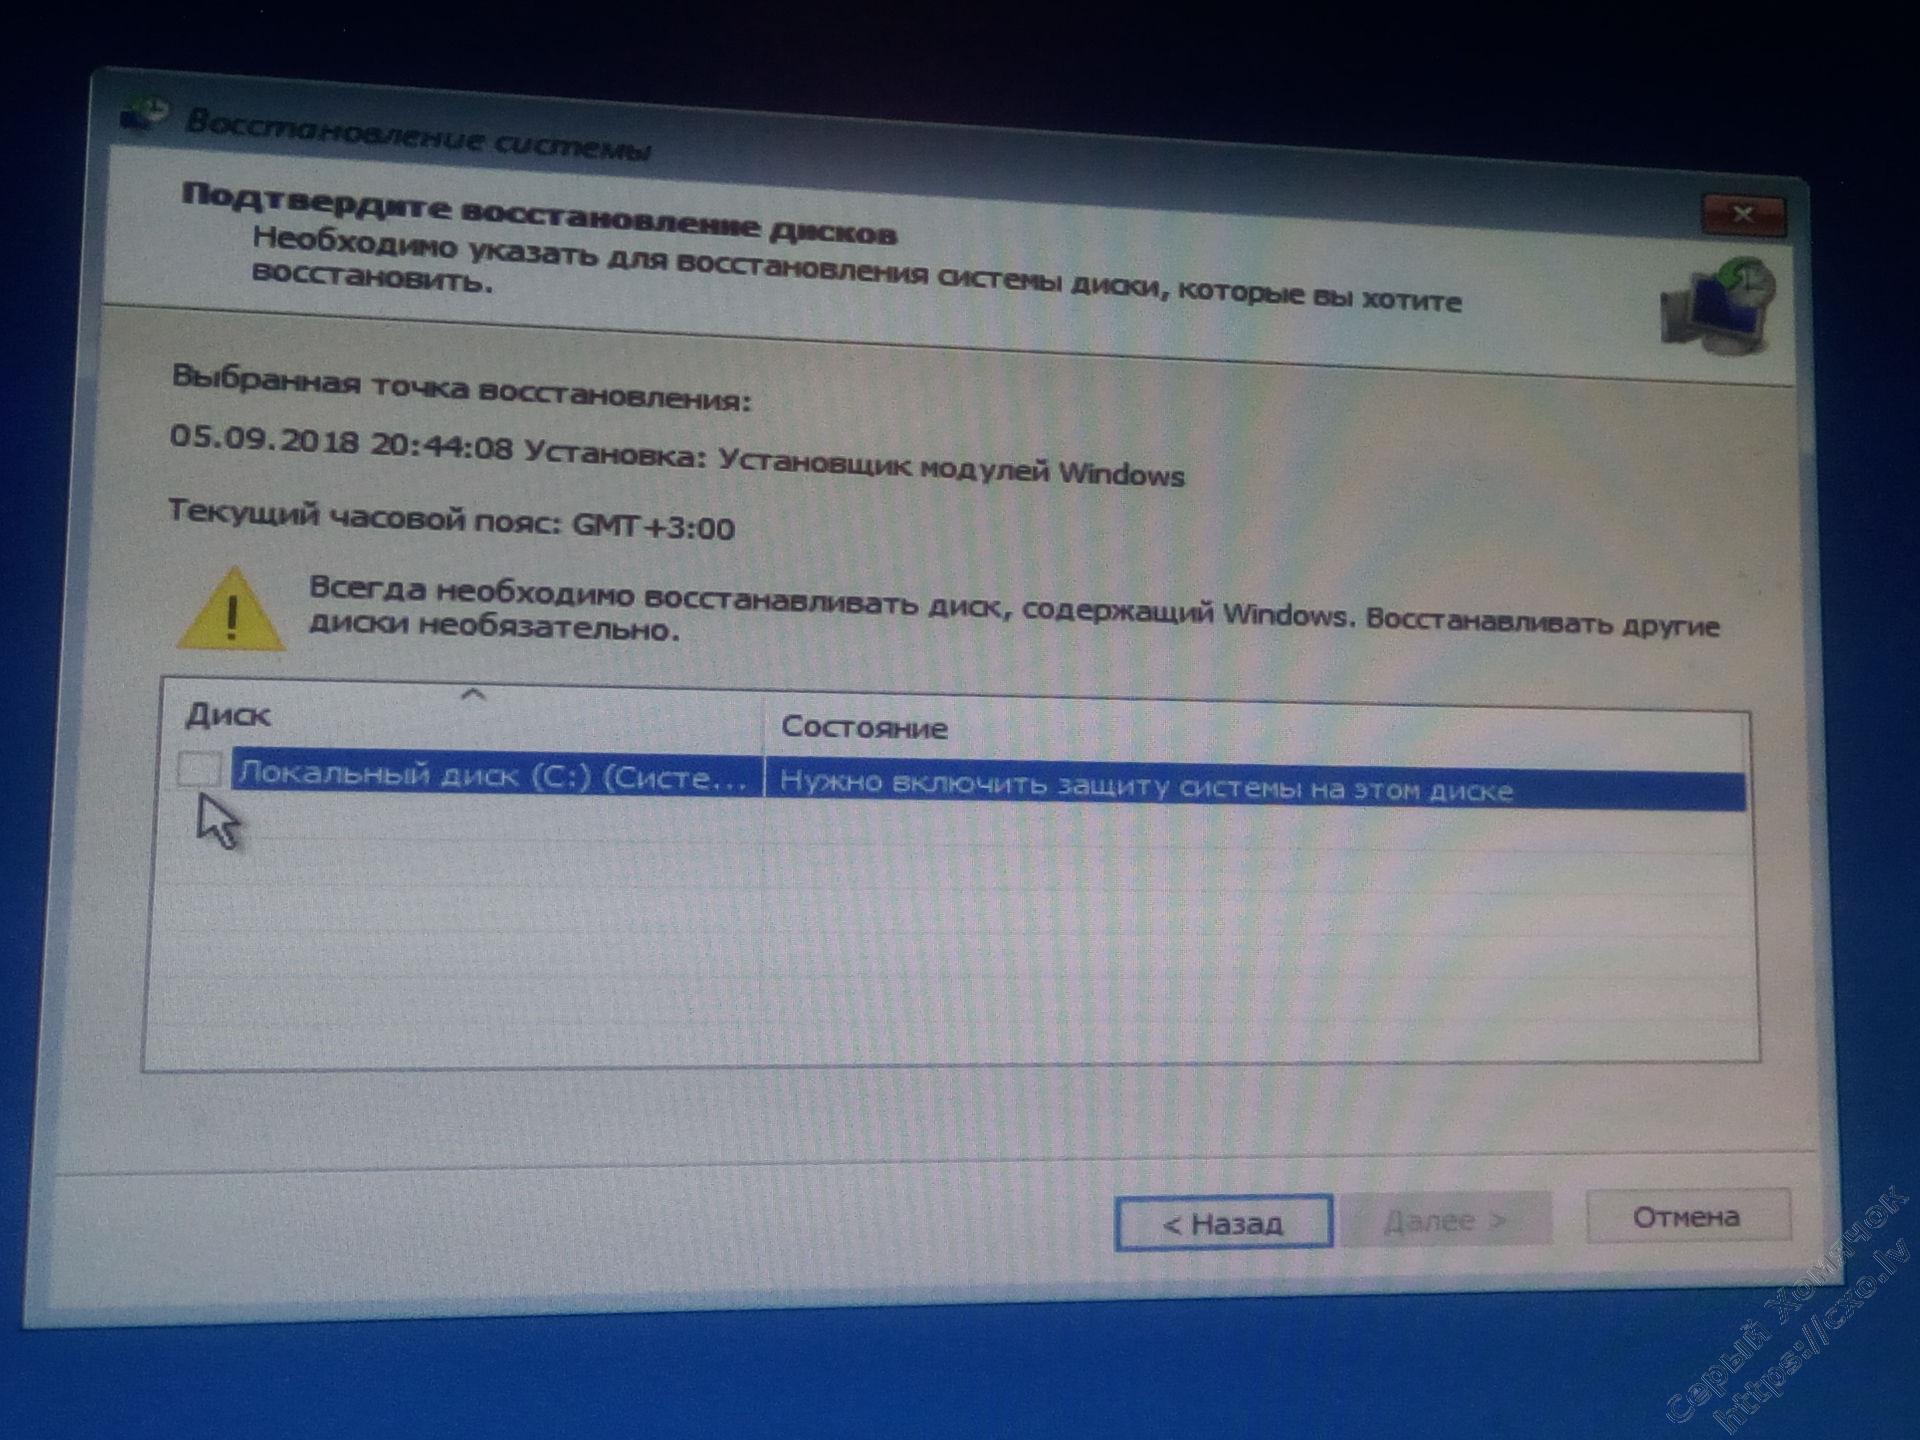
Поборем эту ошибку и восстановим нормальную загрузку системы, сначала покажу как это сделать в почти графическом режиме, а в конце будет список консольных команд для тех, кто не любит шерудить мышкой.
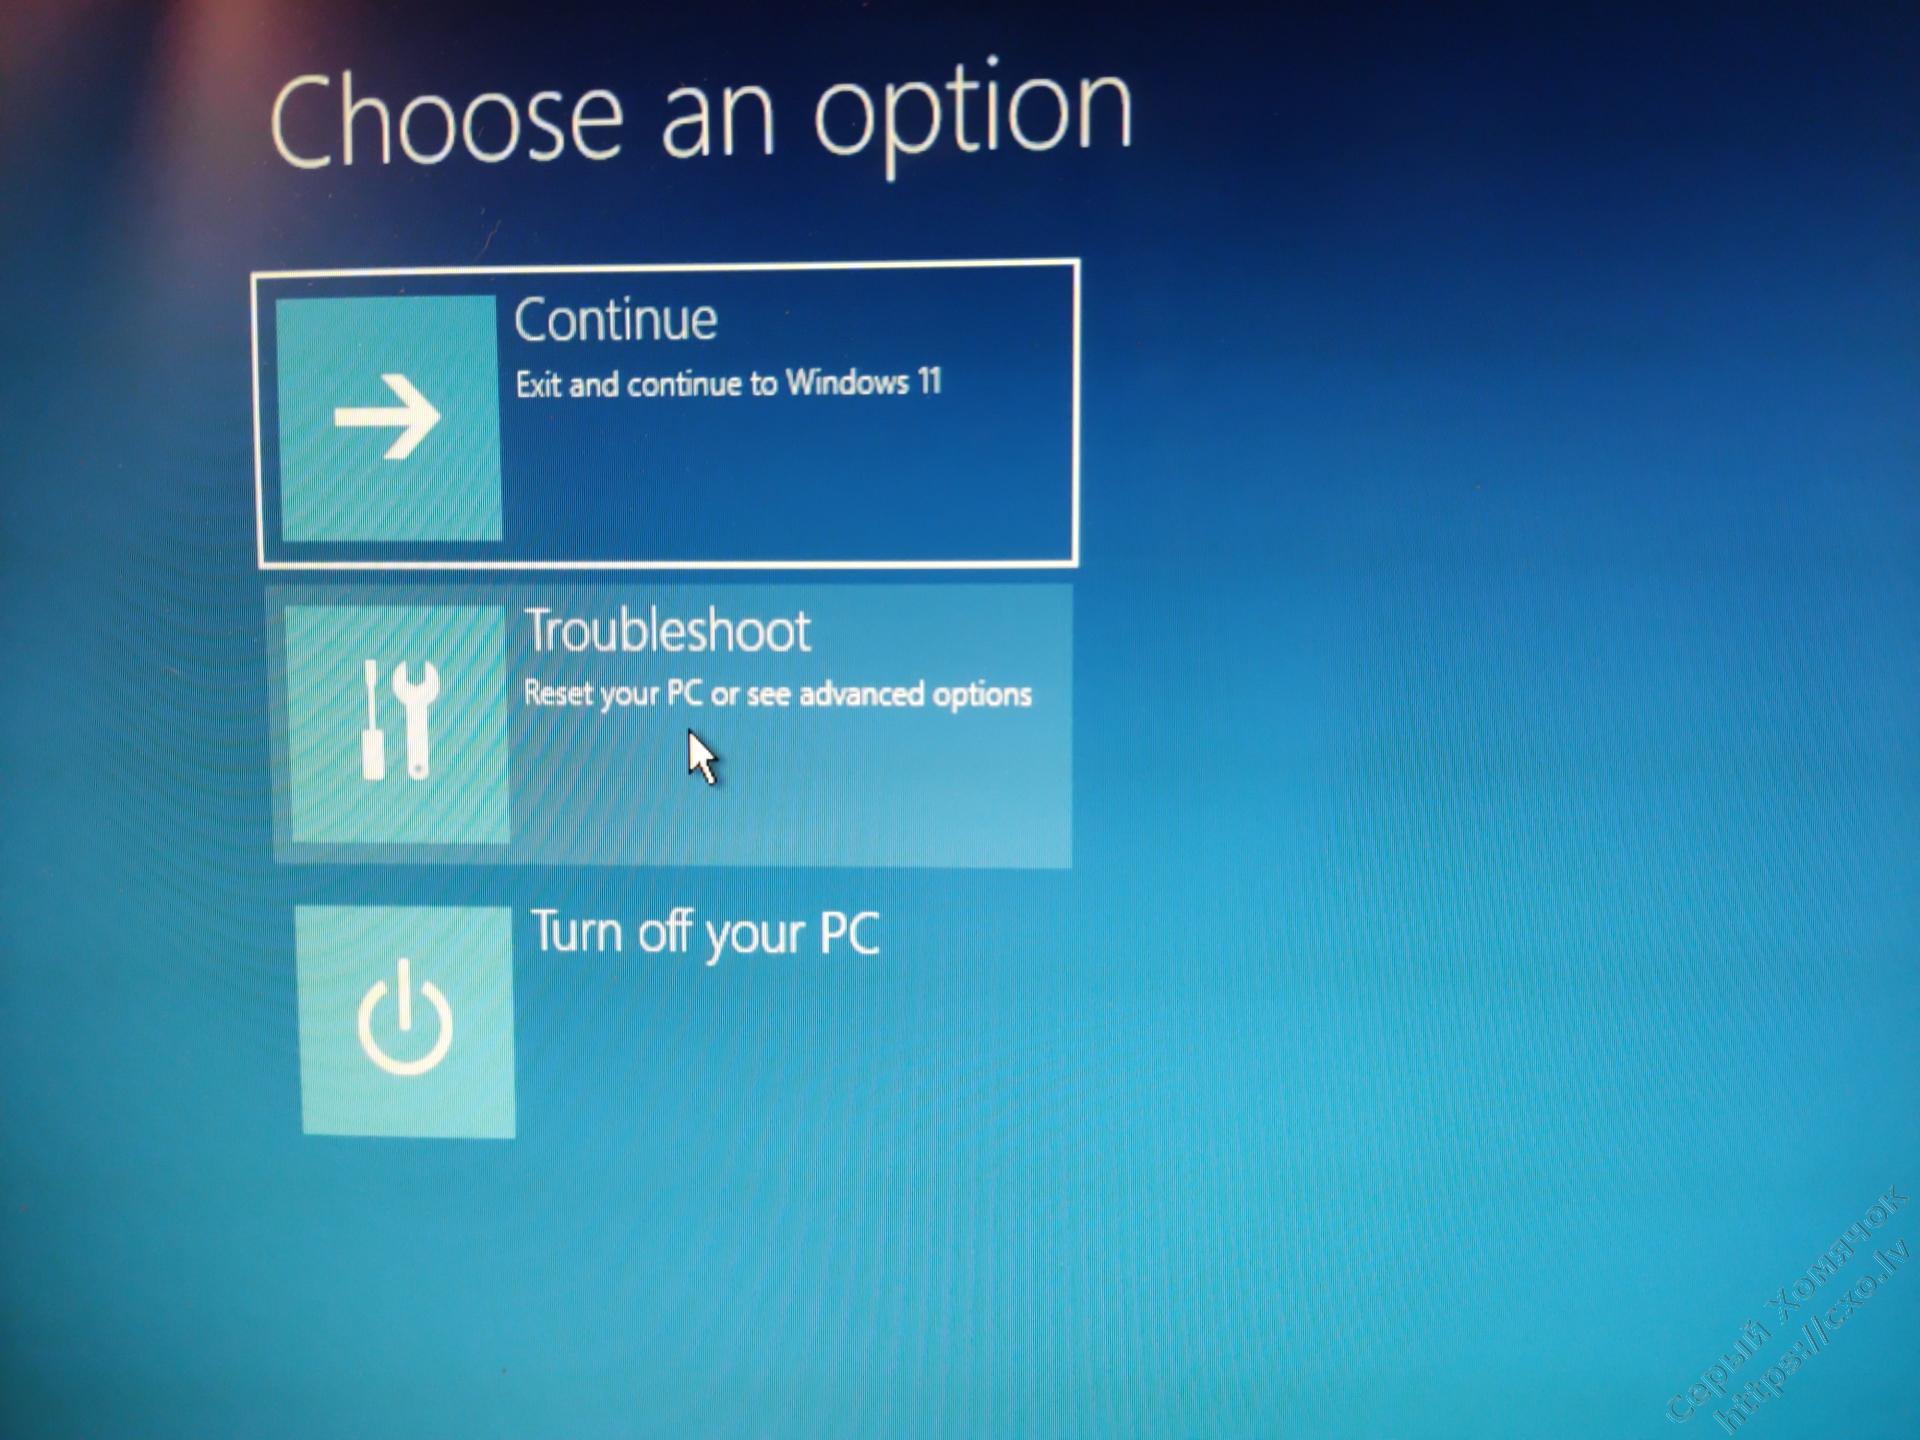
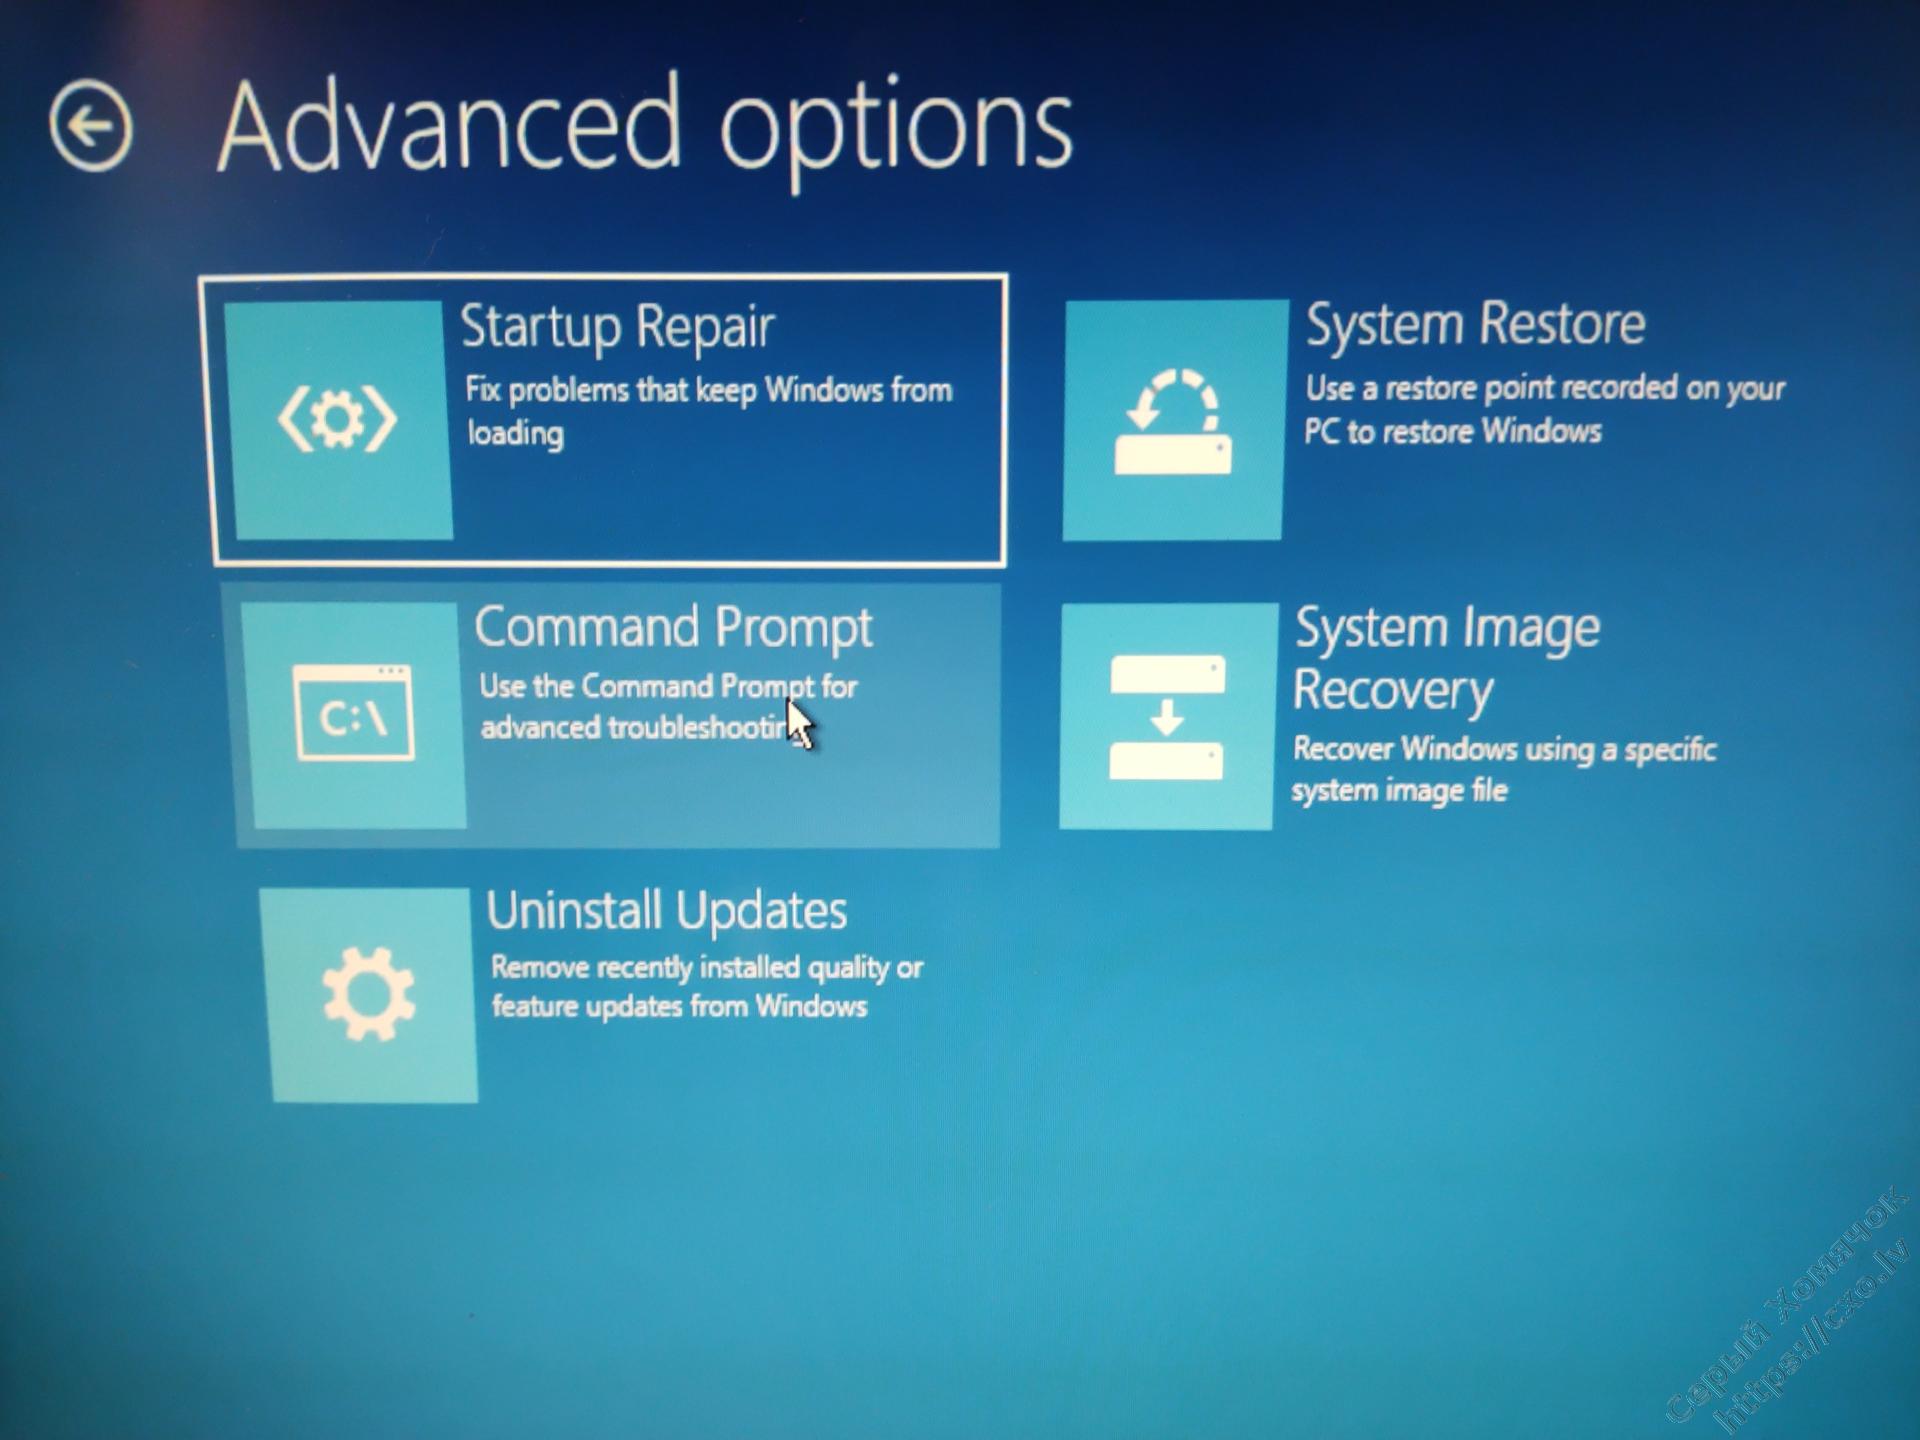
Загружаемся в Windows Recovery Environment (WinRE), если не получается из своей системы, то заготавливаем ЮСБ носитель с загрузочным образом вашей системы, у меня будет Win11 и я предпочитаю для подготовки использовать Rufus, и загружаемся с него. В появившемся экране выбираем Repair your computer -> Troubleshoot -> Command Prompt.
В открывшемся окне набираем notepad — будем использовать его в качестве файлменеджера:

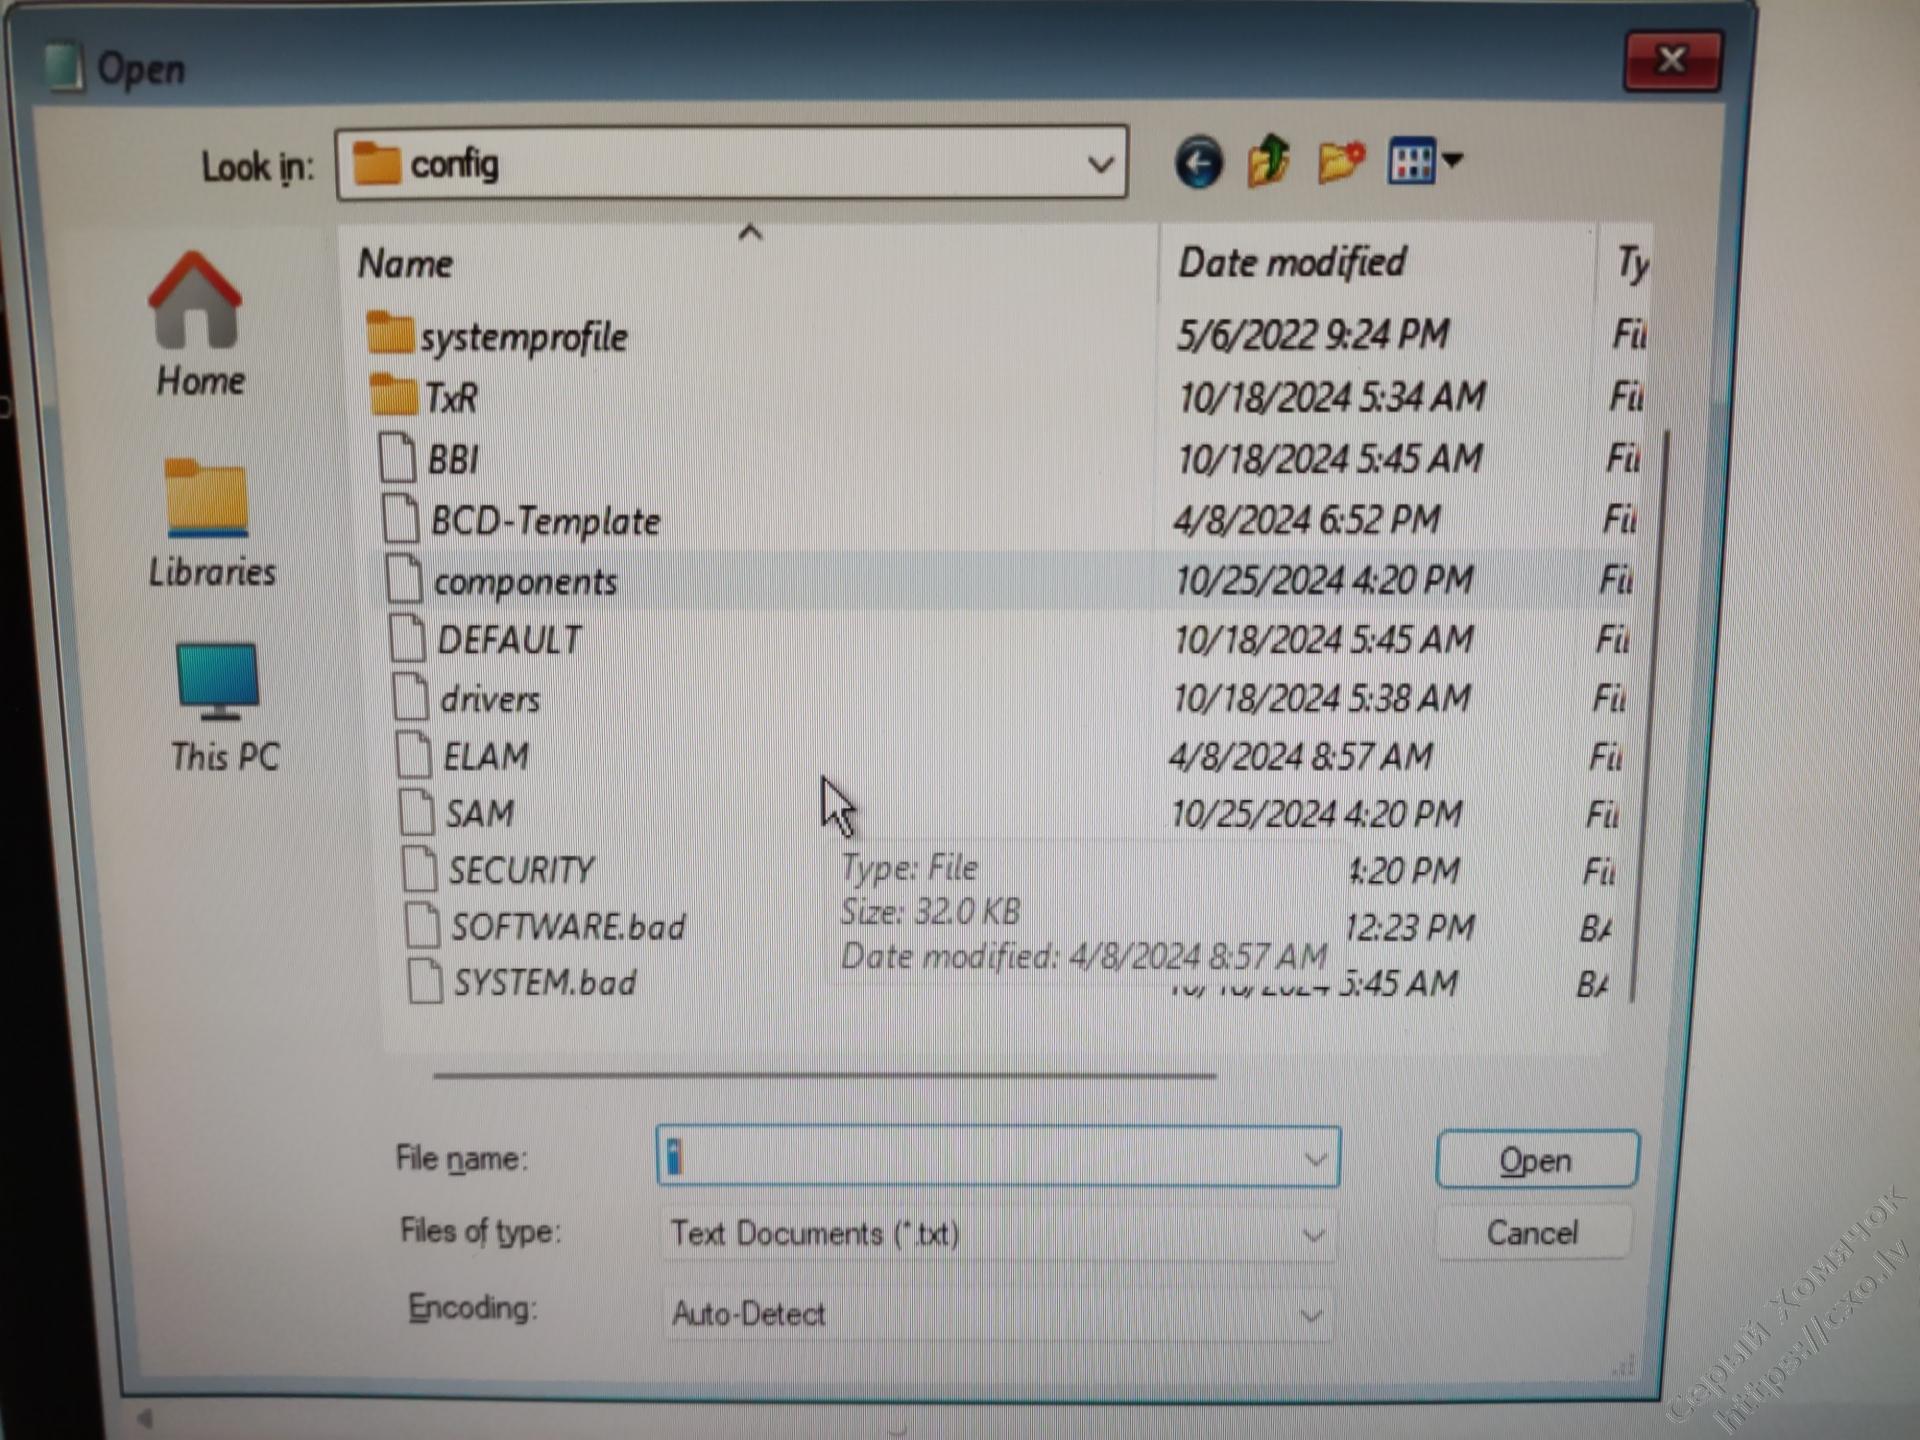
В открывшемся блокноте нажимаем Ctrl-O и нажимаем на кнопку обзора компьютера, так мы можем увидеть список дисков, какой диск с системой, какую букву система выделила этому диску, у меня системный диск — F и именно на диске F я буду в следующем абзаце искать кусты реестра, у вас это может быть другая буква.
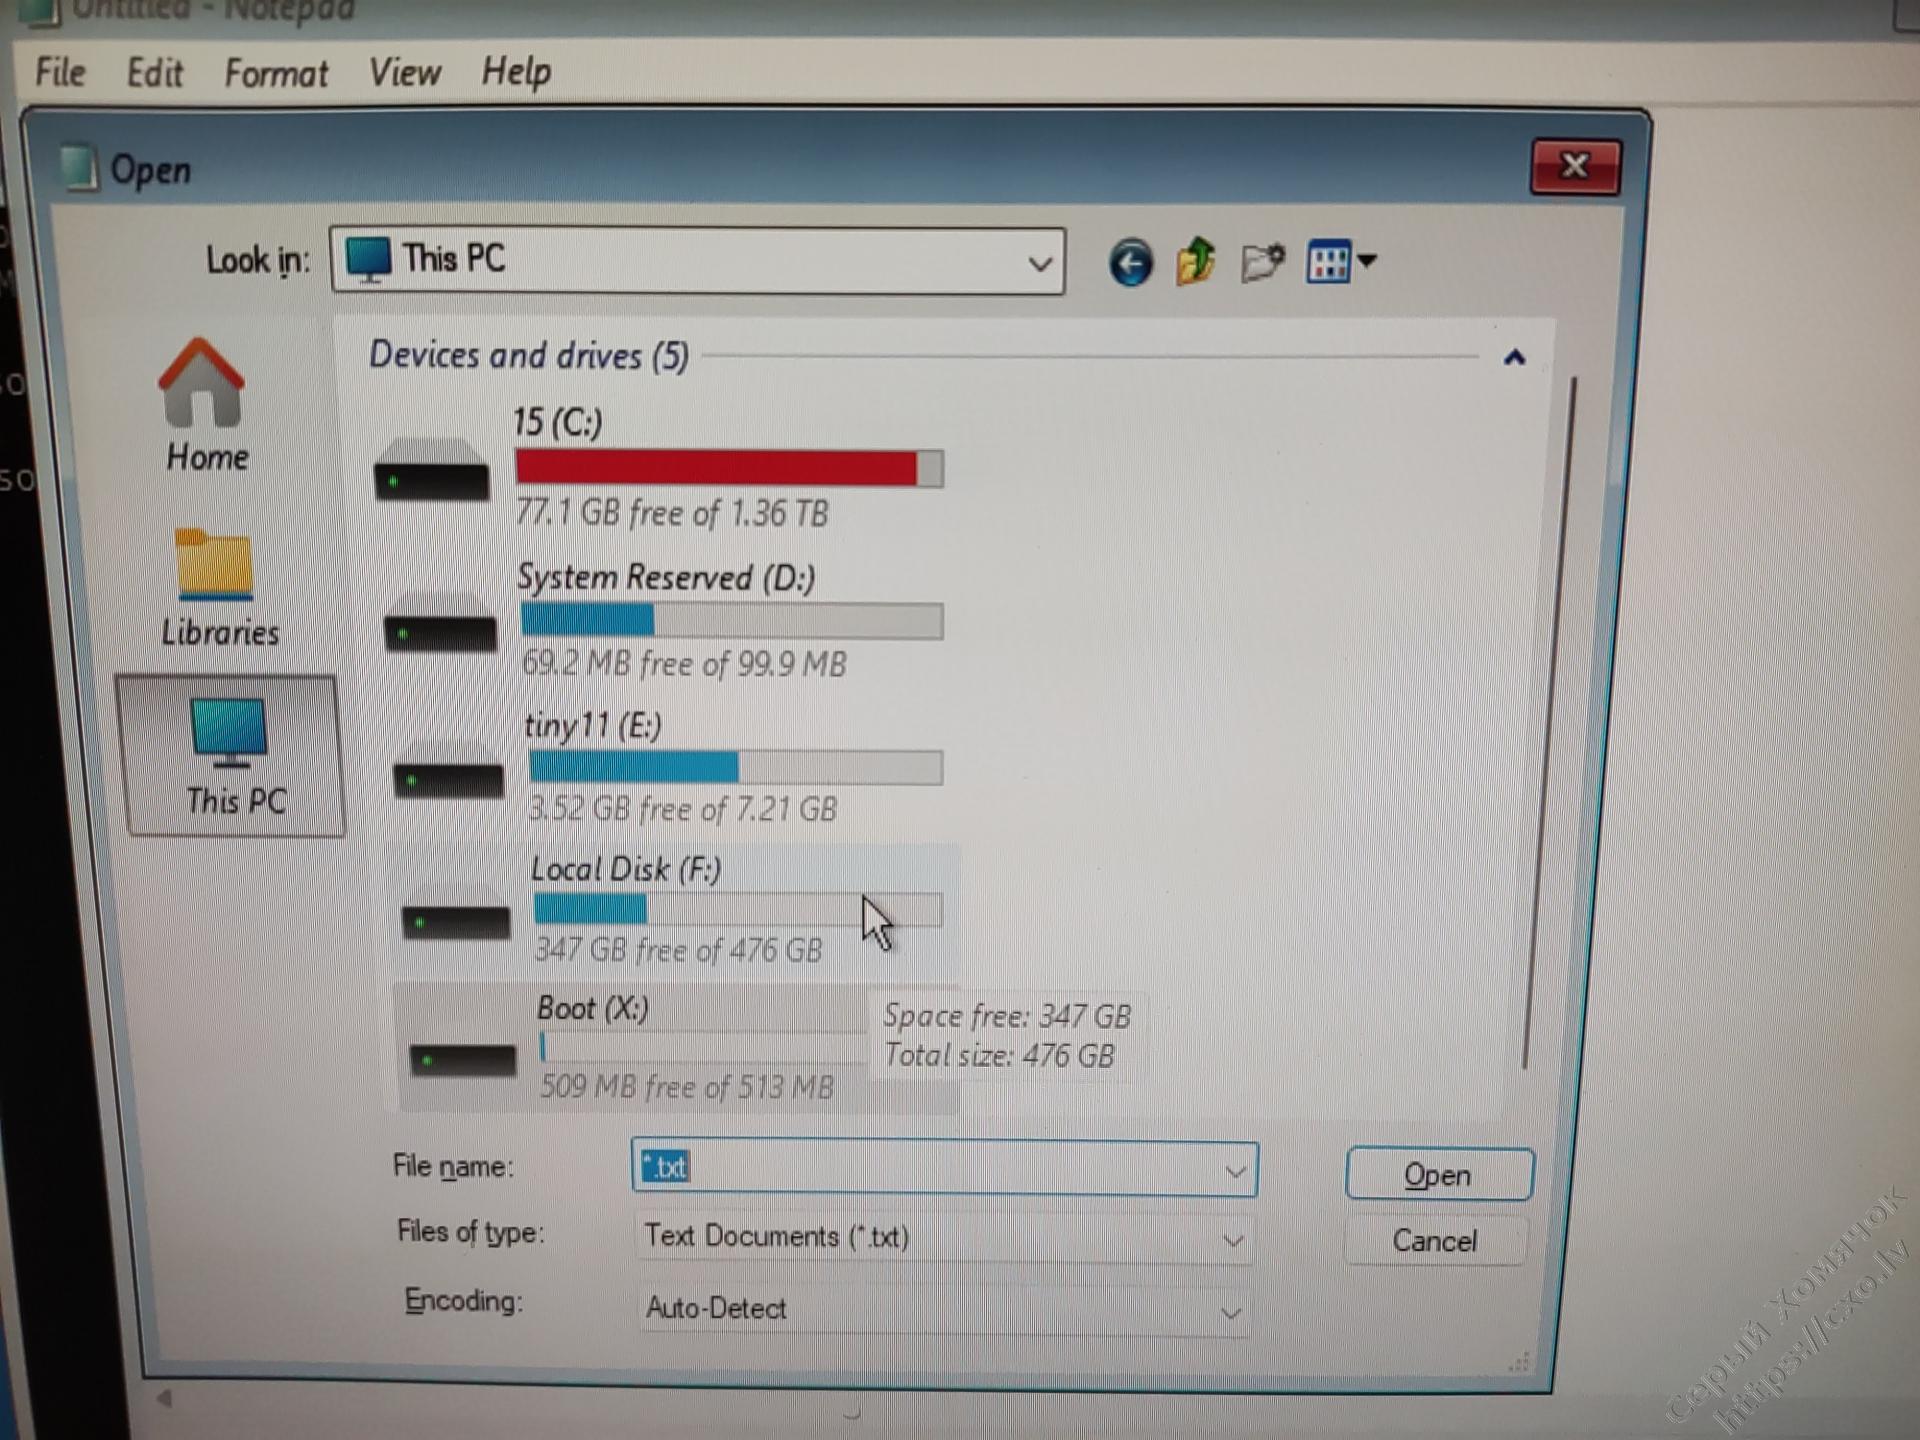
Небольшое отступление: если система сломалась из-за неполадок в реестре, а это почти всегда, то стоит сразу же пойти по адресу F:/windows/wystem32/config и переименовать кусты реестра SYSTEM и SOFTWARE. Что бы увидеть все имена файлов в поле File Name нужно поставить звёздочку — *. Что бы переименовать выбираем файл курсором и нажимаем F2, даём новое имя и нажимаем Enter.
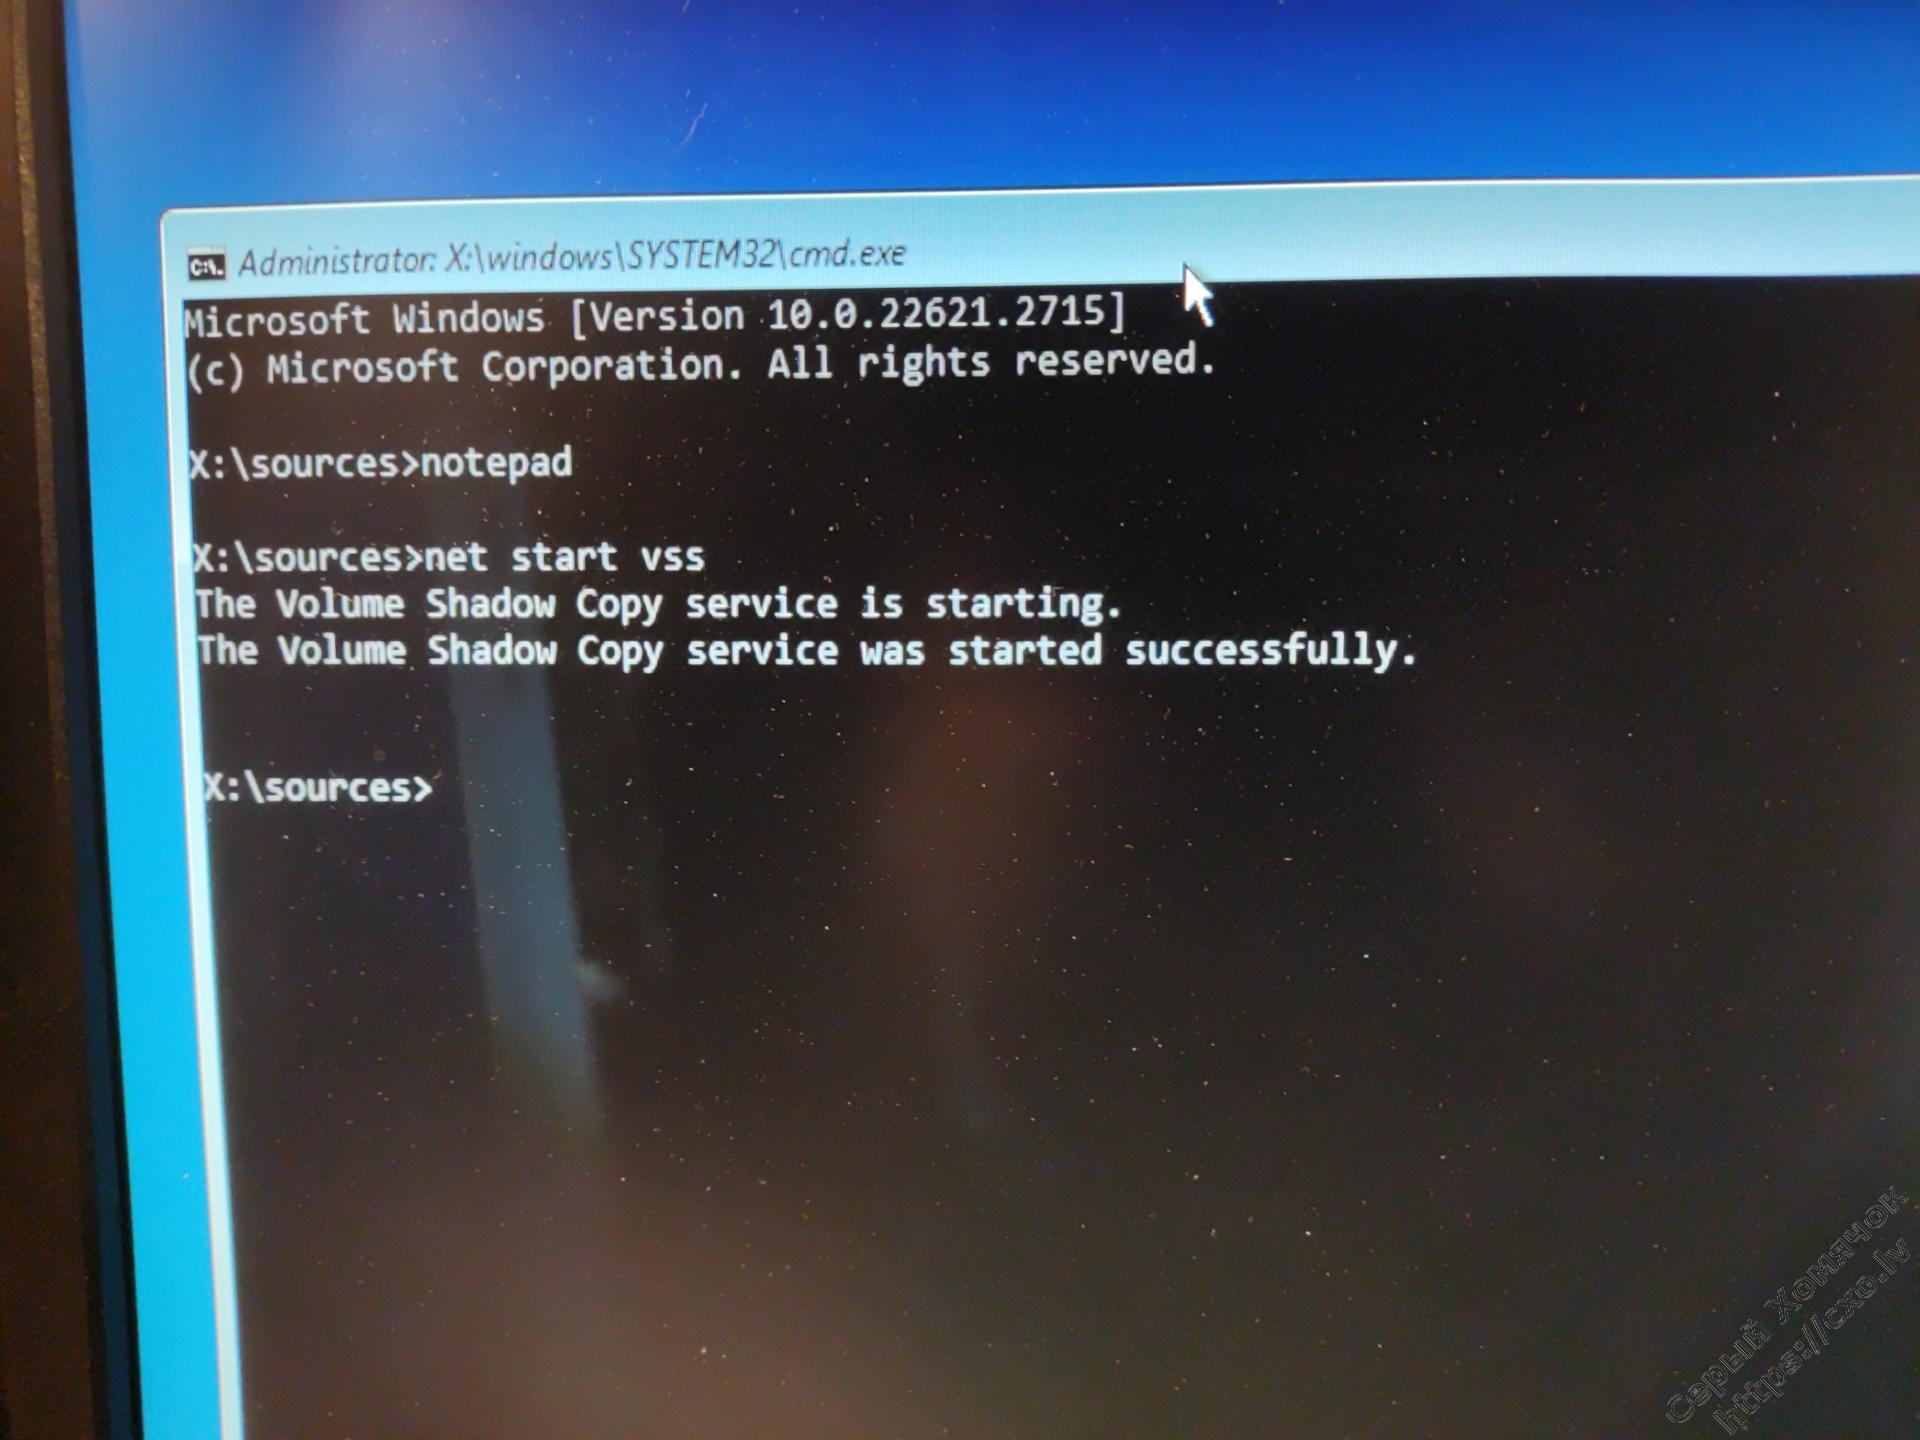
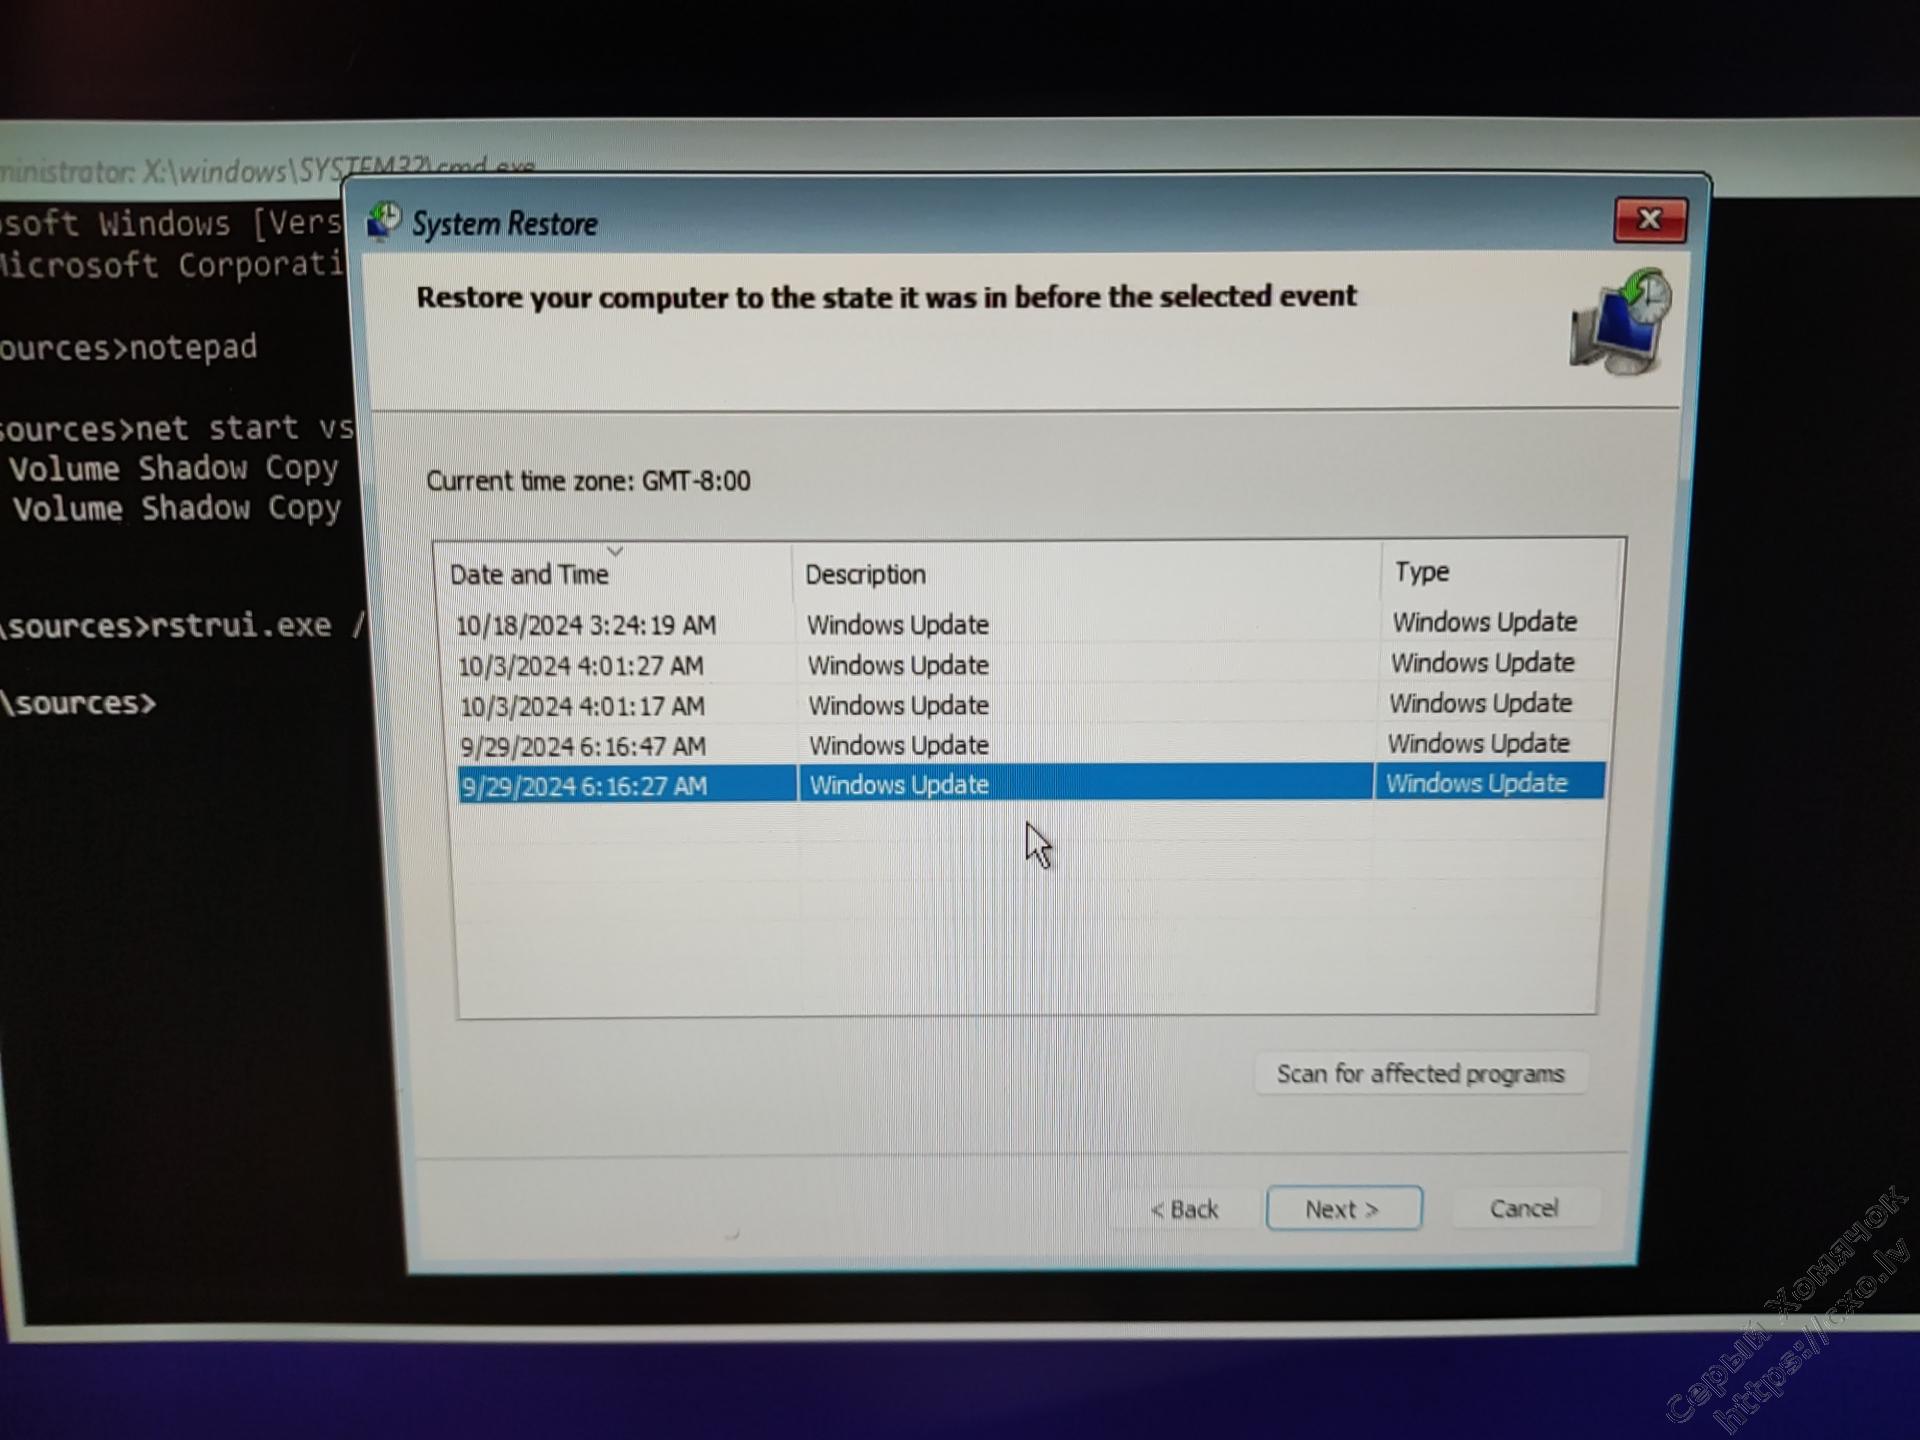
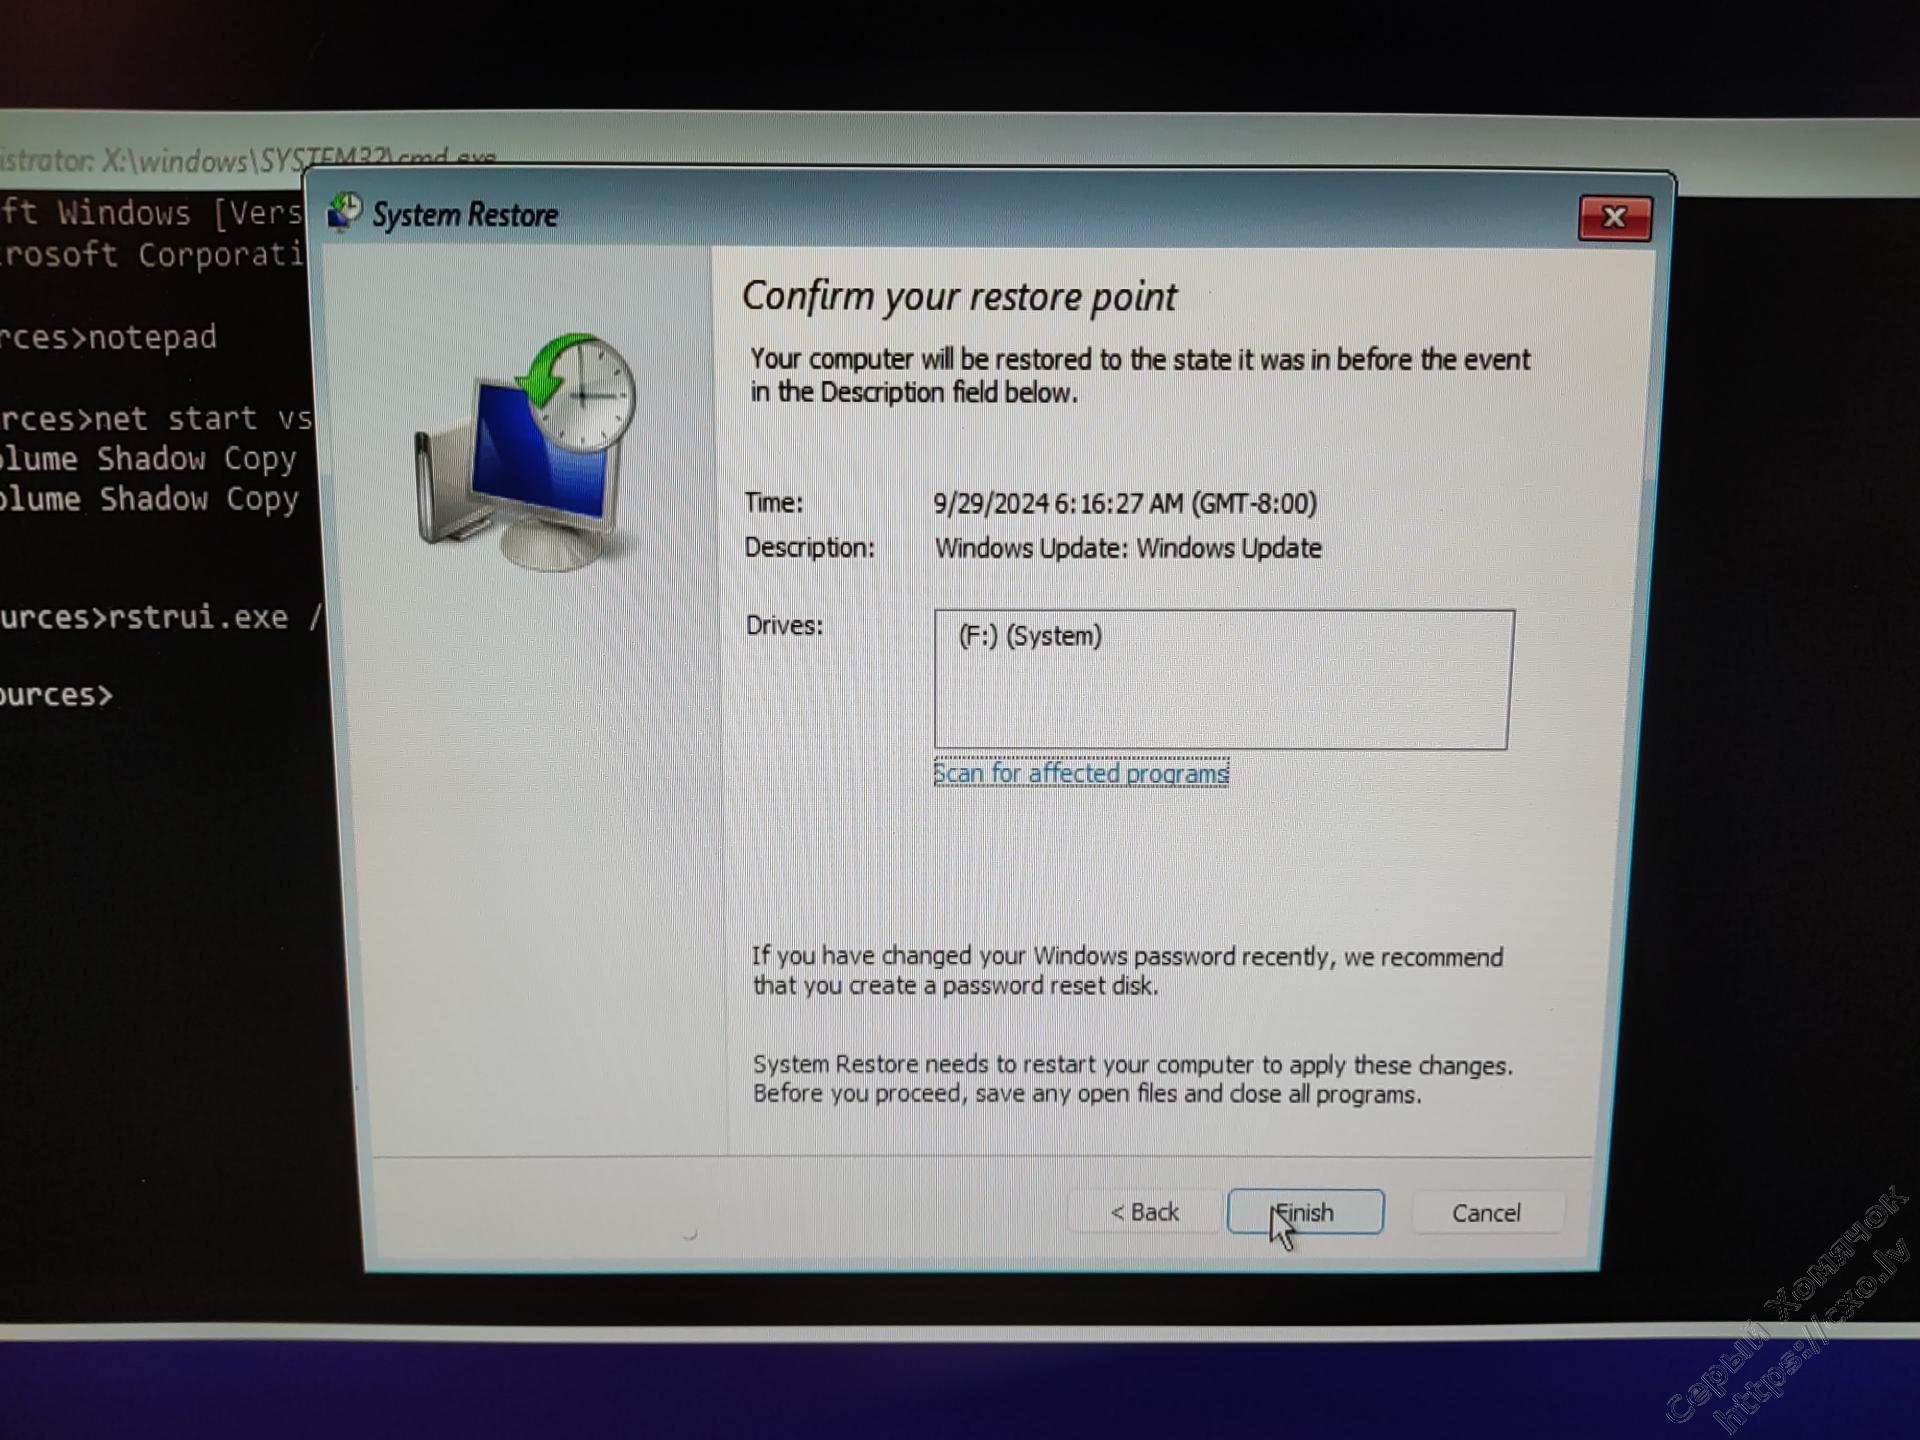
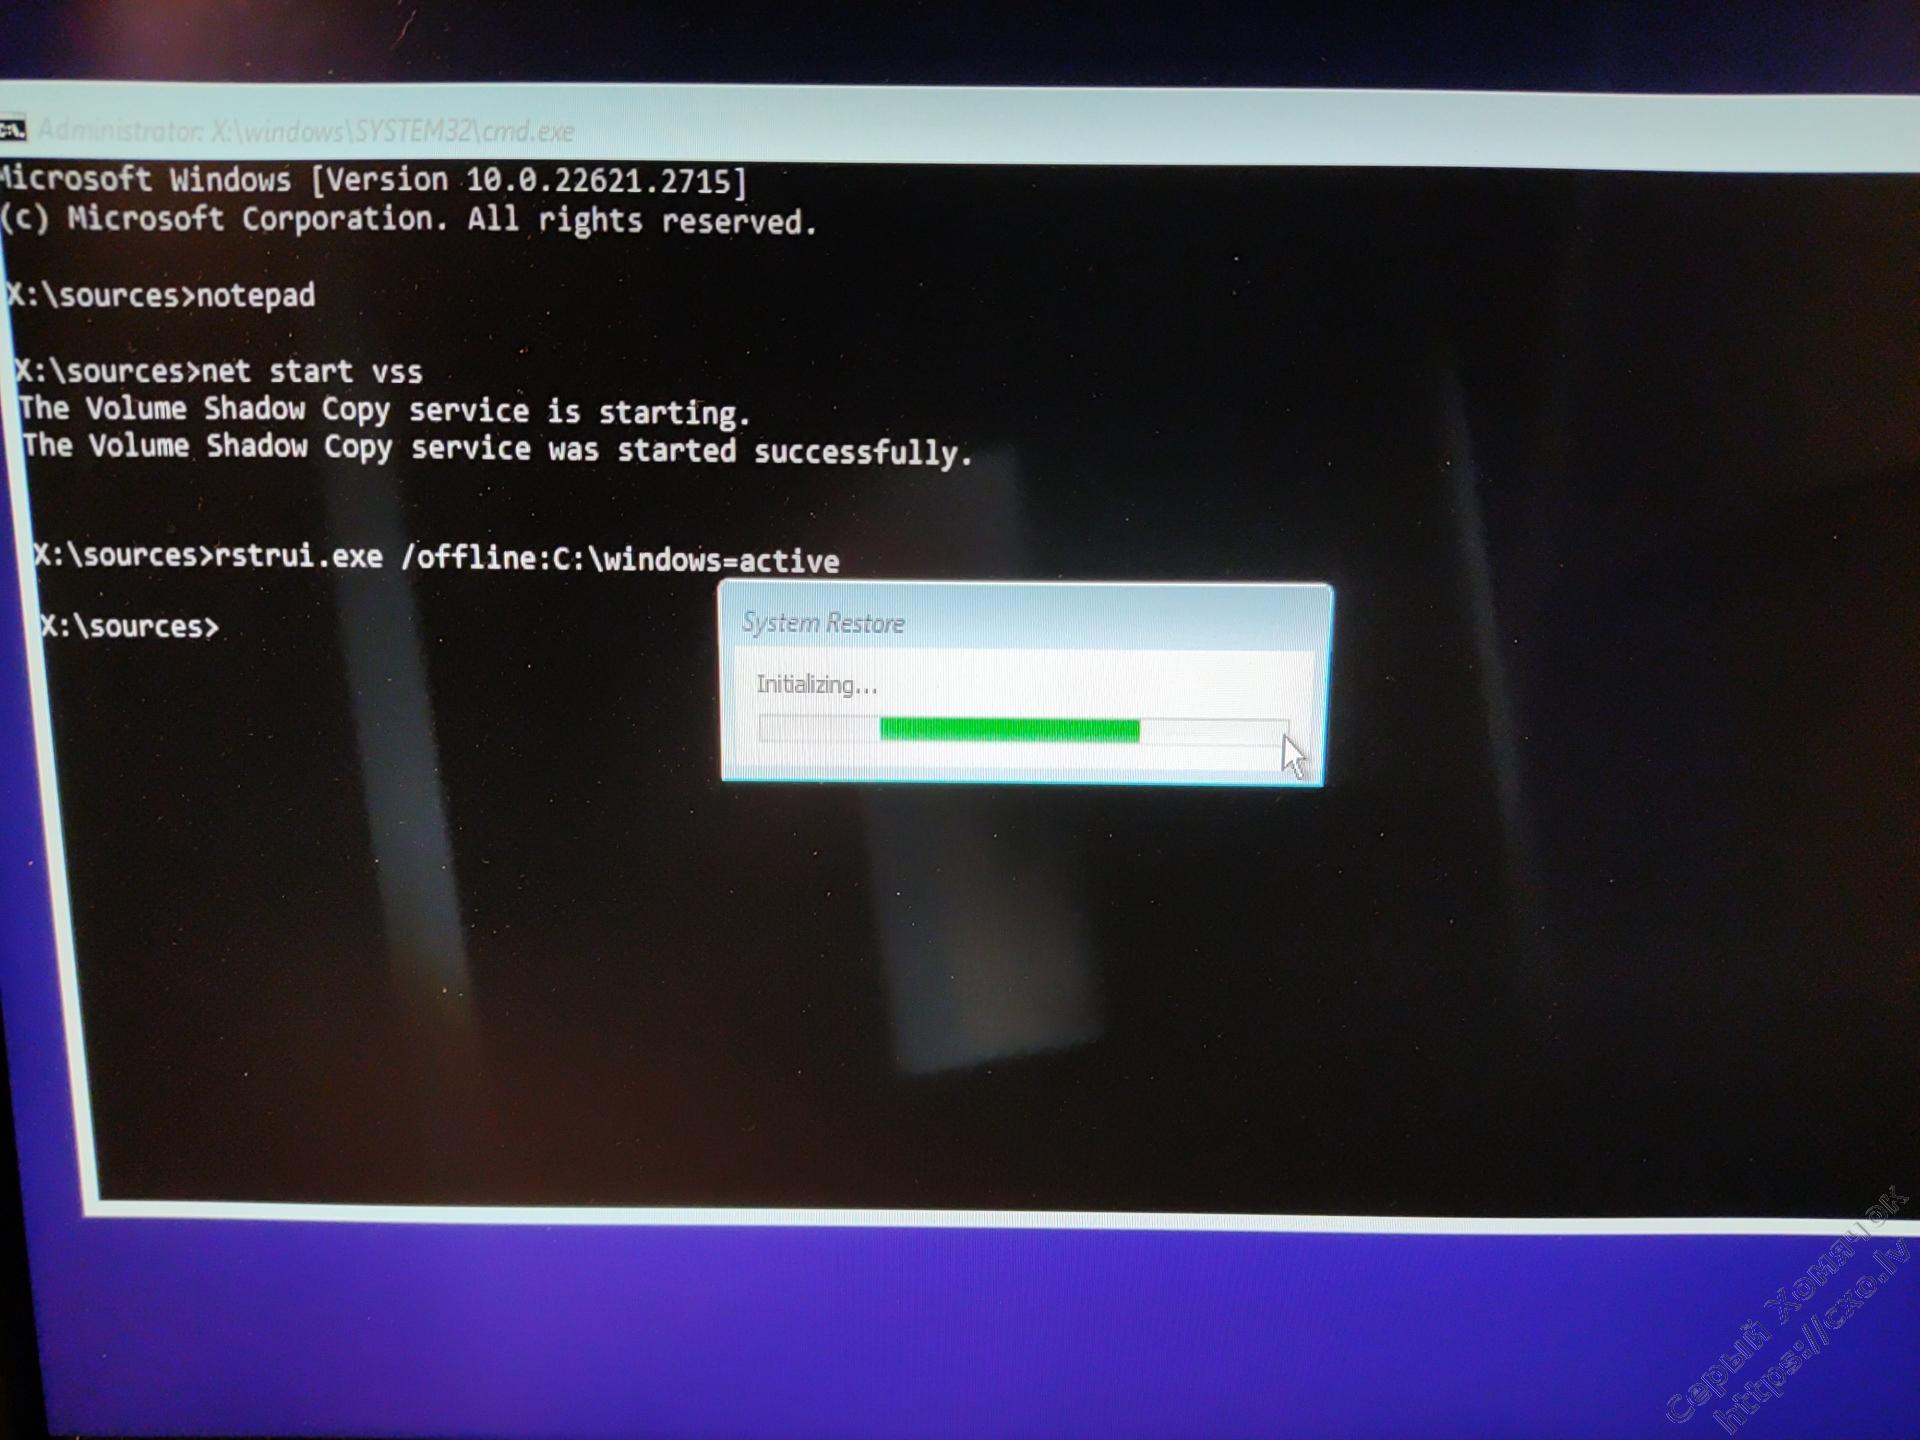
Всё, закрываем блокнот и последовательно вводим команды net start vss — это запуск службы теневых копий, и rstrui.exe /offline:C:\windows=active — запуск системы восстановления с включённой защитой системного диска.
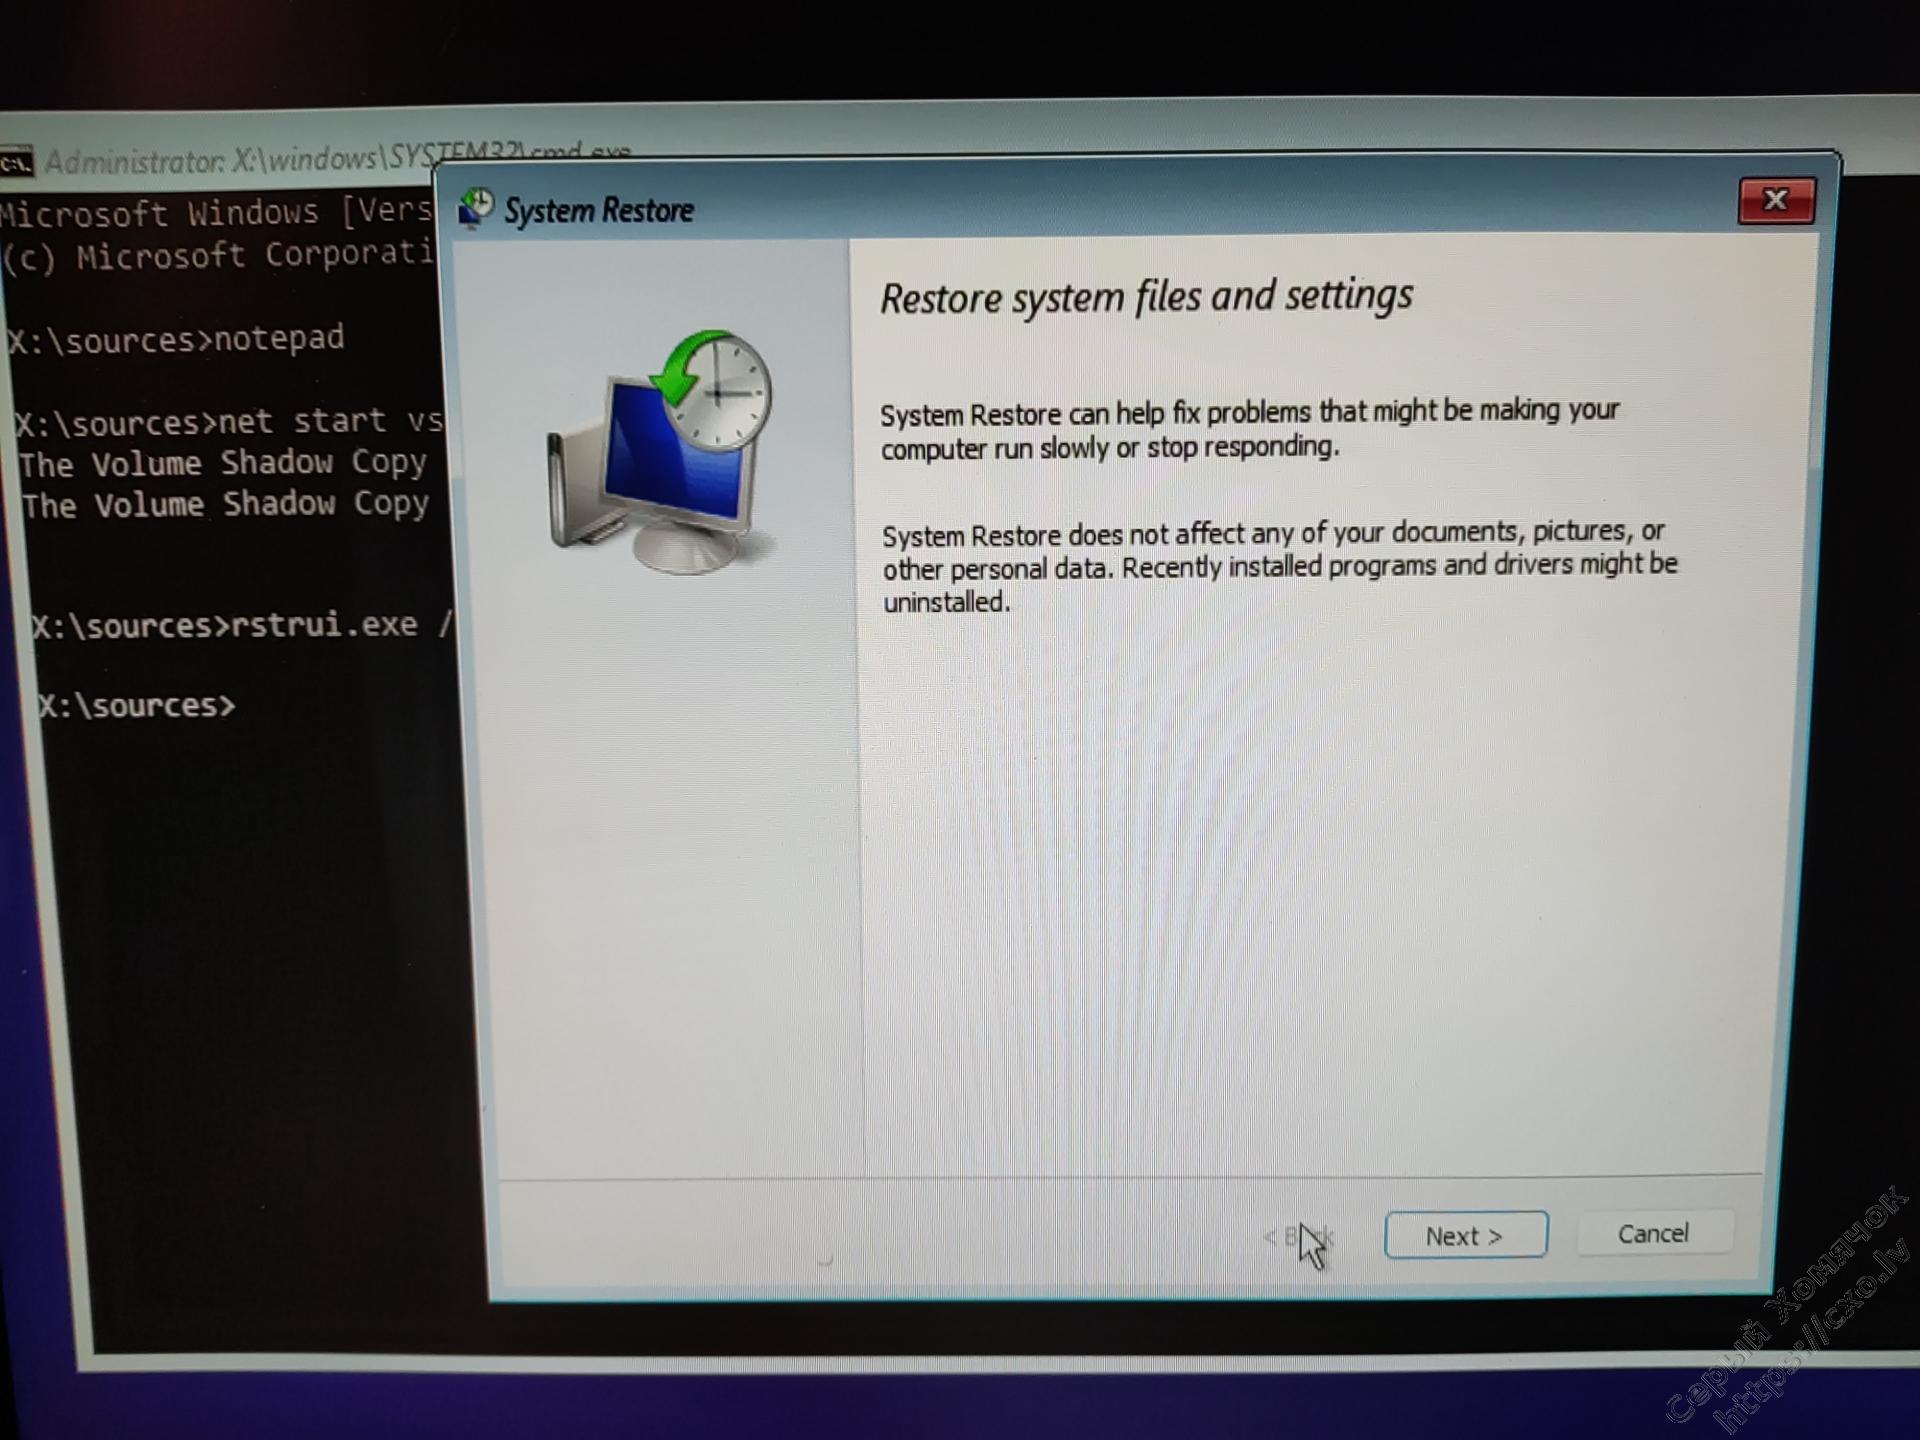
Запустится система восстановления и дальше мы увидим, что блокировка ошибкой исчезла, восстановление начнётся и успешно завершится, и мы можем успешно восстановить нормальную загрузку системы.

Теперь, для нелюбителей возить мышкой, просто консольные команды, в порядке исполнения: выводим список дисков, что бы подсмотреть на каком диске у нас стоит Windows, переходим в директорию с реестром, переименовываем кусты реестра, включаем теневые копии и запускаем восстановление:
diskpart
list vol
exit
cd F:\windows\system32\config
ren SYSTEM SYSTEM.bad
ren SOFTWARE SOFTWARE.bad
net start vss
rstrui.exe /offline:C:\windows=active
И в конце я хотел бы напомнить, что нужно минимально понимать что и зачем делается, по возможности всё бекапить. И если что-то пойдёт не так, как ожидалось, то я в этом не виноват и меня хаять не надо!
Ну ты красавец. Мне ты очень помог.
Спасибо за помощь, всё сработало как надо
The “You must enable system protection on this drive” message appears inside System Restore and it prevents users from running this utility on the disk they chose. The message is a status message for the selected drive which users want to restore.
There are quite a few different methods users came up with to resolve this problem and we decided to include all of them in this article. Just make sure you follow the instructions carefully and the problem should be gone in no time!
What Causes the “You Must Enable System Protection on This Drive” Error on Windows?
This problem can be caused by two distinct causes. The first case scenario is that System Protection is simply not activated on your computer and you have to activate it manually. This can be more difficult if you have accessed System Restore from the Advanced Startup.
The second cause may be the fact that the System Protection service is simply not running on your computer and you need to restart it properly. Make sure you check out both causes and the methods related to them!
Solution 1: Use Command Prompt to Rename Registry File and Perform the System Restore
System Restore can also be run in a command prompt window. However, before you run it, you should rename two system files which cause the “You must enable system protection on this drive” message to appear. Since this issue mostly occurs when you are not able to access your operating system, all troubleshooting will be run from the advanced startup options.
- If you are not able to access your operating system at all, you will have to insert the installation drive you own or which you have just created and boot your computer.
- You will see a Choose your keyboard layout window so choose the one you want to use. The Choose an option screen will appear so navigate to Troubleshoot >> Advanced options >> Command Prompt

- At the command prompt window, simply type in the command below in a new line and click the Enter key to navigate to the C >> Windows >> System32 >> config folder:
cd %systemroot%\system32\config
- Once you have navigated to the config folder inside System32, it’s time to rename two system files. You can do that by typing the two commands below. Make sure you tap Enter after each one!
ren SYSTEM system.001
ren SOFTWARE software.001

- Finally, it’s time to run System Restore by typing out the command below.
rstrui.exe /offline:C:\windows=active
- System Restore should now open without displaying the “You must enable system protection on this drive” this time. Follow the instructions on-screen to follow through and see if your computer starts operating normally!
Solution 2: Enable System Protection using PowerShell
There is a simple PowerShell command which can bring back the system protection feature for the drive you want to restore. After that, you can visit System Restore settings to check whether you can enable System Protection for the drive where you have installed Windows in. Follow the steps below to execute this method!
- Open the PowerShell utility by right-clicking the Start menu button and clicking the Windows PowerShell (Admin) option at the context menu.
Running PowerShell from Start menu
- If you see Command Prompt instead of PowerShell at that spot, you can also search for it in the Start menu or the search bar next to it. This time, make sure you right-click on the first result and choose Run as administrator.
- In the PowerShell console, type in the commands shown below and make sure you click Enter after typing out each one.
enable-computerrestore -drive "c:\"
vssadmin resize shadowstorage /on=c: /for=c: /maxsize=5%
checkpoint-computer -description "Done"
Let these commands do their thing! It should take a couple of seconds for them to finish their process. point in time, if you opt to go back.
- To check if your System Restore is disabled or not, click the Start menu button at the taskbar and type Control Panel. Click on the first result to open it. You can also use the Windows Key + R key combination to open the run dialog box. After that, type “control.exe” in the box and click OK to run Control Panel.
- Click on System to navigate to the Control Panel’s System section.
- In the left side of the screen, you will see System protection settings. Click on it to open System Properties. Navigate to the System Protection tab and you will see the Protection Settings.

- Check to see if the Protection is switched to On under the drive you are using for your files and folders.
- If the option is set to off, select the drive you want to turn on System Restore for and click on the Configure
- The System Protection Settings for Windows 10 will open so check under Restore Settings for the “Turn on system protection” radio button. Make sure that this option is selected and click OK.
- Try running the System Restore now and check to see if the same error message appears.
Solution 3: Start the System Protection Service
If the System Protection Service isn’t running at all or if it’s broken, System Protection used for System Restore may not work properly and you may receive the message that it has been turned off. You should consider restarting the System Protection Service before re-running System Restore to see if the problem has been resolved. Follow the steps below!
- Open the Run utility by using the Windows Key + R key combination on your keyboard (press these keys at the same time. Type “services.msc” in the newly opened box without the quotation marks and click OK to open the Services tool.
Running Services.msc - The alternative way is to open the Control Panel by locating it in the Start menu. You can also search for it using the Start menu’s search button.
- After the Control Panel window opens, change the “View by” option at the top right part of the window to “Large Icons” and scroll down until you locate the Administrative Tools entry. Click on it and locate the Services shortcut at the bottom. Click on it to open it as well.

Services in Administrative Tools - Locate the System Protection Service service on the list, right-click on each one and select Properties from the context menu which appears.
- If the service is started (you can check that just next to the Service status message), you should stop it for now by clicking the Stop button in the middle of the window. If it is stopped, leave it stopped until we proceed.

Stopping the service - Make sure that the option under the Startup type menu in the service’s properties window is set to Automatic before you proceed with other steps. Confirm any dialogue boxes which may appear when changing the startup type. Click on the Start button in the middle of the window before exiting.


You may receive the following error message when you click on Start:
Windows could not start the service on Local Computer. Error 1079: The account specified for this service differs from the account specified for other services running in the same process.
If this happens, follow the instructions below to fix it.
- Follow the steps 1-3 from the instructions above to open the service’s properties window. Navigate to the Log On tab and click on the Browse… button.

- Under the “Enter the object name to select” entry box, type in Network Service, click on Check Names and wait for the name to become available.
- Click OK when you are finished and type in the password in the Password box when you are prompted with it if you have set up a password. System Restore should now work properly!

Alternative: Use Command Prompt
- If you are not able to access your operating system at all, you will have to insert the installation drive you own or which you have just created and boot your computer.
- You will see a Choose your keyboard layout window so choose the one you want to use. The Choose an option screen will appear so navigate to Troubleshoot >> Advanced options >> Command Prompt
- At the command prompt window, simply type in the commands below in a new line and click the Enter key after each one to stop and restart the System Protection Service:
net stop vss
net start vss
- Check to see if System Restore now works properly!
Kevin Arrows
Kevin Arrows is a highly experienced and knowledgeable technology specialist with over a decade of industry experience. He holds a Microsoft Certified Technology Specialist (MCTS) certification and has a deep passion for staying up-to-date on the latest tech developments. Kevin has written extensively on a wide range of tech-related topics, showcasing his expertise and knowledge in areas such as software development, cybersecurity, and cloud computing. His contributions to the tech field have been widely recognized and respected by his peers, and he is highly regarded for his ability to explain complex technical concepts in a clear and concise manner.
,
A few days ago I tried to restore a Windows 10 system to a previous state, using the System Restore option in Windows Recovery Environment (WinRE). But, unfortunately, System Restore displays the error «You cannot restore C: Drive» because «You must enable system protection on this drive».

In this tutorial you’ll find two methods on how to bypass the following warning when running System Restore in Windows Recovery Environment: «You must enable system protection on this drive».
FIX: System Restore error «You must Enable System Protection on Drive» (Windows 10/8/7 OS).
Method 1. Enable System Protection on Drive.
To enable the System Protection on drive, apply the following steps:
1. Close the System Restore window an from Troubleshoot > Advanced options open Command Prompt.
2. In command prompt type the following command and hit Enter.
- rstrui.exe /offline:C:\windows=active

3. Normally now System Restore should allow you to restore your system.
Method 2. Restore Windows Registry from Backup.
In some cases the discussed SFC error occurs when the Windows Registry is corrupted. So, the next method to fix the problem is to restore the registry from backup. To do that:
1. In command prompt, type the following command and press Enter.
- bcdedit
2. Notice the drive letter of the OS partition (e.g. «osdevice –> partition=C: «).
3. Now type the drive letter of the OS partition + : and press Enter (e.g. D: ).
4. Then give the following commands in order (press Enter after each command):
- cd \windows\system32\config
- md backupreg
- copy *.* backupreg
- cd regback
- copy *.* ..
* Notice: Press a when asked to overwrite all files in destination.

7. Type exit and press Enter to close command prompt.
8. Now try to run the sfc /scannow command again.
That’s it! Which method worked for you?
Let me know if this guide has helped you by leaving your comment about your experience. Please like and share this guide to help others.
If this article was useful for you, please consider supporting us by making a donation. Even $1 can a make a huge difference for us in our effort to continue to help others while keeping this site free:
- Author
- Recent Posts
Konstantinos is the founder and administrator of Wintips.org. Since 1995 he works and provides IT support as a computer and network expert to individuals and large companies. He is specialized in solving problems related to Windows or other Microsoft products (Windows Server, Office, Microsoft 365, etc.).
Konstantinos Tsoukalas
Konstantinos is the founder and administrator of Wintips.org. Since 1995 he works and provides IT support as a computer and network expert to individuals and large companies. He is specialized in solving problems related to Windows or other Microsoft products (Windows Server, Office, Microsoft 365, etc.).