
Мы уже настолько привыкли к тому, что наши Android или iOS смартфоны и планшеты автоматически подстраивают яркость подсветки экрана в зависимости от внешнего освещения, что её отсутствие на прочих мобильных устроствах приводит порой в замешательство.
При этом еще не все владельцы планшетов и ноутбуков с операционной системой Microsoft Windows 10 на борту, оказывается знают, что и на этих устройствах можно включить режим автоматической регулировки яркости. Как это сделать я сегодня хочу вам рассказать.
Включить режим адаптивной или — автоматической регулировки яркости очень несложно: нужно просто знать где прячется соответстыующая опция.
Чтобы добраться до неё кликните по значку батареи в системном трее (там где находятся индикаторы клавиатуры, значок WiFi и часы) и перейдите в «Параметры питания и спящего режима».

В открывшемся окне кликните по пункту «Дополнительные параметры», который находится в самом низу, в результате чего вы увидите следующее:
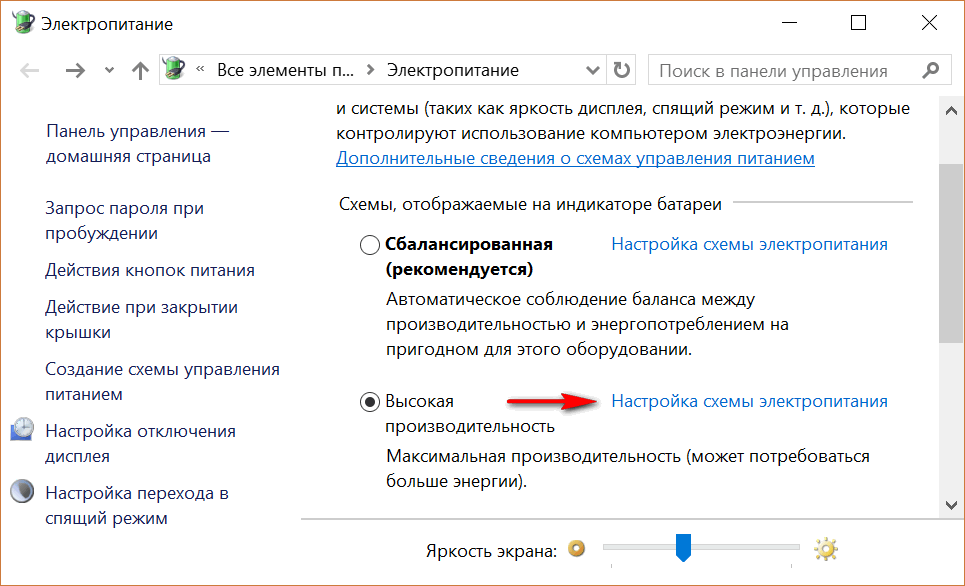
Здесь вам нужно открыть настройки текущей схемы электропитания, кликнув по «Настройка схемы электропитания» напротив установленной по умолчанию схемы.

В открывшемся окне выберите «Изменить дополнительные параметры питания», после чего откроется окно следующего вида:

Здесь вам просто нужно найти в перечне пунктов «Экран», раскрыть его и выбрать опцию «Включить адаптивную регулировку яркости» в соответствующем или обоих режимах: «От сети» и/или «От батареи».
Вот и всё. Смею заметить, что режим адаптивной или — автоматической регулировки яркости экрана булет работать только на устройствах, оснащенных специальным датчиком внешнего освещения.
Похожие материалы:
После установки Windows 10
Windows 10 Prewiew получила возможность получать уведомления от Android устройств
Windows 10 – советы и подсказки. Как на планшете разделить экранную клавиатуру на две части
Windows 10 — советы и подсказки. Как сделать так, чтобы экранная клавиатура автоматически запускалась при необходимости ввода или редактирования текста
Теги:
- windows 10
- windows 10 советы и подсказки
- советы и подсказки
Confirm you’re using the right key to change the brightness, or use Action Center to adjust it
Updated on October 17, 2023
When you cannot change the brightness on your Windows 10 desktop PC or laptop, the problem can be software- or hardware-based. Here’s how to try to get it working again.
How to Fix It When Brightness Is Not Changing on Windows 10
If you can’t change the brightness on your Windows 10 machine, there are a number of different ways to troubleshoot and fix the issue. Here’s a look at the key methods in order of difficulty.
-
Check that you’re using the correct key. On a laptop, it’s often possible to change brightness levels by holding the Fn button along with a function key.
-
Change the brightness via the Action Center. Use Windows 10’s Action Center to toggle brightness rather than keyboard commands. It can sometimes fix the issue.
-
Reboot your computer. This is a simple fix for lots of common problems, and it might be all you need to do to fix brightness issues if a temporary software bug is to blame.
-
Check Power Options. Go to Control Panel > System and Security > Power Options and check that your power options aren’t affecting the brightness on your screen. While there, check that the brightness isn’t automatically adjusted by your PC or laptop.
-
Update your display drivers. Update your display drivers. This usually takes about 10-15 minutes and often fixes common problems. It also often makes your system run more responsively.
-
Update Windows. Check for Windows updates and make sure your operating system is fully up-to-date.
-
Use a different monitor. Try using a different external monitor to see if the problem is solely an issue with your existing screen.
-
Switch graphics cards. Either try installing a separate graphics cards or switch from your dedicated graphics card to your integrated graphics card to see if the issue lies with one of the GPUs. This option is usually found alongside the screen resolution settings.
-
Contact your PC/laptop manufacturer. If the problem persists and you can’t fix it, contact the manufacturer of your device to see if they can help or to send it off for repair.
How Can I Adjust Brightness in Windows 10?
Changing the brightness on Windows 10 is a relatively simple process, but you have multiple ways. Here’s a quick overview of the methods.
- Keyboard commands. On a laptop, you can often change the brightness via keyboard commands. Hold down the Fn key, then look for any icons next to letters that could represent brightness.
- Via the Action Center. Open the Action Center (press Win+A) and slide the brightness bar left or right.
- Automatically. If you’d prefer your computer to adjust brightness automatically, go to Settings > System > Display and change the settings to automatically let your computer decide what’s best based on the time of day you’re using it.
Causes of When Brightness Is Not Changing on Windows 10
Many issues can be fixed at home, but there are certain cases where, if the hardware is at fault, you may need to arrange for the system to be professionally repaired or for replacement components to be purchased.
Before reaching that stage, it’s worth narrowing down where the issue lies:
- PC won’t respond to brightness adjustment. If you’re following the commands to adjust brightness correctly, you may be dealing with either a software or hardware issue stopping the change from taking effect.
- PC recently won’t change brightness. If your PC used to adjust the brightness correctly but won’t anymore, it may be down to a software upgrade issue.
- Brightness no longer auto-adjusts. If the brightness on your device used to adjust automatically but doesn’t anymore, it’s important to check if it’s still possible to adjust the brightness manually.
If the brightness isn’t working on your laptop, this can be for a number of different reasons. Here’s a look at some of the reasons why this might be the case.
- Your display has a problem. If your laptop has suffered a few knocks or is simply aging, the display may have a problem with switching brightness.
- Your software is out of date. If Windows 10 or your graphics drivers haven’t been updated in a while, this may cause a problem with adjusting brightness.
- Keyboard issues. If you’re using keyboard commands to adjust the brightness on your laptop and it’s not working, it may be an issue with the keyboard rather than your display.
FAQ
-
You might need to update the display driver from the Lenovo support site. Once you locate your product, select Drivers & Software > Windows 10 Display and Video Graphics. If the problem occurred after a recent display driver update, you might want to roll back a driver from Control Center > Device Manager > Properties > Roll Back Driver.
-
Check to see if you have adaptive or automatic brightness enabled from Power Options. On some devices running Windows 10, you can turn off auto brightness from Control Panel > Hardware & Sound > Power Options > Change plan settings > Change advanced power settings > Display > Enable adaptive brightness.
Thanks for letting us know!
Get the Latest Tech News Delivered Every Day
Subscribe
Проблема с регулировкой яркости экрана – частая проблема, которая встречается как в Windows 10, так и в Windows 11. Как правило пользователи жалуются, что не удается увеличить или уменьшить яркость экрана на ноутбуке из панели управления Windows, с помощью выделенных клавиш или сочетаниями Fn+F5/F6/F11/F12.
В большинстве случае проблема с регулировкой яркости в Windows связана с драйверами монитора и видеокарты (часто проблема встречается на устройствах с видеокартами Intel Graphics и AMD Radeon). Однако есть и другие причины. Рассмотрим несколько простых способ исправить проблему с невозможностью изменить яркость на ноутбуке с Windows 10 и 11.
Содержание:
- Как изменить яркость экрана в Windows 10 и 11?
- Включите Generic Pnp Monitor
- Не работает регулировка яркости после установки TeamViewer
- Обновите драйвер видеоадаптера
- Не работают Fn клавиши регулировки яркости на ноутбуке
- Включить регулировку яркости экрана в реестре
- Не регулируется яркость дисплея на ноутбуке с интегрированной графикой Intel HD Graphics
- Проверьте настройки адаптивной регулировки яркости
Как изменить яркость экрана в Windows 10 и 11?
В первую очередь проверьте, удастся ли вам изменить яркость экрана с помощью стандартных способ регулировки яркости в Windows.
Вариант 1. Изменить яркость из панели Параметры Windows
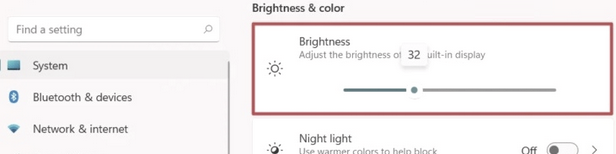
В Windows 10 и 11 можно изменить настройку яркости дисплея из панели Параметры. Перейдите в Settings -> System -> Display (можно открыть эту панель настроек, выполнив команду быстрого доступа ms-settings:display или desk.cpl). Воспользуйтесь ползунком Brightness, чтобы изменить яркость дисплея.
Вариант 2. Изменить яркость дисплея из панели быстрого доступа Windows
В Windows 10 и 11 вы можете использовать панель быстрого доступа (quick settings) для изменения настроек яркости. Нажмите на любую системную иконку в таскбаре (Wi-Fi, звук, батарея или нажмите
Win+A
). Отрегулируйте яркость дисплея с помощью ползунка.
Если ползунок яркости отсутствовует или неактивнем:
- Возможно вы используете компьютер с внешним монитором (используйте кнопки на мониторе, чтобы изменить яркость);
- Попробуйте обновить драйвер видеоадаптера (описано ниже).
Вариант 3. Настройка яркости с помощью функциональные клавиш клавиатуры
На большинстве ноутбуков есть специальные функциональные клавиши со значками 🔆 и 🔅. Нажмите на кнопку Fn+функциональную клавишу увеличения/уменьшения яркости и убедитесь, что яркость дисплея изменилась.
На моем ноутбуке для регулировки яркости используются сочетания Fn+F11 и Fn+F12. У разных производителей устройств эти сочетания могут отличаться.
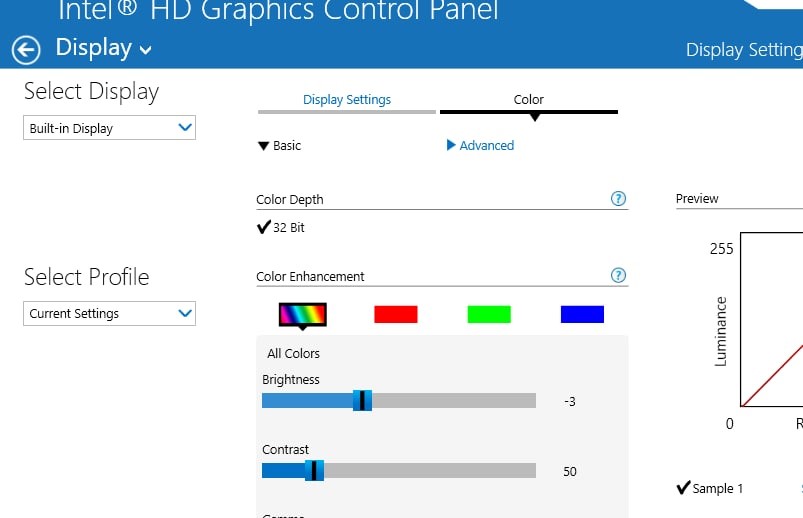
Вариант 4. Настройки яркости экрана в параметрах видеодрайвера
Вы можете изменить яркость экрана в параметрах видеокарты. В моем примере это Intel HD Graphisc Control Panel, доступная из контекстного меню рабочего стола.
Вариант 5. Задать яркость экрана с помощью PowerShell
Следующая команда PowerShell позволяет принудительно задать определенную яркость дисплея:
(Get-WmiObject -Namespace root/WMI -Class WmiMonitorBrightnessMethods).WmiSetBrightness(1,70)
Яркость задается в процентах от максимальной в диапазоне от 0 до 100. В этом примере я задал 70% яркости.
Включите Generic Pnp Monitor
Если вы не можете изменить настройки яркости Windows, проверьте не отключен ли у вас в оборудовании Универсальный монитор PnP (Generic Pnp Monitor). Это распространенная проблема на ноутбуках Lenovo и HP Pavilion.
Откройте диспетчер устройств (
devmgmt.msc
) и в разделе Monitors (Мониторы) проверьте, что устройство Generic Pnp Monitor (Универсальный монитор PnP) включено. Если это не так, щелкните по нему ПКМ и включите его (Enable / Задействовать).

Перезагрузите компьютер и проверьте возможность регулировки яркости.
В некоторых случаях нужно попробовать обновить/переустановить драйвер Generic Pnp Monitor в диспетчере оборудования через Update Driver.
Не работает регулировка яркости после установки TeamViewer
Есть известная проблема, что в Windows перестает работать регулировка яркости экрана после установки TeamViewer. Дело в том, что TeamViewer при устанавливает собственный драйвер дисплея Pnp-Montor Standard, который используется для компрессии графики и оптимизации трафика
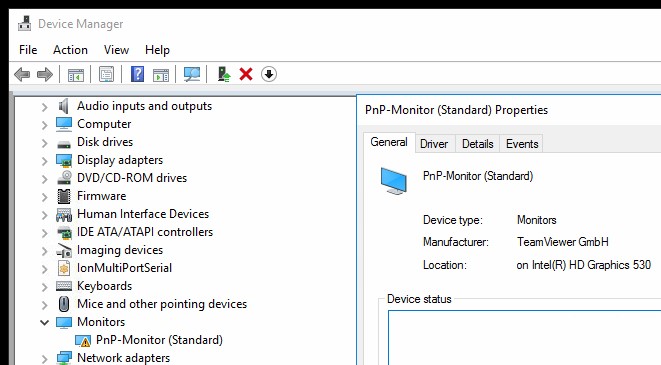
Попробуйте заменить драйвер для этого устройства на «Универсальный монитор PnP» (ПКМ -> Обновить драйверы -> Выбрать из списка уже установленных драйверов).
Обновите драйвер видеоадаптера
Возможно проблема с яркостью связана с текущим драйвером видеоадаптера. В первую очередь проверьте, что ваша видеокарта включена в диспетчере устройств (по аналогии со способом выше). Если предыдущий метод не помог, попробуйте выполнить автоматическое обновление драйвера видеоадаптера (если оно не отключено).
В диспетчере устройств (консоль
devmgmt.msc
) разверните секцию Display adapters найдите свою видеокарту, щелкните по ней ПКМ и выберите пункт Update Driver Software. Затем выберите опцию Search automatically for updated driver software и подождите пока Windows 10 найдет и установит последнюю версию драйвера (требуется подключение к интернету).
Если автоматическое обновление драйвера не исправило проблему с неработающей регулировкой яркости в Windows 10, попробуйте удалить текущий драйвер и установить с сайта производителя самую последнюю версию драйвера.
В некоторых случаях нужно наоборот, откатить версию видеоадаптера на предыдущую: Update driver -> Browse my computers for drivers -> Let me pick from a list of available drivers on my computer -> включите Show compatible hardware. Выберите предыдущую версию драйвера.
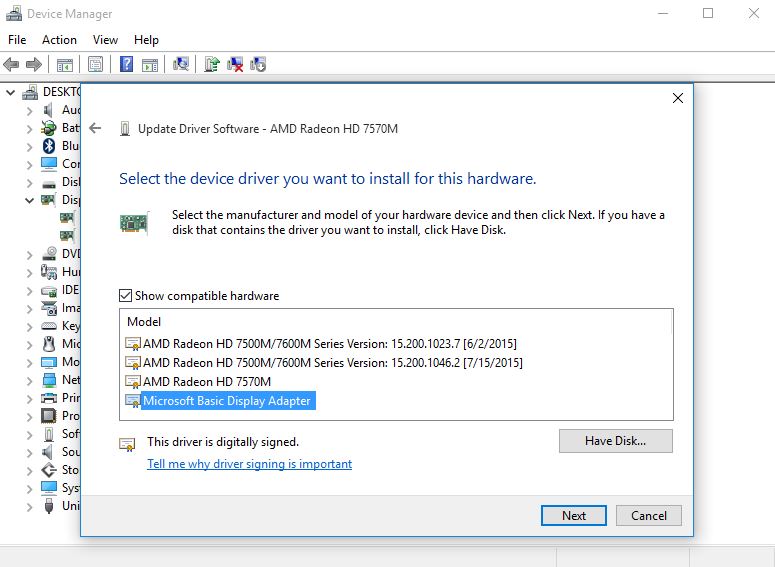
Если обновление или откат драйвера не помогли решить проблему с регулировкой яркости, попробуйте использовать для видеокарты стандартный драйвер Microsoft Basic Display Adapter.
Не работают Fn клавиши регулировки яркости на ноутбуке
Если вы обнаружили, что регулировка яркости в настройках Windows работает нормально, но не работают функциональные клавиши (
Fn
) управления яркости на клавиатуре ноутбука, скорее всего вам нужно установить дополнительно ПО от производителя ноутбука.
У каждого вендора есть своя утилита. Ниже представлены названия утилит для популярных моделей ноутбуков:
- ASUS — ATK Hotkey Utility
- Sony Vaio — Sony Notebook Utilities
- Dell – QuickSet
- HP — HP Software Framework и/или HP Hotkey Support
- Lenovo — Hotkey Features Integration for Windows 10 или AIO Hotkey Utility Driver
Скачайте программу с официального сайта производителя и установите ее. Попробуйте изменить яркость с помощью функциональный клавиш нуотбука.
Включить регулировку яркости экрана в реестре
В Windows можно разрешить регулировку яркости экрана с помощью параметра реестра KMD_EnableBrightnessInterface2 в ветке HKEY_LOCAL_MACHINE\SYSTEM\ControlSet001\Control\Class\{4d36e968-e325-11ce-bfc1-08002be10318}\0000.
Откройте редактор реестра (regedit.exe), перейдите в указанную ветку и измените значение DWORD-параметра KMD_EnableBrightnessInterface2 с 1 на 0
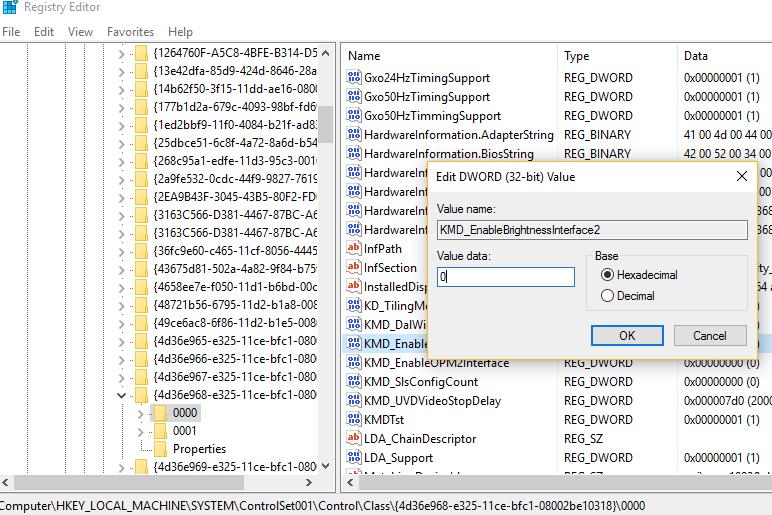
В реестре может быть несколько параметров KMD_EnableBrightnessInterface2. Поэтому, воспользуйтесь поиском (F3) и найдите все остальные параметры с именем
KMD_EnableBrightnessInterface
. Для всех найденных ключей нужно изменить значение с 1 на 0.
Перезагрузите компьютер.
Не регулируется яркость дисплея на ноутбуке с интегрированной графикой Intel HD Graphics
На ноутбуках со встроенной видеокартой Intel HD Graphics нужно отключить коррекцию яркости через реестр. Для этого перейдите в раздел реестра HKEY_LOCAL_MACHINE\SYSTEM\ControlSet001\Control\Class\{4d36e968-e325-11ce-bfc1-08002be10318}\0000 (в некоторых случаях 0001) и найдите DWORD параметр FeatureTestControl. Измените его значение c f000 на f008 и перезагрузите компьютер.
В комментариях пишут, что иногда помогает значение FeatureTestControl = fb20.
нужно внести изменения в реестр с помощью такого reg файла:
Windows Registry Editor Version 5.00
[HKEY_LOCAL_MACHINE\SYSTEM\ControlSet001\Control\Class\{4d36e968-e325-11ce-bfc1-08002be10318}\0000]
"FeatureTestControl"=dword:0000f008
"KMD_EnableBrightnessInterface2"=dword:00000000
"KMD_EnableBrightnesslf2"=dword:00000000
[HKEY_LOCAL_MACHINE\SYSTEM\ControlSet001\Control\Class\{4d36e968-e325-11ce-bfc1-08002be10318}\0001]
"FeatureTestControl"=dword:0000f008
[HKEY_LOCAL_MACHINE\SYSTEM\ControlSet001\Control\Class\{4d36e968-e325-11ce-bfc1-08002be10318}\0002]
"FeatureTestControl"=dword:0000f008
[HKEY_LOCAL_MACHINE\SYSTEM\ControlSet001\Services\intelkmd]
"FeatureTestControl"=dword:0000f008
Проверьте настройки адаптивной регулировки яркости
Windows может использовать датчики освещенности ноутбука для регулировки ярости экрана. Яркость экрана задается в зависимости от освещения помещения (Ambient Light). Это называется адаптивная яркость.
Вы можете включить/отключить адаптивную яркость дисплея из панели Settings: System -> Brightness -> Change brightness automatically when lighting changes

Здесь же есть еще одна опция – уменьшения яркости дисплея, если устройство работает от батареи (Help improve battery by optimizing the content shown and brightness). Эта функция называется CABC (Content Adaptive Brightness Control).
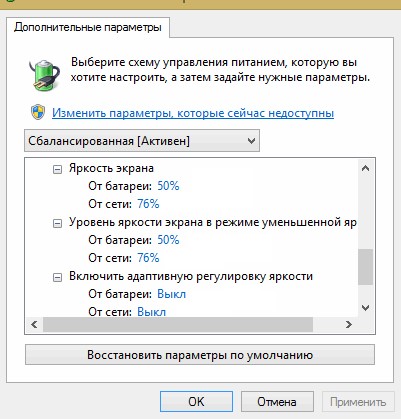
Также отключить адаптивную регулировку яркости в настройках схемы электропитания Windows: Control Panel -> Power Options (Электропитание) -> в свойствах выбранного плана электропитания, нажмите на кнопку Change advanced power settings (Настройка схемы электропитания) -> Change advanced power settings (Изменить дополнительные параметры питания) -> разверните раздел Display (Экран).
В пункте Enable adaptive brightness (Включить адаптивную регулировку яркости) нужно отключить адаптивную яркость для режима от сети и от батареи. Если адаптивная яркость включена, вы не можете значительно увеличить яркость экрана
Также попробуйте изменить настройки в пунктах:
- Dimmed display brightness (Уровень яркости экрана в режиме уменьшенной яркости)
- Display brightness (Яркость экрана)
Download Article
Adjust screen brightness manually or automatically
Download Article
- Using Action Center
- Using Settings
- Troubleshooting
- Video
- Expert Interview
- Q&A
- Tips
- Warnings
|
|
|
|
|
|
|
Is your PC monitor too bright or too dim? You can easily adjust the screen brightness of your Windows 10 computer in the Settings menu. You can also change the screen brightness in the action center in the taskbar. This wikiHow guide will show you how to adjust the screen brightness in Windows 10.
Things You Should Know
- Open the action center in the taskbar and drag the brightness slider.
- Alternatively, go to Settings > System > Display and drag the brightness slider.
- Optionally, check the box labeled Change brightness automatically when lighting changes in the display menu.
-

Click the message icon to the right of the clock in the taskbar to open the action center.
- If you’re considering upgrading your monitor or switching to a 2-monitor setup, check out our guide on how to choose a monitor.
-

It’s near the bottom of the screen and has a sun icon next to it. Drag it to the left to lower the screen brightness, and to the right to raise the screen brightness.[1]
- Note that the brightness slider only appears in versions 1903 and later of Windows 10. To change the brightness in earlier versions, use the Settings menu method below.
- The slider won’t appear if you’re using a desktop PC and external monitor. Use the monitor’s control buttons to adjust the screen brightness. For example, if you’re using your TV as a monitor, you’ll need to use the buttons to navigate to the brightness settings on the TV.


Advertisement
-

The Windows Start menu is the icon that has the Windows logo in the taskbar. By default, it’s in the lower-left corner of the taskbar.
- If you’re trying to change the brightness on an external monitor, you’ll need to use the monitor’s button. For example, an external monitor connected to a laptop will have buttons on the sides or back.
- If you’ve connected two monitors to your laptop or desktop, you’ll need to adjust them separately.
-

The Settings menu is the icon that resembles a gear. It’s on the far left side of the Windows Start menu.
-
It’s the first item in the Windows Settings menu. It’s next to an icon that resembles a computer.
-
It’s the first option in the sidebar to the left. This opens the display settings.
-
The slider bar that says «Change brightness» is at the top of the display settings. Drag the slider bar to the left to lower the screen brightness. Drag it to the right to increase the screen brightness.
- Use a lower screen brightness to conserve power/battery life.
-

Some PCs can automatically adjust the brightness when the lighting in your environment changes.
- In the Display settings menu, go to the “Brightness and color” section.
- Check the box labeled Change brightness automatically when lighting changes.


Advertisement
-
Finding and updating drivers is easy. If you’re not using a desktop PC and the slider is either missing or not working, updating the display driver can sometimes resolve the issue:
- Search “Device Manager” in the taskbar search box.
- Click Device Manager in the list of results.
- Select Display adapters in the Device Manager window.
- Select your display adapter driver.
- Right-click the display adapter driver.
- Click Update driver and follow the prompts.

Add New Question
-
Question
I tried doing all these steps, but the brightness is not changing. What should I do?
It sounds like your computer’s display drivers aren’t installed correctly. You can visit the manufacturer’s website, or contact their support, to download the latest drivers for your computer.
-
Question
I’m using a PC that does not have an option for brightness in settings. What do I do?
It sounds like you are using a computer with an independent monitor. Try to use the button on the monitor to change the brightness.
Ask a Question
200 characters left
Include your email address to get a message when this question is answered.
Submit
Advertisement
Video
-
If the slider does not change the screen brightness, the cause may be that your computer does not have the correct display drivers installed. You can check the manufacturer’s website to download the display drivers for your computer.
Thanks for submitting a tip for review!
Advertisement
-
This will not work on computers with a standalone monitor. To change the brightness on those, you will need to use the buttons on the monitor.
Advertisement
About This Article
Article SummaryX
1. Click the Windows Start menu.
2. Click the Gear icon.
3. Click System.
4. Use the slider bar to adjust screen brightness.
Did this summary help you?
Thanks to all authors for creating a page that has been read 1,045,648 times.
Is this article up to date?
Although Windows 10 comes built-in with a Night Mode and quick brightness slider, it doesn’t work on extended displays or desktops. If you use a multi-monitor setup, you have to manually adjust the brightness levels on every monitor. Having said that, you can get past this by simply using screen dimmer apps for Windows 10.
Screen Dimmer Apps for Windows 10
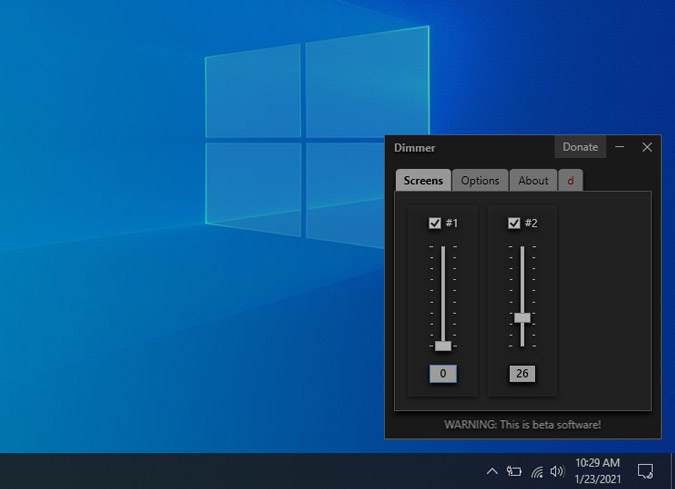
1. Dimmer
Dimmer, as the name suggests, is a basic Windows screen dimming app that supports multiple displays. The app casts a grey overlay on all the displays and you can just move the slider to dim the screens. I tried it on 3 monitor setup and it worked flawlessly. Dimmer is a portable program. So, you just have to extract the zip folder and double-click to use Dimmer.
The only downside is a lack of controls within the app. It doesn’t support keyboard shortcuts or user-defined presets. Having said that, if you need a basic app, it works flawlessly.
Features:
- Portable app
- Individual controls for different monitors
- No hotkeys or inbuilt presets
Download Dimmer for Windows 10
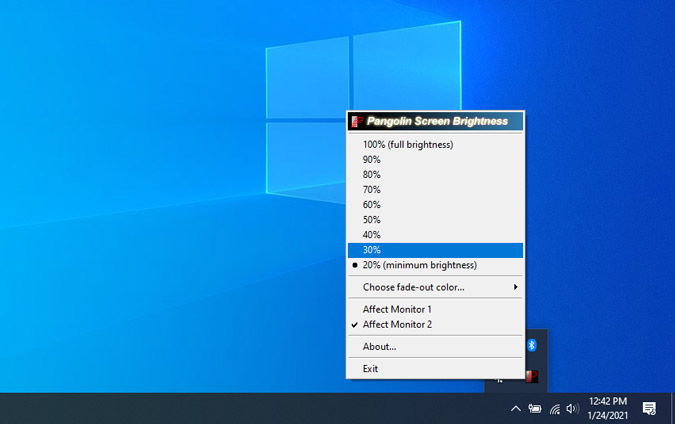
2. PangoBright
Similar to Dimmer, PangoBright is another screen dimmer app for Windows 10. It stays in the system tray and instead of a slider, you get percentages. On top of usual features in Dimmer, PangoBright also provides you an option to change the tint color of the screen.
So, for instance, during the daytime, you would prefer to have an orange tint on the display whereas, at night, you would prefer to have a yellow tint. PangoBright lets you do all of that in a couple of clicks.
Features:
- Change brightness level in percentages
- Option to change tint color
Download PangoBright for Windows 10
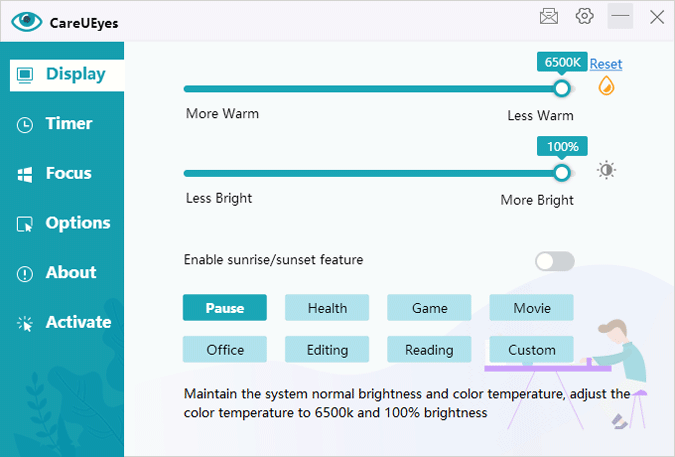
3. CareUEyes
CareUEyes builds a bit on the above-mentioned apps. It provides manual toggles for screen white balance, brightness, etc. Also, if you find all of these options confusing, there are built-in presets like Office, Editing, Gaming, Reading, etc. for different scenarios. On top of it, you can also create your own presets.
My favorite feature of CareUEyes is that you have the option to set up hotkeys to increase or decrease the brightness. So, instead of opening the app every time, I can control the brightness of all my monitors with keyboard shortcuts. The only caveat with the app is that it doesn’t provide separate controls for individual monitors. The settings apply to every monitor connected.
Features:
- Inbuilt presets like Editing, Gaming, Reading, etc
- Multi-monitor support
- Brightness and white balance slider
- Hotkeys supported
Download CareUEyes for Windows 10
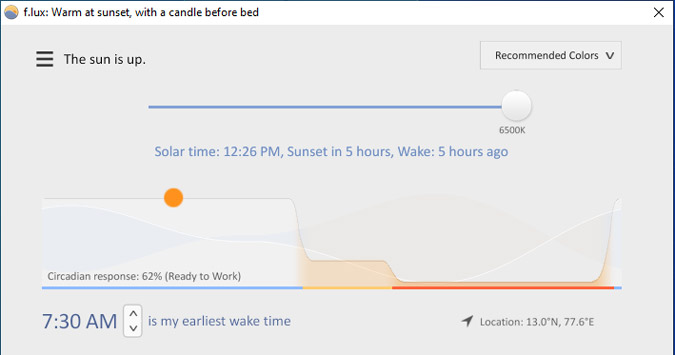
4. F.lux
F.lux is a popular screen dimmer cum night mode app for Windows 10. Although Windows 10 has an inbuilt night mode, it’s pretty barebone. Foremost, it doesn’t let you customize the white balance value of the tint. On the other hand, f.lux provides all the customizations you will need in a screen dimmer app.
When you open f.lux for the first time, it asks you to enter your location and adjust brightness as per the time of day. For instance, it provides 3 different white balance tones for sunrise, sunset, and bedtime. You can customize these options and have even more white balance timers.
Moreover, if you have a smart light like Philips Hue or Yeelight, you can sync them with f.lux. It’ll customize the white balance of your screen along with the light in your house.
Features:
- Supports multi-monitor setup
- Adjusts according to the time of the day of your location
- Provides sync with smart lights such as Philips Hue, Yeelight, etc
Download F.lux for Windows 10
5. Iris Screen Dimmer
Iris Screen Dimmer is a mix and match of minimal as well as power options. In case you need a simple app to just modify screen brightness settings automatically as per time of the day, Iris Screen Dimmer can do that. If you are a power user who wants to fine-tune brightness, gamma, saturation, etc manually, Iris Screen Dimmer lets you do that as well. It syncs all your settings across multiple monitors.
The only caveat with Iris Screen Dimmer is that it’s a paid app. You get a 7-day free trial and post that, you have to shell out $1.99/month.

Features:
- Automatic white balance, saturation, brightness as per your location timings
- Syncs settings across multiple monitors
- Advanced options to fine-tune brightness, saturation, blue light, etc
Download Iris Screen Dimmer for Windows 10 (7-day trial)
Brightness Control Apps for Windows 10
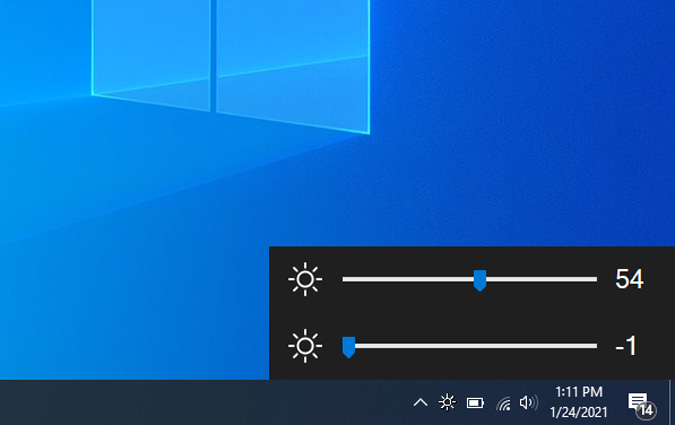
6. Win10 Brightness Slider
Win10 Brightness Slider is a brightness control app rather than a screen dimmer app. Basically, other apps overlay a tint over the display instead of modifying the brightness. Win10 Brightness Slider, on the other hand, sends commands to modify the brightness values of the monitors and extended displays. However, your monitor needs to support DDC/CI and it has to be enabled in the monitor. In case you don’t know, DDC/CI lets software control the brightness and other settings of the monitor.
Win10 Brightness slider is the most basic brightness control app. It just sits on the system tray and lets you change the display values. If you have 1 monitor connected, it shows 1 slider and if you have 2 monitors connected, it shows 2 different sliders.
Features:
- Brightness slider for multiple monitors in the Taskbar
- Supports DDC/CI display only
- Portable app
Download Win10 Brightness Slider for Windows 10
7. DisplayTuner
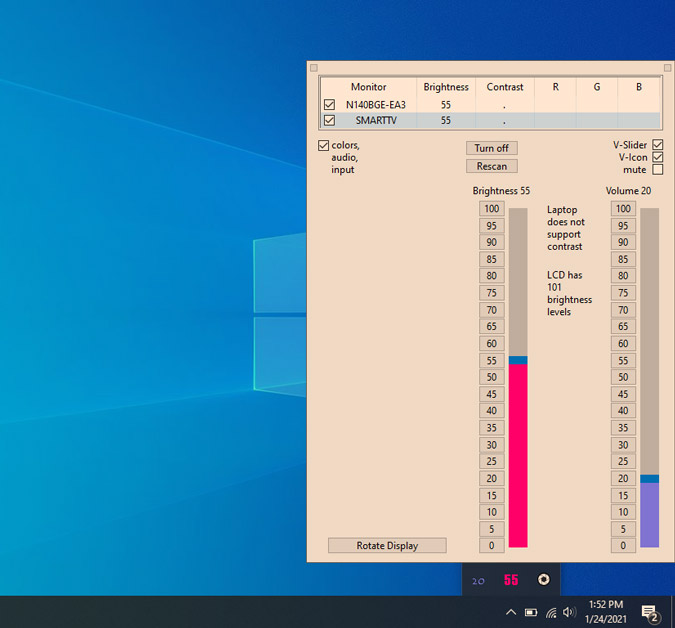
Similar to Win10 Brightness Slider, DisplayTuner also works with DDC/CI displays. Apart from the brightness slider, DisplayTuner also provides you the option to adjust the gamma, RGB levels, etc. Moreover, it lets you control the audio levels, screen orientation of the desktops right from within the app.
The only caveat with DisplayTuner is that it doesn’t work on laptop screens. For instance, if you have a laptop extending to a monitor, it works only on the monitor but not on the laptop.

Features:
- Supports DDC/CI monitors
- Option to tune gamma, RGB levels, audio, screen orientation, etc.
- Options to create custom presets and hotkeys
- Doesn’t work on laptops
Download DisplayTuner for Windows 10
8. ClickMonitorDDC
Click Monitor CDC is similar to DisplayTuner but with a lot more customizations and hotkeys. Apart from the usual brightness and sound levels, it also lets you set up brightness and audio levels for different times of the day. You have to manually set it up within the app first.
Moreover, you get a lot of hotkeys as well as mouse action support. The mouse action support is quite interesting. In case you have 2 monitors, ClickMonitorDDC will show up with 2 icons in the system tray. Now, you just have to hover over the ClickMonitorDDC icon in the system tray and rotate the mouse cursor to increase or reduce the brightness. You can also setup double-click mouse actions to quickly switch to a preset.
Features:
- DDC/CI monitor support
- Lots of customizations, hotkey, and mouse action support
- Option to have different brightness, saturation, contrast levels at a different time of the day
Download ClickMonitorDDC for Windows 10
How Do You Dim Screen or Manager Brightness
For a minimal use case, Dimmer is a portable app that lets you control monitors individually. I use f.lux as it requires minimal manual setup and works flawlessly. If you are a power user, you should try a brightness control app like ClickMonitorDDC.
Also Read: Best Free Monitor Calibration Software Windows 10
Pratik
Pratik works as an In-house writer and video host at TechWiser. Former Programmer, Current writer. Loves tech in any form, quite optimistic about AI, data science and IoT. Talks extremely less but you betcha can geek out over anything on Twitter.