
Have you recently received an XPS file from your friend or colleague and want to open it on your Windows 10/11 PC? Are you unable to find the XPS Viewer software on your Windows 10 or 11 computer? This guide shows you how to install the XPS Viewer app on a Windows 10/11 PC.
As you might already know, XPS stands for XML Paper Specification. It’s a document format very similar to the popular PDF (Portable Document Format). The XPS file format was originally developed to compete with PDF, but PDF still remains the popular one. Just like PDF, an XPS file retains its layout and appearance when opened on a different computer as well.
The XPS Viewer is not part of Windows 11 and its predecessor, Windows 10. However, the official XPS Viewer app is offered under optional features, just like Windows Fax and Scan in Windows 11. Here is how to install XPS Viewer in Windows 10 and 11.
Once the XPS Viewer is installed, you will not only be able to view XPS documents but also copy, print, and sign XPS documents.
For Windows 11 directions, scroll down the page.
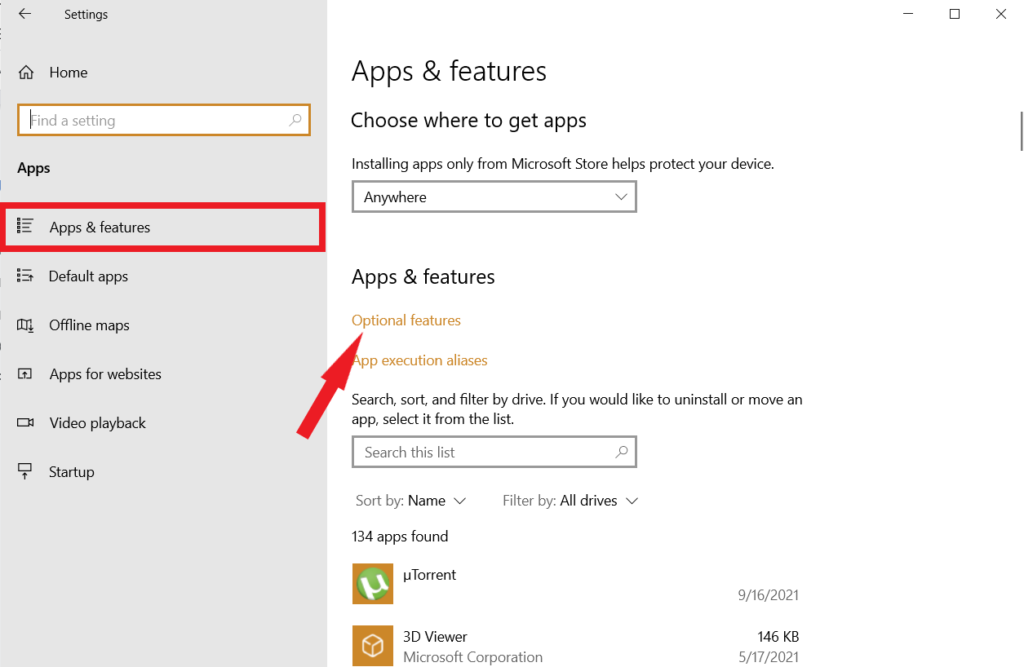
Step 1: Launch Windows 10 Settings. Navigate to Apps > Apps & features page.
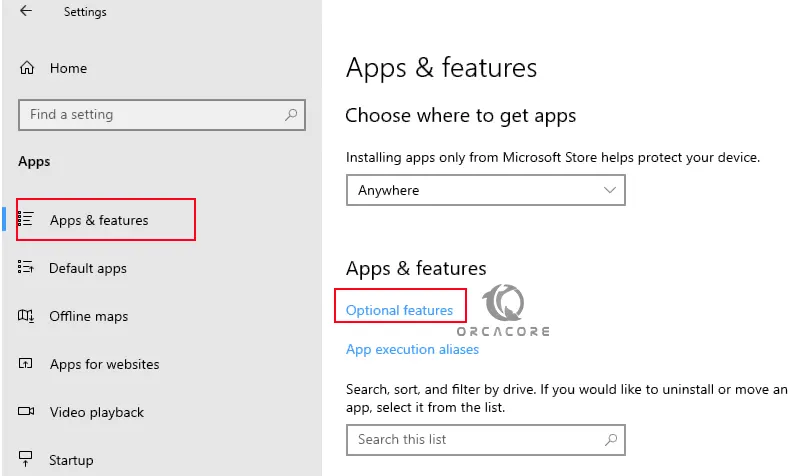
Step 2: Here, click the Optional features link.

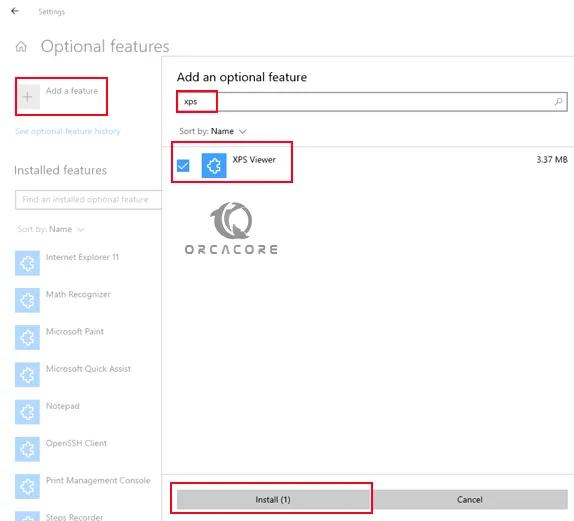
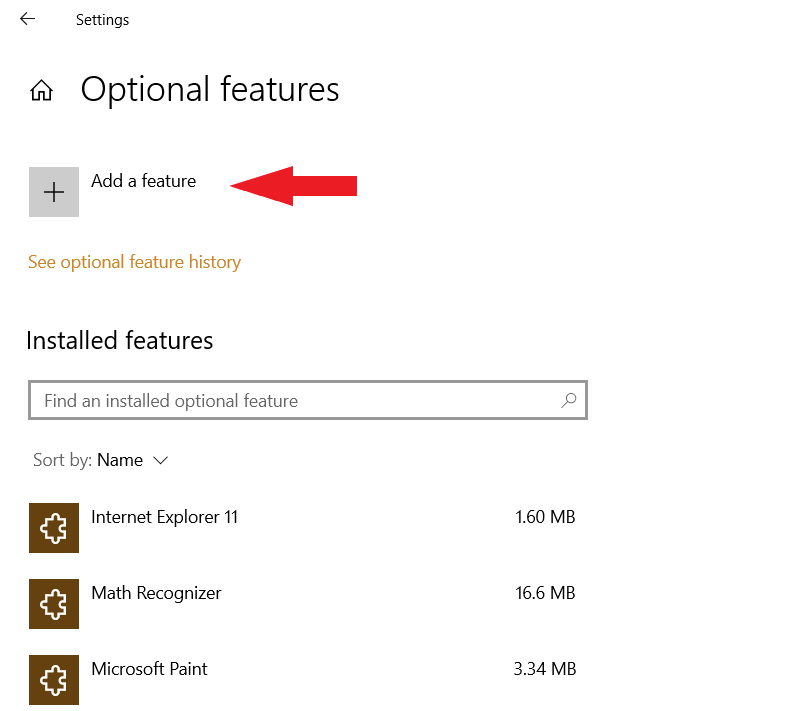
Step 3: Click Add a feature to open the Add an optional feature dialog.

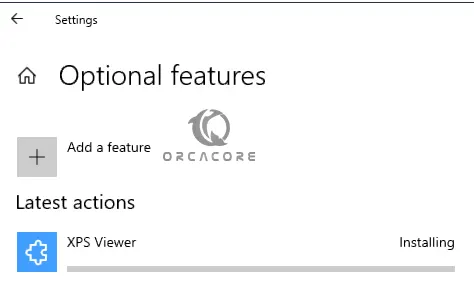
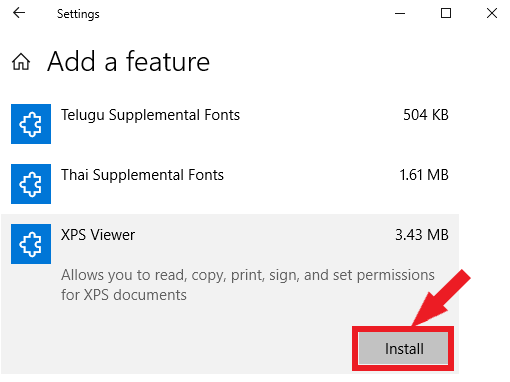
Step 4: Scroll down the list to see the XPS Viewer. Select the XPS Viewer and then click the Install button. Windows 10 might take a few minutes to complete the XPS Viewer installation.


Install XPS Viewer on Windows 11 computer
Step 1: Open the Windows 11 Settings app. Go to System > Optional features page.

Step 2: On the Optional features page, click the View features button present next to the Add an optional feature option. This will bring up Add an optional feature dialog.

Step 3: Scroll down the list to see the XPS Viewer. Select the XPS Viewer by checking the check box next to it. Click the Next button.

Step 4: Finally, click the Install button to install the XPS Viewer. This process might take about ten minutes to complete.

Once installed, you can launch the XPS Viewer using Start or taskbar search.

This tutorial intends to teach you to Install XPS Viewer on Windows 10. XPS is a file format that is used to print content to a file similar to PDF. It was created by Microsoft. XPS Viewer is an app that can open to print content to a file similar to PDF.
You can follow this guide on the Orcacore website to see how to install XPS viewer on Windows 10.
Table of Contents
Step To Manually Install XPS Viewer on Windows 10
To complete this guide, you must have access to your Windows client and follow the steps below.
Step 1 – XPS Viewer Installation on Windows 10
As we said, newer versions of Windows 10 won’t have the app installed out of the box but you can still install it. To do this, follow the steps below:
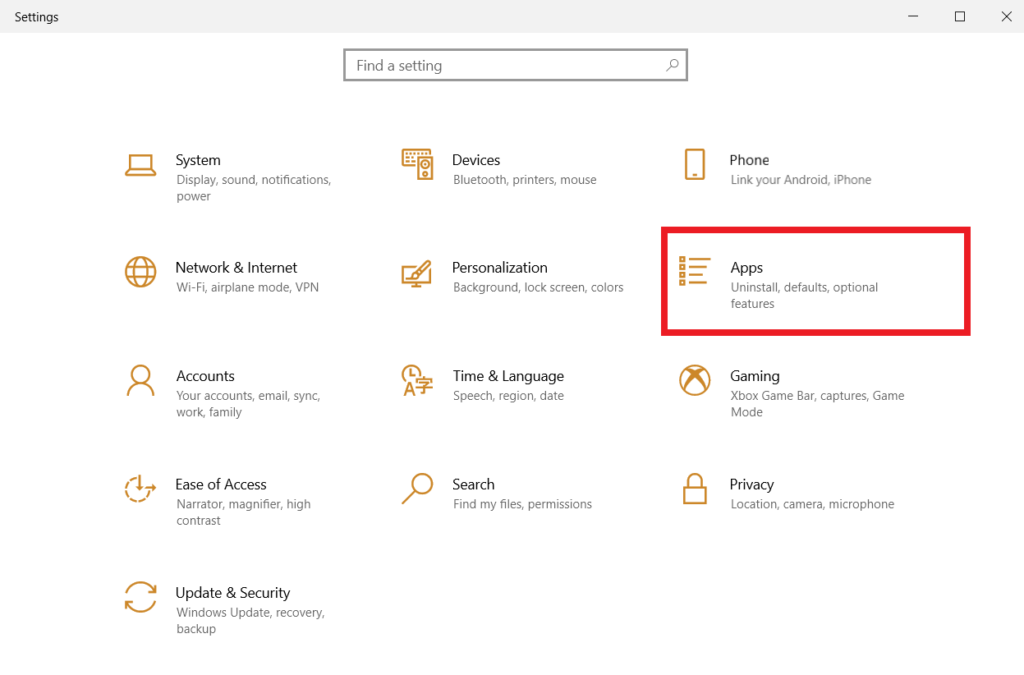
First, you must open Windows Settings by using the Win + I key.
Then, navigate to the Apps.
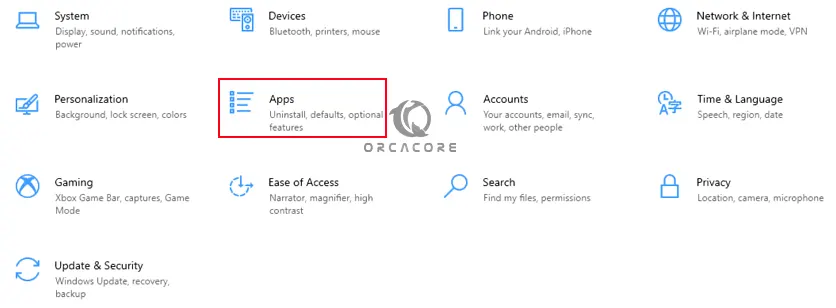
From the right side of the window, click on Apps and Features and select Optional Features.
Next, click on Add a Feature and search for the XPS viewer. Check the box next to it and click Install.
The installation process may take some time to complete.
Step 2 – How To Open an XPS File?
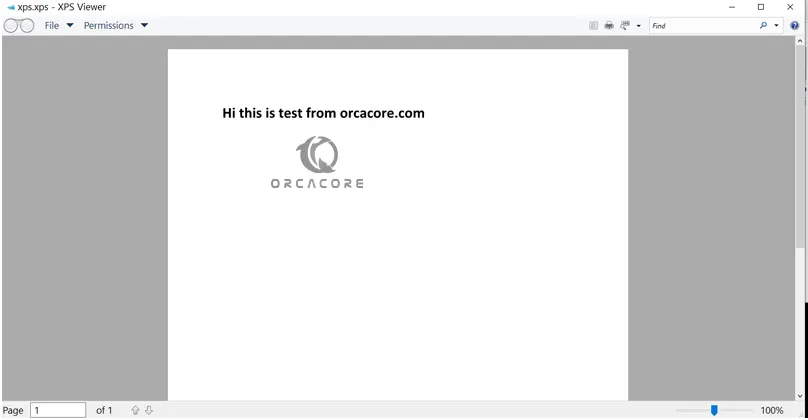
When your XPS viewer installation is completed on your Windows 10, right-click on an XPS file and select Open with XPS Viewer. Here we open a Word XPS file.
Your file should be open in the XPS viewer.
Conclusion
At this point, you have learned to Install and Enable XPS Viewer on Windows 10 and Open a sample XPS file with it. Hope you enjoy using it.
Also, you may also interested in these articles:
Connect Remote Desktop Without a Password in Windows
How To Change Mouse Speed on Windows 10
Please Subscribe to us on Facebook, Instagram, and Twitter.
FAQs
Is XPS Viewer free?
Yes. This software is available for free on Windows.
What software can open XPS?
Windows 11 and Windows 10 can open XPS files using Microsoft’s Reader app. You can use Pagemark to open XPS files on a Mac and the Pagemark XPS Viewer plug-in for Firefox and Safari web browsers. Linux users can use Pagemark’s programs to open XPS files, too.
Is XPS better than PDF?
If you want to save your publication in a format that can be easily shared and is used by many commercial printers, it’s better to choose PDF.
If you want to save your publication with even greater compression than PDF format, it’s recommended to choose XPS.
Does Windows 10 support XPS Viewer?
At the current time, new versions of Windows 10 don’t have XPS viewer installed. But if you want to use this app, you can install it on your system.
The XPS file format was developed by Microsoft as opposed to the PDF file format. It is quite possible that many of you have encountered an XPS file that cannot be used, or even opened. For those who wish to create or use XPS documents, this post may prove useful for understanding what XPS is, what XPS Viewer is, and how to use it.
Table of Contents
You may have tried using an XML file, but are unable to open it since your operating system does not find a supporting application, and may see something like this:

Allow us to shed some light on what XPS is all about.
What is XPS file
XPS stands for XML Paper Specification. Microsoft developed this format in order to compete with Portable Document Format (PDF). However, it was not as popular as expected. The XML documents can contain regular text as well as additional information about the content, such as its layout and appearance.
The purpose behind the creation of XPS was to eliminate the use of paper in an attempt by Microsoft to go green.
An XPS file may have an extension .xps or .oxps (OpenXPS).
What is XPS Viewer
XPS Viewer is a free-to-use application by Microsoft for using and viewing XPS files and documents. It used to come preinstalled with Windows 10 up until version 1803 was released. Since it was not in demand, it was given as an optional application that users can install manually when and if required.
With XPS Viewer, you can save copies of a file, digitally sign them, manage permissions, and search through them. The application supports a number of file formats:
- .XPS
- .OXPS
Download and Install XPS Viewer on Windows 11/10
Installing the XPS Viewer on Windows 11 and 10 is pretty much the same; some layouts may be a bit different.
Here is how you can install XPS Viewer on Windows 11:
You have now successfully installed XPS Viewer.
How to use XPS Viewer
You can launch the application by searching for it in Windows Search, or the Start menu.

Alternatively, you can also type in xpsrchvw in Run or Command Prompt to launch XPS Viewer.
To open an XPS document, click on File from the top menu in the XPS Viewer, and click Open. You can then browse the saved XPS file and select it to open it in XPS Viewer.

Once a document is open, you can then save its copies, or change its permissions by clicking on the Permissions menu from the top, and then clicking Set permissions.

You can also convert an XPS file to PDF format. To do so, simply click on the Print button at the top of the app, and then select Print to PDF. Click OK to save the document as a PDF file.

Since XPS Viewer is a tiny application, it cannot do much of anything else, except for what we have already discussed.
How to remove XPS Viewer
If you are no longer in need of the XPS Viewer, you can just as easily remove it from your computer. Here is how:
- Open the Settings app, click App on the left, and then click Optional features on the right side of the window. Here, scroll down and click on XPS Viewer in the right-side pane. Once expanded, click Uninstall.

- The XPS Viewer app will then be immediately uninstalled. You can confirm this by running through the installed applications list on the Optional features page.

Microsoft XPS Document Writer (MXDW)
Microsoft XPS Document Writer is another hidden gem in both Windows 11 and 10. Similar to the method of creating a PDF document while printing and selecting the option Print to PDF, MXDW provides the same option, but for XPS.

This feature has to be enabled manually through Optional Features. To do so, type in appwiz.cpl in Run, and then click Turn Windows features on or off on the left.

In the pop-up window, scroll down and check the box next to “Microsoft XPS Document Writer,” then click Ok.

MXDW will now be installed in a few seconds. You should now be able to see the option to Print to XPS on the print pages, which you can select to save files in .xps format.
In case you8 ever feel like turning off the feature, simply uncheck the box next to “Microsoft XPS Document Writer” on the Windows Features page.
XPS Viewer alternatives
There are other methods available on the internet that can be used instead of XPS Viewer. Some are applications that can be installed, whilst others provide an online web view.
GroupDocs
GroupDocs is a quick and free online tool to help you view your XPS and OXPS files. All that is required is for you to drag and drop your file, and it will convert and display it for you.
To use GroupDocs, open their webpage in any browser and simply drop your file over the given area.

SumatraPDF
SumatraPDF is a downloadable application that can be used to view almost any document. This includes .xps, .oxps, and .pdf.

Google Drive
Google Drive is an excellent tool as it also supports XPS formatting. All you need to do is upload the file to Google Drive and you can then view it easily.
Open Google Drive, click New, and then click File Upload from the drop-down menu.

Now browse to upload the XPS file. Once uploaded, click on it to view it within the browser directly from Google Drive.

Verdict
Not many people use the XPS format anymore. However, there can be certain scenarios where you already have an XPS document but have no idea how to access its content.
We hope that this blog post helps you understand everything there is to know about XPS and its associated applications.
Компонент XPS Viewer Feature on Demand (FOD) позволяет вам читать, копировать, печатать, подписывать и устанавливать разрешения для документов XPS. В этой статье объясняется установка средства просмотра XPS в Windows 10 и 11.
При установке «XPS Document Writer» через классическое диалоговое окно «Функции Windows» (например, «OptionalFeatures.exe») средство просмотра XPS не устанавливается. Это два разных компонента.
Компонент XPS Viewer FOD можно установить разными способами. Следуйте одному из вариантов ниже.
Способ 1: использование настроек
- Откройте «Настройки» → «Система» → «Дополнительные функции».
- Нажмите «Просмотреть функции».
- В диалоговом окне «Добавить дополнительную функцию» введите
xps. - Установите флажок «Просмотр XPS» и нажмите «Далее».
- На следующем экране нажмите « Установить» .
Вышеуказанные шаги предназначены для Windows 11.
В Windows 10 выполните следующие действия:
- Откройте «Настройки», «Система».
- Нажмите «Дополнительные функции».
Примечание. Если «XPS Viewer» еще не установлен, он не появится в списке «Установленные функции». - Нажмите «Добавить функцию».
- Введите xps
- Установите флажок «Просмотр XPS».
- Нажмите «Установить».
Способ 2: использование DISM
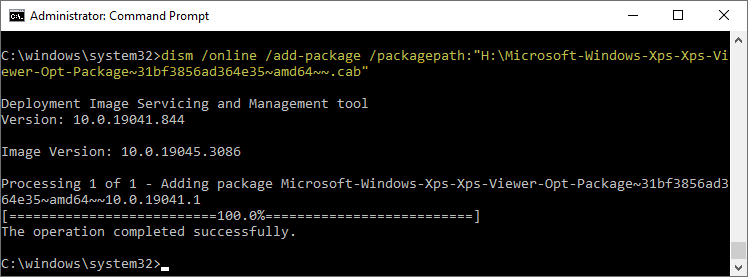
Чтобы установить средство просмотра XPS с помощью DISM, убедитесь, что система подключена к Интернету. Затем выполните следующие команды из командной строки администратора :
dism /online /remove-capability /capabilityname:XPS.Viewer~~~~0.0.1.0
dism /online /add-capability /capabilityname:XPS.Viewer~~~~0.0.1.0
Приведенные выше команды удаляют средство просмотра XPS и переустанавливают средство просмотра XPS, загрузив исходные файлы из Центра обновления Windows.
Способ 3. Использование DISM (с использованием CAB-файла) в автономном режиме.
Для методов 1 и 2 требуется доступ в Интернет для загрузки пакетов FOD. Чтобы установить средство просмотра XPS или другие пакеты FOD на компьютер, который находится в автономном режиме (т. е. без доступа к Интернету), необходимо использовать CAB-файл. Файлы FOD .cab будут доступны в ISO-образе Windows FOD.
инструкции
- Загрузите соответствующий ISO-образ FOD и смонтируйте его. Чтобы смонтировать ISO, щелкните его правой кнопкой мыши и выберите «Смонтировать». Имя CAB-файла для средства просмотра XPS указано ниже:
Средство просмотра XPS – Информация о FOD
Название функции: Средство просмотра XPS
Имя возможности: XPS.Viewer~~~~0.0.1.0
Имя CAB-файла: Microsoft-Windows-Xps-Xps-Viewer-Opt-Package~31bf3856ad364e35~amd64~~.cab
Примечание
Вышеупомянутый CAB-файл будет присутствовать в
rootпапке ISO-образа Windows 10 FOD. В то время как в ISO-образе FOD для Windows 11 этот файл находится вLanguagesAndOptionalFeaturesпапке. - Предположим, что смонтированная буква диска FOD ISO —
H:\. Чтобы установить компонент FOD XPS Viewer, выполните следующую команду:Windows 11
dism /online /add-package /packagepath: "H:\LanguagesAndOptionalFeatures\Microsoft-Windows-Xps-Xps-Viewer-Opt-Package~31bf3856ad364e35~amd64~~.cab"
Windows 10
dism /online /add-package /packagepath:"H:\Microsoft-Windows-Xps-Xps-Viewer-Opt-Package~31bf3856ad364e35~amd64~~.cab"
Вы увидите следующий результат:
Инструмент обслуживания образов развертывания и управления ими
Версия: 10.0.19041.844

Версия образа: 10.0.19045.3086

Обработка 1 из 1 — Добавление пакета Microsoft-Windows-Xps-Xps-Viewer-Opt-Package~31bf3856ad364e35~amd64~~10.0.19041.1
[=========================100.0%==================== =====]
Операция завершилась успешно.
Вот и все!
Join @AdmNtsRu on Telegram
Wondering how to enable XPS Viewer on Windows 10?
XPS is a file format similar to PDF that Microsoft released with the Windows Vista update in 2007. There wasn’t a big difference between the two in terms of features and interface, except that PDF offers enhanced portability.
Unfortunately, not many people were fans of XPS, and the company eventually abandoned the format. With the Windows 10 version 1803 update, users could no longer view XPS files unless the computer was upgraded from version 1709.
So, if you’ve set up a new device or performed a clean installation, XPS Viewer would not be available on your computer anymore. Lucky for you, we’ve compiled a list of methods to reinstall or enable the app even if Windows no longer supports it.
So, let’s get to it right away!
1. Enable XPS Viewer on Windows 10 via Settings.
You need dedicated viewing software to read, print, or change the permissions of any file format. Since the latest system update has disabled the XPS Viewer, you’d have to reinstall it to view such files on your computer again.
Here’s how you can do that using Windows Settings:
- First, press Windows+i on your keyboard or type ’settings’ on the search bar to enter Settings.
- Now, from the multiple options appearing on your screen, select Apps.
- From the panel on the left side, click on Apps & features tab.
- From there, go to Optional Features under Apps & features on the right panel.
- Then, you’ll come across a list of features already enabled on your computer with an Add a feature option at the top-left corner of the window. Click on it.
- Use the search bar or scroll down to find XPS Viewer, then select it.
- Finally, click the Install button, and your computer will start downloading the feature.
Once downloaded, you should be able to open an XPS or OXPS file easily.
2. Use Command Prompt To Enable XPS Viewer.
Sometimes, users are unable to find the XPS Viewer listed when scrolling through the list of features in the Settings. Other times, the feature fails to install on your computer.
Whatever the reason, you don’t have to worry. Another method to enable XPS Viewer on Windows 10 is done through the Command Prompt. To do so, you’ll need to run the software as an administrator.
Here are the steps you need to follow:
- To begin, open the Start menu by clicking on the Windows icon located at the bottom-left of the screen or by pressing the Windows key on your keyboard.
- Now, type cmd in the search bar.
- Then, click on the Run as administrator option to run the app under full rights.
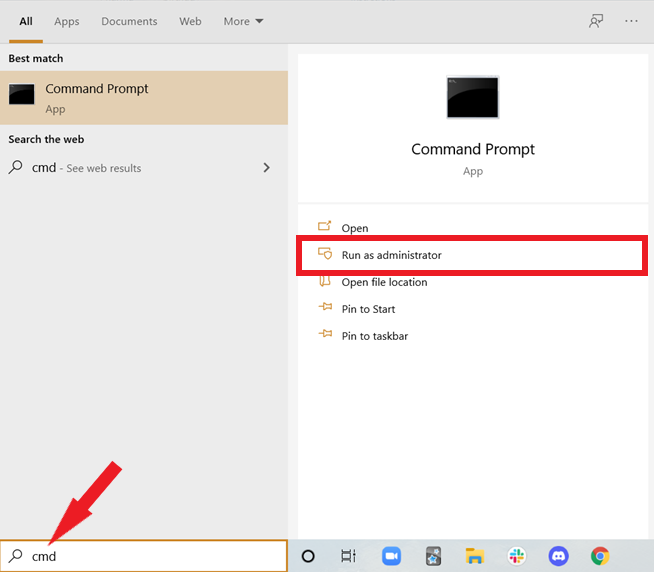
- When the Command Prompt window opens, type the following command and press Enter.
Dism /Online /Add-Capability /CapabilityName:XPS.Viewer~~~~0.0.1.0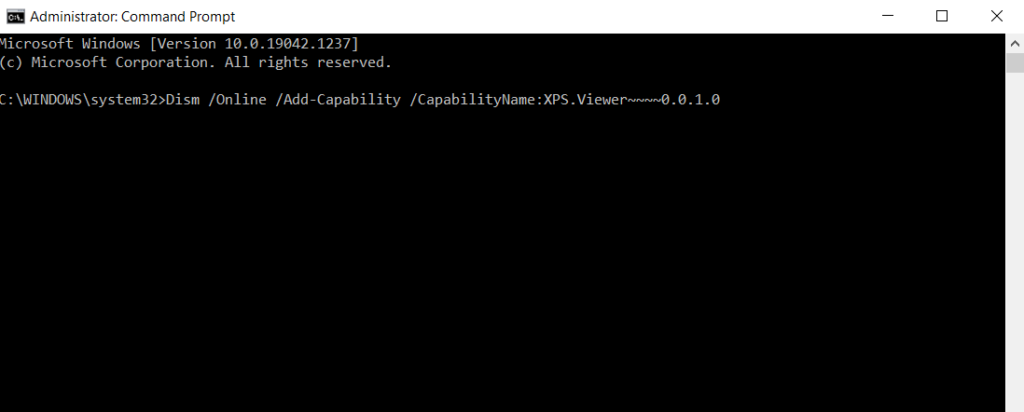
After that, XPS Viewer should get installed on your computer.
3. Use Windows Powershell To Enable XPS Viewer.
If you’re an old Windows user, you must be familiar with Windows PowerShell. It was first released in 2006 and is quite similar to Command Prompt. You can use this automation software to enable XPS Viewer.
Simply input the required command in the associated scripting language to perform the task.
These are the steps you should follow:
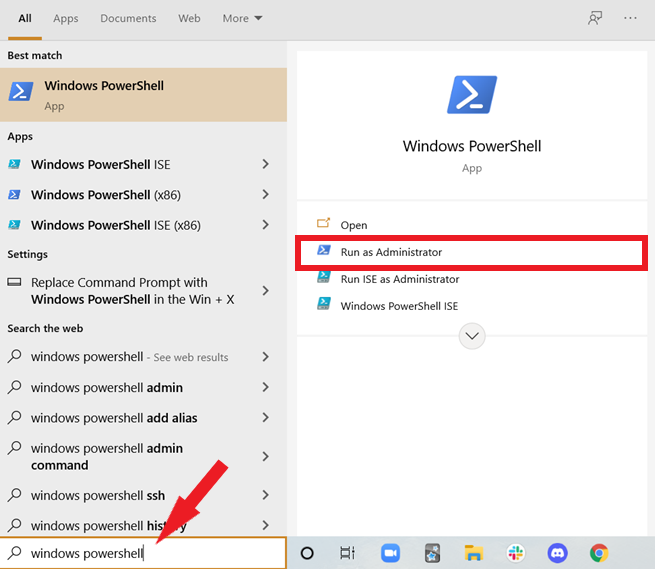
- Start by pressing Windows key+i or directly click on the Search Bar at the bottom left of the screen.
- Then, type Microsoft Powershell so that a list of options appears on the right panel.
- From there, click on Run as administrator since you need special permissions to perform tasks.
- When the app opens and you come across the PowerShell console, type the following command:
dism / Online / Add-Capability /CapabilityName:XPS.Viewer~~~~0.0.1.0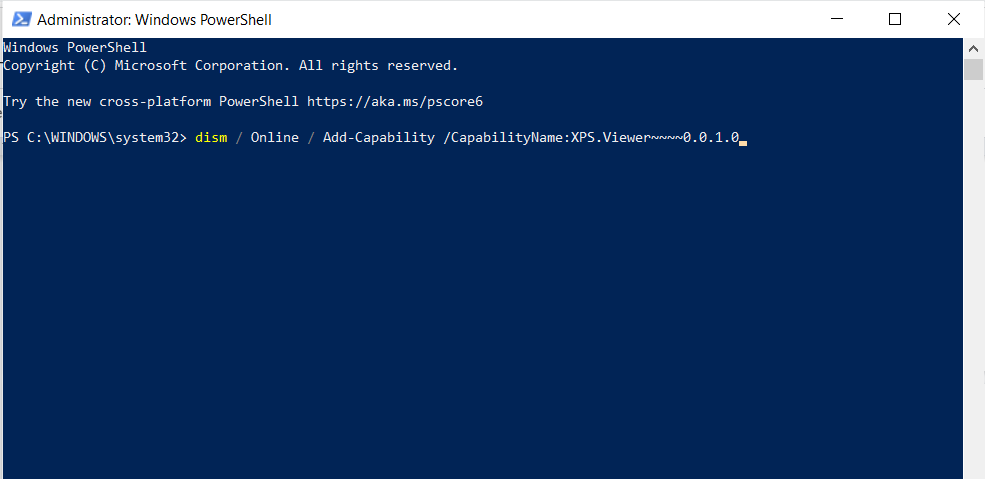
- Finally, press Enter to begin the installation.
XPS Viewer will then be downloaded on your computer and can easily be accessed on the Desktop.
4. Enable XPS Viewer From Windows Update.
If your computer has Windows 10 Pro or Windows Enterprise, the method to install XPS Viewer can be pretty different. Moreover, you’ll need to alter a few more settings in the Group Policy Editor if the computer you’re using belongs to a domain.
This is what you need to do:
- To start, type ’Run’ in the search box and click Open. You can also press the Windows key and R simultaneously as a shortcut.
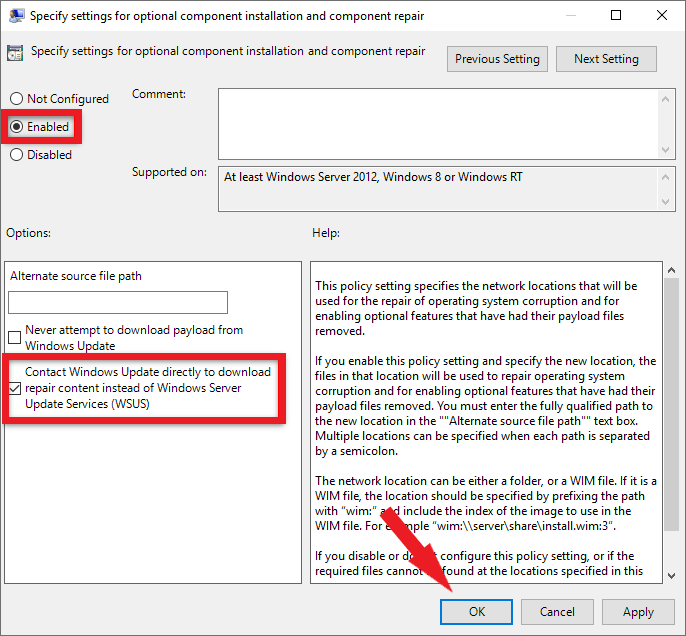
- When the Run command box opens, type gpedit.msc and click OK.

- Scroll down the left pane and click on the drop-down arrow of Computer Configuration.
- Now, click on Administrative Templates and then on System.
- Then, select Specify settings for optional component installation and component repair on the right pane.
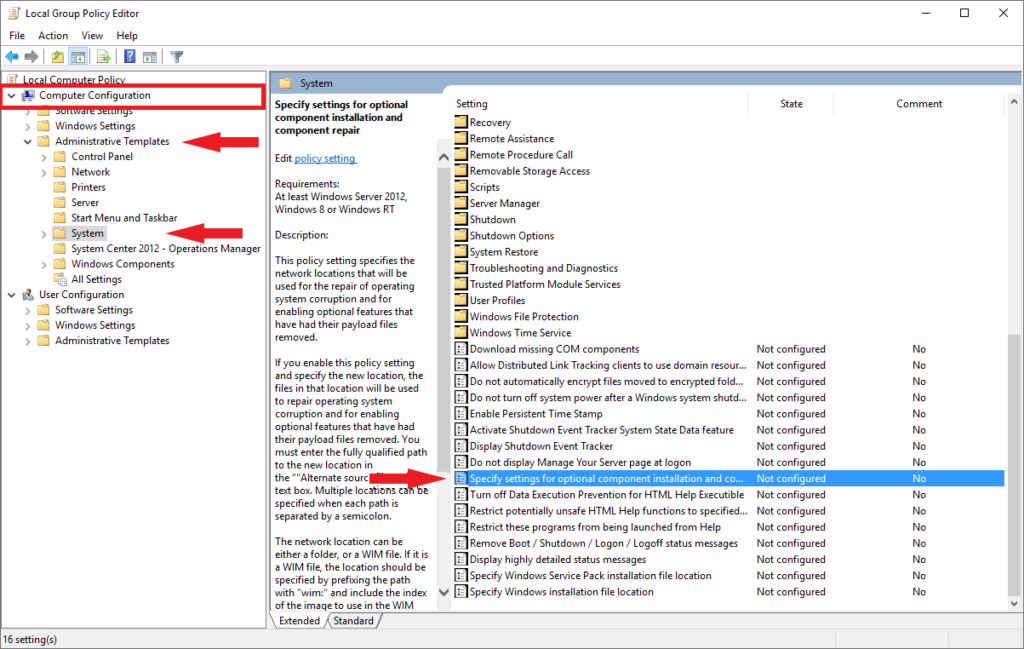
- In the next window, select Enabled and check the box that says Download repair content and optional features directly from Windows Update instead of Windows Server Update Services (WSUS).
- Finally, click on Apply, then OK, and restart your computer.
You can then install the XPS Viewer like you would on any other computer with Windows 10.
5. Use Microsoft XPS Document Writer (MXDW).
Microsoft XPS Document Writer is a driver installed in Windows OS. You can use this to protect the XPS files’ content and print the documents even when Microsoft doesn’t support the format.
You need to enable the driver manually by following the steps below:
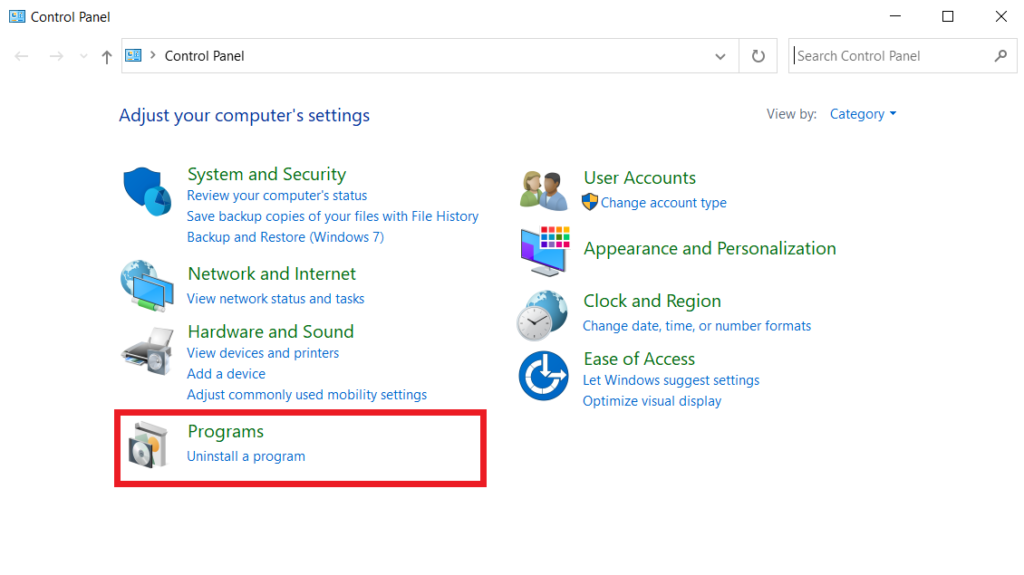
- First, type ’Control Panel’ in the search bar and click Open.
- Then, select Programs at the bottom-left of the window.
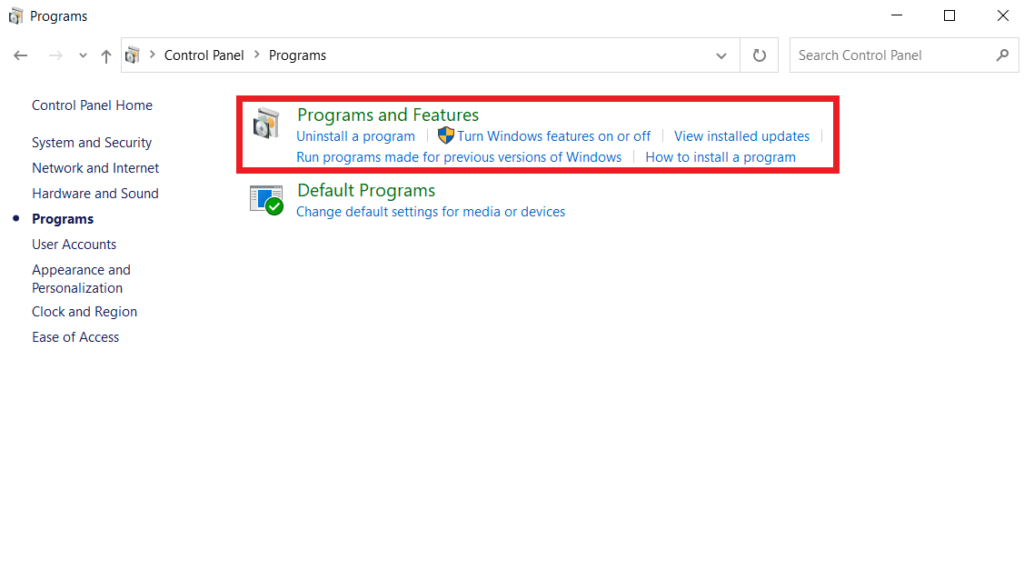
- From there, go to Programs and Features.
- Now, from the left pane, select Turn Windows Features on or off.
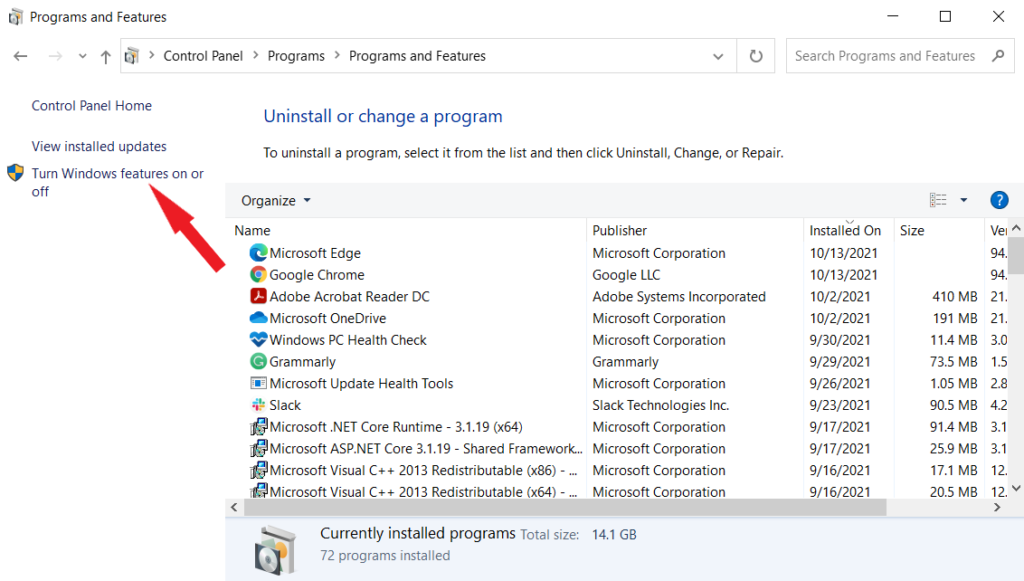
- Finally, a pop-up window will open. Scroll down and check the box next to Microsoft XPS Document Writer and click OK.
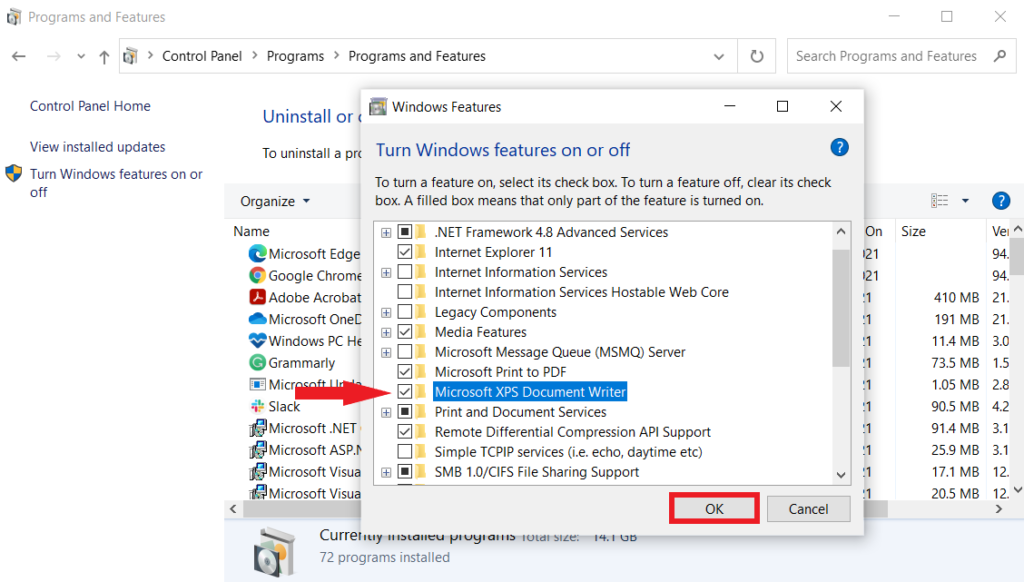
It will take only a couple of seconds for the MXDW to get installed. After that, a Print to XPS option will appear in print pages, and you can select it to save files in XPS format.
6. Use PDF Converter.
Although Microsoft no longer supports the XPS Viewer, you can still easily install it using one of the above methods. However, since there will be no more maintenance or updates on the program, it’s better to convert your XPS files to PDF format, so they remain readable even if the XPS Viewer crashes.
Here’s how to do it:
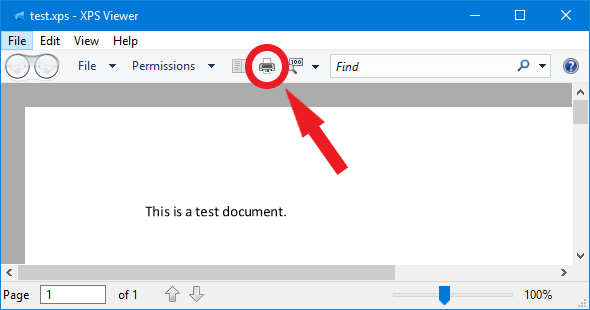
- First, right-click on the file you wish to convert and select Open with XPS Viewer.
- Then, click on the Printer icon at the top panel or press Ctrl+P on your keyboard.
- A selection box will then appear on your screen. From there, in the General tab, go to Microsoft Print to PDF under Select Printer.
- Lastly, click the Print button.
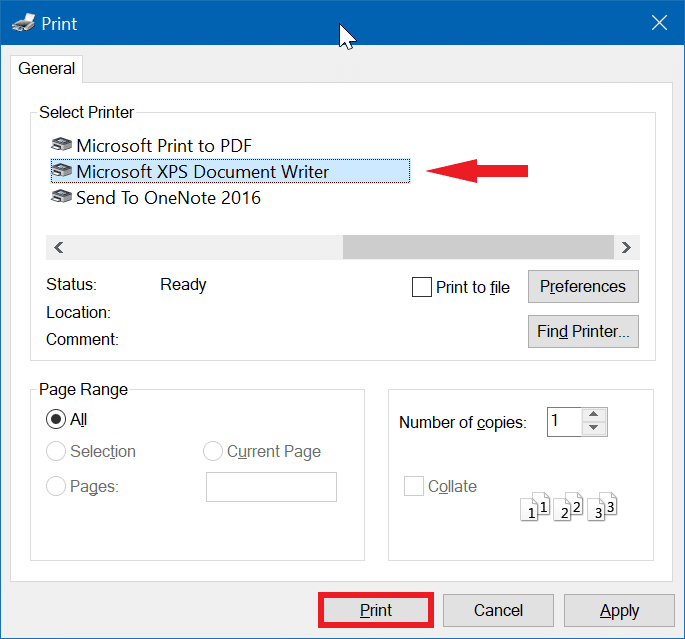
This will convert the format of your XPS file to PDF. Repeat the steps to convert the remaining files on your computer.
There you have it! A complete guide on how to enable XPS Viewer on Windows 10. Hopefully, at least one of the methods has proven to be successful. If you still have any confusion, leave a comment down below, and we’ll do our best to help you through it.
If this guide helped you, please share it. 🙂
-
Aimen Choudhry is an architecture student who has always been fascinated by science. She now finds her therapy researching and writing about the latest technology and the issues that come alongside. Otherwise, you’ll find her playing video games, listening to music, or watching fantasy/sci-fi movies.
View all posts