
Since Windows 10 build 1803 from April 2018, the XPS Viewer is no longer included by default in that build of the operating system and has to be installed manually.
Usually this is done by browsing to the applications and feature pane but sometimes cannot be found and installed this way. The quickest and most efficient way is using the command line.
1. Open the Command Prompt (or PowerShell) with elevated privileges :
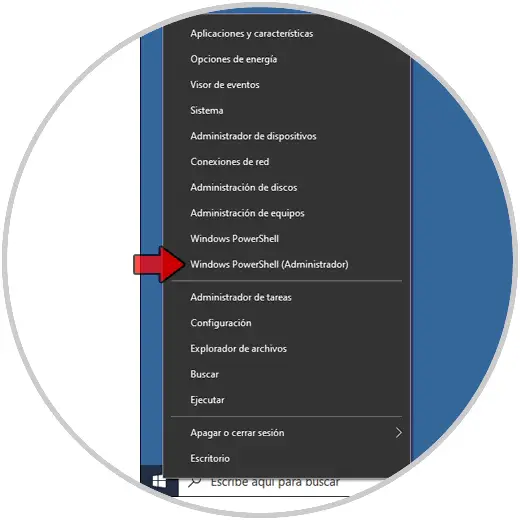
Right click on the Windows button, then “Command Prompt (Admin)” or “Windows PowerShell (Admin)”
2. Enter the following command to request the installation of the XPS Viewer component :
dism /Online /Add-Capability /CapabilityName:XPS.Viewer~~~~0.0.1.0
1. How to install the XPS viewer from CMD
2. How to install the XPS viewer from PowerShell
In the computer we get used to handling, managing and sharing a number of different documents , since through them we store different information and data in a simple and orderly way..
There are files with different types of extensions, each one created to allow the user to manage and work focused on a special segment, as well as with the XLSX extensions we can work with Excel files, DOCX for text files.
There is an extension that is XPS which we can find at some point when using Windows 10. This by default cannot be opened with a browser as a PDF file . XPS files are files that are XML-based with access and read properties. Windows 10 does not have an application for this type of files and for this we must install the XPS viewer, this can be installed through CMD or from PowerShell..
Let’s see how to use these two methods to install the XPS viewer in Windows 10.
To stay up to date, remember to subscribe to our YouTube channel! SUBSCRIBE
1. How to install the XPS viewer from CMD
We access the CMD console as administrators:
Once the console is open, we execute the following:
dism / Online / Add-Capability /CapabilityName:XPS.Viewer~~~~0.0.1.0
We press Enter and wait for the installation process to start:
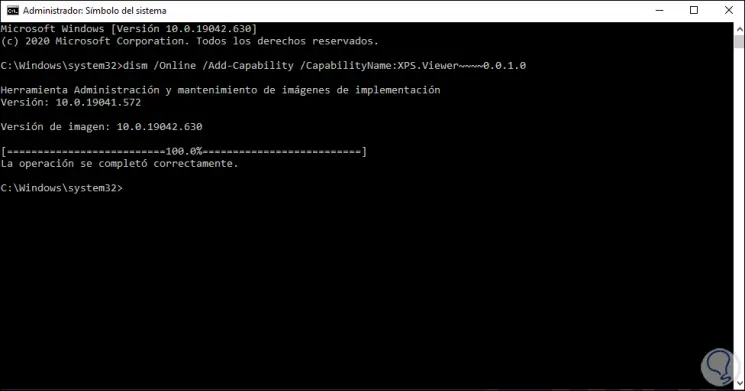
At the end we will see the following:
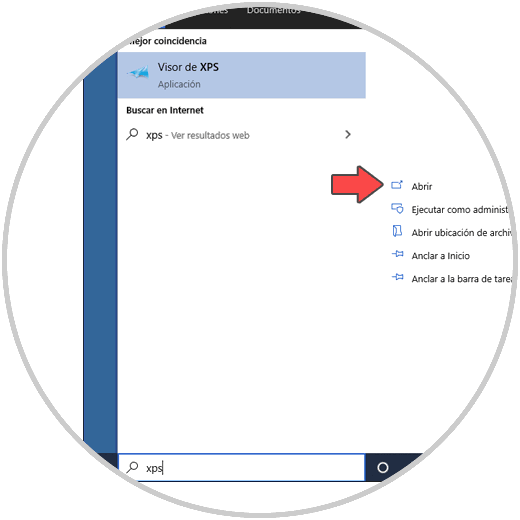
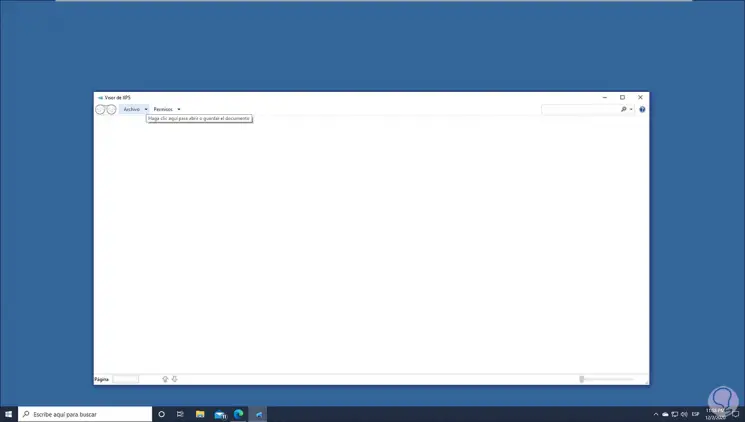
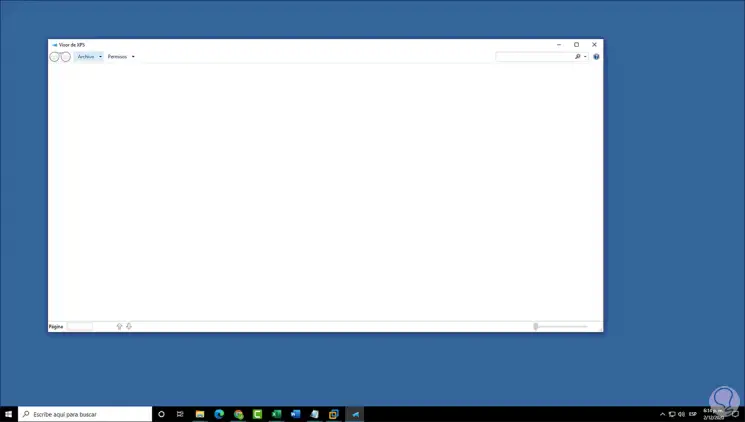
Now we can access the XPS viewer from the Start menu:
Step 5
The appearance of this will be as follows:
So it is ideal to install the XPS viewer from CMD..
2. How to install the XPS viewer from PowerShell
We access PowerShell as administrators:
Step 2
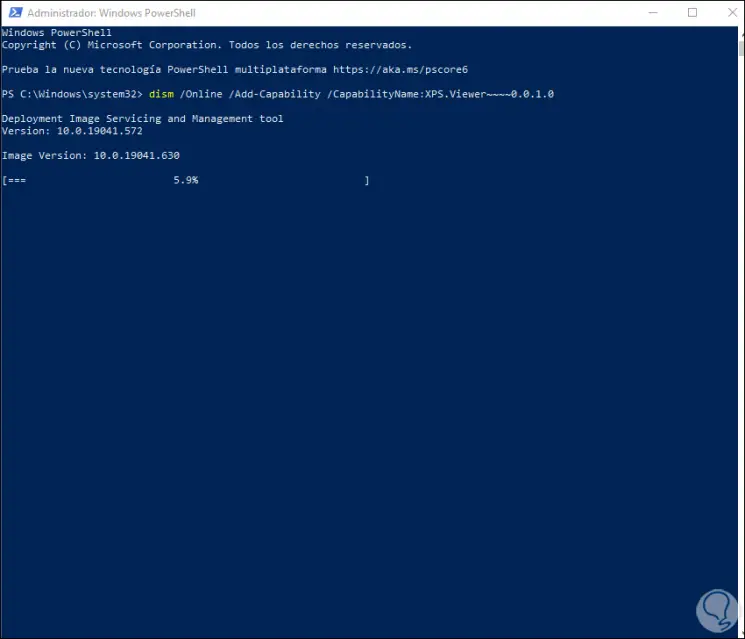
In the PowerShell console we enter:
dism / Online / Add-Capability /CapabilityName:XPS.Viewer~~~~0.0.1.0
We press Enter to start the process:
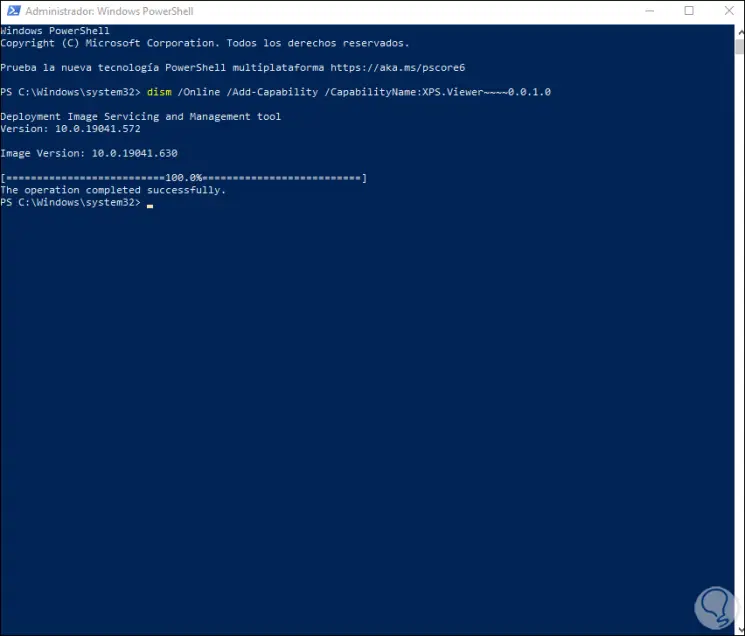
At the end we will see this:
Step 4
It will now be possible to access the XPS viewer from Home:
With either of these two methods we can install the XPS viewer in Windows 10.
Wondering how to enable XPS Viewer on Windows 10?
XPS is a file format similar to PDF that Microsoft released with the Windows Vista update in 2007. There wasn’t a big difference between the two in terms of features and interface, except that PDF offers enhanced portability.
Unfortunately, not many people were fans of XPS, and the company eventually abandoned the format. With the Windows 10 version 1803 update, users could no longer view XPS files unless the computer was upgraded from version 1709.
So, if you’ve set up a new device or performed a clean installation, XPS Viewer would not be available on your computer anymore. Lucky for you, we’ve compiled a list of methods to reinstall or enable the app even if Windows no longer supports it.
So, let’s get to it right away!
1. Enable XPS Viewer on Windows 10 via Settings.
You need dedicated viewing software to read, print, or change the permissions of any file format. Since the latest system update has disabled the XPS Viewer, you’d have to reinstall it to view such files on your computer again.
Here’s how you can do that using Windows Settings:
- First, press Windows+i on your keyboard or type ’settings’ on the search bar to enter Settings.
- Now, from the multiple options appearing on your screen, select Apps.
- From the panel on the left side, click on Apps & features tab.
- From there, go to Optional Features under Apps & features on the right panel.
- Then, you’ll come across a list of features already enabled on your computer with an Add a feature option at the top-left corner of the window. Click on it.
- Use the search bar or scroll down to find XPS Viewer, then select it.
- Finally, click the Install button, and your computer will start downloading the feature.
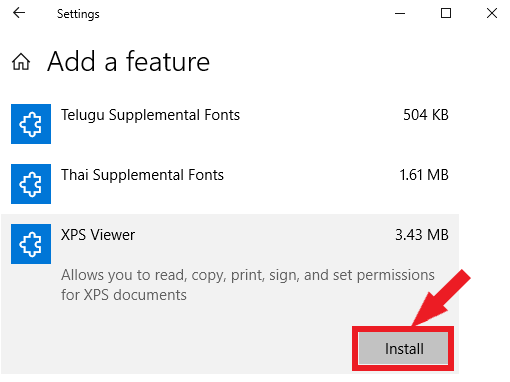
Once downloaded, you should be able to open an XPS or OXPS file easily.
2. Use Command Prompt To Enable XPS Viewer.
Sometimes, users are unable to find the XPS Viewer listed when scrolling through the list of features in the Settings. Other times, the feature fails to install on your computer.
Whatever the reason, you don’t have to worry. Another method to enable XPS Viewer on Windows 10 is done through the Command Prompt. To do so, you’ll need to run the software as an administrator.
Here are the steps you need to follow:
- To begin, open the Start menu by clicking on the Windows icon located at the bottom-left of the screen or by pressing the Windows key on your keyboard.
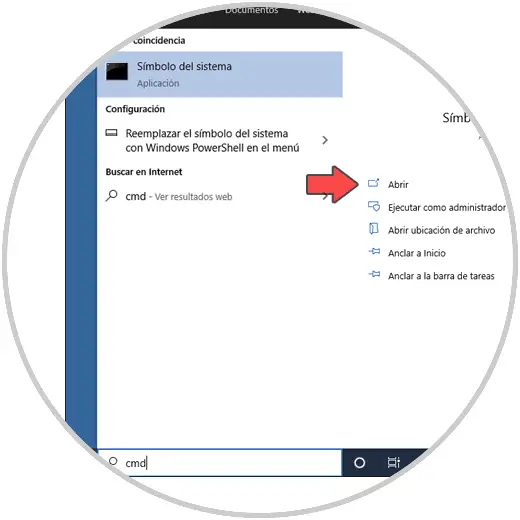
- Now, type cmd in the search bar.
- Then, click on the Run as administrator option to run the app under full rights.
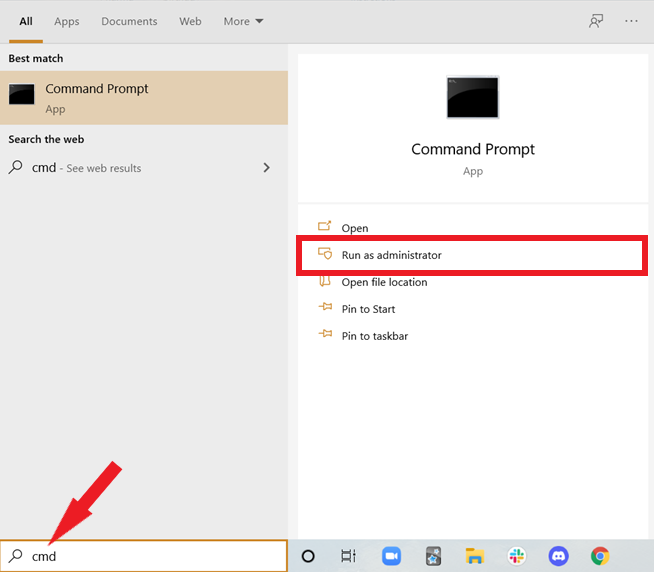
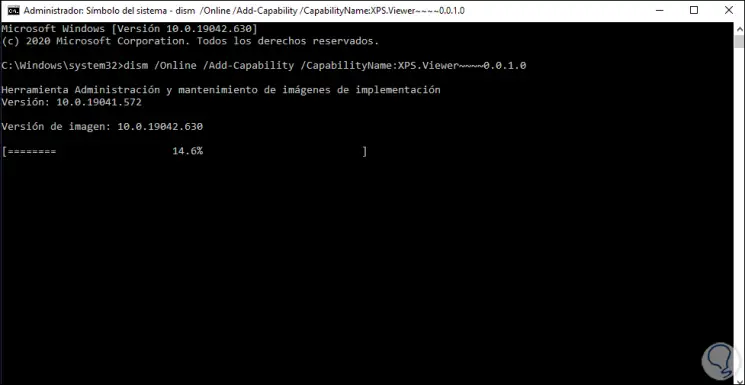
- When the Command Prompt window opens, type the following command and press Enter.
Dism /Online /Add-Capability /CapabilityName:XPS.Viewer~~~~0.0.1.0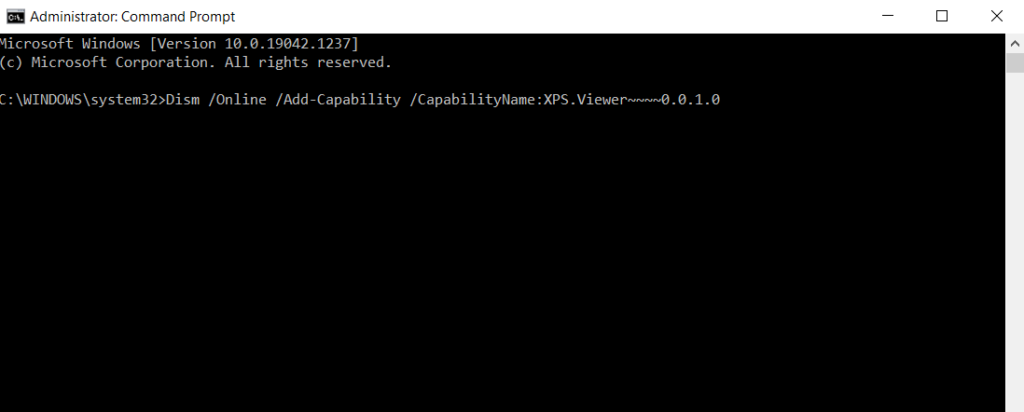
After that, XPS Viewer should get installed on your computer.
3. Use Windows Powershell To Enable XPS Viewer.
If you’re an old Windows user, you must be familiar with Windows PowerShell. It was first released in 2006 and is quite similar to Command Prompt. You can use this automation software to enable XPS Viewer.
Simply input the required command in the associated scripting language to perform the task.
These are the steps you should follow:
- Start by pressing Windows key+i or directly click on the Search Bar at the bottom left of the screen.
- Then, type Microsoft Powershell so that a list of options appears on the right panel.
- From there, click on Run as administrator since you need special permissions to perform tasks.
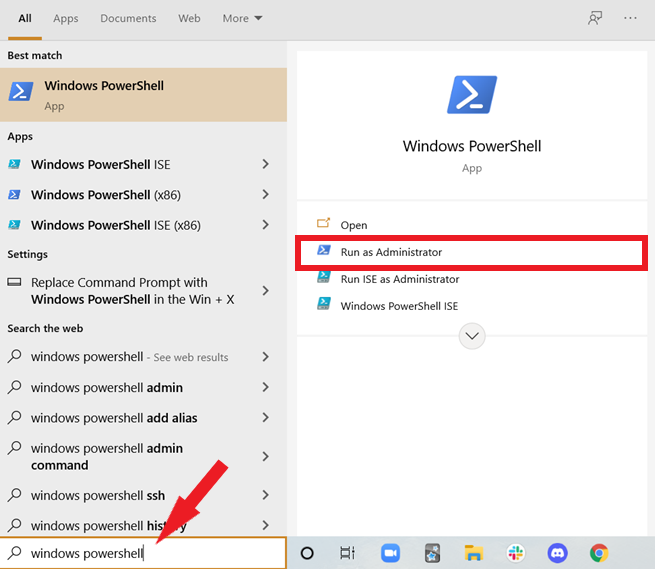
- When the app opens and you come across the PowerShell console, type the following command:
dism / Online / Add-Capability /CapabilityName:XPS.Viewer~~~~0.0.1.0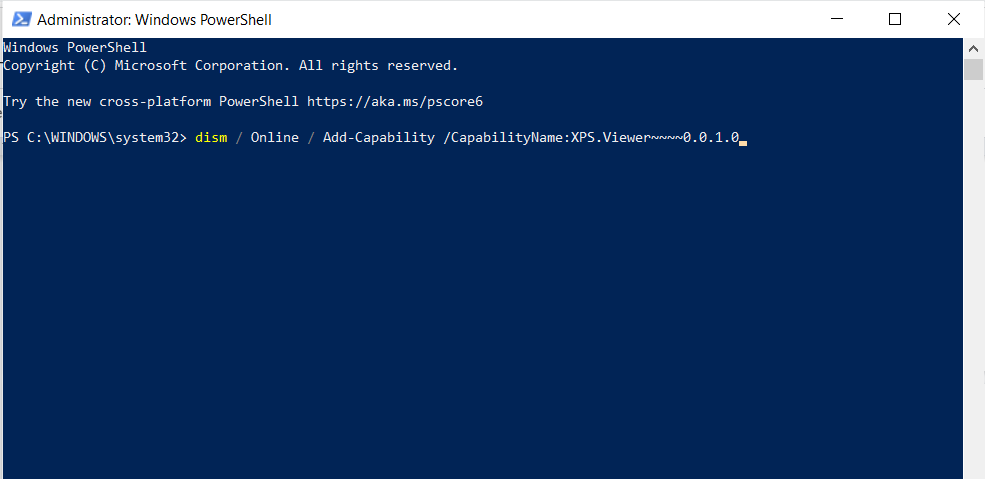
- Finally, press Enter to begin the installation.
XPS Viewer will then be downloaded on your computer and can easily be accessed on the Desktop.
4. Enable XPS Viewer From Windows Update.
If your computer has Windows 10 Pro or Windows Enterprise, the method to install XPS Viewer can be pretty different. Moreover, you’ll need to alter a few more settings in the Group Policy Editor if the computer you’re using belongs to a domain.
This is what you need to do:
- To start, type ’Run’ in the search box and click Open. You can also press the Windows key and R simultaneously as a shortcut.
- When the Run command box opens, type gpedit.msc and click OK.

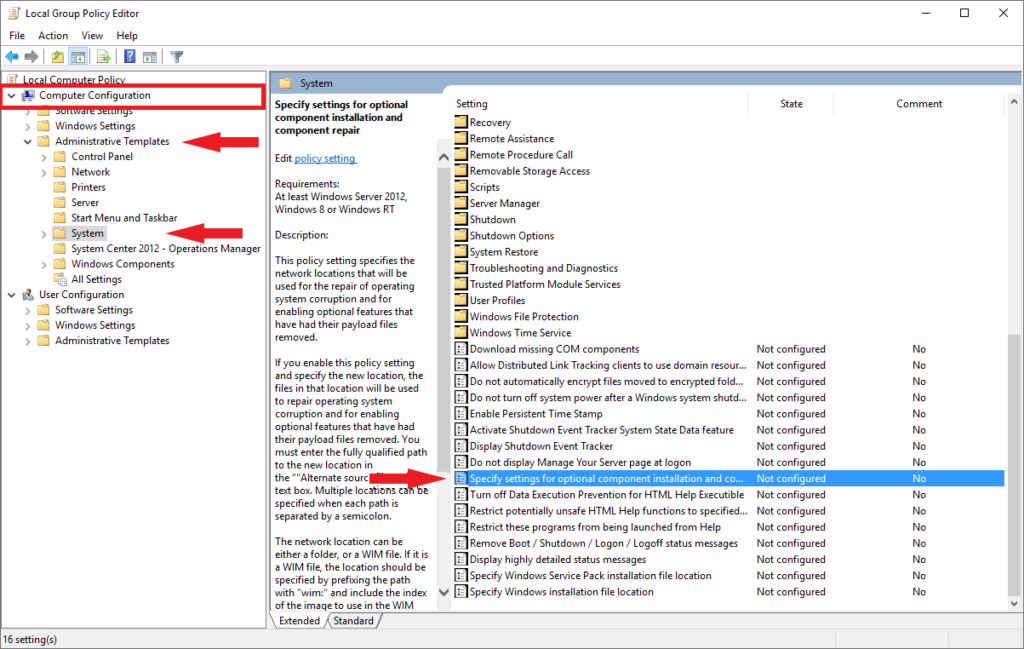
- Scroll down the left pane and click on the drop-down arrow of Computer Configuration.
- Now, click on Administrative Templates and then on System.
- Then, select Specify settings for optional component installation and component repair on the right pane.
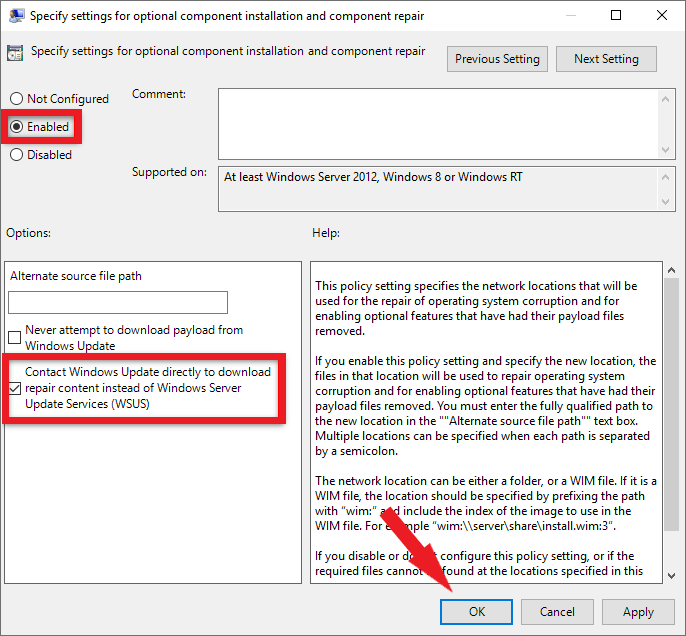
- In the next window, select Enabled and check the box that says Download repair content and optional features directly from Windows Update instead of Windows Server Update Services (WSUS).
- Finally, click on Apply, then OK, and restart your computer.
You can then install the XPS Viewer like you would on any other computer with Windows 10.
5. Use Microsoft XPS Document Writer (MXDW).
Microsoft XPS Document Writer is a driver installed in Windows OS. You can use this to protect the XPS files’ content and print the documents even when Microsoft doesn’t support the format.
You need to enable the driver manually by following the steps below:
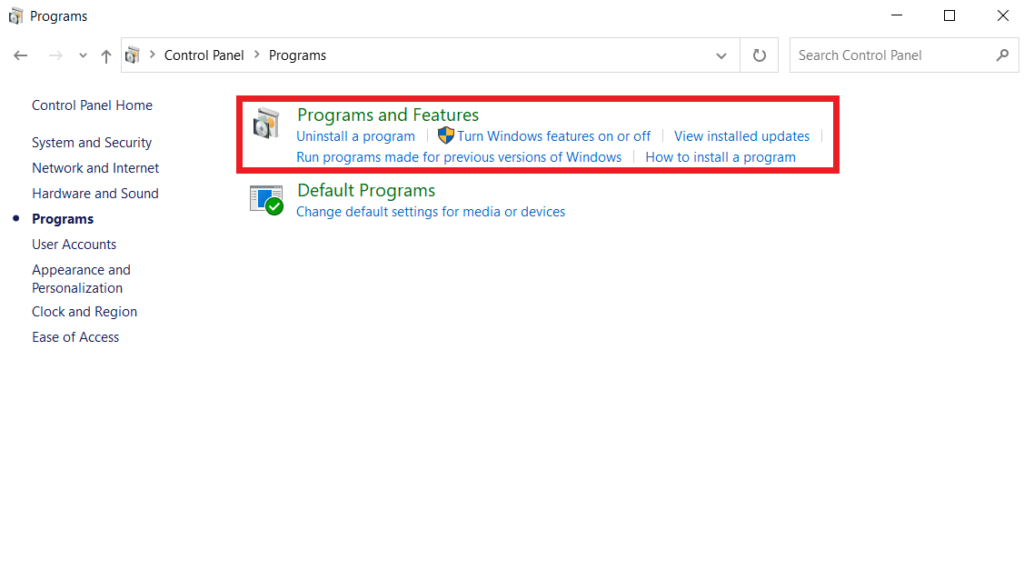
- First, type ’Control Panel’ in the search bar and click Open.
- Then, select Programs at the bottom-left of the window.
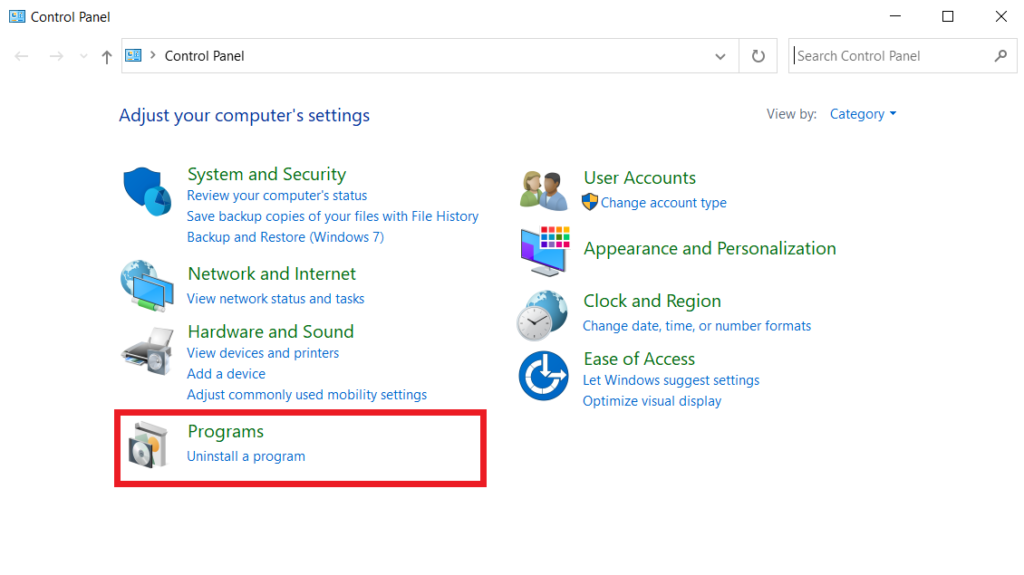
- From there, go to Programs and Features.
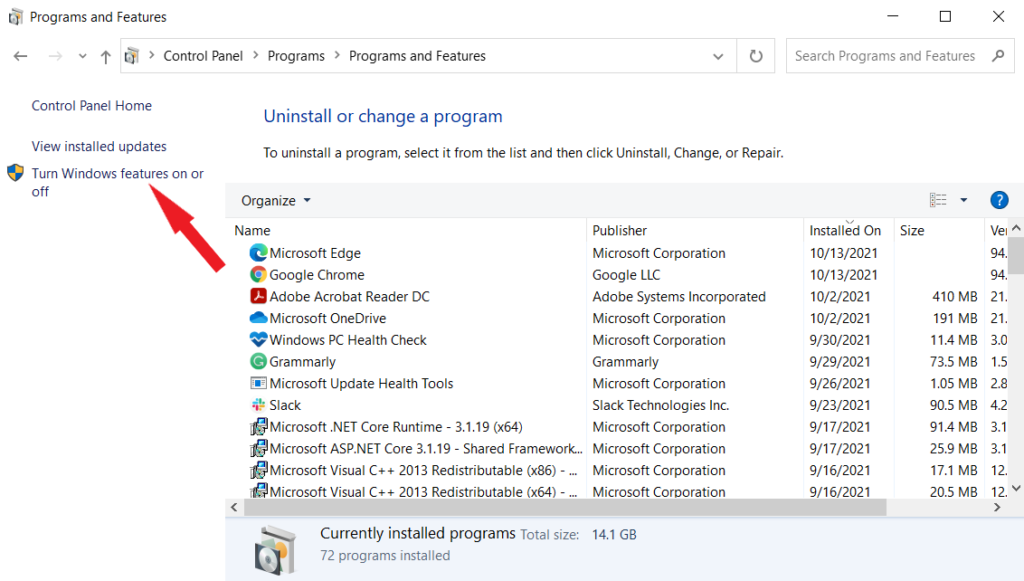
- Now, from the left pane, select Turn Windows Features on or off.
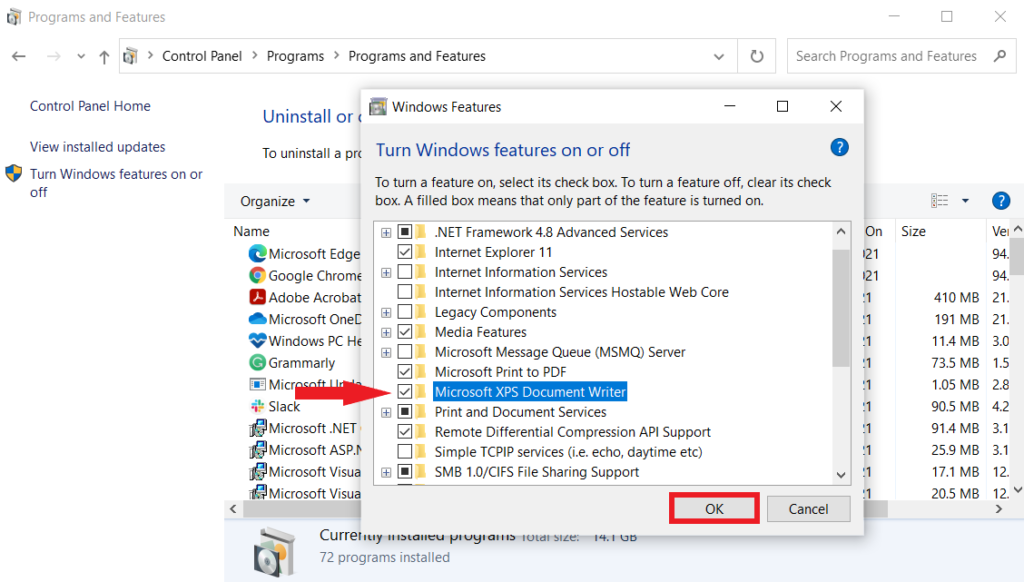
- Finally, a pop-up window will open. Scroll down and check the box next to Microsoft XPS Document Writer and click OK.
It will take only a couple of seconds for the MXDW to get installed. After that, a Print to XPS option will appear in print pages, and you can select it to save files in XPS format.
6. Use PDF Converter.
Although Microsoft no longer supports the XPS Viewer, you can still easily install it using one of the above methods. However, since there will be no more maintenance or updates on the program, it’s better to convert your XPS files to PDF format, so they remain readable even if the XPS Viewer crashes.
Here’s how to do it:
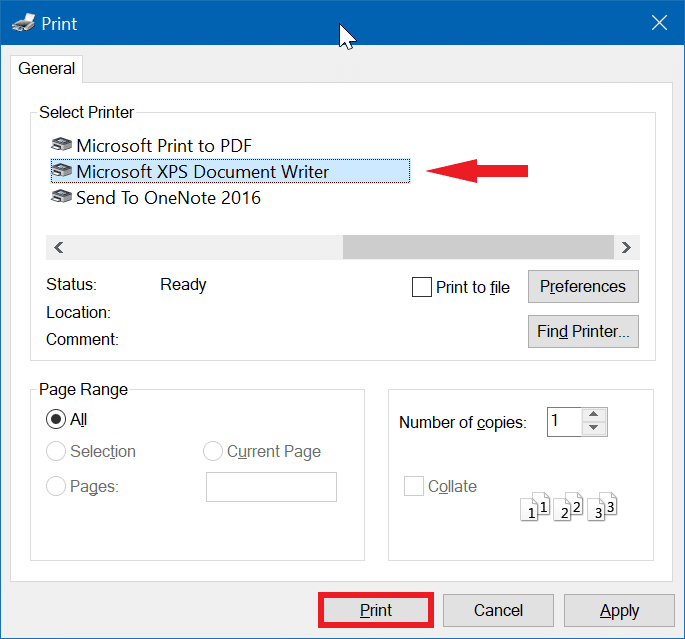
- First, right-click on the file you wish to convert and select Open with XPS Viewer.
- Then, click on the Printer icon at the top panel or press Ctrl+P on your keyboard.
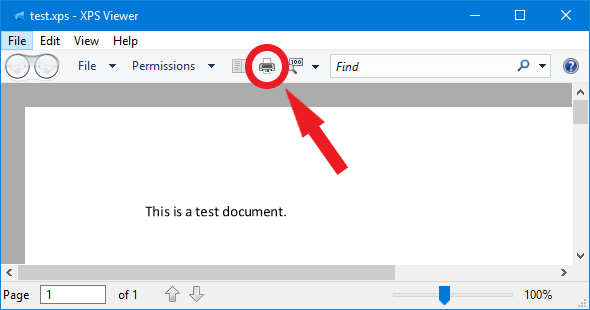
- A selection box will then appear on your screen. From there, in the General tab, go to Microsoft Print to PDF under Select Printer.
- Lastly, click the Print button.
This will convert the format of your XPS file to PDF. Repeat the steps to convert the remaining files on your computer.
There you have it! A complete guide on how to enable XPS Viewer on Windows 10. Hopefully, at least one of the methods has proven to be successful. If you still have any confusion, leave a comment down below, and we’ll do our best to help you through it.
If this guide helped you, please share it. 🙂
-
Aimen Choudhry is an architecture student who has always been fascinated by science. She now finds her therapy researching and writing about the latest technology and the issues that come alongside. Otherwise, you’ll find her playing video games, listening to music, or watching fantasy/sci-fi movies.
View all posts
The possibility and ease that computers offer write, correct, sort and share written documents it is simply amazing and convenient, managing to generate a clean and error-free structure that can be handled by anyone in a format that can be modified to one’s liking.
However, there are many ways to view the different types of documents, but a new creation that emerged based on Microsoft in 2008 was the XPS format, which aims to be a competition to the famous PDF format and tries to be a universal viewer of any type of document, which allows you to transform your documents into a printed format that cannot be edited
How to install XPS Viewer using DISM command?
If you are one of those who like to try new software or like to catch up with the new trends, you can try the XPS viewer that Microsoft offers and that we can easily install on our Windows system, for this we will only have to follow the following steps:
- We will go to the taskbar of our desktop and we will write in the search bar CMD, then we will enter the command window that opens.
- In this window we insert the following code: dism / online / Add-Capablity / CapablityName: XPS.Viewer ~~~~ 0.0.1.0
- Then, we will press Enter.
Once this is done, the XPS viewer will be automatically installed in our operating system and we will be able to view, convert, edit or create any XPS document without the need for Microsoft Office.

What is the way to download XPS Viewer from Windows Update instead of WSUS?
In case we cannot install XPS from the Windows CMD, we also have the option to use the Windows Update service, which offers us another alternative that will allow us to install the XPS viewer on our computer, for which we will just have to follow the steps below:
- We will press the button Windows together with R and we will enter the command gpedit.msc in the window that opens.
- Then, we will proceed to go to Computer Configuration, log in to Administrative models and finally System.
- In the panel that appears on the right, we will click on Specify the settings for installation and repair of optional components.
- We will change the status to enabled and check the box named Download repair content and optional features directly from Windows Update instead of Windows Server Update Services (WSUS).
How can I troubleshoot the installation of the XPS Viewer?
It may happen that, at the time of installation, various problems arise that make the installation of the XPS viewer impossible. While it is not common for these to manifest, here are some solutions you can try for ensure the installation of the XPS viewer on your computer:
Uninstall and reinstall Microsoft XPS Document Writer
If an installation error occurs, it is likely associated with a download error or a bug generated during installation, so you will need to uninstall the application and reapply some of the installation processes.

How to configure the XPS file once installed?
Once our XPS viewer is installed, we believe it would be necessary to make changes so that it suits our tastes, but being a viewer doesn’t have great options to edit.
The main options that will allow us to access the program window will be to open an XPS file, create an XPS file, print an XPS file and index an XPS file and other features such as converting XPS files to Word that we can find better explained in Microsoft support.
Since the arrival of computers, among its many functions, the use of documents has always been present, whose objective is to be able to store and record a wide variety of information in a comfortable and methodical way . With the advancement of information technology, more and more ways of processing and managing these documents or files are being added.
XPS is one of several extensions that exist to give different . To be able to use it in Windows 10, it is necessary to install the XPS viewer , and for this there are several options of which are found using PowerShell or CMD. So here’s how to do it.
Index( )
- What is the procedure to download XPS viewer on your PC using Windows Update?
- What steps do you need to follow to successfully install XPS Viewer on your computer using DISM?
- How to quickly fix any issues with XPS viewer installation?
- Delete and reinstall Microsoft XPS writer
- How is the XPS file configured after it was installed on the PC?
What is the procedure to download XPS viewer on your PC using Windows Update?
Presented the case of wanting to activate the XPS Viewer in the Windows 10 operating system, it is a good option to use the Windows Update module . It is a very easy and fast way to download the viewer. To start installing it, go to the start of Windows and follow these steps:
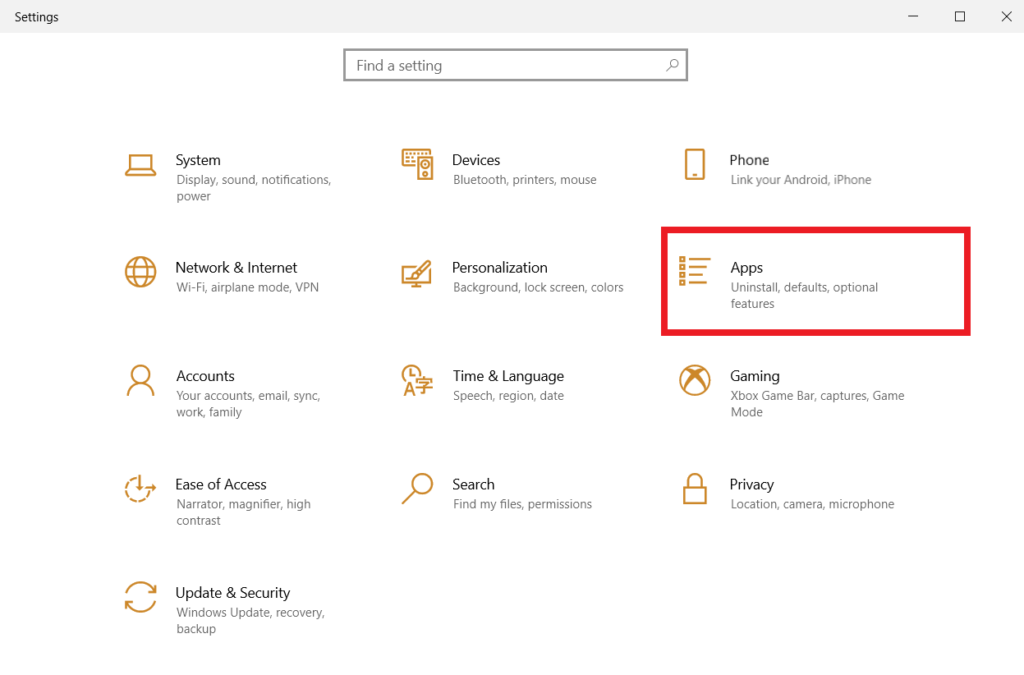
- Go into settings.
- Click on ‘applications’.
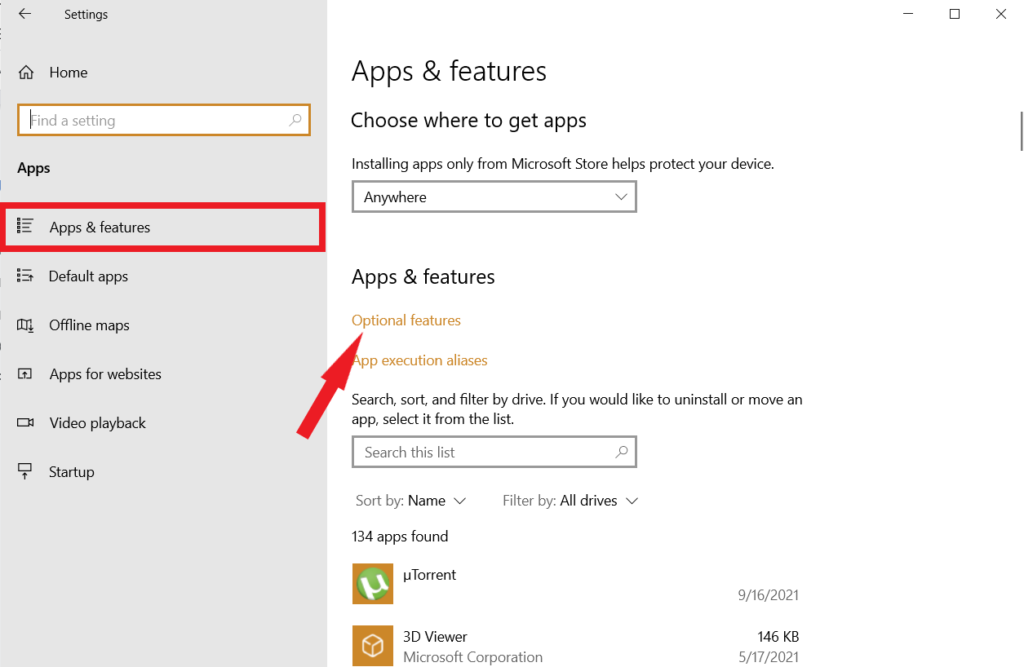
- Within the ‘applications and features’ section, click on ‘optional features’.
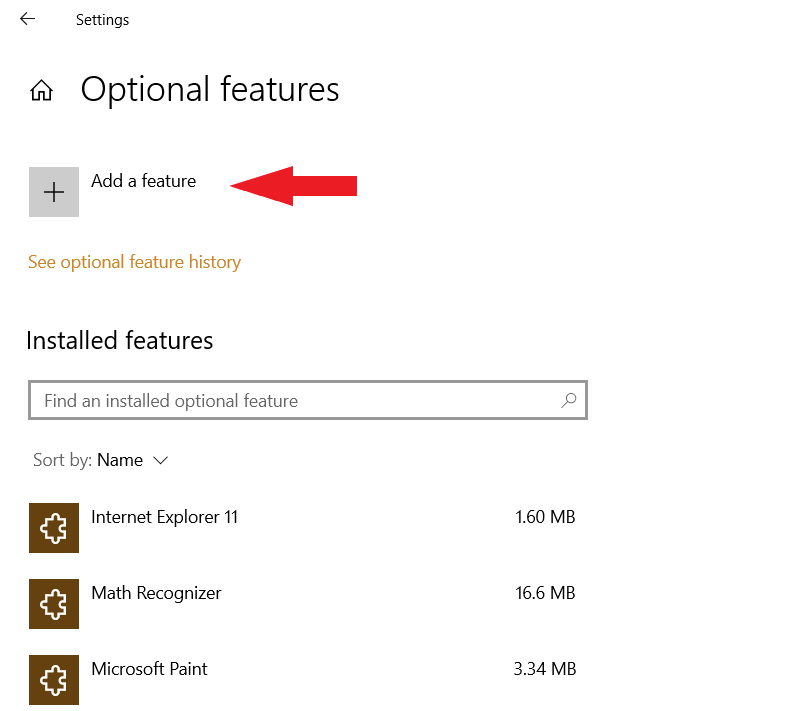
- Go into the ‘ add a feature‘ option .
- Find the box for ‘ XPS Viewer‘ and check it.
- Click to install.
What steps do you need to follow to successfully install XPS Viewer on your computer using DISM?
The practice of using commands in DISM is quite a useful tool to be able to install and activate features on computers . Using this to accomplish the installation of the XPS viewer has become a very effective method. There are two ways to install XPS viewer with DISM: using PowerShell and CMD.
In the case of wanting to install it through PowerShell, you must go to the start of Windows and press right click. Among the options to choose from, select ‘Windows PowerShell (Administrator)’. Subsequently, the PowerShell console will open where the following command is entered: dism /Online /add-Capability /CapabilityName:XPS.Viewer~~~~0.0.1.0
When you finish placing the command, you have to press the Enter key, and the installation process will start. Upon completion, the window should be exited and access to the XPS Viewer will be available. But if you want to install in another way, there is the alternative to do it with CMD . For them, follow these steps:
- Go to Windows Start and type ‘CMD’ in the search engine.
- Open CMD console as administrator
- Ingresar: dism /Online /Add-Capanility /CapabilityName:XPS.Viewer~~~~0.0.1.0
- Pulsar Enter
- Wait for the installation to finish.
With the completion of these steps, access to the XPS Viewer will be available from Windows startup. With this achieved, this document and file extension can be used to perform its different functions .
How to quickly fix any issues with XPS viewer installation?
Among the possible existing cases, the situation where the XPS viewer fails to be installed correctly may occur . Due to a possible error in the DISM commands, the viewer will not be able to appear after having done the installation process. Luckily you can opt for the following method.
Delete and reinstall Microsoft XPS writer
With this method it will be possible to solve the problems after the installation of the viewer . For this, it is necessary to do the following steps:
- Enter the control panel, and open ‘programs and features’.
- Click ‘Turn Windows features on or off’
- Uncheck the ‘ Microsoft XPS Document Writer‘ box and click OK.
- Go back to ‘turn Windows features on or off’
- Select the ‘ Microsoft XPS Document Writer‘ checkbox and click OK.
- Restart your computer.
- Install XPS Viewer with any of the methods explained above.
How is the XPS file configured after it was installed on the PC?
Something similar to what happens with PDF virtual printers, the XPS extension has the function of archiving documents that want to be printed. To achieve this configuration, go to the file or document that you want to print and use the ‘Save as…’ option and choose ‘XPS Document’ followed by indicating the folder where to save it and that’s it.